
525404 - Access Point Intellinet - Free user manual and instructions
Find the device manual for free 525404 Intellinet in PDF.


| Product Type | Access Point |
| Brand | Intellinet |
| Model | 525404 |
| Wireless Standard | IEEE 802.11b/g/n |
| Maximum Data Rate | 300 Mbps |
| Frequency Band | 2.4 GHz |
| Antenna Type | Internal omni-directional |
| Ethernet Ports | 1 x 10/100 Mbps (PoE) |
| Power Supply | PoE (802.3af) or DC 5V/1A |
| Power Consumption | 5W |
| Dimensions (L x W x H) | 150 x 100 x 30 mm |
| Weight | 200 g |
| Mounting | Wall / Ceiling |
| LED Indicators | Power, LAN, WLAN |
| Security | WEP, WPA/WPA2, MAC filtering |
| Number of SSIDs | Up to 4 |
| Operating Temperature | 0°C to 40°C |
| Humidity | 10% to 90% non-condensing |
| Certifications | FCC, CE |
| Management | Web interface |
| Warranty | 1 year |
Frequently Asked Questions - 525404 Intellinet
User questions about 525404 Intellinet
0 question about this device. Answer the ones you know or ask your own.
Ask a new question about this device
Download the instructions for your Access Point in PDF format for free! Find your manual 525404 - Intellinet and take your electronic device back in hand. On this page are published all the documents necessary for the use of your device. 525404 by Intellinet.
USER MANUAL 525404 Intellinet
WIRELESS N ACCESS POINT USER MANUAL
MODELS: 525404, 524728,524735


INTELLINET®
NETWORK SOLUTIONS
Federal Communications Commission Interference Statement
FCC Part 15
This equipment has been tested and found to comply with the limits for a Class B digital device, pursuant to Part 15 of FCC Rules. These limits are designed to provide reasonable protection against harmful interference in a residential installation. This equipment generates, uses and can radiate radio frequency energy and, if not installed and used in accordance with the instructions, may cause harmful interference to radio communications. However, there is no guarantee that interference will not occur in a particular installation. If this equipment does cause harmful interference to radio or television reception, which can be determined by turning the equipment off and on, the user is encouraged to try to correct the interference by one or more of the following measures:
- Reorient or relocate the receiving antenna.
- Increase the separation between the equipment and receiver.
- Connect the equipment into an outlet on a circuit different from that to which the receiver is connected.
- Consult the dealer or an experienced radio technician for help.
FCC Caution
This equipment must be installed and operated in accordance with provided instructions, and a minimum of 20 cm of space (approx. 8 inches) must be provided between any computer-mounted antenna and a person's body (excluding hands, wrists and feet) during wireless modes of operation.
This device complies with Part 15 of the FCC Rules. Operation is subject to the following two conditions: (1) This device may not cause harmful interference; and (2) This device must accept any interference received, including interference that may cause undesired operation.
Any changes or modifications not expressly approved by the party responsible for compliance could void the authority to operate the equipment.
Federal Communications Commission (FCC) Radiation Exposure Statement
This equipment complies with FCC radiation exposure set forth for an uncontrolled environment. In order to avoid the possibility of exceeding the FCC radio frequency exposure limits, human proximity to the antenna shall not be less than 20 cm (8 inches) during normal operation.
The antenna(s) used for this transmitter must not be co-located or operating in conjunction with any other antenna or transmitter.
The equipment version marketed in the U.S. is restricted to usage of channels 1-11 only.
R&TTE Compliance Statement
This equipment complies with all the requirements of Directive 1999/5/EC of the European Parliament and the Council of March 9, 1999, on radio equipment and telecommunication terminal equipment and the mutual recognition of their conformity (R&TTE).
The R&TTE Directive repeals and replaces in the directive 98/13/EEC (Telecommunications Terminal Equipment and Satellite Earth Station Equipment) as of April 8, 2000.
Safety
This equipment is designed with the utmost care for the safety of those who install and use it. However, special attention must be paid to the dangers of electric shock and static electricity when working with electrical equipment. All guidelines of this and of the computer manufacturer must therefore be allowed at all times to ensure the safe use of the equipment.
EU Countries Intended for Use
The ETSI version of this device is intended for home and office use in Austria, Belgium, Denmark, Finland, France, Germany, Greece, Ireland, Italy, Luxembourg, the Netherlands, Portugal, Spain, Sweden and the United Kingdom.
The ETSI version of this device is also authorized for use in EFTA member states Iceland, Liechtenstein, Norway and Switzerland.
EU Countries Not Intended for Use
None.
Table of Contents
Chapter I: Product Information.... 1
1-1 Product Introduction....1
1-2 Safety Information....2
1-3 System Requirements....3
1-4 Package Contents....4
1-5 Connections and Indicators....5
Chapter II: System and Network Setup.... 7
2-1 Installing the access point to your Network....7
2-2 Connecting to wireless access point by web browser......8
2-2-1 Windows 95/98/Me IP address setup 8
2-2-2 Windows 2000 IP address setup .... 10
2-2-3 Windows XP IP address setup 12
2-2-4 Windows Vista IP address setup 14
2-2-5 Connecting to Web Management Interface 17
2-3 View System Status and Information 19
2-4 Select an Operating Mode for Wireless Access Point....21
2-4-1 AP Mode 23
2-4-1-1 Multiple ESSID 25
2-4-2 Station-Infrastructure 26
2-4-2-1 Wireless Site Survey 28
2-4-3 AP Bridge-Point to Point Mode 29
2-4-4 AP Bridge-Point to Multi-Point Mode 32
2-4-5 AP Bridge-WDS Mode 34
2-4-6 Universal Repeater 36
2-5 WPS Setting....39
2-6 Advanced Wireless Settings....42
2-7 Wireless Security 45
2-7-1 Disable Security....47
2-7-2 WEP 48
2-7-3 WPA Pre-shared Key 50
2-7-4 WPA RADIUS 52
2-7-5 802.1x Authentication .... 54
2-8 Radius Server 56
2-9 MAC Filtering 59
2-10 System Utilities....61
2-10-1 Change Password 61
2-10-2 IP Address of the Wireless Access Point....62
2-10-3 DHCP Server 64
Chapter III: Advanced Configuration.... 66
3-1 Configuration Backup and Restore ....66
3-2 Firmware Upgrade ....67
3-3 System Reset....68
Chapter IV: Troubleshooting.... 69
Chapter V: Glossary.... 71
Chapter I: Product Information
1-1 Product Introduction
Thank you for purchasing this INTELLINET NETWORK SOLUTIONS™ Wireless 150N Access Point, Model 525404; Wireless 300N Access Point, Model 524728; or Wireless 300N PoE Access Point, Model 524735. With this cost-efficient wireless access point, computers and wireless devices that are compatible with 802.11 Draft-N can be connected to an existing wired Ethernet network at speeds of up to 150 Mbps (Model 525404) or 300 Mbps (Models 524728 and 524735).
Easy install procedures allow computer users to set up a network environment in a relatively short time.
Other features of this access point include:
- Compatible with IEEE 802.11b/g/Draft-N wireless network standard — works with other 802.11b/g/Draft-N wireless devices.
- Allows wireless devices to connect to existing wired network and share network resources.
• Supports DHCP server function. - Supports 64/128-bit WEP, WPA, and WPA2 wireless data encryption.
- Supports MAC address filtering: only allows specific wireless devices of your choice to connect to this access point.
- Supports RADIUS server: only allows users listed in your authorization server to use wireless network.
- Supports WPS (Wi-Fi Protected Setup): simplifies wireless client setup procedures. Even inexperienced users can set up a wireless network without a network technician's help.
- Easy-to-use Web-based user interface for network configuration and management purposes.
• Three-Year Warranty
1-2 Safety Information
To maintain the safety of users and property, follow these safety instructions:
- This access point is designed for indoor use only; DO NOT place this access point outdoors.
- DO NOT put this access point in or near hot or humid places, like a kitchen or bathroom. Also, do not leave this access point in your car in hot weather.
- DO NOT pull any connected cable with force; disconnect it from the access point first.
- If you want to place this access point at any significant height or hang it on a wall, make sure it's firmly secured. Falling from any height would damage the access point and its accessories.
- Accessories of this access point, like the antennas and power supply, are dangers to small children under 3 years of age. They may put the small parts in their nose or mouth, possibly causing injury. KEEP THIS ACCESS POINT OUT THE REACH OF CHILDREN!
- The access point will become hot when in use for long time. This is normal and is not a malfunction. DO NOT put this access point on paper, cloth or other flammable materials.
- There's no user-serviceable part inside the access point. If the access point is not working properly, contact your dealer and ask for help. DO NOT disassemble the access point.
- If the access point falls into water when it's powered, DO NOT use your hands to pick it up. Switch the electrical power off before you do anything, or contact an experienced electrical technician for help.
- If you smell something strange or even see some smoke coming from the access point or power supply, remove the power supply or switch the electrical power off immediately and call the dealer for help.
1-3 System Requirements
- Computer or network devices with a wired or wireless network interface card.
- Web browser (Microsoft Internet Explorer 4.0 or above, Netscape Navigator 4.7 or above, Opera Web browser or Safari Web browser).
- An available AC power socket (100 – 240 V, 50/60 Hz).
1-4 Package Contents
Before you start to use this access point, check to see if there's anything missing in the package. If so, contact your dealer of purchase.
- Wireless Access Point (main body, 1 pc.)
- 3dBi Dipole Antenna (Model 525404; 1 pc.; Models 524728 and 524735: 2 pcs.)
- Quick Install Guide (1 pc.)
- User Manual on CD (1 pc.)
• A/C Power Adapter (1 pc.)
1-5 Connections and Indicators
Front Panel
Wireless N Access Point


| LED Name | Light Status | Description |
| PWR | On | The access point is switched on and correctly powered. |
| WLAN | On | Wireless WPS mode is enabled. |
| Off | Wireless network is switched off. | |
| Flashing | Wireless LAN activity (transferring or receiving data). | |
| LAN | On | LAN port is connected. |
| Off | LAN port is not connected. | |
| Flashing | LAN activity (transferring or receiving data). |
Back Panel
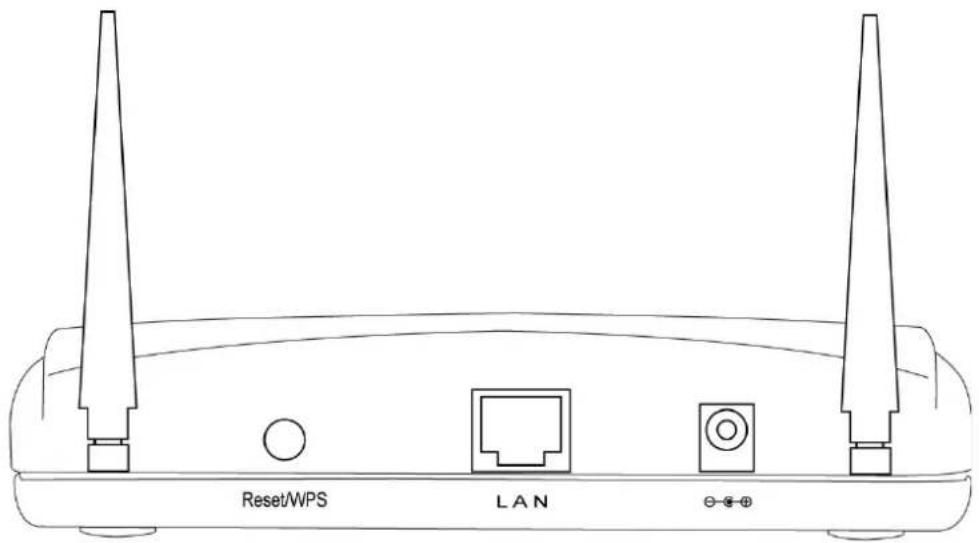
| Item Name | Description |
| Antennas | One or two reserve SMA antenna connectors for attaching 3 dBi detachable antennas enclosed with the product. |
| Power | Power connector; connects to A/C power adapter. |
| LAN | Local area network (LAN) port. |
| Reset / WPS | Reset the router to factory default settings (clear all settings) or start the WPS function. Press this button and hold it in for 10 seconds to restore all settings to factory defaults; press this button for less than 5 seconds to start the WPS function. |
Chapter II: System and Network Setup
2-1 Installing the access point to your Network
Follow these instructions to build the network connection between your new wireless access point and your computer's network devices:
- Connect the access point to the router or switch/hub in your network through the LAN port of the access point using Ethernet cable.
- Connect the A/C power adapter to the wall socket, then connect it to the Power jack of the access point.
- Check all LEDs on the front panel. The PWR LED should be steadily on; the LAN LED should be on if the access point is correctly connected to the ADSL modem, router or switch/hub. If the PWR LED is not on, or if any LED you expect to be on isn't, recheck the cabling or refer to 4-2 Troubleshooting for possible causes and solutions.
2-2 Connecting to wireless access point by Web browser
After the network connection is made, the next step is to set up the access point with proper network parameters so it can work properly in your network environment.
Before you can connect to the access point and start configuration procedures, your computer must be able to get an IP address automatically (use a dynamic IP address). If it's set to use a static IP address, or if you're unsure, follow the instructions below to configure your computer to use a dynamic IP address:
If the operating system of your computer is....
Windows 95/98/Me - Go to section 2-2-1 Windows 2000 - Go to section 2-2-2
Windows XP - Go to section 2-2-3 Windows Vista - Go to section 2-2-4
2-2-1 Windows 95/98/Me IP address setup
- Click the Start button (it should be located at lower-left corner of your computer), then click Control Panel. Double-click the Network icon to display the Network window. Select "TCP/IP," then click "Properties."
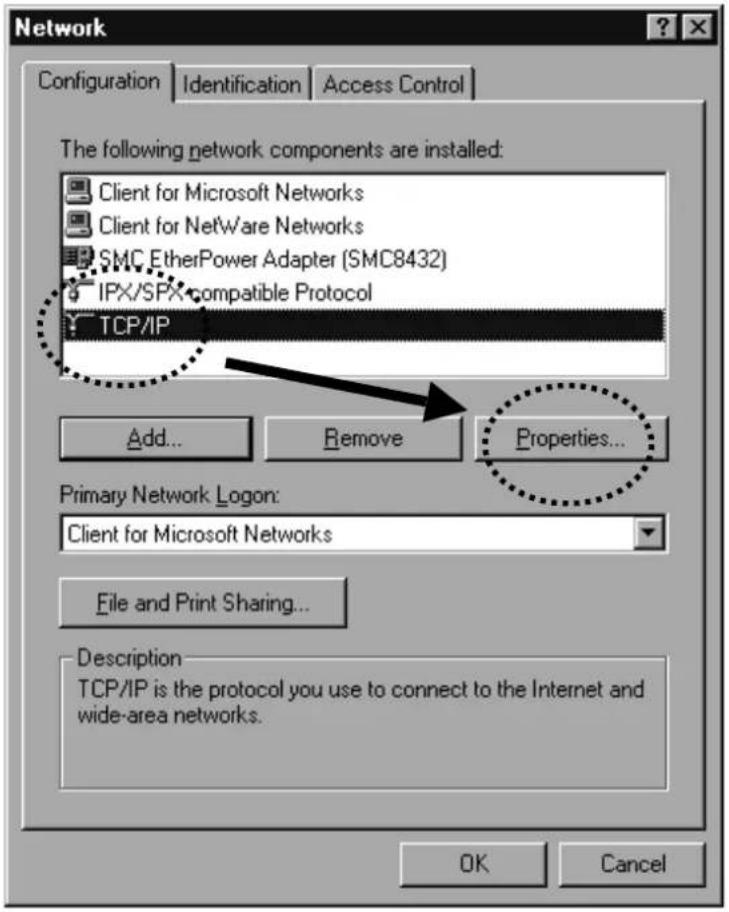
- Select "Specify an IP address," then enter the following settings in their respective fields:
IP address: 192.168.2.2
Subnet Mask: 255.255.255.0
Click "OK" when finished.

2-2-2 Windows 2000 IP address setup
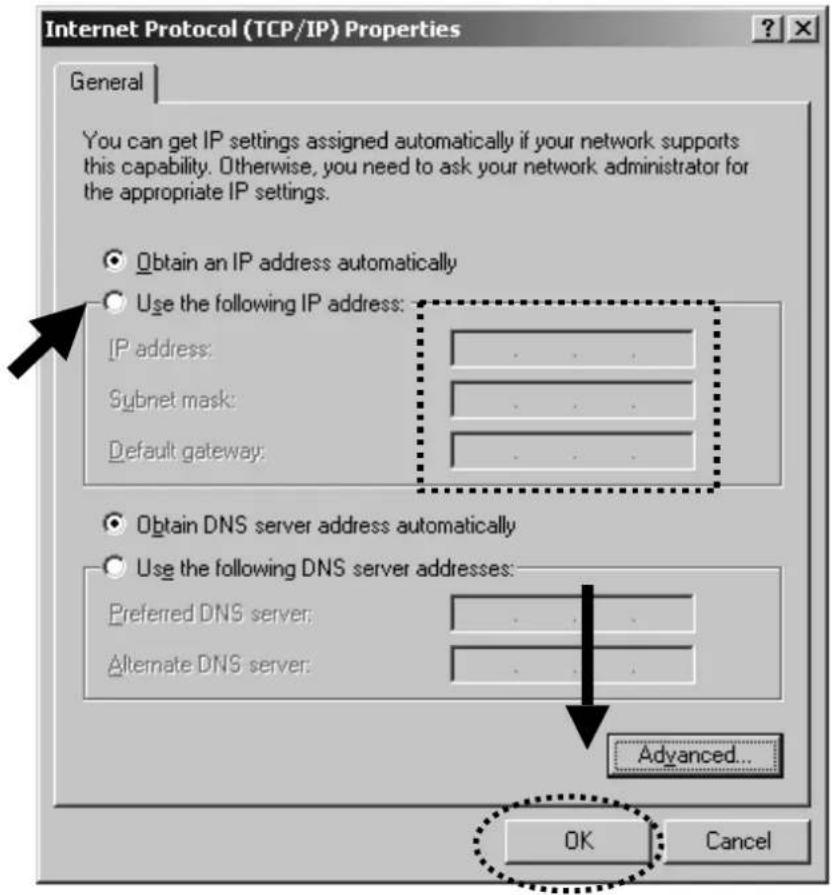
- Click the Start button (it should be located at lower-left corner of your computer), then click Control Panel. Double-click the Network and Dial-up Connections icon, then double-click Local Area Connection. The Local Area Connection Properties window will appear. Select "Internet Protocol (TCP/IP)," then click "Properties."

- Select "Use the following IP address," then enter the following settings in their respective fields:
IP address: 192.168.2.2
Subnet Mask: 255.255.255.0
Click "OK" when finished.
2-2-3 Windows XP IP address setup
- Click the Start button (it should be located at lower-left corner of your computer), then click Control Panel. Double-click the Network and Internet Connections icon, click Network Connections, then double-click Local Area Connection. The Local Area Connection Status window will appear. Click "Properties."
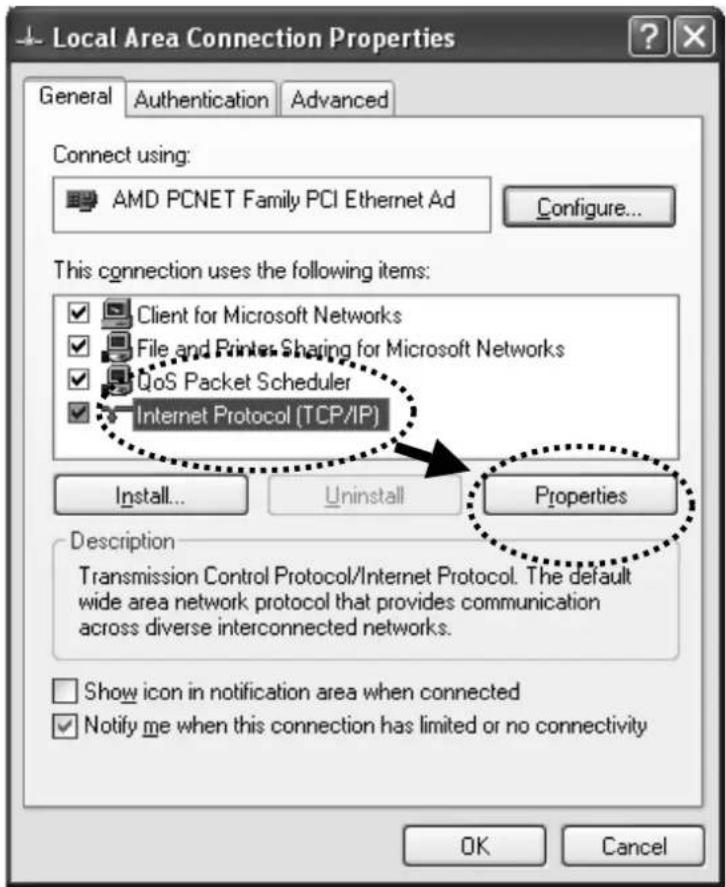
- Select "Use the following IP address," then enter the following settings in their respective fields:
IP address: 192.168.2.2
Subnet Mask: 255.255.255.0
Click "OK" when finished.

2-2-4 Windows Vista IP address setup
- Click the Start button (it should be located at lower-left corner of your computer), then click Control Panel. Click View Network Status and Tasks, then click Manage Network Connections. Right-click Local Area Network, then select "Properties." The Local Area Connection Properties window will appear. Select "Internet Protocol Version 4 (TCP / IPv4)," then click "Properties."

- Select "Use the following IP address," then enter the following settings in their respective fields:
IP address: 192.168.2.2
Subnet Mask: 255.255.255.0
Click "OK" when finished.

2-2-5 Connecting to the Web Management Interface
All functions and settings of this access point must be configured via the Web management interface. Start your Web browser, and enter “192.168.2.1” in the address bar, then press the

Enter a username and password in the corresponding text fields. The default username is “admin;” the default password is “1234.” Click “OK” and you can see the Web management interface of this access point:

NOTE: If you can't see the Web management interface and you're being prompted to input a username and password again, it means you didn't input the username and password correctly. Re-enter the username and password. If you're certain the username and password you entered are correct, go to 4-2 Troubleshooting to perform a factory reset and set the password back to its default value.
2-3 View System Status and Information
After you've connected to the access point through the Web browser, the first thing you'll see is the Status and Information page. All system- and network-related information of this access point will be displayed here. The information is helpful when you want to know the details of your access point and when you need to fix a communication problem between this access point and other wired/wireless computers/devices.
You can click Home on the left while viewing other screens, as well, and the system status and information will be displayed, as shown:

Here are descriptions of every item:
| Up time | Displays the total elapsed time since the wireless access point is first powered on. |
| Hardware Version | Displays hardware version. This information is helpful when you need online help from the dealer. |
| Runtime Code Version | Displays current firmware version. If you want to perform a firmware upgrade, this number will help you to determine if you need such an upgrade. |
| Mode | Displays current wireless operating mode (see next section). |
| ESSID | Displays current ESSID (the name used to identify this wireless access point. |
| Channel Number | Displays current wireless channel number. |
| Security | Displays current wireless security setting. |
| BSSID | Displays current BSSID (a unique identification of this access point that can not be modified by the user). |
| Associated Clients | Displays the number of connected wireless clients. |
| IP Address | Displays the IP address of this wireless access point. |
| Subnet Mask | Displays the net mask of IP address. |
| Default Gateway | Displays the IP address of default gateway. |
| MAC address | Displays the MAC address of LAN interface. |
2-4 Select an Operating Mode for the Wireless Access Point
This access point can be operated in different modes: You can click Basic Settings on the left of the Web management interface to select an operating mode you want to meet for different needs.

You can click the Mode drop-down menu to select an operating mode: There are six operating modes available:
| AP | Allows wireless clients to connect to the access point and exchange data with the devices connected to the wired network. |
| Station-Infrastructure | Enables the Ethernet device such as TV and game player connected to the access point to a wireless client. |
| AP Bridge-Point to Point | Establishes a wireless connection with another wireless access point using thesame mode, and links the wired network that connects these two wireless access points. Only one access point can be connected in this mode. |
| AP Bridge-Point to Multi-Point | Establishes a wireless connection with other wireless access points using the same mode, and links the wired network that connects these two wireless access points. Up to four access points can be connected in this mode. |
| AP Bridge-WDS | This mode is similar to AP Bridge to Multi-Point. While the access point doesn’t work in bridge-dedicated mode, it will be able to accept wireless clients while the access point is working as a wireless bridge. |
| Universal Repeater | This product can act as a wireless range extender that will help you extend the network wirelessly. The access point can act as Station and AP at the same time. It can use the Station function to connect to a root AP and use the AP function to service all wireless clients within its coverage. |
Select a wireless operating mode. For detailed descriptions of each operating mode, refer to Sections 2-4-1 to 2-4-6 below.
2-4-1 AP Mode
This is the most common mode. When in AP mode, this access point acts as a bridge between 802.11b/g/Draft-N wireless devices and a wired Ethernet network, and exchanges data between them.
When you select AP, the following options will be displayed:

Here are descriptions of every setup item:
| Band | Select the wireless band you wish to use. By selecting different band settings, you'll be able to allow or deny the wireless client of a certain band.If you select 2.4 GHz (B), 2.4 GHz (N) or 2.4 GHz (G), only wireless clients using the wireless band you select (802.11b, 802.11 Draft-N or 802.11g) will be able to connect to this access point.If you select 2.4 GHz (B+G), then only wireless clients using 802.11b and 802.11g bands will be able to connect to this access point.If you want to allow 802.11b, 802.11g and 802.11 Draft-N clients to connect to this access point, select 2.4 GHz (B+G+N). |
| Main ESSID | Input the ESSID (the name used to identify thiswireless access point) here. You can input up to 32 alphanumerical characters. NOTE: THE ESSID IS CASE SENSITIVE. |
| Multiple ESSID | The access point supports multiple SSID functions; up to four SSIDs can be set. If you want to configure additional SSIDs, click this button. For detailed descriptions of the function, refer to Section 2-4-1-1. |
| Channel Number | Select a channel number you wish to use. If you know a certain channel number is being used by other wireless access points nearby, refrain from using the same channel number. |
| Associated Clients | Click the Show Active Clients button and a new popup window will appear which contains the information about all wireless clients connected to this access point. You can click the Refresh button in the popup window to keep information up to date. |
After you finish with the settings, click "Apply" and the following message will be displayed:
Save setting successfully!
You may press CONTINUE button to continue configuring other settings or press APPLY button to restart the system for changes to take effect
Continue
Apply
When you see this message, the settings you made are successfully saved. You can click “Continue” to go back to the previous page and continue with other settings, or click “Apply” to restart the wireless access point. Changes will take effect after about 30 seconds.
2-4-1-1 Multiple ESSIDs
This access point supports four SSIDs. Except for the main SSID (configured on the Basic Settings page), you can configure another three SSIDs here. With different SSIDs, you can separate the wireless networks with different SSID names, wireless security, WMM and VLAN settings.
NOTE: If you want to configure the wireless security for different SSIDs, go to 2-7 Wireless Security for more information.

Here are descriptions of every setup item:
| No. | Except for the Main SSID, you can configure another three ESSIDs here. |
| Enable | Select the box to enable the additional ESSIDs. |
| SSID | Input the SSID name (the name used to identify this wireless access point) here. You can input up to 32 alphanumeric characters.NOTE: THE ESSID IS CASE SENSITIVE. |
| Broadcast SSID | Decide if the wireless access point will broadcast its own ESSID or not. You can hide the ESSID of your wireless access point (set the option to “Disable”) so only those who know the ESSID of your wireless access point can get connected. |
| WMM | WMM (Wi-Fi Multimedia) technology can improve the performance of certain network applications, like audio/video streaming, network telephony (VoIP) and others. When you enable the WMM function, the access point will define the priority of different kinds of data to give higher priority to applications that require instant response. Therefore, you can improve the performance of such network applications. |
| VLAN ID(0:Untagged) | If your network uses VLANs, you can assign the SSID to a VLAN on your network. Client devices that associate using the SSID are grouped into this VLAN. The VLAN ID range is from 1 to 4094. The VLAN ID is 0 by default, meaning that it disables the VLAN function for the ESSID. |
2-4-2 Station-Infrastructure
In this mode, you can connect the access point to an Ethernet device, such as a TV and game player, to enable the Ethernet device to be a wireless station and join to a wireless network through an access point or AP router.

Here are descriptions of every setup item:
| Band | Select the wireless band you wish to use. By selecting different band settings, you'll be able to allow or deny the wireless client of a certain band.If you select 2.4 GHz (B), 2.4 GHz (N) or 2.4 GHz (G), only wireless clients using the wireless band you select (802.11b, 802.11 Draft-N or 802.11g) will be able to connect to this access point.If you select 2.4 GHz (B+G), then only wireless clients using 802.11b and 802.11g bands will be able to connect to this access point.If you want to allow 802.11b, 802.11g and 802.11 Draft-N clients to connect to this access point, select 2.4 GHz (B+G+N). |
| Main ESSID | Input the ESSID (the name used to identify this wireless access point) here. You can input up to 32 alphanumerical characters. NOTE:THE ESSID IS CASE SENSITIVE. |
| Site Survey | When you use this access point as a wireless station for an Ethernet network device to have wireless capability, you have to associate it with a working access point. Click “Select Site Survey” and “Wireless Site Survey Table” will pop up. It will list all available access points nearby. You can select one access point in the table and it will join the wireless LAN through this access point. Go to Section 2-4-2-1 for more information about the Wireless Site Survey Table. |
After you finish with the settings, click "Apply" and the following message will be displayed:
Save setting successfully!
You may press CONTINUE button to continue configuring other settings or press APPLY button to restart the system for changes to take effect
Continue
Apply
When you see this message, the settings you made are successfully saved. You can click “Continue” to go back to the previous page and continue with other settings or click “Apply” to restart the wireless access point. Changes will take effect after about 30 seconds.
2-4-2-1 Wireless Site Survey
The table will list the access points nearby as the access point is set to Station mode. You can select one of the access points to associate with.

Here are descriptions of every setup item:
| Select | Click the radio button to select the access point. |
| Channel | Display to channel number of the access point. |
| SSID | Display the SSID name of the access point. |
| BSSID | Display the BSSID (MAC Address) of the AP. |
| Encryption | Display the encryption setting of the access points. If you have selected the access point with a security setting, you need to go to 2-7 Wireless Security to set the same security with the access point you want to associate with. |
| Authentication | Display the authentication type of the access point. |
| Signal | The signal strength of each access point will be displayed here. When the signal strength is stronger, the connection quality is better. |
| Mode | Display the wireless modes of the access points: 11b, 11b/g, 11b/g/n or 11n only. |
| Refresh | Click this button to refresh the table. |
| Connection | Select an access point and click to choose the network. The SSID name of the access point you have selected will be displayed in the Main SSID on the Basic Setting page. |
2-4-3 AP Bridge-Point to Point Mode
In this mode, this wireless access point will connect to another wireless access point that uses the same mode, and all wired Ethernet clients of both wireless access points will be connected together. You can use this mode to connect a network to another network that is physically isolated.
NOTE: When you set your access point to this mode, it will not accept regular wireless clients anymore.
When you select AP Bridge-Point to Point, the following options will be displayed:

Here are descriptions of every setup item:
| Band | Select the wireless band you wish to use. By selecting different band settings, you'll be able to allow or deny the wireless client of a certain band.If you select 2.4 GHz (B), 2.4 GHz (N) or 2.4 GHz (G), only wireless clients using the wireless band you select (802.11b, 802.11 Draft-N or 802.11g) will be able to connect to this access point.If you select 2.4 GHz (B+G), then only wireless clients using 802.11b and 802.11g bands will be able to connect to this access point.If you want to allow 802.11b, 802.11g and 802.11 Draft-N clients to connect to this access point, select 2.4 GHz (B+G+N). |
| Channel Number | Select a channel number you wish to use. The channel number must be the same as another wireless access point you wish to connect |
| MAC address 1 | Input the MAC address of the wireless access point you wish to connect. |
| Set Security | Click this button to select an encryption mode for this wireless link. A new popup window will appear. Refer to Section 2-7 for detailed descriptions. |
After you finish with the settings, click "Apply" and the following message will be displayed:
Save setting successfully!
You may press CONTINUE button to continue configuring other settings or press APPLY button to restart the system for changes to take effect
Continue
Apply
When you see this message, the settings you made are successfully saved. Click “Continue” to go back to the previous page and continue with other settings, or click “Apply” to restart the wireless access point. Changes will take effect after about 30 seconds.
2-4-4 AP Bridge-Point to Multi-Point Mode
In this mode, this wireless access point will connect to up to four wireless access points that use the same mode, and all wired Ethernet clients of every wireless access point will be connected together. You can use this mode to connect a network to other networks that are physically isolated.
NOTE: When you set your access point to this mode, it will not accept regular wireless clients anymore.
When you select AP Bridge-Point to Multi-Point, the following options will be displayed:

Here are descriptions of every setup item:
| Band | Select the wireless band you wish to use. By selecting different band settings, you'll be able to allow or deny the wireless client of a certain band.If you select 2.4 GHz (B), 2.4 GHz (N) or 2.4 GHz (G), only wireless clients using the wireless band you select (802.11b, 802.11 Draft-N or 802.11g) will be able to connect to this access point.If you select 2.4 GHz (B+G), then only wireless clients using 802.11b and 802.11g bands will be able to connect to this access point.If you want to allow 802.11b, 802.11g and 802.11 Draft-N clients to connect to this access point, select 2.4 GHz (B+G+N). |
| Channel Number | Select a channel number you wish to use. The channel number must be the same as another wireless access point you wish to connect to. |
| MAC address 1-4 | Input the MAC address of the wireless access point you wish to connect to. |
| Set Security | Click to select an encryption mode for this wireless link. A new popup window will appear. Refer to Section 2-7 for detailed descriptions. |
After you finish with the settings, click "Apply" and the following message will be displayed:
Save setting successfully!
You may press CONTINUE button to continue configuring other settings or press APPLY button to restart the system for changes to take effect
Continue
Apply
When you see this message, the settings you made are successfully saved. Click “Continue” to go back to the previous page and continue with other setting, or click “Apply” to restart the wireless access point. Changes will take effect after about 30 seconds.
2-4-5 AP Bridge-WDS Mode
In this mode, this wireless access point will connect to up to four wireless access points that use the same mode, and all wired Ethernet clients of every wireless access point will be connected together. You can use this mode to connect a network to other networks that are physically isolated.
When you use this mode, this access point is still able to accept wireless clients.
When you select AP Bridge-WDS, the following options will be displayed:

Here are descriptions of every setup item:
| Band | Select the wireless band you wish to use. By selecting different band settings, you’ll be able to allow or deny the wireless client of a certain band.If you select 2.4 GHz (B), 2.4 GHz (N) or 2.4 GHz (G), only wireless clients using the wireless band you select (802.11b, 802.11Draft-N or 802.11g) will be able to connect to this access point.If you select 2.4 GHz (B+G), then only wireless clients using 802.11b and 802.11g bands will be able to connect to this access point.If you want to allow 802.11b, 802.11g and 802.11 Draft-N clients to connect to this access point, select 2.4 GHz (B+G+N). |
| MAIN ESSID | Input the ESSID (the name used to identify this wireless access point) here. You can input up to 32 alphanumerical characters. NOTE:THE ESSID IS CASE SENSITIVE. |
| Multiple ESSID | The access point supports multiple SSID functions; up to four SSIDs can be set. If you want to configure additional SSIDs, click this button. For detailed descriptions of the function, refer to Section 2-4-1-1. |
| Channel Number | Select a channel number you wish to use. The channel number must be the same as another wireless access point you wish to connect to. |
| Associated Clients | Click “Show Active Clients” and a new popup window will appear that contains information about all wireless clients connected to this access point. You can click “Refresh” in the popup window to keep information up to date. |
| MAC address 1-4 | Input the MAC address of the wireless access point you wish to connect to. |
| Set Security | Click this button to select an encryption mode for this wireless link. A new popup window will appear. Refer to Section 2-7 for detailed descriptions. |
After you finish with setting, click "Apply" and the following message will be displayed:
Save setting successfully!
You may press CONTINUE button to continue configuring other settings or press APPLY button to restart the system for changes to take effect
Continue
Apply
When you see this message, the settings you made are successfully saved. Click “Continue” to go back to the previous page and continue with other settings, or click “Apply” to restart the wireless access point. Changes will take effect after about 30 seconds.
2-4-6 Universal Repeater
In this mode, the access point can act as a wireless repeater: It can be Station and AP at the same time. It can use the Station function to connect to a root AP and use the AP function to service all wireless stations within its coverage.
NOTE: For Repeater Mode, this access point will demodulate the received signal, check if this signal is noise for the operating network, then have the signal modulated and amplified again. The output power of this mode is the same as that of WDS and normal AP mode.

Here are descriptions of every setup item:
| Band | Select the wireless band you wish to use. By selecting different band settings, you'll be able to allow or deny the wireless client of a certain band.If you select 2.4 GHz (B), 2.4 GHz (N), or 2.4 GHz (G), only wireless clients using the wireless band you select (802.11b, 802.11 Draft-N or 802.11g) will be able to connect to this access point.If you select 2.4 GHz (B+G), then only wireless clients using 802.11b and 802.11g bands will be able to connect to this access point.If you want to allow 802.11b, 802.11g and 802.11 Draft-N clients to connect to this access point, select 2.4 GHz (B+G+N). |
| MAIN SSID | Input the ESSID (the name used to identify this wireless access point) here. You can input up to 32 alphanumerical characters. NOTE:THE ESSID IS CASE SENSITIVE. |
| Multiple ESSID | The access point supports multiple SSID functions; up to four SSIDs can be set. If you want to configure additional SSIDs, click this button. For detailed descriptions of the function, refer to Section 2-4-1-1. |
| Channel Number | Select a channel number you wish to use. The channel number must be the same as another wireless access point you wish to connect to. |
| Associated Clients | Click “Show Active Clients” and a new popup window will appear that contains information about all wireless clients connected to this access point. You can click “Refresh” in the popup window to keep information up to date. |
| Root AP SSID | In Universal Repeater mode, this device canact as a station to connect to a root AP. You should assign the SSID of the root AP here or click “Select Site Survey” to choose a root AP. |
| Select Site Survey | Click “Select Site Survey” and a “Wireless Site Survey Table” will pop up. It will list all available access points nearby. You can select one access point in the table and the access point will join the wireless LAN through this access point. Go to Section 2-4-2-1 for more information about the Wireless Site Survey Table. |
After you finish with the settings, click "Apply" and the following message will be displayed:
Save setting successfully!
You may press CONTINUE button to continue configuring other settings or press APPLY button to restart the system for changes to take effect
Continue
Apply
When you see this message, the settings you made are successfully saved. Click “Continue” to go back to the previous page and continue with other settings, or click “Apply” to restart the wireless access point. Changes will take effect after about 30 seconds.
2-5 WPS Setting
Wi-Fi Protected Setup (WPS) is the simplest way to build a connection between wireless network clients and this access point. You don't have to select an encryption mode and input a long encryption passphrase every time you need to set up a wireless client: You only have to press a button on the wireless client and this access point, and the WPS will do the setup for you.
This access point supports two types of WPS: Push-Button Configuration (PBC) and PIN code. If you want to use PBC, you need to switch this access point to WPS mode and push a specific button on the wireless client to start WPS mode. You can push the Reset/WPS button of this access point or click "Start PBC" in the Web configuration interface to do this; if you want to use PIN code, you need to provide the PIN code of the wireless client you wish to connect to this access point and then switch the wireless client to WPS mode. The detailed instructions are listed below.
NOTE: The WPS function of this access point will not work for wireless clients that do not support WPS.
To use the WPS function to set an encrypted connection between this access point and a WPS-enabled wireless client, click “WPS Setting” on the left side of the Web management menu and the following information will be displayed:
Enable WPS
□ Enable WPS Proxy
• Wi-Fi Protected Setup Information
| WPS Status: | unConfigured |
| Self PinCode: | 20630249 |
| SSID: | INTELLINET_AP |
| Authentication Mode: | Disable |
| Passphrase Key: |
• Device Configure
| Config Mode: | Registrar | |
| Configure via push button: | Start PBC | |
| Configure via client pin code: | Start PIN | |
Here are descriptions of every setup item:
| Enable WPS | Check to enable or disable the WPS function. |
| Wi-Fi Protected Setup Information | All information related to WPS will be displayed here — helpful when you’re setting up connections by WPS.WPS Status: Displays WPS status. If data encryption settings of this access point have never been set, an “unConfigured” message will be displayed here (see Section 2-7 for detailed information); if data encryption settings have been set before, a “Configured” message will be displayed here.Self PinCode: This is the WPS PIN code of this access point. This code is useful when you need to build wireless connections by WPS with other WPS-enabled wireless devices.SSID: Displays the SSID (ESSID) of this AP.Authentication Mode: The wireless security authentication mode of this access point will be displayed here. If you don't enable a security function of the access point before WPS is activated, the access point will auto-set the security to WPA (AES) and generate a set of passphrase keys for WPS connection.Passphrase Key: Displays the WPA passphrase here. All characters will be replaced by asterisks for security reasons. If encryption is not set on this access point, nothing will be displayed here. |
| Config Mode | There are “Registrar” and “Enrollee” modes for the WPS connection. When “Registrar” is enabled, the wireless clients will follow the access point's wireless settings for WPS connection. When “Enrollee” mode is enabled, the AP will follow the wireless settings of the wireless clients for WPS connection. |
| Start PBC | Click “Start PBC” to start the Push Button-style WPS setup procedure. This access point will wait for WPS requests from wireless clients for 2 minutes. The WLAN LED on the access point will be lit for 2 minutes when this access point is waiting for incoming WPS requests. |
| Start PIN | Input the PIN code of the wireless client you wish to connect, and click “Start PIN.” The WLAN LED on the access point will be lit when this access point is waiting for incoming WPS requests. |
NOTE: When you're using PBC-type WPS setup, you must press "PBC" (hardware or software) on the wireless client within 120 seconds; if you don't press the PBC button on the wireless client within this time period, press "PBC" (hardware or software) of this access point again.
2-6 Advanced Wireless Settings
This wireless access point has many advanced wireless features. All settings listed here are for experienced users only: If you're not sure about the meaning and function of these settings, don't modify them, or the wireless performance will be reduced.
Click Advanced Settings on the left side to enter the Advanced Settings menu, and the following message will be displayed:
Advanced Settings
These settings are only for more technically advanced users who have a sufficient knowledge about wireless LAN. These settings should not be changed unless you know what effect the changes will have on your Broadband router.

Here are descriptions of every setup item:
| Fragment Threshold | Set the fragment threshold of the wireless radio. Do not modify the default value (2346) unless you know what it does. |
| RTS Threshold | Set the RTS threshold of the wireless radio. Do not modify the default value (2347) unless you know what it does. |
| Beacon Interval | Set the beacon interval of the wireless radio. Do not modify the default value (100)unless you know what it does. |
| DTIM Period | Set the DTIM period of the wireless radio.Do not modify the default value (3) unless you know what it does. |
| Data Rate | Set the wireless data transfer rate to a certain value. Since most of wireless devices will negotiate with each other and pick a proper data transfer rate automatically, it's not necessary to change this value unless you know what will happen after modification. |
| N Data Rate | Set the data rate of 802.11 Draft-N clients: MCS 0 to MCS 15: It's safe to set this option to "Auto" and it's not necessary to change this value unless you know what will happen after modification. |
| Channel Width | Select the wireless channel width (bandwidth taken by wireless signals of this access point). It's suggested to select "Auto 20/40 MHz." Do not change to "20 MHz" unless you know what it is. |
| Preamble Type | Set the type of preamble of the wireless radio, Do not modify the default (Short Preamble) unless you know what will happen after modification. |
| Broadcast ESSID | Decide if the wireless access point will broadcast its own ESSID or not. You can hide the ESSID of your wireless access point (set the option to 'Disable') so only those who know the ESSID of your wireless access point can get connected. |
| WMM | WMM (Wi-Fi Multimedia) technology can improve the performance of certain network applications, like audio/video streaming, network telephony (VoIP) and others. When you enable the WMM function, the access point will define the priority of different kinds of data to give higher priority to applications that require instant response. Therefore, you canimprove the performance of such network applications. |
| CTS Protect | Enabling this setting will reduce the chance of radio signal collisions between 802.11b and 802.11g wireless access points. It's recommended to set this option to “Auto.” |
| TX Power | You can set the output power of the wireless radio. Unless you're using this wireless access point in a really big space, you may not have to set output power to 100%. This will enhance security (malicious/unknown users outside the range will not be able to reach your wireless access point). |
After you finish with the settings, click "Apply" and the following message will be displayed:
Save setting successfully!
You may press CONTINUE button to continue configuring other settings or press APPLY button to restart the system for changes to take effect
Continue
Apply
When you see this message, the settings you made are successfully saved. Click “Continue” to go back to the previous page and continue with other settings, or click “Apply” to restart the wireless access point. Changes will take effect after about 30 seconds.
2-7 Wireless Security
This wireless access point provides many types of wireless security (wireless data encryption). When you use data encryption, data transferred by radio signals in the air will become unreadable for those who don't know correct encryption key (encryption password).
There are two ways to set wireless security:
- Click Security on the left side of the Web management interface.
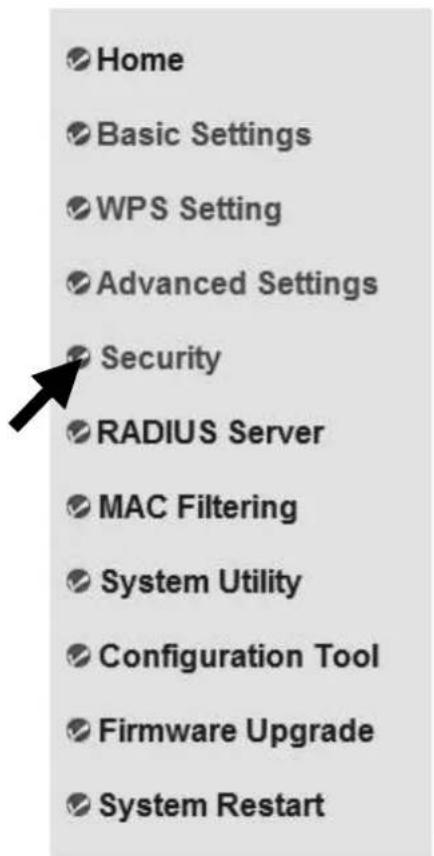
- Click Set Security when the wireless operating mode you selected is AP Bridge-Point to Point, AP Bridge-Point to Multi-Point or AP Bridge-WDS.

There are four types of security level you can select: Disable (no security - data encryption disabled), WEP, WPA Pre-shared Key and WPA RADIUS. Refer to the following sections for detailed instructions.
NOTE: If you have enabled the Multiple SSID function, select the SSID network you want to configure in advance.
Remember, it's very important to set wireless security settings properly! Without a proper setting, hackers and intruders may gain access to your local network and do something to your computers and servers that could cause serious problems.
There are several things you can do to improve wireless security:
-
Always enable data encryption. Only disable it when you want to open your wireless access point to the public.
-
Never use simple words as encryption passwords. Using a random combination of symbols, numbers and letters will greatly improve security.
-
Use WPA when possible — it's much safer than WEP.
-
Change your encryption password after you've used it for a while.
2-7-1 Disable Security
Select the SSID you want to configure. When you select "Disable," wireless encryption for the network is disabled.

After you finish with the settings, click "Apply" and the following message will be displayed:

When you see this message, the settings you made are successfully saved. Click “Continue” to go back to the previous page and continue with other settings, or click “Apply” to restart the wireless access point. Changes will take effect after about 30 seconds.
2-7-2 WEP
WEP (Wired Equivalent Privacy) is a common encryption mode, safe enough for home and personal use. But if you need a higher level of security, consider using WPA encryption (see next section).
Some wireless clients don't support WPA (only WEP), so WEP is still a good choice if you have such a client in your network environment.
When you select WEP as your encryption type, the following message will be displayed:

Here are descriptions of every setup item:
| Key Length | There are two types of WEP key length: 64-bit and 128-bit. Using “128-bit” is safer than “64-bit,” but will reduce some data transfer performance. |
| Key Format | There are two types of key format: ASCII and Hex. When you select a key format, the number of key characters will be displayed. For example, if you select “64-bit” as the keylength and “Hex” as key format, you’ll see the message at the right of “Key Format” is “Hex (10 characters,” which means the length of the WEP key is 10 characters. |
| Default Tx Key | You can set up to four sets of WEP keys, and you can decide which key is being used by default here. If you don’t know which one you should use, select “Key 1.” |
| Encryption Key 1 to 4 | Input WEP key characters here. The number of characters must be the same as the number displayed in the “Key Format” field. You can use any alphanumerical characters (0-9, a-z and A-Z) if you select “ASCII” key format; if you select “Hex” as the key format, you can use characters 0-9, a-f and A-F. You must enter at least one encryption key here; if you enter multiple WEP keys, they should all be different. |
| Enable 802.1x Authentication | Check to enable 802.1x user authentication. Refer to Section 2-7-5 for detailed instructions. |
After you finish with the settings, click "Apply" and the following message will be displayed:
Save setting successfully!
You may press CONTINUE button to continue configuring other settings or press APPLY button to restart the system for changes to take effect
Continue
Apply
When you see this message, the settings you made are successfully saved. Click “Continue” to go back to the previous page and continue with other settings, or click “Apply” to restart the wireless access point. Changes will take effect after about 30 seconds.
2-7-3 WPA Pre-shared Key
WPA Pre-shared key is currently the safest encryption method, and it's recommended to use this encryption method to ensure the safety of your data.
When you select "WPA pre-shared key" as your encryption type, the following messages will be displayed:

Here are descriptions of every setup item:
| WPA Unicast Cipher Suite | Available options are “WPA (TKIP),” “WPA2 (AES)” and “WPA2 Mixed.” You can select one of them, but you need to make sure your wireless clients support the cipher you selected. |
| Pre-shared Key Format | Select the format of pre-shared key here: “Passphrase” (8 to 63 alphanumerical characters) or “Hex” (64 hexadecimal characters – 0 to 9 and a to f). |
| Pre-shared Key | Input the pre-shared key according to the key format you selected here. For security reasons, don’t use simple words. |
After you finish with the settings, click "Apply" and the following message will be displayed:
Save setting successfully!
You may press CONTINUE button to continue configuring other settings or press APPLY button to restart the system for changes to take effect
Continue
Apply
When you see this message, the settings you made are successfully saved. Click “Continue” to go back to the previous page and continue with other settings, or click “Apply” to restart the wireless access point. Changes will take effect after about 30 seconds.
2-7-4 WPA RADIUS
WPA RADIUS is the combination of the WPA encryption method and RADIUS user authentication. If you have a RADIUS authentication server, you can check the identity of every wireless client by user database.
When you select "WPA RADIUS" as your encryption type, the following messages will be displayed:

Here are descriptions of every setup item:
| WPA Unicast Cipher Suite | You can select the WPA encryption type here. AES is safer than TKIP, but not every wireless client supports it. Refer to the specifications of your wireless client to decide which encryption type you should use. |
| Use internal MD5/PEAP RADIUS Server | Uses the built-in RADIUS Server (refer to Section 2-8) instead of an external RADIUS server. If you check this box, the values in the following three fields will be ignored. |
| RADIUS Server IP address | Input the IP address of the RADIUS authentication server here. |
| RADIUS Server Port | Input the port number of the RADIUS authentication server here. Default value is 1812. |
| RADIUS Server Password | Input the password of the RADIUS authentication server here. |
After you finish with the settings, click "Apply" and the following message will be displayed:
Save setting successfully!
You may press CONTINUE button to continue configuring other settings or press APPLY button to restart the system for changes to take effect
Continue
Apply
When you see this message, the settings you made are successfully saved. Click “Continue” to go back to the previous page and continue with other settings, or click “Apply” to restart the wireless access point. Changes will take effect after about 30 seconds.
2-7-5 802.1x Authentication
You can enable 802.1x user identification (based on the RADIUS user authentication server) by checking the “Enable 802.1x Authentication” box when you select “Disable” or “WEP” as the encryption type. The following message will be displayed:
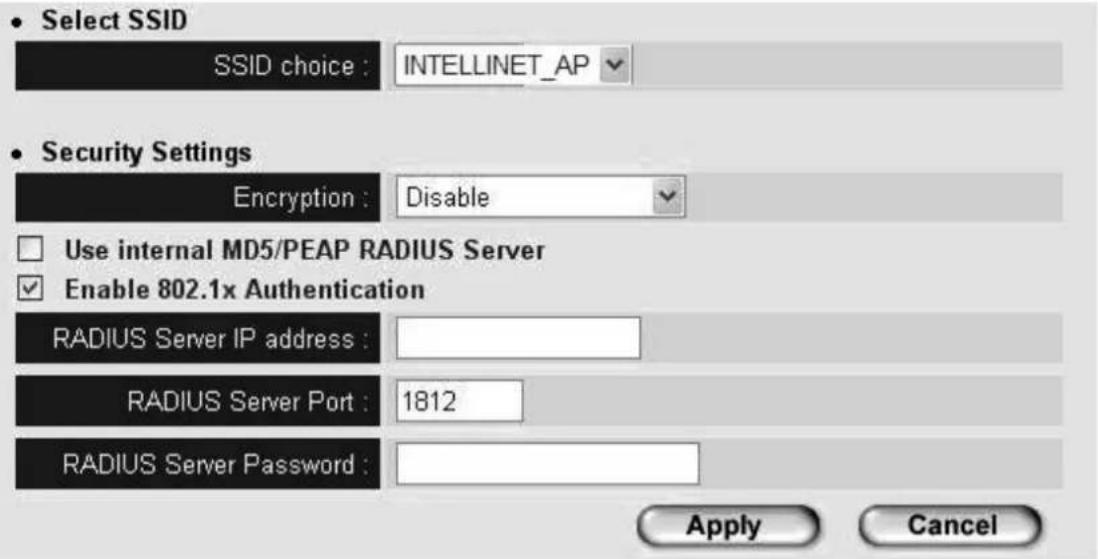
Here are descriptions of every setup item:
| Select SSID | Choose the SSID you wish to configure. |
| Use internal MD5/PEAP RADIUS Server | Uses the built-in RADIUS server (refer to next section) instead of an external RADIUS server. If you check this box, the value of the internal RADIUS server fields will be ignored. |
| Enable 802.1x Authentication | Enable or disable the use of 802.1x user authentication. |
| RADIUS Server IP address | Input the IP address of the RADIUS authentication server here. |
| RADIUS Server Port | Input the port number of the RADIUS authentication server here. Default is 1812. |
| RADIUS Server Password | Input the password of the RADIUS authentication server here. |
After you finish with the settings, click "Apply" and the following message will be displayed:
Save setting successfully!
You may press CONTINUE button to continue configuring other settings or press APPLY button to restart the system for changes to take effect
Continue
Apply
When you see this message, the settings you made are successfully saved. Click “Continue” to go back to the previous page and continue with other settings, or click “Apply” to restart the wireless access point. Changes will take effect after about 30 seconds.
2-8 RADIUS Server
Compared to other wireless security measures, RADIUS server provides user-based authentication. If your wireless client supports 802.1x user authentication, you can use the RADIUS Server function to use the internal mini RADIUS server to improve security and wireless user control.
The internal RADIUS server only supports 96 users and 16 IP addresses. If the number of users and/or IP addresses you need is more than this, use an external RADIUS server.
To set up the internal RADIUS server, click RADIUS Server on the left side of the Web management interface, and the following information will be displayed:

Enable Radius Server
Users Profile (up to 96 users)

| NO. | Username | Select |
| 1 | chen |

Authentication Client (up to 16 clients)

| NO. | Client IP | Select |
| 1 | 192.168.2.25 |

Here are descriptions of every setup item:
| Enable RADIUS Server | Check this box to enable the internal RADIUS server function. |
| User Profile | You can add or delete RADIUS users here.Input a username and password in the corresponding fields and click “Add” to add the user to the RADIUS server database. You can click “Reset” to clear the text you entered in the above three fields.All current RADIUS users will be listed here. If you want to delete one or more users, check the “Select” box of that user and click “Delete Selected”; click “Delete All” to delete all users in the RADIUS server database. You can also click “Reset” to uncheck all “Select” boxes. |
| Authentication Client | You can add allowed RADIUS client IP addresses here. Enter the client IP and secret key in the corresponding fields and click “Add” to add the IP address to the RADIUS server database. You can click “Reset” to clear the text you typed in the above three fields.All current IP addresses will be listed here. If you want to delete one or more addresses, check the “Select” box of that address and click “Delete Selected”; click “Delete All” to delete all addresses in the RADIUS server database. You can also click “Reset” to uncheck all “Select” boxes. |
After you finish with the settings, click "Apply" and the following message will be displayed:
Save setting successfully!
You may press CONTINUE button to continue configuring other settings or press APPLY button to restart the system for changes to take effect
Continue
Apply
When you see this message, the settings you made are successfully save. Click “Continue” to go back to the previous page and continue with other settings, or click “Apply” to restart the wireless access point. Changes will take effect after about 30 seconds.
2-9 MAC Filtering
Another security measure you can use to keep hackers and intruders away is MAC filtering. You can pre-define a so-called "white-list," which contains MAC addresses of the wireless clients you trust. All other wireless clients with MAC addresses not on your list will be denied by this wireless access point.
To set up MAC filtering, click MAC Filtering on the left side of the Web management interface and the following messages will be displayed:

This page contains two parts of MAC filtering information. All allowed MAC addresses will be listed in the upper part (1), and you can add new MAC addresses by components in the lower part (2).
Here are descriptions of every setup item:
| Select | Check this box to select one or more MAC address(es) to delete. |
| Delete Selected | Click to delete all selected MAC address(es). |
| Delete All | Delete all MAC address entries. |
| Reset | Uncheck all selected MAC address entries. |
| Enable Wireless Access Control | Check this box to enable MAC address restriction. If unchecked, no restriction will be enforced (any wireless client with the proper encryption setting will be able to connect to this wireless access point). |
| MAC address | Input a MAC address allowed using this wireless access point here. You don’t have to add a colon (:) or hyphen (-) yourself: Just input 0 to 9 and a to f here; e.g., 112233445566 or aabbccddeeff. |
| Comment | You can input any text here as a comment for this MAC address; e.g., “Room 2 Computer.” Input up to 16 alphanumerical characters. This is optional and you can leave it blank; but it’s recommended that you write a comment for every MAC address as a memory aid. |
| Add | When you finish inputting a MAC address and (optional) comment, click to add the MAC address to the list. |
| Clear | Remove all characters in the “MAC address” and “Comments” fields. |
After you finish with the settings, click "Apply" and the following message will be displayed:
Save setting successfully!
You may press CONTINUE button to continue configuring other settings or press APPLY button to restart the system for changes to take effect
Continue
Apply
When you see this message, the settings you made are successfully saved. Click “Continue” to go back to the previous page and continue with other setting, or click “Apply” to restart the wireless access point. Changes will take effect after about 30 seconds.
2-10 System Utilities
This access point provides control functions that include password, IP address management and DHCP server function. Click System Utility on the left side of the Web management interface to access these functions. Below are detailed descriptions of each function.
2-10-1 Change Password
You can change the password used to enter the Web configuration menu of this wireless access point.
Click System Utility on the left, and the following will be displayed:

Input the current password in the “Current Password” field, then input the new password in both the “New Password” and “Re-Enter Password” fields. Click “Apply,” and the following message will be displayed:

When you see this message, the settings you made are successfully saved. Click “Continue” to go back to the previous page and continue with other settings, or click “Apply” to restart the wireless access point. Changes will take effect after about 30 seconds.
2-10-2 IP Address of the Wireless Access Point
You can change the IP address of this wireless access point so it can become a part of your local network. Remember this address or you won't be able to connect the configuration menu of this wireless access point.
The default IP address is 192.168.2.1; the subnet mask is 255.255.255.0. Press and hold "Reset/WPS" longer than 10 seconds to change the IP address back to the default value if you forget the IP address you set.
To change the IP address, click System Utility on the left, and the following message will be displayed:

Input the IP address and subnet mask in the corresponding fields, and input the IP address of the gateway in the “Gateway Address” field if you need to manage this wireless access point from another network (like the Internet).
To activate the DHCP server function of this wireless access point, select “Enabled” in the “DHCP Server” option, and refer to the next section for detailed instructions; if you don’t want to use the DHCP server function of this wireless access point, or if there’s another DHCP server on the network that this access point connects to, select “Disable.”
Click "Apply" and the following message will be displayed:
Save setting successfully!
You may press CONTINUE button to continue configuring other settings or press APPLY button to restart the system for changes to take effect
Continue
Apply
When you see this message, the settings you made are successfully saved. Click “Continue” to go back to the previous page and continue with other settings, or click “Apply” to restart the wireless access point. Changes will take effect after about 30 seconds.
2-10-3 DHCP Server
This wireless access point is able to act as a DHCP server for your network, and it's disabled by default. If you want to activate this function, click System Utility on the left side, and the following message will be displayed:
- DHCP Server

NOTE: Remember to select “Enable” in the “DHCP Server” option as described in the last section or all DHCP-related fields will be grayed out and you will not be able to input any DHCP parameters.
Here are descriptions of every setup item:
| Default Gateway IP | Input the IP address of the default gateway of your network here. |
| Domain Name Server IP | Input the IP address of the domain name server (DNS) here. |
| Start IP | Input the start IP address of the IP range. |
| End IP | Input the end IP address of the IP range. |
| Domain Name | You can also input the domain name for your network. This is optional. |
| Lease Time | From the drop-down menu, choose a lease time (the duration that every computer can keep a specific IP address) of every IP address assigned by this access point. |
Click "Apply" and the following message will be displayed:
Save setting successfully!
You may press CONTINUE button to continue configuring other settings or press APPLY button to restart the system for changes to take effect
Continue
Apply
When you see this message, the settings you made are successfully saved. Click “Continue” to go back to the previous page and continue with other settings, or click “Apply” to restart the wireless access point. Changes will take effect after about 30 seconds.
Chapter III: Advanced Configuration
3-1 Configuration Backup and Restore
You can back up all configurations of this access point to a file, allowing you to make several copies of your access point configuration for security reasons.
To back up or restore an access point configuration, follow these instructions:
Click Configuration Tool on the left side of the Web management interface, and the following will be displayed on your Web browser:
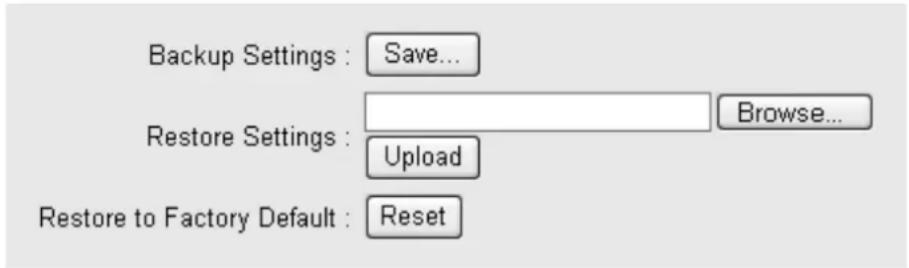
Here are descriptions of every buttons:
| Backup Settings | Click “Save...” and you’ll be prompted to download the configuration as a file. The default filename is “config.bin.” You can save it as another filename for different versions and keep it in a safe place. |
| Restore Settings | Click “Browse...” to pick a previously saved configuration file from your computer, then click “Upload” to transfer the configuration file to the access point. After the configuration is uploaded, the access point’s configuration will be replaced by the file you just uploaded. |
| Restore to Factory Default | Click to remove all settings you’ve made and revert the configuration of this access point to factory default settings. |
3-2 Firmware Upgrade
If there is new firmware available for this wireless access point, you can upload it to the access point to incorporate added functions or to effect solutions to problems.
To perform a firmware upgrade, click Upgrade on the left side of the Web management interface, and the following will be displayed:
Firmware Upgrade
This tool allows you to upgrade the Access Point's firmware. Firmware upgrades should only be performed with a computer that is connected to the Access Point via a network cable. Enter the path and name of the upgrade file, then click APPLY. You will be prompted to confirm the upgrade.
Browse...
Click “Browse” first: You’ll be prompted to provide the filename of the firmware upgrade file. After a firmware upgrade file is selected, click “Apply” and the access point will start the firmware upgrade procedure automatically. The procedure may take several minutes, so be patient.
NOTE: Never interrupt the upgrade procedure by closing the Web browser or physically disconnecting your computer from the access point. If the firmware you uploaded is corrupt, the firmware upgrade will fail and you may need to return this access point to the dealer for help.
3-3 System Reset
If you have reason to believe the access point is not working properly, you can use this function to restart the access point, which may solve the problem.
This function is useful when the access point isn't within easy reach physically. However, if the access point is not responding, you may have to switch it off by unplugging the power cord and plugging it back in after 10 seconds.
To reset your access point, click Reset on the left. The following message will be displayed:
Restart
This screen allows you to perform a system restart. Click APPLY below to begin the process. You will be asked to confirm your decision. The restart is completed when the Power LED stops flashing.
Click "Apply" and a pop-up message will ask you again to make sure you really want to reset the access point:

Click "OK" to reset the access point, or click "Cancel" to abort. Remember, all connections between wireless clients and this access point will be disconnected.
Chapter IV: Troubleshooting
If you find that the access point is working improperly or stops responding, refer to the troubleshooting suggestions below. Some problems can be solved without assistance in a short time.
| Scenario | Solution |
| Access point is not responding when I want to access it by Web browser | a. Check the connection of the power cord and network cable of this access point. All cords and cables should be correctly and firmly inserted.b. If all LEDs on this access point are out, check the status of the A/C power adapter and make sure it's correctly powered.c. You must use the same IP address section the access point uses.d. Are you using a MAC or IP address filter? Try to connect the access point by another computer and see if it works; if not, perform a hard reset (press the Reset button).e. Set your computer to obtain an IP address automatically (DHCP) and see if your computer can get an IP address.f. If you did a firmware upgrade and this happens, contact your dealer for help.g. If all above solutions don't work, contact the dealer for help. |
| Can't get connected to the wireless access point | a. If encryption is enabled, re-check the WEP or WPA passphrase settings on your wireless client.b. Try to move closer to the wireless access point.c. Unplug the power plug of the access point and plug it back in after 10 seconds.d. If all LEDs on this access point are out, check the A/C power adapter and make sure it's correctly powered. |
| I can't locate my access point by my wireless client | a. Is “Broadcast ESSID” set to “Off”?b. Is the antenna properly installed and secured?c. Are you too far from your access point? Try to get closer.d. Remember that you have to input the ESSID on your wireless client manually if ESSID broadcast is disabled. |
| File download is very slow or breaks frequently | a. Try to reset the access point and see if it's better after that.b. See what computers do on your local network. If someone's transferring large files, others will think the Internet is really slow.c. Change the channel number and see if this works. |
| I can't log on to the Web management interface: password is wrong | a. Make sure you're connecting to the correct IP address of the access point.b. Password is case-sensitive. Make sure the Caps Lock light is not illuminated.c. If you forget the password, do a hard reset. |
| Access point becomes hot | a. This is not a malfunction. If you can keep your hand on the access point's chassis, it's okay.b. If you smell something wrong or see smoke coming from the access point or A/C power adapter, disconnect from utility power (make sure it's safe before you're doing this!) and call your dealer for help. |
Chapter V: Glossary
Default Gateway (Access point): Every non-access point IP device needs to configure a default gateway's IP address. When the device sends out an IP packet, if the destination is not on the same network, the device has to send the packet to its default gateway, which will then send it out toward the destination.
DHCP: Dynamic Host Configuration Protocol. This protocol automatically gives every computer on your home network an IP address.
DNS Server IP Address: DNS stands for Domain Name System, which allows Internet servers to have a domain name (such as www.Broadbandaccesspoint.com) and one or more IP addresses (such as 192.34.45.8). A DNS server keeps a database of Internet servers and their respective domain names and IP addresses, so that when a domain name is requested (as in typing "Broadbandaccesspoint.com" into your Internet browser) the user is sent to the proper IP address. The DNS server IP address used by the computers on your home network is the location of the DNS server your ISP has assigned to you.
DSL Modem: DSL stands for Digital Subscriber Line. A DSL modem uses your existing phone lines to transmit data at high speeds.
Ethernet: A standard for computer networks. Ethernet networks are connected by special cables and hubs, and move data around at up to 10/100 million bits per second (Mbps).
Idle Timeout: Idle Timeout is designed so that after there is no traffic to the Internet for a pre-configured amount of time the connection will automatically be disconnected.
IP Address and Network (Subnet) Mask: IP stands for Internet Protocol. An IP address consists of a series of four numbers separated by periods that identifies a single, unique Internet computer host in an IP network. Example: 192.168.2.1. It consists of two portions: the IP network address and the host identifier.
The IP address is a 32-bit binary pattern, which can be represented as four
cascaded decimal numbers separated by “.”: aaa.aaa.aaa.aaa, where each “aaa” can be anything from 000 to 255, or as four cascaded binary numbers separated by “.”: bbbbbbbb.bbbbbbbb.bbbbbbbb.bbbbbbbb, where each “b” can either be 0 or 1.
A network mask is also a 32-bit binary pattern, and consists of consecutive leading 1's followed by consecutive trailing 0's, such as
11111111.11111111.11111111.00000000. Therefore, sometimes a network mask can also be described simply as "x" number of leading 1's.
When both are represented side by side in their binary forms, all bits in the IP address that correspond to 1's in the network mask become part of the IP network address, and the remaining bits correspond to the host ID.
For example, if the IP address for a device is, in its binary form,
11011001.10110000.10010000.00000111, and if its network mask is,
11111111.11111111.11110000.00000000
It means the device's network address is
11011001.10110000.10010000.00000000, and its host ID is,
00000000.00000000.00000000.00000111. This is a convenient and efficient method for access points to route IP packets to their destination.
ISP Gateway Address: (see ISP for definition). The ISP Gateway Address is an IP address for the Internet access point located at the ISP's office.
ISP: Internet Service Provider. An ISP is a business that provides connectivity to the Internet for individuals and other businesses or organizations.
LAN: Local Area Network. A LAN is a group of computers and devices connected together in a relatively small area (such as a house or an office). Your home network is considered a LAN.
MAC Address: MAC stands for Media Access Control. A MAC address is the hardware address of a device connected to a network. The MAC address is a unique identifier for a device with an Ethernet interface. It is composed of two parts: 3 bytes of data that corresponds to the Manufacturer ID (unique for each manufacturer), plus 3 bytes that are often used as the product's serial number.
NAT: Network Address Translation. This process allows all of the computers on your home network to use one IP address. Using the broadband access point's NAT capability, you can access the Internet from any computer on your home network without having to purchase more IP addresses from your ISP.
Port: Network Clients (LAN PC) uses port numbers to distinguish one network application/protocol over another. Below is a list of common applications and protocol/port numbers:
| Application | Protocol | Port Number |
| Telnet | TCP | 23 |
| FTP | TCP | 21 |
| SMTP | TCP | 25 |
| POP3 | TCP | 110 |
| H.323 | TCP | 1720 |
| SNMP | UCP | 161 |
| SNMP Trap | UDP | 162 |
| HTTP | TCP | 80 |
| PPTP | TCP | 1723 |
| PC Anywhere | TCP | 5631 |
| PC Anywhere | UDP | 5632 |
PPPoE: Point-to-Point Protocol over Ethernet. Point-to-Point Protocol is a secure data transmission method originally created for dial-up connections; PPPoE is for Ethernet connections. PPPoE relies on two widely accepted standards, Ethernet and the Point-to-Point Protocol. It is a communications protocol for transmitting information over Ethernet between different manufacturers
Protocol: A protocol is a set of rules for interaction agreed upon between multiple parties so that when they interface with each other based on such a protocol, the interpretation of their behavior is well defined and can be made objectively, without confusion or misunderstanding.
Access point: A access point is an intelligent network device that forwards packets between different networks based on network layer address information such as IP addresses.
Subnet Mask: A subnet mask, which may be a part of the TCP/IP information provided by your ISP, is a set of four numbers (e.g., 255.255.255.0) configured
like an IP address. It is used to create IP address numbers used only within a particular network (as opposed to valid IP address numbers recognized by the Internet, which must be assigned by InterNIC).
TCP/IP, UDP: Transmission Control Protocol/Internet Protocol (TCP/IP) and Unreliable Datagram Protocol (UDP). TCP/IP is the standard protocol for data transmission over the Internet. Both TCP and UDP are transport layer protocol. TCP performs proper error detection and error recovery, and thus is reliable. UDP on the other hand is not reliable. They both run on top of the IP (Internet Protocol), a network layer protocol.
WAN: Wide Area Network is a network that connects computers located in geographically separate areas (e.g., different buildings, cities, countries). The Internet is a wide area network.
Web-based management Graphical User Interface (GUI): Many devices support a graphical user interface that is based on the web browser. This means the user can use the familiar Netscape or Microsoft Internet Explorer to Control/configure or monitor the device being managed.



- WIRELESS N ACCESS POINT USER MANUAL
- Federal Communications Commission Interference Statement
- FCC Part 15
- FCC Caution
- Federal Communications Commission (FCC) Radiation Exposure Statement
- R&TTE Compliance Statement
- Safety
- EU Countries Intended for Use
- EU Countries Not Intended for Use
- Table of Contents
- Chapter I: Product Information.... 1
- Chapter II: System and Network Setup.... 7
- Chapter III: Advanced Configuration.... 66
- Chapter IV: Troubleshooting.... 69
- Chapter V: Glossary.... 71
- Chapter I: Product Information
- 1-1 Product Introduction
- 1-2 Safety Information
- 1-3 System Requirements
- 1-4 Package Contents
- 1-5 Connections and Indicators
- Front Panel
- Chapter II: System and Network Setup
- 2-1 Installing the access point to your Network
- 2-2 Connecting to wireless access point by Web browser
- 2-2-1 Windows 95/98/Me IP address setup
- 2-2-2 Windows 2000 IP address setup
- 2-2-3 Windows XP IP address setup
- 2-2-4 Windows Vista IP address setup
- 2-2-5 Connecting to the Web Management Interface
- 2-3 View System Status and Information
- 2-4 Select an Operating Mode for the Wireless Access Point
- 2-4-1 AP Mode
- Save setting successfully!
- 2-4-1-1 Multiple ESSIDs
- 2-4-2 Station-Infrastructure
- 2-4-2-1 Wireless Site Survey
- 2-4-3 AP Bridge-Point to Point Mode
- 2-4-4 AP Bridge-Point to Multi-Point Mode
- 2-4-5 AP Bridge-WDS Mode
- 2-4-6 Universal Repeater
- 2-5 WPS Setting
- NOTE: The WPS function of this access point will not work for wireless clients that do not support WPS.
- 2-6 Advanced Wireless Settings
- Advanced Settings
- 2-7 Wireless Security
- 2-7-1 Disable Security
- 2-7-2 WEP
- 2-7-3 WPA Pre-shared Key
- 2-7-4 WPA RADIUS
- 2-7-5 802.1x Authentication
- 2-8 RADIUS Server
- 2-9 MAC Filtering
- 2-10 System Utilities
- 2-10-1 Change Password
- 2-10-2 IP Address of the Wireless Access Point
- 2-10-3 DHCP Server
- Chapter III: Advanced Configuration
- 3-1 Configuration Backup and Restore
- 3-2 Firmware Upgrade
- Firmware Upgrade
- 3-3 System Reset
- Restart
- Chapter IV: Troubleshooting
- Chapter V: Glossary
Brand : Intellinet
Model : 525404
Category : Access Point