
525497 - Access Point Intellinet - Free user manual and instructions
Find the device manual for free 525497 Intellinet in PDF.


| Product Type | Wireless 150N Outdoor Range Extender / Access Point |
| Wireless Standard | IEEE 802.11b/g/n |
| Maximum Data Rate | Up to 150 Mbps |
| Frequency Band | 2.4 GHz |
| Interfaces | 2 x RJ-45 (10/100 Mbps) - Main (WAN) and Secondary (LAN with PoE) |
| Antenna | SMA connector for external antenna (internal antenna included) |
| Security | WEP (64/128-bit), WPA/WPA2-PSK, WPA/WPA2-RADIUS |
| Operational Modes | Bridge, Gateway, WISP (Wireless ISP) |
| Firewall | MAC/IP/Port Filtering, Port Forwarding, DMZ, Content Filtering, VPN Passthrough |
| Power Supply | DC 12V / PoE (Power over Ethernet via included injector) |
| Management | Web-based, System Log, Firmware Upgrade, Settings Backup |
| Package Contents | Outdoor AP, DC 12V Power Adapter, PoE Injector, Tie, User Manual CD |
Frequently Asked Questions - 525497 Intellinet
User questions about 525497 Intellinet
0 question about this device. Answer the ones you know or ask your own.
Ask a new question about this device
Download the instructions for your Access Point in PDF format for free! Find your manual 525497 - Intellinet and take your electronic device back in hand. On this page are published all the documents necessary for the use of your device. 525497 by Intellinet.
USER MANUAL 525497 Intellinet
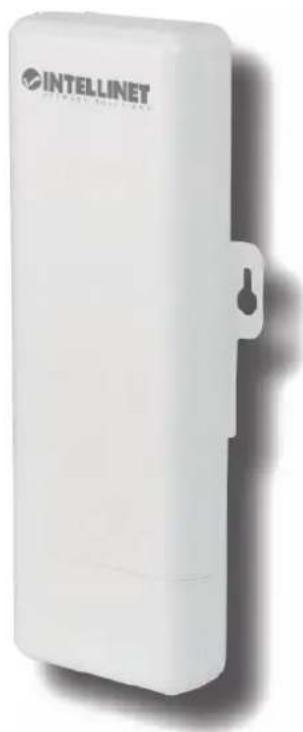
Wireless 150N Outdoor Range Extender / Access Point User Manual
Model 525497
natural_image
White rectangular device labeled 'INTELLINET' with a small handle, shown against a plain background (no readable text or symbols beyond branding)
INT-525497-UM-1013-01
Table of Contents
- Terminology....5
- Introduction......7
2.1 Package Content....7
2.2 Product Features....7
2.3 Rear Panel Description....8
2.3 Front Panel Description ......9
- Hardware Installation ...... 10
3.1 Appearance and Interface Introduction....10
3.2 Hardware Installation Steps ...... 12
- Software Configuration....14
4.1 Prepare your PC to configure the Access Point....15
4.2 Connect to the Access Point .... 16
4.3 Management and configuration of the Access Point .....16
4.3.1 Wizard....16
4.3.1.1 Bridge Mode 16
4.3.1.2 Gateway Mode....21
4.3.1.3 WISP Mode ....30
4.3.2 Operation Mode .... 41
4.3.3 Internet Settings....43
4.3.3.1 WAN....43
4.3.3.2 LAN 48
4.3.3.3 VPN Passthrough....49
4.3.4 Wireless Settings ....50
4.3.4.1 Basic ....50
4.3.4.2 Advanced 52
4.3.4.3 Security ....54
4.3.4.4 Site Survey....61
4.3.4.5 WPS....62
4.3.5 Firewall 63
4.3.5.1 MAC/IP/Port Filtering 63
4.3.5.2 Port Forwarding....65
4.3.5.3 DMZ 67
4.3.5.4 System Security 68
4.3.5.5 Content Filtering....69
4.3.6 Administration 70
4.3.6.1 Management 70
4.3.6.2 QoS 72
4.3.6.3 Upload Firmware....73
4.3.6.4 Settings Management....73
4.3.6.5 Status....74
4.3.6.6 System Log....75
5. FREQUENTLY ASKED QUESTIONS (FAQ) 76
5.1 What are and how do I find my PC's IP and MAC addresses?......76
5.2 What is Wireless LAN? 76
5.3 What are ISM bands?......76
5.4 How does wireless networking work? 77
5.5 What is BSSID?......78
5.6 What is ESSID?......78
5.7 What are potential factors that may cause interference? .....78
5.8 What are the Open System and Shared Key authentications?......78
5.9 What is WEP? 78
5.10 What is Fragment Threshold?....79
5.11 What is RTS (Request to Send) Threshold?....79
5.12 What is Beacon Interval? 79
5.13 What is Preamble Type? 80
5.14 What is SSID Broadcast? 80
5.15 What is Wi-Fi Protected Access (WPA)?......80
5.16 What is WPA2? 80
5.17 What is 802.1x Authentication?......80
5.18 What is Temporal Key Integrity Protocol (TKIP)?......81
5.19 What is Advanced Encryption Standard (AES)? ......81
5.20 What is Inter-Access Point Protocol (IAPP)? ......81
5.21 What is Wireless Distribution System (WDS)?......81
5.22 What is Universal Plug and Play (PnP)?......81
5.23 What is Maximum Transmission Unit (MTU) Size?......81
5.24 What is Clone MAC Address?......81
1. Terminology
| 3DES | Triple Data Encryption Standard |
| AES | Advanced Encryption Standard |
| ANSI | American National Standards Institute |
| AP | Access Point |
| CCK | Complementary Code Keying |
| CSMA/CA | Carrier Sense Multiple Access/Collision Avoidance |
| CSMA/CD | Carrier Sense Multiple Access/Collision Detection |
| DDNS | Dynamic Domain Name Server |
| DH | Diffie-Hellman Algorithm |
| DHCP | Dynamic Host Configuration Protocol |
| DSSS | Direct Sequence Spread Spectrum |
| EAP | Extensible Authentication Protocol |
| ESP | Encapsulating Security Payload |
| FCC | Federal Communications Commission |
| FTP | File Transfer Protocol |
| IEEE | Institute of Electrical and Electronic Engineers |
| IKE | Internet Key Exchange |
| IP | Internet Protocol |
| ISM | Industrial, Scientific and Medical |
| LAN | Local Area Network |
| MAC | Media Access Control |
| MD5 | Message Digest 5 |
| NAT | Network Address Translation |
| NT | Network Termination |
| NTP | Network Time Protocol |
| PPTP | Point to Point Tunneling Protocol |
| PSD | Power Spectral Density |
| RF | Radio Frequency |
| SHA1 | Secure Hash Algorithm |
| SNR | Signal to Noise Ratio |
| SSID | Service Set Identification |
| TCP | Transmission Control Protocol |
| TFTP | Trivial File Transfer Protocol |
| TKIP | Temporal Key Integrity Protocol |
| UPnP | Universal Plug and Play |
| VPN | Virtual Private Network |
| WDS | Wireless Distribution System |
| WEP | Wired Equivalent Privacy |
| WLAN | Wireless Local Area Network |
| WPA | Wi-Fi Protected Access |
2. Introduction
This Intellinet Network Solutions Wireless 150N Outdoor Range Extender / Access Point (AP) serves multiple purposes — an access point for your wireless network supporting wireless bridge for point-to-point connections or WDS setups, an integrated antenna for long range transmissions — and brings it all together so that the devices can access a high-speed Internet connection.
2.1 Package Contents
Ensure that the following items were included in your purchase:
√ Outdoor Range Extender / Access Point
√ DC 12V Power Adapter
√ User manual on CD
√ POE Injector
√ Tie
2.2 Product Features
Compatible with IEEE 802.11n specifications, providing wireless data rate speeds up to 150 Mbps
➢ Compatible with the IEEE 802.11g standard to provide wireless speeds of 54 Mbps data rate
Compatible with the IEEE 802.11b standard to provide wireless speeds of 11 Mbps data rate
Maximizes performance and is ideal for mediacentric applications like streaming video, gaming and Voice over IP technology
Supports various operational modes (Bridge/Gateway/Ethernet Converter) between wireless and wired Ethernet interfaces
Supports WPS, 64-bit and 128-bit WEP, WPA and WPA2 encryption to protect wireless data transmission
Supports TKIP/AES/TKIPAES of WPA algorithms
➢ Supports IEEE 802.3x full duplex flow control on 10/100M Ethernet interfaces
Supports DHCP server to provide clients with auto IP address assignments
Supports DHCP client, static IP, PPPoE, L2TP and PPTP of WAN Interface
➢ Supports firewall security with port filtering, IP filtering, MAC filtering, port forwarding, DMZ hosting and URL filtering functions
Supports Web-based management and configuration
Supports System Log
Supports Dynamic DNS
Supports NTP
2.3 Rear Panel Description

| LED Indicator | State | Description |
| 1. PWR LED | ON | The WLAN Broadband Router is powered ON. |
| O f f | The WLAN Broadband Router is powered Off. | |
| 2. WLAN LED | ON | Wireless Radio On. |
| Off | Wireless Radio Off. | |
| Flashing | Data is transmitting or receiving on the wireless. | |
| 3. WAN LED | ON | Port linked. |
| Off | No link. | |
| Flashing | Data is transmitting or receiving on the WAN interface. | |
| 4. LAN LED | ON | Port linked. |
| O f f | No link. | |
| Flashing | Data is transmitting or receiving on the LAN interface. |
2.3 Front Panel Description

| Interfaces | Description |
| SMA connector | For an external antenna. You can use the SMA connector to connect with an external 2.4 Ghz antenna. |
| Secondary (middle) | The RJ45 sockets allow LAN connection through Category 5 cables.Supports auto-sensing on 10/100M speed and half/ full duplex; complies with IEEE 802.3/ 802.3u, respectively. |
| Main (right) | The RJ45 socket allows WAN connection through a Category 5 cable.Supports auto-sensing at 10/100M speeds and half/full duplex; complies with IEEE 802.3/ 802.3u, respectively. |
| Reset (bottom) | Press the Reset button about 5 - 10 seconds to reset the configuration parameters to factory defaults. |
3. Hardware Installation
3.1 Appearance and Interface Introduction
Note: The product images are for reference only; refer to the actual product.
- LED Panel

- Waterproof sliding cover
- Passthrough for Ethernet cable
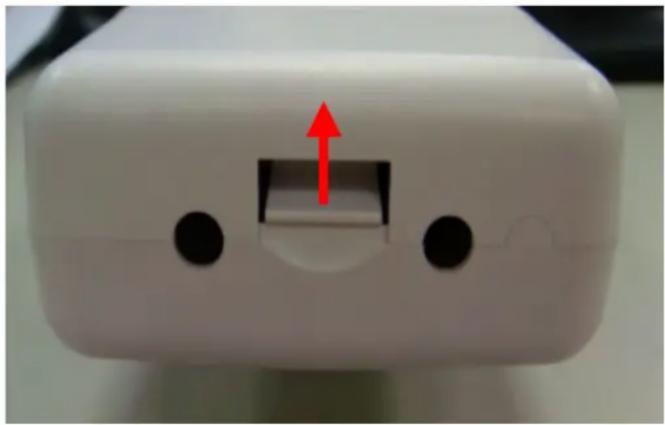
- Push this button to remove the upper housing

- Pole Mount
- Wall Mount

- Secondary port with PoE
- Main port
- SMA connector for external antenna
- Reset button

3.2 Hardware Installation Steps
Step 1: Push the button on the side to remove upper housing.
natural_image
Close-up of a white electronic device component with a red arrow pointing to a port and two black circular ports (no text or symbols visible)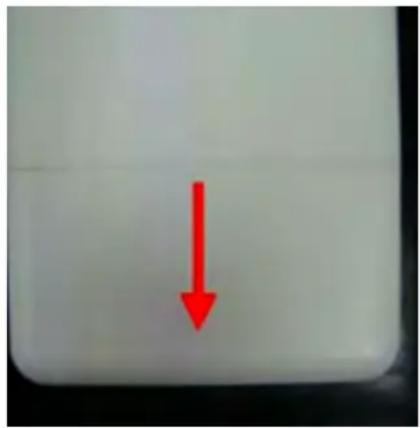
natural_image
Close-up of a white container with a red downward arrow pointing to the bottom (no text or symbols)Step 2: Pass Ethernet cable through the hole; insert the cable into the secondary port.
Note: RJ-45 8P8C Ethernet cable is required.

natural_image
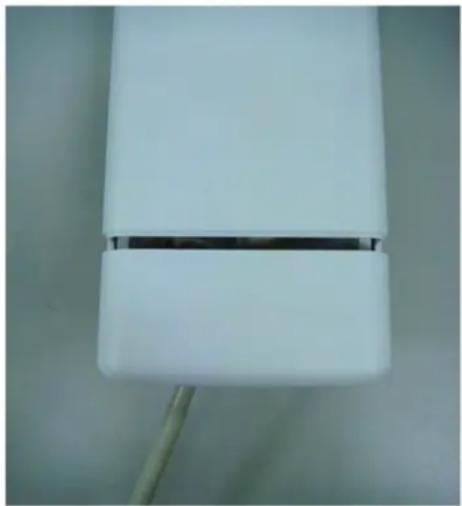
White electronic device casing with attached cable and connector, showing internal components and no visible text or symbols.Step 3: Install the upper housing and make sure the housing is well installed.
natural_image
Close-up of a white rectangular electronic device with a black horizontal bar and wires attached (no visible text or symbols)Step 4: Complete the hardware installation as shown below.
Install PoE Injector
DC: Insert adapter
PoE: This jack is linked to the secondary port of the AP with RJ45.
LAN: This jack is linked to the LAN side of a PC/hub or router/ADSL modem device with RJ45.

There is no software driver or utility installation needed — only the configuration settings. Refer to Chapter 4 for software configuration.
Notice: It will take about 50 seconds to complete the boot-up sequence after powering on. The Power LED will light, then the WLAN Activity LED will flash to indicate the WLAN interface is enabled and operational.
4. Software Configuration
There are Web-based management and configuration functions allowing you to use this device more easily.
The AP is delivered with the following factory default parameters on the Ethernet LAN interfaces.
Default IP address: 192.138.2.1
Default IP subnet mask: 255.255.255.0
Web login user name: admin
Web login password: 1234
4.1 Prepare your PC to configure the WLAN Broadband Router
For Windows 2000/ XP:
- Click the Start button and select Settings, then click Control Panel. The Control Panel window will appear.
- Double-click the right mouse button on the Network and Dial-up Connections icon. Double-click the Local Area Connection icon. The Local Area Connection window will appear. Click the Properties button in the Local Area Connection window.
- Check the installed list of Network Components. If TCP/IP is not installed, click the Add button to install it; otherwise, go to Step 6.
- Select Protocol in the Network Component Type dialog box and click the Add button.
- Select TCP/IP in the Microsoft of Select Network Protocol dialog box, then click the OK button to install the TCP/IP protocol. It may need the Microsoft Windows CD to complete the installation. Close and go back to the Network dialog box after the TCP/IP installation.
- Select TCP/IP and click the properties button in the Network dialog box.
- Select Specify an IP address and type in values as per the following example.
IP Address: 192.168.2.1 — any IP address within 192.168.2.1 to 192.168.2.254 is good to connect the Wireless LAN Access Point. Don't use 192.168.2.1.
√ IP Subnet Mask: 255.255.255.0. - Click OK to complete the IP parameters setting.
For Windows Vista / 7:
- Click the Start button and select Settings, then click Control Panel. The Control Panel window will appear.
- Double-click the right mouse button on Network Connections. The Network Connections window will appear. Double-click the Local Area Connection icon, and the User Account Control window is shown. Right-click on the Continue button to set properties.
- In the Local Area Connection Properties window, choose the Networking tab and click Internet Protocol Version 4 (TCP/IPv4), then click on the Properties button.
- Click on the General tab, select Specify an IP address and enter values per the following example.
IP Address: 192.168.2.1 — any IP address within 192.168.2.1 to 192.168.2.254 is good to connect the Wireless LAN Access Point. Don't use 192.168.2.1.
√ IP Subnet Mask: 255.255.255.0
-
Click OK to complete the IP parameters setting.
-
NOTE: Procedures for Windows 8 are similar.
4.2 Connect to the AP
Open a Web browser — i.e., Microsoft Internet Explorer 6.1 SP1 or above — then enter 192.168.2.1 in the URL field to connect the WLAN Broadband Router.
4.3 Management and configuration of the AP
4.3.1 Wizard
The setup wizard will be changed when you select different operation modes.
4.3.1.1 Bridge Mode
This mode is for bridge setting. The Setup Wizard will guide you to configure the device to connect to your ISP (Internet Service Provider).
Setup Wizard
This mode is for bridge setting. The 'Setup Wizard' will guide you to configure the mode to setting AP, AP Client, WDS+AP or WDS.
The wizard will guide you through these three quick steps. Begin by clicking on Next.
Step 1. Configure LAN IP address settings.
Step 2. Configure Wireless mode settings.
Step 3. Configure WDS mode AP Client mode or AP mode or Apply.
Back
Next
Cancel
Apply
Click Next to go to the next step for LAN IP address settings.
Step 1: Configure LAN IP address settings
Setup Wizard
This mode is for home networking. The 'Setup Wizard' will guide you to configure the router to connect to your ISP(Internet Service Provider).
Step 1. Configure LAN IP address settings
| LAN Setup | |
| IP Address | 192.168.1,200 |
| Subnet Mask | 255.255.255.0 |
Back
Next
Cancel
Apply
Step 2: Configure Wireless Settings
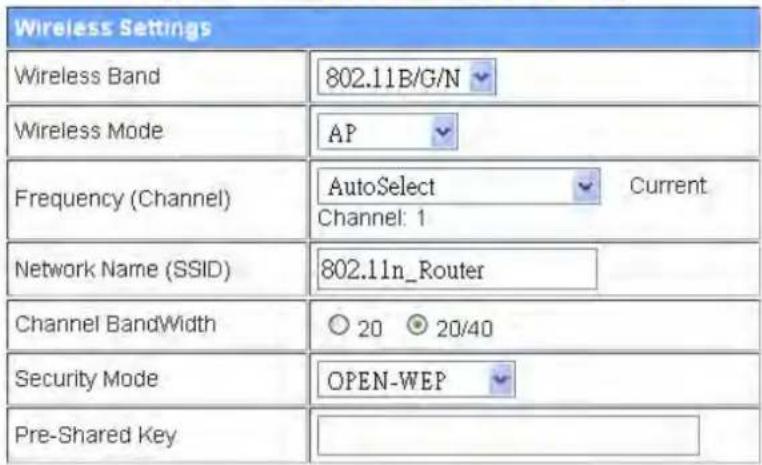
There are four options (Disable, Open-WEP, Shared-WEP, WPA-PSK/WPA2-PSK) for the wireless security connection.
Setup Wizard
This mode is for bridge setting. The 'Setup Wizard' will guide you to configure the mode to setting AP, AP Client, WDS+AP or WDS.
Step 2. Configure Wireless settings

Back
Next
Cancel
Apply
| Item | Description |
| Network Band | Click to select a wireless band from pull-down menu. |
| Network Mode | Click to select a wireless mode from pull-down menu. |
| Frequency (Channel) | Select the wireless communication frequency/channel from pull-down menu. |
| Network Name (SSID) | It is the wireless network name. The SSID can be 32 bytes long. |
| Channel Bandwidth | Select the operating channel width 20 MHz or 20/40 MHz. |
| Security Mode | Select the security mode related to wireless data encryption. |
| Pre-Shared Key | WEP: When you select WEP, input 5, 13 (ASCII), 10 or 26 (hexadecimal) characters for the WEP Key.WPA-PSK/WPA2-PSK: When WPA/WPA2 Pre-shared key encryption is selected, fill in the Pre-shared key. The format can be passphrase or hex (64 characters). |
OPEN WEP
Setup Wizard
This mode is for bridge setting. The 'Setup Wizard' will guide you to configure the mode to setting AP, AP Client, WDS+AP or WDS.
Step 2. Configure Wireless settings

SHARED WEP
Setup Wizard
This mode is for bridge setting. The 'Setup Wizard' will guide you to configure the mode to setting AP, AP Client, WDS+AP or WDS.
Step 2. Configure Wireless settings


WPA-PSK
Setup Wizard
This mode is for bridge setting. The 'Setup Wizard' will guide you to configure the mode to setting AP, AP Client, WDS+AP or WDS.
Step 2. Configure Wireless settings


WPA2-PSK
Setup Wizard
This mode is for bridge setting. The 'Setup Wizard' will guide you to configure the mode to setting AP, AP Client, WDS+AP or WDS.
Step 2. Configure Wireless settings
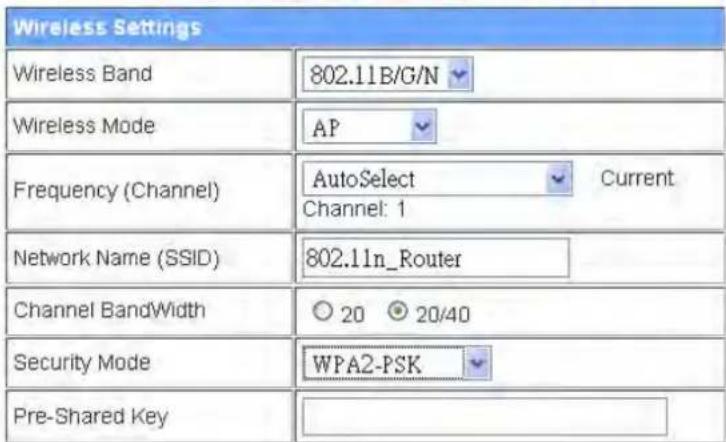

When you finish these settings, click Apply to save.
Choose either Client or WDS, then click Next to go to Step 3.
Step 3:
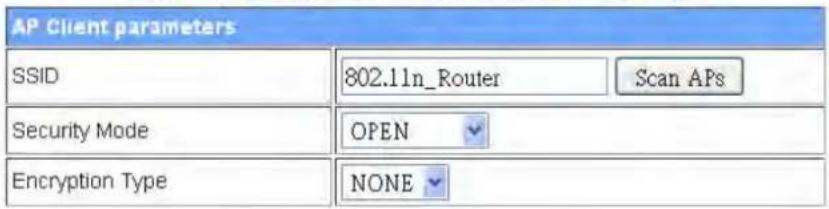
a. Configure AP Client Mode Settings
Setup Wizard
This mode is for bridge setting. The 'Setup Wizard' will guide you to configure the mode to setting AP, AP Client, WDS+AP or WDS.
Step 3. Configure AP Client Mode Settings

b. Configure WDS Mode Settings
Setup Wizard
This mode is for bridge setting. The 'Setup Wizard' will guide you to configure the mode to setting AP, AP Client, WDS+AP or WDS.
Step 3. Configure WDS Mode Settings
| Encryp Type | Encryp Key | AP MAC Address |
| NONE | ||
| NONE | ||
| NONE | ||
| NONE |

This mode is for home networking. The Setup Wizard will guide you to configure the device to connect to your ISP (Internet Service Provider).
Setup Wizard
This mode is for home networking. The 'Setup Wizard' will guide you to configure the router to connect to your ISP(Internet Service Provider).
The wizard will guide you through these three quick steps. Begin by clicking on Next.
Step 1. Configure LAN IP address settings.
Step 2. Configure Internet connection.
Step 3. Configure Wireless settings.
Black
Next
Cancel
exply
Step 1: Configure LAN IP address settings
Setup Wizard
This mode is for home networking. The 'Setup Wizard' will guide you to configure the router to connect to your ISP(Internet Service Provider).
Step 1. Configure LAN IP address settings
| LAN Setup | |
| IP Address | 192.168.1.200 |
| Subnet Mask | 255.255.255.0 |
Back
Next
Cancel
Apply
Step 2: Configure the Internet connection
Click Next to go to the next step for Internet connection settings. There are five options (DHCP, Static Mode, PPPOE, L2TP, PPTP) for Internet connection on the WAN port.
a. DHCP (Auto Configure)
Setup Wizard
This mode is for home networking. The 'Setup Wizard' will guide you to configure the router to connect to your ISP(Internet Service Provider).
Step 2. Configure Internet Connection

Back
Next
Cancel
Apply
If you select the DHCP option, click Next to jump to Step 3.
b. Static Mode (fixed IP)
If you select Static Mode (fixed IP), fill in these fields.
Setup Wizard
This mode is for home networking. The 'Setup Wizard' will guide you to configure the router to connect to your ISP(Internet Service Provider).
Step 2. Configure Internet Connection
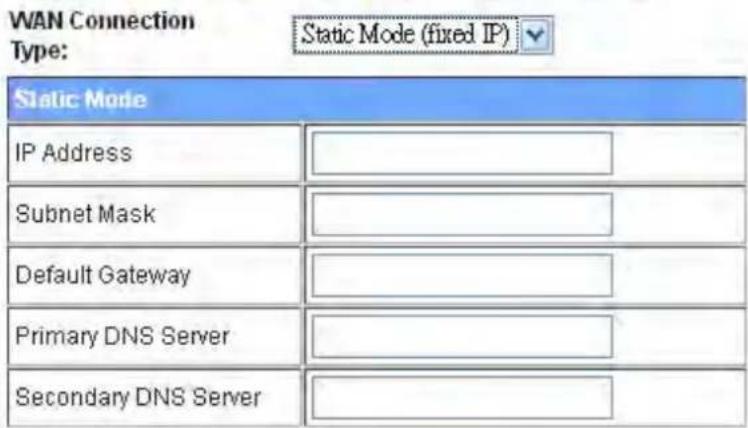

| Item | Description |
| IP Address | Fill in the IP address for the WAN interface. |
| Subnet Mask | Fill in the subnet mask for the WAN interface. |
| Default Gateway | Fill in the default gateway for WAN interface outgoing data packets. |
| Primary DNS Server | Fill in the IP address of Domain Name Server 1. |
| Secondary DNS Server | Fill in the IP address of Domain Name Server 2. |
When you finish these settings, click Next to jump to Step 3.
c. PPPOE (ADSL)
If you select PPPOE, fill in these fields.
Setup Wizard
This mode is for home networking. The 'Setup Wizard' will guide you to configure the router to connect to your ISP(Internet Service Provider).
Step 2. Configure Internet Connection


| Item | Description |
| User Name | If you select the PPPoE support on the WAN interface, fill in the user name to log in to the PPPoE server. |
| Password | If you select the PPPoE support on the WAN interface, fill in the password to log in to the PPPoE server. |
| Verify Password | Fill in the password again for verification. |
| Operation Mode | Keep Alive: Keep the PPPoE connection all the time. Also configure the Redial Period field.On Demand: Configure the Idle Time field. When time is up, the PPPoE connection will disconnect. The connection will re-connect when any outgoing packet arises.Manual: Lets a user connect manually. |
When you finish these settings, click Next to jump to Step 3.
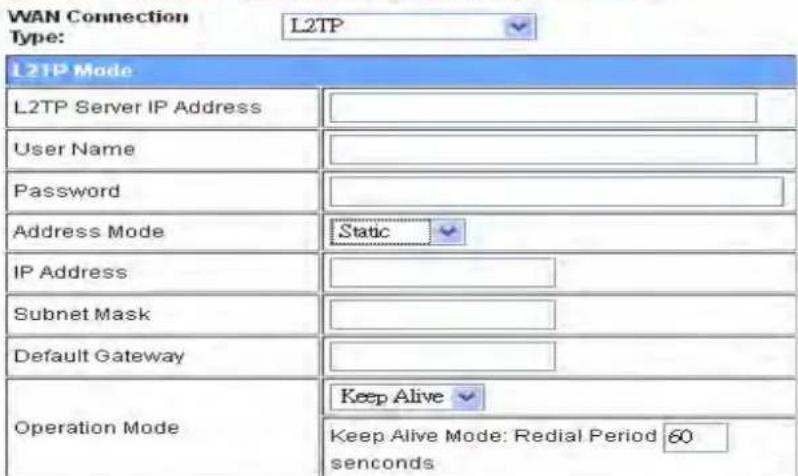
d. L2TP
If you select L2TP, fill in these fields.
Setup Wizard
This mode is for home networking. The 'Setup Wizard' will guide you to configure the router to connect to your ISP(Internet Service Provider).
Step 2. Configure Internet Connection
Back
Next
Cancel
Apply
| Item | Description |
| L2TP Server IP Address | Allows you to make a tunnel with a remote site directly to secure the data transmission among the connection. You can use embedded L2TP client supported by this device to make a VPN connection. If you select the L2TP support on WAN interface, fill in the IP address for it. |
| User Name | Fill in the user name to log in to the L2TP server. |
| Password | Fill in the password to log in to the L2TP server. |
| Address Mode | Static: To configure the IP address information manually, fill in the related settings below.Dynamic: The option allows the machine to get IP address information automatically from the DHCP server on the WAN side. |
| IP Address | Fill in the IP address for the WAN interface. |
| Subnet Mask | Fill in the subnet mask for the WAN interface. |
| Default Gateway | Fill in the default gateway for WAN interface outgoing data packets. |
| Operation Mode | Keep Alive: Keep the L2TP connection all the time. Also configure the Redial Period field.Manual: Lets a user connect manually. |
When you finish these settings, click Next to jump to Step 3.
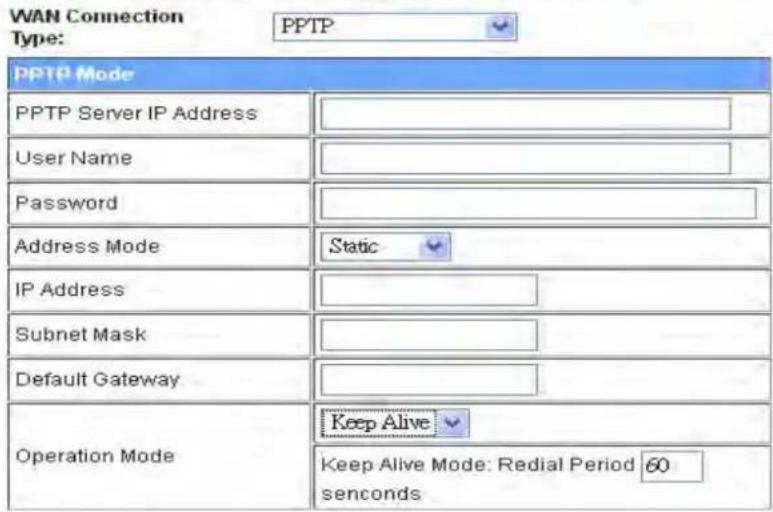
e. PPTP
If you select PPTP, fill in these fields.
Setup Wizard
This mode is for home networking. The 'Setup Wizard' will guide you to configure the router to connect to your ISP(Internet Service Provider).
Step 2. Configure Internet Connection

| Item | Description |
| PPTP Server IP Address | Allows you to make a tunnel with a remote site directly to secure the data transmission among the connection. You can use embedded PPTP client supported by this device to make a VPN connection. If you select the PPTP support on the WAN interface, fill in the IP address for it. |
| User Name | Fill in the user name to log in to the PPTP server. |
| Password | Fill in the password to log in to the PPTP server. |
| Address Mode | Static: To configure the IP address information manually, fill in the related settings below.Dynamic: This option allows the machine to get IP address information automatically from the DHCP server on the WAN side. |
| IP Address | Fill in the IP address for the WAN interface. |
| Subnet Mask | Fill in the subnet mask for the WAN interface. |
| Default Gateway | Fill in the default gateway for WAN interface outgoing data packets. |
| Operation Mode | Keep Alive: Keep the PPTP connection all the time. Also configure the Redial Period field.Manual: Lets a user connect manually. |
When you finish these settings, click Next to jump to Step 3.
Step 3: Configure Wireless Settings
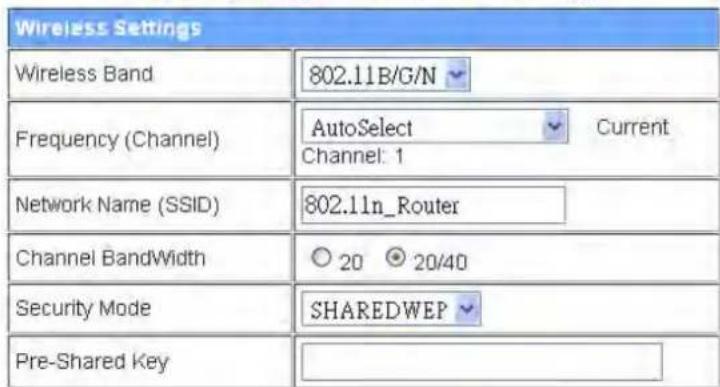
There are three options (Disable, WEP, WPA-PSK/WPA2-PSK) for the Wireless security connection.
Setup Wizard
This mode is for home networking. The 'Setup Wizard' will guide you to configure the router to connect to your ISP(Internet Service Provider).
Step 3. Configure Wireless Settings

| Item | Description |
| Network Band | Click to select wireless band from pull-down menu. |
| Network Mode | Click to select wireless mode from pull-down menu. |
| Frequency (Channel) | Select the wireless communication frequency/channel from pull-down menu. |
| Network Name (SSID) | It is the wireless network name. The SSID can be 32 bytes long. |
| Channel Bandwidth | Select the operating channel width 20 MHz or 20/40 MHz. |
| Security Mode | Please select the security mode related to the wireless data encryption. |
| Pre-Shared Key | WEP: When you select WEP, input 5, 13 (ASCII), 10 or 26 (hexadecimal) characters for WEP Key.WPA-PSK/WPA2-PSK: When WPA/WPA2 Pre-shared key encryption is selected, fill in the Pre-shared key. The format can be passphrase or hex (64 characters). |
OPEN WEP
Setup Wizard
This mode is for home networking. The 'Setup Wizard' will guide you to configure the router to connect to your ISP(Internet Service Provider).
Step 3. Configure Wireless Settings

Back
Nex
Cancel
Apply
SHARED WEP
Setup Wizard
This mode is for home networking. The 'Setup Wizard' will guide you to configure the router to connect to your ISP(Internet Service Provider).
Step 3. Configure Wireless Settings
Back
Next
Cancel
Apply
WPA-PSK
Setup Wizard
This mode is for home networking. The 'Setup Wizard' will guide you to configure the router to connect to your ISP(Internet Service Provider).
Step 3. Configure Wireless Settings


WPA2-PSK
Setup Wizard
This mode is for home networking. The 'Setup Wizard' will guide you to configure the router to connect to your ISP(Internet Service Provider).
Step 3. Configure Wireless Settings


When you finish these settings, click Apply to save.
Choose either Client or WDS, then click Next to go to Step 3.
4.3.1.3 WISP Mode
This mode is for home networking. The Setup Wizard will guide you to configure the device to connect to your ISP (Internet Service Provider).
Setup Wizard
This mode is use wireless to connected APs. The 'Setup Wizard' will guide you to configure the wireless how to connect any APs, and setting WAN mode to connected internet.
The wizard will guide you through these four quick steps. Begin by clicking on Next.
Step 1. Configure LAN IP address settings.
Step 2. Configure Internet connection.
Step 3. Configure Wireless settings.
Step 4. Site survey APs to connected internet.
Back
Next
Cancel
Apply
Step 1: Configure LAN IP address settings
Setup Wizard
This mode is use wireless to connected APs. The 'Setup Wizard' will guide you to configure the wireless how to connect any APs, and setting WAN mode to connected internet.
Step 1. Configure LAN IP address settings
| LAN Setup | |
| IP Address | 192.168.1.200 |
| Subnet Mask | 255.255.255.0 |

Step2: Configure Internet connection
Setup Wizard
This mode is use wireless to connected APs. The 'Setup Wizard' will guide you to configure the wireless how to connect any APs, and setting WAN mode to connected internet.
Step 2. Configure Internet Connection


Click Next to go to the Internet connection settings. There are five options (DHCP, Static Mode, PPPOE, L2TP, PPTP) for Internet connection on the WAN port.
a. DHCP (Auto Configure)
Setup Wizard
This mode is use wireless to connected APs. The 'Setup Wizard' will guide you to configure the wireless how to connect any APs, and setting WAN mode to connected internet.
Step 2. Configure Internet Connection


If you select DHCP option, click Next to jump to Step 3.
b. Static Mode (fixed IP)
If you select Static Mode (fixed IP), fill in these fields.
Setup Wizard
This mode is use wireless to connected APs. The 'Setup Wizard' will guide you to configure the wireless how to connect any APs, and setting WAN mode to connected internet.
Step 2. Configure Internet Connection

Back
Next
Cancel
Apply
| Item | Description |
| IP Address | Fill in the IP address for the WAN interface. |
| Subnet Mask | Fill in the subnet mask for the WAN interface. |
| Default Gateway | Fill in the default gateway for WAN interface outgoing data packets. |
| Primary DNS Server | Fill in the IP address of Domain Name Server 1. |
| Secondary DNS Server | Fill in the IP address of Domain Name Server 2. |
When you finish these settings, click Next to jump to Step 3.
c. PPPOE (ADSL)
If you select PPPOE, fill in these fields.
Setup Wizard
This mode is use wireless to connected APs. The 'Setup Wizard' will guide you to configure the wireless how to connect any APs, and setting WAN mode to connected internet.
Step 2. Configure Internet Connection


| Item | Description |
| User Name | If you select the PPPoE support on WAN interface, fill in the user name to log in to the PPPoE server. |
| Password | If you select the PPPoE support on WAN interface, fill in the password to log in to the PPPoE server. |
| Verify Password | Fill in the password again for verification. |
| Operation Mode | Keep Alive: Keep the PPPoE connection all the time. Also configure the Redial Period field.On Demand: Configure the Idle Time field. When time is up, the PPPoE connection will disconnect. The connection will re-connect when any outgoing packet arises.Manual: Lets a user connect manually. |
When you finish these settings, click Next to jump to Step 3.
d. L2TP
If you select L2TP, fill in these fields.
Setup Wizard
This mode is use wireless to connected APs. The 'Setup Wizard' will guide you to configure the wireless how to connect any APs, and setting WAN mode to connected internet.
Step 2. Configure Internet Connection


| Item | Description |
| L2TP Server IP Address | Allows you to make a tunnel with remote site directly to secure the data transmission among the connection. You can use embedded L2TP client supported by this device to make a VPN connection. If you select the L2TP support on WAN interface, fill in the IP address for it. |
| User Name | Fill in the user name to log in to the L2TP server. |
| Password | Fill in the password to log in to the L2TP server. |
| Address Mode | Static: To configure the IP address information manually, fill in the related settings below.Dynamic: The option allows the machine to get IP address information automatically from the DHCP server on the WAN side. |
| IP Address | Fill in the IP address for the WAN interface. |
| Subnet Mask | Fill in the subnet mask for the WAN interface. |
| Default Gateway | Fill in the default gateway for WAN interface outgoing data packets. |
| Operation Mode | Keep Alive: Keep the L2TP connection all the time. Also configure the Redial Period field.Manual: Lets a user connect manually. |
When you finish these settings, click Next to jump to Step 3.
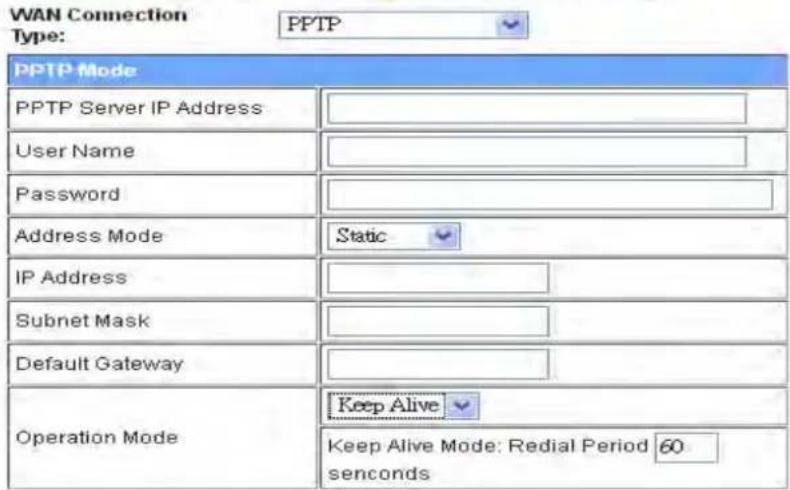
e. PPTP
If you select PPTP, fill in these fields.
Setup Wizard
This mode is use wireless to connected APs. The 'Setup Wizard' will guide you to configure the wireless how to connect any APs, and setting WAN mode to connected internet.
Step 2. Configure Internet Connection

| Item | Description |
| PPTP Server IP Address | Allows you to make a tunnel with remote site directly to secure the data transmission among the connection. You can use embedded PPTP client supported by this device to make a VPN connection. If you select the PPTP support on the WAN interface, fill in the IP address for it. |
| User Name | Fill in the user name to log in to the PPTP server. |
| Password | Fill in the password to log in to the PPTP server. |
| Address Mode | Static: To configure the IP address information manually, fill in the related settings below.Dynamic: This option allows the machine to get IP address information automatically from the DHCP server on the WAN side. |
| IP Address | Fill in the IP address for the WAN interface. |
| Subnet Mask | Fill in the subnet mask for the WAN interface. |
| Default Gateway | Fill in the default gateway for WAN interface outgoing data packets. |
| Operation Mode | Keep Alive: Keep the PPTP connection all the time. Also configure the Redial Period field.Manual: Lets a user connect manually. |
When you finish these settings, click Next to jump to Step 3.
Step 3: Configure Wireless Settings
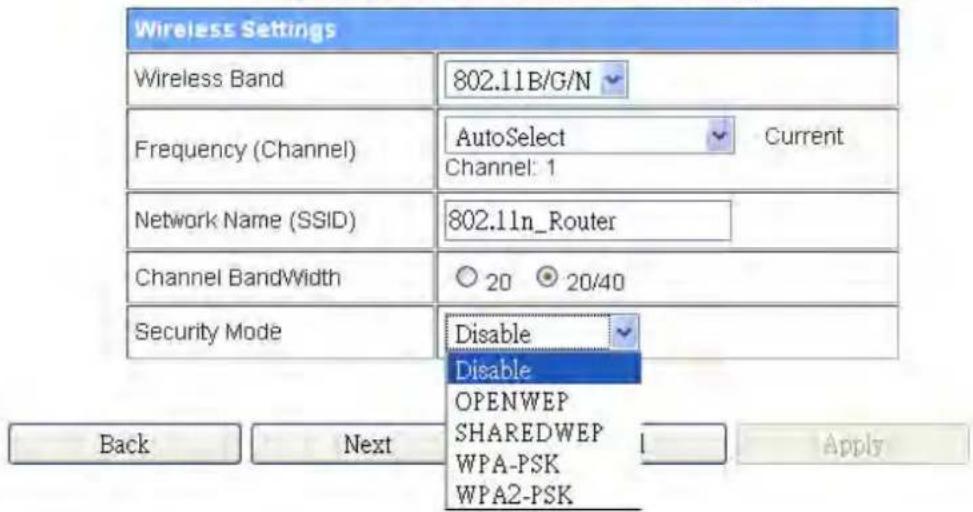
There are five options (Disable, OPENWEP, WPA-PSK WPA2-PSK) for the Wireless security connection.
Setup Wizard
This mode is use wireless to connected APs. The 'Setup Wizard' will guide you to configure the wireless how to connect any APs, and setting WAN mode to connected internet.
Step 3. Configure Wireless Settings
| Item | Description |
| Network Band | Click to select wireless band from pull-down menu. |
| Network Mode | Click to select wireless mode from pull-down menu. |
| Frequency (Channel) | Select the wireless communication frequency/channel from pull-down menu. |
| Network Name (SSID) | It is the wireless network name. The SSID can be 32 bytes long. |
| Channel Bandwidth | Select the operating channel width 20 MHz or 20/40 MHz. |
| Security Mode | Select the security mode related wireless data encryption. |
| Pre-Shared Key | WEP: When you select WEP, input 5, 13 (ASCII), 10 or 26 (hexadecimal) characters for WEP Key.WPA-PSK/WPA2-PSK: When WPA/WPA2 Pre-shared key encryption is selected, fill in the Pre-shared key. The format can be passphrase or hex (64 characters). |
OPEN WEP
Setup Wizard
This mode is use wireless to connected APs. The 'Setup Wizard' will guide you to configure the wireless how to connect any APs, and setting WAN mode to connected internet.
Step 3. Configure Wireless Settings

Back
Next
Cancel
Apply
When you finish these settings, click Next to jump to Step 4.
SHARED WEP
Setup Wizard
This mode is use wireless to connected APs. The 'Setup Wizard' will guide you to configure the wireless how to connect any APs, and setting WAN mode to connected internet.
Step 3. Configure Wireless Settings

Back
Next
Cancel
Apply
When you finish these settings, click Next to jump to Step 4.
WPA-PSK
Setup Wizard
This mode is use wireless to connected APs. The 'Setup Wizard' will guide you to configure the wireless how to connect any APs, and setting WAN mode to connected internet.
Step 3. Configure Wireless Settings


When you finish these settings, click Next to jump to Step 4.
WPA2-PSK
Setup Wizard
This mode is use wireless to connected APs. The 'Setup Wizard' will guide you to configure the wireless how to connect any APs, and setting WAN mode to connected internet.
Step 3. Configure Wireless Settings


| Item | Description |
| Network Band | Click to select wireless band from pull-down menu. |
| Network Mode | Click to select wireless mode from pull-down menu. |
| Frequency (Channel) | Select the wireless communication frequency/channel from pull-down menu. |
| Network Name (SSID) | It is the wireless network name. The SSID can be 32 bytes long. |
| Channel Bandwidth | Select the operating channel width 20 MHz or 20/40 MHz. |
| Security Mode | Select the security mode related wireless data encryption. |
| Pre-Shared Key | WEP: When you select WEP, input 5, 13 (ASCII), 10 or 26 (hexadecimal) characters for WEP Key.WPA-PSK/WPA2-PSK: When WPA/WPA2 Pre-shared key encryption is selected, fill in the Pre-shared key. The format can be passphrase or hex (64 characters). |
When you finish these settings, click Apply to save.
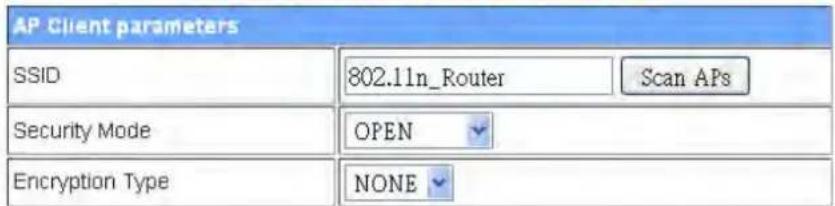
Step 4. Configure AP Client setting
Setup Wizard
This mode is use wireless to connected APs. The 'Setup Wizard' will guide you to configure the wireless how to connect any APs, and setting WAN mode to connected internet.
Step 4. Configure AP Client setting

SCAN APs
| SSID | BSSID | RSSI | Channel | Authentication | Wireless Mode | |
| ○ | LP-7696_RD | 00:1a:ef.00:00:08 | 20% | 1 | WPA2PSK/AES | 11b/g/n |
| ○ | XPossible-charles | 00:1a:ef.2c:e0:3c | 10% | 1 | WPA1PSKWPA2PSK/AES | 11b/g/n |
| ○ | Amped_2.4GHz | 00:1a:ef.00:20:03 | 9% | 1 | WPA1PSKWPA2PSK/AES | 11b/g/n |
| ○ | CD-R King test | 00:1a:ef.20:f8:8a | 20% | 1 | WPAPSK/AES | 11b/g/n |
| ○ | hinet_VDSL | 28:10:7b:42:de:de | 5% | 6 | WPAPSK/TKIP | 11b/g |
| ○ | RTK 11n AP | 00:1a:ef.18:7d.18 | 25% | 6 | NONE | 11b/g/n |
| ○ | RTK 11n AP_LNK | 00:1a:ef.21:f2:4a | 9% | 11 | WEP | 11b/g |
| ○ | LP-8696C | 00:1a:ef.18:4c.78 | 5% | 11 | WPA2PSK/AES | 11b/g |
| ○ | loopcomm | 00:1a:ef.28:54:25 | 10% | 11 | WPA2PSK/AES | 11b/g/n |
| ○ | XPossible | 00:1a:ef.21:f2:77 | 50% | 11 | NONE | 11b/g/n |
4.3.2 Operation Mode
a. Bridge:
Operation Mode Configuration
You may configure the operation mode suitable for you environment.
| ◎ Bridge: | In this mode, all ethernet ports and wireless interface are bridged together and NAT function is disabled. All the WAN related function and firewall are not supported. |
| ○ Gateway: | In this mode, the device is supposed to connect to internet via ADSL/Cable Modem. The NAT is enabled and PCs in LAN ports share the same IP to ISP through WAN port. The connection type can be setup in WAN page by using PPPOE, DHCP client, PPTP client , L2TP client or static IP. |
| ○ Wireless ISP: | In this mode, all ethernet ports are bridged together and the wireless client will connect to ISP access point. The NAT is enabled and PCs in ethernet ports share the same IP to ISP through wireless LAN. You must set the wireless to client mode first and connect to the ISP AP in Site-Survey page. |

Bridge mode allows all Ethernet and wireless interfaces to be bridged into a single bridge interface.
b. Gateway:
Operation Mode Configuration
You may configure the operation mode suitable for you environment.
| ○ Bridge: | In this mode, all ethernet ports and wireless interface are bridged together and NAT function is disabled. All the WAN related function and firewall are not supported. |
| ◎ Gateway: | In this mode, the device is supposed to connect to internet via ADSL/Cable Modem. The NAT is enabled and PCs in LAN ports share the same IP to ISP through WAN port. The connection type can be setup in WAN page by using PPPOE, DHCP client, PPTP client , L2TP client or static IP. |
| ○ Wireless ISP: | In this mode, all ethernet ports are bridged together and the wireless client will connect to ISP access point. The NAT is enabled and PCs in ethernet ports share the same IP to ISP through wireless LAN. You must set the wireless to client mode first and connect to the ISP AP in Site-Survey page. |

Gateway mode allows the first Ethernet port to be treated as a WAN port. The Ethernet port and the wireless interface are bridged together and are treated as LAN ports.
c. Wireless ISP
Operation Mode Configuration
You may configure the operation mode suitable for you environment.
| ○ Bridge: | In this mode, all ethernet ports and wireless interface are bridged together and NAT function is disabled. All the WAN related function and firewall are not supported. |
| ○ Gateway: | In this mode, the device is supposed to connect to internet via ADSL/Cable Modem. The NAT is enabled and PCs in LAN ports share the same IP to ISP through WAN port. The connection type can be setup in WAN page by using PPPOE, DHCP client, PPTP client , L2TP client or static IP. |
| ○ Wireless ISP: | In this mode, all ethernet ports are bridged together and the wireless client will connect to ISP access point. The NAT is enabled and PCs in ethernet ports share the same IP to ISP through wireless LAN. You must set the wireless to client mode first and connect to the ISP AP in Site-Survey page. |

The Wireless ISP mode allows that the wireless interface is treated as a WAN port, and the Ethernet ports are LAN ports.
4.3.3 Internet Settings
4.3.3.1 WAN
a. STATIC
Wide Area Network (WAN) Settings
You may choose different connection type suitable for your environment. Besides, you may also configure parameters according to the selected connection type.

| Item | Description |
| IP Address | Fill in the IP address for the WAN interface. |
| Subnet Mask | Fill in the subnet mask for the WAN interface. |
| Default Gateway | Fill in the default gateway for WAN interface outgoing data packets. |
| Primary DNS Server | Fill in the IP address of Domain Name Server 1. |
| Secondary DNS Server | Fill in the IP address of Domain Name Server 2. |
| MAC Clone | Use the NIC MAC address of the PC on the LAN side as the MAC address of the WAN interface. |
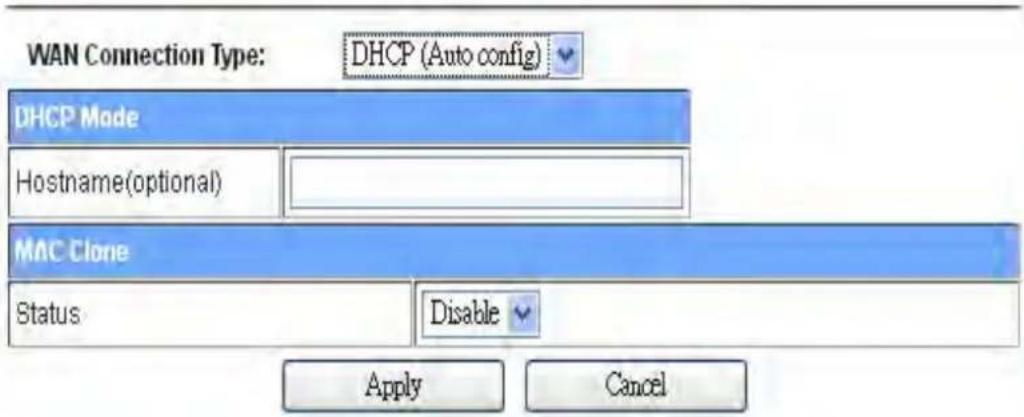
b. DHCP
Wide Area Network (WAN) Settings
You may choose different connection type suitable for your environment. Besides, you may also configure parameters according to the selected connection type.
| Item | Description |
| Hostname | Fill in the host name for the DHCP server. The default value is empty. |
| MAC Clone | Use the NIC MAC address of the PC on the LAN side as the MAC address of the WAN interface. |
.PPPoE
Wide Area Network (WAN) Settings
You may choose different connection type suitable for your environment. Besides, you may also configure parameters according to the selected connection type.

| Item | Description |
| User Name | If you select the PPPoE support on the WAN interface, fill in the user name to log in to the PPPoE server. |
| Password | If you select the PPPoE support on the WAN interface, fill in the password to log in to the PPPoE server. |
| Verify Password | Fill in the password again for verification. |
| Operation Mode | Keep Alive: Keep the PPPoE connection all the time. Also configure the Redial Period field.On Demand: Configure the Idle Time field. When time is up, the PPPoE connection will disconnect. The connection will re-connect when any outgoing packet arises.Manual: Lets a user connect manually. |
| MAC Clone | Use the NIC MAC address of a PC on the LAN side as the MAC address of the WAN interface. |
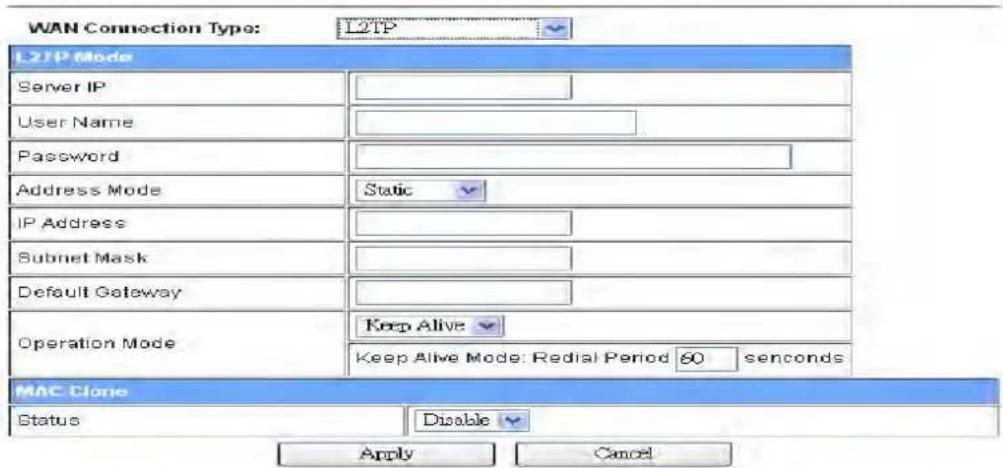
Wide Area Network (WAN) Settings
You may choose different connection type suitable for your environment. Besides, you may also configure parameters according to the selected connection type.
| Item | Description |
| Server IP | Allows you to make a tunnel with a remote site directly to secure the data transmission among the connections. You can use embedded L2TP client supported by this device to make a VPN connection.If you select the L2TP support on the WAN interface, fill in the IP address for it. |
| User Name | Fill in the user name to log in to the L2TP server. |
| Password | Fill in the password to log in to the L2TP server. |
| Address Mode | Static: To configure the IP address information manually, fill in the related settings below.Dynamic: This option allows the machine to get IP address information automatically from the DHCP server on the WAN side. |
| IP Address | Fill in the IP address for the WAN interface. |
| Subnet Mask | Fill in the subnet mask for the WAN interface. |
| Default Gateway | Fill in the default gateway for WAN interface outgoing data packets. |
| Operation Mode | Keep Alive: Keep the L2TP connection all the time. Also configure the Redial Period field.On Demand: Configure the Idle Time field. When time is up, the L2TP connection will disconnect. The connection will re-connect when any outgoing packet arises.Manual: Lets a user connect manually. |
| MAC Clone | Use the NIC MAC address of a PC on the LAN side as the MAC address of the WAN interface. |
e. PPTP
Wide Area Network (WAN) Settings
You may choose different connection type suitable for your environment. Besides, you may also configure parameters according to the selected connection type.

| Item | Description |
| Server IP | Allows you to make a tunnel with a remote site directly to secure the data transmission among the connection. You can use embedded PPTP client supported by this device to make a VPN connection.If you select the PPTP support on the WAN interface, fill in the IP address for it. |
| User Name | Fill in the user name to log in to the PPTP server. |
| Password | Fill in the password to log in to the PPTP server. |
| Address Mode | Static: To configure the IP address information manually, fill in the related settings below.Dynamic: This option allows the machine to get IP address information automatically from the DHCP server on the WAN side. |
| IP Address | Fill in the IP address for the WAN interface. |
| Subnet Mask | Fill in the subnet mask for the WAN interface. |
| Default Gateway | Fill in the default gateway for WAN interface outgoing data packets. |
| Operation Mode | Keep Alive: Keep the PPTP connection all the time. Also configure the Redial Period field.On Demand: Configure the Idle Time field. When time is up, the PPTP connection will disconnect. The connection will re-connect when any outgoing packet arises.Manual: Lets a user connect manually. |
| MAC Clone | Use the NIC MAC address of a PC on the LAN side as the MAC address of the WAN interface. |
4.3.3.2 LAN
Local Area Network (LAN) Settings
You may enable/disable networking functions and configure their parameters as your wish.
| LAN Setup | |
| MAC Address | 8C:92:36:00:66:F8 |
| IP Address | 192.168.1.200 |
| Subnet Mask | 255.255.255.0 |
| DHCP Type | Disable |
| Lease Time | 86400 |
| 802.1d Spanning Tree | Disable |
| LLTD | Disable |
| IGMP Proxy | Disable |
| UPNP | Disable |
| Router Advertisement | Disable |
| PPPoE Relay | Disable |
| DNS Proxy | Disable |

| Item | Description |
| MAC Address | Use the NIC MAC address of a PC on the LAN side as the MAC address of the WAN interface. |
| IP Address | Fill in the IP address for the WAN interface. |
| Subnet Mask | Fill in the subnet mask for the WAN interface. |
| DHCP Type | Disable: Disable the DHCP server on LAN side.Server: Enable the DHCP server on LAN side. |
| Lease Time | Fill in the lease time of the DHCP server function. |
| LLTD | Select enable or disable the Link Layer Topology Discover function from the pull-down menu. |
| IGMP Proxy | Select enable or disable the IGMP proxy function from the pull-down menu. |
| UPNP | Select enable or disable the UPnP protocol from the pull-down menu. |
| DNS Proxy | Select enable or disable the DNS Proxy function from the pull-down menu. |
4.3.3.3 VPN Passthrough
VPN Passthrough
VPN passthroughout configurations including: L2TP, IPSec, and PPTP passthrough.

| Item | Description |
| L2TP Passthrough | Select enable or disable the L2TP passthrough function from pull-down menu. |
| IPSec Passthrough | Select enable or disable the IPSec passthrough function from pull-down menu. |
| PPTP Passthrough | Select enable or disable the PPTP passthrough function from pull-down menu. |
4.3.4 Wireless Settings
4.3.4.1 Basic
Basic Wireless Settings
You could configure the minimum number of Wireless settings for communication, such as Network Name (SSID) and Channel. The Access Point can be set simply with only the minimum setting items.

Apply
Cancel
| Item | Description |
| Wireless On/Off | Click Wireless OFF to turn off the wireless RF radio. Click Wireless ON to turn on the wireless RF radio. |
| Antenna Switch | Select Internal antenna or External antenna. The default is Internal antenna. |
| Wireless Mode | Click to select a wireless mode from pull-down menu. |
| Wireless Band | Click to select a wireless band from pull-down menu. |
| SSID | It is the wireless network name. The SSID can be 32 bytes long. You can use the default SSID or change it. |
| Broadcast Network Name (SSID) | Enable or disable the SSID broadcast function. |
| AP Isolation | Wireless network is similar to the virtual local area network. All of the wireless client devices can access each other completely. When you enable this function, it will turn off the connection between wireless clients, only allowing theconnection between a wireless client and this device. |
| BSSID | Show the MAC address of the wireless interface. |
| Frequency (Channel) | Select the wireless communication frequency/channel from the pull-down menu. |
| Operating Mode | Select “Mixed Mode” for 11b/g/n mode or “Green Field” for 11n mode. |
| Channel Bandwidth | Select the operating channel width 20 MHz or 20/40 MHz. |
| Guard Interval | Select “Long” or “Auto.” Guard intervals are used to ensure that distinct transmissions do not interfere with one another. Only works in Mixed Mode. |
| MCS | Select 0-7 or “Auto” from the pull-down menu. The default is “Auto.” Only works in Mixed Mode. |
4.3.4.2 Advanced
Advanced Wireless Settings
Use the Advanced Setup page to make detailed settings for the Wireless. Advanced Setup includes items that are not available from the Basic Setup page, such as Beacon Interval, Control Tx Rates and Basic Data Rates.
| Advanced Wireless | |
| B/G Protection Mode | Auto |
| Beacon Interval | 100 ms (range 20 - 999, default 100) |
| Data Beacon Rate (DTIM) | 1 ms (range 1 - 255, default 1) |
| Fragment Threshold | 2346 (range 256 - 2346, default 2346) |
| RTS Threshold | 2347 (range 1 - 2347, default 2347) |
| TX Power | 100 (range 1 - 100, default 100) |
| Short Preamble | ○ Enabled ○ Disabled |
| Short Slot | ○ Enabled ○ Disabled |
| Tx Burst | ○ Enabled ○ Disabled |
| Country Code | US (United States) |

| Item | Description |
| Beacon Interval | Beacons are the packets sent by the access point to synchronize the wireless network. The beacon interval is the time interval between beacons sent by this unit in AP or AP+WDS operation. The default and recommended beacon interval is 100 milliseconds. |
| Data Beacon Rate (DTM) | This is the Delivery Traffic Indication Map. It is used to alert the clients that multicast and broadcast packets buffered at the AP will be transmitted immediately after the transmission of this beacon frame. You can change the value from 1 to 255. The AP will check the buffered data according to this value. For example, selecting “1” means to check the buffered data at every beacon. |
| Fragment Threshold | The fragmentation threshold determines the size at which packets are fragmented (sent as several pieces instead of as one block). Use a low setting in areas where communication is poor or where there is a great deal of radio interference. This function will help you improve the network performance. |
| RTS Threshold | The RTS threshold determines the packet size at which the radio issues a request to send (RTS) before sending the packet. A low RTS Threshold settingcan be useful in areas where many client devices are associating with the device, or in areas where the clients are far apart and can detect only the device and not each other. You can enter a setting ranging from 0 to 2347 bytes. |
| TX Power | The default TX power is 100%. In cases where you're shortening the distance and the coverage of the wireless network, input a smaller value to reduce the radio transmission power. For example, input 80 to apply 80% Tx power. |
| Short Preamble | Default: Disable. It is a performance parameter for 802.11 b/g mode and is not supported by some very-early-stage 802.11b station cards. If there is no such kind of station associated with this AP, you can enable this function. |
| Short Slot | It is used to shorten the communication time between this AP and station. |
| TX Burst | The device will try to send a series of packages with single ACK reply from the clients. Enable this function to apply it. |
| Country Code | Select the country code for wireless from the pull-down menu. |
4.3.4.3 Security
a. Disable
Wireless Security/Encryption Settings
Setup the wireless security and encryption to prevent from unauthorized access and monitoring.
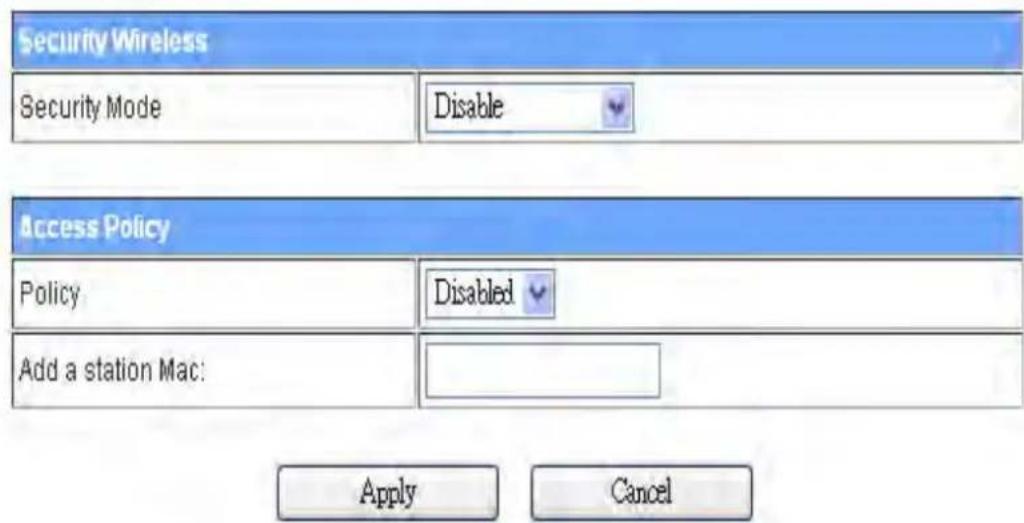
If you set Security Mode to Disable, the wireless data transmission will not include encryption to prevent from unauthorized access and monitoring.
b. OPEN-WEP // SHARED-WEP
Wireless Security/Encryption Settings
Setup the wireless security and encryption to prevent from unauthorized access and monitoring.

Wireless Security/Encryption Settings
Setup the wireless security and encryption to prevent from unauthorized access and monitoring.

If you set Security Mode to OPEN-WEP or SHARED-WEP, fill in the related configurations as below.
| Item | Description |
| Default Key | Specify a Key number. |
| WEP Keys (1-4) | When you select WEPAUTO, input 5, 13 (ASCII), 10 or 26 (hexadecimal) characters for WEP Key. |
c. WPA-PSK/WPA2PSK
Wireless Security/Encryption Settings
Setup the wireless security and encryption to prevent from unauthorized access and monitoring.
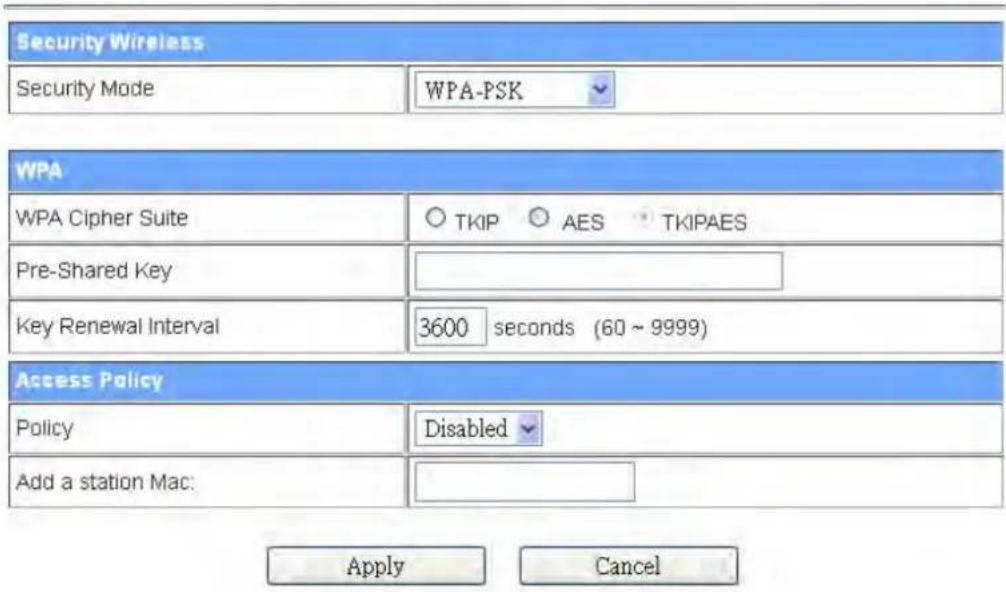
Wireless Security/Encryption Settings
Setup the wireless security and encryption to prevent from unauthorized access and monitoring.

If you set Security Mode to "WPAPSK or WPA2-PSK," fill in the related configurations as below.
| Item | Description |
| WPA Cipher Suite | Select TKIP, AES or TKIPAES for WPA algorithms. |
| Pre-Shared Key | Fill in a passphrase like “test wpa 123” or a hexadecimal string like “65E4 E123 456 E1.” |
| Key Renewal Interval | Fill in a number for Group Key Renewal interval time. |
d. WPA-RADIUS/WPA2-RADIUS
Wireless Security/Encryption Settings
Setup the wireless security and encryption to prevent from unauthorized access and monitoring.
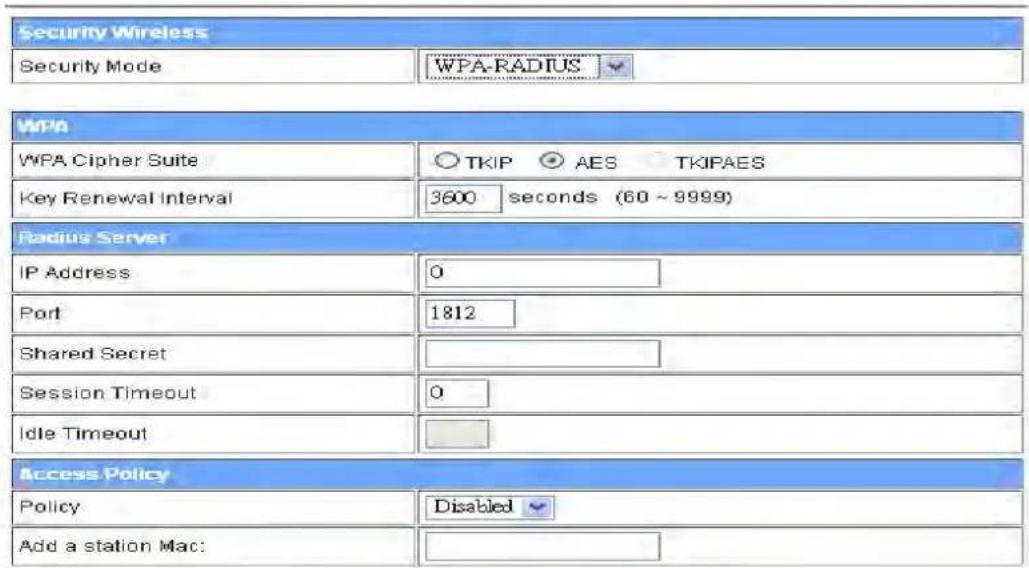

Wireless Security/Encryption Settings
Setup the wireless security and encryption to prevent from unauthorized access and monitoring.
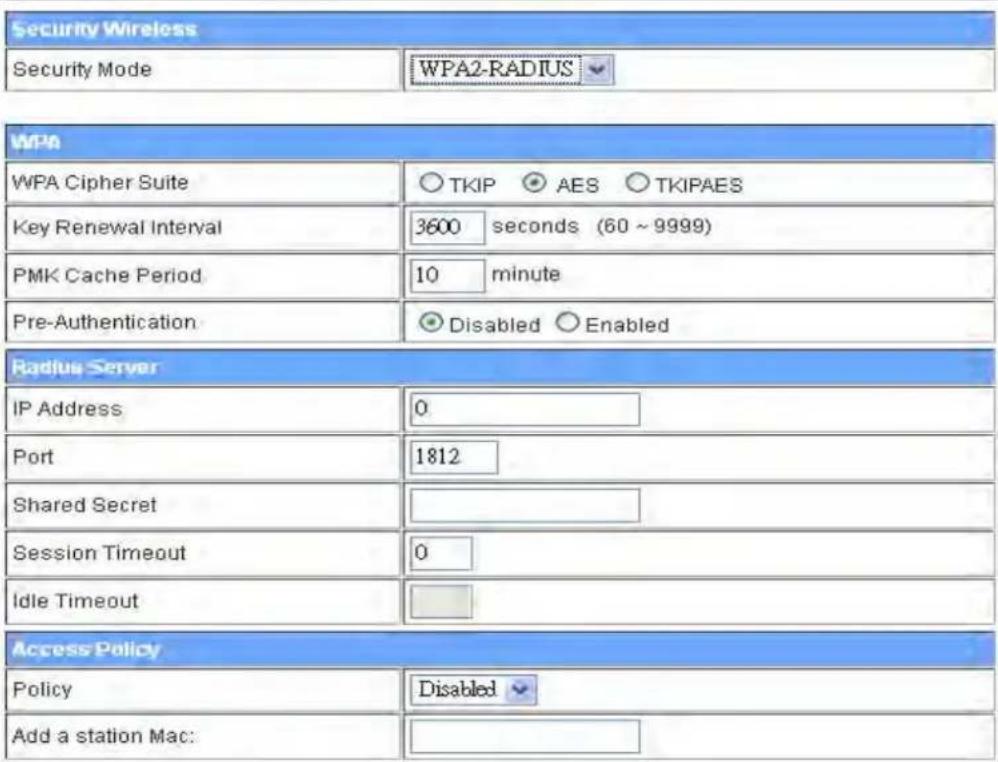

| Item | Description |
| WPA Cipher Suite | Select TKIP or AES for WPA algorithms. |
| Key Renewal Interval | Fill in a number for Group Key Renewal interval time. |
| IP Address | Enter the RADIUS Server's IP Address provided by your ISP. |
| Port | Enter the RADIUS Server's port number provided by your ISP. (The Default is 1812.) |
| Shared Secret | Enter the password shared with the RADIUS Server. |
| Session Timeout | Session timeout interval is for 802.1x re-authentication setting. Set to zero to disable 802.1x re-authentication service for each session. Session timeout interval unit is seconds and must be larger than 60. |
| Idle Timeout | Enter the idle timeout in the column. |
Wireless Security/Encryption Settings
Setup the wireless security and encryption to prevent from unauthorized access and monitoring.
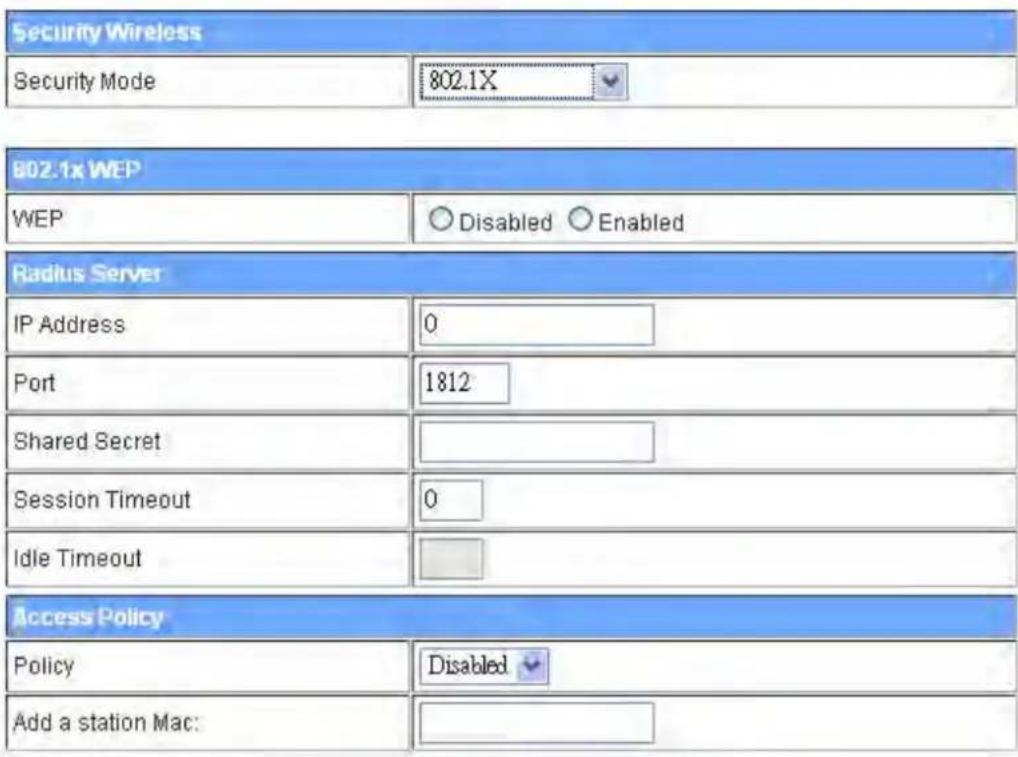

| Item | Description |
| WEP | Select Disabled or Enabled for WEP. |
| IP Address | Enter the RADIUS Server's IP Address provided by your ISP. |
| Port | Enter the RADIUS Server's port number provided by your ISP. (The Default is 1812.) |
| Shared Secret | Enter the password shared with the RADIUS Server. |
| Session Timeout | Session timeout interval is for 802.1x re-authentication setting. Set to zero to disable 802.1x re-authentication service for each session. Session timeout interval unit is seconds and must be larger than 60. |
| Idle Timeout | Enter the idle timeout in the column. |
f. Access Policy
| Access Policy | |
| Policy | Disabled |
| Add a station Mac: | |
| Item | Description |
| Policy | Select Disabled, Allow or Reject from the drop-down menu to choose a wireless access control mode. This is a security control function; only those clients registered in the access control list can link to this WLAN device. |
| Add a station MAC | Fill in the MAC address of a client to register this device’s access capability. |
4.3.4.4 Site Survey
Site Survey
You could configure AP Client parameters here.
| SSID | BSSID | RSSI | Channel | Authentication | Wireless Mode | |
| ○ | XPossible-charles | 00:1a:ef.2c:e0:3c | 9% | 1 | WPA1PSKWPA2PSK/AES | 11b/g/n |
| ○ | Amped_2.4GHz | 00:1a:ef.00:20:03 | 15% | 1 | WPA1PSKWPA2PSK/AES | 11b/g/n |
| ○ | LP-7696_RD | 00:1a:ef.00:00:08 | 10% | 1 | WPA2PSK/AES | 11b/g/n |
| ○ | Inkoutside | 00:50:7f:50:fd:28 | 3% | 6 | WPAPSK/TKIP | 11b/g/n |
| ○ | RTK 11n AP | 00:1a:ef.18:7d:18 | 25% | 6 | NONE | 11b/g/n |
| ○ | loopcomm | 00:1a:ef.28:54:25 | 10% | 11 | WPA2PSK/AES | 11b/g/n |
| ○ | XPossible | 00:1a:ef.21:f2:77 | 60% | 11 | NONE | 11b/g/n |
| ○ | RTK 11n AP_LNK | 00:1a:ef.21:f2:4a | 7% | 11 | WEP | 11b/g |

You can configure AP Client parameters here.
4.3.4.5 WPS
Wi-Fi Protected Setup
You could setup security easily by choosing PIN or PBC method to do Wi-Fi Protected Setup.

| WPS Summary | |
| WPS Current Status: | Not used |
| WPS Configured: | No |
| WPS SSID: | 802.11n_Router |
| WPS Auth Mode: | Open |
| WPS Encryp Type: | None |
| WPS Default Key Index: | 1 |
| WPS Key(ASCII) | |
| AP PIN: | 96829202 Generate |
| Reset OOB | |

| Item | Description |
| WPS | Select to Enable or Disable the Wi-Fi Protected Setup function. Then click Apply for it to take effect. |
| WPS Summary | After enabling the WPS function, if there is connection the WPS Summary will show related information and status. |
| AP PIN | This shows the AP's PIN (Personal Identification Number) code that the enrollee should enter to make a connection. Click Generate to generate a new AP PIN code. |
| Reset OOB | Click Reset OOB to reset WPS AP to the OOB (out-of-box) configuration. |
| WPS mode | Select WPS mode. PIN: Personal Identification Number. PBC: Push Button Communication. |
| PIN | Input enrollee's PIN code to AP-registrar. |
4.3.5 Firewall
4.3.5.1 MAC/IP/Port Filtering
MAC/IP/Port Filtering Settings
You may setup firewall rules to protect your network from virus, worm and malicious activity on the Internet.

| Item | Description |
| MAC/IP/Port Filtering | Select to Enable or Disable the MAC/IP/Port Filtering function. |

(The maximum rule count is 32.)
Apply Reset
| Item | Description |
| Source MAC address | Fill in the MAC address of the source NIC to restrict data transmission. |
| Dest IP Address | Fill in the IP address of the destination to restrict data transmission. |
| Source IP Address | Fill in the IP address of the source to restrict data transmission. |
| Protocol | Select the protocol that you want to restrict. There are four options: None, TCP, UDP and ICMP. |
| Dest Port Range | Fill in the start-port and end-port number of the destination to restrict data transmission. |
| Source Port Range | Fill in the start-port and end-port number of the source to restrict data transmission. |
| Action | Select Accept or Drop to specify the action of filtering policies. |
| Comment | Make a comment for the filtering policy. |
| Current MAC/IP/Port filtering rules in system: | |||||||||
| No. | Source MAC address | Dest IP Address | Source IP Address | Protocol | Dest Port Range | Source Port Range | Action | Comment | Pkt Cnt |
| Others would be dropped | - | ||||||||
Delete Selected Reset
| Item | Description |
| Make a mark for the next action. | |
| Delete Selected | Click Delete Selected to delete all that you selected. |
| Reset | Click Reset to clear selected items. |
4.3.5.2 Port Forwarding
Virtual Server Settings
You may setup Virtual Servers to provide services on Internet.
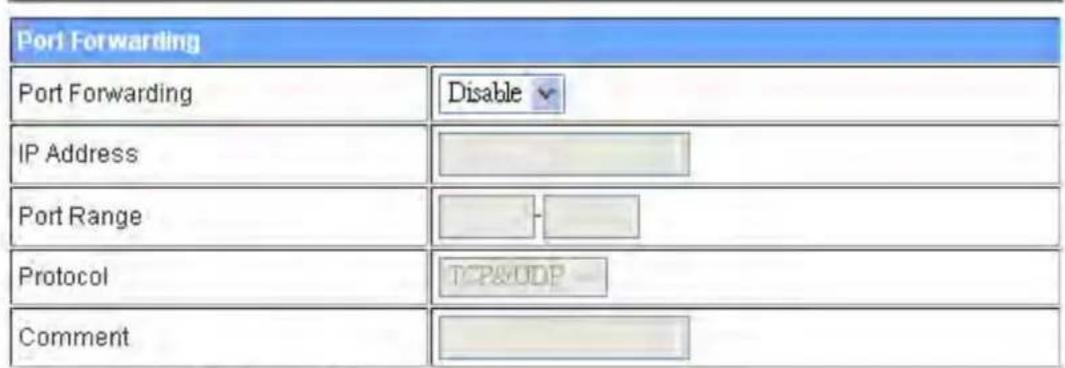
(The maximum rule count is 32.)
Apply
Reset
| Item | Description |
| Port Forwarding | Select to Enable or Disable the Port Forwarding function. |
| IP Address | To forward data packets coming from the WAN to a specific IP address hosted in the local network behind the NAT firewall, fill in the IP address. |
| Port Range | To forward data packets coming from the WAN to a specific IP address hosted in the local network behind the NAT firewall, fill in the port range. |
| Protocol | Specify the protocol: TCP&UDP, TCP or UDP. |
| Comment | Make a comment for the port forwarding policy. |
| Virtual Server | |
| Virtual Server | Enable |
| IP Address | |
| Public Port | |
| Private Port | |
| Protocol | TCP&UDP |
| Comment | |
(The maximum rule count is 32.)
Apply Reset
| Item | Description |
| Virtual Server | Select to Enable or Disable the Virtual Server function. |
| IP Address | To forward data packets coming from the WAN to a specific IP address hosted in the local network behind the NAT firewall, fill in the IP address. |
| Public Port | To forward data packets coming from the WAN to a specific IP address hosted in the local network behind the NAT firewall, fill in the public port. |
| Private Port | To forward data packets coming from the WAN to a specific IP address hosted in local network behind the NAT firewall, fill in the private port. |
| Protocol | Specify the protocol: TCP&UDP, TCP or UDP. |
| Comment | Make a comment for the virtual server policy. |
4.3.5.3 DMZ
DMZ Settings
You may setup a De-militarized Zone(DMZ) to separate internal network and Internet.

Apply
Reset
| Item | Description |
| DMZ Settings | Enable or Disable the DMZ function. |
| DMZ IP Address | To support DMZ in your firewall design, fill in the IP address of the DMZ host that can be accessed from the WAN interface. |
4.3.5.4 System Security
System Security Settings
You may configure the system firewall to protect AP/Router itself from attacking.
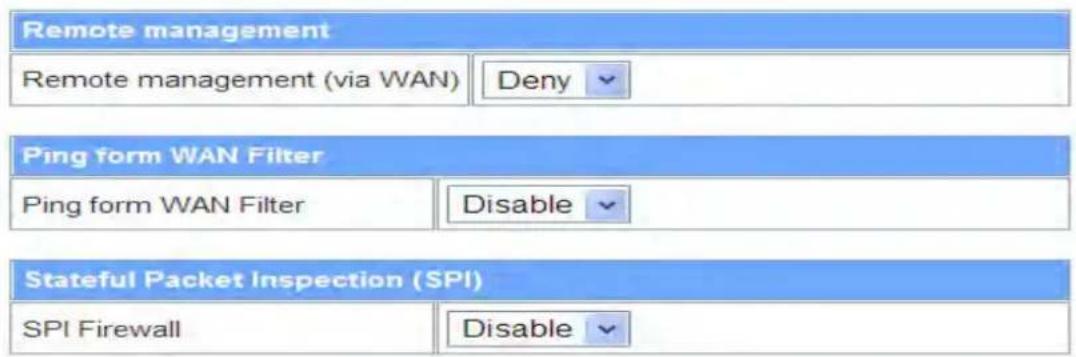
Apply Reset
| Item | Description |
| Remote management | Select to Deny or Allow the remote management function. |
| Ping from WAN Filter | Select Disable or Enable to allow pinging from the WAN. |
| SPI Firewall | Select to Disable or Enable the SPI firewall function. |
4.3.5.5 Content Filtering
Webs Host Filter Settings


| Item | Description |
| Keyword | Enter the name of the website you wish to filter. |
| Add | Click to save the keyword(s). |
| Delete | Click Delete to delete all that you selected. |
| Reset | Click Reset to clear selected items. |
4.3.6 Administration
4.3.6.1 Management


| Item | Description |
| Username | Fill in the user name for web management login control. |
| Password | Fill in the password for web management login control. |
| Current Time | It shows the current time. |
| Time Zone | Select the time zone in your country from the pull-down menu. |
| NTP Server | Fill in the NTP server IP address. |
| NTP synchronization | Fill in a number to decide the synchronization frequency with the NTP server. |

| Item | Description |
| Dynamic DNS Provider | Select the DDNS provider you registered with from the drop-down menu. |
| Account | Fill in the account of the DDNS you registered with. |
| Password | Fill in the password of the DDNS you registered. |
| DDNS | Fill in the domain name that you registered. |
4.3.6.2 QoS
Quality of Service Settings
You may setup rules to provide Quality of Service guarantees for specific applications.

| Item | Description |
| Uplink Speed | Input the uplink maximum upload speed. |
| Downlink Speed | Input the downlink maximum upload speed. |
| Local IP Address | Enter the local IP address. |
| Uplink Bandwidth | Enter the limit upload bandwidth. |
| Downlink Bandwidth | Enter the limit downlink bandwidth. |
4.3.6.3 Upload Firmware
Upgrade Firmware
Upgrade the Device firmware to obtain new functionality. It takes about 1 minute to upload upgrade flash and be patient please. Caution! A corrupted image will hang up the system.

| Item | Description |
| Location | Click theBrowsebutton to select the new firmware image file on the PC. Then click theApplybutton to upgrade the firmware. |
4.3.6.4 Settings Management
Settings Management
You might save system settings by exporting them to a configuration file, restore them by importing the file, or reset them to factory default.



| Item | Description |
| Export Button | Click Export to export the current configuration to your PC. |
| Settings file location | Click Browse to select the configuration file from your PC, then click Import to update the configuration. |
| Load Default Button | Click the Load Default button to reset the configuration parameters to factory defaults. |
4.3.6.5 Status
This page shows the current status and some basic settings of the device, including system info, Internet configurations and local network info.
Access Point Status
This page shows the current status and some basic settings of the device.
| System Information | |
| Firmware Version | 1.1.06-N_H (Nov 19 2012) |
| System Up Time | 0 days, 0 hours, 46 mins, 41 secs |
| Operation Mode | Wireless ISP Mode |
| Repeater Information | |
| Repeater Status | N/A |
| Repeater Device | N/A |
| Repeater Mac Address | N/A |
| Repeater RSSI | N/A |
| Wireless information | |
| Status | Radio ON |
| Mode | AP |
| SSID | 802.11n_Router |
| Channel | 1 |
| Encryption | Disable |
| BSSID | 00:30:4F:93:BF:E8 |
| WAN Information | |
| Connected Type | DHCP |
| WAN IP Address | |
| Subnet Mask | |
| Default Gateway | |
| DNS1 | |
| DNS2 | |
| MAC Address | 00:30:4F:93:BF:E9 |
| LAN Information | |
| DHCP Server | Enabled |
| LAN IP Address | 192.168.1.200 |
| Subnet Mask | 255.255.255.0 |
| MAC Address | 00:30:4F:93:BF:E8 |
4.3.6.6 System Log
This page is used to view system logs.
System Log
Syslog:
Refresh
Clear
System Log
Jan 1 01:49:36 ralink syslog.info syslogd started: BusyBox v1.12.1
Jan 1 01:49:36 ralink user.notice kernel: klogd started: BusyBox v1.12.1 (2012-10-
Jan 1 01:49:39 ralink user.debug kernel: ra0; no IPv6 routers present
Jan 1 01:49:39 ralink user.debug kernel: eth2.1; no IPv6 routers present
Jan 1 01:49:39 ralink user.debug kernel: eth2.2; no IPv6 routers present
Jan 1 01:49:41 ralink user.debug kernel: apcli0; no IPv6 routers present
Jan 1 01:49:41 ralink user.debug kernel: br0; no IPv6 routers present
| Item | Description |
| Refresh | Click the Refresh button to refresh the log shown on the screen. |
| Clear | Click the Clear button to clear the log displayed on the screen. |
5. FREQUENTLY ASKED QUESTIONS (FAQ)
5.1 What are (and how do I find) my PC's IP and MAC addresses?
IP address is the identifier for a computer or device on a TCP/IP network. Networks using the TCP/IP protocol route messages based on the IP address of the destination. The format of an IP address is a 32-bit numeric address written as four numbers separated by periods. Each number can be zero to 255. For example, 191.168.1.254 could be an IP address.
The MAC (Media Access Control) address is your computer's unique hardware number. (On an Ethernet LAN, it's the same as your Ethernet address.) When you're connected to the Internet from your computer (or host as the Internet protocol thinks of it), a correspondence table relates your IP address to your computer's physical (MAC) address on the LAN.
To find your PC's IP and MAC addresses,
√ Open the Command program in Microsoft Windows.
√ Type in "ipconfig /all," then press
√ Your PC's IP address is the one entitled IP Address and your PC's MAC address is the one entitled Physical Address.
5.2 What is a Wireless LAN?
A wireless LAN (WLAN) is a network that allows access to the Internet without the need for any wired connections to the user's machine.
5.3 What are ISM bands?
ISM stands for Industrial, Scientific and Medical; radio frequency bands that the Federal Communications Commission (FCC) authorized for wireless LANs. The ISM bands are located at 915 +/-13 MHz, 2450 +/-50 MHz and 5800 +/-75 MHz.
5.4 How does wireless networking work?
The 802.11 standard defines two modes: infrastructure mode and ad hoc mode. In infrastructure mode, the wireless network consists of at least one access point connected to the wired network infrastructure and a set of wireless end stations. This configuration is called a Basic Service Set (BSS). An Extended Service Set (ESS) is a set of two or more BSSs forming a single sub-network. Since most corporate WLANs require access to the wired LAN for services (file servers, printers, Internet links) they will operate in infrastructure mode.

flowchart
graph TD
    A["Access Point"] -->|BSS| B["Basic Service Set"]
    A -->|BSS| C["Extended Service Set"]
    D["Access Point"] -->|ESS| E["Basic Service Set"]
    D -->|ESS| F["Extended Service Set"]
    G["Distribution System (DS)"] --> H["Basic Service Set"]
    G --> I["Extended Service Set"]
Example 1: wireless Infrastructure Mode
Ad hoc mode (also called peer-to-peer mode or an Independent Basic Service Set, or IBSS) is simply a set of 802.11 wireless stations that communicate directly with one another without using an access point or any connection to a wired network. This mode is useful for quickly and easily setting up a wireless network anywhere that a wireless infrastructure does not exist or is not required for services, such as a hotel room, convention center or airport, or where access to the wired network is barred (such as for consultants at a client site).
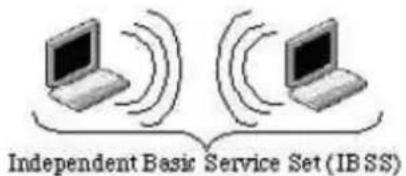
Example 2: Wireless Ad Hoc Mode
5.5 What is BSSID?
A six-byte address is that distinguishes a particular access point from others. Also known simply as SSID. Serves as a network ID or name.
5.6 What is ESSID?
The Extended Service Set ID (ESSID) is the name of the network you want to access. It is used to identify different wireless networks.
5.7 What are potential factors that may causes interference?
Factors of interference:
√ Obstacles: walls, ceilings, furniture, etc.
√ Building materials: metal doors, aluminum studs.
√ Electrical devices: microwaves, monitors and electrical motors.
Solutions to overcome the interferences:
√ Minimize the number of walls and ceilings.
√ Position the WLAN antenna for best reception.
√ Keep WLAN devices away from other electrical devices; e.g., microwaves, monitors and electric motors.
√ Add additional WLAN Access Points if necessary.
5.8 What are the Open System and Shared Key authentications?
IEEE 802.11 supports two subtypes of network authentication services: open system and shared key. Under open system authentication, any wireless station can request authentication. The station that needs to authenticate with another wireless station sends an authentication management frame that contains the identity of the sending station. The receiving station then returns a frame that indicates whether or not it recognizes the sending station. Under shared key authentication, each wireless station is assumed to have received a secret shared key over a secure channel that is independent from the 802.11 wireless network communications channel.
5.9 What is WEP?
An option of IEEE 802.11 functionality is offering frame transmission privacy similar to a wired network. The Wired Equivalent Privacy generates secret shared encryption keys that both source and destination stations can use to alert frame bits to avoid disclosure to eavesdroppers. WEP relies on a secret key that is shared between a mobile station (e.g., a laptop with a wireless Ethernet card) and an access point (i.e., a base station). The secret key is used to encrypt packets before they are transmitted, and an integrity check is used to ensure that packets are not modified in transit.
5.10 What is Fragment Threshold?
This protocol uses the frame fragmentation mechanism defined in IEEE 802.11 to achieve parallel transmissions. A large data frame is fragmented into several fragments, each of a size equal to the fragment threshold. By tuning the fragment threshold value, we can get varying fragment sizes. The determination of an efficient fragment threshold is an important issue in this scheme. If the fragment threshold is small, the overlap part of the master and parallel transmissions is large. This means the spatial reuse ratio of parallel transmissions is high. In contrast, with a large fragment threshold, the overlap is small and the spatial reuse ratio is low. However, high fragment threshold lead to low fragment overhead. Hence there is a trade-off between spatial re-use and fragment overhead.
Fragment threshold is the maximum packet size used for fragmentation. Packets larger than the size programmed in this field will be fragmented.
If you find corrupted packets or asymmetric packet reception (all send packets, for example), you may want to try lowering your fragmentation threshold. This will cause packets to be broken into smaller fragments. These smaller fragments, if corrupted, can be resent faster than a larger fragment.
Fragmentation increases overhead, so you'll want to keep this value as close to the maximum value as possible.
5.11 What is RTS (Request to Send) Threshold?
The RTS threshold is the packet size at which packet transmission is governed by the RTS/CTS transaction. The IEEE 802.11-1997 standard allows for short packets to be transmitted without RTS/CTS transactions. Each station can have a different RTS threshold. RTS/CTS is used when the data packet size exceeds the defined RTS threshold. With the CSMA/CA transmission mechanism, the transmitting station sends out an RTS packet to the receiving station and waits for the receiving station to send back a CTS (Clear to Send) packet before sending the actual packet data. This setting is useful for networks with many clients. With many clients and a high network load, there will be many more collisions. By lowering the RTS threshold, there may be fewer collisions and performance should improve. Basically, with a faster RTS threshold, the system can recover from problems faster. RTS packets consume valuable bandwidth, however, so setting this value too low will limit performance.
5.12 What is Beacon Interval?
In addition to data frames that carry information from higher layers, 802.11 includes management and control frames that support data transfer. The beacon frame, which is a type of management frame, provides the "heartbeat" of a wireless LAN, enabling stations to establish and maintain communications in an orderly fashion. Beacon Interval represents the amount of time between beacon transmissions. Before a station enters power save mode, the station needs the beacon interval to know when to wake up to receive the beacon (and learn whether there are buffered frames at the access point).
5.13 What is Preamble Type?
There are two preamble types defined in IEEE 802.11 specifications. A long preamble basically gives the decoder more time to process the preamble. All 802.11 devices support a long preamble. The short preamble is designed to improve efficiency (for example, for VoIP systems). The difference between the two is in the synchronization field. The long preamble is 128 bits, and the short is 56 bits.
5.14 What is SSID Broadcast?
Broadcast of SSID is done in access points by the beacon. This announces your access point (including various bits of information about it) to the wireless world around it. By disabling that feature, the SSID configured in the client device must match the SSID of the access point. Some wireless devices don't work properly if SSID isn't broadcast (for example the D-link DWL-120 USB 802.11b adapter).
Generally, if your client hardware supports operation with SSID disabled, it's not a bad idea to run that way to enhance network security. However it's no replacement for WEP, MAC filtering or other protections.
5.15 What is Wi-Fi Protected Access (WPA)?
Wi-Fi's original security mechanism, Wired Equivalent Privacy (WEP), was long ago recognized as insufficient for securing confidential business communications. Before the long-term solution — the IEEE 802.11i standard — was developed, a significant short-term enhancement to Wi-Fi security was introduced: Wi-Fi Protected Access. To upgrade older WLAN networks to support WPA, access points require a WPA software upgrade, and clients may require a software upgrade for the network interface card and possibly a software update for the operating system. For enterprise networks, an authentication server, typically one that supports RADIUS and the selected EAP authentication protocol, would need to be added to the network.
5.16 What is WPA2?
It is the second generation of WPA. WPA2 is based on the final IEEE 802.11i amendment to the 802.11 standard.
5.17 What is 802.1x Authentication?
802.1x is a framework for authenticated MAC-level access control, and defines the Extensible Authentication Protocol (EAP) over LANs (WAPOL). The standard encapsulates and leverages much of EAP, which was defined for dial-up authentication with Point-to-Point Protocol in RFC 2284.
Beyond encapsulating EAP packets, the 802.1x standard also defines EAPOL messages that convey the shared key information critical for wireless security.
5.18 What is Temporal Key Integrity Protocol (TKIP)?
The Temporal Key Integrity Protocol, pronounced tee-kip, is part of the IEEE 802.11i encryption standard for wireless LANs. TKIP is the next generation of WEP, the Wired Equivalency Protocol, which is used to secure 802.11 wireless LANs. TKIP provides per-packet key mixing, a message integrity check and a re-keying mechanism, thus fixing the flaws of WEP.
5.19 What is Advanced Encryption Standard (AES)?
Security issues are a major concern for wireless LANs., AES is the U.S. government's next-generation cryptography algorithm.
5.20 What is Inter-Access Point Protocol (IAPP)?
The IEEE 802.11f Inter-Access Point Protocol (IAPP) supports Access Point Vendor interoperability, enabling roaming of 802.11 stations within an IP subnet. IAPP defines messages and data to be exchanged between access points and between the IAPP and high-layer management entities to support roaming. The IAPP protocol uses TCP for inter-AP communication and UDP for RADIUS request/response exchanges. It also uses Layer 2 frames to update the forwarding tables of Layer 2 devices.
5.21 What is Wireless Distribution System (WDS)?
The Wireless Distribution System allows WLAN APs to talk directly to other APs via a wireless channel, like the wireless bridge or repeater service.
5.22 What is Universal Plug and Play (UPnP)?
UPnP is an open networking architecture that consists of services, devices and control points. The ultimate goal is to allow data communication among all UPnP devices regardless of media, operating system, programming language and wired/wireless connection.
5.23 What is Maximum Transmission Unit (MTU) Size?
Maximum Transmission Unit (MTU) controls the network stack so that any packet larger than this value will be fragmented before the transmission. During the PPP negotiation, the peer of the PPP connection will indicate its MRU and will be accepted. The actual MTU of the PPP connection will be set to the smaller one of MTU and the peer's MRU.
5.24 What is Clone MAC Address?
Clone MAC address is designed for special applications in which you request that clients register to a server machine with one identified MAC address.

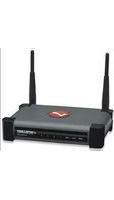


- Wireless 150N Outdoor Range Extender / Access Point User Manual
- Table of Contents
- Administration 70
- FREQUENTLY ASKED QUESTIONS (FAQ) 76
- Terminology
- Introduction
- Package Contents
- Product Features
- Rear Panel Description
- Front Panel Description
- Hardware Installation
- Appearance and Interface Introduction
- Hardware Installation Steps
- Software Configuration
- Prepare your PC to configure the WLAN Broadband Router
- For Windows 2000/ XP:
- For Windows Vista / 7:
- Connect to the AP
- Management and configuration of the AP
- Wizard
- Bridge Mode
- Setup Wizard
- Step 1: Configure LAN IP address settings
- Step 2: Configure Wireless Settings
- OPEN WEP
- SHARED WEP
- WPA-PSK
- WPA2-PSK
- Step 3:
- Step 2: Configure the Internet connection
- a. DHCP (Auto Configure)
- b. Static Mode (fixed IP)
- c. PPPOE (ADSL)
- d. L2TP
- e. PPTP
- Step 3: Configure Wireless Settings
- WISP Mode
- Step2: Configure Internet connection
- Step 4. Configure AP Client setting
- Operation Mode
- a. Bridge:
- Operation Mode Configuration
- b. Gateway:
- c. Wireless ISP
- Internet Settings
- WAN
- Wide Area Network (WAN) Settings
- b. DHCP
- LAN
- Local Area Network (LAN) Settings
- VPN Passthrough
- VPN Passthrough
- Wireless Settings
- Basic
- Basic Wireless Settings
- Advanced
- Advanced Wireless Settings
- Security
- Wireless Security/Encryption Settings
- b. OPEN-WEP // SHARED-WEP
- c. WPA-PSK/WPA2PSK
- d. WPA-RADIUS/WPA2-RADIUS
- f. Access Policy
- Site Survey
- Site Survey
- WPS
- Wi-Fi Protected Setup
- Firewall
- MAC/IP/Port Filtering
- MAC/IP/Port Filtering Settings
- Port Forwarding
- Virtual Server Settings
- DMZ
- DMZ Settings
- System Security
- System Security Settings
- Content Filtering
- Administration
- Management
- QoS
- Quality of Service Settings
- Upload Firmware
- Upgrade Firmware
- Settings Management
- Settings Management
- Status
- Access Point Status
- System Log
- System Log
- FREQUENTLY ASKED QUESTIONS (FAQ)
- What are (and how do I find) my PC's IP and MAC addresses?
- What is a Wireless LAN?
- What are ISM bands?
- How does wireless networking work?
- What is BSSID?
- What is ESSID?
- What are potential factors that may causes interference?
- What are the Open System and Shared Key authentications?
- What is WEP?
- What is Fragment Threshold?
- What is RTS (Request to Send) Threshold?
- What is Beacon Interval?
- What is Preamble Type?
- What is SSID Broadcast?
- What is Wi-Fi Protected Access (WPA)?
- What is WPA2?
- What is 802.1x Authentication?
- What is Temporal Key Integrity Protocol (TKIP)?
- What is Advanced Encryption Standard (AES)?
- What is Inter-Access Point Protocol (IAPP)?
- What is Wireless Distribution System (WDS)?
- What is Universal Plug and Play (UPnP)?
- What is Maximum Transmission Unit (MTU) Size?
- What is Clone MAC Address?
Brand : Intellinet
Model : 525497
Category : Access Point