
SMFC01 - Autres appareils de cuisine SMEG - Free user manual and instructions
Find the device manual for free SMFC01 SMEG in PDF.


| Product Type | Pasta roller and cutter accessory for stand mixers |
| Brand | Smeg |
| Model | SMFC01 |
| Compatibility | Smeg stand mixers (e.g., SMF series) |
| Included Accessories | Pasta roller (SMPR01), spaghetti cutter (SMSC01), tagliolini/fettuccine cutter (SMPC01), cleaning brush |
| Thickness Settings | 8 positions (1-8) for varying pasta thickness |
| Pasta Types Supported | Sheet pasta, fettuccine, tagliolini, spaghetti |
| Material | Stainless steel rollers and cutters, plastic housing |
| Dimensions (approx.) | Length: 25 cm, Width: 12 cm, Height: 8 cm (pasta roller) |
| Weight (approx.) | 1.2 kg (total set) |
| Power Source | Powered by stand mixer motor |
| Safety Features | Compatible mixer must be off when attaching; keep hands away from moving parts; non-slip attachment |
| Cleaning Instructions | Do not immerse in water or use dishwasher; clean with dry brush after drying for 1 hour; lubricate yearly with mineral oil |
| Maintenance | Lubricate mechanism every 50 uses or annually; disassemble scrapers for thorough cleaning |
| Intended Use | Domestic use only; for rolling and cutting pasta dough |
| Country of Origin | Italy (typical for Smeg) |
| Warranty | 2 years (standard manufacturer warranty) |
Frequently Asked Questions - SMFC01 SMEG
User questions about SMFC01 SMEG
0 question about this device. Answer the ones you know or ask your own.
Ask a new question about this device
Download the instructions for your Autres appareils de cuisine in PDF format for free! Find your manual SMFC01 - SMEG and take your electronic device back in hand. On this page are published all the documents necessary for the use of your device. SMFC01 by SMEG.
USER MANUAL SMFC01 SMEG
Thank you for choosing a Smeg product.
By choosing Smeg, you have selected an appliance which combines iconic style with innovative technical design and attention to detail.
This appliance co-ordinates perfectly with other Smeg products, or equally a standalone statement piece in your kitchen.
We hope you enjoy using your new appliance!
For any further information please visit www.smeg50style.com or www.smeg.com.
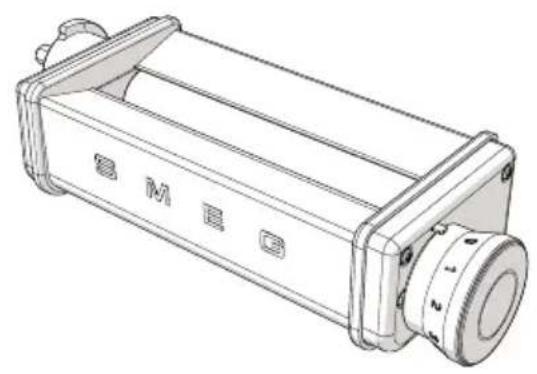
natural_image
Technical line drawing of a mechanical device with no visible text or symbols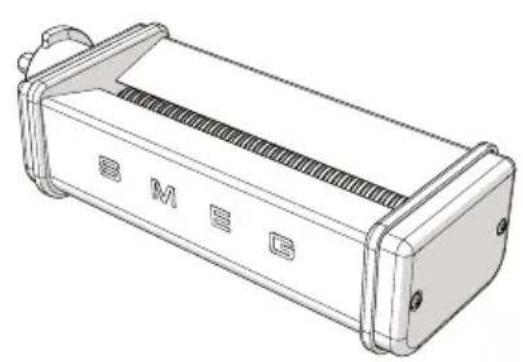
natural_image
Technical line drawing of a rectangular electronic device with mounting flanges and internal slots (no text or symbols)SMPRO1 SMSC01
Pasta roller accessory Spaghetti accessory
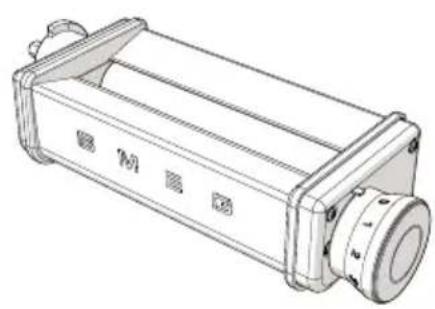
natural_image
Technical line drawing of a rectangular mechanical device with mounting flanges and a central cylindrical component (no text or symbols)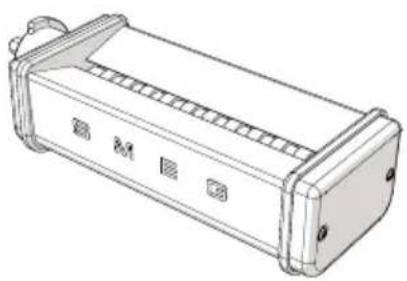
natural_image
Technical line drawing of a rectangular electronic device with mounting flanges and internal slots (no text or symbols)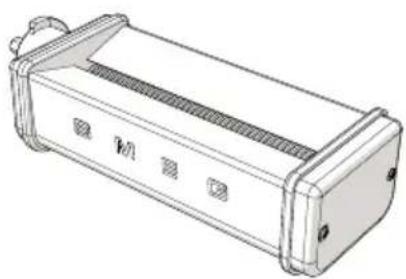
natural_image
Technical line drawing of a rectangular electronic device with mounting holes and ventilation slots (no text or symbols)SMPC01
Pasta roller accessory and Pasta cutting set (Tagliolini and Fettuccine)
Contents
1 Instructions 24
1.1 Introduction 24
1.2 This user manual 24
1.3 Intended use 24
1.4 General safety instructions 25
1.5 Manufacturer liability 26
1.6 Disposal 26
2 Description 27
2.1 Product description 27
2.2 Standard accessories 28
3 Use 29
3.1 Before first use 29
3.2 Fitting the pasta roller and accessories for cutting the pasta 29
3.3 Using the pasta roller 31
3.4 Using the accessories for long pasta 34
4 Cleaning and care 36
4.1 Instructions 36
4.2 Cleaning the surfaces 36
4.3 Ordinary daily cleaning 36
4.4 Food stains or residues 36
4.5 Lubricating the mechanism 36
4.6 Extraordinary maintenance 37
5 Recipes 38
We advise you to read this manual carefully, it contains all the instructions for maintaining the appliance's aesthetic and functional qualities.
For further information on the product: www.smeg.com
The manufacturer reserves the right to make any changes deemed useful for improvement of its products without prior notice. The illustrations and descriptions contained in this manual are therefore not binding and are merely indicative.
1 Instructions
1.1 Introduction
Key information for the user:
Instructions

General information on this user manual, on safety and final disposal.
Description

Description of accessories
Use

Information on using the accessories.
Cleaning and care

Information on proper cleaning and maintenance of the accessories.
Recipes

List of recipes for preparing various types of pasta.

Safety instructions

Information

Advice
1.2 This user manual
This user manual is an integral part of these accessories and must therefore be kept in its entirety and in an accessible place for the whole working life of the accessories.
1.3 Intended use
• These accessories are designed exclusively for home use.
- Use these accessories only in combination with the same manufacturer's stand mixer.
- Use the accessories indoors.
- The pasta roller can be used to roll out the pasta to the required thickness.
- The long pasta accessories can be used to cut the pasta into different shapes (tagliatelle, tagliolini, fettuccine and spaghetti).
- Do not use the accessories for anything other than their intended use.
- These accessories may not be used by people (including children) of reduced physical and mental capacity, or lacking in experience in the use of electrical appliances, unless they are supervised or instructed by adults who are responsible for their safety.
1.4 General safety instructions
Follow all safety instructions in order to use the accessories safely.
- Before using the accessories, read both this manual and the manual supplied with the stand mixer carefully.
- Do not use the accessories if they are damaged.
- Do not use the accessories if the stand mixer power cord or the plug is damaged, or if the stand mixer has been dropped or is damaged in any manner.
- Do not leave the accessories unattended during use.
- Do not modify the accessories.
- Do not try to repair the accessories yourself or without the assistance of a qualified engineer.
- In the event of a fault, repairs should only be carried out by a qualified engineer.
- Never try to put out a fire or flames with water: turn off the appliance and remove the plug from the socket, and smother the flames with a fire blanket or other appropriate cover.
• Children must never play with these accessories. Keep the accessories out of the reach of children.
For these accessories
- Turn off the stand mixer before fitting or removing the accessories.
- Do not touch moving parts while the appliance is operating. Keep hands, hair, clothing, spoons, spatulas and other objects at a safe distance from the accessories to avoid personal injury and/or damage to the stand mixer and its accessories.
- Only use original standard and optional accessories provided by the manufacturer. The use of non-original standard and optional components and accessories could lead to personal injury or damage to the appliance and its accessories.
- Do not remove accessories while the stand mixer is operating. Check that the speed selector is in the 0 (OFF) position.
- Let the stand mixer cool down before cleaning.
- Do not use harsh detergents or sharp scrapers to clean the accessories.
- Do not place objects on top of the accessories.
- Keep a close eye on children and ensure they do not play with the accessories.
1.5 Manufacturer liability
The manufacturer shall not be held responsible for personal injuries or property damage caused by:
- Use of the accessories for purposes other than those envisaged
• Not having read the user manual - Tampering with any part of the accessories
• Use of non-original spare parts
• Not following the safety instructions
1.6 Disposal
Old appliances do not belong in household waste! To comply with current legislation, old appliances, having reached the end of their useful lives, should be taken to a disposal facility where they can be sorted. In this way, any valuable material contained in the old appliances can be recycled, helping to protect the environment. The relevant local authorities or their waste disposal operators can provide further information.
Our accessories are packed in non-polluting and recyclable materials.
- Dispose of the packing materials at an appropriate disposal facility.

Plastic packaging Danger of suffocation
- Do not leave the packaging or any part of it unattended.
- Do not let children play with the plastic bags.
2 Description
2.1 Product description
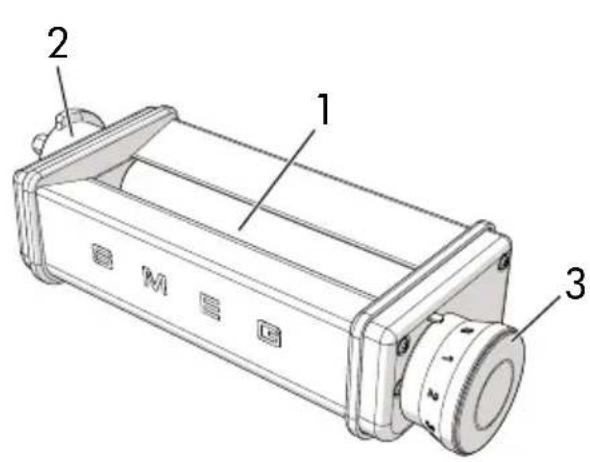
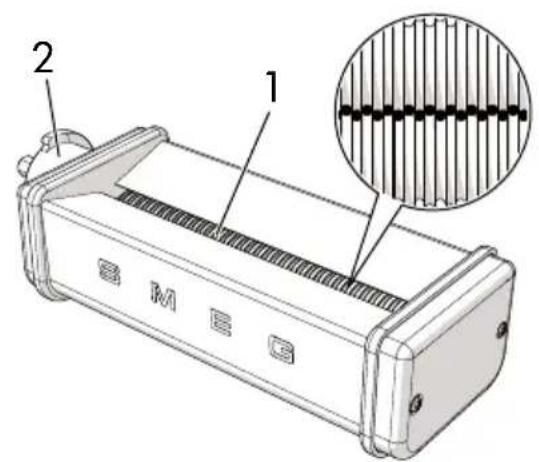
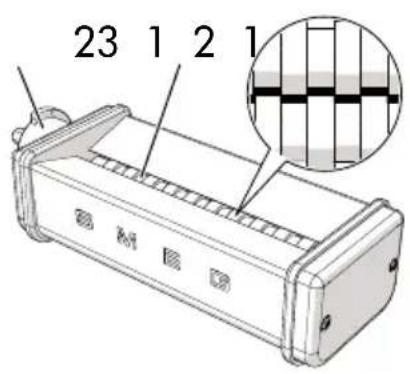
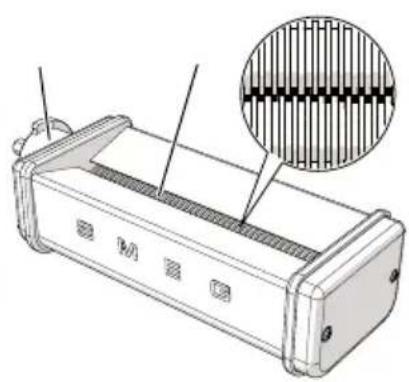
SMPR01 - Pasta roller accessory SMSC01 - Spaghetti accessory
natural_image
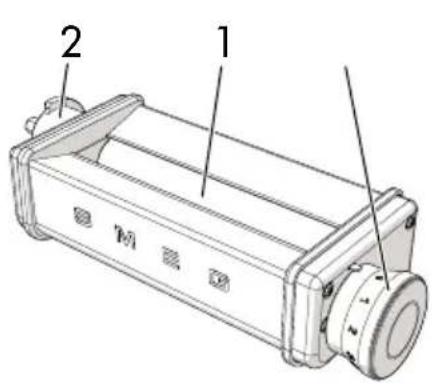
Technical line drawing of a rectangular electronic device with internal components and a magnified inset showing a textured surface (no text or symbols)SMPC01 - Pasta roller accessory - Tagliolini accessory - Fettuccine accessory
1 Rollers
2 Attachment
3 Thickness selection knob
2.2 Standard accessories
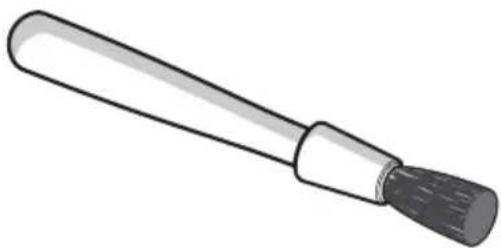
Brush
natural_image
Illustration of a brush with a textured handle and cap (no text or symbols)For removing any dry pasta residue from the accessories and rollers.

The accessories intended to come into contact with food are made of materials that comply with the provisions of current legislation.
3 Use

Danger of electrocution
- Plug the stand mixer into a grounded 3-pin socket.
- Do not remove earth prong.
- Do not use an adapter.
- Do not use an extension cord.
- Failure to follow these instructions could result in death, fire, or electrical shock.
3.1 Before first use
- Remove any protective packaging from the outside or inside of the accessories.
- Remove any labels from the accessories.
- Clean the accessories (see 4 Cleaning and care).
- Prepare the pasta to be rolled with the pasta roller or to be cut with the accessories for long pasta.
3.2 Fitting the pasta roller and accessories for cutting the pasta
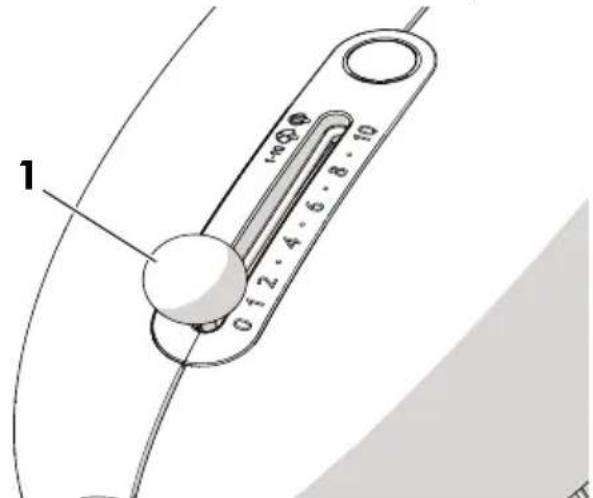
- Turn off the stand mixer by moving the mixer lever (1) to the '0' (OFF) position.
- Remove the plug from the power socket.
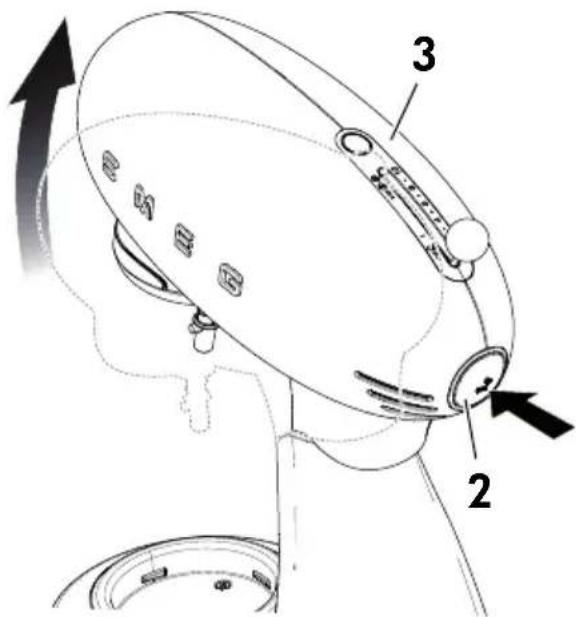
- Press the release button (2).
- Hold down the button and raise the head (3), accompanying its movement with your hand.
- Remove any standard accessories (dough hook, wire whisk, flat beater) which may be fitted.
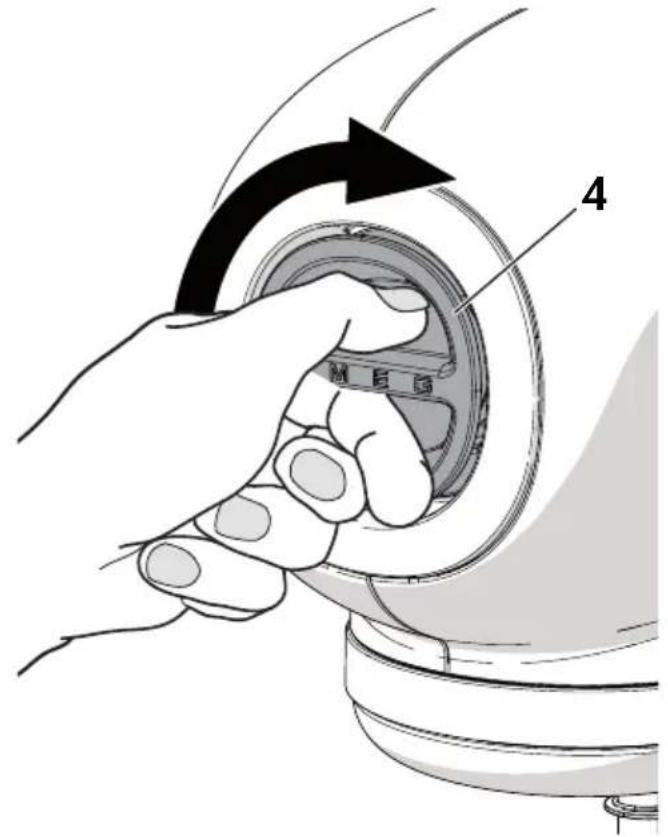
- Grasp the front attachment hub cover (4) at the centre and turn it clockwise.
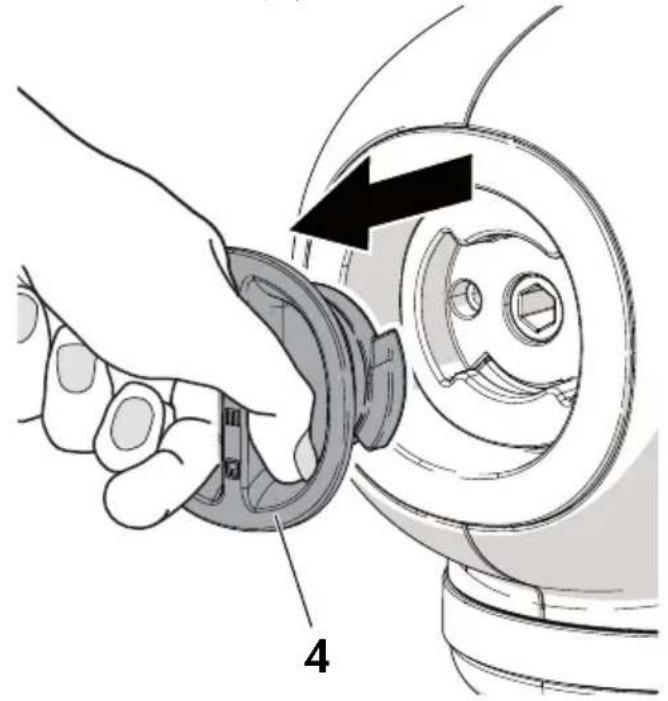
- Pull the cover (4) to remove it.
natural_image
Illustration of a hand using a tool to adjust a mechanical component, labeled with number 4 (no text or symbols on the diagram itself)- Insert the accessory (5) following the guide in the attachment hub (6), then turn it 60^ .
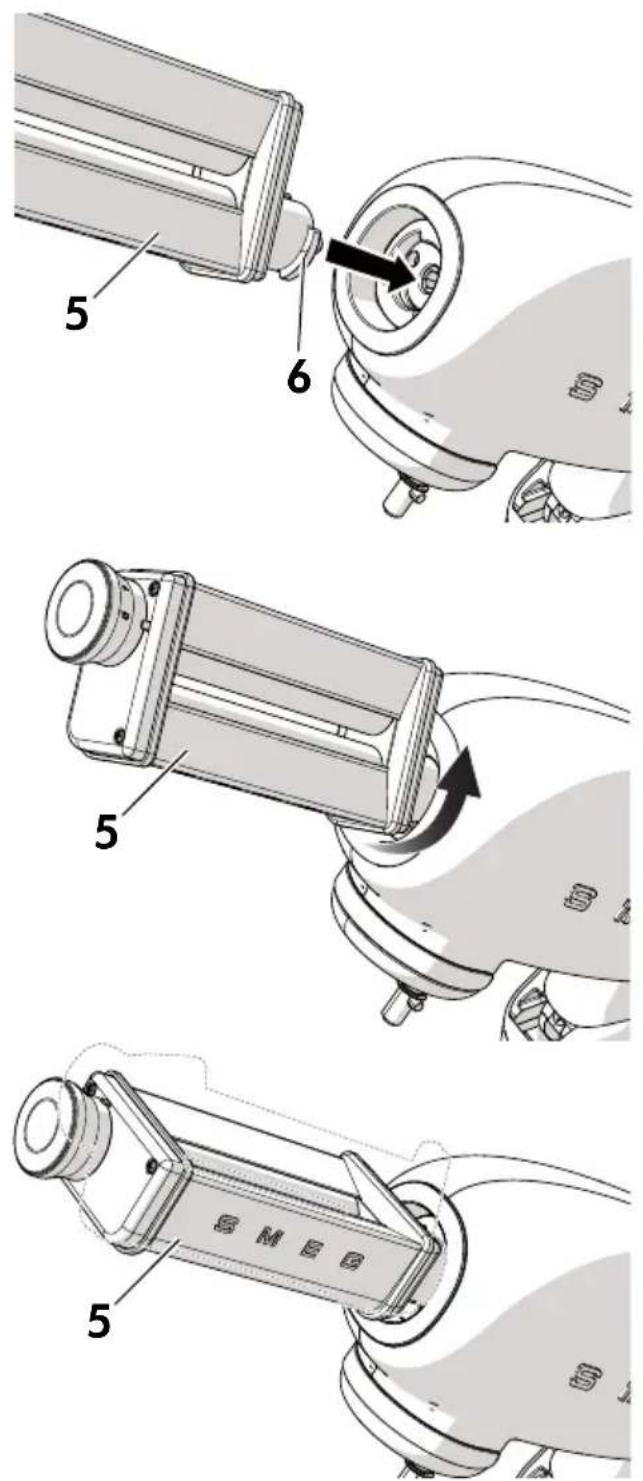
- Press the release button and lower the stand mixer head, supporting it with your hand as you lower it.
3.3 Using the pasta roller
Pasta roller settings
Setting Suitable for
2 Kneading, rolling out
3 Thick egg pasta
4 E g g
4 or 5 Pasta for lasagne, fettuccine, spaghetti, tagliolini
6 or 7 Pasta for tortellini, thin fettuccine
7 or 8 Very thin pasta
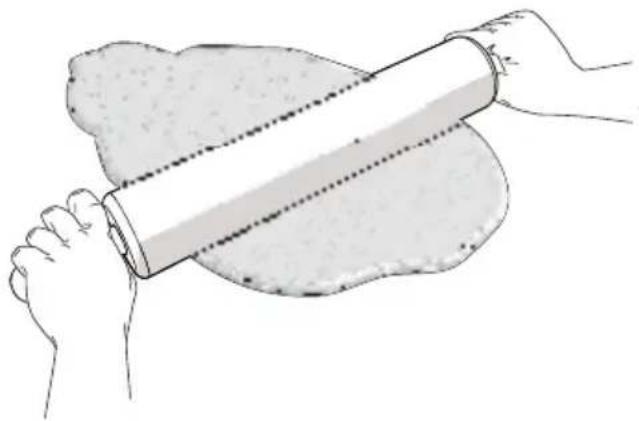
- Follow the tips given in section "Tips for perfect pasta dough" when preparing the pasta dough.
natural_image
Illustration of a hand rolling a piece of dough with a roller, showing the rolling process (no text or symbols)
-
Cut the pasta dough into pieces approximately 1 cm thick.
-
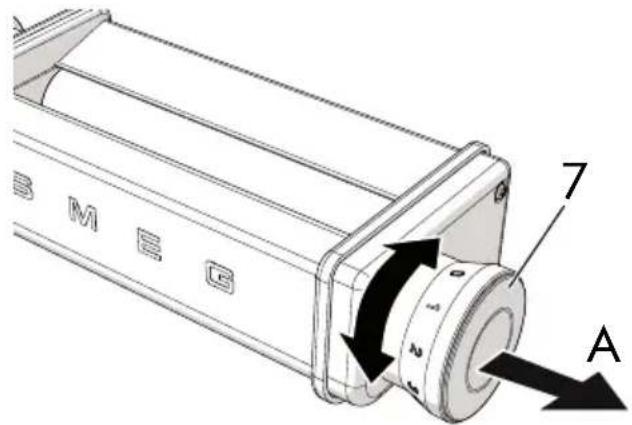
Pull the knob (7) in the direction shown by the arrow A to release it, then turn it to the '1' position.

Risk of food poisoning
- Do not leave ingredients subject to spoiling such as eggs, dairy, etc. outside the fridge for more than one hour.

Use
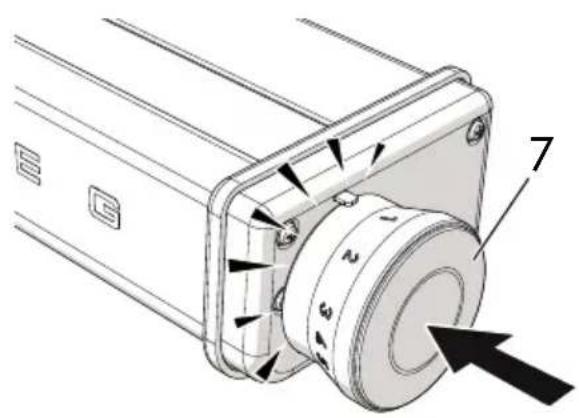
- Let go of the knob (7) and ensure that it locks in position by checking it is correctly engaged in its housing.
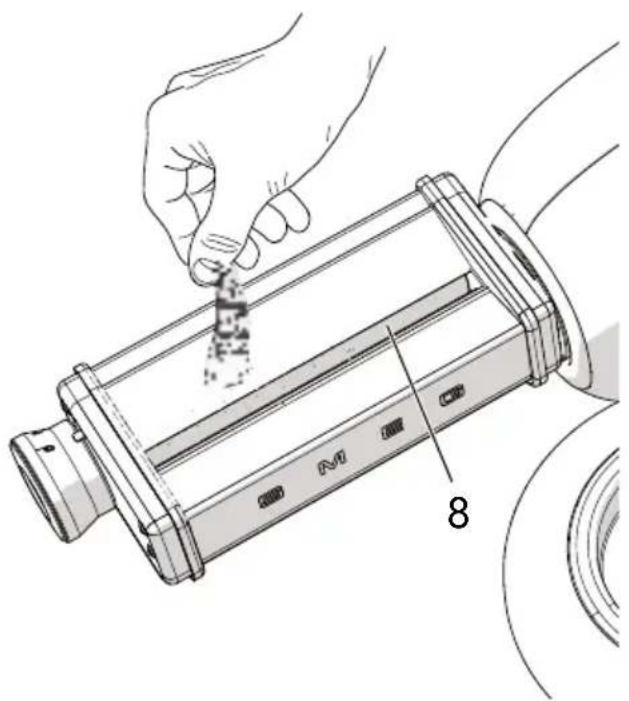
- Sprinkle flour between the rollers (8).
natural_image
Illustration of a hand inserting a component into a cylindrical device with labeled parts (no text or symbols present)-
Insert the stand mixer plug into the power socket.
-
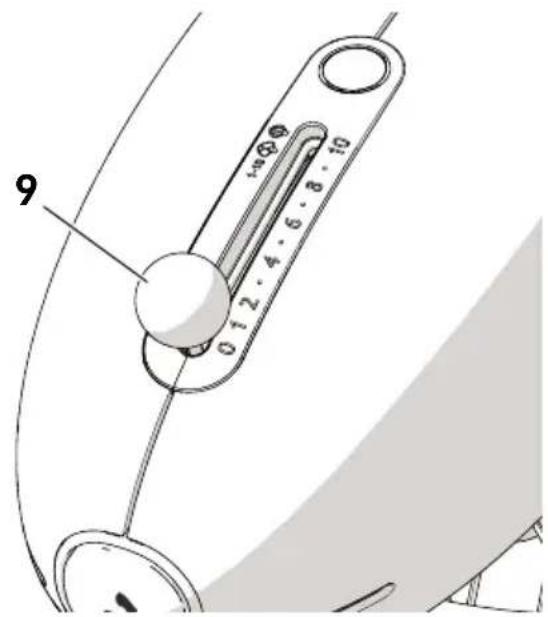
Move the stand mixer speed selector lever (9) to the '1' position to start the rollers.

Moving parts Danger of personal injury and damage to the appliance
- Do not touch the accessories while the appliance is running.
-
Do not use the accessories for anything other than the uses specified.
-
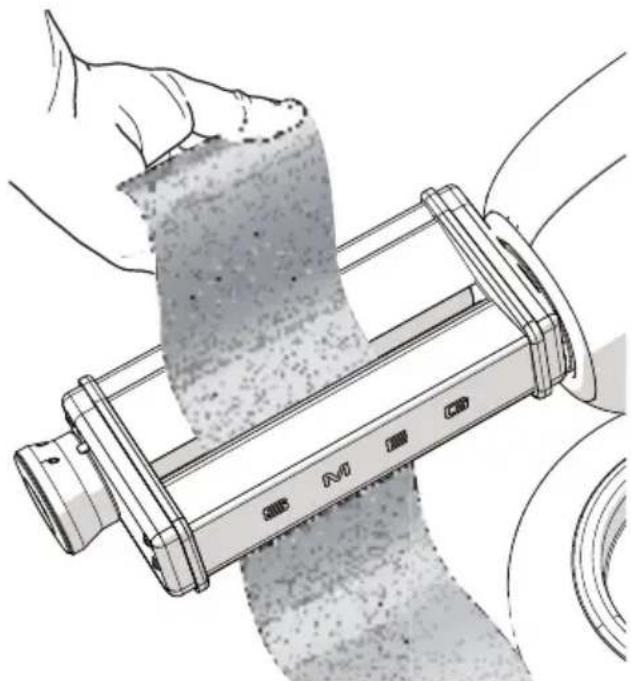
Pass a piece of pasta through the rollers to roll it out.
natural_image
Illustration of hands holding a flexible, segmented mechanical device with a textured surface (no text or symbols visible)-
Fold the pasta in two and insert it between the rollers again.
-
Select position '2' with the knob. Pass the pasta between the rollers to roll it thinner. Continue to gradually reduce the space between the rollers, until you obtain pasta of the required thickness. (See "Pasta roller settings" for further details).
-
Move the stand mixer speed selector to the '0' (OFF) position to stop it.

Improper use Risk of damage to the accessory
- Do not use the pasta roller to roll out or cut any kind of dough other than pasta dough.
- Once you have finished using the accessory, remove the plug from the power socket, remove the accessory from the attachment hub and replace the cover on the attachment hub.
3.4 Using the accessories for long pasta
Use the pasta roller to roll out the pasta to the thickness required for the type of pasta you wish to cut, as described in section "3.3 Using the pasta roller".
- Select the required long pasta accessory.
- Follow the same procedure described in section "3.2 Fitting the pasta roller and accessories for cutting the pasta" to fit the accessories for long pasta.
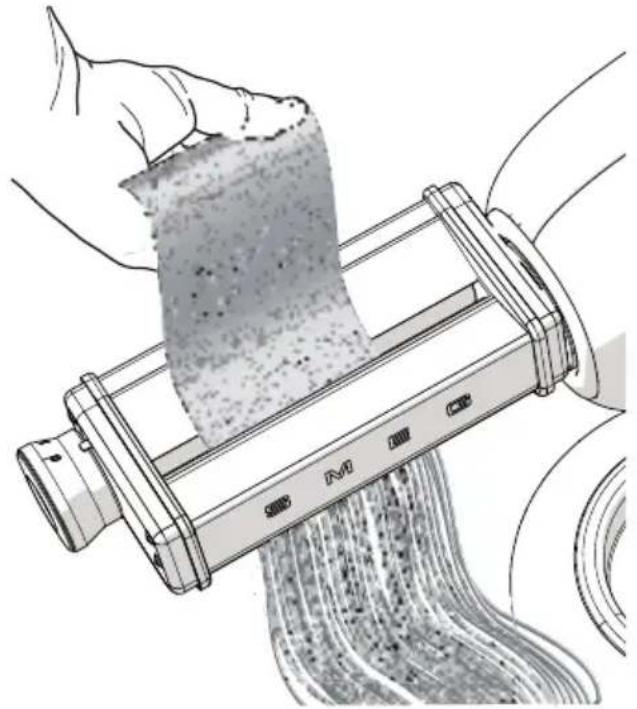
- Pass the pasta dough through the chosen pasta cutting accessory (1) in order to shape it into the required type of pasta.
natural_image
Illustration of hands using a lathe machine to spread fabric or material, with no visible text or symbols.
Moving parts Danger of personal injury and damage to the appliance
- Do not touch the accessories while the appliance is running.
-
Do not use the accessories for anything other than the uses specified.
-
Move the stand mixer speed selector to the '0' (OFF) position to stop it.
Tips for perfect pasta dough
- Humidity, type of flour chosen and size of the eggs used can all influence the consistency of the pasta dough.
- The pasta dough should be firm and rough to the touch, but should also be malleable. It should not stick to your fingers or crumble.
- Pinch the pasta dough to check its consistency. If the dough remains compact and does not stick to your fingers, it is suitable. If this is not the case, add a little flour. If the pasta is crumbly, add a little water.
- Cut the sheets of pasta into two or more pieces before cutting them into fettuccine, tagliolini or spaghetti, as they will be difficult to manage if they are too long.
- The pasta may be cooked immediately after cutting.
Tips for preserving pasta
Freshly made pasta may be consumed immediately, or dried or frozen to be used at a later date.
- To dry the pasta, spread it out in a single layer on a tray or tea towel for approximately one hour and leave it to dry in the air. The dried pasta can be kept in an airtight plastic container.
- To freeze the pasta, let it dry in the air for approximately one hour, sprinkle it with flour and roll it up into nests. Then place it in an airtight plastic container and store it in the freezer.
4 Cleaning and care
4.1 Instructions

Improper use Risk of damage to surfaces
- Do not place the accessories in water.
• Never wash in the dishwasher. - Do not use steam jets to clean the accessories.
- Do not use cleaning products containing chlorine, ammonia or bleach.
- Do not use abrasive or corrosive detergents (e.g. powder products, stain removers and metallic sponges).
- Do not use rough or abrasive materials or sharp metal scrapers.
4.2 Cleaning the surfaces
To keep the surfaces in good condition, they should be cleaned regularly after use.
4.3 Ordinary daily cleaning
Use a soft cloth or a dry microfibre cloth to clean the surfaces.
4.4 Food stains or residues
Let the pasta roller and the long pasta accessories dry for at least one hour before removing any pasta residue. Use the supplied brush to remove any dry pasta residue.
You must never use sharp scrapers or knives, as these will damage the surface.
Do not insert cloths or tea towels between the rollers to clean them.
4.5 Lubricating the mechanism
Lubricate the mechanism at least once a year, or every 50 uses.
Use a light mineral oil.
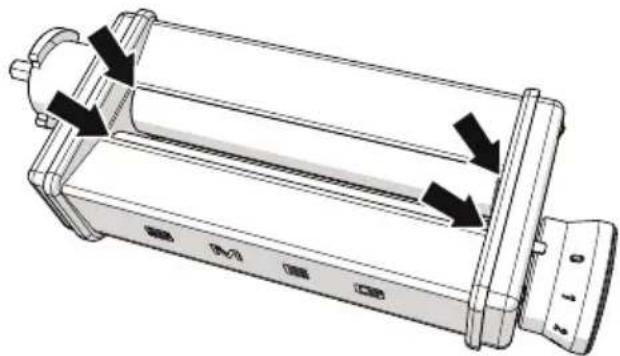
Apply a drop of mineral oil to the four corners of the rollers.
natural_image
Technical line drawing of a cylindrical device with directional arrows indicating flow or movement (no text or symbols)Cleaning and care

4.6 Extraordinary maintenance
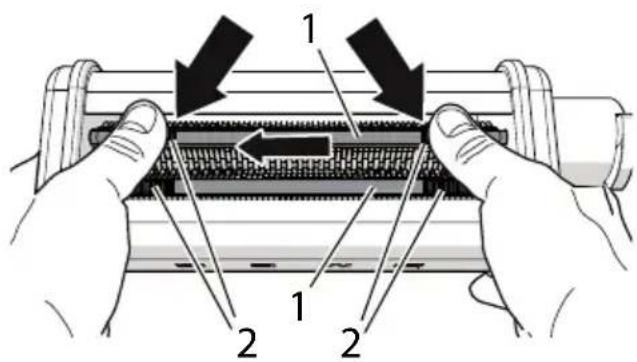
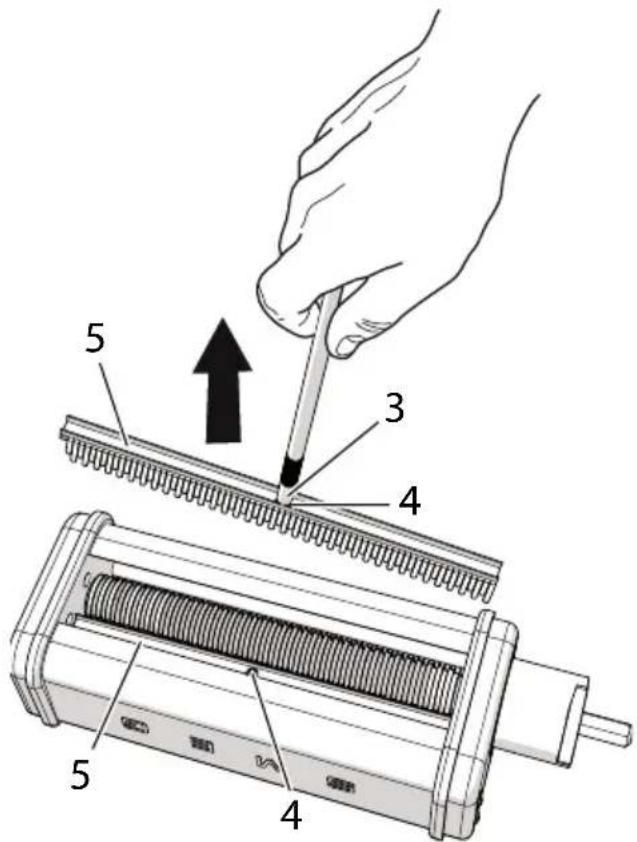
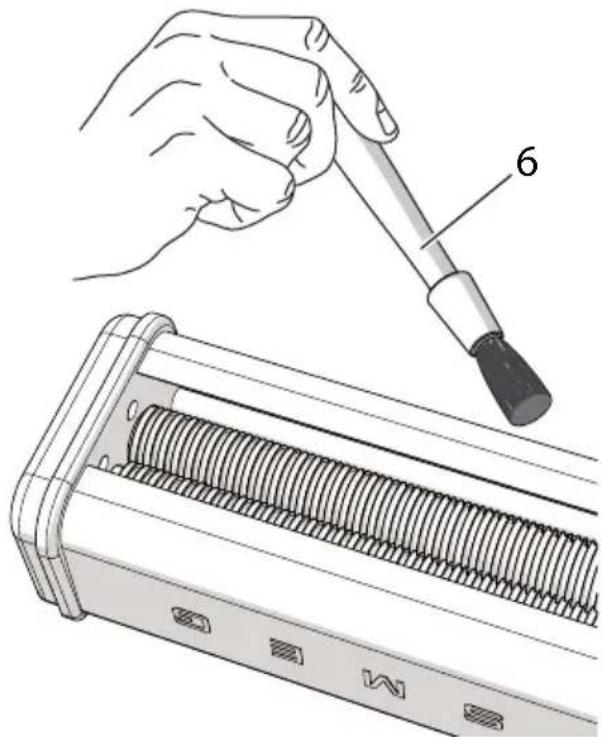
For more thorough cleaning and to avoid proliferation of germs which could contaminate the pasta, disassemble the scrapers and clean the rollers of the long pasta accessories as follows:
- Extract the lower scrapers (1) by pressing down on the milled parts (2) and moving the scraper sideways.
- Insert the end (3) of the rod in the hole (4) of the scraper (5) and pull upwards.
- Clean the pasta roller and the long pasta accessories using the supplied brush (6).
natural_image
Illustration of a hand using a screwdriver to press through a mechanical component (no text or symbols present)- Refit the scrapers following the above procedure in reverse.

Important
- Before cleaning, leave the pasta cutting accessories to dry for at least one hour, then remove any dry pasta residue with the cleaning brush. If this is difficult, tap the accessory with your hand.
5 Recipes
Wholewheat fettuccine
natural_image
Black-and-white photo of a grid-patterned surface with scattered debris (no visible text or symbols)Ingredients:
270g Wholewheat flour
130g Durum wheat semolina
4 eggs
2-3 tablespoons water (if required)
A pinch of salt
Flour to roll the dough
Method
-
Using the dough hook attachment mix the flour, semolina, salt and eggs on speed 1 or 2 for 3/5 minutes. Soften the dough with water if necessary.
-
Remove the dough from the bowl, wrap with cling film and rest it in a refrigerator for 30 minutes.
-
Roll the dough using the pasta roller accessory, sprinkling with flour when necessary so that it does not stick, and pass it through the machine several times reducing the thickness from no. 0 to 5.
-
Allow the sheets of pasta to dry for a little, and then make the fettuccine using the relevant accessory.
-
Sprinkle the fettuccine strips with flour, form them in nests and let them dry well.
Lasagna sheets
natural_image
Highly pixelated grayscale image with no discernible text, symbols, or structured content.Ingredients:
400 g flour
4 eggs
20g water
A pinch of salt
Flour to roll the dough
Method
-
Using the dough hook attachment mix the flour, salt and eggs on speed 1 or 2 for 3/5 minutes. Soften the dough with water if necessary.
-
Remove the dough from the bowl, wrap with cling film and rest it in a refrigerator for 30 minutes.
-
Roll the dough using the pasta roller accessory, sprinkling with flour when necessary so that it does not stick, and pass it through the machine several times reducing the thickness from no. 0 to 3.
-
When at thickness 3 change to thickness 6 and roll through once. Cut it into rectangles ready to be used.
Recipes

Spinach tagliolini
natural_image
Microscopic view of a granular material or cellular structure (no visible text or symbols)Ingredients:
340 g flour
3 eggs
70g spinach (cooked, squeezed and blended)
A pinch of salt
Four to roll the dough
Method
-
Using the dough hook attachment mix the flour, salt, eggs and spinach on speed 1 or 2 for 3/5 minutes.
-
Remove the dough from the bowl, wrap with cling film and rest it in a refrigerator for 30 minutes.
-
Roll the dough using the pasta roller accessory, sprinkling with flour when necessary so that it does not stick, and pass it through the machine several times reducing the thickness from no. 0 to 5.
-
Leave the dough to rest for a few minutes, then cut with the relevant accessory, sprinkling the pasta with four.
-
Sprinkle the tagliolini strips with flour, form them in nests and let them div thoroughly
Tomato cannelloni sheets
natural_image
Grayscale aerial or satellite view of a textured terrain with no visible text, numbers, or symbols.Ingredients:
300g flour
2 eggs
1 egg yolk
120g of concentrated tomato purée
1-2 tablespoons water (if required)
A pinch of sol
Four to roll the dough
Method
- Pour the flour and salt in the mixer bowl. In a separate bowl beat the whole eggs with the egg yolk and the concentrated tomato puree and pour into the flour. Using the dough hook attachment mix everything together on speed 1 or 2 for 3/5 minutes. If necessary, soften with water.
- Remove the dough from the bowl, wrap with cling film and rest it in a refrigerator for 30 minutes.
- Roll the dough using the pasta roller accessory, sprinkling with flour when necessary so that it does not stick, and pass it through the machine several times reducing the thickness from no. 0 to 5.

Recipes
Spaghetti
natural_image
Grayscale aerial or satellite view of a coastal landscape with layered terrain and no visible text or symbolsIngredients:
400g Durum wheat semolina
230g approx hot water
6q salt
Flour to roll the dough
Method
-
Using the dough hook attachment mix the semolina, water and salt on speed 1.
-
Work it for 4 or 5 minutes to make a smooth dough.
-
Remove the dough from the bowl, wrap with cling film and rest it in a refrigerator for 30 minutes.
-
Roll the dough using the pasta roller accessory, sprinkling with flour when necessary so that it does not stick, and pass it through the machine several times reducing the thickness from no. 0 to 1.
-
Leave the pasta to rest for 10-15 minutes, then cut with the relevant accessory, sprinkling the pasta thoroughly with flour.
-
Allow to dry before use.

- Contents
- Instructions 24
- Description 27
- Use 29
- Cleaning and care 36
- Recipes 38
- Instructions
- Introduction
- This user manual
- Intended use
- General safety instructions
- For these accessories
- Manufacturer liability
- Disposal
- Plastic packaging Danger of suffocation
- Description
- Product description
- Standard accessories
- Brush
- Use
- Danger of electrocution
- Before first use
- Fitting the pasta roller and accessories for cutting the pasta
- Using the pasta roller
- Pasta roller settings
- Setting Suitable for
- Risk of food poisoning
- Use
- Moving parts Danger of personal injury and damage to the appliance
- Improper use Risk of damage to the accessory
- Using the accessories for long pasta
- Tips for perfect pasta dough
- Tips for preserving pasta
- Cleaning and care
- Instructions
- Improper use Risk of damage to surfaces
- Cleaning the surfaces
- Ordinary daily cleaning
- Food stains or residues
- Lubricating the mechanism
- Cleaning and care
- Extraordinary maintenance
- Important
- Recipes
- Ingredients:
- Method
- Recipes
- Spinach tagliolini
- Tomato cannelloni sheets
- Spaghetti
Brand : SMEG
Model : SMFC01
Category : Autres appareils de cuisine