
WD361 - Water dispenser Avanti - Free user manual and instructions
Find the device manual for free WD361 Avanti in PDF.


| Product Type | Water Dispenser |
| Brand | Avanti |
| Model | WD361 |
| Dimensions (H x W x D) | 40 x 12 x 12 inches (approx.) |
| Weight | 25 lbs (approx.) |
| Power Supply | 120V AC, 60Hz |
| Power Consumption | 0.5 kWh (heating), 0.1 kWh (cooling) |
| Water Capacity | 5 gallons (bottle), 3 liters (reservoir) |
| Hot Water Temperature | 185°F (85°C) |
| Cold Water Temperature | 50°F (10°C) |
| Dispensing Modes | Hot, Cold, Room Temperature |
| Safety Features | Child safety lock, auto shut-off |
| Cleaning Instructions | Wipe with damp cloth; descale every 3 months |
| Filter Type | Replaceable carbon filter (included) |
| Warranty | 1 year limited |
Frequently Asked Questions - WD361 Avanti
User questions about WD361 Avanti
0 question about this device. Answer the ones you know or ask your own.
Ask a new question about this device
Download the instructions for your Water dispenser in PDF format for free! Find your manual WD361 - Avanti and take your electronic device back in hand. On this page are published all the documents necessary for the use of your device. WD361 by Avanti.
USER MANUAL WD361 Avanti
Verify that your carton contains the following items:
- ScanPal 5100 mobile terminal
• Main battery pack (3.7V, Li-ion) - AC power supply
- Lanyard
- Belt Clip
- Quick Start Guide
Note: If you ordered accessories for your terminal, verify that they are also included with the order.
Be sure to keep the original packaging in case you need to return the ScanPal terminal for service.
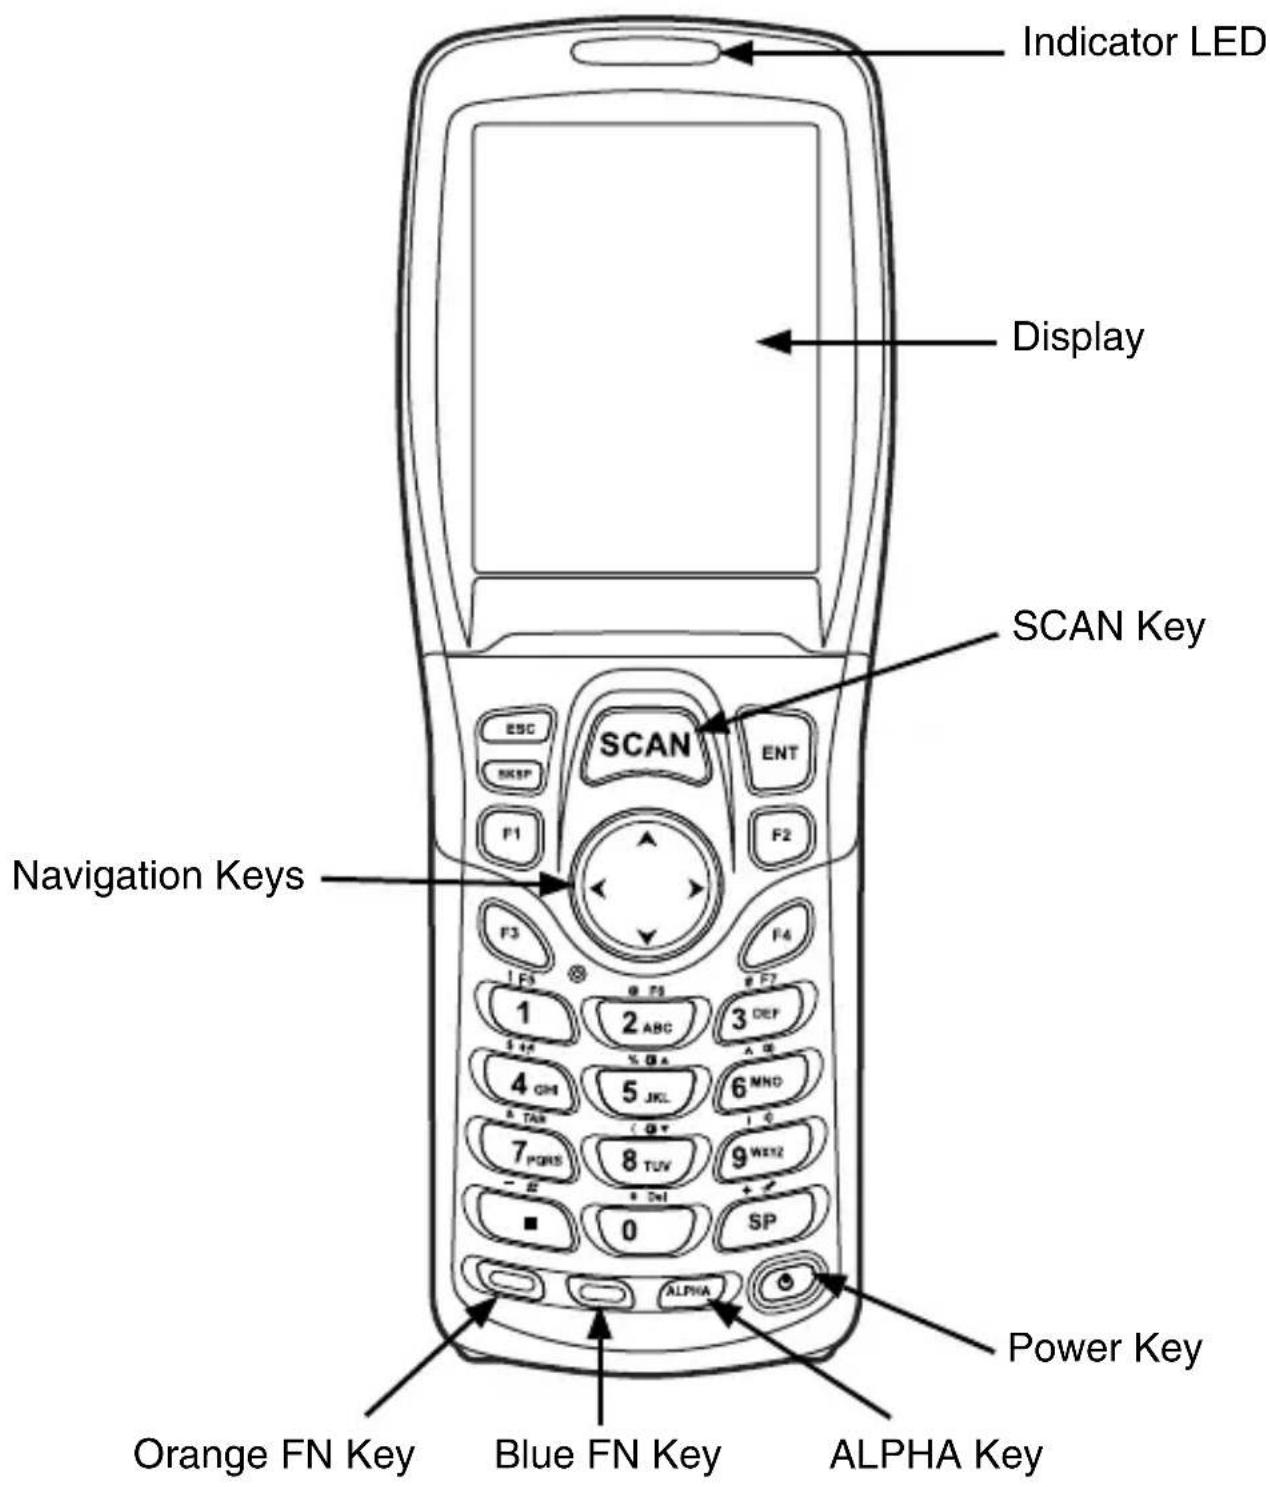
Front Panel
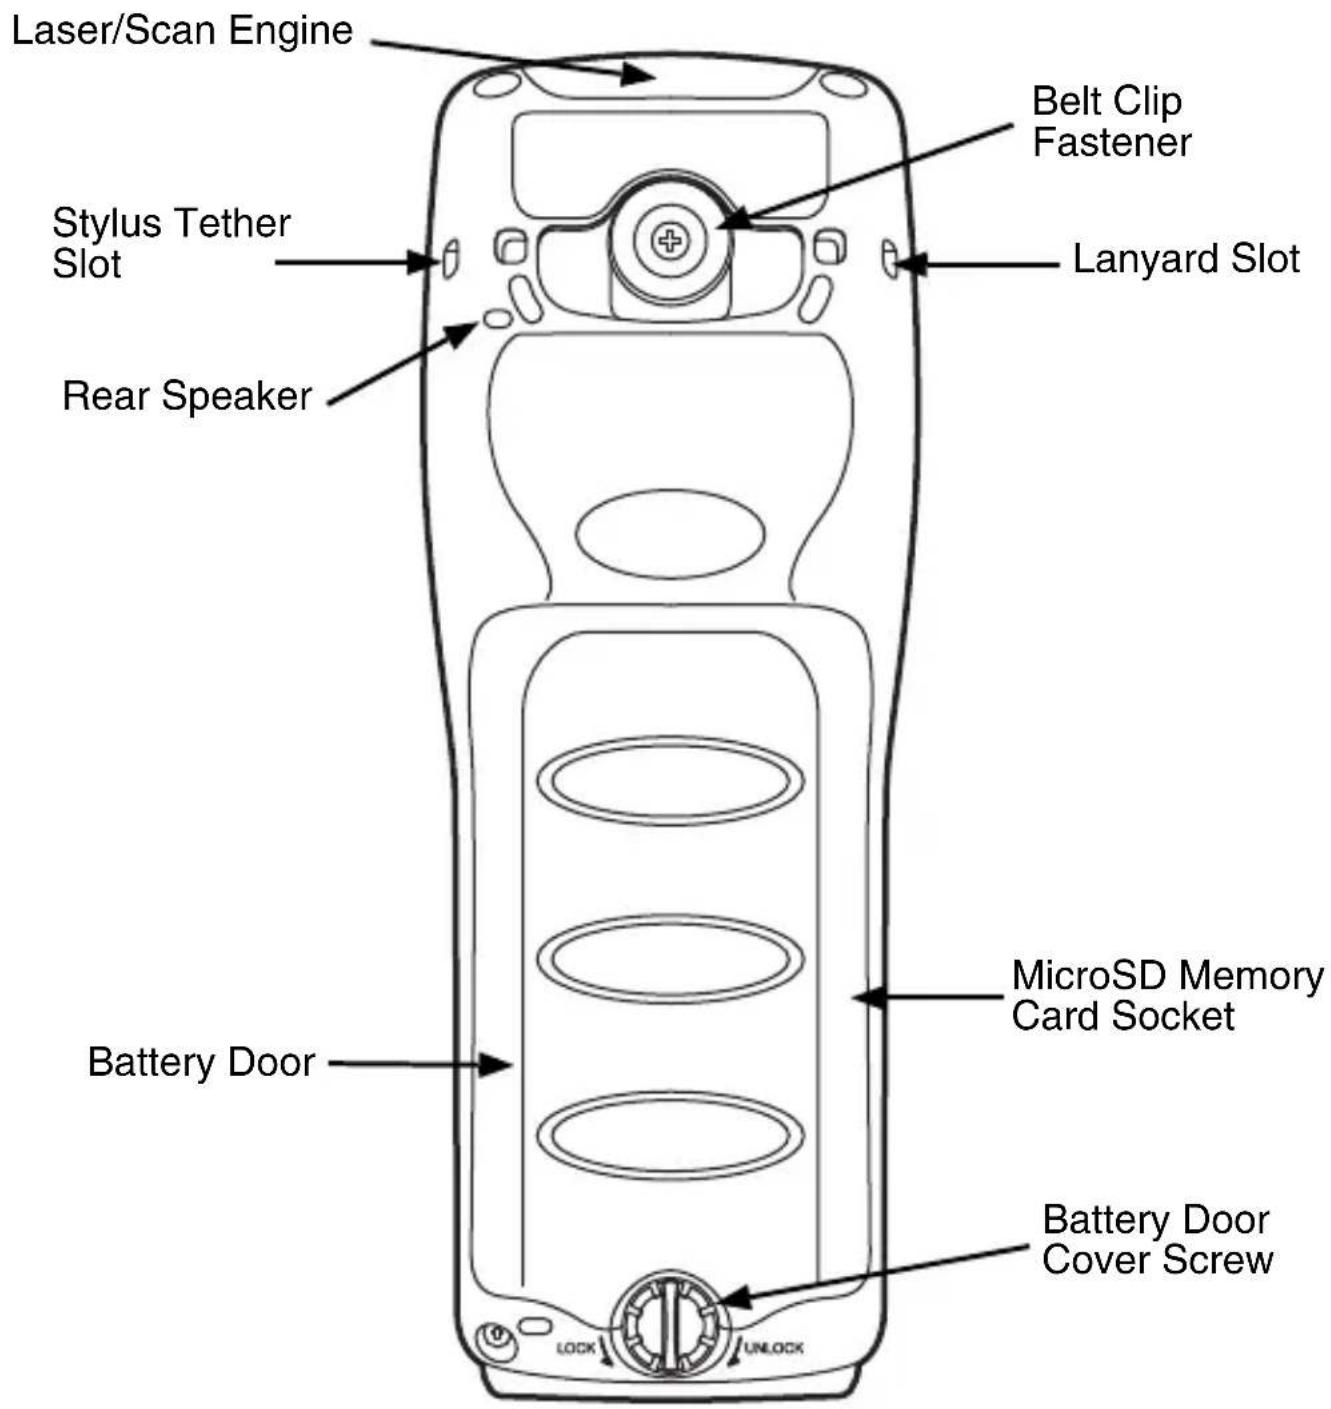
Back Panel
Keyboard
Alphanumeric Keyboard

Navigation Keys with Mouse Pointer
To activate mouse pointer, press the ALPHA key until you see a pointer in the task bar.
To move the pointer, use keys 1, 2, 3, 4, 6, 7, 8, 9. To select press the 5 key.
To deactivate mouse pointer, press the ALPHA key.
Installing the Battery Pack

Ensure all components are dry prior to mating terminals/batteries with peripheral devices. Mating wet components may cause damage not covered by the warranty.
The ScanPal 5100 is shipped with the battery packaged separately from the terminal. Perform the following steps to install the battery.

Note: Install the battery door before powering the terminal.
Connect the terminal to one of the ScanPal 5100 charging peripherals to charge the battery pack.

We recommend use of Honeywell Li-Ion battery packs. Use of any non-Honeywell battery may result in damage not covered by the warranty.
Charging the ScanPal 5100
ScanPal 5100 terminals ship with the main battery and the backup battery significantly discharged of power. Charge the main battery pack with an ScanPal 5100 charging device for a minimum of 4 hours before initial use.
If you remove the battery or it is completely discharged, a fully charged backup battery will provide approximately 0.5 hours of work in suspend mode, during which you can change or charge the main battery pack.
If the backup battery discharges completely, some data will be lost.
ScanPal 5100 LED Indicators
Green Full or fully charged
Red Charging
Charging/Communication Cable

flowchart
graph TD
    A["Computer"] -->|USB Connection| B["Switch"]
    B --> C["Mobile Phone"]
    C --> D["Power Plug"]
    D --> E["Mobile Device"]
    style A fill:#f9f,stroke:#333
    style B fill:#ccf,stroke:#333
    style C fill:#cfc,stroke:#333
    style D fill:#fcc,stroke:#333
    style E fill:#cff,stroke:#333
HomeBase

HomeBase Back Panel
AUX Battery Charge State LED

HomeBase Battery Well LED Indicators
Green Full (completed charge)
Red Fast charge
Orange Pre-charge (low battery status)
Orange - Blinking Battery cannot be charged
Off No battery, fault or over temperature
Suspending/Resuming Terminal
To put the device into Suspend mode when the terminal is powered on:
- Press and release the Power button.
- To resume from the Suspend mode, press and release the Power button.
Restarting the Device
In case of a system failure, press the reset button. The ScanPal 5100 will restart once the reset button is released.
ActiveSync Communication
To synchronize data (e.g., e-mail, contacts, and calendar between the terminal and the host workstation (PC):
- ActiveSync® (version 4.5 or higher) or Windows® Mobile Device Center (WDMC) must be installed on your PC. You can download the most current version of ActiveSync or WDMC from the Microsoft Web site (http://go.microsoft.com/fwlink/?LinkId=147001).
Note: ScanPal 5100 terminals ship with ActiveSync already installed. ActiveSync on your ScanPal 5100 terminal works with WDMC on PCs running Windows Vista or Windows 7 and with ActiveSync on PCs running Windows XP.
-
The ScanPal 5100 terminal and PC must be configured for the same communication type.
-
Connect the terminal to the PC (using an ScanPal 5100 peripheral) to initiate communication. For additional information on ActiveSync or Windows Mobile Device Center visit www.microsoft.com.

We recommend use of Honeywell peripherals, power cables, and power adapters. Use of any non-Honeywell peripherals, cables, or power adapters may cause damage not covered by the warranty.
Installing a Memory Card
- Power down the terminal.
- Unlock and remove the battery door.
- Remove the battery.
- Slide the MicroSD card in the slot until it clicks.
- Install the battery.
- Install and lock the battery door.
- Power on the terminal.

natural_image
Line drawing of a remote control device with hand operating keys and a close-up view showing the switch (no text or symbols)Using the Scan Engine
Point the aiming beam at a bar code. The aiming beam must align with the bar code for the best results. Holding the terminal between 4-10 inches (10-25 cm) from a bar code is recommended.
- Select Start > Programs > Demos > Scan Demo.
- Point the ScanPal 5100 terminal at the bar code.
- Project the aiming beam by pressing and holding the SCAN key.
- Center the aiming beam over the bar code. For optimum performance, avoid reflections by scanning the bar code at a slight angle.
- When the bar code is successfully decoded the terminal beeps. The bar code information is entered into the application in use.
Aiming Beam
The aiming beam is narrower when you hold the terminal closer to a bar code and the aiming beam is wider when you hold it farther from the bar code.
The aiming beam must be aimed closer to symbologies that have smaller bars or elements (mil size). The aiming beam must be aimed farther from symbologies that have larger bars or elements (mil size).
5300SR Red High-Vis Aiming Pattern

4813 Red Aiming Beam

Technical Assistance
Contact information for technical support, product service, and repair can be found at www.honeywellaidc.com.
User Documentation
For localized versions of this document, and to download the User's Guide, go to www.honeywellaidc.com.
Patents
For patent information, please refer to www.honeywellaidc.com/patents.
Limited Warranty
Refer to www.honeywellaidc.com/warranty_information for your product's warranty information.
Disclaimer
Honeywell International Inc. (“HII”) reserves the right to make changes in specifications and other information contained in this document without prior notice, and the reader should in all cases consult HII to determine whether any such changes have been made. The information in this publication does not represent a commitment on the part of HII.
HII shall not be liable for technical or editorial errors or omissions contained herein; nor for incidental or consequential damages resulting from the furnishing, performance, or use of this material.
This document contains proprietary information that is protected by copyright. All rights are reserved. No part of this document may be photocopied, reproduced, or translated into another language without the prior written consent of HII.
© 2011-2012 Honeywell International Inc. All rights reserved.
Web Address: www.honeywellaidc.com


- Keyboard
- Alphanumeric Keyboard
- Navigation Keys with Mouse Pointer
- Installing the Battery Pack
- Charging the ScanPal 5100
- ScanPal 5100 LED Indicators
- HomeBase
- HomeBase Back Panel
- HomeBase Battery Well LED Indicators
- Suspending/Resuming Terminal
- Restarting the Device
- ActiveSync Communication
- Installing a Memory Card
- Using the Scan Engine
- Aiming Beam
- Technical Assistance
- User Documentation
- Patents
- Limited Warranty
- Disclaimer
Brand : Avanti
Model : WD361
Category : Water dispenser