
841448 - Drill KAWASAKI - Free user manual and instructions
Find the device manual for free 841448 KAWASAKI in PDF.


| Brand | Kawasaki |
| Model | 841448 |
| Product Type | Cordless Drill/Driver |
| Voltage | 19.2 V |
| No-Load Speed (Low) | 0-400 RPM |
| No-Load Speed (High) | 0-1150 RPM |
| Torque Settings | 20+1 (Drill mode) |
| Chuck Type | Keyless, 13 mm (1/2 in.) |
| Battery Type | Ni-Cad |
| Charger Input | 120 V ~ 60 Hz |
| Charging Time | Approx. 1 hour |
| Battery Pack Model | 691798 |
| Charger Model | 691799 |
| Forward/Reverse | Yes, with trigger lock |
| Variable Speed Trigger | Yes |
| LED Light | Built-in |
| Battery Level Indicator | 3-LED display |
| Comfort Grip | Yes |
| High/Low Speed Switch | Yes |
| Weight (approx.) | 4.5 lb (2.0 kg) |
| Safety Certification | UL Std. No.60745-1, CSA C22.2 |
| Warranty | 3 Years Limited (2 years battery) |
Frequently Asked Questions - 841448 KAWASAKI
User questions about 841448 KAWASAKI
0 question about this device. Answer the ones you know or ask your own.
Ask a new question about this device
Download the instructions for your Drill in PDF format for free! Find your manual 841448 - KAWASAKI and take your electronic device back in hand. On this page are published all the documents necessary for the use of your device. 841448 by KAWASAKI.
USER MANUAL 841448 KAWASAKI

US
Conforms to UL Std. No.60745-1, 60745-2-1,60745-2-2
Certified to CAN/CSA-C22.2 STD No.60745-1-04, 60745-2-1-04, 60745-2-2-04

87-1904-60957
KAWASAKI IS A TRADEMARK LICENSED BY KAWASAKI MOTORS CORP., U.S.A., WHICH DOES NOT MANUFACTURE OR DISTRIBUTE THIS PRODUCT. CONSUMER INQUIRES SHOULD BE DIRECTED TO:
KAWASAKI EST URE MARQUE DE COMMERCE DE KAWASAKI MOTORS CORP., U.S.A., QUI NE FABRIQUE PAS ET NE DISTRIBUE PAS DE PRODUIT THIS PRODUCT. LES QUESTIONS DES CONSONMATEURS DOIVENT ÊTRE ADRESSEES À :
KAWASAKI ES UNA MARCA REGISTRADA CON LICENCIA DE KAWASAKI MOTORS CORP., E.U.A., QUE NO FABRICA NI DISTRIBUYE ESTE PRODUCTO. LAS CONSULTAS DE LOS CONSUMIDORES DEBEN DIRIGIRSE A:
©COPYRIGHT 2010 ALLTRADE TOOLS. LLC. 1431 VIA PLATA
LONG BEACH, CA 90810-1462 USA
681795 - 19.2V Cordless Drill, Perceuse sans fil, de 19.2 V, Talsdro Instantrica de 19.2V Rev 6/2/10
THIS MANUAL CONTAINS IMPORTANT INFORMATION REGARDING SAFETY, OPERATION, MAINTENANCE AND STORAGE OF THIS PRODUCT. BEFORE USE, READ CAREFULLY AND UNDERSTAND ALL CAUTIONS, WARNINGS, INSTRUCTIONS AND PRODUCT LABELS. FAILURE TO DO SO COULD RESULT IN SERIOUS PERSONAL INJURY AND/OR PROPERTY DAMAGE.
CE MANUEL CONTIENT DES INFORMATIONS IMPORTANTES CONCERNANT LA SÉCURITÉ, LE FONCTIONNEMENT ET LE REMISAGE DE CE PRODUIT. LIRE, ÉTUDIER ET VEILLER À BIEN COMPRENDRE TOUTES LES MISES EN GARDE ET INSTRUCTIONS ET AUTOCOLLANTS APPOSÉS SUR LE PRODUIT AWANT DE L'UTILISER. NE PAS RESPECTER CES INSTRUCTIONS POURRAIT ENTRAÎNER DES BLESSURES ET/OU DES DOMMAGES MATÉRIELS.
INSTALLING DRILL BIT INTO KEYLESS CHUCK 14-15
MAINTENANCE AND CLEANING 19-20
ACCESSORIES 20
SPECIFICATIONS 21
PROTECTING THE ENVIRONMENT 21
OTHER CONSUMER DO-IT-YOURSELF (DIY) TOOLS 21
SECTION FIVE
3 YEAR LIMITED WARRANTY 22-25
CONGRATULATIONS!
Thanks for choosing this product. At Alltrade, our aim is to provide you with quality products at an affordable price, and we want you to be totally satisfied with your product and our Customer Service. If any help and advice is needed, please contact us at 1-800-590-3723. Properly cared for, this tool will give you many years of satisfaction.
INTENDED USE
This tool is intended for consumer use only. Your charger and/or adapter has been designed for charging batteries of the type approved and supplied with this tool.
GENERAL SAFETY WARNINGS – FOR ALL BATTERY OPERATED TOOLS
WARNING
READ ALL SAFETY WARNING AND INSTRUCTIONS.
Failure to follow the warning and instructions may result in electric shock, fire and/or serious injury.
SAVE ALL WARNINGS AND INSTRUCTIONS FOR FUTURE REFERENCE.
RECOGNIZE SAFETY SYMBOLS, WORDS AND LABELS
The safety instructions provided in this manual are not intended to cover all possible conditions and practices that may occur when operating, maintaining and cleaning power tools.
Always use common sense and pay particular attention to all the DANGER, WARNING, CAUTION and NOTE statements of this manual.

This is the safety alert symbol. It is used to alert you to potential personal injury hazards. Obey all safety messages that follow this symbol to avoid possible injury or death.
DANGER
DANGER indicates an imminently hazardous situation which, if not avoided, will result in death or serious injury.
WARNING
WARNING indicates a potentially hazardous situation which, if not avoided, could result in death or serious injury.
CAUTION
CAUTION indicates a potentially hazardous situation which, if not avoided, may result in minor or moderate injury.
CAUTION
CAUTION used without the safety alert symbol indicates a potentially hazardous situation which, if not avoided, may result in property damage.
NOTE
NOTE provides additional information that is useful for proper use and maintenance of this tool. If a NOTE is indicated make sure it is fully understood.
IMPORTANT SAFEGUARDS
DANGER
People with electronic devices, such as pacemakers, should consult their physician(s) before using this product. Operation of electrical equipment in close proximity to a heart pacemaker could cause interference or failure of the pacemaker.
WARNING: Some dust created by power sanding, sawing, grinding, drilling and other construction activities contains chemicals known to the State of California to cause cancer, birth defects or other reproductive harm.
Some examples of these chemicals are:
- Lead from lead-based paints.
- Crystalline silica from bricks and cement and other masonry products, and arsenic and chromium from chemically-treated lumber.
Your risk from these exposures varies, depending on how often you do this type of work. To reduce your exposure to these chemicals: work in a well ventilated area, and work with approved safety equipment, such as dust masks that are specially designed to filter out microscopic particles.
WARNING: This product contains chemicals known to the State of California to cause cancer and birth defects or other reproductive harm.
WORK AREA
WARNING
Keep work area clean and well lit. Cluttered or dark areas invite accidents.
Do not operate power tools in explosive atmospheres, such as in the presence of flammable liquids, gases or dust. Power tools create sparks which may ignite the dust or fumes.
Keep children and bystanders away while operating a power tool. Distractions can cause you to lose control.
ELECTRICAL SAFETY
WARNING
Power tool plugs must match the outlet. Never modify the plug in any way. Do not use any adapter plugs with earthed (grounded) power tools. Unmodified plugs and matching outlets will reduce risk of electric shock.
Avoid body contact with earthed or grounded surfaces such as pipes, radiators, ranges and refrigerators. There is an increased risk of electric shock if your body is earthed or grounded.
Do not expose power tools to rain or wet conditions. Water entering a power tool will increase the risk of electric shock.
Do not abuse the cord. Never use the cord for carrying, pulling or unplugging the power tool. Keep cord away from heat, oil, sharp edges or moving parts. Damaged or entangled cords increase the risk of electric shock.
When operating a power tool outdoors, use an extension cord suitable for outdoor use. Use of a cord suitable for outdoor use reduces the risk of electric shock.
If operating a power tool in a damp location is unavoidable, use a ground fault circuit interrupter (GFCI) protected supply. Use of a GFCI reduces the risk of electric shock.
A battery operated tool with integral batteries or a separate battery pack must be recharged only with the specified charger for the battery. A charger that may be suitable for one type of battery may create a risk of fire when used with another battery.
Use battery operated tool only with specifically designated battery pack. Use of any other batteries may create risk of fire.
PERSONAL SAFETY
WARNING
Stay alert, watch what you are doing, and use common sense when operating a power tool. Do not use tool while tired or under the influence of drugs, alcohol or medication. A moment of inattention while operating power tools may result in serious personal injury.
Dress properly. Do not wear loose clothing or jewelry. Keep your hair, clothing, and gloves away from moving parts. Loose clothes, jewelry or long hair can be caught in moving parts.
Prevent accidental starting. Ensure switch is in the "OFF" position before connecting to power source and/or battery pack, picking up or carrying the tool. Carrying power tools with your finger on the switch or energizing power tools that have the switch "ON" invites accidents.
Remove adjusting keys or wrenches before turning the tool "ON". A wrench or a key that is left attached to a rotating part of the tool may result in personal injury.
Do not overreach. Keep proper footing and balance at all times. This enables better control of the power tool in unexpected situations.
Use personal protective equipment. Always wear eye protection. Protective equipment such as dusk mask, non-skid safety shoes, hard hat, or hearing protection used for appropriate conditions will reduce personal injuries.
Wear ear protectors with impact drills. Exposure to noise can cause hearing loss.
If devices are provided for the connection of dust extraction and collection facilities, ensure these are connected and properly used. Use of dust collection can reduce dust-related hazards.
POWER TOOL USE AND CARE
WARNING
Do not force the power tool. Use the correct power tool for your application. The correct power tool will do the job better and safer at the rate for which it was designed.
Do not use the power tool if the switch does not turn it on and off. Any power tool that cannot be controlled with the switch is dangerous and must be repaired.
WARNING
Disconnect the plug from the power source and/or the battery pack from the power tool before making any adjustments, changing accessories, or storing power tools. Such preventive safety measures reduce the risk of starting the power tool accidentally.
Store idle power tools out of the reach of children and do not allow persons unfamiliar with the power tool or these instructions to operate the power tool. Power tools are dangerous in the hands of untrained users.
Maintain power tools. Check for misalignment or binding of moving parts, breakage of parts and any other condition that may affect the power tool's operation. If damaged, have the power tool repaired before use. Many accidents are caused by poorly maintained power tools.
Keep cutting tools sharp and clean. Properly maintained cutting tools with sharp cutting edges are less likely to bind and are easier to control.
Use the power tool, accessories and tool bits etc. in accordance with these instructions, taking into account the working conditions and the work to be performed. Use of the power tool for operations different from those intended could result in a hazardous situation.
Use auxiliary handles (if) supplied with the tool. Loss of control can cause personal injury.
BATTERY TOOL USE AND CARE
WARNING
Recharge only with the charger specified by the manufacturer. A charger that is suitable for one type of battery pack may create a risk of fire when used with another battery pack.
Use power tools only with specifically designated battery packs. Use of any other battery packs may create a risk of injury and fire.
When battery pack is not in use, keep it away from other metal objects, like paper clips, coins, keys, nails, screws or other small metal objects, that can make a connection from one terminal to another. Shorting the battery terminals together may cause burns or a fire.
Under abusive conditions, liquid may be ejected from the battery; avoid contact. If contact accidentally occurs, flush with water. If liquid contacts eyes, additionally seek medical help. Liquid ejected from the battery may cause irritation or burns.
SERVICE
WARNING
Have your power tool serviced by a qualified repair person using only identical replacement parts. This will ensure that the safety of the power tool is maintained.
Follow instructions in the Maintenance section of this manual. Use of unauthorized parts or failure to follow Maintenance Instructions may create a risk of shock or injury.
SPECIFIC SAFETY RULES AND/OR SYMBOLS
WARNING
Hold tool by insulated gripping surfaces when performing an operation where the cutting tool may contact hidden wiring or its own cord.
Contact with a "live" wire will also make exposed metal parts of the tool "live" and shock the operator.
Hold power tool by insulated gripping surfaces, when performing an operation where the fastener may contact hidden wiring or its own cord. Fasteners contacting "live" may make exposed metal parts of the power tool "live" and could give the operator an electric shock.
SAFETY RULES FOR CORDLESS DRILL / DRIVERS
WARNING
Always wear safety goggles or eye protection when using this tool. Use a dust mask or respirator for applications which generate dust.
Do not grasp the tool or place your hands too close to the spinning chuck or drill bit. Your hand may be lacerated or may cause injury.
Secure the material being worked on. Never hold it in your hand or across your legs. Unstable support can cause loss of control and injury.
Position yourself to avoid being caught between the tool or side handle and walls or posts. Should the socket or bit become bound in the work, the reaction torque of the tool could crush your hand or leg.
WARNING
Check to see that keys and adjusting wrenches are removed from the Cordless Drill before switching the tool "ON". Keys or wrenches can fly away at high velocity striking you or a bystander.
When using the Cordless Drill, always maintain a firm grip on the tool with both hands.
Keep the handle of the Cordless Drill dry, clean, and free from oil and grease. Do not run the Cordless Drill while carrying it at your side. A spinning socket or bit could become entangled with clothing and injury may result.
Disconnect the plug or remove the battery pack from tool and place the switch in the locked or "OFF" position before making any assembly adjustments, changing accessories, performing any inspection, maintenance or cleaning procedures. Such preventive safety measures reduce the risk of starting the tool accidentally.
Ensure the switch is in the off position before inserting battery pack. Inserting battery pack into power tools that have the switch on invites accidents.
Do not use the Cordless Drill if it has been damaged, left outdoors in the rain, snow, wet or damp environments, or immersed in liquid.
Maintain labels and nameplates on the Cordless Drill. These carry important information. If unreadable or missing, contact Alltrade for a replacement.
SYMBOLS
IMPORTANT: Some of the following symbols may be used on your tool. Please study them and learn their meaning. Proper interpretation of these symbols will allow you to operate the tool better and safer.
SYMBOL NAME EXPLANATION
| V Volts Voltage (Potential) | ||
| A Amperes Current | ||
| L Liters Volume | ||
| Kg Kilograms Weight | ||
| Alternating Current Type of Current | ||
| or d.c. | Direct Current | Type of Current |
| or a.c. | Alternating or Direct Current | Type of Current |
| Earthing Terminal | Grounding Terminal | |
| Class II Construction | Denotes Double Insulation | |
| h Hours | Time | |
| min | Minutes | Time |
| s | Seconds | Time |
| φ | Diameter | Size of Drill Bits, Grinding Wheels, etc. |
| n0 | No load speed | No-load Rotational Speed |
| .../min | Revolutions per Minute | Revolutions, Surface Speed, Strokes, etc. per Minute |
| psi | Pounds per square inch | Pressure |
| 1,2,3, ... | Ring Selector Settings | Speed, Torque or Position Settings |
FUNCTIONAL DESCRIPTION
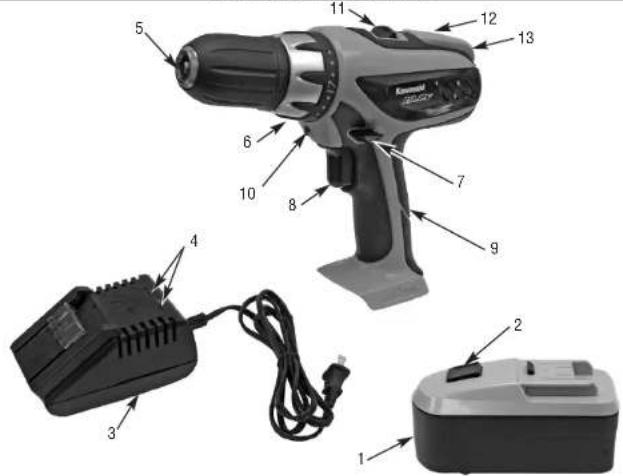
CONTROLS AND COMPONENTS:
- Battery Pack
- Release Buttons on Front
- Charger
- LED Charging Indicators
- 13mm (1/2 in.) Keyless Chuck
- 20 +1 Adjustable Torque Settings Control Ring
- Forward/Reversing and Trigger Lock Lever
-
Variable Speed Controlled Trigger Switch
-
Comfort Grip
- LED Light
- High/Low Speed Switch
- Battery Level Indicator
- Level Indicator Switch
COMPONENT MODEL NUMBER
BATTERY PACK 691798
CHARGER 691799
BATTERY

Before using battery pack, please read carefully all instructions and cautionary markings on battery pack, battery charger and product using battery.
Do not incinerate the battery pack even if it is severely damaged or is completely worn out. The battery pack can explode.
Do not carry battery packs in aprons, pockets, or tool boxes, product kit boxes, drawers, etc. with loose metal objects. Battery pack terminals could be short circuited causing damage to the battery pack, severe burns or fire.
The battery pack is Nickel-Cadmium (Ni-Cad) and is considered to be a toxic material by the Environmental Protection Agency. Before disposing of damaged or worn out Ni-Cad battery packs, check with your State Environmental Protection Agency to find out about special restrictions on the disposal of these battery packs, take them to your local recycling center for proper disposal, or call 1-800-822-8837.
NOTE
The battery is not fully charged. Before first use, the battery pack requires charging (see CHARGING BATTERY PACK in next pages).
Always switch to a fresh battery when tool performance begins to diminish. Severe heat is most destructive to a battery; the more heat generated, the faster the battery loses power. A battery that gets too hot can have a shortened life.
Never over-discharge a battery by using the tool even after tool performance has decreased. Do not attempt to discharge a tool's battery by continuing to pull on the tool trigger. When tool performance begins to diminish, stop the tool and recharge the battery for optimal performance.
Charge battery pack at ambient temperatures between 50°F - 104°F .
Store tool and battery pack in locations where temperatures will not exceed 120° F. This is important to prevent serious damage to the battery cells.
The battery pack should always be recharged when the Cordless Drill begins to run slowly.
When battery pack is not in use, keep it away from other metal objects such as paper clips, coins, keys, nails, screws or other small metal objects that can make a connection from one terminal to another. Shorting the battery terminals together may cause sparks, burns, or fire.
REMOVING/ATTACHING BATTERY PACK
REMOVE BATTERY PACK:
- Press release button on front of the Cordless Drill to release the battery pack.
- Pull battery pack free of Cordless Drill.
ATTACH BATTERY PACK:
- Align the raised portion of the battery pack with the groove in the battery compartment of the Cordless Drill.
- Press the battery pack into place. Make sure the latches are securely fastened. Do not use the Cordless Drill if the battery pack is not seated properly.

CHARGER
WARNING
Before using battery charger, please read carefully allutionary markings on battery charger, battery pack andry.
Use only the charger which accompanied your product or direct replacement as listed in this manual. Do not substitute any other charger. Use only Alltrade approved chargers with your product.
Do not disassemble charger.
Do not use charger if it has been damaged, left outdoors in the rain, snow, wet or damp environments, or immersed in liquid.
The battery pack and charger heat during charging. Place the charger on a flat, non-flammable surface away from flammable materials with at least four inches of clearance to allow proper air circulation around the charger and battery pack.
When the battery pack requires recharging, a 1 hour charge allows the tool to operate at full power. A charging indicator light on the charger will illuminate to show that charging is taking place.
CHARGING BATTERY PACK
CHARGE BATTERY PACK:
- Make sure the trigger on the Cordless Drill is in the "OFF" position and remove the battery pack from the Cordless Drill.
- Plug the charger into the nearest 120 volt electrical outlet. The step of the battery has positive and terminal markings on it. Align the markings on the identical markings on top of the charger base. Insert the battery pack into base. Pack will not insert properly if reversed.
- When the battery is charging, the red LED light should be "ON".
- After approximately one hour* of charging, the red LED light should turn "OFF" and green LED should turn "ON" indicating that the battery is fully charged. *Charge time may vary +/-15% depending upon temperature of environment.
- When fully charged, reattach battery pack onto the Cordless Drill, making certain latches fasten securely. Cordless Drill will not operate properly if the battery pack is not seated properly.
IMPORTANT INFORMATION FOR RECHARGING HOT BATTERIES
When using your Cordless Drill continuously, the batteries in your battery pack will become hot. You should let a hot battery pack cool down for approximately 30 minutes before attempting to recharge. When the battery pack becomes hot, if installed in the charger, the battery pack will not be charged. When the battery pack cools down, if installed in the charger, the red LED turns "ON" to indicate charging.
NOTE
This will occur when continuous use of your Cordless
Drill causes the battery pack to become hot. It does not occur under normal circumstances.

BATTERY CHARGE CONDITION INDICATOR LIGHTS
Your drill is equipped with charge condition indicator lights. The indicator lights show the charge condition of the battery.
To check battery charge condition, depress and hold the button on the top of the Cordless Drill.
-
-
- When all three lights are illuminated, this indicates the battery pack is fully charged.
-
- When all two lights illuminate, this indicates the battery pack is partially charged.
- When only one light illuminates, this indicates the battery pack is slightly charged.
When no lights illuminate, this indicates the battery pack is completely discharged.
ASSEMBLY
WARNING
Be aware that this tool is always in an operating condition because it does not have to be plugged into an electrical outlet. Always lock the Trigger Switch and remove the battery pack before changing bits.
INSTALLING DRILL BIT INTO KEYLESS CHUCK
WARNING
Before inserting a drill bit or other accessory, make sure the forward/reverse and trigger lock lever is in the center "OFF" position to prevent accidental starts that may result in injury.
Do not attempt to tighten drill bits (or any other accessory) by gripping the front of the chuck and turning the tool on. This may cause personal injury and/or damage to the chuck.
When removing the bit from the tool, avoid contact with skin and use proper protective gloves when grasping the bit or accessory. Accessories may be hot after prolonged use.
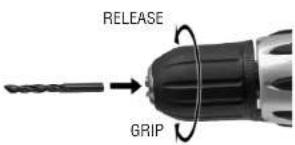
- Rotate the chuck sleeve counter-clockwise viewing from chuck end, and open chuck to approximate drill bit diameter.
- Insert the shank of the bit (or other accessory) fully into the keyless chuck, taking care to keep the bit in the center of the jaws of the chuck.
- Close chuck by rotating the chuck sleeve clockwise and securely tighten by hand.
OPERATING THE DRILL
WARNING
Never tape the trigger switch down to provide continu-
ous high speed. The tool may fail under such conditions causing fire or personal injury.
VARIABLE SPEED TRIGGER SWITCH
THIS TOOL IS CONTROLLED BY A TRIGGER SWITCH:
- The speed of the Cordless Drill depends on the amount of pressure you put on the trigger.
• The more pressure you apply, the faster the Cordless Drill will go. - Release the pressure and the Cordless Drill will slow down.
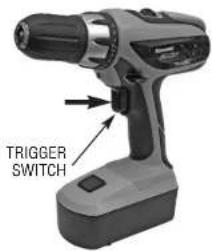
BUILT IN LED LIGHT
- Press the trigger switch to light up the light. The light remains on while the trigger switch is being pressed. The light goes out after releasing the trigger.
NOTE: Use a dry cloth to wipe the dirt off the lens of light. Be careful not to scratch the lens of light, or it may lower the illumination.
CAUTION
Do not look into light or see the source of light directly.
FORWARD / REVERSE AND TRIGGER LOCK LEVER
NOTE
Be sure the trigger is released when changing the position of the lever. Always store the tool in the "LOCKED/OFF" position.
Always check the direction of the Cordless Drill's rotation before use.
TO SELECT THE DIRECTIONS OF ROTATION:
• To select forward Cordless Drill rotation, press the trigger lock from right to left flat against the Cordless Drill body.
• To select reverse, press the trigger lock lever in the opposite direction.
• The center position locks the tool.

TORQUE SETTINGS
NOTE
To prevent damaging the tool or driving screw too deep ease the trigger when you feel the clutch slip.
THE CONTROL RING ADJUSTS THE LEVEL OF TORQUE:
- For light duty work, use lower settings.
- For heavy duty work, use higher settings.
PROPER SETTING FOR DRIVING SCREWS:
- Set the ring on the lowest setting to begin.
- Try tightening the first screw. If the drill drives smoothly, proceed with the next screw.
- If the Drill's clutch slips, increase the torque setting and try again until the Drill drives the screw without incident.
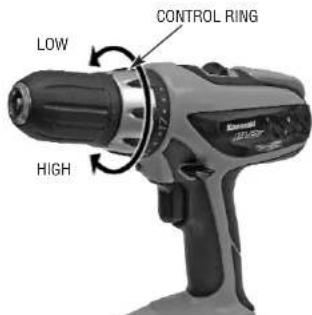
FOR LOW SPEED SETTING:
- Slide the switch on top of the Drill to Position 1 for high torque (low speed) applications and driving screws.
FOR HIGH SPEED SETTING:
- Slide the switch to Position 2 for low torque (high speed) applications and light duty projects.

SCREWDRIVING
WHEN DRIVING FASTENERS:
• Always start slowly and gradually increase the speed of the Drill.
- Release the trigger when you feel the clutch slip.
• Always keep the driver bit straight to prevent damage to the screw.
- Hold the Drill with both hands to ensure control if the bit should stick or slip.
- To prevent wood from splitting, drill pilot holes into the wood before driving in the screws.
DRILLING METAL
WHEN DRILLING HARD METALS:
- Apply a lubricant, such as cutting oil, to the tip of the bit.
- Start with a small hole then enlarge to the required size. Make sure the bit is actually cutting and not spinning in the hole as this will dull the edges of the bit.
- Keep enough pressure on the bit to keep it drilling through the material.
DRILLING MASONRY
WHEN DRILLING MASONRY:
- Masonry can be brittle so be careful not to apply too much pressure and crack the material. D (1)
- Apply enough pressure to keep the bit cutting and not spinning in the hole as this will dull the edges of the bit.
- Bricks and similar soft materials will require less pressure, concrete will require much more.
DRILLING WOOD
Use twist bits to drill holes in wood. Make sure the bits are sharp. Pull the bits out of the hole frequently to clear chips from the flutes as an overburdened bit may overheat.
HINTS FOR OPTIMUM USE
DRILLING:
- Keep the right amount of pressure in a straight line with the drill bit. Too little and the bit will spin without cutting, too much and the motor may stall.
- Just before the drill tip breaks though the other side of the work piece drill more slowly and decrease pressure on the tool. This will prevent stalling and leave a cleaner hole.
- Use a block of wood to back up work pieces that may splinter.
- Use spade bits when drilling large diameter holes in wood.
- Use HSS drill bits when drilling in metal.
- Use masonry bits when drilling in soft masonry.
- Use a lubricant when drilling metals other than cast iron, aluminum, copper, and brass.
- When drilling, start the hole slowly, allowing the bit to drill deep enough to prevent slipping at higher speeds.
- Never try to start a stalled Drill by clicking the trigger switch "ON" and "OFF". This may damage your tool.
- To reduce jamming, always keep the Drill running when pulling the bit out of a finished hole.
SCREWDRIVING:
- Always use the correct type and size of screwdriver bit.
- If screws are difficult to tighten, try applying a small amount of washing liquid or soap as a lubricant.
• Always hold the tool and screwdriver bit in a straight line with the screw.
MAINTENANCE AND CLEANING
⚠ WARNING Always remove the battery pack before attempting cleaning or maintenance.
NOTE This Cordless Drill is lubricated before it leaves the factory. This lubrication should last for the life of the tool. No further lubrication is required.
Use only mild soap and a damp cloth to clean the tool. Never let any liquid get inside the casing. Never immerse any part of the tool in a liquid. Always keep the ventilation openings clear.
Always clean the battery pack using only a dry cloth. Do not use liquids.
Always unplug the charger before cleaning it.
Regularly clean the ventilation slots in your tool and charger using only a soft brush or dry cloth.
Never open the Cordless Drill case, battery pack or charger. Do not attempt to repair the Cordless Drill, battery pack or charger yourself. Opening any of these parts will void your warranty.
ACCESSORIES
Use only accessories that are recommended by the manufacturer for your model. Accessories that may be suitable for one tool may become hazardous when used on another tool.
Always attach grounded (3-prong) extension cords to grounded (3-hole) outlets.
If you must use an extension cord, be sure that the gauge is large enough to carry the amount of current necessary for your power tool. If not, your tool may experience a loss of power, excessive voltage drop or overheating. The smaller the gauge number, the heavier the cord (see table on next page).
RECOMMENDED SIZES OF EXTENSION CORDS FOR 120 VOLT AC 60 HZ TOOLS
| CURRENT RATING IN AMPS CONDUCTOR SIZE IN A.W.G. | |||
| MORE THAN NOT MORE THAN 25 FT. 50 FT. 100 FT. 150 FT. | |||
| 0 6 18 16 16 14 | |||
| 6 | 1 | 0 | 1 8 |
| 10 | 12 | 16 16 14 12 | |
| 12 | 16 | 14 12 NOT RECOMMENDED | |
SPECIFICATIONS
| SPECIFICATIONS | |
| Voltage 19.2V | === |
| No Load Low Speed 0-400/min. | |
| No Load High Speed 0-1150/min. | |
| Torque Settings 20+1 Drill | |
| Chuck Capacity Up to 13mm (1/2 in.) | |
| Charger Input 120V 60Hz | ~ |
| Charging Time Approx. 1 hour* | |
| Battery Type Ni-Cad | |
* Charge time may vary +/-15% depending upon temperature of environment.
PROTECTING THE ENVIRONMENT
BATTERIES
Alltrade batteries can be recharged many times. At the end of their useful life, recycle batteries with due care for our environment.
Ni-Cad and Ni-MH batteries are recyclable. Take them to your local recycling center or call 1-800-822-8837. Collected batteries will be recycled or disposed of properly.
OTHER CONSUMER DO-IT-YOURSELF (DIY) TOOLS
Alltrade offers a full range of Kawasaki tools that make DIY jobs easy. If you would like further information on the following products, please contact Alltrade Customer Service Department at 1-800-590-3723.
| Cordless Drills/Screwdrivers | Reciprocating Saws |
| Impact Wrenches | Routers |
| Sanders | Rotary Tools |
| Jigsaws | Corded and Cordless Multi-Purpose Tools |
| Circular Saws | Wide Range of Accessories and more |
| Angle Grinders |
3 YEAR LIMITED WARRANTY
Express and Exclusive Limited Warranty to Original Retail Buyer
Alltrade Tools LLC (hereinafter "Alltrade") expressly warrants to the original retail purchaser of the accompanying KAWASAKI power tool and no one else all parts of the product (except those parts referred to below which are specifically excluded from such warranty (see Exclusions)) to be free from defects in materials and workmanship for a period of three years from original date of purchase, except that such warranty with regard to the battery shall be for a period of two years from original date of purchase, unless the tool is used for commercial or rental purposes.
SPECIAL WARRANTY NOTE FOR COMMERCIAL OR RENTAL USE: The above warranty for this Kawasaki power tool, including the battery, shall be effective for only 90 days from the original date of purchase if this tool is used for any COMMERCIAL OR RENTAL PURPOSE.
The date of purchase shall be the date of shipment to the original purchaser, or the date the original purchaser took possession, custody or control of the product, whichever occurred first. This warranty shall be null and void if the product or any component thereof is modified or altered. This warranty does not apply to any other product and/or component thereof manufactured or distributed by Alltrade, and does not apply to products and/or components thereof designed, manufactured and/or assembled by others, for which Alltrade makes no warranties whatsoever.
THERE ARE NO WARRANTIES WHICH EXTEND BEYOND THE DESCRIPTION ON THE FACE HEREOF.
Warranty Performance
By purchasing the product, purchaser expressly acknowledges and agrees that their sole and exclusive remedy under this warranty shall be strictly limited to the repair or replacement of any covered nonconforming items or parts thereof provided that any such nonconforming item and/or part is promptly returned to Alltrade's facility postage pre-paid and insured (address: ALLTRADE Warranty Claims & Repair, 1431 Via Plata, Long Beach, CA 90810, Attn: Customer Service #1-800-590-3723) within the applicable warranty period, with a written request by purchaser that Alltrade repair and/or replace the nonconforming item and/or part. We recommend that you keep the original product packaging in the event you need to ship the unit. We suggest the package be insured against loss or in transit damage. When sending your product include your name, address, phone number, dated proof of purchase (or copy), and a statement about the nature of problem. Warranty coverage is conditioned upon purchaser furnishing Alltrade with adequate written proof that they are the original purchaser and of the original purchase date. Parts returned, freight prepaid and insured, to Alltrade's facility (see above address) will be inspected and, at Alltrade's option, repaired and/or replaced free of charge if
found to be defective and subject to warranty. Alltrade retains the sole discretion to determine whether any item or part is nonconforming and, if so, whether the item and/or part will be repaired and/or replaced. If the unit is repaired, new or reconditioned replacement parts may be used. If Alltrade chooses to replace the product, it may replace it with a new or reconditioned one of the same or comparable design. The repaired or replaced unit will be warranted under the terms of the remainder of the warranty period. Typically, a defective product that is returned within the first 30 days after the purchase date will be replaced; for items returned after the first 30 days and within the warranty period, covered defective parts not subject to normal wear and tear or other exclusions will be repaired or replaced, at Alltrade's option. During the warranty period, Alltrade will be responsible for the return shipping charges. Alltrade's repair and/or replacement of any non-conforming item and/or part thereof shall constitute fulfillment of all obligations to the purchaser. Alltrade shall not be responsible or liable for any expense, including freight charges, or repairs made outside Alltrade's facility, unless expressly agreed to by Alltrade in writing. Under no circumstances shall Alltrade bear any responsibility for loss of the unit, loss of time or rental, inconvenience, commercial loss or consequential damages.
Exclusions
This warranty does not cover parts damaged due to normal wear, abnormal conditions, misapplication, misuse, abuse, accidents, operation at other than recommended pressures or temperatures, improper storage or freight damage. Parts damaged or worn by operation in dusty environments are not warranted. Failure to follow recommended operating and maintenance procedures also voids warranty.
This limited warranty does not apply to accessory items such as drill bits, screwdriving bits, circular saw blades, jigsaw blades, grinding wheels, sanding sheets and other related items.
DAMAGE TO THE PRODUCT RESULTING FROM TAMPERING, ACCIDENT, ABUSE, NEGLIGENCE, FAILURE TO FOLLOW INSTRUCTIONS, UNAUTHORIZED REPAIRS OR ALTERATIONS, DAMAGE WHILE IN TRANSIT TO OUR SERVICE FACILITY, USE OF UNAPPROVED OR IMPROPER ATTACHMENTS OR ACCESSORIES, COMMERCIAL AND RENTAL APPLICATIONS OR OTHER CAUSES UNRELATED TO PROBLEMS WITH MATERIAL OR WORKMANSHIP ARE NOT COVERED BY THIS WARRANTY.
Alltrade will not be liable for the following: labor charges, loss or damage resulting from improper operation, maintenance or repairs made by other persons; pre-delivery services such as assembly, oil or lubricants, and adjustment; maintenance services that are normally required to maintain the product.
The use of other than genuine Alltrade Repair Parts will void warranty.
Warranty Disclaimers
EXCLUSION AND DISCLAIMER OF ALL OTHER EXPRESS WARRANTIES, GUARANTIES AND/OR REPRESENTATIONS. EXCEPT FOR THE LIMITED WARRANTY PROVIDED ABOVE, ALL OTHER EXPRESS WARRANTIES, GUARANTIES AND/OR REPRESENTATIONS BY ALLTRADE AND/OR ITS REPRESENTATIVE(S) REGARDING THE DESIGN, MANUFACTURE, PURCHASE, USE AND/OR OPERATION OF THE PRODUCT OR ANY COMPONENT THEREOF SOLD HEREUNDER, REGARDLESS OF WHETHER ANY SUCH WARRANTY, GUARANTY AND/OR REPRESENTATION, WRITTEN OR ORAL, ARISES BY OPERATION OF LAW AND/OR EQUITY AND/OR BY ANY ACT OR OMISSION OF ALLTRADE AND/OR ITS REPRESENTATIVE(S), OR THE BUYER, ARE HEREBY EXPRESSLY EXCLUDED AND DISCLAIMED BY ALLTRADE AND/OR ITS REPRESENTATIVES. PURCHASER KNOWINGLY AND WILLINGLY WAIVES ANY AND ALL SUCH WARRANTIES AND RIGHTS, CLAIMS AND/OR CAUSES OF ACTION ARISING THEREFROM OR BASED THEREON. PURCHASER'S SOLE AND EXCLUSIVE REMEDY IS AS STATED ABOVE.
EXCLUSION AND DISCLAIMER OF ALL IMPLIED WARRANTIES, INCLUDING THE IMPLIED WARRANTIES OF MERCHANTABILITY AND FITNESS FOR A PARTICULAR PURPOSE. NO WARRANTY, ORAL OR WRITTEN, OTHER THAN THE ABOVE WARRANTY IS MADE WITH REGARD TO THIS PRODUCT. ALL EXPRESS AND/OR IMPLIED WARRANTIES, GUARANTIES AND/OR REPRESENTATIONS BY ALLTRADE AND/OR ITS REPRESENTATIVE(S) REGARDING THE DESIGN, MANUFACTURE, PURCHASE, USE AND/OR OPERATION OF THE PRODUCT OR ANY COMPONENT THEREOF SOLD HEREUNDER, REGARDLESS OF WHETHER ANY SUCH WARRANTY, GUARANTY AND/OR REPRESENTATION, WRITTEN OR ORAL, ARISES BY OPERATION OF LAW AND/OR EQUITY AND/OR BY ANY ACT OR OMISSION OF ALLTRADE AND/OR ITS REPRESENTATIVE(S), OR THE PURCHASER, INCLUDING BUT NOT LIMITED TO THE IMPLIED WARRANTY OF MERCHANTABILITY AND THE WARRANTY OF FITNESS FOR A PARTICULAR PURPOSE, ARE HEREBY EXPRESSLY EXCLUDED AND DISCLAIMED BY ALLTRADE AND/OR ITS REPRESENTATIVES. PURCHASER KNOWINGLY AND WILLINGLY WAIVES ANY AND ALL SUCH WARRANTIES AND RIGHTS, CLAIMS AND/OR CAUSES OF ACTION ARISING THEREFROM OR BASED THEREON. PURCHASER'S SOLE AND EXCLUSIVE REMEDY IS AS STATED ABOVE.
Limitation Of Liability
IN NO EVENT SHALL ALLTRADE AND/OR ITS REPRESENTATIVE(S) BE LIABLE FOR INDIRECT, INCIDENTAL, SPECIAL AND/OR CONSEQUENTIAL DAMAGES OF ANY KIND ARISING OUT OF OR RELATED TO, DIRECTLY OR INDIRECTLY, ANY BREACH OF ANY PROVISION OF ANY AGREEMENT BETWEEN ALLTRADE AND/OR ITS REPRESENTATIVE(S) AND PURCHASER, ANY WARRANTY HEREUNDER, AND/OR THE EXISTENCE, DESIGN, MANUFACTURE, PURCHASE, USE AND/OR OPERATION OF ANY ITEM(S) SOLD HEREUNDER EVEN IF ALLTRADE AND/OR ITS
REPRESENTATIVE(S) HAS BEEN ADVISED OF THE POSSIBILITY OF ANY SUCH DAMAGES. IN NO EVENT, WHETHER AS A RESULT OF A BREACH OF CONTRACT, WARRANTY, TORT (INCLUDING NEGLIGENCE) OR OTHERWISE, SHALL ALL TRADE'S AND/OR ITS REPRESENTATIVE(S)' LIABILITY EXCEED THE PRICE OF THE PRODUCT. ANY AND ALL LIABILITY CONNECTED WITH THE USE OF THIS PRODUCT SHALL TERMINATE UPON THE EXPIRATION OF THE WARRANTY PERIODS SPECIFIED ABOVE.
Limitations on Warranty Disclaimers
Some states do not allow limitations on how long an implied warranty lasts and some states do not allow the exclusion or limitation of the incidental or consequential damages, so part or all of the above limitations or exclusions may not apply to you. This warranty gives you specific legal rights, and you may also have other rights which vary from state to state.
If your product is not covered by this warranty, please call our Customer Service Department toll free at 1-800-590-3723 for general repair information and charges.



- SECTION FIVE
- CONGRATULATIONS
- INTENDED USE
- GENERAL SAFETY WARNINGS – FOR ALL BATTERY OPERATED TOOLS
- SAVE ALL WARNINGS AND INSTRUCTIONS FOR FUTURE REFERENCE
- RECOGNIZE SAFETY SYMBOLS, WORDS AND LABELS
- DANGER
- WARNING
- CAUTION
- NOTE
- IMPORTANT SAFEGUARDS
- WORK AREA
- ELECTRICAL SAFETY
- PERSONAL SAFETY
- POWER TOOL USE AND CARE
- BATTERY TOOL USE AND CARE
- SERVICE
- SPECIFIC SAFETY RULES AND/OR SYMBOLS
- SAFETY RULES FOR CORDLESS DRILL / DRIVERS
- SYMBOLS
- CONTROLS AND COMPONENTS
- COMPONENT MODEL NUMBER
- BATTERY
- REMOVING/ATTACHING BATTERY PACK
- REMOVE BATTERY PACK
- ATTACH BATTERY PACK
- CHARGER
- DO NOT DISASSEMBLE CHARGER
- CHARGING BATTERY PACK
- CHARGE BATTERY PACK
- IMPORTANT INFORMATION FOR RECHARGING HOT BATTERIES
- BATTERY CHARGE CONDITION INDICATOR LIGHTS
- ASSEMBLY
- INSTALLING DRILL BIT INTO KEYLESS CHUCK
- OPERATING THE DRILL
- VARIABLE SPEED TRIGGER SWITCH
- THIS TOOL IS CONTROLLED BY A TRIGGER SWITCH
- BUILT IN LED LIGHT
- FORWARD / REVERSE AND TRIGGER LOCK LEVER
- TO SELECT THE DIRECTIONS OF ROTATION
- TORQUE SETTINGS
- THE CONTROL RING ADJUSTS THE LEVEL OF TORQUE
- PROPER SETTING FOR DRIVING SCREWS
- FOR LOW SPEED SETTING
- FOR HIGH SPEED SETTING
- SCREWDRIVING
- WHEN DRIVING FASTENERS
- DRILLING METAL
- WHEN DRILLING HARD METALS
- DRILLING MASONRY
- WHEN DRILLING MASONRY
- DRILLING WOOD
- HINTS FOR OPTIMUM USE
- DRILLING
- MAINTENANCE AND CLEANING
- ACCESSORIES
- PROTECTING THE ENVIRONMENT
- BATTERIES
- OTHER CONSUMER DO-IT-YOURSELF (DIY) TOOLS
- 3 YEAR LIMITED WARRANTY
- EXPRESS AND EXCLUSIVE LIMITED WARRANTY TO ORIGINAL RETAIL BUYER
- SPECIAL WARRANTY NOTE FOR COMMERCIAL OR RENTAL USE: THE ABOVE WARRANTY FOR THIS KAWASAKI POWER TOOL, INCLUDING THE BATTERY, SHALL BE EFFECTIVE FOR ONLY 90 DAYS FROM THE ORIGINAL DATE OF PURCHASE IF THIS TOOL IS USED FOR ANY COMMERCIAL OR RENTAL PURPOSE
- THERE ARE NO WARRANTIES WHICH EXTEND BEYOND THE DESCRIPTION ON THE FACE HEREOF
- WARRANTY PERFORMANCE
- EXCLUSIONS
- WARRANTY DISCLAIMERS
- LIMITATION OF LIABILITY
- LIMITATIONS ON WARRANTY DISCLAIMERS
Brand : KAWASAKI
Model : 841448
Category : Drill