
LEDVD2396 - TV COBY - Free user manual and instructions
Find the device manual for free LEDVD2396 COBY in PDF.


| Product Type | TV/DVD Combo |
| Screen Size | 23 inches (diagonal) |
| Display Resolution | 1920 x 1080 (Full HD) |
| Display Colors | 16.7 million |
| Pixel Pitch | 0.265 (H) x 0.265 (V) mm |
| TV System | ATSC / NTSC |
| Power Consumption (On) | 50 W max |
| Power Consumption (Standby) | Less than 1 W |
| Power Supply | AC 100-240 V, 50/60 Hz |
| Speaker Output | 2 x 5 W (4 Ω) |
| Wall Mount Pattern | 200 x 200 mm, M6 screws |
| HDMI Inputs | 2 (HDMI 1 & HDMI 2) |
| VGA Input | 1 (with PC audio input) |
| Component Input | 1 (Y, Pb, Pr) |
| Composite Input | 1 (AV) |
| Antenna Input | 1 (75 Ω coaxial) |
| Digital Audio Output | 1 (Coaxial S/PDIF) |
| Supported Disc Types | DVD, DVD±R/RW, CD, CD-R/RW, MP3, JPEG |
| USB / Card Reader | 1 USB port, 1 card slot (SD/MMC) |
| Remote Control | Included (2x AAA batteries required, not included) |
| Included Accessories | RCA cable, remote control, user manual |
| Audio Decoder | Dolby Digital |
| Energy Star Compliant | Yes |
| Safety Certifications | FCC Class B, UL, CSA |
Frequently Asked Questions - LEDVD2396 COBY
User questions about LEDVD2396 COBY
0 question about this device. Answer the ones you know or ask your own.
Ask a new question about this device
Download the instructions for your TV in PDF format for free! Find your manual LEDVD2396 - COBY and take your electronic device back in hand. On this page are published all the documents necessary for the use of your device. LEDVD2396 by COBY.
USER MANUAL LEDVD2396 COBY
natural_image
Warning symbol of a lightning bolt inside a triangle (no text or numbers)CAUTION
WARNING: SHOCK HAZARD. DO NOT OPEN.
AVIS: RISQUE DE CHOC ELECTRIQUE.
NE PAS OUVRIR

natural_image
Gray triangular warning symbol with an exclamation mark (no text or numbers)CAUTION: TO REDUCE THE RISK OF FIRE AND ELECTRIC SHOCK, DO NOT REMOVE THE COVER (OR BACK) OF THE UNIT. REFER SERVICING ONLY TO QUALIFIED SERVICE PERSONNEL.

The lightning flash with arrowhead symbol within an equilateral triangle is intended to alert the user to the presence of uninsulated “dangerous voltage” within the product’s enclosure that may be of sufficient magnitude to constitute a risk of electric shock.

The exclamation point within an equilateral triangle is intended to alert the user to the presence of important operation and servicing instructions in the literature accompanying the appliance.
For recycling or disposal information about this product, please contact your local authorities or the Electronics Industries Alliance:www.eiae.org.
For Customer Use:
Enter below the serial number that is located on the rear of the unit. Retain this information for future reference.
Model No. LEDVD 2396
Serial No. ____
Precautions
WARNING: To prevent fire or shock hazard, do not expose this device to rain or moisture. Dangerous high voltage is present inside the enclosure. Do not open the cabinet.
Note: If the product suddenly has no response or powers off, an electrostatic discharge may be the cause. In this circumstance, please follow the procedures below for recovery:
- Unplug the unit. Wait 30 seconds.
• After 30 seconds, plug the unit in and turn it on again.
FCC Statement:
This device complies with Part 15 of the FCC Rules. Operation is subject to the following two conditions: This device may not cause harmful interference, and•
- This device must accept any interference received, including interference that may cause undesired operation.
Note:
This equipment has been tested and found to comply with the limits for Class B digital devices, pursuant to Part 15 of the FCC rules. These limits are designed to provide reasonable protection against harmful interference in a residential installation. This equipment generates, uses and can radiate radio frequency energy and, if not installed and used in accordance with the instructions, may cause harmful interference to radio communications. However, there is no guarantee that interference will not occur in a particular installation. If this equipment does cause harmful interference to radio or television reception, which can be determined by turning the equipment off and on, the user is encouraged to try to correct the interference by one or more of the following measures:
Reorient or relocate the receiving antenna.
Increase the separation between the equipment and receiver.
- Connect the equipment into an outlet on a circuit different from that to which the receiver is connected.
Consult the dealer or an experienced radio/TV technician for help•
Use of shielded cable is required to comply with Class B limits in Subpart B of Part 15 of the FCC rules. Do not make any changes or modifications to the equipment unless otherwise specified in the manual. If such changes or modifications should be made, you could be required to stop operation of the equipment.
Important Safety Instructions
Warnings and precautions
To prevent any injuries, the following safety precautions should be observed in the installation, use, servicing and maintenance of this equipment. Before operating this equipment, please read this manual completely, and keep it nearby for future reference.
Important Safety Instructions
- Read these instructions: All the safety and operating instructions should be read before the product is operated.
- Keep these instructions: The safety and operating instructions should be retained for future reference.
- Heed all warnings: All warnings on the product and in the operating instructions should be adhered to. Follow all instructions: All operating and usage instructions should be followed.4.
- Do not use this apparatus near water: (e.g., near a bath tub, washbowl, kitchen sink, laundry tub, in wet basements, or near a swimming pool and the like).
- Clean only with a soft dry cloth. Never use liquid or aerosol cleaners on the equipment. Always remove the power cord from the outlet before cleaning the equipment.
- Do not block any ventilation openings. Install in accordance with the manufacturer's instructions: Do not insert anything into the ventilation holes of your equipment. Inserting any metal or flammable objects may result to fire or electric shock. Do not install this equipment in a confined or building-in space such as a book case or similar unit, and remain a well ventilation openings with items such as newspaper, table—cloths, curtains etc
- Do not install near any heat sources such as radiators, heat registers, stoves, or other apparatus (including amplifiers) that produce heat.
- Do not defeat the safety purpose of the polarized or grounding-type plug. A polarized plug has two blades with one wider than the other. A grounding type plug has two blades and a third grounding prong. The wide blade or the third prong are provided you're your safety. If the provided plug does not fit you're your outlet, consult an electrician for replacement of the obsolete outlet.
- Protect the power cord from being walked on or pinched particularly at plugs, convenience receptacles, and the point where they exit from the apparatus. Only use attachments/accessories specified by the manufacturer.11.
- Use only with the cart, stand, tripod, bracket, or table specified by the manufacturer, or sold with the apparatus. When a cart is used, use caution when moving the cart/apparatus combination to avoid injury from tip-over.
- Do not place the equipment on uneven or unstable carts, stands, tables, shelves etc, The equipment may fall, causing serious injury to children or adults and serious damage to the equipment itself. Always place the equipment on the floor or on a surface that is sturdy, level, stable and strong enough to support the weight of the equipment. Unplug this apparatus during lightning storms or when unused for long periods of time.14.
- Refer all servicing to qualified service personnel. Servicing is required when the apparatus has been damaged in any way, such as power-supply cord or plug is damaged, liquid has been spilled or objects have fallen into the apparatus, the apparatus has been exposed to rain or moisture, does not operate normally, or has been dropped.
- If you can not fit the plug into the electrical outlet, contact an electrician to install a grounding outlet.
- Always operate this equipment from the type of power source indicated on the rear of the serial/model plate. Never overload wall outlets and extensions.18.
- Use and handle the power cord with care. Do not place any heavy objects on the AC power cord.
- Do not pull the AC power cord. Do not handle the AC power cord with a wet hand.
- Remove the plug from the wall outlet, if the equipment will not be used for a long period of time.
- Do not expose the equipment to extreme temperature or to direct sunlight, as the equipment may heat up and suffer damage.
- Do not attempt to service the equipment yourself.
Important Safety Instructions
- Opening and removing the covers may expose you to dangerous voltage or other hazards and may void your warranty. Refer service to qualified personnel. Do not place or drop any other objects on top.25.
- Protect the power cord from being walked on or pinched particularly at plugs, convenience receptacles, and the point where they exit
- WARNING: The mains plug or an appliance coupler is used as the disconnected device, the disconnected device shall remain readily operable.
- WARNING: To reduce the risk of fire or electric shock, do not expose this apparatus to rain or moisture. The apparatus shall not be exposed to dripping or splashing and that no objects filled with liquids, such as vases, shall be placed on apparatus.
Protective earthing terminal. The apparatus should be connected to a mains socket outlet with a 29. protective earthing connection. - Battery shall not be exposed to excessive heat such as the sunshine, fire or the like. Danger of explosion if battery is incorrectly replaced. Replace only with the same or equivalent type.
Important Safety Instructions
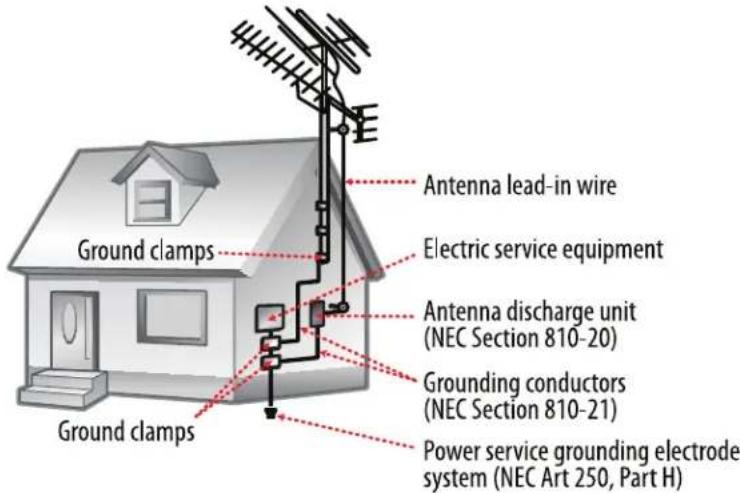
Antenna Safety Instructions
If an outdoor antenna is connected, follow the precautions below:
- An outdoor antenna should not be located in any area where it could come in contact with overhead power lines, or any other electric light or power circuits.
- When installing an outdoor antenna system, extreme caution should be taken to prevent contact with power lines. Direct contact with power lines may be fatal and should be avoided at all costs.
Section 810 of National Electrical Code (NEC) provides information with respect to proper grounding of the mast and supporting structure, grounding of the lead-in wire to an antenna discharge unit, size of grounding conductors, location of antenna discharge unit, connection to grounding electrodes, and requirements for the grounding electrode.
Listening with Earphones
Listen at moderate Volumes to avoid hearing damage.
- If you hear no sound during playback, do not turn the Volume up as the music may suddenly begin at a high Volume. Excessive sound pressure from earphones and headphones can cause hearing loss.
• To avoid damaging your ears, adjust the Volume to the lowest level before playback, and turn up to the desired level when playback has started.
Legal and Trademark Notices
Coby is a registered trademark of Coby Electronics Corporation. All other trademarks and logos are property of their respective owners unless indicated otherwise.
Manufactured under license from Dolby Laboratories. "Dolby" and the double-D symbol are trademarks of Dolby Laboratories. Confidential unpublished works. © 1992 -1997 Dolby Laboratories, Inc. All rights reserved.
This TV incorporates High-Definition Multimedia Interface (HDMITM) technology. HDMI, the HDMI logo and High-Definition Multimedia Interface are trademarks or registered trademarks of HDMI Licensing LLC.
Note: This product contains electrical or electronic materials. The presence of these materials may, if not disposed of properly, have potential adverse effects on the environment and human health. Presence of this label on the product means it should not be disposed of as unsorted waste and must be collected separately. As a consumer, you are responsible for ensuring that this product is disposed of properly.
Table of Contents
Table Of Contents
Precautions
Important Safety Instructions
Main Feature----1
Package Contents----2
Unit View----3
Wall Mounting----3
Remote Control 4
Cable Connections----7
TV Function----11
AV Function----16
PC Function----17
DVD Operation 18
Playback Function----20
DVD Setup----22
Troubleshooting 24
Specifications 25
Main Features
Multiple Mode
TV
AV
COMPONENT
DVD
VGA
HDMI 1
HDMI 2
High Quality Property
High Resolution
Adopt an MPEG2 decoding format to achieve horizontal resolution more than 500 lines.
Superior sound
Built-in Dolby Digital decoder to output high quality sound effects.
Screen
Support the picture size of a normal screen (4:3) and a wide screen (16:9)
Panel Information
The panel used in this television contains millions of thin film transistors that have been manufactured using a high-technology process to deliver a crisp, clear, and detailed picture. Occasionally, a few of these transistors may become stuck or non-active; please note that this does not affect the performance of the television.
NOTE: It is normal to experience some light or dark spots appearing on the screen.
Power Supply:
Insert the power plug into the AC100-240V wall outlet. If you have difficulty inserting the plug, turn it over and re-insert it.
Power Management:
Before plugging the power cord into the AC outlet, make sure that all necessary • connections have been properly made.
If the unit will not be used for a long period of time, disconnect the power and remove the batteries from the remote.
Energy Star Information -
As an ENERGY STAR partner, Coby Eletronics is committed to saving you money and to protecting the environment with energy-efficient products. ENERGY STAR is a set of power-saving guidelines issued by the U.S. Environmental Protection Agency (EPA).
This TV meets the latest ENERGY STAR requirements when used with its factory-default settings. Changing features, settings, and functions of this TV may increase power consumption beyond ENERGY STAR guidelines. These features, settings, and functions are explained in the user manual.
Package Contents
Please make sure the following items are included with your product. If any item is missing, contact your dealer.
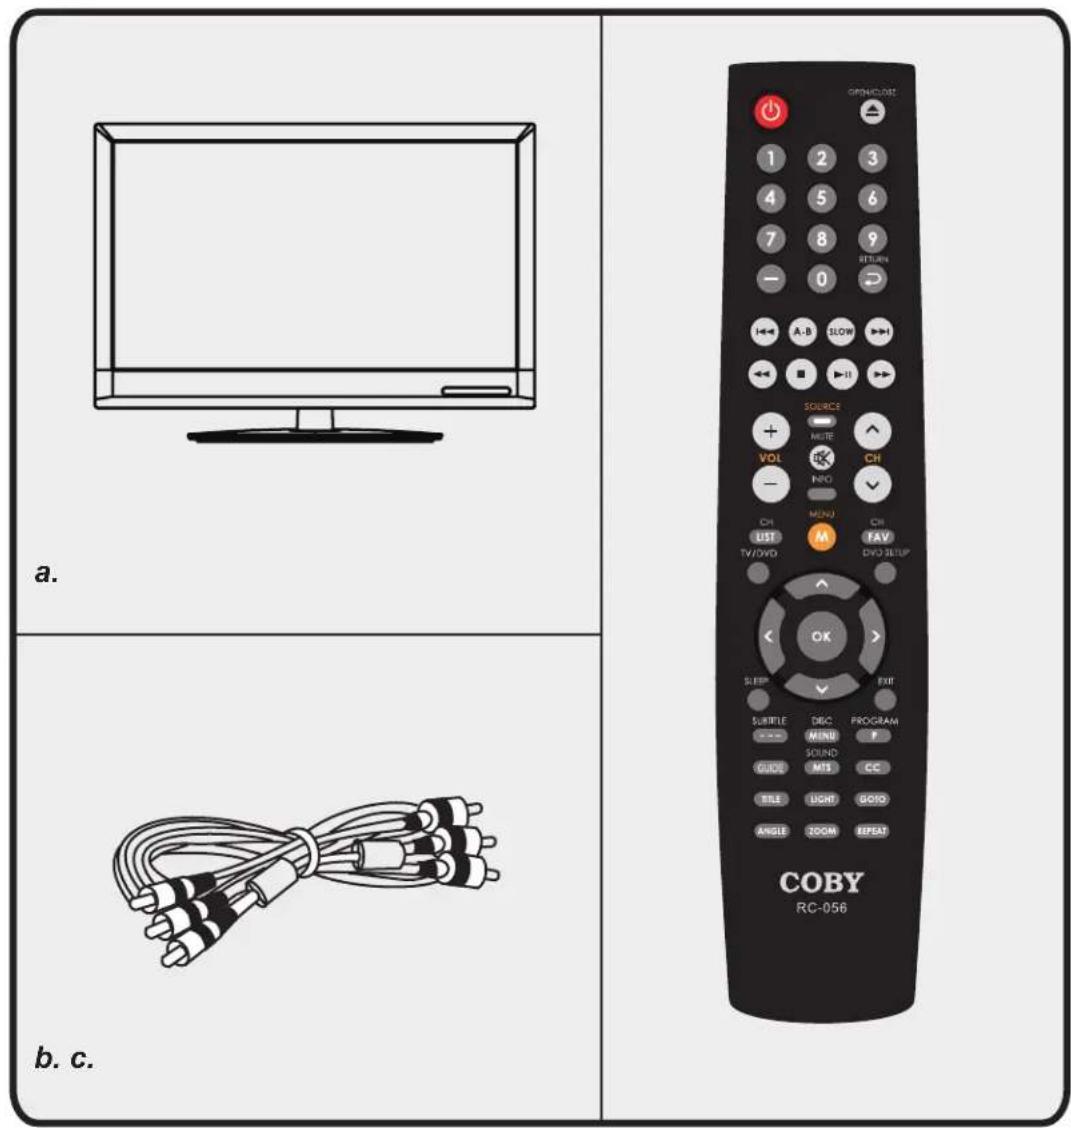
a, Main Unit
b, RCA Cable
c, Remote Control Unit
Unit View
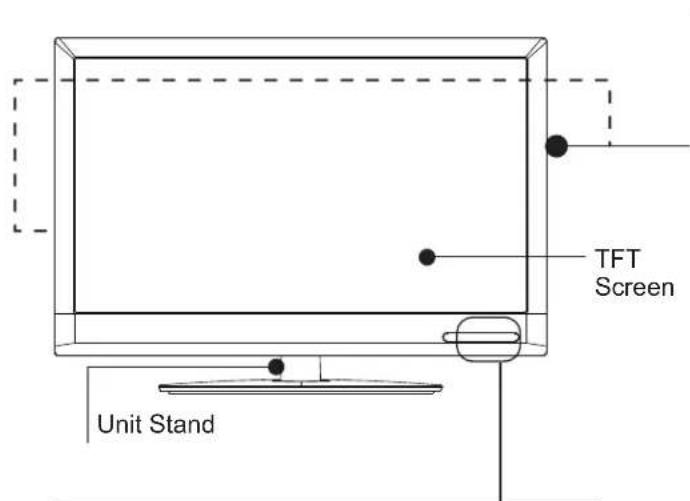
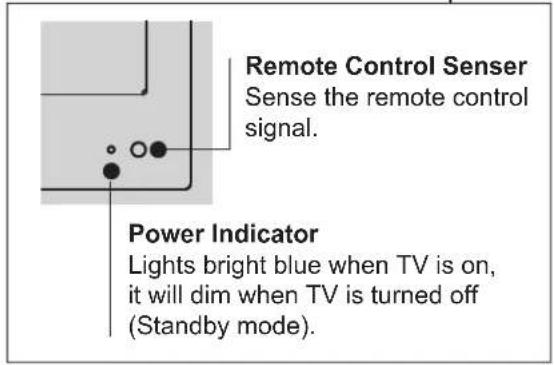
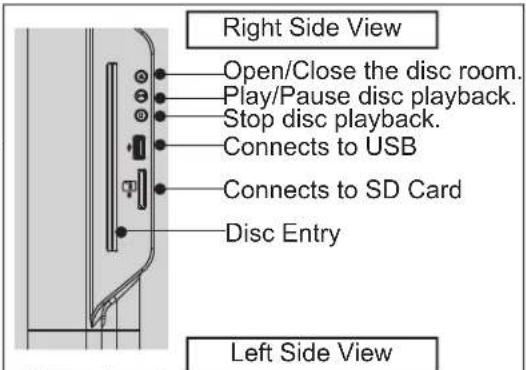
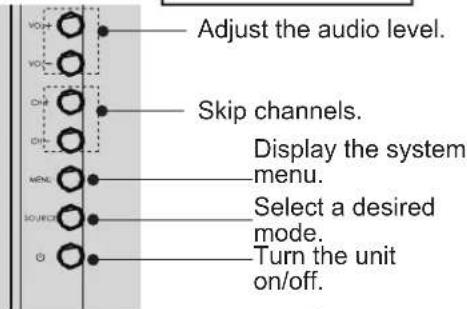
NOTE: The unit enters into the standby mode after being turned off with the POWER button, and it still consumes power in the standby mode.
Unplug the power cord from the outlet completely when it will not be used for a long period of time.
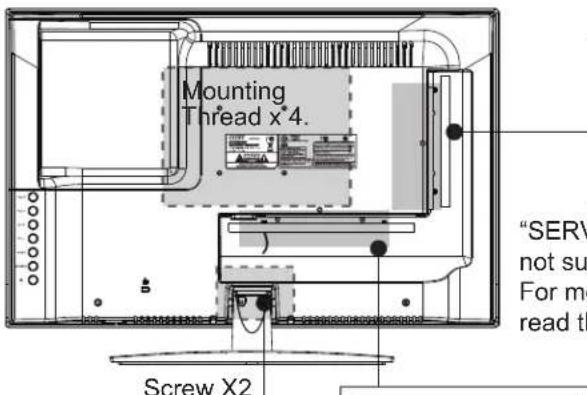
These screws are connecting the TV case to the unit stand.
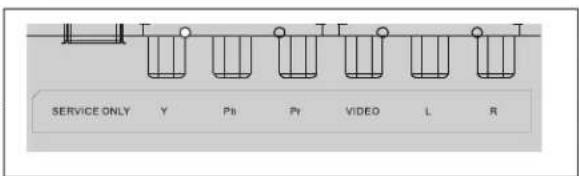
"SERVICE ONLY" is for the engineering use merely and not supposed to be utilized by a finial user.
For more specific details on connector pannels, please read the Cable Connection section
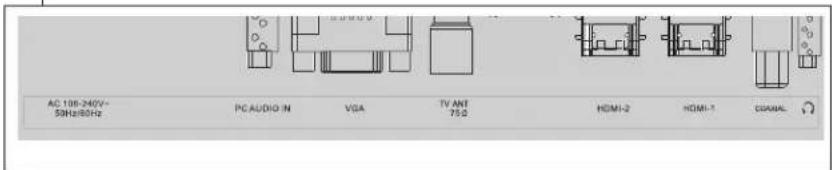
Wall Mounting - Attach the TV case to the wall
- This unit can be delivered to a final user either as a wholly assembled product or with the TV case detached from the unit base, depending on different packing methods. If you got the unit as a fully assembled product, you would have to remove the unit stand first before wall mounting, To detach the unit base, release the fixing screws.
- Use proper wall mounts to fix the TV case on the wall. Take care when mounting, it may cause damage or serious injury should it fall from its mountings. See the Specification page for mounting informaiton. A variety of mounts are available in your local retailer, see instructions when installing the unit. An adequate space is necessary for this installation.
Remote Control
Remote Control Drawing
1. POWER
Turn the unit on or off (standby).
2. Numeric Keypad
Input numeric data. Access the TV channel directly.
3. Sub-channel Selector <->
This button is usually used with the numeric keypad to tune to a channel substation.
e.g. To tune to channel 13-2, press these keys in sequence: <1>, <3>, <−>, <2>.
4. Skip Backward
Repeatedly press this button to skip backward through DVD playback.
5. A-B
Repeat specified playback A to B in the DVD mode.
6. Fast Reverse
Search fast backward through DVD playback.
7. Stop
Stop disc playback.
8. VOL+/-
Adjust the volume level up and down.
9. INFO
Display system current working information.
10. CH/LIST
Display the TV program list, use the up/down direction button to select the desired program in the list, press OK to access.
11. TV/DVD
Switch between the TV mode and the DVD mode.
12. Direction & OK
This set of buttons is usually used when working with system setup menu, use arrow buttons to select an option in the menu, press OK to confirm settings.
13. SLEEP
Cycle through the sleep timer options.
14. SUBTITLE
Display available DVD subtitles.
15. DISC MENU
Access the DVD root menu.
16. GUIDE
Display TV electronic program guide.
17. MTS
Set the audio mode.
18. TITLE
Access the DVD title menu.
19. LIGHT
Turn the front panel light on/off.
20. ANGEL
Some discs are recorded with Multi-angle, press this button to chose the desired viewing angle.
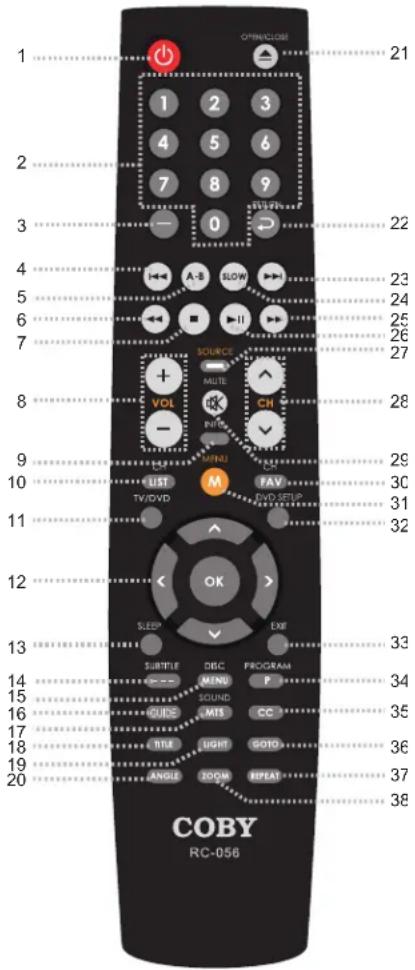
Remote Control
21. OPEN/CLOSE
In the DVD mode, press this button to take in/out disc automatically.
22. RETURN
Reveal the previously viewed channel.
23. Skip Forward
Repeatedly press this button to skip forward through DVD playback.
24. SLOW
Press this button to have current playback advanced in a slow motion, repeatedly press this button to change advance speed. You can press Play/Pause to pause current playback, and then repeatedly press this button to have playback moved step by step forward. To resume normal playback, press Play/Pause.
25. Fast Forward
Search fast forward through DVD playback.
26. Play/Pause
Press this button to start/hold DVD playback.
27. SOURCE
Display the working mode menu, use the up/down direction button to select a desired working mode, press OK to enter.
28. CH+/-
Tune to a higher or lower channel.
29. MUTE
Disable/enable audio output.
30. CH FAV
Display the TV favorite channels list.
31. MENU
Access the TV's main menu to adjust system options.
32. DVD SETUP
Display the DVD system menu.
33. EXIT
Exit the TV system menu.
34. PROGRAM
Display the DVD program menu.
35. CC
Repeatedly press this button to select a desired TV closed caption mode.
36. GOTO
Go to a desired section on a disc via information input.
37. REPEAT
Repeat DVD title/chaptor or CD tracks.
38. ZOOM
Repeatedly press this button to zoom in/out images.
Remote Control
Remote Control
Preparation
- Remove the battery compartment cover located on the rear of the remote control. Insert 2 x "AAA" batteries, making sure to match their polarities (+/-) to the markings on the inside of the compartment. Replace the cover.
- Batteries in the remote will last for approximately 6 months under the normal use. Replace the batteries if the remote control does not work. Do not mix old with new batteries, or different types of batteries.
- Remove the batteries from the remote if it will not be used for a long period of time.
Warnings:
The battery used in this device may present a fire or chemical burn if mistreated. Do not recharge, disassemble, incinerate, or heat the battery ( 212°F). Keep batteries away from children.
Using the Remote Control
To use the remote, point it at the remote sensor of the player. Operate the remote within 20 feet of the sensor and at an angle of ±30 degrees.
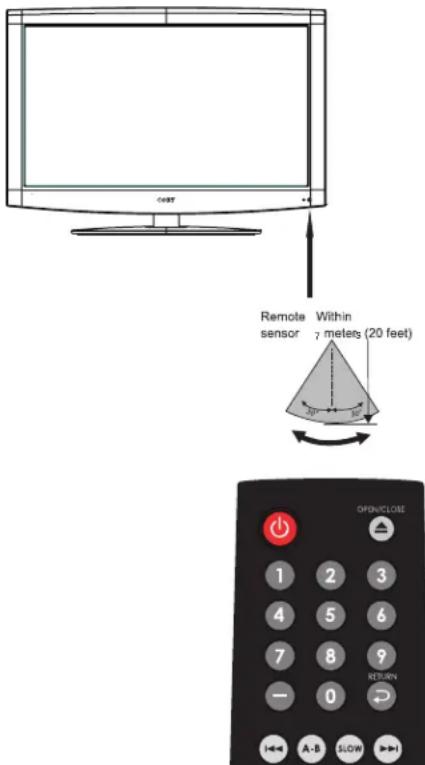
The operating distance may vary depending on the brightness around.
Notes:
Do not point bright lights directly at the remote control sensor.1. Do not place objects between the remote control unit and the remote control sensor.2. Do not use this remote control unit while simultaneously operating the remote control unit of any other 3. equipment.
Cable Connections
Figure. Cable connections
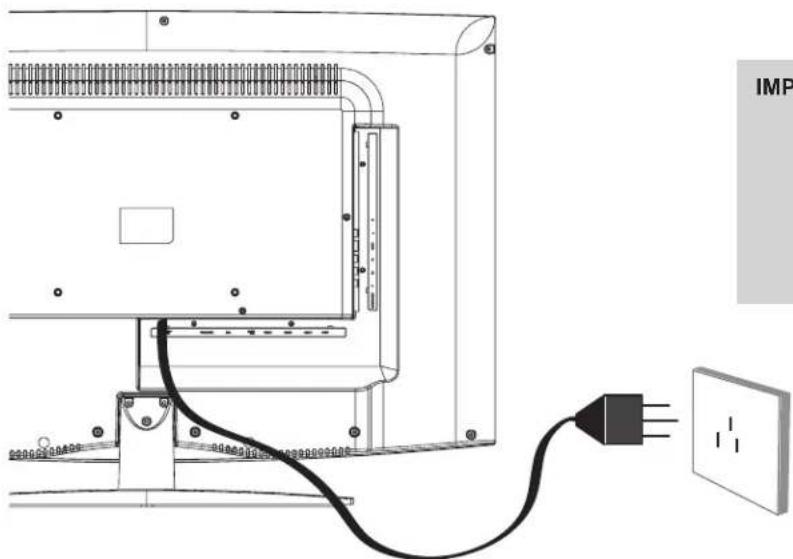
Power Connection
Insert the power plug into the 100-240V AC wall outlet. If you have difficulty inserting the plug, turn it over and re-insert it.
natural_image
Technical diagram of an electrical enclosure with a black cable and a black plug, connected to a wall socket (no text or symbols)IMPORTANT NOTICE
Be sure to have all necessary 1. connections properly done before connect the power supply. If the product will not be used for a 2. long period of time, disconnect the power.
Antenna Connection
Connect TV RF sources to the antenna port. TV RF signals include: receiving antenna/CATV net. You can use 75 Ohm coaxial cable to connect outdoor antenna.
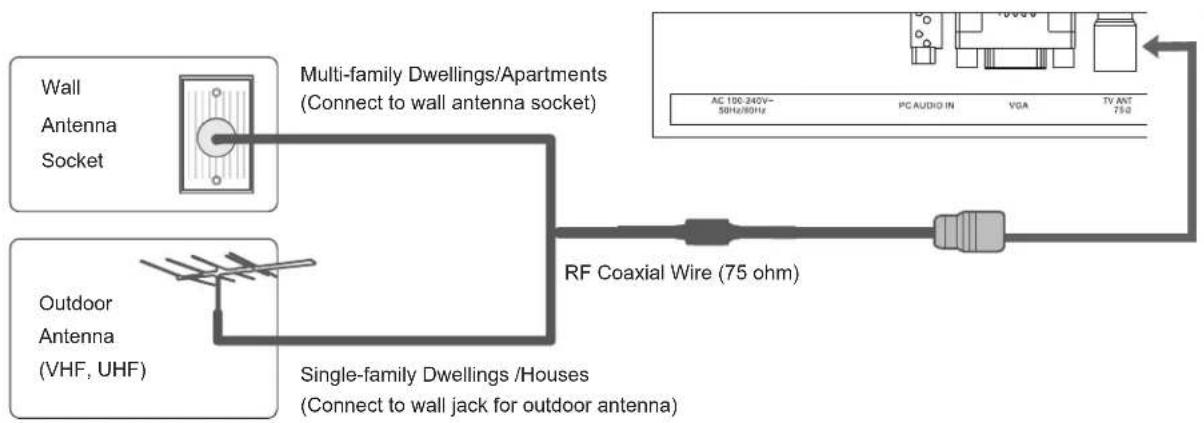
flowchart
graph LR
    A["Wall Antenna Socket"] --> B["Multi-family Dwellings/Apartments (Connect to wall antenna socket)"]
    C["Outdoor Antenna (VHF, UHF)"] --> D["Single-family Dwellings/Houses (Connect to wall jack for outdoor antenna)"]
    B --> E["RF Coaxial Wire (75 ohm)"]
    D --> E
    E --> F["TV ANT 75Ω"]
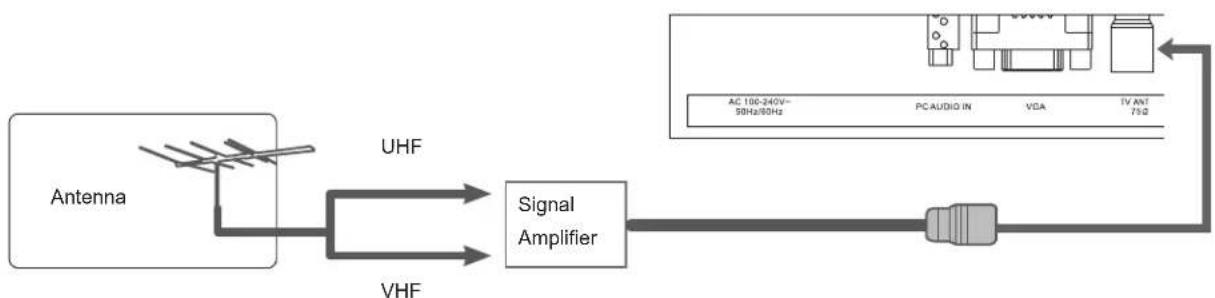
flowchart
graph LR
    A["Antenna"] -->|UHF| B["Signal Amplifier"]
    B --> C["AC 100-240V~ 9GHz/9GHz"]
    B --> D["PC AUDIO IN"]
    B --> E["VGA"]
    B --> F["IV ANT 75Ω"]
    B --> G["VHF"]
NOTE:
- In poor signal areas, to achieve better picture quality it may be necessary to install a signal amplifier to the antenna as shown above.
If signal needs to be split for two TVs, use an antenna signal splitter for connection.
Cable Connections
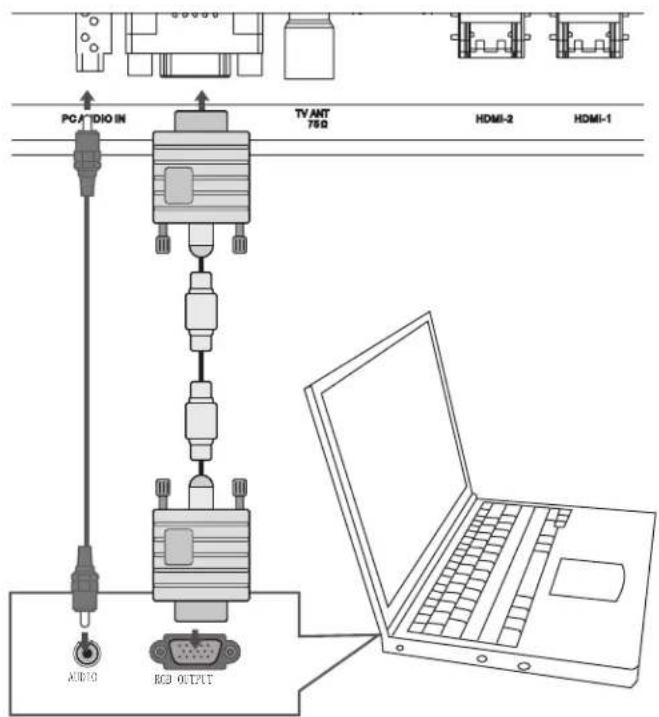
VGA Input - PC Connection
The VGA port of the TV is capable of accepting high-definition signals from computers with a VGA output jack. When used as a computer moniter, connect the VGA jack and the PC Audio In jack with a 15-Pin D-Sub cable and a 3.5mm stereo audio cable. The mentioned cables are not included with this product.
Headphone/Earphone Connection
Be sure that your unit is set at a low volume level before connecting the headphone. Increase the volume gradually for your comfortable listening.
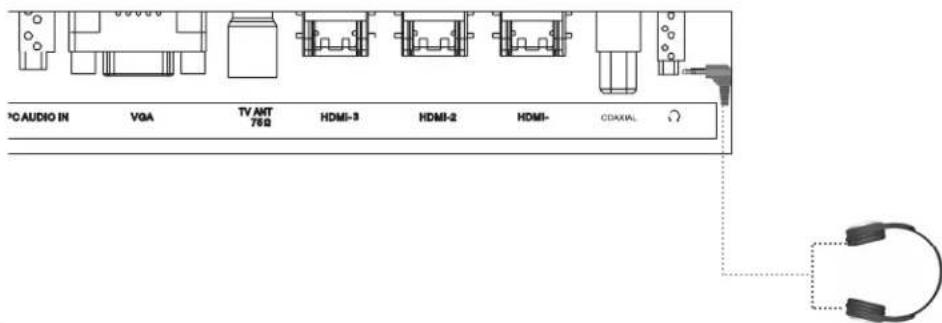
CAUTION:
Hearing experts advise against the constant use of personal stereos played at high volume. Constant high volume use can lead to hearing loss. If you experience ringing in the ears or hearing loss, discontinue use and seek medical advise.
Cable Connections
COAXIAL (S/PDIF) - General Information
This port is usually found on digital audio equipment such as a DAT (Digital Audio Tape) machine or audio processing device. It allows the transfer of audio from one file to another without the conversion to and from an analog format, which could degrade the signal quality. The most common connector used with an S/PDIF interface is the RCA connector, the same one used for consumer audio products. An optical connector is also sometimes used.
COAXIAL(S/PDIF) Connection
Send the TV's audio signal to an external audio equipment via COAXIAL Output port. A 75 ohm coaxial cable is required for this connection. If you want to enjoy digital broadcasting through 5.1-channel speakers, connect the COAXIAL terminal on the back of TV to a Home Theater (or amp).
Notice : Coaxial digital audio output only operates under the HDMI and Digital TV mode.
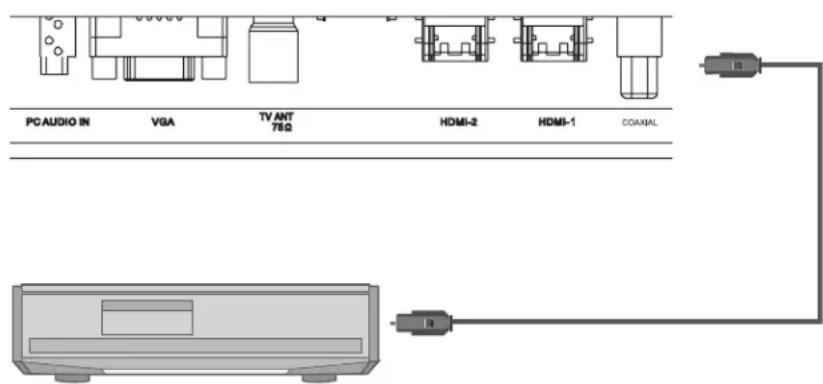
NOTE: If you can not hear anything after COAXIAL(SPDIF) connection, set the SPDIF as PCM via "Digital Audio/SPDIF" option under the "Audio Menu". See page 12 for details.
CAUTION:
Do not look into the output port. Looking at the laser beam may damage your vision.
External Audio and Video Signal Input - HDMI, RCA, COMPONENT.
The player's AV function would enable users to view programs from external signal sources.
- Three input modes are available for you to chose from, we have them ranked as below in regard to image definition: HDMI, COMPONENT, RCA.
After cable connection, set the unit into the relevant input mode with the Source button to enable the signal pass.
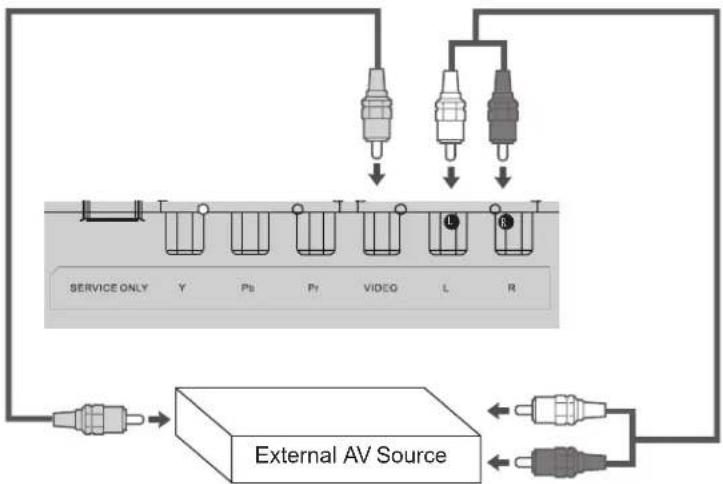
NOTE: We supply one set of AV cable with this product. The white/red plug of the RCA cable is for the audio L/R connection and the yellow plug for the video connection. The white/red plug of the RCA cable can also be used separately to input the audio signal in the S-video/Component connection. The rest of cables required for other necessary connections are not included with this product, please check with your electronic store.
IMPORTANT NOTICE - When work with an external device,
- Be sure to have all necessary connections properly done before connect the power supply. Set the unit into the relative input/output mode to enable the signal pass. - Refer to the manual of external devices as well.
HDMI 1/2 Input
Cable Connections
HDMI (High Definition Multimedia Interface) is a new type of connection that transmits digital audio and video signals simultaneously over a single cable. A HDMI cable is required for the HDMI connection. These HDMI input connectors are capable of receiving video at resolutions up to 1080p (1080-progressive). HDMI 1/2 is used in the same application.
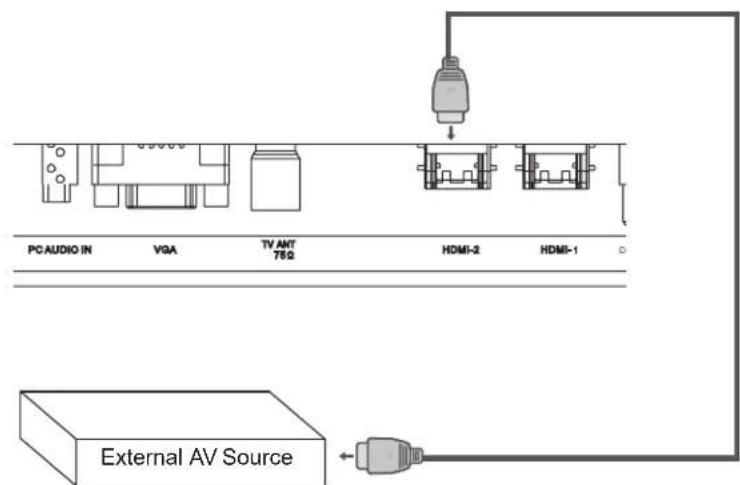
NOTE:
The TV can receive video and audio signals simultaneously over a DHMI cable.
If the external AV device does not support Auto HDMI, you must set the output resolution appropriately. Check that your HDMI cable is version 1.3 or higher. If the HDMI cables don't support HDMI version 1.3, flickering image or blank screen can be a result. Please use the latest cables that support at least HDMI version 1.3.
AV Input
The CVBS port is capable of accepting signals from standard video sources(e.g., cable/satellite boxes, DVD players, VCRs, etc.)
Connect the VIDEO port with the yellow plug of the supplied AV cable.1. Connect the L, R port with the white/red plug of the supplied AV cable.2.
flowchart
graph TD
    A["External AV Source"] --> B["Service Only"]
    A --> C["Device 1"]
    A --> D["Device 2"]
    A --> E["Device 3"]
    B --> F["Y"]
    B --> G["Ps"]
    B --> H["Pr"]
    B --> I["VIDEO"]
    B --> J["L"]
    B --> K["R"]
    C --> L["Pin 1"]
    D --> M["Pin 2"]
    E --> N["Pin 3"]
Cable Connections
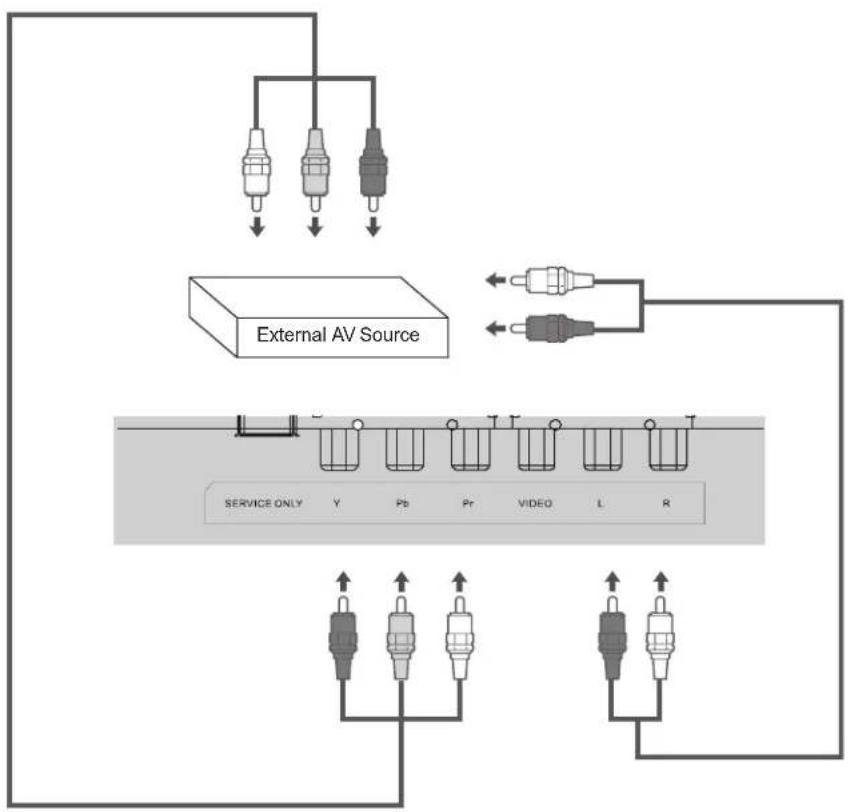
Component Input (Y Cb/Pb Cr/Pr)
The component port is capable of accepting high-definition signals from standard video sources. (e.g., cable/satellite boxes, DVD players, VCRs, etc.)
- Connect the Y, Pb, Pr port by the component cable to input the video signal. Component cabel is not included with this product.
Use the red/white plug of supplied AV cable to connect R,L port for audio transmission.2.
flowchart
graph TD
    A["External AV Source"] --> B["Service ONLY"]
    A --> C["Video"]
    A --> D["Antenna"]
    A --> E["Antenna"]
    A --> F["Antenna"]
    A --> G["Antenna"]
    A --> H["Antenna"]
    A --> I["Antenna"]
    A --> J["Antenna"]
    A --> K["Antenna"]
    A --> L["Antenna"]
    A --> M["Antenna"]
    A --> N["Antenna"]
    A --> O["Antenna"]
    A --> P["Antenna"]
    A --> Q["Antenna"]
    A --> R["Antenna"]
    A --> S["Antenna"]
    A --> T["Antenna"]
    A --> U["Antenna"]
    A --> V["Antenna"]
    A --> W["Antenna"]
    A --> X["Antenna"]
    A --> Y["Antenna"]
    A --> Z["Antenna"]
Preparations
Connect cables.(Refer to the "Cable Connections" section for details).1.
Press the POWER button to turn on the player.2.
Select the TV signal mode, using the SOURCE button.3.
Press CH+/- to skip channels. Or you can use number buttons to access a channel directly.4.
. For an initial use, you need to scan channels under the Channesl Menu, please follow steps below.
Press the MENU button to display system menu window, use direction buttons to access the CHANNELS menu. In the Channels menu, select "Auto Channel Search", press OK to enter - - > Set the TV source as Antenna/Cable (ATV/DTV) - - > Select "Start", press OK to scan. To quit, press MENU.
System Setup Menu
Various features can be preset through the setup menu, please read this section carefully.
- Press MENU to display the system menu window.
- Press the left/right direction button to select the desired menu, press the down direction button or the OK button to enter.
While working with the menu,
Always use direction buttons to select an option, press OK to confirm. Press MENU to back up/exit the setup menu, or press EXIT to quit.
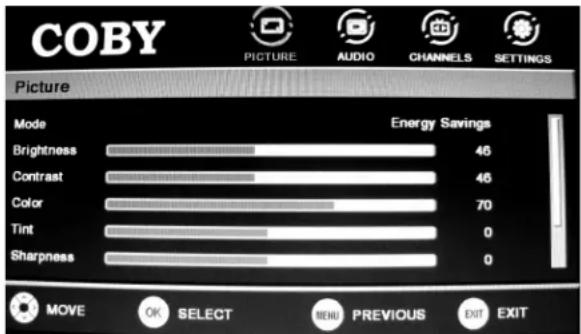
Note: Menu option availability is dependent on the TV's current input source mode. Options that are grayed out are not selectable from the current mode.
Picture Menu
| ITEM DESCRIPTION |
| Mode - Setup the picture mode as Custom/Sports/Theater/Energy Savings/Standard/Vivid. |
| Brightness/Contrast/Color/Tint/Sharpness - Press the left/right direction button to adjust settings. When you select a picture Mode other than "Custom", these items are automatically given parameters to correspond with the chosen preset mode, so any change to these parameters would return the Mode setting to "Custom". |
| Advanced Video - Press the right button to enter this option.Aspect Ratio - Set the screen aspect ratio as Normal/Zoom/Wide/Cinema.Color Temperature - Set color preference as Cool/Normal/Warm.Noise Reduction - Set the noise reduction function as Off/Low/Middle/Hight.Adaptive Contrast - Set the adaptive contrast function on/off.Over Scan - Set the over scan function on/off. |
| Reset Picture Settings - Select this item and press OK or the right direction button to set all items under this menu to the factory default. |
TV Function
Audio Menu
| ITEM DESCRIPTION | |
| Mode Set the audio Music/News. | mode as Custom/Standard/Theater/ |
| Treble/Bass/Balance When you select an audio Mode other than "Custom", these items are automatically given parameters to correspond with the chosen preset mode, so any change to these parameters would return the Mode setting to "Custom" | Press the left/right direction button to adjust settings. |
| Digital Audio/SPDIF (COASTAL) RAW is to be used when you have a receiver that can decode the signal. While SPDIF PCM is to be used when you do not have the ability to decode the signal. SPIDIF RAW is the preferred option, if you can't hear anything then switch to PCM | Set Digital Audio/SPIDIF as RAW/PCM. |
| MTS/SAP Set the ATV audio mode as Mono/Stereo/SAP. | |
| Audio Language Set | DTV audio languages. |
| Reset Audio Settings set all items under | Select this item and press OK or the right button to this menu to the factory default. |
Channel Menu
| ITEM DESCRIPTION | |
| Auto Channel Searchviously stored channels.Select this item, press OK to enter - -> Set the TV source as Antenna/Cable (ATV/DTV) - -> Select "Start", press OK to search channels. To quit, press MENU. | |
| Add/Skip This channel this option, press OK to enter - -> Use direction buttons to select a channel you want to skip, press OK to confirm. To reveal the h dden channel, press OK again. | |
| Favorite Select this option, press OK to enter - -> Use direction buttons to select a channel, press OK to mark it as a favorite channel. To disable the setting, press OK again. | |
| Channel Labels programs.Select this option, press OK to enter - -> Locate a channel you want to put a label - -> When edit labels, use the left/right direction button to move left/right, use the up/down direction button to change characters - -> Press OK to display "Yes/No" box, select "Yes", press OK. | |
| Channel Strength | Display the DTV signal intensity. |
| Audio Only | Set audio output on/off. |
TV Function
Settings Menu
| ITEM DESCRIPTION | |
| Parental You controls option | are required to enter the 4-digit password to access this The initial password is 0000. Button Lock - This option would enable users to lock buttons on the unit panel. Block Unrated TV -This option would enable users to lock unrated TV program. USA Parental Locks - Setup the US parental control. Select this option, press OK to enter, there are TV Rating and Movie Rating, Use direction buttons to select the rating level, press OK to confirm, press MENU to back up menu. TV(TV Rating) - Y, Y7, G, PG, 14, MA. MPAA(Movie Rating) - PG-13, R, NC-17, X, N/A, G, PG) Canadian Parental Locks - Setup the Canada parental control. Select this option, press OK to enter. There are English Rating and French Rating. Use direction buttons to select the rating level, press OK to confirm, press MENU to back up menu. English Rating - E, C, C8+, G, PG, 14+, 18+. French Rating - E, G, 8ans+, 13ans+, 16ans+, 18ans+. Change Password - To change the password, input the new password - -> Verify again. Please remember the password since the player's reset function would not revert the password. RRT5 Settings - Set the rating region table. |
| Closed Caption | Select this option , press the right direction button to access the Closed Caption menu. There are four options listed under the Closed Caption menu. Mode - Set the closed caption mode as CC Off/CC On/CC On |
| Mute. Text1~4/Off. | Analog Caption - Set the analog caption type as CC1~4/ Digital Caption - Set the digital caption type as CS1~6/Off. Digital CC Settings - Press the right direction button to enter CC Settings menu, set "Style" as "Custom" to edit CC type to your own preference. Press MENU to back up. |
TV Function
Settings Menu
| ITEM DESCRIPTION | |
| Time This option would enable users to adjust Date/Time information as well as setup the sleep timer.Date/Time - Enter this option, set "Mode" as "Auto" / "Custom".When Mode is set as "Auto", system would adjust date/time information automatically after you select a desired Time Zone.When Mode is set as "Custom", you can customize year/month/day/Hour information by your own standards, using direction buttons to write in data.Sleep Timer - Unit will shut down automatically on Sleep Time.The available option is 5/10/15/30/45/60/90/120/180/240 min/Off. The count down would start immediately after setting.You can access this function by repeatedly pressing the SLEEP button on the remote also. To check the timer left, press the SLEEP button on the remote once. To cancel the sleep timer,set the timer to Off. | |
| Menu Settings | Transparency - Set OSD (On-Screen-Display) transparency.Language - Set OSD languages. |
| Computer This option is available for the VGA mode and to be used to Settings Adjust PC parameters. | |
| Reset to Set Default | the unit to the factory default. |
AV Function
The player's AV input function would enable user to view programs from external signal sources. When input AV signals, read the user's manual of the external device as well.
Connect the external AV signal source. Refer to the "Cable Connection" section for details1.
Use the SOURCE button to select the relevant AV mode (AV, S-Video, Component, HDMI).2.
System Setup Menu
Various features can be preset through the setup menu, please read this section carefully.
Press MENU to display the system menu window.
- Press the left/right direction button to select the desired menu, press the down direction button or the OK button to enter.
While working with the menu,
Always use direction buttons to select an option, press OK to confirm. Press MENU to back up/exit the setup menu, or press EXIT to quit.
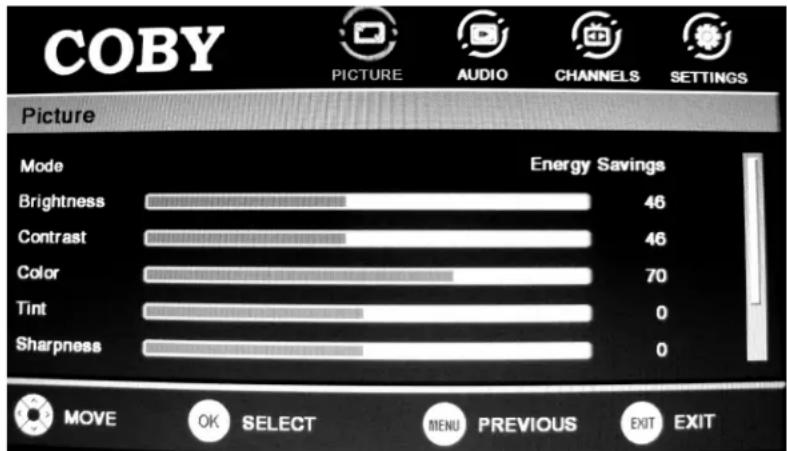
NOTE: Please see the TV section for menu descriptions.
Note: Menu option availability is dependent on the TV's current input source mode. Options that are grayed out are not selectable from the current mode.
PC Function
The unit's screen can be used as your computer's monitor.
- Shut down PC and this unit, connect the VGA jack and PC Audio In jack with a 15 -Pin D-Sub cable and a 3.5mm stereo audio cable. See the "Cable Connection" section for details.
Turn on both units and use the SOURCE button to select VGA2.
Important Notice
- There may be interference relating to resolution, vertical pattern, contrast or brightness in PC mode. Change the PC mode to another resolution or change the refresh rate to another rate or adjust the brightness and contrast of your PC until the picture is clear. If the refresh rate of the PC graphic card can not be changed, change the PC graphic card or consult the manufacturer of the PC graphic card.
The synchronization input waveform for Horizontal and Vertical frequencies are separate.
We recommend using under 5m of cable. This provides the best picture quality.
System Setup Menu
Some of the PC features can be preset through the setup menu, please read this section carefully.
Press MENU to display the system menu window.
- Press the left/right direction button to select the desired menu, press the down direction button or the OK button to enter.
While working with the menu,
Always use direction buttons to select an option, press OK to confirm. Press MENU to back up/exit the setup menu, or press EXIT to quit.
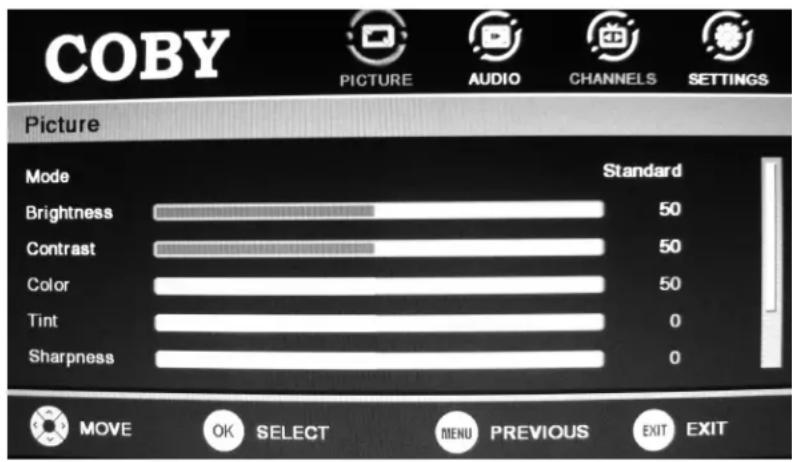
Adjust the PC Screen via System Menu
Upon switching to the PC mode, the monitor will be automatically regulated for a proper functioning. If the result is not up to your expectation, please adjust the monitor manually via the "Computer Settings" menu which is listed under the "Settings" menu.
DVD Operation
Preparation
After all necessary connections have been made, press POWER to turn on the player and then press the MODE button to select DVD. The following discs can be read by the player : DVD /CD / MP3 /JPEG.
Disc Loading
- Put the disc slightly into the disc tray.
- The disc will be taken automatically into the tray.
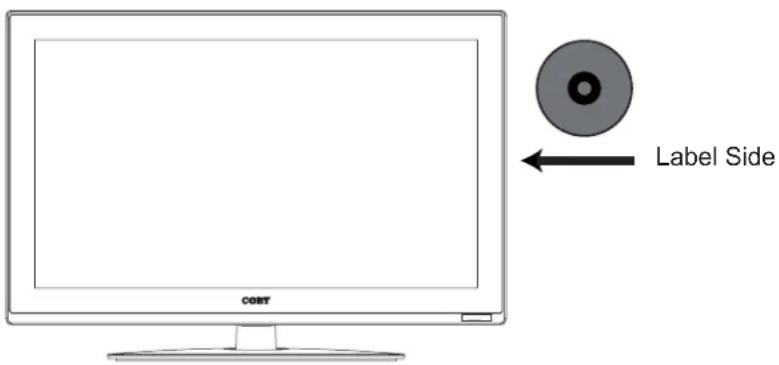
Warning: Do not play poor quality discs that may damage the player's lens.
DVD Playback
MENU
Normally a DVD disc consists of several titles and chapters. Once disc data is recognized by the player, a root menu will be displayed on the screen. Press the direction buttons to select the desired title/chapter from the menu and press OK to play. During playback, press DISC MENU to return to the root menu. Some discs start playback automatically.
SUBTITLE
Press the SUBTITLE button to select subtitle languages for multi-subtitle discs.
ANGLE
Press the ANGLE button to select the available viewing angle. Some discs are recorded from various camera positions, which lets you enjoy the same scene from different perspectives. In this case, you'll usually find a marking on the DVD sleeve.
VOLUME
During playback, press the VOL+ button to increase the volume and press the VOL- button to decrease the volume.
DVD Operation
CD Playback
The player will play all tracks on a CD disc by default.
MP3 Playback
Load a disc into the disc tray. 1.
- It will start playback automatically. Or press direction buttons to select a file from the menu and press OK or PLAY/PAUSE button to start playback. Press left/right button to enter /exit file folders.
Press the STOP button to stop playback.3.
JPEG Playback
JPEG is a common picture format that requires small amounts of storage per image and has low loss in resolution. Hundreds of pictures can be stored on a disc in this format. In order to view JPEG photo albums, you can ask your film development company to make a "PICTURE CD" when they develop your film.
Normal Playback
Load a JPEG disc in.
Press the direction buttons to select the target file and press OK to access.
Picture Rotation
There are four kinds of rotational modes: Inversion, Enantiomorphism, rotate left and rotate right.
Press direction buttons to select:
"UP" ---- Inversion/Normal
"DOWN" ---- Enantiomorphism/Normal
"LEFT" ---- Rotate left
"RIGHT" ---- Rotate right
Zoom
Press ZOOM button to zoom in/out picture.
Press direction buttons to move the zoomed picture.
During playback, press the STOP button to return to the previous menu.
NOTE: Depending on how the disc was made, a JPEG disc may allow playback, but not rotation or zooming of the images.
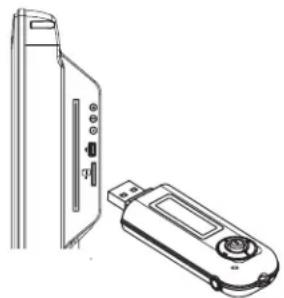
USB/Card Access
Set the unit into the DVD mode, plug the USB or Card into the corresponding slot, the player starts reading data. When the USB/Card is detected, the screen displays a working menu, press the direction buttons to select the file, press OK to start playback. To disconnect the device, just unplug it from the port when it is not in working.
natural_image
Technical line drawing of a device with a vertical panel and a rectangular device (no text or symbols)Unit right side panel
Start Playing
Press PLAY/PAUSE to start playback
Pause Playing
Press PLAY/PAUSE once to hold playback, press it again to resume.
Stop Playing
Press STOP once to stop playback at a time point. (Pre-stop mode) It will resume from where it was stopped, when you press PLAY button. Press STOP twice to stop playback completely.
Repeat Function
Use the REPEAT button to perform the repeat function.
Repeatedly press the REPEAT button to cycle through the repeat modes as below,1.
DVD Mode REP: CHAPTER --> REP:TITLE --> REP:ALL --> REP:OFF
CD Mode REP: 1 --> REP:ALL --> REP:OFF
- Use the A-B button on the remote to repeat a section A-B. Press A-B once to set the starting point A, press it twice to set the ending point B, the player would start playing section A-B. To cancel, press A-B.
NOTE: Some discs do not support the repeat function.
Search Function
Go to a desired section in a disc.
Press the GOTO button, below picture appears on the screen.
DVD
Search by title /chapter/time

CD/MP3
Search by track / time

- Press direction buttons to move between title/chapter/time entry, press numeric buttons to input data.
Press OK to start search.
Press GOTO once again to exit.2.
NOTE: Some DVD discs do not support the search function.
Fast Playback
Press ▶◀◀◀ on the remote to go fast forward/backward through a disc. Repeatedly press the button to change the search speed as below.

Slow Playback
Slow Motion
Press the SLOW button on the remote to have current playback advanced in a slow motion, repeatedly press this button to change speed as below.

Step by Step
Press Play/Pause to pause current playback, and then repeatedly press SLOW to have playback moved step by step forward. To resume normal playback, press Play/Pause.
Zoom Function
Repeatedly press the ZOOM button to achieve the following zoom effect.
ZOOM 2 - ZOOM3 - ZOOM 4 - ZOOM1/2 - ZOOM1/3 - ZOOM1/4 - ZOOM:OFF
NOTE: There is no zoom function for MP3 or CD discs.
Programming Chapters/Tracks
You can store up to 16 programs.
Press the PROGRAM (P) button to display the program menu.1.
e.g. DVD Mode
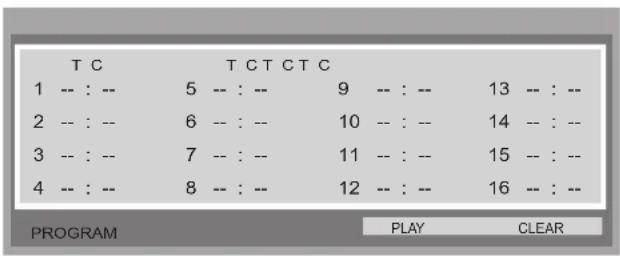
Press direction buttons to move between input fields and press number buttons to input data.2.
Press direction buttons to select "Play" and press OK to start playback. 3.
To clear, select "CLEAR" from the menu and press OK. 4.
To quit, press the Program button.5.
DVD Setup
Various features can be preset through the DVD setup menu. Press the DVD SETUP button to show the DVD menu.


SYSTEM SETUP
POWER RESUME
SCREEN SAVER
PASSWORD
RATING
DEFAULT
While working with the setup menu:
Press the direction buttons to select the desired item.1.
Press the right direction button or the OK button to confirm settings.2.
To exit, press DVD SETUP again.3.
System Setup
• Power Resume - Set the power resume function On.Off. The default setting is Off.
- Screen Saver - Set the Screen Saver ON/OFF. The default setting is On. The screen saver is useful to prevent your display from becoming damaged. If the Screen Saver is set ON, the screen saver picture appears when you leave the player in the stop mode for about a few minutes. Press any button on the unit/remote to exit the screen saver.
- Password - Move the cursor to the PASSWORD prompt and press OK. Input the password 8888, if it is the first use. After confirmation, you will be required to input a new 4-digit code, and verify again.
- Rating - There are eight levels of Parental Control. Level one opens discs to people of all ages, level eight is suitable only for adults. To change the parental control setting, a 4-digit code is required to be input first. (The default code is 8888). When the input code is confirmed, the level setting menu will appear, select the appropriate level by the UP/DOWN button and press OK to confirm.
- Default - This function allows you to set the unit back to the factory default.
DVD Setup
Language Setup
| Item | Instruction | Default |
| OSD Language Setup the OSD language. English | ||
| Audio Lang Setup the audio language. English | ||
| Subtitle Lang Setup the subtitle language. When OFF is English selected, the subtitle will not be displayed. | ||
| Menu Lang Setup the menu language. English | ||
Trouble Shooting
If you have a problem with this device, please read the troubleshooting guide section and check our website at www.cobyusa.com for Frequently Asked Questions (FAQs) and firmware updates. If these resources do not resolve the problem, please contact Technical Support.
COBY Electronics Technical Support
150 Knowlton Way, Savannah, GA 31407
Email : techsupport@cobyusa.com
Web : www.cobyusa.com
Phone & Hours: US Residents: 877-302-2629
Monday-Friday (9:00AM-9:00PM EST)
Canadian Residents: 855-542-8917
Monday-Friday (8:00AM-8:00PM EST)
| Symptom | Check and Action |
| No Power | Make sure the unit has been powered on manually.•Check if the power cord has been properly connected to the power outlet.Check if the main power has been switched on. |
| No Picture | Try another TV channel•Check if the system connection is proper and secure.•Check if the connection cables are damaged. |
| No Sound | Increase the volume.•Check if the MUTE function of the unit has been activated.•Check if the sound system has been properly set.•Check if the AV audio signal input cable has been connected properly. |
| Color Distorted | Reset the color system of the unit.Check if the system has been properly connected.Check if the AV video signal input cable is connected properly. |
| Picture and Sound are interfered | Check if the system has been properly connected.If using antenna, adjust the antenna. |
| Remote Control does not work | Make sure the POWER button on the unit has been turned on manually.Remove the obstacles between the remote control and the player.Point the remote control towards the remote sensor on the player.Check if the batteries of the remote control have been loaded with correct polarities.Replace the batteries of the remote control. |
| Malfunction | Should the player develop a malfunction, unplug the player for 30 • minutes. After that, power on the player and the restore function should reset the player. |
Specifications and manual are subject to change without prior notice.
Specification
LEDVD2396
| TFT Panel Characteristic | Active Area | 23" |
| Resolution | 1920x1080 | |
| Display Color | 16.7M colors | |
| Pixel Pitch | 0.265(V) X0.265(H) | |
| TV Characteristic | TV System | ATSC/NTSC |
| Antenna Impedance | 75Ω | |
| Standard | Standby Power Consumption | <1W |
| Power Consumption | AC100-240V 50/60Hz | |
| On Working 50W(Max) | ||
| Speaker 2x(4Ω, 5W) | ||
| Operating Temperature Range | 0°C-40°C | |
| Wall Mounting | 200X200MM, M6. |
TFT LED Widescreen Television
natural_image
Line drawing of a flat-screen monitor with a blank screen and a small button at the base (no text or symbols)Instruction Manual
LEDVD 2396
Please read this manual carefully before connection and use

- CAUTION
- For Customer Use:
- Precautions
- FCC Statement:
- Note:
- Important Safety Instructions
- Warnings and precautions
- Antenna Safety Instructions
- Listening with Earphones
- Legal and Trademark Notices
- Table of Contents
- Main Features
- Multiple Mode
- High Quality Property
- High Resolution
- Superior sound
- Screen
- Panel Information
- Power Supply:
- Power Management:
- Energy Star Information -
- Package Contents
- Unit View
- Wall Mounting - Attach the TV case to the wall
- Remote Control
- Remote Control Drawing
- POWER
- Numeric Keypad
- Sub-channel Selector <->
- Skip Backward
- A-B
- Fast Reverse
- Stop
- VOL+/-
- INFO
- CH/LIST
- TV/DVD
- Direction & OK
- SLEEP
- SUBTITLE
- DISC MENU
- GUIDE
- MTS
- TITLE
- LIGHT
- ANGEL
- OPEN/CLOSE
- RETURN
- Skip Forward
- SLOW
- Fast Forward
- Play/Pause
- SOURCE
- CH+/-
- MUTE
- CH FAV
- MENU
- DVD SETUP
- EXIT
- PROGRAM
- CC
- GOTO
- REPEAT
- ZOOM
- Preparation
- Warnings:
- Using the Remote Control
- Notes:
- Cable Connections
- Figure. Cable connections
- Power Connection
- IMPORTANT NOTICE
- Antenna Connection
- VGA Input - PC Connection
- Headphone/Earphone Connection
- CAUTION:
- COAXIAL (S/PDIF) - General Information
- COAXIAL(S/PDIF) Connection
- External Audio and Video Signal Input - HDMI, RCA, COMPONENT.
- IMPORTANT NOTICE - When work with an external device,
- HDMI 1/2 Input
- AV Input
- Component Input (Y Cb/Pb Cr/Pr)
- Preparations
- System Setup Menu
- While working with the menu,
- Picture Menu
- TV Function
- AV Function
- PC Function
- Adjust the PC Screen via System Menu
- DVD Operation
- Disc Loading
- DVD Playback
- MENU
- SUBTITLE
- ANGLE
- VOLUME
- CD Playback
- MP3 Playback
- JPEG Playback
- Normal Playback
- Picture Rotation
- Zoom
- USB/Card Access
- Start Playing
- Pause Playing
- Stop Playing
- Repeat Function
- Search Function
- Fast Playback
- Slow Playback
- Zoom Function
- Programming Chapters/Tracks
- DVD Setup
- SYSTEM SETUP
- While working with the setup menu:
- Trouble Shooting
- COBY Electronics Technical Support
- Specification
- TFT LED Widescreen Television
- Instruction Manual
Brand : COBY
Model : LEDVD2396
Category : TV