IW006 - Weather Station Prologue - Free user manual and instructions
Find the device manual for free IW006 Prologue in PDF.


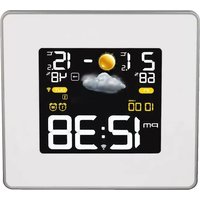
| Product Type | Weather Station with Colour Screen |
| Model | IW006 (IW006-DCF) |
| Brand | Prologue |
| Dimensions (with stand) | 150 × 50 mm |
| Dimensions (without stand) | 20 × 140 mm |
| Power Supply (Main unit) | DC 4.5 V via mains adaptor (included) |
| Backup Batteries (Main unit) | 3 × AAA/LR03 |
| Power Supply (Outdoor sensor) | 2 × AAA/LR03 |
| Indoor Temperature Range | 0–50 °C (32–122 °F) |
| Outdoor Temperature Range | -50–70 °C (-58–158 °F) |
| Indoor Humidity Range | 20–95% |
| Outdoor Humidity Range | 20–95% |
| Barometric Pressure Range | 850–1050 hPa |
| Radio Controlled Clock | DCF-77 (77.5 kHz), range ~2000 km |
| Time Display | 12 or 24 hour format |
| Weather Forecast | 12-hour forecast based on barometric pressure |
| Alarm Function | Two independent alarms with snooze (5–60 min) |
| Backlight Dimmer | Adjustable backlight intensity |
| Outdoor Sensor Channels | Up to 3 (channel 1, 2, 3) |
| Mounting Options | Free-standing (stand included) or wall mount |
| Care Instructions | Clean with damp cloth, mild detergent only |
| Safety | Indoor use only; avoid water, extreme temperatures, direct sunlight |
| CE Compliance | Yes (Directive 1999/5/EC) |
Frequently Asked Questions - IW006 Prologue
User questions about IW006 Prologue
0 question about this device. Answer the ones you know or ask your own.
Ask a new question about this device
Download the instructions for your Weather Station in PDF format for free! Find your manual IW006 - Prologue and take your electronic device back in hand. On this page are published all the documents necessary for the use of your device. IW006 by Prologue.
USER MANUAL IW006 Prologue
Weather Station with Colour Screen
Väderstation med färgskärm Værstasjon med fargeskjerm Sääasema, jossa värinäyttö Wetterstation mit Farbdisplay
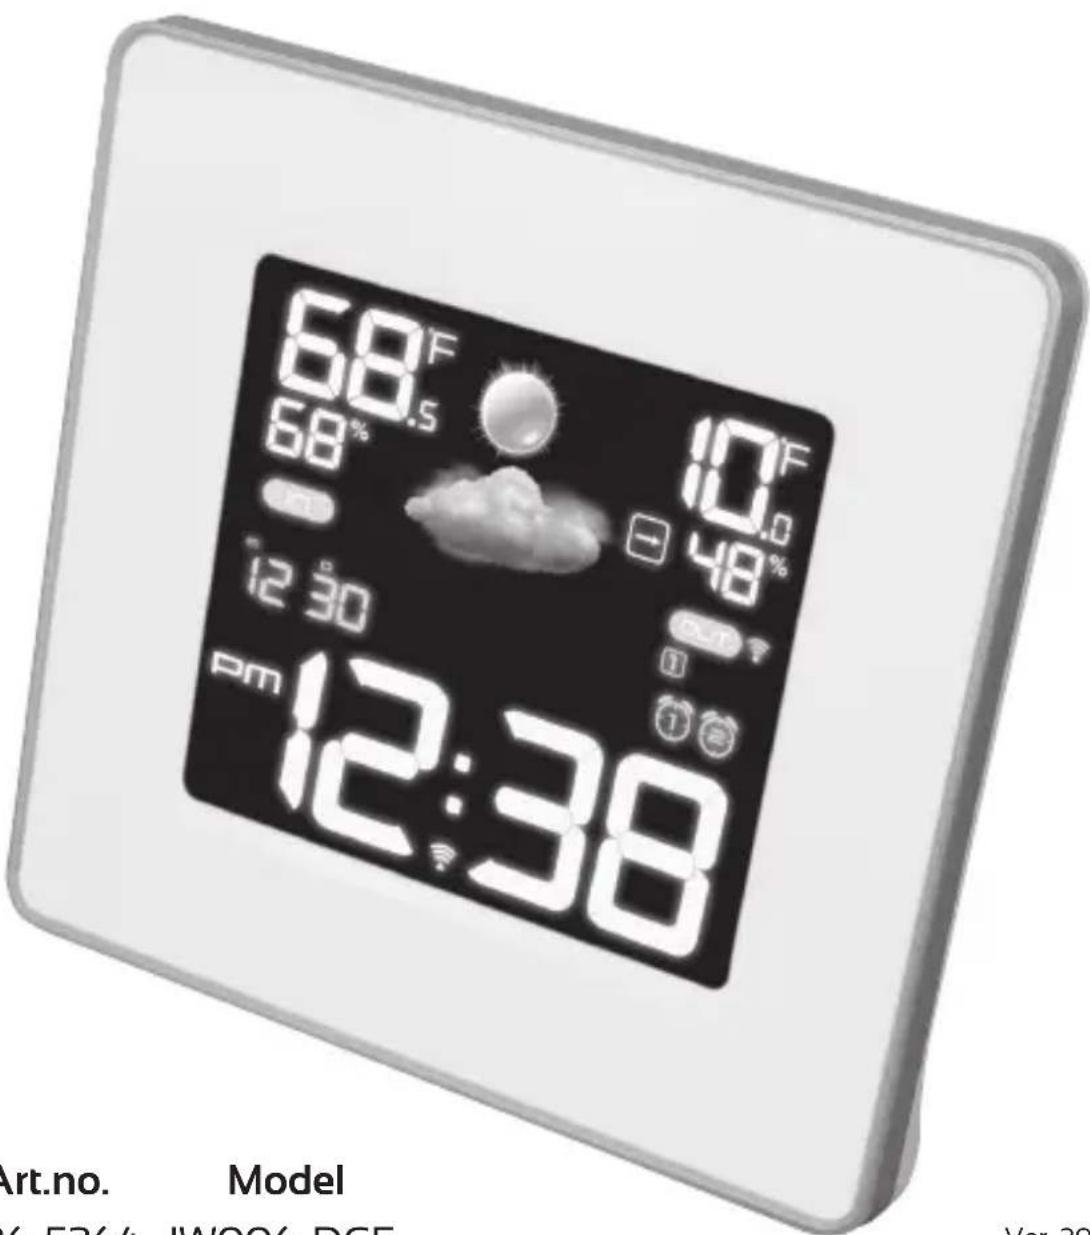
Art.no. Model 36-5364 IW006-DCF
Ver. 20130715
Weather Station with Colour Screen
Art.no 36-5364 Model IW006-DCF
Please read the entire instruction manual before using the product and save it for future reference. We reserve the right for any errors in text or images and any necessary changes made to technical data. If you have any questions regarding technical problems please contact our Customer Services.
Things to consider:
- Other wireless equipment using the same frequency can reduce the transmission range.
- The range of all wireless equipment depends on the type of obstacles located between the transmitter and the receiver (e.g. a concrete wall will interfere with the signal more than a plasterboard wall).
If you experience problems, try the following:
- Turn off any other existing wireless equipment and check if this is the cause of the problem.
- Move any other existing wireless equipment, shorten the distance between the sending and receiving devices, reduce the number of obstacles (walls, furniture, etc) between them or try a combination of these measures to successfully address the problem.
What is a radio controlled clock?
A radio controlled clock is an extremely accurate timekeeping device.
The time is controlled by the atomic clock in Braunschweig, Germany (accuracy ±1 second per 1 million years). The clock has a built-in radio receiver that decodes the incoming atomic clock signal (long wave 77.5 kHz).
The product also has a precisely calibrated quartz clock movement with a frequency of 32 kHz that keeps it running.
The transmitter in Germany has an official range of 2,000 km. This means that the UK and Ireland should be well within range.
Safety
- The weather station must only be repaired by qualified service technicians.
- The weather station's main unit is only intended for indoor use.
- Do not place the product where there is a risk of it falling into water or other liquid.
- Do not place the weather station in damp or dusty environments or where it could be subject to strong vibrations.
- Do not expose the weather station to extremely high or low temperatures. Do not expose the product to direct sunlight.
- Never try to open, change or modify the product in any way.
- Always remove the batteries from the weather station and the outdoor sensor if they are not to be used for a long time.
Buttons and functions
Display

- Indoor temperature
- Indoor humidity
- Calendar or barometric pressure
- "PM" (only displayed when the 12-hour clock is selected)
- Time
- Weather forecast
- Outdoor temperature
- Outdoor humidity
- Barometric trends
- Outdoor sensor icon
- Outdoor sensor channel
- Alarm 1 and 2
- Time signal icon
Main unit rear panel
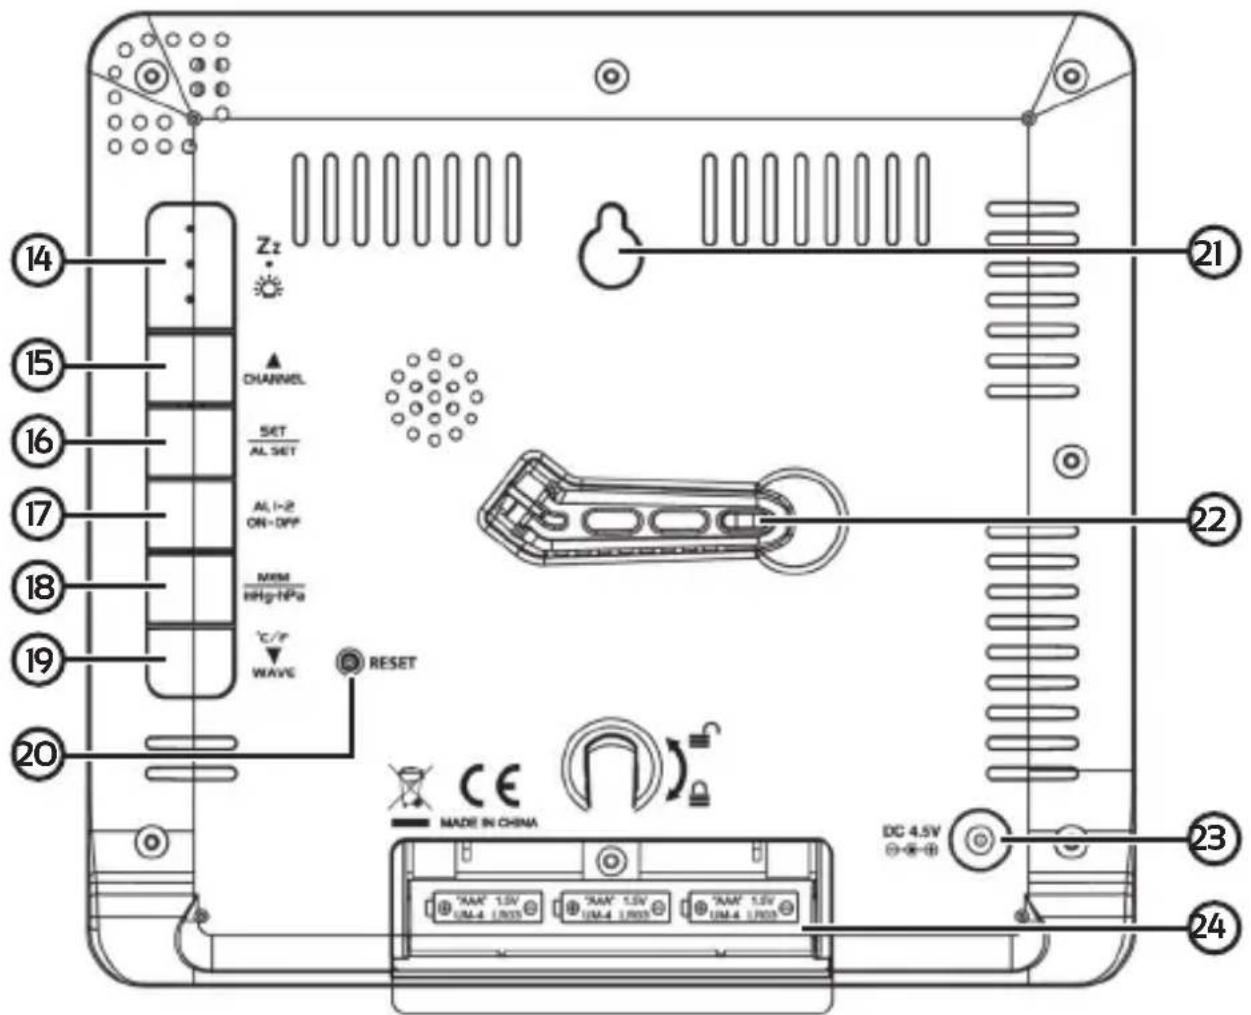
- [Zz Ⓞ] Snooze/dimmer
- [▲ CHANNEL] Increases setting values, selects outdoor sensor channel or sensor display reading/s.
- [SET/AL SET] Sets time, time zone, snooze time, date and alarm
- [AL 1-2/ON-OFF] Turns the alarms on and off
- [MEM/inHg-hPa] Displays highest and lowest temperatures, selects device for barometric pressure readings
- [°C/°F ▼ WAVE] Selects the device for temperature readings, decreases setting values, manual time signal search
- [RESET] Reinstates default factory settings
- Wall bracket
- Table stand
- Mains adaptor socket
- Battery holder
Outdoor sensor

- LED indicator
- [RESET] Reinstates default factory settings
- Foot/wall bracket
- Channel selector
- Battery holder
Operating instructions
Quick start
- Plug the mains adaptor into a wall socket and then into the weather station's socket (23).
- Position the main unit and the sensor next to each other.
- Open the battery cover on the back of the outdoor sensor.
- Set the channel selector (28) to channel 1 and insert 2 × AAA/LR03 batteries. Note: Note the polarity markings in the battery compartment to ensure correct insertion.
- Refit the battery cover.
- Make sure that channel 1 shows on the display (11), otherwise press [▲ CHANNEL] until channel 1 displays without flashing.
- The readings from the outdoor sensor will appear on the main unit's display after a few seconds.
- The time and date will be set automatically if the weather station is able to receive the radio time signal. If the weather station is unable to receive the time signal, the time and date must be set manually.
Mounting options

natural_image
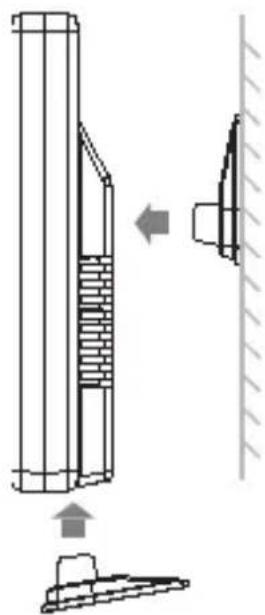
Line drawing of mechanical clamping components (no text or symbols)- Use the included stand (14) if you wish to use the weather station as a free-standing unit.
- Use the wall mount (21) to mount the weather station onto a wall.
Placing the outdoor sensor
Place the outdoor sensor in an area where it is not exposed to constant sunlight.
Fit the outdoor sensor's foot to the base for use as a free-standing unit or use the foot to mount the unit onto a wall.
natural_image
Technical diagram showing a vertical structure with internal components and an arrow indicating direction (no text or symbols)Time signal reception
As soon as the weather station is connected to the mains it will automatically begin searching for the radio time signal and (13) begin flashing. All buttons and controls will be inoperative whilst the unit is busy searching for the time signal. The weather station will be unreceptive to any outdoor sensor signals whilst searching for the time signal.
The weather station is preprogrammed to conduct nightly hourly time signal searches beginning at 01:00 am and continuing on throughout the rest of the night. This guarantees timely updates and high accuracy.
Depending on reception, you may see the following icon patterns:
- flashing: Weak or no time signal reception
• flashing: Strong signal reception
• solid: Max reception
• no icon: No time signal reception
If no time signal is received, the time and date must then be set manually.
Setting the time and date manually
- Hold [SET/AL SET] in for 2 seconds until "00" flashes in the display.
Press [▲ CHANNEL] or [°C/°F ▼ WAVE] to set the desired time zone in 1-hour increments. - Press [SET/AL SET] again until "24Hr" begins flashing. Press [▲ CHANNEL]
or [°C/°F ▼ WAVE] to select a 12- or 24-hour time display. - Press [ SET/AL SET ] again until "0" begins flashing. Press or hold in
[▲CHANNEL] or [▼°C/°F] to set the desired hour. - Press [ SET/AL SET ] again until "00" begins flashing. Press or hold in
[▲CHANNEL] or [▼°C/°F] to set the desired minutes. - Press [ SET/AL SET ] again until "Yr" and "2013" begin flashing. Press or
hold in [▲CHANNEL] or [▼°C/°F] to set the desired year. - Press [ SET/AL SET ] again until the months display begins flashing.
Press or hold in [▲CHANNEL] or [▼°C/°F] to set the desired month. - Press [ SET/AL SET ] again until the days display begins flashing. Press or
hold in [▲CHANNEL] or [▼°C/°F] to set the desired day. - Press [ SET/AL SET ] again until "m" and "d" begin flashing.
Press [▲ CHANNEL] or [°C/°F ▼ WAVE] to select the preferred date
display beginning with month ("m" "d") or day ("d" "m"). - Press [ SET/AL SET ] again until "SN" and "05" begin flashing.
Press [▲ CHANNEL] or [°C/°F ▼ WAVE] to set the snooze time,
from 5–60 minutes. - Press [ SET/AL SET ] again to return to normal time display. If no button
is pressed for approximately 10 seconds, the weather station will
automatically return to normal time display.
Setting alarms 1 and 2
- Press [SET/AL SET] once until "A1" and "06:00" begin flashing.
- Hold in [SET/AL SET] for about 2 seconds until the hour display begins flashing. Press [▲CHANNEL] or [▼°C/°F WAVE] to set the desired hour.
- Press [ SET/AL SET ] again until the minutes display begins to flash. Press [ ▲CHANNEL] or [ ▼°C/°F WAVE] to set the desired minutes.
- Press [SET/AL SET] again until "A2" and "06:00" appear. Set alarm 2 using the same procedures used for setting alarm 1.
- Press [ SET/AL SET ] again to return to normal time display. If no button is pressed for approximately 10 seconds, the weather station will automatically return to normal time display.
Turning the alarm on/off
Press [ Alarm on/off ] for activating or deactivating the individual alarms.
- When alarm 1 is activated
① will appear. - When alarm 2 is activated
will appear.
Snooze function
- When the alarm sounds its respective alarm icon will flash.
- Press [Zz ○] to activate the snooze function. The alarm will sound and its respective alarm icon will flash again according to the snooze time that has been previously set.
- Press [ AL 1-2/ON-OFF ] to turn the alarm off. The specific set alarm will then sound again after 24 hours if not deactivated.
Backlight dimmer
Press [Zz ○] to change the backlight intensity.
Temperature display
Press [°C/°F ▼ WAVE] for selecting temperature units in °C or °F.
Weather forecasts and trends
The weather station is equipped with a barometric pressure sensor. The weather station gathers barometric data for a 12-hour period enabling it to then provide a 12-hour weather forecast.
Note: If the weather station is moved to a different height above sea level (when moving it to another floor level for example), then a 12-hour recalibration period will be required before an approximate forecast can be given.
Barometric icons (9):
- Rising pressure: Good weather expected.
• Falling pressure: Bad weather expected.
• → Stable pressure: No change.
Weather icons
| Sunny Rain |  |  | |
| Partly cloudy |  | Storm |  |
Cloudy Frost warning (appears  | when the outdoor temperature is 3 °C or below). |  | |
Barometric display
- Hold in [MEM/inHg-hPa] until the barometric pressure appears instead of the day and month.
- Hold in [MEM/inHg-hPa] again to return to the day and month display.
Displaying max and min temperatures
- Press [ MEM/inHg-hPa ] to display max indoor and outdoor temperatures.
- Press [MEM/inHg-hPa] to display min indoor and outdoor temperatures.
Resetting max and min temperatures
Hold in [MEM/inHg-hPa] during max or min temperature display in order to reset them to zero.
Backup batteries
- The backup batteries will retain time and alarm settings during a power cut but the alarm will not sound.
-
The display will also be turned off when only supported by the backup batteries. Press [Zz ^O ] to turn on the 5 sec. backlight.
-
Open the battery cover at the back of the weather station by sliding it in the direction of the arrow.
-
Insert 3 × AAA/LR03 batteries.
-
Refit the battery cover.
Note: Note the polarity markings in the battery compartment to ensure correct insertion.
Connecting 2 additional outdoor sensors
- Press [ ▲ CHANNEL ] until channel 2 appears in the display.
- Hold in [▲ CHANNEL] until ⚙ flashes, The weather station will then begin scanning for a signal from the outdoor sensor set to channel 2.
- Open the battery compartment on the outdoor sensor and make sure that the channel selector (28) is set to channel 2.
- Insert 2 × AAA/LR03 batteries into the battery compartment. Note the polarity markings in the battery compartment to ensure correct insertion.
- Refit the battery cover.
- The temperature and humidity data from this sensor will appear on the display after a few seconds.
- To connect a 3rd outdoor sensor press [▲ CHANNEL] until channel 3 appears. Then follow the same procedures as listed above for connecting a sensor using channel 2.
Multiple display mode
- Press [▲ CHANNEL] until channel 1 flashes in the display. The readings from all connected sensors will now appear in turn.
- Press [ ▲ CHANNEL ] again to only show readings from channel 1.
Care and maintenance
Clean the weather station using a lightly moistened cloth.
Only use mild cleaning agents, never solvents or corrosive chemicals.
Troubleshooting guide
| The weather station doesn’t work.The display doesn’t come on. | Make sure that the mains adaptor and its lead are undamaged and securely connected both to a wall socket and the weather station.Check that the wall socket is live. |
| Incorrect or unreadable values on the display. | Press [ RESET ] (20) on the back of the weather station. |
| No readings from the connected sensors are shown.The display shows “---”. | Try moving the sensors to a different location.Make sure the sensor is set to the correct channel and that its batteries are not flat.Press [ RESET ] on the front of the sensor.Follow the instructions listed in the Quick start section or in the Connecting 2 additional outdoor sensors section above. |
| The display shows “HH.H/LL.L”. | The measured temperature lies outside the weather station’s range.See the Specifications section below. |
Disposal
This product should be disposed of in accordance with local regulations. If you are unsure how to proceed, contact your local authority.
Specifications
Indoor temperature range 0–50 °C (32–122 °F)
Outdoor temperature range -50–70 °C (-58–158 °F)
Indoor humidity range 20–95 %
Outdoor humidity range 20–95 %
Barometric pressure range 850–1050 hPa
Size 150 × 50 mm (with stand), 20 × 140 mm (without stand)
natural_image
Line drawing of mechanical clamping components (no text or symbols)natural_image
Technical diagram showing a vertical structure with internal components and an arrow indicating direction (no text or symbols)natural_image
Line drawing of mechanical clamping components (no text or symbols)natural_image
Technical diagram showing a vertical structure with brickwork and an attached bracket, connected to a ramp (no text or symbols present)natural_image
Line drawing of mechanical clamping components (no text or symbols)natural_image
Technical diagram showing a vertical structure with internal components and an arrow indicating direction (no text or symbols)natural_image
Line drawing of mechanical clamping components (no text or symbols)natural_image
Technical diagram showing a vertical structure with internal components and an arrow indicating direction (no text or symbols)Declaration of Conformity
CE
Hereby, Clas Ohlson AB declares that following product(s):
Weather station IW006-DCF
36-5364
IW006 (Main unit) / TW003 (Transmitter)
is in compliance with the essential requirements and other relevant provisions of Directive 1999/5/EC.
Article 3.1a (Safety): EN 60950-1 EN 62479 EN 50371
Article 3.1b (EMC): EN 301 489-1 EN 301 489-3 EN 55014-1 EN 61000-3-2 EN 61000-3-3 EN 55014-2
Article 3.2 (Radio): EN 300 220-1 EN 300 220-2 EN 300 330-1 EN 300 330-2
CE0700
Insjön, Sweden, April 2013
Klas Balkow,
President.
Clas Ohlson, 793 85 Insjön, Sweden
Sverige
Postal 10 – 13 Market Place
Kingston Upon Thames
Surrey
KT1 1JZ
Deutschland

- Weather Station with Colour Screen
- Things to consider:
- If you experience problems, try the following:
- What is a radio controlled clock?
- Safety
- Buttons and functions
- Display
- Main unit rear panel
- Outdoor sensor
- Operating instructions
- Quick start
- Mounting options
- Placing the outdoor sensor
- Time signal reception
- Setting the time and date manually
- Setting alarms 1 and 2
- Turning the alarm on/off
- Snooze function
- Backlight dimmer
- Temperature display
- Weather forecasts and trends
- Barometric icons (9):
- Weather icons
- Barometric display
- Displaying max and min temperatures
- Resetting max and min temperatures
- Backup batteries
- Connecting 2 additional outdoor sensors
- Multiple display mode
- Care and maintenance
- Disposal
- Specifications
- Declaration of Conformity
- CE
- CE0700
- Sverige
- Deutschland
Brand : Prologue
Model : IW006
Category : Weather Station