
UXABP48 - Battery APC - Free user manual and instructions
Find the device manual for free UXABP48 APC in PDF.


| Product Type | Replacement Battery |
| Brand | APC |
| Model | UXABP48 |
| Compatible UPS Series | Back-UPS Pro 1500, Back-UPS RS 1500, and select Smart-UPS models |
| Battery Chemistry | Sealed Lead-Acid (SLA) |
| Voltage | 12 V |
| Capacity | 9 Ah |
| Dimensions (L x W x H) | 151 x 65 x 94 mm |
| Weight | 2.5 kg |
| Maintenance | Maintenance-free, no electrolyte filling required |
| Safety Features | Flame retardant case, pressure relief valve, overcharge protection |
| Expected Lifespan | 3–5 years under typical usage |
| Operating Temperature Range | 15°C to 25°C (optimal) |
| Storage Temperature Range | -15°C to 40°C |
| Installation | Easy drop-in replacement, no tools required |
| Spare Parts Availability | Widely available through APC partners and online retailers |
| Recyclability | Recyclable through lead-acid battery recycling programs |
Frequently Asked Questions - UXABP48 APC
User questions about UXABP48 APC
0 question about this device. Answer the ones you know or ask your own.
Ask a new question about this device
Download the instructions for your Battery in PDF format for free! Find your manual UXABP48 - APC and take your electronic device back in hand. On this page are published all the documents necessary for the use of your device. UXABP48 by APC.
USER MANUAL UXABP48 APC
natural_image
Technical line drawing of a rectangular enclosure with multiple circular holes and mounting holes (no text or symbols)Installation Instructions
1. Introduction
The UXBP is a large Battery Pack module designed to be used with a Smart-UPS system to provide a significant increase in on-battery runtime for your protected equipment.
For complete information on the Smart-UPS system, refer to the Owner's Manual that came with your UPS.
Note: If you are installing your Smart-UPS system for the first time, be sure to read the Smart-UPS Owner's Manual first. Set up your UPS system before installing the UXBP.
2. Safety!
CAUTION!
- Use the UXBP only with a UPS that is properly installed according to the UPS Owner's Manual and connected only to a two-pole, three-wire grounding mains receptacle. The receptacle must be connected to appropriate branch protection (fuse or circuit breaker). Connection to any other type of receptacle may result in a shock hazard and may violate local electrical codes.
- Avoid installing the UXBP in locations where there is water or excessive humidity.
- Do not allow water or any foreign object to get inside the UXBP. Do not put objects containing liquid on or near the unit.
-
To reduce the risk of overheating the UXBP, avoid exposing the unit to the direct rays of the sun. Avoid installing the unit near heat emitting appliances such as a room heater or stove.
-
Do not move the UXBP with its batteries installed. Doing so may result in damage to the Battery Pack and/or a shock hazard.
- Install only factory-authorized batteries in the UXBP. Improper batteries may result in a hazardous chemical spill and/or a shock hazard.
3. Presentation
3.1 UXBP front
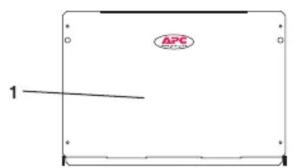
Front View
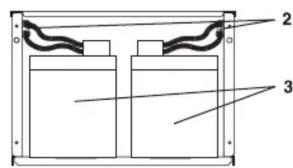
Front View (panel removed)
UXBP Battery Pack
The UXBP contains either two (UXBP24L) or four (UXBP24, UXABP48) user-replaceable, sealed lead-acid batteries and the associated cables and connectors.
1. Front panel/Battery door
The front panel of the Battery Pack provides access for battery installation and replacement. Refer to Section 4 when installing or replacing batteries.
2. Battery internal coupler
These four couplers connect the UXBP's replaceable internal batteries. See Section 4.
3. Batteries
The Battery Pack contains either two (UXBP24L) or four (UXBP24, UXABP48) nominal 12 Vdc sealed lead-acid batteries. Use only factory-authorized batteries in the UXBP!
3.2 UXBP rear
natural_image
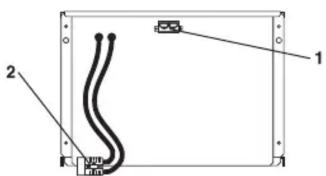
Pure electrical circuit lines without any symbolsRear View
1. Battery Pack rear panel coupler
Additional UXBP Battery Packs are connected to this coupler. Refer to Section 4.5 for information on making connections with this coupler.
2. In-line Battery Pack coupler
This coupler connects the Battery Pack to the UPS or to the rear panel coupler on another matching Battery Pack.
4. Installation
4.1 Receiving inspection
When you remove the UXBP from its shipping container, inspect it for damage that may have occurred in transit. Immediately notify the carrier and place of purchase if any damage is found. The packing materials are made from recyclable materials and should be saved for reuse or disposed of properly.
4.2 Moving the UXBP
The UXBP and its batteries are quite heavy and should be moved on the original shipping palette using a fork-type hand truck, or separately on a hand truck. Never move the Battery Pack while its batteries are installed!
Warning: Do not move the UXBP with its internal batteries installed! Doing so could result in severe physical damage to the Battery Pack and cause a shock hazard.
4.3 Placement
The UXBP may be installed in any protected environment that is suitable for the UPS. Refer to the Owner's Manual that came with the UPS.
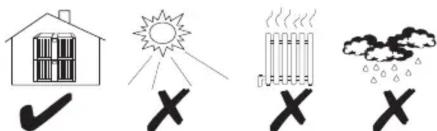
Identify a location convenient to the UPS with enough room in front of and behind the unit for servicing. There should be at least 30.5 cm (1 ft) clearance behind the UXBP. Leave enough clearance in front that you can comfortably access the battery compartment.
Caution: Do not stack more than 4 UXBPs on top of each other or on top of other components of the UPS system. Damage to the unit could result.
4.4 Unpacking and Installation
The UXBP is shipped with the cabinet secured to the shipping pallet and its batteries unconnected. You must unpack the batteries and unbolt the cabinet from the pallet before you can use your Battery Pack. Use only factory-authorized batteries in the Battery Pack!
Move the pallet containing the Battery Pack to the desired operating location before installing the batteries (see Section. 4.3). Do not move the Battery Pack with the batteries installed!
4.4.1 Warning
It is important that you read and understand the following warnings and cautions before installing the batteries in the UXBP.
- Only personnel familiar with the dangers of batteries and the required precautions should perform or supervise battery replacement. Keep unauthorized personnel away from batteries. Replace batteries with the same number and type of sealed lead acid batteries as originally installed in your UXBP.
- WARNING — Use only factory-authorized sealed batteries in the Battery Pack. Use of unsealed batteries may result in a hazardous chemical spill.
- CAUTION — Do not dispose of batteries in a fire. The batteries may explode.
-
CAUTION — Do not open or mutilate batteries. They contain an electrolyte which is toxic and harmful to the skin and eyes.
-
CAUTION — A battery can present a risk of electrical shock and high short circuit current. When replacing batteries, remove wrist watches and jewelry such as rings. Use tools with insulated handles.
- The batteries in this UPS are recyclable. Dispose of the batteries properly. The batteries contain lead and pose a hazard to the environment and human health if not disposed of properly. Refer to local codes for proper disposal requirements or return the battery to a factory authorized Service Center.
4.4.2 Unpacking the Battery Pack
To unpack the UXBP, follow the procedure outlined below.
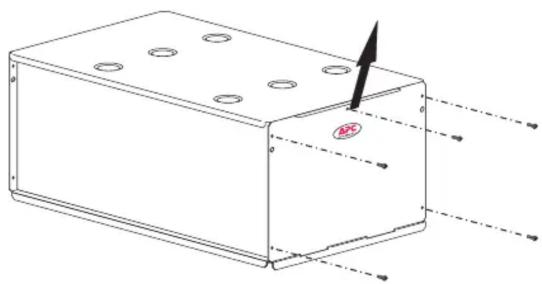
- Remove the five (5) phillips screws securing the battery door/front panel to the Battery Pack.
- Tilt the battery door/front panel forward, then lift it away from the cabinet.
- Remove each of the batteries and all corrugated packing material from inside the cabinet. Remove the corrugated sleeves from the batteries.
Warning! Do not connect the batteries together.
Note: For safety reasons, it is important that all packing material be removed from the interior of the cabinet.
- On the outside of the cabinet there are four (4) 1/4-20 screws that secure the cabinet to the shipping pallet. Use a phillips screwdriver to remove these four (4) screws.
- Move the empty cabinet to its permanent location.
- Proceed to Section 4.4.3, Step 3 to complete the battery installation.
4.4.3 Battery installation and replacement
To install the batteries, follow the procedure outlined below.
- Remove the five (5) phillips screws securing the battery door/front panel to the Battery Pack.
- Tilt the battery door/front panel forward, then lift it away from the cabinet.
natural_image
Technical line drawing of a rectangular mechanical housing with mounting holes and a central bolt (no text or symbols)- Position the batteries on the floor in front of the cabinet. The terminals should be up and to the inside of the cabinet. Note the gray couplers (4) located inside the cabinet, one for each battery.
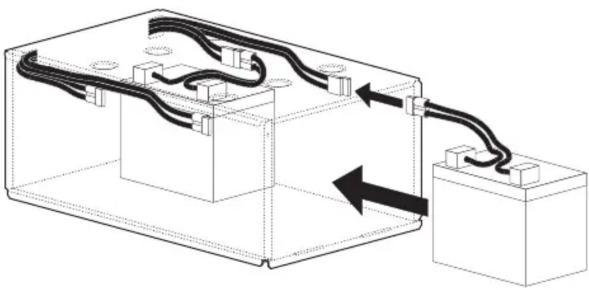
- Select a battery and, using firm pressure, slide the battery all the way to the rear of the cabinet.
- Connect the battery's coupler to the matching coupler located on the cabinet wall.
Warning! Do not connect the couplers mounted to the cabinet together.
- Select the second battery and move it into place.
UXBP24L - If you have a UXBP24L, place the second battery on the same side of the cabinet and in front of the first battery.
Note: The batteries may be installed on either side of the cabinet, but both batteries must be installed on the same side of the cabinet.
natural_image
Diagram of a battery pack connected to a terminal block via wires, showing internal components and wiring direction (no text or symbols)UXBP24L
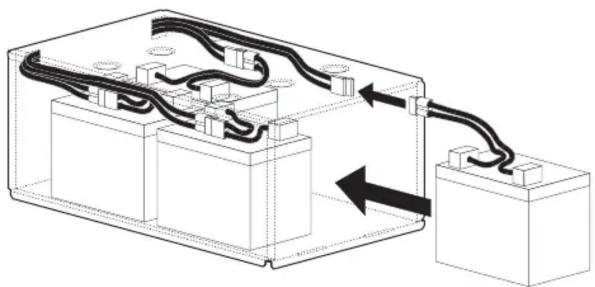
UXBP24 and UXABP48 - If you have a UXBP24 or UXABP48, slide the second battery all the way to the rear of the cabinet beside the first battery.
natural_image
Diagram of a battery pack connected to a terminal block via wires, showing internal components and wiring direction (no text or labels)UXBP24 and UXABP48
- Connect the second battery's coupler to the matching coupler mounted on the side of the enclosure and route the battery cable over the top of the battery.
Warning! Do not connect the batteries together.
- If you have a UXBP24L, proceed to Section 4.4.4.
If you have a UXBP24 or UXABP48, repeat steps 5 through 7 for the front battery pair.
- Refer to Section 4.4.4 for Test Instructions before replacing the battery door/front panel.
4.4.4 Installing and Replacing Batteries: Test Instructions
Before coupling the UXBP to a Smart-UPS or another battery pack, a test must be performed to insure that the batteries have been properly installed within the cabinet. A DC voltmeter is required to perform this simple test. Warning! Do not install the UXBP until this test procedure has been performed.
- Locate the gray(UXBP24, UXBP24L) or the blue(UXABP48) coupler at the end of the DC power bus cable (See item 2 in Section 3.2).
- Measure the DC voltage across the two conductors in the coupler. Warning! Care must be taken not to short circuit the coupler with the test leads.
- Refer to the following table for the status of the UXBP:
1elbaXBP24, UXBP24L Battery Pack Voltage
| Battery Pack Voltage | Battery Pack Status |
| 22.5 Vdc | Ready to Install |
| 0.024 Vdc28.6 Vdc - 57.0 Vdc | Miswired or Bad Battery |
elba-TUXABP48 Battery Pack Voltage
| Battery Pack Voltage | Battery Pack Status |
| 540 Vdc - 750 Vd | Ready to Install |
| 0.0 Vdc - 45.0 Vdc | Miswired or Bad Battery |
-
When the Battery Pack Status is “Ready to Install,” complete the final steps of the installation. If the Battery Pack Status is “Miswired or Bad Battery,” disconnect the internal battery connections. Do not connect the UXBP to any other equipment. Review the Installation and Test Procedures and if necessary contact APC’s Technical Support for additional help with the installation and troubleshooting. When calls are placed to the Technical Support Line please have the following information ready when the representative answers:
-
The UXBP serial number.
- The battery pack voltage measured at the gray(UXBP24, UXBP24L) or the blue(UXABP48) coupler.
- Each of the individual battery voltages.
4.4.5 Final Installation
When the correct battery voltage has been verified, perform the following steps to complete the battery installation.
- Replace the battery door/front panel and reinstall the five (5) phillips screws that were removed in Step 1.
- Connect the UXBP gray(UXBP24, UXBP24L) or blue(UXABP48) DC coupler to the UPS or to another matching battery pack (if desired). This procedure is described in Section 4.5
4.5 Module interconnections
After you have positioned the Battery Pack and installed the batteries, you can connect the Battery Pack to the UPS or to other Battery Packs in the system. Refer to the following instructions to properly install the battery pack couplers.
Remove clamp
Connect couplers
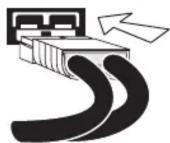
Secure clamp

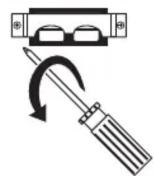
- Use a phillips screwdriver to remove the battery pack coupler clamps from the UPS and from all but the last Battery Pack.
- Connect the blue battery pack couplers as shown. Do not attempt to connect the gray(UXBP24, UXBP24L) or the blue(UXABP48) battery pack couplers with the gray battery couplers inside the cabinet.
Use the supplied UXABP48 adaptor cable when appropriate.
- Fasten the battery pack coupler clamp to secure the couplers in place.
- Repeat for any additional Battery Packs.
Installation of the Battery Pack is complete. Refer to the UPS's Owner's Manual for information on starting up the system.
4.6 Estimating Runtime with BackPack.exe
The diskette included with the UXBP contains an MSDOS utility that will provide the estimated runtime for your configuration at a given load. Follow the instructions printed on the diskette label, with the following exception:
When the program asks for the number of battery packs installed, multiply the number of installed UXBP packs by 5 if you have a UXBP24 or UXABP48, and by 3 if you have a UXBP24L and insert this result. For example, if you have 2 UXBPs installed, use 10 as the result ( 2 × 5 = 10 ).
5. Storing the Battery Pack
The Battery Pack should be stored in a covered location and with its batteries in a fully-charged state (reports 100% capacity to the UPS).
In extended storage, use the UPS to refresh the Battery Pack every six months in environments where the temperature is -15 to +30 °C (+5 to +86 °F). Refresh the Battery Pack every three months in environments where the temperature is +30 to +45 °C (+86 to +113 °F).
6. Battery Life
6.1 Battery life
You can expect to receive three to six years of service from the Battery Pack's batteries. When the batteries can no longer sustain a charge, the Replace Battery indicator on the front panel of the UPS lights. Refer to Section 4 to replace the batteries.
7. Specifications
7.1 Battery
Battery type: Two (UXBP24L) or Four (UXBP24, UXABP48) spill-proof, maintenance-free, sealed lead-acid
Nominal battery 24 Vdc (Model UXBP24, UXBP24L) pack voltage: 48 Vdc (Model UXABP48)
Typical battery life: 3 to 6 years, depending on environment dnuse
Recharge time: See table in Section 7.4
7.2 Environment
Operating temperature: 0 to +40 °C (+32 to +104°F)
Storage temperature: -15 to +45 °C (+5 to +113 °F)
Operating and storage re tive huyidi 0 to 95%, non-condensing
Operating 0 to 3,000 m (10,000 ft) elevation:
Storage 0 to 15,000 m (50,000 ft) elevation:
7.3 Physical
| UXBP24L | UXBP24/UXABP48 | |
| Size (H'W'D): | 31.0 x 44.7 x 75.4 cm(12.2 x 17.6 x 29.7 in.) | 31.0 x 44.7 x 75.4 cm(12.2 x 17.6 x 29.7 in.) |
| UXBP weight:(with batteries) | 74.5 kg (164.0 lbs) | 127.3 kg (280.0 lbs) |
| Shipping weight:(with batteries) | 90.0 kg (198.0 lbs) | 142.7 kg (314.0 lbs) |
7.4 Runtime versus load
Run times are typical at 25 ^ ( 77 ^ ).
Run Time
Runtime with SUA1000UXI
| deriuqetBu | ||||||
| da↓L | 1h↓ | 2 hr | 3 hr | 4 hr | 6 hr | 8 hr |
| 60/A | 1 UXBP24L | 1 UXBP24 | 1 UXBP24+1 UXBP24L | |||
| 000 VA | 1 UXBP24L | 1 UXBP24 | 1 UXBP24 +1 UXBP24L | |||
Runtime with SUA2200UXI/SUA3000UXI
| Runtime required | ||||||
| Load ↓ | 1 hr | 2 hr | 3 hr | 4 hr | 6 hr | 8 hr |
| 0AV | 1 UXABP48 | 2 UXABP48 | ||||
| 0AV | 1 UXABP48 | 2 UXABP48 | 3 UXABP48 | |||
| 0AV | 1 UXABP48 | 2 UXABP48 | 3 UXABP48 | 4 UXABP48 | ||
| 0AV | 1 UXABP48 | 2 UXABP48 | 3 UXABP48 | 4 UXABP48 | 5 UXABP48 | |
| 0AV | 1 UXABP48 | 2 UXABP48 | 3 UXABP48 | 4 UXABP48 | 5 UXABP48 | 6 UXABP48 |
Recharge Time
| Number of UXBP Battery Packs | ||||||
| 1 | 2 | 3 | 4 | 5 | 6 | |
| 1000 VA UPS | 15 | 19 | 23 | 27 | 31 | 35 |
| 2200 VA UPS3000 VA UPS | 8 | 11 | 13.5 | 16 | 18.5 | 21 |
* Recharge to 90% capacity after discharge into 50% of rated full load.
Technical Support and Customer Service
All customers use Web site www.apc.com
American Continent, contact: European Continent, contact:
American Power Conversion American Power Conversion
132 Fairgrounds Road Ballybritt Business Park
West Kingston, Rhode Island 02892 Galway, Ireland
1-800-800-4APC 1-800-702000
1-401-789-5735 353-91-702020

- Installation Instructions
- Introduction
- Safety!
- CAUTION!
- Presentation
- UXBP front
- UXBP Battery Pack
- Front panel/Battery door
- Battery internal coupler
- Batteries
- UXBP rear
- Battery Pack rear panel coupler
- In-line Battery Pack coupler
- Installation
- Receiving inspection
- Moving the UXBP
- Placement
- Unpacking and Installation
- Warning
- Unpacking the Battery Pack
- Battery installation and replacement
- Installing and Replacing Batteries: Test Instructions
- Final Installation
- Module interconnections
- Estimating Runtime with BackPack.exe
- Storing the Battery Pack
- Battery Life
- Battery life
- Specifications
- Battery
- Environment
- Runtime versus load
- Run Time
- Technical Support and Customer Service
Brand : APC
Model : UXABP48
Category : Battery