
Mini Remote 4 Scene - Remote control Insteon - Free user manual and instructions
Find the device manual for free Mini Remote 4 Scene Insteon in PDF.


| Product Type | Remote Control Keypad (4-Scene) |
| Brand | INSTEON |
| Model Numbers | 2342-232, 2444A2WH4 (US); 2342-432 (EU); 2342-532 (AUS/NZ) |
| Dimensions | 2.6" H x 1.3" W x 0.39" D (66 x 33 x 10 mm) |
| Weight | 1 oz (28 g) |
| Power Source | Rechargeable Lithium Polymer battery (3.7 VDC, pre-installed) |
| Battery Life | 9-12 months (typical usage) |
| Charging | Micro-USB (5 VDC), charge time approx. 1 hour |
| RF Frequency | 915 MHz (US), 869 MHz (EU), 921 MHz (AUS/NZ) |
| RF Range | 50 ft (15 m) line-of-sight |
| Scenes | 4 (default), configurable to 8; supports On, Off, Bright, Dim, Fast On/Off |
| Maximum Scene Links | 400 |
| LED Indicator | Two-color (green/red) for status and setup feedback |
| Beeper | Configurable on/off for setup and usage |
| Mounting Options | Handheld, wall mount (with optional bracket), tabletop stand, visor clip |
| Operating Environment | Indoor, 32°F to 104°F (0°C to 40°C), up to 85% humidity |
| What's in the Box | Mini Remote, rechargeable battery (pre-installed), Quick-Start Guide |
| Required Accessories | Micro-USB cable (type A to micro-B) for charging |
| Optional Accessories | Wall Mount Bracket, Tabletop Stand, Visor Clip, USB Power Adapter |
| Warranty | 2 years limited |
Frequently Asked Questions - Mini Remote 4 Scene Insteon
User questions about Mini Remote 4 Scene Insteon
0 question about this device. Answer the ones you know or ask your own.
Ask a new question about this device
Download the instructions for your Remote control in PDF format for free! Find your manual Mini Remote 4 Scene - Insteon and take your electronic device back in hand. On this page are published all the documents necessary for the use of your device. Mini Remote 4 Scene by Insteon.
USER MANUAL Mini Remote 4 Scene Insteon
INSTEON® Remote Control Keypad, 4 Scene (formerly RemoteLinc 2)
Owners Manual
2342-232, 2444A2WH4 (US)
2342-432 (EU)
2342-532 (AUS/NZ)

About Mini Remote .... 3
Features & Benefits 4
What's in the Box? 4
Required Accessories....4
Optional Accessories....5
Getting Started 6
Scenes......6
Make Mini Remote (Button) a Controller 6
Remove Mini Remote (Button) as a Controller....6
Using Mini Remote....7
LED Behavior 8
Turn Unit On/Off (Pocket Mode) 8
Stuck Button 8
Advanced Features 8
Add Multiple Responders to a Scene (Multi-Link) 8
Remove Multiple Responders from a Scene (Multi-Unlink) 8
Change Button / Scene Configuration (e.g., Change to 8 Button Mode) 9
Turn LED Off (or Back On)....10
Turn Beeper On During Usage (or Back Off) 10
Beeper Behavior....11
LED Behavior During Setup 11
Factory Reset 11
Specifications....12
Troubleshooting....13
Certification and Warranty 14
FCC & Industry Canada Compliance Statement....14
Limited Warranty 15
Limitations....16
About Mini Remote
Mini Remote is the smallest and most versatile INSTEON remote control in the world. The 4 scene controller can easily be reconfigured to give you toggle control of up to 8 scenes and/or devices. Mini Remote can be:
- Handheld (wireless remote)
- Mounted on wall with no trim plate (wireless keypad)
- Mounted on wall in a single-gang Decorator trim plate (wireless keypad, built-in look)
- Mounted on wall in a multi-gang Decorator trim plate (add to the number of controllers in your room without hiring an electrician and/or tearing out drywall)
- Placed on a Tabletop Stand (sold separately)
- Clipped to your car's visor with Visor Clip (sold separately)
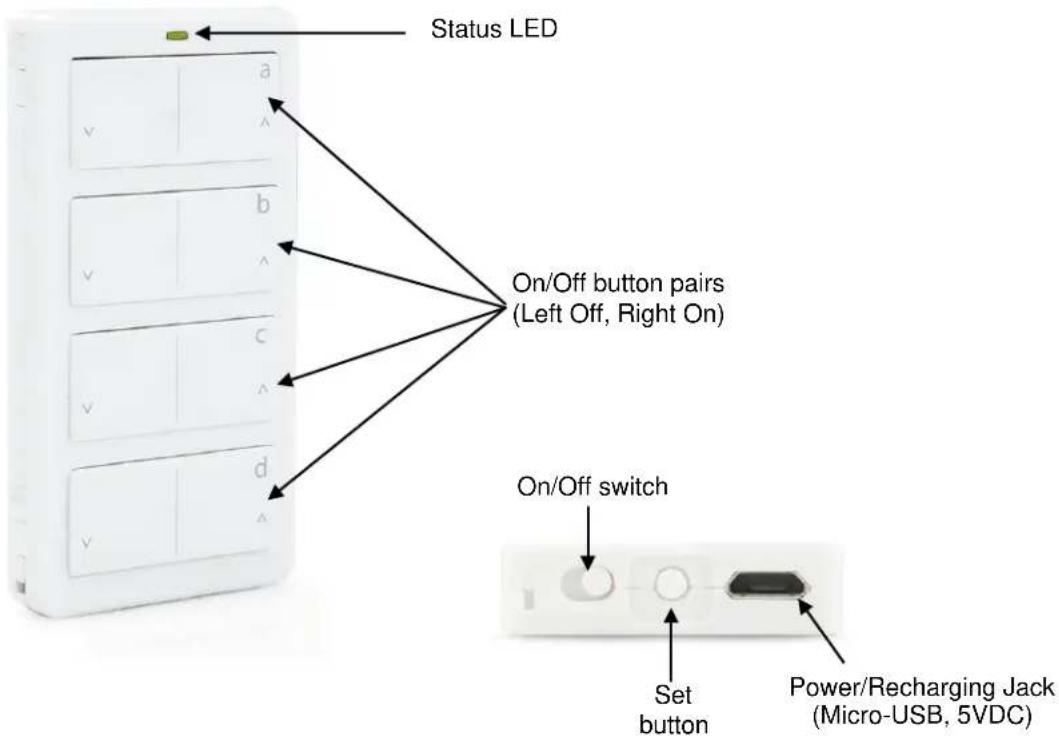
Features & Benefits
- Small, elegant design
- Super-easy setup
- Rechargeable battery included
• Discreet On and Off buttons for 4 scenes - Can be reconfigured for 8 scene triggers or 8 scene On/Off toggle control
- Can be installed into a single Decorator style opening (requires Wall-Mount Bracket, sold separately)
- Can be used as a table-top controller (requires Tabletop Stand, sold separately)
- Can be used as a visor-mounted remote control for lights, garage door opener etc. (requires Visor Clip, sold separately)
• LED blinks green when turning a scene On and red when turning a scene Off - Power switch for disabling buttons ("vacation" or "pocket" mode)
- Stuck Button Mode – saves battery life by going to sleep if button stuck down
- Beeper for setup ease
• Recharges with standard USB charger with via Micro-USB Plug (5VDC)
• 9-12 month battery life based on average usage - Battery charge LED indicator built-in
- All settings stored in stable memory which is maintained even without power
- 2 year warranty
What's in the Box?
- Mini Remote
- Rechargeable battery (pre-installed)
- Quick-Start Guide
Required Accessories
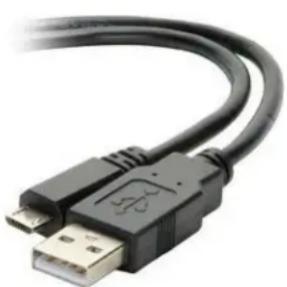
- A micro USB cable for connecting and recharging Mini Remote via USB port on a computer or USB power adapter.
- If the INSTEON device you intend to control does not receive RF signals (i.e., power line only), you will need at least one dual-band INSTEON device to convert the RF signals to power line signals.
natural_image
Close-up of a black USB cable with a metallic connector (no text or symbols visible)Type A to Micro-B cable (2444B5)
Optional Accessories

Pair the Wall Mount Bracket with any decorator style wall plate (sold separately) for the perfect wireless wall switch solution.
Wall Mount Bracket
(2444B4)
• Wall mount your Mini Remote anywhere
• Gang two or more together for more control
• Can be installed adjacent to existing wired-in switches
- Mini Remote can easily be removed for portability or recharging
• Use with any decorator wall plate
•
natural_image
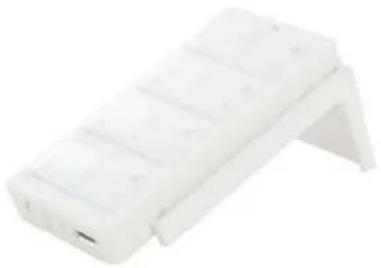
White plastic electronic device with four rectangular panels, no visible text or symbolsTabletop Stand
(Available in the 2444Bxx kit)
- Perfect for a nightstand, kitchen counter or coffee table
natural_image
Black plastic electrical plug with two metallic pins (no visible text or symbols)
natural_image
White electronic device with metallic metal clamps attached (no visible text or symbols)Visor Clip
(Available in the 2444Bxx kit)
• Control your home from your vehicle
- Turn lights on when you arrive and off as you leave
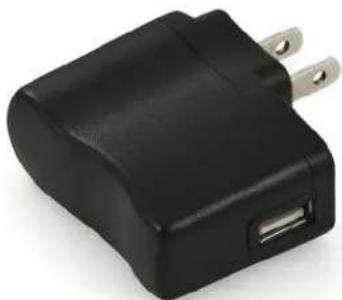
USB Power Adapter
(2444B6)
- For use with Mini Remote USB Charging Cable and any other device that charges via USB cable
Getting Started
Fully charge your Mini Remote prior to programming or anytime the unit is not responding. Mini Remote charges via a USB cable (Type A to Micro-B, sold separately). The red charging LED will turn off once the battery has been fully charged (approximately 1 hour). To turn on Mini Remote, simply slide the power switch to the on position.
Note: Mini Remote uses a subtle beeper sound to assist setup. It is recommended that you program the unit in a quiet area.
Scenes
Scene: One or more INSTEON devices which respond to an INSTEON controller. When the scene is activated (turned "on"), all devices return to the states they were at when the scene was programmed. INSTEON scenes let you activate dramatic lighting moods at the touch of a button. For example, you can set all the lights in a scene to dim to 50% or turn certain lights on while turning others off, all with the tap of a button on any INSTEON Controller. INSTEON scenes are easy to set up, just follow the directions below.
Maximum number of scenes in Mini Remote Keypad: 8 (Default is 4) Scene Control Functions supported; On, Off, Press & hold Bright, Press & hold Dim, Double-tap Fast On and Double-tap Fast Off.
Make Mini Remote (Button) a Controller
Follow the steps below to control a scene (one or more INSTEON devices).
1) Tap the Mini Remote scene button of choice (on or off buttons will both work)
2) Adjust the scene responder to the "state" you want when the scene is activated from Mini Remote (e.g., 50%, 25% or even OFF) ^1
3) Press & hold Mini Remote's Set button until Mini Remote beeps
Mini Remote's LED will blink green
4) Press & hold the responder's Set button until it beeps (or until its LED/load flashes)
Mini Remote will double-beep and its LED will stop blinking
Responder's LED will stop blinking (it may also double-beep)
5) Confirm that scene addition was successful by tapping on/off on your chosen Mini Remote button
The Responder will toggle between the scene on level and off
6) If you wish to add more responders to Mini Remote, repeat steps 1-5 for each additional scene responder (or see Add Multiple Responders to a scene)
Remove Mini Remote (Button) as a Controller
If you are no longer going to use an INSTEON responder that is a scene responder of Mini Remote, it is very important that you remove its scene membership. Otherwise, Mini Remote will retry every scene command repetitively, thus creating delays and shortening battery life.
1) Tap the Mini Remote scene button of choice (on or off buttons will both work)
The Responder will respond
2) Press & hold the Mini Remote's Set button until it beeps
Mini Remote's LED will blink green
3) Press & hold the Mini Remote's Set button until it beeps again
Mini Remote's LED will blink red
4) Press & hold the Responder's Set button until it double-beeps (or LED blinks)
Mini Remote will double-beep and its LED will stop blinking
5) Confirm that Unlinking was successful by tapping the scene button on and off The Responder will not respond ____
6) If you wish to remove multiple responders from Mini Remote, repeat steps 1-5 for each additional responder (or see Remove Multiple Responders from a Scene)
Using Mini Remote
4 Scene Mode (Default)
The On/Off button pairs each control all their scene members as follows:
| Button | Side Icon | Tap | Press & hold | Double-tap |
| On Right ^ | Turn scene on | Brighten scene members until released | Turn scene members full-bright instantly | |
| Off Left v | Turn scene off | Dim scene members until released | Turn scene members off instantly |
8 Scene Toggle Mode
Each button will control all its scene members as follows:
| Last Command Sent | Tap | Press & hold | Double-tap |
| Off or Dim | Turn scene on | Brighten scene members until released | Turn scene members full-bright instantly |
| On or Bright | Turn scene off | Dim scene members until released | Turn scene members off instantly |
8 Scene Non-Toggle Mode (Always On)
Each button will control all its scene members as follows:
| Tap | Press & hold | Double-tap |
| Turn scene on | Brighten scene members until released | Turn scene members full-bright instantly |
Note: Devices in scenes that respond to the scene trigger by turning off do not respond to scene dim and brighten. Devices in scenes that only support On/Off (such as switches and relays) do not respond to scene dim and brighten.
LED Behavior
Mini Remote has a two-color LED (Green & Red) which momentarily indicates whether an on or an off is being sent.
| LED State | Meaning |
| Blink Green (Once) | On Sent |
| Blink Red (Once) | Off Sent |
| Blink Red (for a few seconds) | One or more scene members did not acknowledge (note: scene members may still have heard the scene command and adjusted their settings) |
Turn Unit On/Off (Pocket Mode)
The Mini Remote features a power switch located next to the Set button. If you plan on carrying the Mini Remote in your pocket it is recommended that you turn it off to prevent buttons from accidentally being pressed. This is also recommended if your Mini Remote will not be in use for long periods of time.
Power Switch (right On, left Off)

flowchart
graph LR
    A["Input"] --> B["Process Step"]
    B --> C["Output"]
Stuck Button
If a button on Mini Remote is held for more than 4 minutes, the Mini Remote will automatically stop transmitting to preserve battery life. The Mini Remote will automatically turn back on when the button that was depressed is no longer being pressed.
Advanced Features
Add Multiple Responders to a Scene (Multi-Link)
1) Tap the Mini Remote scene button of choice (on or off buttons will both work)
2) Press & Hold Set Button for 3 seconds - until you hear a beep
Mini Remote's LED will blink green
3) Tap Set Button
Mini Remote's LED will double-blink green
4) Adjust Each Responder you wish to add to scene, then Press & Hold its Set Button until Mini Remote double-beeps
Mini Remote's LED will continue to double-blink green
5) When all your devices have been added, tap Mini Remote's Set Button
Mini Remote will double-beep and its LED will turn off
Remove Multiple Responders from a Scene (Multi-Unlink)
1) Tap the Mini Remote scene button from which you wish to remove the responder (on or off buttons will both work)
2) Press & Hold Set Button for 3 seconds - until you hear a beep
Mini Remote's LED will blink green
3) Press & Hold Set Button a 2 ^nd time for 3 seconds - until you hear a beep
Mini Remote's LED will blink red
4) Tap Set Button
Mini Remote's LED will double-blink red
5) For each Responder you wish to remove from scene, Press & Hold its Set Button until Mini Remote double-beeps
Mini Remote's LED will continue to double-blink red
6) When all your devices have been removed, tap Mini Remote's Set Button
Mini Remote will double-beep and its LED will turn off
Change Button / Scene Configuration (e.g., Change to 8 Button Mode)
- Press & Hold Set Button for 3 seconds - until you hear a beep
LED will blink green - Press & Hold Set Button a 2 ^nd time for 3 seconds - until you hear a beep
LED will blink red - Press & Hold Set Button a 3 ^rd time for 3 seconds - until you hear a beep
LED will blink green -
Press & Hold Set Button a 4^th time for 3 seconds - until you hear a beep
LED will blink red -
Tap Set Button
LED will double-blink red
- Press the appropriate button for the desired button/scene configuration
| Desired Configuration | Button to Press |
| 8 Button Toggle | Bottom Row, Left Side |
| 8 Button Non-Toggle (Always On) | Top Row, Left Side |
| 4 scene (Default) | Top Row, Right Side |
Mini Remote will double-beep and its LED will turn off
- To confirm the configuration, tap the top left button on Mini Remote several times
LED will flash as follows
| Flash Pattern | Configuration |
| Red every tap | 4 scene |
| Green every tap | 8 scene Non-Toggle (Always On) |
| Alternating Green / Red | 8 scene Toggle |
Turn LED Off (or Back On)
1) Press & Hold Set Button for 3 seconds - until you hear a beep
LED will blink green
2) Press & Hold Set Button a 2^nd time for 3 seconds - until you hear a beep
LED will blink red
3) Press & Hold Set Button a 3^rd time for 3 seconds - until you hear a beep
LED will blink green
4) Press the appropriate button for the desired button/scene configuration
| Desired LED Mode | Button to Press |
| LED Off | Top Row, Left Side |
| LED On (default) | Top Row, Right Side |
Mini Remote will double-beep and its LED will turn off
Turn Beeper On During Usage (or Back Off)
1) Press & Hold Set Button for 3 seconds - until you hear a beep
LED will blink green
2) Press & Hold Set Button a 2^nd time for 3 seconds - until you hear a beep LED will blink red
3) Press & Hold Set Button a 3^rd time for 3 seconds - until you hear a beep
LED will blink green
4) Tap Set Button
LED will double-blink green
5) Press the appropriate button for the desired button/scene configuration
| Desired Beeper Mode | Button to Press |
| Off (Default) | Top Row, Left Side |
| On | Top Row, Right Side |
Mini Remote will double-beep and its LED will turn off
Beeper Behavior
| Command Method | Beeper Disabled (Default) | Beeper Enabled | |
| On | Tap | - | Single Beep |
| Off | Tap | - | Single Beep |
| Fast-On | Double-Tap | - | Single Beep |
| Fast-Off | Double-Tap | - | Single Beep |
| Begin Bright | Press & hold | - | Single Beep |
| Begin Dim | Press & hold | - | Single Beep |
| Setup Action | Beeper | ||
| Enter Setup Mode, Transition to next setup mode or Exit Setup Mode | Single Beep | ||
| Setup successful, return to Ready Mode | Double-Beep | ||
| Return to Ready Mode after a longer than 3 minute time-out | Long Beep (3 seconds) | ||
| Failure to add a scene responder | Long Beep (3 seconds) | ||
| Exiting Stuck Button | Long Beep (3 seconds) | ||
LED Behavior During Setup
Mini Remote has a two-color LED (Green & Red) which displays helpful information.
| LED State | Meaning |
| Blinking Green slowly | Add Responder Setup Mode, or |
| LED on/off Setup Mode | |
| Blinking Red slowly | Remove Responder Setup Mode |
| Double-Blinking Green slowly | Multi-Add Responder Setup Mode, or |
| Beeper on/off Setup Mode | |
| Double-Blinking Red slowly | Multi-Remove Responder Setup Mode, or |
| Keypad Configuration Setup Mode |
Factory Reset
The factory reset procedure clears all settings from Mini Remote including INSTEON scenes.
1) If possible, unlink (remove) all scene responders prior to performing factory reset
2) Turn Mini Remote off (slide power switch to left)
3) Press & Hold Set Button
4) While continuing to hold the Set Button, turn Mini Remote back on (slide power switch to the right)
Mini Remote will beep and LED stays solid green
Mini Remote will emit a long beep
5) Continue to Hold Set Button until the long beep stops
LED turns solid red
6) Release Set Button
Mini Remote will double-beep and its LED will turn off
Specifications
| General | ||
| Product Name | Mini Remote 4-Scene (formerly RemoteLinc 2) | |
| Brand | INSTEON | |
| Manufacturer Product Number | 2342-232, 2444A2WH4 (US)2342-432 (EU)2342-532 (AUS/NZ) | |
| UPC | 813922010701 (US)813922012583 (EU)813922012590 (AUS/NZ) | |
| FCC ID | SBP2444A | |
| Patent Number | Protected under U.S. and foreign patents (see www.insteon.com/patents) | |
| Warranty | 2 Years, Limited | |
| INSTEON | ||
| Scenes | 4 (default), configurable to 8 | |
| Scene Configurations | 4 On/Off (default), 8 Toggle or 8 Always On | |
| Maximum scene Links | 400 | |
| Scene Commands Supported | On | Off |
| Begin Brightening | Begin Dimming | |
| End Brightening | End Dimming | |
| Fast On | Fast Off | |
| Software Configurable | Yes | |
| X10 Support | None | |
| Operation | ||
| LED Type | Two-color: Green and Red | |
| LED during Use | Green Flash Once | On (sent) |
| Bright | ||
| Fast-On | ||
| Red Flash Once | Off | |
| Dim | ||
| Fast-Off | ||
| Red Blink for ~3 Seconds | Scene Acknowledge Missing | |
| LED | Always used for setup, default On during use | |
| Setup Button | Yes | |
| On/Off Switch | Yes | |
| Beeper | Yes, configurable | |
| Battery Charging LED | Yes, Embedded (shines red through case during charge) | |
| RF Range | 50' Line-of-Sight | |
| RF Frequency | 915MHz (US)869MHz (EU)921MHz (AUS/NZ) | |
| Retains all settings without power | Yes, all saved in Non-volatile EEPROM | |
| Mechanical | ||
| Color | White | |
| Plastic | UV Stabilized ABS | |
| Dimensions | 2.6" H x 1.3" W x 0.39" D | |
| Weight | 1 Oz. | |
| Button Style | Plastic Paddles over Contact Switches | |
| Optional Hardware | Wall Mount | |
| Tabletop Stand | ||
| Visor Clip | ||
| Operating Environment | Indoors, 32°F to 104°F, up to 85% relative humidity | |
| Electrical | ||
| Battery type | 3.7 VDC Lithium Polymer, Rechargeable, non-replaceable | |
| Battery life (between charges) | 9-12 months under standard usage | |
| Battery Re-charging cycles | >500 recharging cycles | |
| Recharging jack | Standard, Micro-USB, 5VDC | |
| Recharging time | 1 hour | |
Troubleshooting
| Problem | Possible Cause | Solution |
| Mini Remote won't add a scene responder | Mini Remote may be out of range of nearest dual-band INSTEON device (hopper) | Try moving an access point or other dual-band plug-in module closer to Mini Remote |
| The INSTEON signal may not be getting to the “vicinity” of Responder | Make sure phases are bridged, add additional INSTEON devices and/or move around existing INSTEON devices | |
| Large appliances, such as refrigerators or air conditioners, may be producing electrical noise on the power line | Install a power line noise filter (e.g., #1626-10) to filter electrical noise and minimize signal attenuation | |
| Other electrical devices, such as computers, televisions, or power strips, may be absorbing the INSTEON signal | ||
| Mini Remote will not turn a Responder On (it may turn it off) | Ramp Rate may be Extremely Slow Or Responder may be Linked at OFF | Re-link to Responder with fast Ramp Rate |
| Responder's Load doesn't appear to turn on right away | The Ramp Rate may be set too slow | Re-link to Responder with fast Ramp Rate |
| Responder(s) is taking a long time to respond to a Mini Remote | Mini Remote may be sending commands to a Responder(s) that is no longer in use | Remove all unused Responders from the Mini Remote. HINT: If you are using home automation software, you can easily check scene membership and eliminate unnecessary Links |
| If the above doesn't work, try the solutions for “Mini Remote will not turn a Responder On” | ||
| Mini Remote blinks red after I turn a scene On or Off | One or more scene members not responding Or One or more scene members not responding AND HouseLinc (or other software) is attempting to communicate to Mini Remote | Monitor for recurrence and if recurs:a) Remove all scene responders that are no longer in use, orb) Add INSTEON devices for better signaling |
| Mini Remote will not respond | Something may have caused the Mini Remote to unexpectedly stop responding | Power cycle: Turn unit Off (slide switch to left), wait 10 seconds and turn back on |
| Perform a factory reset on Mini Remote |
If you have tried these solutions, reviewed this Owner's Manual, and still cannot resolve an issue you are having, please call: 866-243-8022
Certification and Warranty
FCC & Industry Canada Compliance Statement
This device complies with FCC Rules Part 15 and Industry Canada RSS-210 (Rev. 7). Operation is subject to the following two conditions:
(1) This device may not cause harmful interference, and
(2) This device must accept any interference, including interference that may cause undesired operation of the device.
The digital circuitry of this device has been tested and found to comply with the limits for a Class B digital device, pursuant to Part 15 of the FCC Rules. These limits are designed to provide reasonable protection against harmful interference in residential installations. This equipment generates, uses, and can radiate radio frequency energy and, if not installed and used in accordance with the instructions, may cause harmful interference to radio and television reception. However, there is no guarantee that interference will not occur in a particular installation. If this device does cause such interference, which can be verified by turning the device off and on, the user is encouraged to eliminate the interference by one or more of the following measures:
- Re-orient or relocate the receiving antenna of the device experiencing the interference
- Increase the distance between this device and the receiver
- Connect the device to an AC outlet on a circuit different from the one that supplies power to the receiver
- Consult the dealer or an experienced radio/TV technician
WARNING: Changes or modifications to this device not expressly approved by the party responsible for compliance could void the user's authority to operate the equipment.
DECLARATION OF CONFORMITY
Hereby, INSTEON declares that this device is in compliance with the essential requirements and other relevant provisions of the following Directives:
1) Electromagnetic Compatibility Directive 2004/108/EC 2) Hazardous Substance Directive 2005/95/EC
Technical data and copies of the original Declaration of Conformity are available and can be obtained from INSTEON; 16542 Millikan Ave, Irvine, CA, USA.
User Information for Consumer Products Covered by EU Directive 2002/96/EC on Waste Electric and Electronic Equipment (WEEE)
This document contains important information for users with regards to the proper disposal and recycling of INSTEON products. Consumers are required to comply with this notice for all electronic products bearing the following symbol:

Environmental Information for Customers in the European Union
European Directive 2002/96/EC requires that the equipment bearing this symbol on the product and/or its packaging must not be disposed of with unsorted municipal waste. The symbol indicates that this product should be disposed of separately from regular household waste streams.
It is your responsibility to dispose of this and other electric and electronic equipment via designated collection facilities appointed by the government or local authorities. Correct disposal and recycling will help prevent potential negative consequences to the environment and human health. For more detailed information about the disposal of your old equipment, please contact your local authorities, waste disposal service, or the shop where you purchased the product.
DECLARATION OF CONFORMITY TO R&TTE DIRECTIVE 1999/5/EC for the European Community, Switzerland, Norway, Iceland and Liechtenstein
Product category: general consumer (category 3).
English: This equipment is in compliance with the essential requirements and other relevant provisions of the European R&TTE Directive 1999/5/EC
Seller warrants to the original consumer purchaser of this product that, for a period of one year from the date of purchase, this product will be free from defects in material and workmanship and will perform in substantial conformity to the description of the product in this Owner's Manual. This warranty shall not apply to defects or errors caused by misuse or neglect. If the product is found to be defective in material or workmanship, or if the product does not perform as warranted above during the warranty period, Seller will either repair it, replace it, or refund the purchase price, at its option, upon receipt of the product at the address below, postage prepaid, with proof of the date of purchase and an explanation of the defect or error. The repair, replacement, or refund that is provided for above shall be the full extent of Seller's liability with respect to this product. For repair or replacement during the warranty period, call the INSTEON Gold Support Line at 866-243-8022 with the Model # and Revision # of the device to receive an RMA# and send the product, along with all other required materials to:
INSTEON
ATTN: Receiving
16542 Millikan Ave.
Irvine, CA 92606-5027
Limitations
The above warranty is in lieu of and Seller disclaims all other warranties, whether oral or written, express or implied, including any warranty or merchantability or fitness for a particular purpose. Any implied warranty, including any warranty of merchantability or fitness for a particular purpose, which may not be disclaimed or supplanted as provided above shall be limited to the one-year of the express warranty above. No other representation or claim of any nature by any person shall be binding upon Seller or modify the terms of the above warranty and disclaimer.
Home automation devices have the risk of failure to operate, incorrect operation, or electrical or mechanical tampering. For optimal use, manually verify the device state. Any home automation device should be viewed as a convenience, but not as a sole method for controlling your home.
In no event shall Seller be liable for special, incidental, consequential, or other damages resulting from possession or use of this device, including without limitation damage to property and, to the extent permitted by law, personal injury, even if Seller knew or should have known of the possibility of such damages. Some states do not allow limitations on how long an implied warranty lasts and/or the exclusion or limitation of damages, in which case the above limitations and/or exclusions may not apply to you. You may also have other legal rights that may vary from state to state.
Protected under U.S. and foreign patents (see www.insteon.com/patents)
© Copyright 2013 INSTEON, 16542 Millikan Ave., Irvine, CA 92606, 866-243-8022, www.insteon.com


- Owners Manual
- About Mini Remote .... 3
- Features & Benefits 4
- Getting Started 6
- Scenes......6
- Using Mini Remote....7
- Advanced Features 8
- Specifications....12
- Troubleshooting....13
- Certification and Warranty 14
- About Mini Remote
- Features & Benefits
- What's in the Box?
- Required Accessories
- Optional Accessories
- Wall Mount Bracket
- (2444B4)
- USB Power Adapter
- (2444B6)
- Getting Started
- Scenes
- Make Mini Remote (Button) a Controller
- Remove Mini Remote (Button) as a Controller
- Using Mini Remote
- Scene Mode (Default)
- Scene Toggle Mode
- Scene Non-Toggle Mode (Always On)
- LED Behavior
- Turn Unit On/Off (Pocket Mode)
- Stuck Button
- Advanced Features
- Add Multiple Responders to a Scene (Multi-Link)
- Remove Multiple Responders from a Scene (Multi-Unlink)
- Change Button / Scene Configuration (e.g., Change to 8 Button Mode)
- Turn LED Off (or Back On)
- Turn Beeper On During Usage (or Back Off)
- LED Behavior During Setup
- Factory Reset
- Certification and Warranty
- FCC & Industry Canada Compliance Statement
- DECLARATION OF CONFORMITY
- 1) Electromagnetic Compatibility Directive 2004/108/EC 2) Hazardous Substance Directive 2005/95/EC
- User Information for Consumer Products Covered by EU Directive 2002/96/EC on Waste Electric and Electronic Equipment (WEEE)
- DECLARATION OF CONFORMITY TO R&TTE DIRECTIVE 1999/5/EC for the European Community, Switzerland, Norway, Iceland and Liechtenstein
- INSTEON
- Limitations
Brand : Insteon
Model : Mini Remote 4 Scene
Category : Remote control