
Dual WAN VPN Router 524049 - Router Intellinet - Free user manual and instructions
Find the device manual for free Dual WAN VPN Router 524049 Intellinet in PDF.


| Product Type | Dual WAN VPN Router |
| Dimensions (W x D x H) | 9.5 x 6.3 x 1.7 inches (24.1 x 16.0 x 4.3 cm) |
| Weight | 2.0 lbs (0.9 kg) |
| Power Input | 100-240V AC, 50-60Hz, 12V DC 2A |
| WAN Ports | 2 x Gigabit Ethernet (RJ45) |
| LAN Ports | 4 x Gigabit Ethernet (RJ45) |
| VPN Protocols Supported | IPsec, PPTP, L2TP, OpenVPN |
| WAN Load Balancing & Failover | Yes |
| Firewall | SPI Firewall, DoS Prevention |
| QoS (Quality of Service) | Yes |
| VLAN Support | Yes (802.1Q) |
| Management | Web-based GUI, CLI, SNMP |
| Security | Password-protected access, firmware updates, VPN encryption |
| Maintenance & Cleaning | Keep ventilation clear; wipe with dry cloth; avoid liquids |
| Spare Parts & Repairability | Power adapter (12V 2A) available; no user-serviceable components |
| Warranty | 1 year limited |
Frequently Asked Questions - Dual WAN VPN Router 524049 Intellinet
User questions about Dual WAN VPN Router 524049 Intellinet
0 question about this device. Answer the ones you know or ask your own.
Ask a new question about this device
Download the instructions for your Router in PDF format for free! Find your manual Dual WAN VPN Router 524049 - Intellinet and take your electronic device back in hand. On this page are published all the documents necessary for the use of your device. Dual WAN VPN Router 524049 by Intellinet.
USER MANUAL Dual WAN VPN Router 524049 Intellinet
INTRODUCTION
Thank you for purchasing the INTELLINET NETWORK SOLUTIONS™ Dual WAN VPN Router, Model 524049.
This versatile device combines a load-balancing router with a failover function, a firewall, a VPN server and a 5-port Fast Ethernet smart switch, providing the speed and security that makes your network more efficient in its operation and more effective in its communication.
The Dual WAN VPN Router can be connected to two different WAN connections at the same time, providing an efficient backup mechanism for the main Internet connection. It can also be used to balance the load between the two connections based on smart algorithms or sophisticated user-defined load sharing rules. Whether you want to reserve one of the two WAN lines for a special application or a special user, or use it as a backup for the main line, there are very few things which you cannot do with this device.
The router comes with an integrated 5-port 10/100 Mbps LAN switch for plenty of connectivity. The switch provides smart functions, such as VLAN, Port Mirroring (Sniffer Port) and port controls, which you normally can only find in a business smart switch.
It also includes a true firewall that secures your network against hackers. With Network Address Translation (NAT) to shield your networked devices from intruders, Denial of Service (DoS) attack prevention to avert potential threats by scanning incoming traffic, integrated virus and worm detection offering an additional layer of protection (even including an e-mail alert function), and content control using URL and domain filtering, you can rest assured that you've taken the necessary precautions to protect the data on your network. And if this were not enough, the built-in VPN server supports up to five connections simultaneously, ideal for telecommuters who need a more secure connection to the Internet.
Plus, the Quality of Service (QoS) feature lets you decide which applications are most important to ensure they have priority with available bandwidth during network peak times.
Easy-to-follow instructions in this user manual help make installation of this router quick and simple, so you'll also soon be enjoying the benefits of these additional features:
- Integrated scheduler to limit Internet access to client computers in the LAN
- Content control through URL and domain filter
- Integrated 10/100 Mbps LAN switch with Auto MDI/MDI-X support
• Supports port controls (auto-negotiation on/off, 10/100 Mbps, full/half duplex)
• Supports port based VLAN with 5 VLAN groups
• Supports port mirroring
• Supports virtual server, port forwarding and DMZ (demilitarized zone)
• DHCP server assigns IP addresses for all LAN users
• DHCP Server supports static lease management
• Supports DDNS (dynamic DNS)
• Supports UPNP (Universal Plug and Play)
• Supports VPN pass-through (PPTP)
• 94 Mbps WAN to LAN throughput - WOL (Wake-On LAN) function sends a wakeup signal to any computer in the LAN
- Remote management function (enable/disable and management port)
- Easy installation through Web-based user interface
- Firmware updates via Web-based user interface
- Includes 19" rackmount brackets
- Lifetime Warranty
NOTE: Some of the screen-shot images have been modified to fit the format of this manual.
TABLE OF CONTENTS
section page
HARDWARE....5
Connections....5
Front-Panel Indicators 5
Reset 5
WINDOWS SETUP/INSTALLATION.... 6
Windows 98/Me 6
Windows 2000 7
Windows XP 7
DUAL WAN VPN ROUTER SETUP/INSTALLATION 8
Log In 8
PPPoE (ADSL) 8
Dynamic IP....10
Static IP 12
Status....13
WAN Status....13
LAN Status....14
Basic Setup....14
LAN/DHCP Setup 14
Net Detector 15
Link Setup/Info 16
Routing Table 17
Switch Config ....17
System 18
Administrator Setup....18
Firmware Upgrade ....19
System Log 19
Access List....20
Misc....21
QoS 22
Basic Setup 22
IP QoS....22
Application QoS 23
Port QoS 24
LS/NAT 24
Load Sharing....24
Applications....25
Internal Server 26
Port Forwarding 27
Port Trigger 28
NAT On/Off 29
Advanced 29
Firewall 29
DDNS 30
WOL 30
URL Filter 31
Remote Management ....31
Scheduler 32
VPN 33
SPECIFICATIONS 34
HARDWARE
Before you begin any installation or setup of the Dual WAN VPN Router, make sure that your computer is equipped with the necessary Web browser (Internet Explorer 4.0 with JavaScript or Netscape Navigator 4.0 or above) and that you have the information you'll need at hand; for example, any user IDs and passwords, ISP account numbers and details or status of your IP address, default gateway and DNS. If your computer has had ADSL PPPoE dial-up software installed, back up your installation and un-install it by going to Start → Control Panel → Add/Remove Programs.
Connections
- Set up your WAN(s) by connecting the broadband cable of your xDSL/cable modem/LAN to one or both of the WAN ports on the router.
- Set up your LAN(s) by connecting your computer LAN card port(s) or the uplink port(s) of your hub/switch(es) to any of the five LAN ports on the router. NOTE: All LAN ports on the router automatically sense and accommodate crossover cable, so either straight-through or crossover cable can be used for LAN connections.
-
Turn on the power to the router. (The included AC power cord connects on the back panel of the device.) The router will enter a self-detect state, during which: the PWR LED will light, the SYS LED will flash (after a proper startup) and unconnected LAN/WAN LEDs will quickly flash twice. The system is now in its normal operational state.
-
Start your computer(s).

Front-Panel Indicators
LED Status Description/Function
PWR On The router is operational.
SYS Flashing The router system is operating normally.
WAN 1/2 On A connection has been made and detected.
LINK/ACT Flashing Data is being transmitted through the corresponding port (1–5).
SPEED Off LAN data is being transmitted at 10 Mbps.
On LAN data is being transmitted at 100 Mbps.
Reset
To reset the router (which will restore all configuration settings to their defaults):
- Press and hold the Reset button located on the front panel of the router.
- Switch the router's power off, then on. NOTE: The power switch is on the back panel.
- After 5 seconds, the SYS LED should flash rapidly.
- Release the Reset button.
WINDOWS SETUP/INSTALLATION
It's recommended that your local network be configured for Internet access through the Dual WAN VPN Router. If this is done after the initial router connections have been made, the connections will need to be made again. Use whichever procedure below corresponds to your Windows platform. The setup can be either a static or dynamic IP configuration. The defaults:
• IP address: 192.168.0.1
- Subnet mask: 255.255.255.0
Windows 98/Me
- Install the router.
- With Windows running, check that the LAN LED on the router is on. If not, check the computer and router connections.
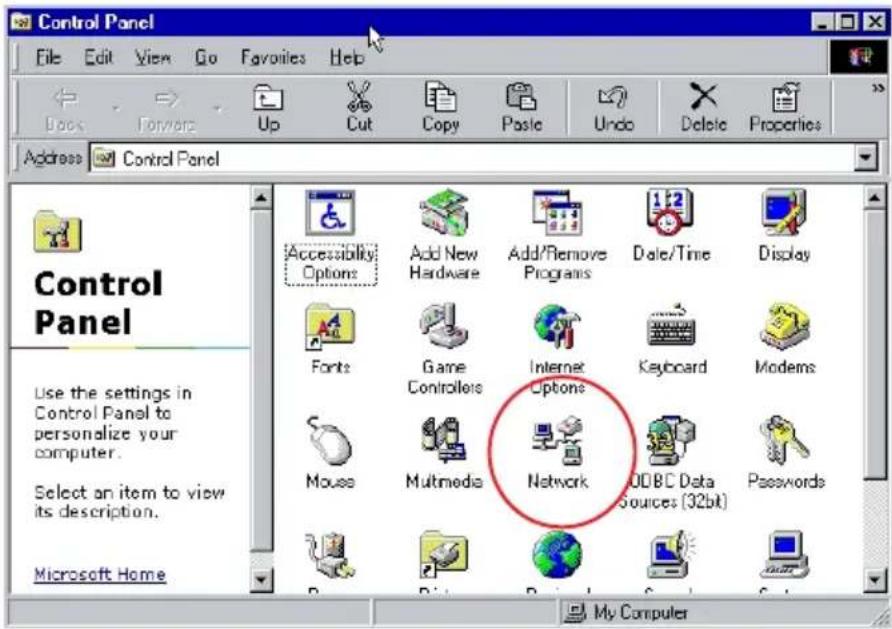
- Go to Start → Settings → Control Panel.
- In the Control Panel, double-click the Network icon.
- Click on the Configuration tab and highlight
"TCP/IP → AMC PCNET Family Ethernet Adapter." Click "Properties."
- Click on the IP Address tab and select "Obtain an IP address automatically." Click "OK."
- Click on the Gateway tab and confirm that the Installed Gateways field is empty.
- Click on the DNS Configuration tab and select "Disable DNS." Click "OK."
- When a System Settings Change window displays a "Do you want to restart your computer
now?" prompt, click "Yes."
- After the reboot, enter "cmd" and press "Enter."
- Enter "ipconfig" and press "Enter."
- Confirm the on-screen IP info:
• The IP address should be within the range of 192.168.0.2 to 192.168.0.254.

• The subnet mask should be 255.255.255.0.
• The default gateway should be 192.168.0.1.
- Enter "ping 192.168.0.1," then press "Enter." If "Reply from 192.168.0.1 bytes=32 time=1ms TTL=255" displays, then the router/computer connection is correct.
Windows 2000
- Install the router.
- With Windows running, check that the LAN LED on the router is on. If not, check the computer and router connections.
- Go to Start → Settings → Control Panel.
- In the Control
Panel, double-click the Network and Dial-Up Connection icon.
-
In the Network and Dial-Up Connections window, click on the Local Area Connection icon.
-
On the General tab of the Local Area Connection Status window, click "Properties."
-
On the General tab of the Local Area Connection Properties window, highlight "Internet Protocol (TCP/IP)," then click "Properties."
-
On the General tab of the Internet Protocol (TCP/IP) Properties window, select "Obtain an IP address automatically" and "Obtain a DNS server address automatically"; click "OK."
-
Click "Start," then "Run."
-
Enter "cmd," then press "Enter."
- Enter "ipconfig" and press "Enter."
- Confirm the on-screen IP info:
• The IP address should be in the range of 192.168.0.2 to 192.168.0.254.
• The subnet mask should be 255.255.255.0.
• The default gateway should be 192.168.0.1.
- Enter "ping 192.168.0.1," then press "Enter." If "Reply from 192.168.0.1 bytes=32 time=1ms TTL=255" displays, then the router/computer connection is correct.

![Microsoft Windows 2000 [Version 5.00.2195] (C) Copyright 1985-1999 Microsoft Corp. D:\> ipconfig Windows IP Configuration Ethernet adapter Local Area Connection: Connection-specific DNS Suffix . : local IP Address. . . . . . . . . . . . . : 192.168.0.2 Subnet Mask . . . . . . . . . . . . : 255.255.2…](/content/2026/05/859326/images/5970fdfe5fe4f8f333ad45378cbf381b6d4ab00e13198ca5b8b5b90bc0fbf366.jpg)
Windows XP
- Install the router.
- With Windows running, check that the LAN LED on the router is on. If not, check the computer and router connections.
- Go to Start → Settings → Control Panel.
- In the Control Panel, double-click Network and Internet Connections.

- On the Network and Internet Connections screen, click Network Connections.
- On the Network Connections screen, click Local Area Connection.
- On the General tab of the Internet Status screen, click "Properties."
- On the Internet Properties screen, highlight "Internet Protocol (TCP/IP)"; click "Properties."
-
On the General tab of the Internet Protocol (TCP/IP) Properties screen, select "Obtain an IP address automatically" and "Obtain a DNS server address automatically"; click "OK."
-
Click "Start," then "Run."
- Enter "cmd," then press "Enter."
- Enter "ipconfig" and press "Enter."
- Confirm the on-screen IP info:
• The IP address should be in the range of 192.168.0.2 to 192.168.0.254.
• The subnet mask should be 255.255.255.0.
• The default gateway should be 192.168.0.1.
- Enter "ping 192.168.0.1," then press "Enter." If "Reply from 192.168.0.1 bytes=32 time=1ms TTL=255" displays, then the router/computer connection is correct.
![Microsoft Windows XP [5.1.2600] (C) 1985-2001 Microsoft Corp. C:\Documents and Settings\Administrator>ipconfig Windows IP Configuration Ethernet adapter Local Area Connection: Connection-specific DNS Suffix . : local IP Address. . . . . . . . . . . . . : 192.168.0.2 Subnet Mask . . . . . . . . . . .…](/content/2026/05/859326/images/e79c5f90341eab67eec2b1c728603797b4d9e9fe483018c8c2a1071a989ba294.jpg)
DUAL WAN VPN ROUTER SETUP/INSTALLATION
The first step in setting up the Dual WAN VPN Router is to log in through your Web browser. Configuration procedures for setting up the router are presented in subsequent sections of this user manual.
Log In
- In the Address bar of your Web browser (Internet Explorer 4.0 with JavaScript or Netscape Navigator 4.0 or above), enter the default IP address: 192.168.0.1.
- When the Login screen displays, click "Login" to continue.
PPPoE (ADSL)
- If using an ADSL modem, connect it to a WAN port and confirm that a lighted WAN LED indicates a proper connection.
- On the Basic Setup tab, click WAN(1 or 2) Setup.
- Select "PPPoE User (ADSL)."
- In the "User ID" and "Password" fields, enter the user ID and password provided by your Internet service provider (ISP).
- Click "Apply." Re-configure the remaining settings as desired:
MTU: Input an MTU value for data packages. The default value is 1454, which is the recommended value and should not be changed.
Disconnect PPP session if idle time is longer than _ Min: If you select this option, the value entered represents the idle time, after which the IP router automatically disconnects from the Internet.
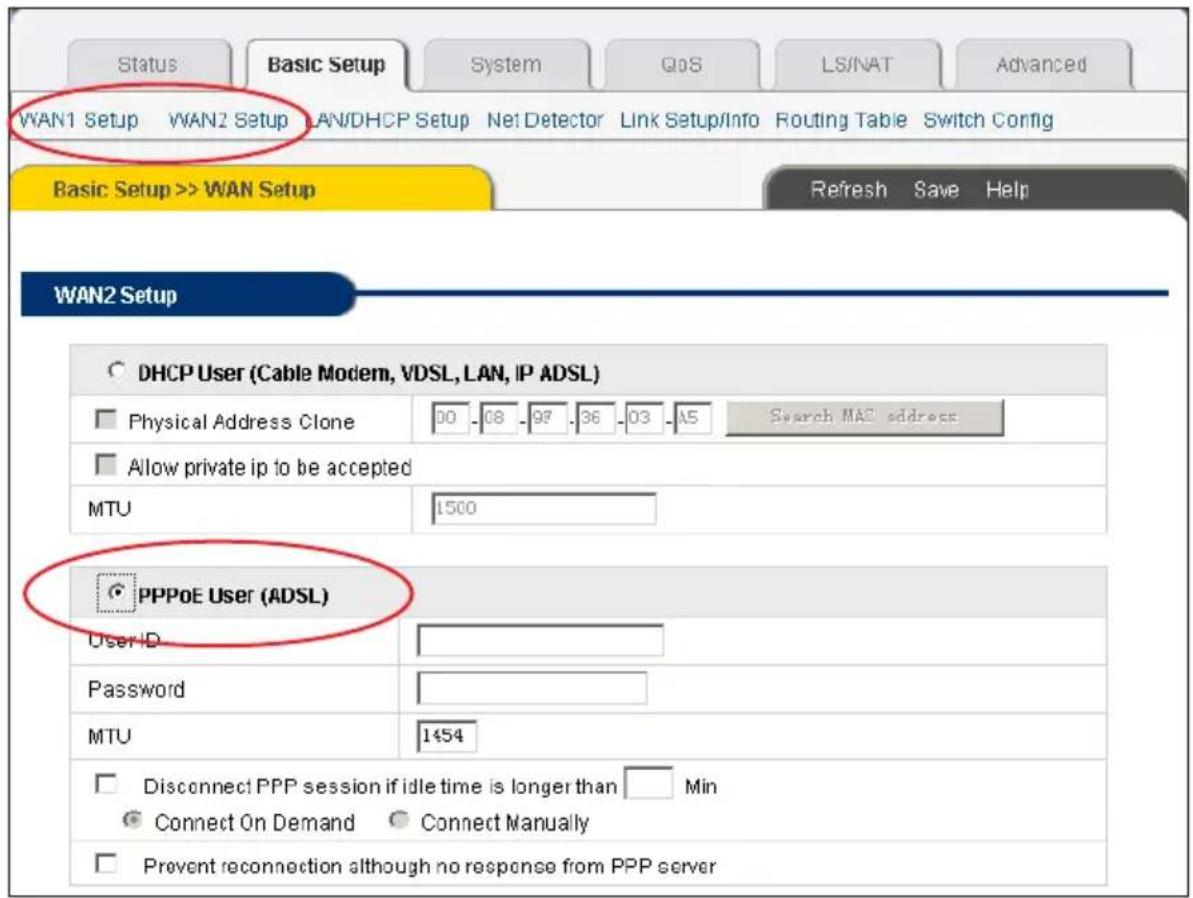
Connect On Demand: The Dual WAN VPN Router can automatically connect with the
Internet if there is Internet access after disconnection. NOTE: If, during normal operation, disconnection occurs due to external causes, the router will immediately try to re-connect with the Internet, and will continue attempting to re-connect until a successful connection is made. This is an inner function of the router, and has nothing to do with "Connect On Demand," which only works when the "Disconnect PPP session if idle time is longer than Min" function is selected.
Connect Manually: When this is selected, you need to re-connect with Internet manually after disconnection. As with "Connect On Demand," this option only works when the "Disconnect PPP session if idle time is longer than _Min" function is selected.
Prevent reconnection although no response from PPP server: Select this option to shut off the router's inner automatic-connection function.
-
A screen displays presenting "Conn (Connection) Type" and "Conn. (Connection) State/Status."
-
If "Successfully connected" displays in the "Conn. State" field, the configuration is correct. Proceed to Step 7.
- If "Invalid ID/Password" displays in
the "Conn. State" field, the configuration is incorrect: Click "Close" and check your ID and password; if the status remains unchanged, check that your service type is correct.
- Go to the Status screen and click WAN Status to confirm the WAN connection status.
Connection Type: This should display "PPPoE (ADSL)."
Connection Status: This should display "Successfully connected."
Physical Address: This displays the router's WAN port MAC address.
WAN IP Address, Subnet Mask, Default Gateway, Primary DNS Server and Secondary
DNS Server: These values, provided by your ISP, can be different from those shown.
Disconnect: Click to manually disconnect the system from the Internet.


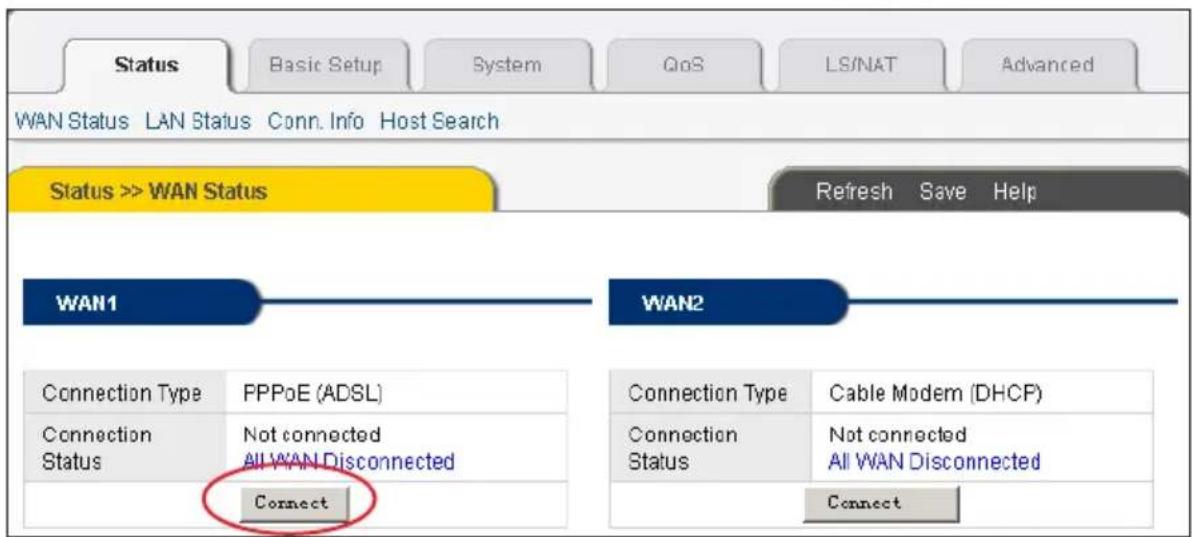
Connect: Click to refresh and re-connect to the Internet.
- Click "Save" to save the current configuration. NOTE: If the settings aren't saved at this point, they will revert to previous values when the system is turned off or restarted.
- Restart all computers connected to the router.
Dynamic IP
- If using a cable modem, connect it to a WAN port and confirm that a lighted WAN LED indicates a proper connection.
- On the Basic Setup tab, click WAN(1 or 2) Setup.
- Select "Dynamic User (Cable Modem, VDSL, LAN, IP ADSL)."
- Click "Apply." Re-configure the remaining settings as desired:
Physical Address Clone: Select to change the WAN port MAC address. If this option is left unselected, the WAN MAC address remains a default value.

Allow private IP to be accepted: Select to allow a WAN port to be assigned a private IP address.
-
A screen displays presenting "Conn (Connection) Type" and "Conn. (Connection) State/Status."
-
If "Successfully connected" displays in the "Conn. State" field, the configuration is correct.
- If "Connecting to Internet" remains in the "Conn. State" field, close the

window, then turn off the cable modem power supply and turn it back on and check the WAN LED to see if it's lit to confirm that a proper connection has been established. Then click "Apply" again.
- Go to the Status screen and click WAN Status to confirm the WAN connection status.

NOTE: You can also click "Show Internet Information" in the previous Connection window.
Connection Type: This should display "Cable Modem (DHCP)."
Connection Status: This should display "Successfully connected."
Physical Address: This displays the router's WAN port MAC address.
WAN IP Address, Subnet Mask, Default Gateway, Primary DNS Server and Secondary DNS Server: These values, provided by your ISP, can be different from those shown.
Disconnect: Click to manually disconnect the system from the Internet. Clicking "Disconnect" (see above) also manually releases the WAN port IP address.
Connect: Click to refresh and re-connect to the Internet. Clicking "Connect" (see below) also manually refreshes the WAN port IP address.
- Click "Save" to save the current configuration. NOTE: If the settings aren't saved at this point, they will revert to previous values when the system is turned off or restarted.
- Restart all computers connected to the router.

Static IP
- Connect the cable modem to a WAN port and confirm that a lighted WAN LED indicates a proper connection.

-
On the Basic Setup tab, click WAN(1 or 2) Setup.
-
Enter the WAN IP address, subnet mask, default gateway, primary DNS server and secondary DNS server provided by your ISP.
-
Click "Apply."
-
A screen displays presenting "Conn (Connection) Type" and "Conn. (Connection) State/Status."
- If "Configuration is done" displays in the "Conn. State" field, then the configuration is correct.
- Go to the Status screen and click WAN Status to confirm the WAN connection status. NOTE: You can

also click "Show Internet Information" in the previous Connection window.
Connection Type: This should display "Static IP."
Connection Status: This should display "Successfully connected."
Physical Address: This displays the router's WAN port MAC address.
WAN IP Address, Subnet Mask, Default Gateway, Primary DNS Server and Secondary DNS Server: Confirm that the values on screen are the same as those provided by your ISP.
-
Click "Save" to save the current configuration. NOTE: If the settings aren't saved at this point, they will revert to previous values when the system is turned off or restarted.
-
Restart all computers connected to the router.
Status
WAN Status
This screen shows the current Internet connection status (WAN port), including Connection Type, Connection Status, WAN IP Address, Subnet Mask, Default Gateway and DNS Server. If it's a dynamic IP connection, "Disconnect" and "Connect" buttons will also be presented. Click

"Disconnect" to release the current WAN port IP address, then click "Connect" to refresh it. "Connect" and "Disconnect" buttons will also be shown presented with a PPPoE connection: Clicking "Connect" connects with the Internet; clicking "Disconnect" disconnect from it. Click "Refresh" to refresh the current page; click "Save" to save the current router configuration.
LAN Status
This screen displays the current LAN connection status and DHCP server status, including the MAC address of the LAN port and the number of IP addresses assigned by the router.

Basic Setup
LAN/DHCP Setup
System IP Setup: The IP address of the LAN can be changed on this screen. NOTE: The router will be automatically restarted if you change the IP address.
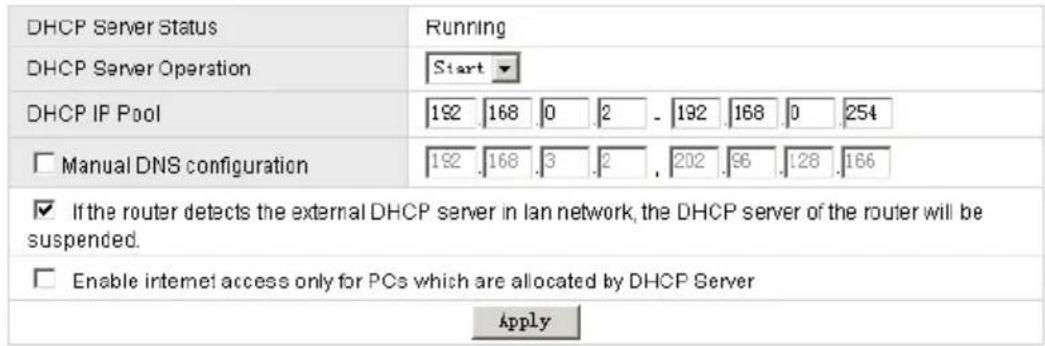
DHCP Server Status: This shows the current operating status of the DHCP server.
DHCP Server Operation can be started or stopped here.

DHCP Setup
Static Lease Management
- Add hardware address & IP pair on the real network
C Add hardware address & IP pair manually
| IP Address | Physical Address | |
| ☐ | 192.168.0.3 | 00-A0-B0-FF-F0-9F |
| Add | ||
IP Address
Physical Address
Del
DHCP IP Pool can be changed here.
Manual DNS configuration, when selected, lets you enter a manual DNS server. The DHCP server will assign a specified IP address as the DNS server.
Static Lease Management will let the router assign a specific IP to a selected computer/workstation.
Twin IP Setup

Twin IP Setup: Through this function, the router can assign its WAN address to a specified PC. As a result, the twin IP host has a real IP address and the traffic from the host bypasses the router's NAT/PAT filter. NOTE: This function is disabled in Wireless WAN mode and NAT Off mode.
Click "Refresh" to refresh the current page; click "Save" to save the current router configuration.
Net Detector
Net Detector Setup: This monitors packets on the network and attempts to discover if a burst of packets is over a detection level. NOTE: Net Detector is not available in NAT Off mode.
Detection Port presents two options for focusing detection of worm-virus packets: "Well-Known Worm Virus Ports" and "All Ports."
Detection Level makes configuration easy with two options: A pull-down menu offers predefined "Low," "Mid" and "High" settings; or the detection level can be manually defined. Burst Drop lets you establish the setting that determines if a burst packet over a detection level is dropped.
E-mail Policy presents notification options when an event occurs and is detected:
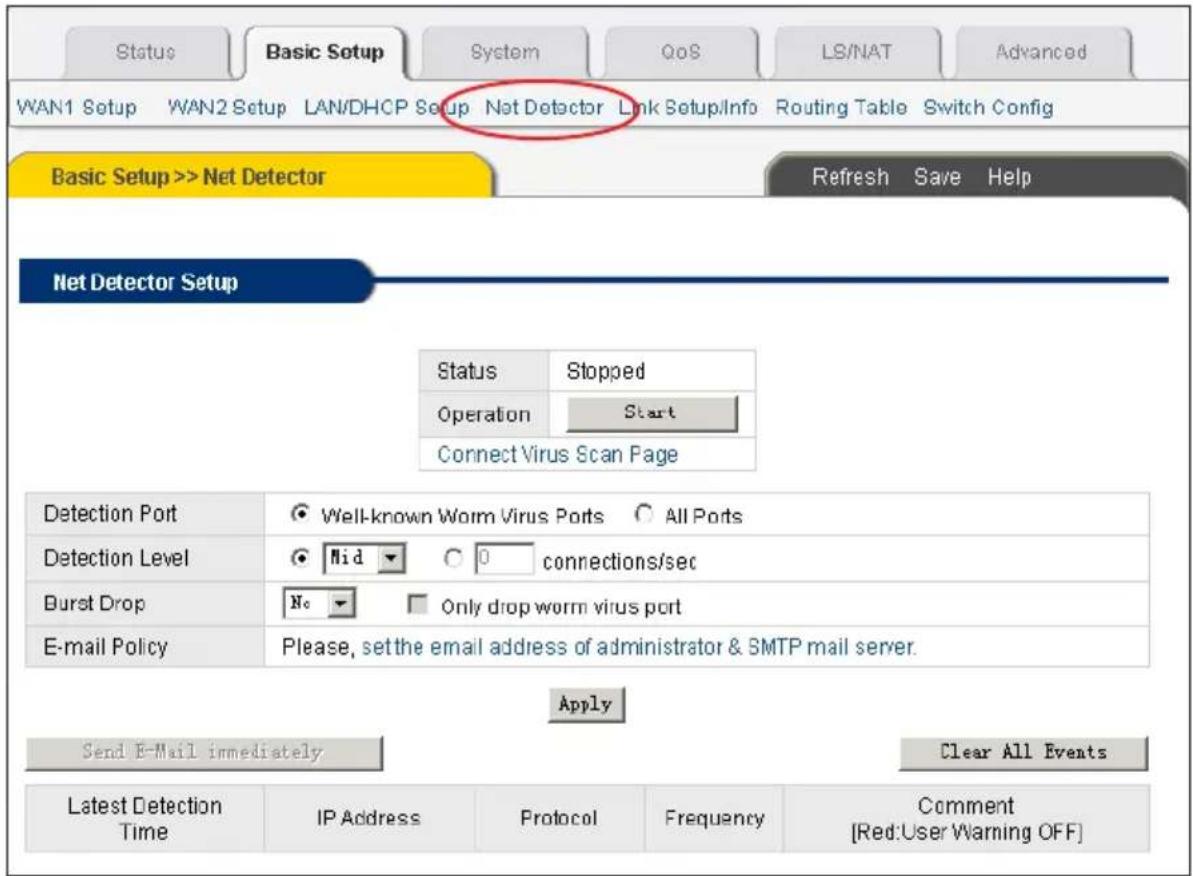
Report an event LOG regularly at assigned times; report a event LOG when a new event is detected; and clear all events after a report. Click "Refresh" to refresh the current page; click "Save" to save the current router configuration.
Link Setup/Info
Link Setup: This panel displays the properties that can be changed. With "Auto" selected, the router automatically assigns the best settings for port speed and duplex mode. With "Manual" selected, the user can define the port speed (either 10 or 100 Mbps) and duplex mode (either half or full).

Link Information
| Port | WAN1 | WAN2 | 1 | 2 | 3 | 4 | 5 |
| Link | Off | On | Off | Off | On | Off | Off |
| Speed | - | 100 Mbps | - | - | 100 Mbps | - | - |
| Duplex | - | Full | - | - | Full | - | - |
Link Statistics
| Port | WAN1 | WAN2 | 1 | 2 | 3 | 4 | 5 |
| Rx-Packets | 5471 | 51617 | 0 | 0 | 27789 | 0 | 0 |
| Rx-Broadcast | 4556 | 26021 | 0 | 0 | 121 | 0 | 0 |
| Tx-Packets | 6763 | 24053 | 0 | 0 | 37305 | 0 | 0 |
Clear
Link Information: This panel displays the link status router as determined above.
Link Statistics: This panel displays the traffic statistics of WAN and LAN links.
Click "Refresh" to refresh the current page; click "Save" to save the current router configuration.
Routing Table
Static Routing Table: This feature determines the physical connecting port an IP data package goes to, helping maintain a smoother traffic flow.

Type lets you choose the type of routing entry to define: "Net" lets you establish when a target is a network; "Host" lets you establish when a target is a host.
Target lets you enter an IP address or network address for the routing entry.
Mask lets you enter the subnet mask if the type of routing entry selected is "Net."
Gateway lets you enter the gateway IP address for the target network.
Click "Add" to effect the above settings; click "Refresh" to refresh the current page; click "Save" to save the current router configuration.
Switch Config
Port Mirror: This panel presents the option "All packets to the Internet will be mirrored to sniffer port," which, while self-explanatory, doesn't included mirroring of local traffic among the LAN ports.
VLAN Configuration: This panel is where you can add or delete separate ports in order to set up a desired VLAN.
![Status Basic Setup System QoS LS/NAT Advanced WAN1 Setup WAN2 Setup LAN/DHCP Setup Net Detector Link Setup/Info Routing Table Switch Config Basic Setup >> Switch Config Refresh Save Help Port Mirror ✓ All packets to the Internet will be mirrored to sniffer port [ Sniffer port : PORT 1 ] Apply VLAN C…](/content/2026/05/859326/images/299e7203c4c00249b72bf1c8dae72a2822aa40f76632b1dd184f43e2fa5f76b3.jpg)
System
Administrator Setup
The two panels on this screen allow basic administrator changes to be made.
Login Account Setup: The login user ID and password for the Web console can be changed here. Enter any new information, then click "Apply."
Admin E-mail Setup: This e-mail address is used for the system to send items such as the system log. The SMTP mail server should be set to send the mail. Enter any new information, then click "Apply."
Click "Refresh" to refresh the current page; click "Save" to save the current router configuration.


Firmware Upgrade
Firmware Upgrade: The update/upgrade firmware for the system:
- Obtain a firmware file from the customer support Web site and save it to a PC folder.
- Select the firmware file.
- Click "Upgrade."

After upgrading firmware, the Dual WAN VPN Router will reset automatically. NOTE: This procedure takes approximately 60 seconds, with the status bar (shown at right) indicating the progress. Make sure that power to the system remains on during the entire process of upgrading.

System Log
The two panels on this screen display information about both the current and previous system settings.
System Log Setup: Click "Clear" in "Clear System Log" to erase all information currently in the log.
System Log History:
Timestamp displays “*****” if the system isn't able to get the time from the time server (see Misc. below).
System Log Contents is presented in one of three colors: Red indicates an error message; blue indicates a warning; black represents basic information. NOTE: If the system log count reaches/reads "Max," no additional system log information will be recorded.

Access List
Access List: On this screen, you can configure the IP address of computers that are allowed to access the router's Web management.
Status, Operation, Allowable IP Address and Description give you control of this function's settings.

Misc.
Hostname Setup: This is what is displayed on the title bar of Internet browser and on the subject line of e-mail reports.
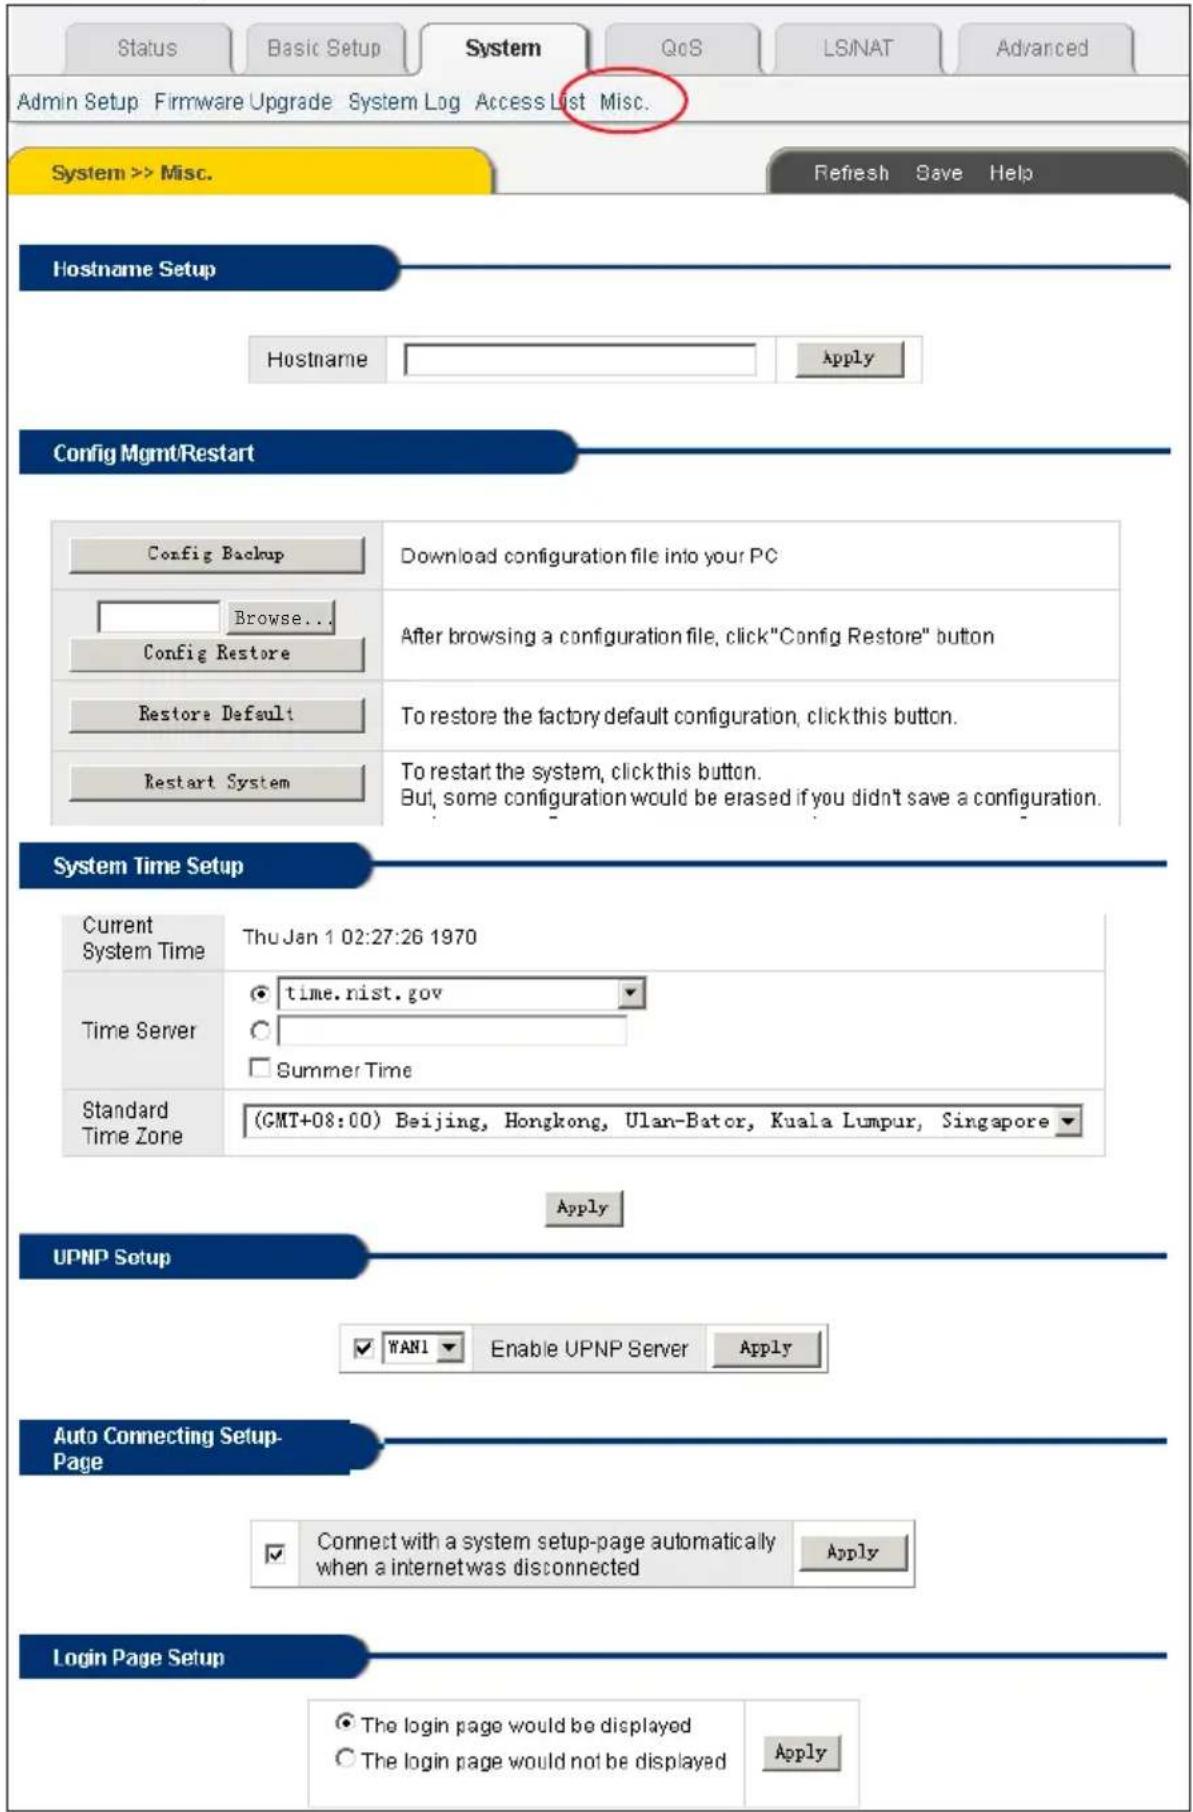
Config Mgmt/Restart:
Config Backup downloads the configuration file to your PC.
Config Restore allows you to reload the previously saved configuration.
Restore Factory Default erases newly set up values and restores to factory default values.
Restart System should be clicked with caution, as unsaved setup values will be lost.
System Time Setup:
Time Server lets you select your preferred time server.
Standard Time Zone lets you chose the time zone for the system time.
UPNP Setup: You can enable the UPNP Server to be operated. Universal Plug and Play (UPnP) is an architecture for pervasive peer-to-peer network connectivity of PCs and the Internet.
NOTE: The UPnP feature is not available in NAT Off mode.
QoS
Basic Setup
On this screen, QoS (Quality of Service) lets you establish Internet access bandwidth.
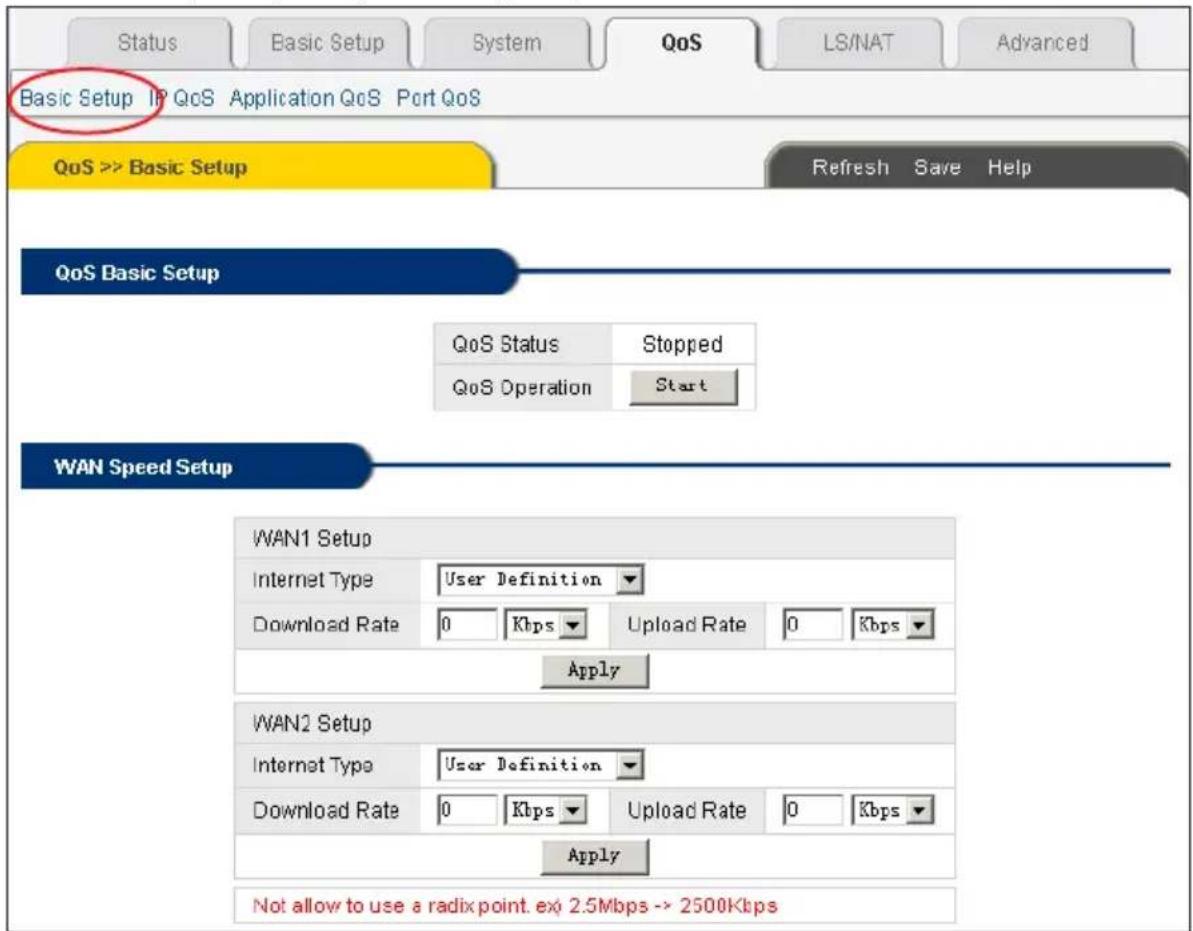
QoS Basic Setup: This panel simply indicates the current status of the operation.
WAN Speed Setup: This panel lets you define the current WAN connection speed.
Internet Type should be set to "User Definition" in wireless mode.
Download Rate and Upload Rate let you enter specific settings.
IP QoS
Setup by IP Address: By setting the QoS by IP address, the upload and download speed of a specified IP address can be limited to specified maximum and minimum rates.
IP Address is where you enter the IP address to establish the QoS.
Operation Mode lets you select "Max Rate" or "Min Rate" for download and upload speeds.
Download/Upload Rate is where you enter specific values.

Application QoS
Setup by Application: By setting the QoS by application, the upload and download speed of a specified application can be limited to specified maximum and minimum rates.
Apps lets you check the application(s) for which you want set QoS values.
Operation Mode lets you designate "Max Rate" or "Min Rate" for specific entries.
Download/Upload let you select the desired speed.

Port QoS
Setup by Port: By setting the QoS by application port, the upload and download speed of a specified application can be limited to specified maximum and minimum rates.

External Port Number lets you select the application port number on the WAN side for setting QoS.
Protocol presents a choice between "TCP" and "UDP."
Operation Mode lets you select "Max Rate" or "Min Rate" for download and upload speeds. Download/Upload Rate is where you enter specific values.
Click "Apply" to effect the above settings; click "Refresh" to refresh the current page; click "Save" to save the current router configuration.
LS/NAT
Load Sharing
The Dual WAN VPN Router has dual WAN ports for two Internet connections, a design that allows for auto line backup, load sharing and user-defined configurations.
Primary WAN: All Internet traffic not matching any rule will be routed to a primary WAN.
Auto Line Backup: By selecting "Enable Auto Line Backup," all traffic is diverted to another WAN automatically should the current WAN connection be lost.
WRR Load Sharing: Weighted Round Robin (WRR) Load Sharing lets you assign weights (as ratios) based on the amount of continuous connections allocated for each WAN.
User Defined LS: This allows the diversification of Internet traffic as defined by the user. NOTE: The latest of the established rules have the highest the priorities.
Rule Name lets you enter any string to distinguish among various rules.
Internal PC IP lets you enter the host IP address for which you want to diversify Internet
traffic.
Net Mask lets you enter the netmask filed to assign an IP subnet range (shown at right).
| C-class Netmask 4th value in IP Address | C-class Netmask 4th value in IP Address | ||
| 31 | 0 – 1 | 27 | 1 – 31 |
| 30 | 1 – 3 | 26 | 1 – 63 |
| 29 | 1 – 7 | 25 | 1 – 127 |
| 28 | 1 – 15 | 24 | 1 – 254 |
![Load Sharing Applications Internal Server Port Forwarding Port Trigger NAT On/Off LS/NAT >> Load Sharing Refresh Save Help Primary WAN Primary WAN WAN1 Apply Auto Line Backup Enable Auto Line Backup Line Backup Check Duration (seconds): 3 Apply WRR Load Sharing PC IP Addr. WRR [STATUS] WAN1 WAN2 App…](/content/2026/05/859326/images/14171b616d2ee599f0bac81bb4ebb1930695d39dcd4d0f64faa59d427e833d7c.jpg)
Protocol is the TCP/UDP type for the packet that you want to diversify within Internet traffic.
Source Port is the source protocol port number for the load sharing rule.
Destination Port is the destination protocol port number for the load sharing rule..
Designated WAN lets you choose a WAN port for the load sharing rule..
Click "Add" to effect the above settings; click "Refresh" to refresh the current page; click "Save" to save the current router configuration.
Applications
Applications enables some software application programs to run, such as video conferencing or a variety of network games, which would normally be disabled with a router using NAT, or network address translation, for a firewall. NOTE: In NAT Off mode, Application Setup is not available.

Application Setup: The applications listed above will work correctly when the IP address is specified.
FTP Private Port: This is used for FTP access when the server is using the private port number (not 21). The application program ports are referenced at right.
Click "Add" to effect the above settings; click "Refresh" to refresh the current page; click "Save" to save the current router configuration.
Application Program Ports
BuddyBuddy TCP 812, TCP 987
WinAmp Broadcasting TCP 8000
GuruGuru TCP 9292
TCP 9999
NetMeeting TCP 1720
WinMX TCP 6699
UDP 6257
Windows XP/2000 TCP 3389
Remote Desktop UDP 3389
Soribada2 UDP 22321
Internal Server
Internal Server Setup: This setup is needed for servers connected to the router's internal network. NOTE: As with Application Setup, Internal Server Setup is not available in NAT Off mode. On the WAN side, the server can be accessed through the external port number. On the LAN side, the server must be configured using the default application port number. If you want to change the port number of the server, use Port Forwarding (see below).
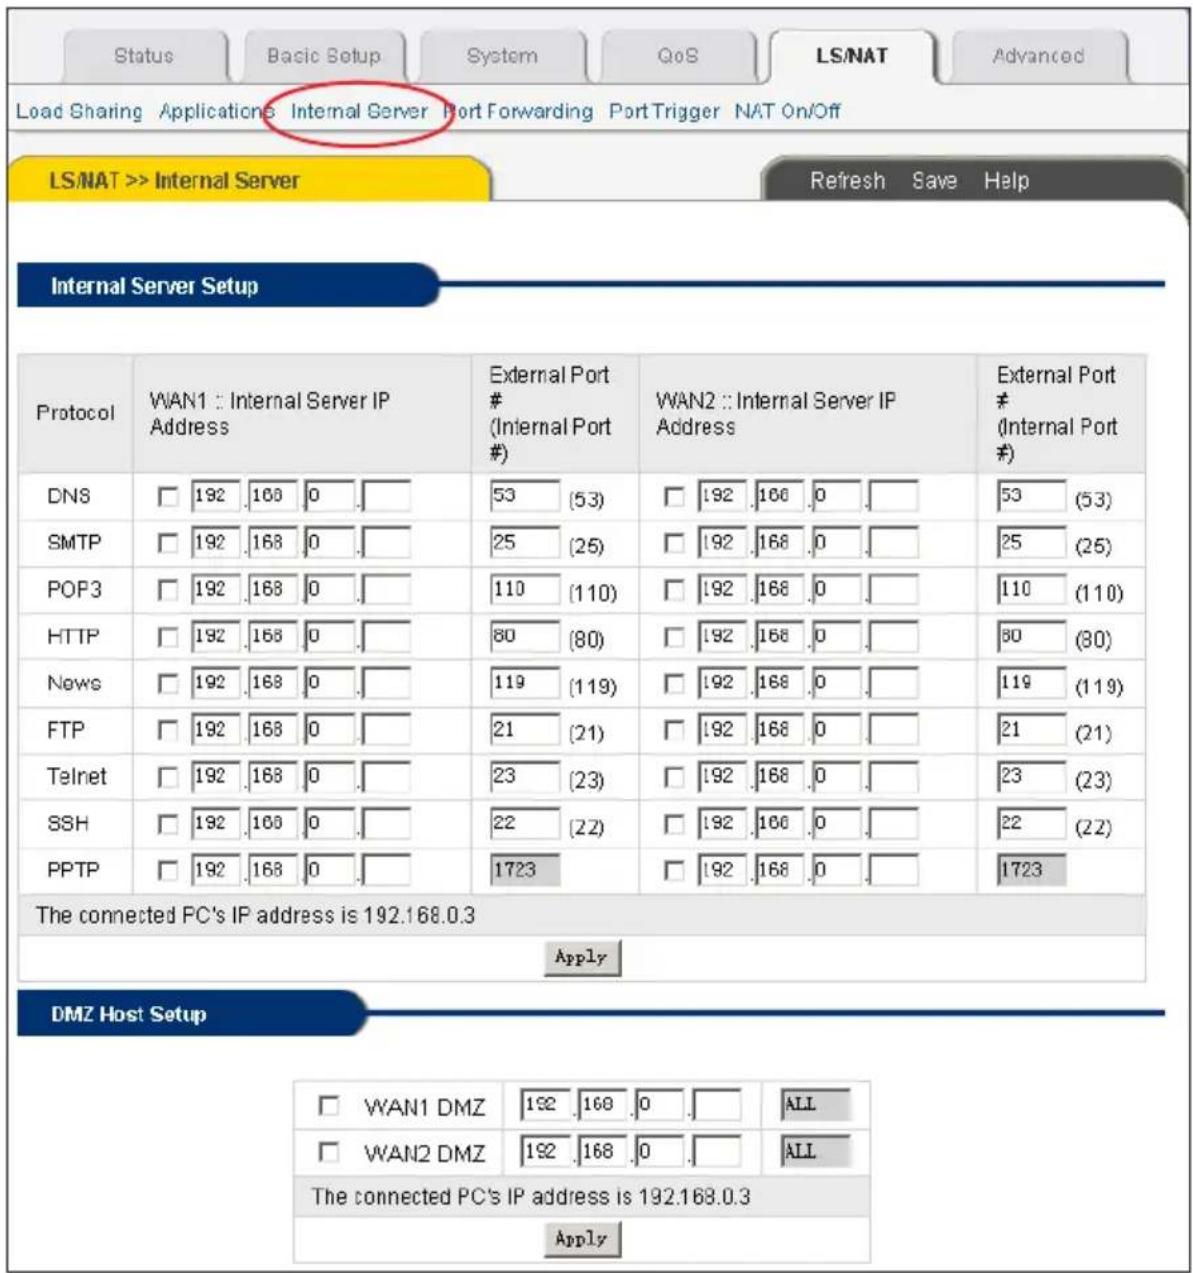
DMZ Host Setup: Traffic transmitted on a WAN through an undefined application port will be forwarded to a specified DMZ host. The host specified as "DMZ" can run any server application without an internal server setup or a port forward. The priority of DMZ Host Setup is lower than the internal server or the port forward setup.
Click "Apply" to effect the above settings; click "Refresh" to refresh the current page; click "Save" to save the current router configuration.
Port Forwarding
Port Forwarding Setup: This is a mapping between WAN-side access and the internal host's application port. NOTE: As with Application Setup and Internal Server Setup, Port Forwarding Setup is not available in NAT Off mode.
Rule Name lets you enter any string to distinguish among various Port Forwading rules.
Protocol lets you choose the protocol type (TCP/UDP).
External Port Range lets you define the port number on the WAN side.
Internal PC IP Address lets you define the IP address of the host on the LAN side.
Internal Port Range lets you define the port number on the LAN side. NOTE: If not defined, the external port number will be used.
Click "Refresh" to refresh the current page; click "Save" to save the current router configuration.

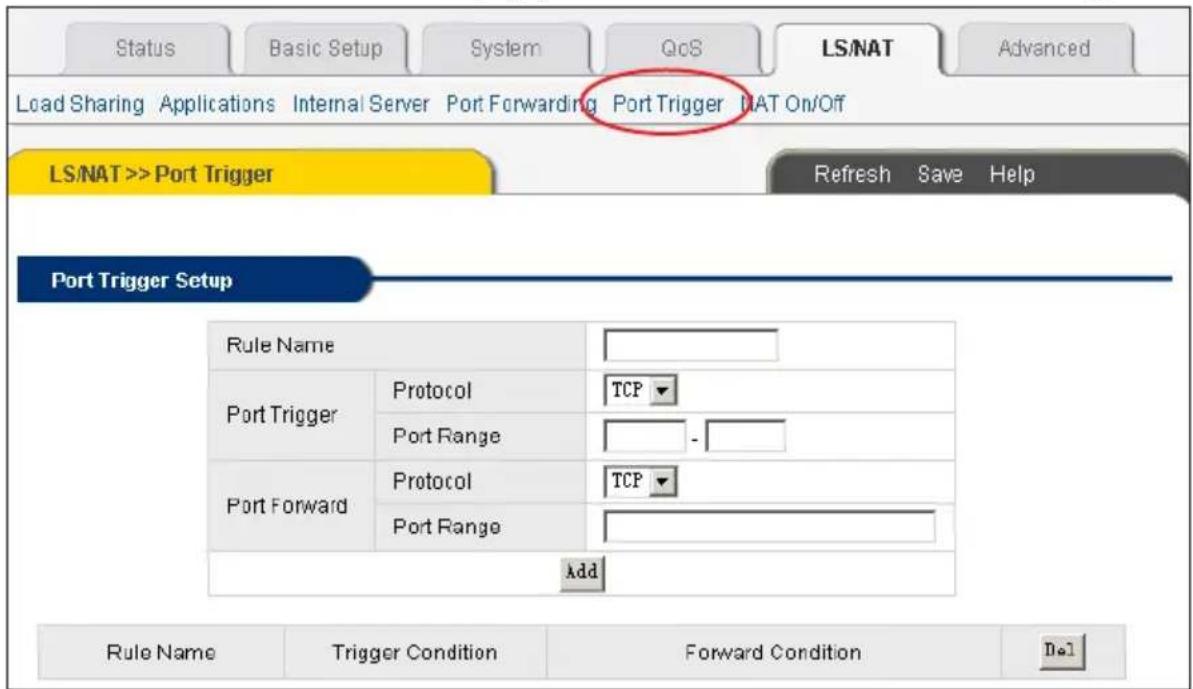
Port Trigger
Port Trigger Setup: This monitors the online connection of an application as a trigger condition and automatically registers the port forward rules when the trigger condition is detected.
NOTE: As with Port Forwarding Setup and other configurations, Port Trigger Setup is not available in NAT Off mode.
Rule Name lets you enter any string to distinguish among various Port Trigger rules.
Trigger Protocol lets you choose the protocol type (TCP/UDP) in a trigger condition.
Trigger Port Range lets you enter the port number (a destination port number) in a trigger condition.
Forward Protocol lets you choose the protocol type (TCP/UDP) for forwarding rules.
Forward Port Range lets you enter the forward port number(s) for forwarding rules.
Click "Refresh" to refresh the current page; click "Save" to save the current router configuration.
NAT On/Off
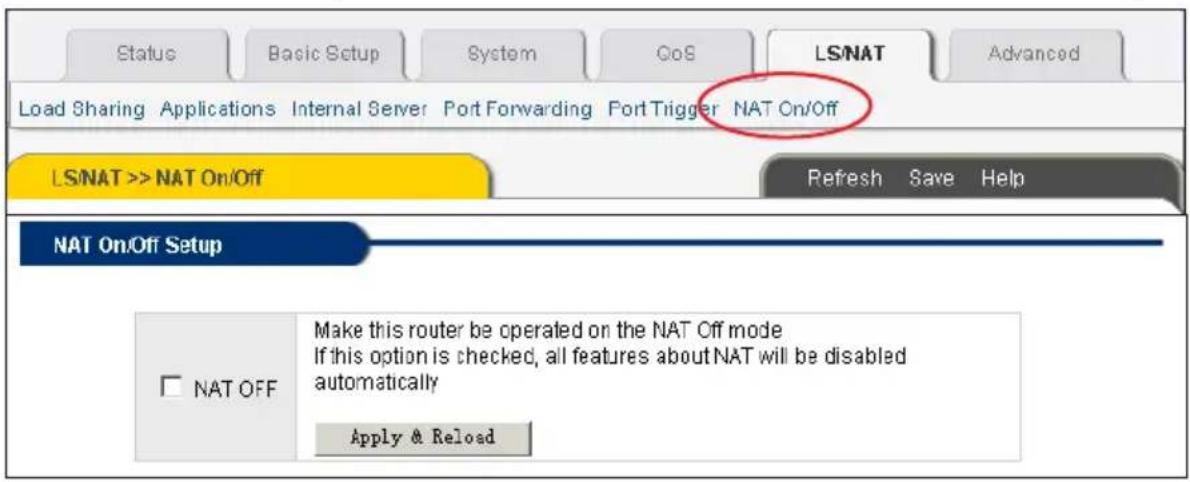
NAT On/Off Setup: Select "NAT Off" to disable the NAT (Network Address Translation) function. NOTE: In NAT Off mode, all other features that involve NAT will be disabled automatically.
Advanced
Firewall
Blocking DoS: Use this to protect the CPU in the router from a wide variety of network attacks, such as SYN flooding, Smurf, IP source routing and IP spoofing. Select the attack you want to block and click "Apply" to start blocking.

Connection Filtering: This function will block or accept the specified internal and external PCs. Direction presents two options:
- "LAN -> WAN" is external to internal, or the traffic from the WAN side to the LAN side;
- "WAN -> LAN" is internal to external, or the traffic from the LAN side to the WAN side.
Source HW Address is the hardware address of the PC where the traffic is started.
Source IP Address is the IP address where the traffic is started.
Destination IP Address is the IP address where the traffic is ended.
Net Mask lets you specify the IP address range. (See the C-class table on Page 24.)
Protocol lets you choose the protocol type: "any," "TCP" or "UDP." NOTE: Selecting "any" means selecting all protocols, and the port number is disabled.
Destination Port lets you specify the port number where the traffic ends.
Accept/Drop lets you select one or the other for the specified traffic.
Click "Refresh" to refresh the current page; click "Save" to save the current router configuration.
DDNS
Your ISP will assign a dynamic IP address when the router is connected to the Internet with a cable modem or ADSL. DDNS (Dynamic Domain Name System) converts a dynamic IP address to a fixed Internet domain name. NOTE: To use the DynDNS service, you can register at www.dyndns.org.

DDNS Setup: Use/enter the ID, password and hostname(s) used to register for the DynDNS account. As many as five hostnames can be entered. Click "Refresh" to refresh the current page; click "Save" to save the current router configuration.
WOL
Wake On LAN (WOL) enables the PCs connected to the router to be turned on when a wake-up packet from the server is received. NOTE: LAN cards and motherboards need to be compatible with the WOL specifications.

WOL PC Registration:
PC Name lets you enter recognizable names to distinguish among various PCs.
Physical Address presents two options:
- "Auto" uses the hardware address of the PC connected to the Web console;
- "Manual" lets you enter a user-specified hardware address.
URL Filter
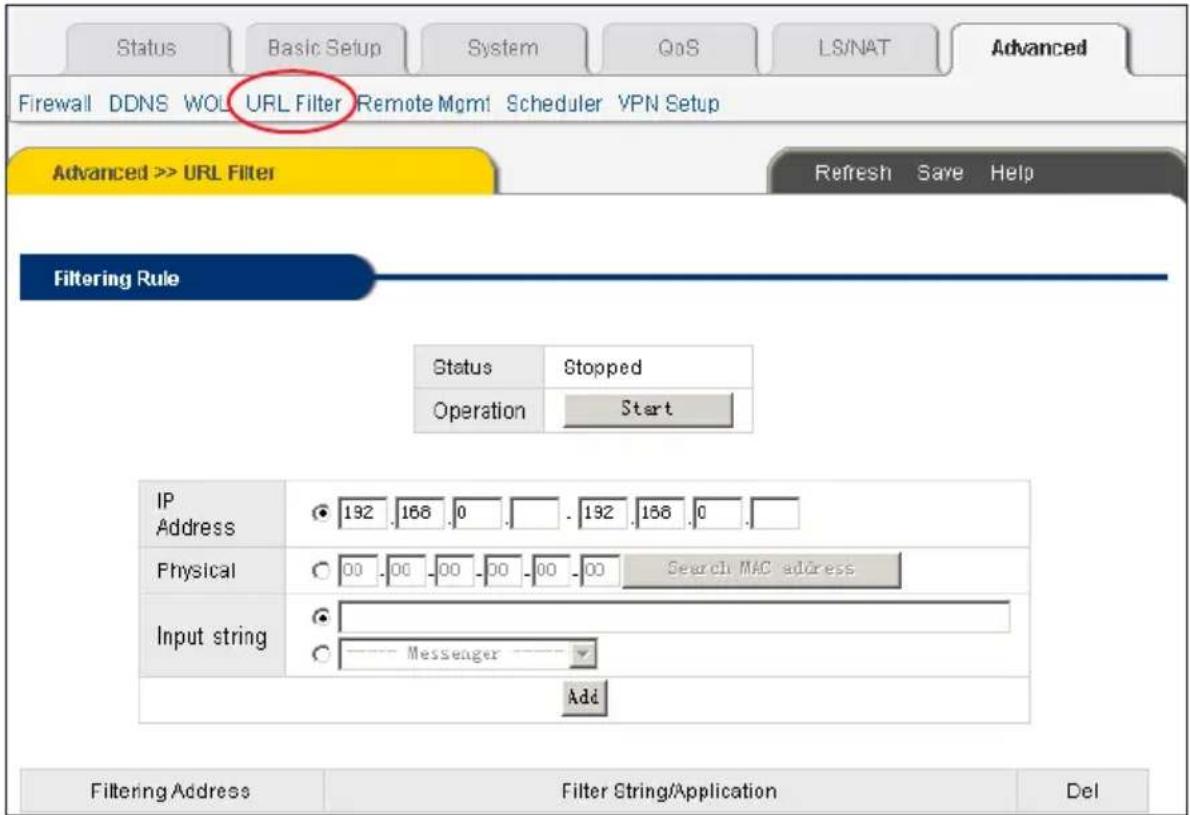
This screen lets you establish sites to be blocked and unavailable to connected users.
Filtering Rule: In the "Input string" field, enter the URL you want to block, then click "Add."
Click "Refresh" to refresh the current page; click "Save" to save the current router configuration.
Remote Management
The Web console of the Dual WAN VPN Router can be accessed using remote management set up on this screen.
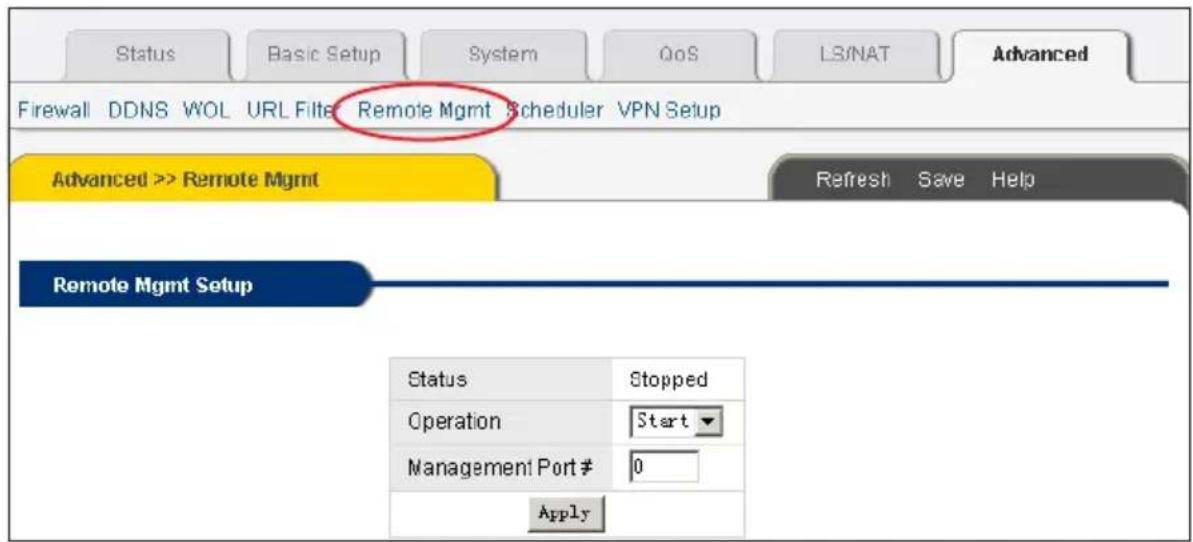
Remote Management Setup:
Status/Operation lets you start/stop the operation and displays the status.
Management Port # is the port number used for remote access; for example, access with the
URL http://xxx.xxx.xxx.xxx:8000 when Port 8000 is selected. NOTE: In NAT Off mode, remote management is not needed.
Scheduler
This screen presents additional options for filtering (blocking) addresses.
Schedule Setup:
User Message lets you define the message that appears when an address is blocked.
Days To Block and Time To Block let you define when the Internet access will be blocked.
Address To Block lets you designate the IP address of the PC which will be blocked.
Netmask lets you specify the IP address with a mask. (See the C-class table on Page 24.)
Physical lets you define the physical address of the PC which will be blocked.
NOTE: The system time (System/Misc.) should be set correctly for normal Scheduler operation.

VPN
The Virtual Private Network (VPN) screen is for establishing necessary parameters.
VPN (PPTP) Setup:
VPN Server Status lets you monitor and change the operation.
VPN (PPTP) Account: Enter the account, password and IP address to be assigned to a VPN client. The IP address should not be in a DHCP pool.
Click "Refresh" to refresh the current page; click "Save" to save the current router configuration.

SPECIFICATIONS
Standards
• IEEE 802.3 (10Base-T Ethernet)
• IEEE 802.3u (100Base-TX Fast Ethernet)
- IEEE 802.3x (flow control, for full duplex mode)
General
• LAN ports: 5 RJ-45 10/100 Mbps data ports
• LAN ports with Auto MDI/MDI-X
• LAN to WAN throughput: 94 Mbps
• CPU: Intel IXP425 network processor at 533 MHz
- Flash: 4 MB
• Memory: 16 MB SDRAM
• Certifications: FCC Class B, CE Mark, RoHS
Router
• Supported WAN connection types:
- Dynamic IP (DHCP for cable service)
- Static IP
- PPPoE (for DSL)
- WAN modes:
- Primary WAN 1
- Primary WAN 2
- Primary WAN 1 with auto line backup (failover) of WAN2
- Primary WAN 2 with auto line backup (failover) of WAN1
- WAN 1 + 2 WRR load sharing
- WAN 1 + 2 user-defined load sharing
- Firewall:
- Access control based on MAC address
- Domain blocking
- URL filter
- Block ICMP PING from Internet to LAN
- Block ICMP PING from LAN to Internet
- Detection of Synflood, Smurf, IP Spoofing and IP source routing
- QoS:
- Application-based
- IP-based
- Port-based
• NAT:
- Virtual server
- Port forwarding
- Special applications (port trigger)
- DMZ (demilitarized zone)
• Supports UPNP (Universal Plug and Play)
• Supports DHCP (client/server)
- Supports PPPoE (DSL), DHCP (cable) and static IP
• Supports VPN PPTP pass-through
- Protocols:
- CSMA/CA
- CSMA/CD
- TCP/IP
- UDP
- ICMP
- PPPoE
- NTP
- NAT (network address translation)
- DHCP
- DNS
Certifications: FCC Class B, CE Mark, RoHS
LEDs
- Power
- SYS (operational status)
• Power Line Link/Act - WAN 1 Link/Act
- WAN 2 Link/Act
• LAN 1-5 Link/Act
• LAN 1-5 10/100 Mbps
Environmental
- Dimensions: 295 (W) mm x 159 (L) mm x 44 (H) mm (11.6 x 5.1 x 1.0 in.)
• Weight: 2.1 kg (4.6 lbs.) - Operating temperature: 0 – 60°C (32 – 149°F)
- Operating humidity: 10 – 85% RH, non-condensing
- Storage temperature: 0 – 60°C (0 – 149°F)
Power
- Internal power supply, 100 – 240 V AC, 50/60 Hz
• Power consumption: 12 Watts (maximum)
Package Contents
- Dual WAN VPN Router
- User manual
- Power cord
- Ethernet Cat5 RJ-45 cable: 1.5 m (5 ft.)
• 19" mounting brackets and screws

INTELLINET™
NETWORK SOLUTIONS
BRINGING NETWORKS TO LIFE
INTELLINET NETWORK SOLUTIONS ™ offers a complete line of active and passive networking products.
Ask your local computer dealer for more information or visit
www.intellinet-network.com.

- INTRODUCTION
- TABLE OF CONTENTS
- HARDWARE....5
- WINDOWS SETUP/INSTALLATION.... 6
- DUAL WAN VPN ROUTER SETUP/INSTALLATION 8
- SPECIFICATIONS 34
- HARDWARE
- CONNECTIONS
- FRONT-PANEL INDICATORS
- LED STATUS DESCRIPTION/FUNCTION
- RESET
- WINDOWS SETUP/INSTALLATION
- WINDOWS 98/ME
- WINDOWS 2000
- WINDOWS XP
- DUAL WAN VPN ROUTER SETUP/INSTALLATION
- LOG IN
- PPPOE (ADSL)
- DYNAMIC IP
- STATIC IP
- STATUS
- WAN STATUS
- LAN STATUS
- BASIC SETUP
- LAN/DHCP SETUP
- DHCP SETUP
- STATIC LEASE MANAGEMENT
- TWIN IP SETUP
- NET DETECTOR
- LINK SETUP/INFO
- LINK INFORMATION
- LINK STATISTICS
- ROUTING TABLE
- SWITCH CONFIG
- SYSTEM
- ADMINISTRATOR SETUP
- FIRMWARE UPGRADE
- SYSTEM LOG
- SYSTEM LOG HISTORY
- ACCESS LIST
- MISC
- CONFIG MGMT/RESTART
- SYSTEM TIME SETUP
- QOS
- IP QOS
- APPLICATION QOS
- PORT QOS
- LS/NAT
- LOAD SHARING
- APPLICATIONS
- INTERNAL SERVER
- PORT FORWARDING
- PORT TRIGGER
- NAT ON/OFF
- ADVANCED
- FIREWALL
- DDNS
- WOL
- WOL PC REGISTRATION
- URL FILTER
- REMOTE MANAGEMENT
- REMOTE MANAGEMENT SETUP
- SCHEDULER
- SCHEDULE SETUP
- VPN
- VPN (PPTP) SETUP
- SPECIFICATIONS
- STANDARDS
- GENERAL
- ROUTER
- LEDS
- ENVIRONMENTAL
- POWER
- PACKAGE CONTENTS
- INTELLINET™
Brand : Intellinet
Model : Dual WAN VPN Router 524049
Category : Router