
PSS300 - Fridge DE DIETRICH - Free user manual and instructions
Find the device manual for free PSS300 DE DIETRICH in PDF.


| Brand | De Dietrich |
| Model | PSS300 |
| Product Type | Fridge with freezer and wine cooler compartments |
| Fridge Temperature Range | +2°C to +8°C |
| Freezer Temperature Range | -15°C to -24°C |
| Wine Cooler Temperature Range | +6°C to +16°C |
| Defrost System | Automatic defrost for fridge; No Frost for freezer |
| Special Features | Coolmatic function for rapid cooling, Frostmatic function for freezing, UV-protected double glazed wine cooler door, adjustable shelves, door shelves, ice cube trays, temperature alarm |
| Controls | Electronic control panel with ON/OFF, temperature setting, Coolmatic/Frostmatic buttons, alarm reset |
| Cooling Technology | Hydrocarbon refrigerant (R600a) in sealed system |
| Climate Class | SN, N, ST, T (ambient temperature range +10°C to +43°C depending on class, see rating plate) |
| Power Supply | 220-240 V, 50 Hz (check rating plate for exact voltage, must be earthed) |
| Installation Requirements | Adequate ventilation around back, avoid heat sources and direct sunlight, level floor, allow 2 hours after horizontal transport before connecting |
| Cleaning and Maintenance | Clean interior with warm water and bicarbonate of soda; clean condenser and compressor with brush or vacuum; defrost water drain hole should be cleaned periodically |
| Light Bulb Replacement | Refrigerator and wine cooler: maximum power shown on light diffuser; press rear hook and slide cover to access |
| Safety Features | Alarm for temperature rise, child safety (old appliance door latch must be disabled), anti-UV glass, warning against sharp instruments for defrosting |
| Dimensions and Weight | Not specified in manual; consult rating plate or product specifications |
| Noise Level | Normal operating sounds: gurgling, bubbling, whirring from compressor |
| Warranty and Service | Authorized service center required; specify model and serial number from rating plate |
Frequently Asked Questions - PSS300 DE DIETRICH
User questions about PSS300 DE DIETRICH
0 question about this device. Answer the ones you know or ask your own.
Ask a new question about this device
Download the instructions for your Fridge in PDF format for free! Find your manual PSS300 - DE DIETRICH and take your electronic device back in hand. On this page are published all the documents necessary for the use of your device. PSS300 by DE DIETRICH.
USER MANUAL PSS300 DE DIETRICH
natural_image
Interior view of a modern minimalist living room with large windows, built-in furniture, and a minimalist rug (no visible text or symbols)LES NOUVEAUX OBJETS DE VALEUR
natural_image
Line drawing of a hand holding a shelf with a ruler, no text or symbols present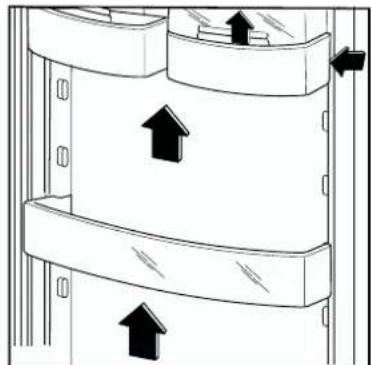
natural_image
Diagram of a multi-layered storage or rack system with directional arrows indicating flow or movement (no text or symbols)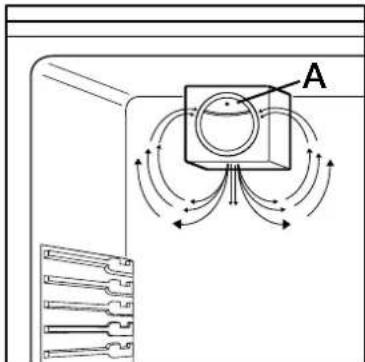
natural_image
Line drawing of a multi-tiered storage rack or shelf structure (no text or symbols)Panel de control del congelador
natural_image
Simple line drawing of a cabinet or drawer with three horizontal drawers and one labeled 'X' (no text or symbols beyond the label)natural_image
Technical line drawing of a mechanical component with an inset showing a close-up view of a component (no text or symbols present)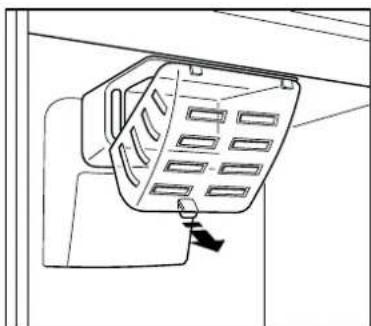
natural_image
Line drawing of a mechanical device with a handle and panel, no text or symbols presentDesecarche
natural_image
Diagram showing a hand holding scissors inside a circular frame, with arrows indicating rotation (no text or symbols)COMO ACTUAR SI EL APARATO NO FUNCIONA
i ADVERTÊNCIAS E CONSELHOS IMPORTANTES
A. Lâmpada de sinal LIGADO/DESLIGADO
natural_image
Line drawing of a hand holding a shelf with a document, no text or symbols present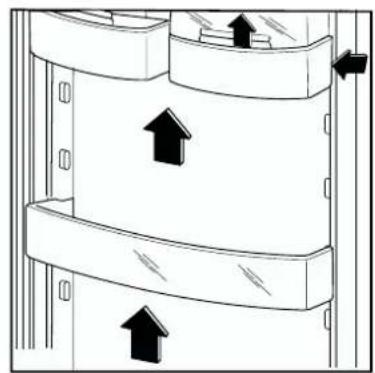
natural_image
Diagram of a multi-level storage or rack system with upward arrows indicating flow or movement (no text or symbols present)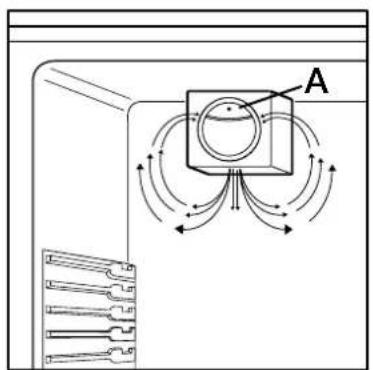
natural_image
Line drawing of a multi-tiered storage rack or shelf structure (no text or symbols)Painel de controlo do congelador
natural_image
Simple line drawing of a cabinet or rack with three horizontal drawers and one labeled 'X' (no text or symbols beyond the label)natural_image
Technical line drawing of a mechanical component with an inset showing a close-up view of a bracket (no text or symbols present)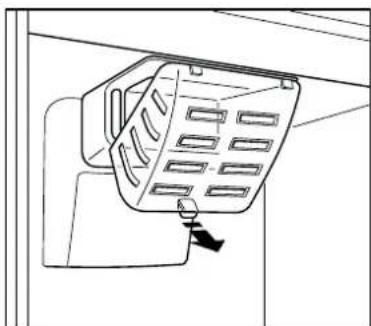
natural_image
Line drawing of a mechanical device with a handle and panel, no text or symbols presentDescongelação
natural_image
Diagram showing a hand holding scissors inside a circular frame, with arrows indicating rotation (no text or symbols)
WARNINGS
It is most important that this instruction book should be retained with the appliance for future reference. Should the appliance be sold or transferred to another owner, or should you move house and leave the appliance, always ensure that the book is supplied with the appliance in order that the new owner can be acquainted with the functioning of the appliance and the relevant warnings.
If this appliance featuring magnetic door seals is to replace an older appliance having a spring lock (latch) on the door or lid, be sure to make that spring lock unusable before you discard the old appliance. This will prevent it from becoming a death-trap for a child.
This must be done before the appliance is built into These warnings are provided in the interest of safety. You must read them carefully before installing or using the appliance.
General Safety
- This appliance is not intended for use by persons (including children) with reduced physical, sensory or mental capabilities, or lack of experience and knowledge, unless they have been given supervision or instruction concerning use of the appliance by a person responsible for their safety. Children should be supervised to ensure that they do not play with the appliance.
- It is dangerous to alter the specifications or modify this product in any way.
- Care must be taken to ensure that the appliance does not stand on the electrical supply cable.
Important: if the supply cord is damaged, it must be replaced by a special cord or assembly available from the manufacturer or its service agent.
- Before any cleaning or maintenance work is carried out, be sure to switch off and unplug the appliance.
- This appliance is heavy. Care should be taken when moving it
- Ice lollies can cause frost burns if consumed straight from the appliance.
• Take utmost care when handling your appliance so as not to cause any damages to the cooling unit with consequent possible fluid leakages. - The appliance must not be located close to radiators or gas cookers.
- Avoid prolonged exposure of the appliance to direct sunlight.
- There must be adequate ventilation round the back of the appliance and any damage to the refrigerant circuit must be avoided.
- For freezers only (except built-in models): an ideal location is the cellar or basement.
- Do not use other electrical appliances (such as ice cream makers) inside of refrigerating appliances, unless they are approved for this purpose by the manufacturer.
Service/Repair
- Any electrical work required to install this
appliance should be carried out by a qualified electrician or competent person
- This product should be serviced by an authorized Service Centre, and only genuine spare parts should be used.
- Under no circumstances should you attempt to repair the appliance yourself. Repairs carried out by inexperienced persons may cause injury or more serious malfunctioning. Refer to your local Service Centre, and always
- This appliance contains hydrocarbons in its cooling unit; maintenance and recharging must therefore only be carried out by authorized technicians.
Use
- The domestic refrigerators and freezers are designed to be used specifically for the storage of edible foodstuffs only.
- Best performance is obtained with ambient temperature between +18°C and +43°C (class T); +18°C and +38°C (class ST); +16°C and +32°C (class N); +10°C and +32°C (class SN). The class of your appliance is shown on its rating plate.
Warning: when the ambient temperature is not included within the range indicated for the class of this appliance, the following instructions must be observed: when the ambient temperature drops below the minimum level, the storage temperature in the freezer compartment cannot be guaranteed; therefore it is advisable to use the food stored as soon as possible.
- Frozen food must not be re-frozen once it has been thawed out.
- Manufacturers' storage recommendations should be strictly adhered to. Refer to relevant instructions.
- The inner lining of the appliance consists of channels through which the refrigerant passes. If these should be punctured this would damage the appliance beyond repair and cause food loss. DO NOT USE SHARP INSTRUMENTS to scrape off frost or ice. Frost may be removed by using the scraper provided. Under no circumstances should solid ice be forced off the liner. Solid ice should be allowed to thaw when defrosting the appliance. 31
- Do not place carbonated or fizzy drinks in the freezer as it creates pressure on the container, which may cause it to explode, resulting in damage to the appliance.
Installation
- During normal operation, the condenser and compressor at the back of the appliance heat up considerably. For safety reasons, minimum ventilation must be as shown in the relevant Figure.
Attention: keep ventilation openings clear of obstruction.
- If the appliance is transported horizontally, it is possible that the oil contained in the compressor flows in the refrigerant circuit. It is advisable to wait at least two hours before connecting the appliance to allow the oil to flow back in the compressor.
- There are working parts in this product which heat up. Always ensure that there is adequate ventilation as a failure to do this will result in component failure and possible food loss. See installation instructions.
- Parts which heat up should not be exposed. Wherever possible the back of the product should be against a wall.
- If the appliance has been transported horizontally, it is possible that the oil contained in the compressor flows in the refrigerant circuit. It is advisable to wait at least two hours before connecting the appliance to allow tll'e oil to flow back in the compressor.
Environment Protection
This appliance does not contain gasses which could damage the ozone layer, in either its refrigerant circuit or insulation materials. The appliance shall not be discarded together with the urban refuse and rubbish. Avoid damaging the cooling unit, especially at the rear near the heat exchanger. Information on your local disposal sites may be obtained from municipal authorities. The materials used on this appliance marked by the symbol are recyclable.
Disposal of old Appliances

The symbol on the product or on its packaging indicates that this product may not be treated as household waste. Instead it shall be handed over to the applicable collection point for the recycling of electrical and electronic equipment. By ensuring this product is disposed of correctly, you will help prevent potential negative consequences for the environment and human health, which could otherwise be caused by inappropriate waste handling of this product. For more detailed information about recycling of this product, please contact your local city office, your household waste disposal service or the shop where you purchased the product.
CONTENTS
Warnings 31
Use - Cleaning the interior - Control Panel ....33
Use - Food protection 34
Use - Movable shelves - Positioning the door shelves - Air recycling .....35
Use - Control Panel - Wine cooler ....36
Use - Control Panel - Freezer 38
Hints Hints for refrigeration - Hints for freezing - Hints for storage of frozen food . . . . . . . . . . . . . . . . . . . . . . . . . . . . . . . . . . . . . . . . . . . 40
Maintenance - Periods of no operation - Periodic cleaning - Interior light 41
Defrosting - Customer service and spare parts - Technical information .....42
Installation - Location - Shelf-holders - Electrical connection 43
USE
Cleaning the interior
Before using the appliance for the first time, wash the interior and all internal accessories with lukewarm water and some neutral soap so as to remove the typical smell of a brand-new product, then dry thoroughly.
Control Panel
Do not use detergents or abrasive powders, as these will damage the finish.
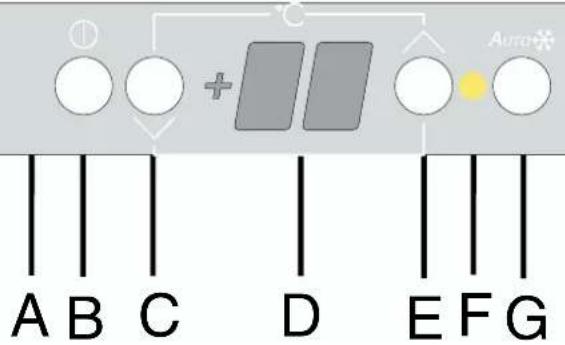
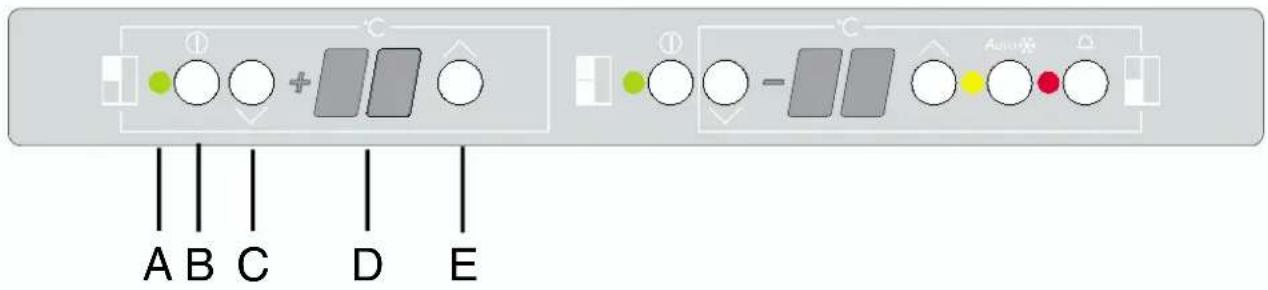
A On/OFF light
B Fridge button ON/OFF
C Temperature setting button (warmest)
D Temperature indicator
E Temperature setting button (coldest)
F Coolmatic light
G Coolmatic button
A. Light ON/OFF
B. Button ON/OFF
ON: Press the button (B). The pilot light (A) switches on.
OFF: Keep press the button (B) until the pilot light (A) and the temperautre indicator switched off.
C - E.Temperature setting buttons
The temperature can be adjusted between +2°C and +8°C.
By pressing the button (C or E), the current temperature setting flashes on the indicator. It is possible to modify the setting temperature only with flashed indicator. To set a warmer temperature, press button (C). To set a colder temperature, press button (E). The indicator display the newly selected temperature for a few seconds and then shows again the inside compartment temperature.
The newly selected-temperature must be reached after 24 hours.
Attention!
During the stability period by the first starting the temperature displayed can not correspond to the setting temperature. During this time it is possible that the temperature displayed is lower than the setting temperature.
D. Temperature indicator
During normal functioning the indicator shows the temperature inside the fridge.
Attention!
Difference between the temperature displayed and temperature setting is normal. Especially when:
- a new setting has recently been selected
- the door has been left open for a long time
- warm food has been placed in the compartment
F. Coolmatic pilot light
G. Coolmatic button
The maximum performance is obtained by setting the Coolmatic function. It's recommended when loading large quantities of food.
Press the Coolmatic button (G). The relevant pilot light (F) switches on.
The internal temperature goes down to +2°C.
After about 6 hours the Coolmatic function switches off automatically.
Operation
Insert the plug in the power socket. Press the button ON/OFF (B). The fridge is switched on.
The fridge is pre-set to run at +5°C. This temperature will be reached in a few hours.
As soon as the appliance is switched on the temperature indicator (D) shows the current temperature inside the fridge.
Fresh food refrigeration
To obtain the best performance:
- do not store warm food or evaporating liquids in the refrigerator;
- do cover or wrap the food, particularly if it has a strong flavour.
- Position food so that air can circulate freely round it.
FOOD PROTECTION
Explanation of the cold zone signs

The symbol shown here on the left indicates the coldest point inside your refrigerator.
Coldest area: below or equal to +4°C
Meat, poultry, fish, cold cuts, ready-to-eat meals, mixed salads, egg or cream based mixes and cakes, fresh pasta, cake mixes, pizzas/quiches, fresh foods and fresh-milk cheeses, vegetables ready to be used and packed in plastic bags and all other fresh foods whose expiry date is associated with a preservation temperature below or equal to +4^ C.
Temperatur indicator
Thermostat must be adjusted Right Temperature
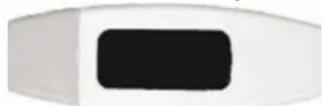
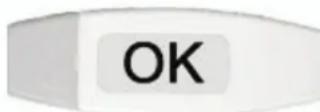
With the temperature indicator you can keep a check that your refrigerator is working properly.
The indicator shows the "OK" symbol when the coldest area reaches a temperature that is below or equal to 4^ C.
If the temperature is higher than 4^ C the indicator is black so you must adjust the thermostat to make the temperature drop.
ATTENTION: Keeping the refrigerator door open for a long time will cause the internal temperature to rise. To measure the temperature correctly, it should be read on the indicator within 30 seconds.
Movable shelves
The walls of the refrigerator are equipped with a series of runners so that the shelves can be positioned as desired.
For better use of space, the front half-shelves can lie over the rear ones.
Positioning the door shelves
To permit storage of food packages of various sizes, the door shelves can be placed at different heights.
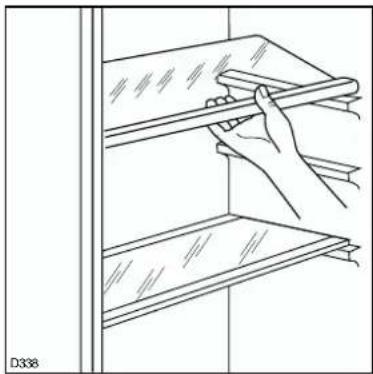
To make these adjustments proceed as follows: Gradually pull the shelf in the direction of the arrows until it comes free, then reposition as required.
Air recycling
The refrigerator compartment is equipped with a device which can be turned on with the switch A (see fig.). The green light, when on, means that the fan is working.
It is suggested that the device be used when the ambient temperature exceeds 25^ C.
This device allows for rapid cooling of foods and a more uniform temperature in the compartment.
natural_image
Line drawing of a hand holding a shelf with a document, no text or symbols present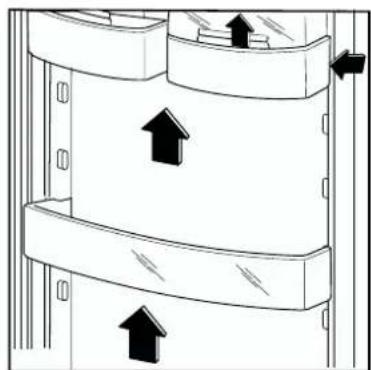
natural_image
Diagram of a multi-level mechanical or structural component with directional arrows indicating movement (no text or symbols present)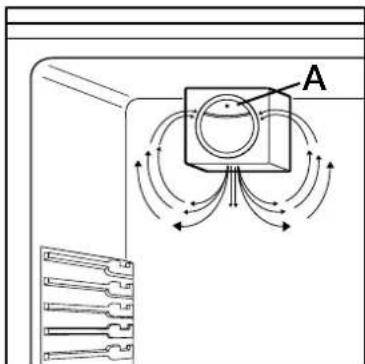
Use of the Wine cooler
Control Panel
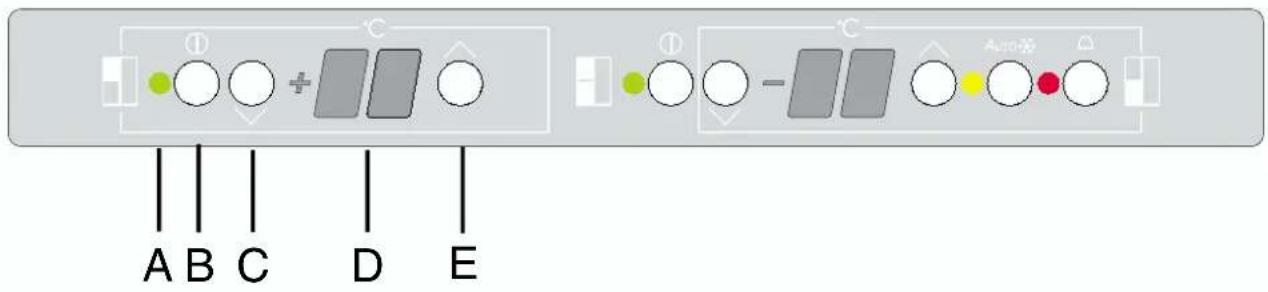
A. On/OFF light
B Fridge button ON/OFF
C Temperature setting button (warmest)
D Temperature indicator
E Temperature setting button (coldest)
A. Light ON/OFF
B. Button ON/OFF
ON: Press the button (B). The frigde compartment can function separately with appliance in function. The pilot light (A) switches on.
OFF: Keep press the button (B) until the pilot light (A) and the temperautre indicator switched off.
C - E.Temperature setting buttons
By pressing the button (C or E), the current temperature setting flashes on the indicator. It is possible to modify the setting temperature only with flashed indicator. To set a warmer temperature, press button (C). To set a colder temperature, press button (E). The indicator display the newly selected temperature for a few seconds and then shows again the inside compartment temperature.
The newly selected-temperature must be reached after 24 hours.

Attention!
During the stability period by the first starting the temperature displayed can not correspond to the setting temperature. During this time it is possible that the temperature displayed is lower than the setting temperature.
D. Temperature indicator
During normal functioning the indicator shows the temperature inside the fridge.

Attention!
Difference between the temperature displayed and temperature setting is normal. Especially when:
- a new setting has recently been selected
- the door has been left open for a long time
- warm food has been placed in the compartment
Operation
Insert the plug in the power socket. Press the button ON/OFF (B) and the fridge is switched on only if the appliance is in function..
The fridge is pre-set to run at +5°C. This temperature will be reached in a few hours.
As soon as the appliance is switched on the temperature indicator (D) shows the current temperature inside the fridge.
Important: If the wine cooler compartment is off, the door must be closed in order that the freezer is working properly.
In this condition, the electronic control of the appliance functions automatically and periodically circulating the air to prevent unpleasant smells and humidity.
Using the wine cooler
Wine cooler
To obtain the best performance the temperature can be adjusted between +6 and +16°C.
This compartment is ideal for storing and refining red or white wines for long periods.
Lay the bottles down in such a way that the corks do not dry.
Keep the wine in the dark. The door is anti-UV darkened double glazed glass to protect the wine from the light in case the appliance is located in a well-lit place.
Handle the bottles with care, to avoid agitating the wine.
Follow the recommendations and advice received at the time of purchase or given in the technical documentation regarding the quality, duration and optimum storage temperature for the wine.
Air circulation
Do not cover the shelves with any protective material, such as paper, cardboard or plastic, which may obstruct the air circulation through them.
Do not place the bottles at directly against the back wall of the compartment which will obstruct the air circulation through them.
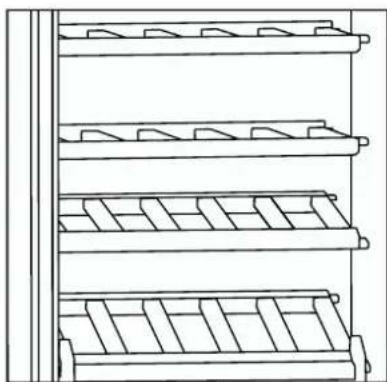
Movable shelves
The shelves can be inclined between the two guides, making sure that the smallest pins are properly inserted in the upper guide seat and the front part of the shelf is resting on the front guide.
Adjust the wooden shelves as follows:
The short shelf can be placed on the two short guides at the top.
The long shelf can be placed on the three long middle guides and inclined between the last short guide at the bottom and the shelf support structure.
The shelf support structure must be placed in the bottom of the compartment.
Important: Only the long shelves can be inserted in the shelf support structure.
Normal operating sounds
You may hear faint gurgling or bubbling sounds when the refrigerant is pumped through the coils or tubing at the rear, to the cooling plate/evaporator or to the fixed freezer shelves.
When the compressor is on, the refrigerant is being pumped round, and you will hear a whirring sound or pulsating noise from the compressor.
natural_image
Line drawing of a multi-tiered storage rack or rack unit (no text or symbols)Use of the freezer
Control Panel
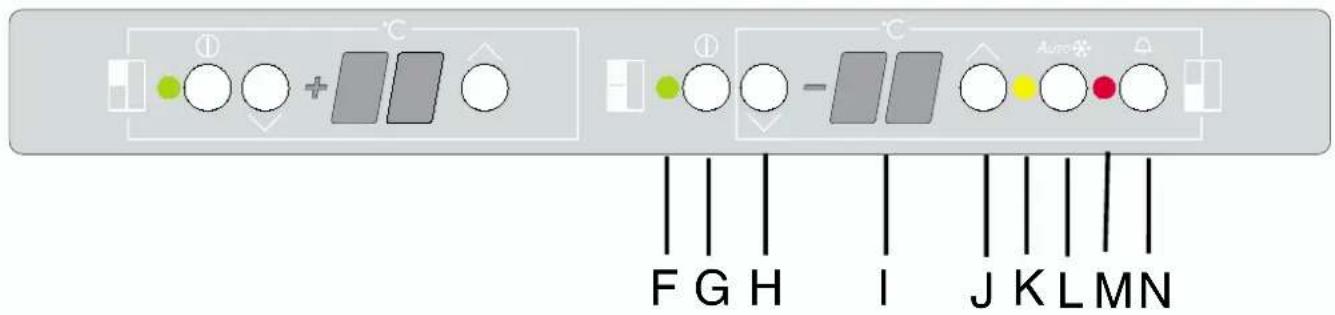
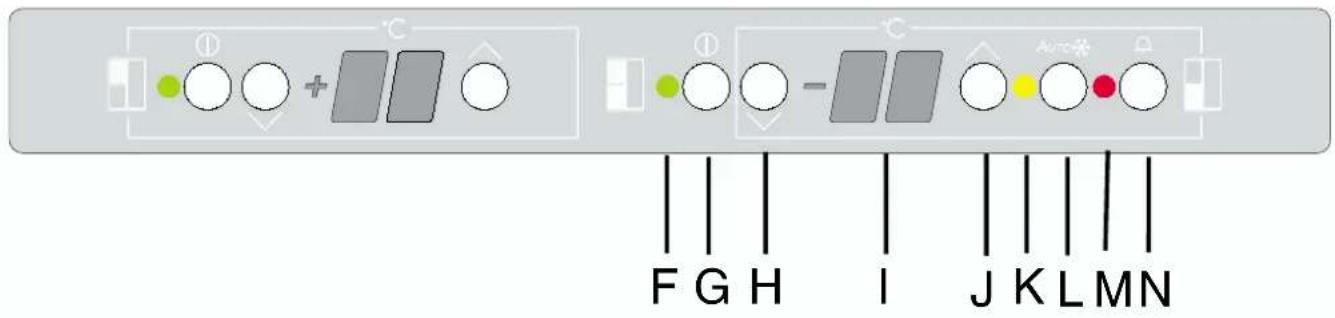
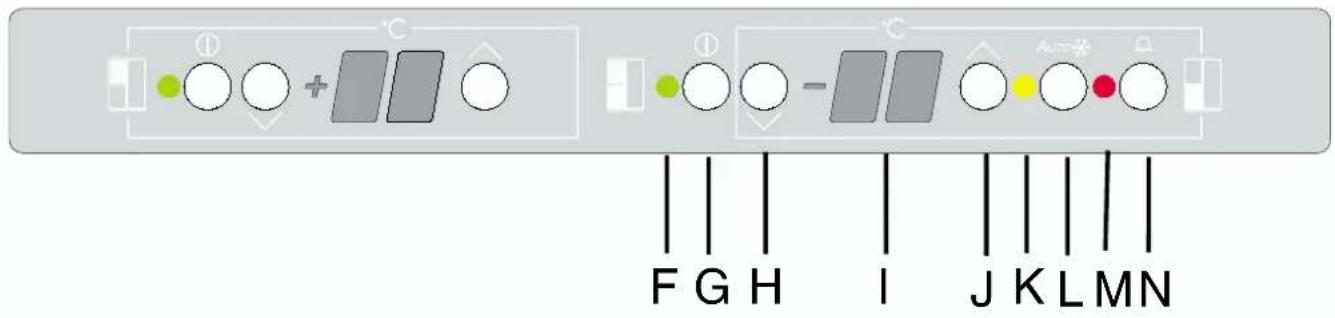
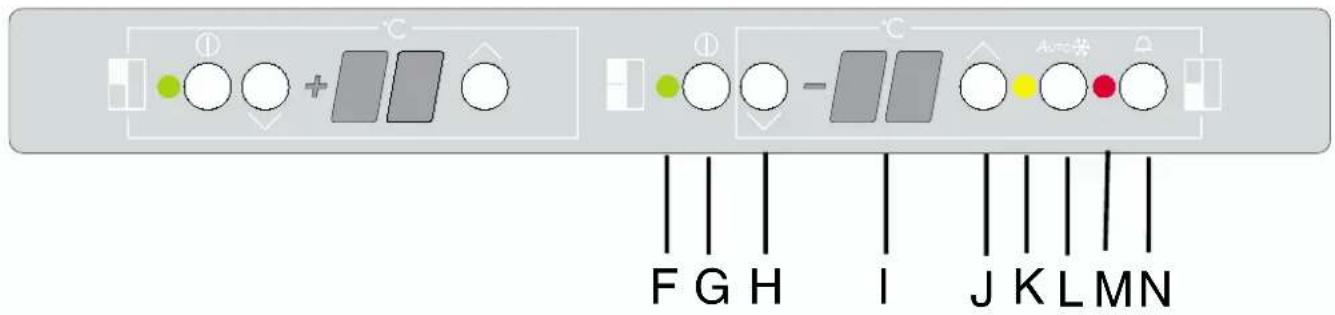
F. On/OFF light
G Appliance button ON/OFF
H Temperature setting button (warmest)
I Temperature indicator
J Temperature setting button (coldest)
K Frostmatic light
L Frostmatic button
M Alarm reset light
N Alarm reset button
F. Light ON/OFF
G. Button ON/OFF
ON: Press the button (G) for the functioning of the whole appliance. The pilot light (F) switches on.
OFF: Keep press the button (G) until the pilot light (H) and the temperautre indicator switched off.
J - L. Temperature setting buttons
The temperature can be adjusted between -15^ and -24^ .
By pressing the button (H or J), the current temperature setting flashes on the indicator. It is possible to modify the setting temperature only with flashed indicator. To set a warmer temperature, press button (H). To set a colder temperature, press button (J). The indicator display the newly selected temperature for a few seconds and then shows again the inside compartment temperature.
The newly selected-temperature must be reached after 24 hours.
Attention!
During the stability period by the first starting the temperature displayed can not correspond to the setting temperature. During this time it is possible that the temperature displayed is lower than the setting temperature.
I. Temperature indicator
During normal functioning the indicator shows the warmest temperature inside the freezer.
Difference until 5°C inside the compartment are quite normal.

Attention!
Difference between the temperature displayed and temperature setting is normal. Especially when:
- a new setting has recently been selected
- the door has been left open for a long time
- warm food has been placed in the compartment
K. Frostmatic pilot light
L. Frostmatic button
To freeze fresh foods, the Frostmatic function must be activated. Press the Frostmatic button (L). The relevant pilot light (K) switches on
The function can be deactivated at any time, by pressing the button (L), otherwise it automatically switched off after 54 hours. With deactivated function the pilot light (K) switches off.
M Alarm reset light
N Alarm reset button
In the event of an abnormal temperature rise inside the freezer (e.g. power cut) warning light (M) will start to flash and a buzzer will sound.
After the temperature has returned to normal, the warning light (M) will continue to flash, although the buzzer has stopped.
When the alarm button (N) is pressed, the warmest temperature reached in the compartment flashes on the indicator (I).
If the power has been off for a long time, frozen food should be consumed as quickly as possible, or cooked and then re-frozen.
Operation
Insert the plug in the power socket. Press the button ON/OFF (G) for the functioning of the whole appliance. The freezer is switched on.
The freezer is pre-set to run at -18°C. this temperature will be reached in a few hours.
As soon as the appliance is switched on the temperature indicator (I) shows the current temperature inside the freezer, the alarm reset light (M) flashes and a buzzer sounds. Press the alarm reset button (N). The buzzer stops and the alarm light (M) continues to flash until the setting temperature is reached.
The wine cooler compartment can be switched off independently of the freezer compartment. By the switching off of the freezer compartment it is switched off also the wine cooler compartment.
Freezing fresh food
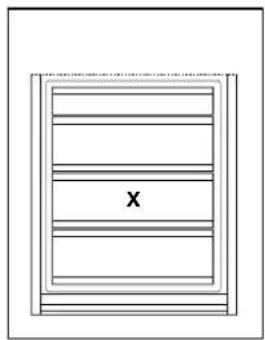
To freeze fresh food, press the Frostmatic button (L).
Place the food to be frozen in the indicated compartment. The maximum quantity of food which can be frozen in 24 hrs. is shown on the rating plate; Warning!
When use the Frostmatic function:
natural_image
Simple line drawing of a cabinet or rack with three horizontal panels and one labeled 'X' (no text or symbols beyond the label)| about 6 hrs before | Introducing small quantities of fresh food (about 5 kg) |
| about 24 hrs before | Introducing the maximum quantity of food (see rating plate) |
| not needed | Introducing frozen food |
| not needed | Introducing small quantities of fresh food daily 2 kg maximum |
Storage of frozen food
When first starting-up or after a period out of use, before putting the products in the compartment let the appliance run for at least two hours on the coldest setting, then turn the thermostat knob to the normal operating position.

Important
If there is a power failure when food is in the freezer, do not open the door of the freezer compartment. The frozen food will not be affected if the power cut is of short duration (up to 6-8 hours) and the freezer compartment is full, otherwise, it is recommended that the food should be used within a short time (a temperature increase of the frozen food shortens its safe storage period).
Ice-cube production
This appliance is equipped with one or more trays for the production of ice-cubes. Fill these trays with

HINTS
Hints for refrigeration
Useful hints:
Meat (all types): wrap in polythene bags and place on the glass shelf above the vegetable drawer.
For safety, store in this way only one or two days at the most.
Cooked foods, cold dishes, etc.: these should be covered and may be placed on any shelf.
Fruit and vegetables: these should be thoroughly cleaned and placed in the special drawer(s) provided.
Butter and cheese: these should be placed in special airtight containers or wrapped in aluminium foil or polythene bags to exclude as much air as possible.
Milk bottles: these should have a cap and should be stored in the bottle rack on the door.
Bananas, potatoes, onions and garlic, if not packed, must not be kept in the refrigerator.
Hints for freezing
To help you make the most of the freezing process, here are some important hints:
- the maximum quantity of food which can be frozen in 24 hrs. is shown on the rating plate;
- the freezing process takes 24 hours. No further food to be frozen should be added during this period;
- prepare food in small portions to enable it to be rapidly and completely frozen and to make it possible subsequently to thaw only the quantity
water, then put them in the freezer compartment. Do not use metallic instruments to remove the trays from the freezer.
Thawing
Deep-frozen or frozen food, prior to being used, can be thawed in the refrigerator compartment or at room temperature, depending on the time available for this operation.
Small pieces may even be cooked still frozen, directly from the freezer: in this case, cooking will take longer.
Ice packs
There are one or more ice packs in one drawer of the freezer.
In the event of a power failure or malfunction, the ice pack will lengthen the amount of time it takes for the frozen food to become too warm by several hours. The ice pack can only fulfil this task optimally if it is placed in the uppermost drawer, at the front, above the frozen food. You can use the ice pack for cooling cold bags.
required;
- wrap up the food in aluminium foil or polythene and make sure that the packages are airtight;
- do not allow fresh, unfrozen food to touch food which is already frozen, thus avoiding a rise in temperature of the latter;
- water ices, if consumed immediately after removal from the freezer compartment, can possibly cause the skin to be freeze burnt;
- it is advisable to show the freezing-in date on each individual pack to enable you to keep tab of the storage time;
- The symbols show different types of frozen goods.
The numbers indicate storage times in months for the appropriate types of frozen goods. Whether the upper or lower value of the indicated storage time is valid depends on the quality of the foods and pre-treating before freezing. do not put carbonated liquids (fizzy drinks, etc.) in the freezer compartment as they may burst.
Hints for storage of frozen food
To obtain the best performance from this appliance, you should:
- not open the door frequently or leave it open longer than absolutely necessary.
- Once defrosted, food deteriorates rapidly and cannot be refrozen.
- Do not exceed the storage period indicated by the food manufacturer.
MAINTENANCE
⚠️ Unplug the appliance before carrying out any maintenance operation.
Warning
This appliance contains hydrocarbons in its cooling unit; maintenance and recharging must therefore only be carried out by authorized technicians.
Periodic cleaning
Clean the inside with warm water and bicarbonate of soda. Rinse and dry thoroughly.
Clean the condenser (black grill) and the compressor at the back of the appliance with a brush or a vacuum cleaner. This operation will improve the performance of the appliance and save electricity consumption.
Interior light
Refrigerator
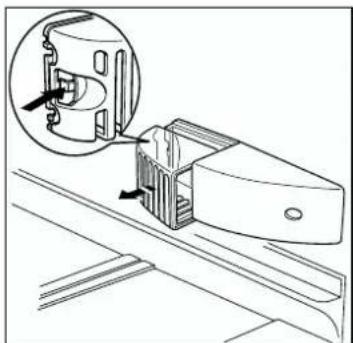
If it becomes necessary to replace the lamp, press on the rear hook and at the same time slide the cover in the direction indicated by the arrow.
Replace the lamp with one of the same power (the maximum power is shown on the light diffuser).
Wine Cooler
Warning! There is a risk of electric shocks! Before changing the light bulb, switch off the appliance and unplug it, or pull the fuse or the circuit breaker.
Light bulb data: Replace the lamp with one of the same power (the maximum power is shown on the light diffuser).
- To switch off the appliance, press the ON/OFF buttons.
- Unplug the mains plug.
- To change the light bulb press on the rear hook and at the same time slide the cover in the direction indicated by the arrow.
- Change the defective light bulb.
- Refit the light bulb cover.
- Put the refrigerator back into operation.
Periods of non-operation
When the appliance is not in use for long periods, take the following precautions:
remove the plug from the wall socket;
remove all food;
defrost and clean the interior and all accessories;
leave the door ajar to allow air to circulate to prevent unpleasant smells.
natural_image
Technical line drawing of a mechanical assembly with an inset showing a close-up of a component (no text or symbols present)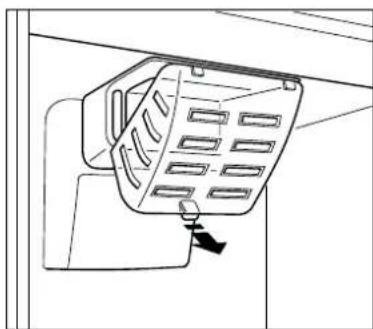
natural_image
Line drawing of a mechanical device with a handle and panel slots (no text or symbols)Defrosting
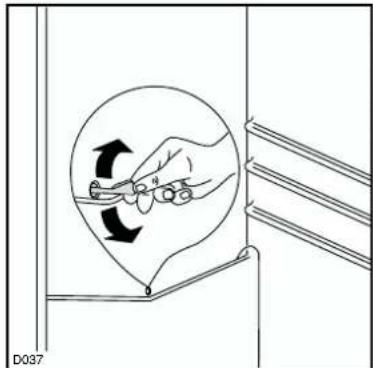
Frost is automatically eliminated from the evaporator of the refrigerator compartment every time the motor compressor stops, during normal use. The defrost water drains out through a trough into a special container at the back of the appliance, over the motor compressor, where it evaporates.
It is important to periodically clean the defrost water drain hole in the middle of the refrigerator compartment channel to prevent the water overflowing and dripping onto the food inside. Use the special cleaner provided, which you will find already inserted into the drain hole.
The freezer compartment of this model, on the other hand, is a "no frost" type. This means that there is no buildup of frost when it is in operation, neither on the internal walls nor on the foods.
The absence of frost is due to the continuous circulation of cold air inside the compartment, driven by an automatically controlled fan.
natural_image
Diagram showing a hand holding a tool inside a circular frame, with arrows indicating rotation (no text or symbols)CUSTOMER SERVICE AND SPARE PARTS
If the appliance is not functioning properly, check that:
- the plug is firmly in the wall socket and the mains power switch is on;
- there is an electricity supply (find out by plugging in another appliance);
- the thermostat knob is in the correct position.
- If there are water drops on the bottom of the cabinet, check that the defrost water drain
opening is not obstructed (see "Defrosting" section).
- If your appliance is still not working properly after making the above checks, contact the nearest service centre.
To obtain fast service, it is essential that when you apply for it you specify the model and serial number of your appliance which can be found on the guarantee certificate or on the rating plate located inside the appliance, on the bottom left-hand side.
TECHNICAL INFORMATION
The technical infomation are situated in the rating plate on the internal left side of the appliance.
INSTALLATION
Location
The appliance should be installed well away from sources of heat such as radiators, boilers, direct sunlight etc.
Electrical connection
Before plugging in, ensure that the voltage and frequency shown on the serial number plate correspond to your domestic power supply. Voltage can vary by ±6% of the rated voltage.
For operation with different voltages, a suitably sized auto-transformer must be used.
The appliance must be earthed.
The power supply cable plug is provided with a contact for this purpose.
If the domestic power supply socket is not earthed, connect the appliance to a separate earth in compliance with current regulations, consulting a specialist technician.
The Manufacturer declines all responsibility if the above safety precautions are not observed.
CE This appliance complies with the following E.E.C. Directives:
- 87/308 EEC of 2/6/87 relative to radio interference suppression.
- 73/23 EEC of 19.2.73 (Low Voltage Directive) and subsequent modifications;
- 89/336 EEC of 3.5.89 (Electromagnetic Compatibility Directive) and subsequent modifications.
Shelf holders
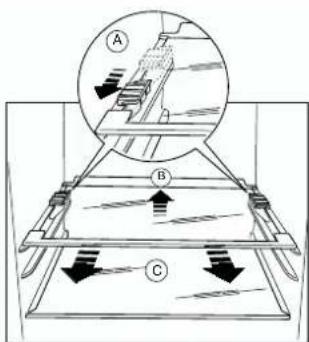
Your appliance is equipped with shelf retainers that make it possible to secure the shelves during transportation.
To remove them proceed as follows:
Move the shelf retainers in the direction of the arrow, raise the shelf from the rear and push it forward until it is freed and remove the retainers.
ATTENTION!
It must be possible to disconnect the appliance from the mains power supply; the plug must therefore be easily accessible after installation.
i ADVARSLER OG VIGTIGE ANVISNINGER
natural_image
Line drawing of a hand holding a shelf with a tray, no text or symbols present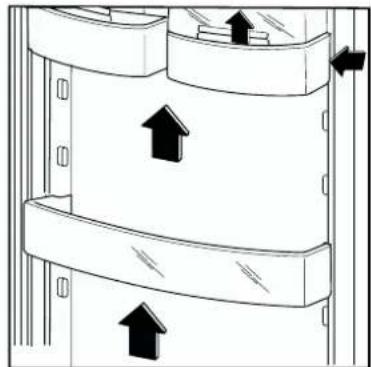
natural_image
Diagram of a multi-layered storage or filtration unit with upward arrows indicating flow direction (no text or symbols)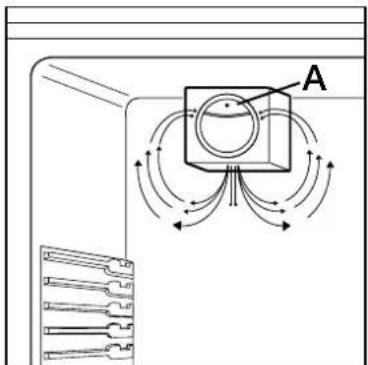
Vinkøler Kontrolpanel
natural_image
Line drawing of a multi-tiered storage cabinet or rack unit (no text or symbols)Fryserens kontrolpanel
F - Kontrollampe TÆNDT/SLUKKET
G - Tast TÆNDT/SLUKKET fryseren
H - Taster til regulering af fryserens temperatur (varmere)
I - Fryserens temperatur indikator
J - Taster til regulering af fryserens temperatur (koldere)
natural_image
Technical line drawing of a mechanical component with an inset showing a close-up view of a housing detail (no text or symbols)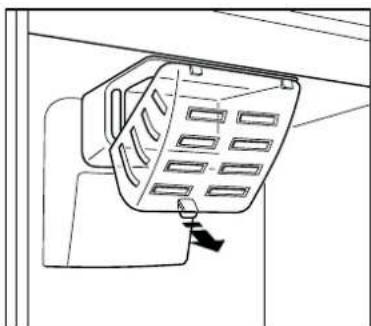
natural_image
Line drawing of a mechanical device with a handle and panel, no text or symbols presentAfrimning
natural_image
Diagram showing a hand holding scissors inside a circular frame, with arrows indicating rotation (no text or symbols)HVIS NOGET IKKE FUNGERER
Brandt UK Ltd
Intec Four, Wade Road, Basingstoke, Hampshire RG24 8NE
Brochures and Stockist information : 08707 505 503
All other departments : 01256 308 000
Service fax : 01256 346 877
Sales Order Processing fax : 01256 843 024
Marketing and Home Economist fax : 01256 325 888
Distributor in Ireland :
Quality Electrical Distributors Ltd
143b Slaney Close, Dublin Industrial Estate, Glasnevin, Dublin 11

- Panel de control del congelador
- Desecarche
- COMO ACTUAR SI EL APARATO NO FUNCIONA
- i ADVERTÊNCIAS E CONSELHOS IMPORTANTES
- Painel de controlo do congelador
- Descongelação
- WARNINGS
- General Safety
- Service/Repair
- Use
- Installation
- Environment Protection
- Disposal of old Appliances
- CONTENTS
- Cleaning the interior
- Control Panel
- Light ON/OFF
- Button ON/OFF
- C - E.Temperature setting buttons
- Attention!
- Temperature indicator
- Coolmatic pilot light
- Coolmatic button
- Operation
- Fresh food refrigeration
- FOOD PROTECTION
- Explanation of the cold zone signs
- Coldest area: below or equal to +4°C
- Temperatur indicator
- Movable shelves
- Positioning the door shelves
- Air recycling
- Use of the Wine cooler
- Using the wine cooler
- Wine cooler
- Air circulation
- Normal operating sounds
- Use of the freezer
- Light ON/OFF
- Button ON/OFF
- J - L. Temperature setting buttons
- Temperature indicator
- Frostmatic pilot light
- Frostmatic button
- M Alarm reset light
- N Alarm reset button
- Freezing fresh food
- Storage of frozen food
- Important
- Ice-cube production
- HINTS
- Hints for refrigeration
- Hints for freezing
- Thawing
- Ice packs
- Hints for storage of frozen food
- MAINTENANCE
- Warning
- Periodic cleaning
- Interior light
- Refrigerator
- Periods of non-operation
- Defrosting
- CUSTOMER SERVICE AND SPARE PARTS
- TECHNICAL INFORMATION
- Location
- Electrical connection
- The appliance must be earthed.
- The Manufacturer declines all responsibility if the above safety precautions are not observed.
- Shelf holders
- i ADVARSLER OG VIGTIGE ANVISNINGER
- Vinkøler Kontrolpanel
- Fryserens kontrolpanel
- Afrimning
- HVIS NOGET IKKE FUNGERER
- Brandt UK Ltd
- Distributor in Ireland :
Brand : DE DIETRICH
Model : PSS300
Category : Fridge