
KeyRig 49 - MIDI Keyboard PINNACLE - Free user manual and instructions
Find the device manual for free KeyRig 49 PINNACLE in PDF.


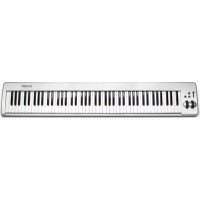
| Product Type | MIDI Keyboard Controller |
| Number of Keys | 49 full-size, velocity-sensitive |
| Connectivity | USB Type B (class-compliant), 1/4" TS sustain pedal jack |
| Power Source | USB bus-powered (no external power required) |
| Controls | Pitch Bend wheel, Modulation wheel (assignable), Volume slider (assignable), Octave Up/Down buttons, Edit Mode button |
| Advanced Functions | Octave shift, Transpose, MIDI channel select (1-16), Program Change, Bank LSB/MSB, assignable MIDI CC, NRPN/RPN |
| Compatibility | Windows XP SP2+ (optional driver for multi-client), Mac OS X 10.3.9+ (no driver required) |
| Included Software | Key Rig virtual instrument, Ableton Live Lite |
| System Requirements (Minimum) | Windows: Pentium III 800 MHz, 256 MB RAM, DirectX 9.0b, USB port; Mac: G3 800/G4 733 MHz, 256-512 MB RAM, USB port |
| Maintenance | Clean with a soft, dry cloth; avoid liquids and abrasive cleaners |
| Safety | Low voltage device; no special precautions required. Do not expose to moisture or extreme temperatures. |
| Spare Parts & Repairability | No user-serviceable parts. Contact technical support for repairs or replacement. |
| What's in the Box | KeyRig 49 keyboard, USB cable, Quick Start Guide, CD-ROM (Key Rig software & drivers), Ableton Live Lite CD-ROM |
Frequently Asked Questions - KeyRig 49 PINNACLE
User questions about KeyRig 49 PINNACLE
0 question about this device. Answer the ones you know or ask your own.
Ask a new question about this device
Download the instructions for your MIDI Keyboard in PDF format for free! Find your manual KeyRig 49 - PINNACLE and take your electronic device back in hand. On this page are published all the documents necessary for the use of your device. KeyRig 49 by PINNACLE.
USER MANUAL KeyRig 49 PINNACLE
natural_image
Black and white photo of a wireless audio workstation with visible keys and control knobs, overlaid with abstract waveform graphics (no text or symbols)User Guide
Introduction....3
KeyRig 49 Keyboard Features 3
Keyboard....3
What's in the Box? 3
Your M-Audio KeyRig 49 bundle should contain the following items . . . . . . . . . . . . . . . . . . . . . . . . . . . . . . . . . . . . . . . . . . . . . . . . . . . . . . . . . . 3
About this Guide....4
KeyRig 49 USB Keyboard Minimum System Requirements 4
Windows 4
Mac OS....4
Installation and Setup 5
Getting Started With Music Creation Software 6
The KeyRig 49 Keyboard 7
Key Names 7
Octave Buttons....7
Pitch Bend Wheel 7
Modulation Wheel 8
Volume Slider 8
Sustain Pedal Jack 8
Advanced KeyRig 49 Features in Edit Mode 9
Advanced Functions in Edit Mode....9
Octave Buttons Options 9
Octave Shift 10
Transpose 10
Channel 11
Program Change.... 11
Bank LSB and Bank MSB 12
Other Assignable Controllers on KeyRig 13
The Modulation Wheel 13
The Volume Slider 14
MIDI Messages In-Depth 15
Program & Bank Changes 15
NRPN/RPNs 16
Troubleshooting 17
Useful MIDI-Specific Troubleshooting Features 18
All Notes Off. 18
Reset All Controllers. 18
Warranty Terms and Registration 18
Warranty Terms.... 18
Warranty Registration 18
Technical Info....19
Appendices - Useful MIDI Data 20
Appendix A - General MIDI Instruments 20
Appendix B - Standard MIDI Controller Numbers (MIDI CC's) 21
Appendix C - Additional RPN Messages 22
Introduction
1
Congratulations on your purchase of the M-Audio KeyRig 49: a 49-key full-size, velocity sensitive USB keyboard designed for easy integration with your Windows XP or Mac OS X computer. KeyRig 49 is a quality keyboard controller with the ability to control a multitude of music creation and virtual instrument applications, such as Ableton Live and Key Rig (included in this bundle). The KeyRig 49 keyboard is also an ideal companion to the popular GarageBand software.
KeyRig 49 Keyboard Features
2
Keyboard:
• 49-key velocity sensitive keyboard
- Pitch Bend wheel
• Modulation wheel; MIDI re-assignable
• Volume slider; MIDI re-assignable
• Octave up/down buttons; MIDI re-assignable
• Edit Mode button for advanced functions and programming
• Sustain foot pedal input
- no driver installation needed – simply connect and power on
• bus-powered through USB
What's in the Box?
3
Your M-Audio KeyRig 49 bundle should contain the following items:
• M-Audio KeyRig 49 USB keyboard
- USB cable
• Printed KeyRig 49 Quick Start Guide
• CD-ROM including Key Rig software, driver, and User Guide
• Ableton Live Lite CD-ROM
If any of the above listed items are missing, please contact the retailer where you purchased the product.
About this Guide
4
This User Guide covers setup and features of the KeyRig 49 USB keyboard. Even if you are experienced with MIDI and computer audio, we recommend reading this User Guide to help you get the most out of KeyRig 49. This keyboard can be used with many third-party music software applications. See your specific software's documentation for more information on this.
KeyRig 49 USB Keyboard Minimum System Requirements
5
Windows\*
■ Pentium 3 - 800 MHz or higher (CPU may be higher for laptops)
256 MB RAM
■ DirectX 9.0b or higher
■ Windows XP (SP2) or higher
(Windows 98, Me, NT, or 2000 not supported)
■ One native USB port
Mac OS
■ Macintosh G3 800/G4 733 MHz or higher** (CPU may be higher for laptops)
■ OS X 10.3.9 with 256 MB RAM,
■ OS X 10.4.2 or greater with 512 MB RAM
■ One native USB port
*Home and Professional Edition only. Windows Media Center Edition is not currently supported.
**G3/G4 accelerator cards are not supported.
M-Audio suggests you also check the minimum system requirements for any third-party software applications you plan on using with your new M-Audio hardware, as they may be greater than the above.
Installation and Setup
C
C
C
The KeyRig 49 USB keyboard is class-compliant. This means that you may simply connect the provided USB cable between KeyRig 49 and your Windows XP or Mac OS X computer and switch the keyboard on. Additional drivers are not mandatory for normal operation.
As you become more familiar with KeyRig 49, you may wish to take advantage of this product's professional features such as: using your new keyboard with more than one application at the same time (multi-client) or sending advanced MIDI messages using KeyRig 49's Edit mode. When using Windows, some of these features can only be accessed after installing the optional KeyRig 49 drivers. No drivers are required for Mac OS X. The optional PC drivers are found on the KeyRig 49 CD-ROM included with this package.
PLEASE NOTE: If you are installing the optional drivers for KeyRig, disconnect your KeyRig until you are instructed to connect it.
To install the optional Windows XP drivers for KeyRig 49:
-
Insert the KeyRig 49 CD-ROM into your computer's CD-ROM drive.
-
The computer will automatically display the interactive install screen. If your computer fails to launch the installer, manually start it by clicking on Start > My Computer > KeyRig 49.
-
Choose KeyRig 49 keyboard from the pull down menu and click "Install."
-
Follow the driver installer's on-screen direction prompts.
-
At various points in this installation process, you may be notified that the driver being installed has not passed Windows Logo Testing. Click "Continue Anyway" to proceed with installation.
-
Click "Finish" once the installer has completed the installation.
-
Connect your KeyRig 49 to an available USB port using the cable provided.
-
Make sure that the power switch on the back of the keyboard is in the "on" (1) position.
-
You will be asked if you want to search the Internet for a driver. Select "No, not this time" and click "Next."
-
Windows will display a Found New Hardware Wizard.
-
Choose "Install the software automatically," and click Next.
- Follow the on-screen direction prompts and click "Finish" when the Found New Hardware Wizard has completed.
Getting Started With Music Creation Software
7
If you are new to MIDI (Musical Instrument Digital Interface), you may find it challenging to understand why sounds have not simply been included in the keyboard. You will find that using a software-based sound source and recording system allows for access to an extremely large array of high quality sounds, a large graphic user interface, and freedom to work with many music creation applications. A basic understanding of MIDI will enable you to take advantage of its wealth of creative possibilities.
Pressing one of KeyRig's keys causes the keyboard to send out MIDI (Musical Instrument Digital Interface) data. MIDI data just gives instructions on how a sound should play. These instructions dictate parameters such as what note to play, when to play it, how loud to play it, and which sound to use.
When using a virtual instrument within your recording software, data from the KeyRig 49 keyboard can be sent to the sequencer, routed to a virtual instrument, and sent to an audio output, turning MIDI data into audible sounds. For this, you must configure your music software to read MIDI data being sent from the KeyRig 49 and play the sound back accordingly. In many music applications, this entails going into the Options or Device Set-Up menu in your music software application and selecting the appropriate MIDI input device. KeyRig 49 should appear under the name "KeyRig 49 In" or "USB Audio Device" in the MIDI devices section of most Windows XP music software applications.
In Windows XP, KeyRig 49 will appear as "USB Audio Device" if the optional drivers have not been installed. After installing these drivers, KeyRig 49 will appear as "KeyRig 49 In." Please consult your software's documentation for instructions on how to configure the software for use with MIDI input devices.

Figure A: Sample MIDI device dialog window without optional KeyRig 49 drivers installed.

Figure B: Sample MIDI device dialog window with optional KeyRig 49 drivers installed.
NOTE:
When running the Key Rig virtual instrument software in standalone mode, Key Rig automatically receives MIDI messages from your KeyRig 49 USB keyboard or from any other installed MIDI interface. No MIDI input configuration in necessary.
When running Key Rig as a plug-in, your host application's MIDI input settings determine the MIDI information received by Key Rig. Please consult your host application's documentation for more information on MIDI routing.
When using the Key Rig software in standalone mode, be sure to select your ASIO-compatible sound card and output channels from the pull down menu at the top of Key Rig's screen as shown.

The KeyRig 49 Keyboard
8
Key Names
The letters printed above the white keys stand for the names of the musical notes the keys represent. The number next to each letter marks the octave each key belongs to. (More information on octaves can be found in the following section.) Black keys are “semitones” to their adjacent white keys and don’t have a dedicated letter. A semitone represents the distance in pitch from one note to its immediate neighbor.
Black keys usually have the same name as the next higher or lower white key, but have an additional sharp symbol (# - semitone higher than the letter indicates), or flat symbol (b - semitone lower than the letter indicates) attached to them. For example, the name of the black key to the right of C3 is C#3 (C-sharp 3), but it can also be called Db3 (D-flat 3), since it is also adjacent to the D key on its right. In other words, black keys have two valid names, depending on the context of the musical notation they are part of.
Octave Buttons
An octave contains 12 notes, and each octave is marked out clearly on your KeyRig 49 keyboard by black and white sections starting on C. Each octave is given a number.
KeyRig 49 is able to shift the pitch of its keys up or down by one or more octaves. When the keyboard's octaves are not shifted (octave shift set to zero), the lights above both the Octave "<" and Octave ">" buttons will be lit. The default octave shift designation is zero and will be the octave setting each time you power up the keyboard.
If you press the Octave “>” button once, the light above the Octave “<” button will go out, indicating the keyboard is now playing an octave higher. If you press the Octave “>” button again, the keyboard will be shifted up two octaves. It is possible to shift the keyboard up a total of four octaves using the Octave “>” button. To shift the octave down, press the Octave “<” button in the same manner: pressing once for one octave, twice for two octaves, and three times for three octaves. It is possible to shift the keyboard down a total of three octaves.
To return the keyboard's octave shift to zero, press both the Octave "<" and "> " buttons at the same time. Both LEDs will light, indicating that the octave shift has returned to zero. In summary, when the Octave buttons are set to control octave shift (default), if the light is only lit above the Octave "> " button, the octave is shifted up. If the light is only lit above the Octave "<" button, the octave is shifted down.
Pitch Bend Wheel
As the name indicates, the Pitch Bend wheel is usually used to bend the notes played on the keyboard up or down. This allows you to play phrases not normally associated with keyboard playing, including guitar-style riffs. Your sound source determines how far you can bend the note. The usual setting is two semitones but can be up to two octaves up or down.
Modulation Wheel
The Modulation wheel is typically used for modulation of the sound you are playing. This real-time controller was originally introduced on electronic keyboard instruments to give the performer options such as adding vibrato, just like players of acoustic instruments do. KeyRig's Modulation wheel is assignable to control many possible parameters. (See chapter "Advanced KeyRig 49 Features in Edit Mode" for more information on this.)
Volume Slider
The Volume slider can send MIDI messages that control the volume of the notes you are playing. The Volume slider can also be assigned to control different parameters such as pan (balance), attack, reverb, and chorus. (See chapter "Advanced KeyRig 49 Features in Edit Mode" for more information on this.) Some software applications respond to volume control MIDI messages, and some programs (like M-Audio's Session) utilize the mouse and graphic user interface to control the volume of instruments.
Sustain Pedal Jack
You can connect a momentary-contact foot pedal (not included) to the Sustain jack on the back of your M-Audio keyboard. The keyboard will automatically detect the correct polarity when powering up. If you want to reverse the polarity, simply press the pedal when you switch on your keyboard.
The foot pedal is normally used for sustaining the sound you are playing without having to keep your fingers pressing down the keys. This is similar to an acoustic piano's sustain pedal function.
Advanced KeyRig 49 Features in Edit Mode

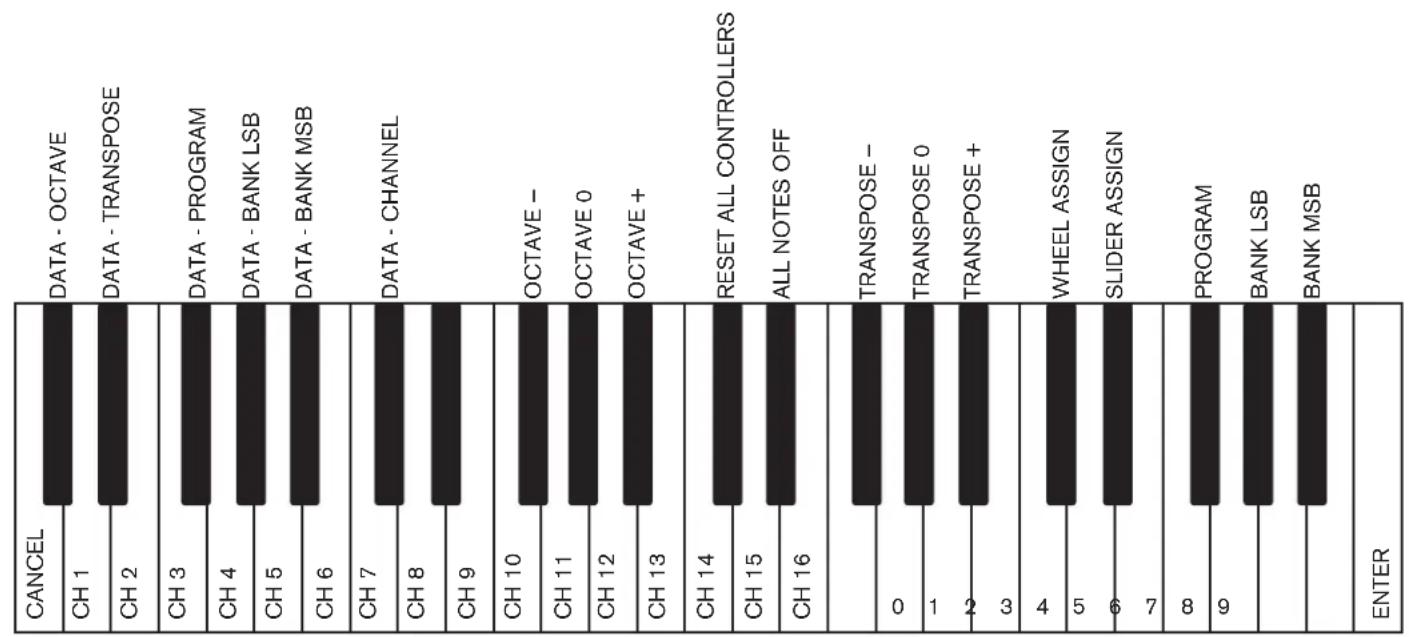
The button to the left of the keys labeled "Edit Mode" is used to access additional advanced functions of the keyboard. When this button is pressed, the keyboard will enter Edit mode and the keys on the keyboard can be used to select functions and enter data.
The light above the Edit Mode button indicates whether or not the keyboard is in Edit mode. When in Edit mode, the black keys on the keyboard are used for selecting functions, while the white keys are used for data entry and channel selection.
Your keyboard will exit Edit mode as soon as either a function is selected or the CANCEL or ENTER key is pressed. The light above the Edit Mode button will then turn off and the keyboard can then be used to play notes again. Some functions do not require any additional data entry. When these functions are selected, the keyboard will automatically exit Edit mode and return to Performance mode.
Advanced Functions in Edit Mode
bar
| Signal | Category | Value | | :--- | :--- | :--- | | CANCEL | DATA - OCTAVE | 0 | | CANCEL | DATA - TRANPOSE | 0 | | CH 1 | DATA - TRANPOSE | 0 | | CH 2 | DATA - PROGRAM | 0 | | CH 3 | DATA - BANK LSB | 0 | | CH 4 | DATA - BANK MSB | 0 | | CH 5 | DATA - BANK MSB | 0 | | CH 6 | DATA - CHANNEL | 0 | | CH 7 | DATA - CHANNEL | 0 | | CH 8 | DATA - CHANNEL | 0 | | CH 9 | OCTAVE - | 0 | | CH 10 | OCTAVE - | 0 | | CH 11 | OCTAVE 0 | 0 | | CH 12 | OCTAVE + | 0 | | CH 13 | OCTAVE + | 0 | | CH 14 | RESET ALL CONTROLLERS | 0 | | CH 15 | ALL NOTES OFF | 0 | | CH 16 | TRANSPOSE - | 0 | | 0 | TRANSPOSE 0 | 0 | | 1 | TRANSPOSE + | 0 | | 2 | TRANSPOSE + | 0 | | 3 | WHEEL ASSIGN | 0 | | 4 | SLIDER ASSIGN | 0 | | 5 | SLIDER ASSIGN | 0 | | 6 | SLIDER ASSIGN | 0 | | 7 | PROGRAM | 0 | | 8 | BANK LSB | 0 | | 9 | BANK MSB | 0 | | ENTER | ENTER | 0 |Octave Buttons Options
The Octave "<" and "> " buttons can be assigned to control one of six possible MIDI functions:
- Octave Shift
- Program Change
- Bank MSB
- Transpose
- Bank LSB
- MIDI Channel Change
In the diagram above, the first six black keys are labeled "DATA = OCTAVE, DATA = TRANSPOSE, DATA = PROGRAM, DATA = BANK LSB, DATA = BANK MSB, and DATA = CHANNEL." These keys are used to select the desired alternate function of the Octave buttons.
To select an alternate function:
-
Press the Edit Mode button.
-
Press the black key that represents the function you want to assign to the Octave buttons. KeyRig 49 will exit Edit mode as soon as you push one of these keys.
PLEASE NOTE: Some of the functions that the Octave buttons can be used for cannot send out a value less than zero. When used to control these functions, both lights above the buttons will remain on, regardless of the current setting of that function.
The available functions of the octave buttons are:
Octave Shift
The Octave "<" and "> " buttons control octave shift by default. However, if these keys have been programmed to control another function, you may wish to re-assign them to control octave shift once again.
To assign the Octave "<" and "> " buttons to control octave shift:
- Press the Edit Mode button.
- Press the black key above C1 (C#1), representing DATA = OCTAVE. KeyRig 49 will exit Edit mode as soon as C#1 has been pressed.
Another method of shifting KeyRig 49's octaves is with the use of the black keys labeled OCTAVE "+" "-" and "0" on the Advanced Functions in Edit Mode diagram. This octave shift method can be useful when the Octave buttons have been reassigned to control another MIDI function.
- Press the Edit Mode button.
- Press the black key below B2 (Bb2). In Edit mode, this key functions as "OCTAVE +," shifting the keyboard up one octave. It is possible to shift the keyboard up a total of four octaves.
- Press the black key above F2 (F#2). In Edit mode, this key functions as "OCTAVE -," shifting the keyboard down one octave. It is possible to shift the keyboard down a total of three octaves.
- Press the black key above G2 (G#2). In Edit mode, this key functions as "OCTAVE 0" to reset the octave shift to zero.
- When you have chosen your octave shift, either press C5 representing "ENTER," or press the Edit Mode button to exit Edit mode.
Transpose
In some cases it is useful to increase or decrease the transmitted pitch by a small number of semitones rather than a whole octave. For example, you may be playing a song with a singer and the singer is having trouble hitting the high notes. In this case, you can try reducing the pitch by one or more semitones. This is achieved using a function called "Transpose."
Transpose works similar to octave shift, except the shift is not limited to multiples of 12 semi-tones. As with octave shift, there are two ways of transposing the keyboard. When in Edit mode, you can assign the Octave "<" and ">" buttons to control the transpose feature. Alternatively, you can use the black keys F#3, G#3, and Bb3 to shift the transposition. These black keys represent "TRANSPOSE -," "TRANSPOSE 0" and "TRANSPOSE +" respectively.
To assign the Octave "<" and "> " buttons to transpose:
- Press the Edit Mode button.
- Press the black key above D1 (D#1), representing "DATA = TRANSPOSE." KeyRig will exit Edit mode as soon as D#1 has been pressed.
When the Octave buttons are assigned to transpose the keyboard, the lights above the buttons indicate the direction of the transposition. To return the keyboard's transpose shift to zero, press both the Octave "<" and ">" buttons at the same time.
Channel
MIDI data from the keyboard can be sent on any of 16 MIDI channels. KeyRig 49's default is to transmit MIDI data on channel 1. However, certain MIDI performance or recording scenarios may require the keyboard to send data on a different channel. You can change the channel on which data is sent using the following method:
-
Press the Edit Mode button.
-
Press one of the 16 channel keys from D1 to E3, whichever one represents the channel you need. KeyRig will exit Edit mode as soon as a channel key has been pressed.
For example, if a device specifies that you need to send data on channel 10, press the Edit Mode button, and then F2 to select channel 10. This channel is usually dedicated to drum sounds when working with GM compatible synthesizers and sound modules.
The channel can also be assigned to the Octave "<" and "> " buttons by pressing the Edit Mode button and then C#2. This will allow the Octave "<" and "> " buttons to increment or decrement through the channels. When channel 16 is reached and "> " is pressed, channel 1 will be selected. If the Octave "<" and "> " buttons are assigned to vary the channel, the lights above the buttons will not change, since it is not possible to have a channel with a negative value. Pressing both the "<" and "> " buttons together will recall KeyRig 49's default, channel 1.
Program Change
Program changes are used to change the instrument or voice you are controlling with your KeyRig 49. Program change messages can be beneficial when using the KeyRig 49 keyboard to control MIDI sound modules or synthesizers. Some music software applications support these messages, however, others do not. Check your software's User Guide to find out if it can process program change messages.
In this example, we will demonstrate how to change the instrument on a General MIDI sound module to a cello sound. To do this we need to send a program change of 42, which will select a cello sound from the General MIDI Instruments standard list (see Appendix A). There are two methods to send the program change:
1) Increment/Decrement Program Change:
- Press the Edit Mode button.
- Press the black key above F1 (F#1). Now the Octave "<" and ">" buttons can be used to change the program.
2) Quick Select Program Change
- Press the Edit Mode button.
- Press the black key above F4 (F#4), representing "program."
- Press keys D4, then B3, then C5. This enters the combination: "4," "2," "ENTER."
Now the keyboard is set to play the GM cello sound 42 (from the General MIDI Instruments standard list). The full list of General MIDI program numbers is given in Appendix A at the end of this manual.
Method 1 is useful if you want to cycle through different instruments for the purpose of comparing and choosing which sound works best in your song. Method 2 is more useful if you want to select a specific sound patch, as is the case here.
If the Octave "<" and "> " buttons have been assigned to control the program number (Method 1), the lights above the buttons will not change, since it is not possible to have a program with a negative value. Pressing both the "<" and "> " buttons together will recall Program 0, which selects the first sound patch on any synthesizer capable of processing MIDI program changes.
Bank LSB and Bank MSB
Program changes are the most commonly used messages to change instruments and voices. However, the number of instruments accessible using only the program change MIDI command is limited to 128. Since some devices have more than 128 voices, they require a method to organize their large number of sounds into banks. These devices then access the sounds within these banks by using program change messages. See chapter "MIDI Messages Explained" for additional information. Generally, these devices use Bank LSB (Least Significant Byte) and Bank MSB (Most Significant Byte) change messages. KeyRig 49 can send these bank change messages in two possible ways*:
1) Incremental/Decremental Bank LSB and Bank MSB Change:
- Press the Edit Mode button.
- Press the black key above G1 (G#1) or Bb1 (A#1), representing Bank LSB or Bank MSB respectively. Now the Octave "<" and "> " buttons can be used to change Bank LSB or Bank MSB.
2) Using the Quick Select Method:
- Press the Edit Mode button.
- Press the black key above G4 (G#4), or Bb4 (A#4), representing Bank LSB or Bank MSB respectively.
- Press the white keys associated with the bank number you wish to select, and then press C5 (Enter). For example, pressing the C4 (the number 3), A3 (the number 1), and C5 (Enter) keys in this step selects bank 31.
As with Program changes, if the Octave "<" and ">" buttons are selected to vary the Bank LSB or MSB number (Method 1), the lights above the buttons will not change, since it is not possible to have a Bank with a negative value. Pressing both the "<" and "> " buttons together will recall Bank 0.
Bank change messages must be followed by a program change message in order to recall a sound. Bank change message by themselves do not activate a sound, but only locate and access a predefined location of a set (bank) of 128 sounds.
PLEASE NOTE: Each time the keyboard is turned off, optional MIDI parameters assigned to the Octave buttons will be lost. When the keyboard is powered up, the Octave buttons will default to controlling octave shift.
Other Assignable Controllers on KeyRig
10
The Modulation Wheel
It is possible to assign different MIDI controller numbers to the Modulation wheel. These parameters are called MIDI continuous controllers. There are 132 (counting from and including zero to 131) MIDI continuous controllers (MIDI CC's). For these controller values to have any effect on the sound, the receiving software or device has to be able to read and respond to these MIDI controller messages. KeyRig 49 accepts controller numbers 0-131. Numbers beyond 127 are a proprietary method M-Audio uses to simplify the transmission of certain, otherwise more complicated multi-part MIDI messages. A full list of controller values is given at the back of this manual in Appendix B.
Some useful MIDI CC's are:
01 Modulation
07 Volume
■ 10 Pan (balance)
05 Portamento
To assign a MIDI controller message to the Modulation wheel:
- Press the Edit Mode button.
- Press the black key above C4 (C#4), representing "WHEEL ASSIGN."
- Use the Numerical Data Entry keys G3 - B4 to enter the number of the MIDI controller you want to assign to the Modulation wheel.
- Press the ENTER key (C5).
- Move the Modulation wheel upwards to increase the value of the MIDI message sent.
If you make an error while entering the numerical data value, you can press the CANCEL key (C1) to exit Edit mode without changing the MIDI CC assigned to the Modulation wheel.
As an example, let's assign effect number 10 to the Modulation wheel. This means the Modulation wheel will control Pan (or balance). To do this:
- Press the Edit Mode button.
- Press the black key above C4 (C#4), representing "WHEEL ASSIGN."
- Press A3 to enter "1."
- Press G3 to enter "0" so you have entered "10."
- Press C5 for "ENTER."
The Volume Slider
As with the Modulation wheel, the Volume slider can also be assigned to any of the 132 controllers (0-131) shown at the back of this manual.
To assign the Volume slider to a certain MIDI parameter:
- Press the Edit Mode button.
- Press the black key above D4 (D#4), representing "SLIDER ASSIGN."
- Use the Numerical Data Entry keys G3 - B4 to enter the number of the controller value you want to assign to the Volume slider.
- Press the ENTER key (C5).
If you make an error while entering the numerical data value, you can press the CANCEL key (C1) to exit Edit mode without changing the MIDI CC assigned to the Volume slider.
PLEASE NOTE: Each time the keyboard is turned off, optional MIDI parameters assigned to the Volume slider or Modulation wheel will be lost. Each time the keyboard is powered up, the Volume slider will default to being assigned to Volume (MIDI CC 07), and the Modulation wheel will default to being assigned to modulation (MIDI CC 01).
MIDI Messages In-Depth
11
Program & Bank Changes
When the MIDI standard was first established, it enabled the user to access only 128 different sounds using program change messages (0-127). As MIDI devices grew to be more sophisticated and contain more sounds, bank change messages were included in an updated MIDI specification to allow for more than 128 sounds to be accessed.
The language MIDI uses to communicate between musical instruments only allows for program change commands 0-127, for a total of 128 possible programs (127 programs + program "0" = 128 programs total). Because of inherent limitations of the MIDI communication protocol, the number of directly accessible programs (using program change messages) cannot easily be expanded beyond 128. Thus, a system of banks, with 128 sounds in each, has been created that enables manufacturers to overcome the 128-sound MIDI limit.
128 Banks with 128 sounds in each bank is the basic principle used to expand the number of accessible sounds. However, to avoid reaching the new limit of the resulting 16,384 possible sounds (128 banks x 128 programs) accessible using a bank change combined with a program change, another layer of banks was added. The result is a system of 128 banks that can contain 128 sub-banks in each of them, which, in turn, can contain 128 sounds (programs) within them.
Bank change messages are useful when calling up sounds from a large library that may exist in a particular sound module or software synth. For example devices that are built with Roland's GS specification or Yamaha's XG specification require you to specify a bank change in order to access the extra voices and effects that these devices provide.
MIDI CC 0 is the bank select MSB (Most Significant Byte) message. This MIDI message is 7-bit in size and can be used to select any of 128 banks. This message can be used in conjunction with MIDI CC 32 which is bank select LSB (Least Significant Byte): a separate 7-bit message allowing additional selection of any of another 128 sub-banks. The combination of Bank MSB and LSB messages gives a 14-bit message that can select any of a possible 16,384 banks. Each bank

flowchart
graph TD
    A["Bank MSB 0"] --> B["Bank LSB 0"]
    A --> C["Bank LSB 1"]
    A --> D["Bank LSB 2"]
    B --> E["Program 0\nProgram 1\nProgram 2"]
    C --> F["Program 0\nProgram 1\nProgram 2"]
    D --> G["Program 0\nProgram 1\nProgram 2"]
    E --> H["Program 127"]
    F --> I["Program 127"]
    G --> J["Program 127"]
    H --> K["Bank MSB 1"]
    I --> L["Bank MSB 127"]
    J --> M["Bank MSB 127"]
    K --> N["Bank MSB 2"]
    L --> O["Bank MSB 2"]
    M --> P["Bank MSB 2"]
    N --> Q["Bank MSB 2"]
    O --> R["Bank MSB 2"]
    P --> S["Bank MSB 127"]
    Q --> T["Bank MSB 127"]
    R --> U["Program 0\nProgram 1\nProgram 2"]
    S --> V["Program 0\nProgram 1\nProgram 2"]
    T --> W["Program 0\nProgram 1\nProgram 2"]
    U --> X["Program 0\nProgram 1\nProgram 2"]
    V --> Y["Program 0\nProgram 1\nProgram 2"]
    W --> Z["Program 0\nProgram 1\nProgram 2"]
    X --> AA["Program 0\nProgram 1\nProgram 2"]
    Y --> AB["Program 0\nProgram 1\nProgram 2"]
    Z --> AC["Program 0\nProgram 1\nProgram 2"]
    AA --> AD["Program 0\nProgram 1\nProgram 2"]
can in turn contain 128 possible sounds selected via a separate program change MIDI message. This enables a user to theoretically recall over two million programs directly, using only MIDI commands. However, most devices only use a few different banks, and allow you to access them with either a Bank LSB message or a Bank MSB message. Please consult your synthesizer's or software's documentation for more information on which type of bank change messages they can process."
You will find many MIDI devices respond to program change commands and many are organized according to the GM listing. In General MIDI devices, different sounds are organized in the same way from device to device. Piano sounds are in their particular place, string sounds are in their place, drum sounds are in their place, and so on. All GM devices (both hardware and software sound modules) are clearly labeled as such, so you know that their sounds are organized in the General MIDI structure. When a GM device receives a MIDI program change, it calls up a type of sound that you expect from the GM sound set. All non-GM MIDI sound modules call up unique sounds from their memory upon receiving MIDI program changes. Since the sounds in a non-GM device are not arranged in a particular order, you need to take a look at the device itself to see which sound you want and at which location in the memory it resides. Many VST instruments such as Native Instruments' FM7 or the synth modules in Propellerhead Reason are non-GM devices.
You can send program change, bank LSB and bank MSB messages directly from the KeyRig keyboard. Please consult the "Advanced KeyRig 49 Features in Edit Mode" section of this User Guide for further details.
NRPN/RPNs
Non-registered parameter numbers (NRPN's) are device-specific messages that enable you to control synths and sound modules via MIDI. The MIDI specification defines open parameter numbers to allow manufacturers to specify their own controllers. The more common of these are registered by the MIDI Manufacturer's Association and are now part of the MIDI specification (hence the term Registered Parameter Numbers – RPN's). (See Appendix B) Each NRPN/RPN has an associated 2-byte number. The two bytes allow for 128 values each. (An RPN or NRPN message is made up of two parts: the MSB and the LSB message. Both of these messages together constitute an RPN or NRPN command.) This allows for 16,384 values in total.
MIDI controllers 98 and 99 represent the NRPN LSB and MSB respectively, while 100 and 101 represent the RPN LSB and MSB messages (see the MIDI controllers list in Appendix B). To transmit an NRPN/RPN message, these LSB and MSB controller messages are sent along with their user-specified values. A further controller message and value needs to be sent to specify the (coarse or fine) value adjustment. This is specified by controller number 6 (data entry) for coarse adjustments or number 38 for fine adjustments.
A list of NRPN's is usually given in the user's manual of any device that receives NRPN messages. It is always necessary that the NRPN MSB and LSB be sent together. Both will be specified in the device's manual.
Troubleshooting
12
KeyRig 49 has been tested in a wide range of systems and operating conditions. However, there are virtually limitless numbers of operating scenarios, any of which could affect your system's performance. Though this section cannot cover all possible situations you may encounter, we would like to offer some suggestions for dealing with possible problems. If you are still not able to find the answer you are looking for, please feel free to contact M-Audio technical support for further assistance.
Problem 1: My KeyRig 49 suddenly stopped working after having performed fine since installation.
Solution 1: Close any music applications you are using, switch the KeyRig 49 off, and restart your computer. Once your computer has completely restarted, switch the KeyRig 49 back on.
Problem 2: I have connected a sustain pedal to my M-Audio keyboard, but its function is reversed.
Solution 2: The polarity of the sustain pedal is calculated by the keyboard when it is powered up. On power up, the sustain pedal is assumed to be in the OFF position. If you want the sustain pedal to be off when it is not pressed, make sure the pedal is not pressed when you power up. Also check to see if there is a polarity switch on your foot pedal. It is possible to use this switch to change foot pedal polarity as well. Another way to reverse the sustain pedal's polarity is to keep it pushed while powering on your KeyRig 49 keyboard.
Problem 3: The KeyRig 49 does not trigger sounds in my music software application.
Solution 3: Be sure KeyRig 49 is selected as the MIDI input device within your software.
Problem 4: I cannot locate the KeyRig 49 USB keyboard in my software's MIDI devices dialog box.
Solution 4: The KeyRig 49 requires a powered USB port. Try plugging the KeyRig 49 into a different USB port or powered USB hub connected to your computer.
Problem 5: My synthesizer always recalls the sound next to the program number that I have sent to it from the KeyRig 49. For example, if I send a program change with the number 40 (Violin), my software loads sound number 41 (Viola).
Solution 5: Some General MIDI modules count their sound patches from 1 – 128 instead of 0-127. Both methods are common. As a result, and depending on the sound module you use, there may be an offset of +/-1 between the sent program change number and the recalled sound patch.
Useful MIDI-Specific Troubleshooting Features
13
KeyRig 49 has been designed to make working with MIDI on your computer as simple as possible. However, sometimes things can go wrong. To counter this, there are two useful MIDI functions.
All Notes Off
Use this if you find there are sustaining notes that you cannot stop. To send an "All Notes Off" MIDI message:
- Press the Edit Mode button.
- Press the black key above D3 (D# 3), representing "ALL NOTES OFF."
- Edit mode will exit, and there will no longer be any sustaining notes.
Reset All Controllers
If one or more of the loaded sound patches doesn't sound as expected, then it may mean that a MIDI CC has applied an undesired effect or other type of sound modulation to that voice. If you are unsure of which MIDI controller to adjust to eliminate the effect, you can send a "Reset All Controllers" MIDI message to set all controller values to their defaults. To send a Reset All Controllers message:
- Press the Edit Mode button.
- Press the black key above C3 (C# 3), representing "RESET ALL CONTROLLERS."
- Edit mode will exit, and all controller values will be reset to their default values.
Warranty Terms and Registration
14
Warranty Terms
M-Audio warrants products to be free from defects in materials and workmanship, under normal use and provided that the product is owned by the original, registered user. Visit www.m-audio.com/warranty for terms and limitations applying to your specific product.
Warranty Registration
Immediately registering your new M-Audio product entitles you to full warranty coverage and helps M-Audio develop and manufacture the finest quality products available. Register online at www.m-audio.com/register to receive FREE product updates and for the chance to win M-Audio giveaways.
Technical Info
15
Caution: Electro Static Discharge, Electrical Fast Transient and Conducted RF interference may cause the unit malfunctioning. In such case, unplug the unit and plug it in again to restore normal operation.
Note: Your M-Audio product has been tested to comply with FCC Standards FOR HOME OR OFFICE USE. Modifications not authorized by the manufacturer may void user's authority to operate this device.
Note: This equipment has been tested and found to comply with the limits for a Class B digital device, pursuant to Part 15 of the FCC Rules. These limits are designed to provide reasonable protection against harmful interference in a residential installation. This equipment generates, uses and can radiate radio frequency energy and, if not installed and used in accordance with the instructions, may cause harmful interference to radio communications. However, there is no guarantee that interference will not occur in a particular installation. If this equipment does cause harmful interference to radio or television reception, which can be determined by turning the equipment off and on, the user is encouraged to try to correct the interference by one or more of the following measures:
• Re-orient or relocate the receiving antenna.
- Increase the separation between the equipment and receiver.
- Connect the equipment to an outlet on a circuit different from that to which the receiver is connected.
- Consult the dealer or an experienced radio/ TV technician for help.
ASIO is a trademark of Steinberg Soft- und Hardware GmbH.
VST is a trademark of Steinberg Soft- und Hardware GmbH


WARNING: This product contains chemicals, including lead, known to the State of California to cause cancer, and birth defects or other reproductive harm. Wash hands after handling.
© 2007 Avid Technology, Inc. All rights reserved. Product features, specifications, system requirements and availability are subject to change without notice. Avid, M-Audio, KeyRig 49, Session and Key Rig are either trademarks or registered trademarks of Avid Technology, Inc. All other trademarks contained herein are the property of their respective owners.
Appendices - Useful MIDI Data
16
Appendix A - General MIDI Instruments
PLEASE NOTE: The following table lists all General MIDI patch names using numbers from 0 – 127. Be advised that some GM modules count their sound patches from 1 – 128 instead. Both methods are common. As a result, and depending on the sound module you use, there may be an offset of -1 between the sent program change number and the recalled sound patch.
Piano
| 0 Acoustic Grand Piano |
| 1 Bright Acoustic Piano |
| 2 Electric Grand Piano |
| 3 Honky Tonk Piano |
| 4 Electric Piano 1 |
| 5 Electric Piano 2 |
| 6 Harpsichord |
| 7 Clavinet |
Bass
| 32 Acoustic Bass |
| 33 Electric Fingered Bass |
| 34 Electric Picked Bass |
| 35 Fretless Bass |
| 36 Slap Bass 1 |
| 37 Slap Bass 2 |
| 38 Syn Bass 1 |
| 39 Syn Bass 2 |
Reed
| 64 Soprano Sax | 96 SFX Rain |
| 65 Alto Sax | 97 SFX Soundtrack |
| 66 Tenor Sax | 98 SFX Crystal |
| 67 Baritone Sax | 99 SFX Atmosphere |
| 68 Oboe | 100 SFX Brightness |
| 69 English Horn | 101 SFX Goblins |
| 70 Bassoon | 102 SFX Echoes |
| 71 Clarinet | 103 SFX Sci- Fi |
Chromatic Percussion
| 8 Celesta |
| 9 Glockenspiel |
| 10 Music Box |
| 11 Vibraphone |
| 12 Marimba |
| 13 Xylophone |
| 14 Tubular bells |
| 15 Dulcimer |
Strings/ Orchestra
| 40 Violin |
| 41 Viola |
| 42 Cello |
| 43 Contrabass |
| 44 Tremolo Strings |
| 45 Pizzicato Strings |
| 46 Orchestral Harp |
| 47 Timpani |
Pipe
| 72 Piccolo | 104 Sitar |
| 73 Flute | 105 Banjo |
| 74 Recorder | 106 Shamisen |
| 75 Pan Flute | 107 Koto |
| 76 Bottle Blow | 108 Kalimba |
| 77 Shakuhachi | 109 Bag Pipe |
| 78 Whistle | 110 Fiddle |
| 79 Ocarina | 111 Shanai |
Organ
| 16 Drawbar Organ |
| 17 Percussive Organ |
| 18 Rock Organ |
| 19 Church Organ |
| 20 Reed Organ |
| 21 Accordion |
| 22 Harmonica |
| 23 Tango Accordion |
Ensemble
| 48 String Ensemble 1 |
| 49 String Ensemble 2 (Slow) |
| 50 Syn Strings 1 |
| 51 Syn Strings 2 |
| 52 Choir Aahs |
| 53 Voice Oohs |
| 54 Syn Choir |
| 55 Orchestral Hit |
Synth Lead
| 80 Syn Square Wave | 112 Tinkle Bell |
| 81 Syn Sawtooth Wave | 113 Agogo |
| 82 Syn Calliope | 114 Steel Drums |
| 83 Syn Chiff | 115 Woodblock |
| 84 Syn Charang | 116 Taiko Drum |
| 85 Syn Voice | 117 Melodic Tom |
| 86 Syn Fifths Sawtooth Wave | 118 Syn Drum |
| 87 Syn Brass & Lead | 119 Reverse Cymbal |
Guitar
| 24 Nylon Acoustic |
| 25 Steel Acoustic |
| 26 Jazz Electric |
| 27 Clean Electric |
| 28 Muted Electric |
| 29 Overdrive |
| 30 Distorted |
| 31 Harmonics |
Brass
| 56 Trumpet |
| 57 Trombone |
| 58 Tuba |
| 59 Muted Trumpet |
| 60 French Horn |
| 61 Brass Section |
| 62 Syn Brass 1 |
| 63 Syn Brass 2 |
Synth Pad
| 88 New Age Syn Pad | 120 Guitar Fret Noise |
| 89 Warm Syn Pad | 121 Breath Noise |
| 90 Polysynth Syn Pad | 122 Seashore |
| 91 Choir Syn Pad | 123 Bird Tweet |
| 92 Bowed Syn Pad | 124 Telephone Ring |
| 93 Metal Syn Pad | 125 Helicopter |
| 94 Halo Syn Pad | 126 Applause |
| 95 Sweep Syn Pad | 127 Gun Shot |
Appendix B - Standard MIDI Controller Numbers (MIDI CC's)
| 00 Bank Select | 38 Data Entry LSB | 76 Controller 76 |
| 01 Modulation | 39 Channel Volume LSB | 77 Controller 77 |
| 02 Breath Control | 40 Balance LSB | 78 Controller 78 |
| 03 Controller 3 | 41 Controller 41 | 79 Controller 79 |
| 04 Foot Control | 42 Pan LSB | 80 Gen Purpose 5 |
| 05 Porta Time | 43 Expression LSB | 81 Gen Purpose 6 |
| 06 Data Entry | 44 Controller 44 | 82 Gen Purpose 7 |
| 07 Channel Volume | 45 Controller 45 | 83 Gen Purpose 8 |
| 08 Balance | 46 Controller 46 | 84 Portamento Control |
| 09 Controller 9 | 47 Controller 47 | 85 Controller 85 |
| 10 Pan | 48 Gen Purpose 1 LSB | 86 Controller 86 |
| 11 Expression | 49 Gen Purpose 2 LSB | 87 Controller 87 |
| 12 Effects Controller 1 | 50 Gen Purpose 3 LSB | 88 Controller 88 |
| 13 Effects Controller 2 | 51 Gen Purpose 4 LSB | 89 Controller 89 |
| 14 Controller 14 | 52 Controller 52 | 90 Controller 90 |
| 15 Controller 15 | 53 Controller 53 | 91 Reverb Depth |
| 16 Gen Purpose 1 | 54 Controller 54 | 92 Tremelo Depth |
| 17 Gen Purpose 2 | 55 Controller 55 | 93 Chorus Depth |
| 18 Gen Purpose 3 | 56 Controller 56 | 94 Celeste (De- tune) |
| 19 Gen Purpose 4 | 57 Controller 57 | 95 Phaser Depth |
| 20 Controller 20 | 58 Controller 58 | 96 Data Increment |
| 21 Controller 21 | 59 Controller 59 | 97 Data Decrement |
| 22 Controller 22 | 60 Controller 60 | 98 Non- Reg Param LSB |
| 23 Controller 23 | 61 Controller 61 | 99 Non- Reg Param MSB |
| 24 Controller 24 | 62 Controller 62 | 100 Reg Param LSB |
| 25 Controller 25 | 63 Controller 63 | 101 Reg Param MSB |
| 26 Controller 26 | 64 Sustain Pedal | 102 Controller 102 |
| 27 Controller 27 | 65 Portamento | 103 Controller 103 |
| 28 Controller 28 | 66 Sostenuto | 104 Controller 104 |
| 29 Controller 29 | 67 Soft Pedal | 105 Controller 105 |
| 30 Controller 30 | 68 Legato Pedal | 106 Controller 106 |
| 31 Controller 31 | 69 Hold 2 | 107 Controller 107 |
| 32 Bank Select LSB | 70 Sound Variation | 108 Controller 108 |
| 33 Modulation LSB | 71 Resonance | 109 Controller 109 |
| 34 Breath Control LSB | 72 Release Time | 110 Controller 110 |
| 35 Controller 35 | 73 Attack Time | 111 Controller 111 |
| 36 Foot Control LSB | 74 Cut- off Frequency | 112 Controller 112 |
| 37 Porta Time LSB | 75 Controller 75 | 113 Controller 113 |
114 Controller 114
115 Controller 115
116 Controller 116
117 Controller 117
118 Controller 118
119 Controller 119
Channel Mode Messages:
120 All Sound off
121 Reset all Controllers
122 Local Control
123 All Notes Off
124 Omni Off
125 Omni On
126 Mono On (Poly Off)
127 Poly On (Mono Off)
Extra RPN Messages:
128 Pitch Bend sensitivity
129 Fine Tune
130 Coarse Tune
131 Channel Pressure
Appendix C - Additional RPN Messages
You may have noticed that although we have stated there are 128 MIDI controller messages (0 – 127), Appendix B shows 132 assignable controller messages. This is because messages 128 – 131 are a different type of MIDI message, defined in the MIDI Specification as RPN messages. M-Audio has created four messages that are sent like MIDI CCs, but actually transmit a series of RPN messages. This makes sending these complex multi-part messages as easy as sending a MIDI CC message. You can assign these to the controls on your KeyRig 49 keyboard in exactly the same way as any other MIDI controller message. The RPN messages control the following:
| Controller Number MI | DI Message Use | |
| 128 Pitch Bend Sensitivity | Alters the range of a pitch bend message | |
| 129 | Master Tune (coarse) | Adjusts the tuning of your sound module or synthesizer in large steps |
| 130 | Master Tune (fine) | Adjusts the tuning of your sound module or synthesizer in small steps |
| 131 Monophonic Aftertouch* | Adds a vibrato effect | |
*Monophonic aftertouch is not an RPN message. However, it is an additional effect message defined in the General MIDI specification and this is why we have included it in Appendix C.
M-Audio USA
5795 Martin Rd., Irwindale, CA 91706
Technical Support
web: www.m-audio.com/tech
tel (pro products): (626) 633-9055
tel (consumer products): (626) 633-9066
fax (shipping): (626) 633-9032
Sales
e-mail: sales@m-audio.com
tel: 1-866-657-6434
fax: (626) 633-9070
Web
www.m-audio.com
M-Audio U.K.
Floor 6, Gresham House, 53 Clarenden Road, Watford
WD17 ILA, United Kingdom
Technical Support
e-mail: support@maudio.co.uk
tel:(Mac support): +44 (0)1765 650072
tel: (PC support): +44 (0)1309 671301
Sales
tel: +44 (0)1923 204010
fax: +44 (0)1923 204039
Web
www.maudio.co.uk
M-Audio France
Floor 6, Gresham House, 53 Clarenden Road, Watford
WD17 ILA, United Kingdom
Assistance Technique
PC:0820000731
MAC: 0820391191
Assistance Technique
e-mail : support@m-audio.fr
mac@m-audio.fr
e-mail: support@m-audio.de
tel +49 (0)7941 - 9870030
fax: +49 (0)7941 98 70070
Sales
e-mail: info@m-audio.de
tel: +49 (0)7941 98 7000
fax: +49 (0)7941 98 70070
Web
www.m-audio.de
M-Audio Canada
1400 St-Jean Baptiste Ave. #150, Quebec City,
Quebec G2E 5B7, Canada
Technical Support
e-mail: techcanada@m-audio.com
phone: (418) 872-0444
fax: (418) 872-0034
Sales
e-mail: infocanada@m-audio.com
phone: (866) 872-0444
fax: (418) 872-0034
Web: www.m-audio.ca
M-Audio Japan


- User Guide
- MIDI Messages In-Depth 15
- Troubleshooting 17
- Useful MIDI-Specific Troubleshooting Features 18
- Warranty Terms and Registration 18
- Technical Info....19
- Appendices - Useful MIDI Data 20
- Introduction
- 1
- KeyRig 49 Keyboard Features
- 2
- Keyboard:
- What's in the Box?
- 3
- Your M-Audio KeyRig 49 bundle should contain the following items:
- About this Guide
- 4
- KeyRig 49 USB Keyboard Minimum System Requirements
- 5
- Windows\*
- Mac OS
- Installation and Setup
- Getting Started With Music Creation Software
- 7
- NOTE:
- The KeyRig 49 Keyboard
- 8
- Key Names
- Octave Buttons
- Pitch Bend Wheel
- Modulation Wheel
- Volume Slider
- Sustain Pedal Jack
- Advanced KeyRig 49 Features in Edit Mode
- Octave Buttons Options
- Octave Shift
- Transpose
- Channel
- Program Change
- 1) Increment/Decrement Program Change:
- 2) Quick Select Program Change
- Bank LSB and Bank MSB
- 1) Incremental/Decremental Bank LSB and Bank MSB Change:
- 2) Using the Quick Select Method:
- Other Assignable Controllers on KeyRig
- 10
- The Modulation Wheel
- Some useful MIDI CC's are:
- The Volume Slider
- MIDI Messages In-Depth
- 11
- Program & Bank Changes
- NRPN/RPNs
- Troubleshooting
- 12
- Problem 1: My KeyRig 49 suddenly stopped working after having performed fine since installation.
- Problem 2: I have connected a sustain pedal to my M-Audio keyboard, but its function is reversed.
- Problem 3: The KeyRig 49 does not trigger sounds in my music software application.
- Problem 4: I cannot locate the KeyRig 49 USB keyboard in my software's MIDI devices dialog box.
- Problem 5: My synthesizer always recalls the sound next to the program number that I have sent to it from the KeyRig 49. For example, if I send a program change with the number 40 (Violin), my software loads sound number 41 (Viola).
- Useful MIDI-Specific Troubleshooting Features
- 13
- All Notes Off
- Reset All Controllers
- Warranty Terms and Registration
- 14
- Warranty Terms
- Warranty Registration
- Technical Info
- 15
- Appendices - Useful MIDI Data
- 16
- Appendix A - General MIDI Instruments
- Appendix B - Standard MIDI Controller Numbers (MIDI CC's)
- Channel Mode Messages:
- Extra RPN Messages:
- Appendix C - Additional RPN Messages
- M-Audio USA
- Technical Support
- Sales
- M-Audio U.K.
- M-Audio France
- Assistance Technique
- M-Audio Canada
- M-Audio Japan
Brand : PINNACLE
Model : KeyRig 49
Category : MIDI Keyboard