
SRT 7805 - Digital decoder STRONG - Free user manual and instructions
Find the device manual for free SRT 7805 STRONG in PDF.


| Product Type | Digital Decoder (Set-top Box) |
| Brand | STRONG |
| Model | SRT 7805 |
| Dimensions (approx.) | 20 x 15 x 5 cm |
| Weight (approx.) | 0.5 kg |
| Power Supply | DC 12V / 1A |
| Power Consumption | Max 10W |
| Video Output | HDMI, SCART (Composite) |
| Audio Output | HDMI (stereo), RCA L/R |
| USB Port | 1x USB 2.0 for media playback |
| Supported Video Formats | MPEG-2, MPEG-4, H.264 |
| Supported Audio Formats | MP3, AAC, AC3 |
| TV Standards | DVB-T/T2 (terrestrial), DVB-S/S2 (satellite) |
| Channel Memory | Up to 10000 channels |
| Electronic Program Guide (EPG) | Yes |
| Parental Control | Yes |
| Languages Supported | Multiple (varies by region) |
| Remote Control | Included (IR) |
| Maintenance | Clean with soft, dry cloth; do not use liquids |
| Safety Warnings | Keep away from water and heat sources; unplug during storms |
| Spare Parts / Repairability | Contact authorized service center |
Frequently Asked Questions - SRT 7805 STRONG
User questions about SRT 7805 STRONG
0 question about this device. Answer the ones you know or ask your own.
Ask a new question about this device
Download the instructions for your Digital decoder in PDF format for free! Find your manual SRT 7805 - STRONG and take your electronic device back in hand. On this page are published all the documents necessary for the use of your device. SRT 7805 by STRONG.
USER MANUAL SRT 7805 STRONG
Fig. 2
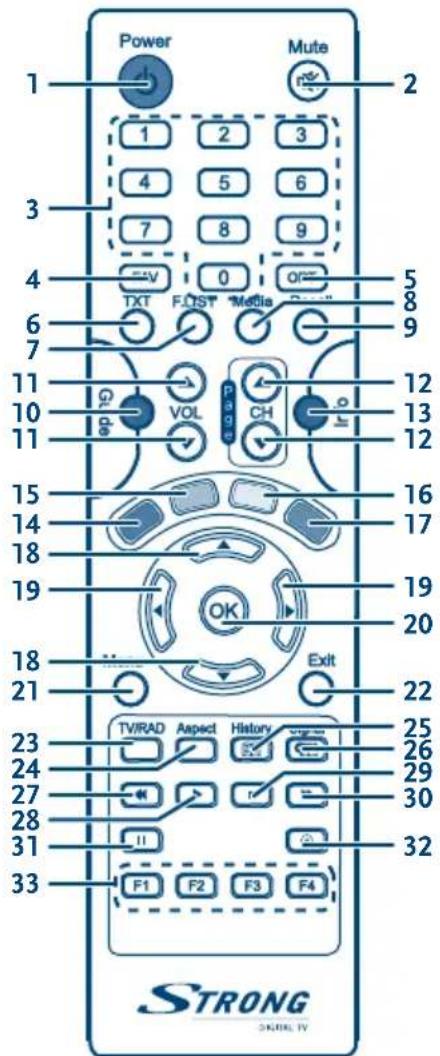
Fig. 3
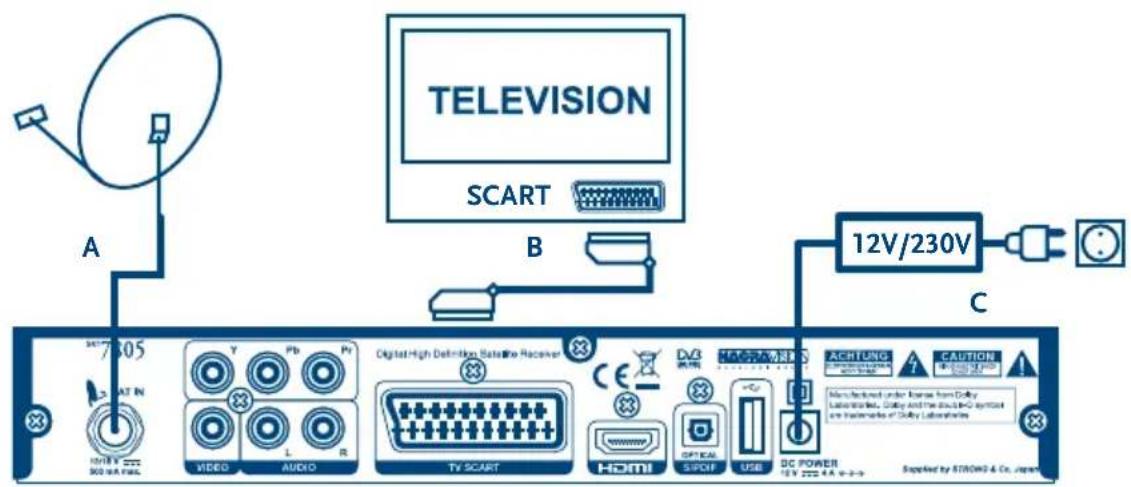
Fig. 4
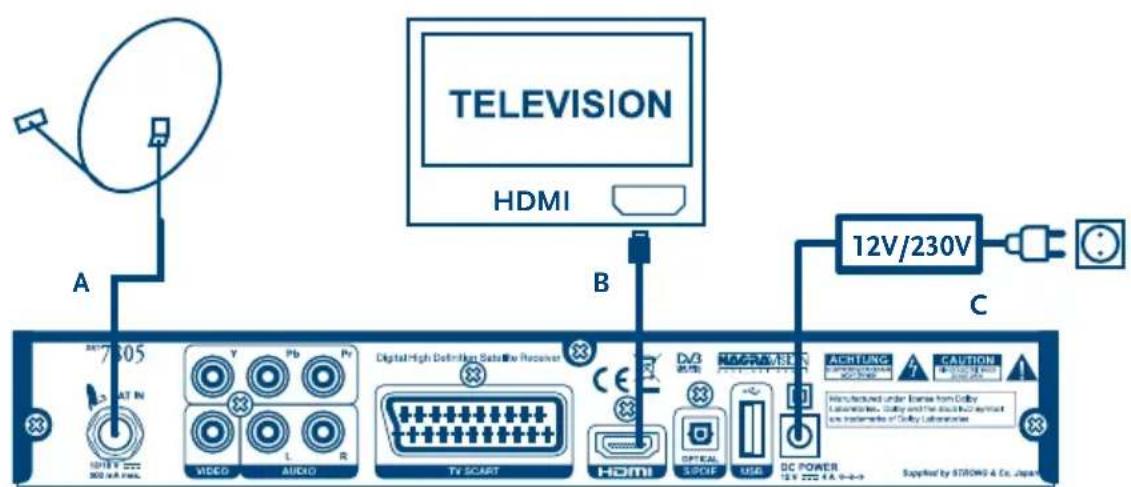
Fig. 5
flowchart
graph LR
    A["DiSEqC Switch"] -->|A OUT| B["12V/230V"]
    A -->|B| C["TV SCART"]
    C --> D["Video"]
    C --> E["Audio"]
    C --> F["TV SCART"]
    C --> G["Hiomi"]
    C --> H["OPTICAL S/PDF"]
    C --> I["USB"]
    C --> J["DC POWER"]
    J --> K["Capacitor"]
    K --> L["12V/230V"]
    style A fill:#f9f,stroke:#333
    style B fill:#ccf,stroke:#333
    style C fill:#cfc,stroke:#333
    style D fill:#fcc,stroke:#333
    style E fill:#cff,stroke:#333
    style F fill:#ffc,stroke:#333
    style G fill:#cfc,stroke:#333
    style H fill:#fcc,stroke:#333
    style I fill:#ffc,stroke:#333
    style J fill:#fcc,stroke:#333
    style K fill:#fcc,stroke:#333
    style L fill:#fff,stroke:#333
Fig. 6
TABLE OF CONTENTS
1.0 INTRODUCTION 2
1.1 Safety Instructions 2
1.2 Storage 2
1.3 Equipment Set-up 2
1.4 Accessories 3
1.5 Usage of external USB devices 3
1.6 General Information 3
2.0 YOUR RECEIVER 4
2.1 DEFAULT PIN-CODE: 0000 4
2.2 Front Panel 4
2.3 Rear Panel 4
2.4 Remote Control Unit 4
3.0 CONNECTIONS 5
3.1 Basic connection using a Scart cable 5
3.2 Basic connection using an HDMI cable 5
3.3 Connecting multiple fixed dishes using a DiSEqC 1.0 switch 5
4.0 STARTING UP FOR THE FIRST TIME 6
4.1 Language selection 6
4.2 Location selection 6
4.3 Output selection 6
4.4 Channel installation 6
4.5 First activation of your HD+ smart card 6
5.0 QUICK GUIDE TO USING YOUR RECEIVER 7
6.0 OPERATION 7
6.1 Changing channels 7
6.2 Info Banner 8
6.3 Audio language and Audio mode 8
6.4 Teletext and Subtitles 8
6.5 HDMI video format 8
6.6 EPG (Electronic Programme Guide) 8
6.7 Recording 9
6.8 Time shift 9
6.9 Playback of recording 9
7.0 MENU 9
7.1 Channel Setup 10
7.2 Control Panel 11
7.3 CAS 13
7.4 Multimedia 13
7.5 Program Guide 15
8.0 OTA SOFTWARE UPGRADE 15
A.1 TROUBLESHOOTING 16
A.2 SPECIFICATIONS 17
STRONG declares that this item complies with the basic requirements and other relevant regulations of directives CE 2004/108/EEC and 73/23EEC; RoHS 2002/95EEC
Manufactured under license from Dolby Laboratories
Dolby' and the 'double-D' symbol are trademarks of Dolby Laboratories
Subject to alterations. In consequence of continuous research and development technical specifications, design and appearance of products may change. Dolby and the double-D symbol are registered trademarks of Dolby Laboratories, ASTRA is a registered trade mark of SES ASTRA, all other product names are trademarks or registered trademarks of their respective owners.
© STRONG 2010. All rights reserved. 11/2010

1.1 Safety Instructions
DO NOT INSTALL YOUR RECEIVER:
In a closed or poorly ventilated cabinet; directly on top of or under any other equipment; on a surface which might obstruct the ventilation slots.
DO NOT EXPOSE THE RECEIVER OR ITS ACCESSORIES:
■ To direct sunlight or any other equipment that generates heat; to rain or intense moisture; to intense vibration and to any shock which may cause permanent damage to your receiver or to any magnetic objects, such as loudspeakers, transformers, etc.
■ Do not use a damaged power cord. It may cause a fire or an electrical shock. Do not touch a power cord with wet hands. It may cause an electric shock.
■ When the receiver is not used for a long period of time, you should unplug the power cord from the wall socket.
■ Do not use alcohol or ammonia based liquids to clean the receiver. If you wish, you may clean your receiver with a soft lint-free cloth slightly made damp with a mild soap solution, only after disconnecting from the mains voltage supply. Make sure no foreign objects fall through the ventilation slots because this could cause fire or an electric shock.
- Do not place any objects on top of the receiver because this might prevent proper cooling of the components inside.
Safety Precautions
■ Never open the receiver cover. It is dangerous to touch the inside of the receiver due to high voltage currents and possible electrical hazards and your warranty will be void. Refer all maintenance or servicing to suitably qualified personnel.
■ When you are connecting cables, be sure that the receiver is disconnected from the mains supply voltage. Wait a few seconds after switching off the receiver before you move the receiver or disconnect any equipment.
It is a necessity that you only use an approved extension and compatible wiring that is suitable for the electrical power consumption of the installed equipment. Please ensure that the electrical power supply corresponds with the voltage on the electrical identification plate at the back of the receiver.
If the receiver does not operate normally, even after strictly following the instructions in this user manual, it is recommended to consult your local dealer or contact the appropriate service.
1.2 Storage
Your receiver and its accessories are stored and delivered in a packaging designed to protect against electric shocks and moisture. When unpacking it, make sure that all the parts are included and keep the packaging away from children. For transporting the receiver from one place to another or if you are returning it under warranty conditions, make sure to repack the receiver in its original packaging with its accessories. Failing to comply with such packaging procedures could void your warranty.
1.3 Equipment Set-up
We recommend you consult a professional installer to set up your equipment. Otherwise, please follow the instructions below:
■ Refer to the user manual of your TV and your antenna.
■ Make sure that the SCART/HDMI cable and outdoor components are in a good condition and the SCART/HDMI connections are well shielded and from good quality.
This manual provides complete instructions for installing and using this receiver. The following symbols will serve as follow.
WARNING: Indicates warning information.
Note Indicates any other additional important or helpful information.
MENU Represents a button on the remote control or the receiver. (BOLD CHARACTER) Move to Represents a menu item within a window. (Italic Character)
1.4 Accessories
■ User's Manual
■ 1 Remote control unit
■ 1 Main Power adapter with power cord
■ 1 HD+ smart card
■ 2x Batteries (AAA type)
WARNING: The batteries should not be recharged, disassembled, electrically short-circuited, be mixed or used with other types of batteries.
If rechargeable accumulators instead of batteries are going to be used, we recommend using (e.g. NiMH) types with low self-discharge to ensure long time operation of remote control.
1.5 Usage of external USB devices
It is recommended to use USB 2.0 high speed storage devices. If your device is not compatible to USB 2.0 specifications, recording, playback and other multimedia functions of the receiver would not work properly.
STRONG cannot guarantee the compatibility to all types of USB storage devices.
It is advised not to store important information on USB storage devices used with the receiver. Always make backups of data on your USB storage device before you are going to use it with your receiver.. STRONG will not take responsibility for any loss of information or circumstances caused by loss of information.
Please ensure that either the USB device is already formatted to FAT or FAT32 system to use all media and record functions.
If your USB storage device is going to be used ONLY for record and playback, we recommend formatting it to E2FS (Linux file system) for the best performance of recording and playback. You can format the USB device via your receiver, refer to chapter 7.4.1 USB INFO & FORMAT for details.
Please be aware that formatting in Linux file system will have the consequence that Windows will not recognise this USB device anymore. If you want to use your E2FS formatted USB storage device under Windows we recommend you to use tools available in the WWW, for example the program: Ext2 Installable File System
1.6 General Information
HD PLUS
■ Version of the Test Suite was used in conformance testing
■ Services via the Satellite Infrastructure are available in Germany (or such other territories as APS may define from time to time), only.
■ The usage of the HD+ card is designated for the Federal Republic of Germany only..
DOLBY
Manufactured under license from Dolby Laboratories. Dolby and the double-D symbol are trademarks of Dolby Laboratories.
2.0 YOUR RECEIVER
2.1 DEFAULT PIN-CODE: 0000
2.2 Front Panel
Fig.1
- Standby/ON switch Turns the receiver ON or to Standby
- Navigations buttons Menu navigation
- 4 digit LED display Displays channel number or time
- MENU Opens the OSD menu
- EXIT Exit from menu
- OK Confirm selection
- Card reader Slot to insert HD+ card for access of HD+ channels*
2.3 Rear Panel
Fig 2.
- SAT IN To connect to the LNB of your satellite dish for reception of satellite broadcast signal
- COMPONENT To connect to TV or Beemer for high video quality over Y/Pb/Pr component output
- VIDEO (RCA) To connect to the RCA video input of your TV or VCR using an RCA cable
- AUDIO (L/R) To connect to the audio input of TV, VCR or your HIFI using an RCA cable
- TV SCART To connect to TV using a SCART cable
- HDMI To connect to the HDMI input of your TV using a good quality HDMI cable.
- S/PDIF (Opt.) To connect to a digital or home cinema audio amplifier using an optical cable
- USB Connect your USB storage device (stick, HDD, etc.) to this port
- DC POWER To connect to the original included main power adapter (Input 110 - 240 V 50 \~ 60 Hz/ Output 12 V DC) there and connect main power adapter to the original included power cord.
2.4 Remote Control Unit
Fig. 3.
- ☑ Turns the receiver ON/Standby
- Mutes the audio output of the receiver
- 0\~9 Channel number and numeric value input
- FAV Opens the favourite group selection
- OPT Opens the audio and subtitle selection menu
- TXT Displays the current Teletext of this channel, if available
- F.LIST Opens the playback list in viewing mode
- MEDIA Opens the Multimedia menu in viewing mode
- RECALL Toggles between the two last watched channels
- GUIDE Displays the EPG (Electronic Program Guide)
- VOL ▲▼ Increasing/decreasing of the volume level
- PAGE CH▲▼ Switches to next/previous channel in viewing mode or scrolls page wise in lists
- INFO Press once to display channel information. Press twice to call extended program info.
-
RED For Teletext function, in OSD for specific functions.
-
GREEN For Teletext function, in OSD for specific functions.
-
YELLOW For Teletext function, in OSD for specific functions.
-
BLUE In viewing mode opens the EPG overview, for Teletext and in OSD for specific functions
-
▲▼ Scrolls channel and EPG information up/down in viewing mode, in OSD for navigation.
-
◀ In OSD for navigation
-
OK In viewing mode displays the channel list, in Menu mode activation/confirmation of the specific item
-
MENU Opens the menu in viewing mode, within menu you can directly exit to viewing mode
-
EXIT In viewing mode removes appearing messages /Info banner, in OSD one step back or cancel actions
-
TV/RAD Toggles between TV and Radio mode
-
ASPECT Show information about the screen format in broadcast.
-
HISTORY Displays the last watched channels list in viewing mode including EPG information
-
SIGNAL Display signal and quality of satellite signal from current selected satellite and channel
-
Fast rewind
-
▶ PLAY / Opens the playback list in viewing mode
-
■ Stop
-
Fast forward
-
II In viewing mode starts Timeshift, in Multimedia for Pause function
-
● Starts recording of the actual broadcast
-
F1\~F4 No function
3.0 CONNECTIONS
3.1 Basic connection using a Scart cable
Fig. 4.
- Connect the LNB of your satellite dish to the SAT IN connector of your receiver using a good quality coax cable and suitable 'F-connector' plugs.
- Connect one end of a good quality Scart cable to the TV SCART connector on your receiver and the other end to the SCART input of your TV.
- Plug the power adapter & cord to a suitable wall outlet.
3.2 Basic connection using an HDMI cable
Fig. 5.
-
Connect the LNB of your satellite dish to the SAT IN connector of your receiver using a good quality coax cable and suitable 'F-connector' plugs.
-
Connect one end of a good quality HDMI cable to the HDMI output on your receiver and the other end to the HDMI input of your TV.
-
Plug the power adapter & cord to a suitable wall outlet.
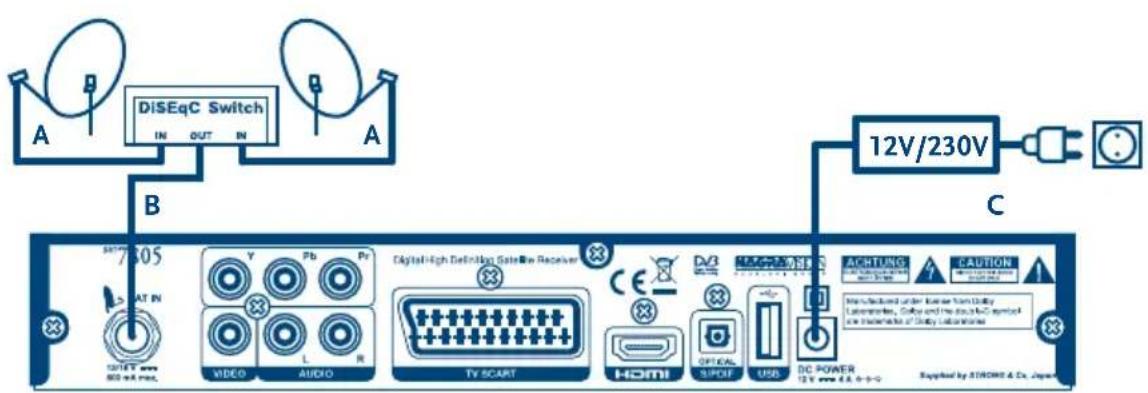
3.3 Connecting multiple fixed dishes using a DiSEqC 1.0 switch
Fig. 6.
- Connect the LNB's of your fixed dishes to the inputs of a DiSEqC 1.0 switch
- Connect the output or "to receiver" connector of the DiSEqC 1.0 switch to the SAT IN connector on your receiver.
- Refer to section 3.1 or 3.2 for TV and mains connections.
4.0 STARTING UP FOR THE FIRST TIME
Ensure that your satellite signal is of good quality and that all connections are sound. In case of difficulties or questions, please ask you local dealer for assistance. It is recommended to follow the Setup Wizard step by step. It will guide you through the basic installation and channel searching process. You can enjoy digital HD broadcasts within just a few minutes.
4.1 Language selection
After turning on the power for the first time, the language selection menu will appear. Choose your language with ◀ and confirm with OK. In this welcome screen will the most important button description, be displayed. Once you are ready, press OK to advance to the next step of the Installation wizard. During any stage of the Setup Wizard, you can press EXIT to get back to the previous screen.
4.2 Location selection
Here you can set the Time zone and switch the Summer time OFF or ON. Use ▲▼ to move the highlight and ◀▶ to change settings. Press OK to confirm and to continue.
4.3 Output selection
Here you can select the connection type you use to your TV screen. Select HDMI / YUV if you use a HDMI or a component cable to HD TV screen. Select SCART if you're using a Scart cable to "normally" TV screen. If SCART is selected, then select as well they correct size of you TV screen. Use ▲▼ to move the highlight and ◀▶ to change settings. Press OK to confirm and to continue..
Note: HD+ services / channels can only be seen if correct selection is made!
4.4 Channel installation
This receiver is equipped with a new fast channel installation system by Astra 19.2 satellite called APS. Per default all settings are correctly adjusted for a fast installation on Astra 19.2. Before you press OK button to start the scan process, first check the Strength and Quality bars on the bottom of this menu. Green bars indicate a good signal and you can proceed. Yellow bars indicate that the signal condition is nearly acceptable and Red indicates bad signal. Adjust your dish for maximum possible signal strength and quality. Once the signal cannot be improved anymore, fix the dish on this position and press OK to continue and start APS scan process. Once receiver finished this scan process a selection will popup with View or Next. Select View and press OK to enjoy and watch the digital satellite channels directly. Select Next if you want to scan for more satellites/channels. Refer to chapter 7.1.1 CHANNEL SCAN for detailed description.

Note:
If you don't want to use this option you can press the BLUE button to start a normal auto scan on the selected satellite.
4.5 First activation of your HD+ smart card
Your receiver is already delivered with correct inserted smart card. Although we recommend you to check that your smart card didn't get loose during the transport.
If you have ensured that the SC is inserted properly, then you are ready for watching HD+ channels. Your SC is already activated, so you only need to switch to an HD+ service channel (please see separate HD+ sheet for HD+ channels reference).
If you have already switched to one of the desired programs, after 10 sec. you will have access to the HD+ service.
Now you are ready to enjoy the HD+ channels.
5.0 QUICK GUIDE TO USING YOUR RECEIVER
We at STRONG understand that you can't wait to enjoy your new HD+ receiver. The following quick guide will make you familiar with the basic operation of this device. We do, however, advice you to read the full manual to get the best performance from your STRONG HD+ receiver.
To turn your receiver ON or to Standby, use the STBY button on the remote control or the button on the left side of the front panel.
If you are using the HDMI connection for your TV set, it might be possible that you need to switch on TV and select the correct HDMI input first.
Choose the desired channel with the ▲▼ buttons and OK or the CH+/CH- buttons. Alternatively, you can digit the channel number with the 0\~9 buttons on the remote control. Or press OK in viewing mode to display the channel list.
The volume can be adjusted with the VOL+/VOL- buttons.
6.0 OPERATION
In viewing mode, several features are available to make watching TV a true pleasure. This paragraph describes these features. Please also read chapter 7.0 to get familiar with the menu of your new receiver.
6.1 Changing channels
Your new receiver is equipped with four ways to change channels.
■ via direct access
■ via the CH+/CH- buttons.
■ via the channel list
■ via selection of channel groups (APS)
Direct access
To gain direct access to a certain channel, simply input its number with the 0\~9 buttons on the remote control. Channel numbers can be up to four digits long. Entering a number with less than four digits is possible. Just wait a few seconds and your receiver will switch to the selected channel.
Using the CH+/CH- buttons
CH+ or ▲ and OK will switch to a higher channel.
CH- or ▼ and OK will switch a lower channel.
Channel list
Press OK in viewing mode to display the Channel List. Use ▲▼ in the Channel List to highlight your channel of choice and press OK once to select the highlighted channel. Press OK again to leave the Channel List. The Channel List is equipped with a filter function to make finding your favourite channels easier. Within the Channel List, press ◀ button to jump to selections on left side of channel list banner. Here you can select following options: ALL, FAV, A\~Z, SAT and APS.
Use ▲▼ to select one of these options and press ▶ button to select the list of your choice and OK to confirm.
You can use the TV/R button within the channel list to toggle between TV and radio channel list/s.
APS Channel list
Your receiver is equipped with new system called "APS" Astra Platform Service which store channels in separated channel lists on sort, type or group. If you are using the Astra 19.2 satellite and did scan on HD+ channel scan in installation, then this system is contained in the channel list.
Press OK in viewing mode to display the Channel List. Press ◀ button to select the group of your choice on the left side of the channel list banner. Select APS with the ▲▼ buttons and press the ▶ button to show the group lists from APS channel system. Select your wanted channel group by ▲▼ buttons.
Directly on the right side is displayed which channels belong to this selected group. Press ▶ button to enter this channel group and select it with the ▲▼ buttons. Press OK once to select the highlighted channel, by another pressing you can switch to viewing mode. The receiver will stay in the selected channel group until you will select another one.
6.2 Info Banner
At any time during viewing mode you can press the INFO button to get info about the current channel and program*. Press INFO twice to see program details about the current channel.

Note: Program information is only displayed when available. Availability depends on the broadcaster.
6.3 Audio language and Audio mode
Press OPT button in viewing mode to display this (Optional Settings) menu
In this menu you can select the Audio language and Audio Mode.
In the audio language selection you can select another language or Dolby digital if the selected channel supports this option.
Selection of Audio mode allows you to select between Stereo, Left or Right audio channel. In case the channels does not support, there will be no change to hear.
6.4 Teletext and Subtitles
Your receiver includes a fully featured Teletext. To access Teletext, press the TXT button in viewing mode. Then the menu to select Teletext @ Subtitle Option will be displayed, when you press it for the 1st time. Use the ▲▼ buttons to select an option and use ◀▶ to change the setting. In case of DVB subtitles availability you can select them to be displayed and press OK there to confirm. If only one Teletext language is available the receiver will show the abbreviation of the used one and you can't select this item. Please choose "Goto Teletext" to display the Teletext on screen, then you can use the 0\~9 buttons to input the number of the page you wish to see. The coloured buttons of the remote control allow you to display selected pages directly, as indicated on the bottom of the Teletext screen. Press EXIT to go back to viewing mode.

Note: VBI Teletext on your TV set is not supported. Please use the Teletext of the receiver.
If you are connected via HDMI, it could be the case that you will observe that the TV set is switching resolution in case there are different resolutions broadcasted on the channels. This is no abnormality as this is a required behaviour followed on the specifications of this product.
6.5 HDMI video format
If you are connected via HDMI, it could be the case that you will observe that the TV set is switching resolution in case there are different resolutions broadcasted on the channels. This is no abnormality as this is a required behaviour followed on the specifications of this product.
6.6 EPG (Electronic Programme Guide)
The Electronic Programme Guide is a very useful function that allows you to watch programme schedules and information on screen and to select programs for recording. Press the GUIDE button to open the EPG overview. Use ▲▼ to select the desired channel and ◀▶ to move within the program schedules. If the desired event is selected, press INFO to open the detailed information. Use ▲▼ button to scroll, in case there is more than one page of information. Press INFO or RED to go back to the EPG overview. Within the EPG you can also set a Timer for the selected event, by pressing OK. Then you can choose if you want to Set a Reminder for Timer, Tune CH or Record, always including event/ channel information according to selected channel.
RED button allows you to Filter by Title, Channel or Theme. Here press GREEN to get back to EPG overview. YELLOW button allows you to select by date. Here press GREEN to get back to today's EPG overview. Use the BLUE button to open the Weekly Overview for the selected channel, press BLUE again to get back to EPG overview.

Note: Availability of EPG data depends on the broadcaster and selected transponder frequency.
6.7 Recording
Your receiver allows you to make an instant recording of the program you are watching, to an external USB HDD.
Simply press ● to start the recording. Press INFO button during a recording to see channel and record time information.
To stop the recording, press ■ button and select OK and confirm with OK button.
The maximum record time of each event is 2 hours.

Note: Please connect an USB storage device with sufficient free space before you start a recording.
For recording HD broadcast, a high speed device is highly recommended.
On the HD+ channels it can happen that some events are protected and a recording is not possible or limited in specific concerns.
6.8 Time shift
The Time shift function allows you to pause live broadcast up to 90 minutes and resume normal watching without missing anything.
Press Ⅱ to freeze the current broadcast. Press Ⅱ again to start time shifted playback. To stop Timeshift, press ■.
During the Time shift press EXIT to remove time shift banner and press ▶ (PLAY) to recall the time shift banner. During time shift you can press ◀ or ▶ buttons to jump within time shift file. Press more times on these buttons to change the speed. You can choose between 2x, 4x, 8x, 16x and 32x.
On the HD+ channels it can happen that some events are protected and fast forward/ rewind in time shift is not possible or limited in specific concerns.

Note: Time shift is only working correctly when a fast USB storage device such as
an USB2.0 HDD / USB storage device is connected to the receiver. Further we recommend you to format the USB storage device to E2FS format for the proper function of record, playback and Time shift, please see special conditions in chapter 1.5 USAGE OF EXTERNAL USB DEVICES. Distorted picture and / or audio during Time shift indicate a low USB device speed. STRONG cannot guarantee for USB devices used. Especially when Timeshift is activated at channels with high data rate (High quality SD/HD), STRONG cannot guarantee an accurate Playback of the Time shifted file.
6.9 Playback of recording
After you have already made some recordings with this receiver you can simply play them back. Press F.LIST or ▶ (PLAY) button to open the Playback List. Use ▲▼ to select a record you want to playback and press OK to start. With the RED button you can delete files if you want to make some free space on your USB device. The recording will be stored with the current event name. You can rename the recording by pressing the GREEN button. With the YELLOW button you can protect a recording with the PIN Code, before it can be played back or deleted.
7.0 MENU
All important settings and features of your receiver can be operated from the Menu. It consists of the following sub-menus: Channel Setup, Control Panel, CAS, Multimedia and Program Guide. Press MENU in viewing mode to display the Menu.
Use ◀▶ to select a sub-menu and ▲▼ to choose an option. Press OK to advance to the chosen submenu. Press EXIT to go one step back or press MENU to go to viewing mode.
7.1 Channel Setup
The installation menu allows you to change satellite settings and to search for channels. It consists of the following sub-menus: Channel Scan and Channel Editor. Choose the desired sub menu with ▲▼ and press OK to advance.
7.1.1 Channel Scan
Use this menu to select the satellite, change the settings for the used antenna and start scan process for searching the channels.
Satellite: Use ▲▼ to highlight Satellite and ◀▶ to select the satellite you wish to change the settings for. To display the list of all available satellites, press OK. At the end of this list you can find Newsat1 -10. Those can be used to configure a new satellite setup.
LNB: Select LNB type if you are using another LNB as Univ.LNB model. As this is the common used LNB, it is set per default.
DiSEqC: If you are using a DiSEqC switch in order to connect more dishes, select the correct used switch type. Select DiSEqC 1.0 for maximum 4 dishes. DiSEqC 1.1 for maximum 16 dishes and select None if you don't use any switch.
DiSEqC Port: If you are using a DiSEqC switch you need to set the correct DiSEqC port which belongs to the connected satellite.
Transponder: Select this option, if you want to scan manually or check the signal on the desired transponder frequency. Use ◀▶ to select the transponder of you choice, or open the Transponder list of the selected satellite with OK.
Motor Control: If you are using a DiSEqC motor to install multiple satellites. Select the according setup type with ◀▶. Select DiSEqC 1.2 for manual setup of each satellite or select GOTO-X for automatic calculation after you have adjusted the 0-position and corresponding Cartesian coordinates of your location.
Note: Please consider that GOTO X must be supported from your Motor as well!
Motor Setting: Here you can setup the necessary settings according to the used Motor Control. Adjust and store these settings correctly, in order to be able to proceed with Search Start.
Search Start:
Before you start the scan process please make sure that all settings are made correctly and Strength and Quality bars are showing green colours. If the Strength and Quality bars showing red or yellow colours, then the satellite signal is too weak. Please try to adjust your satellite dish first, to improve the signal.
At the first time installation there was performed the HD+ Channel Scan from APS. After this successful scan process you can choose following of the additional possibilities:
Select Search Start and press OK.
A new menu will be opened on the right side of your screen, called "Options". Use this menu to perform an Automatic, TP (manual) or Network channel search on one or more satellites. Use ◀▶ ▲▼ to highlight and OK to select an option.
Start Auto Scan: Use this option to perform a full channel scan on the selected satellite, under the below mentioned conditions.
TP Search Start: Use this option to perform a scan on the selected transponder only.
Network Search Start: Use this option to receive new launched channels from the selected satellite. The receiver will perform an additional search for channels from the NIT table (NIT= Network Identification Table).
Search Mode: Select All to scan all channels including scrambled channels or FTA to scan for Free-To-Air channels only.
NIT Search: Select OFF if you don't want to perform a network search or set ON to perform a network search.
DiSEqC repeat:
Here you can set 1 x or 2 x time/s of DiSEqC repeat, if you are using a multiple switch system or a DiSEqC motor behind a DiSEqC switch.
After you have set all necessary settings, press OK to start the desired scan process.
After the selected scan finished successfully the receiver will ask you to Save or Cancel, to save the search result select Save, to discard select Cancel.
7.1.2 Channel Editor
Here you can Delete, Set Favourites, Lock, Move and Sort your channels.
Press TV/RAD button on your remote to select TV or Radio channel list.
Use ◀▶ ▲▼ to highlight and OK to select channel(s) for the desired option explained below:
Press RED button to delete the selected channel/s or channel group/s.
Press GREEN to add or remove channels to/ from your favourite group.
Press YELLOW to lock channel/s with a PIN code before you can watch or deleted it/them.
Press BLUE to move channels within the selected channel list.
Press EXIT to exit this menu and select OK at the displayed message to store changes or choose Cancel to discard the changes.
7.2 Control Panel
The Control Panel allows you to change system settings as language and time, set protections with PIN code and reset the receiver back to the factory settings. It consists of the following sub-menus: System Setup, Factory Default and Lock Setup. Choose the desired sub menu with ▲▼ and press OK to advance.
7.2.1 System Setup
Use the Setup menu to configure the system settings of your receiver. The following sub-menus are available: Language Setup, Time Setup, Receiver Information and User Setup.
7.2.1.1 Language Setup:
Here you can set the preferred OSD, Audio and Subtitle languages settings. Use ▲▼ to highlight the setting you wish to change and ◀▶ to change the value of the setting. Press OK to display a list of all available options, for the chosen setting. Press EXIT to exit and save settings.
OSD Language:
This setting affects the menu language of your receiver. All menu's and messages will be displayed in this language.
Audio: is the preferred audio language. The receiver will automatically switch audio to the preferred language whenever available.
Subtitle: Subtitles will be displayed in the selected language, whenever available.
7.2.1.2 Time Setup:
The Time Setup allows you to set the way the receiver collects and adjusts the time. You can also adjust the Auto Standby function here for an automatic switch to standby after a desired time, to save power. Use ▲▼ to highlight the setting you wish to change and ◀▶ or 0\~9 to change the value of the highlighted setting. Press OK to display a list of all available options, for the chosen setting.
Local Time:
Adjust the correct time zone you are located based on GMT.
Summer Time:
Select OFF or ON to adjust the current setting for summer time.
Date: The date is normally synchronized by satellite signal. If you like to change
another date, press OK to call calendar and use ◀▶ to change date.
Current Time:
The time is normally synchronized by satellite signal. We recommend you not to change time manually, although you can enter another time. Use 0\~9 numeric buttons to enter your time.
Auto Standby:
This is a new, power saving feature that helps you in reducing power consumption. It will switch the receiver to standby mode when no command is given for the set time. Possible settings are: 1, 2, 3, 6, 12, 24 hours and OFF.
Once all settings are made, press EXIT to leave the menu. A confirmation banner will be shown to save your settings.
7.2.1.3 Receiver Information:
This menu contains valuable information about the model number, the software version and our web address www.strong.tv. A customer support agent might ask for the information given in this screen. Press EXIT to leave this menu.
7.2.1.4 User Setup:
Within the User Setup menu you can configure the audio and video outputs of your receiver. Use ▲▼ to highlight the setting you wish to change and ◀▶ to change the value of the highlighted setting. Press OK to display a list of all available options, for the chosen setting.
| Video Output Via: | Use this option to configure your connection to the TV set. Select SCART if you are connect by Scart cable or select HDMI/YUV if you are connect by HDMI or Component cable to TV set. Be aware that HD+ services / channels can only be seen if correct selection is made! |
| Resolution: | If you have selected HDMI/YUV in above, then you can select the resolution of HDMI output. Available options are: 1080i, 720p, 576p and 576i. |
| Aspect Ratio: | If you have selected SCART in above, then you can select the according aspect ratio of your TV set. Available options are: 4:3 and 16:9. |
| Display16:9 Event: | Use this option to set the preferred way of conversion from 16:9 broadcasts in 4:3 TV set. You can choose between the following options: Letter-box (the full 16:9 picture will be displayed on your 4:3 TV set with black bars above and below the picture.), Pan and scan (The centre of the 16:9 picture will be displayed as full-screen on your 4:3 TV set) and Just Scale (Combination of Letter-box and Pan and scan.) |
| SCART Mode: | Select RGB for the best picture quality or CVBS in case your TV doesn't support RGB. In case you have set HDMI/YUV in the above setting, your Scart output will be switched to CVBS automatically. |
| Info banner Timeout: | Defines the time after which the OSD banners time out. Possible settings are: 2~12 seconds. |
| TV List Timeout: | Defines the time after which the TV list time out. Possible settings are: 2~12 seconds. |
| Dolby Digital Option: | Select ON if you using an optical connection to you digital amplifier to enjoy Dolby Digital*, in case the selected channel support this. Select OFF if you not use this option. |
| Subtitle Control: | Use this option to set the preferred way of subtitles support. Select Auto to switch subtitles automatic on if they are available, or select Manual to select ON or OFF. In viewing mode you can press the OPT button to enter this setting. |
Advanced Setup
In User Setup menu you can press the BLUE button to enter the advanced settings. It is strictly recommend not to change any of these settings unless you are absolutely sure and an advanced user.
LNB Power: Allow you to switch OFF or ON power of LNB.
DiSEqC repeat: Repeat command for commit switches (1, 2 and OFF)
Power save Mode: This setting will set the receiver in low power mode during standby in order to reduce standby power below 2 watt. If you select this option to ON be aware that wakeup of your receiver will take more then one minute.
Pre Wakeup (min.): Here you can set the pre wake up time for your receiver if a Timer/recording is configured and you are using the Power save Mode during Standby (3, 4 and 5 min.).
HDCP Setting: To switch ON or OFF the control key for HD screens. If you select OFF will only low video resolution available.
Press OK to confirm and to exit this menu.
7.2.2 Factory Default:
A factory default will reset all settings of the receiver to the factory default. To reset the receiver, you have to enter your PIN code (DEFAULT PIN: 0000) Select Factory Initialization and Press OK. You have to enter your PIN code again to make 100% sure that you want to perform this action.
After the reset, the receiver will start up with the Setup Wizard.
WARNING A factory reset will permanently delete all your personal settings, timers and stored channels. Please consider this before you perform a factory reset.
7.2.3 Lock Setup:
Within the Lock Setup menu you can enable or disable the menu lock function and change the PIN code. Before you can enter this menu you have to enter your PIN code (DEFAULT PIN: 0000). Use ▲▼ to highlight the setting you wish to change and ◀▶ or 0\~9 to change the value of the highlighted setting.
Install Lock: Here you can change the PIN code setting for the access to installation menu. Select ON if you like to protect entering Control panel menu with PIN code. Select OFF to disable this function.
Parental Lock: Select ON if you want to switch on the protection of channels with LOCK sign. Select OFF to disable this function.
New PIN code: Use this function to set your own personal PIN code. Enter here your new PIN. Confirm PIN code: Enter here again the new PIN code to confirm. A successful change of PIN is confirmed by an on screen message.
Use EXIT to go back to the previous menu.
7.3 CAS
SMART CARD
In this Nagra CAS menu you can read the details form your HD+ smart card and can change the PIN code from this Smart card.
Find below Smart Card Information all details as Subscribed date and Smart Card serial number. This information show you if card is still active and if you need to call the Call centre of HD+ to activated it again.
Press OK to open Change CA PIN menu. Enter with the numeric buttons 0\~9 first default PIN code (0000) of 4 digits. Enter now your new PIN and confirm again PIN. A successful change of PIN is confirmed by an on screen message.
Use EXIT to go back to the previous menu.
⚠ WARNING Please be aware, that the CA PIN is the PIN from your Smart Card, changing it has nothing to do with receiver PIN code!
7.4 Multimedia
The Multimedia menu allows you to see detail information of your connected USB device, handle your records and give you access to your music and pictures on USB device. It consists of the following sub-menus: USB info & Format, Record Manager and Music & Photo Player. Choose the desired sub menu with
▲▼ and press OK to advance.
7.4.1 USB Info & Format:
The USB Info & Format menu displays all details from the connected USB storage device. It contains information about the storage capacity and about the current free space for new recordings.
If you want that all functions are fully supported, as Jpeg and MP3 play back, ensure that either the USB device is already formatted in FAT or FAT32 system on your computer. When you are going to use it only for record and playback, we recommend you to format it to E2FS (Linux file system) in this menu for the best performance of record and playback.
Use ▲▼ to select HDD Format (E2FS) and press OK button to start formatting of the connected USB device.
To safely remove the external USB storage device press the GREEN button. Use EXIT to go back to the previous menu.
⚠ WARNING The Format function will delete all records, data and information from your
USB device. STRONG will not take any responsibility for damaged or lost data on the USB device. Please make a backup copy of important data on your USB device before you are going to use it with your receiver.
Please be aware that formatting in Linux file system will have the consequence that Windows will not recognise such an USB device anymore. If you want to use your E2FS formatted USB storage device under Windows we recommend you to use tools available in the WWW, for example the program: Ext2 Installable File System.
7.4.2 Record Manager
The Record Manager can be used for the playback of previously recorded programs, to delete, rename and lock them.
Use ▲▼ to select a file in this folder. Press OK to start the playback of the desired recording. Press INFO during playback to see details form this record. If you have already watched this recording, then there will be a message displayed to ask you if you want to start the playback from the beginning, or if you want to start from the point you stopped watching before.
⚠ WARNING HD+ channel recordings are limited in playback concerns. If this limit has
passed an HD+ message appears on your screen. Then this file can not be watched anymore and you can delete it to get free space for new recordings. Your smart card must be valid to watch HD+ recordings, otherwise it will fail.
Press the RED button to delete a selected recording from your USB device.
Press the GREEN button to rename the recording.
Press the YELLOW button to lock the recording with the PIN code. Afterwards you will need to enter this PIN code to watch or delete the recording.
7.4.3 Music & Photo Player
In the Music & Photo Player menu you can navigate on your USB device to choose JPEG photos or MP3 music files.
Use ▲▼ to select a file or a folder. Press OK to mark a selected MP3 or JPEG and press ▶ to start playback/ show this file.
Press the RED button to select all MP 3 and JPEG in the folder or route. Use ▲▼ and press OK to select / unselect single files.
Press the GREEN button to add selected or all files into the My Media list.
Press the YELLOW button to set Slide show or set MP3 repeat, depending on what you want to watch or hear.
Press the BLUE button to start play back from My Media list.
During playback, the following functions are available:
■ starts playback of the next MP3 / Jpeg.
■◀ starts playback of the previous MP3 / Jpeg.
■ Press || to pause the playback. Press || again to resume playback.
- starts playback of the next MP3 / Jpeg.
- starts playback of the previous MP3 / Jpeg.
- Press II to pause the playback. Press II again to resume playback.
■ stops playback.
■ starts playback of the next Jpeg.
■ starts playback of the previous Jpeg.
■ Press EXIT or ■ to get back to the menu.
Note: STRONG can not guarantee play back of every JPEG format size or MP3 sample rate.
7.5 Program Guide
The Program Guide menu allows you access (EPG) Electronic Programme Guide and to set Timers for wakeup and/or recording.
Choose the desired sub menu with ▲▼ and press OK to advance.
7.5.1 EPG
The Electronic Programme Guide is a very useful function that allows you to watch programme schedules and information on screen and to mark programs for recording. Find all detailed descriptions in chapter 6.6 EPG

Note: Availability of EPG data depends on the broadcaster.
7.5.2 Timers
Timers can be used to schedule recordings or to switch to a certain channel at a desired moment. It will help you not to miss your favourite events. You can set up to 30 Timers.
Use ▲▼ to select one of the available timers. Press OK to advance. The Edit Timer screen will now be displayed.
Use ▲▼ to switch between settings and ◀▶ or 0\~9 to adjust the value of a setting.
Type: Choose between View, Record or None.
Channel: Press OK to display the channel list and use ▲▼ to select the wished channel for this action.
Press TV/RAD button to switch between TV channel and Radio channel list.
Confirm highlighted channel with OK button.
Title: Press OK if you want to give the Timer another name as "Manual Timer xx". Use the displayed keypad for insertion.
Repeat: Choose between Once, Daily, Weekly, Weekdays or Weekend.
Date: With repeat set to Once: press OK to display the calendar. Use ▲▼◀▶ to pick the date for the recording and confirm it with OK. Then press EXIT to apply the date to the Timer setting.
With Repeat set to Weekly: Use ◀▶ to select the day of the week, at which you want the timer to start.
Time: Press OK and use the ◀▶ or OK and ▲▼ to choose the hour. Use ▲▼
buttons to enter the minute ◀▶ or OK and ▲▼ to choose the minute. Press EXIT to leave the setting.
Duration: Use the 0\~9 buttons to digit the duration of the timer if you have selected Record.
Once all settings are made, Press RED Save button to store these settings and press EXIT to leave the Timer menu.
Delete a timer
In order to delete a set timer, select it with ▲▼ and press OK to select. Press BLUE Delete button to delete and confirm with OK.
8.0 OTA SOFTWARE UPGRADE
OTA automatic
The OTA (Over the Air) function automatically takes care that your receiver check if the latest software is loaded.
Every time your receiver is switched to standby the OTA function will check for an improved software version.
After detection of a newer version, your receiver will display a message, after you switched it ON again. Then you can download the new SW version. You can select OK to start the update immediately, or you can select Cancel to start next time. Be aware that download takes around 20 minutes. You can skip the update process only for five times, afterwards a forced download will be started.
WARNING
NEVER power off the receiver or pull the mains plug during the software upgrade process. Doing so might cause irreparable damage to your receiver and will void your warranty.
A.1 TROUBLESHOOTING
There may be various reasons for abnormal operation of the receiver. Please check the receiver according to the procedures as explained below. If the receiver does not work properly after checking it, please contact your local Service line or STRONG dealer. Alternatively you can send a support mail via our website: www.strong.tv. NEVER open or disassemble your receiver. This may cause a dangerous situation and will void the warranty.
| Symptom Cause | Remedy | |
| The display on front panel does not light up. | The power cord /adapter is not plugged in. | Check that the power cord is plugged in to the wall outlet. Make sure power adapter is connected correctly on the rear panel. |
| No picture or sound Wrong connection or setting of the Audio/Video output. | Connect the Audio/Video output of the receiver correctly to the TV set and check the settings in the menu Control Panel > System Setup > User Setup. | |
| TV is powered off.Wrong Input selected. | Turn TV on.Select the correct TV Input. | |
| No Signal/ No picture The receiver can't receive the signal. | Check the antenna cable, replace the cable, or connect the cable to the receiver tightly. | |
| Wrong direction of the dish. Check the signal with an appropriate equipment and adjust your dish correctly. | ||
| No access to pay per view services | Payment expiredSmart Card not correct inserted.Wrong smart cardTuned to pay TV service which is not supported by your used smart card | Check your access data in CAS menuCheck if your card is correct inserted.Check with you local dealerCheck if card match to the service. |
| The remote control does not work | The batteries of the remote control are not inserted, wrongly inserted or exhausted. | Check whether the batteries are inserted correctly or exhausted, if so replace the batteries in the remote control. |
| The USB storage device is not working properly. | Wrong formatted.Device speed not sufficient. | Format USB device by receiver in menu Multimedia>USB Info & Format.Check if USB 2.0 device is connected. |
| The external USB HDD does not start. | Power consumption is too high. Connect an extra power supply adapter to your USB HDD device. | |
| The receiver switches to STBY automatically. | Auto Power Down function is activated and reached the adjusted time (default 3h). | In the menu Control Panel > System Setup > Time Setup you can adjust the Auto Standby time. |
A.2 SPECIFICATIONS
Demodulator
Demodulation: QPSK, 8PSK
Input symbol rate: DVB-S QPSK: 1 \~ 45 Ms/s
DVB-S2 8PSK/QPSK: 10\~30 Ms/s
FEC decoder: Auto, 1/2, 2/3, 3/4, 5/6, 7/8 in DVB-S mode
1/2, 3/5, 2/3, 3/4, 4/5, 5/6, 8/9, 9/10 in DVB-S2 mode
3/5, 2/3, 3/4, 5/6, 8/9, 9/10 in 8PSK mode
Video Decoder
Profile level: MPEG-2 MP@ML, MP@HL, MPEG-4 H.264/AVC
Input rate: Max. 90 Mbit/s
Aspect ratio: 4:3 and 16:9, Pan & Scan, Letterbox
Frame rate: 25 Hz
Video resolution: 576i, 576p, 720p, 1080i
Audio Decoder
Audio decoding: MPEG-1 Layer 1 & 2, Dolby Digital*, Dolby Digital Plus
Audio mode: Stereo, Dual Mono, Joint Stereo, Mono, AC3
Sampling rate: 32, 44.1, 48 kHz
* Dolby is a registered trademark of Dolby Laboratories
Tuner
Type1 F Type, IEC169-24, Female
Input frequency range: 950 \~ 2150 MHz
RF impedance: 75 Ohm unbalanced
Signal level: -65 to -25 dBm
LNB power: 13.5/18 V DC (+/- 5%), max. 0.5 A, overload protected
DiSEqC versions: V1.0, V1.2, GOTO X
System & memory
Main processor: BCM7325 (Broadcom)
Flash memory: 16 Mbytes
System memory: 256 MBytes
Multimedia
Audio playback MP3 format
Picture view JPEG format
STRONG can not guarantee play back of every JPEG format size or MP3 sample rate.
Connectors
SAT IN
HDMI 1.3
TV SCART (RGB, CVBS, Audio L&R)
3 RCA (Audio L&R and Video CVBS)
Component Y&Pb&Pr
S/PDIF optical
USB 2.0
DC Power jack (input: 12 V DC, max. 4A)
General Data
Supply voltage: 100 - 240 V AC @ 50/60 Hz ± 5 %, max.1.1 A
Power consumption: max 30 W, typ. 13 W (without external device)
Power consumption in stand-by: 1.30 W (without external device)
Operating temperature: +5 \~ +35 °C
Storage temperature: -20 \~ +60 °C
Operating humidity range: 25 \~ 75 % RH, non-condensing
Size (W x D x H) in mm: 265 x 190 x 45
Weight: 0.90 kg
EAN code SRT 7805: 8717 185 445 398


- TABLE OF CONTENTS
- INTRODUCTION 2
- YOUR RECEIVER 4
- CONNECTIONS 5
- STARTING UP FOR THE FIRST TIME 6
- QUICK GUIDE TO USING YOUR RECEIVER 7
- OPERATION 7
- MENU 9
- OTA SOFTWARE UPGRADE 15
- A.1 TROUBLESHOOTING 16
- A.2 SPECIFICATIONS 17
- Safety Instructions
- DO NOT INSTALL YOUR RECEIVER:
- DO NOT EXPOSE THE RECEIVER OR ITS ACCESSORIES:
- Safety Precautions
- Storage
- Equipment Set-up
- Accessories
- Usage of external USB devices
- General Information
- HD PLUS
- DOLBY
- YOUR RECEIVER
- DEFAULT PIN-CODE: 0000
- Front Panel
- Rear Panel
- Remote Control Unit
- CONNECTIONS
- Basic connection using a Scart cable
- Basic connection using an HDMI cable
- Connecting multiple fixed dishes using a DiSEqC 1.0 switch
- STARTING UP FOR THE FIRST TIME
- Language selection
- Location selection
- Output selection
- Channel installation
- First activation of your HD+ smart card
- QUICK GUIDE TO USING YOUR RECEIVER
- OPERATION
- Changing channels
- Direct access
- Channel list
- APS Channel list
- Info Banner
- Audio language and Audio mode
- Teletext and Subtitles
- HDMI video format
- EPG (Electronic Programme Guide)
- Recording
- Time shift
- Playback of recording
- MENU
- Channel Setup
- Channel Scan
- Search Start:
- Select Search Start and press OK.
- Channel Editor
- Control Panel
- System Setup
- Language Setup:
- Time Setup:
- Receiver Information:
- User Setup:
- Advanced Setup
- Factory Default:
- Lock Setup:
- CAS
- SMART CARD
- Multimedia
- USB Info & Format:
- Record Manager
- Music & Photo Player
- Program Guide
- EPG
- Timers
- Delete a timer
- OTA SOFTWARE UPGRADE
- OTA automatic
- WARNING
- A.1 TROUBLESHOOTING
- A.2 SPECIFICATIONS
- Demodulator
- Video Decoder
- Audio Decoder
- Tuner
- System & memory
- Multimedia
- Connectors
- General Data
Brand : STRONG
Model : SRT 7805
Category : Digital decoder