
DVL-2253 - Television LENCO - Free user manual and instructions
Find the device manual for free DVL-2253 LENCO in PDF.


| Product Type | 22-inch LED TV with DVD player and DVB-T tuner |
| Screen Size | 22 inches (55 cm) diagonal |
| Resolution | 1920 x 1080 pixels (Full HD) |
| TV System | PAL B/G/D/K, SECAM L/L', DVB-T |
| Audio Output | 2 x 3W stereo speakers |
| Power Supply | 12V DC, 5A (adapter included) |
| Power Consumption | 60W (typical) |
| Antenna Input | 75 Ohm coaxial (unbalanced) |
| Connectivity | HDMI, VGA, SCART, USB (for firmware update), CI slot, coaxial audio output, headphone jack, composite video, YPbPr, PC audio input |
| DVD Player | Built-in slot-loading DVD player; supports DVD, SVCD, VCD, CD, HD-CD, WMA, JPEG, Digital Audio |
| Remote Control | Full-function remote with dedicated DVD buttons and teletext controls |
| Menu Languages | Multiple languages (user-selectable) |
| Teletext | Support in ATV mode; also DVB subtitles |
| Parental Control | System lock, child lock, key lock, parental rating (DVD) |
| Accessories Included | Remote control, power adapter, user manual, quick start guide |
| Cleaning | Use a soft dry cloth; do not use solvents or petrol-based fluids |
| Safety | Do not expose to rain or moisture; unplug during lightning storms; do not block ventilation |
| Dimensions (Approx.) | 50 x 35 x 10 cm (width x height x depth without stand) |
| Weight (Approx.) | 3.5 kg (without stand) |
Frequently Asked Questions - DVL-2253 LENCO
User questions about DVL-2253 LENCO
0 question about this device. Answer the ones you know or ask your own.
Ask a new question about this device
Download the instructions for your Television in PDF format for free! Find your manual DVL-2253 - LENCO and take your electronic device back in hand. On this page are published all the documents necessary for the use of your device. DVL-2253 by LENCO.
USER MANUAL DVL-2253 LENCO
22” (55cm) LED TV with DVD & DVBT
Model No.: DVL-2253 BLACK
natural_image
Line drawing of a flat-screen computer monitor with a circular base (no text or symbols)Read all of the instructions before using this TV and keep the instruction manual in a safe place for future reference.
Contents
1-3 SAFETY INFORMATION
Unit4
5-6 Remote Control
7 Aerial connection
8-11 Connecting external devices
12 Common Interface slot
13 Auto installation setup
14 Source menu
15-22 Menu settings
DVD Operation23-29
30 TROUBLE SHOOTING GUIDE
31 TECHNICAL SPECIFICATIONS
SAFETY INFORMATION
IMPORTANT SAFETY INSTRUCTIONS - READ CAREFULLY BEFORE USE.
Take note of the following safety information which appears on the back of the TV.

CAUTION TO PREVENT ELECTRICAL SHOCK, DO NOT REMOVE ANY COVER SCREWS, NO USER SERVICEABLE PARTS INSIDE, REFER SERVICING TO QUALIFIED SERVICE PERSONNEL.

This symbol indicates that there are important operating maintenance instructions in the literature accompanying this unit.

This symbol indicates that dangerous voltage constituting a risk of electric shock is present within this unit.
Keep these instructions
• Do not use this TV near water.
• Clean only with a slightly damp cloth.
- Do not block any ventilation openings.
• Install in accordance with the supplied Quick Start Guide and this User Guide.
- Protect the power chord from being walked on or pinched, particularly at plugs, and the point where it exits from the TV.
- Do not allow the power chord to overhang the edge of a table.
- Unplug this TV during lightening storms or when unused for long periods of time.

WARNING! TO REDUCE THE RISK OF FIRE OR ELECTRICAL SHOCK, DO NOT EXPOSE THIS TV TO RAIN OR MOISTURE. THE TV MUST NOT BE EXPOSED TO DRIPPING AND SPLASHING AND NO OBJECTS FILLED WITH LIQUIDS SHOULD BE PLACED ON THE TV.
NOTE: No naked flames such as candles should be placed on the TV.
IMPORTANT SAFETY INFORMATION (Continued)
This unit has been produced according to all current safety regulations. The following safety tips should safeguard users against careless use and the dangers connected with such use.
- Although this appliance has been carefully manufactured and rigorously checked prior leaving the factory, as with all electrical appliances it is possible for problems to develop. If you notice smoke, an excessive build up of heat or any other unexpected phenomena, you should disconnect the plug from the mains power socket immediately.
- Ensure that the unit is sufficiently ventilated! Never place next to or underneath curtains!
- The mains plug or appliance coupler is used as the disconnect device, the disconnect device shall remain readily operable.
- This set should only be connected to a mains power supply which matches that stated on the label on the rear of the TV – do not attempt to connect it to any other type of supply.
- The socket – outlet must be installed near the equipment and easily accessible.
- To prevent overload, don't share the same mains supply socket with too many other items of equipment.
- Apparatus with Class 1 construction shall be connected to a mains socket outlet with a protective earthing connection.
- Keep away from rodents. Rodents enjoy biting into electric flexes.
- Always hold the plug when pulling out the plug from the mains supply socket. Do not pull on the flex, the flex can become overloaded and cause a short circuit.
- Set up the unit so that no one is able to trip over the flex.
- Do not place heavy items on the flex, which may damage it.
- Take note that the flex cannot be reached and pulled by young children, avoiding injury.
- Do not set up the unit near to heat sources. The casing and the flex could be damaged by the impact of heat.
- The screen is made of plastic and can break if damage is done to it. Be careful when collecting sharp edged plastic splinters to avoid injury.
- Avoid placing the unit on any surfaces that may be subject to vibrations or shocks.
- To protect the unit during a thunderstorm unplug the AC power cable and disconnect the aerial. Caution: Do not touch the aerial (RF) connector.
- When you leave your home for long periods of time, unplug the AC power cable for safety reasons.
- The unit becomes warm when in operation. Do not place any covers or blankets on the unit in order to prevent overheating. The ventilation holes are not to be blocked. Do not set up near radiators. Do not place in direct sunshine. When placing on a shelf leave 5 cm (2") free space around the whole unit.
- Do not allow water or moisture to enter the TV. Do NOT use in wet or moist areas such as Bathrooms, steamy kitchens or near swimming pools.
- Do not use this unit when moisture condensation may occur
- Any repairs must be carried out by qualified personnel only.
- Do not open this unit. A non-expert attempting to repair the unit could be dangerous and potentially cause a fire hazard.
IMPORTANT SAFETY INFORMATION (continued)
- Liquids spilt into the unit can cause serious damage. Switch the set OFF and disconnect the mains power supply, then consult a qualified service person before attempting to use the unit again.
- Do NOT remove the safety covers. There are no useable or serviceable parts inside. You may invalidate the warranty. Qualified personnel must only service this apparatus.
- Do NOT tap or shake the screen, you may damage the internal circuits. Take good care of the remote control, do not drop.
- Never place hot objects or open flame sources on or close to the TV.
• High temperatures can melt plastic and lead to fires. - To clean the TV use a soft dry cloth. Do NOT use solvents or petrol based fluids. For stubborn stains, you may use a damp cloth with dilute detergent.
Headphone Warning
Loud music can damage your hearing irreversibly, therefore do not set the volume to a high level when listening through headphones, particularly for lengthy listening periods.
Where to install
Locate the television away from direct sunlight and strong lights, soft indirect lighting is recommended for comfortable viewing. Use curtains or blinds to prevent direct sunlight falling on the screen. Place the TV on a sturdy platform of which the surface should be flat and steady. This will prevent it from falling over.
Make sure the television is located in a position where it cannot be pushed or hit by objects, as pressure will break or damage the screen, and so that small objects cannot be inserted into the ventilation slots or openings in the cabinet.
Unit and Accessories
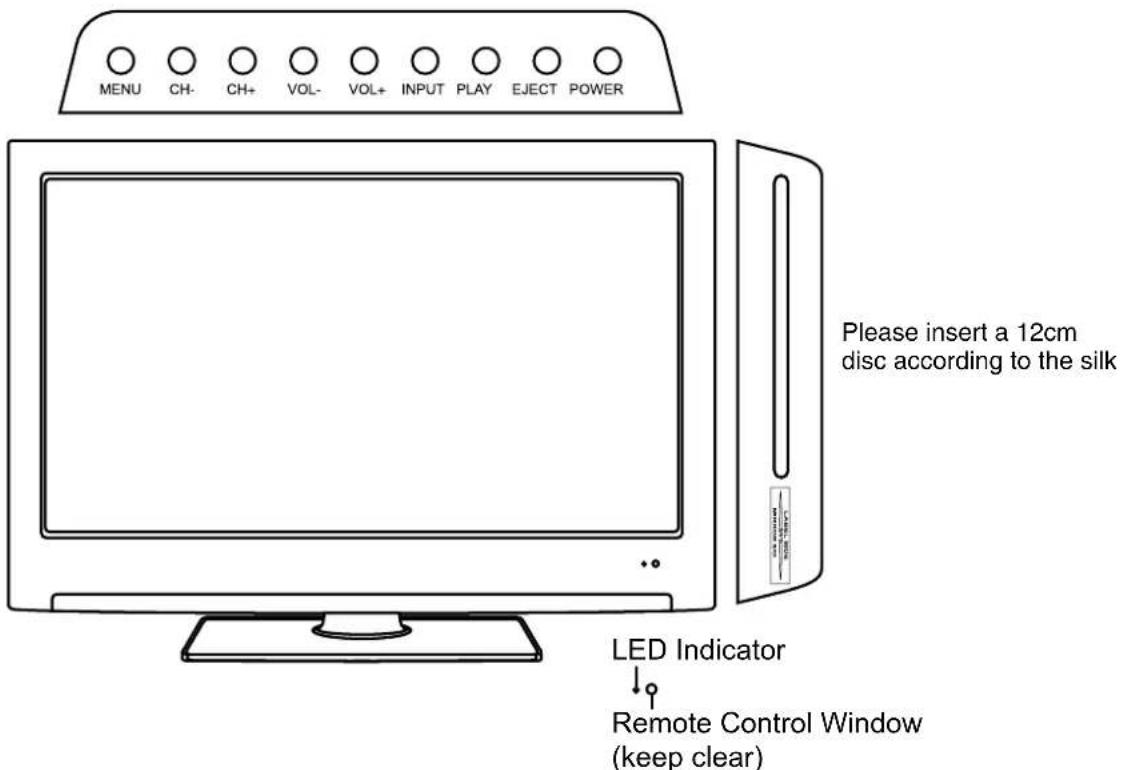
The functions of the TV buttons are described below.
MENU Press to display the OSD menu, Press again to exit the menu. :
CH-/CH+: Press to scan through channels.
They are also can be used to move down/up in the OSD menu screen.
VOL-/VOL+: Press to adjust the volume.
They are also can be used to move left/right in the OSD menu screen.
VOL+ button can be used to skip forward to next menu.
INPUT: Press to select the source.
PLAY: Play / Pause the disc playing.
EJECT: Eject the disc.
Power: Turn on/off the TV set.
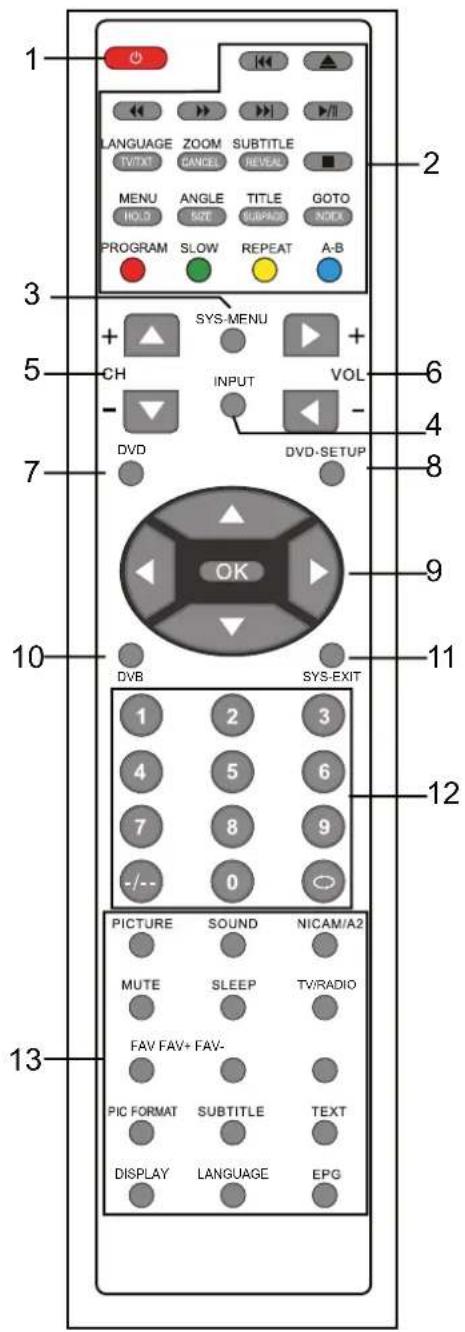
Remote control
-
POWER: Turn the TV on/standby.
-
buttons for DVD operation
▲ : Load/eject DVD disc
▶ : Play/pause DVD program
■ : Stop DVD program
: DVD fast reverse
▶ : DVD fast forward
: DVD previous chapter
▶ : DVD next chapter
- buttons for DVD operation
LANGUAGE: Select DVD disc language
ZOOM: Adjust picture size in DVD mode
SUBTITLE: Turn on/off the DVD subtitle display
MENU: DVD play list/Disc menu
ANGLE: Select DVD picture angle
TITLE: DVD title
GOTO: DVD search, Tracks or Chapters
PROGRAM: Edit the program and play
SLOW: play DVD programs at slow speed
REPEAT: Play the title or chapter once again
A-B: Select and play the preferable paragraph of DVD program by pressing this key twice at the beginning and end of it.
- buttons for TELETEXT(In ATV mode)
TV/TXT: Teletext on/off
CANCEL: Turn off the Teletext display
REVEAL: Reveal any hidden text, for example-quiz answer
HOLD: Hold or carry on the current subpage
SIZE: Press to see top half of page double size, Press again to see the bottom half of page double size, Press again for normal size
SUBPAGE: press to subpage, again to cancel.
INDEX: go to index.
Colour buttons: short cuts-follow the coloured links in the text.
(In DTV mode, press red key to switch between TV and radio. Green key, yellow key and blue key are invalid.)
-
SYS-MENU: System setup menu.
-
INPUT: Press to display the input source menu.
-
CH+/-: Scan through channels.
-
VOL+/-: Adjust the volume.
-
DVD: switch to DVD
-
DVD-SETUP: DVD system setup
-
Cursor left/right up/down: Cursor buttons used in menus.
OK: CONFIRM BUTTON for menu.
Remote control (continued)
-
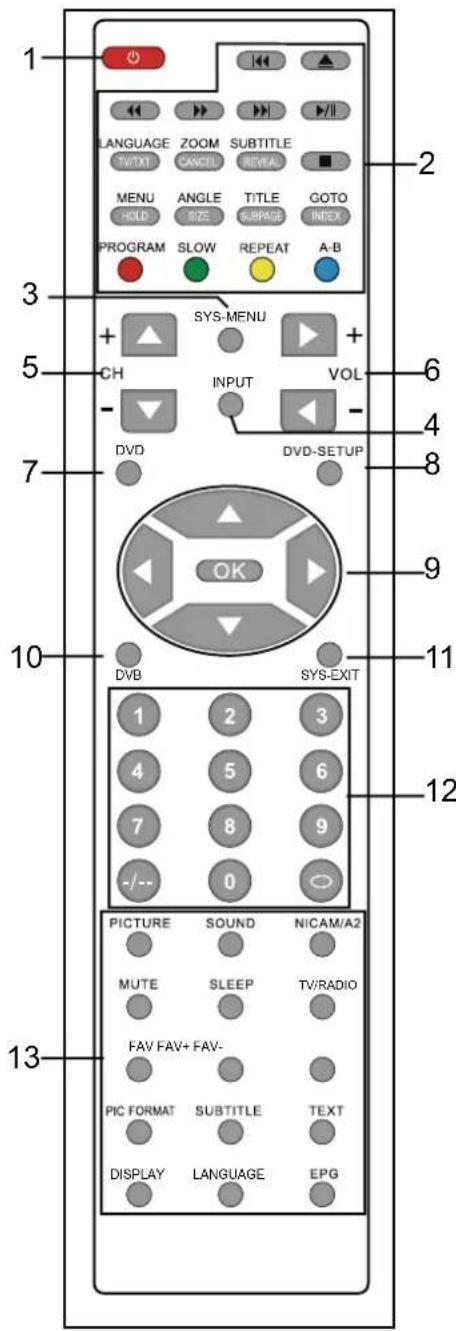
DVB: switch to DTV
-
SYS-EXIT: Exit the OSD menu.
-
0-9,-/--
Choose channel directly. Number buttons for DVD.
O
Returns to the previous channel.
13.
PICTURE: Select the picture mode.
SOUND: Select the sound mode.
NICAM/A2: Selects Nicam or Mono sound.
MUTE: Mutes the Audio.
SLEEP: Standby Timer
TV/RADIO: Disc menu change between TV and Radio.
Buttons for DTV function
FAV: Display the favorite program list.
FAV+/-: Favorite program up/down.
PIC FORMAT: Press to change the display mode of the screen: 4:3, 16:9.etc
SUBTITLE: To switch the dialogue at the bottom of the screen.
TEXT: To view the teletext broadcasting program.
DISPLAY: Display current mode information.
LANGUAGE: To select audio language.
EPG: To show the Electronic Program Guide during no-menu state only.
Aerial connection
WARNING! ENSURE THE TV AND ALL ANCILLARY EQUIPMENT IS UNPLUGGED FROM THE MAINS BEFORE MAKING ANY CONNECTIONS!
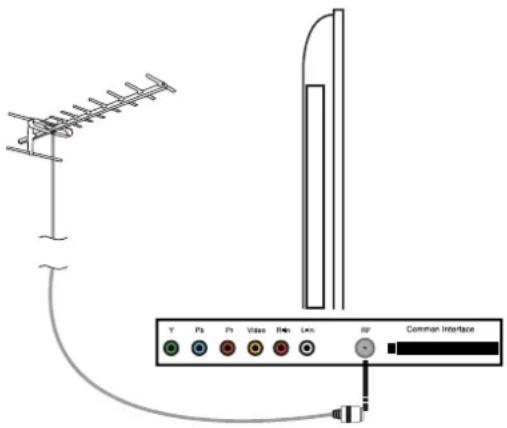
Connecting the TV Antenna
Connect the TV antenna to the aerial socket with a 75 ohm co-axial plug. For best results use a high gain TV aerial, preferably roof or loft mounted.
- To improve picture quality in a poor signal area, purchase and install a signal amplifier.
- If the antenna needs to be split for two TVs, use a 2-Way Signal Splitter (not supplied).
Connecting external devices
This instruction manual shows the simplest and most effective way of connecting your TV to ancillary equipment. Alternate methods are listed below.
HDMI Lead
You can connect this TV to a compatible device using a HDMI lead. This method will give the best picture.
Connect the cable from the HDMI equipment to the TV HDMI socket.
SCART Lead
You can connect this TV to a compatible device using a SCART lead. The connection uses component video signals, i.e. the red, green and blue (RGB) content of the video are sent on separate signals.
VGA Cable
You can use your TV as a monitor for your personal computer by using a VGA cable. Sound from your personal computer may also be played through the TV.
Connecting external devices (continued)
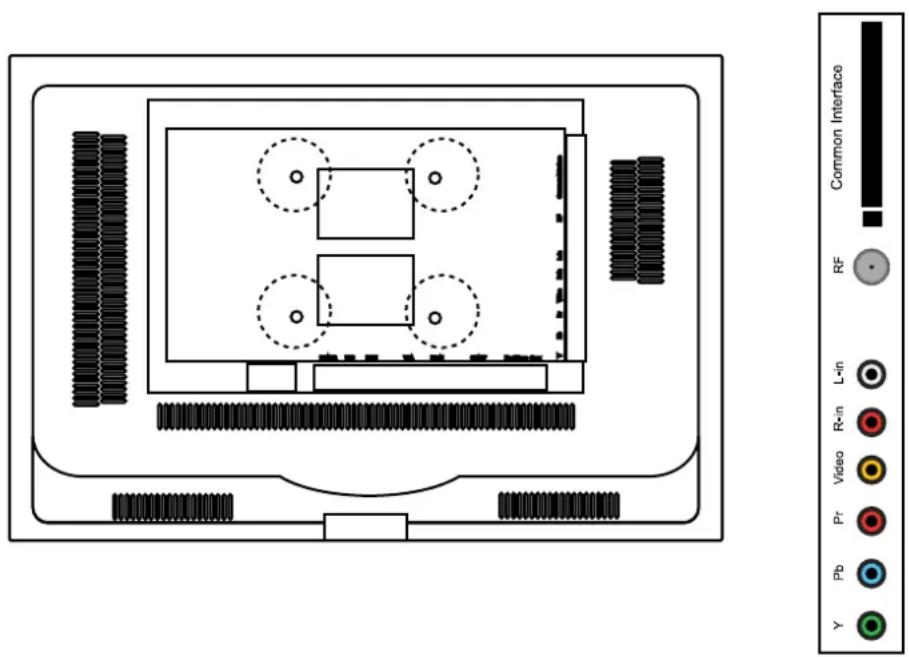

POWER: Connect to the mains adaptor.
USB: For DVB-T software upgrade only.
HDMI: Connect it to the HDMI of DVD or other equipment.
VGA: For PC display. Connect it to the D-Sub 15 pins analog output connector of the PC.
PC-IN: Connect it to the audio output terminal of PC.
SCART: Connect them to the SCART video output terminal of DVD.(used in component source)
Headphone: Connect it to your headphone or other audio equipment.
Coax: DVD coaxial output.
Common Interface: CI slot.
RF: Connect antenna or cable 75 Ohm coaxial to receive TV signal.
R/L in: Connect them to the audio output terminal of DVD.(shared with YPbPr)
VIDEO: Connect it to video output terminal of DVD.
YPbPr: Connect them to the YPbPr video output terminal of DVD.(used in component source)
Caution:
Before connecting external devices:
- Makes sure to disconnect the appliances from the power supply in order to avoid any potential damage from occurring.
• Make sure to establish the required connection. - Make sure that the connectors are properly and correctly attached before connecting the appliances to the power supply.
Connecting external devices (continued)
PC connection
As PCs are sometimes still supplied with a ‘conventional’ CRT monitor, you may need to adjust the display settings of your PCs graphics card, otherwise the pictures may not appear correctly. Switch on your PC (still with your original monitor connected) now select the screen resolution, and select 60Hz refresh rate. Switch off your PC, then connect it to your TV while both appliances are still switched off.
VGA, HDMI PC Connection
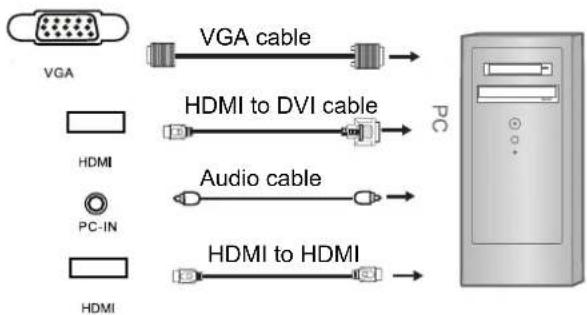
Use a PC-VGA cable (not supplied) to connect the TV to your PC. You can also use an HDMI cable to connect to your PC (if your PC Graphic card supports HDMI). When the HDMI cable is used, the PC audio cable is no longer required. If you use the HDMI to DVI cable, you will need to use the PC audio cable. Connect all cables carefully and do not bend or break the connector pins.
When using the VGA cable
- Switch on the TV
- Switch on the PC
- Select PC/VGA as input source
When using the HDMI cable
- Select HDMI as input source
flowchart
graph LR
    A["VGA"] -->|VGA cable| B["PC"]
    C["HDMI"] --> D["PC-IN"]
    E["HDMI"] --> F["HDMI"]
    G["HDMI to DVI cable"] --> H["PC"]
    I["Audio cable"] --> J["PC-IN"]
    K["HDMI to HDMI"] --> L["PC-IN"]
( All illustrated cables are not supplied)
Connecting external devices (continued)
Connecting Video camera and Video recorder
Video camera
- Connect the AV cable to the TV and to the video camera.
• Turn on both video camera and the TV. - Select AV/CVBS source
• You can now see the playback picture from the video camera.
Note:
- To connect the video camera using other cables, refer to the video camera instruction manual.
Video recorder
- Connect the Scart cable to the TV and video recorder.
• Turn on both video recorder and the TV. - Select Scart source
• You can now see the playback picture from the video recorder.
Note:
- To connect the video recorder using other cables, refer to the video recorder instruction manual.
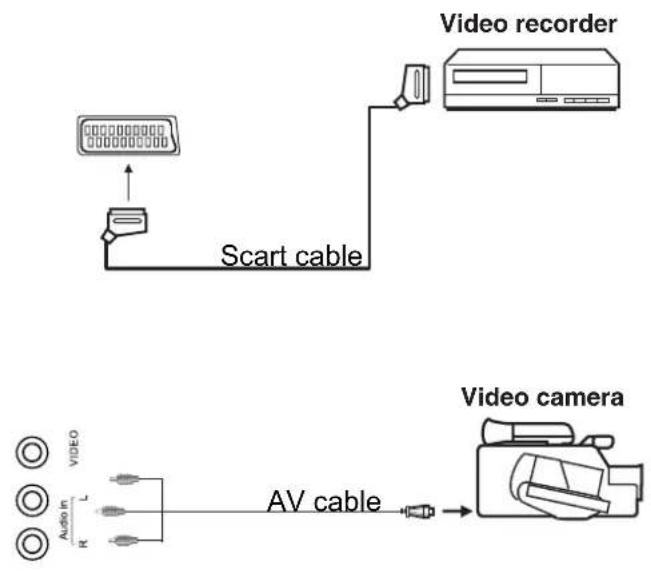
(All illustrated cables are not supplied)
Connecting external devices (continued)
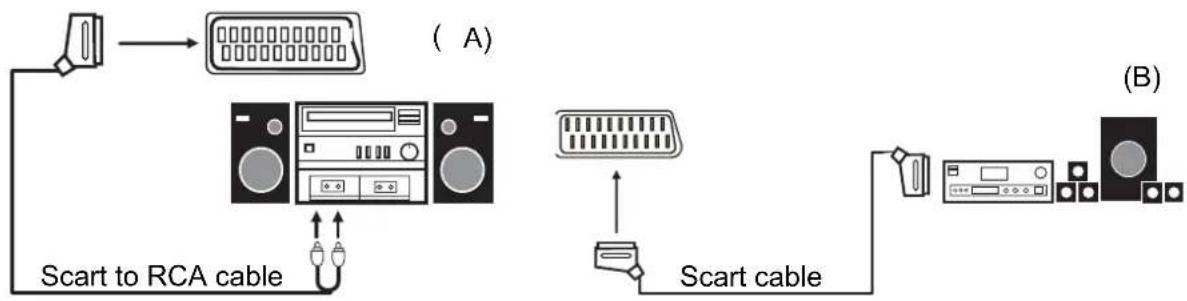
Connecting an audio system
You can supply the TV sound to the stereo system (A) with the Scart socket. Use a special scart cable SCART to RCA. (Please consult your hi-fi instructions for details). If you have a surround sound amplifier/decoder (B) Use the Scart cable or the special scart cable Scart to RCA.
flowchart
graph TD
    A["Device"] --> B["Switch to RCA cable"]
    B --> C["Radio Cable Interface"]
    C --> D["Scart Cable"]
    D --> E["Audio System"]
    style A fill:#f9f,stroke:#333
    style B fill:#ccf,stroke:#333
    style C fill:#cfc,stroke:#333
    style D fill:#fcc,stroke:#333
    style E fill:#ffc,stroke:#333
(All illustrated cables are not supplied)
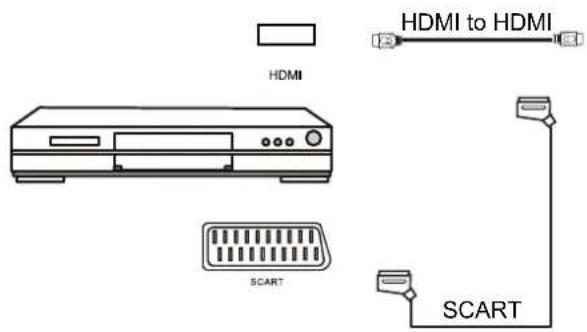
Connecting a DVD player
Connect a DVD player using either a SCART cable or the HDMI cable. (only if your external equipment supports HDMI).
(All illustrated cables are not supplied)
When using the SCART cable
- Switch on the TV
- Switch on the DVD player
- Select SCART as input source
When using the HDMI cable
- Select HDMI as input source
Common Interface Slot
USING YOUR COMMON INTERFACE SLOT
Common Interface
The Common Interface (CI) slot is designed to accept the Conditional Access Module (CAM) and Smart Card in order to view the pay TV programmes and additional services. Contact your Pay Per View TV service provider to get more information about the modules and subscriptions.
NOTE: Conditional Access Module and Smart Cards are sold separately.
WARNING! SWITCH OFF YOUR TV BEFORE ANY MODULE IS INSERTED INTO THE COMMON INTERFACE SLOT, THEN ADD THE SMART CARD TO THE CAM.
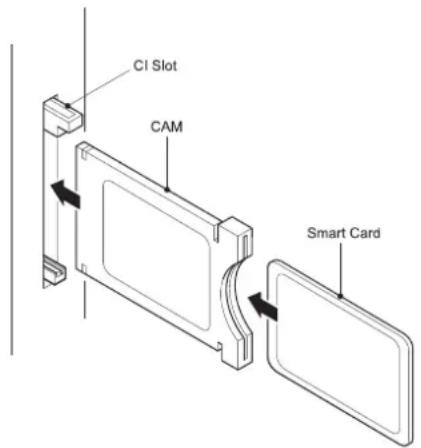
- Turn on the TV and ensure 'DTV' Source is selected.
- If the CAM is detected the TV will display the following message on the screen. "Common Interface Module inserted" wait for a few moments until the card is activated.
- Select the relevant digital Pay Per View channel.
- Detailed information on the Smart Card in use is displayed
- Press the Ok button to access the card menu. Refer to the Module Instruction Manual for setting details.
- When the module is removed, the following message will appear on the screen. "Common Interface module removed".
Auto installation setup
Power On / Off the LCD TV
- Connect to the power supply with a power code and an adaptor.
- -To turn on the TV
Press POWER button on the TV or remote control.
-To turn off the TV
Press POWER button on the TV or remote control.
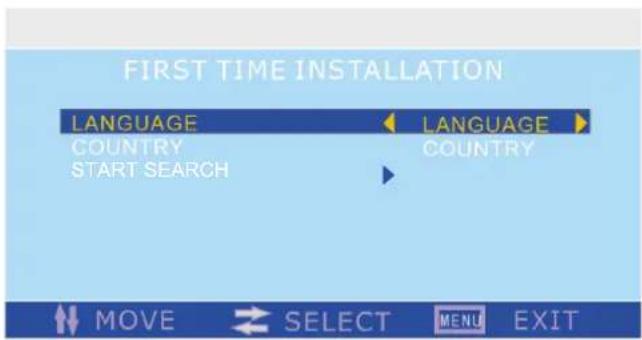
When you initially turn on the LCD TV you will see the first time installation menu as below:
Ensure that the aerial is plugged in to the TV, Make sure your Remote is in TV mode (by pressing INPUT button), switch on the TV by pressing POWER. You will see the first time installation menu.
You can select "Country" and "Language" (OSD display language), and select the contents of the Auto Search (Analog Program or Digital Program) according to the hints at the bottom.
When you finished, press ▲/▼ button to select "OK", and press OK button to start auto search. The TV will start searching from the lowest frequency (you can press MENU to cancel the auto search.). When it finds a station, it will automatically store this in the first location and move to the next. When Autosearch is complete, the TV will display the first station found. If you want to change the order of the programs, you can use the "Program Edit" function to change.
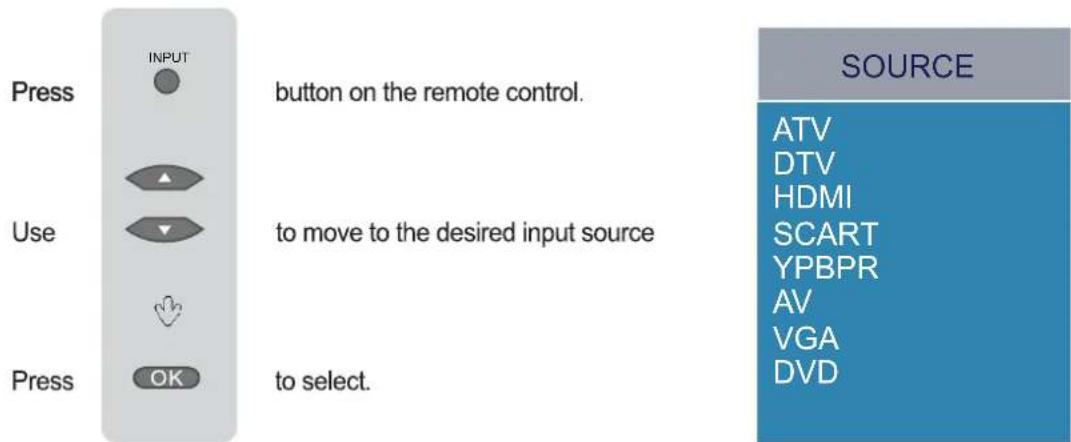
Source Menu
You can select the input source menu by pressing the Source button on the remote control or the INPUT button on the LCD TV.
Menu Settings
- Turn the LCD TV on.
- Press the MENU button on the Remote Control.
- Use the ◀ and ▶ buttons to navigate through the menu.
- Press the EXIT button to exit the Menu.
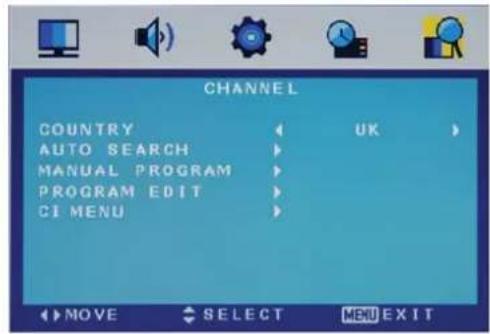
CHANNEL MENU
Allows you to search channels and set up a variety of channel options. (Select DTV source for example)
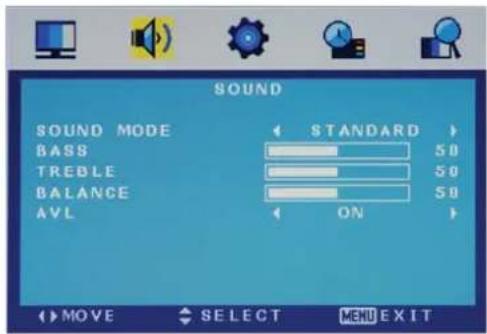
SOUND MENU:
Allows you to customize the sound options and effects. (Select DTV source for example)
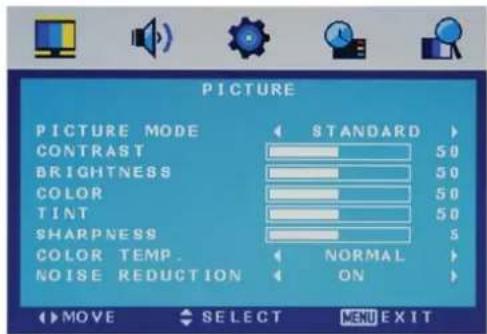
PICTURE MENU:
Allows you to make adjustments to your picture settings. (Select DTV source for example)
SETTING MENU:
Allows you to setup a variety of setup options. (Select DTV source for example)
FUNCTION MENU:
Allows you to set up a variety of lock/time and setup options. (Select DTV source for example)
Note: Use the left right up down navigation buttons to select the required options in the menus.
Menu Settings (continued)
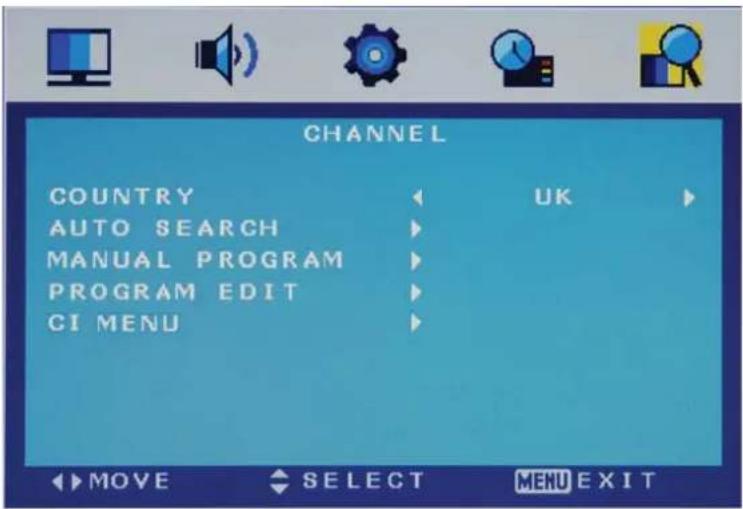
Use the ◀ and ▶ buttons to select the CHANNEL menu (as the picture above), press
▼ button to enter the menu.
The CHANNEL menu includes the following options :
| Country | Press ◀ and ▶ buttons to select the Country. (Can be selected in ATV mode) |
Auto Search
Press button to start auto search.
Auto Search menu for DTV Auto Search menu for ATV

Manual Program
Press ▶ button to enter the submenu.
Manual Program menu for ATV
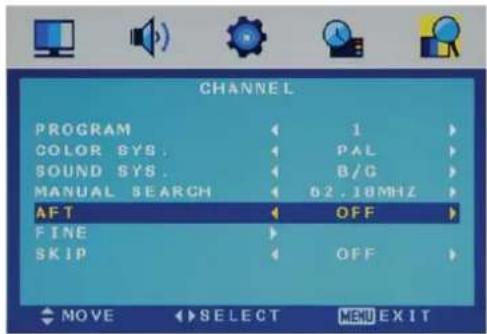
| Program | Select the program you want to edit. |
| Color Sys. | Select the color system for the program you want to edit. |
| Sound Sys. | Select the sound system for the program you want to edit. |
| Manual Search | Use ◀ and ▶ button to manual search. |
| AFT | Turn on/off the Auto Frequency Tuning function for Manual Search. |
| Fine | Use ◀ and ▶ button to fine-tune. |
| Skip | Select “Yes” to skip the program when you scan the programs by CH+/-. |
Menu Settings (continued)
Manual Program menu for DTV
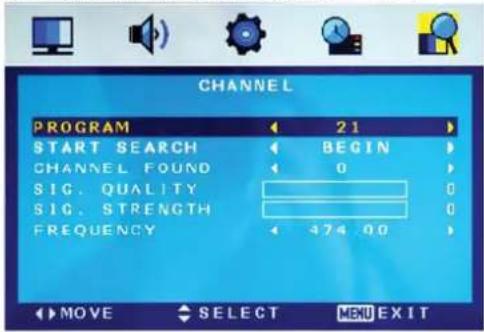
Program
Start Search
Channel Found
SIG. Quality
SIG. Strength
Frequency
Select the program you want to edit.
Press ▶ button to start search.
Display the channel it found.
Display the singal quality of the channel it found.
Display the singal strength of the channel it found.
Display the frequency of the channel it found.
Program Edit: Press ▶ button to enter the submenu as the following picture.
Program Edit menu for ATV
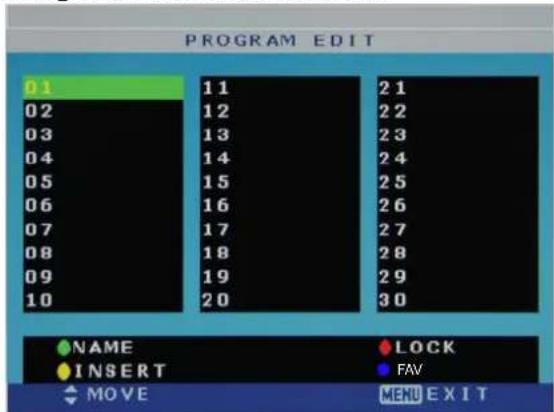
NAME: Select the channel, press GREEN button on the remote control to change the name of the channel.
(Use ◀▶▼ ▲button to name, and press OK button to confirm)
LOCK: Select the channel, press RED button to lock the channel. You have to enter the code to view the channel you have locked. Note: you could set the code in System Lock menu in FUNCTION menu, the original code is 0000.
INSERT: Select a channel you want to insert, press YELLOW button, then select the position, press GREEN button to insert, or you could press RED button to cancel the option.
FAV: Press blue button to add the channel FAV list.
Program Edit menu for DTV
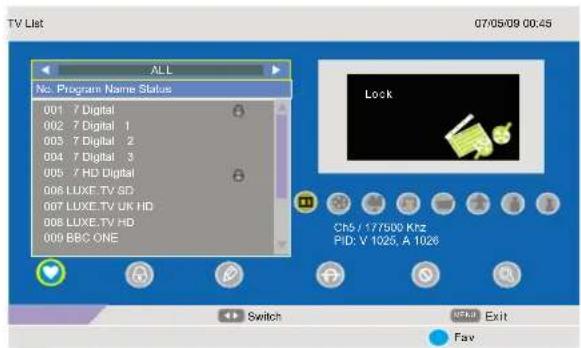
FAV:
- Use the ▲▼ button to select channel. - Use 1-8 number buttons to set the current channel to your favorite group 1-8. if the current channel already be one of your favorite group 1-8, use 【1-8】 number buttons again will set it to a normal channel. - Use Yellow button on the remote, the menu will appear: save the change?
LOCK:
- Use the ◀▶ button to switch between all channel and fav 1-8 channel.
- Use the 【Ok】button to set the current channel to lock. if the current channel already lock, use it again will unlock.
EDIT:
- Use the ◀▶ button to switch between all options and use 【Ok】 button to select. - Use the ▲▼ button to select channel, then use 【Ok】 button to enter the program info menu.
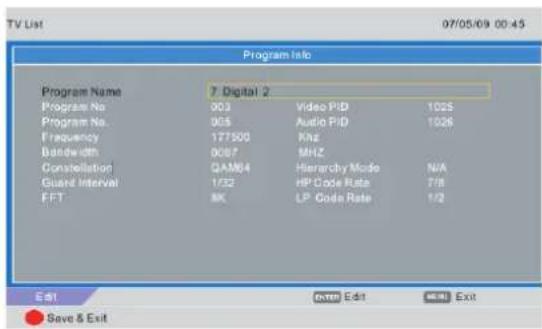
- Use the ▲▼ button to select channel, then use【Ok】button to rename the program.
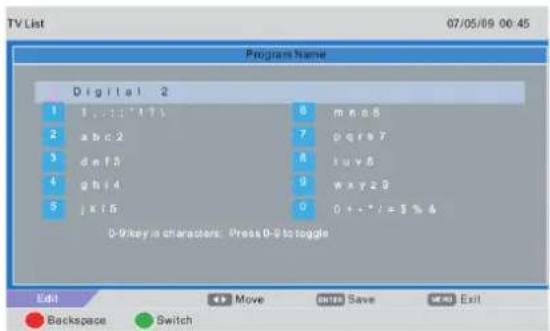
There are two options:
- Use the 【1-9】 number buttons to select different character.
- Use the Green button to Switch between upper and lower case letters. Circularly press the number buttons 2 to select between a, b, c and 2 and use 【OK】 button to save.
SKIP:
- Use the cursor buttons to select the channel you want to Skip. Use 【OK】button and will be shown at the channel selected. To remove the skip function by using 【OK】button again. When a channel has been selected to Skip, you still may select that channel with the numeric buttons.
DELETE:
- Use the cursor buttons to select the channel you wish to delete. Use 【OK】button and will be shown at the channel selected. To remove the delete function, use 【OK】button.
CI MENU(in DTV mode)
Please contact your "pay perview" provider who can supply a viewing card and cam unit with instructions for their use.
SEARCH:
- Use 【OK】 button to enter the search menu.
- Use the number buttons to select the corresponding characters.
Menu Settings (continued)
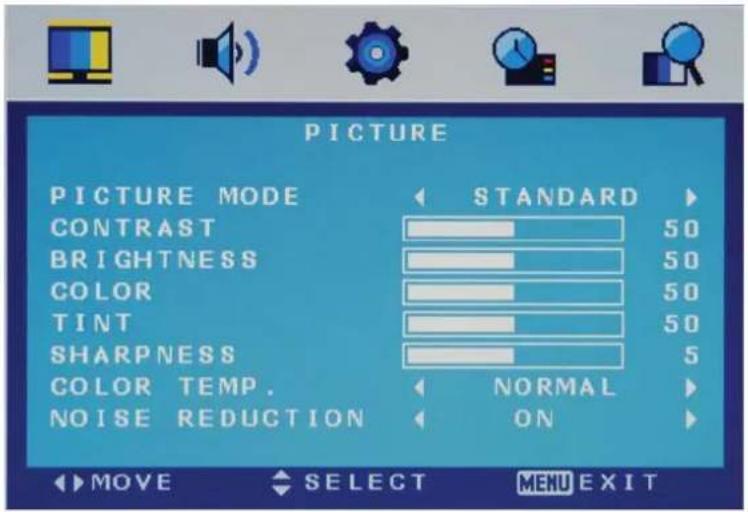
Use the ◀ and ▶ buttons to select the PICTURE menu (as the picture above), press
▼ button to enter the menu.
The PICTURE menu includes the following options :
| Picture Mode | Choose from Standard, Movie, Vivid and Personal. |
| Note: Contrast, Brightness, Color and Sharpness can only be adjusted in the Personal mode option in the Picture Mode Settings. | |
| Contrast | Controls the difference between the brightest and darkest regions of the picture. |
| Brightness Controls the overall brightness of the picture | |
| Color Control the color. | |
| Sharpness | Increase this setting to see crisp edges in the picture; decrease it for soft edges . |
| Tint Controls the tint ( NTSC mode only). | |
| Colour Temp. | Choose from Normal, Cool, and Warm. |
| Noise Reduction | Reduce any interference noise by selecting “ON”. (Can be selected in ATV mode). |
Menu Settings (continued)
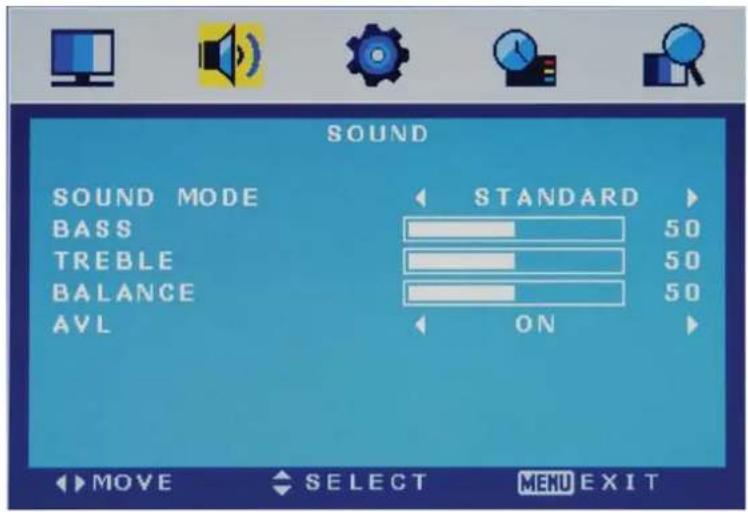
Use the ◀ and ▶ buttons to select the SOUND menu (as the picture above), press
▼ button to enter the menu.
The SOUND menu includes the following options :
| Sound Mode | Allows you to select among: Standard, Music, Movie and Personal. |
| Bass (Can be adjusted when the sound mode is set to User)Controls the relative intensity of lower pitched sounds. | |
| Treble (Can be adjusted when the sound mode is set to User)Controls the relative intensity of higher pitched sounds. | |
| Balance To adjust the balance of the left and right sound track, or turn off the volume of the left and right sound track. | |
| AVL | Control the volume of the program automatically when you turn on the function by selecting “On”. |
Menu Settings (continued)
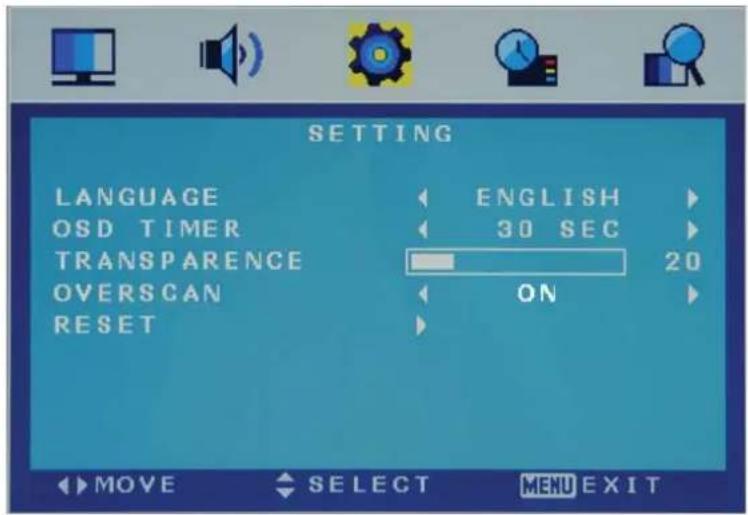
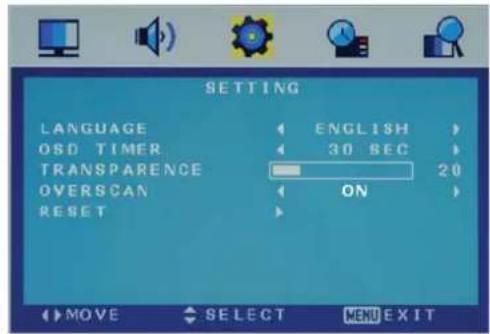
Use the ◀ and ▶ buttons to select the SETTING menu (as the picture above), press
▼ button to enter the menu.
The SETTING menu includes the following options:
| Language | Allows you to select menu language. |
| OSD Timer | Allows you to select the time for OSD menu displays on the screen. |
| Transparence | Allows you to select the transparence for OSD menu displays on the screen. |
| Overscan | Turn on/off the overscan funciton.(Can be selected in HDMI mode) |
| Reset | Press ▶ button to restore factory default. |
Menu Settings (continued)
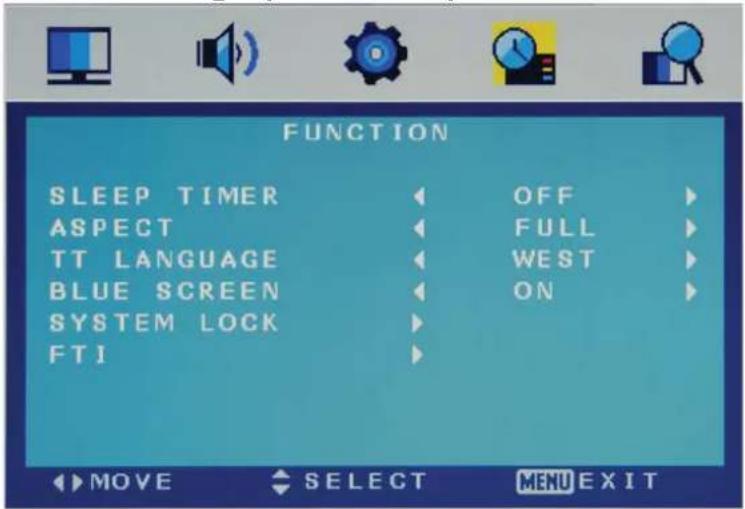
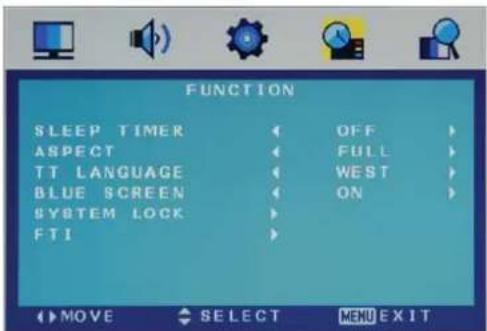
Use the ◀ and ▶ buttons to select the FUNCTION menu (as the picture above), press ▼ button to enter the menu.
The FUNCTION menu includes the following options :
| Sleep Timer | Allows you to setup the sleep timer to : 15min, 30min, 45min, 60min, 75min, 90min,105min, 120min and off. |
| Aspect Allows you to select the screen display mode.(Can be selected in DTV mode) | |
| TT Language Allows you to select the Teletext language.(Can be selected in ATV mode) | |
| Blue Screen Turn on the blue screen display in no signal state by selecting “ON”(Can be selected in ATV mode) | |
System Lock Press
button, and enter the code to enter the submenu. The original code is 0000.
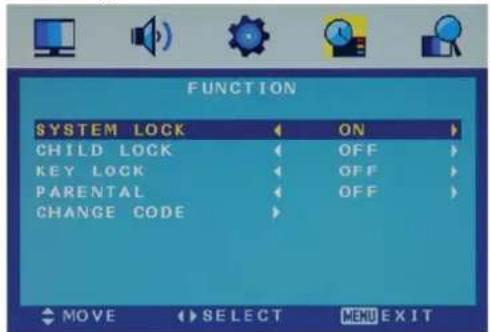
System Lock Turn on/off the system lock function.
Child Lock Lock the channel, you have to enter the code to view the channel. Key Lock Lock the buttons on the TV set, you could not operate the TV by the buttons on the TV set.
Parental Select the parental control mode. Change Code Change the code.
FTI (First Time Installation)
Press ▶ button to enter the First Time Installation menu.
Menu Settings (continued)
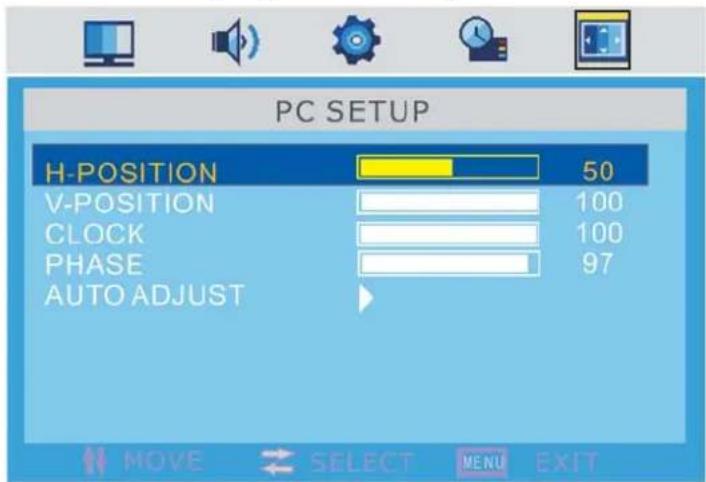
Use the ◀ and ▶ buttons to select the PC SETUP menu (as the picture above), press ▼ button to enter the menu.
The PC SETUP menu includes the following options :
| H-Position | Adjust the transverse position of the screen. |
| V-Position Adjust the vertical position of the screen. | |
| Clock Adjust the pixel clock frequency, until the image size is maximized for the screen. | |
| Phase Adjust the phase of the ADC sampling clock relative to the sync signal, until a stable image is obtained. | |
| Auto Adjust Press | button to setup the parameter of the screen automatically. |
DVD Operation
Press the Power button on the TV or the remote control, then press the INPUT button to select DVD mode. If there is no disc in the DVD player the screen will show "NO DISC". It will play once you put in the disc. Press source to DVD mode play the disc.
Place a disc
Insert a disc according to the silk.
Do not touch the playing surface.
Hold the disc around the outside with your fingers and place the disc into the slot. The player will automatically draw the disc into the player.
To "Eject" the disc, press the "▲" button on the TV button on the remote control.
Play
The contents of each disc vary, as to how the disc was authored and what features are included. Some discs start playing as soon as they have been read, some need "Play" selecting in the Menu. Different play modes are offered, such as Menu Play, Sequence Play and other modes.
Menu Play
- Compatible with DVD, SVCD or VCD2.0.
- If the disc is a DVD, ROOT MENU will appear on the screen. If it is SVCD or VCD 2.0, please press the Menu button to see the menu.
- When a DVD disc is loaded, press the Arrows buttons to highlight the menu item you want to choose. With SVCD or VCD 2.0, press the numeric buttons to select a track to play.
- Press ENTER or Play to start when highlighted.
- Return to Menu when Playing: When playing a DVD disc press the Menu button to return to the "ROOT" menu. When playing a SVCD or VCD, and PBC is "on" press the Menu or Return button to return to the disc menu.
Title Play
- Compatible with DVD discs only.
- During DVD playback, press Title button to display the DVD title content.
- Press the Arrow buttons to highlight the title you want to choose, and press Enter; also you can press numeric buttons to choose.
- The DVD player begins with the chapter 1 of the chosen title.
Sequence Play
- Compatible with DVD, SVCD, VCD, CD, HD-CD, WMA, Digital Audio disc.
- When a SVCD or VCD disc is loaded and PCB is "on", press the MENU button once switches the PBC "off". The player can now playback in sequence mode. To turn the PBC back on press the MENU button again.
- Except for SVCD or VCD discs, when in stop state, press the Play button, the player will play in the "Sequence" mode. This is for all compatible discs.
Program Play
- Compatible with DVD, SVCD, VCD, CD, HD-CD, WMA, Digital Audio disc.
- The Program Playback option allows you to enter the order in which you want chapters or tracks to play, maximum to 16.
- Program Menu: If PBC is on, this operation will turn PBC off while the chapters / tracks play in programmed order.
-
According to the highlight, use the Numeric buttons to enter the chapters / tracks in the order you want them to play. Then press Play or use Arrow buttons to highlight the "PLAY" item and press Enter. The chapters /tracks will play in the programmed order. You can program maximum 16 titles / chapters / tracks.
-
According to the Direction Indicator on the menu, you can press Arrow buttons to highlight where you want to enter.
- During Program Playback, if program button is repressed, the program order and the contents will be displayed on the screen, and the Program Playback will be stopped; also you can press Stop and Play to resume normal playback.
- Notes:
To clear the program order, use Arrow buttons to highlight the "CLEAR" item, then press Enter. To modify the program order, use Arrow buttons to highlight the item you are changing and enter the new chapter / track you want to program directly. - The program indicator in the screen and the playing chapter / track illuminate.
Additional operation
Selecting Tracks
- Compatible with DVD, SVCD, VCD, CD, HD-CD, WMA, Digital Audio disc.
- When playing a DVD disc, press Numeric buttons on the menu or title page to select tracks; During DVD playback, you can input desired title numbers directly.
- During sequence playback of a SVCD or VCD disk, press the numeric buttons to select tracks. (During Program Playback and when the PBC is on, you can only press Prev / Next button to select)
- As for CD, HD-CD, discs, press Numeric buttons directly to select tracks.
- When playing WMA, Digital Audio disc/JPEG discs, press Numeric buttons to select different tracks on current track list.
Skipping Tracks
- Compatible with DVD, SVCD, VCD, CD, HD-CD, WMA, Digital Audio disc.
- To skip forward to the beginning of the next title / chapter / track on a disc, press Next on the remote or the right side of the player.
- To skip backward to the beginning of the preceding title / chapter/track on a disc, press Prev on the remote or the right side of the player.
Multispeed Fast Motion Play
- Compatible with DVD, SVCD, VCD, CD, HD-CD, WMA, Digital Audio disc.
- Press the Multispeed Fast/Slow button on the remote during play to search through a disc. Multispeed Fast/Slow has four speeds: x2, x4, x8, x20.
With each consecutive press of the button, the search speed increases. If you press the button five times, Fast Multispeed Fast cycles back to normal play. - During DVD play, when Multispeed Fast gets to the beginning of the next title / chapter, it resumes normal play; During SVCD or VCD play with PBC on, when Fast Forward Play gets to the beginning of the next track, it resumes normal play.
Multiphase Slow Motion Play
- Compatible with DVD, SVCD, VCD.
- Multiphase Slow has six speeds: 1/2, 1/3, 1/4, 1/5, 1/6, 1/7 of the normal Speed play when pressing the "Slow" button consecutively when playing discs.
- When you press Play or the "Slow" button 7 times the player returns to normal play.
Freeze Frame
- Compatible with DVD, SVCD, VCD, CD, HD-CD, WMA, Digital Audio disc
- During CD, HD-CD, WMA or Digital Audio disc / JPEG playback, press Pause once to freeze playback; Press Play button to resume normal playback.
Using the Repeat Feature
-
Compatible with DVD, SVCD, VCD, CD, HD-CD, WMA, Digital Audio disc
-
While a disc is playing, press Repeat button once and the repeat banner appears to show current repeat mode.
a) In SVCD, VCD, CD, HD-CD, WMA or Digital Audio disc/JPEG sequence playback mode. Press Repeat button again to turn on repeat mode. Press the button again on the remote to turn to the next repeat mode. There are three repeat options: Off, Track Repeat and Disc Repeat. With each consecutive press of the button, the repeat mode switches. If you press the button four times, repeat mode cycles back to Off.
b) In DVD playback, press Repeat button again to turn on repeat mode. There are three repeat options: Off, Chapter Repeat and Title Repeat. With each consecutive press of the button, the repeat mode switches. If you press the button four times, repeat mode cycles back to Off.
c) In WMA, Digital Audio disc /JPEG playback, press Repeat button again to turn on repeat mode. There are four repeat options: Off, Track Repeat, Directory Repeat, and Disc Repeat. With each consecutive press of the button, the repeat mode switches. If you press the button five times, repeat mode cycles back to Off.
Using the Display Feature
- Compatible with DVD, SVCD, VCD, CD, HD-CD, WMA, Digital Audio disc discs.
- Loading and playing DVDs (two pages)
- Press DISPLAY button once to show the first page:
- "Disc Type, Title */ * (the playing title / total titles), Chapter */ * (the playing chapter / total chapters), Elapsed Time of the Disc".
- Press the button again to show the second page:
- "Language */* (the serial number of playing language / the amount of optional languages) or Off, Language Type, Audio Type, Subtitle */ * (the serial number of playing subtitle /the amount of optional subtitles) or Off, Angle */ * (the serial number of playing angle / the amount of optional angles) or Off".
-
Press the button for the third time, the display menu fades out.
-
Loading and playing SVCD discs (two pages)
- Press Display button once to show the first page:
- "Disc Type, Track */ * (the playing track / total tracks), Mute, PBC, Repeat Mode, Elapsed Time of the Playing Track".
- Press the button again to show the second page:
- "Language * / * (the serial number of playing language/ the amount of optional languages) or Off, Language Type, Audio Type, Subtitle * / * (the serial number of playing subtitle / the amount of optional subtitles) or Off".
-
Press the button for the third time, the display menu fades out.
-
Loading and playing VCD
-
Press Display button once to show the first page:
- "Disc Type, Track */ * (the playing track / total tracks), Mute, PBC, Repeat Mode, Elapsed Time of the Playing Track".
-
Press the button again, the display menu fades out.
-
Loading and playing CD, HD-CD, WMA, Digital Audio
-
Press Display button once to show the first page:
- "Disc Type, Track */ * (the playing track / total tracks), Mute, Repeat Mode, Elapsed Time of the Playing Track".
- Press the button again, the display menu fades out.
Using the Search Feature
- Compatible with DVD, SVCD, VCD, CD, HD-CD discs.
- You can use Search feature to select a title/ chapter/track number or go to a specific point in a title. First, press GOTO button on the remote controller to bring up the search menu and enter the edit state. Secondly, press Arrow buttons to highlight the title / chapter/ track number or the time option; Thirdly, use Numeric buttons to enter the title / chapter/ track you want to play or the elapsed time you want to go to in that title. At last, press ENTER button to start playback.
For example, entering 01:23:56 will start playback one hour, twenty-three minutes and fifty-six seconds into the title.
3. Notes
a) This feature does not work in Program Play mode.
b) If PBC is on, it will turn off automatically when Search Playback starts.
c) When playing WMA, MP3 / JPEG discs, Search Feature does not work.
Changing the Soundtrack or Language
- Compatible with DVD SVCD, VCD, CD, HD-CD, WMA, Digital Audio disc /JPEG discs.
- Press the LANGUAGE button to display current soundtrack.
a) Press the button to switch soundtracks.
b) Press the button again on the remote to turn to next soundtrack. - When playing a SVCD or VCD disc, there are five soundtracks: Stereo (L/R), L/L, R/R, L/L Auto A/D Detect, and R/R Auto A/D Detect. With each consecutive press of the button, the soundtrack switches. If you press the button six times, soundtrack cycles back to Stereo.
- When playing a CD, HD-CD, WMA, Digital Audio disc, there are three: Stereo (L/R), L/L, and R/R.
- When playing a DVD or SVCD disc, press LANGUAGE button to display current language, press the button again to turn to next language if the disc has different languages.
Subtitles
- Compatible with DVD, SVCD discs.
- Press the Subtitle button on the remote once, and the subtitle info banner appears
- When a DVD or SVCD is recorded with subtitles, you can use the Subtitle feature to view the subtitles on-screen. By default, subtitles are off. The info banner will display Subtitle Off.
- To display subtitles, press the Subtitle button again. The default language with its responding serial number will be displayed in the info banner and subtitles will be displayed in that language. There are 8 supported subtitles: Chinese, English, Japanese, French, Spanish, Portuguese, Germany and Latin. With each consecutive press of the Subtitle button, the subtitle switches. For example, "Language Icon: [1 English DTS 6CH] or [Off]" (the availability of the subtitles are disc-dependent). To turn subtitles off, press the Subtitle button until Subtitle Off is displayed.
Mute the Audio Output
- Compatible with DVD, SVCD, VCD, CD, HD-CD, WMA, Digital Audio disc /JPEG discs.
- Pressing the Mute button allows you to reduce sound to an inaudible level, and the icon of "MUTE" will be displayed on screen. Press the button again or press the Vol +/- button to return to the normal condition.
- If the player has no sound, check that the "Mute" is not on.
Zoom In the Video Image
- Compatible with DVD, SVCD, VCD, JPEG discs.
- The Zoom Function allows you to enlarge the video image.
- Press Zoom repeatedly to activate the function and choose the required zoom factor: Zoom 2, Zoom 3, Zoom 4, Zoom 1/2, Zoom 1/3, Zoom 1/4, Zoom Off.
Repeat a Specific Segment on the Disc that You Define
- Compatible with DVD, SVCD, VCD, CD, HD-CD, WMA, Digital Audio disc.
- During normal or fast playback, press the A-B button once. REPEAT "A" appears on the screen. This indicates the start point of the loop.
- Press A-B again, REPEAT A-B will be shown, this indicates the end point of the loop.
- The segment will now be repeated until you press the "REPEAT" button again to turn off the feature.
- Press A-B again to cancel the loop points.
- When playing a SVCD, VCD, or CD disc, you can repeat a specific segment only in one track. When the next track begins, A-B Repeat turns off automatically.
- When playing a DVD disc, you can repeat a specific segment only in one title.
Digital Audio Disc
- Compatible with Digital Audio discs
-
The player will search the disc directory automatically and display the contents on screen.
-
The player will then start to play the first track, of the selected directory.
- To change directories use the direction buttons.
DVD System Operation
System operation will define the setting of the set; these definitions will be stored until you change them again.
General Steps of Setup Menu
- Pause or Stop the player. Press DVD-SETUP on the remote control. The main menu will be shown as below.
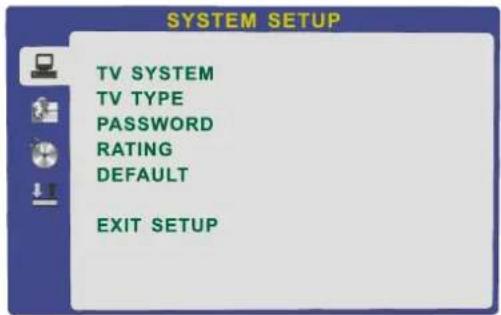
- Press the ▲/▼ buttons to select the Icon of the desired section e g. "TV System" and press ▶ button to open that section.
- Press ▲/▼ to select the desired feature and again press ▶ button to open that section.
- Press ▲/▼ to select the desired feature and then press "OK" to select the new setting.
5 To exit the menu, press "DVD-SETUP" or ▼ to select EXIT SETUP and then press "OK" When launching the setup routine, the pressing of the following buttons will turn off the setup menu, while the choices that have been changed will be saved.
Menu specification
1. SYSTEM SETUP
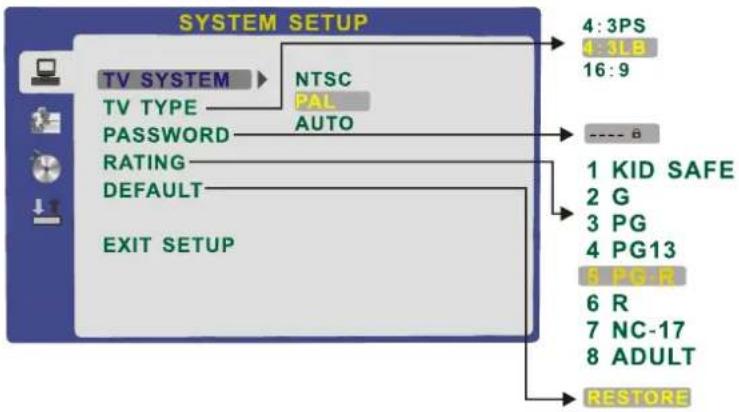
The system setup options are illustrated below:
flowchart
graph TD
    A["TV SYSTEM"] --> B["NTSC"]
    A --> C["PAL"]
    A --> D["AUTO"]
    E["Password"] --> F["---- 8"]
    G["RATING"] --> H["1 KID SAFE"]
    I["DEFAULT"] --> J["2 G"]
    K["EXIT SETUP"] --> L["3 PG"]
    M["4:3PS"] --> N["4:3LB"]
    O["16:9"] --> P["16:9"]
    Q["5 PG-R"] --> R["5 PG-R"]
    S["6 R"] --> T["6 R"]
    U["7 NC-17"] --> V["7 NC-17"]
    W["8 ADULT"] --> X["8 ADULT"]
    Y["RESTORE"] --> Z["RESTORE"]
TV SYSTEM
According to the Color system of your TV, select proper TV TYPE.
PASSWORD
The password option is initialized as locked. You cannot set the ratings limit or change the password.
To enable these features you must unlock the Password. The default password is "0000". Using the ▲/▼ button, move the highlight to "PASSWORD", press the button and enter "0000". You will see the padlock symbol open. You may now change the RATING or put in a new password number.
If the Lock symbol is BLUE you must press the ▶ button to enter the lock field, the lock symbol will change to YELLOW, you may now enter a new 4 digit number. Please remember or write down the new Password and keep safe.
RATING
The Rating feature is a rating limit feature, like movie ratings. This helps you to control what DVD the family watches. There are 8 levels of selection, from KIDS SAFE to ADULT. Adult is the "play all" selection.
2. LANGUAGE SETUP
The language setup options are illustrated below:
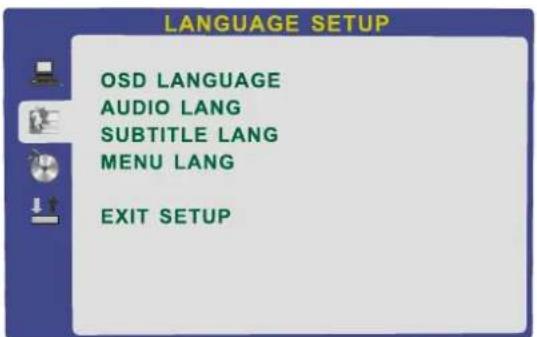
- OSD LANGUAGE: The OSD will display in the language you choose.
- AUDIO LANG: If the disc you are playing has the language you choose, it will output audio in that language.
- SUBTITLE LANG: If the disc you are playing has the language you require you may select this either in the Menu or using the "SUBTITLE" button on the Remote control. You may also switch this OFF.
- MENU LANG: If the disc you are playing has the language you require you may select this.
3. AUDIO SETUP
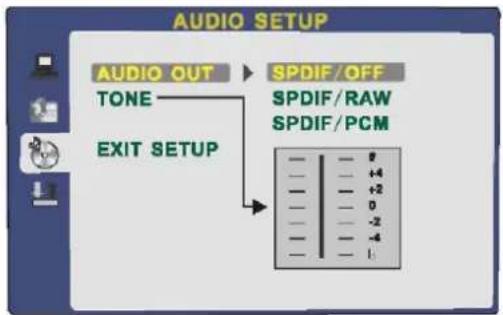
-Highlight the AUDIO OUT option, and press the ▲/▼ to choose the audio output mode you prefer. Press OK to confirm; There are 3 optional audio output modes: SPDIF/OFF SPDIF/RAW and SPDIF/PCM. SPDIF/RAW is for amplifiers with a built in digital decoder. SPDIF/PCM is selected for amplifiers with no built in digital decoder.
-TONE: Use the ▲/▼ button to move the scroll and adjust the tone.
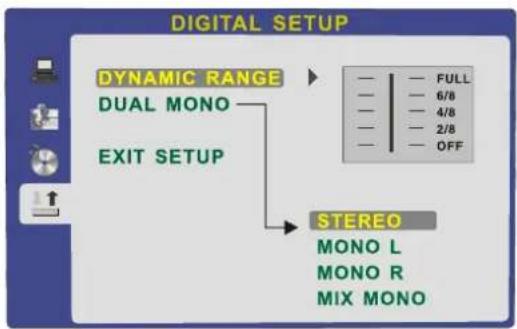
4. DIGITAL SETUP
The video setup options are illustrated below:
- DYNAMIC RANGE: Use the ▲/▼ button to move the scroll and adjust the dynamic range.
- DUAL MONO: Choose the mode of the audio output.
- There are four modes: STEREO, MONO L, MONO R, MIX MONO.
Disc Care
About Disc Terms
Title
Generally, pictures or music compressed on a DVD are divided into several sections, "title".
Chapter
The smaller section unit of picture or music in a DVD under the title, usually one title is comprised of one or more chapters and each of them is numbered for easy searching, but some discs may not have a recording chapter.
Track
A segment of picture or music on a CD, Each track is numbered for searching.
Care of Disc
Video disc contains high-density compressed data that needs proper handling.
-
Hold the disc with fingers by outer edge and/or the center spindle hole. Do not touch the discs surface.
-
Do not bend or press the disc.
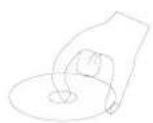
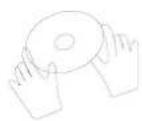
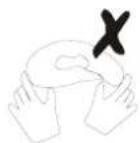
- Do not expose the disc to direct sunlight or heating sources, Stere discs in cabinet vertically, and in dry condition.
Prevent exposure to:
Direct sunlight
Heat or exhaust from a heating device
Extreme humidity
Clean the disc surface with a soft, dry cleaning cloth, Wipe the disc surface gently and radically from center toward the outer edge.
Do not apply thinner, alcohol, chemical solvent, or sprays when cleaning. Such cleaning fluids will permanently damage the disc surface.
TROUBLESHOOTINGGUIDE
To assist in locating possible faults use the help guide below.
GNITOOHSELBUORTMOTPMYS
| No Picture, no sound | Check that the TV is correctly plugged in.Check that the TV is connected to a suitable power source.Check the electrical supply is turned on. |
| No Picture | Ensure that the TV is powered on.Check that the cables are fitted securely.Ensure the aerial and/or external sources are connected.Press the INPUT button to change the source.Turn the TV on or off. |
| No Sound | Press the MUTE button and check if Mute mode is set.Switch to another channel and see if the same problem occurs.Press V+ button to see if the problem can be solved. |
| No picture on some channels | Check that correct channel is selectedAdjust the antenna. |
| No colour on some channels (black & white) | Check if the same problem exists on other channels.Ensure the correct picture settings are selected. |
| Noisy, Snowy,Ghosting picture. | Check the antenna is connected correctly.Check that the antenna Is in good condition.Try moving the antenna. |
NOTE: The TV must only be repaired by a qualified registered service person. Never attempt to remove the back cover as the TV has dangerous voltages inside that may cause fatality or fire.
TECHNICALSPECIFICATIONS
Specifications of the TV that you have just purchased may vary from the information in this table due to technical innovations.
TVSpecifications
| TV System PAL / BG / DK / I | |
| Audio System | BG / DK / I SECAM L/L' |
| Screensize 22"(Diagonal) | |
| Resolution 1920 x 1080Pixels(RGB) | |
| Aerial input 75 (unbalanced) | |
| Audio output power 2 x 3W | |
| Power requirements | 12V 5A |
| Power consumption 60W | |
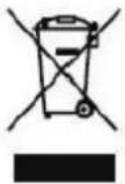
If at any time in the future you should need to dispose of this product please note that: Waste electrical products should not be disposed of with household waste. Please recycle where facilities exist. Check with your Local Authority or retailer for recycling advice. (Waste Electrical and Electronic Equipment Directive)

- 22” (55cm) LED TV with DVD & DVBT
- Model No.: DVL-2253 BLACK
- Contents
- 1-3 SAFETY INFORMATION
- SAFETY INFORMATION
- Keep these instructions
- IMPORTANT SAFETY INFORMATION (Continued)
- Headphone Warning
- Where to install
- Unit and Accessories
- The functions of the TV buttons are described below.
- Remote control
- Remote control (continued)
- Buttons for DTV function
- Aerial connection
- WARNING! ENSURE THE TV AND ALL ANCILLARY EQUIPMENT IS UNPLUGGED FROM THE MAINS BEFORE MAKING ANY CONNECTIONS!
- Connecting external devices
- HDMI Lead
- SCART Lead
- VGA Cable
- Connecting external devices (continued)
- Caution:
- PC connection
- VGA, HDMI PC Connection
- Connecting Video camera and Video recorder
- Video camera
- Note:
- Video recorder
- Connecting an audio system
- Connecting a DVD player
- When using the SCART cable
- Common Interface Slot
- USING YOUR COMMON INTERFACE SLOT
- Common Interface
- WARNING! SWITCH OFF YOUR TV BEFORE ANY MODULE IS INSERTED INTO THE COMMON INTERFACE SLOT, THEN ADD THE SMART CARD TO THE CAM.
- Auto installation setup
- Source Menu
- Menu Settings
- CHANNEL MENU
- SOUND MENU:
- PICTURE MENU:
- SETTING MENU:
- FUNCTION MENU:
- Menu Settings (continued)
- FAV:
- LOCK:
- EDIT:
- SKIP:
- DELETE:
- CI MENU(in DTV mode)
- SEARCH:
- DVD Operation
- Place a disc
- Play
- Menu Play
- Title Play
- Sequence Play
- Program Play
- Additional operation
- Selecting Tracks
- Skipping Tracks
- Multispeed Fast Motion Play
- Multiphase Slow Motion Play
- Freeze Frame
- Using the Repeat Feature
- Using the Display Feature
- Using the Search Feature
- Notes
- Changing the Soundtrack or Language
- Subtitles
- Mute the Audio Output
- Zoom In the Video Image
- Repeat a Specific Segment on the Disc that You Define
- Digital Audio Disc
- DVD System Operation
- General Steps of Setup Menu
- Menu specification
- SYSTEM SETUP
- TV SYSTEM
- PASSWORD
- RATING
- LANGUAGE SETUP
- AUDIO SETUP
- DIGITAL SETUP
- Disc Care
- About Disc Terms
- Title
- Chapter
- Track
- Care of Disc
- TROUBLESHOOTINGGUIDE
- TECHNICALSPECIFICATIONS
Brand : LENCO
Model : DVL-2253
Category : Television