
Latte Art - Milk frother Gastroback - Free user manual and instructions
Find the device manual for free Latte Art Gastroback in PDF.


| Product Type | Milk Frother |
| Brand | Gastroback |
| Model | Latte Art Milk Frother Advanced (Art.-No. 42360) |
| Dimensions (W x D x H) | 14.0 cm x 15.4 cm x 26.5 cm |
| Weight | 1.65 kg |
| Power Supply | 230-240 V AC, 50/60 Hz |
| Power Consumption | 500 W |
| Capacity | 0.2 L (MIN) to 0.75 L (MAX); Cappuccino/Latte max 0.5 L |
| Heating Technology | Induction heating (no heating plate) |
| Stirring Mechanism | Magnetic drive, contactless |
| Frothing Discs | Two included: cappuccino disc (cogwheel) for thick froth, latte disc (smooth) for silky froth |
| Temperature Control | Adjustable via selection dial; includes COLD STIR setting |
| Controls | START/STOP push dial with indicator light |
| Safety Features | Automatic shut-off after 30 seconds idle, overheat protection, thermal cut-out, lid seal, non-slip base |
| Dishwasher Safe Parts | Jug, lid, measuring cup, frothing discs (upper rack only) |
| Cleaning Instructions | Wipe power base with damp cloth; do not immerse power base or cord in water |
| Materials | Stainless steel jug, plastic lid and measuring cup, silicone seal |
| Integrated Measuring Cup | Built-in, up to 30 ml |
| Cord Length | Approx. 1.05 m |
| Storage | Cord wrap on base, on-board disc storage at rear |
| Warranty | 2 years from purchase date (see manual for details) |
| Intended Use | Household use only; for frothing, heating, and mixing milk and milk alternatives |
Frequently Asked Questions - Latte Art Gastroback
User questions about Latte Art Gastroback
0 question about this device. Answer the ones you know or ask your own.
Ask a new question about this device
Download the instructions for your Milk frother in PDF format for free! Find your manual Latte Art - Gastroback and take your electronic device back in hand. On this page are published all the documents necessary for the use of your device. Latte Art by Gastroback.
USER MANUAL Latte Art Gastroback
Operating Instructions
Latté Art Milk Frother Advanced
natural_image
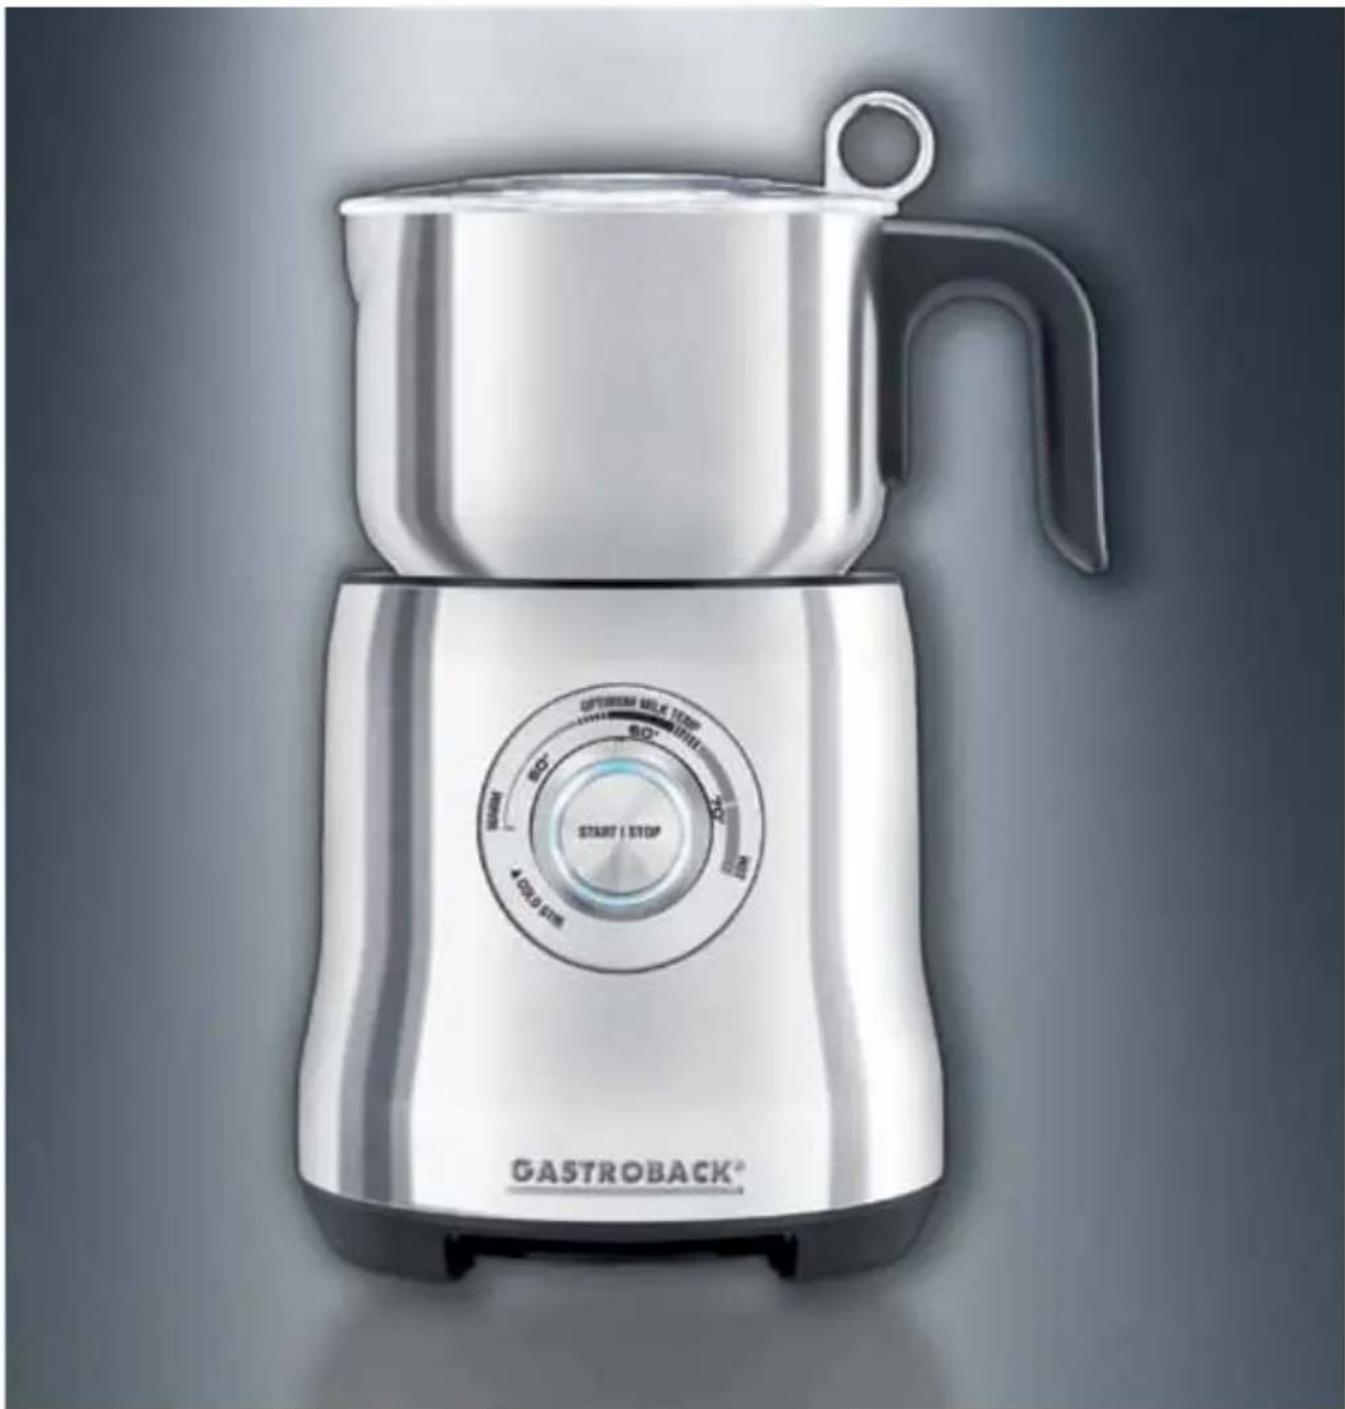
Exterior view of a modern stainless steel Gastroback coffee maker with control knob (no text or symbols on the device itself)Art.-No. 42360 Latté Art Milk Frother Advanced
Read all provided instructions before first usage!
Model and attachments are subject to change!
For household use only!

Carefully read all provided instructions before you start running the appliance and pay regard to the warnings mentioned in these instructions.
Table of Contents
Dear Customer! 25
Knowing Your Latté Art Milk Frother Advanced 25
Important safeguards....27
General Safety Instructions....27
Important Safeguards for Electrical Appliances 29
High Temperatures—Risk of Burns 29
Moving Parts 30
Technical Specifications ....30
Properties of Your New Milk Frother....30
Safety Interlocks....31
Tips for Best Results 31
Before First Use 32
Operation 33
Preparing the Appliance ....34
Frothing Milk 35
Adding Further Ingredients ....36
Solving Problems....37
Care and Cleaning 38
Storage....39
Notes for Disposal....40
Information and Service 40
Warranty 40
Recipes....41
Index 43
Dear Customer!
Congratulations! An astonishing forward-looking technology comes with your new Gastroback Latté Art Milk Frother Advanced. Without any effort you prepare delicious silky milk froth for coffee, cacao, milk drinks and even refined desserts. You can freely select the desired temperature, thus always getting best results. According to the innovative induction heating technology, the Milk Frother works without any heating plate—only the jug is heated. Additionally, the frothing discs are driven contact-less via magnets, avoiding weak points normally caused by a drive shaft in the jug. Thus, cleaning is made easy, too.
These instructions for use will inform you about the various functions and features, which make it easy to take pleasure in your new Milk Frother.
We hope that you will enjoy your new Milk Frother.
Your Gastroback GmbH
Knowing Your Latté Art Milk Frother Advanced
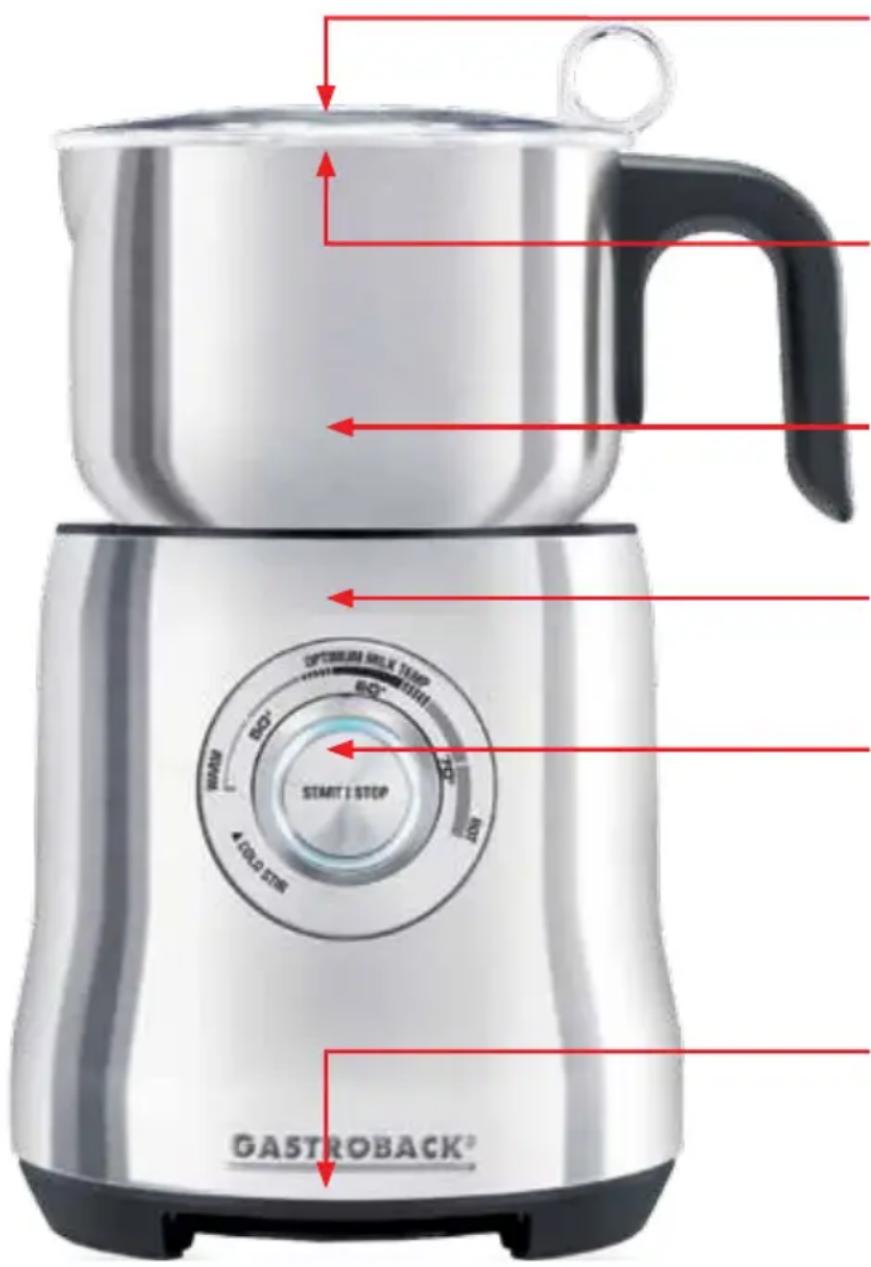
Built-In Measuring Cup – for measuring and adding ingredients up to 30 ml once mixing has started.
Lid with Seal — keep it always firmly closed during operation; with ring-pull handle.
Jug — dishwasher-safe, stainless steel with inner filling marks and spout.
Power base – Induction Heating system provides gentle, even heat distribution.
START/STOP push dial — Turn the selection dial to adjust the temperature. Press the centre of the dial (START/STOP button) to start or stop operation. The integrated indicator is illuminated, when the appliance is ready for operation.
Cord wrap for the
Power cord — wind the power cord loosely around the retainer for storing the appliance. Always completely unwind it before operation.
Important safeguards
Carefully read all instructions before operating this appliance and save for further reference. Do not attempt to use this appliance for any other than the intended use, described in these instructions. Any other use, especially misuse, can cause severe injuries or damage by electric shock, moving parts, heat, or fire.
These instructions are an essential part of the appliance. Do not pass the appliance without this booklet to third parties.
Any operation, repair and technical maintenance of the appliance or any part of it other than described in these instructions may only be performed at an authorised service centre. Please contact your vendor.
General Safety Instructions
- This appliance is for household use only and NOT intended for use in moving vehicles. Do not operate or store the appliance in humid or wet areas or outdoors. Any use of accessories, attachments or spare parts that are not recommended by the manufacturer or damaged in any way may result in damage and/or injuries to persons.
- Check the entire appliance regularly for proper operation—especially the power cord. Do not operate the appliance, when the appliance or any part of it is likely to be damaged, to avoid risk of fire, electric shock or any other injuries to persons and/or damage. The appliance is likely to be damaged if the appliance has been subject to inadmissible strain (e.g. overheating, mechanical or electric shock), or if there are any cracks, excessively frayed or melted parts, or distortions, or if the appliance is not working properly. In this case, immediately unplug the appliance and return the entire appliance (including all parts and accessories) to an authorized service centre for examination and repair.
- Operate the appliance on a well accessible, stable, level, dry, water-resistant, and suitable large table or counter. Always keep the appliance and the table or counter clean and dry, and wipe off spilled liquids immediately. Always remove the jug from the power base, before taking food out of the jug. Do not place any clothes or tissue or other objects under or on the power base during operation, to avoid risk of fire, electric shock and overheating. Do not place the appliance or hot jug over a power cord, or near the edge of the table or counter, or on wet or inclined surfaces.
- During operation keep the appliance in an appropriate distance of at least 10 cm on each side and 50 cm above to furniture, walls, boards, curtains, and any delicate objects. Exclusively use the appliance for processing edible food and for domestic use. Immediately unplug the appliance, if there is any kind of malfunction or problem (e.g. liquid running out, overheating).
- This appliance is NOT intended for use by persons (including children) with reduced physical, sensory or mental capabilities, or lack of experience and knowledge, unless they have been given supervision or instruction concerning use of the appliance by a person responsible for their safety. The frothing discs could be swallowed by young children, causing risk of suffocation! Children must always be supervised to ensure that they do not play with the appliance or any parts of the appliance or the packaging. Always keep the appliance where it is dry, frost-free, and clean,
and where young children cannot reach it. Do not leave the appliance or any part of it unattended, when it is in reach of young children.
- Do not place the appliance or any part of it on or near hot surfaces (e.g. burner, heater or oven). Do not use any parts of the appliance with any other device or for any other purpose. Do not handle the appliance or any part of it with violence.
- Do not use any hard, sharp or edged objects (e.g. knives, forks) with the appliance.
- Do not process hard ingredients or large amounts of powdery ingredients. Always close the lid securely with the measuring cup properly in place before operation. Do not open the lid during operation.
- Do not overfill the jug. Otherwise, liquids could run out at the spout. Please observe the different maximum filling levels for the various ingredients. Always wipe off spilled liquids and ensure that the jug is completely dry before placing it on the power base. If liquids run out or are spilled on the power base, immediately unplug the appliance. However, do not operate the appliance without liquid. Always fill to at least the MIN filling level.
- Use caution when pouring foamed milk from the jug after heating, as hot milk may scald at high temperatures. During operation and shortly thereafter, hot steam could escape from under the lid. Additionally, the jug will become very hot. Only touch the jug and lid by the handles. Beware of hot steam and condensate when opening the lid shortly after operation.
- Do not leave the appliance unattended, when it is connected to the power supply. Always unplug the appliance, before moving, or cleaning the appliance, or when the appliance is not in use. Always hold the power base at both sides near the bottom for moving or lifting. Do not hold the appliance at the jug, lid, or power cord for moving the appliance. Do not place any hard and/or heavy objects on the appliance or any part of it.
- Do not use any abrasive cleaners, cleaning pads (e.g. metal scouring pads), or any corrosive chemicals (e.g. bleach) for cleaning. Do not immerse the power base or power cord in water or any other liquid. Do not spill or drip any liquids on the power base, or on the power cord to avoid risk of fire and electric shock. Do not place the power base or power cord in an automatic dishwasher.
- Do not leave any food dry on the appliance. Always clean the appliance after each use to prevent an accumulation of baked-on foods (see ,Care and Cleaning'). Always keep the appliance and its parts clean.
Important Safeguards for Electrical Appliances
The appliance is driven electrically. Place the appliance near a suitable wall power socket to connect the appliance directly to a protected mains power supply with protective conductor (earth/ground) connected properly. Ensure that the voltage rating of your mains power supply corresponds to the voltage requirements of the appliance (230 V, 50 Hz, AC, rated for at least 10 A).
The installation of a residual current operated circuit breaker (r.c.c.b.) with a maximum rated residual operating current of 30 mA in the supplying electrical circuit is strongly recommended. If in doubt, contact your electrician for further information.
In various foreign countries, the specifications for power supplies are subject to incompatible norms. Therefore it is possible that power supplies in foreign countries do not meet the requirements for safe operation of the appliance. Thus, before operating the appliance abroad, ensure that safe operation is possible.
- Do not to use any external timer, remote control systems, or desk top multi socket outlets. It is best to avoid using extension cords, but if you wish to use one, only use an extension cord rated for a maximum continuous current of at least 10 A (or 1500 W) with protective conductor (earth/ground) connected properly.
- Always handle power cords with care. Always completely unwind the power cord before use. Do not place the appliance on a power cord. Power cords may never be knotted, twisted, pulled, strained or squeezed. Do not let the plug or power cord hang over the edge of the table or counter. The power cord may not touch hot surfaces or sharp edges. Ensure that no one will pull the appliance by the power cord. Take care not to entangle in the power cord. Always grasp the plug to disconnect the power cord. Do not touch the appliance or power plug with wet hands when the appliance is connected to the power supply.
- DO NOT let any liquids run down the exterior of the jug, when the jug is mounted on the power base. Do not place the jug on the power base, when the exterior of the jug is wet. Otherwise liquid could run into the power
base. When liquids are spilled on the power base or power cord, immediately unplug the appliance. Thereafter, clean the appliance and let it dry for at least 1 day (see 'Care and Cleaning').
High Temperatures—Risk of Burns
The Milk Frother is designed for frothing and heating milk, and therefore milk, jug, lid, and measuring cup can get very hot during operation and shortly thereafter. Please keep this in mind to avoid scalds and damage.
- Do not touch jug, lid and measuring cup of the appliance with your hands, arms or any other parts or your body or any heat-sensitive or moisture-sensitive objects. Do not place the jug on any heat-sensitive surfaces shortly after operation. Only touch the jug and lid at the handles (e.g. handle of the jug, finger hole at the lid) during operation and shortly thereafter.
- Even with the lid properly closed, steam could escape from the lid during operation and shortly thereafter. Condensate could accumulate under the lid and measuring cup and drip, when pouring out the contents of the jug, or when opening the lid.
- Do not cook any high-proof alcoholic liquid or alcoholic foodstuffs (e.g. mulled wine, grog) within the appliance to avoid risk of explosion and fire.
Moving Parts
The stirrer of the appliance is driven electrically via a magnet. Thus, you should always avoid inserting your hands, or any delicate objects in the jug, when the jug is placed on the power base and the appliance is connected to the power supply.
Technical Specifications
| Modell: Art.-Nr. 42360 Laté Art Milk Frother Advanced | |
| Power supply: 230-240 V AC, 50/60 Hz | |
| Power consumption: 500 W | |
| Length of power cord: ca. 1.05 m | |
| Weight: ca. 1.65 kg | |
| Dimensions: ca. 14.0 cm x | 15.4 cm x 26.5 cm (width x depth x height) |
| Capacity: 0.2 – 0.75 Litre | |
Properties of Your New Milk Frother
Your new Milk Frother has been designed specifically for the purpose of foaming milk and milk alternatives.
IMPORTANT: The appliance is NOT intended to thicken or heat other food substances (e.g. custards, soups, gravies), or to whip cream or egg white. Additionally, the appliance is not intended to mix a large quantity of dry and/or solid ingredients (e.g. ground nuts, spices, flour, cacao powder, herbs) or melt large pieces of food (e.g. chocolate or butter).
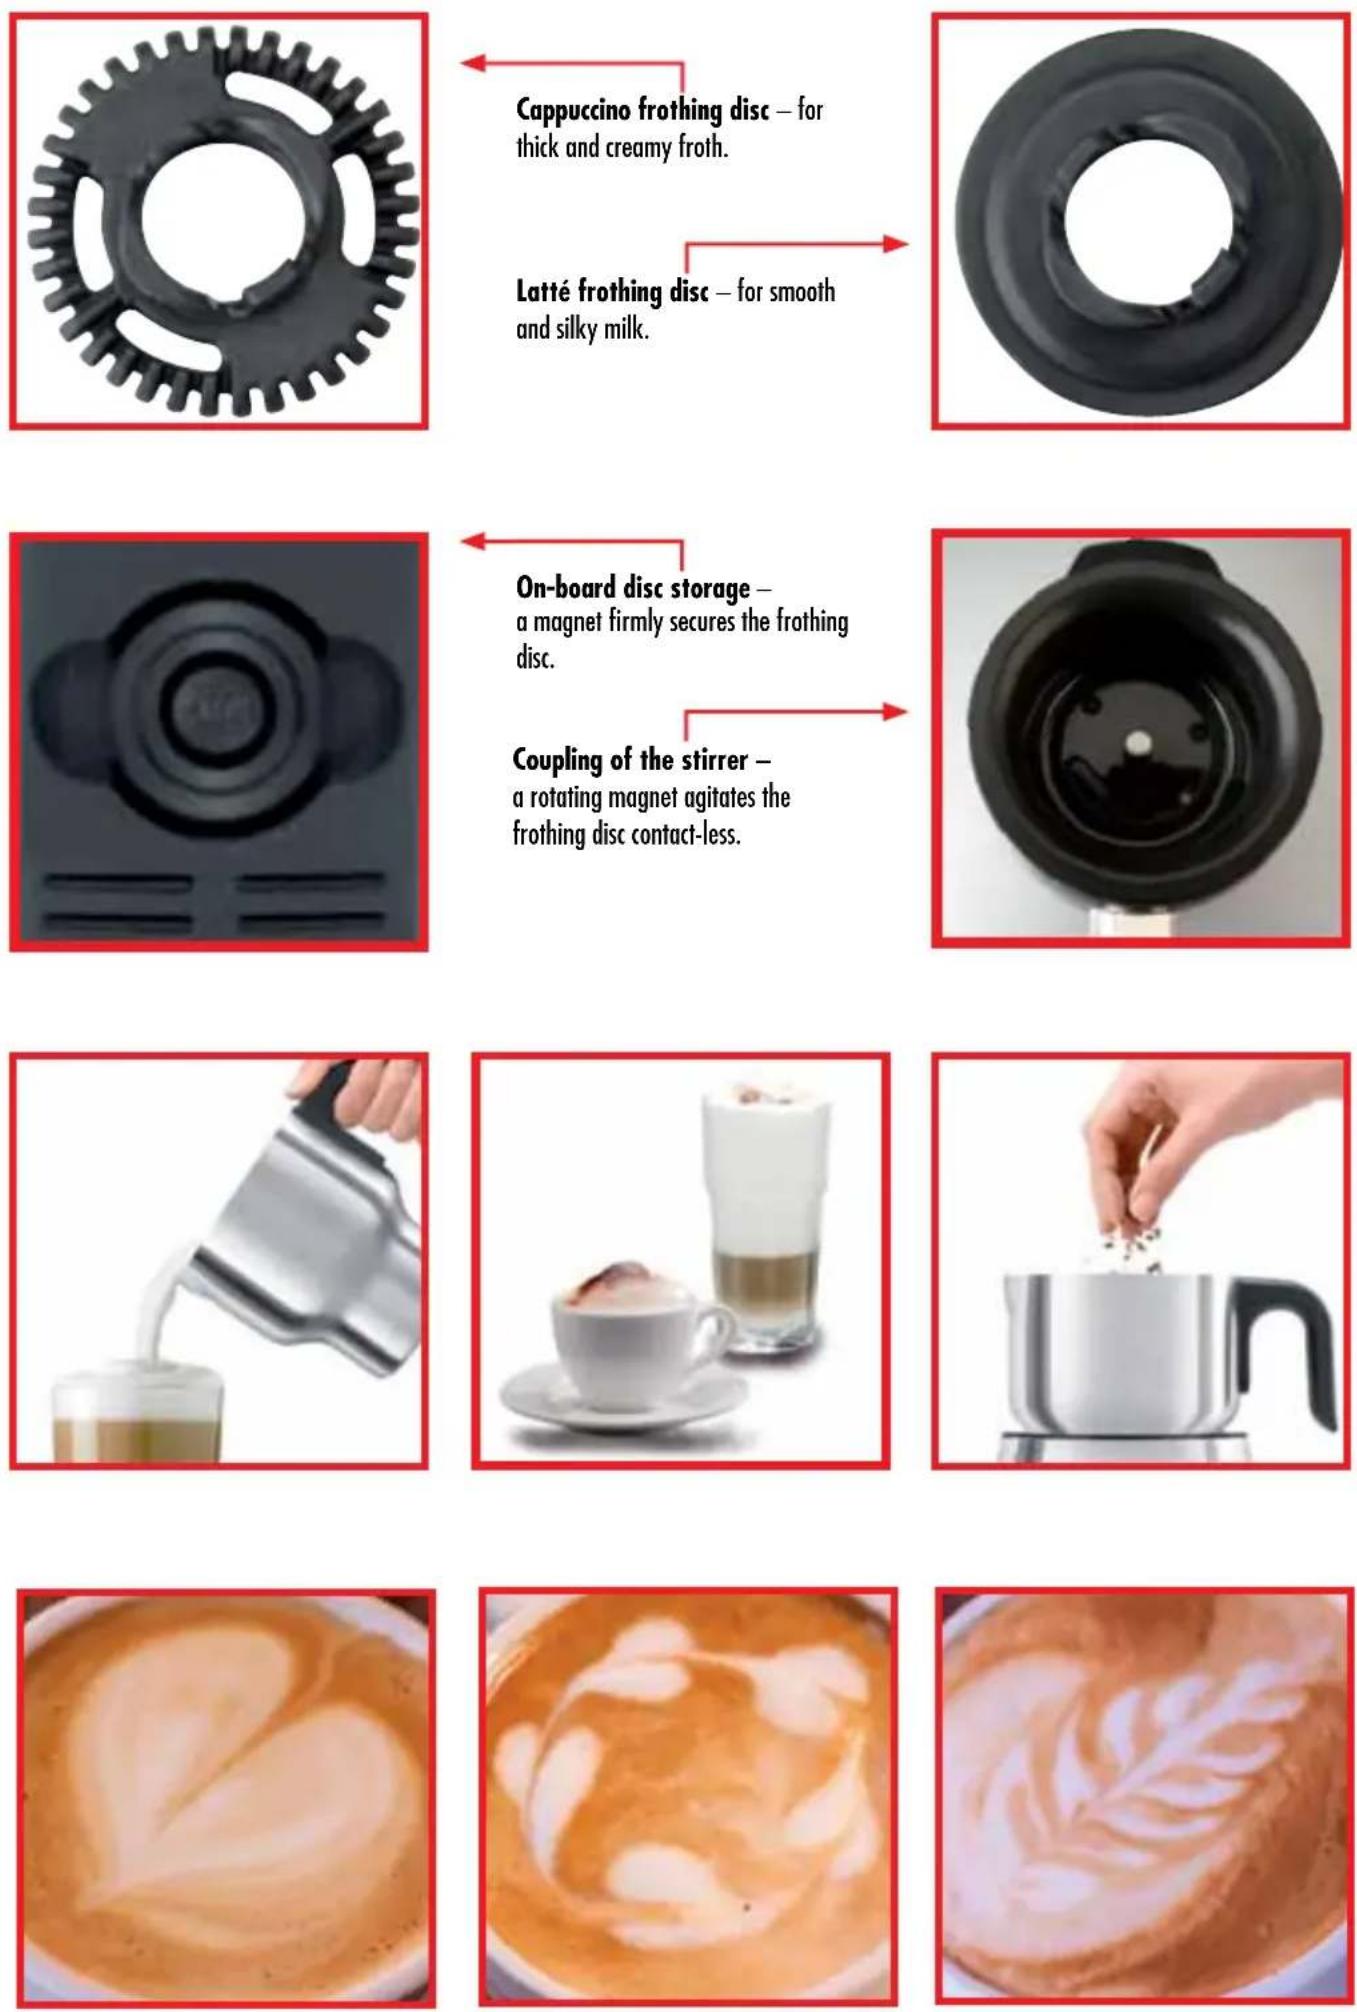
The frothing discs are driven contact-less via magnets. No opening for a drive shaft is necessary in the jug, thus avoiding weak points and leaks. As a result, cleaning is made much easier, too. Additionally, the frothing discs, jug, lid and measuring cup are dishwasher-safe (upper rack only).
Due to the seal at the brim of the lid, the contents will not drip or splash out of the jug, when operated correctly. Further ingredients are added via the opening for the measuring cup without removing the lid.
Safety Concept
For your protection and convenience, your new Milk Frother offers an innovative design.
• After 30 seconds of being idle the Milk Frother will switch off automatically and the indicator goes out. To start operation again, simply press the START/STOP button.
• Overheat Protection: The Milk Frother will automatically cease to operate, if the jug overheats. Possible reasons:
- The jug is empty, or liquid is below the MIN filling mark.
– Consecutive uses without sufficiently pausing.
In this case, immediately unplug the appliance and wait at least 5 minutes for the appliance to cool down. Thereafter, you can activate the appliance again.
- Thermal Cut-Out: This feature means protection for you and the appliance in case of serious malfunction. The appliance will no longer be able to operate. In this case, immediately unplug the appliance, and send the appliance and all parts of it to an authorized service centre for repair.
- The appliance operates via an induction heating system and a magnetic stirring system. Thus, injuries are avoided as far as possible, because you cannot unintentionally touch any heated or moving parts in the power base. Just keep in mind that the jug is heated and thus, everything touched by the hot jug will get hot, too. Therefore, after operation and removing the jug, let the power base cool down for some minutes, before moving or cleaning.
Tips for Best Results
• Always use cold, fresh (or freshly opened) milk.
- For optimum frothing results, do not exceed the CAPP LATTE MAX (500 ml) filling mark inside the jug. Generally, you will get more froth, when processing various small portions.
- Wait until the appliance warmed up the milk, before adding further ingredients.
• Pour frothed milk promptly to avoid the milk from separating.
- Do not reheat frothed milk that has not been used immediately.
- Ensure jug and frothing disc are clean before each use. When consecutively preparing various portions, always flash out the jug with cold tap water, before frothing the next portion of milk.
- Avoid adding sugary powders when using 'COLD STIR' setting. Toppings and syrups work best.
- For cappuccino or latté, we recommend staying within the 'OPTIMUM MILK TEMP' range (55 °C to 65 °C), however this is up to your personal preference.
- Different frothing results may be achieved depending on various influences. Experiment with different milk options, ingredients, temperatures and frothing discs to achieve the desired result.
- Milk alternatives: use fresh milk or UHT milk (e.g. cow, sheep or goat) or milk substitutes (e.g. soy, oat or almond) with various fat content. However, using low fat milk will provi de somewhat more silky froth.
- Further ingredients: acidity and fat content of the ingredients have a great effect on frothing. Adding powdery ingredients could in some cases prevent the build-up of froth (e.g. cacao powder).
As an example, you can add the following ingredients: cacao powder, mixtures for chocolate drinks and chai tea, flakes of chocolate, syrups (e.g. of maple, berries, woodruff), honey.
- Even the time of adding ingredients can be of great effect on the results. Some ingredients (e.g. cacao) prevent the milk from frothing. You should add ingredients like this after frothing.
- You can prepare various recipes. Examples: hot and iced chocolate, coffee recipes (cappuccino, latté, chai-latté, ice coffee, ice mocha).
- If you wish to froth cold milk, just turn the selector dial to COLD STIR, before switching on the appliance. Generally, the best results are achieved within 1 minute. Therefore, the appliance stops automatically after 1 minute.
Before First Use
WARNING: DO NOT let young children play with the appliance, or any part of it, or the packaging!
- Unpack the appliance and all accessories carefully.
- Check that no parts are damaged or missing (see: ,Knowing Your Latté Art Milk Frother Advanced').
Tip: A frothing disc could be mounted within the jug.
- Carefully remove all shipping materials and promotional materials, but DO NOT remove any warning labels or the model label. Especially ensure that there are no foreign objects (e.g. packaging material) in the interior of the jug and coupling of the power base.
WARNING! Always unplug the appliance, before cleaning. Do not immerse the power base or power cord in water or other liquids or spill any liquids on the power base or power cord. Do not place the power base or power cord in an automatic dishwasher.
- Before first use and after a longer period of storage, clean the appliance and its parts (see: 'Care and Cleaning').
Operation
WARNING: Always ensure that the appliance and all its parts and accessories are out of reach of young children. This holds especially for the frothing discs that could be swallowed by young children, thus causing risk of suffocation.
The appliance is intended for heating and mixing milk and milk surrogates (e.g. cow milk, soy milk). Therefore, the jug can get very hot during operation. Always observe the following safety precautions to avoid injuries and damage:
- With the jug mounted on the power base and/or the appliance is connected to the power supply: Do not insert your hands or any foreign objects (e.g. cooking utensils, clothes) in the jug. Always prepare the jug completely for operation (frothing disc inserted, filled, lid and measuring cup inserted), before placing it on the power base.
Do not drip any liquids on the exterior of the jug or in the power base. Immediately wipe off spilled liquids. When liquids come out from under the lid, run down at the exterior of the appliance and/or accumulate under the appliance, immediately unplug the appliance to avoid injuries and damage caused by electricity. Clean and dry the appliance, according to the instructions in section Care and Cleaning.
- During operation and shortly thereafter: Only touch the jug or lid at the designated handles. Do not hold your hands or face over the appliance. Steam could escape from under the lid. Additionally, condensate could accumulate under the lid and measuring cup and drip, when opening the lid. Do not remove the lid or jug, while the appliance is working (indicator is blinking), to avoid overflow and overheating. Add further ingredients via the opening in the lid, where the measuring cup is placed. Always switch OFF (press START/STOP button once) the appliance or wait until it stops working automatically (acoustic signal sounds twice, indicator is illuminated continuously or goes out), before removing the jug. Place the jug on a stable, level, moisture-resistant, and heat-resistant surface, before removing the lid. Keep the hot jug away from heat-sensitive objects.
- Only use the appliance for food. Do not process thick mixtures, solid, or high-proof alcoholic foodstuffs. The appliance is NOT suited for melting, mixing or chopping solid ingredients.
Preparing the Appliance
WARNING: Only place the appliance on a stable, dry, level, and clean surface. Do not place the appliance on inclined surfaces. Do not place any clothes or tissue or other foreign objects on or under the appliance during operation, to avoid risk of fire or electric shock. Do not block the ventilation slots at the bottom and rear of the power base. During operation, the operating elements (see: Knowing Your Latté Art Milk Frother Advanced) must be accessible any time.
Before assembling the appliance, always ensure that all parts and accessories you wish to use are in proper working order (e.g. not cracked, chapped, broken or distorted). Do not use any damaged or unsuitable parts to avoid risk of injuries and damage.
Do not operate the appliance with the filling level below the MIN filling mark or exceeding the MAX filling mark. Ensure not to spill any liquids on the power base. The jug must always be clean and dry, when placed on the power base to avoid risk of electric shock or damage.
- Place the power base on a flat, stable, moisture-resistant and heat-resistant surface near a suitable wall power outlet (see: Important Safeguards) with the START/STOP push dial facing to you. Leave at least 10 cm of free space to walls, curtains, boards and other objects on each side of the appliance. Leave at least 50 cm of free space above the appliance to get unhindered access. Ensure that the appliance is unplugged.
-
Select the appropriate frothing disc and insert it in the jug.
-
select the cappuccino frothing disc (like a cogwheel) for thick and creamy froth.
– select the latté frothing disc (smoothly shaped) for silky and smooth milk.
Put the frothing disc on the shaft in the middle of the jug. For this, the level side of the frothing disc must face downwards. Press the frothing disc gently down, until it tangibly engages on the shaft.
-
Fill the desired amount of cold fresh milk in the jug. For this, always observe the filling marks within the jug.
-
The filling level must lay above the MIN filling mark (at least 200 ml).
- If you wish to froth milk (e.g. for cappuccino or latté), then the filling level may not exceed the CAPP LATTE MAX filling mark (approx. 500 ml).
- If you wish to prepare cacao, the filling level may reach the HOT CHOC MAX filling mark, because cacao is scarcely frothing.
Even if you wish to add further ingredients during operation, always observe the MAX filling level, therefore starting with a smaller amount.
- Place the lid onto the jug and press it down gently to avoid leaking.
- Place the measuring cup into the lid. For this, turn the measuring cup a little until it slips down into the opening of the lid. The brim of the measuring cup may not protrude the lid. Then turn the measuring cup to lock it in the lid. Otherwise, the measuring cup could fall out later.
WARNING: Do not place the jug on the power base, when the jug is wet to avoid risk of electric shock and damage. Always keep the exterior of the jug dry and clean, when it is mounted on the power base.
- Ensure that the exterior of the jug is clean and dry. Then place the jug on the power base. The appliance is ready for operation now.
Frothing Milk
- Connect the appliance to the power supply.
The indicator in the START/STOP push dial illuminates.
Tip: After being idle for 30 seconds the Milk Frother will enter standby mode (indicator goes out, fan stops working). Simply press the START/STOP button once to re-activate the appliance.
- Turn the selection dial to the desired temperature. See: Tips for Best Results If temperature setting is changed during operation, the appliance will stop at the new temperature.
Tip: The function COLD STIR leaves the heating system deactivated while the stirrer is agitating. For instance, use this function to prepare cold drinks. The appliance will stop automatically after 1 minute.
WARNING: Especially when selecting high temperatures, the exterior of the jug will become very hot. Ensure, not to get scald by steam and condensate. Only touch the jug and lid at the handles to avoid scalding. Do not hold your hands or face over the jug during operation and shortly thereafter.
- Press the START/STOP button to switch on the appliance.
The appliance starts working, an acoustic signal sounds once, and the indicator starts to flash. Depending on the used quantity of milk and the selected temperature, the appliance will take between 2 and 8 minutes to reach the adjusted temperature.
Note: Do not remove the jug or the lid during operation. To stop operation at any time, press the START/STOP button once. An acoustic signal sounds twice and the indicator is illuminated continuously.
Even after switching OFF, the fan of the appliance continues working audibly, and the indicator illuminates continuously. This does NOT mean that stirrer and heater are still operating. After 30 seconds without operation the fan will shut down automatically and the indicator goes out.
WARNING: Do not place the hot jug on a heat-sensitive or inclined surface where it can tilt or fall. Beware of hot liquid, condensate and steam, when opening the lid and pouring out the contents.
Due to the contact with the hot jug, the mounting of the jug in the power base could be slightly hot. Let the power base cool down for some minutes, before touching the upper sides of the power base.
-
Carefully remove the jug from the power base as the jug and contents could be hot. Place the jug on a heat-resistant level surface.
-
Holding the jug by the handle, remove the lid. Then pour out the frothed milk. Use a wooden or plastic spoon (e.g. cocktail spoon with especially long handle) to take out the froth.
-
Flush out the jug with cold tap water immediately after emptying.
-
If you wish to prepare another portion of milk, just continue as described in this section.
-
After you have processed your milk as desired, unplug the appliance.
-
Clean the appliance and all used parts and accessories immediately after use. Do not let any food dry on the surfaces (see: 'Care and Cleaning').
Adding Further Ingredients
WARNING: Ensure not to spill any liquids on the appliance, when adding further ingredients through the opening in the lid. Do not overfill the jug. Do not remove the lid, while the appliance is operating. Always pour further ingredients through the opening for the measuring cup. Otherwise the jug could overflow, and liquid could drip on the power base, causing electrical hazard.
Additionally, the contents of the jug could splash, when pouring in further ingredients. Thus, do not hold your face over the opening in the lid while the stirrer is agitating. Keep delicate objects in sufficient distance from the appliance.
It is best to slowly add further ingredients with the stirrer operating and after the appliance has slightly warmed up the milk (some seconds up to 1 minute). This way, the ingredients are mixed evenly and you get the best results. Prefer liquids rather than solid ingredients (e.g. sugar syrup is better than caster sugar). Whenever possible, dissolve solid ingredients in a small amount of milk (e.g. caramel) and/or melt it (e.g. butter or chocolate).
- Remove the measuring cup from the lid. For this, turn the measuring cup until you can lift it up and out.
You can use the measuring cup for measuring out the required amount (up to 30 ml).
- Slowly pour the ingredients into the opening in the lid.
Always pour slowly and in small quantities, to avoid splashes and achieve an even mixture. Additionally, adding ingredients too quickly may cause the frothing disc to dislodge or stop spinning.
- Turn the measuring cup upside down, and insert the measuring cup in the opening in the lid. The bottom of the measuring cup must be on a level with the top of the lid. Turn the measuring cup to lock it in the lid.
Solving Problems
If any problems occur during operation, you will find solutions in this section.
| Problem Reason The Solution | ||
| Milk is not frothing • Start | with cold, fresh milk. | Do not re-foam already heated milk. Try reducing milk volume in jug. |
| Appliance is not heating. | The jug is not placed properly on the power base.The process has not yet been started.The selected temperature is too low. | • Ensure jug is correctly positioned onto power base.• Press START/STOP button to switch on the appliance; thereafter, the indicator must flash.• Increase temperature by turning the selection dial clockwise. |
| Frothing disc is not moving or is dislodged. | Frothing disc is not inserted correctly.Ingredients have been added too quickly. | 1. Stop operation.2. Remove liquid from jug.3. Insert disc firmly into jug.4. Refill jug with liquid.• Add ingredients slowly and in small quantities. Finely cut large pieces before adding. |
| Ingredients are not melting. | Ingredients have been added before milk has warmed up.Ingredients are too large. | • Allow the Milk Frother to heat for a few seconds before adding ingredients.• Finely cut large pieces before adding. |
| Milk is too cold or too hot. | Wrong temperature setting.Too much or too less milk in the jug. | • Adjust selection dial to suit personal preference.• Always operate the appliance between MIN and MAX filling marks (inside the jug). |
| The appliance suddenly stops. | Power failure.The overheat protection is active.The thermal cut-out is active. | ·Ensure that the power outlet is live.·Unplug the appliance and wait for the appliance to cool down (approx. 5 minutes). Thereafter you can continue working as usual.·Unplug the appliance and send the appliance to an authorized service centre for repair. |
Care and Cleaning
WARNING: Always ensure that the appliance and any parts and accessories of it are out of reach of young children. This holds especially for the frothing discs that could be swallowed by young children, thus causing risk of suffocation.
Always unplug the appliance, before cleaning. Even shortly after operation, the jug can be very hot. Ensure that the jug cooled down before cleaning.
Do not use any abrasive cleaners, cleaning pads (e.g. metal scouring pads), or any corrosive chemicals (e.g. bleach) for cleaning the appliance or any parts of it, to avoid damage to the surfaces. Do not use any hard or sharp-edged objects for cleaning. Do not immerse the power base or power cord in water or any other liquid. Do not spill or drip any liquids on the power base, or on the power cord to avoid risk of fire and electric shock. Do not use violence!
Do not let any food dry up on the appliance or any parts of it to prevent accumulation of baked-on foods. Always clean the appliance after each use according to the following instructions.
Cleaning the Appliance
Note: Only the jug, lid, measuring cup and frothing discs can be washed in the automatic dishwasher (top rack only). Ensure that the frothing disc will not fall down into the dishwater pan of the dishwasher.
CAUTION: Do not place the power base or power cord in an automatic dishwasher.
- Always unplug the appliance, before cleaning or moving the appliance.
- Completely empty the jug. You can pour out the liquid via the spout. It is best to use a wooden or plastic spoon with extra-long handle for taking out the froth.
- Rinse the jug with cold tap water. Thereafter take out the frothing disc.
- Wash the jug, lid, measuring cap and frothing disc in warm soapy water and rinse thoroughly.
Note: The seal on the lid can be removed and washed separately. However, do not use any hard or sharp-edged objects for removing and cleaning the seal to avoid damage to lid and seal.
- Wipe the power base with a soft, damp cloth.
WARNING: Always ensure that the appliance and all parts of it are out of reach of young children.
- Dry all parts of the appliance thoroughly and let all parts dry naturally were they are out of reach of young children.
- If you removed the seal, then put the seal into the groove of the lid.
Storage
WARNING: Young children must be supervised that they do not play with the appliance or any part of it. The frothing discs could be swallowed by young children, thus causing risk of suffocation. Jug, lid and measuring cup get very hot during operation.
Always unplug the appliance when it is not in use. Let the appliance cool down, before cleaning or storing the appliance. Always clean the appliance and all its parts before storing to avoid accumulation of dried-on food (see: 'Care and Cleaning').
Ensure to store the appliance where it is clean, dry and safe from frost, direct sunlight and inadmissible strain (mechanical or electric shock, heat, moisture) and where it is out of reach of young children. Place the appliance on a clean and stable surface, where it cannot fall. Do not place any hard or heavy objects on the appliance or any part of it.
Always handle the power cord with care. Power cords may never be knotted, twisted, pulled, strained, or squeezed.
Do not use any parts or accessories of the appliance for any other purpose than operating the appliance. It is good advice to store the parts and accessories of the appliance with the appliance.
- Ensure that the appliance is switched OFF (indicator is illuminated continuously or dark) and unplug the appliance. Let the appliance cool down, than clean the appliance and its parts before storage (see: 'Care and Cleaning').
- Loosely wrap the power cord around the cord wrap in the bottom of the power base.
- Place the jug on the power base.
- Insert the frothing discs into the jug.
Alternatively, you can put one of the frothing discs on the on-board disc storage at the rear of the appliance.
- Place the lid on the jug and insert the measuring cup in the lid.
CAUTION: Do not hold the appliance by the jug, power cord or lid for moving the appliance. To move the appliance, always hold the power base at both sides near the bottom to avoid damage.
- Grasp the power base with both hands at its sides, and place it on a suitable surface, where it cannot fall, and is out of reach of young children.
Notes for Disposal
Dispose of the appliance and packaging must be effected in accordance with the corresponding local regulations and requirements for electrical appliances and packaging. Please contact your local disposal company.
Information and Service
Please check www.gastroback.de for further information. For technical support, please contact Gastroback Customer Care Center by phone: +49 (0)4165/22 25-0 or e-mail info@gastroback.de.
Warranty
We guarantee that all our products are free of defects at the time of purchase. Any demonstrable manufacturing or material defects will be to the exclusion of any further claim and within 2 years after purchasing the appliance free of charge repaired or substituted. There is no Warranty claim of the purchaser if the damage or defect of the appliance is caused by inappropriate treatment, over loading or installation mistakes. The Warranty claim expires if there is any technical interference of a third party without a written agreement.
The purchaser has to present the sales slip in assertion-of-claim and has to bear all charges of costs and risk of the transport.
Recipes
Hot Chocolate
Select cappuccino frothing disc
Ingredients (2 portions):
250 ml cold fresh milk;
1 - 2 teaspoon shaved chocolate, melted chocolate or cacao powder; caster sugar to taste
Add milk in the jug and allow to heat and froth at the desired temperature setting (recommended: 60 °C) for 30 seconds. Then add chocolate/cacao and sugar slowly and in small portions.
Cappuccino
A composition of 1/3 lukewarm espresso, 1/3 hot milk, and 1/3 of milk froth.
Select cappuccino frothing disc.
Ingredients (1 portion):
1 small cup of espresso,
200 ml fresh cold milk,
1/2 - 1 pack vanilla sugar (to taste),
1/2 teaspoon shaved chocolate or cacao powder.
Prepare espresso in a large cappuccino cup (for approx. 300 ml). Fill milk in the jug, select the desired temperature and let the appliance operate for approx. 30 seconds. Slowly add vanilla sugar. As soon as the frothing process is complete, carefully pour the liquid to the espresso. Use a wooden or plastic spoon to cover with froth. At least sprinkle with chocolate or cacao powder.
Latté
Latté is a blend of 1/3 espresso to 2/3 frothed milk.
Select latté frothing disc.
Ingredients (1 portion):
1 small cup espresso,
200 ml fresh,
cold milk,
caster sugar to taste.
Fill espresso in a huge narrow glass (approx. 300 ml in size). Prepare milk in the Milk Frother, adding sugar to taste. Tilt the latté glass a little and pour the milk slowly down the inner side of the glass, thus getting layers of milk, coffee and froth.
Chai Latté
Select latté frothing disc
Ingredients (1 portion):
250 ml fresh, cold milk,
1 portion chai latté tea concentrate,
some grounded nutmeg or cinnamon.
Fill milk in the jug and select the desired temperature. After approx. 30 seconds slowly add the tea concentrate. After processing of milk has been finished, pour out and top with nutmeg or cinnamon to taste.
Flat White
Select latté frothing disc
Ingredients (1 portion):
1 small cup espresso,
250 ml fresh, cold milk.
Fill milk in the jug, select the desired temperature and start the appliance. Prepare espresso. After processing of milk has been finished, pour milk and espresso in a large cup.
Iced Coffee or Iced Chocolate
Select cappuccino frothing disc
Ingredients (1 portion):
250 ml cold, fresh milk,
1 teaspoon instant coffee or chocolate powder,
1 scoop of vanilla ice cream,
whipped cream.
Whipping the cream in a mixer, you can possibly add some sugar to taste. Dissolve instant coffee or chocolate powder in a little lukewarm milk. Fill the remaining milk in the jug, turn the selection dial to COLD STIR, and start the appliance. Slowly add the coffee or chocolate mixture. After the appliance switched OFF, pour the coffee/chocolate in a large glass. Add a scoop of vanilla ice cream. Top with some whipped cream.
Index
A
abroad operation....29
accessories....27
C
capacity 30, 34
care and cleaning....38
condensate....29
cord wrap....32, 38
D
dishwasher use 38
disposal 40
E
electricity 29
extension cord 29
F
first use....32
frothing disc 34
functions 30
H
heating system 25
|
inteded use 27
J
jug 25
M
model 30
moving parts 30
O
operating elements 25
operation 33
overheat protection 31
on-board disc storage 39
P
parts 25
power consumption 30
power cord 29, 30, 32
power supply 29,30
preparation 34
properties 30
R
recipes......41
S
Safety instructions ......27
safety interlock....31
service....40
solving problems....37
spare parts 27
steam 29
storage 38
T
technical specifications ....30
temperature....29
test for proper operation....27
Thermal Cut-Out....31
tips....31
W
warranty 40
workspace 27
GASTROBACK GmbH
- Operating Instructions
- Latté Art Milk Frother Advanced
- Table of Contents
- Dear Customer!
- Cord wrap for the
- Important safeguards
- General Safety Instructions
- Important Safeguards for Electrical Appliances
- High Temperatures—Risk of Burns
- Moving Parts
- Properties of Your New Milk Frother
- Safety Concept
- Tips for Best Results
- Before First Use
- WARNING: DO NOT let young children play with the appliance, or any part of it, or the packaging!
- Operation
- WARNING: Always ensure that the appliance and all its parts and accessories are out of reach of young children. This holds especially for the frothing discs that could be swallowed by young children, thus causing risk of suffocation.
- Preparing the Appliance
- Frothing Milk
- Adding Further Ingredients
- Solving Problems
- Care and Cleaning
- Cleaning the Appliance
- CAUTION: Do not place the power base or power cord in an automatic dishwasher.
- Storage
- Notes for Disposal
- Information and Service
- Warranty
- Recipes
- Hot Chocolate
- Cappuccino
- Latté
- Chai Latté
- Flat White
- Iced Coffee or Iced Chocolate
- Index
- A
- C
- D
- E
- F
- H
- |
- J
- M
- O
- P
- R
- S
- T
- W
- GASTROBACK GmbH
Brand : Gastroback
Model : Latte Art
Category : Milk frother