
Wizz.it 3 - Communication Software MARANTZ - Free user manual and instructions
Find the device manual for free Wizz.it 3 MARANTZ in PDF.


| Type | Communication Software |
| Brand | Marantz |
| Model | Wizz.it 3 |
| Supported Operating Systems | Windows 2000, Windows XP, Windows Vista |
| Minimum PC Requirements | 500 MHz Intel Pentium III or equivalent, 128 MB RAM, 250 MB free hard disk space, free USB port |
| Recommended PC Requirements | 1.2 GHz Intel Pentium IV or equivalent, 512 MB RAM, 500 MB free hard disk space, free USB port |
| Main Functions | Editing RC3001 setting data, backup of RC3001 settings to PC, configuration file customization, IR code learning, IR database integration, macro programming, RF setup, simulator |
| Supported Remote Controllers | RC3001, RC2001 |
| Installation Method | Download from Marantz website, run installer |
| File Format | Configuration files (.mcf) |
| License | Proprietary, free with Marantz products |
| Language Support | English (manual available in French, German, Italian, Spanish, Portuguese on website) |
| Dimensions | Not applicable (software) |
| Weight | Not applicable (software) |
| Power Supply | Not applicable (software) |
| Maintenance and Cleaning | Keep software updated from Marantz website; no special cleaning required |
| Safety Warnings | Do not disconnect USB cable during download to prevent data loss |
| Spare Parts and Repairability | Not applicable (software); reinstall if corrupted |
| General Information | Designed for customizing Marantz remote controls; includes database of IR codes for various brands |
Frequently Asked Questions - Wizz.it 3 MARANTZ
User questions about Wizz.it 3 MARANTZ
0 question about this device. Answer the ones you know or ask your own.
Ask a new question about this device
Download the instructions for your Communication Software in PDF format for free! Find your manual Wizz.it 3 - MARANTZ and take your electronic device back in hand. On this page are published all the documents necessary for the use of your device. Wizz.it 3 by MARANTZ.
USER MANUAL Wizz.it 3 MARANTZ
This document is only included in the English language edition. Access the Marantz website to view it in French, German, Italian, Spanish or Portuguese (http://www.marantz.com/).
FRANÇAIS
EDITING A NEW CONFIGURATION FILE ....4
ACTION WINDOW ....5
LABEL WINDOW 12
LEFT SIDE SOFT BUTTON SETTING ....13
RF SETUP ....14
REGISTERING TO MY DATABASE ....15
OTHER 16
FEATURES
The software "Wizz.it 3" enables you to perform the following operations.
• Editing of RC3001 setting data
- Backup of RC3001 setting data to a PC
Support OS
- Windows 2000
- Windows XP
- Windows Vista
Minimum requirements for PC
- 500 MHz Intel Pentium III workstation or equivalent
- 128MB of RAM
• 250MB free Hardisk space - Free USB port
Recommended requirements for PC
• 1.2 GHz Intel PentiumIV workstation or equivalent
- 512MB of RAM
- 500MB of free Hardisk space
- Free USB port
INSTALLING Wizz.it 3
- At first, you download the software "Wizz.it 3" from the Home Entertainment section of your region in Marantz Website http://www.marantz.com.
- Open the downloaded file in your PC and follow the on screen instructions to install the editor.
Notes:
You can install Wizz.it 3 together with other Marantz editors.
The files of Wizz.it 3 are automatically placed in a separate directory.
CUSTOMIZING THE CONFIGURATION FILE
During the installation of the editor, one configuration file was also saved on your PC.
There is one default configuration file which you can start from to create a custom configuration file (CF) (defaultRC3001.mcf).
The default CF is constructed in such a way that they can be easily adjusted to the needs of every customer.
- This file contains the main Marantz remote control codes for enabling control of Marantz products with the default settings.
CONNECTIONS
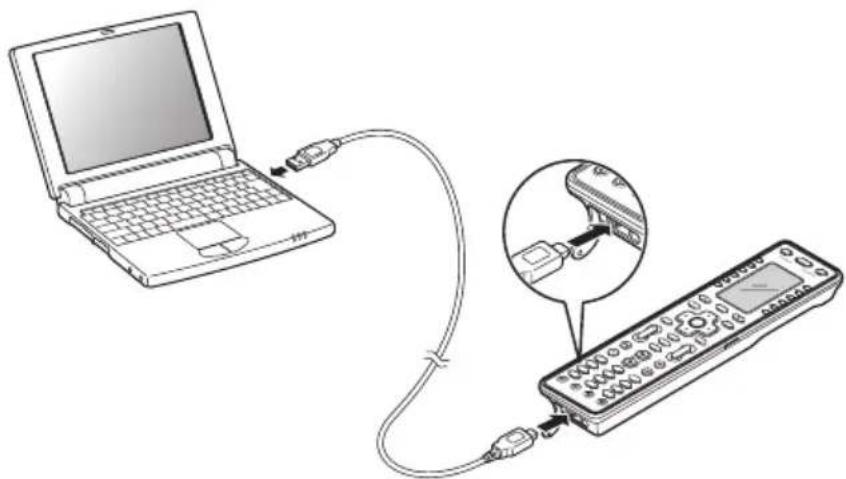
CONNECT PC AND REMOTE CONTROLLER
natural_image
Line drawing of a laptop connected to a remote control via cable, with an inset showing the cable being inserted (no text or symbols present)- The attached USB cable connects to the USB port of remote controller and the USB port of your PC
- Open the USB Device wizard menu in your PC automatically.
- Select the automatic scanning of USB driver or select the location of USB driver.
The location of RC2001_3001 USB driver
C:\Program Files\Marantz\Marantz Wizz.it 3
Note:
The USB driver of RC2001 and RC3001 does not take the certification of Microsoft.
However, you can use it in your PC.
WIZZ.IT 3 OPERATION
After Wizz.it 3 is installed, the Wizz.it 3 icon is displayed on the PC desktop.
Double-clicking the icon starts Wizz.it 3.
To make settings for the remote controller after startup, either edit the default configuration file or use a new configuration file.
ICON DESCRIPTIONS
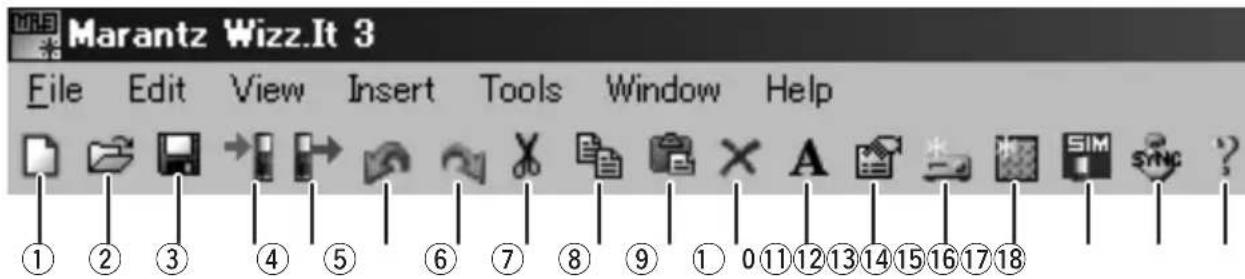
① New Configuration
This creates a new setting configuration.
② Open Configuration
This opens a setting file saved in the PC.
③ Save Configuration
This saves the configuration that is being edited as a user file to the PC.
④ Download to remote control
This writes the edited configuration to the remote controller.
⑤ Upload from remote control
This loads remote controller settings to the PC.
⑥ Undo
This is used to undo an edit operation in the settings.
⑦ Redo
This is used to redo an edit operation in the settings that were undone.
⑧ Cut
This cuts a selected setting.
⑨ Copy
This copies a selected setting.
⑩ Paste
This pastes a selected setting.
⑪ Delete
This deletes a selected setting.
⑫ Label
This is used to set the label of a selected device or button.
⑬ Properties
This is used to set the properties of a selected device or button.
⑭ Add new device
This adds a new device.
⑮ Add new page
This adds a new page.
⑯ Wizz. it Simulator
This simulates on the PC the remote controller that was set.
⑰ Clock Sync
This synchronizes the internal clock of the remote controller with the internal clock of the PC.
⑱ Help
The User Manual is displayed as a PDF file.
EDITING A NEW CONFIGURATION FILE
Use the procedure below to make the settings when using a new configuration file.
![Marantz Web21.2 - [O:\Documents and Settings\frx.matsuc\DF-AVYRy Documents\frx.dct] File Edit Help HOME PAGE1 CD DEVICE2 DEVICE3 DEVICE4 DEVICE5 HOME FWR TV VCR1 DSS DD LINK TO TY-HARD-ONOFF LINK TO TY-HARD-ONOFF Add R Code Create Link Add Delay Create Jump Add Deep Punch Through Sleep Timer Test R](/content/2026/05/857785/images/874153783d034655744149901d6d7d126f18eb63c70eb4f3d728d469e166a1b5.jpg)
- Click the New Configuration icon.
- Click the Add new device icon, and add the number of devices to match the number of devices to be controlled.
The devices are registered automatically starting from Device 1 on the Home page for the number of devices that were set. - Double-click the HOME icon, and then select and double-click Page1. The remote controller illustration screen appears on the screen.
- Double-click the button on the right of each device name to display the Key Property screen.
- Select Label, and then assign names to the devices. The names can be up to 9 characters in length. (Refer to page 12.)
- Select Action to select the action that is performed. The jump operation is automatically set to each device by default. (Refer to page 5.)
- To make the settings for each device, select the device under the tree display, and then double-click the page of the device to display the remote controller illustration screen.
Double-click each button to display the Property screen. Make the Action setting here.
(Refer to page 5.)
To add more pages, click the Add New Page icon. - After the settings are completed, connect the remote controller to the PC using a USB cable. Click the Download icon to write the settings in the user file to the remote controller.
Note:
Do not disconnect the USB cable while downloading. This could cause data to be erased in the remote controller so that it no longer functions properly.
- It is recommended that you click the Save icon to save to the PC the user file that was set.
Effectively combining Jump/Link operations enables building of a user interface in the remote controller that is optimized for the customer's operating conditions.
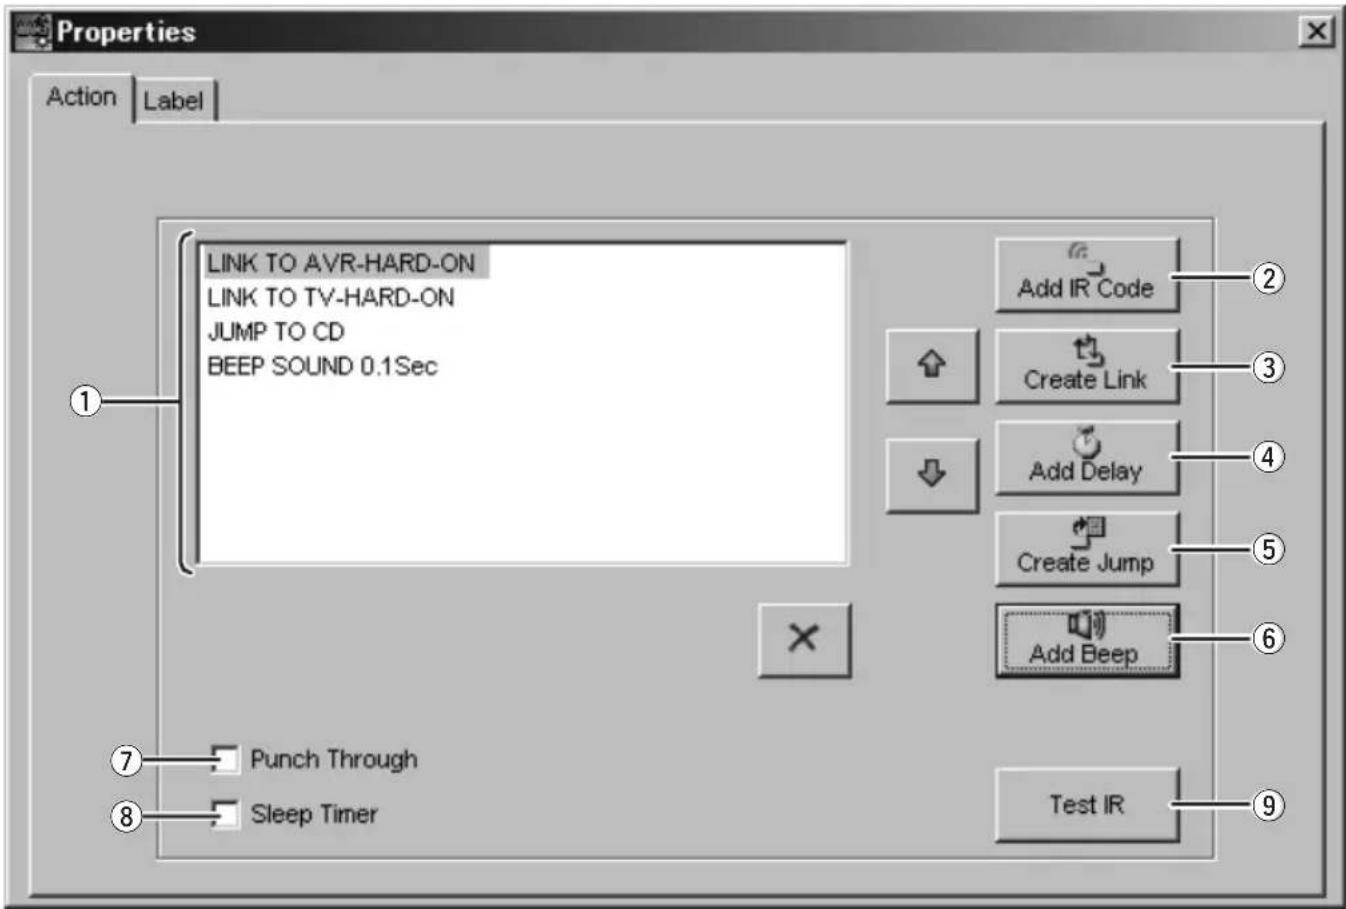
① Action List
This list sets the One Touch Operation (Macro).
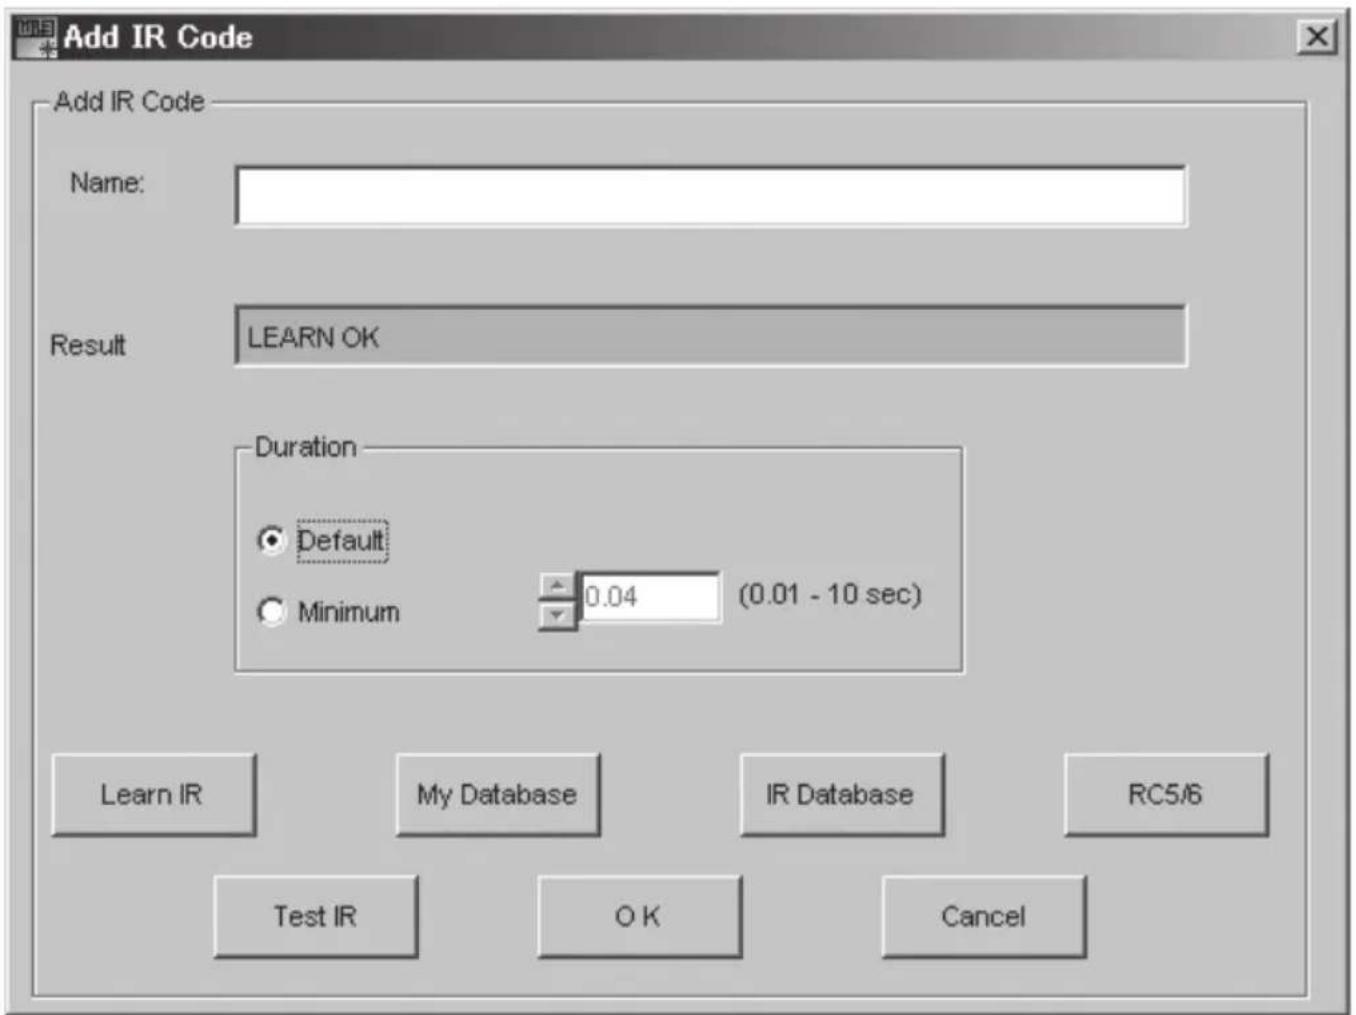
② Add IR Code
This is used when setting the IR command to be sent. (Refer to page 6, "Add IR Code Window".)
③ Create Link
This sets the links for the Action List. (Refer to page 10, "Create Link Window".)
④ Add Delay
This sets a delay time between commands in the action list if necessary. The adjustment range is 0.1 to 32 seconds in 0.1 sec/step.
⑤ Create Jump
This sets which page is jumped to in the middle or end of the action list. (Refer to page 10, "Create Jump Window".)
⑥ Add Beep
This sets the beep sound in the action list. (Refer to page 11, "Add Beep Window".)
⑦ Punch Through
Click to insert a check mark in the check box when setting the same command code as the hard button of each device. This cannot be set by the soft buttons.
⑧ Sleep Timer
This is set when the sleep timer is used to send the action list. Click to insert a check mark in the check box. In the sleep time setting, the sending of commands is set by the remote controller. (Refer to the RC3001 User Guide.)
⑨ Test IR
This performs a test transmission of IR commands from the remote controller connected to the PC from IR codes selected in the action list.
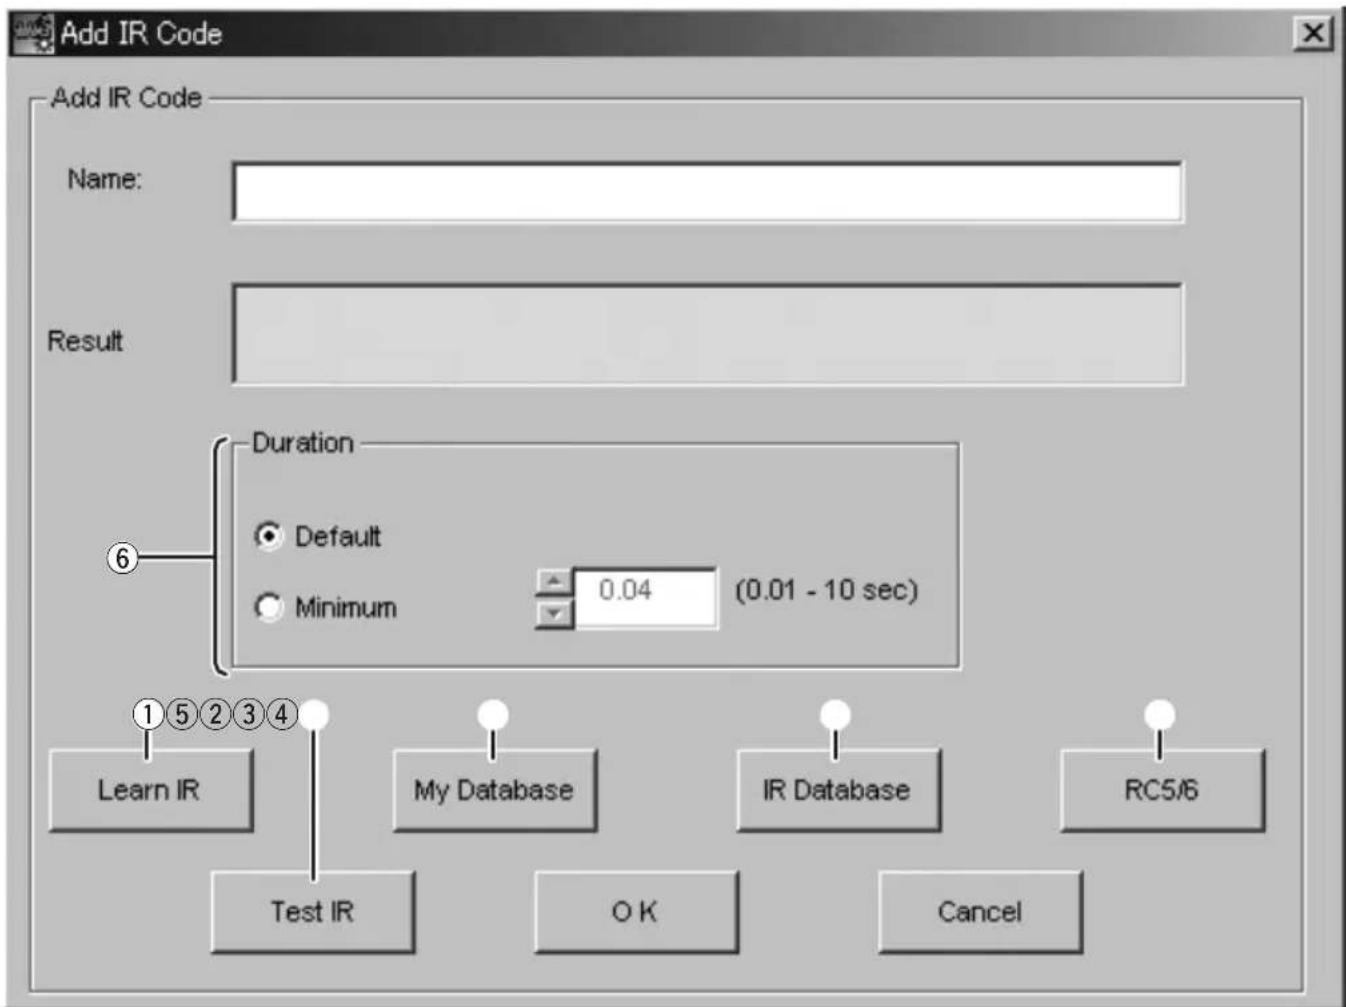
① Learn IR
This is used to learn the remote control codes from other remote controllers and set them in the action list. (Refer to page 7, "Learning IR".)
② My Database
This loads and sets the IR codes registered in My Database. Specify the file saved in the PC to load the IR codes registered in My Database.
③ IR Database
This loads and sets the IR codes from the IR Database containing the remote codes from various brands. (Refer to page 8, "IR Database Window".)
④ RC5/6
This uses direct key input to set the remote control codes RC-5, RC-5 Extension, RC-6 mode 0, RC-6 mode 6A used by Marantz. (Refer to page 9, "Edit RC5/RC6 Window (Direct Input Code".)
⑤ Test IR
This performs a test transmission of IR commands by sending a preset code from the remote controller connected to the PC.
⑥ Duration
This is used to adjust the duration of the IR command.
LEARN IR
- Use a USB cable to connect the PC making the settings to the remote controller (RC3001/RC2001).
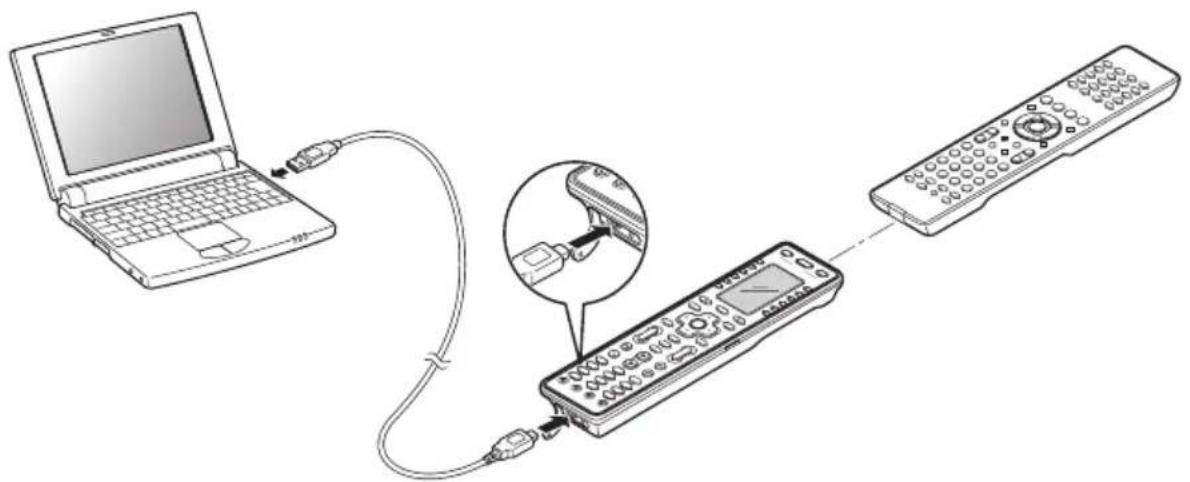
- Place the remote controller so that its infrared signal transmitter is facing the infrared signal receiver on the remote controller at a distance of about 2 inches (0.05 m).
- Click the "Learn IR" icon in "Add IR Code Window".
- This enters the learning standby mode. Send the remote controller code that you want to learn.
- Learning is complete when "LEARN OK" is displayed in Results.
IR DATABASE WINDOW
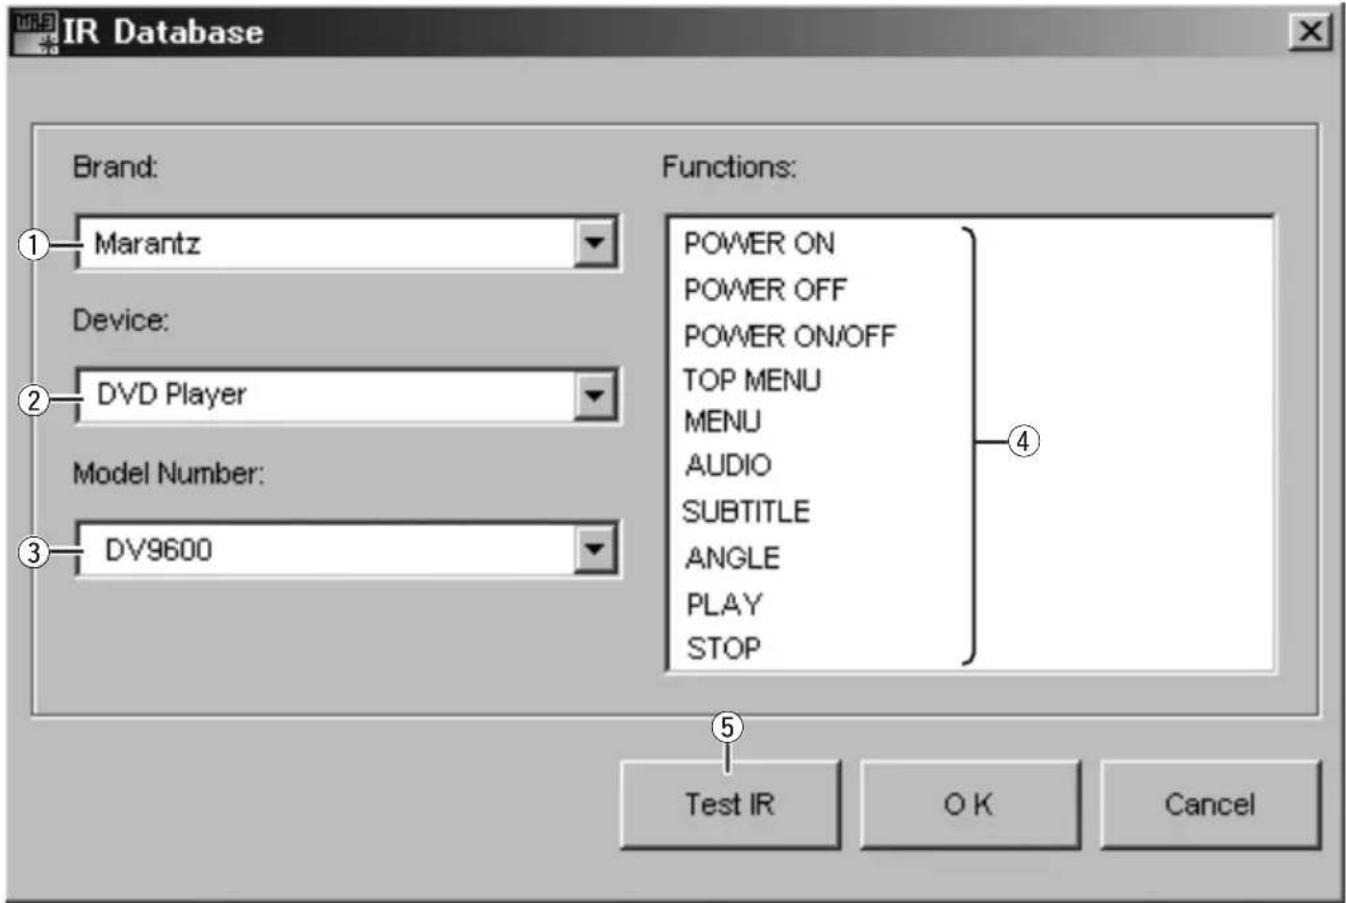
① Brand
Select the brand name of the device to be controlled.
② Device
Select the device type to be controlled.
③ Model Number
Select the model number of the device to be controlled. If there is no applicable model number, select from the preset codes.
④ Functions
Select from the displayed remote control codes registered for the selected model number.
⑤ Test IR
This performs a test transmission of IR commands by sending a preset code from the remote controller connected to the PC.
EDIT RC5/RC6 WINDOW(DIRECT INPUT CODE)
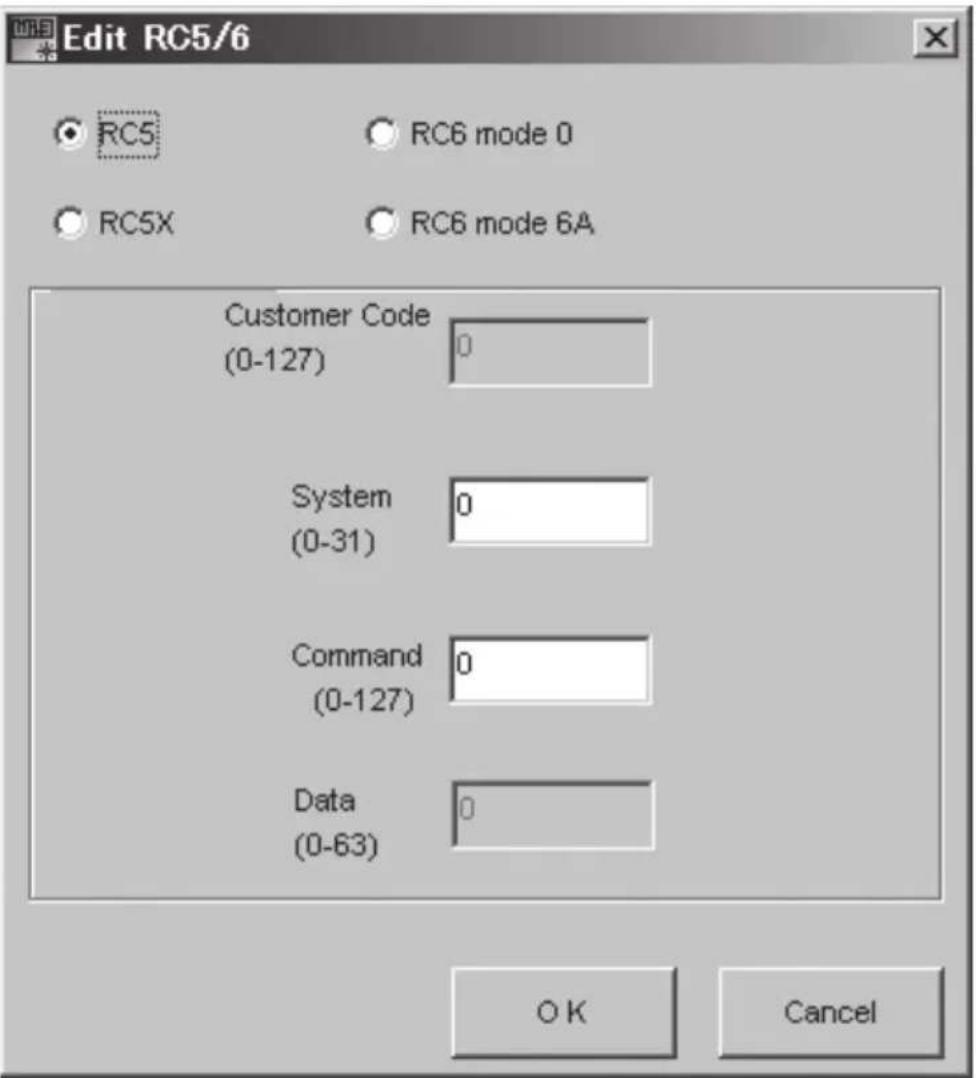
Use the radio buttons to select the code type that will be set.
Enter the codes required according to the specific code type.
After entering the codes, click OK.
CREATE LINK WINDOW
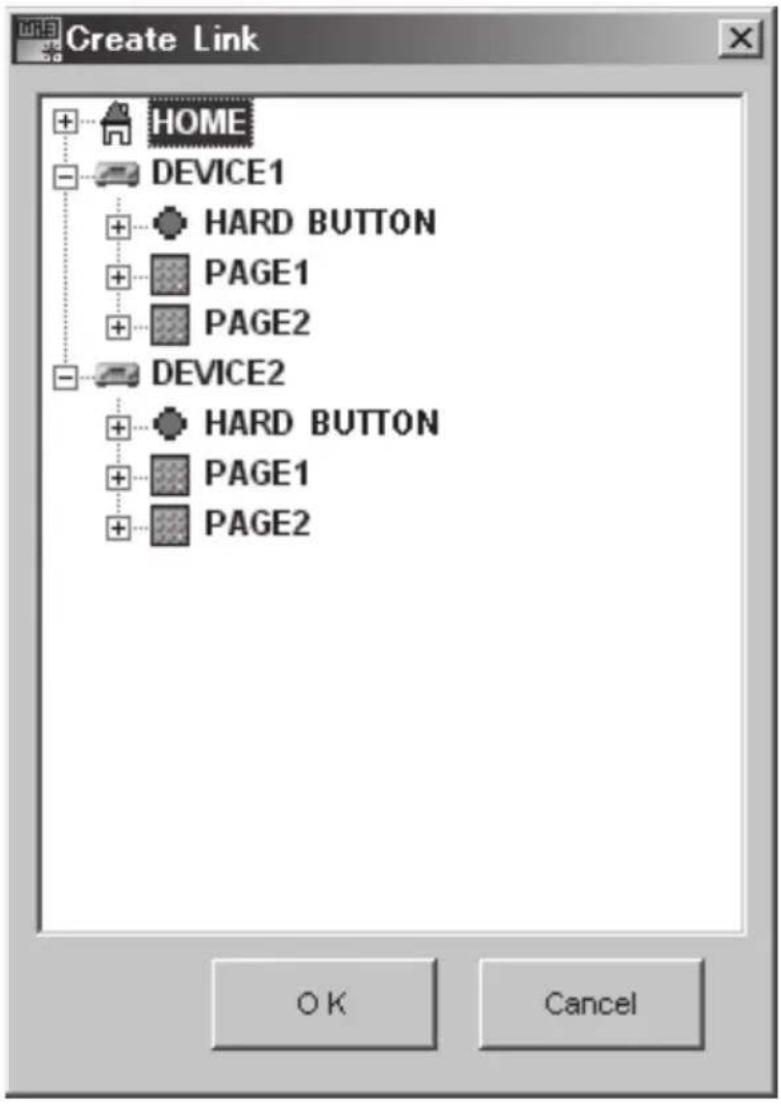
To set a link, select the action list that will be linked to by clicking the Device name → Hard button or Page → Button label name.
After determining the link, click OK.
CREATE JUMP WINDOW
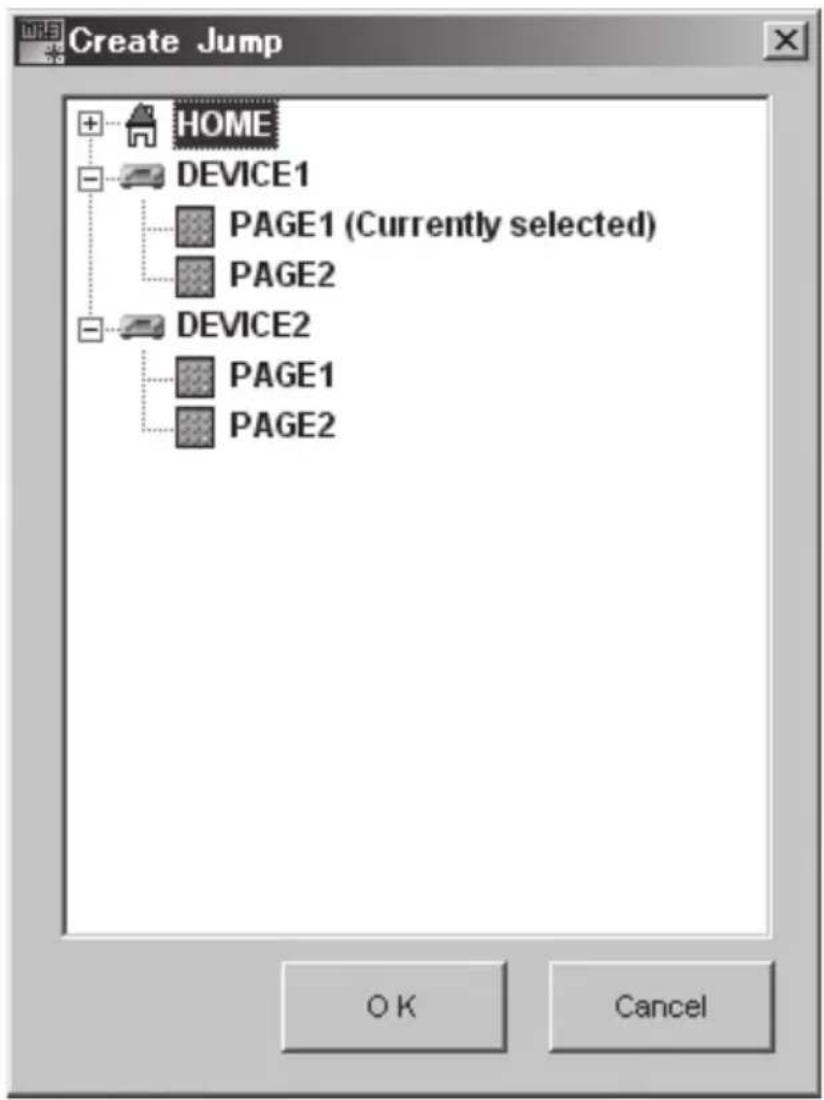
Make the setting by selecting the device name and the page number where the jump operation will go to. After determining the jump locations, click OK.
ADD BEEP WINDOW
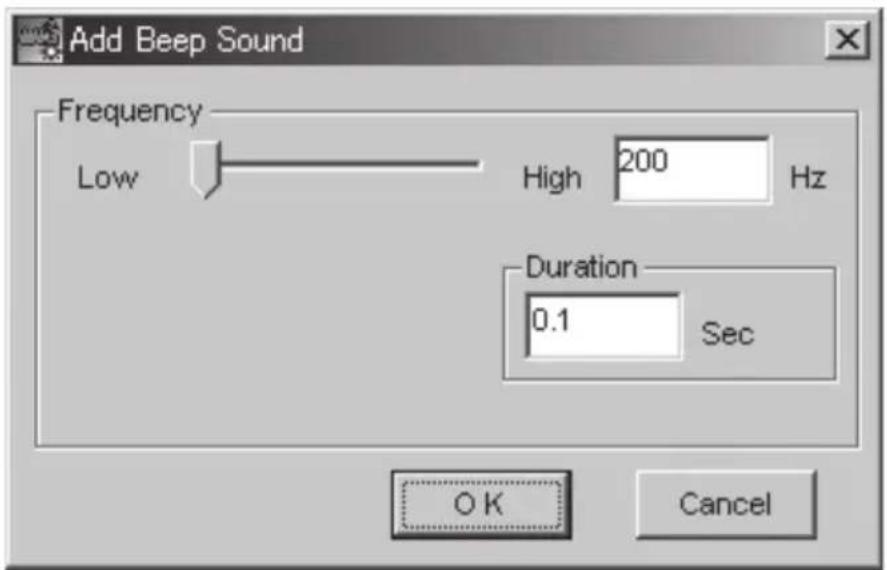
This is used to set the beep sound frequency and duration.
After making the settings, click OK.
LABEL WINDOW
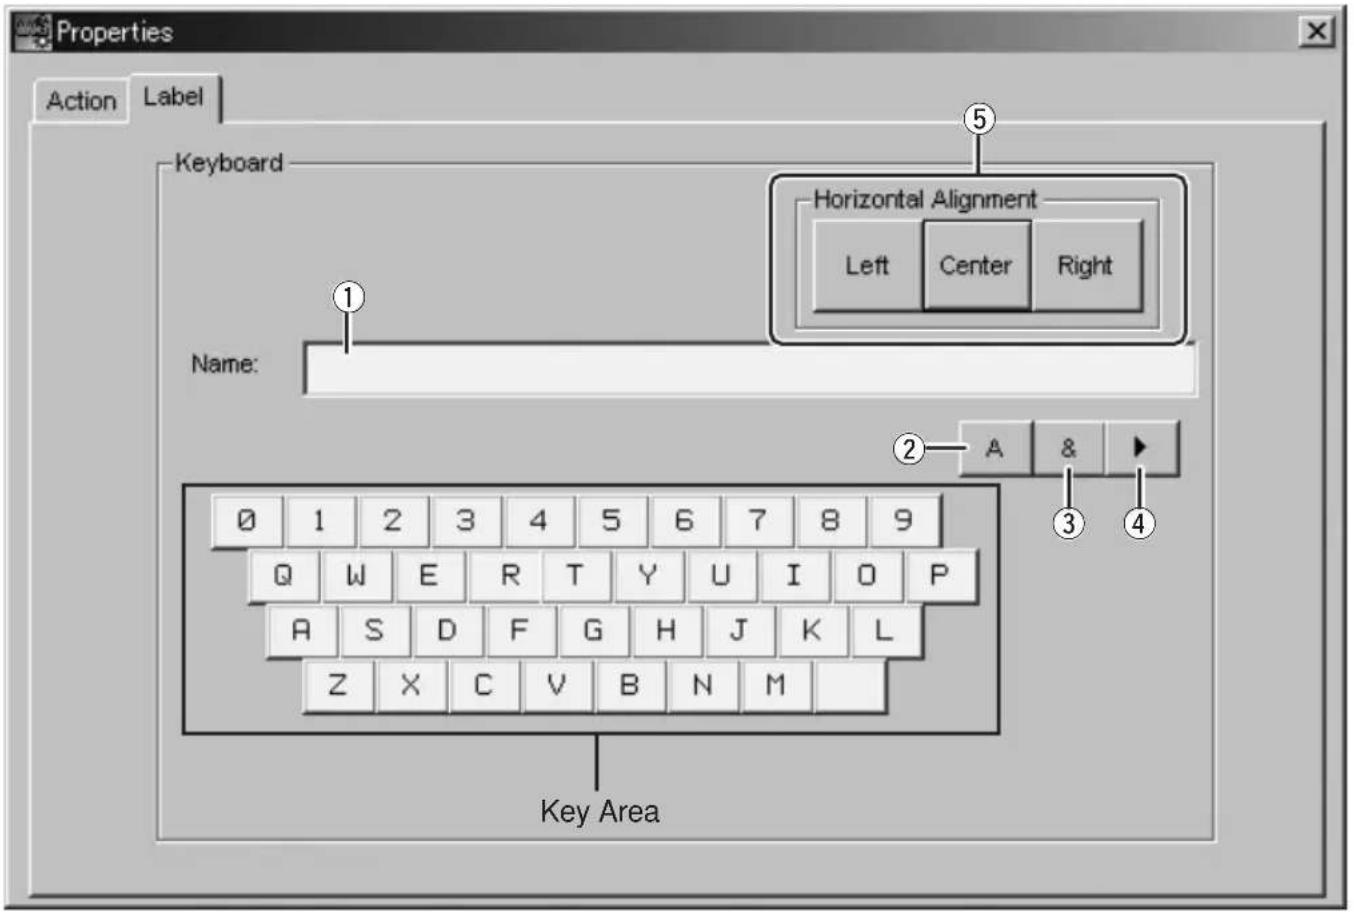
This is used to set the command name displayed on the remote controller LCD.
① Name
This allows setting of a name of up to 9 alphanumeric characters, symbols, or icons in length. To select, click the input characters in the key area.
② A
This is used to enter uppercase letters.
③ &
This is used to enter symbols.
④
This is used to enter icons.
⑤ Horizontal Alignment
This is used to select the display position of the entered characters.
LEFT SIDE SOFT BUTTON SETTING
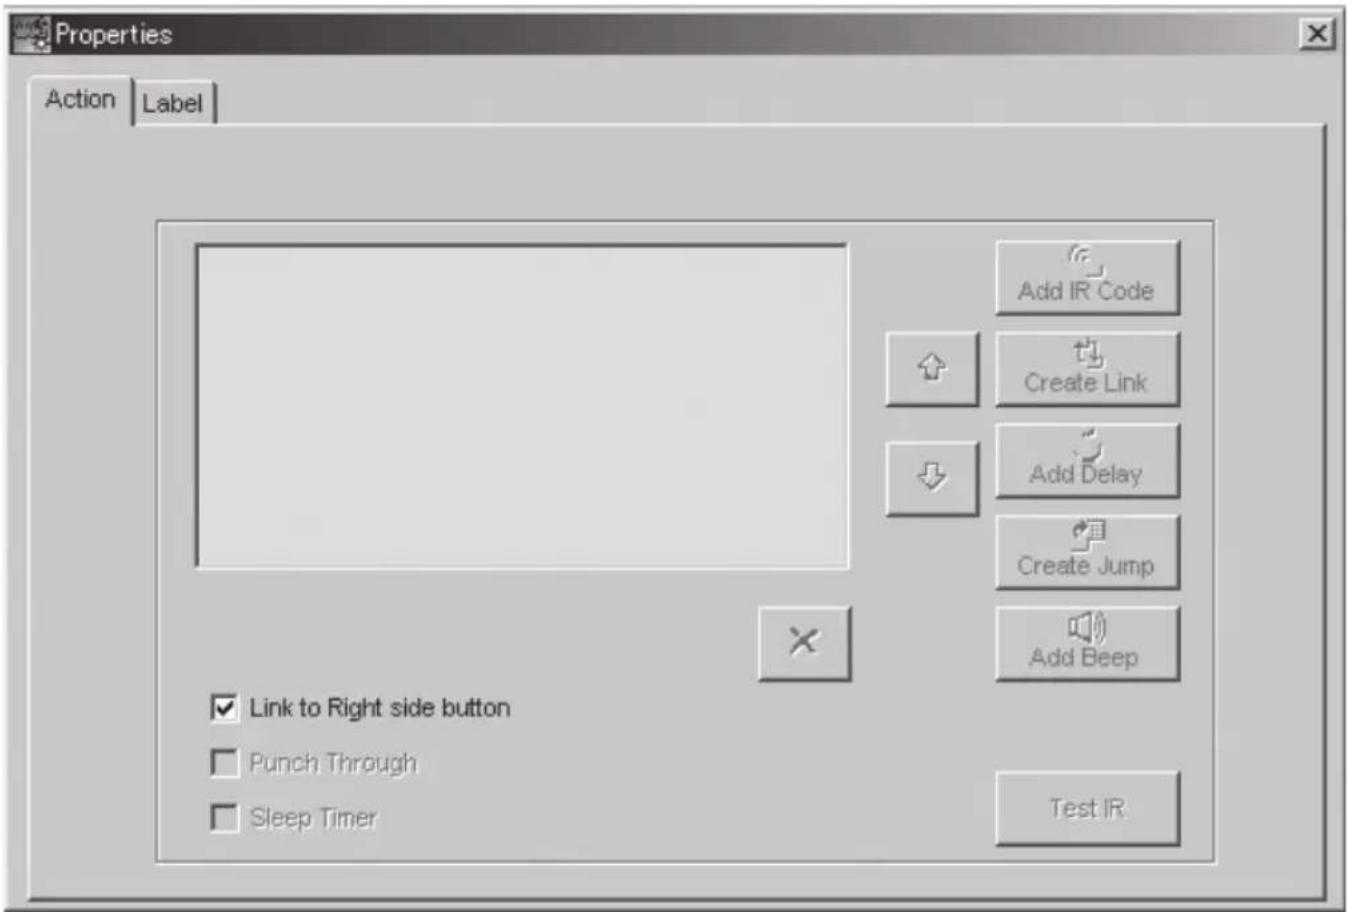
In the default settings, the action (Action List) for the left-side soft buttons has the same setting as the right-side soft buttons.
To set a different command list, remove the check mark from the "Link to Right Side Button", and then set the command list. However, independent label settings cannot be made for the left-side soft buttons, and so make these settings on the right-side button side.
RF SETUP
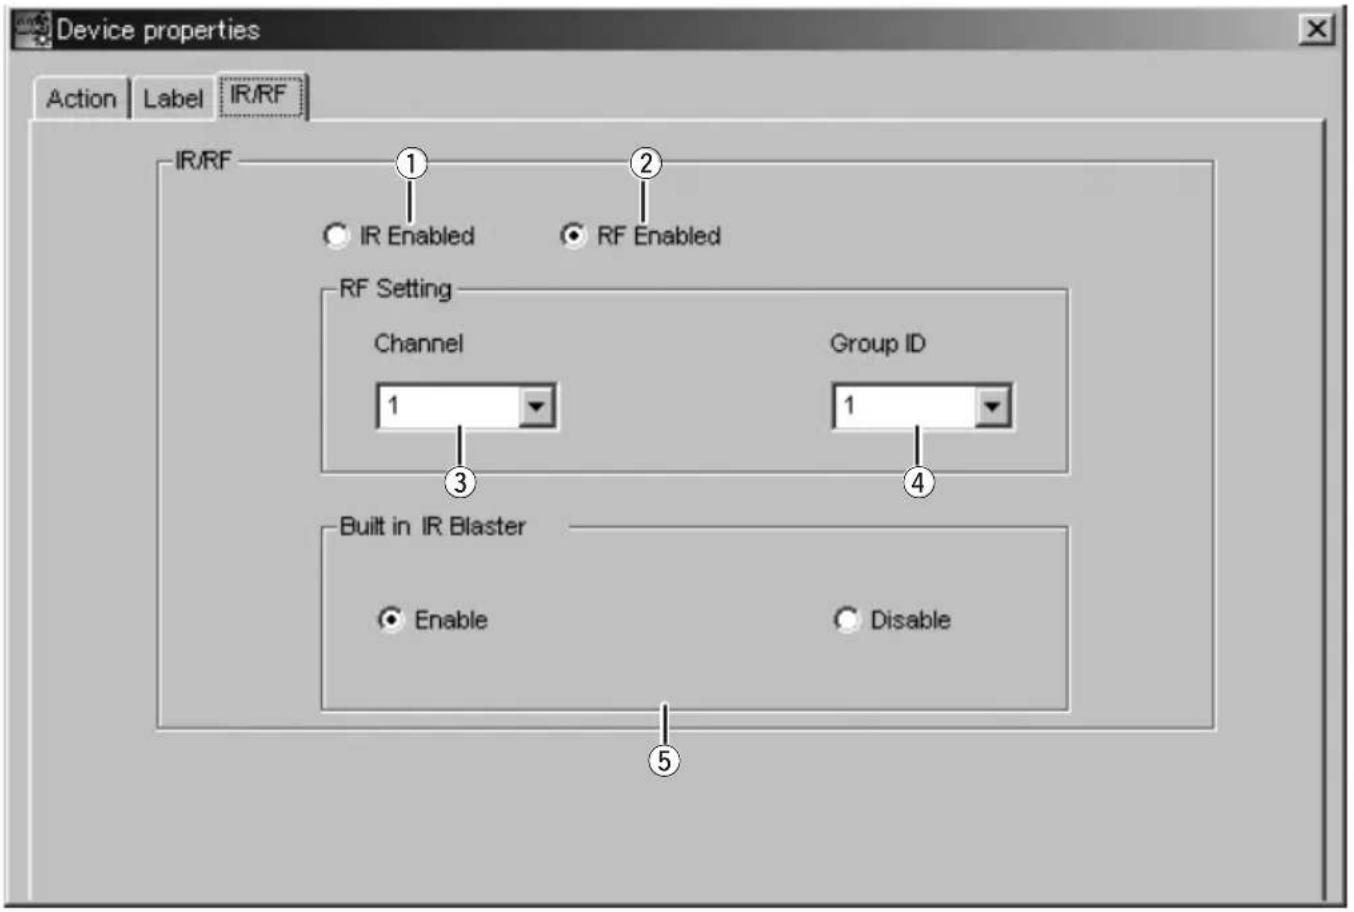
① IR Enabled
Select this radio button when device control is performed by IR operation.
② RF Enabled
Select this radio button when device control is performed by RF operation using the RX3001.
③ Channel
The RF channel can be selected here. Use this to select the same setting as the RX3001.
④ Group ID
The RF ID can be set here. Setting different group IDs enables independent control under the same system of two devices that use the same remote commands.
⑤ Built-in IR Blaster
Use the radio button to enable or disable the built-in IR blaster in the RX3001 set.
Note:
When editing the RC2001 settings, although RF Enabled and other settings can be selected in the editing software, RF Enabled and other settings are automatically disabled after downloading a file to the RC2001.
REGISTERING TO MY DATABASE
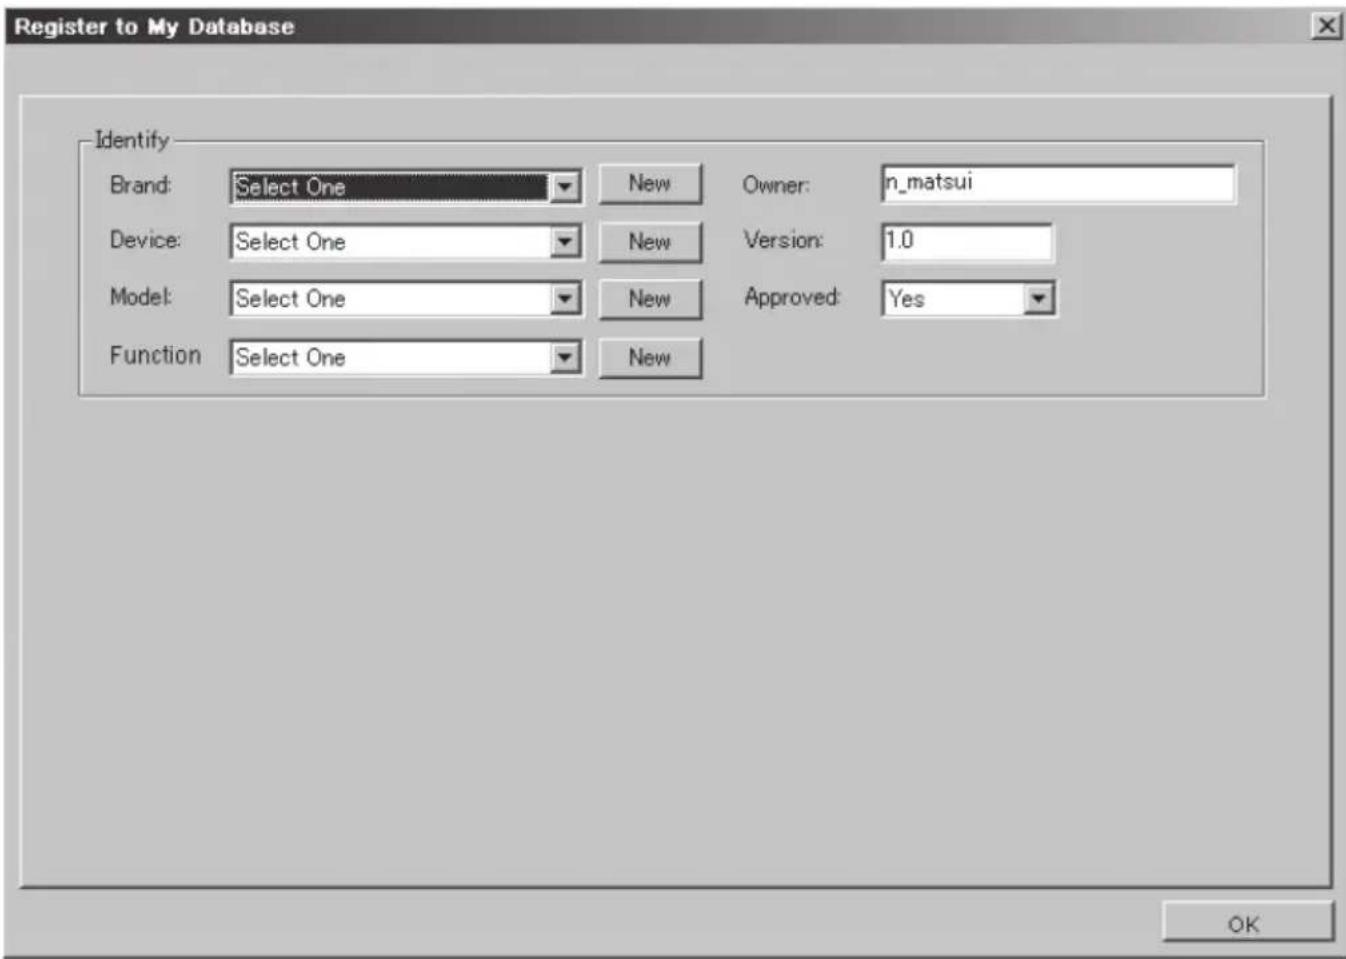
Commands added to the Action List can be registered to My Database.
Select the IR command in the Action list, and then right-click and select "Register to My Database".
Enter the required items, and then click OK.
LIST OF SHORTCUTS AND HOTKEYS
| Item | Shortcuts and Hotkeys on PC Operation |
| 1 | ALT +D Add Device |
| 2 | ALT+P Add Page |
| 3 | ALT+Drag Copy Action list |
| 4 | ALT+C All pages in the page view are closed at once |
| 5 | ALT+ENTER Display the Properties |
| 6 | ALT+O Open all pages of the selected device |
| 7 | ALT+SHIFT+DRAG Create Link in the action list |
| 8 | CTRL+Drag Copy Page in Menu Tree or KEY NAME + ACTIONCopy in Key layout |
| 9 | CTRL+M Open the Simulator |
| 10 | CTRL+N New configuration |
| 11 | CTRL+O Open configuration |
| 12 | CTRL+F4 Close configuration |
| 13 | CTRL+U Upload from remote unit |
| 14 | CTRL+D Download to remote unit |
| 15 | CTRL+UP Move to up the device and page and action list |
| 16 | CTRL+DOWN Move to down the device and page and action list |
| 17 | CTRL+C Copy |
| 18 | CTRL+V Paste |
| 19 | CTRL+Y Redo |
| 20 | CTRL+Z Undo |
| 21 | Drag-and-drop Move the KEY NAME and ACTION |
| 22 | ESC Close model window |
| 23 | F1 Wizz.it 3 Help |
| 24 | F2 Label |
| 25 | F6 Shift focus from the tree view to the page view |
| 26 | DEL Delete |
| 27 | TAB Select the next item |
| 28 | SHIFT+TAB Select the previous item |
HIDE DEVICE
With this command, a device that was set can be hidden at the remote controller side. Select the device that will be hidden in the tree view, and then right-click and select "Hide Device". The Device icon changes to red in the tree view.
HIDE PAGE
With this command, a page that was set can be hidden at the remote controller side. Select the page that will be hidden in the tree view, and then right-click and select "Hide Page". The Page icon changes to red in the tree view.
www.marantz.com
You can find your nearest authorized distributor or dealer on our website.
marantz®
is a registered trademark.
- FRANÇAIS
- FEATURES
- Support OS
- Minimum requirements for PC
- Recommended requirements for PC
- INSTALLING Wizz.it 3
- Notes:
- CUSTOMIZING THE CONFIGURATION FILE
- CONNECTIONS
- CONNECT PC AND REMOTE CONTROLLER
- Note:
- WIZZ.IT 3 OPERATION
- ICON DESCRIPTIONS
- EDITING A NEW CONFIGURATION FILE
- ① Learn IR
- ② My Database
- ③ IR Database
- ④ RC5/6
- ⑤ Test IR
- ⑥ Duration
- LEARN IR
- IR DATABASE WINDOW
- ① Brand
- ② Device
- ③ Model Number
- ④ Functions
- CREATE LINK WINDOW
- CREATE JUMP WINDOW
- ADD BEEP WINDOW
- LABEL WINDOW
- ① Name
- ② A
- ③ &
- ④
- ⑤ Horizontal Alignment
- LEFT SIDE SOFT BUTTON SETTING
- RF SETUP
- REGISTERING TO MY DATABASE
- HIDE DEVICE
- HIDE PAGE
Brand : MARANTZ
Model : Wizz.it 3
Category : Communication Software