
HDF-7080 - Digital photo frame HITACHI - Free user manual and instructions
Find the device manual for free HDF-7080 HITACHI in PDF.

| Product Type | Digital Photo Frame |
| Brand | Hitachi |
| Model | HDF-7080 |
| Display Size | 7 inches |
| Display Resolution | 800 x 480 pixels |
| Aspect Ratio | 16:9 |
| Supported Image Formats | JPEG, BMP, PNG |
| Supported Video Formats | Motion JPEG |
| Internal Memory | 128 MB |
| Memory Card Support | SD/SDHC, MMC, MS |
| USB Port | USB 2.0 for data transfer |
| Power Supply | AC adapter 5V/2A |
| Power Consumption | 5 W (typical) |
| Dimensions (W x H x D) | 190 x 140 x 25 mm |
| Weight | 350 g |
| Mounting Options | Desktop stand, wall-mountable |
| Slideshow Modes | Manual, auto, random, transition effects |
| Clock and Calendar | Yes |
| Remote Control | Included (IR) |
| Cleaning Instructions | Wipe gently with a soft, dry cloth |
| Safety Warnings | Do not expose to moisture; use only provided adapter |
| Spare Parts Availability | Contact Hitachi support for remote or adapter |
| Repairability Index | Not rated |
| General Information | User manual available for download in PDF |
Frequently Asked Questions - HDF-7080 HITACHI
User questions about HDF-7080 HITACHI
0 question about this device. Answer the ones you know or ask your own.
Ask a new question about this device
Download the instructions for your Digital photo frame in PDF format for free! Find your manual HDF-7080 - HITACHI and take your electronic device back in hand. On this page are published all the documents necessary for the use of your device. HDF-7080 by HITACHI.
USER MANUAL HDF-7080 HITACHI
HITACHI Inspire the Next
Model name HDF-7080
7.0" color TFT LCD
Auto slide show
Auto on/off
Time setup and display
READ THIS FIRST
Trademark Information
■ Microsoft ^® and Windows ^® are U.S. registered trademarks of Microsoft Corporation.
■ Pentium ^® is a registered trademark of Intel Corporation.
■ Macintosh is a trademark of Apple Inc.
■ SD ^TM is a trademark.
■ Other names and products may be trademarks or registered trademarks of their respective owners.
Product Information
■ Product design and specifications are subject to change without notice. This includes primary product specifications, software, software drivers, and user's manual. This User Manual is a general reference guide for the product.
The product and accessories that come with your photo frame may be different from those described in this manual. This is due to the fact that different retailers often specify slightly different product inclusions and accessories to suit their market requirements, customer demographics, and geographical preferences. Products very often vary between retailers especially with accessories such as batteries, chargers, memory cards, cables, pouches, and language support. Occasionally a retailer will specify a unique product color, appearance, and internal memory capacity. Contact your dealer for precise product definition and included accessories.
■ The illustrations in this manual are for the purpose of explanation and may differ from the actual design of your photo frame.
■ The manufacturer assumes no liability for any errors or discrepancies in this user manual.
SOME DOS AND DON'TS ON THE SAFE USE OF EQUIPMENT
This equipment has been designed and manufactured to meet international safety standards but, like any electrical equipment, care must be taken if you are to obtain the best results and safety is to be assured.
**********************************************************************
DO read the operating instructions before you attempt to use the equipment.
DO ensure that all electrical connections (including the mains plug, extension leads and inter-connections between the pieces of equipment) are properly made and in accordance with the manufacturer's instructions. Switch off and withdraw the mains plug before making or changing connections.
DO consult your dealer if you are ever in doubt about the installation, operation or safety of your equipment.
DO be careful with glass panels or doors on equipment.
DO route the mains lead so that it is not likely to be walked on, crushed, chafed, or subjected to excessive wear and tear or heat.
****************************************************************************************
DON'T remove any fixed cover as this may expose dangerous voltages.
DON'T obstruct the ventilation openings of the equipment with items such as newspapers, tablecloths, curtains, etc. Overheating will cause damage and shorten the life of the equipment.
DON'T allow electrical equipment to be exposed to dripping or splashing, or objects filled with liquids, such as vases, to be placed on the equipment.
DON'T place hot objects or naked flame sources such as lighted candles or nightlights on, or close to equipment. High temperatures can melt plastic and lead to fires.
DON'T use makeshift stands and NEVER fix legs with wood screws - to ensure complete safety always fit the manufacturer's approved stand or legs with the fixings provided according to the instructions.
DON'T use equipment such as personal stereos or radios so that you are distracted from the requirements of traffic safety. It is illegal to watch television whilst driving.
DON'T listen to headphones at high volume, as such use can permanently damage your hearing.
DON'T leave equipment switched on when it is unattended unless it is specifically stated that it is designed for unattended operation or has a stand-by mode. Switch off using the switch on the equipment and make sure that your family know how to do this. Special arrangements may need to be made for infirm or handicapped people.
DON'T continue to operate the equipment if you are in any doubt about it working normally, or if it is damaged in any way - switch off, withdraw the mains plug and consult your dealer.
ABOVE ALL
--- NEVER let anyone especially children push anything into holes, slots or any other opening in the case - this could result in a fatal electrical shock;
--- NEVER guess or take chances with electrical equipment of any kind, it is better to be safe than sorry! EN 2
SAFETY INSTRUCTIONS
Read and understand all Warnings and Cautions before using this product.
Warnings
If foreign objects or water have entered the photo frame, turn the power off and unplug the power cord.
Continued use might cause fire or electric shock. Consult the store of purchase.
If the photo frame has fallen or its case has been damaged, turn the power off and unplug the power cord.
Continued use might cause fire or electric shock. Consult the store of purchase.
If the photo frame begins to emit smoke, noises, or strange odor, immediately turn the power off and unplug the power cord.
Continued use might cause fire or electric shock. Consult the store of purchase.
Do not disassemble, change or repair the photo frame.
This might cause fire or electric shock. For repair or internal inspection, ask the store of purchase.
Do not use the photo frame in areas near water.
This might cause fire or electric shock.
Do not place the photo frame on inclined or unstable surfaces.
This might cause the photo frame to fall or tilt over, causing damage.


Cautions
Use only the AC adapter included with the photo frame.
Using any other power adapter might cause damage or malfunction.

Do not subject the LCD monitor to impact.
This might damage the glass on the screen or cause the internal fluid to leak. If the internal fluid enters your eyes or comes into contact with your body or clothes, rinse with fresh water. If the internal fluid has entered your eyes, consult a physician to receive treatment.

A photo frame is a precision instrument. Do not drop it, strike it or use excessive force when handling the photo frame.
This might cause damage to the photo frame.

Do not use the photo frame in humid, steamy, smoky, or dusty places.
This might cause fire or electric shock.

Do not wrap the photo frame or place it in cloth or blankets.
This might cause heat to build up and deform the case, resulting in fire. Use the photo frame in a well-ventilated place.

Do not leave the photo frame in places where the temperature may rise significantly, such as inside a car.
This might adversely affect the case or the parts inside, resulting in fire.

Before you move the photo frame, disconnect cords and cables.
Failure to do this might damage cords and cables, resulting in fire and electric shock.

Cleaning the LCD Screen
■ Treat the screen gently. The screen on the photo frame is made of glass and can be scratched or broken.
If fingerprints or dust make the LCD screen dirty, use a soft, dry, non-abrasive cloth such as the camera lens cloth to clean the LCD screen.
If you use a LCD cleaning kit, do not apply the cleaning liquid directly to the LCD screen. Clean the LCD screen with cleaning cloth moistened with the liquid.
CONTENTS
INTRODUCTION ......6
Overview 6
Package Contents 6
GETTING TO KNOW YOUR PHOTO FRAME ....7
Front View 7
Rear View 7
Button Operation ....7
GETTING STARTED 8
Turning on the Photo Frame 8
Selecting the Displayed Language 8
Setting the Date and Time ....8
Playing Slide Show 8
BASIC OPERATION 9
Viewing Photos (Photo Mode) 9
Single Photo Display 9
Thumbnail Display 9
Photo Menu 9
Viewing Current Date and Time (Calendar Mode) 11
Viewing File/Folder List (File Mode) 11
Setting up the Photo Frame (Setup Mode) 12
CONNECTING TO A COMPUTER ....14
SPECIFICATIONS ....15
TROUBLESHOOTING ....15
INTRODUCTION
Overview
Congratulations on your purchase of this new digital photo frame.
With 7" TFT-LCD display and simple operation, it is easy and fun to share your digital memories. The key features of the photo frame are as follows:
■ Display digital photos (JPEG) stored on internal memory (10MB) or on inserted memory card.
■ Compatible memory cards include SD/SDHC card (Secure Digital) and MMC card (MultiMedia).
■ Auto slide show with multiple transition effects and selected time interval.
■ Calendar and clock time display.
■ Auto power on/off at set on/off time.
■ USB 2.0 connection to your PC.

■ The photo frame does not support video or audio files.
Package Contents
Carefully unpack your photo frame and ensure that you have the following items:
■ Digital photo frame
■ Quick guide
USB cable
■ AC power adapter

■ Accessories and components may vary by retailer.
GETTING TO KNOW YOUR PHOTO FRAME
Front View
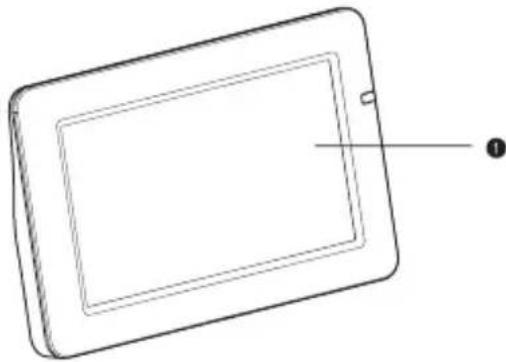
natural_image
Line drawing of a tablet device with a labeled point (no text or symbols on the device itself)Rear View

- LCD screen
- ON/OFF Power button
- ▶ Right button
- Left button
- ▲ Up button
- ▼ Down button
- Zoom button
- SLIDE Slide button
- EXIT Exit button
- OK OK button
- Frame stand
- AC power input
- Mini USB jack
- Memory card slot
Button Operation
| Button Function descriptions | |
| ON/OFF button Press to turn the photo frame on or off. | |
| ◀ button Press to select the left item or return to the previous menu/directory. | |
| ▶ button Press to select the right item or go to next menu/directory. | |
| ▲ button Press to select the above item or increase a value setting. | |
| ▼ button Press to select the below item or decrease a value setting. | |
| ○ button Press continuously to zoom in a photo. | |
| SLIDE button Press to start a slide show. | |
| EXIT button Press to stop a slide show or return to the previous screen or main menu. | |
| OK button Press to enter menus or confirm a selection or setting. |
GETTING STARTED
Turning on the Photo Frame
-
Adjust the frame stand and make sure the photo frame is placed stably near power source.
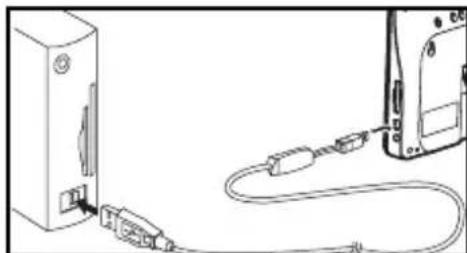
-
Connect the photo frame with the supplied AC adapter and plug the other end to a power outlet.
-
Insert a compatible memory card with photo files to the memory card slot.
■ To remove the memory card, push lightly on the edge of the card and it will elect.
- Press the ON/OFF button to turn the photo frame on.
■ The photo frame enters the main menu as shown on the right when first turned on.
■ To turn the photo frame off, press and hold the ON/OFF button for 2 seconds.
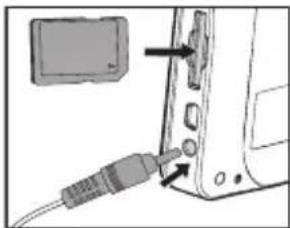
natural_image
Diagram showing a device with an attached cable and two arrows pointing to ports (no text or symbols present)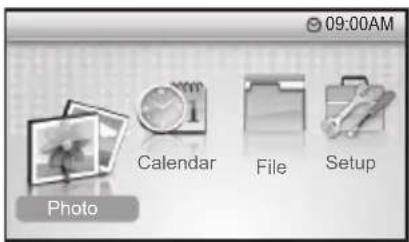
Selecting the Displayed Language
- From main menu, select [Setup] and then press the OK button to enter setup menu.
- Select [Language] and then press the OK or ▶ button to go to next menu.
- Select the desired language and then press the OK button to save the setting.
Setting the Date and Time
- From main menu, select [Setup] and then press the OK button to enter setup menu.
- Select [Date/Time] and then press the OK or ▶ button to go to next menu.
- Select [Current Date] and then press the OK or ▶ button to set the date.
■ Use ◀/▶ buttons to select each item (Day/Month/Year) and use ▲/▼ buttons to set the value.
-
Press the OK button to save the setting and return to the previous menu.
-
Select [Current Time] and follow the above steps to set the time.
■ Select [Time Format] and then press the OK button to set the time display format
Playing Slide Show
You can start a slide show from any mode.
- Press the SLIDE button to start a slide show.
- Press the EXIT button to stop a slide show.

If a memory card is inserted, the slide show plays the JPEG files on the card automatically. If you want to play the files on internal memory, please remove the memory card.
BASIC OPERATION
Viewing Photos (Photo Mode)
Single Photo Display
You can view single photo display on screen.
-
From main menu, select [Photo] and then press the OK button to enter photo mode.
-
Press◀or▶button to display previous or next photo.

natural_image
Black-and-white photo of two girls in wedding attire, one wearing a tiara and the other striped skirt, seated together (no text or symbols visible)■ The photo menu access indicator will appear on the bottom-right corner for 3 seconds.
■ Press button continuously to enlarge a photo by up to 4X.
■ Use ◀/▶/▲/▼ buttons to move the enlarged area around.
■ Press EXIT button to return to normal size display.
Thumbnail Display
You can also view the photos in thumbnail digest display by setting thumbnail digest mode.
- From main menu, select [Setup] and then press the OK button to enter setup menu.
- Select [Photo] and then set the [Thumbnail Digest] to [On].
- Set different thumbnail mode by specifying [Digest Style].
■ The photo will be displayed in selected thumbnail digest mode in photo mode.
■ Select the photos with ◀/▶/▲/▼ buttons and press the OK or 🔒 button to view the selected photo in normal size display. Press the EXIT button to return to thumbnail display.
Photo Menu
You can specify a setting for individual photo from the photo menu.
- In photo normal size display, press the OK button to enter the photo menu.
- Select the desired option item and then press the OK or ▶ button to enter its respective menu.
■ Press ◀ button to return to the previous menu.
- Select the desired setting and then press the OK button to save the setting.

natural_image
Grid of black-and-white family photographs arranged in 3x4 grids, with a small decorative flower icon on the left (no text or symbols visible)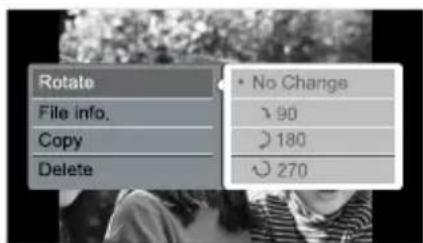
Rotate
This sets the photo to rotate clockwise to the desired degree. When you rotate a photo, you can display the rotation in the current photo mode or slide show but you cannot save a rotated photo. In other words, the photo reverts to original display once you exit from current photo mode or slide show and enter any other mode.
* No Change / 90 / 180 / 270
File Info.
This sets the photo to display file information such as resolution, file size and file name in photo single display mode. If a file name contains any unrecognizable character, it will be displayed as PHOTO000X.JPG.
* On / Off
Copy
This allows you to copy the displayed photo on the memory card to the internal memory of the photo frame so that you can display photos without a memory card.
The copy function is for photos on a memory card only. You cannot copy files on the internal memory. The [Copy] item of a photo on the internal memory is disabled and cannot be selected.
* No / Yes
Delete
This allows you to delete the displayed photo stored on internal memory only. You cannot delete a photo on a memory card. The [Delete] item of a photo on a memory card is disabled and cannot be selected.
* No / Yes

If a memory card is inserted, the photo frame displays photos on the memory card automatically when set to photo mode. If you want to view the photos on the internal memory, please remove the memory card.
Viewing Current Date and Time (Calendar Mode)
The photo frame can be used as a calendar as well as a clock. When not playing a slide show, you can set the photo frame to calendar mode, showing calendar, clock, current date and time.
- Set correct current date and time first.
■ Refer to "Setting the Date and Time".
- From main menu, select [Calendar] and then press the OK button to enter calendar mode,

Viewing File/Folder List (File Mode)
You can view the file list on the internal memory or file/folder list on the inserted memory card. On the list, use ▲/▼ buttons to select a file or folder. When a JPEG file is selected, its thumbnail is displayed on the left; when a folder is selected, the thumbnail appears blank.
- From main menu, select [File] and then press the OK button to enter file mode.
■ The selected list number and total list number are displayed on the top-right corner.
■ When a photo thumbnail is displayed on the left, its file size and created date are also displayed below.
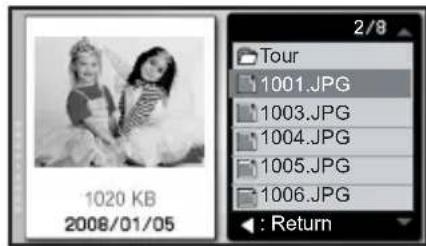
■ indicates the list as a folder; □ indicates the list as a JPEG file.
- Select the desired file or folder and then press the OK button to display the photo in normal size or go to the subfolder directory.
■ Press the ◀ button to return to the previous diectory if it exists.
■ When a photo is displayed, press the EXIT button to return to the file list.

The photo frame displays photo (JPEG) files only. The audio or video files are not supported or displayed in file mode.
If a folder name contains any unrecognizable character, it will be displayed as DIR000X; if a file name contains any unrecognizable character, it will be displayed as PHOTO000X.JPG on file list.
Setting up the Photo Frame (Setup Mode)
From the setup menu, you can set the photo frame's operating environment or your preferred setting.
-
From main menu, select [Setup] and then press the OK button to enter setup menu.
-
Select the desired option item and then press the OK or ▶ button to enter its respective menu.
■ Press ◀ button to return to the previous menu.
- Select the desired setting and then press the OK button to save the setting or go to next menu.
■ Press the EXIT button to return to main menu.
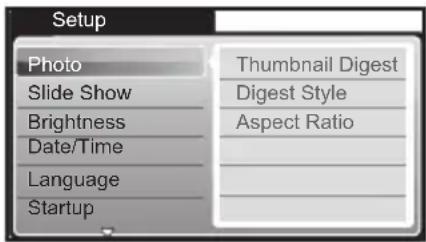
Photo
This sets the preferred photo mode setting.
Thumbnail Digest
This sets whether to display photos in thumbnail digest when set to photo mode.
* On / Off
Digest Style
This sets the thumbnail digest style. The selected style will be displayed only when [Thumbnail Digest] is set to [On].
* 2x2 / 3x3 / 4x4
Aspect Ratio
This sets whether to display the photos in their original aspect ratio (Normal) or fit into the frame screen (16:9).
* Normal / 16:9
Slide Show
This sets the preferred slide show setting.
Interval Time
This sets the slide show transition interval.
* 10 Sec. / 30 Sec. / 1 Min. / 5 Min. / 30 Min.
Transition
This sets the slide show transition special effect.
* Normal / Active / Random / Fade / Off
Brightness
This sets the brightness of the screen display.
* 1 / 2 / 3 / 4 / 5 / 6 / 7
Date/Time
This sets the current date and time and activates the auto timer function.
Current Date
* Refer to "Setting the Date and Time" for further information.
Current Time
* Refer to "Setting the Date and Time" for further information.
Auto Timer
This sets the auto timer function so that the photo frame can turn on or off at the set time.
* On / Off
Auto On At
* Sets the time at which the photo frame turns on automatically when it is off and when [Auto Timer] is set to [On].
Auto Off At
* Sets the time at which the photo frame turns off automatically when it is on and when [Auto Timer] is set to [On].
Time Format
This sets the time display in 12-hour or 24-hour format.
* 12 / 24
Language
This specifies in which language menu items and messages are displayed on the LCD monitor.
Startup
This sets the first mode or screen the photo frame enters every time when it is turned on.
* Main Menu / Calendar / Slide Show
Set to Default
This sets the photo frame to return to default setting. When set to default, the date and time setting are retained.
* No / Yes
Version
This displays the photo frame's firmware version information.
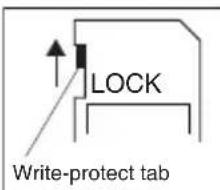
CONNECTING TO A COMPUTER
You can connect the photo frame to a computer with the supplied USB cable. When connecting to a computer, the photo frame works as a mass storage device. With the USB connection, you can add, delete or edit files stored on the internal memory or memory card.
System Requirements
| Windows Macintosh | |
| ■ Pentium 166 MHz or higher■ Windows 2000/XP/Vista■ 128MB RAM■ 128MB hard disk space■ CD-ROM drive■ Available USB port | ■ PowerPC G3/G4/G5■ OS 9.0 or later■ 128MB RAM■ 128MB hard disk space■ CD-ROM drive■ Available USB port |
- Connect one end of the USB cable to the USB port on your computer.
- Connect the other end of the USB cable to the USB mini jack on the photo frame.
- Turn on the photo frame.
■ During USB connection, the LCD monitor will be off.
- From the Windows desktop, double click on "My Computer".
- Look for a new "removable disk" icon.
This “removable disk” is actually the memory (or memory card) in the photo frame. Typically, the photo frame will be assigned drive letter “e” or higher.
- You can Copy & Paste or Drag-N-Drop files between the photo frame and the computer or edit the stored files.
natural_image
Line drawing of two connected devices with cables, no text or symbols presentMac users: Double-click the "untitled" or "unlabeled" disk drive icon on your desktop.

To edit files on the memory card with USB connection to a computer, make sure to move the write-protect tab on the side of the card to unlock position.
SPECIFICATIONS
| Item Description | |
| LCD monitor 7.0" color TFT LCD | |
| LCD resolution 480 x 234 pixels | |
| Screen ratio 16:9 | |
| Memory card supported SD/SDHC, MMC card | |
| Internal memory 10MB flash | |
| USB interface USB 2.0 mini jack | |
| File format supported JPEG | |
| Power AC adapter (5V, 2A) | |
| Dimensions Approx. 201 x 130 x 22 mm | |
| Weight Approx. 335g (without AC adapter and memory card) | |
* Design and specifications are subject to change without notice.
TROUBLESHOOTING
| Symptom Cause | Solutions / Corrective Actions | |
| The photo frame does not turn on. | There is no power to the photo frame. | Connect the AC power adapter to the photo frame and plug it into an active power outlet. Then press the ON/OFF button to turn the photo frame on. |
| The power connector to the photo frame is not securely inserted. | Make sure you connect the AC adapter to the photo frame properly. | |
| The screen display is too dark. | The display brightness is not properly adjusted. | Select and set proper brightness from the setup menu. |
| The photo frame turns off suddenly. | The Auto Timer function is activated. | Set [Auto Timer] to [Off] or set other [Auto Off At] time setting from the setup menu. |
| The power is suddenly cut off. | Check if the AC power adapter loosens from the photo frame or power outlet. | |
| “No Files” is displayed when photo or file mode is selected or when SLIDE button is pressed. | Memory card is not inserted correctly and no file is stored on internal memory. | Insert the memory card in correct direction according to the indicator by the card slot. |
| No photo file is stored on internal memory or inserted memory card. | Copy photo files to the internal memory or insert a memory card with photo files. | |
| The files on internal memory or on memory card are incompatible. | The photo frame supports JPEG format photo files only. Other photo format, video or music files are not supported. | |
| “No Enough Space!” is displayed on screen. | You are copying a photo to the internal memory and there is not enough space. | Delete some photos on the internal memory to increase available space. |
| “File Exist!” is displayed on screen. | You are copying a photo to the internal memory while a file of the same file name has existed on the internal memory. | Check whether the file on the internal memory is the same one. If not, modify the file name of either one and then copy the file again. |
| "Not Support" is displayed on screen. | The image size of the displayed photo is too big. Either pixel columns (width) or pixel rows (height) is over 4096. | Resize the photo on your computer. |
| The photo file is damaged. | - | |
| Cannot see the photo frame as a removable disk in USB connection. | The USB cable is not connected securely. | Make sure the USB cable is connected securely. |
| The photo frame is not turned on. | Make sure the photo frame is turned on. |
HDF-7080 Warranty
HITACHI
Hitachi Europe Ltd.
This product is exclusively available through Argos and in the unlikely event of a problem please return the faulty item together with proof of purchase to Argos for repair /replacement.
For further information including obtaining spare parts please contact the Hitachi Digital Camera helpline on: +44 (0) 870 446 0806 or mail to Technical@premiercamera.co.uk.
- HITACHI Inspire the Next
- Model name HDF-7080
- READ THIS FIRST
- Trademark Information
- Product Information
- SOME DOS AND DON'TS ON THE SAFE USE OF EQUIPMENT
- ABOVE ALL
- SAFETY INSTRUCTIONS
- Warnings
- Cautions
- Cleaning the LCD Screen
- CONTENTS
- INTRODUCTION ......6
- GETTING TO KNOW YOUR PHOTO FRAME ....7
- GETTING STARTED 8
- BASIC OPERATION 9
- CONNECTING TO A COMPUTER ....14
- SPECIFICATIONS ....15
- TROUBLESHOOTING ....15
- INTRODUCTION
- Overview
- Package Contents
- GETTING TO KNOW YOUR PHOTO FRAME
- Front View
- Rear View
- Button Operation
- GETTING STARTED
- Turning on the Photo Frame
- Selecting the Displayed Language
- Setting the Date and Time
- Playing Slide Show
- BASIC OPERATION
- Viewing Photos (Photo Mode)
- Single Photo Display
- Thumbnail Display
- Photo Menu
- Rotate
- File Info.
- Copy
- Delete
- Viewing Current Date and Time (Calendar Mode)
- Viewing File/Folder List (File Mode)
- Setting up the Photo Frame (Setup Mode)
- Photo
- Thumbnail Digest
- Digest Style
- Aspect Ratio
- Slide Show
- Interval Time
- Transition
- Brightness
- Date/Time
- Current Date
- Current Time
- Auto Timer
- Auto On At
- Auto Off At
- Time Format
- Language
- Startup
- Set to Default
- Version
- CONNECTING TO A COMPUTER
- System Requirements
Brand : HITACHI
Model : HDF-7080
Category : Digital photo frame