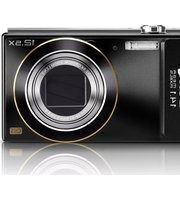
GH200 - Camera BENQ - Free user manual and instructions
Find the device manual for free GH200 BENQ in PDF.


| Product Type | Digital Camera |
| Brand | BenQ |
| Model | GH200 |
| Sensor Resolution | 14 Megapixels |
| Optical Zoom | 5x |
| Digital Zoom | 4x |
| Display Size | 2.7-inch LCD |
| Storage Media | SD/SDHC Memory Card |
| Battery Type | Lithium-Ion (NP-45) |
| Power Supply | 3.7V 700mAh |
| Dimensions (W x H x D) | 96 x 62 x 27 mm |
| Weight (with battery) | 140 g |
| Video Recording | 720p HD @ 30fps |
| Connectivity | USB 2.0, AV Out |
| Main Functions | Auto Mode, Scene Modes, Face Detection, Smile Shutter, Blink Detection |
| Care & Cleaning | Wipe exterior with soft dry cloth; clean lens with lens cloth |
| Safety Precautions | Avoid water, extreme temperatures; do not disassemble; use only approved charger |
| Spare Parts & Repairability | Battery, charger, USB cable available; service center contact for other parts |
| General Information | User manual in PDF; supports PictBridge; tripod mount |
Frequently Asked Questions - GH200 BENQ
User questions about GH200 BENQ
0 question about this device. Answer the ones you know or ask your own.
Ask a new question about this device
Download the instructions for your Camera in PDF format for free! Find your manual GH200 - BENQ and take your electronic device back in hand. On this page are published all the documents necessary for the use of your device. GH200 by BENQ.
USER MANUAL GH200 BENQ
GH200/205 Series Digital Camera User Manual
Copyright
Copyright 2012 BenQ Corporation. All rights reserved. No part of this publication may be reproduced, transmitted, transcribed, stored in a retrieval system or translated into any language or computer language, in any form or by any means, electronic, mechanical, magnetic, optical, chemical, manual or otherwise, without the prior written permission of BenQ Corporation.
All other logos, products, or company names mentioned in this manual may be the registered trademarks or copyrights of their respective companies, and are used for informational purposes only.
Disclaimer
BenQ Corporation makes no representations or warranties, either expressed or implied, with respect to the contents hereof and specifically disclaims any warranties, merchantability or fitness for any particular purpose. Further, BenQ Corporation reserves the right to revise this publication and to make changes from time to time in the contents hereof without obligation of BenQ Corporation to notify any person of such revision or changes.
This user manual aims to provide the most updated and accurate information to customers, and thus all contents may be modified from time to time without prior notice. Please visit http://www.beng.com for the latest version of this manual.
BenQ ecoFACTS
BenQ has been dedicated to the design and development of greener product as part of its aspiration to realize the ideal of the "Bringing Enjoyment 'N Quality to Life" corporate vision with the ultimate goal to achieve a low-carbon society. Besides meeting international regulatory requirement and standards pertaining to environmental management, BenQ has spared no efforts in pushing our initiatives further to incorporate life cycle design in the aspects of material selection, manufacturing, packaging, transportation, using and disposal of the products. BenQ ecoFACTS label lists key eco-friendly design highlights of each product, hoping to ensure that consumers make informed green choices at purchase. Check out BenQ's CSR Website at http://csr.BenQ.com/ for more details on BenQ's environmental commitments and achievements.

WEEE directive
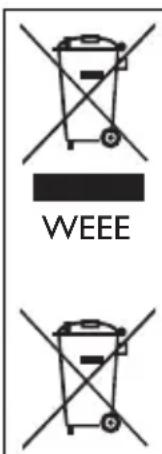
Battery
Disposal of Waste Electrical and Electronic Equipment and/or Battery by users in private households in the European Union.
This symbol on the product or on the packaging indicates that this can not be disposed of as household waste. You must dispose of your waste equipment and/or battery by handling it over to the applicable take-back scheme for the recycling of electrical and electronic equipment and/or battery. For more information about recycling of this equipment and/or battery, please contact your city office, the shop where you purchased the equipment or your household waste disposal service. The recycling of materials will help to conserve natural resources and ensure that it is recycled in a manner that protects human health and environment.
Recycling information: See http://www.benq.com/support/recycle for details.
CE Regulatory Notice
This devise is herewith confirmed to comply with the requirements set out in the Council Directives on the Approximation of the Laws of the Member States relating Electromagnetic Compatibility (2004/108/EC); the Low Voltage Directive (2006/95/EC); the Restriction of The Use of Certain Hazardous Substances in Electrical And Electronic Equipment Directive (2002/95/EC), Turkish EEE Directive; the Commission Regulation (EC) No 1275/2008 implementing Directive 2005/32/EC of the European Parliament and of the Council with regard to eco-design requirements for standby and off mode electric power consumption of electrical and electronic household and office equipment, and the Directive 2009/125/EC of the European parliament and of the council establishing a framework for the setting of eco-design requirements for energy-related products.
FCC Statement
This equipment has been tested and found to comply with the limits for a Class B digital device, pursuant to Part 15 of the FCC Rules. These limits are designed to provide reasonable protection against harmful interference in a residential installation. This equipment generates, uses and can radiate radio frequency energy and, if not installed and used in accordance with the instructions, may cause harmful interference to radio communications. However, there is no guarantee that interference will not occur in a particular installation. If this equipment does cause harmful interference to radio or television reception, which can be determined by turning the equipment off and on, the user is encouraged to try to correct the interference by one or more of the following measures:
- Reorient or relocate the receiving antenna.
- Increase the separation between the equipment and receiver.
- Connect the equipment into an outlet on a circuit different from that to which the receiver is connected.
- Consult the dealer or an experienced radio/TV technician for help.
This device complies with Part 15 of the FCC Rules. Operation is subject to the following two conditions: (1) This device may not cause harmful interference, and (2) this device must accept any interference received, including interference that may cause undesired operation.
FCC Caution: Any changes or modifications not expressly approved by the party responsible for compliance could void the user's authority to operate this equipment.
Safety warning and notice
Before operating the camera, please make sure that you read and fully understand the content in this section. If you ignore and violate all safety warning notices indicated in this section, the camera warranty may be void. Meanwhile, not only the camera but also you and all other people and things around you may be severely damaged, injured, or even placed in danger of death.
For your safety
- Keep the camera and its accessories out of the reach of babies, toddlers, and children. In particular, small parts such as memory cards and batteries could be easily dismantled and swallowed by them.
- Use only the original accessories to avoid possible risks to health and property, and thus meet all related legal regulations.
- Do not dismantle the camera under any circumstances.
- When using the flash, do not go too close to human eyes (particularly for babies, toddlers, and children) or animal eyes. Otherwise, when the flash fires, the light may cause damage to human eyes or irritate animals.
- Batteries could explode, for instance. All batteries can cause property damage, injury or burns if a conductive material such as jewelry, keys or beaded chains touch exposed terminals. The material may complete an electrical circuit and become quite hot. Exercise care in handling any batteries, particularly when placing it inside your pocket, purse, or other container with metal objects. Do not dispose of batteries in fire as they may explode.
- To prevent electric shock, do not attempt to disassemble or repair your camera by yourself.
- Some camera models accept non-rechargeable batteries. When using these batteries, do not charge them. Otherwise, dangers such as explosion and fire may occur.
- Risk of explosion if battery is replaced by an incorrect type. Dispose of used batteries according to the instructions.
Warranty
- Warranty is void if damage or system failure occurred due to outside factors such as collision, fire, flood, dirt, sewage, earthquake, and other force majeure events as well as incorrect usage of electricity or use of non-original accessories.
- It is the sole responsibility of the user if problems (such as data loss and system failure) occurred due to non-factory installed software, parts, and/or non-original accessories.
- Do not change the camera. Any changes to the camera invalidate the warranty.
Taking care of your camera
- Always keep the camera in the accompanying leather case or pouch for better protection against splashes, dust, and collision.
- The only way of replacing the battery and the memory card is to open the battery/card cover.
- Dispose of unwanted batteries and cameras as permitted by the laws in your countries.
• Water may cause a fire or electric shock. Therefore, store your camera in a dry place. - If your camera becomes wet, wipe it with a dry cloth as soon as possible.
- Salt or seawater may cause severe camera damage.
- Do not drop, knock, or shake the camera. A rude behavior of using the camera may damage the internal electronic circuit board, deform the lens shape, or make the lens unretractable.
- Do not use harsh chemicals, cleaning solvents, or strong detergents to clean the camera.
- Finger grease may be left on the camera lens and will result in unclear images or videos. To avoid this problem, be sure to clean the camera lens before taking pictures or recording videos. You should also clean the camera lens on a regular basis.
- If the lens is dirty, use a lens brush or soft cloth to clean the lens.
- Do not touch the lens with your fingers.
- If a foreign substance or water gets in your camera, please turn the power off immediately and disconnect the batteries. Next, remove the foreign substance or water and send it to the maintenance center.
- Whenever there is data in the internal memory or the external memory card, you should make a backup copy to a computer or disc. So, you can have a backup solution if data loss occurs.
- If the lens cannot retract into the camera, please replace the batteries first (usually this is because of drained batteries). Then the lens should retract automatically. If the lens still cannot retract, please contact your dealer.
- Under no circumstances should you push the lens back manually as this may damage the camera.
- All original accessories are designed only for use with this camera model you purchased. Do not use these accessories with other camera models or cameras of other brands to avoid unpredictable danger or damage.
- Before initial use of a memory card, always use the camera to format the card first.
- Remember to slide the write-protect tab (if available) to the unlock position. Otherwise, all data (if any) on the memory card is protected and the card cannot be edited or formatted.
Operating environment
- Do not use or store your camera in the environments listed below:
- Direct sunlight
- Dusty places
- Next to an air conditioner, electric heater or other heat sources
• In a closed car that is in direct sunlight -
Unstable locations
-
Do not use your camera outdoors when it is raining or snowing.
- Do not use your camera in or near water.
- The camera operating temperature is between 0 and 40 degrees Celsius. It is normal for the operating time to be shortened when the temperature is low.
- The capacity of your camera batteries will reduce each time it is charged/emptied.
- Storage at too high or low temperatures will also result in a gradual capacity loss. As a result, the operating time of your camera may be considerably reduced.
- It is normal for the camera to become warm during operation, because the camera casing might conduct heat.
natural_image
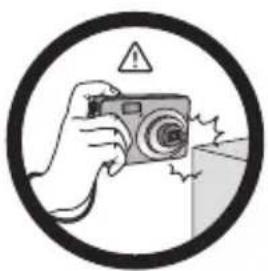
Illustration of a hand holding a camera inside a circle with warning symbols (no text or labels)Do not hold the camera by excessive force. Plus, be sure to protect the camera from strong impacts.
natural_image
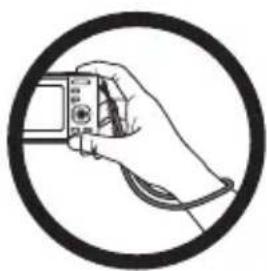
Illustration of a hand holding a camera within a circle (no text or symbols)To avoid accidental falling, please attach the hand strap to the camera and always hold the camera by keeping the hand strap around your wrist.
flowchart
graph TD
    A["Negative State"] --> B["Positive State"]
    C["Stress"] --> D["Energy"]
    E["Failure"] --> F["Failure"]
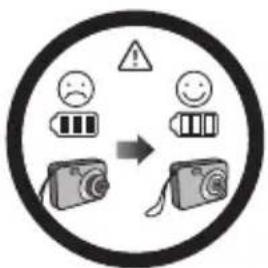
If the battery suddenly depleted and caused the lens fail to retract, please carefully protect the lens to avoid collision and insert a battery with full power ASAP.
natural_image
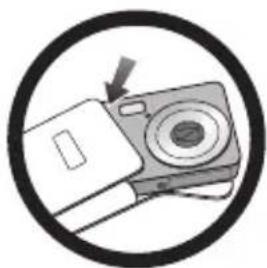
Diagram of a camera inside a circle, showing a device with an arrow pointing to it (no text or symbols present)When the camera is not in use, always turn the power off and make sure the lens has retracted successfully before storing the camera in its case. If you do not intend to use the camera for a long time, please remove the battery from the camera and store the battery carefully.
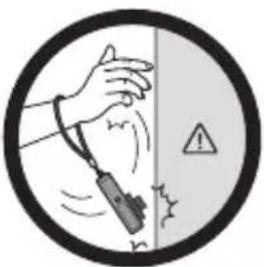 | 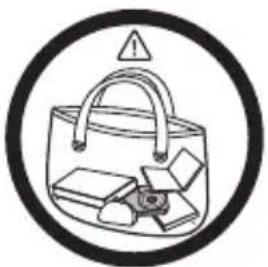 |
| Keep your camera away from sharp objects and avoid collision. | When the camera is not in use, please place it in a steady place. Plus, always keep your camera away from pressure or any other similar environment (for example, in a pant pocket) to avoid possible damage. |
Table of Contents
Unpacking 12
General Guide....13
Monitor Screen Contents....14
- Configuring Monitor Screen Settings .... 16
First, charge the battery prior to use. 17
- To load the battery .... 17
- Charge the Battery .... 18
Configuring Basic Settings the First Time You Turn On the Camera ..... 21
Preparing a Memory Card 21
- Supported Memory Cards .... 21
- To load a memory card. 23
- To format (initialize) a new memory card .... 24
Turning the Camera On and Off. 25
• To turn power on....25
- To turn off the camera .... 25
To shoot a snapshot 26
Viewing Snapshots....28
Deleting Snapshots and Movies 29
- To delete a single file.... 29
- To delete specific files....30
- To delete all files .... 30
- Snapshot Tutorial 31
Using the Control Panel....31
Changing the Image Size.... (Size)... 32
- To select the snapshot image size.... 33
Using Flash . . . . . . . . . . . . . . . . . . . . . . . . . . . . . . . . . . . . . . . . . . . . . . . . . . . . . . . . . . (Flash) .. 35
Using the Self-timer ....(Self-timer)... 36
Using Face Tracking....37
Shooting without Disturbing Others . . . . . . . . . . . . . (Silent Mode) . . 38
Using the Simple Mode....38
Shooting with Zoom....41
- Optical Zoom and Digital Zoom Switch Point .... 42
• Recording Movie Images and Audio 43
To record a movie....43
Shooting a Snapshot while Shooting a Movie. 44
Recording Audio Only . . . . . . . . . . . . . . . . . . . . . . (Voice REC) . . . 45
- To play back an audio recording .... 46
• Using Scene Mode 47
What is Scene Mode? 47
- Some Sample Scenes.... 47
To shoot an image with Scene Mode 47
- Advanced Settings 49
Using On-screen Menus 49
REC Mode Settings (REC)...50
- Selecting a Focus Mode .... (Focus) ... 50
- Changing the Focus Frame Shape .... (Focus Frame) ... 52
- Reducing the Effects of Camera and Subject Movement (Stabilizer)....53
- Specifying the Auto Focus Area ..... (AF Area) ... 54
- Assigning Functions to the [ ] and [ ] Keys .... (L/R Key) ... 55
- Displaying the On-screen Grid (Grid) ... 55
- Using Icon Help .... (Icon Help) ... 55
- Configuring Power On Default Settings (Memory) ... 56
Image Quality Settings . . . . . . . . . . . . . . . . . . . . . . . . . . . . . . . . . . . . . . . . . . . . (Quality) . . . 57
- Specifying Snapshot Image Quality .... (Quality (Snapshot)) ... 57
- Correcting Image Brightness (EV Compensation) ... 57
- Controlling White Balance (White Balance) ... 58
- Specifying ISO Sensitivity ..... (ISO) ... 59
- Optimizing Image Brightness ....(D-Lighting) ... 59
- Using Built-in Color Filters (Color Mode) ... 59
• Viewing Snapshots and Movies 60
Viewing Snapshots....60
Viewing a Movie 60
Zooming an On-screen Image 61
Displaying the Image Menu 61
Viewing Snapshots and Movies on a TV Screen 62
• Other Playback Functions (PLAY) 64
Using the PLAY Panel 64
Playing a Slideshow on the Camera . . . . . . . . . . . . . . . . . . . . . . (Slideshow) . . . 66
Performing Playback without Disturbing Others ..... (Silent Mode)... 67
Rotating an Image .... (Rotate)... 67
Selecting Images for Printing . . . . . . . . . . . . . . . . . . . . . . . . . . . . . . . . . . . . . . . . . . . (DPOF) . . 68
Protecting a File Against Deletion ....(Protect)... 68
Resizing a Snapshot (Resize)...69
Cropping a Snapshot ..... (Trimming)... 69
Adding Audio to a Snapshot (Voice Memo)...70
• To play snapshot audio .... 70
Copying Files (Copy)...71
- Printing 72
Connecting Directly to a PictBridge Compatible Printer ..... 72
Using DPOF to Specify Images to be Printed and the Number of Copies . . 74
- Other Settings (Set Up) 75
Configuring Camera Sound Settings .... (Sounds)... 75
Configuring a Startup Image 76
Specifying the File Name Serial Number Generation Rule .... (File Numbering)... 76
Configuring World Time Settings (World Time) 77
Time Stamping Snapshots ..... (Date Stamp)... 78
Setting the Camera's Clock (Adjust)...78
Specifying the Date Format. 79
Specifying the Display Language ..... (Language)... 79
Configuring Sleep State Settings .....(LCD Save)...80
Configuring Auto Power Settings ..... (Power Saving)... 80
Configuring [band] Settings (REC/PLAY)...81
Disabling File Deletion .....(Disable)... 81
Configuring USB Protocol Settings ..... (USB)... 82
Selecting the Screen Aspect Ratio and Video Output System (TV Out)....82
Formatting Built-in Memory or a Memory Card .....(Format)... 83
Resetting the Camera to Factory Defaults .... (Reset)... 83
- Appendix 84
- Battery Precautions....84
- Troubleshooting and service information....84
- Technical support .... 86
Specifications....87
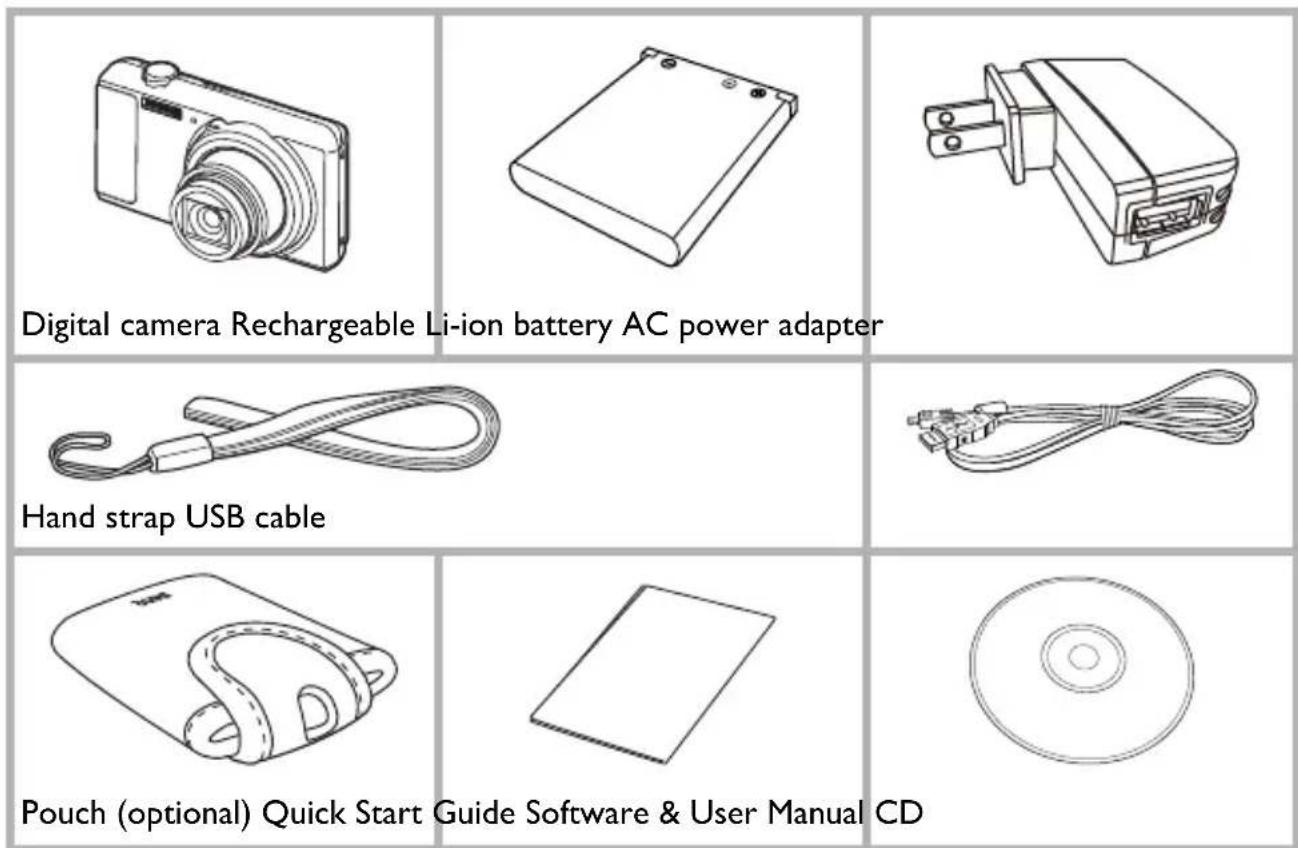
Unpacking
As you unpack your camera, check to make sure that all items shown below are included. If anything is missing, contact your original retailer.
General Guide
- Camera
Front
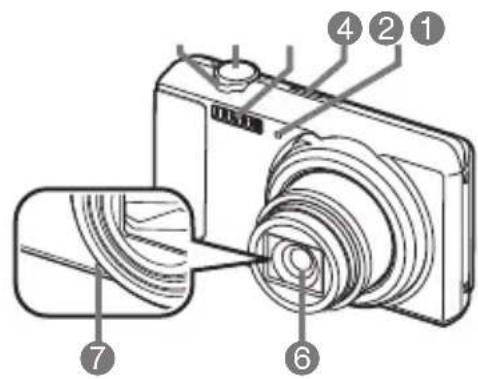
Back
![10 9 11 12 13 8 16 17 15 14 18 [▲] [◀] [▼] DISP SET [▶] [SET]](/content/2026/05/857675/images/dba349e098da26ce03c2a32a4b8f8a34e4c1d7d8688b3dfa9d08ee28bedd011f.jpg)
I Zoom contr
2 Shutter but
3 Flash)
4 [ON/OFF] (
5 Front lamp
6 Lens
7 Microphone
8 [ ] (REC) button
9 Backl a m p
10 [ ] (Movie) button
II Strap hole
b2 [USB&AV] port
18 Connector cover
14 [SET] button
P5 [p]v(Delete) button
16 [E(PLAY) button
17 Control button
([▲][▼][◀][▶])
18 Monitor screen
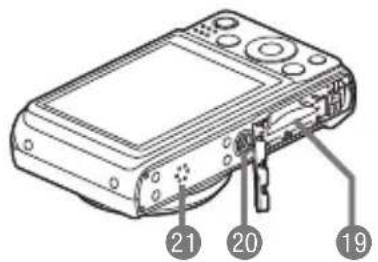
19 Battery/memory card slots
20 Tripod hole Use this hole when attaching to a tripod.
21 Speaker
Bottom
Monitor Screen Contents
The monitor screen uses various indicators, icons, and values to keep you informed of the camera's status.
- The sample screens in this section are intended to show you the locations of all the indicators and figures that can appear on the monitor screen in various modes. They do not represent screens that actually appear on the camera.
- Snapshot Recording
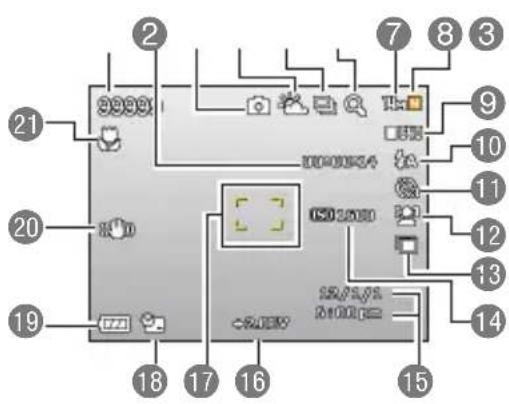
I Remaining snapshot memory capacity
2 Remaining movie memory capacity
3 Recording mode
4 White balance setting
5 B u r s t
6 Image deterioration indicator
7 Snapshot image size
8 Snapshot image quality
9 Movie image quality
10 Flash
II Self-timer
12 Face Tracking
13 D-Lighting
14 ISO sensitivity
15 Date/time
16 EV Compensation
17 Focus frame
18 Date Stamp indicator
19 Battery level indicator
20 Stabilizer indicator
21 Focus Mode
- Shutter Button Half-pressed
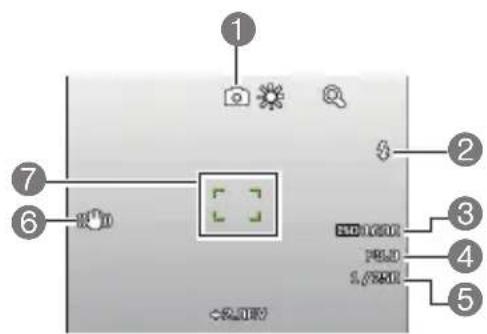
I Recording mode
2 Flash
3 ISO sensitivity
4 Aperture value
5 Shutter speed
6 Stabilizer indicator
7 Focus frame
NOTE
- The aperture, shutter speed, and ISO sensitivity values will turn orange when you half-press the shutter button if Auto Exposure is not correct.
- Simple Mode
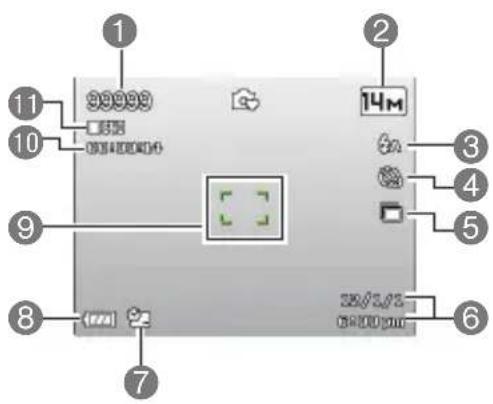
I Remaining snapshot memory capacity
2 Snapshot image size
3 Flash
4 Self - timer
5 D - Lighting
6 Date / time
7 Date Stamp indicator
8 Battery level indicator
9 Focus frame
10 Remaining movie memory capacity)
II Movie image quality
- Movie Recording
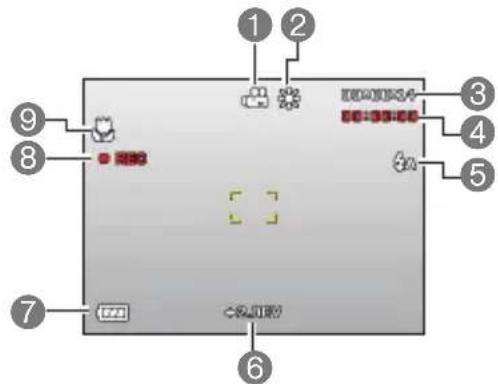
I Recording mode
2 White balance setting
3 Remaining movie memory capacity
4 Movie recording time
5 Flash
6 E V value
7 Battery level indicator
8 Movie recording indicator
9 Focus Mode
- Snapshot Viewing
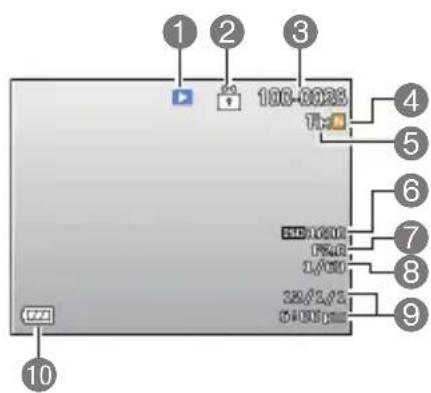
I File type
2 Protect indicator
3 Folder name/file name
4 Snapshot image quality
5 Snapshot image size
6 ISO sensitivity
7 Aperture value
8 Shutter speed
9 Date / time
10 Battery level indicator
- Movie Playback
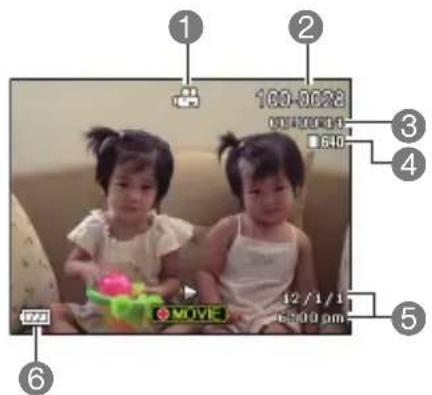
I File type
2 Folder name/file name
3 Movie recording time
4 Movie image quality
5 Date / time
6 Battery level indicator
Configuring Monitor Screen Settings
You can turn display information on and off by pressing [▲] (DISP). You can configure separate settings for the REC mode and PLAY mode.
| Information display on | Displays information about image settings, etc. (REC mode only). |
| Information display + Date/Time on | In addition to information about snapshot settings, displays movie setting information and the date/time screen.• You can specify the date format you want to use. |
| Information display off No information displayed | |
First, charge the battery prior to use.
Note that the battery of a newly purchased camera is not charged. Perform the steps below to load the battery into the camera and charge it.
- Use only the provided batteries or type of battery and charger that came with your camera. Using other types of battery or charger may damage the equipment and invalidate the warranty.
To load the battery
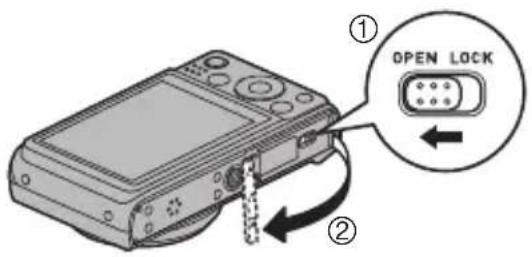
1.Open the battery cover.
Slide the battery cover slider towards OPEN and then open it as indicated by the arrows in the illustration.
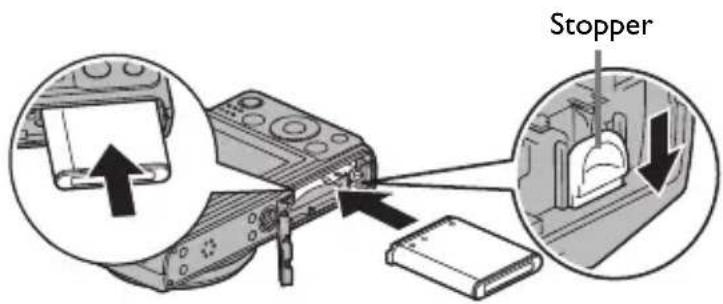
2.Load the battery.
Insert the battery into the compartment with the terminal facing inside the camera with correct orientation as shown. Press the battery in until the stopper secures it in place.
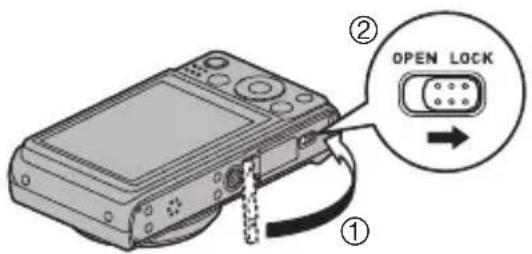
3. Close the battery cover.
Close the battery cover and then shift the slider towards LOCK.
You can use either of the two following methods to charge the camera's battery.
- USB adapter
• USB connection to a computer
• To charge with the USB adapter
- Turn off the camera.
Check to make sure that the camera's monitor screen is blank. If it isn't, press [ON/OFF] (Power) to turn off the camera.
- Connect the camera with the USB cable as shown.
![[ON/OFF] (Power)](/content/2026/05/857675/images/7dcd063a97b95848cfd31f800acec80b8d94d7316e4ff04c23fcee9a100b7e30.jpg)
- Connect the other end with the USB adapter and plug it into a power outlet or with the USB port of PC directly for charging.
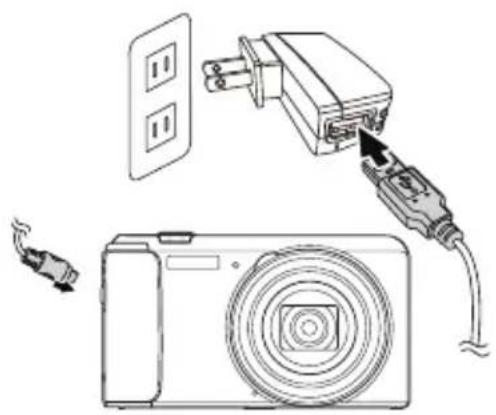
natural_image
Diagram showing a camera connected to an electrical outlet with plug, and a separate photo of a digital camera (no text or symbols present)Back Lamp Operation
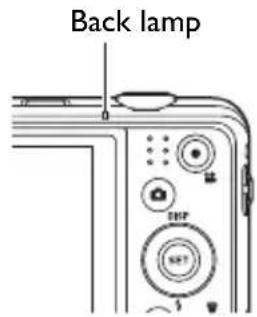
| Lamp Status Description | |
| Lit Red Charging | |
| Flashing Red | Abnormal ambient temperature, USB-AC adaptor problem, or battery problem |
| Off Charging complete |
- After charging is complete, disconnect the USB cable from the camera and then unplug the power cord from the power outlet.
• To charge using a USB connection to a computer
The battery loaded in the camera is charged whenever the camera is connected directly to a computer with the USB cable.
- Depending on the setup of your computer, you may not be able to charge the camera's battery over a USB connection. If this happens, use of the USB adapter that comes with
the camera is recommended.
1. Turn off the camera.
Check to make sure that the camera's monitor screen is blank. If it isn't, press [ON/OFF] (Power) to turn off the camera.
![[ON/OFF] (Power) Monitor screen](/content/2026/05/857675/images/38967a40a48fd28c69f19f5bf2f0e5c263f46fb24442263255c827a43ce454b2.jpg)

IMPORTANT!
- The first time you connect the camera to your computer with the USB cable, an error message may appear on your computer. If this happens, disconnect and then reconnect the USB cable.
2. With your computer turned on, connect the camera to it.
The back lamp should light red, indicating that charging has started.
The back lamp will go out when charging is complete.
It takes about 130 minutes to achieve a full charge. Charging may take longer depending on charging conditions.
![USB port USB cable (included with camera) Large connector [USB/AV] port Small connector](/content/2026/05/857675/images/947ce37a04feb92071a97557c3badefff250a12bf4944f0cbee617adc686bb70.jpg)
Making sure that the ↑mark on the USB cable connector is towards the lens side, connect the cable to the camera.
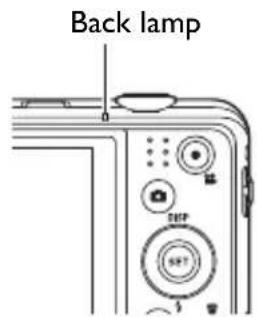
Back Lamp Operation
| Lamp Status Description | |
| Lit Red Charging | |
| Flashing Red | Abnormal ambient temperature, charging taking abnormally long, or battery problem |
| Off Charging complete |
3. After charging is complete, disconnect the USB cable from the camera and then from the computer.
NOTE
- Even if you turn on the camera, the battery will continue to charge if there is a USB connection with a computer. In this case, however, back lamp operation will change as described below.
Back Lamp Operation
| Lamp Status Description | |
| Lit Red Charging | |
| Flashing Red | Abnormal ambient temperature, charging taking abnormally long, or battery problem |
| Lit Green Charging complete |

IMPORTANT!
- Charging is not performed while the connected computer is in the hibernate mode.
- A charging error can occur immediately after charging begins or some time after charging begins. A charging error is indicated by the back lamp flashing red.
Checking Remaining Battery Power
As battery power is consumed, a battery indicator on the monitor screen indicates remaining power as shown below.
| Remaining Power High Low | ←→ | ||||
| Battery Indicator | → | → | → | → | |
Configuring Basic Settings the First Time You Turn On the Camera
The first time you load a battery into the camera, a screen appears for configuring the display language, date, and time settings. Failure to set the date and time correctly will cause the wrong date and time data to be recorded with images.

IMPORTANT!
- Camera models sold in certain geographic areas may not support display language selection.
- Press [ON/OFF] (Power) to turn on the camera.
- Use [ ], [ ], [▼], and [ ] to select the language you want and then press [SET].
- Use [ ] and [ ] to select a date format and then press [SET].
Example: July, 10, 2012
YY/MM/DD → 12/7/10
DD/MM/YY → 10/7/12
MM/DD/YY → 7/10/12
![[ON/OFF] (Power) [▲] [◀] [▼] [●] ( M o v](/content/2026/05/857675/images/eece1f963b952c7f19263b58ef0b5187eba2307da65f4f198684aef2dd30e297.jpg)
- Set the date and the time.
Use [◀] and [ ]▶ to select the setting you want to change and then use [◀] and [ ]▼ to change it.
To switch between 12-hour and 24-hour format, press [●] (Movie).
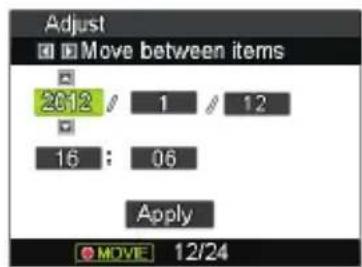
- After setting the date and time, use [ ] and [ ] to select "Apply" and then press [SET].
Preparing a Memory Card
Though the camera has built-in memory that can be used to store images and movies, you probably will want to purchase a commercially available memory card for greater capacity. The camera does not come with a memory card. Images recorded while a memory card is loaded are saved to the memory card. When no memory card is loaded, images are saved to built-in memory.
Supported Memory Cards
- SD Memory Card (Up to 2GB)
- SDHC Memory Card (2GB to 32GB)
- SDXC Memory Card (32GB to 2TB)

Use one of the above types of memory card.
- The above are supported memory card types as of May 2011.
- Noted memory card capacities are standard values.
-
Use only SD cards that are compliant with the SD Card Association specification.
-
Press [ON/OFF] (Power) to turn off the camera and then open the battery cover. Slide the battery cover slider towards OPEN and then open it as indicated by the arrows in the illustration.
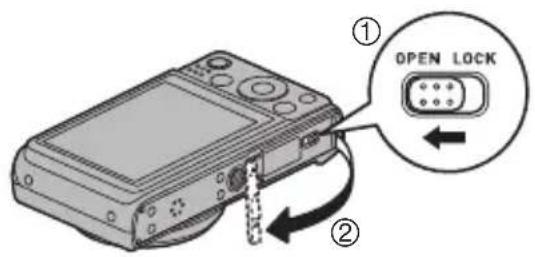
- Load a memory card. Positioning the memory card so its front is facing upwards (towards the monitor screen side of the camera), slide it into the card slot all the way in until you hear it click securely into place.
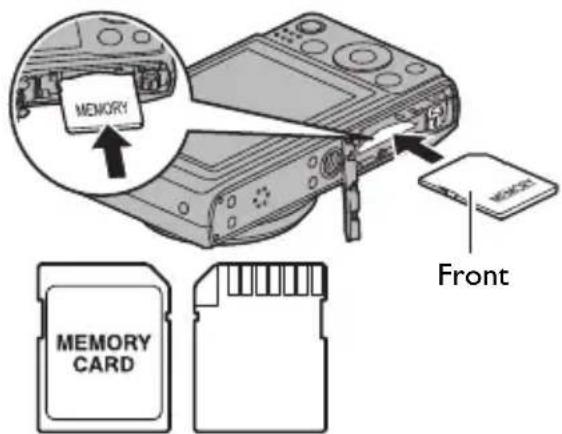
Front Back
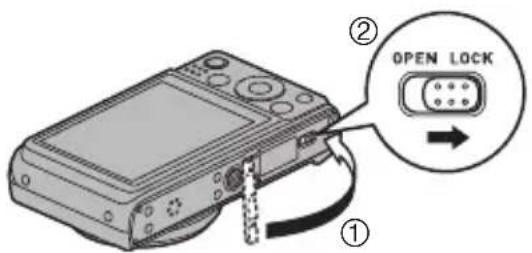
- Close the battery cover. Close the battery cover and then shift the slider towards LOCK.

IMPORTANT!
- Never insert anything besides a supported memory card into the memory card slot.
- Should water or any foreign object ever get into the card slot, immediately turn off the camera, remove the battery, and contact your retailer or authorized service center.
To format (initialize) a new memory card
You need to format a new memory card before using it for the first time.
- Press [ON/OFF] (Power) to turn on the camera and then press [SET].
- Use [] and [] to select the second Control Panel option from the bottom (MENU) and then press [SET].
- Use [] and [] to select the "Set Up" tab.
- Use [ ] and [ ] to select "Format" and then press [ ].
- Use [ ] and [ ] to select "Format" and then press [SET].
To turn power on
| To turn on power and enter the REC mode | Press [ON/OFF] (Power) or [REC).• The back lamp will light green momentarily and the lens will extend out of the camera. |
| To turn on power and enter the PLAY mode | Press [PLAY).• The back lamp will light green momentarily and an image currently stored in camera memory will appear on the monitor screen. |
- Take care to ensure that nothing is restricting or coming into contact with the lens as it extends. Holding the lens with your hand so it cannot extend creates the risk of malfunction.
- Pressing while in the REC mode switches to the PLAY mode. The lens retracts about 10 seconds after switching modes.
- The LCD Save and Power Saving will turn off power automatically if you do not perform any operation for a preset amount of time.
To turn off the camera
[ON/OFF] (Power)
natural_image
Technical line drawing of a mechanical component with no visible text or symbolsBack lamp
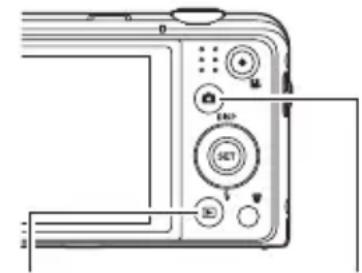

Press [ON/OFF] (Power).
- You can configure the camera so power does not turn on when you press [ ] (REC) or [E(PLAY). You also can configure the camera to turn off when you press [ ] (REC) or [D] ( P L A Y ) .
To shoot a snapshot
1. Press [图标] (REC) to turn on the camera.
The camera will enter the REC mode.
Make sure is on the display.
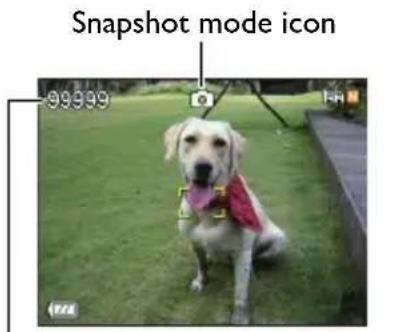
Remaining Snapshot Memory Capacity
![Monitor screen Shutter button [ ] ( R E](/content/2026/05/857675/images/26f3b7a5a6c98ab3ea66145fdfdd52e52c38c2ba107b847a9260fdfe2bd7e5c8.jpg)
2. Point the camera at the subject.
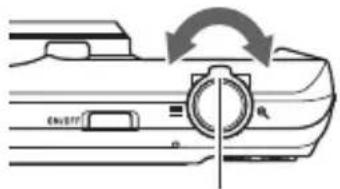
You can zoom the image, if you want.
natural_image
Diagram of a car front bumper with directional arrows indicating rotation (no text or symbols)Zoom controller
natural_image
Two aircraft flying in formation against a blue sky with clouds (no visible text or symbols)Wide Angle
natural_image
Aerial view of a flying saucer against a clear blue sky with clouds (no visible text or symbols)Telephoto
3. Half-press the
shutter button to focus the image.
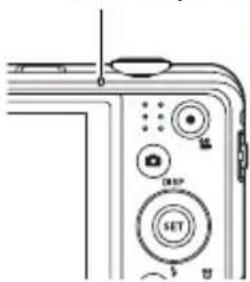
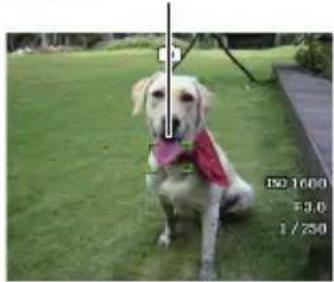
When focus is complete, the camera will beep, the back lamp will light green, and the focus frame will turn green.
Back lamp Focus frame
natural_image
A white retriever dog wearing a red vest sitting on grass, with no visible text or symbols.Half-press
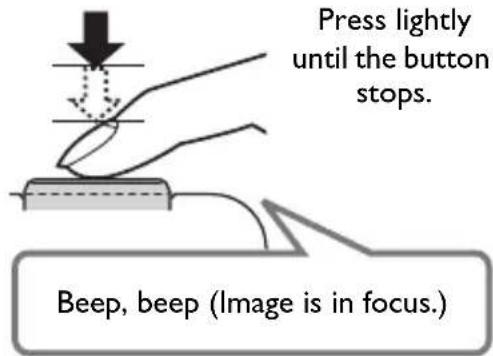
When you half-press the shutter button, the camera automatically adjusts exposure and focuses on the subject it is currently pointed at. Mastering how much pressure is required for a half-press and a full-press of the shutter button is an important technique for good-looking images.
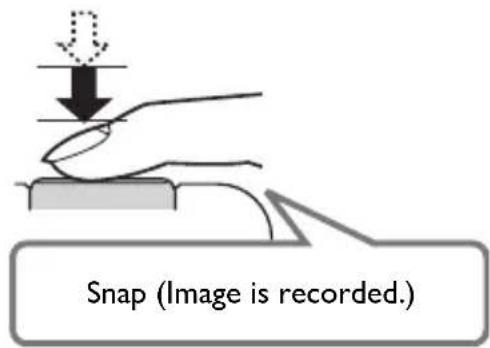
- Continuing to keep the camera still, press the shutter button the rest of the way down.
This records the snapshot.
Full-press
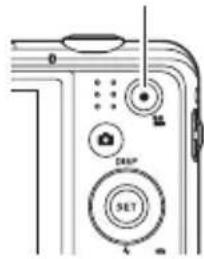
Recording a Movie
Press [●(Movie) to start movie recording. Press [●]
(Movie) again to stop movie recording.
[ ] (Movie)
• If the image does not focus...
If the focus frame stays red and the back lamp is flashing green, it means that the image is not in focus (because the subject is too close, etc.). Re-point the camera at the subject and try to focus again.
- If the subject is not in the center of the frame...
"Focus lock" is the name of a technique you can use when you want to shoot an image in which the subject to be focused on is not within the focus frame in the center of the screen.
• To track the movement of a moving subject
Half-press the shutter button to follow and focus automatically on a moving subject. See “[‘κ] Tracking” for more information.
Viewing Snapshots
Use the following procedure to view snapshots on the camera's monitor screen.
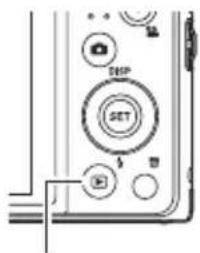
1. Press [] (PLAY) to enter the PLAY mode.
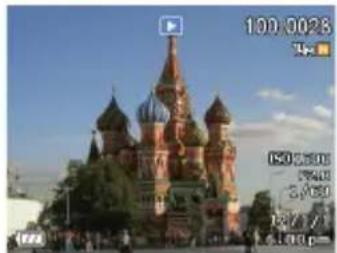
• This will display one of the snapshots currently stored in memory.
• Information about the displayed snapshot also is included.
- You also can clear the information to view only the snapshot.
[ ]
( P L A Y )
- You can zoom in on the image by sliding the zoom controller towards. If you are recording a snapshot that is very important to you, it is recommended that you zoom the image and check its details after recording it.
2. Use [ ] and [ ] to scroll between images.
- Holding down either button scrolls at high speed.
![BENQ GH200 - Use [ ] and [ ] to scroll between images. - 1](/content/2026/05/857675/images/6b23546f2b02cc43737ef12db7aad9934b1be52da1f14733ef856f4ac3801438.jpg)
natural_image
Knitted elephant toy with knitted fabric, sitting on a surface (no text or symbols visible)[▶]
→
←
[◀]
![BENQ GH200 - Use [ ] and [ ] to scroll between images. - 2](/content/2026/05/857675/images/76b9a73dfc3960d8c2db596885887aec472378e4a2c147c3edd2183eeb0343fe.jpg)
natural_image
Two birds flying in formation against a blue sky with clouds (no visible text or symbols)[▶]
[◀]
→
←
![BENQ GH200 - Use [ ] and [ ] to scroll between images. - 3](/content/2026/05/857675/images/14c624758285aa1fbe3ceadde1473939d176be0ab39b9c1d850f3e7977c362b4.jpg)
natural_image
Exterior view of Saint Basil's Cathedral in Moscow under a clear blue sky (no signage or text visible)NOTE
- Half-pressing the shutter button while in the PLAY mode or while a menu screen is displayed will switch directly to the REC mode.
Deleting Snapshots and Movies
If memory becomes full, you can delete snapshots and movies you no longer need in order to free up storage and record more images.
- In either the REC mode or PLAY mode, you can delete files simply by pressing [Delete].
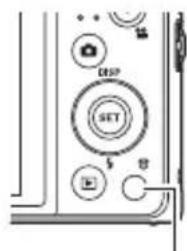
[ ] (Delete)
To delete a single file
- Press [] (Delete).
- Use [] and [] to scroll through the files until the one you want to delete is displayed.
- Use [] and [] to select "Delete" and then press [SET].
• To delete other files, repeat steps 2 and 3.
- To exit the delete operation, press [] (Delete).
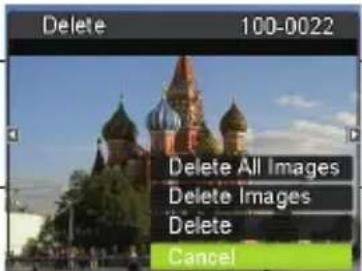
-
Press [ ] (Delete).
-
Use [ ] and [ ] to select "Delete Files" and then press [SET].
- This displays a file selection screen.
- Use [ ], [ ], [▼], and [ ] to move the selection boundary to the file you want to delete, and then press [SET].
- This will select the check box of the currently selected file.
-
Repeat step 3 to select other files, if you want. After you are finished selecting files, press [?] (Delete).
-
Use [] and [] to select "Yes" and then press [SET].
- This deletes the files you selected.
- To exit the delete operation, press [ ] (Delete).
To delete all files
-
Press [ ] (Delete).
-
Use [ ] and [ ] to select "Delete All Files" and then press [SET].
-
Use [ ] and [ ] to select "Yes" and then press [SET] to delete all files.
This will cause the message “There are no files” to appear.
Snapshot Tutorial
Using the Control Panel
The Control Panel can be used to configure camera settings.
1. In the REC mode, press [SET].
This will select one of the Control Panel icons and display its settings.
![[▲] ▼ [ ]◀ [ ] SET [SET]](/content/2026/05/857675/images/bdf6edb46951c8e8a800458e5525d5e39479b926b3319af2931d502981fcb5de.jpg)
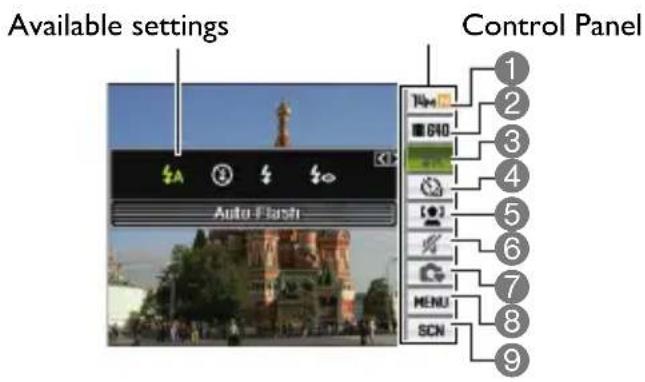
2. Use [ ] and [ ] to select the setting you want to change.
I Snapshot image size/quality*
2 Movie image quality
3 Flash
4 Self - timer
5 Face Tracking
6 Silent Mode
7 Simple Mode
8 R E C m e n u d i s p l a
9 Scene Mode scene selection
- Snapshot image quality cannot be changed using the Control Panel.
3. Use [ ] and [ ] to change the setting.
4. If you want to configure another setting, repeat steps 2 and 3.
5. After all of the settings are the way you want, press [SET].
This will apply the settings and return to the REC mode.
If you selected "MENU", the REC menu will appear.
If you selected "SCN", the Scene Mode scene menu will appear.
- You can close the Control Panel by pressing [ ] (Delete).
Changing the Image Size (Size)
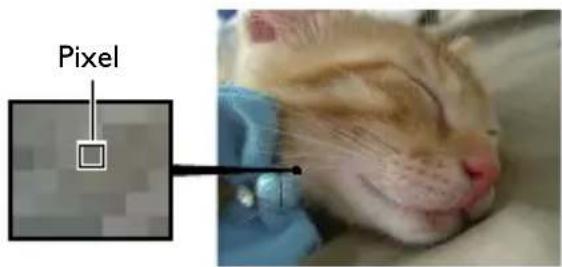
- Pixels
A digital camera image is a collection of small dots called “pixels”. The more pixels there are in an image, the more detail there will be. However, you generally can do with fewer pixels when printing an image (L size) through a print service, attaching an image to e-mail, when viewing the image on a computer, etc.
- About image sizes
The size of an image indicates how many pixels it contains, and is expressed as horizontal pixels x vertical pixels.
10M (3648x2736) size image = Approximately 10 million pixels
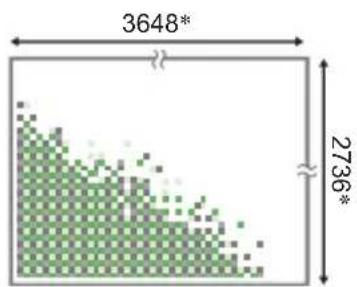
geo
| Dimension | Value | |---|---| | Top Dimension | 3648* | | Bottom Dimension | 2736* |VGA (640x480) size image = Approximately 300,000 pixels
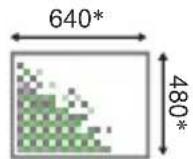
* Unit: pixels
Image Size Selection Tips
Note that larger images have more pixels, so they take up more memory space.
| Large Number of Pixels | More detail, but takes up more memory. Best when you plan to print large-size prints (such as A3 size). |  |
| Small Number of Pixels | Less detail, but takes up less memory. Best when you want to send images by e-mail, etc. |  |
- In the REC mode, press [SET].
- Use [] and [] to select the top Control Panel option (Snapshot Image Size).
- Use [ ] and [ ] to select an image size and then press [SET].
| Image Size (Pixels) | Suggested Print Size and Application | Description |
| 14M (4320x3240) Poster Print | Good detail for better clarity even for images cropped from the original | |
| 3:2 (4320x2880) Poster Print | ||
| 16:9 (4320x 2432) HDTV | ||
| 10M (3648x2736) A3 Print | Good detail | |
| 6M (2816x2112) A4 Print | ||
| 3M (2048x1536) 3.5" | x5" Print | Best when preserving memory capacity is relatively more important than image quality. |
| VGA (640x480) E Mail | Image files are smaller, which is better when attaching images to e-mail. However, images are relatively coarser. | |
- The initial factory default image size setting is "14M".
- Selecting “3:2” records images with an aspect ratio of 3:2, which matches the standard aspect ratio of print paper.
- The letters “HDTV” stand for “High Definition Television”. An HDTV screen has an aspect ratio of 16:9, which makes them wider than the usual 4:3 aspect ratio of television screens of the past. Your camera can record images that are compatible with the aspect ratio an HDTV screen.
- You should regard the print paper sizes suggested here as guidelines only (200 dpi print resolution).
- Specifying Movie Image Quality
Movie image quality is a standard that determines the detail, smoothness, and clarity of a movie during playback. Shooting with the high-quality (1280) setting will result in better image quality, but it also shortens the amount of time you can shoot.
- In the REC mode, press [SET].
- Use [] and [] to select the second Control Panel option from the top (Movie Image Quality).
- Use [ ] and [ ] to select the setting you want and then press [SET].
| Image Quality (Pixels) Approximate Data Rate Frame Rate | |||
| 1280 1280 | x720 30 | Megabits/second 30 frames/second | |
| 640 640 | x480 6 Megabits/second 30 frames/second | ||
- The 16:9 aspect ratio is available when “1280” is selected as the image quality.
Using Flash (Flash)
-
In the REC mode, press [ ] ( ) once.
-
Use [ ] and [ ] to select the flash setting you want and then press [SET].
- If there are no indicators on the monitor screen, you can cycle through the flash modes by pressing [▼( ). You can turn display information on or off by pressing [▲ (DISP).
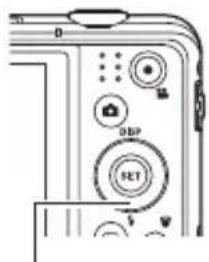
[▼] §( )
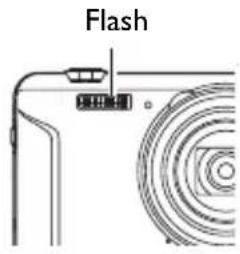
| Auto Flash | Flash fires automatically in accordance with exposure (amount of light and brightness) conditions. |
| Forced Off Flash | does not fire. |
| Forced On | Flash always fires. This setting can be used to brighten a subject that normally comes out dark due to daylight or backlight (daylight synchro flash). |
| Red Eye Reduction | Flash fires automatically. This type of flash can be used to reduce the chance of redness in the subject's eyes. |
- Press the shutter button to shoot.
natural_image
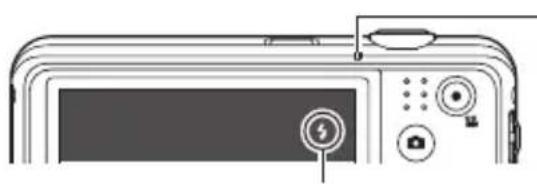
Line drawing of a device front panel with buttons and a battery icon (no text or symbols)indicates the flash will fire.
Back lamp
Flashes orange while the flash is charging to indicate that image recording is disabled.
- You will not be able to take another flash snapshot until the lamp stops flashing orange, which indicates that charging is complete.
Red-eye Reduction
Using the flash to shoot at night or in a dimly lit room can cause red spots inside the eyes of people who are in the image. This is caused when the light from the flash reflects off of the retina of the eye. When red-eye reduction is selected as the flash mode, the camera fires a pre-flash to cause the irises in the eyes of any people in the image to close, which reduces the chance of red eye.
Note the following important points when using red-eye reduction.
- Red-eye reduction does not work unless the people in the image are looking directly at the camera (flash).
- Red-eye reduction may not work very well if the subjects are located far away from the camera.
Using the Self-timer (Self-timer)
With the Self-timer, pressing the shutter button starts a timer. The shutter is released and the image is shot after a fixed amount of time.
- In the REC mode, press [SET].
- Use [] and [] to select the fourth Control Panel option from the top (Self-timer).
- Use [] and [] to select the setting you want and then press [SET].
| Self-timer:10 sec. | Self-timer: 10 seconds |
 Self-timer: 2 sec. Self-timer: 2 sec. | Self-timer: 2 secondsWhen shooting under conditions that slow down the shutter speed, you can use this setting to prevent image blur due to camera movement. |
 Self-timer: x3 Self-timer: x3 | Shoots three images: one image 10 seconds after the shutter button is pressed, and the next two images as soon as the camera is ready after shooting the previous image. How long it takes for the camera to get ready to shoot depends on the image size and quality settings, whether or not a memory card is loaded in the camera, and the flash charge condition. |
| Self-timer: Off Turns off the Self-timer. | |
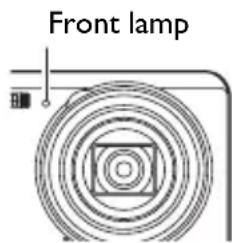
- The front lamp flashes while the Self-timer countdown is in progress.
- You can interrupt an ongoing Self-timer countdown by pressing [SET].
NOTE
- The Self-timer cannot be used together with the following features. Burst, some Scene Mode scenes
- The Triple Self-timer cannot be used together with the following features. Movie, Simple Mode, some Scene Mode scenes
Using Face Tracking
When shooting people, the face tracking feature detects the faces of up to eight individuals and adjusts focus and brightness accordingly.
- In the REC mode, press [SET].
- Use [ ] and [ ] to select the fifth Control Panel option from the top (Face Tracking).
- Use [◀] and [▶] to select “Face Tracking: On” and then press [SET].
- Point the camera at the subject(s).
The camera will detect human faces and display a frame around each one.
- Half-press the shutter button.
The camera will focus and the frames around the faces it focuses on will turn green.
- Press the shutter button the rest of the way down.
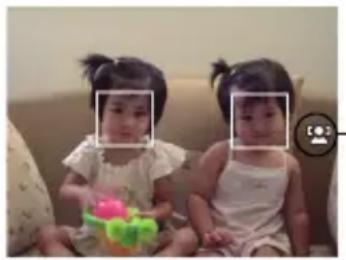
natural_image
Two young girls sitting on a couch, one holding a toy (no visible text or symbols)Face Tracking icon

IMPORTANT!
- The camera performs center focus if it cannot detect a face.
- The only focus mode available while face tracking is enabled is Auto Focus (AF).
- Face Tracking may take a bit longer when you hold the camera sideways.
- Detection of the following types of faces is not supported.
— Face that is obstructed by hair, sunglasses, a hat, etc., or a face in dark shade
– A profile or a face that is at an angle
— A face that is very far away and small, or very close and large
– A face in an area that is very dark - The face of a pet or some other non-human subject
- Face Tracking cannot be used in combination with any of the following features.
– Some Scene Mode scenes - Simple Mode
- Movie Recording
- The AF area setting is ignored while face tracking is enabled.
Shooting without Disturbing Others (Silent Mode)
The Silent mode automatically disables flash, mutes operation tones, and configures other settings to avoid disturbing others around you. It comes in handy when shooting in a museum or other areas where flash photograph is prohibited.
- In the REC mode, press [SET].
- Use [] and [] to select the sixth Control Panel option from the top (Silent Mode).
- Use [ ] and [ ] to select "On" and then press [SET].
This enters the Silent mode, which is indicated by [Silent) on the monitor screen. The following shows the camera setup in the Silent mode.
| Flash Off | |
| Self-timer Off | |
| Sounds Off |
-
As shown in the example to the right, Flash and Self-timer are not included in the control panel. This means that these settings cannot be changed from the Control Panel.
• See the following for details. -
Flash
- Self-timer
- Sounds
- Entering the Silent mode in the REC mode will also enter the Silent mode in the PLAY mode automatically.
Using the Simple Mode
The Simple mode eliminates troublesome setups and simplifies snapshot recording. This mode is recommended for those who are new to digital imaging.
- In the REC mode, press [SET].
- Use [] and [] to select the third option from the bottom in the Control Panel (Simple Mode).
- Use [] and [] to select “” an when press [SET].
This enters the Simple mode.
- Point the camera at the subject.
If the camera detects a human face, it continually focuses on the face.
If the camera does not detect a face, it continually focuses on the center of the screen.
- The camera will focus and focus frame will turn green.
5. When you are ready to shoot, press the shutter button.
This records the snapshot.

IMPORTANT!
• Vibration and noise will occur due to lens operation. This does not indicate malfunction.
- Simple Mode Control Panel
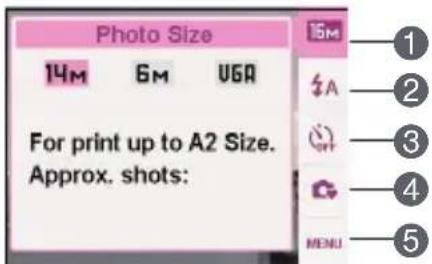
In the Simple mode, the Control Panel provides you with access to four setting items: image size, flash, self-timer, and Simple Mode. There is also a “MENU” option, which you can select to display a menu screen for configuring image quality and Setup tab settings.
- In the Simple mode, the Quality tab can be used to configure the "Movie Quality" and "D-Lighting" settings only.
- The settings of menu options that appear on the normal REC menu but not on the Simple mode REC menu are automatically fixed at their optimum settings. These fixed settings do not affect normal REC menu settings.
- In the Simple mode, press [SET].
In the Simple mode, the characters that appear on the setting screen are larger than they are in other modes.
- Use [] and [] to select the setting you want to change.
I Image size
2 Flash
3 Self - timer
4 Simple Mode
5 REC menu display
- Use [ ] and [ ] to change the setting.
| Setting: Available Options: | |
| Photo Size * / / | 74M 6M VGA |
| Flash (Auto)* / (Off) / (Off) | |
| Self-timer (Self-tim 10 sec.) / * OFF | |
| Simple Mode / | ON OFF |
| MENU | Quality tab/Set Up tab |
- An asterisk (*) indicates reset default settings.
• The following are explanations of the Simple Mode.
ON : Stays in Simple Mode.
OFF: Exits Simple Mode to the normal REC mode.
4. Press [SET].
This will apply your setting(s) and display the Simple Mode viewfinder screen, indicating the camera is ready to shoot.
If you selected "MENU" in step 2, pressing [SET] will display the REC menu. See
“Advanced Settings” for details about configuring its settings.
- Pressing [ ] (Delete) will exit the Control Panel.
Shooting with Zoom
Your camera provides you with 12.5X optical zoom (that changes the lens focal distance), which can be used in combination with digital zoom (that digitally processes the center portion of the image to enlarge it) for total zoom capabilities of 12.5X to 159.5X. The image deterioration point depends on the image size.
- In the REC mode, slide the zoom controller to zoom.
natural_image
Aerial view of multiple aircraft flying in formation against a blue sky with clouds (no visible text or markings)Wide Angle Telephoto
natural_image
Close-up of a fish in flight against a blue sky with clouds (no text or symbols visible)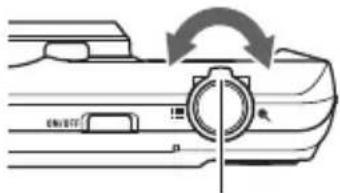
Zoom controller
■ (Wide Angle) : Reduces the size of the subject and broadens the range.
(Telephoto): Enlarges the subject and narrows the range.
- Press the shutter button to shoot the image.

IMPORTANT!
• Digital zoom is disabled while time stamping is turned on.
If you hold the zoom controller towards (Telephoto), the zoom operation will stop when the optical zoom factor reaches its maximum. Momentarily releasing the zoom controller and then holding it again towards (Telephoto) will switch to digital zoom, which you can use to set an even higher zoom factor.
- During zoom, a zoom bar on the monitor screen shows the current zoom setting.
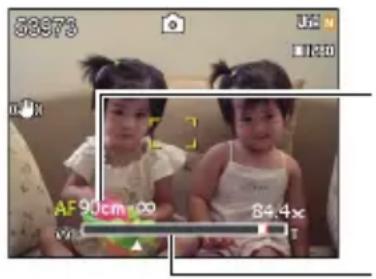
Focusing range (Displayed for Auto Focus, Macro Focus, and Manual Focus.)
Zoom bar
- The image deterioration point depends on the image size (page 32). The smaller the image size, the higher the zoom factor you can use before reaching the image deterioration point.
- Though digital zoom generally causes a deterioration of image quality, some digital zoom without image deterioration is possible with image sizes of “10M” and smaller. The range in which you can use digital zoom without image deterioration is indicated on the display. The deterioration point depends on the image size.
| Image Size | Maximum Zoom Factor | Undeteriorated zoom limit |
| 14M 50.0X | 12.5X | |
| 3:2 50.0X | 12.5X | |
| 16:9 50.0X | 12.5X | |
| 10M 59.3X | 14.8X | |
| 6M 76.6X | 19.1X | |
| 3M 105.4X | 26.4X | |
| VGA 159.5X | 84.4X |
Recording Movie Images and Audio
To record a movie
1. Configure the quality setting for the movie (page 34).
The length of the movie you can record will depend on the quality setting you select.
2. In the REC mode, point the camera at the subject and then press
[●] ( M o v i e )
This will start recording and display the monitor screen.

Movie recording includes monaural audio.
3. Press [ ] (Movie) again to stop recording.
Movie recording also will stop automatically if memory becomes full before you press
[●] ( M o v i e ) .
• The maximum allowed for a single movie recording is 4 GB in file size or
29 minutes in length. Movie recording stops automatically when either of these limits is reached.
 0 EXP SET](/content/2026/05/857675/images/a88ce1109dcaf6deb174015338ff5ad36e0577d5c178df6b9418591662a5c788.jpg)
Remaining recording time (page 87)
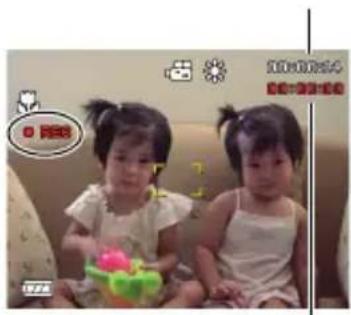
Recording time
Shooting with Scene Mode
With Scene Mode, you can select the sample scene that matches the type of movie you are trying to shoot and the camera will change its setup accordingly, for beautiful movies every time. Selecting the Scene Mode scene named Night Scene, for example, will configure the camera so night scenes appear clearer and brighter.
NOTE
- Spending a long time using movie recording will cause the camera to become slightly warm to the touch. This is normal and does not indicate malfunction.
-
The camera also records audio. Note the following points when shooting a movie.
-
Take care that the microphone is not blocked by your fingers, etc.
- Good recording results are not possible when the camera is too far away from what you are trying to record.
-
Operating camera buttons while shooting can cause button noise to be picked up in the audio.
-
Shooting a very bright subject can cause a vertical band or a pink cast on the monitor screen image. This does not indicate malfunction.
- When using the camera's built-in memory or certain types of memory cards, it can take too much time to record data, which can result in breaks in the image and/or audio. This condition is indicated by and flashing on the monitor screen. To avoid loss of movie frames, use of a memory card with a maximum transfer speed of at least 10MB per second is recommended.
- The effects of camera movement in an image become more pronounced when you shoot close up or with a large zoom factor. Because of this, use of a tripod is recommended
natural_image
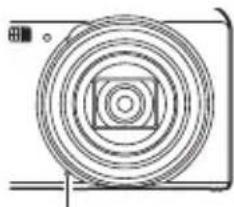
Pure geometric diagram of concentric circles and a square, no text or symbols presentMicrophone
under these conditions.
Shooting a Snapshot while Shooting a Movie
1. While a movie is being recorded, press the shutter button.
Movie recording continues after the snapshot is recorded.
NOTE
- You can use [▼] (§) while shooting a movie to change the flash mode setting.
- Movie recording is interrupted for a few seconds at the point where a snapshot is recorded.
- Shooting a snapshot during movie recording is not possible when shooting with any of the following.
– Some Scene Mode scenes - Simple Mode
Recording Audio Only (Voice REC)
Voice REC lets you record audio only, without a snapshot or movie.
-
In the REC mode, press [SET].
-
Use [ ] and [ ] to select the bottom Control Panel option (SCN) and then press [SET].
-
Use [ ], [ ], [], and [ ] to select the "Voice REC" scene and then press [SET].
This causes to appear on the monitor screen.
-
Press the shutter button to start recording.
-
The back lamp flashes green while recording is in progress.
-
Pressing [SET] during recording will insert a marker into the recording. During playback, you will be able to jump to the markers in the recording.
-
Press the shutter button again to stop audio recording.
-
To create another audio recording file, repeat steps 4 and 5.
- To turn off Voice REC, press [SET], use [] and [] to select the bottom Control Panel option (SCN), and then select Auto.
Remaining recording time
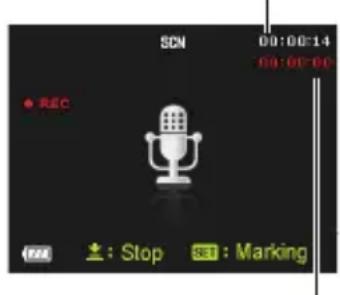
Recording time
NOTE
- You can use [▲] (DISP) during audio recording to toggle the monitor screen on and off.
- When monitor screen contents are turned off, selecting the “Voice REC” scene will cause the monitor screen to turn off immediately.
1. In the PLAY mode, use [ ] and [ ] to display the
Voice REC file you want to play.
is displayed in place of an image for a Voice REC file.
2. Press [ ] (Movie) to start playback.
- You can also start playback by selecting the second PLAY Panel item from the top (Playback Start) and pressing [SET].
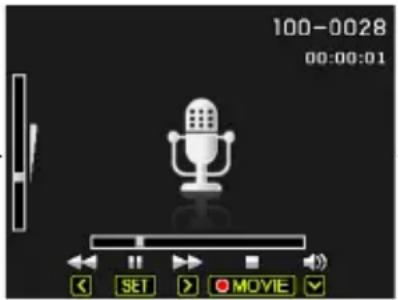
Voice REC Playback Controls
| Fast forward/fast reverse [ ] [ ] | ◀ ▶ |
| Play/pause [SET] | |
| Jump to marker | While playback is paused, press [ ] or [ ]to jump to the next marker and then press [SET] to resume playback. |
| Volume adjustment Press [ ] and then press [ ] [▼] ▲ ▼ | |
| Monitor screen on/off [ ] (DISP) | ▲ |
| Playback end [ ] (Movie) | ● |
Using Scene Mode
What is Scene Mode?
Scene Mode provides you with a collection of sample “scenes” that show a variety of different types of shooting conditions. When you need to change the setup of the camera, simply find the scene that matches what you are trying to achieve, and the camera sets up for it automatically. This helps to minimize the chance of ruined images due to poor exposure and shutter speed settings.
Some Sample Scenes
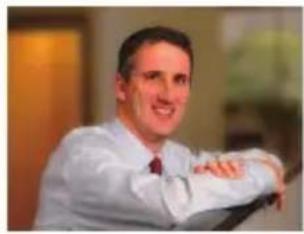
natural_image
Portrait of a smiling man in a white shirt and tie, seated indoors (no visible text or symbols)Portrait Scenery
natural_image
Rock formations in a desert landscape under a blue sky, no visible text or symbolsNight Scene Night Scene Portrait
natural_image
Night cityscape with illuminated skyscrapers reflected in water (no visible text or signage)e Portrait
natural_image
Portrait of a woman at night with blurred bokeh lights in the background (no text or symbols visible)广力云智慧零售收银系统
To shoot an image with Scene Mode
- In the REC mode, press [SET].
- Use [ ] and [ ] to select the bottom Control Panel option (SCN) and then press [SET].
This will display a menu of Scene Mode scenes.
• The initial default selection is
- Use [ ], [ ], [▼], and [ ] to move the boundary to the scene you want to select.
![[▲] [▼] [▼] SET [SET]](/content/2026/05/857675/images/18f0601aadb8a76da4dc12a6d1d9d934634e1ff5a4d21c99a05d965e33d5d6ad.jpg)
Currently selected scene (with boundary)
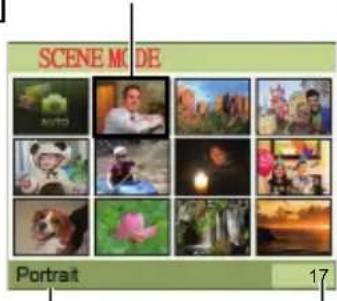
Scene name Scene number
- The scene menu has multiple pages. Use [▲] and [▼] to scroll between menu pages.
-
You can access information about the currently selected scene.
• To return to normal snapshot recording, select Scene I (Auto). -
Press [SET] to configure the camera with the settings for the currently selected scene.
This returns to the REC mode.
- The settings of the scene you selected remain in effect until you select a different scene.
-
To select a different Scene Mode scene, repeat the above procedure from step 1.
-
Press the shutter button (if you are shooting a snapshot) or [ ] (Movie) (if you are shooting a movie).
• Using Scene Information Screen
To find out more about a scene, select it with the boundary on the scene selection screen, and then slide the zoom controller in either direction.
- To return to the scene menu, slide the zoom controller again.
- To scroll between scenes, use [ ] and [ ].
- To configure the camera with the settings for the currently selected scene, press [SET].
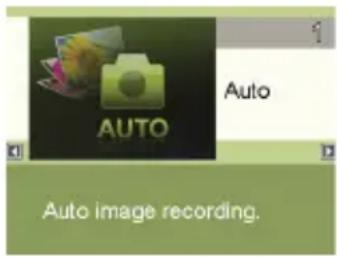
Advanced Settings
The following are menu operations you can use to configure various camera settings.
- REC mode menu contents and operations are different from those in the PLAY mode. This section explains operations using the REC menu screen.
Using On-screen Menus
• Example REC Menu Screen Operation
- In the REC mode, press [SET].
- Use [] and [] to select the second Control Panel option from the bottom (MENU) and then press [SET]. This will display the REC menu screen.
- Use [] and [] to select the tab where the menu item you want to configure is located.
- Use [ ] and [ ] to select the menu item you want, and then press [].
- Use [ ] and [ ] to change the setting of the selected menu item.
-
After the setting is the way you want, press [SET] to apply the setting and return to the viewfinder screen.
-
Pressing [ ] instead of [SET] applies the selected setting and returns to the menu item selection.
- To configure settings on another tab after pressing [] to return to the menu item selection, use [] or ▲ [ ] (Delete) to move the highlighting up to the tabs, and then use [] and [] to select the tab you want.
Example: When “Quality” is selected on the “Quality” tab
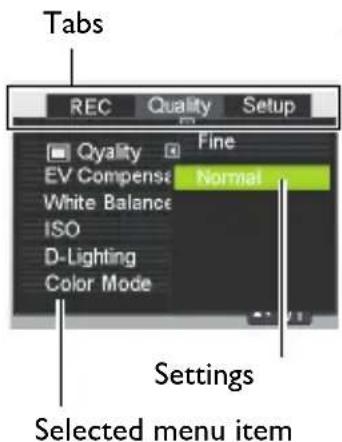
NOTE
• [Delete] (Delete) provides a helpful way to navigate around tabs and menus.
- Pressing [💡] (Delete) while a tab is selected will display the viewfinder screen.
- Pressing [💡] (Delete) while menu item or setting is selected will "back step" in the following sequence: Settings → Menu items → Tab.

IMPORTANT!
- Some menu items are not available while the camera is in the Silent mode.
Procedure
[1(REC) [SET] MENU REC Tab Focus →
| Settings Type | of Shot | Focus Mode Approximate Focus Range* | 1 | ||
| Snapshot Movies Snapshot | Movies | ||||
| Auto Focus | General recording | Automatic | Automatic | Approximately 5 cm to ∞ (infinity) (2.0" to ∞ (Wide Angle) | |
![BENQ GH200 - [1(REC) [SET] MENU REC Tab Focus → - 1](/content/2026/05/857675/images/b565f3c327ec6548e58db87df60677e5560da683345c11e531a3f5b04e53fd84.jpg) Macro Close ups Automatic Macro Close ups Automatic | Approximately 1 cm to 50 cm (0.39" to 19.7") (Fifth step zoom from the Widest Angle setting) | ||||
![BENQ GH200 - [1(REC) [SET] MENU REC Tab Focus → - 2](/content/2026/05/857675/images/64ae78535009d7f147f94f5da71c21a6325650cab6ac5164f70704b5fd7d7042.jpg) Super Macro Super Macro | Close ups Automatic | Approximately 1 cm to 30 cm (0.39" to 11.8") | |||
![BENQ GH200 - [1(REC) [SET] MENU REC Tab Focus → - 3](/content/2026/05/857675/images/9b809918316af354beb8fde9aca1d97e85c5f22fda2149ed338c9d2c8451d8f8.jpg) Infinity Infinity | Scenery and other distant subjects | Fixed Infinity | |||
![BENQ GH200 - [1(REC) [SET] MENU REC Tab Focus → - 4](/content/2026/05/857675/images/d7bb23edc7b429b9a28947150189e3ac3c454d9904c093a264a439750f80e2f2.jpg) Manual Focus Manual Focus | When you want to focus manually | Manual | Approximately 5 cm to ∞ (infinity)*2 (2.0" to ∞ (Wide Angle) | ||
NOTE
*1 The focus range is the distance from the lens surface.
*2The minimum changes along with the optical zoom setting.
Super Macro
Super Macro fixes optical zoom at a position that allows you to shoot from the closest distance to the subject. The result is closer and larger subject images.
NOTE
- Zoom is fixed while Super Macro is selected, so no zoom operation is performed when you slide the zoom controller.
To focus with manual focus
-
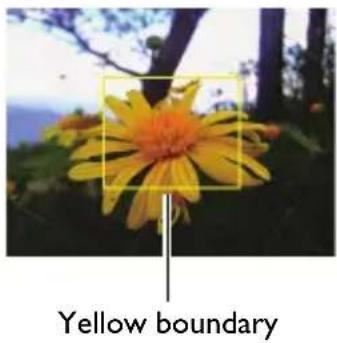
On the monitor screen, compose the image so the subject you want to focus on is within the yellow boundary.
-
Watching the image on the monitor screen use []◀ and [] to adjust focus.
- At this time the image that is within the boundary will enlarge and fill the monitor screen, which aids in focusing. If you do not perform any operation for two seconds while the enlarged image is displayed, the screen in step I will re-appear.
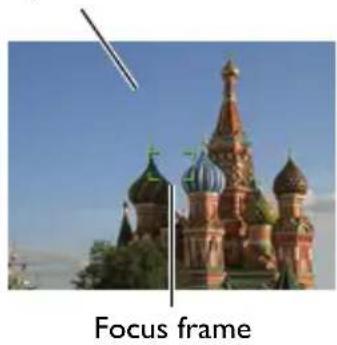
Using Focus Lock
"Focus lock" is a technique you can use when you want to compose an image in which the subject you want to focus on is not within the focus frame in the center of the screen.
- To use focus lock, select “[Spot]” for the Auto Focus area.
-
Align the monitor screen's focus frame with the subject you want to focus on and then half-press the shutter button.
-
Keeping the shutter button half-pressed (which maintains the focus setting), move the camera to compose the image.
-
When you are ready to shoot the image, press the shutter button the rest of the way down.
Subject to be focused on
natural_image
Exterior view of Saint Basil's Cathedral in Moscow under a clear blue sky, labeled 'Focus frame' below (no other text or symbols)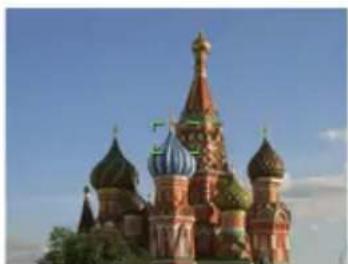
natural_image
Exterior view of Saint Basil's Cathedral in Moscow under a clear blue sky (no signage or text visible)NOTE
- Focus lock also locks exposure (AE).
Procedure
[REC] [SET] MENU REC Tab Focus Frame
You can use this procedure to select from among five different shapes, including a heart shape, for the focus frame.
| Settings |
NOTE
- Half-pressing the shutter button will cause the focus frame to change one of the shapes shown below.
| Focus successful |  |  |  | [DYBH] |
| Focus not successful |  |  |  | [DBY6] |
- When shooting with face tracking or the Simple mode, the frame shape is . [ ]
Procedure
[REC] [SET] MENU REC Tab Burst →
While Burst is turned on, images are continually recorded until memory becomes full, as long as you keep the shutter button depressed.
Releasing the shutter button stops shooting.
Reducing the Effects of Camera and Subject Movement (Stabilizer)
Procedure
[1] (REC) [SET] MENU REC Tab Stabilizer
You can turn on the camera's Stabilizer feature to reduce image blur due to subject movement or camera movement when shooting a moving subject using telephoto, when shooting a fast-moving subject, or when shooting under dim lighting conditions.
Your digital camera is equipped with a CCD shift type camera shake correction feature and a high-sensitivity anti image blur feature. These two features work in concert to minimize the effects of hand and subject movement.
![BENQ GH200 - [1] (REC) [SET] MENU REC Tab Stabilizer - 1](/content/2026/05/857675/images/f6b1756a5111d7a20e09949a467c555b1ca1396420683dca9b78dd4a69d8b9b6.jpg) On Minimizes On Minimizes | the effects of hand and subject movement. |
| Off Turns off Stabilizer settings | |
| DEMO | Half-pressing the shutter button demonstrates the effect of Stabilizer. However, the image is not recorded. |
Procedure
[1] (REC) [SET] MENU REC Tab AF Area
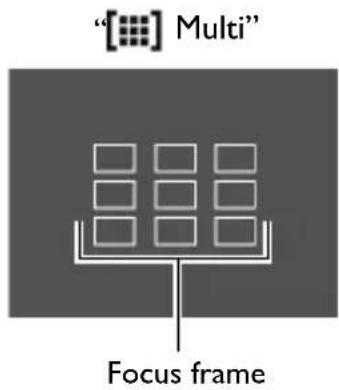
![BENQ GH200 - [1] (REC) [SET] MENU REC Tab AF Area - 1](/content/2026/05/857675/images/5a77b272aa89c2d8ba4c7ad97bb4c41b95ace86ac21deb7dbf87b5d8ad1d0ee2.jpg) | This mode takes readings of a small area in the center of the image. This setting works well with focus lock. |
![BENQ GH200 - [1] (REC) [SET] MENU REC Tab AF Area - 2](/content/2026/05/857675/images/2ba64c0857392e1429e92d99b47e6cb029b28130ac32a737133b0d3bca702dcf.jpg) | When you half-press the shutter button while this setting is selected, the camera will select the optimum Auto Focus area from among nine possible areas. The focus frame of the area where the camera focuses will be displayed in green. |
![BENQ GH200 - [1] (REC) [SET] MENU REC Tab AF Area - 3](/content/2026/05/857675/images/b4d2a35a21f0ca2ded81070257f15907ed6abb0a4b5150db853961a4b542aab6.jpg) | Half-pressing the shutter button focuses on the subject and causes the focus frame to track the movement of the subject. |
!["[·] Spot" [ok" Tracking" Focus frame](/content/2026/05/857675/images/ed3aa282109808341e11830c377553255995d52b5201d587fa71791bb14e66ce.jpg)
IMPORTANT!
- Selecting “[‘κ]Tracking” can cause vibration and noise to occur due to lens operation while tracking a subject. This does not indicate malfunction.
Procedure
[1(REC) [SET] MENU REC Tab L/R Key
You can assign one of the four functions listed below to the [ ] and [ ] keys.
| Setting [ ]/[ ] key operation ▶ | |
| EV Compensation Adjusts the EV Compensation value | |
| White Balance Changes the white balance setting | |
| ISO Changes the ISO Sensitivity setting | |
| Self-timer Sets the self-timer time | |
| Off Cancels [ ] and [ ] key assignments ▶ |
Displaying the On-screen Grid (Grid)
Procedure
[1(REC) [SET] MENU REC Tab Grid →
The on-screen grid can be displayed on the REC mode monitor screen for easy vertical and horizontal alignment when composing images.
![BENQ GH200 - [1(REC) [SET] MENU REC Tab Grid → - 1](/content/2026/05/857675/images/f58cfa5740c0606d3a7b6a4397f105a77380fe6b8db990497d313a9dd6983f9a.jpg)
natural_image
Grid of nine identical gray rectangular blocks arranged in 3x3 pattern (no text or symbols)Using Icon Help (Icon Help)
Procedure
[1] (REC) [SET] MENU REC Tab Icon Help
While Icon Help is turned on, a textual description will appear on the display for certain icons when you switch between REC functions.
Functions Supported by Icon Help
• REC Mode, Flash, Metering Mode, White Balance, Self-timer, EV Compensation
Procedure
[1(REC) [SET] MENU REC Tab Memory
When you turn off the camera, it remembers the current settings of all enabled memory items and restores them when you turn it back on. Any memory item that is disabled will be returned to its initial default setting whenever you turn off the camera.
| Setting Disabled (Initial | Default Setting) Enabled | |
| SCN Scene Mode Snapshot (Auto) | Setting at power off | |
| Flash Auto | ||
| Focus Auto Focus | ||
| White Balance Auto | ||
| ISO Auto | ||
| AF Area Spot | ||
| Burst Off | ||
| Self-timer Off | ||
| MF Position | Position before manual focus was selected. | |
| Zoom Position* | Full wide | |
* Optical zoom setting only.
- If you turn the camera power off and then back on while the Scene Mode memory item is enabled, all of the other memory items (except for zoom position) are initialized to the currently selected Scene Mode sample scene setup, regardless of the enabled/disabled status of the other memory items.
Image Quality Settings (Quality)
Specifying Snapshot Image Quality (Quality (Snapshot))
Procedure
[REC] [SET] MENU Quality Tab Quality (\$napshot)
| Fine Gives image quality priority. | |
| Normal Normal | |
- The “Fine” setting helps to bring out details when shooting a finely detailed image of nature that includes dense tree branches or leaves, or an image of a complex pattern.
Correcting Image Brightness (EV Compensation)
Procedure
[REC] [SET] MENU Quality Tab EV Compensation
You can manually adjust an image's exposure value (EV value) before shooting it.
• EV Compensation Range: -2.0 EV to +2.0 EV
- Unit: I/3 EV
- Use [ ] and [ ] to adjust the exposure compensation value.
Increases the EV value. A higher EV value is best for light-colored subjects and backlit subjects.
![BENQ GH200 - [REC] [SET] MENU Quality Tab EV Compensation - 1](/content/2026/05/857675/images/81700f4de2e2b503c8adf9fb401092fec1c3b3a7a6e83c5df953f9884e25d77f.jpg)
natural_image
Two-panel illustration showing a girl in a window transforming into a person's face, with no text or symbols present.Decreases the EV value. A lower EV value is best for dark-color subjects and for [▼]: shooting outdoors on a clear day.
To cancel exposure compensation, change the EV value to 0.0.
2. Press [SET].
This applies the exposure compensation value. The exposure compensation value you set remains in effect until you change it or turn off the camera (which causes it to revert to "0.0").
NOTE
- When shooting under very dark or very bright conditions, you may not be able to obtain satisfactory results even after performing exposure compensation.
Procedure
[REC] [SET] MENU Quality Tab White Balance
You can adjust white balance to match the source of light available where you are shooting and avoid the blue cast that results when shooting outdoors when it is cloudy, and the green cast that results when shooting under fluorescent lighting.
| Auto Configures the camera to adjust white balance automatically. | |
| (Daylight) For shooting outdoors on a clear day | |
| (Overcast) For shooting outdoors on an overcast rainy day, in the shade, etc. | |
| Shade For shooting on a clear day in the shade of trees or buildings | |
| (Day White Fluorescent) | For shooting under white or day white fluorescent lighting |
| (Daylight Fluorescent) | For shooting under daylight fluorescent lighting |
| (Tungsten) For shooting under light bulb lighting | |
| Custom | For configuring the camera manually to suit a particular light source1 Select “Manual”. Blank white paper2 Under the lighting conditions you plan to use when shooting, point the camera at a blank white piece of paper so it fills the entire monitor screen and then press the shutter button.3 Press [SET].The white balance setting is retained even if you turn off the camera. |
- When “Auto” is selected for the white balance setting, the camera automatically determines the white point of the subject. Certain subject colors and light source conditions can cause problems when the camera tries to determine the white point, which makes proper white balance adjustment impossible. If this happens, select the white balance setting that matches your shooting conditions (Daylight, Overcast, etc.).
Procedure
[REC] [SET] MENU Quality Tab ISO →
ISO sensitivity is a measure of sensitivity to light.
| Auto Adjusts sensitivity automatically according to conditions. | |||
| ISO 64 | Lower sensitivity | Slow shutter speed | Less noise |
| ISO 100 | |||
| ISO 200 | |||
| ISO 400 | |||
| ISO 800 | Higher sensitivity | Fast shutter speed (Set for shooting in dimly lit areas.) | Some coarseness(increased digital noise) |
| ISO 1600 | |||
- “Auto” ISO sensitivity always is applied for movies, regardless of the current ISO sensitivity setting.
- Higher ISO sensitivity values tend to result in digital noise in images.
Optimizing Image Brightness (D-Lighting)
Procedure
[REC] [SET] MENU Quality Tab D-Lighting
You can use this setting to optimize the balance between bright areas and dark areas when shooting images.
| On | Performs brightness correction. When this option is selected, it takes longer for the image to be stored after the shutter button is pressed. |
| Off Does not perform brightness correction. | |
Using Built-in Color Filters (Color Mode)
Procedure
[REC] [SET] MENU Quality Tab Color Mode
Settings: Off, B/W, Sepia, Red, Green, Blue, Yellow, Pink, and Purple
Viewing Snapshots and Movies
Viewing Snapshots
See page 28 for the procedure for viewing snapshots.
Viewing a Movie
-
Press [ ] (PLAY) and then use [ ] and [ ] to display the movie you want to view.
-
Press [ ] (Movie) to start playback.
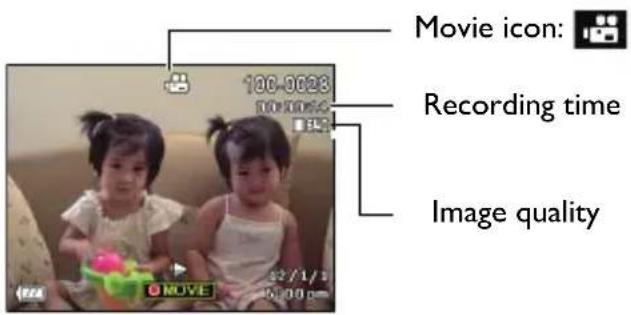
Movie Playback Controls
| Fast forward/fast reverse | [◀] ▶[ ]Each press of either button increases the speed of the fast forward or fast reverse operation.To return to normal playback speed, press [SET]. |
| Play/pause [SET] | |
| I frame forward/back | [◀] ▶[ ]Holding down either button scrolls continuously. |
| Volume adjustment | Press [ ] and then press [ ] ▶. ▼Volume can be adjusted only while movie playback is in progress. |
| Information display on/off | [▲] ( D I S P ) |
| Zoom | Slide the zoom controller in the direction of ⚙You can use [ ] ▶[ ], ▽, and [ ] to scroll the zoomed image on the monitor screen. You can zoom a movie image up to 4.5 times normal size. |
| Stop playback [ ] (Movie) |
- Playback may not be possible for movies not recorded with this camera.
Zooming an On-screen Image
- In the PLAY mode, use [ ] and [ ] to scroll through the images until the one you want is displayed.
2.Slide the zoom controller towards to zoom.
You can use [▲, [ ],▼], and [ ] to scroll the zoomed image on the monitor screen. Slide the zoom controller towards 📊 to unzoom the image.
- When monitor screen contents are turned on, a graphic in the lower right corner of the screen shows what part of the zoomed image is currently displayed.
- To exit the zoom screen, press [ ] (Delete).
- Though the maximum image zoom factor is 8X, certain image sizes may not allow zooming up to the full 8X.
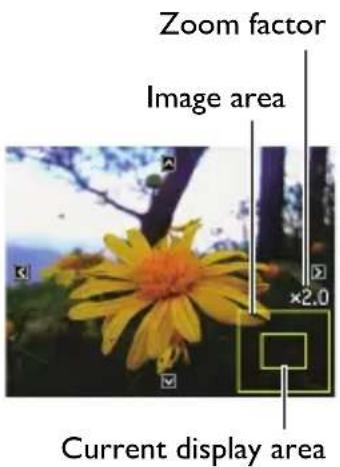
- Pressing [SET] will lock the current zoom factor for the on-screen image. You can then use [◀] and [▶] to scroll between images, using the same zoom factor. Pressing [SET] again will unlock the zoom factor and allow you to use [▲, [ ],▼] and [ ] to move around the currently displayed images.
Displaying the Image Menu
- In the PLAY mode, slide the zoom controller towards ≡.
Use [▲, [ ],▼] and [ ] to move the selection boundary around the image menu.
To view a particular image, use [4], [ ], [ ], or [ ] to move the selection boundary to the image you want and then press [SET].
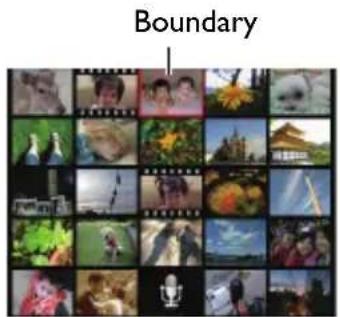
Viewing Snapshots and Movies on a TV Screen
- Use the AV cable that comes with the camera to connect it to the TV.
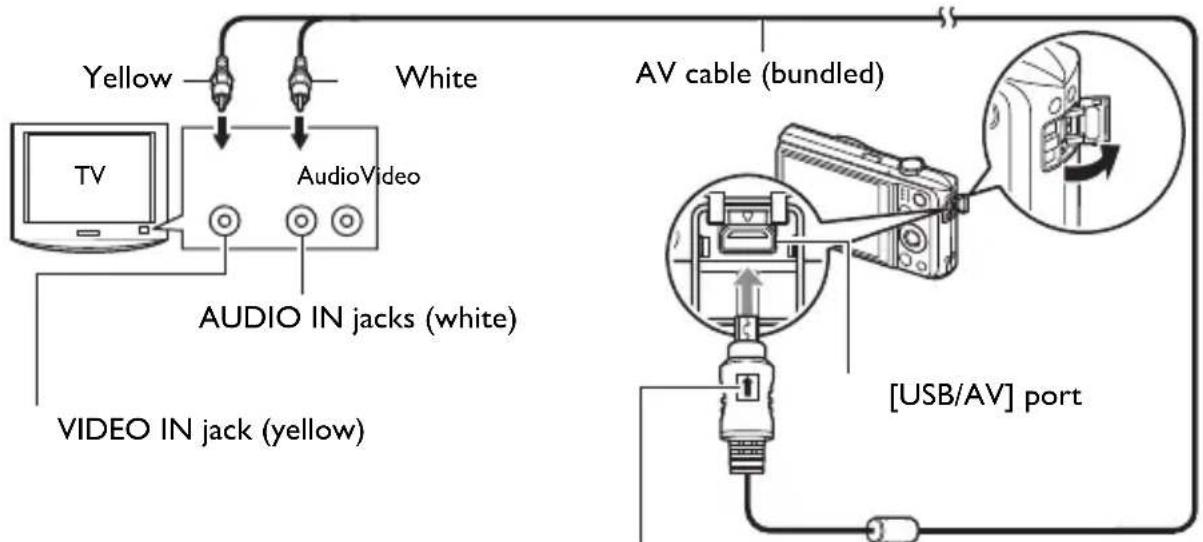
flowchart
graph TD
    A["TV"] --> B["Audio Video"]
    B --> C["White"]
    B --> D["Yellow"]
    B --> E["VIDEO IN jack (yellow)"]
    B --> F["AUDIO IN jacks (white)"]
    G["AV cable (bundled)"] --> H["[USB/AV"] port]
    H --> I["Analog cable with bundled cable"]
Making sure that the 1 mark on the AV cable connector is towards the lens side, connect the cable to the camera.
- Make sure that you insert the cable connector into the USB/AV port until you feel it click securely into place. Failure to insert the connector fully can result in poor communication or malfunction.
- Note that even while the connector is fully inserted, you still will be able to see the metal part of the connector as shown in the illustration.
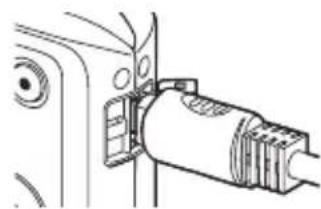
natural_image
Technical line drawing of a mechanical assembly with no visible text or symbols- Turn on the TV and select its video input mode.
If the TV has more than one video input, select the one where the camera is connected.
- Press [ ] (PLAY) to turn on the camera.
This will cause an image to appear on the TV screen, without anything appearing on the camera's monitor screen.
- Pressing [ON/OFF] (Power) or [☐] (REC) will not turn on the camera while the AV cable is connected.
- You also can change the aspect ratio of the screen and the video output system.
- Now you can display images and play back movies as you normally do.

IMPORTANT!
- Before connecting to a TV to display images, be sure to configure the camera's [REC] and [PLAY] buttons for "Power On" or "Power On/Off".
- Audio is initially output by the camera at maximum volume. When you first start displaying images, set the TV volume control at a relatively low level and then adjust it as required.
NOTE
- Audio is monaural.
- Certain TVs may cut off part of the images.
- All icons and indicators that appear on the monitor screen also appear on the TV screen. You can use [▲] (DISP) to change the display contents.
Recording Camera Images to a DVD Recorder or Video Deck
Use one of the following methods to connect the camera to the recording device using the camera's bundled AV cable.
– DVD recorder or video deck: Connect to the VIDEO IN and AUDIO IN terminals.
- Camera: USB/AV port
You can play a slideshow of snapshots and movies on the camera and record it on a DVD or video tape. When recording images to an external device, use [▲] (DISP) to clear all indicators from the monitor screen.
For information about connecting a monitor to the recording device and about how to record, see the user documentation that comes with the recording device you are using.
Other Playback Functions (PLAY)
This section explains menu items that you can use to configure settings and perform other playback operations.
Using the PLAY Panel
Pressing [SET] in the PLAY mode will display the PLAY Panel.
• Example PLAY Panel Operation
- In the PLAY mode, press [SET].
The PLAY Panel will appear along the right side of the monitor screen.
2. Use [ ] and [ ] to select the PLAY Panel item you want, and then press [SET].
![[▲] ▼] [SET]](/content/2026/05/857675/images/eb40ba81c2fa5d6380bed16164d2bc4317dbf6e4abbaf9a6aba1afbb2f71b754.jpg)
PLAY Panel
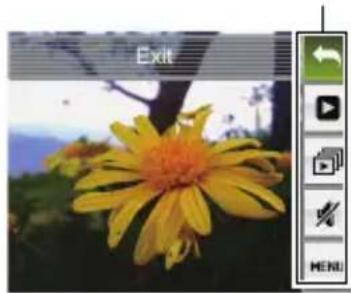
natural_image
Close-up photo of a yellow flower with orange center, captured in an outdoor setting (no text or symbols visible)- The following describes the operations you can perform for each of the PLAY Panel items.
 Exit Exits the Exit Exits the | PLAY Panel. |
| [C552] Playback Start | The operation that is performed when this item is selected depends on the type of file that is currently displayed on the monitor screen.Movie: Starts movie playback.Voice REC: Starts voice recording playback.Audio snapshot: Starts audio playback. |
 Slideshow Displays a slideshow menu. Slideshow Displays a slideshow menu. | |
 Silent Mode Silent Mode | The Silent mode turns off camera operation sounds so you can avoid disturbing others around you when playing back images. |
| MENU Menu | Displays the PLAY menu. You can perform the following operations on the PLAY menu.1 Use [ ] and [ ] ▶ select the tabwhere the menu item you want to configure is located.2 Use [ ] and [ ] ▶ select the menu item you want, and then press [ ].3 Use [ ] and [ ] ▶ change the setting of the selected menu item.4 Press [SET] to apply the setting.NOTEPressing [ ] (Delete) performs one of the following operations.- If you previously selected a tab, pressing [ ] (Delete) returns to the viewfinder screen.- If you previously selected menu item, pressing [ ] (Delete) returns to the tab. | 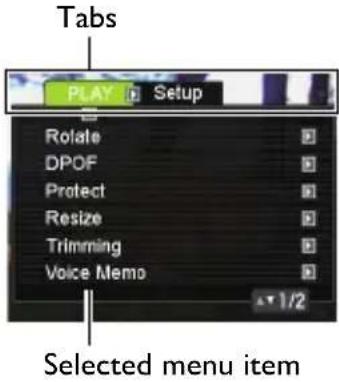 |
- PLAY Menu Operations in This Manual
PLAY menu operations are represented in this manual as shown below.
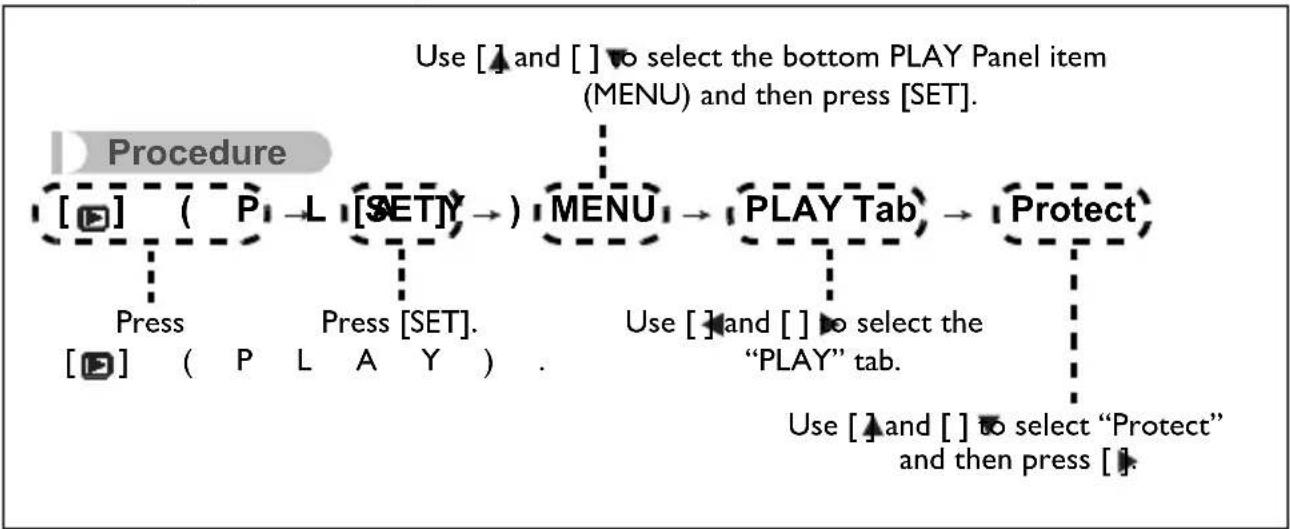
flowchart
graph LR
    A["Procedure"] --> B["[P"] ( P_L["SET"] →]
    B --> C["MENU → PLAY Tab → Protect"]
    C --> D["Use [ "] and[" "] to select the bottom PLAY Panel item (MENU) and_then_press["SET"].
    C --> E["Use [ "] and[" "] to select the "PLAY" tab.
    C --> F["Use [ "] and[" "] to select "Protect" and_then_press["."]]
    B --> G["Press [P L A Y ."]
Playing a Slideshow on the Camera (Slideshow)
1. In the PLAY mode, press [SET].
- Use [] and [] to select the third PLAY Panel item from the bottom (Slideshow) and then press [SET].
| Start Starts | the slideshow. |
| Time | Time from the start to the end of the slideshow1 to 5 minutes, 10 minutes, 15 minutes, 30 minutes, 60 minutes |
| Interval | Amount of time each image remains displayedUse [ ] and [ ] to select a value from 1 to 30 seconds, or “MAX”.If you specify a value from 1 to 30 seconds, images change at the specified interval, but the audio portion of movies and audio snapshots will continue to play until the end.When the slideshow reaches a movie file while “MAX” is selected, only the first frame of the movie will displayed. Voice REC files are not played back when “MAX” is selected. |
| Effect | Turns effect on or off.On: Turns on the image change effect and background music.Off: No image change effect or background music |
- To stop the slideshow, press [atos] (Delete). Pressing [SET] instead of [atos] (Delete) stops the slideshow and returns to the menu screen.
- Adjust audio volume by pressing [▼] and then press [▲] or [▼] during playback.
- All button operations are disabled while the slideshow is transitioning from one image to another.
- The time required for transition from one image to another may be longer in the case of an image that was not recorded with this camera.
Performing Playback without Disturbing Others (Silent Mode)
The Silent mode turns off camera operation sounds so you can avoid disturbing others around you when play back images.
- In the PLAY mode, press [SET].
-
On the PLAY panel, use [ ] and [ ] to select the second menu option from the bottom (Silent) and then press [SET].
-
Use [▲] and [▼] to select "On" and then press [SET]. This enters the Silent mode, which is indicated by m on the monitor screen. The "Sounds" setting automatically changes to "Off" in the Silent mode.
Rotating an Image (Rotate)
Procedure
1 Snapshot Screen →[SET] → MENU→ PLAY Tab -Rotate
-
Use [▲] and [▼] to select "Rotate" and then press [SET]. Each press of [SET] will rotate the displayed image 90 degrees left.
-
When the displayed image is at the orientation you want, press [ ] (Delete).
NOTE
- Note that this procedure does not actually change the image data. It simply alters how the image is displayed on the camera's monitor screen.
- An image that has been protected or zoomed cannot be rotated.
- The original (unrotated) version of the image will be displayed on the image menu screen.
Selecting Images for Printing (DPOF)
Procedure
[PLAY] Snapshot Screen [SET] MENU PLAY Tab DPOF →
Protecting a File Against Deletion (Protect)
Procedure
1 [SET] MENU PLAY-Tab Protect
| On | Protects specific files.1 Use [ ] and [ ] to scroll through the files until the one you want to protect is displayed.2 Use [ ] and [ ] to select “On” and then press [SET].An image that is protected is indicated by theicon.3 To protect other files, repeat steps 1 and 2.To exit the protect operation, press [ ] (Delete). To unprotect a file, select “Off” instead of “On” in step 2 above. | 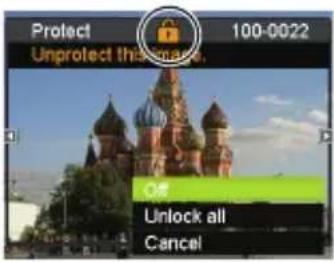 |
| All Files: On | Protects all files.1 Use [ ] and [ ] to select “All Files: On” and then press [SET].2 Press [ ] (Delete).To unprotect all files, select “All Files: Off” instead of “All Files: On” in step 1 above. |

IMPORTANT!
- Note that even if a file is protected, it will be deleted if you perform the format operation.
Resizing a Snapshot (Resize)
Procedure
[1](PLAY) Snapshot Screen [SET] MENU PLAY Tab Resize
You can reduce the size of a snapshot and save the result as a separate snapshot. The original snapshot is also retained. You can select resize an image to one of three image sizes: 10M, 6M, VGA.
- Resizing a 3:2 or 16:9 size snapshot will create an image with an aspect ratio of 4:3, with both sides cut off.
- The recording date of the resized version of the snapshot will be the same as the recording date of the original snapshot.
Cropping a Snapshot (Trimming)
Procedure
[1](PLAY) Snapshot Screen [SET] MENU PLAY Tab Trimming
You can crop a snapshot to trim parts you do not need, and save the result in a separate file. The original snapshot is also retained.
Use the zoom controller to zoom the image to the size you want, use [4], [ ], [ ], and [ ] to display the portion of the image you want to cut out, and then press [SET].
- The image produced by cropping a 3:2 or 16:9 image will have an aspect ratio of 4:3.
- The recording date of the cropped image will be the same as the recording date of the original snapshot.
Zoom factor
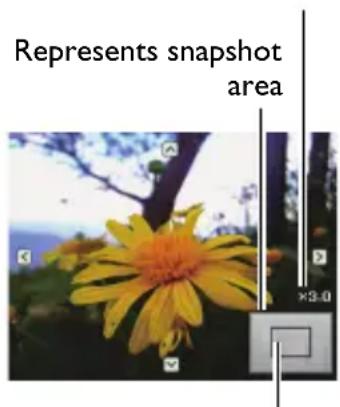
Part of snapshot that is currently displayed
Adding Audio to a Snapshot (Voice Memo)
Procedure
[1](PLAY) Snapshot Screen [SET] MENU PLAY Tab Voice Memo
You can add audio to a snapshot after you shoot it. You can re-record a snapshot's audio whenever you want. You can record up to about 30 seconds of audio for a single snapshot.
- Press [SET] to start audio recording.
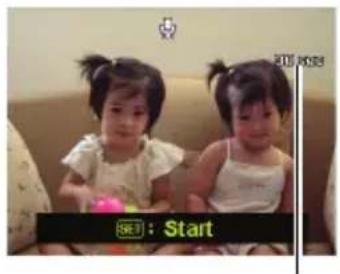
Remaining recording time
- Press [SET] again to stop audio recording.
Take care that you do not block the camera's microphone with your fingers while recording.
• Good recording results are not possible when the camera is too far away from what you are trying to record.
- Your camera supports the following audio data formats.
- Audio Format: WAV extension
- You cannot add audio to an image that is protected.
- To delete audio, perform the following operation: Voice Memo – Delete [SET] [] (Delete).
 Snapshot Screen [SET] MENU PLAY Tab Voice Memo - 2](/content/2026/05/857675/images/f1ca89c2a59b1b022774e47863346ff4ed3ce3fe0db8e39f70753f2df257ff36.jpg)
natural_image
Simple line drawing of a camera with concentric rings and a central square (no text or symbols)Microphone
 Snapshot Screen [SET] MENU PLAY Tab Voice Memo - 3](/content/2026/05/857675/images/221406a56fb340e9c95191b3aba0d298cfbdb6996726d3c93d8e4aa5fe4ea0e2.jpg)
IMPORTANT!
- Note that you cannot restore the original audio of an Audio Snapshot after you delete or re-record it.
To play snapshot audio
-
In the PLAY mode, use [] and [] to scroll through the images until the Audio Snapshot you want is displayed. An audio snapshot is one that has a icon.
-
Press [ ] (Movie) to start playback.
Voice Recording Playback Controls
| Fast forward/fast reverse [ ] [ ] | ◀ ▶ |
| Play/pause [SET] | |
| Volume adjustment | Press [ ] and then press [▲] ▼ [ ] . |
| Display content switching [ ] (DISP) | ▲ |
| Stop playback [ ] (Movie) | ● |
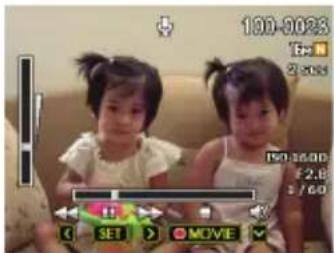
Copying Files (Copy)
Procedure
[PLAY] Snapshot Screen [SET] MENU PLAY Tab Copy →
Files can be copied from the camera's built-in memory to a memory card or from a memory card to built-in memory.
| Copy to Card | Copies all files from built-in camera memory to a memory card.This option copies all the files in built-in camera memory. It cannot be used to copy a single file. |
| Copy to Camera | Copies a single file on the memory card to built-in camera memory.Files are copied to the folder in built-in memory whose name has the largest serial number.1 Use [ ] and [ ] to select the file you want to copy.2 Use [ ] and [ ] to select “Copy” and then press [SET]. |
NOTE
- You can copy snapshots, movies, audio snapshots, or Voice REC files you recorded with this camera.
Printing
Connecting Directly to a PictBridge Compatible Printer
You can connect the camera directly to a printer that supports PictBridge and print images without going through a computer.
- To set up the camera before connecting to a printer
- Turn on the camera. Next, press [SET] and then display the REC menu or the PLAY menu.
- On the "Set Up" tab, select "USB" and then press [ ]
- Use [▲] and [▼] to select "PTP (PictBridge)", and then press [SET].
• To print
-
Turn on the printer and load paper.
-
Turn on the camera. This will display the print menu screen.
-
Use [ ] and [ ] to select "Paper Size", and then press [].
-
Use [] and [] to select a paper size and then press [SET].
- The following are the available paper sizes. 3.5"x5", 5"x7", 4"x6", A4, 8.5"x11", By Printer
- Selecting "By Printer" prints using a paper size selected on the printer.
• See the documentation that comes with your printer for information about paper settings.
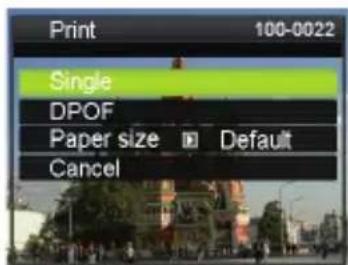
- Use [ ] and [ ] to specify the print option you want.
Single : Prints one image. Select and then press [SET]. Next, use [◀] and [▶] to select the image you want to print.
DPOF : Prints multiple images. Select and then press [SET]. With this option, images will be printed in accordance with DPOF settings.
- To toggle date stamping on and off, press [ ] (Movie). The date stamp will be printed when "On" is indicated on the monitor screen.
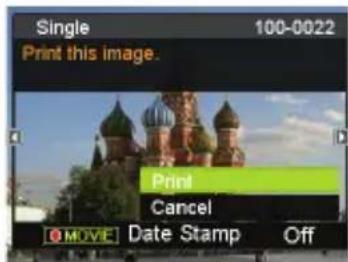
- Use [] and [] to select "Print" and then press [SET].
Printing will start and the message "Busy... Please wait..." will appear on the monitor screen. The message will disappear after a short while, even though printing is still being performed. Pressing any camera button will cause the printing status to re-appear. The print menu screen will re-appear when printing is complete.
- If you selected "Single", you can repeat the procedure from step 5, if you want.
- After printing is complete, turn off the camera and disconnect the USB cable from the printer and camera.
Using DPOF to Specify Images to be Printed and the Number of Copies
• Digital Print Order Format (DPOF)
DPOF is a standard that allows you to include image type, number of copy, and time stamp on/off information on the memory card with the images. After configuring settings, you can use the memory card to print on a home printer that supports DPOF or take the memory card to a professional print service.
- Whether or not you will be able to use DPOF settings for printing depends on the printer you are using.
- Some professional print services may not support DPOF.

Other Settings (Set Up)
This section explains menu items that you can use to configure settings and perform other operations in both the REC mode and PLAY mode.
Configuring Camera Sound Settings (Sounds)
Procedure
[SET] -MENU Set Up Tab Sounds
| Startup Sound 1 / Sound | 2 / Sound 3 / Off |
| Half Shutter | On / Off |
| Shutter | |
| Beep | |
 Beep Beep | Specifies the sound volume. This setting is also used as the audio level during video output. |
 Playback Playback | Specifies the volume of movie and Audio Snapshot audio output. This volume setting is not used during video output (from the USB/AV port). |
- Setting a volume level of 0 mutes output.
Configuring a Startup Image
Procedure
[SET] -MENU Set Up Tab Startup Image
Display the image you want to use as your startup image and then select "On".
- The startup image does not appear when you turn on the camera by pressing [ ] (PLAY).
- You can specify a snapshot you recorded as the startup image, or you can use the special startup image provided in the camera's built-in memory.
- If you select an audio snapshot as the startup image, the audio will not play at startup.
- Formatting built-in memory will delete the current startup image setting.
Specifying the File Name Serial Number Generation Rule (File Numbering)
Procedure
[SET] -MENU Set Up Tab File-Numbering
Use the following procedure to specify the rule that governs generation of the serial number used in file names.
| Continue | Tells the camera to remember the last used file number. A new file will be named using the next sequential number, even if files are deleted or if a blank memory card is loaded. If a memory card is loaded and that card already has files stored on it and the largest sequential number in the existing file names is greater than the largest sequential number remembered by the camera, numbering of new files will start from the largest sequential number in the existing file names plus 1. |
| Reset | Restarts the serial number from 0001 whenever all files are deleted or when the memory card is replaced with a blank one. If a memory card is loaded and that card already has files stored on it, numbering of new files will start from the largest sequential number in the existing file names number plus 1. |
Configuring World Time Settings (World Time)
Procedure
[SET] -MENU Set Up Tab World Time
You can use the World Time screen to view the current time in a zone that is different from your Home City when you go on a trip, etc. World Time displays the current time in 162 cities in 32 time zones around the globe.
- Use [] and [] to select "Destination" and then press [].
- To change the geographic area and city for the time where you normally use the camera, select "Home".
- Use [] and [] to select "City" and then press [].
- To change the “Destination” setting to summer time, use [ ] and [ ] to select “DST” and then select “On”. Summer time is used in some geographical areas to advance the current time setting by one hour during the summer months.
-
Use [ ]▲[ ], [ ], and [ ] to select the geographic area you want and then press [SET].
-
Use [] and [] to select the city you want and then press [SET].
-
Press [SET].
IMPORTANT!
- Before configuring World Time settings, make sure that the Home City setting is the place where you live or normally use the camera. If it isn't, select "Home" on the screen in step I and configure the Home City, date, and time settings as required.
Time Stamping Snapshots (Date Stamp)
Procedure
[SET] -MENU Set Up Tab Date Stamp
You can configure the camera to stamp the recording date only, or date and time in the lower right corner of each snapshot.
- Once date and time information is stamped into a snapshot, it cannot be edited or deleted.
Example: July, 10, 2012, 1:25 p.m.
| Date 2012/7/10 | |
| Date&Time 2012/7/10 | 1:25pm |
| Off No stamping of date and/or time | |
- Even if you do not stamp the date and/or time with Date Stamp, you can do so later using the DPOF function or some printing application.
- Digital zoom is disabled while time stamping is turned on.
- Time stamping is disabled when certain Scene Mode scenes are being used.
Setting the Camera's Clock (Adjust)
Procedure
[SET] -MENU Set Up Tab Adjust
| [▲][ ]Change the setting at the cursor location | |
| [◀][ ]Move the cursor between settings | |
| [▶(Movie) Toggles between 12-hour and 24-hour format |
When the date and time settings are what you want, press [SET] to apply them.
- You can specify a date from 2001 to 2049.
- Be sure to select your Home City before setting the time and date. If you set the time and date while the wrong city is selected for your Home City, the times and dates of all of the World Time cities will be wrong.
Specifying the Date Format
Procedure
[SET] -MENU Set Up Tab Date Format
You can select from among three different styles for the date.
Example: July, 10, 2012
| YY/MM/DD 12/7/10 | |
| DD/MM/YY 10/7/12 | |
| MM/DD/YY 7/10/12 |
Specifying the Display Language (Language)
Procedure
[SET] \_MENU Set Up Tab Language
- Specify the display language you want.
1 Select the tab on the right.
2 Select "Language".
3 Select the language you want.
- Camera models sold in certain geographic areas may not support display language selection.
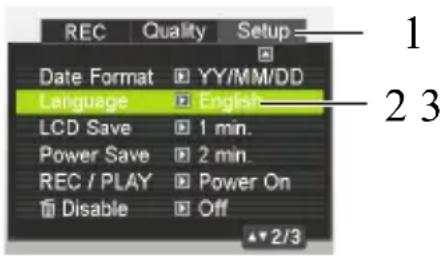
Configuring Sleep State Settings (LCD Save)
Procedure
[SET] -MENU Set Up Tab LCD Save
This feature turns off the monitor screen whenever no camera operation is performed for a preset amount of time. Press any button to turn the monitor screen back on.
Trigger Time Settings: 30 sec, 1 min, 2 min, Off (LCD Save is disabled while "Off" is selected.)
- LCD Save is disabled under any of the following conditions.
- In the PLAY mode
- While the camera is connected to a computer or other device
– During a slideshow - During " [Tracking"
– During Voice REC playback or recording
– During movie recording and playback
- When both LCD Save and Power Saving are turned on, Power Saving takes priority.
Configuring Auto Power Settings (Power Saving)
Procedure
[SET] \_MENU Set Up Tab Power Saving
Power Saving turns off the camera whenever no camera operation is performed for a preset amount of time.
Trigger Time Settings: 1 min, 2 min, 5 min (The trigger time is always 5 minutes in the PLAY mode.)
- Power Saving is disabled under any of the following conditions.
- While the camera is connected to a computer or other device
– During a slideshow - During " [Tracking"
– During Voice REC playback or recording
– During movie recording and playback
Configuring [ ] and [ ] Settings (REC/PLAY)
Procedure
[SET] -MENU Set Up Tab REG/PLAY
| Power On Camera turns on whenever [ ] (REC) or [ ] (PLAY) is pressed. | |
| Power On/Off | Camera turns on or off whenever [ ] (REC) or [ ] (PLAY) is pressed. |
| Disable | Camera does not turn on or off whenever [ ] (REC) or [ ] (PLAY) is pressed. |
- With "Power On/Off", the camera turns off when you press [图标] (REC) in the REC mode or [RE(PLAY)] in the PLAY mode.
- Change this setting to anything besides “Disable” before connecting to a TV for image viewing.
Disabling File Deletion (Disable)
Procedure
[SET] \_MENU Set Up Tab Disable
The camera will not start the image delete operation when you press [ ] (Delete) while “” is turned on.
You can protect against accidental deletion of images by selecting "On" for
“D is a b l e ”.
- Performing a format operation will cause all images to be deleted, even if file deletion is disabled (“On” selected for “☐ disable”) for some images.
Configuring USB Protocol Settings (USB)
Procedure
[SET] -MENU Set Up Tab USB
You can use the procedure below to select the USB communication protocol, which is used when exchanging data with a computer, printer, or other external device.
| Mass Storage | Select this setting when connecting to a computer. With this setting, the computer sees the camera as an external storage device. Use this setting for normal transfer of images from the camera to a computer. |
| PTP(PictBridge) | Select this setting when connecting to a printer that supports PictBridge. This setting simplifies the transfer of image data to the connected device. |
Selecting the Screen Aspect Ratio and Video Output System (TV Out)
Procedure
[SET] -MENU Set Up Tab TV-Out
You can use the procedure in this section to select either NTSC or PAL as the video output system. You can also specify an aspect ratio of 4:3 or 16:9.
| NTSC Video system used in Japan, the U.S., and other countries | |
| PAL Video system used in Europe and other areas |
| 4:3 Normal TV screen aspect ratio | |
| 16:9 Wide screen aspect ratio |
- Select the aspect ratio (4:3 or 16:9) that matches the type of TV you plan to use. Images will not display correctly if you select the wrong aspect ratio.
- Images will not display correctly unless the camera's video signal output setting matches the video signal system of the TV or other video equipment.
- Images cannot be displayed correctly on a TV or video equipment that is not NTSC or PAL.
Formatting Built-in Memory or a Memory Card (Format)
Procedure
[SET] -MENU Set Up Tab Format
If a memory card is loaded in the camera, this operation will format the memory card. It will format built-in memory if no memory card is loaded.
- The format operation will delete all contents on the memory card or in built-in memory. It cannot be undone. Make sure you do not need any data currently on the card or in built-in memory before you format it.
- Formatting built-in memory will delete the following data.
- Protected images
- Startup screen
- Formatting a memory card will delete the following data.
- Protected images
- Formatting will cause all images to be deleted, even if file deletion is disabled (“On” selected for “☑ disable”) for some images.
- Make sure the camera's battery is sufficiently charged before starting a formatting operation. Formatting may not be performed correctly and the camera may stop operating normally if the camera powers down while formatting is in progress.
- Never open the battery cover while formatting is in progress. Doing so can cause the camera to stop operating normally.
Resetting the Camera to Factory Defaults (Reset)
Procedure
[SET] -MENU Set Up Tab Reset
The settings below are not reset.
World Time settings, clock settings, date format, screen language, video output
Battery Precautions
- Precautions during Use
- Operation provided by a battery under cold conditions is always less than operation under normal temperatures. This is due to the characteristics of the battery, not the camera.
- Charge the battery in an area where the temperature is within the range of 5°C to 35°C (41°F to 95°F). Outside this temperature range charging can take longer than normal or even fail.
- Do not tear or remove the battery outer label.
- If a battery provides only very limited operation following a full charge, it probably means the battery has reached the end of its service life. Replace the battery with a new one.
- Storage Precautions
- Storing the battery for a long time while it is charged can cause deterioration of battery characteristics. If you do not plan to use a battery for some time, fully use up its charge before storing it.
- Always remove the battery from the camera when you are not using it. A battery left in the camera can discharge and go dead, which will require some time to charge when you need to use the camera.
- Store batteries in a cool, dry place (20°C (68°F) or lower).
- To prevent over discharging of an unused battery, fully charge it, and then load it in the camera and fully use up the charge about once every six months.
Troubleshooting and service information
If your camera cannot operate normally, see the frequently encountered problems and solutions listed below. If the problem persists, contact your nearest service center or technical support.
| Problem Cause Solution | ||
| The camera cannot power up. | There is no battery or the battery is not inserted correctly. | Insert the battery correctly. |
| The battery has no power. | Replace the battery. | |
| The battery power is draining quickly. | The external temperature is extremely low. | -- |
| Many shots are being captured in dark places, requiring a flash. | -- | |
| The battery or camera is warm. | The camera or flash was used continuously over a long period of time. | -- |
| Problem Cause Solution | ||
| The flash does not fire or recharge. | The camera flash is turned off. | Set the flash to Auto Flash. |
| The light source is sufficient. | -- | |
| Even though the flash fired, the image is dark. | The distance to the subject is greater than the flash's effective range. | Get closer to the subject and shoot. |
| The image is too bright or too dark. | The exposure is excessive or inadequate. | Reset exposure compensation. |
| I cannot format a memory card. | The memory card is write-protected. | Remove the write protection. |
| End of the memory card life. | Insert a new memory card. | |
| I cannot download images from the camera to my computer. | The free space on the hard disk of your computer is insufficient. | Ensure that the hard disk has enough space for running Windows and that the drive for loading image files has free space equal to or greater than the memory card in the camera. |
| There is no power being supplied to the camera. | Replace the battery. | |
| The camera does not shoot even when pressing the shutter button. | The battery is running low. | Replace the battery. |
| The camera is not in the Capture mode. | Switch to the Capture mode. | |
| The shutter button was not pressed all the way down. | Press the shutter button all the way down. | |
| The internal memory or memory card does not have any free space. | Load a new card or delete unwanted files. | |
| The flash is recharging. Wait | until the flash mode icon, indicated on the screen, stops flashing. | |
| The camera does not recognize the memory card. | Format the memory card before the initial use or before using with another camera. | |
| I cannot print images with PictBridge-compliant printers. | The camera is connected to the printer when the camera is powered off. | Connect the camera to the printer, turn on the camera, and then select Printer. |
Technical support
For technical assistance, free driver updates, product information, and news releases, visit the following web site:
http://www.BenQ.com
| Sensor Sony 14.1 M | Mega Pixels, 1/2.3 inch CCD |
| Zoom Optical: 12.5X | Digital: Up to 4X (Preview) / Up to 8X (Playback) |
| Lens f = 4.24 (W) ~ | 53 (T) mmF= 3.0 (W) ~ 5.9 (T)f = 24 mm ~ 300 mm, 35 mm equivalent |
| Focus Range | Normal: W = 5 cm ~ Infinity, T = 90 cm ~ InfinitySuper Macro: 1 cm |
| LCD 2.7" LCD 230k | pixels |
| Image Resolution • | 14M (4320 x 3240)• 3:2 (4320 x 2880)• 16:9 (4320 x 2432)• 10M (3648 x 2736)• 6M (2816 x 2112)• 3M (2048 x 1536)• VGA (640x480) |
| Movie Mode HD 720p | (1280 x 720), VGA (640 x 480), 30 fpsContinuous recording with sound |
| Shutter Speed 1/2000 ~ 1/2 sec (Fireworks 2 sec.; Night Scene 1/2000 ~ 4 sec.) | |
| White Balance Auto, | Daylight, Cloudy, Tungsten, Fluorescent 1, Fluorescent 2, Customer |
| Exposure -2 ~ +2 EV | (0.3EV / step) |
| ISO Auto / 64 / 100 / | 200 / 400 / 800 / 1600 |
| Flash Auto Flash / F | Forced Off / Forced On / Red-eye Reduction |
| Drive mode 10 sec. | 2 sec. / x3 / Off |
| Power Source CIPA | approximately 200 based on bundled Li-ion battery |
| Storage Type | Built-in approx. 13.6 MBSD (up to 4GB) / SDHC (up to 32GB) / SDXC (up to 64GB) |
| File Format | Still Image: JPEG (EXIF 2.2 compatible); DCF compatibleVideo: MJPEGAudio: WAV |
| Dimensions / Weight | 103.2 x 58.5 x 21.2 mm160 g (w/o battery & SD card) |
| Interface Digital output | USB 2.0 compatibleAudio / Video output (NTSC/PAL)PictBridge compatible |
| Accessories USB Cable | Software & User Manual CD / Quick Guide / Hand Strap / Pouch / Li-ion battery / AC power adapterAvailable accessories depend on the actual items shipped and may vary from the list above. |
All information, designs, and specifications are subject to change without prior notice.

- Copyright
- Disclaimer
- BenQ ecoFACTS
- WEEE directive
- CE Regulatory Notice
- FCC Statement
- Safety warning and notice
- For your safety
- Warranty
- Taking care of your camera
- Operating environment
- Table of Contents
- - Snapshot Tutorial 31
- • Recording Movie Images and Audio 43
- • Using Scene Mode 47
- - Advanced Settings 49
- • Viewing Snapshots and Movies 60
- • Other Playback Functions (PLAY) 64
- - Printing 72
- - Other Settings (Set Up) 75
- - Appendix 84
- Unpacking
- General Guide
- - Camera
- Monitor Screen Contents
- NOTE
- Configuring Monitor Screen Settings
- First, charge the battery prior to use.
- To load the battery
- 1.Open the battery cover.
- 2.Load the battery.
- Close the battery cover.
- Turn off the camera.
- IMPORTANT!
- With your computer turned on, connect the camera to it.
- After charging is complete, disconnect the USB cable from the camera and then from the computer.
- Checking Remaining Battery Power
- Configuring Basic Settings the First Time You Turn On the Camera
- Preparing a Memory Card
- Supported Memory Cards
- To format (initialize) a new memory card
- To turn power on
- To turn off the camera
- To shoot a snapshot
- Press [图标] (REC) to turn on the camera.
- Point the camera at the subject.
- Half-press the
- Viewing Snapshots
- Press [] (PLAY) to enter the PLAY mode.
- Use [ ] and [ ] to scroll between images.
- Deleting Snapshots and Movies
- To delete a single file
- Snapshot Tutorial
- Using the Control Panel
- In the REC mode, press [SET].
- Use [ ] and [ ] to select the setting you want to change.
- Use [ ] and [ ] to change the setting.
- If you want to configure another setting, repeat steps 2 and 3.
- After all of the settings are the way you want, press [SET].
- Changing the Image Size (Size)
- - Pixels
- - About image sizes
- Image Size Selection Tips
- Using Flash (Flash)
- Back lamp
- Red-eye Reduction
- Using the Self-timer (Self-timer)
- Using Face Tracking
- Shooting without Disturbing Others (Silent Mode)
- Using the Simple Mode
- When you are ready to shoot, press the shutter button.
- Press [SET].
- Shooting with Zoom
- Recording Movie Images and Audio
- To record a movie
- Configure the quality setting for the movie (page 34).
- In the REC mode, point the camera at the subject and then press
- Press [ ] (Movie) again to stop recording.
- Shooting with Scene Mode
- Shooting a Snapshot while Shooting a Movie
- While a movie is being recorded, press the shutter button.
- Recording Audio Only (Voice REC)
- In the PLAY mode, use [ ] and [ ] to display the
- Press [ ] (Movie) to start playback.
- Using Scene Mode
- What is Scene Mode?
- Some Sample Scenes
- To shoot an image with Scene Mode
- Advanced Settings
- Using On-screen Menus
- Procedure
- [1(REC) [SET] MENU REC Tab Focus →
- Super Macro
- [REC] [SET] MENU REC Tab Focus Frame
- [REC] [SET] MENU REC Tab Burst →
- [1] (REC) [SET] MENU REC Tab Stabilizer
- [1] (REC) [SET] MENU REC Tab AF Area
- [1(REC) [SET] MENU REC Tab L/R Key
- Displaying the On-screen Grid (Grid)
- [1(REC) [SET] MENU REC Tab Grid →
- Using Icon Help (Icon Help)
- [1] (REC) [SET] MENU REC Tab Icon Help
- [1(REC) [SET] MENU REC Tab Memory
- Image Quality Settings (Quality)
- Specifying Snapshot Image Quality (Quality (Snapshot))
- [REC] [SET] MENU Quality Tab Quality (\$napshot)
- Correcting Image Brightness (EV Compensation)
- [REC] [SET] MENU Quality Tab EV Compensation
- Press [SET].
- [REC] [SET] MENU Quality Tab White Balance
- [REC] [SET] MENU Quality Tab ISO →
- Optimizing Image Brightness (D-Lighting)
- [REC] [SET] MENU Quality Tab D-Lighting
- Using Built-in Color Filters (Color Mode)
- [REC] [SET] MENU Quality Tab Color Mode
- Viewing Snapshots and Movies
- Viewing a Movie
- Zooming an On-screen Image
- Displaying the Image Menu
- Viewing Snapshots and Movies on a TV Screen
- Other Playback Functions (PLAY)
- Using the PLAY Panel
- Playing a Slideshow on the Camera (Slideshow)
- In the PLAY mode, press [SET].
- Performing Playback without Disturbing Others (Silent Mode)
- Rotating an Image (Rotate)
- Selecting Images for Printing (DPOF)
- Protecting a File Against Deletion (Protect)
- Resizing a Snapshot (Resize)
- [1](PLAY) Snapshot Screen [SET] MENU PLAY Tab Resize
- Cropping a Snapshot (Trimming)
- [1](PLAY) Snapshot Screen [SET] MENU PLAY Tab Trimming
- Adding Audio to a Snapshot (Voice Memo)
- [1](PLAY) Snapshot Screen [SET] MENU PLAY Tab Voice Memo
- To play snapshot audio
- Voice Recording Playback Controls
- Copying Files (Copy)
- [PLAY] Snapshot Screen [SET] MENU PLAY Tab Copy →
- Printing
- Connecting Directly to a PictBridge Compatible Printer
- Using DPOF to Specify Images to be Printed and the Number of Copies
- • Digital Print Order Format (DPOF)
- Other Settings (Set Up)
- Configuring Camera Sound Settings (Sounds)
- Configuring a Startup Image
- [SET] -MENU Set Up Tab Startup Image
- Specifying the File Name Serial Number Generation Rule (File Numbering)
- [SET] -MENU Set Up Tab File-Numbering
- Configuring World Time Settings (World Time)
- [SET] -MENU Set Up Tab World Time
- Time Stamping Snapshots (Date Stamp)
- [SET] -MENU Set Up Tab Date Stamp
- Setting the Camera's Clock (Adjust)
- [SET] -MENU Set Up Tab Adjust
- Specifying the Date Format
- [SET] -MENU Set Up Tab Date Format
- Specifying the Display Language (Language)
- [SET] \_MENU Set Up Tab Language
- Configuring Sleep State Settings (LCD Save)
- [SET] -MENU Set Up Tab LCD Save
- Configuring Auto Power Settings (Power Saving)
- [SET] \_MENU Set Up Tab Power Saving
- Configuring [ ] and [ ] Settings (REC/PLAY)
- [SET] -MENU Set Up Tab REG/PLAY
- Disabling File Deletion (Disable)
- [SET] \_MENU Set Up Tab Disable
- Configuring USB Protocol Settings (USB)
- [SET] -MENU Set Up Tab USB
- Selecting the Screen Aspect Ratio and Video Output System (TV Out)
- [SET] -MENU Set Up Tab TV-Out
- Formatting Built-in Memory or a Memory Card (Format)
- [SET] -MENU Set Up Tab Format
- Resetting the Camera to Factory Defaults (Reset)
- [SET] -MENU Set Up Tab Reset
- Battery Precautions
- - Precautions during Use
- - Storage Precautions
- Troubleshooting and service information
- Technical support
Brand : BENQ
Model : GH200
Category : Camera