
CE 6430 - Camera ACER - Free user manual and instructions
Find the device manual for free CE 6430 ACER in PDF.


| Product Type | Digital Camera |
| Brand | Acer |
| Model | CE 6430 |
| Resolution | 6.4 Megapixels |
| Optical Zoom | 3x |
| Digital Zoom | 4x |
| LCD Screen Size | 2.7 inches |
| Storage Media | SD/SDHC Memory Card |
| Battery Type | 2x AA Alkaline or NiMH |
| Dimensions (W x H x D) | 90 x 60 x 25 mm |
| Weight (without batteries) | Approx. 130 g |
| Image Stabilization | Electronic |
| Scene Modes | Portrait, Landscape, Night, Sports |
| Video Recording | 640x480 @ 30 fps |
| Interface | USB 2.0, AV Out |
| Flash | Built-in, Auto/Red-eye/Fill/Off |
| Self-timer | Yes, 2s or 10s delay |
| Power Source | 2x AA batteries or AC adapter (optional) |
| Cleaning Instructions | Use a soft, dry cloth; avoid solvents |
| Safety Precautions | Do not expose to water or extreme temperatures |
| Repairability | Battery and memory card user-replaceable; lens not serviceable |
| Included Accessories | USB cable, wrist strap, software CD |
Frequently Asked Questions - CE 6430 ACER
User questions about CE 6430 ACER
0 question about this device. Answer the ones you know or ask your own.
Ask a new question about this device
Download the instructions for your Camera in PDF format for free! Find your manual CE 6430 - ACER and take your electronic device back in hand. On this page are published all the documents necessary for the use of your device. CE 6430 by ACER.
USER MANUAL CE 6430 ACER
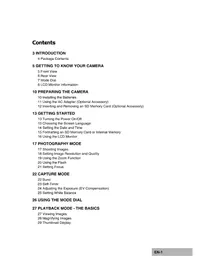
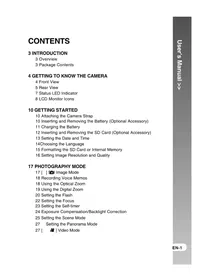
5 Front View 6 Rear View 7 Mode Dial 8 LCD Monitor Information
10 PREPARING THE CAMERA
10 Installing the Batteries 11 Using the AC Adapter (Optional Accessory) 12 Inserting and Removing an SD Memory Card (Optional Accessory)
13 GETTING STARTED
13 Turning the Power On/Off 13 Choosing the Screen Language 14 Setting the Date and Time 15 Formatting an SD Memory Card or Internal Memory 16 Using the LCD Monitor
17 PHOTOGRAPHY MODE
17 Shooting Images 18 Setting Image Resolution and Quality 19 Using the Zoom Function 20 Using the Flash 21 Setting Focus
22 Capture Mode
22 Burst 23 Self-Timer 24 Adjusting the Exposure (EV Compensation) 25 Setting White Balance
26 USING THE MODE DIAL
27 PLAYBACK MODE - THE BASICS
27 Viewing Images 28 Magnifying Images 29 Thumbnail Display
30 MOVIE MODE
30 Recording Movie Clips
31 Playing Back Movie Clips
32 PLAYBACK MODE - ADVANCED FEATURES
32 Playing Back Still Images/Movie Clips on TV
33 Deleting Images/Movie Clips
34 Connecting to a PictBridge-Compatible Printer
38 TRANSFERRING FILES FROM YOUR DIGITAL CAMERA TO COMPUTER
38 Step 1: Install the USB driver
39 Step 2: Connect the digital camera to your computer
40 Step 3: Download images or movie clips
41 EDITING SOFTWARE INSTALLATION
41 Installing NTI Photo Suite (Optional)
42 USING THE DIGITAL CAMERA AS A PC CAMERA
42 Step 1: Install the PC camera driver
43 Step 2: Connect the digital camera to your computer
43 Step 3: Run your application software (i.e. Windows NetMeeting)
44 MENU OPTIONS
44 Camera Menu
49 Movie Menu
50 Playback Menu
53 Setup Menu
57 SPECIFICATIONS
INTRODUCTION
Thank you for purchasing the new digital still camera!
Equipped with a 6.36 Mega pixels CCD sensor, your camera delivers high quality, 2816 x 2112 resolution images. Other features provided by the camera include the following:
■ 6.36 Mega pixels
A high-resolution CCD sensor provides 6.36 mega pixels for high quality of images.
■ Auto flash
An auto flash sensor automatically detects the shooting (lighting) conditions and determines whether the flash should be used.
■ 2.36" TFT color image LCD monitor
■ Optical zoom: 1x~3x
■ Digital zoom: 1x~4x
■ Approx. 8MB internal (built-in) memory
Images can be captured without using an SD memory card.
■ Support for SD memory card for memory expansion
You may wish to expand the memory capacity (up to 1GB capacity) by using an additional SD memory card.
USB connection
Still images or movie clips that you have recorded can be downloaded to your computer using the USB cable (A USB driver is required for Win 98 and Win98SE).
■ DPOF functionality
DPOF can be used to print your images on a DPOF compatible printer by simply inserting the SD memory card.
■ PictBridge support
You can connect the camera directly to a printer that supports PictBridge and perform image selection and printing using the camera monitor screen and controls.
■ Provided editing software: NTI Photo Suite
You can enhance and retouch your images on your computer by using the provided editing software.
Package Contents
Carefully unpack your kit box and ensure that you have the following items. In the event that any item is missing or if you find any mismatch or damage, promptly contact your dealer.
Common Product Components:
Digital camera
User's manual
Camera strap
USB cable
2 AA batteries (Alkaline or Ni-MH recommended)
Warranty card
Common (Optional) Accessories:
SD memory card
Battery charger
AC power adapter
Software CD-ROM
Camera pouch
AV cable

■ Accessories and components may vary by retailer.
GETTING TO KNOW YOUR CAMERA
Front View

- Shutter release button
- Mode dial
- Power switch
- Flash
- Self-timer LED
- PC / AV terminal
- DC input terminal
- Lens
- Microphone
Rear View

- LED indicator
- / Zoom in (telephoto) button / Zoom out (wide-angle) button
- Playback button
- Menu button
- Delete button
- Self-timer button
- Focus button
- Strap holder
- Exposure compensation button
- Flash button
- Display button 12. Battery / card cover 13. Tripod socket
- LCD monitor
Mode Dial
You can select from seven shooting modes and setup mode according to shooting conditions to achieve the desired effect.

Mode Description
| 1. Program Select this mode to permit the shutter speed and aperture to be set manually. | |
| 2. [8K50] | Portrait Select this mode to make people stand out with the background out-of-focus. |
3.  | Landscape Select this mode to take phototographs of distant scenery or landscapes. |
4.  | Sports Select this mode to shoot fast moving objects. |
5.  | Night Select this mode to take phototographs of people against a dusk or night-time background. |
6.  | Setup Select this mode to adjust the camera settings. |
7.  | Video Select this mode to record video clips. |
| 8. [026H] | Auto Select this mode to adjust point-and-shoot action. |
LCD Monitor Information
■ Camera Mode
- Mode indication
[ ] Program Mode [ ] Portrait [ ] Landscape Mode [ ] Sports Mode [ ] Night Mode [ SET UP ] Setup [ ] Movie Mode [ ] Auto Mode
- Flash mode
[5A] Auto [ A ] Redeye [ ] Flash on [ ] Flash off
- Capture mode
[ x1 ] Single [ ■ ] Burst [ ] AEB [ ] 2 sec. Self-timer [ ] 10 sec. Self-timer [ ] 0+2 sec. Self-timer
- Focus mode
[ ] Standard [ ] Macro [ ] Infinity
- Possible number of shots
- Memory status
: Built-in memory (without card) SD : SD memory card
- Battery and AC adapter
[ ] Full battery power [ ] Medium battery power [ ] Low battery power [ ] No battery power [ ] AC adapter

- Recorded pixels
[ ] 2816 x 2112 [ ] 2272 x 1704 [ ] 21600 x 1200 [ ] 640 x 480
- Image quality
[★] Fine [★] Normal [ ] Economy
- White balance
Auto
[ ] Daylight [ ] Cloudy [ ] Tungsten [※] Fluorescent
- ISO sensitivity
[ ] Auto [ISO 64] 64 [ISO 100] 100 [ISO 200] 200
- EV compensation
- Zoom bar
- Focus area
■ Movie Mode
- Movie mode
- Flash mode
- Recordable movie time available
- Memory status
- Battery power and AC adapter indicator
- Focus area
- Zoom bar

■ Image Playback
- Playback mode
- Number of image
- Memory status
- Battery power and AC adapter indicator
- Index number of total number
- DPOF indicator
- Protect indicator
- Date
- Time 10. EV compensation 11. ISO sensitivity
- White balance
- Image quality
- Recorded pixels

■ Movie Playback
- Playback mode
- Movie mode
- Number of movie
- Memory status
- Battery power and AC adapter indicator
- Index number of total number
- Elapsed time
- Date
- Time
- Play/Pause indicator

PREPARING THE CAMERA
Installing the Batteries
You can use 2 AA size batteries (alkaline or Ni-MH rechargeable) to power the camera. Make sure that the power of the digital camera is off before inserting or removing the batteries.
- Make sure the camera is turned off.
- Open the battery cover.
- Insert the batteries in the correct orientation as shown in the illustration.
- Close the battery cover.
■ To remove the batteries, turn the camera off before removing batteries and hold the camera with the battery cover facing upward, then open the battery cover.


■ Be careful not to drop the batteries when opening or closing the battery cover. ■ Due to the characteristics of AA alkaline battery, camera performance may deteriorate. AA alkaline battery is not recommended except in emergencies and checking the camera's functionality.
Using the AC Adapter (Optional Accessory)
Use of the AC adapter is recommended if you intend to use the LCD monitor for a long time or connect the camera to a PC.
- Make sure your camera is off.
- Connect one end of the AC adapter to the camera DC input terminal labeled "DC IN 3V".
- Connect the other end to a power outlet.


■ Make sure to use only the AC adapter specified for the camera. Damage caused by the use of an incorrect adapter is not covered under the warranty. ■ To prevent unexpected auto power off resulting from no battery power left during the process of transferring your images to the computer, use the AC adapter as a power supply. ■ The AC adapter can only be used to power the camera. Batteries cannot be charged inside the camera.
Inserting and Removing an SD Memory Card (Optional Accessory)
The digital camera comes with 8MB of internal memory, allowing you to store captured still images or video clips in the digital camera. Moreover, you can also expand the memory capacity by using an optional SD (Secure Digital) memory card so that you can store more files.
- Make sure your camera is turned off before inserting or removing a memory card.
- Open the battery/SD memory card cover.
- Insert an SD memory card in the correct orientation as shown in the illustration.
- Close the battery/SD memory card cover.
■ To remove the SD memory card, make sure the camera is turned off. Press lightly on the edge of the memory card and it will eject.


■ Be sure to format an SD memory card with this digital camera before using it. Refer to section in the manual titled “Formatting an SD Memory Card or Internal Memory” for further details.
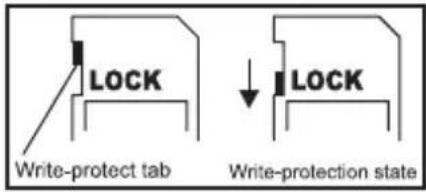
■ To prevent valuable data from being accidentally erased from an SD card, you can slide the write protect tab (on the side of the SD memory card) to "LOCK".
■ To save, edit, or erase data on an SD memory card, you must unlock the card.
GETTING STARTED
Turning the Power On/Off
■ Press the power switch until the digital camera turns on. ■ To turn the power off, press the power switch again.

Choosing the Screen Language
Follow the steps below to choose the desired language.
- Rotate the mode dial to SET and turn your camera on by pressing the power switch.

- [Setup] is displayed.
- Use the four-way controller to select [Language], then press the button.
- Use the four-way controller to select the language you want.
- Press the button to confirm.

Setting the Date and Time
Follow the steps below to set the date display style, current date and time.
- Rotate the mode dial to SET and turn your camera on by pressing the power switch.
- [Setup] is displayed.
- Use the four-way controller to select [Date & Time] and switch the date types, then press the button.
- Press the four-way controller to select Day, Month, Year and Time fields.
■ The time is displayed in 24-hour format.
- Press the button after all fields are set.


■ The date illustration shown is for the purpose of explanation and may differ from the actual setting of your camera.
Formatting an SD Memory Card or Internal Memory
The term “Formatting” means preparing an “SD memory card” to record images; this process is also called “initialization”. This utility formats an SD memory card or the internal memory and erases all stored images and data.
- Rotate the mode dial to set and turn your camera on by pressing the power switch. ■ [Setup] is displayed.
- Use the four-way controller to select [Format], then press the button.
- Use the four-way controller to select [Yes], then press the button to confirm.

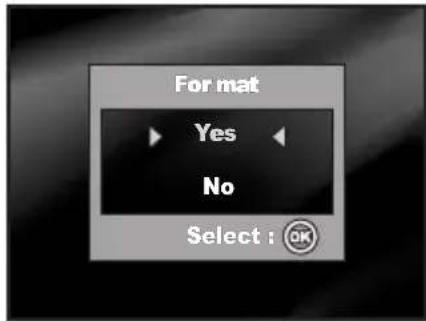

■ When you format an SD memory card, be aware that all data on the SD memory card will be erased. Protected images are also erased. ■ To format the internal memory, do not insert an SD memory card into the camera. Otherwise, you will format the SD memory card. ■ An SD memory card having any problem cannot be properly formatted.
Using the LCD Monitor
Your camera is equipped with a 2.36" full color TFT LCD monitor to help you compose images, replay recorded images/movie clips or adjust menu settings. The mode icons, text and numbers displayed on the monitor may vary according to the current settings.
- Rotate the mode dial to ,A, P, , or
- Press the power switch to turn on the power.
- Compose your scene on the LCD monitor.
- Press the shutter release button.


■ The LCD monitor darkens in strong sunlight or bright light. This is not a malfunction. ■ To prevent your images from being blurred while pressing the shutter release button, always hold it carefully. This is especially important when you are shooting under low lighting conditions, since your camera may decelerate the shutter speed to ensure your images are properly exposed.
PHOTOGRAPHY MODE
Shooting Images
- Rotate the mode dial to ▲, or ▲ and turn your camera on by pressing the power switch.
- Mode-dial Help information will be displayed on the LCD monitor. This is a brief guide to the selected mode which disappears in a few seconds.
- Compose the image on the LCD monitor screen so that the main subject is within the focus frame.
- Press the shutter release button down halfway to focus the image.

- When you press the shutter release button down halfway, the camera's Auto Focus feature automatically focuses the image. The focus frame turns green if the subject is in focus. Proper exposure is determined and locked at the same time.
- Press the shutter release button the rest of the way down to capture the image.

■ The actual captured image appears to be larger than the one displayed by the LCD monitor screen after the image has been captured. - Pressing the OK/IO button switches the LCD monitor display mode. Each time you press the OK/IO button, the display changes in the following order: Normal Display → Infomation Display → No Icons → LCD Off. ■ To enable/disable Mode-dial Help function, set the [Option-Mode-dial Help] to [On]/[Off] in the SET UP mode.
Setting Image Resolution and Quality
As you get to know the digital camera, you can set the image resolution (number of vertical and horizontal pixels) and image quality (compression ratio) based on the types of images you want to shoot. These settings affect the number of images that can be stored in the internal memory, or on an SD memory card.
Higher resolution and higher quality images provide finer detail but cause the images' file size to be larger.
To change image resolution or image quality, perform these steps below:
- Rotate the mode dial to ,A ,P , ▲ , or C and turn your camera on by pressing the power switch.
- Press the button.
■ [Capture] is displayed. In the Amode, [Auto] is displayed.
- Use the four-way controller to select [Image Size], then press the button.
- Use the four-way controller to select the desired setting, then press the OK button to confirm.
- Follow steps 3 and 4 above to set the [Quality].



■ The possible number of shots and recording time depend on the storage size, resolution, quality settings, and the subject of the image to be captured.
Using the Zoom Function
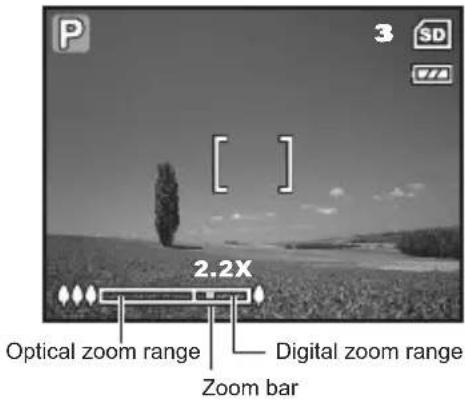
This camera is equipped with 3x optical zoom. The lens moves during optical zoom photography, allowing you to capture telephoto and wide-angle shots. By using the optical zoom function, images appear closer by pressing the 🔊 button, or smaller away by pressing the 🔊 button.
The zoom bar indicates the current level of magnification. When the digital zoom is within 3x magnification, the zoom bar is within the optical zoom range. When the digital zoom function is set to On, you can further enlarge the subjects with the 4x digital zoom by continuously pressing the 🔊 button. It is activated after your camera reaches its maximum optical zoom factor (3x) and the zoom bar is within the digital zoom area. You can enlarge the subject to a maximum magnification equivalent to 12 times. A useful feature as it is, however, the more the image is enlarged, the more pixelated the image will appear.
To capture a zoomed image, perform the following steps:
- Rotate the mode dial to, or and turn your camera on by pressing the power switch.
- Adjust the magnification ratio by using the / button.
To exit zoom photography, press and hold the 🎥 button. The status of digital magnification is displayed on the LCD monitor.

- Compose your scene and press the shutter release button.

To enable the digital zoom feature, set [Function - Digital Zoom] to [On] in the A, P, Q, ▲, ⚙, or mode.
Using the Flash
The flash is designed to function automatically when lighting conditions warrant the use of flash. You can take an image using a desired flash mode to suit your circumstances.
- Rotate the mode dial to A, P, ▲, or C.
- Press the power switch to turn on the power.
- Press the four-way controller (the flash mode changes each time the button is pressed).
- Press the button to confirm the setting.
- Compose your scene and press the shutter release button.

The camera has four flash modes: Auto, Red-eye, Flash on and Flash off. The table below will help you to choose the appropriate flash mode:
| Flash mode Description | ||
 | Auto The flash fires | automatically according to the photographic conditions. |
 | Red-eye Use this mode | de to reduce the red-eye phenomenon when you want to take natural-looking photographs of people and animals in low-light conditions.When taking photographs, the red-eye phenomenon can be reduced by asking the subject (person) to look at the digital camera or get as close to the digital camera as possible. |
 | ||
| ||
| ||
-  | Flash on The flash will always fire regardless of the surrounding brightness. | |
 | Flash off The flash will not discharge, regardless of the brightness.Use this mode when taking pictures using indoor lighting, for stages and indoor competitions, and when the subject is too far away for the flash to be effective. | |
Setting Focus
Images can be captured with the focus determined automatically using auto focus. You may over-ride the auto focus and specify macro or infinity.
- Rotate the mode dial to ▲.

- Press the power switch to turn on the power.
- Press the four-way controller (the focus mode changes each time the button is pressed).
- Press the button to confirm the setting.
- Compose your scene and press the shutter release button.

The camera has three focus modes: Standard, Macro and Infinity. The table below will help you choose the appropriate focus mode:
| Focus mode Description | ||
 | Standard Select Standard-focus setting for most occasions when you want the camera to automatically determine the focus setting.When using Standard-focus setting, any object at a range of focus is 50 cm or greater can be in focus. | |
 | Macro Select Macro-focus setting to capture close-up images.When the lens is zoomed to its widest position you may focus objects as close as 5 cm.When the lens is zoomed to its telephoto position (3x zoom) you may focus objects as close as 30 cm. | |
 | Infinity Select Infinity-focus setting when you want to capture images of subject at a distance of infinity. The flash mode will be set to Flash Off automatically. | |
Capture Mode
Burst
Burst mode is used for continuous shooting. 3 pictures are taken continuously once the shutter release button is pressed. Secure the camera to a tripod or place it on a stable surface.
Auto Bracket
In Auto Bracket (AEB) mode, the camera automatically changes the exposure within a set range to take three shots after you press the shutter release button once. Auto Bracket settings can be combined with exposure compensation settings to extend the adjustment range.
- Rotate the mode dial to A, P, D, ▲, ☆ or ⚙.
- Press the power switch to turn on the power.
- Press the four-way controller ( ) and select [Burst] or [AEB].
- Press the button to confirm the setting. The ■(Burst) or □(AEB) indicator is displayed on the monitor screen.
- Press the shutter release button halfway to lock the focus.
- Press the shutter release button to capture a sequence of images.
- In Burst mode, the flash mode will be set to Flash Off automatically.



In Burst and Auto Bracket mode, the flash mode will be set to Flash Off automatically.
Self-Timer
The self-timer can be used in situations such as group shots. When using this option, you should either mount the camera on a tripod (recommended) or rest it on a flat, level surface.
- Secure the camera to a tripod or place it on a stable surface.
- Rotate the mode dial to ,A ,P ,D ▲

- Press the power switch to turn on the power.
- Press the four-way controller (💡) and select your desired self-timer mode.
- Press the button to confirm the setting.
- Compose your scene and press the shutter release button.
■ The self-timer function is activated. ■ The photograph is then taken after the preset time. ■ To cancel the self-timer at any time, press the four-way controller ⏻ or press the shutter release button halfway.

The table below will help you choose the appropriate self-timer mode:
| Self-timer mode Description | |
| 2 sec. Self-timer The | image is captured about 2 seconds after the shutter is pressed. This mode is useful for preventing camera shake. |
| 10 sec. Self-timer The | image is captured about 10 seconds after the shutter is pressed. This mode is suitable for the shots in which the photographer has to be included. |
| 10+2 sec. Self-timer | The first image is captured about 10 seconds after the shutter release button is pressed, and then the second image is captured 2 seconds later. This mode is convenient when capturing group images in succession. Flash does not fire in this mode. |

■ After one shot is taken, the self-timer mode is turned off. ■ If you wish to take another image using the self-timer, repeat these steps.
Adjusting the Exposure (EV Compensation)
You can manually adjust the exposure determined by the digital camera. Use this mode when the proper exposure cannot be obtained, for example, when the contrast (difference between bright and dark areas) between the subject and the background is extremely high. The EV compensation value can be set in the range from -2.0EV to +2.0EV.
- Rotate the mode dial to or Ⓐ.
- Press the power switch to turn on the power.
- Press the four-way controller ( ) and set the range of EV compensation value from -2.0EV to +2.0EV.
- Press the button to confirm the setting.


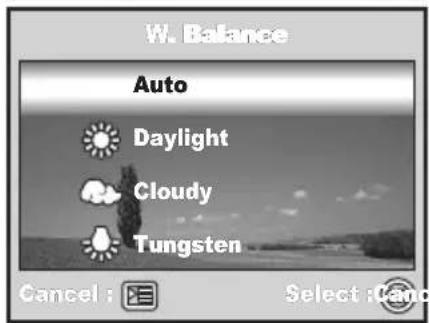
Setting White Balance
This feature lets you make adjustments to compensate for different lighting types according to your shooting conditions.
- Rotate the mode dial to , or C.
- Press the power switch to turn on the power.
- Press the button. [Capture] is displayed.
- Use the four-way controller to select [W. Balance], then press the button.
- Use the four-way controller to select the desired white balance setting, then press the button to confirm.
- To cancel the setting, press the button and exit the menu.


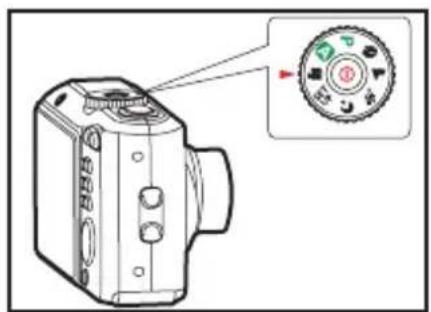
USING THE MODE DIAL
The digital camera provides 6 types of scene modes to satisfy different shooting conditions of your subject.
Auto Mode: This is the simplest way which allows you to take still pictures without having to set special functions or manual adjustments. The camera sets the optimal focusing and exposure.
P Program Mode: The camera automatically sets the shutter speed and aperture for taking still images. You can adjust other functions, such as flash mode or continuous shooting mode.
Portrait Mode: Select this mode to make people stand out with the background out-of-focus.
Landscape Mode: This mode allows you to take photographs of distant scenery or landscapes.
Sports Mode: This mode allows you to shoot fast moving objects.
Night Mode: This mode allows you to take photographs of people against a dusk or night-time background.
- Rotate the mode dial to the desired mode and turn your camera on by pressing the power switch.
- Mode-dial Help information will be displayed on the LCD monitor. This is a brief guide to the chosen mode which disappears in a few seconds. If you wish to refer to this information again, press the OK button.
- Compose your subject within the focus frame.
- Press the shutter release button to capture the image.



To enable/disable Mode-dial Help function, set the [Option-Mode-dial Help] to [On]/[Off] in the SET UP mode.
PLAYBACK MODE - THE BASICS
Viewing Images
You can display the still images one by one.
- Rotate
the
mode
dial
to

and turn your camera on by the power switch.
- Press the button.
■ The last recorded image appears on the LCD monitor screen. ■ Basic information is shown by indicators on the LCD monitor screen. To see full information display, press the OK/IOI button.

- Use the four-way controller to select the desired images.

■ For protected images/movie clips, a mark will be displayed. If there is no image stored in the internal memory or on the SD memory card, the [No image] message will appear on the LCD monitor screen. ■ You cannot enter the Playback mode from the Setup mode.
Magnifying Images
While reviewing your images, you may enlarge a selected portion of an image. This magnification allows you to view fine details. The zoom factor displayed on the screen shows the current magnification ratio.
- Press the button.
■ The last recorded image appears on the LCD monitor screen. ■ Press the four-way controller to view the previous or next image.
- Adjust the zoom ratio by using the button.
■ To enlarge the selected image, press the 🔊 button. ■ To return to the normal image, press the 🔊 button. ■ The magnification factor is displayed on the LCD monitor screen.
- To view different portions of the images, press the four-way controller to adjust the display area.


The magnification factors range from 1.5X to 4X (within 6 stages: 1.5X, 2.0X, 2.5X, 3.0X, 3.5X and 4.0X).
Thumbnail Display
This function allows you to view 9 thumbnail images on the LCD monitor screen simultaneously so you may search for a particular image.
- Press the button.
The last recorded image appears on the LCD monitor screen.
- Press the /▲ button once.
Nine thumbnail images are displayed simultaneously. For recorded movie clips, the movie mode icon will be displayed. For protected images/movie clips, a 0m mark will be displayed.
- Use the four-way controller to move the cursor to select the image to be displayed at regular size.
- Press the OK/ button to display the selected image on full screen.

MOVIE MODE
Recording Movie Clips
This mode allows you to record movie clips with sound via the built-in microphone.
- Rotate the mode dial to Movie Mode and turn your camera on by pressing the power switch.
- Mode-dial help information will be displayed on the LCD monitor. This is a brief guide that disappears in a few seconds. If you wish to refer to this information again, press the button.
- Compose your subject within the focus frame.
- Press the shutter release button to start recording.
- To stop recording, press the shutter release button again.


The optical zoom function (3X) can be activated before you start recording movie clips. The digital zoom function can be activated before and during recording. Pressing the OK/IO button switches the LCD monitor screen display mode. Each time you press the OK/IO button, the display changes in the following order: Normal Display → No Icons → LCD Off. To enable/disable the Mode-dial Help function, set [Option-Mode-dial Help] to [On]/[Off] in all modes.
Playing Back Movie Clips
You can play back the recorded movie clips on the LCD monitor screen. However, the sound recorded with movie clips can only be played back on a TV or on a computer.
- Press the button.
- Use the four-way controller to go through the images until the movie clip you want to play back is displayed.
- Press the button to start playing back the movie clips.
To pause or resume movie playback, press the button again.


The index number, date and time indicators displayed on the LCD monitor screen will disappear after a few seconds. The zoom function cannot be activated when playing back movie clips. To playback the movie clips on the computer, we recommend you to use Windows Media Player 9.0 or later (WMP 9.0 or later). You can download the WMP version from the website at www.microsoft.com.
PLAYBACK MODE - ADVANCED FEATURES
Playing Back Still Images/Movie Clips on TV
You can also playback your images on a TV screen. Before connecting to any device, make sure to select the NTSC/PAL system to match the video output system of the video equipment you are going to connect to the digital camera, then turn off all devices to be connected.
- Connect one end of the AV cable to the AV terminal of the digital camera.
- Connect the other end to the AV input socket of the TV set.
- Turn the TV and digital camera on.
- Playback the images/movie clips.
■ The method of operation is the same as playing back still images and movie clips on the digital camera.


■ The sound recorded with movie clips can only be played back on a TV or on a computer.
Deleting Images/Movie Clips
Use this function to delete one or all images/movie clips stored in SD memory card or the internal memory. Please note that the deleted images or movie clips cannot be recovered. Exercise caution before deleting a file.
- Rotate the mode A dial to ▲, , , , or an turn your camera on by pressing the power switch.
- Press the button.
■ The last recorded image/movie clip appears on the LCD monitor screen.
- Use the four-way controller to select the image/movie clip you want to delete.
- Press the button to delete.
- Use the four-way controller to select [This Image] or [All Images] by your preference, then press the O button.
- When the delete message appears, use the four-way controller to select [Yes], then press the OK button to confirm the deletion.
■ If you wish to cancel the deletion, select [No].


■ Protected images cannot be deleted with the delete function.
Connecting to a PictBridge-Compatible Printer
Even if you do not have a computer, you can connect the camera directly to a printer that supports PictBridge to perform image selection and printing using the camera screen and controls. DPOF support also lets you specify which images you want to print and how many copies of each should be printed.
Connecting the camera to the printer
- Rotate the mode dial to and turn your camera on by pressing the power switch.
- Press the four-way controller to select the [Option] menu, then use the four-way controller to select [USB Mode]. Press the OK button.
- Use the four-way controller to select [PictBridge], then press the button.
- Connect your camera and the printer via a supplied USB cable.

■ The message “One moment” will appear on the on the LCD monitor screen.

On Windows 98/98SE/ME/2000, if the camera is connected to your computer and you unintentionally set the camera's USB connection to PictBridge, the "Install Driver" message will appear. Ignore this message and click "Cancel".
Printing images
When the camera is properly connected to a PictBridge-compatible printer, the [Printing Mode Select] screen is displayed on the LCD monitor. Use the four-way controller to select the print mode.
In [Print] Mode:
Lets you print the specified image with PictBridge.
- Use the four-way controller to select the [Print] mode, then press the button.
- Use the four-way controller to select the image you want to print, then press the four-way controller to set more detailed settings.
- Use the four-way controller to select by your preference, then press the button.
[Quantity]: Specifies the number of prints. You can select the number up to 10.
[Date]: If you select [With], images are printed with the date.
[File Name]: If you select [With], images are printed with the file name.
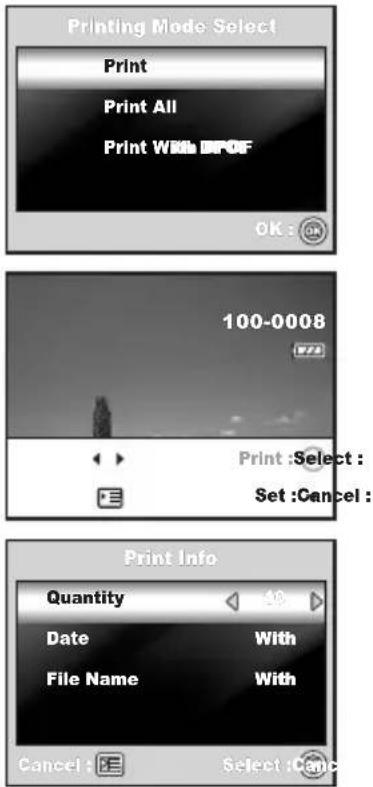
- After Print Setting is set, the print icon □ is marked on the displayed image. You can still use the four-way controller to change the image by your preference, then press the OK button to print.
- Use the four-way controller to access the paper selection setting, then press the OK button to confirm.
[Size]: You may select the desired item depending on the type of printer being used.
[Borderless]: You may select the desired item depending on the type of printer being used.
- This starts printing and displays the message "Transferring" on the LCD monitor. The message will disappear after the printing is finished. Then the screen returns to [Printing Mode Select].
■ To cancel printing:
Pressing the OK button during print data transfer displays the screen for selecting whether to [Continue] or [Cancel] printing.
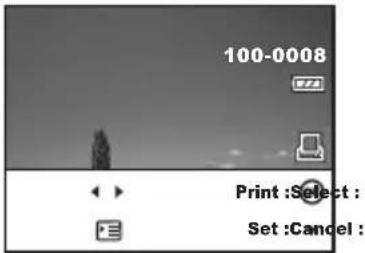


In [Print All] Mode:
Lets you print all images with PictBridge.
- If you wish to print all the images stored in the camera, you may choose [Print All] in [Printing Mode Select].
- To set Print Settings, follow steps 2 to 6 in [Print] Mode.

In [Print With DPOF] Mode:
This function only lets you print the specified image based on the previous DPOF settings.
- If you wish to print images with DPOF setting, you may choose [Print With DPOF] in [Printing Mode Select].
- To set Print Settings, follow steps 2 to 6 in [Print] Mode.

![ACER CE 6430 - In [Print With DPOF] Mode: - 2](/content/2026/05/857617/images/5e8cc5aa65a22378f0d3aa7b835eec4bdf79fd9c357749de007e8b97db857622.jpg)
■ When connecting a printer which is not compatible with DPOF, [Print With DPOF] cannot be selected.
TRANSFERRING FILES FROM YOUR DIGITAL CAMERA TO COMPUTER
After using a USB cable to establish a USB connection between the camera and your computer, you can use your computer to share recorded images or video clips with your family or friends via e-mail or post them on the Web. In order to do this, you must install the USB driver onto your computer first. Note that before you begin to install the software, you need to check your system according to the table as shown below.
| System Requirements (Windows) | System Requirements (Macintosh) | |
| CPU Pentium III 600 MHz | processor or higher | PowerPC G3/G4 |
| Operating System | Windows 98SE/Me/NT/2000/XP | OS 9.0 or higher |
| RAM 32MB | (64MB RAM recommended) | 32MB(64MB RAM recommended) |
| Hard Disk Space 128MB | hard disk space 128MB hard disk space | |
| Required Devices A | CD-ROM driveAn available USB port | An available USB port |
| Display Color Monitor | (800x600,24-bit or higherrecommended) | Color Monitor (800x600,24-bit or higherrecommended) |
Step I: Install the USB driver
■ Installation on Windows 98 & 98SE
The USB driver on the supplied CD-ROM is exclusively for Windows 98 and 98SE. Windows 2000/ME/XP users need not install the USB driver.
- Insert the enclosed CD-ROM into your CD-ROM drive.
- When the welcome screen appears, click "Install USB/PC-Cam driver". Follow the on-screen instructions to complete the installation.
- After the USB driver has been installed, restart your computer.
■ Installation on MAC OS 9.0
For Mac OS 9.0 or higher, the computer will automatically recognize the digital camera and load its own USB drivers.
Step 2: Connect the digital camera to your computer
- Rotate the mode dial to SET and turn your camera on by pressing the power switch.
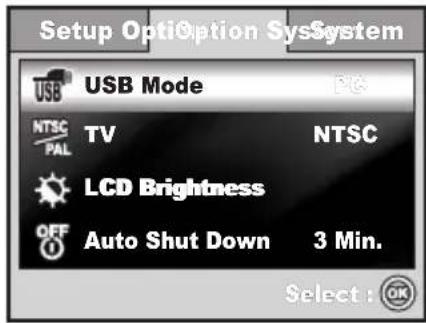
- Press the four-way controller to select the [Option] menu, then use the four-way controller to select [USB Mode].
- Press the button.
- Use the four-way controller to select [PC], then press the O button.
- Turn off your camera.
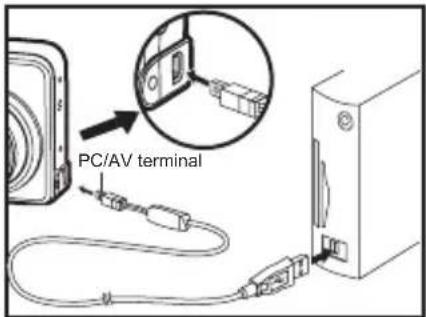
- Connect your camera and the computer via the supplied USB cable.
- Turn your camera on by pressing the power switch.
- There will be a new "Removable Disk" icon detected in "My Computer", which contains your recorded images or movie clips. (For Mac users, double-click [untitled] or [unlabeled] disk drive icon on your desktop.)

Step 3: Download images or movie clips
When the digital camera is turned on and connected to your computer, it is considered to be a disk drive, just like a floppy disk or CD. You can download (transfer) images by copying them from the “Removable disk” (“untitled” or “unlabeled” disk on a Macintosh) to your computer hard drive.
Windows
Open the “removable disk” and double click on the DCIM / DSCIM folder to open it to find more folders. Your images are inside these folder(s). Select the desired still images or video clips and then choose “Copy” from the “Edit” menu. Open the destination location (folder) and choose “Paste” from the “Edit” menu. You may also drag and drop image files from the digital camera to a desired location.
Macintosh
Open the “untitled” disk icon, and the destination location on your hard disk. Drag and drop from the digital camera to the desired destination.

■ Memory card users may prefer to use a memory card reader (highly recommended). ■ Video playback application is not included with the package. Make sure that video playback application has been installed in your computer.
EDITING SOFTWARE INSTALLATION
Installing NTI Photo Suite (Optional)
PC users will find that NTI Photo Suite is a very user-friendly image-editing program. With NTI Photo Suite, you can retouch, compose, and organize your images. It includes a variety of templates, such as photo frames, birthday cards, calendars and more. Get your images ready and explore this amazing program.
To install NTI Photo Suite:
- Insert the CD-ROM that came with the camera into your CD-ROM drive. The welcome screen appears.
- Click "INSTALL NTI PHOTO SUITE". Follow the on-screen instructions to complete the installation.

To use NTI Photo Suite to edit and retouch your recorded images, please refer to the on-line help. For Windows 2000/XP users, please make sure to install and use the NTI Photo Suite in "Administrator" mode. NTI Photo Suite is not supported on the Mac. iPhoto or iPhoto2 is recommended.
USING THE DIGITAL CAMERA AS A PC CAMERA
Your digital camera can act as a PC camera, which allows you to videoconference with business associates, or have a real-time conversation with friends or family. To use the digital camera for videoconferencing, your computer system must include the items as below:
Microphone, sound card, speakers or headphones, network or Internet connection.

Video conferencing (or video editing) software is not included with the digital camera. This mode is not supported for Mac.
Step I: Install the PC camera driver
The PC-camera driver included in the CD-ROM is exclusively for Windows. The PC camera function is not supported for Mac platforms.
- Insert the enclosed CD-ROM into your CD-ROM drive.
- When the welcome screen appears, click "Install USB/PC-Cam driver". Follow the on-screen instructions to complete the installation.
- After the driver installation is completed, restart your computer.
Step 2: Connect the digital camera to your computer
- Rotate the mode dial to SET and turn your camera on by pressing the power switch.
- Press the four-way controller to select the [Option] menu, then use the four-way controller to select [USB Mode].
- Press the button.
- Use the four-way controller to select [PC CAM.], then press the button.
- Connect your camera and the computer via the supplied USB cable.
- Position the digital camera steadily on top of your computer monitor or use a tripod.

Step 3: Run your application software (i.e. Windows NetMeeting)
To use Windows NetMeeting for videoconferencing:
- Go to Start → Programs → Accessories → Communications → NetMeeting to launch the NetMeeting program.
- Click the Start Video button to view live video.
- Click the Place Call button.
- Type the e-mail address or the network address of the computer that you are calling.
- Click Call. The person that you are calling must also have Windows NetMeeting running and be willing to accept your call to start the videoconference.

■ The video resolution for videoconferencing applications is generally 320 x 240. For more information about the operation of videoconference application software, refer to its respective help documentation. ■ Use of AC adapter is recommended while the camera is used as a PC camera.
MENU OPTIONS
Camera Menu
This menu is for the basic settings to be used when capturing still images.
- Rotate the mode dial to A, P, or (and turn your camera on.
- Press the button, then use the four-way controller to select the [Capture] / [Function] / [Image] menu. In A Mode, press the button to access the [Auto] menu directly.
- Use the four-way controller to select the option item, then press the button.
- Press the four-way controller to select the desired setting, then press the button.


| Item Functional | Description |
Image Size | Sets the size of the image that will be captured. Refer to the section in this manual titled "Setting Image Resolution and Quality" for further details.6M 2816x21124M 2272x17042M 1600x12000.3M 640x480 |
Quality Sets the quality (compression rate) at which the image is captured. | Refer to the section in this manual titled "Setting Image Resolution and Quality" for further details.FineNormalEconomy |
In


or
Mode.
■ [Capture] settings
| Item Functional | Description |
Image Size Refer  | to the section in this manual titled “Setting Image Resolution and Quality” for further details. |
Quality Refer to  | the section in this manual titled “Setting Image Resolution and Quality” for further details. |
W.Balance Sets  | the white balance when shooting under a variety of lighting conditions and permits photographs to be taken that approach the conditions that are seen by the human eye. AutoDaylightCloudyTungstenFluorescent |
ISO Sets the sen  | sensitivity for taking pictures. When the sensitivity is raised (and the ISO figure is increased), photography will become possible even in dark locations, but the more pixelated (grainier) the image will appear.Auto / 64 / 100 / 200 |
■ [Function] settings
| Item Functional | Description |
Metering You can![ACER CE 6430 - ■ [Function] settings - 1](/content/2026/05/857617/images/799623275ff661177095d981991141920e202715481b968e83ba04906d4712bd.jpg) | select the metering mode that sets which part of the subject to measure to determine the exposure.Center-weighted: Averages the light metered from the entire frame, but gives greater wieght to the subject matter at the center.Spot: The exposure is determined by the small area in the center of the screen only. |
Digital Zoom This![ACER CE 6430 - ■ [Function] settings - 2](/content/2026/05/857617/images/f4e5da3876a353cc0920750ceae859b83a4f32c9d26308af8944a5152bf032dd.jpg) | sets whether or not to use digital zoom at the time of shooting.Refer to the section in this manual titled “Using the Zoom Function” for further details. |
Quick View Set to![ACER CE 6430 - ■ [Function] settings - 3](/content/2026/05/857617/images/ba4f1f14d71945a5a32d3ec0511c8f30a2908549ce4b47994dff4fdc9386c7ea.jpg) | display a photographed image on LCD monitor screen immediately after you have taken the shot. |
■ [Image] settings
| Item Functional | Description |
| Color Sets the color of the image that will be captured. | |
| Full ColorBlack & WhiteSepia | |
| Sharpness Sets the level of image sharpness. | |
| HighMediumLow | |
| Saturation To capture an image, your camera offers you three different degrees of color to match with your preference.Your images will demonstrate different impression by selecting different degrees of color. This is called “Saturation”. | |
| HighMediumLow | |
| Date Imprint The date of recording can be printed directly on the still images.This function must be activated before the image is captured. The date appears on the right bottom of the captured picture. When images are shot with date imprint feature, the date cannot be removed later. | |
| Item Functional | Description |
| Color Sets the color of the image that will be captured. | |
![ACER CE 6430 - ■ [Image] settings - 1](/content/2026/05/857617/images/061c60cbde549656b6e3f6a0c8f11b48a14b805adb58ccdb2a23125abae37348.jpg) | Full ColorBlack & WhiteSepia |
| Sharpness Sets the level of image sharpness. | |
![ACER CE 6430 - ■ [Image] settings - 2](/content/2026/05/857617/images/7a8fed41701ade4047a3cdc9bb3395e632f201209761af49f1b114d6b4623809.jpg) | HighMediumLow |
| Saturation To capture an image, your camera offers you three different degrees of color to match with your preference.Your images will demonstrate different impression by selecting different degrees of color. This is called “Saturation”. | |
![ACER CE 6430 - ■ [Image] settings - 3](/content/2026/05/857617/images/3a64fa6c2ec4a66aaf5c4370d904ecfe749317ebeac00f6005ecd3975f6855b8.jpg) | HighMediumLow |
| Date Imprint The date of recording can be printed directly on the still images.This function must be activated before the image is captured. The date appears on the right bottom of the captured picture. When images are shot with date imprint feature, the date cannot be removed later. | |
Movie Menu
This menu is for the basic settings to be used when recording movie clips.

- Rotate the mode dial to and turn your camera on.
- Press the button.
- Press the four-way controller to select the option item. Then press the button.
- Press the four-way controller to select the desired setting, then press the OK button.
- To exit the movie menu, press the button.
| Item Functional | Description |
Color Refer to the  | Camera Menu's option item (the , , , , or Mode) for further details. |
| Digital Zoom Refer to the Camera Menu's option item (the , , P, or Mode) for further details. | |
Playback Menu
In the ▶ menu, set the settings used for playback.

- Press the button.
The last recorded image appears on the LCD monitor screen.
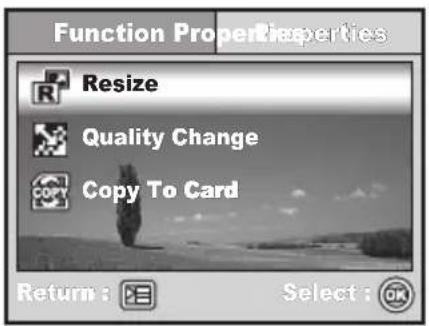
- Press the button, then use the four-way controller to select the [Function] / [Properties] menu.
- Use the four-way controller to select the option item, then press the button.
- Press the four-way controller to select the desired setting, then press the OK button.
- To exit the playback menu, press the button.
[Function] settings
| Item Functional | Description |
Slide Show You | can play back recorded images in order with a selected interval time.This function is useful for checking your images or for presentations, etc.3 Sec. / 5 Sec. / 10 Sec. |
Protect Set the data to read-only to prevent images from being erased by mistake. | |
| DPOF Allows you to select the desired pictures to be printed and set the number of prints and whether or not to imprint the data in DPOF format. You can print images easily just by inserting the SD memory card to a DPOF-compatible printer or taking it to a print shop. | |
[Properties] settings
| Item Functional | Description |
Resize Changes | the size of a recorded image.Resizing replaces the original image with the changed image. Only resizing to a smaller size is available.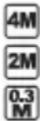 2272x17041600x1200640x480 2272x17041600x1200640x480 |
Quality Change | Changes the quality (compression rate) of a recorded image.Compresses images and overwrites an old size images with a newly compressed image. Only quality changing to a lower quality level is available.[XHQ]NormalEconomy |
Copy to Card All | ows you to copy your files from the digital camera's internal memory to an SD memory card. You can only do this if you have an SD memory card installed and some files in internal memory. |
Setup Menu
This feature allows you to set up the default settings by preference for using your camera.
- Rotate the mode dial to mode and turn your camera on.
- Press the four-way controller to select the [Setup] / [Option] / [System] menu.
- Use the four-way controller to select the desired option item, then press the OK button. (4) To exit the setup menu, rotate the mode dial to another mode.
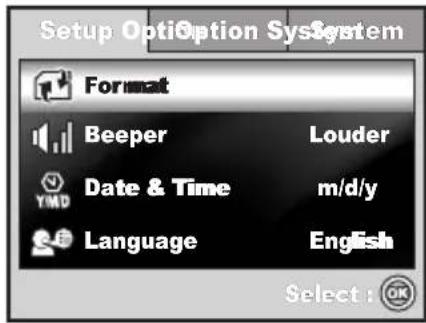
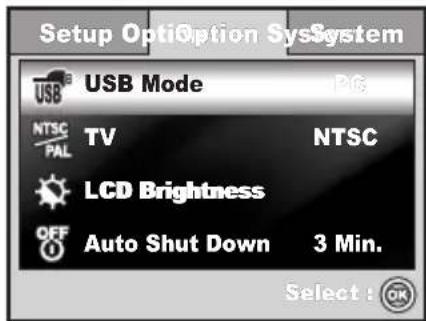


[Setup] settings
| Item Functional | Description |
Format Erases a | Images and reformats the SD memory card loaded in your camera. Protected images are also erased. SD memory card cannot be formatted if it is write-protected.Refer to the section in this manual titled “Formatting an SD Memory Card or Internal Memory” for further details. |
Beeper This sets | whether or not to mute the startup sound, and the camera sound each time you press a camera button.Louder / Soft / Off |
Date & Time This | sets the date and the time.Refer to the section in this manual titled “Setting the Date and Time” for further details.d/m/ym/d/yy/m/d |
Language Sets the | the language that is displayed on the LCD monitor screen.Refer to the section in this manual titled “Choosing the Screen Language” for further details.English/ Français / Deutsch / Español / Italiano /繁體中文简体中文 |
[Option] settings
| Item Functional | Description |
USB Mode Selects to choose one of the following modes for further settings.  | PC / PictBridge / PC CAM |
TV Sets video output  | output of the camera for matching the video output system of the equipment that you are going to connect to the camera.PAL / NTSC |
LCD Brightness  | This sets the brightness of the LCD monitor screen.The adjustment range is from -5 to +5. |
Auto Shut Down  | If no operation is performed for a specific period of time, the power to the camera is automatically turned off. This feature is useful to reduce battery wear.2 Min. / 3 Min. / 5 Min. / Off |
Mode-dial Help  | This enables/disables the Mode-dial Help function. When this function is activated, a brief mode guide appears on the LCD monitor as you rotate the mode dial to different modes. |
[System] settings
| Item Functional | Description |
Reset Number. S | Sets whether or not to reset the file number when you take photographs. This creates a new folder. The captured images are recorded to the newly created folder from number 0001. If you want to reset the file number, be sure that no images are recorded in the internal memory or the SD memory card. |
Set to Default | Returns all basic settings to the digital camera 's default settings. The time setting will not be reset. |
Version This displ | plays the current firmware version of the camera. |
SPECIFICATIONS
Item Description
| Image Sensor CCD | |
| Effective pixels 6.36 Mega pixels | |
| Image size Still image: 2816x 2112, 2272 x 1704, 1600 x 1200,640 x 480Movie clip: 320 x 240 | |
| Image quality Still image: Fine / Normal / EconomyMovie image: QVGA | |
| Recording media Approx. 8 MB internal memorySD memory card (Optional, up to 1 GB) | |
| File format JPEG (Exif 2.2), DCF, Motion JPEG (AVI) | |
| Lens F-no.: Wide: 2.8 / Tele: 4.8Focal length: 5.5mm~16.5mm (equivalent to 34~102mm) | |
| Focus range Normal :40cm ~ infinityMacro :W: 5cm ~ 40cmT: 35cm ~ 40cm | |
| Flash effective range Wide: Approx. 0.6 m - Approx.2.4 m (at the standard output sensitivity of 200)Tele: Approx. 0.6 m - Approx. 1.8 m (at the standard output sensitivity of 200) | |
| LCD monitor 2.36" color TFT-LCDApprox. 110K pixels display | |
| Self-timer 10 sec self-timer, 2 sec self-timer, 10+2 sec self-timer | |
| Exposure compensation -2.0EV~ +2.0EV (in 1/3 EV increments) | |
| White balance Auto, Daylight, Cloudy, Tungsten, Fluorescent | |
| ISO | Auto, 64, 100, 200 |
| Interface | DC input terminal, PC/AV terminal |
| Power | 2 x AA (alkaline or Ni-MH rechargeable) batteriesAC-DC Adapter (3V/2.5A) (Optional) |
| Dimension | Approx. 88.5 x 60 x 28 mm (3.6 x 2.4 x 1.1 in) |
| Weight | Approx. 130g (without batteries and SD memory card) |
* Recording capacity shows approximate number of shots recorded during CIPA-compliant testing. Actual performance may vary according to operating conditions. * Design and specifications are subject to change without notice.

- PREPARING THE CAMERA
- GETTING STARTED
- PHOTOGRAPHY MODE
- CAPTURE MODE
- USING THE MODE DIAL
- PLAYBACK MODE - THE BASICS
- MOVIE MODE
- PLAYBACK MODE - ADVANCED FEATURES
- TRANSFERRING FILES FROM YOUR DIGITAL CAMERA TO COMPUTER
- EDITING SOFTWARE INSTALLATION
- USING THE DIGITAL CAMERA AS A PC CAMERA
- MENU OPTIONS
- SPECIFICATIONS
- INTRODUCTION
- MEGA PIXELS
- AUTO FLASH
- TFT COLOR IMAGE LCD MONITOR
- OPTICAL ZOOM: 1X~3X
- DIGITAL ZOOM: 1X~4X
- APPROX. 8MB INTERNAL (BUILT-IN) MEMORY
- SUPPORT FOR SD MEMORY CARD FOR MEMORY EXPANSION
- USB CONNECTION
- DPOF FUNCTIONALITY
- PICTBRIDGE SUPPORT
- PROVIDED EDITING SOFTWARE: NTI PHOTO SUITE
- PACKAGE CONTENTS
- COMMON PRODUCT COMPONENTS
- COMMON (OPTIONAL) ACCESSORIES
- GETTING TO KNOW YOUR CAMERA
- FRONT VIEW
- REAR VIEW
- MODE DIAL
- LCD MONITOR INFORMATION
- CAMERA MODE
- IMAGE PLAYBACK
- MOVIE PLAYBACK
- INSTALLING THE BATTERIES
- USING THE AC ADAPTER (OPTIONAL ACCESSORY)
- INSERTING AND REMOVING AN SD MEMORY CARD (OPTIONAL ACCESSORY)
- TURNING THE POWER ON/OFF
- CHOOSING THE SCREEN LANGUAGE
- SETTING THE DATE AND TIME
- FORMATTING AN SD MEMORY CARD OR INTERNAL MEMORY
- USING THE LCD MONITOR
- SHOOTING IMAGES
- SETTING IMAGE RESOLUTION AND QUALITY
- USING THE ZOOM FUNCTION
- USING THE FLASH
- SETTING FOCUS
- BURST
- AUTO BRACKET
- SELF-TIMER
- ADJUSTING THE EXPOSURE (EV COMPENSATION)
- SETTING WHITE BALANCE
- VIEWING IMAGES
- MAGNIFYING IMAGES
- THUMBNAIL DISPLAY
- RECORDING MOVIE CLIPS
- PLAYING BACK MOVIE CLIPS
- PLAYING BACK STILL IMAGES/MOVIE CLIPS ON TV
- DELETING IMAGES/MOVIE CLIPS
- CONNECTING TO A PICTBRIDGE-COMPATIBLE PRINTER
- CONNECTING THE CAMERA TO THE PRINTER
- PRINTING IMAGES
- IN [PRINT] MODE
- IN [PRINT ALL] MODE
- IN [PRINT WITH DPOF] MODE
- STEP I: INSTALL THE USB DRIVER
- INSTALLATION ON WINDOWS 98 & 98SE
- INSTALLATION ON MAC OS
- STEP 2: CONNECT THE DIGITAL CAMERA TO YOUR COMPUTER
- STEP 3: DOWNLOAD IMAGES OR MOVIE CLIPS
- WINDOWS
- MACINTOSH
- INSTALLING NTI PHOTO SUITE (OPTIONAL)
- TO INSTALL NTI PHOTO SUITE
- STEP I: INSTALL THE PC CAMERA DRIVER
- STEP 3: RUN YOUR APPLICATION SOFTWARE (I.E. WINDOWS NETMEETING)
- TO USE WINDOWS NETMEETING FOR VIDEOCONFERENCING
- CAMERA MENU
- [FUNCTION] SETTINGS
- [IMAGE] SETTINGS
- MOVIE MENU
- PLAYBACK MENU
- SETUP MENU
Brand : ACER
Model : CE 6430
Category : Camera