
CS 6531 - Camera ACER - Free user manual and instructions
Find the device manual for free CS 6531 ACER in PDF.


| Product Type | Compact Digital Camera |
| Dimensions | 95.0 x 62.0 x 25.0 mm |
| Weight | 130 g (without batteries) |
| Power Source | 2 x AA batteries (Alkaline or NiMH) |
| Image Sensor | 6.1 Megapixel CCD |
| Optical Zoom | 3x (36-108mm equivalent) |
| Digital Zoom | 4x |
| LCD Screen | 2.0-inch TFT LCD, approx. 110k dots |
| Storage | SD/MMC card compatible (up to 2GB) |
| File Format | JPEG (still), AVI (video) |
| Interface | USB 2.0, AV out |
| Flash | Built-in; Auto, Red-eye, Fill, Off |
| Shooting Modes | Auto, Portrait, Landscape, Night Scene, Sports |
| Self-Timer | 2s, 10s |
| Exposure Compensation | ±2 EV in 1/3 steps |
| White Balance | Auto, Daylight, Cloudy, Fluorescent, Tungsten |
| Sensitivity (ISO) | Auto, 50, 100, 200 |
| Shutter Speed Range | 1/2000 – 8 seconds |
| Video Recording | 640x480 @ 30 fps with sound |
| Care and Cleaning | Clean lens with soft cloth; avoid moisture and extreme temperatures |
| Safety | Do not disassemble; remove batteries if not used for extended periods |
| Spare Parts and Repairability | Batteries, AC adapter (optional), USB cable; repairs by authorized service center |
| General Information | Entry-level compact camera for everyday photography |
Frequently Asked Questions - CS 6531 ACER
User questions about CS 6531 ACER
0 question about this device. Answer the ones you know or ask your own.
Ask a new question about this device
Download the instructions for your Camera in PDF format for free! Find your manual CS 6531 - ACER and take your electronic device back in hand. On this page are published all the documents necessary for the use of your device. CS 6531 by ACER.
USER MANUAL CS 6531 ACER
4 Front View 5 Rear View 7 Status LED Indicator 8 LCD Monitor Icons
10 GETTING STARTED
10 Attaching the Camera Strap 10 Inserting and Removing the Battery (Optional Accessory) 11 Charging the Battery 12 Inserting and Removing the SD Card (Optional Accessory) 13 Setting the Date and Time 14 Choosing the Language 15 Formatting the SD Card or Internal Memory 16 Setting Image Resolution and Quality
17 PHOTOGRAPHY MODE
17 [ ] Still Image Mode 18 Recording Voice Memos 18 Using the Optical Zoom 19 Using the Digital Zoom 20 Setting the Flash 22 Setting the Focus 23 Setting the Self-timer 24 Exposure Compensation/Backlight Correction 25 Setting the Scene Mode 27 Setting the Panorama Mode 27 [ ] Video Mode
28 [ ] PLAYBACK MODE
28 Playing Back Still Images
29 Playing Back Video Clips
31 Playing Back Still Images/Video Clips on a TV
32 Attaching Voice Memos
33 Thumbnail Display
34 Zoom Playback
35 Slideshow Display
36 Protecting Images
38 DPOF Settings
40 Resizing an Image
41 Compressing an Image
42 [ ] Erasing Images
44 MENU OPTIONS
44 Still Image Menu (Capture)
47 Still Image Menu (Function)
49 Video Menu (Capture)
50 Video Menu (Function)
51 Playback Menu
52 Setup Menu (In Photography Mode)
53 Setup Menu (In Playback Mode)
54 EDITING SOFTWARE INSTALLATION
54 Installing NTI Photo Suite
55 CAMERA SPECIFICATIONS
INTRODUCTION
Overview
Congratulations on your purchase of the new digital camera.
Capturing high-quality digital images is fast and easy with this state-of-the-art smart camera. Equipped with a 6.2 Mega pixel CCD, this camera is capable of capturing images with a resolution of up to 2816 x 2112 pixels.
Package Contents
Carefully unpack your camera and ensure that you have the following items.
Common Accessories:
■ Digital camera A/V cable ■ User's manual USB cable ■ Camera strap ■ Conversion adapter
Optional Accessories:
■ SD card ■ AC power adapter ■ Rechargeable lithium-ion battery ■ Software CD-ROM - Camera pouch
GETTING TO KNOW THE CAMERA
Front View

# Name Description
- Shutter button Focuses and locks the exposure of the camera when pressed halfway down, and capture the image when pressed all the way down.
- POWER button Turns the camera power on and off.
- Flash Provides flash illumination.
- Mode switch: Sets the camera mode.
Still image mode: Select this when capturing still images. Video mode: Select this when recording video clips. Playback mode: Performs image playback and deletion.
- Self-timer LED: Blinks red during Self-timer mode until the image is captured.
(AF auxiliary LED): Lights red for auto focusing when capturing in dark places.
- Speaker: Produces camera sounds and plays recorded audio.
- Lens: 3x optical zoom lens allows you to capture telephoto and wide-angle images.
- Conversion adapter: Allows you to connect the conversion adapter to an AC terminal power adapter to the camera to operate the camera without battery, or to charge rechargeable lithium-ion battery or to connect a USB cable or an A/V cable to the camera.
- Microphone: Records audio clips.
Rear View

# Name Description
- LCD monitor: Provides menu information to operate the camera, and previews the image before capturing it and review it afterwards.
- Display button: Turns the OSD display on and off.
- Status LED: Displays the camera's current state.
- Zoom in button: Zooms the lens to telephoto position. Zoom out button: Zooms the lens to wide-angle position.
- MENU button: Toggles OSD menu on and off.
- ☑ Erase button Allows you to erase the image.
- Strap holder Camera strap attachment.
- SET /Direction button Allows you to scroll through menus and image, and then select choices.
- Battery/SD card cover Allows access to the battery and insert or remove the memory card.
- Tripod socket Allows tripod mounting.
SET /Direction button

# Name Description
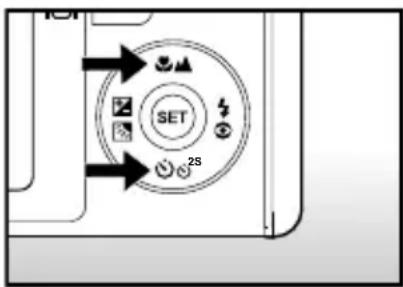
- ▲ button Scrolls upwards.
Focus button Allows you to choose the appropriate focus setting.
- ▶ button Scrolls right.
Flash button Allows you to choose the appropriate flash setting.
- ▼ button Scrolls downwards.
Self-timer button Allows you to toggle the self-timer on and off, selects the desired self-timer mode.
- button Scrolls left.
Exposure compensation Allows you to toggle the exposure / Backlight correction button compensation / backlight correction on and off.
- SET button: Enters the menu page and confirms the chosen setting.
Status LED Indicator
This describes the color and state of the status LED.
| Color | State | During power off | During photography | During connection to a PC |
| Green | On | - | Ready for shot. | System ready. |
| Red | On | Battery charging in progress. | When the image is not in focus. | - |
| Off | The completion of battery charge. | - | - | |
| Flashing | - | Accessing files in progress. Flash charging in progress. | Accessing files in progress. |
LCD Monitor Icons
Photography mode [ ] - Still image mode
- Zoom status
- Voice memo
- Remaining battery status
[ ] Full battery power [ ] Medium battery power [ ] Low battery power [ ] No battery power
- Flash icon
[5A] Auto [ ] Red-eye Reduction [ ♣ ] Forced Flash [③] Flash Off
- [ — ] Histogram
- Focus area (When the shutter button is pressed halfway)
- Capture mode icon
[Blank] Single
[ ] Continuous
[ AEB ] AEB
- Image size
[ ] 2816 x 2112 [ ] 2272 x 1704 [ ] 1600 x 1200 [ ] 640 x 480
- Possible number of shots
- Quality
[ ★★★ ] Fine [ ★★ ] Normal [ ★ ] Economy
- Date and time
- Self-timer icon
[💡 10s] 10 sec.
[💡 2s ] 2 sec.
[∅ 10+2s ] 10+2 sec.
- Unsteady hold warning icon
- [+] Exposure compensation
[ ] Backlight correction
- Metering icon
[ Blank ] Average
[□] Spot
- White balance icon
[Blank] Auto

[ ] Incandescent [ ] Fluorescent 1 [ ] Fluorescent 2 [ ] Day Light [◇] Cloudy [ M ] Manual
- Focus icon
[Blank] Auto focus
[ ] Macro [▲] Infinity
- Scene mode
[ A ] Auto [ ] Panorama [●] Portrait [●] Landscape [ ] Sports [★] Night [带] Candlelight [ ] Macro [ ] Sunset [\~] Sunrise [...] Splash Water [※] Fireworks
![ACER CS 6531 - Photography mode [ ] - Still image mode - 2](/content/2026/05/987464/images/5514b001dee023a23b4eb4cf474b1198ed77989e75f7383189e06ee8c6f802b8.jpg)
Each press of the □ button switches one step in the sequence of Normal display (displaying the icons, etc), Normal and Histogram, Composition Line display, No OSD display
Photography mode [ ]
- [ ]video mode
- Zoom status
- Remaining battery status
- Image size
- Possible recording time / elapsed time
- Quality
- Recording indicator
- Self-timer icon
- Focus icon

Playback mode [ ]-Still image playback
- Playback mode
- File number
- Folder number
- Protect icon
- Voice memo

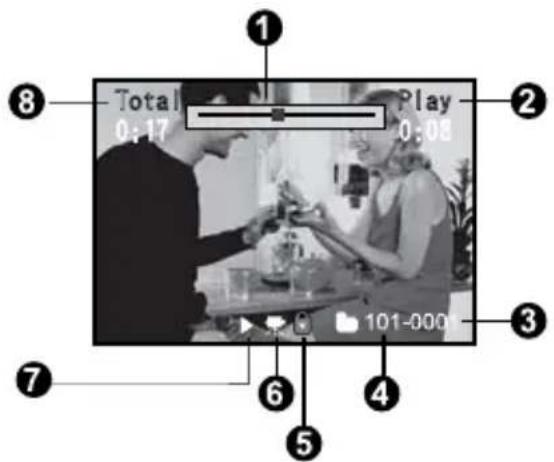
Playback mode [ ]-Video playback
- Video status bar
- Elapsed time
- File number
- Folder number
- Protect icon
- Video mode
- Playback mode
- Total time
GETTING STARTED
Attaching the Camera Strap
Attach the camera strap as shown in the illustration.


Inserting and Removing the Battery (Optional Accessory)
We highly recommend using the specified rechargeable lithium-ion battery (3.7V, 650mAh) to fully demonstrate this camera's functions. Charge the battery before using the camera. Make sure the camera is powered off before inserting or removing the battery.
Inserting the Battery
- Open the battery/SD card cover.
- Insert the battery in the correct orientation as shown. Tilt the battery lock lever in the direction of the arrow and orient the battery so that its label faces the rear side of the camera, then insert the battery.
- Close the battery/SD card cover.

Removing the Battery
Open the battery/SD card cover and release the battery lock lever. When the battery has come out a little, slowly pull it out the rest of the way.
Charging the Battery
Using the optional AC power adapter/charger may charge the battery or operate the camera as a power supply. Make sure the camera is powered off and then insert the battery before starting.
- Insert the conversion adapter into the conversion adapter terminal of the camera as shown in the illustration.
- Insert one end of the AC power adapter/charger into the DC IN terminal of the conversion adapter.
- Insert the other end of the AC power adapter/charger into a wall outlet.
The status LED lights red when charging starts and goes out when charging is completed. It is recommended to fully discharge or exhaust the battery before charging. Charging time varies according to ambient temperature and battery status.

This camera must be used with the specified AC power adapter/charger. Damage caused by the use of an incorrect adapter is not covered under the warranty. If charging does not start even after following the above procedure, turn the power on in any mode after the LCD monitor turns on, and then turn the power off. The battery may feel warm after charging or immediately after use. This is normal and not a malfunction. When using the camera in cold areas, keep the camera and battery warm by holding them inside your outer clothing. If you open the battery cover without removing the battery, the power will not be terminated. If you remove the battery, you must insert it again within 2 hours to ensure the date and time are not reset. We recommend charging the battery for 8 hours on first use. Always unplug the AC power adapter/charger from the power outlet before unplugging it from the camera. Make sure the AC power adapter/charger is always unplugged from the power outlet when not in use, as it consumes power even if no camera is connected, and may increase the risk of danger. Never expose the battery or AC power adapter to dripping or sprayed water. Moreover, never place objects or containers filled with liquids (for example, a vase) on the camera.

Inserting and Removing the SD Card (Optional Accessory)
The digital camera comes with approx. 16 MB of internal memory (10 MB for image storage), allowing you to store captured still images or movie clips in the digital camera. However, you can also expand the memory capacity by using an optional SD card so that you can store more files.
Inserting the SD card
- Open the battery/SD card cover.
- Insert the SD card in the correct orientation shown.
Hold the SD card with its front side (printed arrow) facing the rear side of the camera, and then insert the card as far as it can go.
- Close the battery/SD card cover.

Removing the SD card
Open the battery/SD card cover, press lightly on the edge of the SD card and it will eject.

To prevent valuable data from being accidentally erased from an SD card, you can slide the write-protect tab (on the side of the SD card) to "LOCK". To save, edit, or erase data on an SD card, you must unlock the card.

Be sure to format an SD card with this digital camera before using it. Refer to the section in this manual titled "Formatting the SD Card or Internal Memory" for further details.
Before inserting or removing the SD card, make sure that the power of the camera is off. The camera will automatically turn off when inserting or removing the SD card.
Setting the Date and Time
The date/time needs to be set if/when:
The camera is turned on for the first time. The camera is turned on after leaving the camera without the battery for an extended period of time.
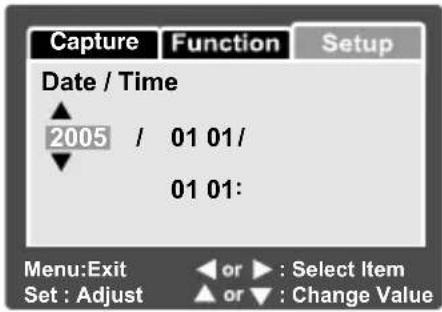
When the date and time information is not displayed on the LCD monitor, follow these steps to set the correct date and time.
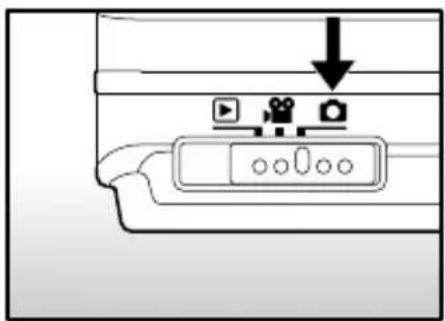
- Slide the mode switch to [
- Press the MENU button and select [Setup] menu with the ▶ button.
- Select [Date/Time] with the ▲ / ▼ buttons and press the SET button.
■ The Date/Time setting screen will be displayed.
- Select the item's field with the ◀/▶ buttons and adjust the value for the date and time with the ▲/▼ buttons.
■ The date and time is set in the order year-month-day-hour-minute. ■ The time is displayed in 24-hour format.
- After confirming all settings are correct, press the SET button.

Choosing the Language
Specify in which language menus and messages are to be displayed on the LCD monitor.
- Slide the mode switch to [ ] or [ ] or [ ].
- Press the MENU button and select [Setup] menu with the ▶ button.
- Select [Language] with the ▲ / ▼ buttons and press the SET button.
■ The Language setting screen will be displayed.
- Select the displayed language with the ▲ /
▼ buttons and press the SET button. ■ The setting will be stored.
![Capture Function Setup Beep On Fr No. Reset Next Menu Auto OFF 1Min. Date/Time Next Menu Sys. Reset Next Menu Language English USB PC Menu: Exit or : Select Page Set : Adjust or : Select Item [ ] Middle](/content/2026/05/987464/images/653e8786f2b69535772385a1c83c3a1b357bb798c4b18ab2f768c569f86fa0b2.jpg)

[▶] Mode
Formatting the SD Card or Internal Memory
This utility formats the internal memory (or memory card) and erases all stored images and data.
- Slide the mode switch to [ ▶ ].

- Press the MENU button and select [Setup] menu with ▶ button.
- Select [Format] with the ▲ / ▼buttons, then press the SET button.
- Select [Execute] with the ▲ / ▼buttons, and press the SET button.
■ To cancel formatting, select [Cancel] and press the SET button.



■ To format the internal memory, do not insert an SD card into the camera. Otherwise, you will format the SD card. - Formatting the SD card also erases the protected images. All data other than images are also erased. Before formatting the card, make sure that all the images are unnecessary. ■ Formatting is an irreversible action and data cannot be recovered at a later time. ■ An SD card having any problem cannot be properly formatted.
Setting Image Resolution and Quality
Resolution and quality settings determine the pixel size (dimension), image file size, and compression ratio for your images. These settings affect the number of images that can be stored. As you get to know the camera, it is recommended that you try each quality and resolution setting to get an appreciation for the effects that these settings will have on your images.
Higher resolution and higher quality images offer the best photographic results but produce large file sizes. Therefore, few images will take up a lot of memory space.
High resolution and quality settings are recommended for printed output and situations requiring the finest detail. Lower resolution/quality images take up less memory space and may be quite suitable for sharing images via e-mail, in a report, or on a web page.
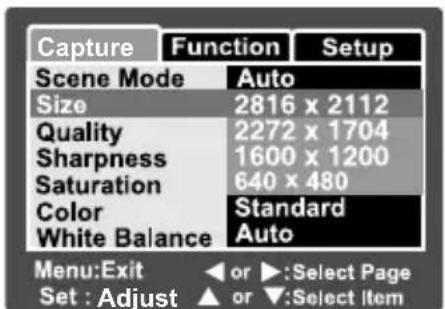
To change image resolution or image quality, perform these steps below:
- Slide the mode switch to [

- Press the MENU button.
■ [Capture] menu is displayed.
- Select [Size] with the ▲ / ▼ buttons, and press the SET button.
- Select the desired setting with the ▲ / ▼ buttons, and press the SET button.
- Select [Quality] with the ▲ / ▼ buttons, and press the SET button.
- Select the desired setting with the ▲ / ▼ buttons, and press the SET button.
- To exit from the menu, press the MENU button.
[Mode

[ ]Mode
PHOTOGRAPHY MODE
[ ] Still Image Mode
Your camera is equipped with a 2.5" TFT color LCD monitor to help you compose images, playback recorded images/movie clips or adjust menu settings.
- Press the POWER button to turn the power on.
- Slide the mode switch to [ ]
- Compose your image in the LCD monitor.
- Press the shutter button.
- Pressing the shutter button down halfway automatically focuses and adjusts the exposure, and pressing the shutter button down fully captures the images. ■ The focus area frame turns blue and the status LED lights green when the camera is in focus and the exposure is calculated. ■ When the focus or exposure is not suitable, the frame of the focus area turns yellow and the status LED turns red.
- If the photographic preview is set to "On", the captured image will be displayed while the image is being recorded onto the SD card/internal memory.

① Press down halfway
② Press down fully
Recording Voice Memos
A voice memo can be recorded once for 30 seconds at still image mode immediately following a still image captured.
- Slide the mode switch to [ ]
- Press the MENU button, and select the [Function] menu with the ▶ button. The [Function] menu is displayed.
- Select [Voice Memo] with the ▲ / ▼ buttons, and press the SET button.
- Select [On] with the ▲ / ▼ buttons, and press the SET button.

- Press the MENU button to exit from the menu.
The [ ] icon is displayed on the screen.
- Compose the image, press the shutter button down halfway, then press it down fully.
[VOICE RECORDING] is displayed on the screen immediately, and the voice memo recording starts.
- Press the shutter button one more time during recording, or wait for 30 seconds.
[VOICE RECORD END] will be displayed and the recording will end. A [icon] icon is displayed with images that have been recorded with a voice memo.

Voice memo is only available in [Single] capture mode. Voice memo is automatically fixed at [Off] in [Continuous] or [AEB] capture mode.
Using the Optical Zoom
Zoom photography allows you to capture zoom images up to 3 times the size or wide-angle photography depending on the distance up to the subject. You can also enlarge the center of the screen and capture images in the digital zoom mode.
- Slide the mode switch to [ ] or [ ]
- Compose the image with the zoom button.
- Pressing the □ button zooms in on the subject, and enlarges the subject on the LCD monitor.
- Pressing the button provides a wider angle image.
■ The lens position moves according to the zoom button setting.

- Press the shutter button down halfway, then press it down fully.
Using the Digital Zoom
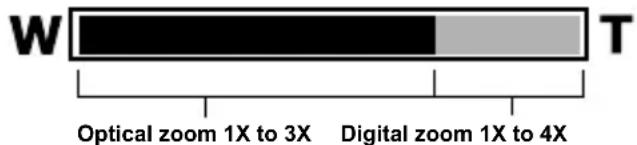
Using a combination of 3 times optical zoom and 4.0 times digital zoom permits zoom photography of up to 12 times to suit the subject and the distance. The digital zoom is a compelling feature, the more an image is enlarged (zoomed), the more pixelated (grainier) the image will appear.
- Slide the mode switch to [ ] or [ ]
- To enable the digital zoom:
a. Press the MENU button. b. Select [Function] with the ◀ / ▶ buttons. c. Select [Digital Zoom] with the ▲ / ▼ buttons, and press the SET button. d. Select [On] with the ▲ / ▼ buttons again, and press the SET button. e. Press the MENU button to exit from the menu screen
f. To activate the digital zoom, press and hold the 📄 button completely until the image on the LCD monitor expands.
- Press the shutter button to capture a "zoomed" image.

■ The zoom setting is automatically cancelled by either turning the camera off or the activation of the Auto OFF function.
Setting the Flash
Set the flash for capturing images. The flash firing mode can be set to suit the photographic conditions.
- Slide the mode switch to [ ]
- Toggle the 🔍 button to select the desired flash mode.

The available flash settings in different photography modes:
| A | ∅ | ∅ | ∅ | ||
| Scene Mode | Auto | ○ | ○ | ○ | ○ |
| Panorama | ○ | ○ | ○ | ○ | |
| Portrait X XX | ○ | ||||
| Landscape X X X | ○ | ||||
| Sports X X X | ○ | ||||
| Night | ○ | ○ | ○ | ○ | |
| Candlelight X X X | ○ | ||||
| Macro X X X | ○ | ||||
| Sunset X X X | ○ | ||||
| Sunrise X X X | ○ | ||||
| Splash Water | ○ | ○ | ○ | ○ | |
| Fireworks X X | X | ○ | |||
| Capture Mode | Single | ○ | ○ | ○ | ○ |
| Continuous X X X | ○ | ||||
| AEB X X X | ○ | ||||
| Focus Mode | Auto | ○ | ○ | ○ | ○ |
| Macro | ○ | ○ | ○ | ○ | |
| Infinity | ○ | ○ | ○ | ○ | |
* This table is for reference only and varies according to different combinations of photography modes. * ○: Available X: Unavailable
The available flash settings in different photography modes:
| Flash mode Description | |
| [ A ] Auto The flash fires a | automatically to suit the photographic conditions. |
| [ ]Red-eye Reduction U | se this mode to reduce the red-eye phenomenon when you want to capture natural-looking images of people and animals in low-light conditions.When capturing images, the red-eye phenomenon can be reduced by asking the subject (person) to look at the camera or get as close to the camera as possible.The flash always fires twice, and the image is captured at the second firing. |
| [ ] Forced Flash In this mode, the flash always fires. Use this mode for photographing under artificial light such as backlighting. | |
| [ ② ] Flash off Use this mode when capturing images using indoor lighting, for stages and indoor competitions, and when the subject is too far away for the flash to be effective. | |
Setting the Focus
Images can be captured with the distance to the subject set by auto focus, [ ] macro or [ ▲infinity.
- Slide the mode switch to [ ] or [ ,
- Toggle the ⚪/▲ button to select the desired focus mode.

The table below will help you choose the appropriate focus mode:
| Focus mode Description | |
| [ Blank]Auto Focus | Selects this when you want to leave the settings up to the camera so that you can capture images without paying attention to settings.Approximately 50 cm to infinity (both Wide and Tele) |
| [ ] Macro | Selects this when you want to capture a close up image.Wide (zoom off) : Approximately 6 cm to infinityTele (at optical zoom 3x) : Approximately 35 cm to infinity |
| [ ] Infinity Selects | this when you want to capture images of subjects at a distance of infinity. |
Setting the Self-timer
This setting allows images to be captured with the self-timer.
- Slide the mode switch to [ ] or [ ,
- Toggle the ⏻ 2s button to select the setting.
■ For the [ ] mode.
![OFF→[ ◎ 10s] 10 sec.→[ ◎ 2s ] 2 sec. ← [ ◎ 10+2s ] 10+2 sec.](/content/2026/05/987464/images/30c110c86fa636697c1425c7472fb41128482f0a3e6bb31d458c8ae02a33b6da.jpg)
![■ For the [ ] mode. OFF→[ 10s ] 10 sec.→[ 2s ] 2 sec.](/content/2026/05/987464/images/90d1d3b3a60aadf936556bd7f89ff51a1f30895b38d909385071bebc2183a4c9.jpg)

- Compose the image, press the shutter button down halfway, then press it down fully.
■ The self-timer LED flashes and the image is captured after the preset time has elapsed. ■ The countdown is displayed on the LCD monitor. ■ To cancel the self-timer during operation, press the shutter button halfway.
The table below will help you choose the appropriate self-timer mode:
| Self-timer mode Description | |
| [ Tunisia 10s] 10 sec. | The image is captured about 10 seconds after the shutter button is pressed. |
| [ Tunisia 2s] 2 sec. | The image is captured about 2 seconds after the shutter button is pressed. |
| [ Tunisia 10+2s]10+2 sec. | One image is captured about 10 seconds after the shutter button is pressed, and the other image is captured again after 2 seconds. This is convenient when capturing group images in succession. |
Exposure Compensation/Backlight Correction
Images can be captured with the overall screen intentionally made brighter or darker. These settings are used when a suitable brightness (exposure) cannot otherwise be obtained in circumstances where the difference in brightness between the subject and the background (the contrast) is large, or when the subject that you want to photograph is very small within the screen. Exposure can be set in 0.3 EV units.
- Slide the mode switch to [ ] and press the 📋 button.
■ Each press of the button displays the setting in the order of [Blank], [ ] Backlight Correction, and [ ] Exposure Compensation.
- Set the exposure value with the ▲ / ▼ buttons.
- Press the ▲ button to increase the value.
- Press the ▼ button to decrease the value. ■ The setting range of the exposure compensation is as follows.
- 2. 0, - 1. 7, - 1. 3, - 1. 0, - 0. 7, - 0. 3, 0, + 0. 3, + 0. 7, + 1. 0, + 1. 3, + 1. 7, + 2. 0
■ Press the button to confirm the setting.
The larger the value, the brighter the image. The smaller the value, the darker the image. The set value is displayed on the screen.

Effective Subjects and Set Values
+ (positive) compensation
* Printed matter comprising black text on whitish paper * Backlighting * Bright scenes or strong reflected light such as ski slopes * When the sky accounts for a large area on the screen
- (negative) compensation
* People illuminated by a spotlight, in particular, against dark background * Printed matter comprising white text on blackish paper * Weak reflecting bodies such as evergreen trees or darkish leaves
Backlight correction (+1.3, fixed)
* When the background is bright and the subject is dark. * When subjects (people) have a light source such as the sun to their backs.
Setting the Scene Mode
By simply selecting one of the following 12 modes, you can capture the image with most appropriate settings.
- Slide the mode switch to [ ]
a. Press the MENU button. b. Select [Scene Mode] with the ▲/▼ buttons, and press the SET button. c. Select the desired scene mode with the ▲/▼ buttons, and press the SET button.
- Compose the image, press the shutter button down halfway, and then press it down fully.
The table below will help you choose the appropriate scene mode:
| Scene mode | Description |
| [A] Auto Camera automatically determines settings needed for the best picture. | |
| [IMAGE]Panorama To create 360° panoramic images. | |
| [IMAGE] Portrait To photograph a person and blur out the background. | |
| [IMAGE]Landscape To photograph mountains, forests or other landscape scenery rich in color. | |
| [IMAGE]Sports To photograph fast-moving objects. | |
| [IMAGE] Night | To photograph scenes at night. |
| [IMAGE] Candlelight | Softer focus and daylight white balance (tripod use suggested). |
| [IMAGE] Macro | For close-up photography. |
| [IMAGE] Sunset | Small aperture setting and daylight white-balance, ideal for use where shades of red are prominent. |
| [IMAGE] Sunrise | High color saturation and deeper red shades. |
| [IMAGE] Splash Water | Fast shutter speed. |
| [IMAGE] Fireworks | Small aperture setting and slow shutter speed (tripod use suggested). |
The available capture menu in scene mode:
| Auto | Panorama | Portrait | Landscape | Sports | Night | Candlelight | Macro | Sunset | Sunrise | Splash Water | Fireworks | |
| Size | ○ | ○ | ○ | ○ | ○ | ○ | ○ | ○ | ○ | ○ | ○ | ○ |
| Quality | ○ | ○ | ○ | ○ | ○ | ○ | ○ | ○ | ○ | ○ | ○ | ○ |
| Sharpness | ○ | ○ | X | X | X | X | X | X | X | X | X | X |
| Saturation | ○ | ○ | X | X | X | X | X | X | X | X | X | X |
| Color | ○ | ○ | X | X | X | X | X | X | X | X | X | X |
| White Balance | ○ | ○ | X | X | X | X | X | X | X | X | X | X |
| Manual WB | ○ | ○ | X | X | X | X | X | X | X | X | X | X |
| ISO | ○ | ○ | X | X | X | X | X | X | X | X | X | X |
| Metering | ○ | ○ | X | X | X | X | X | X | X | X | X | X |
* : Available X: Unavailable
This mode is designed to make it easier to take a series of shots and then stitch them together with software to make a single photo. You can capture a photographic subject that won't fit into a single frame, such as a landscape, and stitch it together later with a program such as Cool 360 or Photoshop application.
- Slide the mode switch to [ ]
a. Press the MENU button. b. Select [Scene Mode] with the ▲ / ▼ buttons, and press the SET button. c. Select [Panorama] with the ▲ / ▼ buttons, and press the SET button.
- Shoot the first image.
■ The next image appears beside the previous image.
- Orient the camera so that the second frame overlaps a small portion of the photographic subject of the first image and press the shutter button to capture the next image.
- Follow the same steps to capture subsequent images in the sequence.
- Finish the sequence by pressing the MENU button or switch to another mode after the last image has been recorded.
[ ] Video Mode
This mode allows you to record video clips at a resolution of 320 x 240 / 640 x 480 pixels. You can select whether audio is recorded or not.
- Slide the mode switch to [ ]
- Compose the image with the zoom button.
- Press the shutter button.
■ The recording of the video clip will start. - Pressing the shutter button one more time will end the recording of the video clip. ■ The recording time depends on the storage size and the subject of the image to be recorded. ■ Zoom function cannot be used during video recording.
NOTE![ACER CS 6531 - [ ] Video Mode - 1](/content/2026/05/987464/images/b98819721068ef12b3abd28531a3590d62afea4f320948ccafa7676edd1294c8.jpg)
■ When recording a video clip, flash photography is not possible. ■ The available Capture menu options are: [Size], [Quality] and [Color]. ■ The available Function menu options are: [Audio], [LCD Bright.] and [Digital Zoom].
[ ] PLAYBACK MODE
Playing Back Still Images
You can play back the still images on an LCD monitor.
- Slide the mode switch to [ ▶ ].
■ The last image appears on the screen.
- The images can be fed in reverse or fed forward with the ◀/▶ buttons.
■ To view the previous image, press ◀.
■ To view the next image, press ▶.
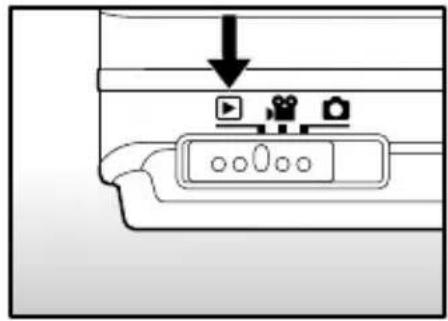
Image Display Information
You can switch the state of the information display by pressing the □ button when playing back images. Each press of the □ button switches the information display state in the following order:
![graph LR A["100:2015"] --> B[" "] B --> C[" "] C --> D["1990:2016 16:13 183.963"] D --> E["1990:2016 16:13 183.963"]](/content/2026/05/987464/images/4e1630f1b563998fe589972c365865d22ec7ec2180dfb2d0cc7ff1c2ae3fb10d.jpg)


- Pressing the ▲ / ▼ buttons during image playback will result in a 90 degree rotated display. The ▼ button rotates the image clockwise and displays it, whereas the ▲ button rotates the image counterclockwise and displays it. A press of the button opposite to the direction in which the image was rotated will return the image to the normal display. ■ [icon is displayed with the video data. Video clips cannot be rotated. ■ A [ ] icon is displayed with images which have an audio memo recorded. ■ Press the SET button to playback the voice memo data.
Playing Back Video Clips
You can play back video clips recorded on the LCD monitor. You can also play back sound if you recording with the audio.
- Slide the mode switch to [ ▶ ].
The last image appears on the screen.
- Select the desired video clip with the ◀/▶ buttons.
- Press the SET button.
- A press of the ▶ / ◀ buttons during playback allows fast forward play / fast reverse play. ■ To stop video playback, press the ▼ button.
This stops playback and returns to the start of the video clip.
■ To pause video playback:
Press the SET button.
This pauses video playback.
To cancel pause, press the SET button again.
Button Operations
| During Playback During a Pause During a Stop | |||
| ▶button | Forward playEach press of the ▶ button moves the operation one step in the sequence of 4 times fast forward play, and regular play. | - | The next image is displayed. |
| ◀button | Reverse playEach press of the ◀ button moves the operation one step in the sequence of 4 times fast reverse play, and regular play. | - | The pervious image is displayed. |
| ▼button | Stop (The display returns to the 1st frame playback) | - | |
| SETbutton | Pause | Canceling pause | Regular forward play |

■ Video clips cannot be displayed rotated or enlarged. ■ The playback information will not be displayed on the LCD monitor with video clips.
Playing Back Still Images/Video Clips on a TV
You can also playback your images on a TV screen. Before connecting to any devices, make sure to select NTSC / PAL system to match the video output system of the video equipment you are going to connect to the camera, then turn all connected devices off. It is also recommended to use the AC power adapter/charger while transferring the recorded images and video files.
- Slide the mode switch to [ ▶ ].
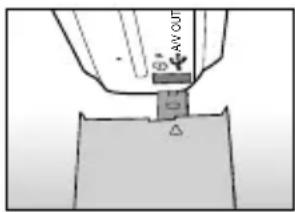
- Connect one end of the A/V cable to the conversion adapter terminal of the camera. ■ If you use the conversion adapter to connect the A/V cable, insert the conversion adapter into the conversion adapter terminal of the camera first, and then connect one end of the A/V cable to the A/V terminal of the conversion adapter.
- Connect the other end to the A/V input socket of the TV set.
- Turn the TV and camera on.
- Play back the still images / video clips.
■ The method of operation is the same as playing back still images and video clips on the camera.



■ Refer to section in this manual titled “Video Output” in the Setup Menu (In Playback Mode) for further details.
Attaching Voice Memos
A maximum of 30 seconds of audio can be recorded like a memo for photographed still images. The voice memo can be recorded only once.
- Slide the mode switch to [ ▶ ].
■ The last image appears on the screen.
- Select the image that you want to attach the voice memo with the /▶ buttons.
- Press the shutter button.
■ [VOICE RECORDING] is displayed on the screen and recording starts.
- To stop recording voice memo during recording, press the shutter button again.
■ [VOICE RECORD END] will be displayed and the recording will end. A [icon] icon is displayed with images that have been recorded with a voice memo.
Playing back voice memo
A press of the SET button displays [VOICE PLAYBACK] and plays back the voice memo.

■ Voice memo is only available for still images.
Thumbnail Display
This function allows you to view 9 thumbnail images on the LCD monitor at the same time, which can quickly search for the image that you want.
- Slide the mode switch to [ ▶ ].
The last image appears on the screen.
- Press the 🏠 button.
The images are displayed in the thumbnail display.
Images that have been selected with the ▲/▼/◀ buttons will be indicated by a green frame.
When there are ten or more images, scroll the screen with the ▲/▼ buttons.
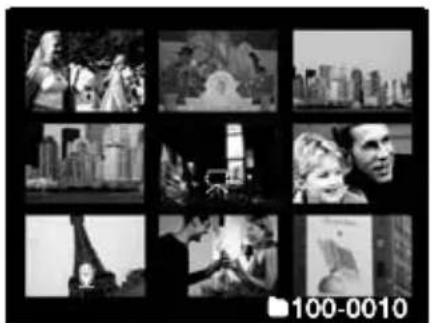
- Press the ▲/▼/◀/▶ buttons to select the image to be displayed at regular size.
- Press the SET button.
The selected image is displayed at its regular size.

A [图标], [图标], [图标] icon will be displayed in a thumbnail display.
Zoom Playback
This mode also allows you to enlarge your image on the selected portion of the image to check for small details.
- Slide the mode switch to [ ▶ ].
- Press the ◀/▶ buttons to select the image you want to enlarge.
You can also select the image you want to enlarge from the thumbnail display.
- Adjust the zoom ratio with the / buttons.
- Pressing the ▶ button enlarges the image. ■ To return to normal magnification, press the 📁 button. ■ The image is displayed enlarged, and the magnification factor is displayed on the LCD monitor.
- Press the ▲ / ▼ ↕ buttons to select the area to enlarge.
- To return to regular display, toggle the 🎯 button until the regular display appears on the screen.

■ The range of magnification factor is from 1x to 4x in 0.5x increments.

Slideshow Display
The slideshow function enables you to playback your still images automatically in order one image at a time.
- Slide the mode switch to [ ▶ ].
- Press the MENU button.
■ The playback menu is displayed.
- Select [Slide Show] with the ▲/▼buttons, and press the SET button.
The slideshow starts.

- Set the playback interval with the ▲ / ▼ buttons, then press the SET button.
- To stop the slide show during playback, press the SET button.
The image is displayed on the screen when you press the SET button.

The Auto OFF function does not operate during slide show. All still images in the folder are automatically played back. Video clips are displayed the first frame image, and they are not played back. You can adjust the slide show display interval within the range of 3 sec., 5 sec., 10 sec. Slideshow display is only activated when more than 2 images are stored in the SD card/internal memory.
Protecting Images
Set the data to read-only to prevent images from being erased by mistake.
Protecting Images
- Slide the mode switch to [
- Select the image that you want to protect with the ◀ / ▶ buttons.

- Press the MENU button.
The playback menu is displayed.
- Select [Protect] with the ▲ buttons, and press the SET button.
- Select [Single] or [All] with the ▲ / ▼ buttons, and press the SET button.
- Select [Set] with the ▲ / ▼ buttons, and press the SET button.
■ Protect is executed and the camera returns to the playback mode.


■ The protect icon [ ] is displayed with protected images. When [All] has been selected, [ ] is displayed with all the images.
Canceling the Protection
To cancel protection for only one image, display the image that you want to remove the image protection.
- Select [Protect] with the ▲ / ▼ buttons from the playback menu, and press the SET button.
- Select [Single] or [All] with the ▲ / ▼ buttons, and press the SET button.
- Select [Cancel Protect] with the ▲ / ▼ buttons, and press the SET button.
■ The removal of image protection is executed and the camera returns to the playback mode.
Protecting multiple images simultaneously
- Select [Protect] with the ▲ / ▼ buttons from the playback menu, and press the SET button.
- Select [Select] with the ▲ / ▼ buttons, and press the SET button.
■ The images are displayed in the thumbnail display.
- Select the image you want to protect with the ▲ / ▼ / ↕ buttons, and press the □□ button.
■ The protect icon [🔍] is displayed with protected images. Selecting a protected image and pressing the □ button again will cancel the protection. This procedure is repeated to select multiple images.
- Press the SET button.
■ Protection and cancellation of protection are executed and the camera returns to playback mode.

■ Formatting the SD card undoes the protection and erases all images.
DPOF Settings
DPOF is the abbreviation for Digital Print Order Format, which allows you to embed printing information on your memory card. You can select the images to be printed and how many prints to make with the DPOF menu in the camera and insert the memory card into a card-compatible printer. When the printer starts printing, it will read the embedded information on the memory card and print the specified images.
- Slide the mode switch to [ ▶ ].
- Select the image that you want to set DPOF with the ◀ / ▶ buttons.
- Press the MENU button.
■ The playback menu is displayed.
- Select [DPOF] with the ▲/▼ buttons, and press the SET button.
■ The DPOF setting screen is displayed.
- Select [Single] or [All] with the ▲ / ▼ buttons, and press the SET button.
■ Single: Sets DPOF for each individual image.
■ All: Sets DPOF for all images at once.
- Single: Sets DPOF for each individual image. - All: Sets DPOF for all images at once.
- Select [Print Num.] with the ▲/▼ buttons, and press the SET button.
■ This displays the number of prints setting screen.
- Set the number of prints with the ▲ / ▼ buttons, and press the SET button.
■ You can set up to 9 prints for each image.


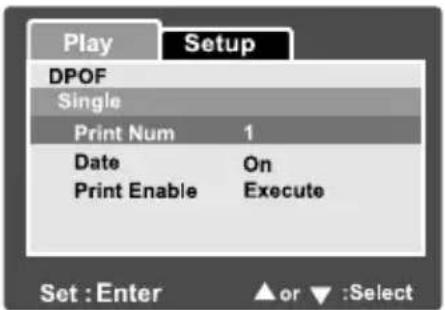
- Select [Date] with the ▲ / ▼ buttons, and press the SET button.
■ The date setting screen appears.
- Select date to [On] or [Off] with the ▲ / ▼ buttons, and press the SET button.
■ On: The date of the photograph will also be printed. ■ Off: The date of the photograph will not be printed.
- Select [Print Enable] with the ▲ / ▼ buttons, and press the SET button.
- Select [Execute] with the ▲ / ▼ buttons, and press the SET button.
- This creates a file containing the DPOF information, and when the operation is finished, the screen returns to the playback mode.

- The date that is printed on the photo is the date set on the camera. To print the correct date on the photo, set the date on the camera before you photograph the image. Refer to the section in this manual titled “Setting the Date and Time” for further details. ■ Before you perform the DPOF settings on your camera, always remember to copy your images from the internal memory to an SD card first. ■ The DPOF function is only activated when an SD card is inserted into the camera and saved images captured by this camera.
Resizing an Image
Resizes a previously saved image.
Resizing replaces the original image with the changed image. Only resizing to a smaller size is available.
The following images cannot be resized:
■ Image size (640 x 480) ■ Image captured with another camera ■ Protected images ■ Video clips ■ Images cannot be resized when the SD card is write-protected

- Select the image that you want to resize.
- Press the MENU button.
- Select [Resize] with the ▲/▼ buttons, and press the SET button.
- Select the image size that you want to change with the ▲/▼ buttons, and press the SET button.
■ To quit resizing, press the MENU button. ■ When resizing ends, the screen returns to playback mode.
NOTE
- It is possible to reduce the size of an image. It is not possible to increase the size of an image, or to restore size after it has been decreased.
Compressing an Image
Changes the quality (compression rate) of a recoded image.
Compresses images down to half of their size or more, overwrites an old size images with a newly compressed image. Only quality changing to the lower quality level is available.
The following images cannot be resized:
■ (Economy) quality images ■ Images captured with other camera ■ Protected images ■ Video clips ■ Images cannot be changed quality when the SD card is write-protected

- Select the image that you want to change its quality.
- Press the MENU button.
- Select [Quality Change] with the ▲ / ▼ buttons, and press the SET button.
- Select the image size that you want to change with the ▲ / ▼ buttons, and press the SET button. ■ To quit compression, press the MENU button. ■ When compression ends, the screen returns to playback mode.
[ ] Erasing Images
Erasing at Photography Mode (Quick Delete Function)
Quick delete function enables you to erase the image during photography. The quick delete menu provides you to directly erase the last image without further settings.
- Slide the mode switch to [ ] or [ ]
- Press the 📋 button.
■ The last image and quick delete menu appear on the screen.
- Press the SET button to erase the image.
To not erase, select [Cancel], and press the SET button.


Erasing at Playback Mode
Erasing single image / Erasing all images
- Slide the mode switch to [ ▶ ].
The last image will be displayed on the screen.
- Select the image you want to erase with the ◀ / ▶ buttons.
- Press the 📋 button.
The deletion menu will be displayed.
- Select [Single] or [All] with the ▲ /▼ buttons, and press the SET button.
Single: Erases the selected image or the last image. All: Erases all of the images on the SD card except for the protected images. Select: Erases a number of selected images.
- Select [Execute] with the ▲ / ▼ buttons, and press the SET button.
To not erase, select [Cancel], and press the SET button.


Even if you capture images after erasing an image, the file number is assigned the next number of the very last one before the image was erased.
Erasing selected images
This erases a number of selected images.
- Slide the mode switch to [ ▶ ].
- Press the 📋 button.
The deletion menu will be displayed.
- Select [Select] with the ▲/▼ buttons, and press the SET button.
The images are displayed in the thumbnail display.
- Select the image you want to erase with the ▲/▼ ↕ buttons, and press the button.


The [icon will be displayed. One more press of the erase button will cancel the operation. Repeat this procedure and select all the images that you want to erase.
- Press the SET button.

To delete the image in internal memory, do not insert an SD card into the camera. Otherwise, you will delete the image in an SD card.
MENU OPTIONS
Still Image Menu (Capture)
This menu is for the basic settings to be used when capturing still images.
- Slide the mode switch to [ ]
- Press the MENU button. ■ [Capture] menu is displayed.
- Select the desired [Capture] option item with the ▲ / ▼ buttons, and press the SET button to enter its respective menu.
- Select the desired setting with the ▲ / ▼ buttons, and press the SET button.
- To exit from the menu, press the MENU button.


NOTE
■ The unavailable menu options are in gray color.
Scene Mode
Refer to section in this manual titled “Setting the Scene Mode” for further details.
Size
This sets the size of the image that will be captured.
* [ ] 2816 x 2112 * [ ] 2272 x 1704 * [ ] 1600 x 1200 * [ ] 640 x 480
Quality
This sets the quality (compression rate) at which the image is captured.
* [★] Fine * [★]★ Normal * [★] Economy
Sharpness
This sets the sharpness of the image that will be photographed.
* Hard / Normal / Soft
Saturation
This sets the saturation of the image that will be captured.
* High / Normal / Low
Color
This sets the color of the image that will be photographed.
* Standard / Vivid / Sepia / Monochrome
White Balance
This sets the white balance capturing under a variety of lighting conditions and permits images to be captured that approach the conditions that are seen by the human eye.
* [Blank] Auto * [ ] Incandescent * [ ] Fluorescent 1 * [ ] Fluorescent 2 * [ ] Day Light * [ ] Cloudy * [M] Manual
Manual WB
This manually sets the white balance and stores it. This is convenient when the white balance does not offer a good match.
Before selecting [Execute], determine the subject (such as a white paper) that will be used to set the white balance.
* Cancel / Execute
ISO
This sets the sensitivity for capturing images. When the sensitivity is raised (and the ISO figure is increased), photography will become possible even in dark locations, but the more pixelated (grainier) the image will appear.
* 50 / 100 / 200 / 400 / Auto
Metering
This sets the metering method for calculating the exposure.
* [Blank] Average: Averages the light metered from the entire frame, but gives greater weight to the subject matter at the center.
* [●] Spot: A very small portion of the center of the screen is measured, and the exposure is calculated.
Still Image Menu (Function)
- Slide the mode switch to [
- Press the MENU button, and select the [Function] menu with the ▶ button. ■ [Function] menu is displayed.

- Select the desired [Function] option item with the ▲ / ▼ buttons, and press the SET button to enter its respective menu.
- Select the desired setting with the ▲ / ▼ buttons, and press the SET button.
- To exit from the menu, press the MENU button.
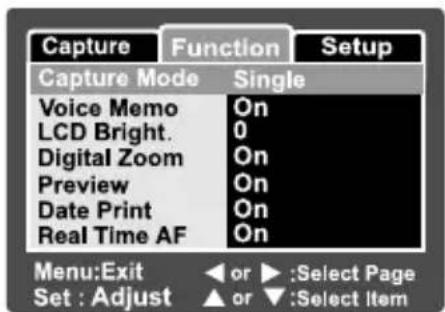
Capture Mode
This sets the recording method at the time of capturing images.
* [Blank] Single: Capture an image at a time. * [ ] Continuous: Permits continuous photography of 3 images max.
* [AEB] AEB: Permits 3 consecutive images in the order of standard exposure, underexposure and overexposure compensation.

■ In [Continuous] and [AEB] capture mode, the voice memo is automatically fixed at [Off].
Voice Memo
Refer to section in this manual titled "Recording Voice Memos" for further details.
* On / Off

■ When [Voice Memo] is set to [On], the preview setting is also fixed at [On].
LCD Bright.
Select a brightness level for the LCD monitor. The LCD becomes brighter with the ▲ button and darker with the ▼ button. The adjustment range is from -5 to +5.

Digital Zoom
This sets whether or not to use digital zoom at the time of photography.
* On / Off
Preview
This sets whether or not to display the captured image on the screen immediately after the image is captured.
* On / Off

■ When [Preview] is set to [Off], [Voice Memo] setting is also fixed at [Off].
Date Print
The date of recording can be printed directly on the still images. This function must be activated before the image is captured.
* On / Off

Real Time AF
This sets the Real Time Focus function at image capture preview mode.
* On / Off
Video Menu (Capture)
This menu is for the basic settings to be used when recording video clips.
- Slide the mode switch to [ 🔧 ].
- Press the MENU button.
■ [Capture] menu is displayed.
- Select the desired [Capture] option item with the ▲ / ▼ buttons, and press the SET button to enter its respective menu.
- Select the desired setting with the ▲ / ▼ buttons, and press the SET button.
- To exit from the menu, press the MENU button.

Size
This sets the size of the image that will be photographed.
* [ ] 640 x 480 * [ 320 x 240
Quality
This sets the quality (compression rate) at which the image is captured.
* [★Fine * [★Normal
Color
Refer to the section in this manual titled "Color" in "Still Image Menu (Capture)" for further details.
Video Menu (Function)
- Slide the mode switch to [
- Press the MENU button, and select the [Function] menu with the ▶ button. ■ [Function] menu is displayed.
- Select the desired [Function] option item with the ▲ / ▼ buttons, and press the SET button to enter its respective menu.
- Select the desired setting with the ▲ /▼ buttons, and press the SET button.
- To exit from the movie menu, press the MENU button.


Audio
This sets whether or not to record audio at the time of video recording.
* On / Off
LCD Bright.
Refer to section in this manual titled “LCD Bright.” in Still Image Menu (Function) for further details.
Digital Zoom
Refer to section in this manual titled "Digital Zoom" in Still Image Menu (Function) for further details.
Playback Menu
In the [ ] mode, set which settings are to be used for playback.
- Slide the mode switch to [ ▶ ].
- Press the MENU button.
The playback menu is displayed.
- Select the desired option item with the ▲/▼ buttons, and press the SET button to enter its respective menu.
- Select the desired setting with the ▲/▼ buttons, and press the SET button.
- To exit from the menu, press the MENU button.
NOTE

The unavailable menu options and settings are in gray color.
Slide Show
Refer to section in this manual titled "Slideshow Display" for further details.
DPOF
Refer to section in this manual titled "DPOF Settings" for further details.
Protect
Refer to section in this manual titled "Protecting Images" for further details.
LCD Bright.
Refer to section in this manual titled "LCD Bright." in Still Image Menu (Function) for further details.
Resize
Refer to the section in this manual titled “Resizing an Image (Resize)” for further details.
Quality Change
Refer to the section in this manual titled “Compressing an Image (Quality Change)” for further details.
Copy to Card
Allows you to copy your files from the digital still camera's internal memory to a memory card. Of course, you can only do this if you have a memory card installed and some files in internal memory.
* Cancel / Execute
Setup Menu (In Photography Mode)
Set your camera's operating environment.
- Slide the mode switch to [ ] or [ ]
- Press the MENU button, and select the [Setup] menu with the ▶ button. ■ [Setup] menu is displayed.
- Select the desired [Setup] option item with the ▲ / ▼ buttons, and press the SET button to enter its respective menu.
- Select the desired setting with the ▲ / ▼ buttons, and press the SET button.
- To exit from the menu, press the MENU button.

Beep
This sets whether or not to mute the camera sound each time you press the camera button.
* On / Off
Fr. No. Reset
This creates a new folder. The photographed images are recorded to the newly created folder from number 0001.
* Cancel / Execute
Auto OFF
If no operation is performed for a specific period of time, the power to the camera is automatically turned off. This feature is useful to reduce battery wear.
* 1 Min. / 2 Min. / 3 Min. / Off
Date/Time
Refer to section in this manual titled "Setting the Date and Time" for further details
Sys. Reset
This returns all basic settings to the camera's default settings. The time setting will not be reset.
* Cancel / Execute
Language
Refer to section in this manual titled "Choosing the Language" for further details.
USB
This sets USB mode when connecting to your computer at any camera mode.
* PC / PC Camera
Setup Menu (In Playback Mode)
- Slide the mode switch to [ ]
- Press the MENU button, and select the [Setup] menu with the ▶ button. ■ [Setup] menu is displayed.
- Select the desired [Setup] option item with the ▲ / ▼ buttons, and press the SET button to enter its respective menu.

- Select the desired setting with the ▲ / ▼ buttons, and press the SET button.
- To exit from the menu, press the MENU button.
Beep
Refer to the section in this manual titled "Beep" in the Setup Menu (in Photography Mode) for further details.
Format
Refer to the section in this manual titled "Formatting the SD Card or Internal Memory" for further details.
Fr. No. Reset
Refer to the section in this manual titled "Fr. No. Reset" in the Setup Menu (in Photography Mode) for further details.
Card Info.
This displays the free capacity of the SD card. If the SD card is not inserted, "NO CARD" message is displayed on the screen.
System Info.
This displays the firmware version of the camera.
Language
Refer to the section in this manual titled "Choosing the Language" for further details.
Video Output
This sets the video output system of the video equipment that you are going to connect to the camera.
* NTSC / PAL
EDITING SOFTWARE INSTALLATION
Installing NTI Photo Suite
PC users will find that NTI Photo Suite is a very user-friendly image-editing program. With NTI Photo Suite, you can retouch, compose, and organize your images. It includes a variety of templates, such as photo frames, birthday cards, calendars and more. Get your images ready and explore this amazing program.
To install NTI Photo Suite:
- Insert the CD-ROM that came with the camera into your CD-ROM drive. The welcome screen appears.
- Click "INSTALL NTI PHOTO SUITE". Follow the on-screen instructions to complete the installation.

■ To use NTI Photo Suite to edit and retouch your recorded images, please refer to the on-line help. - For Windows 2000/XP users, please make sure to install and use the NTI Photo Suite in "Administrator" mode. ■ NTI Photo Suite is not supported on the Mac. iPhoto or iPhoto2 is recommended.
CAMERA SPECIFICATIONS
| Item Description | |
| Image sensor 1/2.5" | CCD sensor (6.2 Mega pixels) |
| Image resolution | <Still image>2816 x 2112, 2272 x 1704, 1600 x 1200, 640 x 480<Video clip>640 x 480, 320 x 240 |
| LCD monitor 2.5" Full | color TFT LCD (201K pixels) |
| Recording media | 16 MB internal memory (10 MB for image storage)Supports SD card (up to 1GB) (optional) |
| Compression format | JPEG compliant |
| Image file format DCF | DPOF, EXIF 2.2, ASF |
| Lens | 3x optical zoom lensF-no.: 3.2 (Wide) / 5.3 (Tele)f=5.4 mm - 16.2 mm (equivalent to 32 mm - 96 mm on a 35 mm camera) |
| Focus range Approx. | Approx. 50 cm to infinity (both Wide and Tele)6 cm to infinity (Macro Wide)Approx. 35 cm to infinity (Macro Tele) |
| Shutter speed 1/2 - 1 | /2000 sec. |
| Digital zoom | 4x (Capture mode)4x in 0.5x increments (Playback mode) |
| Metering system Average / Spot | |
| Flash effective range | 0.5 m - 2.7 m (Wide)0.5 m - 2.4 m (Tele) |
| Self-timer 10 sec. / 2 | sec. / 10+2 sec. |
| Interface | DC IN 5V terminal (Via conversion adapter)A/V OUT terminal (Via conversion adapter)USB 2.0 compliant |
| Power supply | Rechargeable Lithium-ion battery (3.7V, 650mAh)(optional)AC power adapter (5V/3A) (optional) |
| Dimension (WxHxD) | Approx. 88.5 x 54.5 x 24mm (without protruding parts) |
| Weight Approx. 130 g | (without the battery & SD card) |
*Design and specifications are subject to change without notice.


- GETTING STARTED
- PHOTOGRAPHY MODE
- [ ] PLAYBACK MODE
- MENU OPTIONS
- EDITING SOFTWARE INSTALLATION
- CAMERA SPECIFICATIONS
- INTRODUCTION
- OVERVIEW
- PACKAGE CONTENTS
- COMMON ACCESSORIES
- OPTIONAL ACCESSORIES
- GETTING TO KNOW THE CAMERA
- FRONT VIEW
- NAME DESCRIPTION
- REAR VIEW
- SET /DIRECTION BUTTON
- STATUS LED INDICATOR
- LCD MONITOR ICONS
- PHOTOGRAPHY MODE [ ] - STILL IMAGE MODE
- PHOTOGRAPHY MODE [ ]
- PLAYBACK MODE [ ]-STILL IMAGE PLAYBACK
- PLAYBACK MODE [ ]-VIDEO PLAYBACK
- ATTACHING THE CAMERA STRAP
- INSERTING AND REMOVING THE BATTERY (OPTIONAL ACCESSORY)
- INSERTING THE BATTERY
- REMOVING THE BATTERY
- CHARGING THE BATTERY
- INSERTING AND REMOVING THE SD CARD (OPTIONAL ACCESSORY)
- INSERTING THE SD CARD
- REMOVING THE SD CARD
- SETTING THE DATE AND TIME
- CHOOSING THE LANGUAGE
- FORMATTING THE SD CARD OR INTERNAL MEMORY
- SETTING IMAGE RESOLUTION AND QUALITY
- [ ] STILL IMAGE MODE
- RECORDING VOICE MEMOS
- USING THE OPTICAL ZOOM
- USING THE DIGITAL ZOOM
- SETTING THE FLASH
- SETTING THE FOCUS
- SETTING THE SELF-TIMER
- EXPOSURE COMPENSATION/BACKLIGHT CORRECTION
- EFFECTIVE SUBJECTS AND SET VALUES
- SETTING THE SCENE MODE
- [ ] VIDEO MODE
- PLAYING BACK STILL IMAGES
- IMAGE DISPLAY INFORMATION
- PLAYING BACK VIDEO CLIPS
- PLAYING BACK STILL IMAGES/VIDEO CLIPS ON A TV
- ATTACHING VOICE MEMOS
- PLAYING BACK VOICE MEMO
- THUMBNAIL DISPLAY
- ZOOM PLAYBACK
- SLIDESHOW DISPLAY
- PROTECTING IMAGES
- CANCELING THE PROTECTION
- PROTECTING MULTIPLE IMAGES SIMULTANEOUSLY
- DPOF SETTINGS
- RESIZING AN IMAGE
- COMPRESSING AN IMAGE
- [ ] ERASING IMAGES
- ERASING AT PHOTOGRAPHY MODE (QUICK DELETE FUNCTION)
- ERASING AT PLAYBACK MODE
- ERASING SELECTED IMAGES
- STILL IMAGE MENU (CAPTURE)
- SCENE MODE
- SIZE
- QUALITY
- SHARPNESS
- SATURATION
- COLOR
- WHITE BALANCE
- MANUAL WB
- ISO
- METERING
- STILL IMAGE MENU (FUNCTION)
- CAPTURE MODE
- VOICE MEMO
- LCD BRIGHT
- DIGITAL ZOOM
- PREVIEW
- DATE PRINT
- REAL TIME AF
- VIDEO MENU (CAPTURE)
- VIDEO MENU (FUNCTION)
- AUDIO
- PLAYBACK MENU
- SLIDE SHOW
- DPOF
- PROTECT
- RESIZE
- QUALITY CHANGE
- COPY TO CARD
- SETUP MENU (IN PHOTOGRAPHY MODE)
- BEEP
- FR. NO. RESET
- AUTO OFF
- DATE/TIME
- SYS. RESET
- LANGUAGE
- USB
- SETUP MENU (IN PLAYBACK MODE)
- FORMAT
- CARD INFO
- SYSTEM INFO
- VIDEO OUTPUT
- INSTALLING NTI PHOTO SUITE
- TO INSTALL NTI PHOTO SUITE
Brand : ACER
Model : CS 6531
Category : Camera