
TSA3511 - Hand blender Teesa - Free user manual and instructions
Find the device manual for free TSA3511 Teesa in PDF.


| Product Type | Hand Blender |
| Brand | Teesa |
| Model | TSA3511 |
| Motor Housing Material | Plastic |
| Blending Shaft Material | Stainless Steel |
| Whisk Material | Stainless Steel |
| Chopper Blades Material | Stainless Steel |
| Chopper Bowl & Beaker Material | SAN |
| Chopper Lid Material | ABS + PP |
| Speed Regulation | Smooth rotation, 8,500 – 12,000 rpm |
| Turbo Speed | Max. 13,000 rpm |
| Max Power | 1000 W |
| Power Supply | 220–240 V, 50/60 Hz |
| Beaker Capacity | 600 ml |
| Chopper Bowl Capacity | 500 ml |
| Blender Dimensions (Height x Diameter) | 40.5 cm x 60 mm |
| Blender Weight | 750 g |
| Set Includes | Blender, Chopper, Whisk, Beaker |
| Overheating Protection | Yes |
| Dishwasher Safe Parts | Yes (except motor unit, at temperature below 50°C) |
| Max Continuous Operation | 1 minute, then 1 minute rest; after 5 cycles, 30 min cool down |
| Max Ingredient Temperature | 60°C |
| Max Food Piece Size for Blending | 1.5 cm cubes |
| Not Suitable For | Dry grinding hard food, ice cubes, frozen meat, coffee beans, grains |
Frequently Asked Questions - TSA3511 Teesa
User questions about TSA3511 Teesa
0 question about this device. Answer the ones you know or ask your own.
Ask a new question about this device
Download the instructions for your Hand blender in PDF format for free! Find your manual TSA3511 - Teesa and take your electronic device back in hand. On this page are published all the documents necessary for the use of your device. TSA3511 by Teesa.
USER MANUAL TSA3511 Teesa
| CS DE EN GR PL ROSK | ||||||
| Knoflik ovládání rychlosti | Drehzahlregler | Adjustable speed knob | Kouμπί ρυθμιζόμενης ταχύτητας | Pokrętło regulacji prędkości | Buton reglare viteză | Regulátor otáčok |
| Tlačitko práce (nastavitelná rychlost) | Taste Drehzahlreglermodus | Adjustable speed mode button | Kouμπί λειτουργίας ρυθμιζόμενης ταχύτητας | Przycisk pracy (regulowana prędkości) | Buton mod viteză reglabilă | Tlačidlo prevádzky (nastavitelná rýchlost) |
| Tlačitko režimu Turbo | Taste Turbomodus | Turbo mode button | Kouμπί λειτουργίας turbo | Przycisk trybu Turbo Buton mod turbo | Buton mod turbo | Tlačidlo prevádzky režimu Turbo |
| Jednotka motoru | Motoreinheit | Motor unit | Μονάδα κινητήρα | Jednostka silnikowa | Corp motor | Motorová časť |
| Nástavec mixéru | Mixer-Schaft-Halterung | Blending stick holder | Στήριγμα ραβδομπλέντερ | Nasadka blendera | Suport unitate mixare | Mixovací nástavec |
| Mixovací koncovka Mixer-Schaft Blending shaft | Aξονας ανάμειξης | Końcówka miksująca | Ax unitate de mixare | Mixovacia noha | ||
| Nástavec šlehače | Schneebesen-Halterung | Whisk holder | Στήριγμα χτυπητηριού | Nasadka trzepaczki Suport tel Nástavec metličky | ||
| Šlehač | Schneebesen | Whisk | Χτυπητήρι | Trzepaczka | Tel | Šlahacia metlička |
| Kryt drtiče | Zerkleinerungsdeckel | Chopper lid | Καπάκι κοπής | Pokrywa rozdrabniacza | Capac tocător | Veko sekacej nádoby |
| Nože drtiče Schneidklingen | Chopper blades | Λεπίδες κοπής | Οstrza rozdrabniacza | Lame tocător | Čepel’sekacej nádoby | |
| Mísa drtiče | Zerkleinerungsbehälter | Chopper bowl | Κύπελλο κοπής | Misa rozdrabniacza | Bol tocător | Sekacia nádoba |
| Džbánek | Mixbecher | Beaker | Ποτήρι ζέσεως | Dzbanek | Recipient | Nádobka |
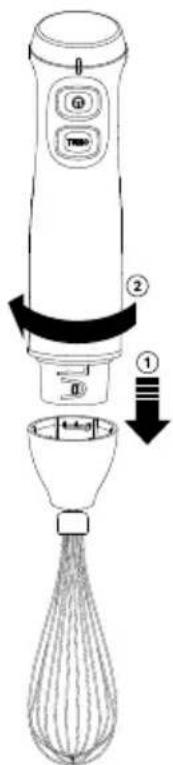
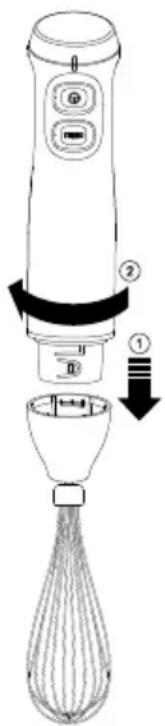
flowchart
graph TD
    A["Electricity meter with battery"] --> B["Step 1: Insert battery"]
    B --> C["Step 2: Insert battery with switch"]
    C --> D["Step 3: Insert battery with switch"]
    D --> E["Step 4: Insert battery with switch"]
    E --> F["Step 5: Insert battery with switch"]
Thank you for purchasing TEESA appliance. Please read this operation instruction carefully before use, and keep it for future use. Producer does not take responsibility for damages caused by inappropriate handling and use of the product.
SAFETY INSTRUCTIONS
In order to reduce the injuries or damages, follow basic safety precautions applied when using any electrical device, including the following:
- Read this instruction manual carefully, even if you are familiar with the appliance. Keep the manual for future reference.
- Do not use this device for purposes others than indicated in this manual.
- Before connecting the device to power supply socket, make sure the voltage indicated on the appliance corresponds to the voltage in the power supply socket.
- The appliance must be plugged into an earthed electrical socket. If you have to use an electrical extension lead, it must be earthed.
- This appliance MUST NOT be supplied through an external switching device, such as a timer, or connected to a circuit that is regularly switched on and off by the utility, as it may lead to damage of the device.
- Place the device on flat, stable surface.
• ALWAYS turn off the device and disconnect it from the mains supply:
• if it's not operating correctly
- if there's an uncommon voice when using
• before disassembling the device
- before cleaning
- when not in use
- Don't plug the appliance into the power supply until it is assembled and always unplug before disassembling the appliance or handling the blade.
- Switch off the device and remove the plug from the socket when it is not in use, before cleaning or whenever any disturbance occurs. When disconnecting the power cord of the device, grasp and pull the plug, not the cord/cable.
- Fixed power cable may only be replaced in an authorized service point.
- Keep the device out of the reach of children. Do not leave children unsupervised with the device.
- This appliance may be used by children who are above 8 years old and by persons with reduced physical, sensory or mental capabilities, or lack of experience and knowledge, if they are supervised and guided by a person who is responsible for their safety in a cautious manner, and all the safety precautions are understood and followed. Children should not play with this device. Children should not perform cleaning and servicing of the device unsupervised.
- Test the device and the cord/cable regularly for damage. Before use, make sure the device operates properly. In case of any damage, or if the device does not operate properly, stop using it and unplug immediately.
- Keep the device and cord/cable away from heat, direct sunlight, water, moisture, sharp edges and the like.
• Use only original accessories, do not connect incompatible products.
• The device is for indoor use only. -
Don't let the motor unit, cord, or plug get wet. Do not immerse the motor unit in water! Do not handle the device with wet hands.
-
Never use the device if the device itself or its cord have been damaged. Do not attempt to repair/disassemble this device yourself. In case of damage, contact with an authorized service point for check-up/repair.
- Don't let excess cord hang over the edge of the table or worktop or touch hot surface.
• The appliance is constructed to process normal household quantities. Not for commercial use.
• Improper use of this device may lead to injuries and damages. - Be careful while handling the blades, they are extremely sharp.
- Keep your fingers and kitchen utensils away from the moving blades / rotating whisk.
- Do not place any accessory of this device into microwave.
OPERATION
- Before assembly, clean all the parts which will have contact with food. Be extremely careful when cleaning the blades – they are sharp and can cause injury.
-
Mounting: Choose the attachment you want to use and follow the steps indicated below:
-
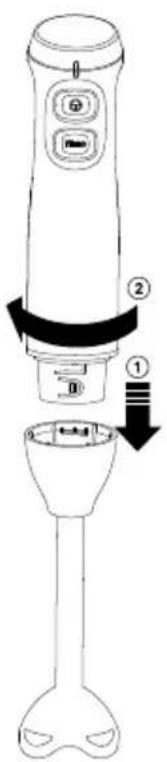
Blender: place the motor unit into the blending stick holder and turn anti-clockwise until it locks in place.
-
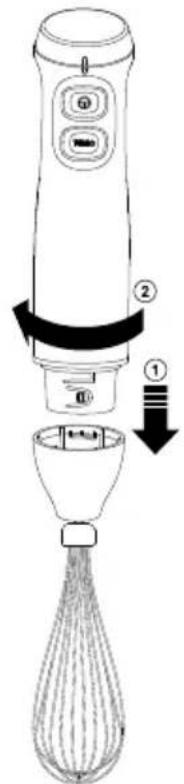
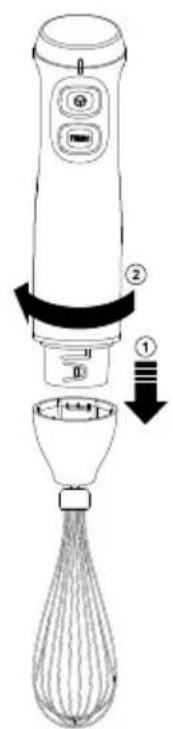
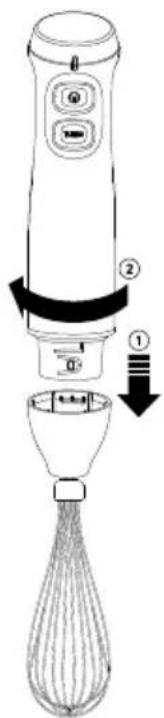
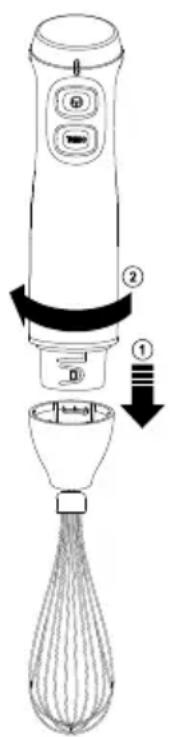
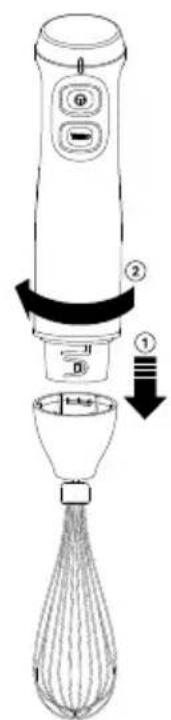
Whisk: place the motor unit into the whisk holder and turn anti-clockwise until it locks in place.
-
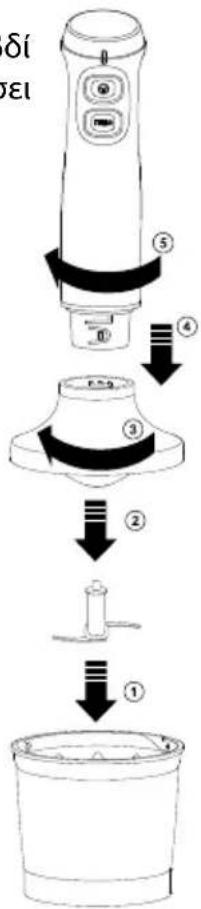
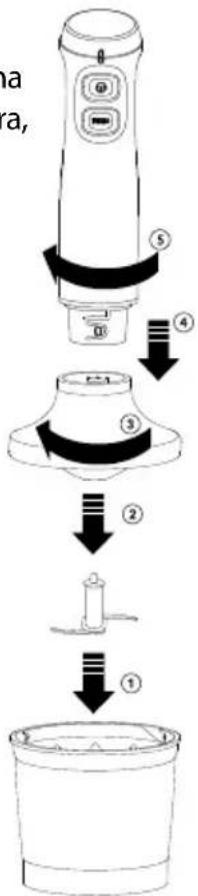
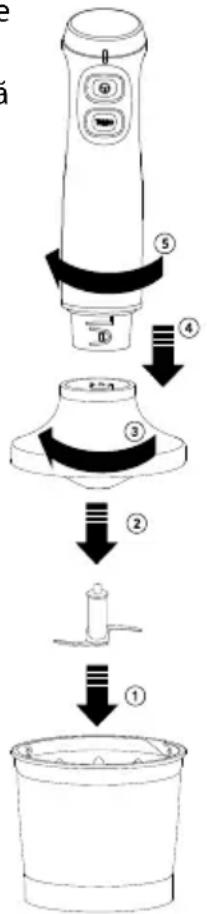
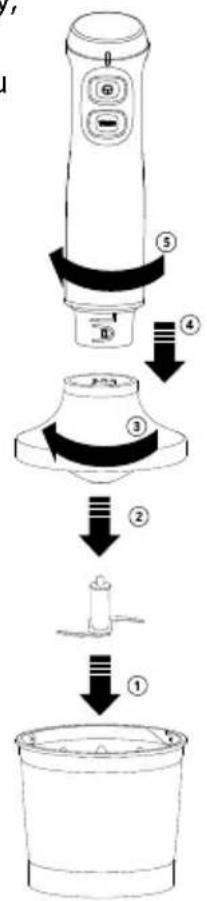
Chopper:
-
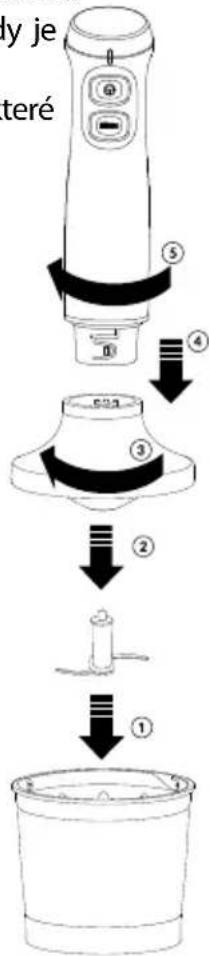
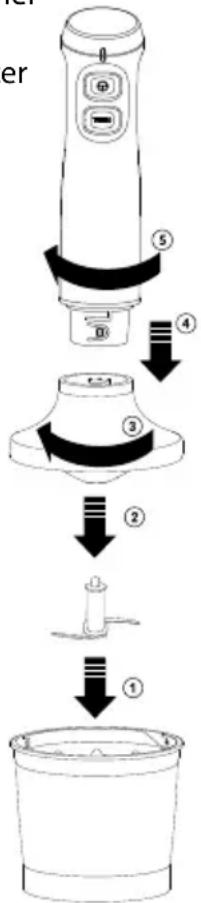
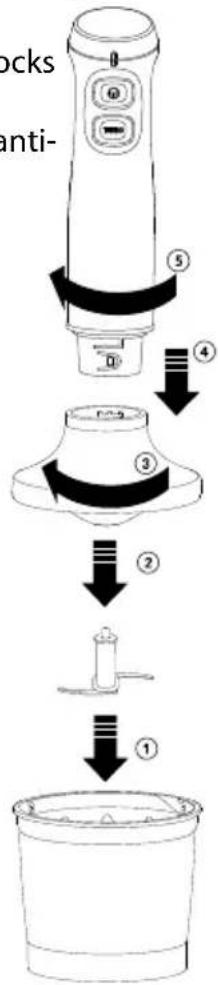
Place the blade on the center pin of the chopper bowl. Be careful, the blade is very sharp! Always hold it by the upper plastic part.
- Once the blades are assembled, user should place the food ingredients into the bowl.
- Place the chopper bowl lid and turn anti-clockwise until it locks in place.
- Place the motor unit into the chopper bowl lid and turn anticlockwise until it locks in place.
- Plug the device into power mains socket.
Note: In case of using blender or whisk, insert the attachment into a container with food to be processed. In case of chopper, the food needs to be inserted into the bowl after the blades are assembled and before the lid and motor unit are mounted.
- Set the adjustable speed knob to desired setting and press adjustable speed mode button OR press Turbo mode button to start operation.
Note: user can freely change settings of the adjustable speed knob during operation when using adjustable speed mode button (top button).
- Use the blender no longer than 1 minute at a time. If within that period, the desired effect has not been reached, stop operation and wait for about 1 minute before using the device again.
Note: please regard 1 minute of operation and 1 minute of rest as a one operation cycle. After continuous operating the device for 5 cycles (that is 1 min. operation followed by 1 minute rest, 5 times in a row), the blender must be left for cooling for about 30 minutes.
- Unplug the device from power supply mains after operation.
Notes on usage:
- Don't use the appliance when not immersed into food / when the chopper bowl is empty.
- Do not overfill chopper bowl or beaker. Maximum ingredients volume for chopper is 500 ml and for beaker 600 ml.
- To avoid splashing, turn on the device only after the blender/whisk has been inserted into food to be processed.
- Short-time operating: Use the appliance for no longer than 1 minute at a time; after that let the device cool down for at least 1 minute. Please regard 1 minute of operation and 1 minute of rest as a one operation cycle. After continuous operating the device of 5 cycles (that is 1 min. operation followed by 1 minute rest, 5 times in a row), the blender must be left for cooling for about 30 minutes.
- Don't operate hard food for longer than 10 seconds at once.
- Do not use the appliance for dry grinding hard food like soybean, rice and frozen meat, ice cubes, nutmeg, coffee beans, grains etc., nor for succulent liquid food processing. Don't operate food without water!
- Food preparation before processing with the blender or chopper: cut the food into cubic blocks no bigger than 1,5x1,5 cm, and add some liquid (e.g. water, milk, etc.).
- Before processing food, make sure it's pitted, peeled, cutted if necessary etc.
- Don't place the device into hot ingredients / don't place hot ingredients into the chopper or beaker. Hot ingredients should be cooled down prior to processing by this appliance. (Max. ingredient temperature is 60°C).
CLEANING AND MAINTENANCE
• Always disconnect the device from mains supply before cleaning or storing.
- Motor unit should be cleaned only with soft, slightly damp cloth. Never immerse motor unit into water or any other liquid.
• After processing very salty food, it is suggested to rise the blades right away.
- Wash the accessories (blender, whisk, chopper bowl, lid and blades) in warm, soapy water after every use. Rinse well.
- All parts except for motor body can be cleaned in a dishwasher (only if the set temperature is below 50°C). When cleaning in a dishwasher, be careful not to overdose cleaner or decalcifier.
- When processing food with color, the plastic parts of the appliance may discolor. Wipe these parts with vegetable oil before cleaning them.
• Cleaning should be performed immediately after use. - The blade is very sharp – exercise caution when handling the blade!
- Let the device dry completely before assembling or storing.
- Do not use strong detergents or sharp utensils to clean the device, as they may damage the appliance.
TROUBLESHOOTING
| Problem Possible reason Suggested solution | ||
| The motor running, but the blade/whisk doesn’t work | · The blending stick has not been assembled properly· The blade/whisk got stuck | · Make sure to assemble the device properly· Disconnect the device from power supply mains, and remove the food from the blades/whisk – be careful, the blades are very sharp. Take out the food material and cut them into small pieces |
| The device suddenly stops working in the processing of using | Using for too long, motor is overheated | Use only in time intervals as indicated in this user’s manual |
| Abnormal vibration or excessive noise | · The device has been assembled improperly· Too much food being processed at once | · Make sure to assemble the device properly· Stop operation, disconnect the device from power supply mains and remove some food being processed |
SPECIFICATION
• Smooth rotation speed regulation: 8 500 - 12 000 rpm
• Turbo speed: max. 13 000 rpm
• Used materials:
- Blades, blender shaft, whisk: stainless steel
• Chopper bowl, beaker: SAN
• Chopper lid: ABS + PP
• Motor housing: plastic
• Beaker capacity: 600 ml
• Chopper bowl capacity: 500 ml
• Protection against: overheating
• Dishwasher safe parts
- Blender weight: 750 g
- Blender height: 40,5 cm
- Blender diameter: 60 mm
• Max. power: 1000 W
• Power supply: 220-240 V, 50/60 Hz
- Set includes: blender, chopper, whisk, beaker

English
Correct Disposal of This Product
(Waste Electrical & Electronic Equipment)



(Applicable in the European Union and other European countries with separate collection systems) This marking shown on the product or its literature, indicates that it should not be disposed with other household wastes at the end of its working life. To prevent possible harm to the environment or human health from uncontrolled waste disposal, please separate this from other types of wastes and recycle it responsibly to promote the sustainable reuse of material resources. Household users should contact either the retailer where they purchased this product, or their local government office, for details of where and how they can take this item for environmentally safe recycling. Business users should contact their supplier and check the terms and conditions of the purchase contract. This product should not be mixed with other commercial wastes for disposal.
Made in China for LECHPOL ELECTRONICS Sp. z o.o. Sp.k., ul. Garwolińska 1, 08-400 Miętne.
flowchart
graph TD
    A["Brusher with ⑥"] --> B["Check the brush"]
    B --> C["Check the cup with ③"]
    C --> D["Check the brush with ②"]
    D --> E["Check the cup with ①"]
flowchart
graph TD
    A["Brusher"] --> B["Step 1: Inserted"]
    B --> C["Step 2: Inserted"]
    C --> D["Step 3: Inserted"]
    D --> E["Step 4: Inserted"]
    E --> F["Step 5: Inserted"]
Brand : Teesa
Model : TSA3511
Category : Hand blender