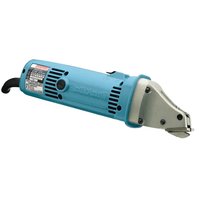
JS1660 - Uncategorized MAKITA - Free user manual and instructions
Find the device manual for free JS1660 MAKITA in PDF.


| Product Type | Jigsaw |
| Brand | Makita |
| Model | JS1660 |
| Power Input | 720 W |
| Variable Speed | 800 – 2,800 strokes per minute |
| Stroke Length | 26 mm |
| Orbital Action | 4 adjustable positions (0, I, II, III) |
| Cutting Capacity (Wood) | 90 mm |
| Cutting Capacity (Steel) | 10 mm |
| Bevel Cuts | 0° to 45° (left and right) |
| Blade Attachment | T-shank, tool-less blade change |
| Weight | 2.4 kg |
| Dimensions (L x W x H) | 260 x 80 x 200 mm |
| Power Cord Length | 2.5 m |
| Dust Blower | Yes, switchable |
| Soft Grip Handle | Yes, for comfort |
| Maintenance | Clean with dry cloth; periodically check carbon brushes |
| Safety Features | Double insulation, lock-off button, blade guard |
| Spare Parts Availability | Carbon brushes, blade holders, and other parts available |
| Repairability | Repair possible with genuine Makita parts |
Frequently Asked Questions - JS1660 MAKITA
User questions about JS1660 MAKITA
0 question about this device. Answer the ones you know or ask your own.
Ask a new question about this device
Download the instructions for your Uncategorized in PDF format for free! Find your manual JS1660 - MAKITA and take your electronic device back in hand. On this page are published all the documents necessary for the use of your device. JS1660 by MAKITA.
USER MANUAL JS1660 MAKITA


1
2

3

4
5

6

7

8
Symbols
The following show the symbols used for the tool. Be sure that you understand their meaning before use
Symboles
Explanation of general view
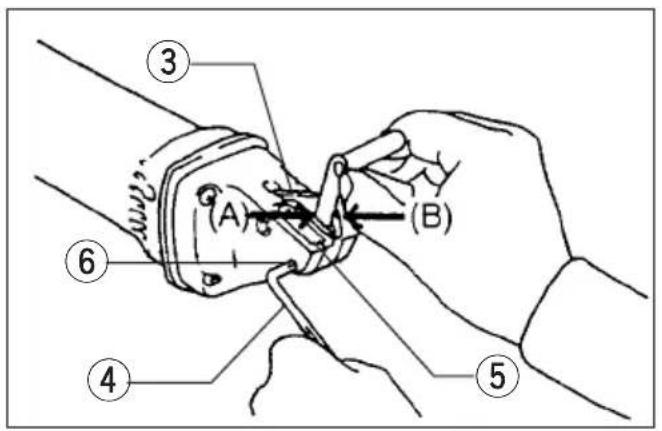
① Screw
② Screwdriver
③ Center blade
④ Hex wrench
⑤ Side blade
⑥ Bolt
⑦ Pin
⑧ Slide switch
⑨ Limit mark
⑩ Brush holder cap
SPECIFICATIONS
Model JS1660 JS1670
Max. cutting capacities
Steel up to 400 N/m 2 m.... 1.6 mm/16 ga 1.0 mm/20 ga
Steel up to 600 N/m 2 m.... 1.2 mm/18 ga 0.7 mm/23 ga
Steel up to 800 N/m 2 m.... 0.8 mm/22 ga 0.5 mm/26 ga
Aluminum up to 200 N/m 2 m.... 2.5 mm/13 ga 2.5 mm/13 ga
Min. cutting radius - 30 mm
Strokes per minute 4,500 4,500
Overall length 304 mm 306 mm
Net weight 1.3 kg 1.3 kg
- Due to our continuing program of research and development, the specifications herein are subject to change without notice.
• Note: Specifications may differ from country to country.
Power supply
The tool should be connected only to a power sup of the same voltage as indicated on the nameplate and can only be operated on single-phase AC supply.
They are double-insulated in accordance with European Standard and can, therefore, also be used from sockets without earth wire.
Safety hints
For your own safety, please refer to the enclosed Safety instructions.
ADDITIONAL SAFETY RULES
ENB011-2
- Hold the tool firmly.
- Secure the workpiece firmly.
- Keep hands away from moving parts.
- Edges and chips of the workpiece are sharp. Wear gloves. It is also recommended that yo put on thickly bottomed shoes to prevent injury.
- Do not put the tool on the chips of the wor piece. Otherwise it can cause damage and trouble on the tool.
- Do not leave the tool running. Operate the tool only when hand-held.
- Always be sure you have a firm footing. Be sure no one is below when using the tool in high locations.
- Do not touch the blade or the workpiece immediately after operation; they may be extremely hot and could burn your skin.
- Avoid cutting electrical wires. It can cause serious accident by electric shock.
SAVE THESE INSTRUCTIONS.
OPERATING INSTRUCTIONS
Adjusting the blade clearance (Fig. 1 & 2)
For JS1660 Only
Important: Always be sure that the tool is switched off and unplugged before adjusting the blade clearance.
Adjust the clearance between the side blade and the center blade according to the thickness of the workpiece.
First use a screwdriver to loosen the screw.
Then use the hex wrench to adjust the clearance by tightening or loosening the bolt. There may be a slight difference between clearances (A) and (B).
Check the smaller clearance with the thickness gauge and adjust it.
When using the thickness gauge to adjust the blade clearance, refer to the table below.
| Workpiece thickness (mm) | Marking on thickness gauge |
| Less than 0.8 | 0.5 |
| 0.8 – 1.3 | 1.0 |
| More than 1.3 | 1.5 |
After adjusting the clearance, tighten the screw securely.
Lubrication (Fig. 3)
Before operation, lubricate the contact point of the center blade and the pin. To keep good cutting performance, also use a cutting lubricant from time to time during operation.
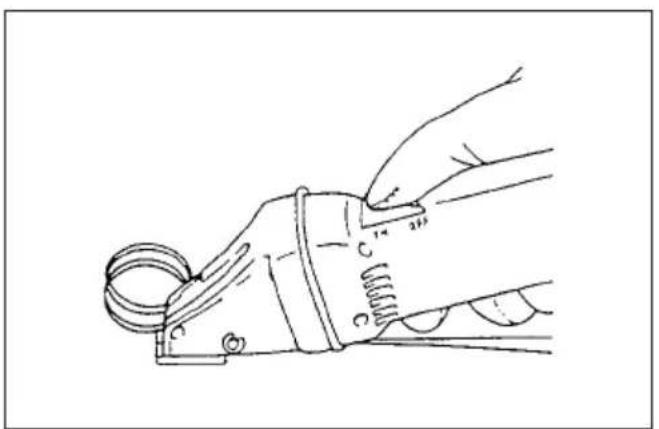
Switch action (Fig. 4)
CAUTION:
Before plugging in the tool, always check to see the slide switch actuates properly and returns to the "OFF" position when depressed.
To start the tool, move the slide switch forward, a the slide switch will lock in the "ON" position. To lightly depress the rear of the slide switch, and it return to the "OFF" position.
Operation (Fig. 5 & 6)
Turn the tool on and set front ends of the side blade on the workpiece. Now simply move the tool forward keeping the side blades flush with the workpiece surface.
CAUTION:
When cutting a small portion of the workpiece, you may have difficulty completing the end of the cut. that case, try to cut it again, pulling the workpiece back slightly.
MAINTENANCE
CAUTION:
Always be sure that the tool is switched off and unplugged before carrying out any work on the tool.
Replacement of carbon brushes (Fig. 7 & 8)
Replace carbon brushes when they are worn down to stop, the limit mark. Both identical carbon brushes should be replaced at the same time.
Replacing blades
The service life of the blades varies in terms of the workpiece to be cut. The following reference tables indicate the approximate service life of the blades. When the blades become dull, ask Makita Authorized or Factory Service Centers to replace the blades.
For JS1660
| Max.cutting capacities mm | ga | |
| Steel up to 400 N/m2m | 1.6 | 16 |
| Steel up to 600 N/m2m | 1.2 | 18 |
| Steel up to 800 N/m2m | 0.8 | 22 |
| Aluminum up to 200 N/m2m | 2.5 | 13 |
For JS1670
| Max.cutting capacities mm | ga | |
| Steel up to 400 N/m2m | 1.0 20 | |
| Steel up to 600 N/m2m | 0.7 23 | |
| Steel up to 800 N/m2m | 0.5 26 | |
| Aluminum up to 200 N/m2m | 2.5 13 |
To maintain product safety and reliability, repairs, maintenance or adjustment should be carried out by a Makita Authorized Service Center.


- SYMBOLS
- SYMBOLES
- EXPLANATION OF GENERAL VIEW
- SPECIFICATIONS
- MODEL JS1660 JS1670
- POWER SUPPLY
- SAFETY HINTS
- ADDITIONAL SAFETY RULES
- SAVE THESE INSTRUCTIONS
- OPERATING INSTRUCTIONS
- ADJUSTING THE BLADE CLEARANCE (FIG. 1 & 2)
- LUBRICATION (FIG. 3)
- SWITCH ACTION (FIG. 4)
- CAUTION
- OPERATION (FIG. 5 & 6)
- MAINTENANCE
- REPLACEMENT OF CARBON BRUSHES (FIG. 7 & 8)
- REPLACING BLADES
Brand : MAKITA
Model : JS1660
Category : Uncategorized