
MY-CS6004W - Multicooker MIDEA - Free user manual and instructions
Find the device manual for free MY-CS6004W MIDEA in PDF.


| Product Type | Multicooker |
| Brand | Midea |
| Model | MY-CS6004W |
| Capacity | 5.0 L |
| Power | 1000 W |
| Voltage | 220-240 V |
| Frequency | 50/60 Hz |
| Dimensions (W x D x H) | 30 x 27 x 27 cm |
| Weight | 4.5 kg |
| Material | Stainless steel body, non-stick inner pot |
| Functions | Rice, slow cook, steam, sauté, porridge, soup, cake, yogurt |
| Control Type | Digital touch panel with LED display |
| Timer | 24-hour delay timer |
| Keep Warm | Automatic keep warm up to 12 hours |
| Safety Features | Overheat protection, automatic shut-off, locking lid |
| Inner Pot | Non-stick, removable, dishwasher safe |
| Accessories Included | Measuring cup, rice paddle, steam basket |
| Cleaning | Wash inner pot with warm soapy water; wipe exterior with damp cloth |
| Spare Parts Available | Replacement inner pot, sealing ring |
| Warranty | 1 year limited warranty |
Frequently Asked Questions - MY-CS6004W MIDEA
User questions about MY-CS6004W MIDEA
0 question about this device. Answer the ones you know or ask your own.
Ask a new question about this device
Download the instructions for your Multicooker in PDF format for free! Find your manual MY-CS6004W - MIDEA and take your electronic device back in hand. On this page are published all the documents necessary for the use of your device. MY-CS6004W by MIDEA.
USER MANUAL MY-CS6004W MIDEA
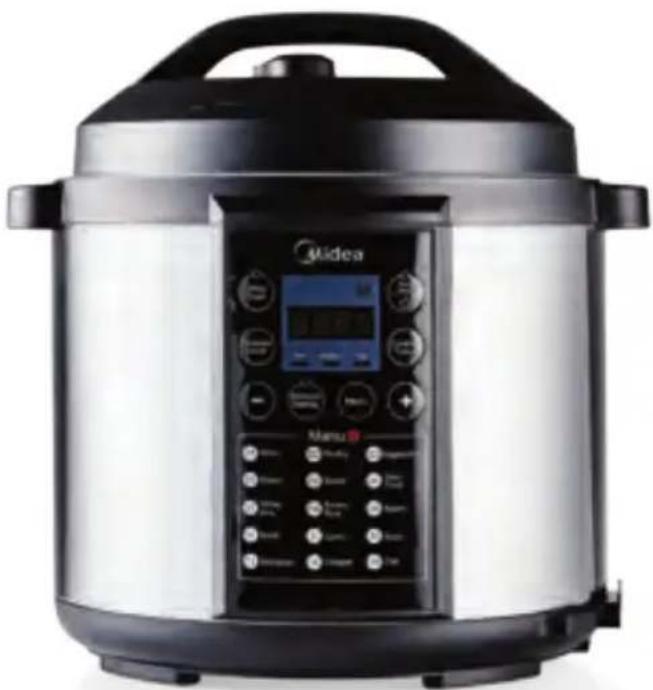
5 in 1 Pressure cooker
natural_image
Exterior view of a Midea rice cooker with digital display and control panel (no visible text or symbols on main body)Owner's Handbook
MY-CS6004WP
IMPORTANT NOTE: Please read the manual carefully before operating your product. Retain it for future reference.
IMPORTANT SAFETY INSTRUCTIONS
Please read these instructions carefully before using the appliance for the first time.
- Always use the appliance from a power outlet of the same voltage (A.C. only) marked on the appliance.
- This appliance includes an earthed pin and must be used with a power outlet with earthed connection.
- Use the appliance only with the detachable power cord supplied.
- Always turn the power off at the power outlet before you insert or remove a plug. Remove by grasping the plug - do not pull on the cord.
- Turn the power off and remove the plug when the appliance is not in use and before cleaning.
- Do not use the appliance with an extension power board.
- If the supply cord is damaged, it must be replaced by a special cord or assembly available from the manufacture or its service agent.
- The appliance shall not be operated by means of an external timer or separate remote control system.
- Do not let the power cord of the appliance hang over the edge of a table or bench top or touch any hot surface.
- Do not place the appliance on or near a hot gas flame, electric element or on a heated oven. Do not place on top of any other appliance.
- For additional protection, it is recommended to use the appliance with a residual current device (safety switch) with a tripping current not exceeding 30mA in the power socket which supply power to the appliance.
- Do not leave the power cord near the edge of a bench top where children may touch or pull it.
- Children should be supervised to ensure that they do not play with the appliance.
14.Do not touch the surface of the appliance when in use as it is
IMPORTANT SAFETY INSTRUCTIONS
hot.
- This appliance is not intended for use by persons (including children) with reduced physical, sensory or mental capabilities, or lack of experience and knowledge, unless they have been given supervision or instruction concerning use of the appliance by a person responsible for their safety.
- Do not move the appliance while switched on or when it is still hot.
- Always switch the power off and unplug the cord while the appliance is NOT in use.
- Always operate the appliance on a flat, level surface.
- Never block the vents in the base or stand the appliance on any surface that may obstruct the vents.
- Do not use the appliance for any purpose other than its intended use.
- The appliance is for household use only and should not be used outdoors.
- Don't immerse in water for cleaning.
23.Do not immerse the unit in water or any liquids. - Do not immerse the cord, plug or base in water or any other liquid.
- The use of accessories or attachments not supplied with the appliance is not recommended.
- The steam vent is very hot when cooking, keep face and hands away from the outer lid and steam vent.
- Use oven gloves or mitts to remove the lid and be careful to avoid escaping steam. Do not allow water from the lid to drip into the housing.
- Never remove the lid before cooking has completed and pressure has been released.
- The appliance includes a safety lock to prevent the lid from opening when under pressure. Do not attempt to force the lid open if it is locked.
IMPORTANT SAFETY INSTRUCTIONS
- Do not place food or liquid in the housing. Only the removable cooking bowl is designed to contain food or liquid.
- Never operate the cooker without food and liquid in the removable cooking bowl.
- The supplied cooking bowl must be used. Do not attempt to use an alternative bowl.
- Never use the cooking bowl for any use other than in this appliance.
- Never use the cooker if the lid, bowl or any other components appear to be damaged.
- Never cover the cooker during operation.
- Never exceed the maximum capacity of the cooker, marked 'Max' on the bowl.
- Never lift the cooker by the handle on the lid. Always carry it with the side handles.
- Do not operate any appliance with a damaged cord or plug or after the appliance malfunctions or is dropped or damaged in any manner. Return the appliance to the nearest authorised service facility for examination, repair or electrical or mechanical adjustment.
- Do not leave the cooker unattended when in use.
- Never place the appliance under a cupboard or overhanging surface. Exposure to steam during the cooking process may damage the surface.
- For household and residential type environments use only. Do not use in staff kitchen areas in shops, offices and other working environments;
Do not use in farm houses;
Do not use in hotels, motels.
Do not use in bed and breakfast type environments. - Confirm that the Red float valve and Steam valve are not jammed before use each time;. Confirm that the filter under the Steam valve is not blocked.
IMPORTANT SAFETY INSTRUCTIONS
- Wipe the external surface of inner pot and the heating plate and ensure it is clean before use.
- Never attempt to defeat any of the safety interlocks or safety valves.
- Never adjust the steam valve during a cooking cycle.
- Never cook foods that may expand such as laver and oatmeal in the pot to avoid jamming a valve or blockage.
- Dry materials should be immersed in water for a period before cooking.
- After cooking, do not open the lid until pressure has been released from the pot. Always turn the steam valve to steam release position prior to opening.
- After cooking and opening the lid, do not directly touch the inner pot or inside of the lid to avoid scalding.
CONTROLS AND FEATURES
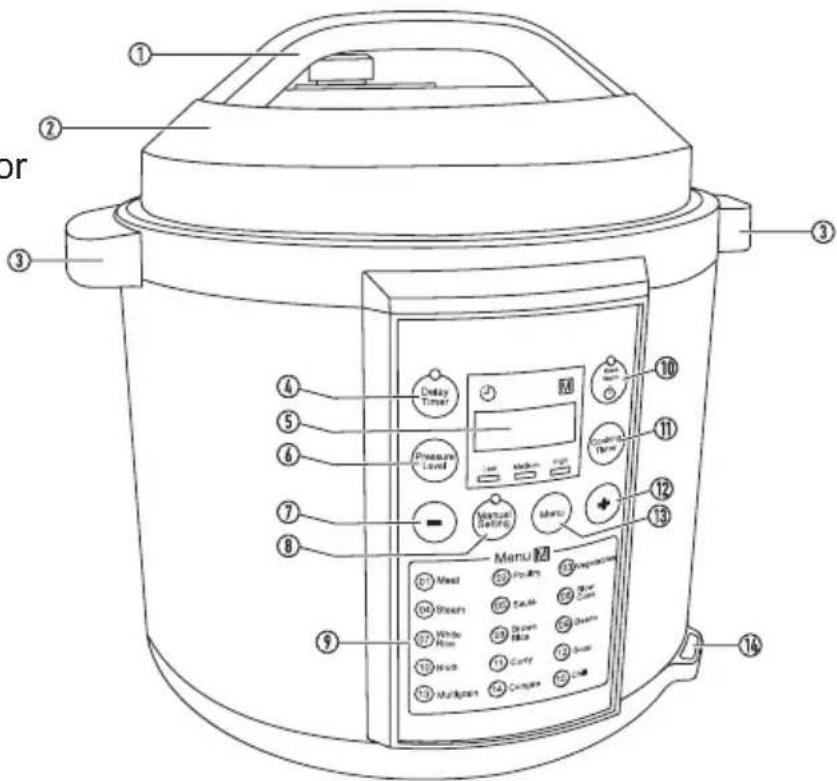
Front view
- id handle
- Lid
- Handles
- Delay timer button and indicator
- Display area
- Pressure level button
- Down button
- Manual setting button and indicator
- Preset option list
- Keep warm/Standby button
- Cooking time button
- Increase button
- Menu button
- Slot to rest rice-spoon
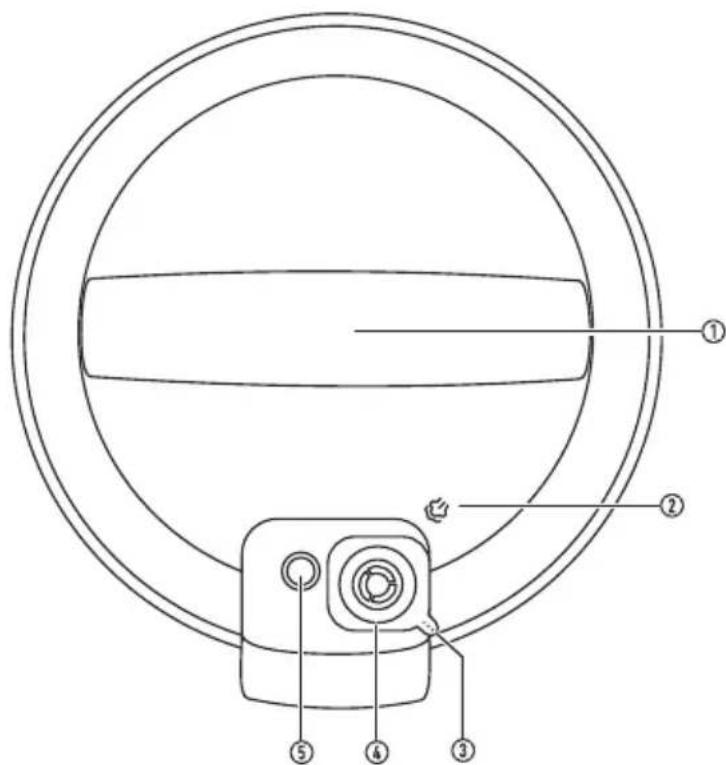
- Lid handle
- Steam release position marking (for steam valve)
- Pressurise position marking (for steam valve)
- Steam valve
- Red float valve
CONTROLS AND FEATURES
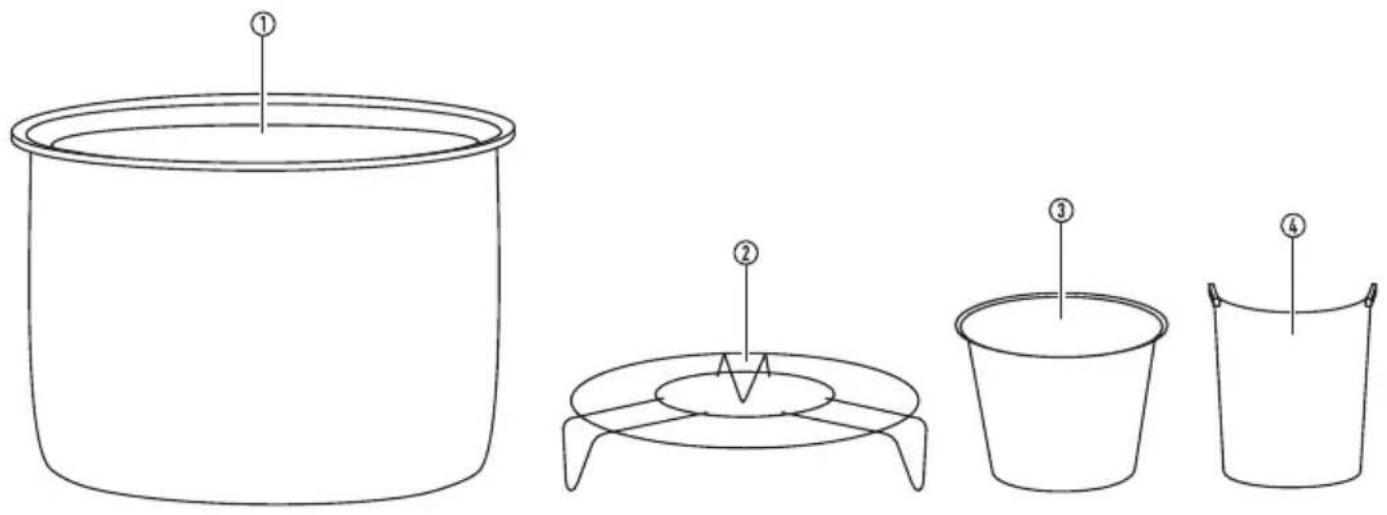
Cooking bowl1.
Rack2.
Measuring cup3.
Condensation collector4.
Serving spoon (not shown)5.
Soup spoon (not shown)6.
INTRODUCTION
Your pressure cooker cooks many different food types, quickly and easily. Food is placed in an inner cooking bowl with a quantity of water or other liquid. The cooking bowl is then placed into a pressure vessel and sealed with a lid.
What can I cook?
Your cooker can pressure-cook rice, meat, poultry, vegetables, beans, currys, soups, and many other food items.
You can also steam, sauté and slow cook by using different settings.
Cooking times and pressure settings
The cooker includes preset programs that set temperature and pressure for pressure-cooking popular food types. Manual setting enables you to set your choice of cook time and pressure setting.
Delay timer
The delay timer can be set to delay the start of cooking by a preset time.
Keep warm function
The keep warm function enables you to keep food warm in the cooker once the cooking phase is completed.
UNPACKING
Unpack the cooker and accessories from the carton.
Retain the carton and packing for future use. If you have to dispose of the carton and packing, please do so responsibly.
The carton should contain -
1 x MY-CS6004WP pressure cooker.
1 x Lid.
1 x Cooking bowl.
1 x Measuring cup.
1 x Serving spoon.
1 x Soup spoon.
1 x Rack.
1 x Condensation collector.
1 x Power cord
1 x Instruction manual.
BEFORE YOU START
Cautions in use
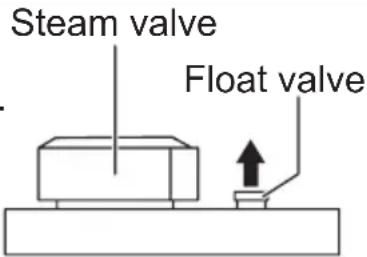
The red float valve rises when the cooker is under pressure.
Never attempt to remove the lid when the float valve indicates that the cooker is under pressure.
Location for your cooker
- Choose a flat, stable location within reach of a mains power outlet.
- Clear away any items that may be damaged by the heat or steam from the cooker.
Placement cautions
Ensure that the appliance is located out of the reach of children when operational. Never place the appliance under a cupboard or overhanging surface. Exposure to steam during the cooking process may damage the surface.
Assembling the lid
The valves and other components of the lid can be disassembled for cleaning. Ensure that all lid components are correctly assembled to the lid before each use.
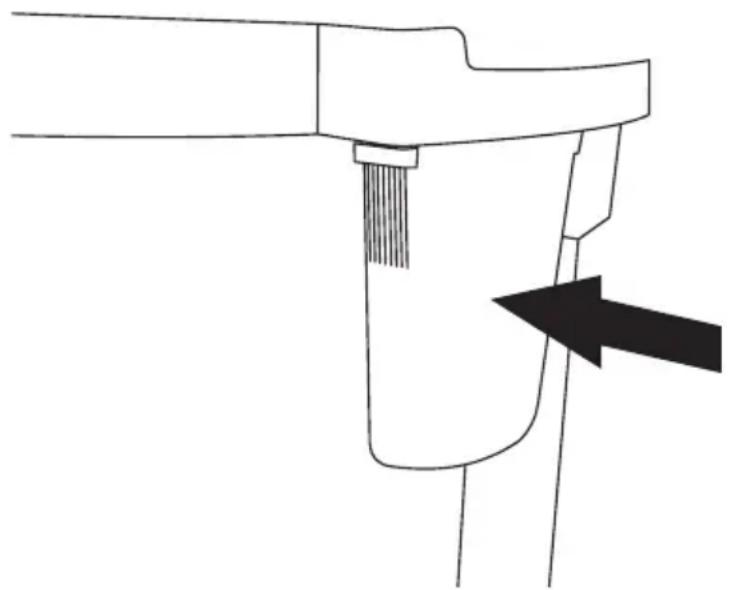
Condensation collector
The condensation collector is a small, narrow cup that slides onto the side at the back of the cooker as shown.
natural_image
Diagram of a mechanical component with a black arrow pointing to a specific part (no text or symbols present)It will collect any fluid that condenses around the rim of the cooker during the cooking operation.
The condensation collector should always be fitted during cooking. When cooking is complete, the condensation collector should be emptied and cleaned.
BEFORE YOU START
Food volume
For fresh ingredients such as meat and vegetables, never exceed the MAX mark on the inside of the bowl.
For rice, dry beans, dried vegetables, pulses and grains, never exceed 50% of the bowl capacity with total volume of food and liquid as these foods will expand when cooking and could block the safety valves.
Preparation guidelines
This section includes some guidelines to get you started with pressure cooking of basic food types. Use these guidelines to begin cooking with your-cooker and update your recipes as you learn to cook to your preference.
Always check that food is fully cooked before serving it.
Browse the Internet for many more pressure cooking recipes and ideas.
Preparing meat
Meat will generally cook best if it is first browned in a little oil in a pan on the stove. Whole cuts can be cooked or meat can be cooked or meat can be cubed pieces, but cooking times should be adjusted accordingly. Add approximately 250ml water or stock in the pan if cooking for less than 45 minutes. For longer cooking times, add 375ml.
Preparing fresh vegetables
Prepare vegetables as you would when cooking them in a regular pan on the stove. Wash and peel them, then cut into equal size pieces to cook uniformly. Add approximately 120ml water or stock to the pan with the vegetables.
Preparing long grain or basmati rice
Measure the rice into a bowl and rinse it first in a few changes of water. 160ml of dry rice is approximately one portion. Add approximately 240ml water per 160ml measure to the bowl and 15-20ml oil to reduce foaming.
Preparing brown rice
Follow the previous instruction for white rice, but add 50% more water.
Dried beans, pulses etc
Pick over the beans and discard any stones or debris. Place the beans into a bowl and rinse in a few changes of water. Place the beans in the cooking bowl with onions, garlic, herbs etc to taste. Add water in the ratio of approximately 1500ml to 500g beans and 30-50 ml oil to reduce foaming.
OPERATION
First use
Before using your cooker for the first time you should ensure that it is thoroughly cleaned.
- Follow the instructions in the Cleaning and Care section to clean the bowl, lid and other accessories before they are first used.
- Check that the valves in the lid are correctly assembled and that the lid seal is correctly fitted
Your pressure cooker is now ready to use.
Pressure cooking - preparation
- Check that you have prepared all the ingredients you plan to cook and place them in the cooking bowl.
The rack can be used to raise larger items such as cuts of meat etc off the base of the bowl if required.
- Add water or stock to the cooking bowl according to your recipe.
Caution
Water or stock is an essential part of the cooking process and a minimum of 125ml must always be added to the cooking bowl.
- Check that the outside of the cooking bowl is dry and place the bowl into the cooker.
- Check that the lid is correctly assembled.
- Align the symbol on the lid with the arrow on top of the control panel and place the lid onto the cooker.
- Twist the lid clockwise until the symbol aligns with the arrow to lock the lid into place.
- Set the Steam valve to the ≈ (pressurise) position.
- Plug the mains cable connector into the power inlet on the cooker, then connect the cable to a convenient mains outlet. Push the cable connector into the socket to ensure it is engaged.
The display will flash ‘----’. You can now choose to select a preset to cook your food or set cooking time manually.
Pressure cooking - setting a preset
- Press 'Menu'.
- The ‘M’ (menu) indicator will light and the display will flash ‘P01’ (preset 01).
- Press ‘+’ or ‘-’ to select the preset number you want.
For example, select preset 03 to cook vegetables.

Note:
Do not select presets 04, 05 or 06. These presets are reserved for other types of cooking.
10 seconds after your last setting, the cooker will beep 3 times and the display will stop flashing. Cooking will begin.
Pressure cooking - setting time manually
- Press 'Manual Setting'.
The indicator on the button will light.
- Press ‘Pressure Level’ button repeatedly to select the desire settings of Low, medium or High.
- Press 'Cooking Timer'.
- Press ‘+’ or ‘-’ to select the cooking time you want.
10 seconds after your last setting, the cooker will beep 3 times and the display will stop flashing. Cooking will begin.
Pressure cooking - the cooking process
10 seconds after settings have been completed, the cooking process will start automatically. The cooker will heat the cooking bowl until it pressurises. During this time some steam will escape from the red float valve. This is normal.
As soon as the required pressure is reached, the (time) indicator will be displayed and the display will switch to show cooking time in minutes. The time will count down. During cooking some steam may escape occasionally from the steam valve. This is normal.
At the end of the cooking time the cooker will beep and '0H' will be displayed. The 'Keep Warm' indicator will light. The prepared food will be held at a safe serving temperature of 60^ C for up to 2 hours.
Pressure cooking - once your food is cooked

Caution
When pressure-cooking has finished the cooker will still be pressurised. Do not open the lid until the pressure in the cooker has decreased sufficiently.
There are two ways to release the pressure in the cooker:
- You can leave the cooker to de-pressurise naturally as it cools.
This will take about 10 minutes and food will continue to cook during this time.
- Wait until the red float valve drops.
This indicates that the cooker is no longer pressurised.
OPERATION
- Turn the Steam valve to the ⏻ (steam release) position. It is now safe to open the lid.
-
Refer now to the section ‘All cooking modes -opening the lid and serving food’.
-
You can de-pressurise the cooker manually.
- Keeping face and hands away from the cooker, use tongs to turn the Steam valve to the 🏠 (steam release) position.
Steam will escape under pressure.
- Wait until the red float valve drops.
This indicates that the cooker is no longer pressurised. It is now safe to open the lid.
- Refer now to the section ‘All cooking modes -opening the lid and serving food’ on page 18.
Steaming food - preparation
Steaming takes place on the rack in the cooking bowl.
- Place the rack in the cooking bowl.
- Pour water into the cooking bowl. Add enough for the steaming operation, but ensure that the water level is below the rack.
- Check that you have prepared all the ingredients you plan to cook and place them on the rack in the cooking bowl. For small ingredients you can place the food on a heat-proof plate or in a steaming basket placed on the rack.
- Check that the outside of the cooking bowl is dry and place the bowl into the cooker.
- Check that the lid is correctly assembled.
- Align the 🔒 symbol on the lid with the ▲ arrow on top of the control panel and place the lid onto the cooker.
- Twist the lid clockwise until the 🔒 symbol aligns with the arrow to lock the lid into place.
- Set the Steam valve to the ≈ (pressurise) position.
- Plug the mains cable connector into the power inlet on the cooker, then connect the cable to a convenient mains outlet. Push the cable connector into the socket to ensure it is engaged.
The display will flash ‘----’.
Steaming food - selecting preset 04
- When you are ready to begin cooking, press 'Menu'.
- The ‘M’ (menu) indicator will light and the display will flash ‘P01’ (preset 01).
- Press ‘+’ 3 times to select preset 04.
10 seconds after you completed setting, the cooker will beep 3 times and the display will stop flashing. Cooking will begin.
OPERATION
Steaming food - the cooking process
10 seconds after settings have been completed, the cooking process will start automatically. The cooker will heat the cooking bowl until it pressurises. During this time some steam will escape from the red float valve. This is normal.
As soon as the required pressure is reached, the ⏻ (time) indicator will be displayed and the display will switch to show cooking time of 10 minutes. The time will count down. During cooking some steam may escape occasionally from the steam valve. This is normal.
During cooking steam will escape from the steam valve opening. This is normal.
You can leave the steaming process to run for a full 10 minutes or, for a shorter steaming time you can end the process earlier by pressing ⏻.
At the end of the cooking time the cooker will beep and '0H' will be displayed. The 'Keep Warm' indicator will light. The prepared food will be held at a safe serving temperature of 60^ C for up to 2 hours.
- Refer now to the section ‘All cooking modes -opening the lid and serving food’ on page 18.
Steaming - once your food is cooked

Caution
When steaming has finished the cooker will still be pressurised.
There are two ways to release the pressure in the cooker:
- You can leave the cooker to de-pressurise naturally as it cools.
This will take about 10 minutes and food will continue to cook during this time.
- Wait until the red float valve drops.
This indicates that the cooker is no longer pressurised.
- Turn the Steam valve to the 🏠 (steam release) position. It is now safe to open the lid.
- Refer now to the section ‘All cooking modes -opening the lid and serving food’.
- You can de-pressurise the cooker manually.
- Keeping face and hands away from the cooker, use tongs to turn the Steam valve to the 🏠 (steam release) position.
Steam will escape under pressure.
- Wait until the red float valve drops.
This indicates that the cooker is no longer pressurised. It is now safe to open the lid.
- Refer now to the section ‘All cooking modes -opening the lid and serving food’ on page 18.
OPERATION
The sautéeing process enables you to use the cooker to brown onions, garlic, meat etc. This may be useful prior to pressure cooking or slow cooking your food.
NOTE: The lid is not fitted when sautéeing.
- Place a little oil or fat into the cooking bowl with the ingredients to be sautéed.
- Plug the mains cable connector into the power inlet on the cooker, then connect the cable to a convenient mains outlet.
Push the cable connector into the socket to ensure it is engaged.
The display will flash ‘----’.
Sautéeing - selecting preset 05
- When you are ready to begin cooking, press 'Menu'.
- The ‘M’ (menu) indicator will light and the display will flash ‘P01’ (preset 01).
- Press ‘+’ 4 times to select preset 05.
10 seconds after you completed setting, the cooker will beep 3 times and the display will stop flashing. Cooking will begin.
Sautéeing - the cooking process
Once cooking has started, the cooker will heat the cooking bowl.
As soon as the required temperature is reached, the ⏻ (time) indicator will be displayed and the display will switch to show a cooking time of 30 minutes. The time will count down. During cooking you may need to stir the ingredients occasionally. Always use a wooden or plastic spoon for this, metal will damage the non-stick finish.
When you have finished the sautéeing process you can switch off the cooker by pressing ⏻.
Slow cooking - preparation
The slow cooking process takes place at lower temperatures and for much longer times than other cooking modes.
- Place all of the ingredients into the cooking bowl. Use volumes of food and liquid/stock as required by your slow-cooking recipe.
- Check that the outside of the cooking bowl is dry and place the bowl into the cooker.
- Check that the lid is correctly assembled.
- Align the 🔒 symbol on the lid with the ▲ arrow on top of the control panel and place the lid onto the cooker.
- Twist the lid clockwise until the 🔒 symbol aligns with the arrow to lock the lid into place.
OPERATION
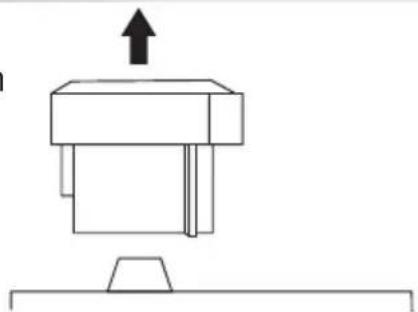
- Pull the Steam valve upwards to remove it from the lid.
This is necessary to stop the cooker from pressurising.
natural_image
Simple line drawing of a mechanical component with an upward arrow, no text or symbols present- Plug the mains cable connector into the power inlet on the cooker, then connect the cable to a convenient mains outlet. Push the cable connector into the socket to ensure it is engaged.
The display will flash '----'.
Slow cooking - selecting preset 06
- When you are ready to begin cooking, press 'Menu'.
- The 'M' (menu) indicator will light and the display will flash 'P01' (preset 01).
- Press ‘+’ 5 times to select preset 06.
10 seconds after you completed setting, the cooker will beep 3 times and the display will stop flashing. Cooking will begin.
Slow cooking - the cooking process
Once cooking has started, the cooker will heat the cooking bowl gently, the (time) indicator will be displayed and the display will switch to show a cooking time of 8 hours. The time will count down. During cooking a little steam will escape from the steam valve opening. This is normal.
You can leave the slow cooking process to run for a full 8 hours or, for a shorter cooking time you can end the process earlier by pressing ⏻.
At the end of the cooking time the cooker will beep and '0H' will be displayed. The 'Keep Warm' indicator will light. The prepared food will be held at a safe serving temperature of 60°C for up to 2 hours.
- Refer now to the section ‘All cooking modes -opening the lid and serving food’ on page 18.
All cooking modes - opening the lid and serving food
- Disconnect the appliance from mains power.
CAUTION: Take extreme care when opening the lid as the contents will be hot and steaming. Never stand over the cooker as the lid is removed.
- Twist the lid anti-clockwise until the symbol aligns with the arrow to unlock the lid.
- Lift off the lid.
- Check that the contents are cooked.
If more cooking is required, check that there is enough fluid remaining in the cooking bowl, then re-fit the lid and set a further cook time manually.
OPERATION
If the food is cooked, it can now be served or carefully transferred to a serving dish.
The bowl should be removed for serving. The cooking bowl will be very hot and may be heavy. Prepare a heatproof surface for it to stand on next to the cooker and lift it out with oven mitts.
If you prefer to leave the bowl in place in the cooker when serving, take care not to spill food or liquid around the outside of the bowl where it may run into the cooker. Remove the bowl and wipe any spillages immediately after serving.
Always use the serving spoon or soup spoon to spoon the food out of the cooking bowl. Never use a metal spoon or fork etc as this may damage the non-stick surface of the cooking bowl.
All cooking modes - cancelling settings
You may want to cancel preset, manual or delay settings before or during cooking.
- Press ⏻.
The display will flash ‘----’. All settings are now cleared.
WARNING: If you do cancel any settings during cooking and decide to open the lid to add or remove food, always set the steam valve to release mode (page 13) first to ensure all pressure is released prior to removing lid.
Delayed start - pressure-cooking only Once you have chosen your pressure-cooking settings you have the option to delay the start of cooking by 2 - 24 hours.
- Press 'Delay Timer'.
2:00 will flash (2 hours delay to start).
- Press ‘+’ or ‘-’ to choose a delayed start time (if required).
CAUTION: Delayed start should not be set when steaming or sautéeing food.
CAUTION: Food that is left in the bowl during a delayed start sequence will be stored at room temperature. Never use the delayed start function to cook meat or other items that may become a health risk if stored at room temperature.
AFTER USE
- Disconnect the appliance from mains power and allow it to cool completely.
- Remove the condensation collector and empty any water that has collected in it.
- Follow the instructions in the Cleaning and Care section to clean the bowl, lid and other accessories.
- Loosely coil the cable and store the cooker and cable safely out of reach of children.
CARE AND CLEANING
CAUTION: The pressure cooker components are not dishwasher- safe. Always hand-wash them.
CAUTION: Never clean any component of the cooker with scourers, abrasive pads or chemicals.
- Unplug the appliance and allow it to cool.
Cleaning the lid
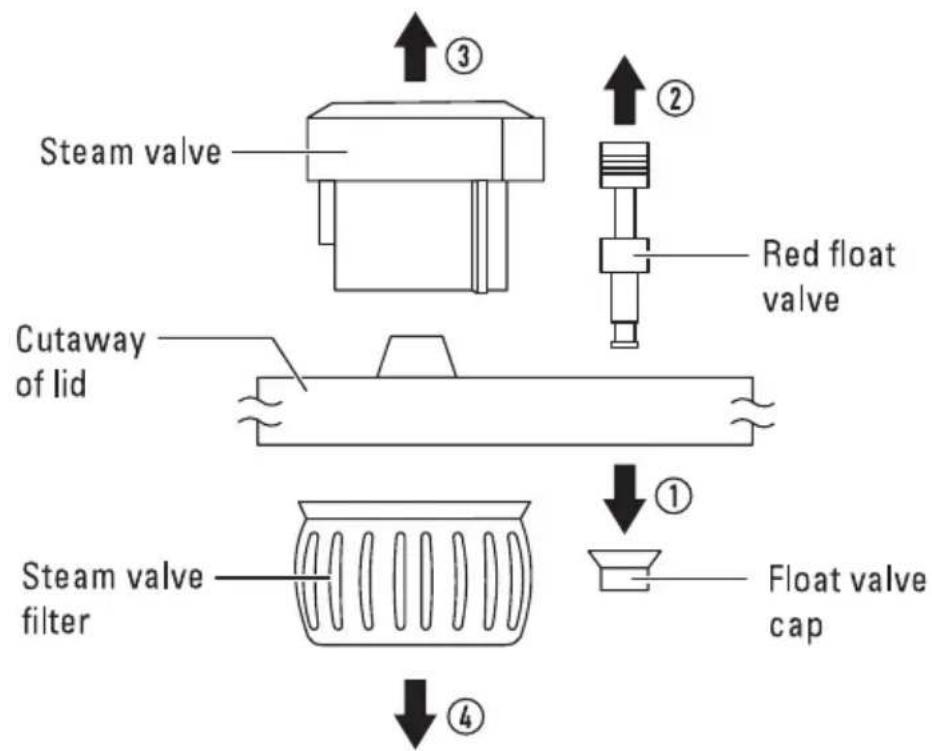
- Refer to the drawing and dismantle the lid valve components before cleaning.
-
From inside the lid, remove the small rubber cap over the inner end of the Red float valve.
-
Remove the Red float valve from above the lid.
-
Remove the Steam valve by pulling the housing upwards.
-
From inside the lid, carefully prise the filter off from under the Steam valve. A small screwdriver blade may be helpful.
-
Remove the rubber seal from the inner edge of the lid.
- Hand wash the lid in a mild detergent solution. Take care to wash the area around the inside lip.
- Wash the rubber seal and valve components separately, taking care not to lose any small parts.
CARE AND CLEANING
Cleaning the bowl
- Remove the cooking bowl and fill it with hot water. Allow it to soak for a while. If any food is stuck to the base of the cooking bowl it must be removed. Never use sharp metal tools or abrasives to clean the bowl as they will damage the non-stick surface. Soak, then use a nylon sponge or spatula to remove any remaining deposits.
Cleaning the main body
- Wipe the main body of the cooker and the main bowl with a damp cloth and dry well. Never immerse the cooker in water.
Cleaning the accessories
- Wash the rack, spoons, cup etc by hand in a mild detergent solution.
After cleaning
- Dry all components completely and reassemble the cooking bowl into the cooker. The accessories can be stored in the bowl.
- Re-assemble the lid valves in the reverse order of removal.
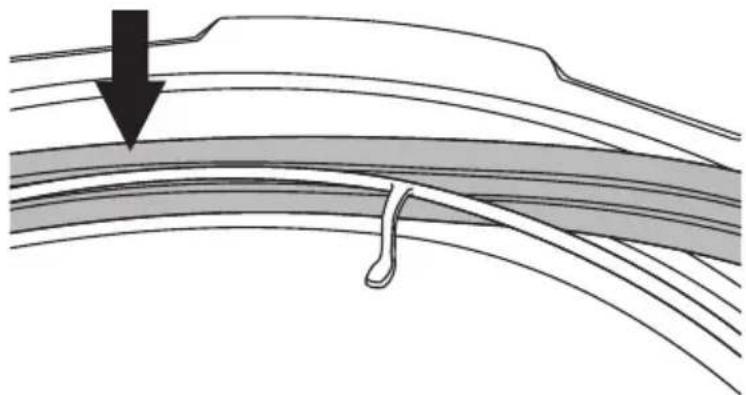
- Fit the rubber seal into the edge of the lid.
CAUTION: When fitting the rubber seal, feed it into the space behind the metal retaining bar as shown by the arrow.
natural_image
Diagram showing layered geological strata with a downward arrow indicating a feature, no text or symbols present.- Fit the lid before storage, but do not clamp it completely. This will save wear on the rubber seal.
TROUBLESHOOTING
CAUTION: If you encounter any problems during the cooking process, always switch off the cooker and allow it to cool before checking the steps below.
- Difficulty closing the lid or steam leaking from the lid.
Check that the rubber seal in the lid is clean and that it is installed correctly.
Check that the lid is correctly aligned before closing.
- Steam leaking from the red float valve.
Remove the lid. The valve may need cleaning. Remove it and clean it.
- Steam leaking from steam valve.
Check that the steam valve is closed.
- Lid will not open.
The cooker may be under pressure. Refer to page 13 to depressurise the cooker before opening the lid.
- Code 'C1' displayed.
The cooking pan has no liquid content.
SPECIFICATIONS
Power supply 220 - 240V\~, 50/60Hz
Power consumption.... 1000W
Weight 5.9kg
IMPORTANT: THIS APPLIANCE MUST BE EARTHED

E285
WARRANTY
-
Our goods come with guarantees that cannot be excluded under the Australian Consumer Law. You are entitled to a replacement or refund for a major failure and for compensation for any other reasonably foreseeable loss or damage. You are also entitled to have the goods repaired or replaced if the goods fail to be of acceptable quality and the failure does not amount to a major failure. Where a failure does not amount to a major failure, BIG W is entitled to choose between providing you with a repair, replacement or refund. To obtain compensation, you would need to provide documentary evidence of the loss or damage suffered, and documentary evidence that such loss or damage was a reasonably foreseeable consequence of a failure by BIG W to comply with a consumer guarantee under the Australian Consumer Law. Such evidence may include photographs, statutory declarations, receipts or reports (eg from your doctor), depending on the loss or damage.
-
In addition to all rights and remedies to which you may be entitled under the Competition and Consumer Act 2010 (Commonwealth), and any other relevant legislation, the manufacturer warrants this product to be free from defects in materials or workmanship for a period of 24 months from the date of purchase.
-
In order to claim under this warranty you will need to bring the product to any BIG W store, along with proof of purchase (typically this will be a receipt). Any cost incurred by you in bringing the product to the service desk will be borne by you. We will then, at our option, either repair or replace the product, or refund your money and take back the product – in accordance with our Returns Policy, a copy of which is available at our return desk
-
Our liability under this manufacturer's warranty is subject to us being satisfied that a defect was caused by defective workmanship or materials, and was not caused by or substantially contributed to by other factors, or circumstances beyond our control, including (but not limited to) defective installation, maintenance or repair, alteration or modification of the product in a manner not recommended by the manufacturers or any neglect, misuse or excessive use.
-
The benefits conferred by this manufacturer's warranty are in addition to all rights and remedies conveyed by the Competition and Consumer Act 2010 (Commonwealth), and any other statutory rights to which you may already be entitled, and this warranty does not exclude, restrict or modify any such rights or remedies that are implied by law.
-
This warranty is provided by BIG W of 1 Woolworths Way, Bella Vista NSW 2153, Phone: 1300 244 999.

- in 1 Pressure cooker
- IMPORTANT SAFETY INSTRUCTIONS
- hot.
- CONTROLS AND FEATURES
- Front view
- INTRODUCTION
- UNPACKING
- BEFORE YOU START
- Cautions in use
- Location for your cooker
- Placement cautions
- Assembling the lid
- Condensation collector
- Food volume
- Preparation guidelines
- Preparing meat
- Preparing fresh vegetables
- Preparing long grain or basmati rice
- Preparing brown rice
- Dried beans, pulses etc
- OPERATION
- First use
- Pressure cooking - preparation
- Caution
- Pressure cooking - setting a preset
- Note:
- Steaming food - preparation
- Steaming food - selecting preset 04
- Sautéeing - selecting preset 05
- Sautéeing - the cooking process
- Slow cooking - preparation
- AFTER USE
- CARE AND CLEANING
- Cleaning the lid
- Cleaning the bowl
- Cleaning the main body
- Cleaning the accessories
- After cleaning
- TROUBLESHOOTING
- SPECIFICATIONS
- WARRANTY
Brand : MIDEA
Model : MY-CS6004W
Category : Multicooker