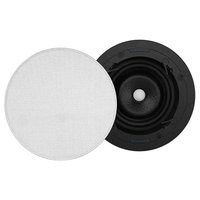
Visual Experience VX66R - Loudspeaker SONANCE - Free user manual and instructions
Find the device manual for free Visual Experience VX66R SONANCE in PDF.


| Product Type | In-ceiling Speaker |
| Brand | Sonance |
| Model | Visual Experience VX66R |
| Speaker Configuration | 2-way |
| Woofer Size | 6.5 inches (165 mm) |
| Woofer Material | Polypropylene |
| Tweeter Size | 1 inch (25 mm) |
| Tweeter Type | Silk dome, pivoting |
| Frequency Response | 40 Hz - 20 kHz |
| Impedance | 8 ohms |
| Power Handling (RMS) | 5 - 80 watts |
| Sensitivity | 90 dB SPL (1W/1m) |
| Cutout Diameter | 7.75 inches (197 mm) |
| Overall Diameter | 9.06 inches (230 mm) |
| Mounting Depth | 4.25 inches (108 mm) |
| Weight | 3.5 lbs (1.6 kg) |
| Grille Material | Perforated metal, paintable |
| Grille Color | White (paintable) |
| Mounting Type | In-ceiling with dog-leg clamps |
| Application | Home theater, distributed audio |
| Warranty | 5 years limited |
| Maintenance | Wipe with dry or damp cloth; do not use solvents |
Frequently Asked Questions - Visual Experience VX66R SONANCE
User questions about Visual Experience VX66R SONANCE
0 question about this device. Answer the ones you know or ask your own.
Ask a new question about this device
Download the instructions for your Loudspeaker in PDF format for free! Find your manual Visual Experience VX66R - SONANCE and take your electronic device back in hand. On this page are published all the documents necessary for the use of your device. Visual Experience VX66R by SONANCE.
USER MANUAL Visual Experience VX66R SONANCE
INSTALLATION AND SUPPORT MANUAL
VISUAL EXPERIENCE SPEAKERS
VX42 | VX46 | VX62 | VX66 | VX82 | VX86 | VX42R | VX46R | VX62R | VX64R | VX66R | VX82R | VX86R
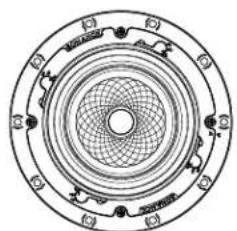
natural_image
Circular mechanical component diagram with concentric rings and mounting holes (no text or symbols)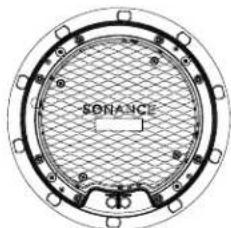
natural_image
Circular diagram with a central grid pattern and 'SONANCE' text, surrounded by small squares and dots (no readable symbols or labels)natural_image
Technical line drawing of a speaker with circular components and decorative elements (no text or symbols)RECTANGLE FRONT VIEW
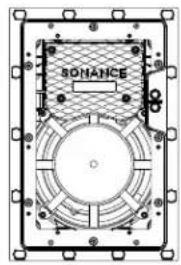
natural_image
Technical diagram of a device casing with labeled 'SONANCE' and circular components (no readable text beyond label)RECTANGLE BACK VIEW
TABLE OF CONTENTS
2 Box Contents
2 Introduction
2 Important Safety Information
2 Installation
5 Grille Painting
6 Technical Specifications
12 Warranty
BOX CONTENTS
(1) Cutout Template/Quickstart Guide
(2) VX Model Speakers
(2) Paintable Grilles
INTRODUCTION
Thank you for selecting Sonance Visual Experience Speakers. Sonance has over four decades of experience in premium distributed audio. Please take the time to carefully read through the manual and study the illustrations. This extra time can lead to trouble-free operation and continued musical enjoyment.
IMPORTANT: Read this section in its entirety before attempting use of speaker.
IMPORTANT SAFETY INSTRUCTIONS
Always follow these basic safety precautions when using your speakers to reduce the risk of fire, electric shock, and injury to prople or objects.
- Read all the safety and operating instructions before operating the speaker and retain them for future reference.
- Adhere to all warnings and precautions listed on the speaker and in the operating instructions.
- Follow all operating instructions.
INSTALLATION
-
Determine the location for the speaker.
-
Perform an obstruction survey to be certain that there are no studs, conduit, pipes, heating ducts, pocket doors, or air returns in the wall cavity that will interfere with the speaker.
- Position the included cutout template where the speaker is to be located and pencil an outline on the wall or ceiling. If you are unsure about obstructions, drill a small hole in the center of the outline and insert a coat hanger wire into the hole to feel-around for possible obstructions.
- Cut the mounting hole using tools appropriate for the construction, and run the speaker wires from the mounting hole to the amplifier location.
IMPORTANT: Consult local building codes before running speaker wires through walls.
i IMPORTANT PRODUCT FEATURE
Sonance Visual Experience speakers can be installed using a one-stage or two-stage installation process thanks to the innovative Flex Frame mounting system. Read through the installation steps for each to help decide which process works best for you, then follow the appropriate steps to install your VX product.
ONE-STAGE INSTALLATION
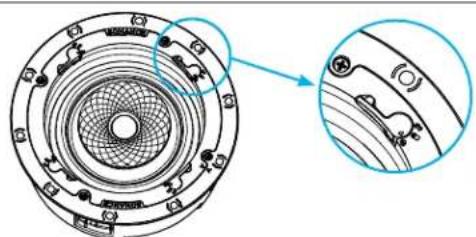
- Leave the Sonance VX speaker module Flex Frame latches in the LOCKED position as supplied out of the box. This will ensure that your VX speaker remains a single piece for the one-stage installation process (see Figure 1).
natural_image
Technical diagram of a mechanical component with concentric rings and mounting holes, shown with an inset close-up view (no text or symbols)Figure 1: Latch in the LOCKED Position
- Strip 1/4" - 1/2" (6mm - 13mm) of insulation from each speaker lead. Twist the strands or tin the exposed wire with solder to ensure that there are no stray strands.
IMPORTANT: Stray strands that touch each other can cause a short-circuit that can damage the amplifier.
- The speaker's connector posts are spring-loaded. Push the top of each connector post down to open the connector and insert the exposed wires into the holes in the posts (see Figure 2).
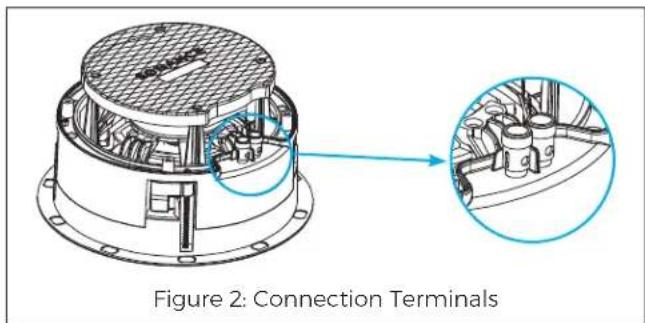
- The speaker's positive post is labeled with a red dot; the negative post is labeled with a black dot.
- After making all connections, double-check that you connected amplifier "+" to speaker "+" and amplifier "-" to speaker "-"
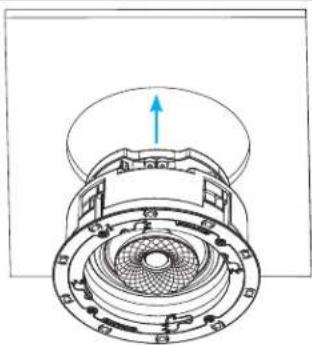
Sonance Visual Experience Series Speakers feature an exclusive integral RotoLock® mounting system for quick mounting directly into existing walls and ceilings. - Make sure all the Roto-Lock toggle feet are retracted so that the speaker can fit within the mounting hole (see Figure 3).
natural_image
Technical line drawing of a mechanical assembly with a central fan and top component (no text or symbols)Figure 3: Roto-Lock Toggle Feet Retracted
INSTALLING INTO THICKER SURFACES
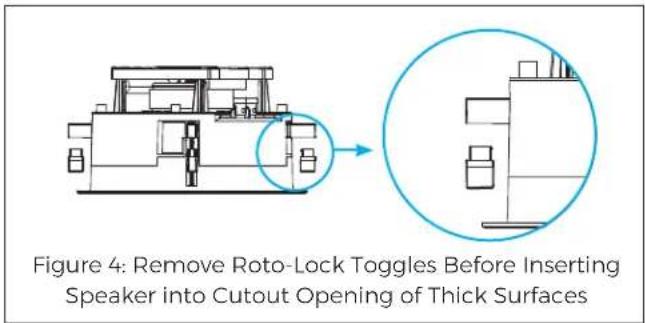
The Sonance Roto-Lock system can accommodate material thicknesses up to 1.5" (38mm) out of the box. For deeper substrates that are up to 2.125" (54mm) thick, remove the tip of the Roto-Lock toggles before inserting the speaker into the cutout opening (see Figure 4).
- Insert the speaker into the mounting hole and tighten the four screws on the front of the speaker baffle (see Figure 5).
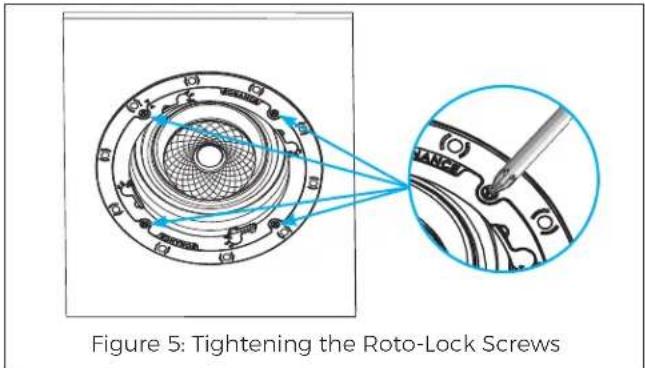
- The Roto-Lock clamps will automatically rotate into position and begin clamping the speaker.
IMPORTANT: Always use low-torque settings when using a screw gun and go very slowly; never over tighten.
IMPORTANT: Adjusting the tension of the Roto-Lock Clamps to help the speaker sit flat with the surface will help ensure proper grille contact all the way around the speaker.
TWO-STAGE INSTALLATION
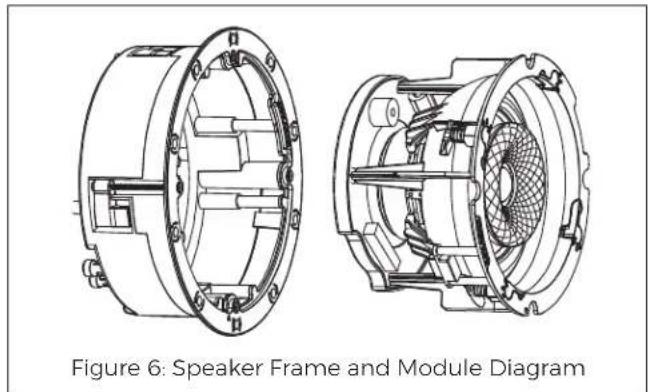
Sonance Visual Experience speaker models can be installed leveraging a unique two-stage process which allows the installer to separate the speaker frame from the speaker module to easily hold, wire, and secure the frame to the installation surface (see Figure 6). This feature makes it simple to pre-wire with maximum visibility and maneuverability without risk of dropping the speaker while on a ladder.
natural_image
Technical line drawing of a speaker frame and module diagram showing two views of a mechanical component (no text or symbols present)-
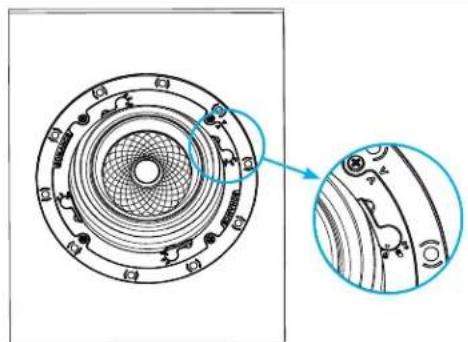
Use thumb pressure to rotate the VX speaker module Flex Frame latch into the UNLOCKED position.
-
Remove the speaker module from the frame (see Figure 7).
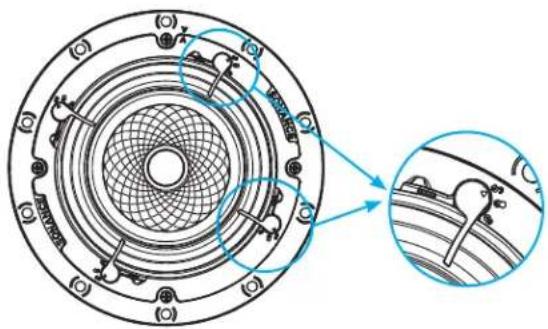
Figure 7: Remove Speaker Module from Frame
- Reserve the speaker module in a safe place for step 8.
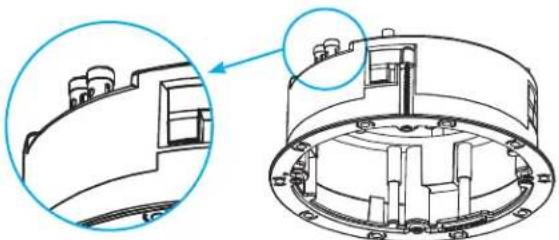
- Secure the speaker wires to the speaker frame using the spring loaded connector posts (see Figure 8).
natural_image
Technical line drawing of a mechanical component with cross-sectional view (no text or symbols)Figure 8: Secure Speaker Wires
- The speaker's connector posts are spring-loaded. Push the top of each connector post down to open the connector and insert the exposed wires into the holes in the posts.
- The speaker's positive post is labeled with a red dot; the negative post is labeled with a black dot.
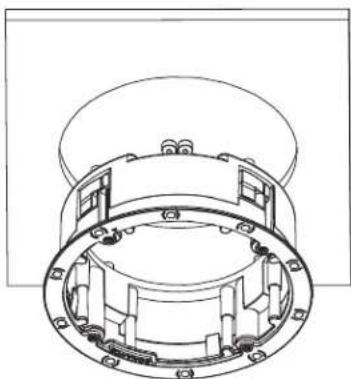
- Install the wired VX speaker frame into the cutout in the installation surface. Make sure all Roto-Lock toggle feet are retracted so that they are tucked within the mounting hole's borders and then insert the speaker frame into the hole (see Figure 9).
natural_image
Technical line drawing of a mechanical component with internal cavities and mounting holes (no text or symbols)Figure 9: Inserting Speaker Frame
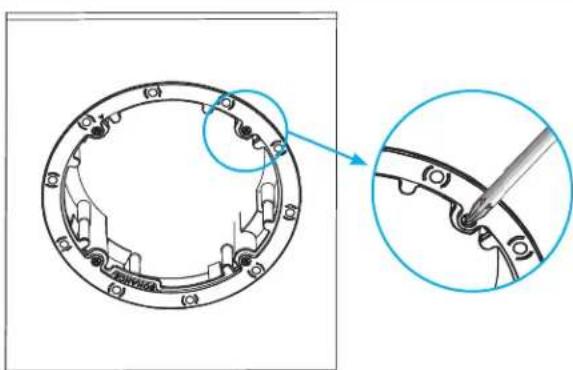
- Tighten the four screws on the front baffle to clamp the Roto-Lock toggle feet into position, securing the speaker frame to the surface (see Figure 10).
natural_image
Technical diagram of a mechanical component with a magnified inset showing a detail view (no text or symbols)Figure 10: Securing the Frame
IMPORTANT: Always use low-torque settings when using a screw gun and go very slowly; never over tighten.
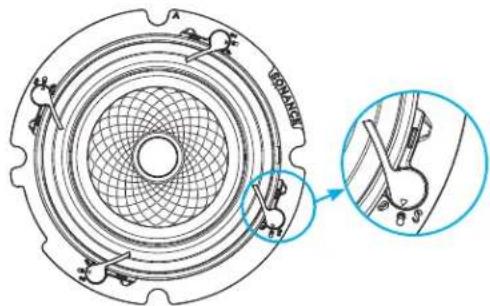
- Use thumb pressure to rotate the VX speaker module Flex Frame latch into the middle HOLD position (see Figure 11).
natural_image
Technical diagram of a mechanical component with internal mesh structure and magnified detail view (no text or symbols)Figure 11: Move Latch to Middle HOLD Position
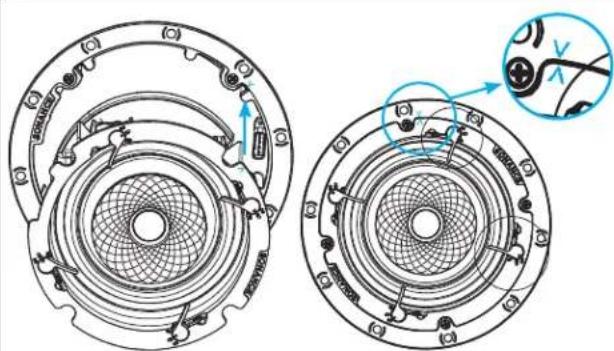
- Firmly and fluidly snap the VX speaker module into the installed VX speaker frame. Line up the bright blue alignment fin of the speaker module with the matching blue alignment notch on the speaker frame (see Figure 12).
natural_image
Technical diagram of two circular mechanical components with internal mesh and labeled parts, shown from top and side views (no text or symbols present)Figure 12: Aligning the Speaker Frame
-
Press firmly to snap the speaker into the frame. Once you hear the "click," the speaker will be secure. Carefully remove your hand to ensure the speaker is locked into place.
-
Use thumb pressure to rotate the VX speaker module Flex Frame latch into the LOCKED position (see Figure 13).
natural_image
Technical diagram of a circular mechanical component with internal mesh structure and a magnified inset showing detail (no text or symbols)Figure 13: Latch in LOCKED Position
- The VX grille is held in place by several small, powerful magnets on the speaker frame. Place the grille against the speaker and the magnets will hold it firmly in place. When properly installed, the grille flange should make contact with the surface all the way around the speaker.
PAINTING THE GRILLES
Sonance Visual Experience Series speaker grilles completely cover the exposed speaker frame, so only the grilles (not the speakers themselves) require painting.
- Remove and save the scrim cloth from the back of the grille.
-
Prime the grille with a metal primer/bonder in a spray can. Carefully follow the manufacturer's directions on the can.
-
We recommend using water-based latex paint on the grilles. Thin the paint with a proper thinning agent to a ratio of 1:1 paint-to-thinner, and strain it through a standard mesh strainer to remove any lumps.
- Use a small touch-up gun or cap-spray gun with a #3 tip for painting.
- Set the nozzle with a medium to wide fan.
- Set the pressure regulator to 60psi.
- Lightly spray the front of the grille in three quick strokes from approximately 10^ away.
- Let the paint set for a minute, then turn the grille 90^ and lightly spray the grille again in three quick strokes.
-
Repeat this step until all four sides of the grille have been evenly painted.
-
While the paint is still wet, inspect the grille and make sure that excess paint has not collected underneath the grille frame, and that none of the grille perforations are filled with paint. If any are, use compressed air to blow the paint out of the perforations.
IMPORTANT: If you find any grille perforations that are plugged with paint after the paint has dried, use a straight pin or sewing needle to carefully remove the paint.
- Optional step. Reattach the scrim cloth to the back of the grille. Once the paint has dried, you may need to use an extremely light single pass coating of 3M Super 76 spray adhesive.
- Once the paint has thoroughly dried, mount the grille on the speaker.
TECHNICAL SPECIFICATIONS - 4 INCH RECTANGLE
VX42
| Tweeter 0.75" (19mm) cloth dome, Ferrofluid-cooled, acoustic back chamber |
| Woofer 4.5" (114mm) textured polypropylene cone, rubber surround |
| Dispersion Technology Sinusoidal textured waveguide |
| Frequency Response 60Hz - 20kHz +/-3dB |
| Impedance 8 ohms nominal; 6 ohms minimum |
| Power Handling 5 watts minimum; 70 watts maximum |
| Sensitivity 89dB SPL (2.83V/1 meter) |
| Mounting Technology Flex Frame 1 or 2-stage, 4 x RotoLock® Clamps |
| Micro Trim Grille (WxH) 5.47" x 8.8" (139.1mm x 223.6mm) |
| Trimless Grille (WxH) 5.13" x 8.46" (130.2mm x 214.8mm) |
| Speaker Mounting Depth (D) 3.28" (83.2mm) |
| Mounting Depth + Retrofit Encl. 3.84" (97.6mm) |
| Cut-Out Dims (WxH) 4.625" x 8" (117mm x 203mm) |
| Shipping Weight 6 lbs. (2.8kg) |
VX46
| Tweeter 0.75" (19mm) ceramic dome, Ferrofluid-cooled, acoustic back chamber |
| Woofer 4.5" (114mm) Kevlar/Nomex cone, rubber surround |
| Dispersion Technology Sinusoidal textured waveguide |
| Frequency Response 58Hz - 20kHz +/-3dB |
| Impedance 8 ohms nominal; 6 ohms minimum |
| Power Handling 5 watts minimum; 80 watts maximum |
| Sensitivity 90dB SPL (2.83V/1 meter) |
| Mounting Technology Flex Frame 1 or 2-stage, 4 x RotoLock® Clamps |
| Micro Trim Grille (WxH) 5.47" x 8.8" (139.1mm x 223.6mm) |
| Trimless Grille (WxH) 5.13" x 8.46" (130.2mm x 214.8mm) |
| Speaker Mounting Depth (D) 3.28" (83.2mm) |
| Mounting Depth + Retrofit Encl. 3.84" (97.6mm) |
| Cut-Out Dims (WxH) 4.625" x 8" (117mm x 203mm) |
| Shipping Weight 6 lbs. (2.8kg) |
TECHNICAL SPECIFICATIONS - 4 INCH ROUND
VX42R
| Tweeter 0.75" (19mm) cloth dome, Ferrofluid-cooled, acoustic back chamber |
| Woofer 4.5" (114mm) textured polypropylene cone, rubber surround, pivoting |
| Dispersion Technology Sinusoidal textured waveguide |
| Speaker Pivot Coincident Woofer + Tweeter Pivoting |
| Frequency Response 60Hz - 20kHz +/-3dB |
| Impedance 8 ohms nominal; 6 ohms minimum |
| Power Handling 5 watts minimum; 70 watts maximum |
| Sensitivity 89dB SPL (2.83V/1 meter) |
| Mounting Technology Flex Frame 1 or 2-stage, 3 x RotoLock® Clamps |
| Round Micro Trim Grille (Dia) 6.77" (171.8mm) |
| Round Trimless Grille (Dia) 6.42" (163mm) |
| Square Micro Trim Grill (WxH) 6.77" x 6.77" (171.8mm x 171.8mm) |
| Square Trimless Grille (WxH) 6.42" x 6.42" (163mm x 163mm) |
| Speaker Mounting Depth (D) 4.53" (115mm) |
| Mounting Depth + Retrofit Encl. 5.75" (146.1mm) |
| Cut-Out Dims (Dia) 5.875" (149mm) |
| Shipping Weight 6 lbs. (2.8kg) |
VX46R
| Tweeter 0.75" (19mm) ceramic dome, Ferrofluid-cooled, acoustic back chamber |
| Woofer 4.5" (114mm) Kevlar/Nomex cone, rubber surround, pivoting |
| Dispersion Technology Sinusoidal textured waveguide |
| Speaker Pivot Coincident Woofer + Tweeter Pivoting |
| Frequency Response 58Hz - 20kHz +/-3dB |
| Impedance 8 ohms nominal; 6 ohms minimum |
| Power Handling 5 watts minimum; 80 watts maximum |
| Sensitivity 90dB SPL (2.83V/1 meter) |
| Mounting Technology Flex Frame 1 or 2-stage, 3 x RotoLock® Clamps |
| Round Micro Trim Grille (Dia) 6.77" (171.8mm) |
| Round Trimless Grille (Dia) 6.42" (163mm) |
| Square Micro Trim Grill (WxH) 6.77" x 6.77" (171.8mm x 171.8mm) |
| Square Trimless Grille (WxH) 6.42" x 6.42" (163mm x 163mm) |
| Speaker Mounting Depth (D) 4.61" (117.1mm) |
| Mounting Depth + Retrofit Encl. 5.75" (146.1mm) |
| Cut-Out Dims (Dia) 5.875" (149mm) |
| Shipping Weight 6 lbs. (2.8kg) |
TECHNICAL SPECIFICATIONS - 6 INCH RECTANGLE
VX62
| Tweeter 1" (25mm) cloth dome, Ferrofluid-cooled, acoustic back chamber |
| Woofer 6.5" (165mm) textured polypropylene cone, rubber surround |
| Dispersion Technology Sinusoidal textured waveguide |
| Frequency Response 45Hz - 20kHz +/-3dB |
| Impedance 8 ohms nominal; 6 ohms minimum |
| Power Handling 5 watts minimum; 125 watts maximum |
| Sensitivity 89dB SPL (2.83V/1 meter) |
| Mounting Technology Flex Frame 1 or 2-stage, 4 x RotoLock® Clamps |
| Micro Trim Grille (WxH) 8.23" x 12.12" (208.9mm x 307.7mm) |
| Trimless Grille (WxH) 7.88" x 11.77" (200.1mm x 298.9mm) |
| Speaker Mounting Depth (D) 3.48" (88.3mm) |
| Mounting Depth + Retrofit Encl. 3.84" (97.6mm) |
| Cut-Out Dims (WxH) 6.9375" x 10.75" (176mm x 273mm) |
| Shipping Weight 9 lbs. (4.1kg) |
VX66
| Tweeter 1" (25mm) ceramic dome, Ferrofluid-cooled, acoustic back chamber |
| Woofer 6.5" (165mm) Kevlar/Nomex cone, rubber surround |
| Dispersion Technology Sinusoidal textured waveguide |
| Frequency Response 43Hz - 20kHz +/-3dB |
| Impedance 8 ohms nominal; 6 ohms minimum |
| Power Handling 5 watts minimum; 140 watts maximum |
| Sensitivity 90dB SPL (2.83V/1 meter) |
| Mounting Technology Flex Frame 1 or 2-stage, 4 x RotoLock® Clamps |
| Micro Trim Grille (WxH) 8.23" x 12.12" (208.9mm x 307.7mm) |
| Trimless Grille (WxH) 7.88" x 11.77" (200.1mm x 298.9mm) |
| Speaker Mounting Depth (D) 3.48" (88.3mm) |
| Mounting Depth + Retrofit Encl. 3.84" (97.6mm) |
| Cut-Out Dims (WxH) 6.9375" x 10.75" (176mm x 273mm) |
| Shipping Weight 10 lbs. (4.5kg) |
TECHNICAL SPECIFICATIONS - 6 INCH ROUND
VX62R
| Tweeter | 1" (25mm) cloth dome, Ferrofluid-cooled, acoustic back chamber |
| Woofer | 6.5" (165mm) textured polypropylene cone, rubber surround, pivoting |
| Dispersion Technology | Sinusoidal textured waveguide |
| Speaker Pivoting | Coincident Woofer + Tweeter Pivoting |
| Frequency Response | 45Hz - 20kHz +/-3dB |
| Impedance | 8 ohms nominal; 6 ohms minimum |
| Power Handling | 5 watts minimum; 125 watts maximum |
| Sensitivity | 89dB SPL (2.83V/1 meter) |
| Mounting Technology | Flex Frame 1 or 2-stage, 4 x RotoLock® Clamps |
VX64R
| Tweeter 1" (25mm) ceramic dome, Ferrofluid-cooled, acoustic back chamber |
| Woofer 6.5" (165mm) textured polypropylene cone, rubber surround, pivoting |
| Dispersion Technology Sinusoidal textured waveguide |
| Speaker Pivoting Coincident Woofer + Tweeter Pivoting |
| Frequency Response 45Hz - 20kHz +/-3dB |
| Impedance 8 ohms nominal; 6 ohms minimum |
| Power Handling 5 watts minimum; 125 watts maximum |
| Sensitivity 89dB SPL (2.83V/1 meter) |
| Mounting Technology Flex Frame 1 or 2-stage, 4 x RotoLock® Clamps |
VX66R
| Tweeter 1" (25mm) ceramic dome, Ferrofluid-cooled, acoustic back chamber |
| Woofer 6.5" (165mm) Kevlar/ Nomex cone, rubber surround, pivoting |
| Dispersion Technology Sinusoidal textured waveguide |
| Speaker Pivoting Coincident Woofer + Tweeter Pivoting |
| Frequency Response 43Hz - 20kHz +/-3dB |
| Impedance 8 ohms nominal; 6 ohms minimum |
| Power Handling 5 watts minimum; 140 watts maximum |
| Sensitivity 90dB SPL (2.83V/1 meter) |
| Mounting Technology Flex Frame 1 or 2-stage, 4 x RotoLock® Clamps |
SHARED DIMENSIONS
| Round Micro Trim Grille (Dia): 9.62" (244.4mm) | Speaker Mounting Depth (D): 4.92" (125mm) |
| Round Trimless Grille (Dia): 9.28" (235.6mm) | Mounting Depth + Retrofit Encl.: 5.75" (146.1mm) |
| Square Micro Trim Grill (WxH): 9.62" x 9.62" (244.4mm x 244.4mm) | Cut-Out Dims (Dia): 8.25" (210mm) |
| Square Trimless Grille (WxH): 9.28" x 9.28" (235.6mm x 235.6mm) | Shipping Weight: 9 lbs. (4.1kg) |
TECHNICAL SPECIFICATIONS - 8 INCH RECTANGLE
VX82
| Tweeter 1.2" (30mm) cloth dome, Ferrofluid-cooled, acoustic back chamber |
| Woofer 8" (203mm) textured polypropylene cone, rubber surround |
| Dispersion Technology Sinusoidal textured waveguide |
| Frequency Response 38Hz - 20kHz +/-3dB |
| Impedance 8 ohms nominal; 6 ohms minimum |
| Power Handling 5 watts minimum; 125 watts maximum |
| Sensitivity 90dB SPL (2.83V/1 meter) |
| Mounting Technology Flex Frame 1 or 2-stage, 6 x RotoLock® Clamps |
| Micro Trim Grille (WxH) 9.72" x 15.87" (246.8mm x 403.1mm) |
| Trimless Grille (WxH) 9.37" x 15.52" (238.0mm x 394.3mm) |
| Speaker Mounting Depth (D) 3.64" (92.4mm) |
| Mounting Depth + Retrofit Encl. 3.86" (98.1mm) |
| Cut-Out Dims (WxH) 8.5" x 14.5" (216mm x 368mm) |
| Shipping Weight 20 lbs. (9kg) |
VX86
| Tweeter 1.2" (30mm) ceramic dome, Ferrofluid-cooled, acoustic back chamber |
| Woofer 8" (203mm) Kevlar/Nomex cone, rubber surround |
| Dispersion Technology Sinusoidal textured waveguide |
| Frequency Response 34Hz - 20kHz +/-3dB |
| Impedance 8 ohms nominal; 6 ohms minimum |
| Power Handling 5 watts minimum; 150 watts maximum |
| Sensitivity 91dB SPL (2.83V/1 meter) |
| Mounting Technology Flex Frame 1 or 2-stage, 6 x RotoLock® Clamps |
| Micro Trim Grille (WxH) 9.72" x 15.87" (246.8mm x 403.1mm) |
| Trimless Grille (WxH) 9.37" x 15.52" (238.0mm x 394.3mm) |
| Speaker Mounting Depth (D) 3.64" (92.4mm) |
| Mounting Depth + Retrofit Encl. 3.86" (98.1mm) |
| Cut-Out Dims (WxH) 8.5" x 14.5" (216mm x 368mm) |
| Shipping Weight 20 lbs. (9kg) |
TECHNICAL SPECIFICATIONS - 8 INCH ROUND
VX82R
| Tweeter 1.2" (30mm) cloth dome, acoustic back chamber, Ferrofluid-cooled |
| Woofer 8" (203mm) textured polypropylene cone, rubber surround, pivoting |
| Dispersion Technology Sinusoidal textured waveguide |
| Speaker Pivot Coincident Woofer + Tweeter Pivoting |
| Frequency Response 38Hz - 20kHz +/-3dB |
| Impedance 8 ohms nominal; 6 ohms minimum |
| Power Handling 5 watts minimum; 125 watts maximum |
| Sensitivity 90dB SPL (2.83V/1 meter) |
| Mounting Technology Flex Frame 1 or 2-stage, 4 x RotoLock® Clamps |
| Round Micro Trim Grille (Dia) 11.52" (292.6mm) |
| Round Trimless Grille (Dia) 11.17" (283.8mm) |
| Square Micro Trim Grill (WxH) 11.52" x 11.52" (292.6mm x 292.6mm) |
| Square Trimless Grille (WxH) 11.17" x 11.17" (283.8mm x 283.8mm) |
| Speaker Mounting Depth (D) 5.51" (140mm) |
| Mounting Depth + Retrofit Encl. 6.52" (165.6mm) |
| Cut-Out Dims (Dia) 10.125" (257mm) |
| Shipping Weight 20 lbs. (9kg) |
VX86R
| Tweeter 1.2" (30mm) ceramic dome, acoustic back chamber, Ferrofluid-cooled |
| Woofer 8" (203mm) Kevlar/Nomex cone, rubber surround, pivoting |
| Dispersion Technology Sinusoidal textured waveguide |
| Speaker Pivot Coincident Woofer + Tweeter Pivoting |
| Frequency Response 34Hz - 20kHz +/-3dB |
| Impedance 8 ohms nominal; 6 ohms minimum |
| Power Handling 5 watts minimum; 150 watts maximum |
| Sensitivity 91dB SPL (2.83V/1 meter) |
| Mounting Technology Flex Frame 1 or 2-stage, 4 x RotoLock® Clamps |
| Round Micro Trim Grille (Dia) 11.52" (292.6mm) |
| Round Trimless Grille (Dia) 11.17" (283.8mm) |
| Square Micro Trim Grill (WxH) 11.52" x 11.52" (292.6mm x 292.6mm) |
| Square Trimless Grille (WxH) 11.17" x 11.17" (283.8mm x 283.8mm) |
| Speaker Mounting Depth (D) 5.51" (140mm) |
| Mounting Depth + Retrofit Encl. 6.52" (165.6mm) |
| Cut-Out Dims (Dia) 10.125" (257mm) |
| Shipping Weight 20 lbs. (9kg) |
LIMITED LIFETIME WARRANTY
Sonance warrants to the first end-user purchaser that this Sonance-brand product ("Product"), when purchased from an authorized Sonance Dealer/Distributor, will be free from defective workmanship and materials for the life of the Product, except for the grille, which is warranted for five (5) years. Sonance will at its option and expense either repair the defect or replace the Product with a new or remanufactured Product or a reasonable equivalent.
EXCLUSIONS: TO THE EXTENT PERMITTED BY LAW, THE WARRANTY SET FORTH ABOVE IS IN LIEU OF, AND EXCLUSIVE OF, ALL OTHER WARRANTIES, EXPRESS OR IMPLIED, AND IS THE SOLE AND EXCLUSIVE WARRANTY PROVIDED BY SONANCE. ALL OTHER EXPRESS AND IMPLIED WARRANTIES, INCLUDING THE IMPLIED WARRANTIES OF MERCHANTABILITY, IMPLIED WARRANTY OF FITNESS FOR USE, AND IMPLIED WARRANTY OF FITNESS FOR A PARTICULAR PURPOSE ARE SPECIFICALLY EXCLUDED. No one is authorized to make or modify any warranties on behalf of Sonance.
The warranty stated above is the sole and exclusive remedy and Sonance's performance shall constitute full and final satisfaction of all obligations, liabilities and claims with respect to the Product.
IN ANY EVENT, SONANCE SHALL NOT BE LIABLE FOR CONSEQUENTIAL, INCIDENTAL, ECONOMIC, PROPERTY, BODILY INJURY, OR PERSONAL INJURY DAMAGES ARISING FROM THE PRODUCT, ANY BREACH OF THIS WARRANTY OR OTHERWISE.
This warranty statement gives you specific legal rights, and you may have other rights which vary from state to state. Some states do not allow the exclusion of implied warranties or limitations of remedies, so the above exclusions and limitations may not apply. If your state does not allow disclaimer of implied warranties, the duration of such implied warranties is limited to period of Sonance's express warranty. Your Product Model and Description: Sonance Visual Experience Round Speakers & Square Adapters.
Additional Limitations and Exclusions from Warranty Coverage: The warranty described above is non-transferable, applies only to the initial installation of the Product, does not include installation of any repaired or replaced Product, does not include damage to allied or associated equipment which may result for any reason from use with this Product, and does not include labor or parts caused by accident, disaster, negligence, improper installation, misuse (e.g. overdriving the amplifier or speaker, excessive heat or cold or humidity, outdoor installation), or from service or repair which has not been authorized by Sonance.
Obtaining Authorized Service: To qualify for the warranty, you must contact your authorized Sonance Dealer/Installer or call Sonance Customer Service at (949) 492-7777, must obtain a return merchandise number (RMA), and must deliver the Product to Sonance shipping prepaid during the warranty period, together with the original sales receipt, or invoice or other satisfactory proof of purchase.
In order to initiate a warranty claim:
- Contact Sonance Technical Support with a description of the fault, the amplifier's serial number and the date of purchase from an authorized Sonance dealer at: technicalsupport@sonance.com
- Sonance Technical Support will follow-up and may request additional troubleshooting.
- Once a determination has been made on the fault, Sonance Customer Service will follow-up by email. Please have a scanned copy of your Sonance Visual Experience Speaker sales invoice ready to send upon request to document the speaker's warranty status.
- Sonance Customer Service will provide an RMA number to be included on the shipping label of the packaging. Please send the speaker back in its original factory carton, which has been specifically designed to protect the speaker during transit.
Contact us at: https://www.sonance.com/company/contact
SONANCE
©2024 Sonance. All rights reserved. Sonance is a registered trademarks of Dana Innovations. Due to continuous product improvement, all features and specifications are subject to change without notice. For the latest Sonance product specification information visit our website: www.sonance.com
SONANCE · 991 Calle Amanecer · San Clemente, CA 92673 USA · PHONE: (949) 492-7777 · FAX: (949) 361-5151 · Technical Support: (949) 492-7777 01.18.2024
- VISUAL EXPERIENCE SPEAKERS
- TABLE OF CONTENTS
- BOX CONTENTS
- INTRODUCTION
- IMPORTANT SAFETY INSTRUCTIONS
- INSTALLATION
- i IMPORTANT PRODUCT FEATURE
- ONE-STAGE INSTALLATION
- IMPORTANT: Stray strands that touch each other can cause a short-circuit that can damage the amplifier.
- INSTALLING INTO THICKER SURFACES
- TWO-STAGE INSTALLATION
- IMPORTANT: Always use low-torque settings when using a screw gun and go very slowly; never over tighten.
- PAINTING THE GRILLES
- IMPORTANT: If you find any grille perforations that are plugged with paint after the paint has dried, use a straight pin or sewing needle to carefully remove the paint.
- TECHNICAL SPECIFICATIONS - 4 INCH RECTANGLE
- TECHNICAL SPECIFICATIONS - 4 INCH ROUND
- TECHNICAL SPECIFICATIONS - 6 INCH RECTANGLE
- TECHNICAL SPECIFICATIONS - 6 INCH ROUND
- TECHNICAL SPECIFICATIONS - 8 INCH RECTANGLE
- TECHNICAL SPECIFICATIONS - 8 INCH ROUND
- LIMITED LIFETIME WARRANTY
- SONANCE
Brand : SONANCE
Model : Visual Experience VX66R
Category : Loudspeaker