
HD2331 - Pliers PHILIPS - Free user manual and instructions
Find the device manual for free HD2331 PHILIPS in PDF.


 FR
FR
 BG
BG
 CS
CS
 DA
DA
 DE
DE
 EL
EL
 EN
EN
 ES
ES
 ET
ET
 FI
FI
 HE
HE
 HU
HU
 IT
IT
 KK
KK
 LT
LT
 LV
LV
 MK
MK
 NL
NL
 NO
NO
 PL
PL
 PT
PT
 RO
RO
 RU
RU
 SK
SK
 SL
SL
 SQ
SQ
 SV
SV
 TR
TR
 UK
UK
| Product type | Steam iron |
| Brand | Philips |
| Model | HD2331 |
| Category | Clothes iron |
| Power supply | 220-240 V, 50-60 Hz |
| Power | 2000 W |
| Tank capacity | 300 ml |
| Dimensions (L x W x H) | 300 x 130 x 150 mm |
| Weight | 1.2 kg |
| Soleplate type | Non-stick soleplate |
| Continuous steam flow | Up to 40 g/min |
| Steam boost | Up to 150 g/min |
| Functions | Anti-drip, auto-off, anti-calc self-cleaning, vertical spray |
| Safety | Auto shut-off (vertical or horizontal position) |
| Maintenance | Regular descaling with self-cleaning function |
| Spare parts | Water tank, soleplate, steam button, filling cap |
| Warranty | 2 years (excluding abusive use) |
Frequently Asked Questions - HD2331 PHILIPS
User questions about HD2331 PHILIPS
0 question about this device. Answer the ones you know or ask your own.
Ask a new question about this device
Download the instructions for your Pliers in PDF format for free! Find your manual HD2331 - PHILIPS and take your electronic device back in hand. On this page are published all the documents necessary for the use of your device. HD2331 by PHILIPS.
USER MANUAL HD2331 PHILIPS
English 6
Czech 11
Danish 16
German 21
Estonian 27
Spanish 32
French 37
Croatian 42
Italian 47
Latvian 52
Lithuanian 57
Hungarian 62
Dutch 67
Norwegian 72
Polish 77
Portuguese 82
Romanian 87
Albanian 92
Slovenian 97
Slovak 102
Serbian 107
Finnish 112
Swedish 117
Turkish 122
Greek 127
Bulgarian 132
Macedonian 137
Russian 142
Ukrainian 147
Kazakh 152
Introduction
Congratulations on your purchase and welcome to Philips!
To fully benefit from the support that Philips offers, register your product at www.philips.com/welcome.
General description
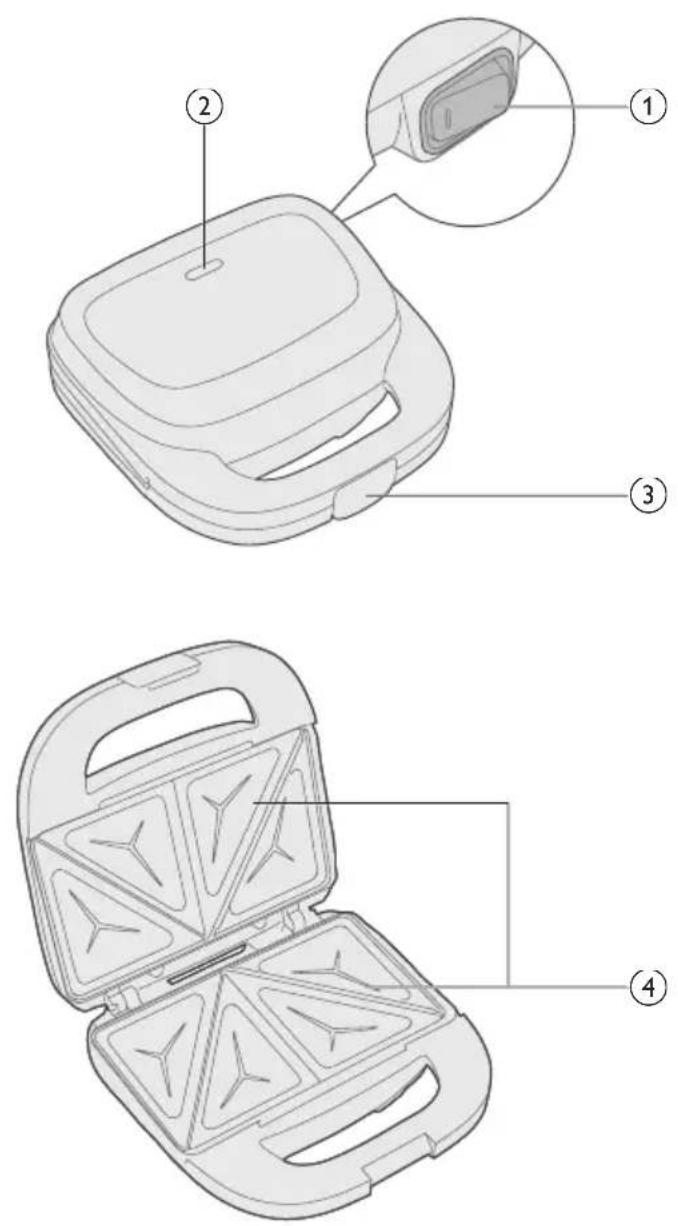
2 Working status light
3 Handle lock
4 Heating Plates:
Important
Danger
Warning
- Do not immerse the appliance or the mains cord in water or any other liquid.
- Check if the voltage indicated on the bottom of the appliance corresponds to the local mains voltage before you connect the appliance.
- Do not use the appliance if the plug, the mains cord or other parts are damaged.
- Keep the mains cord away from hot surfaces.
- Never connect this appliance to an external timer switch in order to avoid a hazardous situation.
- Do not let the appliance operate unattended.
- This appliance can be used by children aged from 8 years and above and persons with reduced physical, sensory or mental capabilities or lack of experience and knowledge if they have been given supervision or instruction concerning use of the appliance in a safe way and understand the hazards involved. Children shall not play with the appliance. Cleaning and user maintenance shall not be made by children unless they are older than 8 and supervised.
- Keep the appliance and its cord out of reach of children less than 8 years.
- The appliance is not intended to be operated by means of an external timer or a separate remote control system.
- The accessible surfaces may become hot during use.
Caution
- This appliance is intended for normal household use only. It is not intended for use in environments such as staff kitchens of shops, offices, farms or other work environments. Nor is it intended to be used by clients in hotel, motels, bed and breakfasts and other residential environments.
- Only connect the appliance to an earthed wall socket.
- Do not let the mains cord hang over the edge of the table or worktop on which the appliance stands.
- The temperature of accessible surfaces may be high when the appliance operates.
- Let the appliance cool down completely before you clean the appliance or put it away.
- Never touch the plates with sharp or abrasive items, as this damages the non-stick surface.
- This appliance is not a grill and is not intended for preparing other foods than sandwiches.
- Always switch off and unplug the appliance after use.
- Always clean the appliance after use.
Electromagnetic fields (EMF)
This appliance complies with the applicable standards and regulations regarding exposure to electromagnetic fields.
Recycling
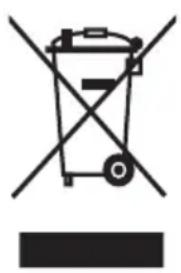
- This symbol means that electrical products shall not be disposed of with normal household waste.
- Follow your country's rules for the separate collection of electrical products.
Warranty and support
Versuni offers a two-year warranty after purchase on this product. This warranty is not valid if a defect is due to incorrect use or poor maintenance. Our warranty does not affect your rights under law as a consumer. For more information or for invoking the warranty, please visit our website www.philips.com/support.
Before first use
Before using your sandwich maker, make sure that it is clean and dry.
Wipe the plates with a damp cloth and let them dry thoroughly before plugging in the appliance.
Using the appliance
The sandwich maker is intended for making grilled or toasted sandwiches.
Follow steps below to use the appliance.
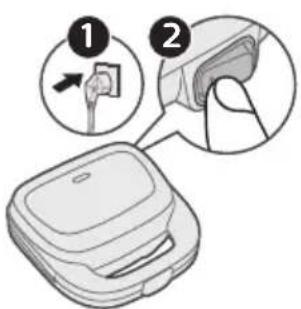
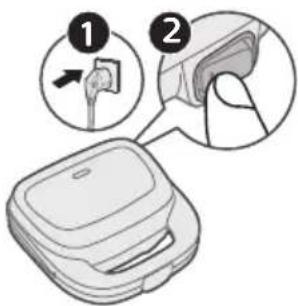
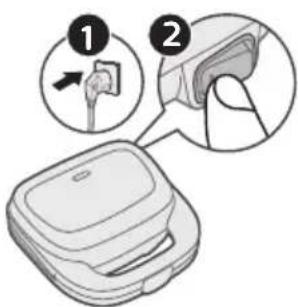
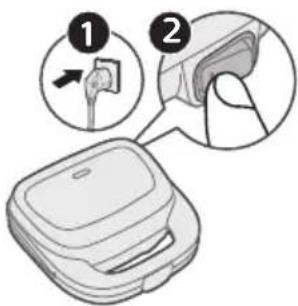
1 Plug the appliance into a power outlet. 2 Turn on the appliance by flipping the power switch to the "on" position. The power light will turn on, indicating that the appliance is heating up.
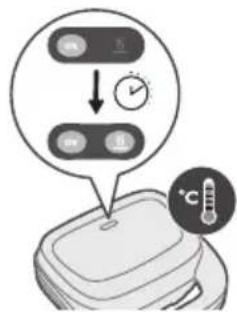
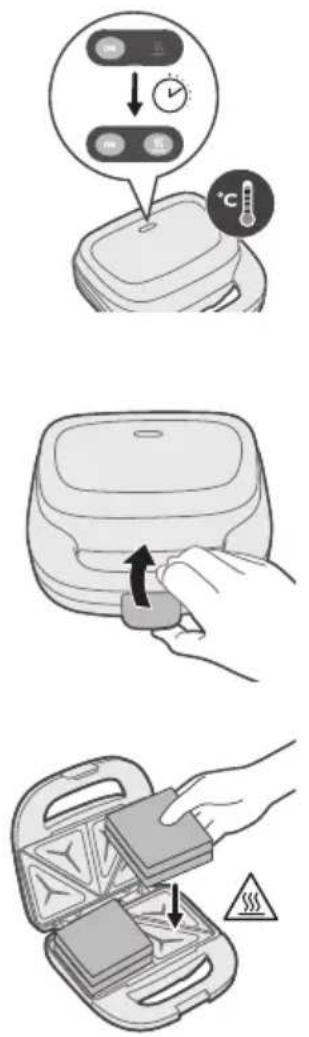
3 Wait for the heating light to turn on, indicating that the preheating is complete.
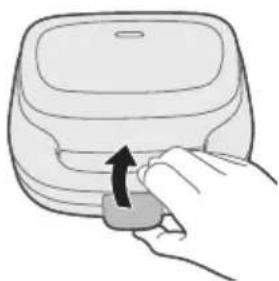
4 Open the sandwich maker by unlocking the handle lock.
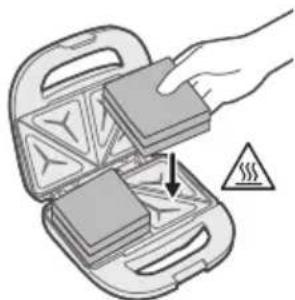
5 Place the prepared sandwich on the bottom cooking plate.
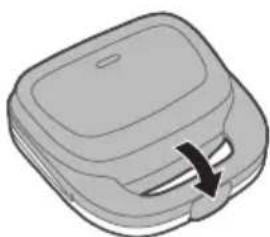
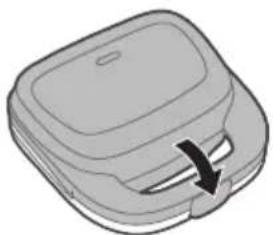
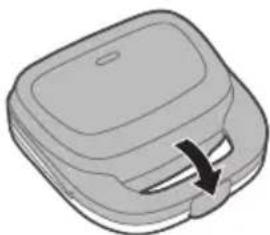
6 Close the sandwich maker and lock it using the handle lock.
The heating light will turn on again, indicating that the cooking process has begun.
7 Allow the sandwich to cook.
Do not open the sandwich maker during cooking to prevent heat loss.
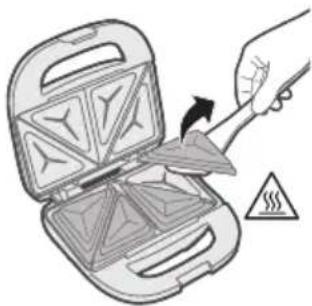
8 Once the cooking time is complete, carefully open the sandwich maker by unlocking the handle lock.
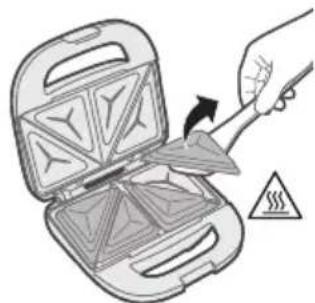
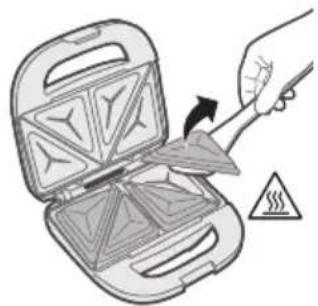
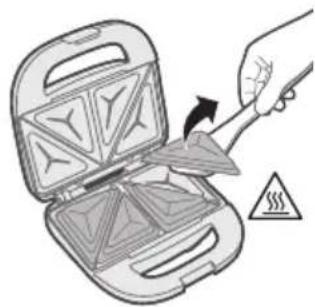
9 Use a heat-resistant utensil to remove the cooked sandwich.
10 Unplug the appliance.
Cleaning and Maintenance
Never use aggressive or abrasive cleaning agents and materials, as this damages the non-stick coating of the plates.
Never immerse the appliance in water or any other liquid, nor rinse it under the tap.
Store the appliance in a dry and safe place when not in use.
1 Do not use metal, sharp, or abrasive utensils. 2 Switch off and unplug the appliance. 3 Let the appliance cool down properly in the open position. 4 First remove excess oil from the plates with a piece of kitchen paper before cleaning them. 5 Use a wooden or plastic spatula to remove sticky food residues (for example, solidified cheese) from the cooking plates. 6 Clean the cooking plates with a moist soft cloth or sponge. 7 Clean the outside of the appliance with a moist cloth.
Introduction
2 Working status light
3 Handle lock
4 Heating Plates:
Important information
Danger
Before using your sandwich maker, make sure that it is clean and dry. Wipe the plates with a damp cloth and let them dry thoroughly before plugging in the appliance.
Using the appliance
Never use aggressive or abrasive cleaning agents and materials, as this damages the non-stick coating of the plates.
Never immerse the appliance in water or any other liquid, nor rinse it under the tap.
Store the appliance in a dry and safe place when not in use.
1 Do not use metal, sharp or abrasive utensils. 2 Switch off and unplug the appliance. 3 Let the appliance cool down properly in open position. 4 First remove excess oil from the plates with a piece of kitchen paper before you clean them. 5 Use a wooden or plastic spatula to remove sticky food residues (for example solidified cheese) from the cooking plates. 6 Clean the cooking plates with a moist soft cloth or sponge. 6 Clean the outside of the appliance with a moist cloth.
Introduction
2 Working status light
3 Handle lock
4 Heating Plates:
Important
Danger
Warning
Before using your sandwich maker, make sure that it is clean and dry.
Wipe the plates with a damp cloth and let them dry thoroughly before plugging in the appliance.
The sandwich toaster is intended for making grilled or toasted sandwiches.
Never use aggressive or abrasive cleaning agents and materials, as this damages the non-stick coating of the plates.
Never immerse the appliance in water or any other liquid, nor rinse it under the tap.
Store the appliance in a dry and safe place when not in use.
1 Do not use metal, sharp or abrasive utensils. 2 Switch off and unplug the appliance. 3 Let the appliance cool down properly in open position. 4 First remove excess oil from the plates with a piece of kitchen paper before you clean them. 5 Use a wooden or plastic spatula to remove sticky food residues (for example solidified cheese) from the cooking plates. 6 Clean the cooking plates with a moist soft cloth or sponge. 6 Clean the outside of the appliance with a moist cloth.
Introduction
2 Working status light
3 Handle lock
4 Heating Plates:
Important!
Caution!
Before using your sandwich maker, make sure that it is clean and dry.
Wipe the plates with a damp cloth and let them dry thoroughly before plugging in the appliance.
Using the appliance
Never use aggressive or abrasive cleaning agents and materials, as this damages the non-stick coating of the plates.
Never immerse the appliance in water or any other liquid, nor rinse it under the tap.
Store the appliance in a dry and safe place when not in use.
1. Do not use metal, sharp or abrasive utensils. 2. Switch off and unplug the appliance. 3. Let the appliance cool down properly in open position. 4. First remove excess oil from the plates with a piece of kitchen paper before you clean them. 5. Use a wooden or plastic spatula to remove sticky food residues (for example solidified cheese) from the cooking plates. 6. Clean the cooking plates with a moist soft cloth or sponge. 7. Clean the outside of the appliance with a moist cloth.
Introduction
2. Working status light
3. Handle lock
4. Heating plates:
Important
Danger
- This symbol means that electrical products shall not be disposed of with normal household waste.
- Follow your country's regulations regarding the collection of electrical products.
Before using your sandwich maker, make sure that it is clean and dry.
Wipe the plates with a damp cloth and let them dry thoroughly before plugging in the appliance.
Using the appliance
Never use aggressive or abrasive cleaning agents and materials, as this damages the non-stick coating of the plates.
Never immerse the appliance in water or any other liquid, nor rinse it under the tap.
Store the appliance in a dry and safe place when not in use.
1 Do not use metal, sharp or abrasive utensils. 2 Switch off and unplug the appliance. 3 Let the appliance cool down properly in open position. 4 First remove excess oil from the plates with a piece of kitchen paper before you clean them. 5 Use a wooden or plastic spatula to remove sticky food residues (for example solidified cheese) from the cooking plates. 6 Clean the cooking plates with a moist soft cloth or sponge. 6 Clean the outside of the appliance with a moist cloth.
Introduction
2 Working status light 3 Handle lock 4 Heating Plates:
Important
Danger
Before using your sandwich maker, make sure that it is clean and dry.
Wipe the plates with a damp cloth and let them dry thoroughly before plugging in the appliance.
Never use aggressive or abrasive cleaning agents and materials, as this damages the non-stick coating of the plates.
Never immerse the appliance in water or any other liquid, nor rinse it under the tap.
Store the appliance in a dry and safe place when not in use.
1. Do not use metal, sharp, or abrasive utensils. 2. Switch off and unplug the appliance. 3. Let the appliance cool down properly in the open position. 4. First remove excess oil from the plates with a piece of kitchen paper before cleaning them. 5. Use a wooden or plastic spatula to remove sticky food residues (for example, solidified cheese) from the cooking plates. 6. Clean the cooking plates with a moist soft cloth or sponge. 7. Clean the outside of the appliance with a moist cloth.
Introduction
2. Working status light
3. Handle lock
4. Heating plates:
Important
Danger
Warning
- This symbol indicates that electrical products must not be disposed of with regular household waste.
- Follow your country's regulations for the separate collection of electrical products.
Warranty and support
Before using your sandwich maker, make sure that it is clean and dry.
Wipe the plates with a damp cloth and let them dry thoroughly before plugging in the appliance.
Using the appliance
The sandwich toaster is intended for preparing grilled or toasted sandwiches.
To use the appliance, follow the steps below.
3 Wait for the heating indicator to turn on, which indicates that heating is complete.
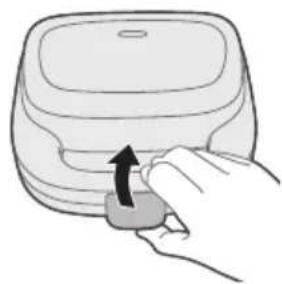
4 Open the sandwich toaster by unlocking the handle.
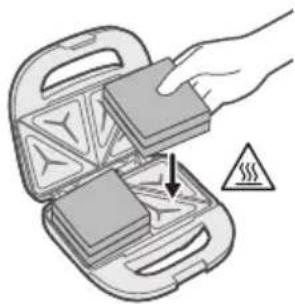
5 Place the prepared sandwich on the lower toasting plate.
Never use aggressive or abrasive cleaning agents and materials, as this damages the non-stick coating of the plates.
Never immerse the appliance in water or any other liquid, nor rinse it under the tap.
Store the appliance in a dry and safe place when not in use.
1 Do not use metal, sharp or abrasive utensils. 2 Switch off and unplug the appliance. 3 Let the appliance cool down properly in open position. 4 First remove excess oil from the plates with a piece of kitchen paper before you clean them. 5 Use a wooden or plastic spatula to remove sticky food residues (for example solidified cheese) from the cooking plates. 6 Clean the cooking plates with a moist soft cloth or sponge. 7 Clean the outside of the appliance with a moist cloth.
Introduction
2 Working status light
3 Handle lock
4 Heating Plates:
Important
Danger
Before using your sandwich maker, make sure that it is clean and dry.
Wipe the plates with a damp cloth and let them dry thoroughly before plugging in the appliance.
Never use aggressive or abrasive cleaning agents and materials, as this damages the non-stick coating of the plates.
Never immerse the appliance in water or any other liquid, nor rinse it under the tap.
Store the appliance in a dry and safe place when not in use.
1 Do not use metal, sharp or abrasive utensils.
2 Switch off and unplug the appliance.
3 Let the appliance cool down properly in open position.
4 First remove excess oil from the plates with a piece of kitchen paper before you clean them.
5 Use a wooden or plastic spatula to remove sticky food residues (for example solidified cheese) from the cooking plates. 6 Clean the cooking plates with a moist soft cloth or sponge.
6 Clean the outside of the appliance with a moist cloth.
Congratulations on your purchase and welcome to Philips!
2 Working status light
3 Handle lock
4 Heating Plates:
Important
Danger!
Warning!
Before using your sandwich maker, make sure that it is clean and dry. Wipe the plates with a damp cloth and let them dry thoroughly before plugging in the appliance.
Using the appliance
Never use aggressive or abrasive cleaning agents and materials, as this damages the non-stick coating of the plates.
Never immerse the appliance in water or any other liquid, nor rinse it under the tap.
Store the appliance in a dry and safe place when not in use.
1 Do not use metal, sharp or abrasive utensils. 2 Switch off and unplug the appliance. 3 Let the appliance cool down properly in open position. 4 First remove excess oil from the plates with a piece of kitchen paper before you clean them. 5 Use a wooden or plastic spatula to remove sticky food residues (for example solidified cheese) from the cooking plates. 6 Clean the cooking plates with a moist soft cloth or sponge. 6 Clean the outside of the appliance with a moist cloth.
Introduction
2 Working status light
3 Handle lock
4 Heating Plates:
Important
Danger
Warning
Before using your sandwich maker, make sure that it is clean and dry. Wipe the plates with a damp cloth and let them dry thoroughly before plugging in the appliance.
Never use aggressive or abrasive cleaning agents and materials, as this damages the non-stick coating of the plates.
Never immerse the appliance in water or any other liquid, nor rinse it under the tap.
Store the appliance in a dry and safe place when not in use.
1 Do not use metal, sharp or abrasive utensils. 2 Switch off and unplug the appliance. 3 Let the appliance cool down properly in open position. 4 First remove excess oil from the plates with a piece of kitchen paper before you clean them. 5 Use a wooden or plastic spatula to remove sticky food residues (for example solidified cheese) from the cooking plates. 6 Clean the cooking plates with a moist soft cloth or sponge. 6 Clean the outside of the appliance with a moist cloth.
Introduction
2 Working status light
3 Handle lock
4 Heating Plates:
Important
Danger
Before using your sandwich maker, make sure that it is clean and dry.
Wipe the plates with a damp cloth and let them dry thoroughly before plugging in the appliance.
Never use aggressive or abrasive cleaning agents and materials, as this damages the non-stick coating of the plates.
Never immerse the appliance in water or any other liquid, nor rinse it under the tap.
Store the appliance in a dry and safe place when not in use.
1 Do not use metal, sharp or abrasive utensils. 2 Switch off and unplug the appliance. 3 Let the appliance cool down properly in open position. 4 First remove excess oil from the plates with a piece of kitchen paper before you clean them. 5 Use a wooden or plastic spatula to remove sticky food residues (for example solidified cheese) from the cooking plates. 6 Clean the cooking plates with a moist soft cloth or sponge. 6 Clean the outside of the appliance with a moist cloth.
Introduction
2 Working status light
3 Handle lock
2 Working status light 3 Handle lock 4 Heating Plates:
Important
Fare
Before using your sandwich maker, make sure that it is clean and dry.
Wipe the plates with a damp cloth and let them dry thoroughly before plugging in the appliance.
Using the appliance
The sandwich grill is designed for making grilled or toasted sandwiches.
Never use aggressive or abrasive cleaning agents and materials, as this damages the non-stick coating of the plates.
Never immerse the appliance in water or any other liquid, nor rinse it under the tap.
Store the appliance in a dry and safe place when not in use.
1 Do not use metal, sharp or abrasive utensils. 2 Switch off and unplug the appliance. 3 Let the appliance cool down properly in open position. 4 First remove excess oil from the plates with a piece of kitchen paper before you clean them. 5 Use a wooden or plastic spatula to remove sticky food residues (for example solidified cheese) from the cooking plates. 6 Clean the cooking plates with a moist soft cloth or sponge. 7 Clean the outside of the appliance with a moist cloth.
Introduction
2 Working status light
3 Handle lock
4 Heating Plates:
Important
Danger
Before using your sandwich maker, make sure that it is clean and dry.
Wipe the plates with a damp cloth and let them dry thoroughly before plugging in the appliance.
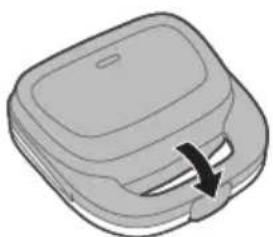
Never use aggressive or abrasive cleaning agents and materials, as this damages the non-stick coating of the plates.
Never immerse the appliance in water or any other liquid, nor rinse it under the tap.
Store the appliance in a dry and safe place when not in use.
1. Do not use metal, sharp, or abrasive utensils. 2. Switch off and unplug the appliance. 3. Let the appliance cool down properly in the open position. 4. First remove excess oil from the plates with a piece of kitchen paper before cleaning them. 5. Use a wooden or plastic spatula to remove sticky food residues (for example, solidified cheese) from the cooking plates. 6. Clean the cooking plates with a moist soft cloth or sponge. 7. Clean the outside of the appliance with a moist cloth.
Introduction
2. Working status light
3. Handle lock
4. Heating plates:
Important
Danger
Before using your sandwich maker, make sure that it is clean and dry.
Wipe the plates with a damp cloth and let them dry thoroughly before plugging in the appliance.
Using the appliance
Never use aggressive or abrasive cleaning agents and materials, as this damages the non-stick coating of the plates.
Never immerse the appliance in water or any other liquid, nor rinse it under the tap.
Store the appliance in a dry and safe place when not in use.
1. Do not use metal, sharp, or abrasive utensils. 2. Switch off and unplug the appliance. 3. Let the appliance cool down properly in the open position. 4. First remove excess oil from the plates with a piece of kitchen paper before cleaning them. 5. Use a wooden or plastic spatula to remove sticky food residues (for example, solidified cheese) from the cooking plates. 6. Clean the cooking plates with a moist soft cloth or sponge. 7. Clean the outside of the appliance with a moist cloth.
Introduction
2 Working status light
3 Handle lock
4 Heating Plates:
Important
Danger
Before using your sandwich maker, make sure that it is clean and dry.
Wipe the plates with a damp cloth and let them dry thoroughly before plugging in the appliance.
Never use aggressive or abrasive cleaning agents and materials, as this damages the non-stick coating of the plates.
Never immerse the appliance in water or any other liquid, nor rinse it under the tap.
Store the appliance in a dry and safe place when not in use.
1 Do not use metal, sharp or abrasive utensils. 2 Switch off and unplug the appliance. 3 Let the appliance cool down properly in open position. 4 First remove excess oil from the plates with a piece of kitchen paper before you clean them. 5 Use a wooden or plastic spatula to remove sticky food residues (for example solidified cheese) from the cooking plates. 6 Clean the cooking plates with a moist soft cloth or sponge. 7 Clean the outside of the appliance with a moist cloth.
Introduction
2 Working status light
3 Handle lock
4 Heating Plates:
Important
Danger
Before using your sandwich maker, make sure that it is clean and dry.
Wipe the plates with a damp cloth and let them dry thoroughly before plugging in the appliance.
Never use aggressive or abrasive cleaning agents and materials, as this damages the non-stick coating of the plates.
Never immerse the appliance in water or any other liquid, nor rinse it under the tap.
Store the appliance in a dry and safe place when not in use.
1 Do not use metal, sharp or abrasive utensils. 2 Switch off and unplug the appliance. 3 Let the appliance cool down properly in open position. 4 First remove excess oil from the plates with a piece of kitchen paper before you clean them. 5 Use a wooden or plastic spatula to remove sticky food residues (for example solidified cheese) from the cooking plates. 6 Clean the cooking plates with a moist soft cloth or sponge. 6 Clean the outside of the appliance with a moist cloth.
Introduction
Congratulations on your purchase and welcome to Philips!
To take full advantage of Philips support, register your product at www.philips.com/welcome.
General description
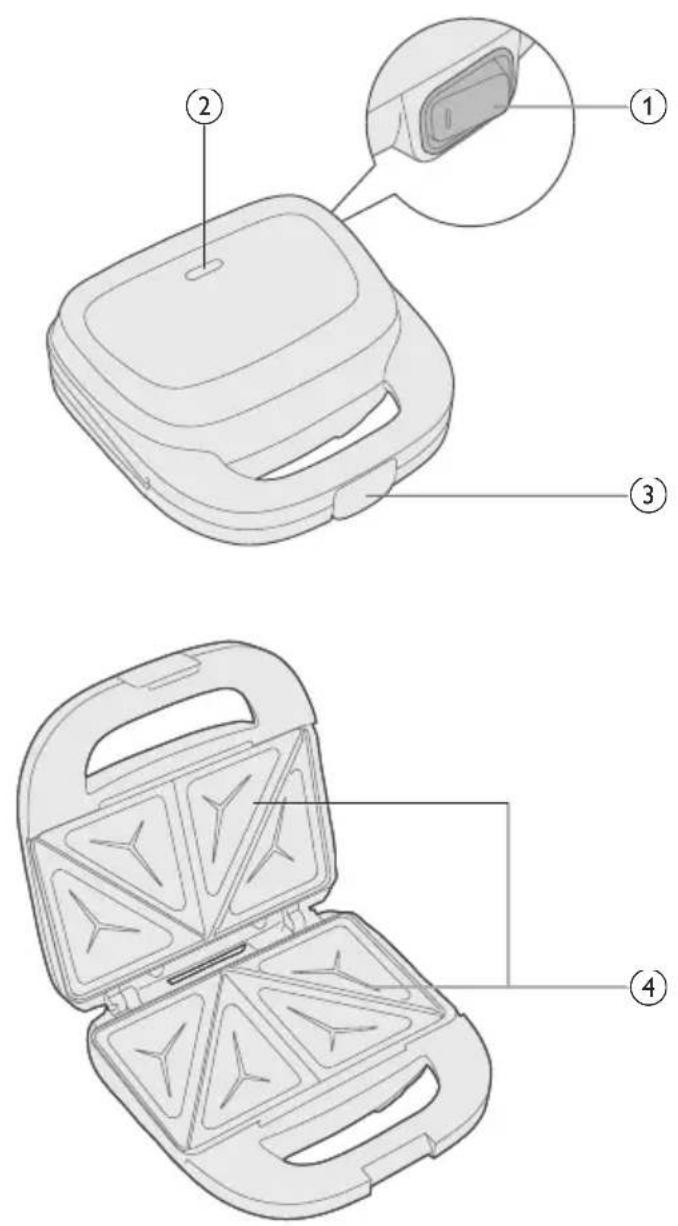
2 Working status light
3 Handle lock
4 Heating Plates:
Important
Danger
- Do not immerse the appliance or the power cord in water or any other liquid.
Warning
Before using your sandwich maker, make sure that it is clean and dry.
Wipe the plates with a damp cloth and let them dry thoroughly before plugging in the appliance.
Using the appliance
1 Plug the appliance into an electrical outlet. 2 Turn the appliance on by switching the on/off switch to the "on" position. The power light will turn on, indicating that the appliance is heating up.
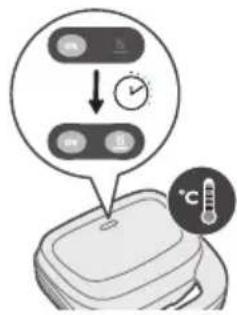
9 Remove the toasted sandwich with heat-resistant utensils.
Never use aggressive or abrasive cleaning agents and materials, as this damages the non-stick coating of the plates.
Never immerse the appliance in water or any other liquid, nor rinse it under the tap.
Store the appliance in a dry and safe place when not in use.
1 Do not use metal, sharp or abrasive utensils. 2 Switch off and unplug the appliance. 3 Let the appliance cool down properly in open position. 4 First remove excess oil from the plates with a piece of kitchen paper before you clean them. 5 Use a wooden or plastic spatula to remove sticky food residues (for example solidified cheese) from the cooking plates. 6 Clean the cooking plates with a moist soft cloth or sponge. 6 Clean the outside of the appliance with a moist cloth.
Introduction
1 Power Switch 2 Working status light 3 Handle lock 4 Heating Plates:
Important
Danger
Before using your sandwich maker, make sure that it is clean and dry.
Wipe the plates with a damp cloth and let them dry thoroughly before plugging in the appliance.
Using the appliance
4 Open the sandwich maker by unlocking the handle lock.
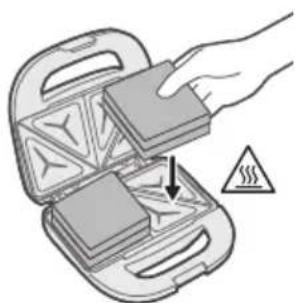
6 Close the sandwich maker and secure it with the handle lock.
Never use aggressive or abrasive cleaning agents and materials, as this damages the non-stick coating of the plates.
Never immerse the appliance in water or any other liquid, nor rinse it under the tap.
Store the appliance in a dry and safe place when not in use.
1 Do not use metal, sharp or abrasive utensils. 2 Switch off and unplug the appliance. 3 Let the appliance cool down properly in open position. 4 First remove excess oil from the plates with a piece of kitchen paper before you clean them. 5 Use a wooden or plastic spatula to remove sticky food residues (for example solidified cheese) from the cooking plates. 6 Clean the cooking plates with a moist soft cloth or sponge. 6 Clean the outside of the appliance with a moist cloth.
Introduction
Congratulations on your purchase and welcome to Philips!
To get the most out of the support that Philips offers, register your product at: www.philips.com/welcome.
General description
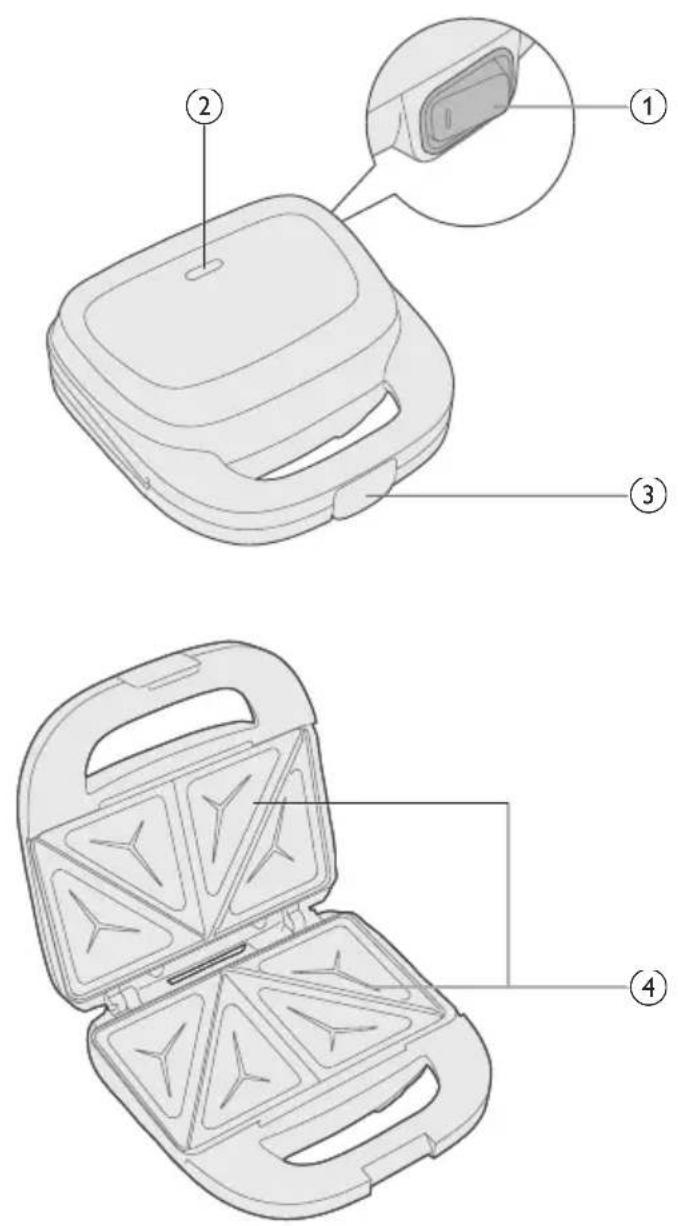
2 Working status light
3 Handle lock
4 Heating Plates:
Important
Danger
- This symbol indicates that electrical products must not be disposed of with ordinary household waste.
- Follow your country's regulations for separate collection of waste electrical products.
Warranty and support
Before using your sandwich maker, make sure that it is clean and dry.
Wipe the plates with a damp cloth and let them dry thoroughly before plugging in the appliance.
Using the appliance
The sandwich maker is intended for making grilled or toasted sandwiches.
Follow the steps below to use the appliance.
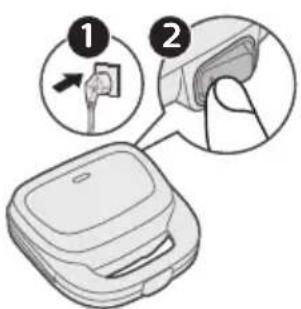
5 Place the prepared sandwich on the lower heating plate.
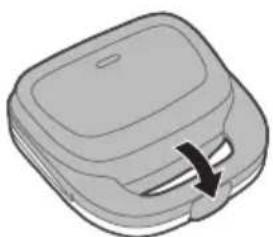
9 Remove the prepared sandwich using heat-resistant utensils. 10 Unplug the appliance from the wall outlet.
Never use aggressive or abrasive cleaning agents and materials, as this damages the non-stick coating of the plates.
Never immerse the appliance in water or any other liquid, nor rinse it under the tap.
Store the appliance in a dry and safe place when not in use.
1 Do not use metal, sharp or abrasive utensils. 2 Switch off and unplug the appliance. 3 Let the appliance cool down properly in open position. 4 First remove excess oil from the plates with a piece of kitchen paper before you clean them. 5 Use a wooden or plastic spatula to remove sticky food residues (for example solidified cheese) from the cooking plates. 6 Clean the cooking plates with a moist soft cloth or sponge. 6 Clean the outside of the appliance with a moist cloth.
Introduction
2 Working status light
3 Handle lock
4 Heating Plates:
Important
Danger
Warning
Before using your sandwich maker, make sure that it is clean and dry.
Wipe the plates with a damp cloth and let them dry thoroughly before plugging in the appliance.
Use
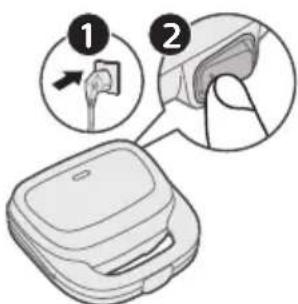
Never use aggressive or abrasive cleaning agents and materials, as this damages the non-stick coating of the plates.
Never immerse the appliance in water or any other liquid, nor rinse it under the tap.
Store the appliance in a dry and safe place when not in use.
1. Do not use metal, sharp or abrasive utensils. 2. Switch off and unplug the appliance. 3. Let the appliance cool down properly in open position. 4. First remove excess oil from the plates with a piece of kitchen paper before you clean them. 5. Use a wooden or plastic spatula to remove sticky food residues (for example solidified cheese) from the cooking plates. 6. Clean the cooking plates with a moist soft cloth or sponge. 7. Clean the outside of the appliance with a moist cloth.
Introduction
2. Working status light
3. Handle lock
4. Heating plates:
Important
Danger
Warning
Before using your sandwich maker, make sure that it is clean and dry.
Wipe the plates with a damp cloth and let them dry thoroughly before plugging in the appliance.
Using the appliance
Never use aggressive or abrasive cleaning agents and materials, as this damages the non-stick coating of the plates.
Never immerse the appliance in water or any other liquid, nor rinse it under the tap.
Store the appliance in a dry and safe place when not in use.
1. Do not use metal, sharp, or abrasive utensils. 2. Switch off and unplug the appliance. 3. Let the appliance cool down properly in the open position. 4. First, remove excess oil from the plates with a piece of kitchen paper before cleaning them. 5. Use a wooden or plastic spatula to remove sticky food residues (for example, solidified cheese) from the cooking plates. 6. Clean the cooking plates with a moist soft cloth or sponge. 7. Clean the outside of the appliance with a moist cloth.
Introduction
2. Working status light
3. Handle lock
4. Heating plates:
Important
Danger
Warning
Before using your sandwich maker, make sure that it is clean and dry. Wipe the plates with a damp cloth and let them dry thoroughly before plugging in the appliance.
Using the appliance
Never use aggressive or abrasive cleaning agents and materials, as this damages the non-stick coating of the plates.
Never immerse the appliance in water or any other liquid, nor rinse it under the tap.
Store the appliance in a dry and safe place when not in use.
1 Do not use metal, sharp or abrasive utensils. 2 Switch off and unplug the appliance. 3 Let the appliance cool down properly in open position. 4 First remove excess oil from the plates with a piece of kitchen paper before you clean them. 5 Use a wooden or plastic spatula to remove sticky food residues (for example solidified cheese) from the cooking plates. 6 Clean the cooking plates with a moist soft cloth or sponge. 7 Clean the outside of the appliance with a moist cloth.
Introduction
2 Working status light
3 Handle lock
4 Heating Plates:
Important!
Danger
Before using your sandwich maker, make sure that it is clean and dry.
Wipe the plates with a damp cloth and let them dry thoroughly before plugging in the appliance.
Using the appliance
Never use aggressive or abrasive cleaning agents and materials, as this damages the non-stick coating of the plates.
Never immerse the appliance in water or any other liquid, nor rinse it under the tap.
Store the appliance in a dry and safe place when not in use.
1 Do not use metal, sharp or abrasive utensils. 2 Switch off and unplug the appliance. 3 Let the appliance cool down properly in open position. 4 First remove excess oil from the plates with a piece of kitchen paper before you clean them. 5 Use a wooden or plastic spatula to remove sticky food residues (for example solidified cheese) from the cooking plates. 6 Clean the cooking plates with a moist soft cloth or sponge. 7 Clean the outside of the appliance with a moist cloth.
Introduction
2 Working status light
3 Handle lock
4 Heating Plates:
Important
Danger
Before using your sandwich maker, make sure that it is clean and dry.
Wipe the plates with a damp cloth and let them dry thoroughly before plugging in the appliance.
Using the appliance
Never use aggressive or abrasive cleaning agents and materials, as this damages the non-stick coating of the plates.
Never immerse the appliance in water or any other liquid, nor rinse it under the tap.
Store the appliance in a dry and safe place when not in use.
1 Do not use metal, sharp or abrasive utensils. 2 Switch off and unplug the appliance. 3 Let the appliance cool down properly in open position. 4 First remove excess oil from the plates with a piece of kitchen paper before you clean them. 5 Use a wooden or plastic spatula to remove sticky food residues (for example solidified cheese) from the cooking plates. 6 Clean the cooking plates with a moist soft cloth or sponge. 6 Clean the outside of the appliance with a moist cloth.
Introduction
2 Working status light 3 Handle lock 4 Heating Plates:
Important
Before using your sandwich maker, make sure that it is clean and dry.
Wipe the plates with a damp cloth and let them dry thoroughly before plugging in the appliance.
Never use aggressive or abrasive cleaning agents and materials, as this damages the non-stick coating of the plates.
Never immerse the appliance in water or any other liquid, nor rinse it under the tap.
Store the appliance in a dry and safe place when not in use.
1. Do not use metal, sharp or abrasive utensils. 2. Switch off and unplug the appliance. 3. Let the appliance cool down properly in open position. 4. First remove excess oil from the plates with a piece of kitchen paper before you clean them. 5. Use a wooden or plastic spatula to remove sticky food residues (for example solidified cheese) from the cooking plates. 6. Clean the cooking plates with a moist soft cloth or sponge. 7. Clean the outside of the appliance with a moist cloth.
2. Working status light 3. Handle lock 4. Heating plates:
Important
Before using your sandwich maker, make sure that it is clean and dry.
Wipe the plates with a damp cloth and let them dry thoroughly before plugging in the appliance.
Never use aggressive or abrasive cleaning agents and materials, as this damages the non-stick coating of the plates.
Never immerse the appliance in water or any other liquid, nor rinse it under the tap.
Store the appliance in a dry and safe place when not in use.
1. Do not use metal, sharp or abrasive utensils. 2. Switch off and unplug the appliance. 3. Let the appliance cool down properly in open position. 4. First remove excess oil from the plates with a piece of kitchen paper before you clean them. 5. Use a wooden or plastic spatula to remove sticky food residues (for example solidified cheese) from the cooking plates. 6. Clean the cooking plates with a moist soft cloth or sponge. 7. Clean the outside of the appliance with a moist cloth.
Introduction
2. Working status light 3. Handle lock 4. Heating Plates:
Important information
Danger
Before using your sandwich maker, make sure that it is clean and dry. Wipe the plates with a damp cloth and let them dry thoroughly before plugging in the appliance.
Never use aggressive or abrasive cleaning agents and materials, as this damages the non-stick coating of the plates.
Never immerse the appliance in water or any other liquid, nor rinse it under the tap.
Store the appliance in a dry and safe place when not in use.
1. Do not use metal, sharp or abrasive utensils. 2. Switch off and unplug the appliance. 3. Let the appliance cool down properly in open position. 4. First remove excess oil from the plates with a piece of kitchen paper before you clean them. 5. Use a wooden or plastic spatula to remove sticky food residues (for example solidified cheese) from the cooking plates. 6. Clean the cooking plates with a moist soft cloth or sponge. 7. Clean the outside of the appliance with a moist cloth.
Kipicne
1. Power Switch 2. Working status light 3. Handle lock 4. Heating Plates:
Important information
Dangerous situations
Before using your sandwich maker, make sure that it is clean and dry.
Wipe the plates with a damp cloth and let them dry thoroughly before plugging in the appliance.
Using the appliance
Never use aggressive or abrasive cleaning agents and materials, as this damages the non-stick coating of the plates.
Never immerse the appliance in water or any other liquid, nor rinse it under the tap.
Store the appliance in a dry and safe place when not in use.
1. Do not use metal, sharp or abrasive utensils. 2. Switch off and unplug the appliance. 3. Let the appliance cool down properly in open position. 4. First remove excess oil from the plates with a piece of kitchen paper before you clean them. 5. Use a wooden or plastic spatula to remove sticky food residues (for example solidified cheese) from the cooking plates. 6. Clean the cooking plates with a moist soft cloth or sponge. 7. Clean the outside of the appliance with a moist cloth.
Before using your sandwich maker, make sure that it is clean and dry. Wipe the plates with a damp cloth and let them dry thoroughly before plugging in the appliance.
8'T'7:
9.
10.7ne
Never use aggressive or abrasive cleaning agents and materials, as this damages the non-stick coating of the plates.
Never immerse the appliance in water or any other liquid, nor rinse it under the tap.
Store the appliance in a dry and safe place when not in use.
| 1.Do | |
| 2.Swi | |
| 3.Let | |
| 4First | |
| .you clean them | |
| 5Use | |
| solidified cheese) from the cooking plates. 6 Clean the cooking plates with a .moist soft cloth or sponge | |
2025 © Versuni Holding B.V.
PHILIPS and the Philips Shield Emblem are registered trademarks of Koninklijke Philips N.V. and are used under license.
This product has been manufactured by and is sold under the responsibility of Versuni Holding B.V., and Versuni Holding B.V. is the warrantor in relation to this product.
(01/2025)
- INTRODUCTION
- GENERAL DESCRIPTION
- IMPORTANT
- DANGER
- WARNING
- CAUTION
- ELECTROMAGNETIC FIELDS (EMF)
- RECYCLING
- WARRANTY AND SUPPORT
- BEFORE FIRST USE
- USING THE APPLIANCE
- DO NOT OPEN THE SANDWICH MAKER DURING COOKING TO PREVENT HEAT LOSS
- CLEANING AND MAINTENANCE
- IMPORTANT INFORMATION
- FARE
- USE
- KIPICNE
- DANGEROUS SITUATIONS
Brand : PHILIPS
Model : HD2331
Category : Pliers