
CPV115B3 - Vacuum Sealer SMEG - Free user manual and instructions
Find the device manual for free CPV115B3 SMEG in PDF.


| Type of product | Built-in vacuum drawer |
| Model | CPV115B3 |
| Brand | Smeg |
| Dimensions (W x D x H) | 560-568 mm x 556 mm x 135 mm (height may vary depending on installation) |
| Weight | Approximately 15 kg |
| Power supply | 220-240 V~, 50/60 Hz |
| Power cord | 3-core 1.5 mm², length 2 m |
| Vacuum levels for bags | Sealing only, Minimum, Medium, Maximum |
| Vacuum levels for containers | 3 levels (Level 1 for twist-off lids, Level 2 for LifeBox, Level 3 for professional/ sous-vide) |
| Sealing levels | 3 levels (Level 1 for thin bags, Level 2 for standard, Level 3 for thick/multiple bags) |
| Chef Cycle | Yes, for marinating, infusions, and quick processing |
| Sous-vide cooking support | Yes, compatible with sous-vide bags |
| Accessories included | 25 bags 20x30 cm, 25 bags 25x35 cm, 25 sous-vide bags 20x30 cm, 25 sous-vide bags 25x35 cm, vacuum adapter for containers |
| Drawer-securing device | Yes, locks drawer in fully open position |
| Absolute vacuum sensor | Yes, ensures maximum vacuum reached before sealing |
| Pump oil dehumidification cycle | Yes, automatic when moisture detected |
| Cleaning surfaces | Soft damp cloth; no abrasive or chlorine-based products |
| Cleaning internal chamber | Wipe with soft cloth dampened with hot water and neutral disinfectant |
| Safety features | Child safety (8+ years with supervision), do not touch sealing bar after use, glass lid implosion risk |
| Spare parts | Original spares only; contact authorized technical assistance |
| Certifications | Complies with EU directives 2002/95/EC, 2002/96/EC, 2003/108/EC |
Frequently Asked Questions - CPV115B3 SMEG
User questions about CPV115B3 SMEG
0 question about this device. Answer the ones you know or ask your own.
Ask a new question about this device
Download the instructions for your Vacuum Sealer in PDF format for free! Find your manual CPV115B3 - SMEG and take your electronic device back in hand. On this page are published all the documents necessary for the use of your device. CPV115B3 by SMEG.
USER MANUAL CPV115B3 SMEG
Dear customer, we would like to thank you for your confidence in us.
By choosing one of our products, you have opted for solutions where research for beauty meets innovative technical design to provide unique objects which become pieces of furniture.
We hope you get the most out of your household appliance.
Kindest regards.
FRANÇAIS
1.1 General safety instructions 40
1.2 Intended use 43
1.3 Manufacturer's liability 43
1.4 About this manual 44
1.5 Identification plate 44
1.6 Disposal 44
1.7 How to use the user manual 45
2 Description 46
2.1 General Description 46
2.2 Control panel 47
2.3 Vacuum drawer 48
2.4 Accessories provided 48
2.5 Other features 48
2.6 Description of the functions 49
3 Use 51
3.1Warnings 51
3.2 First use 52
3.3 Using the accessories 52
3.4 Using vacuum seal bags 54
3.5 How to create vacuum in external containers 56
3.6 Storing vacuum-sealed products 57
3.7 Sous-vide cooking 58
3.8 Chef Cycle 59
4 Cleaning and maintenance 63
4.1Warnings 63
4.2 Cleaning the appliance's surfaces 63
4.3 Pump oil dehumidification cycle 64
4.4 What to do if... 65
5 Installation
5.1 Electrical connection 68
5.2 Positioning 69
5.3 Installing the vacuum drawer 69
TRANSLATION OF THE ORIGINAL INSTRUCTIONS
We recommend that you read this manual carefully: it contains all instructions necessary for maintaining the appliance's aesthetic and functional qualities.
For further information on the product: www.smeg.com
1 Warnings
1.1 General safety instructions
Risk of personal injury
- This appliance may be used by children aged 8 years and over and by people of reduced physical, sensory or mental capacity, or lacking in experience in the use of electrical appliances, provided that they are supervised or instructed by adults who are responsible for their safety.
• Children must not be allowed to play with the appliance. - Keep children under the age of 8 at a safe distance unless they are constantly supervised.
- Keep children under the age of 8 away from the appliance when it is in operation.
-
Cleaning and maintenance must not be carried out by unsupervised children.
-
Never attempt to put out a fire or flames with water: switch off the appliance, remove the plug from the power outlet and smother the flames with a lid or fire blanket.
- Do not use the appliance if the glass lid is damaged (cracked, chipped, scratched).
- Do not leave the appliance unattended while it is in operation.
- Do not use the appliance with wet hands or if you are in contact with water.
- Do not touch the sealing bar or the seal immediately after sealing.
- Do not touch or modify the electrical or mechanical components of the appliance.
- Do not open the casing of the drawer.
- Switch off the appliance after use.
• DO NOT USE OR STORE FLAMMABLE MATERIALS NEAR THE APPLIANCE.
• DO NOT MODIFY THE APPLIANCE.
- The appliance should be installed and maintained according to current standards by qualified personnel.
- If the appliance is damaged or does not work, contact an authorized technical assistance centre immediately.
- Do not attempt to repair the appliance yourself or without the assistance of a qualified technician.
- Only use original spares when replacing faulty or defective parts.
- Do not pull the cable to unplug the device.
Risk of damage to the appliance
- Do not strike or damage the glass lid in any way: it could implode if damaged.
- Do not remove the protective film from the lid.
- Do not overturn or tilt the appliance to prevent oil leaking from the pump.
- Prevent the pump from coming into contact with liquids.
- Do not put weight on or lean on the open drawer so as to avoid damaging the runners.
- Do not use abrasive or corrosive detergents (e.g. scouring powders, stain removers and metallic sponges) on glass parts.
- Do not use rough or abrasive materials or sharp metal scrapers.
- Do not sit on the appliance.
- Do not use cleaning products containing chlorine, ammonia or bleach on parts made of steel or that have a metallic surface finish (e.g. anodised, nickel- or chromium-plated).
- Do not use steam jets or running water to clean the appliance.
Installation and maintenance
- THIS APPLIANCE MUST NOT BE INSTALLED IN BOATS OR CARAVANS.
• Install the appliance and anchor it to a fixed structure. - The sides of the appliance must be next to equipment or units of the same height.
• Install the appliance so that the drawer can be pulled out completely and the lid fully opened. - The appliance should be installed and maintained according to current standards by qualified personnel.
- The electrical connection should be carried out by qualified technical personnel.
- The appliance must be earthed in compliance with electrical safety standards.
-
Use cables that can withstand a temperature of at least 90^ C .
-
The tightening torque of the terminal board screws for the power supply wires must be 1.5 - 2 Nm.
- If the power supply cable is damaged, contact technical assistance immediately to have it replaced.
• Always put on any personal protective equipment that may be required before carrying out any work on the appliance (installation, maintenance, positioning or handling). - Switch off the mains power supply before carrying out any work on the appliance.
- Do not use multi-socket adapters or extension leads.
For this appliance
- The vacuum drawer must only be used if it is built-in.
- Do not use the glass lid as a support on which to place things or as a work surface.
- Do not close the vacuum drawer while it is in operation.
- Do not use the vacuum drawer for storing food or drink.
- Do not overturn or tilt the appliance to prevent oil leaking from the pump.
- In the event of a power failure during the vacuum sealing process, the glass lid might not be open: do not attempt to force it open.
- Do not touch the sealing bar or the seal immediately after sealing.
- Only use certified vacuum seal bags and containers.
- Pack cold foods, preferably chilled to 3°C and that have been cleaned, washed and dried beforehand.
- Never vacuum pack live food, e.g. molluscs.
- Only use fresh and good quality foods.
- Maintain hygiene standards and the continuity of the cold chain.
- Do not install / use the appliance outdoors.
1.2 Intended use
- This appliance is intended for vacuum sealing food in the home environment at a temperature of between 15 and 35°C. Any other use is considered improper.
- The appliance is not designed to operate with external timers or with remote-control systems.
1.3 Manufacturer's liability
The manufacturer shall bear no liability for personal injury or property damage caused by:
• Using the appliance for anything other than the intended use.
- Failure to follow the instructions given in the user manual.
• Altering any part of the appliance.
• The use of non-original spare parts.
1.4 About this manual
- This user manual is an integral part of the appliance and must therefore be kept in its entirety and at hand for the entire working life of the appliance.
- Read this user manual carefully before using the appliance.
1.5 Identification plate
The identification plate bears the technical data, serial number and brand name of the appliance. Do not remove the identification plate for any reason.
1.6 Disposal

This appliance must be disposed of separately from other waste (directives 2002/95/EC, 2002/ 96/EC, 2003/108/EC). The appliance does not contain substances in quantities sufficient to be considered hazardous to health and the environment, in accordance with current European directives.
To dispose of the appliance:
- Cut the power cable and remove it along with the plug.

Electrical hazard Electrocution hazard
- Disconnect the mains power supply.
- Unplug the appliance.
• Take the appliance to the appropriate recycling centre for waste electrical and electronic equipment, or return it to the retailer when purchasing an equivalent product, on a one for one basis.
Warnings
Our appliances are packaged in non-polluting and recyclable materials.
• Take the packing materials to the appropriate recycling centre.

Plastic packaging Danger of suffocation
- Do not leave the packaging or any part of it unattended.
- Do not let children play with the plastic bags.
1.7 How to use the user manual
This the following symbols are used in this user manual.
Warnings

General information on this user manual, on safety and final disposal.
Description

Description of the appliance and its accessories.
Use

Information on the use of the appliance and its accessories, cooking tips.
Cleaning and maintenance

Information for proper cleaning and maintenance of the appliance.
Installation

Information for qualified technicians: installation, initial start-up and testing.

Safety instructions

Information

Advice
- Sequence of instructions.
- Standalone instruction.
2 Description
2.1 General Description
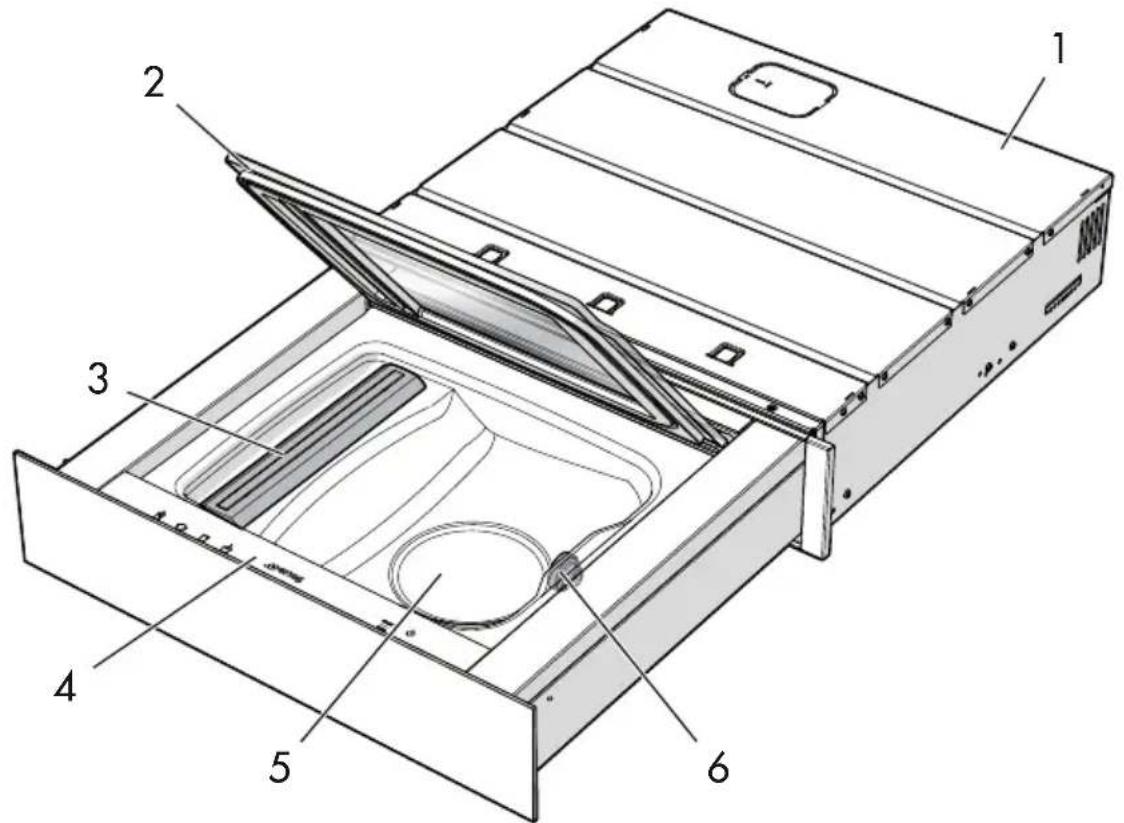
1 Built-in box
2 Glass lid
3 Sealing bar
4 Control panel
5 Vacuum chamber
6 Vacuum pump air inlet
2.2 Control panel

Z
1 Bag vacuum level indicator light
2 Bag vacuum level selection / set button
3 Chef cycle indicator light
4 Chef cycle selection button
5 Sealing level indicator light
6 Bag sealing level selection button
7 Container vacuum level indicator light
8 Container vacuum level selection / set button
9 Warning indicator light
10 Pump oil dehumidification cycle indicator light
11 Cycle ON indicator light
12 Cycle START/STOP button
13 ON/OFF button
2.3 Vacuum drawer
The drawer consists of an internal vacuum chamber in which the vacuum is created.
The pump completely eliminates the air from the outside and the inside of the bag.
The bag is then hermetically sealed by the sealing bar with a double heat seal.
Vacuum sealing helps to protect food from being contaminated by dust and microbes.
The vacuum system completely eliminates air, especially oxygen, which causes the oxidation of food.
Advantages:
• Halts the oxidation process
• Preserves flavours, aromas, colours and nutritional properties of foods
• Prevents the growth of parasites in pasta, rice, flour and dried fruit
• Prevents the growth of microorganisms and bacteria
• Prevents oils and fats from becoming rancid
- Prevents mould, even in oil
• Prevents the spread of odours
- Prevents freezer burn
- Allows food to be preserved for longer
- Reduces food waste because it can be kept for longer
- Allows food to be correctly vacuum-sealed for sous-vide cooking.
2.4 Accessories provided
• 25 Vacuum seal bags 20x30
• 25 Vacuum seal bags 25x35
• 25 Bags for sous-vide cooking 20x30
• 25 Bags for sous-vide cooking 25x35
• Vacuum adapter for creating a vacuum in external containers.

The optional or supplied bags and containers are food safe and are made from materials that comply with the current regulations.
2.5 Other features
Drawer-securing device
The drawer-securing device locks the drawer in the fully open position to prevent it from being closed by accident whilst it is in operation.
Absolute vacuum sensor
This sensor ensures that the maximum vacuum is reached according to the vacuum level that has been set.
If this value is not reached, the bag is not sealed.
2.6 Description of the functions
Setting the vacuum level for bags
| Setting Suitable for | |
| Sealing only* | · Closing the bag· Packing delicate products· Repackaging products such as crisps, biscuits, bread. |
| Minimum vacuum | · Packing delicate fruit and vegetables such as salad, strawberries and other berries.· Packing delicate products such as mousse, whipped cream.· Packing soft cheeses. |
| Medium vacuum | · Preserving raw or cooked products such as fish fillets and meat on the bone, whole crustaceans, courgettes, tomatoes, aubergines, sauces or soups. |
| Maximum vacuum | · Preserving non-delicate raw or cooked products such as potatoes, carrots, meat· Preserving products with liquids such as vegetables in oil· Preserving pieces of hard cheese· Products for sous-vide cooking, such as meat, fish, vegetables and sauces. |
Setting the bag sealing level
| The higher the sealing level, the longer the sealing process will take. | |
| Setting Suitable for | |
| Level 1 | Thin bags, even if not suitable for vacuum sealing |
| Level 2 | LifeBag vacuum seal bagsV-Cook Bags for sous-vide cooking |
| Level 3 | Aluminium bags or thick bagsSealing multiple bagssimultaneously** |
* no preservation effect. To be used together with the bag sealing level selection button.
**Sealing level 3 allows multiple overlapped bags to be sealed simultaneously. The bags will not be stuck together – individual seals will be created.
Setting the vacuum level for containers Setting the Chef cycle
| Setting Suitable for | Setting Suitable for | ||
Level 1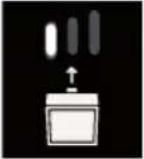 | Containers with a "twist-off" lid containing: marmalades, jams, sauces and preserves (in oil, in vinegar), mousse, whipped cream | Level | Marinating meatPreparing carpaccio and cured meatsPreparing vegetables in oil or vinegarTomato sauces, fruit juices and coulis, syrups and wine or vinegar concentrates |
Level 2 | LifeBox containers, professional use containers and containers with a "twist-off" lid, containing: marmalades, jams, sauces and preserves (in oil, in vinegar), creams and vegetables. | ||
Level 3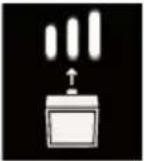 | Professional use containers and containers containing marmalades, jams, sauces and preserves (in oil, in vinegar), vegetables, biscuitsContainers for sous-vide cooking | ||
3 Use
3.1 Warnings

Improper use Risk of personal injury
- Do not touch the sealing bar or the seal immediately after sealing.
- Only use certified vacuum seal bags and containers.
- Pack cold foods, preferably chilled to 3°C and that have been washed, cleaned and dried beforehand.
- Never vacuum pack live food, e.g. molluscs.
- Do not allow children to get near to the drawer when it is in use.

Improper use Danger of fire or explosion
- Do not strike or damage the lid in any way: damage could cause it to implode.
- Do not overturn or tilt the appliance to prevent oil leaking from the pump.
- Do not use or leave flammable materials near the drawer.

Improper use Risk of damage to the appliance
- Keep the drawer fully open when in operation.
- Do not use the lid as a support on which to place things or as a work surface.
- Do not use harsh detergents and scrapers or abrasive sponges that may damage the internal surfaces and the lid of the drawer.
3.2 First use
- Remove the adhesive tape and the labels (apart from the technical data plate) from the appliance.
- Clean the internal chamber and the glass lid using a soft damp cloth (see "4 Cleaning and maintenance").

When first switched on, the settings of the appliance will be as follows:
• Maximum vacuum level for bags
• Medium sealing level.

After the vacuum and sealing levels have been modified, the appliance retains the settings even when it is in standby.

When the appliance is switched off and on again using the ON/
OFF button, the default settings are restored.
3.3 Using the accessories
Vacuum seal or sous-vide cooking bags
- Use suitable vacuum seal bags of an appropriate size for the food to be packaged.
- Only fill vacuum seal bags to a maximum of 2/3 of their capacity with semi-solid or high-moisture content foods.
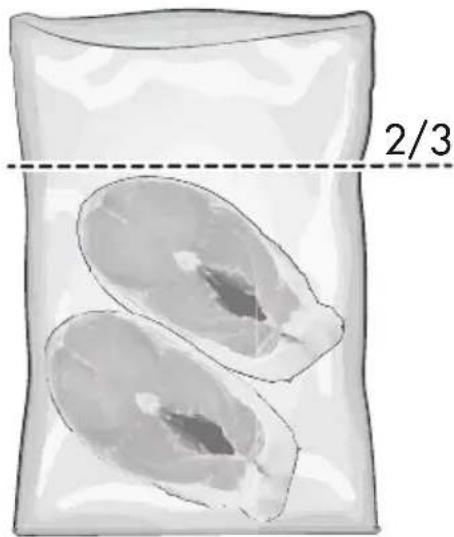
- Only fill vacuum seal bags to a maximum of 1/3 of their capacity with liquids.

natural_image
Illustration of a rectangular bag with a dashed line labeled '1/3' indicating a measurement or scale (no text or symbols on the bag itself)
Freeze liquid foods to allow the vacuum seal bag to be filled to 2/3 of its capacity.
- If you wish to put several foods in a single vacuum seal bag, arrange them neatly one beside another.

Vacuum seal cold foods (3°C), which have been cleaned, washed and dried beforehand.
- To obtain a perfect seal, do not allow grease, moisture or residue to remain in the sealing area of the bag, and do not fold this area.

- Before placing the product in the bag, fold the top over so that the outside remains clean.
- Only use vacuum seal bags once.
Vacuum containers
- Only use vacuum containers that can withstand the high vacuum (99.9%).
- For best results, place cold foods in the containers.
Maximum filling limits
| Solid foods | 100% of the container |
| Broths and infusions | Half of the container |
| Sauces | 1/3 of the container |
| Creams and cream sauces | 1/4 of the container |
| Foods based on eggs or egg whites | 1/6 of the container |
3.4 Using vacuum seal bags

Improper use Risk of personal injury and damage to the appliance
- Do not strike or damage the glass lid in any way: it could implode if damaged.
- Do not use the glass lid as a support on which to place things or as a work surface.
-
Make sure that the buttons on the control panel are not dirty. If they are, they may not function or may activate unwanted functions.
-
Use a vacuum seal bag suitable for preserving food or for sous-vide cooking that is appropriate for the amount of food.

• Vacuum seal cold foods (3°C), which have been cleaned, washed and dried beforehand.
- For semi-solid or high-moisture content foods, fill the bag so that it is no more than 2/3 full.
- For liquid foods, fill the bag so that it is no more than 1/3 full.
- Before placing the product in the bag, fold the top over so that the outside remains clean.
- Open the glass lid (1) and make sure that the internal chamber (2) is dry.

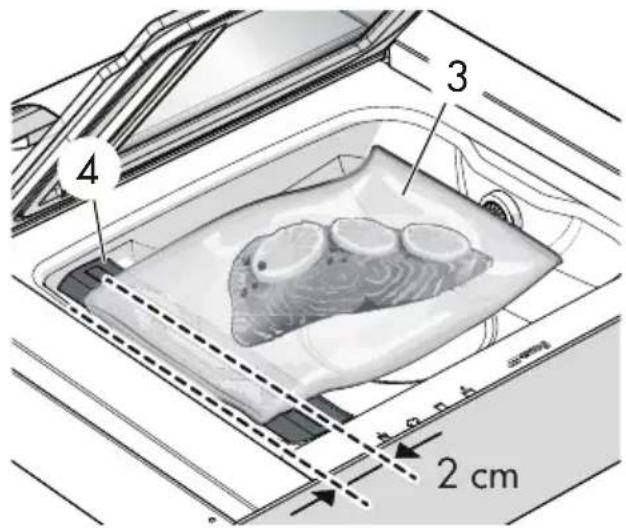
- Position the bag (3) at the centre of the sealing bar (4): the open edge should protrude approximately 2 cm from the bar.

- Close the lid (1).

natural_image
Diagram of a device with a lid and internal compartments, showing a curved arrow indicating rotation or movement (no text or symbols present)- Press the lid slightly.
- Press the ON/OFF button on the control panel.
- Press the bag vacuum level selection / set button
- Press the button several times to select the required vacuum level, see "Setting the vacuum level for bags".
- Press the bag sealing level selection button 📄.

- The higher the sealing level, the longer the sealing process will take.
-
Use vacuum level 2 or 3 for preserving foods and sous-vide cooking.
-
Press the 📄 button several times to select the required sealing level, see "Setting the bag sealing level".
- Press the START/STOP START STOP button start the function and then gently press the glass lid to start the vacuum.

- The appliance is working normally if the bag inflates and bubbles form in liquids.
-
The sealing bar carries out a double heat-sealing cycle.
-
Once the sealing cycle has finished, open the lid and remove the bag.

Improper use Risk of personal injury
- Do not touch the sealing bar or the seal immediately after sealing.
- Do not allow children to get near to the drawer when it is in use.

The cycle can be stopped at any time by pressing the START/STOP START button.
If the cycle is stopped, the bag will not be sealed.

Only start a new vacuum sealing cycle when the internal chamber and the sealing bar are clean and dry.
Eliminate any traces of dirt.

If the maximum vacuum for the set level is not reached during the cycle, the bag will not be sealed and the cycle will have to be restarted.
3.5 How to create vacuum in external containers

Improper use Risk of personal injury and damage to the appliance
- Only use containers that can withstand the high vacuum (99.9%).
- Use a vacuum sealing container.
- Place the product in the container.
- Close the lid if you are vacuum sealing a glass container.
-
Leave the lid open if you are using LifeBox type containers with a valve and suction tube.
-
To connect LifeBox containers, follow the instructions in the container instructions booklet.
- Press the ON/OFF ⏻ button on the control panel.
- Press the container vacuum level selection / set button
- Press the button several times to select the required vacuum level, see "Setting the vacuum level for containers".
- Press the START/STOP button to start the function.

Keep the glass lid of the drawer open for the entire duration of the cycle.
- When the cycle has finished, disconnect the adapter from the lid of the container and from the fitting in the internal chamber.

Only start a new vacuum sealing cycle when the internal chamber and the sealing bar are clean and dry.
Eliminate any traces of dirt.

It is also possible to create a vacuum in containers that do not require an adapter to be used (e.g. containers for jams, preserves in oil, etc.). Set the level of vacuum required for containers and make sure that you close the lid before starting the cycle.
After use
-
Switch off the vacuum drawer by pressing the ON/OFF button.
-
Clean and dry the drawer as indicated in the "4 Cleaning and maintenance" section.
- Close the glass lid when the internal chamber is completely dry.
- Close the vacuum drawer.
3.6 Storing vacuum-sealed products
Freezer storage at -18°C

Storing vacuum-sealed products in a freezer slows down the life cycle of microorganisms that cause food to deteriorate.
Freezing is particularly effective for foods that contain large amounts of water, such as fresh products, fruit and vegetables.
It also prevents freezer burn and maintains the original form and texture of the products.

Products that have been defrosted should be cooked before being vacuum-sealed.

Sous-vide cooking bags must not be kept in a freezer.
Refrigerator storage at +3-5°C
Storing vacuum-sealed products in a refrigerator is recommended when preparing dishes, which are vacuum-sealed to be eaten in small amounts and at different times.
Cupboard storage at room temperature (+18°C)
Storing vacuum-sealed products in a cupboard is recommended for foods that may lose their aroma, for example coffee, or which could deteriorate due to the humidity in the room, for example salt, sugar and flour.
This type of preservation also prevents the food coming into contact with mould, insects and dust.

The length of time a vacuum-sealed product can be kept varies according to the type of product. Generally, a vacuum-sealed product can be kept for 3 - 4 times longer than the same product that is not vacuum-sealed.
3.7 Sous-vide cooking
Sous-vide cooking consists of sealing a raw, pre-cooked or partially cooked product in a special bag and cooking it by immersing it in water or using a steam oven. The temperature of the water must be kept constant and below boiling point.
Once cooked, remove the product from the bag and finish cooking it by sautéing it in a pan or grilling it.
Advantages:
- Retains the flavours, aromas, juices and the texture of foods.
- Excellent cooking results can be obtained that cannot be achieved with traditional cooking.
- Perfect marinating: vacuum sealing opens up the fibres of the meat and allows the marinade to penetrate the meat very quickly.
- Reduces the evaporation of liquids during cooking, which keeps the food tender and juicy.
- Regenerates food perfectly.
- Intensifies the flavours and colours of the food.
- Uniform cooking.
• Preserves nutrients and vitamins. - No added fat or oil.
• Less need for condiments (spices, salt etc.).
Useful tips:
- Do not leave the food to be cooked at room temperature for too long as the bag may inflate during cooking and lose all the advantages of vacuum sealing it.
- Make sure that you chill the food as quickly as possible using water, ice or a blast chiller.
- Keep vacuum-sealed products (cooked and chilled) in a refrigerator and at a constant temperature of no higher than 3°C.

The following is required for sous-vide cooking:
• Vacuum drawer and bags that can withstand the cooking temperature.
- Thermostatic bath or steam cooker.
3.8 Chef Cycle
The Chef cycle uses alternate compression and decompression cycles.
This allows procedures such as marinating and infusion, which generally require a long time, to be speeded up.
The Chef Cycle is used for:
- Tomato sauces
- Fruit juices and coulis
- Syrups and wine or vinegar concentrates
- Marinating meat or fish
• Preparing carpaccio and cured meats
• Preparing vegetables in oil or vinegar - Preparing cold infusions (iced tea, herbal teas).
Use:
- Use a bag suitable for the quantity of food.

- For solid, semi-solid or high-moisture content foods, fill the bag so that it is no more than of 2/3 full.
- For liquid foods, fill the bag so that it is no more than 1/3 full.
-
Before placing the product in the bag, fold the top over so that the outside remains clean.
-
Open the lid (1) and make sure that the internal chamber (2) is dry.

- Position the bag (3) at the centre of the sealing bar (4): the open edge should protrude approximately 2 cm from the bar.
- Close the lid (1).

natural_image
Diagram of a laboratory setup with a tray holding an open chamber and a lid showing internal tissue (no text or symbols)-
Press the lid slightly.
-
Press the ON/OFF control panel.

button on the
- Press the Chef Cycle selection button

- Press the bag sealing level selection
button


- The higher the sealing level, the longer the sealing process will take.
-
Use level 2 or 3 for preserving foods and sous-vide cooking.
-
Press the button several times to select the required sealing level, see "Setting the bag sealing level".
-
Press the START/STOP START STOP button start the function and then gently press the glass lid to start the vacuum.

-
The appliance is working normally if the bag inflates and bubbles form in liquids.
• The sealing bar carries out a double heat-sealing cycle. -
Once the sealing cycle has finished, open the lid and remove the bag.

Improper use Risk of personal injury
- Do not touch the sealing bar or the seal immediately after sealing.
- Do not allow children to get near to the drawer when it is in use.

The cycle can be stopped at any time by pressing the START/
STOP START button.
If the cycle is stopped, the bag will not be sealed.

Only start a new vacuum sealing cycle when the internal chamber and the sealing bar are clean and dry.
Eliminate any traces of dirt.

Only use vacuum seal bags once.
After use
- Switch off the vacuum drawer by
pressing the ON/OFF ⏻ button.
- Clean and dry the drawer as indicated in the "4 Cleaning and maintenance" section.
- Close the glass lid when the internal chamber is completely dry.
- Close the vacuum drawer.
4 Cleaning and maintenance
4.1 Warnings

Improper use
Risk of personal injury and damage to the appliance
- Switch off the appliance before cleaning.
- Wait until the sealing bar has cooled down completely before cleaning.
- Do not use steam jets to clean the appliance.
- To avoid damage, do not use water to clean the internal chamber.
- Do not use cleaning products containing chlorine, ammonia or bleach on parts made of steel or that have a metallic surface finish (e.g. anodised, nickel- or chromium-plated).
- Do not use abrasive or corrosive detergents (e.g. scouring powders, stain removers and metallic sponges) on glass parts.
- Do not use rough or abrasive materials or sharp metal scrapers.
4.2 Cleaning the appliance's surfaces
To keep the surfaces in good condition, they should be cleaned regularly after use. Let them cool down first.
Only close the glass lid when the internal chamber is completely dry.
Cleaning the outside of the appliance
Always and only use specific products that do not contain abrasives or chlorine-based acids.
Pour the product onto a soft damp cloth and clean the steel parts, the lid and the control panel.
Dry thoroughly with a soft cloth or a microfibre cloth.
Cleaning the internal chamber
- Wait for the sealing bar to cool down.
- Pull the bar upwards to remove it.
- Wipe with a soft cloth, dampened with hot water and a neutral disinfectant.
- Dry thoroughly with a soft cloth or a microfibre cloth.
Cleaning and maintenance
Cleaning the sealing bar
- Wait for the sealing bar to cool down.
- Pull the bar upwards to remove it.
- Wipe with a soft cloth, dampened with hot water.
- Dry thoroughly with a soft cloth or a microfibre cloth.
Cleaning the vacuum adapter for external containers
- Clean with warm water and washing up liquid.
- Rinse thoroughly.
- Dry the adapter thoroughly with a clean cloth and put it away.
4.3 Pump oil dehumidification cycle
After several vacuum sealing cycles, some moisture may reach the oil in the vacuum pump and reduce its ability to generate the high vacuum levels required for preserving food for longer periods.
The indicator light turns on to warn you that a dehumidification cycle needs to be carried out.
- Remove any objects and residual liquids from the internal chamber.
- Clean the internal chamber, if necessary.
- Press the START/STOP START STOP button.
- Wait for the drying cycle to finish.

• The maximum cycle time is approximately 20 minutes.
- If the cycle is stopped via the START/STOP START button, it will have to be repeated.

If one dehumidification cycle is insufficient, the appliance will carry out another cycle and will not allow other functions to be used until the sensor detects a sufficiently high vacuum level which is suitable for properly preserving the food. Between one cycle and the next, the machine stops for one hour in order to cool down.
4.4 What to do if...
The vacuum drawer does not open:
- The "Push-pull" system of the guides has jammed.
• The spiral power cable is jammed.
The vacuum drawer does not switch on:
- Make sure that the plug is correctly inserted in the socket.
- Make sure that the power socket is working correctly.
The vacuum drawer switches off:
- Make sure that there is no power cut. Restore the power supply.
• Possible electronics failure.
Contact the technical assistance service.
The buttons do not work:
- The surface of the control panel is dirty or wet.
Clean and dry the control panel thoroughly.
The glass lid does not open:
- Check to see if there is a cycle in progress.
The lid remains closed when the drawer is in operation.
- Power failure: do not attempt to open the lid.
Restore power and wait for the chamber to decompress.
Too much air in the sealed bag:
- The bag is unsuitable for the quantity of food.
Use an adequately sized bag.
- The vacuum level selected is too low. Repeat the cycle using a higher vacuum level.
- The product is liquid. It is normal for there to be bubbles in liquid foods.
The bag does not maintain the vacuum even if the seal is good:
- Mixtures or sharp bones in the bag may have pierced it.
- Restart the vacuum cycle using a new bag and protect the sharp parts with a suitable material.
- Use an external container.
The sealing bar lifts but does not seal:
- Sealing bar protective device triggered. There are 2 buttons in the lower right section of the appliance for resetting the protective device.
Press the 2 buttons.
If the fault persists, contact the technical assistance service.
- Sealing bar broken.
Contact the technical assistance service.
The seal is not airtight:
- The sealing level selected is unsuitable for the type of bag used.
Repeat the cycle using a higher sealing level. - Too many consecutive sealing cycles.
Wait at least 2 minutes between one cycle and the next in order to allow the sealing bar to cool down. - The bag is larger than the sealing bar.
Use an adequately sized bag. - The edge of the bag is not positioned correctly.
Position the edge of the bag at the centre and make sure that it has no creases. The bag should protrude 2 cm from the sealing bar. - The edge of the bag is dirty.
Before placing the product in the bag, fold the top over so that the outside remains clean. - The sealing bar is dirty.
Clean the sealing bar as described in the section "Cleaning the sealing bar". - The sealing bar or the rubber profile in the lid are damaged.
Contact the technical assistance service. - The rubber counter pressure profile of the sealing bar is not uniform.
Smooth the rubber coating on the sealing bar.
The indicator light flashes:
- Excessive moisture in the pump. Run the dehumidification cycle. Vacuum seal cold foods (3°C) which have been cleaned, washed and dried beforehand.
The indicator light turns on and the appliance emits a beep during the cycle:
- The vacuum has not been started or the lid has not been closed.
To start the cycle, gently press the glass lid to start the vacuum. - Dirt on the seal of the glass lid.
Clean the seal and the internal chamber with a soft damp cloth and dry thoroughly. - Seal of glass lid broken.
Contact the technical assistance service. - The pump will not start due to the protective device.
There are 2 buttons in the lower right section of the appliance for resetting the protective device.
Press the 2 buttons.
If the fault persists, contact the technical assistance service.
Cleaning and maintenance
The ⚠️ Indicator light flashes and the appliance has not sealed the bag after a vacuum level 3 bag sealing cycle or the
indicator light flashes after a vacuum level 2 bag sealing cycle or after a vacuum level 3 sealing cycle for containers or the
indicator light turns on:
- The appliance warns you that the product is too hot and / or that the bag is too full.
Reset the alarm and press the select cycle button.
Cool the product to 3^ C and/or reduce the amount of food in the bag and start a new cycle if the previous cycle had not been completed.
The ⚠️ Indicator light turns on and the appliance emits a beep.
- The lid has not been lowered or has not been pressed against the chamber.
Close the lid; press it slightly in order to start a new cycle.
• The vacuum adapter has not been connected correctly.
Connect the adapter and start a new cycle.
• Substantial loss of vacuum.
A pipe may have become detached.
Contact the technical assistance service.
The ⚠️ Indicator light switches on and the indicator light of the ON/OFF button flashes:
- Excessive number of cycles carried out, causing the oil in the pump to overheat.
- Allow the vacuum drawer to cool down for at least 1 hour.
The ⚠️ Indicator light turns on and the appliance emits a beep:
- Absolute vacuum sensor fault. Contact the technical assistance service.

If the problem persists, or for other types of fault, contact your local technical support centre.
5 Installation
5.1 Electrical connection

Electrical hazard Electrocution hazard
- The electrical connection should be carried out by qualified technical personnel.
- The appliance must be earthed in compliance with electrical safety standards.
- Disconnect the mains power supply.
General information
Make sure that the mains electricity supply is the same as that indicated on the identification plate.
The identification plate with the technical data, serial number and brand name is located in an easily visible position on the appliance.
Do not remove this plate for any reason. The appliance operates at 220-240 V\~.
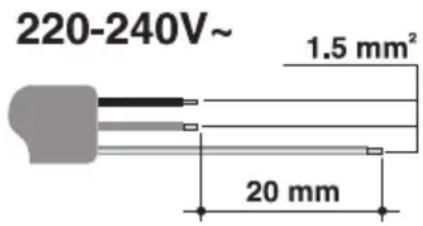
Use a three-core cable (3 x 1.5 mm ^2 internal conductors).
Make the earth connection using a wire that is 20 mm longer than the other wires.
Fixed connection
Install an omnipolar circuit breaker on the power supply line in compliance with installation regulations.
The circuit breaker should be located near to the appliance and in an easily accessible position.
Connection with plug and socket
Make sure that the plug and socket are of the same type.
Avoid using adapters or gang sockets as these could cause overheating or burns.
5.2 Positioning

Heavy appliance Crushing hazard
- Use protective gloves when handling the appliance.
- Position the appliance in the unit with the help of another person.

Appliance heats up when in operation Fire hazard
• Make sure that the carcase material is heat resistant.
- Make sure that the unit has the required openings.
- Do not install the appliance in a recess that can be closed with a door, or in a cupboard.
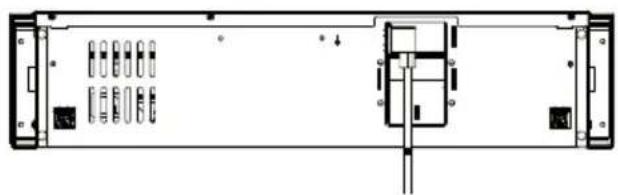
Position of the power cable
natural_image
Technical line drawing of a server rack with multiple ports and connectors (no text or labels)(rear view)

Improper use Risk of personal injury and damage to the appliance
- Do not open the drawer until it has been fastened to the unit.
5.3 Installing the vacuum drawer

• Install the drawer so that the internal chamber is visible.
• Make sure that there is enough space for the vacuum drawer to be pulled out completely and for the glass lid to be opened.
- Remove the upper cover (1) in the direction indicated by the arrows.

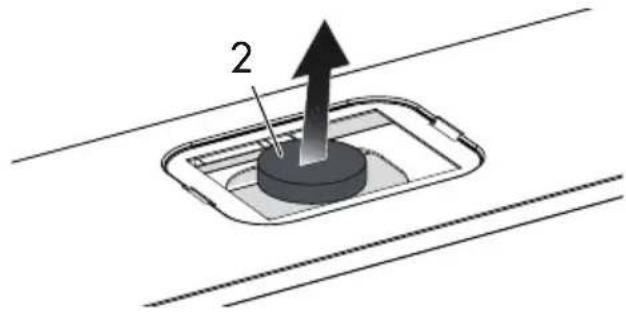
- Remove the oil filter cap (2).
- Screw the filter (3) onto the pump.

- Install the upper cover (1) in the direction indicated by the arrows.

- Insert the plug (4) into the socket (5) on the back of the built-in box.

- Insert the mounting brackets (6).

- Lift the drawer and place it in the unit, resting it on the shelf of the unit.

The shelf of the unit must be clean and level in order for the drawer to function correctly.

If the drawer is disassembled and moved, remove the pump filter and insert the cap.
Installation

- Fasten the mounting brackets (6) to the side walls of the unit using the screws (8) provided.

- Route the power cable towards the wall power socket.
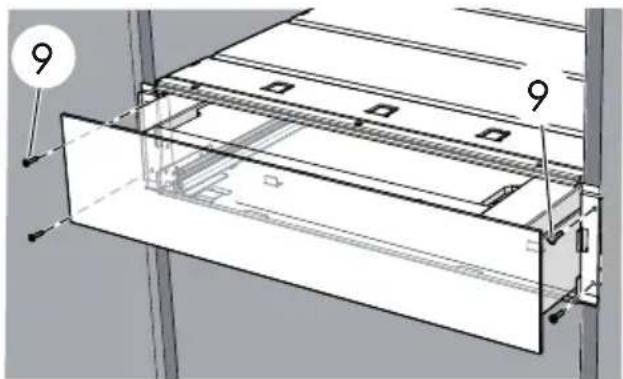
- Fasten the front part of the drawer to the unit using the screws (9) provided.
natural_image
Technical diagram of a mechanical or architectural component with labeled parts (no readable text or symbols)- Fit the cover plates (10) onto the mounting brackets (11).


natural_image
Technical line drawing of a mechanical assembly with no visible text or symbols- Align the drawer correctly.
Adjusting the front panel
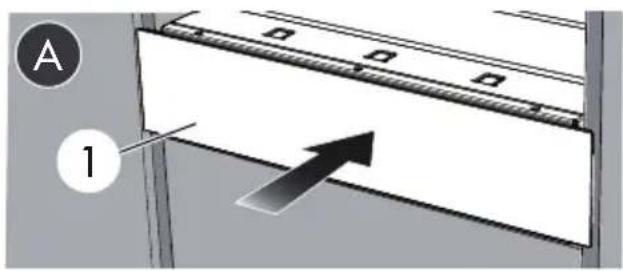
- Press gently on the front of the drawer (1) to open it.

natural_image
Technical diagram of a mechanical assembly with labeled component '1' and directional arrow (no text or symbols beyond labels)- Loosen the 2 adjustment screws (2) at the bottom left and right of the front panel using an Allen key.

natural_image
Technical line drawing of a mechanical assembly with a rectangular component and mounting bracket (no text or symbols)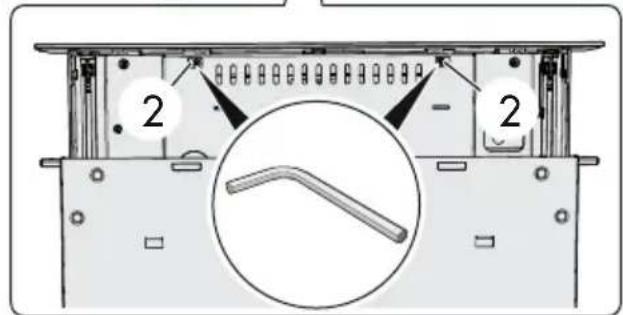

Improper use Risk of injury
- Do not fully unscrew the adjustment screws. The front panel is not fastened to the casing by screws and may fall.
- Readjust by moving the front panel of the drawer slightly upwards or downwards.
- Tighten the adjustment screws.
- Close the drawer by pushing it inwards.

When connecting the drawer for the first time of after a power failure, the buttons and indicator lights light up for 10 seconds.
This is an initialization test.
The appliance can be used as soon as the indicator lights turn off.
Mounting under worktops (mm)


Make sure that there is an opening of approx. 35 or 60 mm at the back / bottom of the unit.
1 Ventilation opening
2 Built-in dimensions with mains plug: cable length (2 metres)
Installing in a tall unit (mm)
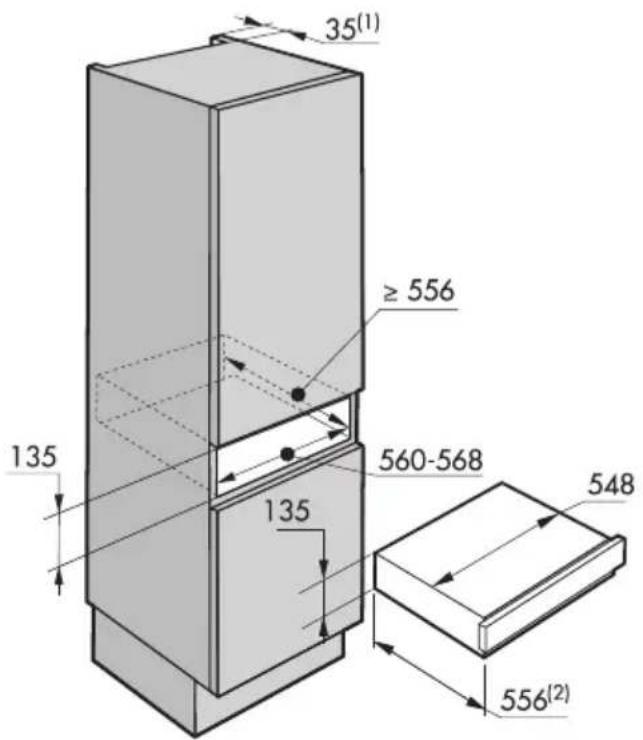

Make sure that there is an opening approx. 35 or 40 mm deep in the top/back of the unit.
1 Ventilation opening
2 Built-in dimensions with mains plug: cable length (2 metres)
Installation in a tall unit with a 600mm high opening in combination with an oven
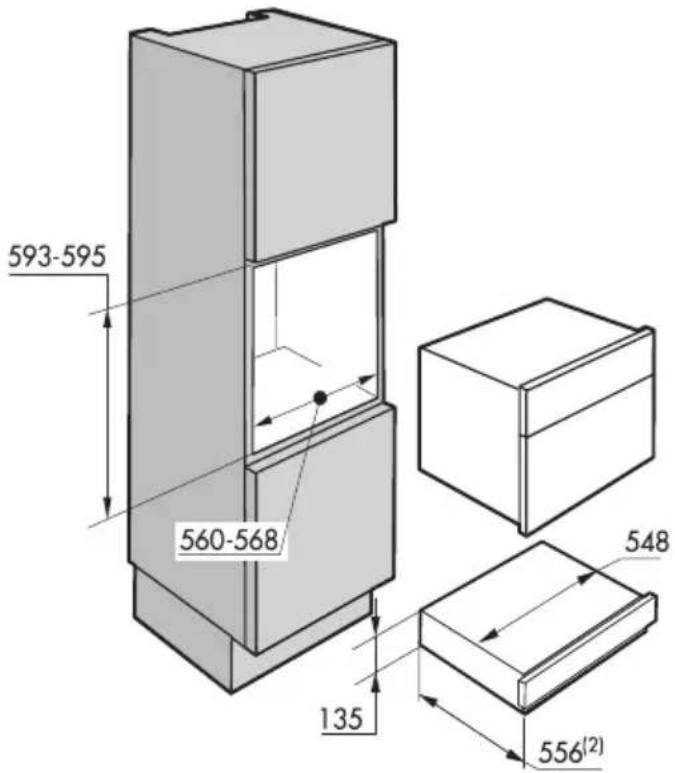
1 Ventilation opening
2 Built-in dimensions with mains plug: cable length (2 metres)

To install an appliance which can be combined with the drawer, follow the instructions provided in the corresponding installation and operating manual.
The manufacturer reserves the right to make any changes deemed useful for improvement of its products without prior notice. The illustrations and descriptions contained in this manual are therefore not binding and are merely indicative.
- FRANÇAIS
- Description 46
- Use 51
- Cleaning and maintenance 63
- Installation
- TRANSLATION OF THE ORIGINAL INSTRUCTIONS
- Warnings
- General safety instructions
- Risk of personal injury
- Risk of damage to the appliance
- Installation and maintenance
- For this appliance
- Intended use
- Manufacturer's liability
- About this manual
- Identification plate
- Disposal
- Electrical hazard Electrocution hazard
- Warnings
- Plastic packaging Danger of suffocation
- How to use the user manual
- Description
- Use
- Cleaning and maintenance
- Installation
- Description
- General Description
- Control panel
- Vacuum drawer
- Advantages:
- Accessories provided
- Other features
- Drawer-securing device
- Absolute vacuum sensor
- Description of the functions
- Setting the vacuum level for bags
- Setting the bag sealing level
- Use
- Warnings
- Improper use Risk of personal injury
- Improper use Danger of fire or explosion
- Improper use Risk of damage to the appliance
- First use
- Using the accessories
- Vacuum seal or sous-vide cooking bags
- Vacuum containers
- Using vacuum seal bags
- Improper use Risk of personal injury and damage to the appliance
- How to create vacuum in external containers
- After use
- Storing vacuum-sealed products
- Freezer storage at -18°C
- Refrigerator storage at +3-5°C
- Cupboard storage at room temperature (+18°C)
- Sous-vide cooking
- Useful tips:
- Chef Cycle
- Use:
- Cleaning and maintenance
- Warnings
- Cleaning the appliance's surfaces
- Cleaning the outside of the appliance
- Cleaning the internal chamber
- Cleaning the sealing bar
- Cleaning the vacuum adapter for external containers
- Pump oil dehumidification cycle
- What to do if...
- Electrical connection
- General information
- Fixed connection
- Connection with plug and socket
- Positioning
- Heavy appliance Crushing hazard
- Appliance heats up when in operation Fire hazard
- Position of the power cable
- Installing the vacuum drawer
- Adjusting the front panel
- Improper use Risk of injury
Brand : SMEG
Model : CPV115B3
Category : Vacuum Sealer