
CM 7750 125 Edition - Coffee maker MIELE - Free user manual and instructions
Find the device manual for free CM 7750 125 Edition MIELE in PDF.


| Product Type | Coffee machine (fully automatic) |
| Brand | Miele |
| Model | CM 7750 125 Edition |
| Dimensions (W x H x D) | 311 x 420 x 445 mm |
| Net Weight | 14.2 kg |
| Power Supply | 220-240 V, 50/60 Hz, 10 A fuse |
| Water Container Capacity | 2.2 L |
| Bean Container Capacities | Approx. 540 g (A), 150 g (B), 210 g (C) |
| Milk Container Capacity | 0.5 L |
| Drip Tray Capacity | 0.8 L |
| Waste Container Capacity | Max. 16 portions |
| Grinder | Steel conical grinder, 5 settings |
| Pump Pressure | Max. 15 bar |
| Central Spout Height Adjustable | 80–160 mm |
| Drink Options | Espresso, Coffee, Cappuccino, Latte Macchiato, Flat White, Ristretto, Long Black, Caffè Americano, Caffè Latte, Café au Lait, Espresso Macchiato, Hot Milk, Milk Froth, Tea (green, black, herbal, fruit), Hot Water |
| Special Functions | DoubleShot, Two portions, Coffee pot (up to 8 cups), TeaTimer, Expert mode, Profiles (up to 10) |
| Cup Heating | Yes, on top of machine |
| WiFi Connectivity | Yes, Miele@home, Miele app control, RemoteUpdate, MobileStart |
| Descaling | Automatic with descaling cartridge or manual with tablets |
| Cleaning | Automatic rinsing, milk pipework cleaning, brew unit degreasing (with Miele cleaning tablets) |
| Safety Features | System lock, child lock, overheating protection, automatic switch-off |
| Warranty | 2 years (UK), registration required |
| Included Accessories | Milk flask (0.5 L), milk siphon, cleaning tablets, descaling tablets, descaling cartridge, cleaning brush, vacuum attachment, drip tray cover |
Frequently Asked Questions - CM 7750 125 Edition MIELE
User questions about CM 7750 125 Edition MIELE
0 question about this device. Answer the ones you know or ask your own.
Ask a new question about this device
Download the instructions for your Coffee maker in PDF format for free! Find your manual CM 7750 125 Edition - MIELE and take your electronic device back in hand. On this page are published all the documents necessary for the use of your device. CM 7750 125 Edition by MIELE.
USER MANUAL CM 7750 125 Edition MIELE
Operating instructions Coffee machine
To avoid the risk of accidents or damage to the appliance it is essential to read these instructions before it is installed and used for the first time.
The following tips can help you save energy and money as well as care for the environment:
- Operate the coffee machine in Eco mode (default setting).
- Select dimmer lighting or abstain from using lighting when the appliance is switched on.
- Switch off the lighting switch-off time when the appliance is switched off.
- Switch off the clock display.
- The coffee machine's energy consumption may increase if you change the settings for the timer.
This setting uses more energy appears in the display.
- Switch the coffee machine off with the On/Off sensor control ① if it is not going to be used for a while.
- Change the setting for the Switch off after timer to 20 minutes. The coffee machine will then switch itself off 20 minutes after the last drink was made or a sensor control was touched.
- If you only want to pre-heat your cups occasionally, you can switch the cup heating surface off. You can use hot water to pre-heat the cups instead.
Disposing of the packaging material
The packaging material is used for handling and protects the appliance from transport damage. The packaging material used is selected from materials which are environmentally friendly for disposal and can generally be recycled. Recycling the packaging material reduces the use of raw materials. Use material-specific collection points for valuable materials and take advantage of return options.
Disposing of your old appliance
Electrical and electronic appliances contain many valuable materials. They also contain certain materials, compounds and components which were essential for their correct functioning and safety. These could be hazardous to human health and to the environment if disposed of with household waste or if handled incorrectly. Please do not, therefore, dispose of your old appliance with household waste.

Instead, please make use of officially designated collection and disposal points to dispose of and recycle electrical and electronic appliances in your local community, with your dealer or with Miele, free of charge. By law, you are solely responsible for deleting any personal data from the old appliance prior to disposal. You are legally obliged to remove any old batteries which are not securely enclosed by the appliance and to remove any lamps without destroying them, where this is possible. These must be taken to a suitable collection point where they can be handed in free of charge. Please ensure that your old appliance poses no risk to children while being stored for disposal.
Caring for the environment 2
Saving energy.... 2
Warning and Safety instructions 7
Guide to the machine 14
Appliance front.... 14
Rear of machine.... 15
Central spout in detail 16
Milk flask and milk siphon.... 16
The milk container 16
Connecting piece for milk siphon and milk container.... 16
Symbols in the display.... 17
Operation 19
Touch display.... 19
Operation.... 19
Miele@home 21
Unpacking and installing 22
Unpacking the coffee machine.... 22
Accessories supplied 22
Setting up and connecting the coffee machine.... 22
Before using for the first time.... 24
Fitting the descaling cartridge.... 24
Set the water hardness level 25
Set up the bean system.... 25
Bean system.... 27
Changing bean system settings (Type of beans).... 27
Renaming type of beans 27
Changing bean type allocation.... 28
Filling the water container.... 29
Switching on and off.... 30
Switching the coffee machine on.... 30
Switching the coffee machine off 30
Preparing for an extended period of inactivity 30
Central spout with cup rim sensor.... 31
Central spout positions 31
Switching the spout adjustment on and off 31
Cup heating 32
Making drinks 33
Coffee.... 33
Coffee drinks made with and without milk 33
The milk 33
Using the milk container 34
Using a milk carton with the milk siphon 35
Making a coffee.... 36
Cancelling a drink.... 36
DoubleShot.... 36
Making two portions ☐ 36
Coffee pot: making several cups of coffee one after the other.... 37
Tea 38
TeaTimer 38
Making tea 39
Cancelling tea preparation.... 39
Tea pot: making several cups of tea, one after the other 40
Dispensing hot water 40
Parameters 41
Quantity of coffee 41
Brewing temperature.... 41
Pre-brewing the ground coffee.... 41
Type of beans 41
Degree of grinding 42
Identifying the ideal degree of grinding.... 42
Adjusting the degree of grinding 42
Portion size 43
Resetting drinks 44
Profiles...... 45
Creating a profile 45
Calling up a profile.... 45
Editing a profile 45
Creating a drink in a profile 46
Changing a drink: changing the portion size(s), drinks parameters and names.... 46
Making a drink from a profile 46
Expert mode 47
Settings 48
Opening the "Settings" menu 48
Changing and saving settings.... 48
Language 48
Time.... 48
Timer 48
Switch on at.... 49
Switch off at 49
Switch off after 49
Allocating days of the week.... 49
Eco mode 49
Lighting.... 50
Water hardness.... 50
Info (display information) 50
System lock 📋 50
Miele@home 51
Display brightness.... 51
Volume 51
Service 51
Evaporate 51
Demo mode.... 51
Factory default 51
Appliance settings 52
Network configuration 52
Networking 53
Setting up the network (Miele@home) 53
Setting up the network again.... 53
Remote control 53
MobileStart 54
RemoteUpdate 54
Cleaning and care 56
Overview of cleaning intervals.... 56
Cleaning by hand or in the dishwasher 57
Unsuitable cleaning agents.... 58
Cleaning the drip tray and waste container.... 58
Cleaning the drip tray cover.... 59
Cleaning the water container.... 60
Removing and cleaning the water container filter 60
Cleaning the central spout.... 61
Cleaning the steam jet.... 62
Cleaning the cup rim sensor.... 62
Cleaning the milk siphon 63
Cleaning the milk container 63
Cleaning the milk pipework manually or using the maintenance programme...... 64
Cleaning the bean system.... 64
Cleaning the ground coffee drawer.... 65
Vacuuming out the ground coffee chute.... 65
Contents
Cleaning the casing.... 66
Maintenance programmes.... 66
Rinsing the appliance.... 66
Rinsing the milk pipework 67
Cleaning the milk pipework.... 67
Degreasing the brew unit and cleaning the interior 68
Message on display.... 68
Degreasing the brew unit when prompted to do so.... 68
Cleaning the brew unit and interior 69
Descaling the machine 70
Automatic descaling.... 73
Please note before and during automatic descaling: 73
The Miele descaling cartridge 74
Removing the descaling cartridge 75
Choosing not to use a descaling cartridge.... 76
Start time for automatic descaling (Descaling timer).... 77
Setting the start time for automatic descaling.... 77
Cancelling automatic descaling.... 77
Problem solving guide.... 78
Messages in the display.... 78
Unusual performance of the coffee machine.... 81
Faults with automatic descaling.... 86
Unsatisfactory results.... 87
Service.... 89
Contact in the event of a fault.... 89
Warranty 89
Transporting the machine 90
Evaporation.... 90
Vacuuming out the ground coffee chute using the attachment and cleaning the interior.... 91
Packaging.... 91
Accessories 92
Electrical connection 93
Dimensions 94
Technical data.... 95
EU Conformity declaration.... 96
UK Conformity declaration 97
This coffee machine complies with all the stipulated safety requirements. Inappropriate use can, however, lead to personal injury and material damage.
Read the operating instructions carefully before using the coffee machine. They contain important information on the installation, safety, use and maintenance of the appliance. This prevents both personal injury and damage to the coffee machine. In accordance with standard IEC 60335-1, Miele expressly and strongly advises that you read and follow the instructions in the chapter on installing and connecting the coffee machine as well as the safety instructions and warnings.
Miele cannot be held liable for injury or damage caused by non-compliance with these instructions.
Keep these operating instructions in a safe place and pass them on to any future owner.
Correct application
This coffee machine is intended for home use.
It must only be used as a domestic appliance to make espresso, cappuccino, latte macchiato, tea etc. Any other use is not permitted.
This coffee machine is not intended for outdoor use.
This coffee machine must not be used at altitudes above 2000 m.
This coffee machine can only be used by people with reduced physical, sensory or mental capabilities, or lack of experience and knowledge, if they are supervised whilst using it, or have been shown how to use it in a safe way and recognise and understand the consequences of incorrect operation.
Safety with children
⚠️ Danger of burning and scalding on the dispensing spouts.
Children's skin is far more sensitive to high temperatures than that of adults.
Ensure children do not touch hot surfaces of the coffee machine or place parts of their body under the dispensing spouts.
▶ Install the coffee machine where it is out of the reach of children.
Children under 8 years of age must be kept away from the coffee machine and the mains connection cable and plug/socket.
Children aged 8 and older may only use the coffee machine without supervision if they have been shown how to use it in a safe manner.
Children aged 8 and older must be aware of the potential dangers caused by incorrect operation.
▶ Please supervise children in the vicinity of the coffee machine and do not allow them to play with it.
▶ Young children must not be allowed to clean the coffee machine at all. Cleaning may only be carried out by children 8 years of age or older under the supervision of an adult.
Remember that coffee and espresso are not suitable drinks for children.
Danger of suffocation! Whilst playing, children may become entangled in packaging material (such as plastic wrapping) or pull the packaging material over their head, presenting the risk of suffocation. Keep packaging material away from children.
Technical safety
▶ A damaged coffee machine is dangerous. Check it for any visible damage before setting it up. Never attempt to use a damaged coffee machine.
To avoid the risk of damage to the machine, make sure the connection data (voltage and frequency) on the data plate corresponds to the household supply, before connecting the machine to the mains supply. Consult a qualified electrician if in any doubt.
The electrical safety of this coffee machine can only be guaranteed when correctly earthed. It is essential that this standard safety requirement is met. If in any doubt please have the electrical installation tested by a qualified electrician.
▶ Temporary or permanent operation on an autonomous power supply system or a power supply system that is not synchronised with the mains power supply (e.g. island networks, back-up systems) is possible. A prerequisite for operation is that the power supply system complies with the specifications of EN 50160 or an equivalent standard.
The function and operation of the protective measures provided in the domestic electrical installation and in this Miele product must also be maintained in isolated operation or in operation that is not synchronised with the mains power supply, or these measures must be replaced by equivalent measures in the installation. As described, for example, in the current version of BS OHSAS 18001–2 ISO 45001.
Do not connect the machine to the mains electricity supply by a multi-socket adapter or an extension lead. These are a fire hazard and do not guarantee the required safety of the appliance.
The coffee machine must not be used in a non-stationary location (e.g. on a ship).
▶ Unplug the machine from the power supply immediately if you notice any damage or smell scorching, for example.
▶ Ensure that the mains connection cable cannot be pinched or damaged by any sharp edges.
The mains connection cable should not hang down. Someone could trip over it with the risk of injury and damage the machine.
▶ Only use the coffee machine in rooms where the ambient temperature is between +16 °C and +38 °C.
Do not place the coffee machine near a window in direct sunshine or right next to an appliance that gives off heat. These would subject the machine to ambient temperatures outside its permitted operating range.
▶ Position the coffee machine at a height of at least 850 mm from the floor.
Danger of overheating. Please ensure that there is adequate ventilation around the coffee machine. Do not cover the coffee machine with tea towels etc. while it is in use.
The coffee machine must not be installed in a niche. Heat and moisture can accumulate in a niche. This can result in damage to the appliance and/or furniture unit.
▶ Protect the coffee machine from water and water spray. Do not immerse the machine in water.
▶ Repairs and other work by unqualified persons to the machine and the connection cable could be dangerous. The manufacturer cannot be held liable for unauthorised work. Repairs may only be carried out by a Miele authorised service technician.
While the machine is under warranty, repairs should only be undertaken by a Miele authorised service technician. Otherwise the warranty is invalidated.
The coffee machine must be disconnected from the electricity supply during repair work.
▶ Never open the outer casing of the machine. Tampering with electrical connections or components and mechanical parts is highly dangerous to the user and can cause operational faults or electric shock.
Correct use
⚠️ Danger of burning and scalding on the dispensing spouts.
The liquids and steam dispensed are very hot.
Keep well away from the area underneath the spouts when hot liquids and steam are being dispensed.
Do not touch hot components.
Hot liquid or steam could spatter from the spouts. Ensure that the central spout is clean and fitted correctly.
Water in the drip tray can also be very hot. Take care when emptying it.
⚠️ Danger of injury to the eyes.
Never look directly at the lighting or use optical instruments to look at it.
▶ Please note the following regarding water:
- The water quality must conform to the requirements for drinking water in the country in which the coffee machine is being used.
- Only use cold, fresh tap water to fill the water container. Hot or warm water or other liquids can damage the coffee machine.
- Change the water every day to prevent a build-up of bacteria.
- Do not use carbonated water.
▶ Only fill the bean container with roasted espresso/coffee beans. Do not fill the bean container with coffee beans which have been treated with additives or with ground coffee.
Do not fill the bean containers with any type of liquid.
Do not use green (unroasted) coffee beans or mixtures of coffee beans which contain green coffee beans. Green coffee beans are very hard and still contain residual moisture. These can damage the coffee machine grinder as soon as grinding begins.
Do not use coffee beans which have been treated with caramel, sugar or other substances including sugary liquids. Sugar will damage the coffee machine.
▶ Only fill the coffee chute with ground coffee beans.
Do not use any caramelised ready ground coffee. The sugar in the coffee will stick to and block the brew unit of the coffee machine. The cleaning tablets for degreasing the brew unit will not remove this type of deposit.
If decaffeinated coffee beans are used after dispensing a drink with caffeinated beans, there may still be residues from the caffeinated beans in the grinder or brew chamber. Discard the first coffee drink when using decaffeinated coffee.
▶ Only use milk without additives. Additives in milk usually contain sugar and this will stick to the milk pipework.
If using dairy milk make sure that it has been pasteurised.
When making tea, please follow the instructions on the packaging.
Do not place flaming alcohol mixtures underneath the central spout. The flames could ignite plastic components and cause them to melt.
Do not use naked flames, e.g. a candle, on or near the coffee machine. The coffee machine could catch fire with the risk of the fire spreading.
The machine must not be used for cleaning objects.
Accessories and spare parts
▶ Miele can only guarantee the safety of the machine when original Miele spare parts are used. Faulty components must only be replaced by genuine Miele original spare parts.
▶ Only use original Miele accessories. If other parts are used, warranty, performance and/or product liability claims will be invalidated.
▶ Miele will guarantee to supply functional spare parts for a minimum of 10 years and up to 15 years following the discontinuation of your coffee machine.
Cleaning and care
▶ Clean the coffee machine and the milk flask daily, particularly before using for the first time.
All parts of the milk system need to be cleaned thoroughly and regularly. Milk contains bacteria which proliferate rapidly with inadequate cleaning.
Do not use a steam cleaner to clean this machine. Steam could reach electrical components and cause a short circuit.
If you do not utilise automatic descaling, you will need to descale the coffee machine manually on a regular basis. Miele cannot be held liable for damage resulting from not descaling the machine, using the wrong descaling agent or an unsuitable descaling solution concentration.
▶ Degrease the brew unit regularly with Miele cleaning tablets. Depending on the natural oil content of the coffee used, the brew unit can become blocked quite quickly.
▶ Used coffee grounds should be disposed of with the organic rubbish or on the compost heap. Do not empty them down the sink, as they could block it.
For machines with stainless steel surfaces:
Do not use sticky notes, adhesive tape, masking tape or other types of adhesive on the stainless steel surfaces.
Stainless steel surfaces are susceptible to scratching. Even magnets can cause scratches.
Appliance front

① On/Off button ①
② “Back” ⇔ sensor
③ Touch display
④ Cup heating
⑤ Water container
⑥ Bean system with 3 bean containers
⑦ Park position for milk tube
⑧ Grinder setting
⑨ Ground coffee drawer with integrated coffee scoop
⑩ Brew unit
⑪ Height-adjustable central spout with lighting
⑫ Drip tray with lid and waste container
⑬ Lower panel with drip tray cover
Rear of machine


① Cover
② Descaling cartridge holder
③ Adapter
④ Miele descaling cartridge
Central spout in detail

① Dispensing spouts for coffee and milk
② Cup sensor
③ Hot-water spout
④ Stainless steel cover
Milk flask and milk siphon

① Milk flask
② Milk siphon
③ Milk pipe
The milk container

① Connecting piece
② Lid
③ Sealing ring
④ Stainless steel tube
⑤ Glass
Connecting piece for milk siphon and milk container
You can prepare milk with the milk siphon or milk container.

There is one connecting piece included in the scope of delivery which can be inserted either into the milk siphon or into the milk container lid.
The appliance is supplied with the connecting piece already inserted into the milk container lid. The connecting piece is easy to push out from the inside of the milk container lid.
Symbols in the display
The following symbols may also appear in the display in addition to the text:
Symbol Explanation
| This symbol indicates the “Settings” menu and the “Language” menu option. | |
| Some settings, e.g. display brightness and buzzer/keypad volume, are selected using a bar chart. | |
| This symbol indicates that there is additional information and advice about using the coffee machine. Select OK to confirm the information. | |
| The Switch on at is activated (see “Settings - Timer”). The symbol and the desired switching on time appear in the display 23:59 hours before the coffee machine is due to switch on, as long as On or Night dimming is selected for the time display. | |
| The TeaTimer minute minder has been started (see “TeaTimer”). The remaining brewing time is shown next to the symbol. | |
| This symbol appears if the system lock is activated.Operation is locked. | |
| This symbol appears while the appliance is being descaled.(This symbol can also be found on the water container: fill up to this mark). |

Guide to the machine
Symbol Explanation
| This symbol and a fault code will appear if a fault occurs. | |
| The strength of the WiFi connection is shown under Settings | Miele@home | Connection status.Symbols represent the connection strength in increments from strong to not connected. | |
| The symbol appears when MobileStart is activated. | |
| Drinks menu symbols:EspressoCoffeeCappuccinoLatte macchiatoTwo portions |
Touch display
The delicate touch display can be scratched by pointed or sharp objects, e.g. pens.
Only touch the display with your fingers.
If your fingers are cold, the touch display may not react.

The display is split into three sections.
The menu name is displayed in the top left and the time in the top right of the display. Depending on the number of items in the menu, a scroll bar may also appear in the middle.
The middle row shows the current menu and options. The most popular drinks are depicted with symbols in the Drinks menu (see “Symbols in the display” for an explanation of the symbols).
You can scroll to the right or left using the < and > arrows at the bottom of the display. Context-dependent functions and menus can be found to the left and right of the arrow sensors.
Operation
You can only select options which are highlighted in light grey.
Each time you touch a possible option the relevant field lights up partially or completely orange.
Selecting or opening a menu
■ Touch the field you want with your finger.
Scrolling
You can scroll left or right using the < and > arrow sensors.
■ Touch the arrow sensor for the direction you want to go.
Exiting a menu level ("Back" ↩ sensor control)
■ Touch the ↔ sensor control to return to the previous screen.
Entries made before this which have not been confirmed with OK will not be saved.
Entering numbers
Use the numerical keypad to enter numbers, e.g. if you want to set a timer duration. The numerical keypad will appear automatically in the relevant menus.

■ Touch the numbers you want.
Once you have entered an accepted value, the OK field will light up green.
■ Confirm with OK.
You can delete one character at a time using the arrow sensor.
Entering letters
Profile names or the names for your own drinks are entered using a keyboard. It is best to select short names (max. 8 characters).
Further letters or symbols can be accessed using the < and > arrow sensors. Numbers can be found by touching the 123 sensor.

■ Select the letters or characters you want.
■ Touch Save.
Your coffee machine is equipped with an integrated WiFi module.
Before installing the coffee machine in its final installation site, ensure that the signal from your WiFi network is strong enough.
To use this feature, you will need:
- A WiFi network
- The Miele app
- A Miele user account (this can be created from the Miele app)
The Miele app will guide you through the process of connecting your coffee machine to your home WiFi network.
Once your coffee machine is connected to your WiFi network, you can use the Miele app to carry out activities such as the following:
- Calling up information on the operating status of your coffee machine
- Changing settings on your coffee machine
- Controlling your coffee machine remotely
Connecting your coffee machine to your WiFi network will increase energy consumption, even when the machine is switched off.
Availability of the WiFi connection
The WiFi connection shares a frequency range with other appliances (including microwave ovens and remote control toys). This can give rise to sporadic or even complete connection failures. Therefore, the availability of featured functions cannot be guaranteed.
Miele@home availability
The ability to use the Miele app depends on the availability of the Miele@home service in your country.
The Miele@home service is not available in every country.
For information about availability, please visit www.miele.com.
Miele App
The Miele App is available to download free of charge from the Apple App Store ® or from the Google Play Store ™ .


Unpacking the coffee machine
■ Unpack the coffee machine.
■ Remove any protective foil and notes from the machine.
Tip: Please retain the original packaging so that you can pack the appliance securely, should you need to transport it in the future.
The drip tray cover can be found in the accessories pack.

■ Remove the protective foil from the drip tray cover and place the drip tray cover into the lower panel.
Accessories supplied
The following accessories are included with your coffee machine. Cleaning products are supplied depending on model.
- Milk flask MB-CM-G (capacity 0.5 l)
- Milk siphon
- Cleaning tablets for degreasing the brew unit (starter set)
- Miele descaling tablets (starter set)
-
Miele descaling cartridge
-
Cleaning brush
- Vacuum cleaner attachment for cleaning coffee chute

Setting up and connecting the coffee machine
Danger of overheating due to insufficient ventilation.
If the coffee machine is not sufficiently ventilated, the appliance can overheat.
Please ensure that there is adequate ventilation around the coffee machine.
Do not cover the coffee machine with tea towels etc. while it is in use.
If the coffee machine is installed in a niche, heat and moisture will accumulate inside the niche. This can result in damage to the coffee machine and/or furniture unit.
Do not install the appliance in a niche.
Please observe the following installation instructions:
- The location of the machine must be dry and well ventilated.
- The ambient temperature of the room in which the machine is used must be between 16 °C and 38 °C.
- Do not place the coffee machine near a window in direct sunshine or right next to an appliance that gives off heat. These would subject the machine to ambient temperatures outside its permitted operating range.
- The coffee machine must be set up on a level surface. The surface must be water resistant.
- The appliance door must be opened completely to remove the brew unit.
■ Place the coffee machine in the location in which you intend to use it.
■ Clean the appliance thoroughly before filling it with drinking water and coffee beans.
- Insert the plug of the coffee machine into the socket (see “Electrical connection”).
■ Remove the water container and fill it with fresh, cold tap water. Only fill the container up to the "max." mark.
■ Push the water container back into the machine.

Tip: The milk pipework can be stored behind the appliance door when not in use.
When you connect the coffee machine to the mains power, Miele will appear briefly in the display.
When you switch the coffee machine on for the first time, Miele will again appear briefly in the display.
The following settings are retrieved:
- Language and country
- Date
- Time of day
- Clock display
- Automatic descaling
- Water hardness
■ Touch the On/Off button ①.
Setting the language
■ Select the language.
■ Confirm with OK.
You might also be asked for your location.
Setting the date
■ Enter the current date.
■ Confirm with OK.
The setting is now saved.
Setting the time of day
■ Enter the current time of day.
■ Confirm with OK.
The setting is now saved.
Setting the clock display
You can choose one of the following options:
- On: the time and date are always visible in the display when the machine is switched off.
- Off: the display is dark when the machine is switched off.
- Night dimming: the time and date are displayed from 5:00 am to 11:00 pm.
■ Select the clock display.
■ Confirm with OK.
Depending on which option you select, the coffee machine may use more energy. A corresponding message appears on the display.
Fitting the descaling cartridge
Some information about automatic descaling will appear in the display. Further information and instructions can be found in “Automatic descaling” in these operating instructions.
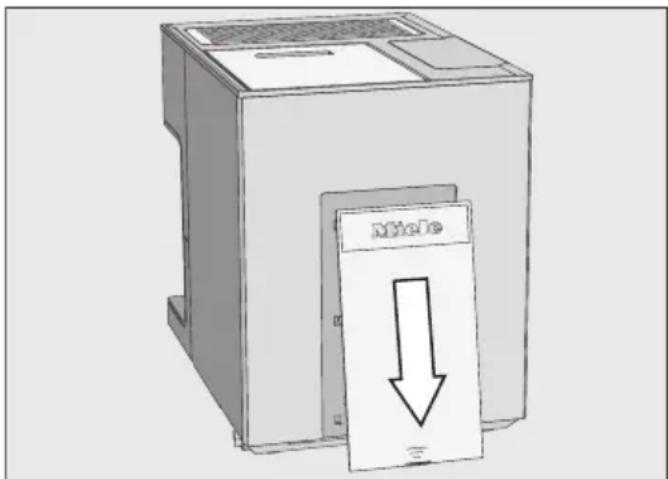
■ Remove the cover at the back of the coffee machine.

■ Pull the cartridge holder ① forwards and insert the descaling cartridge ②. Push the cartridge upwards as far as it will go.
■ Push the holder back into position.
■ Put the cover back on.
The next time the coffee machine is switched off, the descaling cartridge will fill with water. You will hear water being pumped into the cartridge at frequent intervals.
When a descaling cartridge is fitted, a message will appear regarding the current start time set for automatic descaling.
■ Confirm with OK.
■ If you want to change the start time, touch Start time and select the required time.
You can also change the start time for automatic descaling to a later time.
Set the water hardness level
Contact your local water supplier to find out your local water hardness range if necessary.
The machine has four programmable levels:
| °dH mmol/l ppm | (mg/l CaCO3 ) | Setting* | |
| 0 – 8.4 | 0 – 1.5 | 0 – 150 Soft | |
| 8.4 – 14 | 1.5 – 2.5 | 150 – 250 Medium | |
| 14 – 21 | 2.5 – 3.7 | 250 – 375 Hard | |
| >21 | >3.7 >3 | 75 Very hard | |
* The hardness level shown in the display may differ from the hardness level in your area. You must follow the values in the chart to set your machine to your local hardness level.
■ Select the hardness level.
■ Touch OK to confirm.
The setting is now saved.
Miele@home communication enabled household appliance will appear in the display. You can connect your coffee machine to your local WiFi network (see "Networking").
■ Confirm with OK.
The coffee machine is now successfully set up for use. You can now fill the bean system.
Set up the bean system
After setting up the coffee machine, you will be prompted to set up the bean system. The coffee machine will assist you when first filling and naming the bean containers.
■ Touch Yes.
If you select No, the assistant for setting up the bean system will not be shown again.
Fill the bean container
Tip: Open one bean container lid at a time to prevent mixing of bean types when filling the bean system.
■ Take one of the lids off.
■ Fill the first type of beans in this container.
■ Replace the lid.
■ Repeat the steps for the other two bean containers.
Tip: Make a note of each type of bean if necessary.
After filling the bean containers, you can now name the types of beans.
Name the types of beans
The three bean containers are shown in the display as follows and are pre-named.

If you rename the bean containers, please note the following:
- Choose concise names (max. 8 characters).
- If you are using the same type of beans in two or three bean containers at the same time (for instance
because you only use one type of bean), make sure you name them in the same way exactly.
■ Enter the name you want for the Type A bean container and then touch Save.
■ Now name the other two bean containers.
Continue will appear in the display. Now allocate bean types to the coffee drinks.
Allocate type of beans
Selected drinks are marked with √.
■ Select a bean type.
■ Now select the drinks that are to be prepared with this type of bean.
■ Select the next type of bean and allocate it to other drinks.
Any remaining drinks which have not been selected will be allocated to the third bean type.
You have set up the bean system and you can now prepare drinks.
To ensure that any coffee residues from the factory testing process are removed from the brewing system, please throw away the first 2 cups of coffee when using the coffee machine for the first time.
Coffee or Espresso can be made from whole roasted coffee beans which are freshly ground for each portion.
Your coffee machine has a bean system with three bean containers which can be filled with different types of beans or even just one type. You can allocate bean types to individual coffee drinks as you wish. Alternatively, you can create profiles with your own coffee drinks and allocate other bean types to these drinks which are different to the Miele profiles.
Alternatively, you can make coffee drinks with ready ground coffee (see "Making coffee drinks with ground coffee").
Risk of damage to the grinder due to incorrect operation.
The coffee machine will be damaged if the bean container is filled with unsuitable substances such as liquids, ground coffee or coffee beans treated with sugar, caramel or similar. In addition, green (unroasted) coffee beans or mixtures of coffee beans which contain green coffee beans can damage the grinder. Green coffee beans are very hard and still contain residual moisture. These can damage the coffee machine grinder as soon as grinding begins.
Only put roasted coffee beans in the bean container.
Tip: You can use a nut or seed grinder to grind green coffee beans. These types of grinder generally have a rotating stainless steel blade. You can then add the ground green coffee one portion at a time to the ground coffee chute and make the desired coffee drink (see "Making coffee drinks with ground coffee").
If decaffeinated coffee beans are used after dispensing a drink with caffeinated beans, there may still be residues from the caffeinated beans in the grinder or brew chamber.
Please be aware that minimal residues of caffeinated beans may be present in the next drink that you make.
Changing bean system settings (Type of beans)
The Drinks menu is displayed.
■ Touch ↻.
■ Touch Settings ▶.
■ Touch Type of beans.
■ Select a bean type.
You can now change the name or allocation.
Tip: If you want to allocate another bean type to a coffee drink, you can also do this under Change parameters (see "Parameters – Bean type").
Renaming type of beans
The 3 bean containers are shown in the display as follows and are pre-named.

If you rename the bean containers, please note the following:
- Choose concise names (max. 8 characters).
- If you are using the same type of beans in two or three bean containers at the same time (for instance because you only use one type of bean), make sure you name them in the same way exactly.
■ Touch Change name.
The editor will open in the display.
■ Enter the name you want and then touch Save.
If you give identically named types of beans different names, you will then need to allocate coffee drinks to the newly named beans.
If you do not allocate a bean type, you will be asked what bean type you want to use for the coffee as you make it.
Changing bean type allocation
If you have created extra profiles for coffee drinks in addition to the standard Miele profile, the bean types can be individually assigned to the drinks in each profile.
■ Touch Change allocation.
If you have set up one or more profiles and saved at least one coffee drink, first select the profile.
■ Select the profile for which you want to allocate the bean types.
All coffee drinks will be listed. The already allocated drinks will be indicated by a ☑.
■ Change the allocation as required.
■ Touch OK to confirm.
Tip: Touch All to select all the drinks. You can then deselect the ones you do not want.

Risk to health due to minated water.
Bacteria can develop in water which has been sitting in the water container for too long and is a risk to your health.
Change the water in the water container every day.

Risk of damage due to incorrect tion.
Unsuitable liquids such as hot or warm water or other liquids can damage the coffee machine.
Bottled mineral water leaves too much limescale in the coffee machine.
Only use cold, fresh tap water to fill the water container.
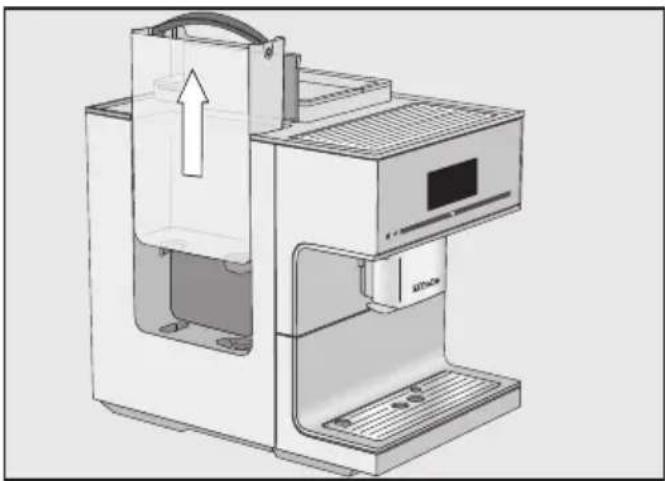
■ Open the lid on the left-hand side of the coffee machine.
■ Pull the water container up by the handle to remove it.
■ Fill the water container with fresh, cold drinking water up to the max. mark.
■ Push the water container back into the machine.
■ Close the lid.
If the water container is not inserted correctly (e.g. sits too high or at an angle), water can leak from the outlet valve.
Check whether the surface that the water container sits on is soiled. If necessary, clean the surface that the water container sits on.
Switching the coffee machine on
■ Touch the On/Off sensor control ①.
Miele will appear briefly in the display.
The appliance heats up and rinses the pipework. Hot water will run out of the central spout.
You can now make drinks.
If the coffee machine is already at operating temperature, rinsing will not take place when the machine is switched on.
While dispensing a drink or during maintenance processes, moisture builds up in the coffee machine. Once a drink has been dispensed or the machine has been switched off, the internal fan will continue to run until the interior is sufficiently dehumidified. You will hear an accompanying noise.
Switching the coffee machine off
■ Touch the On/Off switch ①.
If a drink has been dispensed, the coffee machine will rinse the coffee pipework automatically before switching off.
Preparing for an extended period of inactivity
If the coffee machine is not going to be used for a while, e.g. if you are going on holiday, remember to do the following:
■ Empty the drip tray, the waste container and the water container.
■ Clean all parts thoroughly, including the brew unit.
■ Unplug the coffee machine to disconnect it from the power supply.
The time of day set will be saved for a maximum of ten days and after that must be reset. Timer settings, profiles and other settings will be kept.
The central spout with cup rim sensor features automatic spout adjustment. Thanks to this spout adjustment function, the central spout moves down automatically at the start of a drink preparation process and the cup rim sensor stops it at the optimum height for the cups or glasses being used.

The central spout and cup rim sensor cannot be manually adjusted.
Central spout positions
You can switch off spout adjustment. The central spout will then remain in the upper position while drinks are being made. When a maintenance programme is being carried out, the central spout will move to the height of the cleaning containers or into a maintenance position.
Tip: To move the central spout into the maintenance position, touch ⇔ for 3 seconds.
If the coffee machine is switched off, the central spout components can be removed and cleaned at any time. The central spout will be in the middle position when switched off.
Switching the spout adjustment on and off
The Drinks menu is displayed.
■ Touch ↻.
■ Touch Settings ▶.
■ Touch Spout adjustment.
■ Select the required option to switch spout adjustment on or off.
■ Confirm with OK.
The setting is now saved.
Cup heating
Danger of overheating due to insufficient ventilation.
If the coffee machine is not sufficiently ventilated, the appliance can overheat.
Ensure that there is sufficient ventilation around the coffee machine, e.g. do not cover cups on the cup heating surface with a tea towel.
Cups should always be pre-heated to allow the flavour of the coffee to develop and its temperature to be retained.
You can pre-heat cups or glasses on the cup heating surface on the top of the coffee machine.
When the cup heating surface is activated, the cup rest will be heated continually until the coffee machine is switched off.
Switching cup heating on or off
The Drinks menu is displayed.
■ Touch ↻.
■ Touch Settings.
■ Touch Cup heating.
■ Select the required setting to switch cup heating on or off.
■ Confirm with OK.
The setting is now saved.
The coffee machine is delivered with cup heating switched off.
Pre-heating cups

■ Arrange the cups or glasses on the cup heating surface on the top of the coffee machine.
Coffee
⚠️ Danger of burning and scalding on the dispensing spouts.
The liquids and steam dispensed are very hot and can cause scalding.
Keep well away from the area underneath the spouts when hot liquids and steam are being dispensed.
Do not touch hot components.
Coffee drinks made with and without milk
You can use the coffee machine to prepare the following coffee-based drinks:
- Café au lait. This is an espresso with slightly hotter milk.
- Caffè Americano consists of espresso and hot water. The espresso is made first, then the hot water is dispensed into the cup.
- Caffè latte consists of coffee and hot milk.
- Cappuccino consists of approx. 2 thirds milk froth and 1 third espresso.
- Cappuccino italiano has the same proportions of milk froth and espresso as a cappuccino. The difference is that the espresso is added first and then the milk froth.
- Espresso is a strong aromatic coffee with a thick hazelnut brown coloured froth – known as the crema – on top. We recommend using espresso-roasted coffee beans to make an espresso.
- Espresso macchiato. This is an espresso with a small amount of milk froth on top.
Select a cup which can hold at least 100 ml for this drink.
- Flat white is a large cappuccino: lots of espresso with plenty of milk froth.
- Coffee differs from espresso by the increased amount of water and the roast of the beans. We recommend using coffee beans of the correct roast to make the coffee.
- Long coffee is a coffee with considerably more water.
- Latte macchiato consists of 1 third each of hot milk, milk froth and espresso.
- Long black. This is made with hot water and two shots of espresso.
- Ristretto is a strong, concentrated espresso. It is prepared with the same amount of coffee as for an espresso but with a lot less water.
Hot milk or milk froth can also be made.
The milk
Cow's milk or alternative plant-based dairy products (e.g. soy milk) containing added sugar can clog up the milk pipe and the rest of the milk pipework. Residues from unsuitable liquids can interfere with milk preparation.
The milk used must not contain any additives.
Dairy milk naturally contains bacteria. If using dairy milk make sure that it has been pasteurised, e.g. pasteurised cow's milk.
As soon as you select a drink containing milk, the machine will start to heat up. The milk will be drawn up into the central spout where it is heated by steam and also frothed for drinks requiring milk froth.
You can prepare hot milk and milk froth using cow's milk or alternative plant-based dairy products. However, the consistency of the milk froth will vary greatly depending on the type of milk used. Not all types of milk are suitable for milk froth.
Tip: Using cold cow's milk (< 10 °C) with a protein content of at least 3 % will produce the perfect milk froth. You can select milk with a fat content according to preference. With whole milk (at least 3.5 % fat), the milk froth will be slightly creamier than with low-fat milk.
Alternative plant-based dairy products – hereafter referred to as “alternative dairy products” – contain different ingredients than cow’s milk, for example. Due to natural settling, alternative dairy products tend to thicken. When preparing hot milk or milk froth, this thicker consistency can prevent the alternative dairy products from being drawn into the milk pipework.
Stir alternative dairy products well immediately before preparation.
Do not shake alternative dairy products. Shaking causes foam to form in the packaging and impairs the preparation process.
Tip: Rinse the milk pipework manually immediately after preparation.
Using the milk container
Milk is not cooled in the milk container.
Milk may spoil if it is left in the milk container for an extended period without being cooled (depending on the type of milk).
In particular, do not leave cow's milk in the milk container for an extended period without cooling it.
Please follow the manufacturer's instructions regarding the shelf life of the milk used.
If you have not made any milk drinks for a while, rinse the milk pipework thoroughly before making the first drink.
■ Insert the connecting piece into the lid from above until everything sits flush.
■ Connect the stainless steel tube to the inside of the lid. Make sure that the slanted end of the stainless steel tube is pointing downwards.
If you use alternative dairy products, make sure that you stir the milk well. To ensure the best preparation, alternative dairy products must be stirred and not shaken.
■ Fill the milk container with milk up to a maximum of 2 cm below the rim.
Tip: For high-quality milk froth, always use cold milk (< 10 °C).
■ Seal the milk container with the lid.

■ Place the milk container next to the coffee machine.
■ Connect the milk pipework to the milk container lid.
■ Connect the milk container to the coffee machine by attaching the milk pipework to the aperture in the central spout.
Tip: The milk pipework is easier to connect to the aperture in the central spout if the central spout is in the maintenance position. Touch the ← button for 3 seconds.
Using a milk carton with the milk siphon
If you have not made any milk drinks for a while, rinse the milk pipework thoroughly before making the first drink.
The milk siphon enables you to prepare milk directly from milk cartons or other suitable containers. The milk siphon is made up of the connecting piece and a long stainless steel tube.
Tip: For high-quality milk froth, always use cold milk (< 10 °C).
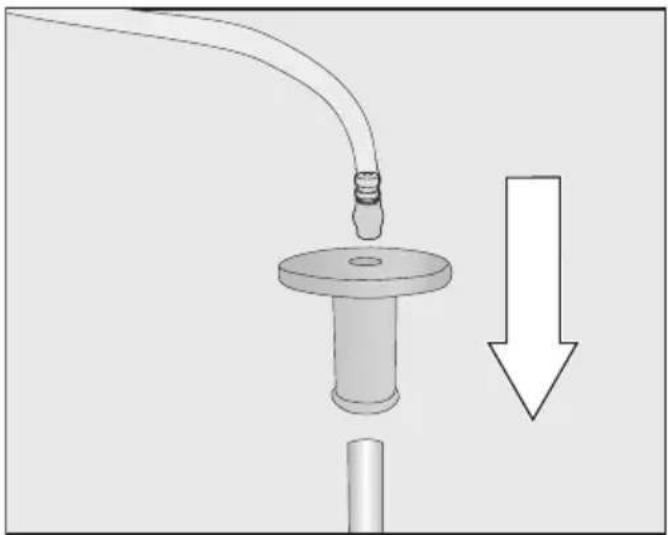
■ Connect the connecting piece to the milk siphon.
■ Connect the milk pipework to the connecting piece.

If you use alternative dairy products, make sure that you stir the milk well. To ensure the best preparation, the milk must be stirred and not shaken.
■ Place the milk carton next to the coffee machine.
■ Dip the milk siphon into the milk.
■ Connect the milk pipework to the aperture in the central spout.
Tip: The milk pipework is easier to connect to the aperture in the central spout if the central spout is in the maintenance position. Touch the button for 3 seconds.
Tip: Rinse the milk siphon under running water after use.
Making a coffee
Further drinks can be displayed and selected using the > arrow sensor.
The Drinks menu is displayed.
■ If you want to make a coffee with milk, prepare the milk container or a milk carton with the milk siphon.

■ Place a cup under the central spout.
■ Touch the symbol or name of the coffee you want to make.
Dispensing starts.
Cancelling a drink
You can finish dispensing individual drink components early, e.g. if the cup is not big enough.
Cancelling individual drink components
■ Touch Stop.
Cancelling the entire drink preparation
■ Touch Cancel.
DoubleShot
Select the DoubleShot function if you would like a particularly strong and aromatic coffee. In this case, more
coffee beans will be ground and brewed halfway through the brewing process. The shorter extraction time means that fewer unwanted aromas and bitter compounds will be released.
DoubleShot will appear while drinks are being made. DoubleShot can be activated for all drinks apart from "Ristretto" and "Long black".
Making a DoubleShot of coffee
Start in the Drinks menu.
■ Place a cup under the central spout.
■ Select the type of coffee you want.
Dispensing will start and the following will appear underneath:

■ Touch DoubleShot.
Double the quantity of coffee beans will be ground and brewed.
Making two portions 📋
With "Two portions" ☐ you can dispense two portions of a drink at the same time.

■ Place a cup under each of the coffee dispensers in the central spout.
■ Touch 🔓.
■ Select a drink.
Two portions of the drink will be dispensed.
Coffee pot: making several cups of coffee one after the other
You can make several cups of coffee one after the other automatically with the Coffee pot function (max. 1 litre), e.g. to fill a coffee pot. Up to eight cups can be made in this way.
The Drinks menu is displayed.
You can use the Coffee pot function twice in a row. After this, the coffee machine needs to cool down for one hour in order to prevent it from being damaged.
■ Place a sufficiently large container under the central spout.
■ Select Coffee pot.
■ Select the number of cups you want (3 to 8).
■ Follow the instructions in the display.
Each portion of coffee will be brewed and dispensed individually. You can follow the process in the display.
Cancelling Coffee pot
You can interrupt preparation at any time.
■ Touch Cancel.
Making coffee drinks with ground coffee
You can make coffee using ready ground coffee. This allows you to make a decaffeinated coffee if the bean container is already filled with regular coffee beans, for example.
To do this, fill the ground coffee drawer with ground coffee. The coffee machine will use all the ground coffee which has been added to the chute to make the next coffee.
Only one portion of coffee or espresso can be made at a time.
Adding ground coffee

The coffee scoop is integrated into the ground coffee drawer.
■ Open the appliance door.
■ Turn the handle (see arrow) to the left to remove the ground coffee drawer.

■ Fill the coffee scoop with ready ground coffee. Push the ground coffee drawer horizontally into the ground coffee chute.
In order to not overfill the brew unit, place a maximum of 2 level scoops of coffee in the ground coffee chute.
■ Turn the handle clockwise to fill the brew unit with the ground coffee and to close the ground coffee chute.
■ Close the appliance door.
Use ground coffee? appears on the display.
Making coffee with ground coffee
■ Touch Yes.
You can now select which type of drink you would like to make with ground coffee.
■ Place a cup under the central spout.
■ Select a drink.
The coffee will now be made.
If you select No, the ground coffee will be disposed of in the waste container without being brewed. The appliance rinses.
Tea
⚠️ Danger of burning and scalding on the hot water spout.
The liquids and steam dispensed are very hot and can cause scalding.
Keep well away from the area underneath the hot water spout when hot liquids and steam are being dispensed.
Do not touch hot components.
This machine is not intended for commercial or scientific purposes. Temperatures given are approximate and can vary according to ambient conditions.
To make tea you can select from the following options:
- Green tea approx. 80 °C
- Herbal tea approx. 90 °C
- Fruit tea approx. 90 °C
- Black tea approx. 90 °C
The type of tea determines the preset temperature.
The respective dispensing temperatures are recommended by Miele for making black tea, green tea, herbal or fruit tea.
Follow the instructions for making tea on the tea packaging.
The taste of the tea will be affected by the type of water used. Water should be as soft as possible to allow the aroma to develop.
Whether you use loose tea leaves, blended tea or tea bags depends on your own personal preference.
The amount of tea and the brewing time will vary depending on the type of tea. Always follow the recommendations of the manufacturer on the packaging or of the retailer. The amount of hot water used can be adjusted depending on the type of tea and the size of the cup (see “Portion size”).
Tip: Store the tea in a cool, dark place in tightly sealed containers. It is best to buy smaller amounts to prevent loss of aroma.
TeaTimer
You can use the TeaTimer to start a minute minder when making tea. A brewing time of 2 minutes is preset as standard. You can adjust the preset brewing time according to your preferences (between 1:00 and 23:59 minutes).
The TeaTimer can be started twice consecutively.
If you have started a TeaTimer, while the brewing time is counting down you can continue to use the coffee machine as normal. An audible tone will sound after the brewing time has elapsed.
If you have switched off audible tones, you will not be reminded when the brewing time has finished.
Switching the TeaTimer on and off
The Settings menu is displayed.
■ Select Timer.
■ Select TeaTimer.
- On: the TeaTimer is displayed while the hot water is being prepared. The TeaTimer can be started after preparation.
- Off: the TeaTimer is not displayed.
■ Select the desired setting.
■ Confirm with OK.
Making tea
The hot water spout is located to the right of the central spout.
Use the arrow sensor > to display and select the types of tea. Different types of tea can be found in the drinks menu after Milk froth.
The Drinks menu is displayed.
■ Pour loose tea into a tea filter or similar or take a tea bag from the packet.
■ Place the tea filter or the tea bag in the tea cup.
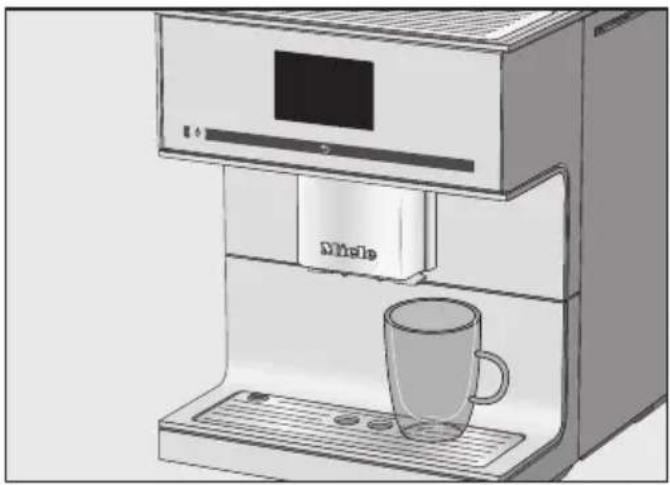
■ Place the cup under the hot water spout.
■ Select the type of tea from the display.
Hot water will be dispensed into the cup.
You can now start the minute minder for brewing time if the TeaTimer is switched on.
Starting the TeaTimer
TeaTimer appears in the bottom left of the display.

■ Touch TeaTimer.
TeaTimer will be selected. After dispensing, the editor will open with a suggested time.
■ Change the brewing time if necessary.
■ Confirm with OK.
A buzzer will sound after the brewing time has elapsed.
■ Now remove the tea leaves or the tea bag.
Cancelling tea preparation
■ Touch Stop or Cancel.
Tea pot: making several cups of tea, one after the other
You can make several cups of tea one after the other automatically with the Teapot function (max. 1 litre), e.g. to fill a tea pot. Up to eight cups can be made in this way.
Start in the Drinks menu.
■ Place the tea or tea bag in the tea pot.
■ Place a suitably sized tea pot under the hot water spout.
■ Select Teapot.
■ Select the type of tea you want.
■ Select the number of cups you want (3 to 8).
■ Follow the instructions in the display.
The teapot will be filled. You can follow the process in the display.
You can interrupt preparation at any time:
■ Touch Cancel.
Dispensing hot water
Danger of burning and scalding on the hot water spout!
The liquids and steam dispensed are very hot and can cause scalding.
Keep well away from the area underneath the spouts when hot liquids and steam are being dispensed.
Do not touch hot components.
The hot water has a temperature of approx. 90 °C when dispensed.
The amount of hot water used can be adjusted depending on the size of the cup (see "Portion size").
Start in the Drinks menu.
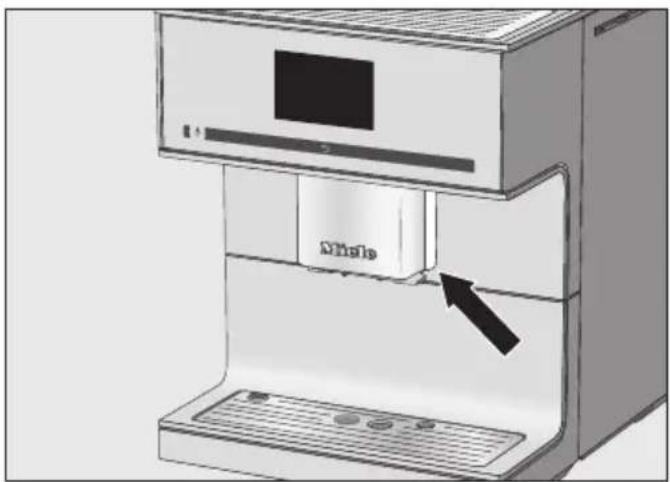
■ Place a suitable container underneath the hot water spout.
■ Select Hot water.
Dispensing will start.
Cancelling a drink
■ Touch Stop or Cancel.
You can individually adjust the following parameters for each drink:
- Quantity of coffee
- Brewing temperature
- Pre-brewing
- Bean type
Changing drink parameters
The Drinks menu is displayed.
■ Select Process.
■ Touch Change drink.
■ Select a drink.
Now you can adjust the portion size (see "Portion size") or set the drink parameters.
■ Touch Drink parameters.
■ Select Amount of coffee, Brew temperature, Pre-brewing or Type of beans.
■ Select the desired setting.
■ Confirm with OK.
The overview of drink parameters will appear in the display.
■ Touch OK again to save your changed settings.
Quantity of coffee
The coffee machine can grind and brew 7.5–12.5 g of coffee beans per cup. The greater the quantity of ground coffee, the stronger the drink.
The quantity of coffee is too low if the espresso or coffee lacks body.
Increase the quantity of coffee to brew more ground coffee.
The quantity of coffee is too high if the espresso or coffee tastes bitter.
Decrease the quantity of coffee to brew less ground coffee.
Brewing temperature
The brewing temperature must be adapted to the beans you are using and how they are roasted. It also varies depending on whether you are making espresso or coffee.
Some bean types are sensitive to high brewing temperatures, resulting in an impaired taste. If your coffee tastes bitter, the brewing temperature you have selected might be too high.
Espresso is usually brewed at higher temperatures.
Pre-brewing the ground coffee
When the pre-brewing function is turned on, the ground coffee is first moistened with a little hot water. The ground coffee swells a little. The remaining amount of water is then pressed through the moistened coffee grounds shortly after. If your coffee tastes too bland and you want to add some spice and richness, try the “Pre-brewing” function. Depending on the type of coffee used, pre-brewing can intensify the taste.
You can set a short or long duration for pre-brewing or turn the “Pre-brewing” function off completely.
Tip: We particularly recommend using the "Pre-brewing" function to make coffee.
Type of beans
You can display which type of bean is saved for the coffee drink or change the allocation.
Degree of grinding
The degree of grinding determines the contact time between the ground coffee and the water, known as the extraction time. Only when the ideal degree of grinding is selected can the machine dispense a perfect cup of coffee with a fine, hazelnut brown crema.
Identifying the ideal degree of grinding
There are various ways to tell whether the degree of grinding is set correctly.
The degree of grinding is too coarse if:
- The espresso or coffee flows into the cup very quickly
- The espresso or coffee tastes sour
- The crema is very pale and uneven
The degree of grinding is too fine if:
- The espresso or coffee flows into the cup very slowly
- The espresso or coffee tastes too bitter
- The crema is dark brown
Adjusting the degree of grinding
If the degree of grinding is adjusted by more than one level, the grinder may be damaged.
Only ever adjust the degree of grinding one level at a time.
Each time you adjust the setting, start making a new drink so that the beans are ground. You can then adjust the degree of grinding by one setting again.
The slide control for adjusting the degree of grinding is located on the top right behind the appliance door.
■ Open the appliance door.
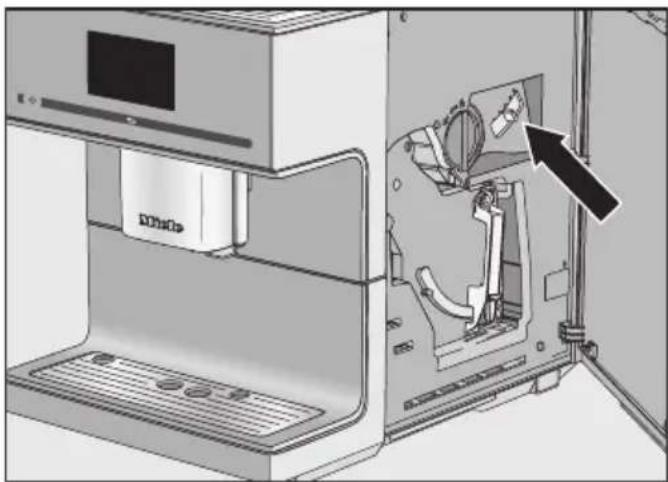
■ Push the slide control a maximum of one setting to the left (for finer grinding) or to the right (for coarser grinding).
The degree of grinding you select will be used for all bean types and coffee drinks.
■ Close the appliance door.
■ Make one cup of coffee.
Now you can adjust the degree of grinding again.
The grinder will naturally wear out slightly over time. Set the grinder to a finer degree of grinding if necessary.
The flavour of the coffee produced depends not only on the type of coffee, but also on the amount of water used. You can programme the amount of water for all coffee drinks, tea and hot water to suit the size of your cups and to suit the type of coffee you are using. This does not alter the amount of coffee used.
For coffee drinks with milk you can also set the amount of milk or milk froth to suit your personal taste. You can also set the portion sizes for hot milk and milk froth.
The changed portion size is always saved in the current profile. The name of the current profile is shown in the top left of the display.
If the water container becomes empty whilst making a drink, the machine will stop programming the portion size. The portion size will not be saved.
The Drinks menu is displayed.
■ Place the cup you want under the central spout or hot water spout.
■ Touch Process.
■ Touch Change drink.
■ Select a drink.
■ Touch Portion size.
If you have selected a drink with milk or tea, portion programming will start immediately. Portion size does not need to be opened separately.
The drink will be made and Save will appear in the display, as soon as the minimum dispensing amount is reached.
■ When the cup is filled up to the level you want, confirm with Save.
If the maximum amount is reached, preparation stops and the maximum possible amount is saved.
If you want to change the portion size for coffee drinks made with milk or hot water, the ingredients which make up the drink will be saved one after the other while the drink is being made.
The programmed mix of ingredients and portion size will now be dispensed every time that particular drink is selected.
You can reset portion sizes and parameters back to their factory default settings for individual drinks or for all drinks.
The Drinks menu is displayed.
■ Touch Process.
Resetting a drink
■ Touch Reset drink.
■ Select a drink.
Reset drink to default settings? will appear in the display.
■ Touch Yes to confirm.
Resetting all drinks
■ Touch Reset all drinks.
Reset all drinks to default settings? will appear in the display.
■ Touch Yes to confirm.
In addition to the Miele drinks menu (Miele profile), you can create up to 10 individual profiles to cater for different tastes and preferences.
The name of the current profile is shown in the top left of the display.
Creating a profile
The Drinks menu is displayed.
■ Touch Profiles.
■ Touch Create profile.
The editor will open in the display.
■ Enter the name you want (max. 8 characters).
■ Touch Save to confirm.
The profile has been created. You can now create drinks (see “Profiles: creating and editing drinks”).
Calling up a profile
The Drinks menu is displayed.
■ Touch Profiles.
■ Select the profile you want.
You now have the following options:
- Making drinks stored in the profile
- Creating a drink
- Changing parameters for the individual drinks in the profile or deleting a drink
Editing a profile
Once you have created at least one profile, you can edit this profile.
The Drinks menu is displayed.
■ Touch Profiles.
■ Touch Process.
You can now edit the following profile settings:
- Change profile
- Change name
- Delete profile
Changing profile
You can programme the coffee machine so that it changes back to the Miele drinks menu automatically after each drink is dispensed or so that it retains the most recently selected profile.
The Drinks menu is displayed.
■ Touch Profiles.
■ Touch Process.
■ Touch Change profile.
You now have the following options:
- Manually: the selected profile will remain active until you select another profile.
- After each use: the machine will change back to the Miele drinks menu automatically after a drink is dispensed.
- When switched on: each time the machine is switched on it will automatically select the Miele drinks menu regardless of which profile was set before the machine was last switched off.
■ Select the option you want.
■ Confirm with OK.
Changing a name
The Drinks menu is displayed.
■ Touch Profiles.
■ Touch Process.
■ Touch Change name.
■ Select the profile you want.
■ Change the name as required.
■ Touch Save to confirm.
The changed profile name is saved.
Deleting a profile
The Drinks menu is displayed.
■ Touch Profiles.
■ Touch Process.
■ Touch Delete profile.
■ Touch the profile you want.
■ Confirm with OK.
The profile will be deleted.
Creating a drink in a profile
You can create new drinks based on existing drinks.
■ Open the profile you want.
■ Touch Create drink.
■ Now select a drink.
■ Change the portion size or drink parameters to create the drink you want.
Preparation will begin and you can save the portions of each component as desired.
■ Enter a name for the new drink (maximum 8 characters).
■ Touch Save to confirm.
The new drink will appear in the first position in the profile.
The last drink created always appears in the first position in the profile. The order of the drinks in a profile cannot be changed.
Changing a drink: changing the portion size(s), drinks parameters and names
The portion quantities and parameters for coffee and milk drinks, hot water and tea can be adjusted in each profile.
The desired profile with the newly created drinks will appear in the display.
■ Open the profile you want.
■ Touch Process drink.
■ Touch Change drink.
■ Select a drink.
You can now change the portion size, the drinks parameters or the name.
Deleting a drink from a profile
The desired profile with drinks will appear in the display.
■ Open the profile you want.
■ Touch Process drink.
■ Touch Delete drink.
■ Select a drink.
■ Confirm with OK.
The entry will be deleted.
Making a drink from a profile
The Drinks menu is displayed.
■ Touch Profiles.
■ Select the profile you want.
The name of the selected profile is shown in the top left of the display. You can now make the drink you want.
■ Place a suitable container underneath the central spout.
■ Select a drink.
Dispensing starts.
In Expert mode you can change the portion size while the drink is being made. The setting will not be saved and will only apply for the current drink.
Expert mode is not available if you have selected DoubleShot or two portions ☐.
Switching Expert mode on and off
The Drinks menu is displayed.
■ Touch ↻.
■ Touch Settings ▶.
■ Touch Expert mode.
■ To switch Expert mode either on or off, select the option you want.
■ Touch OK to confirm.
If Expert mode has been switched on, you can now change the portion size while the drink is being made.
Expert mode: changing the portion size
Start in the Drinks menu.
The portion size can only be changed when the respective ingredient is being processed while the drink is being made.
Changing portion size
■ Select a drink.
Dispensing will start. You can adjust the portion size while it is being dispensed, e.g. individually change the amount of hot milk, milk froth and espresso for Latte macchiato.
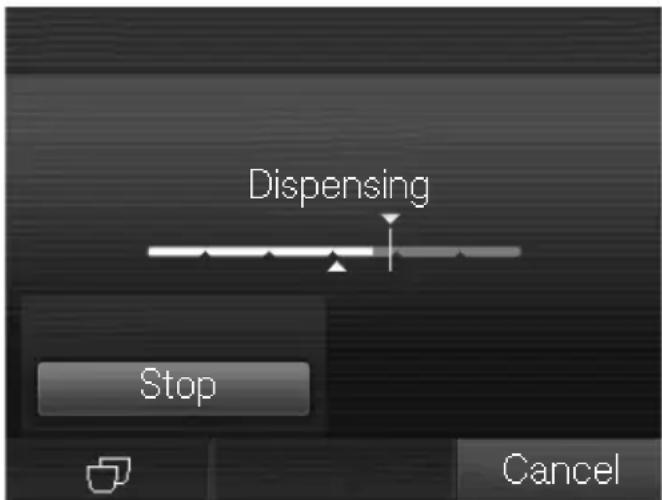
■ Touch the segments and adjust the indicator (small triangle) as you wish.
You can use the “Settings” menu to customise the coffee machine to suit your requirements.
Some settings which can be found in the Settings menu are described in their separate sections in the operating instructions.
Opening the "Settings" menu
The Drinks menu is displayed.
■ Touch ↻.
■ Touch Settings ▶.
You can now check or change the settings.
The settings which are currently selected will have a coloured frame around them.
Touching ⇔ takes you back to the previous menu level.
Changing and saving settings
The Settings ▶ menu is displayed.
■ Select the option you want to change.
■ Select the desired setting.
■ Confirm with OK.
The setting is now saved.
Language
You can select the language (and location variant of that language) for all display text.
Tip: If you select the wrong language by mistake, you can find the "Language" option again via the ▶ symbol.
Time
You can set the time display, the clock format and the time.
Clock display
You can choose one of the following options:
- On: the time and date are always visible in the display when the machine is switched off.
- Off: the time and date are not visible in the display when the machine is switched off.
- Night dimming: the time and date are displayed from 5:00 am to 11:00 pm.
Depending on which option you select, the coffee machine may use more energy. A corresponding message appears on the display.
Clock format
The options are:
- 24 hour display (24 h)
- 12 hour display (12 h (am/pm))
Setting
Set the hours and the minutes.
If the coffee machine has been connected to a WiFi network and is signed into the Miele app, the time will be synchronised based on the location setting in the Miele app.
Timer
There are two timers with the following functions:
The coffee machine
- switches on at a particular time, e.g. in the morning for breakfast (Switch on at).
- switches off at a particular time (Switch off at),
- switches off after a particular length of time if none of the sensors has been touched or a drink has not been made (Switch off after; available with Timer 1 only).
You can allocate the timer functions to individual days of the week.
For Switch on at and Switch off at, the timer must be activated and at least one day of the week allocated.
Selecting a timer
The options are:
- Timer 1: Switch on at, Switch off at, Switch off after
- Timer 2: Switch on at, Switch off at
Switch on at
The coffee machine will not switch on at the required time if you have activated the system lock. The timer settings are deactivated.
If the coffee machine has switched itself on automatically three times via the Switch on at timer function and no drinks have been dispensed, the machine will not switch itself on again automatically. This prevents the coffee machine from switching itself on unnecessarily, for example, whilst you are away on holiday. The programmed times will, however, remain in memory and will be reactivated after manually switching the machine on again.
Switch off at
In the event of a longer absence the programmed times will remain in memory and will be reactivated after manually switching the machine on again (see “Switch on at”).
Switch off after
The Switch off after timer function is only available in Timer 1.
If none of the sensors have been touched or no drink has been made, the coffee machine will switch itself off after 20 minutes to save energy.
You can change this to another time of between 15 minutes and 9 hours.
Allocating days of the week
The selected day of the week will be marked by ☑.
■ Select the required day of the week.
■ When all required days of the week are marked, confirm with OK.
Activating and deactivating the timer
If you have selected On or Night dimming for the time display:
when Switch on at is activated for the timer, the ⏻ symbol and the desired switching on time will appear in the display 23:59 hours before.
If the system lock is activated, the Switch on at option for the timer cannot be selected.
Select the timer function you want to use. The selected timer function will have a √ next to it.
Eco mode
Eco mode is an energy-saving mode. The system does not heat up until someone starts making a drink.
Eco mode is activated by default.
Lighting
You have the following options:
- The machine is switched on: set the brightness.
- The machine is switched off: set the brightness and set the time the lighting should switch off.
When the coffee machine is switched on, it remains lit up for a certain length of time after the last action. This time cannot be adjusted.
Water hardness
If a descaling cartridge is not fitted and you descale the coffee machine using descaling tablets, the machine should be set to the local water hardness. A prompt to descale the machine will then appear in the display at the correct time.
Programme the coffee machine to the water hardness level of your area so that it functions correctly and does not get damaged.
Contact your local water supplier to find out your local water hardness range if necessary.
If you are using bottled drinking water, e.g. mineral water, select settings according to the calcium content. The calcium content is specified on the label of the bottle in mg/l Ca 2+ or ppm (mg Ca 2+ /l).
Do not use carbonated water.
Tip: If your water hardness is >21° dH (3.8 mmol/l), we recommend using bottled drinking water instead ( <150\ mg/l\ Ca2+ ). This will mean your coffee machine will need to be descaled less often and there will be less impact on the environment because less descaling agent will be used.
The machine is programmed ex-works to hardness level 3.
The machine has four programmable levels:
| °dH mmol/l ppm | (mg/l CaCO3 ) | Setting* | |
| 0–8.4 0 | -1.5 0–150 | Soft 1 | |
| 8.4–14 1.5 | -2.5 150 | -250 Medium 2 | |
| 14–21 2.5 | -3.8 250 | -375 Hard 3 | |
| >21 | >3.8 | >375 | Very hard 4 |
* The hardness level shown in the display may differ from the hardness level in your area. You must follow the values in the chart to set your coffee machine to your local water hardness level.
Info (display information)
The Info option allows you to see the number of portions made for each drink. You can also see how many portions can be dispensed before the brew unit needs to be degreased (No. of drinks until).
To return to the previous display, touch ↩.
System lock 🔒
You can lock the coffee machine to prevent it being used without your knowledge, by children, for example.
Activating and deactivating the system lock 🔒
When the system lock is activated, the timer settings for Switch on at are deactivated. The coffee system will not switch on at the time set.
Temporarily deactivating the system lock 🔒
If you touch the On/Off Ⓐ sensor control, 🔔 will appear.
■ Touch 🔒 as long as a relevant instruction appears in the display.
As soon as you switch the coffee machine off, it will be locked again.
Miele@home
The following options may appear under Miele@home:
- Set up: this option only appears if the coffee machine has never been connected to a WiFi network or if the Network configuration has been reset.
- Deactivate*/Activate*: the settings for the WiFi network are retained, but the network is switched on or off.
- Connection status*: information about the WiFi connection is displayed. The symbols indicate the strength of the connection.
- Set up again*: the settings for the current WiFi network will be reset. The WiFi connection will be set up again.
* This menu option appears if Miele@home has been set up and the coffee machine has – where applicable – been connected to a WiFi network.
Display brightness
You can set the display brightness using the bar chart.
Volume
You can set the volume of the buzzer and keypad tones using the bar chart.
Service
Evaporate
The coffee machine should be evaporated before it is stored for a long period of time or transported any distance (see “Transporting the machine”)
Demo mode
Do not activate this setting for domestic use!
The coffee machine can be demonstrated in the showroom using Demo mode. In this mode the machine lights up but drinks cannot be made or actions taken.
Factory default
You can reset the coffee machine to its factory default settings.
Please refer to the “Overview of available settings” chart for the factory settings.
Appliance settings
The following will not be reset:
- The number of drinks dispensed and the appliance status (no. of portions until appliance needs descaling, ... brew unit needs degreasing)
- Language
- Time and date
- Profiles and their associated drinks (the allocation of bean types to drinks is reset)
The Descaling timer is reset to 04:00.
Network configuration
The settings for the WiFi network will be reset.
The network configuration should be reset whenever the coffee machine is being disposed of or sold, or if a used coffee machine is being put into operation. This is the only way to ensure that all personal data has been removed and the previous owner will no longer be able to access the coffee machine.
Your coffee machine is WiFi enabled and can be operated via the Miele app using a mobile device, e.g. smartphone or tablet.
Please ensure you adhere to the warning and safety instructions in these operating instructions even when you are operating the coffee machine via the Miele app.
Energy consumption increases when the coffee machine is connected to a WiFi network. This applies even when the coffee machine is switched off.
Setting up the network (Miele@home)
Networking is deactivated by default.
■ Make sure that your WiFi network signal is sufficiently strong in the place where you want to set up your coffee machine.
The Settings ▶ menu is displayed.
■ Touch Miele@home.
■ Touch Set up.
■ Select the connection method you wish to use:
- Via the Miele app
- Via WPS
■ Follow the instructions provided in the coffee machine display and in the Miele app.
Connection successfully established will appear in the display.
Setting up the network again
If your WiFi network has changed, you can set up Miele@home for your coffee machine again.
The Settings menu is displayed.
■ Touch Miele@home.
■ Touch Set up again.
■ Follow the instructions in “Setting up the network (Miele@home)”.
Remote control
Remote control is only visible when the coffee machine is connected to a WiFi network.
You can change the coffee machine settings, for example, in the Miele app when remote control is switched on. To start making a drink via the app, MobileStart must be activated as well.
Remote control is activated by default.
Switching remote control on or off
The Drinks menu is displayed.
■ Touch ⇔.
■ Touch Settings ▶.
■ Touch Remote control.
■ Select the required option to switch remote control on or off.
MobileStart
With MobileStart you can start making a drink, for example, via the Miele app.
Danger of burning and scalding on the dispensing spouts. If liquids or steam are dispensed while the machine is unsupervised, persons may burn themselves if they place body parts under the central spout or touch hot components. Ensure that no one, especially children, can be harmed if the machine is operated without supervision.
Automatic descaling and activation rinsing will not start if MobileStart is activated.
If the coffee machine is being operated manually, it cannot be operated via the app. Operation on the appliance takes precedence.
To start making drinks remotely, MobileStart must be activated. Make sure that the coffee machine is ready to use – for example, check that the water container is sufficiently filled. Place a sufficiently large, empty cup under the central spout.
MobileStart will be deactivated after 24 hours.
The ☐ symbol appears in the display as long as MobileStart is activated, even when the coffee machine is switched off.
If you are making a drink with MobileStart, you will be notified of drink dispensing with acoustic and optical signals. These signals cannot be changed or switched off.
Switching MobileStart on and off
If you want to use MobileStart, the Remote control option must be switched on.
The Drinks menu is displayed.
■ Touch ⇔.
■ Touch MobileStart.
■ Select the required option to switch remote control on or off.
You can now start making a drink via the app. Follow the prompts to do this.
RemoteUpdate
The RemoteUpdate menu option is only displayed and can only be selected if the requirements for using Miele@home have been met.
The RemoteUpdate function allows the software on your coffee machine to be updated. If an update is available for your coffee machine, it will automatically download it. Updates will not be installed automatically. They must be initiated manually.
If you do not install an update, you can continue to use your coffee machine in the usual way. However, Miele recommends installing updates.
Activating/deactivating
The RemoteUpdate function is activated by default. Available updates will be downloaded automatically but will only be installed if you initiate installation manually.
Deactivate RemoteUpdate if you do not want any updates to be downloaded automatically.
Running a RemoteUpdate
Information about the content and scope of an update is provided in the Miele app.
A message will appear in your coffee machine display if a software update is available.
You can install the update immediately or postpone this until later. When the coffee machine is switched on again, you will be reminded about the update.
Deactivate RemoteUpdate if you do not want to install the update.
The update may take several minutes to install.
Please note the following information about the RemoteUpdate function:
- You will only receive a message when an update is available.
- Once an update has been installed, it cannot be undone.
- Do not switch off the coffee machine during an update. Otherwise, the update will be aborted and will not be installed.
- Some software updates can only be carried out by the Miele Customer Service Department.
Cleaning and care

Risk to health due to inadequate cleaning
Heat and moisture inside the coffee machine can cause coffee residues to become mouldy and/or milk residues to go off and pose a risk to health.
Carefully clean the coffee machine regularly.
Overview of cleaning intervals
Recommended frequency What do I have to clean/maintain?
| Daily (at the end of the day) | Water container |
| Waste container | |
| Drip tray and drip tray cover | |
| Milk flask | |
| Milk siphon | |
| Cup rim sensor | |
| Once a week (more often if heavily soiled) | Central spout |
| Brew unit | |
| Area underneath the brew unit and the drip tray | |
| Casing | |
| Once a month Bean container | |
| Ground coffee chute and ground coffee drawer | |
| Water container filter (or as required) | |
| When prompted Milk pipework | |
| Degrease the brew unit (using cleaning tablets) | |
| Descale the machine if prompted to do so in the display |
Cleaning by hand or in the dishwasher
The brew unit is not dishwasher safe. Clean the brew unit by hand only under warm running water. Do not use washing-up liquid or any other cleaning agent.
The following components must be cleaned by hand only:
- Central spout stainless steel cover
- Cup sensor
- Brew unit
- Coffee bean container lid
- Lower panel
⚠️ Risk of damage as a result of excessively high dishwasher temperatures.
Components may be ruined (e.g. may become warped) if washed in a dishwasher at temperatures higher than 55 °C.
For dishwasher-safe components, always select dishwasher programmes with a maximum temperature of 55 °C.
Contact with natural dyes such as those found in carrots, tomatoes and ketchup may discolour the plastic parts in the dishwasher. This discolouration does not affect the stability of the parts.
The following components are dishwasher safe:
- Drip tray and lid
- Drip tray cover
-
Waste container
-
Water container
- Central spout (without stainless steel cover)
- Ground coffee drawer
- Milk flask with lid
- Milk siphon
⚠️ Danger of burning and scalding on hot components or by hot liquids. Components can become very hot during operation. Touching hot components can cause burning. The liquids and steam dispensed are very hot and can cause scalding.
Keep well away from the area underneath the spouts when hot liquids and steam are being dispensed.
Always allow the coffee machine to cool down before cleaning it.
Please be aware that water in the drip tray can also be very hot.
⚠️ Risk of damage due to moisture ingress.
The steam from a steam cleaning appliance could reach live electrical components and cause a short circuit.
Do not use a steam cleaner to clean the coffee machine.
It is important to clean the machine regularly, as the used coffee grounds will soon go mouldy. Milk residues can go off and can block the milk pipework.
Unsuitable cleaning agents
Contact with unsuitable cleaning agents can alter or discolour all surfaces. All surfaces are susceptible to scratching. Scratches on glass can in some circumstances lead to breakage.
Remove all cleaning agent residues immediately. Make sure you remove any spillages or splashes of descaler immediately.
To avoid damaging the surfaces, do not use:
- Cleaning agents containing soda, ammonia, acids or chlorides
- Solvent-based cleaning agents
- Cleaning agents containing descaling agents (unsuitable for cleaning the casing)
- Stainless steel cleaners
- Dishwasher cleaning agents (unsuitable for cleaning the casing)
- Glass cleaning agents
- Cleaning agents for ceramic glass hobs
- Oven cleaners
- Abrasive cleaning agents, e.g. powder cleaners and cream cleaners
- Hard, abrasive sponges, e.g. pot scourers, brushes or sponges which have been previously used with abrasive cleaning agents
- Eraser stain remover blocks
- Sharp metal scrapers
- Steel wool or stainless steel wire scourers
Cleaning the drip tray and waste container
⚠️ Danger of burning and scalding on hot components or by hot liquids.
Components can become very hot during operation. Touching hot components can cause burning. The liquids and steam dispensed are very hot and can cause scalding.
If the pipework has just been rinsed, wait a while before removing the drip tray.
Please be aware that water in the drip tray can also be very hot.
Do not touch hot components.
Clean the drip tray and waste container every day to avoid unpleasant smells and mould.
A prompt will appear in the coffee machine display when the drip tray and/or the waste container is full and needs to be emptied. Empty the drip tray and the waste container.
The waste container is located in the drip tray.
Remove the drip tray and the waste container while the coffee machine is switched on. Otherwise the message Empty the drip tray and the waste container will appear in the display even though the drip tray and/or the waste container are not filled to the maximum level.
■ Pull the drip tray carefully out of the coffee machine.
Water from rinsing also collects in the waste container.
■ Empty the drip tray and the waste container.
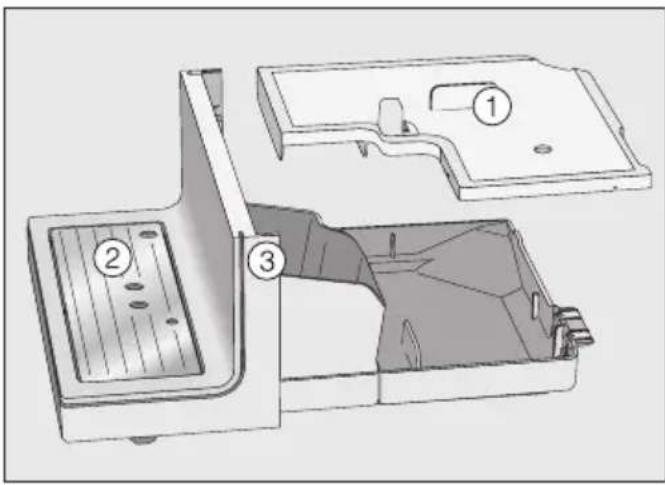
■ Remove the lid ①, the drip tray cover ② and the lower panel ③.
Clean the lower panel by hand only using warm water and a little washing-up liquid.
All other parts are dishwasher-safe.
■ Clean all parts by hand.
Tip: To give the drip tray, waste container, lid and drip tray cover an extra thorough clean, clean them in the dishwasher from time to time.

■ Clean the contacts (metal discs) and the space between them carefully.
■ Dry all parts thoroughly.
The contacts will not be able to detect that the drip tray is full if they are damp or dirty.
Check the contacts and the area around them once a week.
■ Clean the inside of the appliance underneath the drip tray.
■ Replace the waste container, the lid and the lower panel before pushing the drip tray back into the coffee machine. Make sure the drip tray has been pushed right into the appliance as far as it will go.
Cleaning the drip tray cover
■ Remove the drip tray cover.
■ Clean the drip tray cover by hand using warm water and a little washing-up liquid.
■ Dry the drip tray cover.

■ Refit the drip tray cover. Make sure that the drip tray cover is correctly fitted (see picture).
Tip: To give the drip tray cover an extra thorough clean, clean it in the dishwasher from time to time.
Cleaning the water container
Clean the water container every day.
■ Remove the water container.
■ Clean the water container by hand with warm water and a little washing-up liquid.
■ Dry the water container.
Tip: To give the water container an extra thorough clean, clean it in the dishwasher from time to time.
■ Carefully clean and dry the surface the water container sits on, taking special care to clean the recesses properly.
■ Push the water container back into the machine.
Make sure that the valve, the underside of the water container and the surface under the water container are clean. Otherwise the water container will not sit correctly.
Please note that the automatic descaling programme will only work if the water container has been filled (at least 500 ml water) and correctly fitted in the machine.
Removing and cleaning the water container filter
Clean the water container filter once a month.

The water container filter is located under the water container.
■ Remove the water container.

■ Unscrew the cap.
■ Remove the sealing ring and the filter.
■ Clean the parts by hand.
■ Rinse all parts carefully under running water.
■ Then replace the filter (with the cross facing upwards) and then the sealing ring.
The opening of the sealing ring should face downwards.
■ Screw the cap back on tightly.
■ Push the water container back into the machine.
Cleaning the central spout
Clean all parts of the central spout with integrated Cappuccinatore at least once a week.
The Drinks menu is displayed.
Removing and dismantling the central spout
If the central spout is in the uppermost position it cannot be dismantled. The central spout must be moved into the maintenance position to do this.
■ Touch ⇔ for 3 seconds.
The central spout will move into the maintenance position.
Tip: If the coffee machine is switched off, the central spout components can be removed and cleaned at any time.
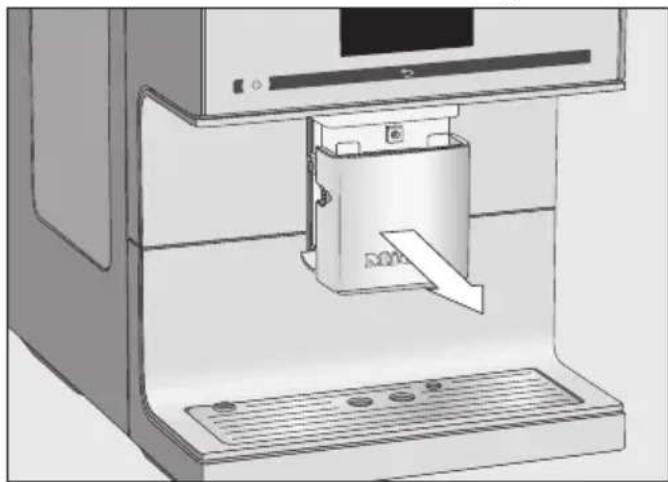
■ Carefully pull the stainless steel cover off.

■ Remove the dispensing unit to the front.

■ Twist off the upper section ① with the holder for the milk pipework. Pull the component off. Then pull the Y-shaped piece ② off. Remove the dispensing spouts ③.
Cleaning the central spout
Clean the central spout's stainless steel cover by hand only, using warm water and a little washing-up liquid.
■ Clean all parts thoroughly by hand.
Tip: With the exception of the stainless steel cover, all parts of the central spout should be cleaned in the dishwasher from time to time to give them a thorough clean. This will remove coffee deposits and milk residues effectively.

■ Clean the surfaces of the central spout with a damp sponge cloth.
■ Clean any blockages in the milk pipework under running water with the cleaning brush supplied: to do this, insert the brush in the pipework. Move it back and forth until all milk residue has been removed.
Inserting the central spout
The dispensing unit is easier to reassemble if the individual parts are dampened with water beforehand.
■ Fit the dispensing unit back together. Push the spouts ③ firmly back onto the dispensing unit.
Make sure that all parts are tightly connected to one another.
■ Refit the dispensing unit into the central spout.
■ Refit the stainless steel cover.
■ Confirm with OK.
Cleaning the steam jet
Clean the steam jet once a month.
■ To move the central spout into the maintenance position, touch ⇔ for 3 seconds.
■ Carefully pull the stainless steel cover off.
■ Remove the dispensing unit to the front.
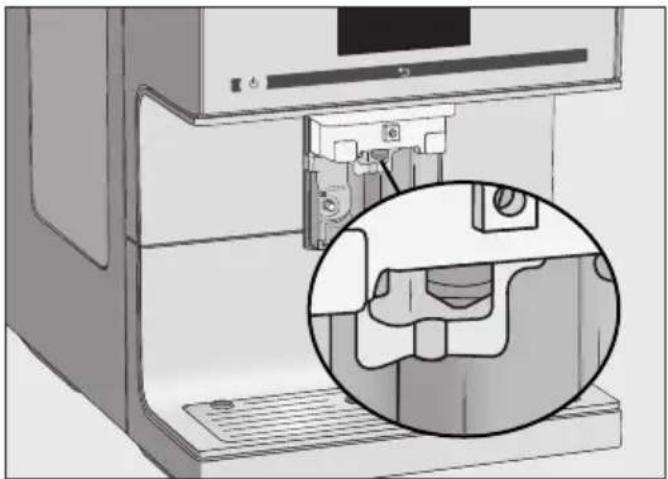
Push the cleaning brush a max. of 1 cm into the steam jet.
■ Clean the steam jet with the cleaning brush.
■ Refit the dispensing unit into the central spout.
■ Refit the stainless steel cover.
Cleaning the cup rim sensor
Clean the cup rim sensor every day. The cup rim sensor is located under the central spout.

■ Press the two latches together (see arrows).
The cup rim sensor is released.
■ Clean the cup rim sensor by hand with warm water and a little washing-up liquid.
■ Dry the cup rim sensor.
Refitting:
■ Press the cup rim sensor from below into the holder on the central spout.
Cleaning the milk siphon
Clean the milk siphon every day.
■ Rinse the milk siphon under running water.
■ Remove the connecting piece from the stainless steel tube.
■ Clean the parts by hand under running water with a little washing-up liquid.
If necessary, soak the parts overnight in water and a little washing-up liquid.
■ Rinse the parts under running water afterwards.
■ Dry the parts.
Tip: To give the individual parts an extra thorough clean, clean them in the dishwasher from time to time.
Cleaning the milk container
Clean the milk container every day.
■ Unscrew the lid from the milk container glass.
■ Remove the stainless steel tube.

If necessary, you can remove the connecting piece and sealing ring from the milk container lid. Once you have removed the stainless steel tube, the connecting piece is easy to push out from the inside of the lid.
■ Clean all parts of the milk container by hand using hot water and a little washing-up liquid.
■ Dry all parts thoroughly.
Tip: To give the individual parts of the milk container an extra thorough clean, clean them in the dishwasher from time to time.
Cleaning the milk pipework manually or using the maintenance programme
Risk to health due to inadequate cleaning
Milk naturally contains bacteria. Heat and moisture inside the coffee machine can cause these bacteria to multiply, e.g. milk residues can go off and pose a risk to health.
Clean all components in which milk is transported on a regular basis.
The milk pipework must be cleaned at least once a week. A message in the display will prompt you when this needs to be done.
■ Confirm with OK.
When you confirm the message Clean the milk pipework with OK, the internal counter for the cleaning interval will be reset. You will not be reminded again.
There are two options for cleaning the milk pipework:
- You can remove and dismantle the central spout with its integrated Cappuccinatore and either wash it in the dishwasher or by hand with warm water and a little washing-up liquid (see “Cleaning the central spout with integrated Cappuccinatore”).
- Or you can clean the milk pipework using the Clean the milk pipework maintenance programme together with the cleaning agent for milk pipework (see "Cleaning the milk pipework").
If you have released the connecting piece from the milk pipework: when reassembling, ensure that the smaller, thinner end of the connecting piece is pushed into the hose.
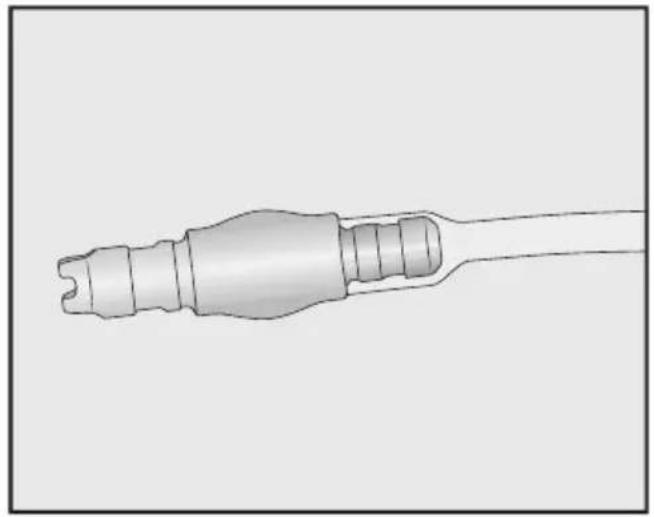
Tip: In addition to your weekly cleaning routine we recommend carrying out the alternative cleaning procedure once a month. For example if you manually clean the machine once a week, then you should run the maintenance programme once a month. This combination will ensure optimum cleaning of the milk pipework.
Cleaning the bean system
Danger of injury on the moving grinder!
If you reach into the grinder or objects such as a spoon are left in the grinder and a grinding process is unintentionally started, you could be injured.
Switch off the machine and disconnect it from the power supply before cleaning the bean system.
Coffee beans contain oils which can deposit themselves on the walls of the bean containers and hinder the flow of the beans. Therefore, clean the bean containers regularly with a soft cloth.
If required, you can clean the lids of the bean containers by hand with warm water and a little washing-up liquid. Dry the lids thoroughly before refitting them on the bean containers.
■ Remove the lid of each bean container.
■ Remove any coffee beans.
Tip: Use a vacuum cleaner to remove any coffee residues from the bean containers.
■ Clean the bean containers with a dry, soft cloth.
You cannot remove the finger protection grille.
■ Refit the lids.
The bean containers can now be refilled individually.
Tip: Open one lid at a time to prevent mixing of bean types when filling the bean system.
Cleaning the ground coffee drawer
Clean the ground coffee drawer and chute for ground coffee regularly, e.g. when you degrease the brew unit.
■ Open the appliance door.

■ Turn the handle (see arrow) to the left to remove the ground coffee drawer.
■ Clean the ground coffee drawer by hand using warm water and a little washing-up liquid.
■ Dry the ground coffee drawer.
Tip: To give the ground coffee drawer an extra thorough clean, clean it in the dishwasher from time to time.
■ Remove any ground coffee residues from the ground coffee chute with a soft, dry cloth.
■ Refit the ground coffee drawer.
■ Turn the handle to the right to close the ground coffee chute.
■ Close the appliance door.
Vacuuming out the ground coffee chute
In order to remove coffee residues properly from the grinder channel, you should vacuum out the ground coffee chute once a year with the vacuum cleaner attachment (supplied).

■ Open the appliance door.
■ Remove the ground coffee drawer.

■ Fit the attachment to the suction tube on your vacuum cleaner to vacuum out the ground coffee chute.
■ Remove the vacuum cleaner attachment.
■ Refit the ground coffee drawer.
■ Close the appliance door.
Cleaning the casing
If soiling is allowed to stay on for a long time or there is contact with unsuitable cleaning agents, surfaces can alter or discolour.
Remove any soiling immediately. Ensure that any splashes of descaler are wiped up immediately.
■ Switch the coffee machine off.
■ Clean the appliance front with a clean sponge cloth and a solution of warm water and washing-up liquid.
■ Dry all surfaces with a soft cloth.
Tip: You can also clean the appliance casing with the Miele all purpose microfibre cloth.
Maintenance programmes
The coffee machine has the following maintenance programmes:
- Rinsing the machine
- Rinsing the milk pipework
- Cleaning the milk line
- Degreasing the brew unit
- Descaling the machine
Carry out the relevant maintenance programme when the prompt to do so appears in the display. You can also start maintenance programmes at any time so that the coffee machine does not prompt mandatory cleaning at an inconvenient time.
Please note that each maintenance programme must be carried through to the end and cannot be cancelled.
Opening the "Maintenance" menu
The Drinks menu is displayed.
■ Touch ↩.
■ Touch Maintenance.
You can now select a maintenance programme.
Rinsing the appliance
If coffee has been dispensed, the coffee machine will rinse the coffee pipework automatically before switching off. This removes any residual coffee grounds.
You can also rinse the pipework manually.
The Drinks menu is displayed.
■ Touch ↻.
■ Touch Maintenance.
■ Touch Rinse the machine.
You may also be prompted to insert the end of the milk pipework into the drip tray cover.
Rinsing the milk pipework
The milk pipework can become blocked by milk residues. The milk pipework should therefore be rinsed regularly. If a drink has been made using milk, the prompt to place the milk pipework into the drip tray cover will appear at the latest when you switch the machine off.
You can also rinse the milk pipework manually.
The Drinks menu is displayed.
Tip: Place a suitable container underneath the central spout.
■ Touch ↻.
■ Touch Maintenance.
■ Touch Rinse the milk pipework.
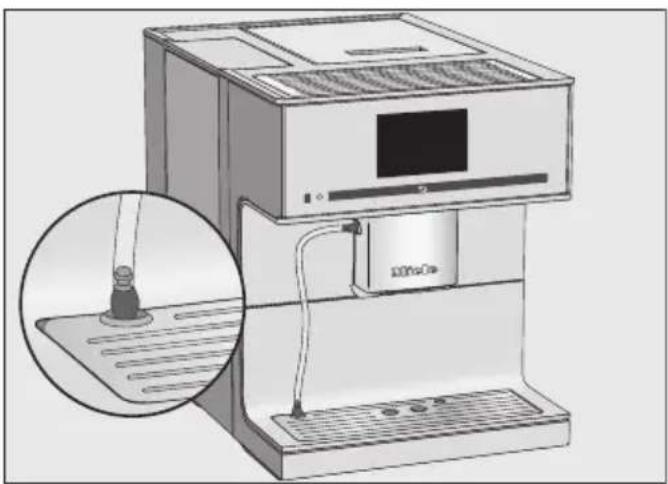
■ Place the end of the milk pipework into the aperture in the drip tray cover.
■ Confirm with OK.
The milk pipework will now be rinsed.
Cleaning the milk pipework
For optimal cleaning results, we recommend using the Miele cleaning agent for milk pipework. The powder cleaning agent for milk pipework has been specially developed for use with Miele coffee machines and prevents subsequent damage.
You can order the cleaning agent for milk pipework via the Miele online shop, the Miele Customer Service Department or from your Miele dealer.
The Clean the milk pipework maintenance programme lasts for approx. 10 minutes.
You need 1 stick of cleaning agent for milk pipework to clean it.
The Drinks menu is displayed.
■ Touch ↻.
The cleaning process cannot be cancelled. It must be completed through to the end.
■ Touch Maintenance.
■ Touch Clean the milk pipework.
The process will start.
■ Follow the instructions in the display.
Insert milk pipe in cleaning agent will appear in the display.
Preparing the cleaning solution:
■ Dissolve the powder cleaning agent in a container with 200 ml of lukewarm water. Stir the solution with a spoon until it has fully dissolved.
Carrying out the cleaning process:

■ Place the container next to the coffee machine and hang the milk pipework in the solution. Make sure the milk pipework is placed sufficiently far into the cleaning solution.
■ Confirm with OK.
■ Follow the further instructions given in the display.
The cleaning process is finished at the end of the rinsing cycle.
Degreasing the brew unit and cleaning the interior
Depending on the natural oil content of the coffee used, the brew unit can become blocked quite quickly. The brew unit must be degreased regularly in order to ensure aromatic coffee and trouble-free operation of the coffee machine.
We recommend using Miele cleaning tablets to clean the brew unit. These have been specially developed for degreasing the brew unit in Miele coffee machines and prevent subsequent damage.
The cleaning tablets are available to order from the Miele online shop, from the Miele Customer Service Department or from your Miele dealer.
Message on display
After 200 drinks have been dispensed, Degrease the brew unit will appear in the display.
■ Confirm with OK.
The message will appear again at regular intervals. Once the maximum possible number of portions has been reached, the coffee machine will lock out.
You can switch the coffee machine off if you do not want to carry out the maintenance programme at this point in time. You will only be able to make coffee drinks again once the brew unit has been degreased.
Degreasing the brew unit when prompted to do so
Degrease the brew unit appears in the display and no drinks can be made.
You need 1 cleaning tablet for the maintenance programme.
The maintenance programme for degreasing the brew unit lasts for approx. 10 minutes.
The maintenance programme cannot be cancelled. It must be completed through to the end.
■ Confirm with OK.
The maintenance programme will then start.
■ Follow the instructions in the display.
Cleaning the brew unit and interior
To ensure good tasting coffee and to prevent the formation of microbes in the appliance, clean the brew unit and interior once a week.
You need 1 cleaning tablet to clean the brew unit.
Risk to health due to inadequate cleaning.
Damp coffee residues in the interior of the machine can go mouldy and pose a risk to health.
Remove coffee residues regularly and clean the interior of the machine.
■ Open the appliance door.

■ Press and hold the button under the brew unit handle ① and, whilst doing so, turn the handle to the left ②.
When you have removed the brew unit, do not change the position of the handle on the brew unit. Otherwise, the brew unit cannot be reinserted.
■ Carefully pull the brew unit out of the coffee machine.
The moving parts of the brew unit are lubricated. Cleaning agents will damage the brew unit.
Clean the brew unit by hand only with warm water. Do not use any cleaning agents.
■ Clean the brew unit by hand under warm running water without using cleaning agent.

■ Wipe any remaining coffee off the two filters (see arrows).
■ Dry the funnel to prevent ground coffee sticking to it the next time a coffee is made.

■ Clean the inside of the coffee machine. Make sure that the areas highlighted in the illustration are cleaned especially well.
Tip: Use a vacuum cleaner to remove dry ground coffee residues.
The following appears in the display: Fit the brew unit with a tablet in it.

■ Drop a cleaning tablet into the top of the brew unit (arrow).
■ Push the brew unit with cleaning tablet back into the coffee machine, making sure it goes in straight.

■ Press the button under the handle of the brew unit ① and, whilst doing so, turn the handle to the right ②.
The handle engages audibly.
■ Close the appliance door.
■ Follow the further instructions given in the display.
The cleaning process is finished at the end of the rinsing cycle. You can now make drinks again.
Descaling the machine
Risk of damage from spilt descaling solution.
Sensitive surfaces and/or natural floors can suffer damage.
Wipe up any spillages of descaling agent immediately.
Limescale builds up in the coffee machine through use. How often the appliance needs to be descaled will depend on the water hardness level in your area. Limescale must be removed regularly.
Depending on how you use your machine and the water hardness level in your area, occasionally you will need to descale your machine manually in addition to automatic descaling.
If a descaling cartridge is not fitted, an empty cartridge is fitted or an expired cartridge is fitted, the machine needs to be descaled regularly using the Descale the machine maintenance programme.
The appliance will guide you through the descaling process. Various messages will appear in the display, e.g. you will be prompted to empty the drip tray or fill the water container.
You need 1 descaling tablet for the descaling process. The process takes approx. 12 minutes.
The coffee machine will give you plenty of warning when it needs to be descaled. Number of drinks until the machine must be descaled: 50 will appear in the display. The remaining number of drinks that can be made before descaling will show in the display after each drink.
■ Confirm with OK.
When the number of remaining portions reaches 0, the coffee machine will lock out.
Descale the machine will appear in the display.
You can switch the coffee machine off if you do not want to run the descaling programme at this point in time.
However, you will not be able to make drinks again until you have descaled the coffee machine.
Descaling after prompt appears in the display
Descale the machine will appear in the display.
Descaling cannot be cancelled once it has started. It must be completed through to the end.
■ Confirm with OK.
The process will start.
■ Follow the instructions in the display.
When Fill the water container to the ⬆ symbol with descaling agent and lukewarm water and place it in the machine. appears in the display, proceed as follows.
Preparing the descaling solution
For optimum descaling results, we recommend using the Miele descaling tablets provided.
The descaling tablets have been specially developed for Miele coffee machines.
Other descalers, which contain other acids besides citric acid and/or other undesirable substances, such as chlorides for example, can cause damage to the product. Moreover, the descaling result required cannot be guaranteed if the descaling solution was not of the appropriate concentration.
Miele descaling tablets are available to order via the Miele webshop, from the Miele Customer Service Department (see the end of this booklet for contact details) or from your Miele dealer.

- Fill the water container to the descaling symbol ⇔ with lukewarm water.
■ Add 1 descaling tablet to the water container.
Follow the instructions for the descaling agent mixing ratio carefully. It is important to fill the water container with the correct amount of water. Otherwise, the descaling process will be cancelled prematurely.
Carrying out descaling
■ Push the water container back into the machine.
■ Follow the further instructions given in the display.
When Rinse the water container and fill it to the ⬇ symbol with fresh tap water appears in the display:
■ Remove the water container and rinse it thoroughly with clean water. Ensure that no descaling solution residue remains in the water container.
- Fill the water container to the descaling symbol ⇒ with fresh drinking water.
The descaling process is complete at the end of the rinsing process. You can now make drinks again.
Risk of damage from spilt descaling solution.
Sensitive surfaces and/or natural floors can suffer damage.
Wipe up any spillages of descaling solution.
When handling a cartridge which has already been filled with water, ensure that the descaling solution does not come into contact with sensitive surfaces.
The coffee machine has an automatic maintenance programme for descaling the appliance. For automatic descaling, a Miele descaling cartridge is fitted at the back of the coffee machine. The coffee machine will automatically determine when to carry out automatic descaling based on the usage pattern. Automatic descaling takes approx. 30 minutes, including the activation time.
You can set the time for automatic descaling to start using the Descaling timer.
Water is mixed with the descaling agent to create a solution for automatic descaling. This descaling solution is then pumped through the pipework of the coffee machine. After the activation time, the solution is then rinsed out of the pipework and the machine can then be used as normal for making drinks.
During automatic descaling you will hear pumping and rinsing noises at frequent intervals even though the appliance is switched off and the display is dark.
If you do not make any drinks, automatic descaling will not be started.
To ensure the longevity of components and a consistent environment free of limescale, the coffee machine needs to be manually descaled from time to time. The intervals are determined by your usage behaviour and the water hardness level of your area. If you make a lot of coffees with milk, for example, you will need to descale the coffee machine more frequently with the descaling tablets.
Please note before and during automatic descaling:
The coffee machine must be ready to use and the following conditions must be met:
- A descaling cartridge which is ready to use is fitted.
- The coffee machine is connected to the electricity supply. The coffee machine must not be disconnected from the electricity supply during automatic descaling.
- The drip tray, brew unit and central spout are inserted.
- The water container is inserted and is filled with water at least up to the ⬆ descaling symbol (at least 500 ml water).
- Carry out the instructions which appear in the display before switching off, e.g. Empty the drip tray.
- The milk pipe is inserted into the aperture in the drip tray cover.
- The coffee machine is switched off.
The Miele descaling cartridge
Only use the Miele descaling cartridge for the automatic descaling programme.
Please note that the Miele descaling cartridge has a lifespan of approx. one year after it has been placed in the machine and filled with water for the first time. Critical for the one-year lifespan is the date on which the descaling cartridge was fitted and filled with water.
Do not fit a descaling cartridge which has already been used in another Miele coffee machine. Your coffee machine will have no information about the fill level of this cartridge. The descaling effect may be insufficient and damage your coffee machine.
Do not fill the descaling cartridge with other fluids or substances.
The descaling agent comes in the form of tablets in the descaling cartridge. The cartridge is filled with water when it is placed in the machine. The tablets gradually dissolve over time.
The descaling cartridge will last for 7 to 12 months of automatic descaling, depending on how often the coffee machine is used.
A prompt will appear in the display shortly before the descaling cartridge is depleted, reminding you that it needs to be replaced. Confirm the message with OK. After this first message, 6 more descaling programmes are possible.
The descaling cartridge is available to order from the Miele online shop, Miele Customer Service Department Customer Service Department or your Miele dealer.
If a descaling cartridge is not fitted, an empty cartridge is fitted or an expired cartridge is fitted, the machine needs to be descaled using the Descale the machine maintenance programme. To do this, the appropriate descaling agent is required (see “Cleaning and care – Descaling the machine”).
The descaling cartridge can remain fitted even if the machine is not used for a long time. Remove the cartridge before transporting the coffee machine. However, please note the following:
- Once filled with water, the descaling cartridge has a maximum shelf life of 3 weeks outside of the machine.
- It should be transported with care and upright. Avoid shaking it. Shaking or turning upside down reduces the shelf life or damages the cartridge.
- The cartridge should be stored upright, in a dark place and at room temperature (16–38 °C).
Fitting the descaling cartridge
Risk of damage from spilt descaling solution.
Sensitive surfaces and/or natural floors can suffer damage.
When handling a cartridge which has already been filled with water, ensure that the descaling solution does not come into contact with sensitive surfaces.
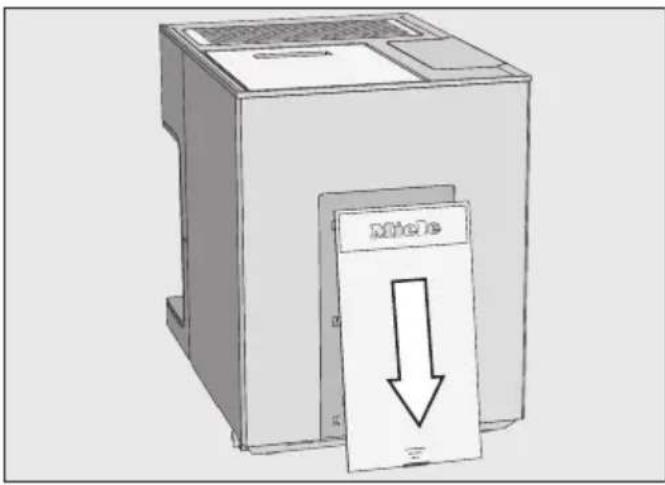
■ Slide the cover at the back of the coffee machine downwards.
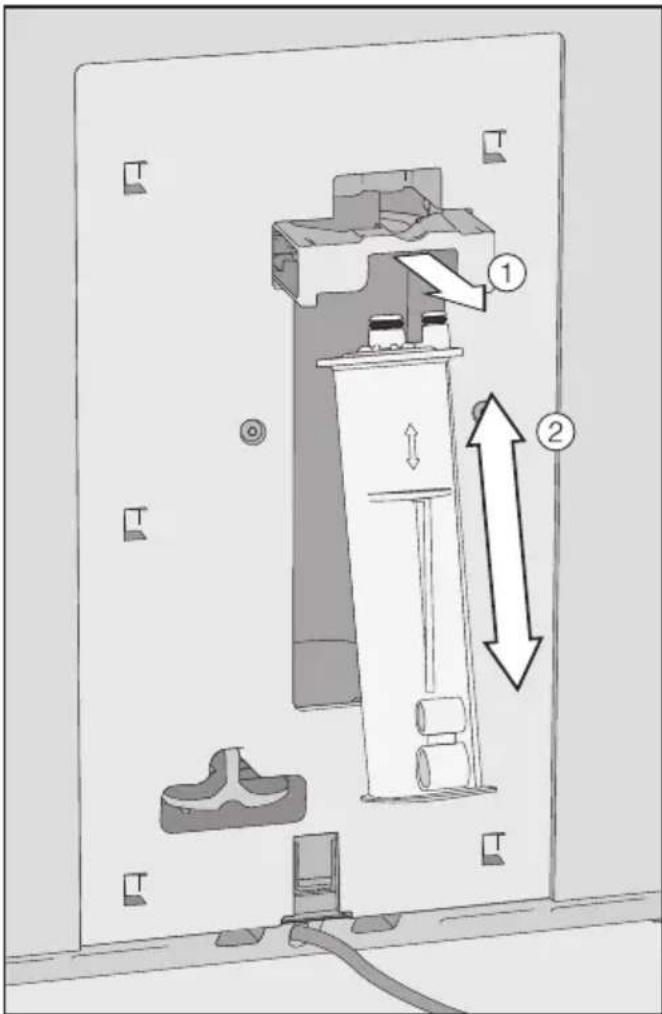
■ Pull the cartridge holder ① forwards.
■ Insert the cartridge ② and push it upwards as far as it will go.
■ Push the cartridge holder back into position.
■ Put the cover back on.
■ Follow the instructions in the display.
The next time the coffee machine is switched off, the new descaling cartridge will fill with water when the machine is rinsed. You will hear water being pumped into the cartridge at frequent intervals.
Removing the descaling cartridge
Risk of damage from spilt descaling solution.
Sensitive surfaces and/or natural floors can suffer damage.
When handling a cartridge which has already been filled with water, ensure that the descaling solution does not come into contact with sensitive surfaces.
The coffee machine is switched on. Only then will the appliance detect the descaling cartridge.

■ Slide the cover at the back of the coffee machine downwards.
Automatic descaling

■ Pull the cartridge holder ① forwards.
There is already a descaling cartridge fitted.
■ Remove the cartridge ②.

■ Seal the descaling cartridge with the cap.
The cap is located on the cartridge. Release it by snapping it off.
■ Dispose of the spent cartridge with your household waste.
Choosing not to use a descaling cartridge
If you do not want to fit a descaling cartridge, the system must be sealed with the plug. Messages such as Fit a new descaling cartridge will be not displayed.
■ Remove the descaling cartridge.

■ Insert the adapter in place of the descaling cartridge.
If you remove the descaling cartridge, automatic descaling is deactivated. You will then have to descale the appliance manually using the Descale the machine maintenance programme. To do this, the appropriate descaling agent is required (see “Cleaning and care – Descaling the machine”).
Start time for automatic descaling (Descaling timer)
You can set the daily start time for automatic descaling as you wish. The coffee machine must be switched off for the duration of the activation phase (approx. 30 minutes).
The default start time for automatic descaling is 04:00.
Setting the start time for automatic descaling
The Drinks menu is displayed.
■ Touch ↻.
■ Touch Settings ▶.
■ Touch Timer.
■ Touch Descaling timer.
■ Set the required start time.
■ Confirm with OK.
The start time is saved. From now on automatic descaling will commence at the desired time each day.
Cancelling automatic descaling
You can cancel automatic descaling during the activation time.
Automatic descaling can be cancelled as often as you like. In this case, you may need to descale the coffee machine using the descaling tablets (see “Cleaning and care – Descaling the machine”).
■ Touch the On/Off sensor control ①.
The time left is shown in the display.
■ Touch Cancel.
The descaling solution is rinsed out of the pipework. Rinsing can take up to 5 minutes. You can make drinks afterwards.
Problem solving guide
Many malfunctions and faults that can occur in daily operation can be easily remedied. You can save time and money in many cases, as you do not need to call the Miele Customer Service Department.
Information to help you rectify faults yourself can be found at www.miele.com/service.
The following tables are designed to help you to find the cause of a malfunction or a fault and to resolve it.
Messages in the display
Error messages must be confirmed with OK, otherwise the message can reappear in the display even though the problem has been remedied.
Follow the instructions which appear in the display to remedy the problem.
If after this, the fault message appears in the display again, contact Miele Service.
| Problem Cause and remedy | |
| F1, F2,F80, F82 | There is an internal fault.■ Switch the coffee machine off with the On/Off button ➊. Wait for approximately 1 hour before switching the appliance back on again. |
| F41, F42, F74, F77,F225, F226, F235, F236 | There is an internal fault.■ Switch the coffee machine off with the On/Off button ➌. Wait for approximately 2 minutes before switching the appliance back on again. |
| F73 orCheck the brew unit | The brew unit cannot be positioned correctly.■ Switch the coffee machine off with the On/Off button ➊.■ Remove the brew unit and clean it. |
| ■ Push the coffee ejector of the brew unit into the correct position.■ Do not fit the brew unit. Close the appliance door and switch the coffee machine on with the On/Off button ➊.This will initialise the brew unit drive and put it back into the start position.■ When Insert the brew unit appears in the display, put the brew unit back in the appliance. Close the appliance door.If the message appears again, reduce the quantity of coffee and/or select a finer grinder setting. Some types of coffee have a much higher grinding volume. | |
Problem solving guide
| Problem Cause and remedy | |
| F233 The cup rim sensor is | not inserted or is incorrectly inserted.The stainless steel cover of the central spout was not fitted properly, e.g. is tilting forwards slightly.If the central spout is moving upwards and the cup rim sensor is bumped, e.g. with a cup, the cup rim sensor loses its reference position.■ Confirm with OK.■ Switch the coffee machine off with the On/Off sensor control 1. Wait for at least 30 minutes before switching the machine back on again. Or disconnect the appliance from the electricity supply by switching off at the wall socket and withdrawing the power plug, or switching off the mains circuit breaker.■ Refit the cup rim sensor.■ Refit the stainless steel cover. Make sure the cover is seated correctly. |
| F 355, F 357–F 362 The be | bean system must be set up again, e.g. coffee beans have possibly got jammed.■ Switch the coffee machine off with the On/Off sensor control 1. Wait for 30 minutes before switching the machine back on again. |
Unusual performance of the coffee machine
| Problem Cause and remedy | |
| The lighting remains off after the coffee machine has been switched on. | The lighting has been switched off.■ Switch the lighting on (see “Settings - Lighting”). |
| The lighting is faulty.■ Call Service. | |
| The display remains dark when the coffee machine is turned on using the On/Off button 1. | The On/Off button 1 was not held for long enough.■ Touch and hold the On/Off button 1 for at least 3 seconds. |
| The power plug is not inserted into the socket correctly.■ Insert the power plug into the socket. | |
| The fuse has tripped because the coffee machine, voltage or another appliance is defective.■ Switch off at the wall socket and unplug the coffee machine.■ Contact a qualified electrician or the Miele Customer Service Department. | |
| The coffee machine turns off suddenly. | The factory set switch-off time (20 minutes) or the switch-off time you have programmed has been reached.■ If required, you can select a new switch-off time (see “Settings – Timer”). |
| The plug is not inserted in the socket correctly.■ Insert the plug into the socket. | |
| The coffee machine is switched on. The lighting switches off suddenly. | The lighting switches off automatically if the coffee machine has not been used for some time. The automatic switch-off time cannot be changed. |
| The sensors do not react to touch.The coffee machine cannot be operated. | There is an internal fault.■ Disconnect the machine from the power supply by removing the plug from the socket. |
Problem solving guide
| Problem Cause and remedy | |
| The coffee machine does not switch itself on, although the Switch on at setting has been activated for the timer. | The system lock has been activated.■ Deactivate the system lock. |
| A day of the week has not been selected and/or the timer has not been activated.■ Check and change the timer settings. | |
| The coffee machine was not used after being switched on automatically three times in succession (holiday mode).■ Switch the machine on and dispense a drink. | |
| The coffee machine does not switch on with the Switch on at timer while automatic descaling is being carried out. This is not a fault. Select a different timer setting. | |
| Fill and refit the water container appears in the display even though the water container is full and in the machine. | The water container is not in the correct position.■ Remove the water container and push it back in again.■ Clean the surface underneath the water container if necessary. |
| During the Descale the machine maintenance programme the water container was not correctly filled and refitted.■ Fill the water container to the descaling symbol ⇌ and restart the descaling programme. | |
The water container filter is blocked.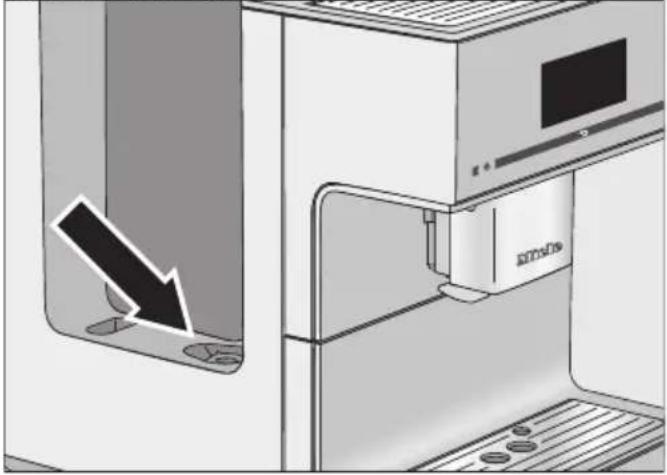 ■ Clean the water container filter (see “Cleaning and care - Removing and cleaning the water container filter”). ■ Clean the water container filter (see “Cleaning and care - Removing and cleaning the water container filter”). | |
| Fill and refit the water containerappears afterswitching on even though the container is filled and fitted in the machine. The appliance does not rinse. | The descaling cartridge is not fitted. The coffee machine needs descaling.■ Switch the coffee machine off with the On/Off sensor control 1.■ Wait approx. one hour.■ Switch the coffee machine back on.■ As soon as Heating-up phase appears, touch Mainten..■ Touch Descale the machine.■ Descale the coffee machine. |
| The bean containers are empty and the message Fill the bean containerdoes not appear. | The fill level sensors in the bean containers are dirty.■ Remove the coffee beans from the bean containers, e.g. with a vacuum cleaner. ■ Clean the fill level sensors (see illustration) with a soft, dry cloth. ■ Clean the fill level sensors (see illustration) with a soft, dry cloth. |
| Insert the drip tray and the waste containerappears in the display, even though both have been inserted.Although the drip tray has been emptied, Empty the drip tray and the waste containerappears in the display. | The drip tray is not in the correct position and is therefore not detected.■ Empty the drip tray and the waste container if necessary.■ Reassemble all parts and push the drip tray back in the coffee machine until it clicks. |
| The waste container is overflowing even though the drip tray and waste container have been emptied following each reminder. | The drip tray has probably been removed without the waste container being emptied.Removing the drip tray resets the internal counter for emptying the waste container.■ Always empty the waste container if you remove the drip tray. |
| Certain types of beans produce a lot of coffee when they are ground, meaning that larger coffee pucks are pressed.■ Adapt the quantity of coffee and grinder setting if necessary.■ Empty the waste container more often than indicated in the display. | |
| The brew unit cannot be removed. | The brew unit is not in the correct position because the appliance door was opened during the grinding or brewing process, for example.■ If necessary, move the handle on the brew unit back to the start position. Close the appliance door.■ Switch the coffee machine off with the On/Off button ➊.■ Disconnect the coffee machine from the power supply.■ Wait approx. 1 minute before reconnecting the coffee machine to the electricity supply and switching it on.This will initialise the brew unit drive and put it back into the start position.■ If necessary, repeat these steps. |
| Coffee is not flowing out of the central spout.Or coffee is only being dispensed via one spout. | The central spout has a blockage.■ Rinse the coffee pipework (see “Cleaning and care - Rinsing the machine”).If there is still no coffee coming out, or coffee is only coming out of one side■ Dismantle the central spout and clean all parts carefully.■ Make sure all parts are reassembled correctly. |
| Neither milk nor milk froth comes out of the central spout. | The milk pipework is blocked.■ Clean the central spout and milk pipework carefully with the brush. |
| Problem Cause and remedy | |
| The milk sputters when it is dispensed. Hissing noises can be heard when milk is being heated up or frothed. Although the milk should be frothed, only hot milk comes out of the central spout. | The milk temperature is too high. Good milk froth can only be achieved with cold milk (<10°C).■ Check the temperature of the milk. |
| The central spout is not fitted correctly and is taking in air. Or the spouts are blocked.■ Check whether the central spout has been assembled correctly. Make sure that all parts are tightly connected to one another.■ Clean the central spout. Knead the spouts under running water to loosen any soiling. | |
| The milk pipework, the connecting pieces or the stainless steel tube of the milk container are blocked.■ Clean all parts carefully with the cleaning brush. | |
| The steam jet on the central spout has a blockage.■ Clean the steam jet with the cleaning brush (max. 1 cm wide). | |
| A fan can be heard even though no drinks are being prepared or the coffee machine is switched off. | This is not a fault.Once a drink has been dispensed or the machine has been switched off, the internal fan will continue to run until the interior is sufficiently dehumidified. |
| The display lights up but the coffee machine does not heat up and no drinks are made.The coffee machine cannot be turned off. | The Demo mode for demonstrating the coffee machine in the showroom has been activated.■ Deactivate Demo mode. |
Faults with automatic descaling
| Problem Cause and remedy | |
| After switching on, a message appears informing you that automatic descaling could not be carried out. | If you have made drinks with milk, the milk pipe must be pushed into the drip tray cover and when the machine is switched off, the message about this in the display confirmed with OK.All removable parts, such as the water container, drip tray, brew unit or central spout, must be fitted.The water container must be filled with water at least up to the descaling symbol ⇌ (at least 500 ml water).The appliance door was not closed.■ Confirm the message with OK.■ Make sure that the coffee machine is ready to use before the next descaling process. |
| The coffee machine was not switched off at the start time using the On/Off button 1.The coffee machine pipework will only be filled with descaling solution when the coffee machine is switched off.■ Confirm the message with OK.■ Change the start time if necessary. | |
| Descale appliance manually appears in the display even though a descaling cartridge which is ready to use is fitted. Drinks cannot be made. | Depending on the water hardness level in your area and your usage behaviour, the coffee machine needs to be descaled using the maintenance programme occasionally.For this you will need to use Miele descaling tablets.■ Descale the coffee machine using the maintenance programme (see “Cleaning and care - Descaling the appliance”). |
Unsatisfactory results
| Problem Cause and remedy | |
| The coffee is not hot enough. | The cup has not been pre-heated.The smaller the cup and the thicker its sides, the more important it is to pre-heat it.■ Pre-heat the cups, e.g. using the cup heating (depending on model). |
| The brewing temperature has been set too low.■ Set a higher brewing temperature. | |
| The filters in the brew unit are blocked.■ Remove the brew unit and clean it by hand.■ Degrease the brew unit. | |
| Drinks are being dispensed from the central spout considerably more slowly. The heating-up time is getting longer and the coffee machine is not performing properly. | The coffee machine needs descaling.If you use hard water (>20°dH / 3.6 mmol/l) or if the coffee machine is used intensively, it may be necessary to descale the machine manually more frequently.■ Run the Descale the machine maintenance programme. You will need one descaling tablet. |
| The consistency of the milk froth is unsatisfactory. | The milk temperature is too high. Good milk froth can only be achieved with cold milk (below 10°C).■ Check the temperature of the milk in the milk flask. |
| The milk pipework is blocked.■ Clean the central spout and milk pipework with the brush. | |
| The coffee grinder makes a louder noise than usual. | The coffee bean container has become empty during the grinding process.■ Fill the coffee bean container with fresh beans. |
| There may be foreign objects such as plastic or stones in amongst the coffee beans.■ Switch the coffee machine off immediately. Call Service. | |
| There is no crema on the coffee or espresso. | The coffee beans are no longer fresh. If roasted coffee beans are stored open for too long, the carbon dioxide gradually escapes from the coffee beans. The crema is no longer formed during dispensing.Of course, you can still use the coffee beans. |
Problem solving guide
| Problem Cause and remedy | |
| The coffee tastes weak.The coffee grounds in the waste container are sludgy and grainy. | Insufficient coffee beans are getting into the grinder and less coffee is being brewed. Have you used a dark roast?This type of coffee bean is often more oily. These oils can cling to the inside of the coffee bean containers and hinder the flow of beans.■ Make a coffee and observe whether the coffee beans drop into the coffee bean container.■ Clean the coffee bean containers more often if you are using darker, more oily coffee beans.Try other types of coffee bean which are less oily. |
| Insufficient coffee beans are getting into the grinder and less coffee is being brewed. Are you using a coffee blend with very large beans or different sized beans? The beans are possibly getting wedged or jammed and forming “bean bridges”.⚠ Danger of injury on the moving grinder!If you place a spoon or similar, or even fingers, in the bean containers during grinding, you could be injured.Do not reach into the bean system during grinding.Do not place any objects in the bean containers during grinding.■ Place a narrow spoon or similar in the bean containers and stir the coffee beans. | |
| The ground coffee chute is blocked.■ Vacuum out the ground coffee chute using the attachment supplied. | |
Information to help you rectify faults yourself and about Miele spare parts can be found at www.miele.com/service.
Contact in the event of a fault
In the event of any faults which you cannot remedy yourself, please contact your Miele dealer or the Miele Customer Service Department.
You can book a Miele Customer Service Department call-out online at www.miele.com/service.
Contact information for the Miele Customer Service Department can be found at the end of this document.
Please quote the model identifier and serial number of your appliance (Fabr./SN/Nr.) when contacting the Miele Customer Service Department. This information can be found on the data plate.
Please note that telephone calls may be monitored and recorded for training purposes and that a call-out charge will be applied to service visits where the problem could have been resolved as described in this booklet.

Warranty
For information on the appliance warranty specific to your country please contact Miele. See back cover for address.
In the UK, your appliance warranty is valid for 2 years from the date of purchase. However, you must activate your cover by calling 0330 160 6640 or registering online at www.miele.co.uk.
Transporting the machine
If you are not going to use the coffee machine for an extended period of time, e.g. whilst on holiday, or if it needs to be moved, a number of procedures will need be carried out to ensure its safety.
- Empty and clean the coffee bean container
- Empty and clean the water container
- Evaporate the coffee machine
- Remove the descaling cartridge and insert the adapter.
- Vacuum out the ground coffee chute using the attachment
- Clean the inside of the machine
- Pack the machine securely
Evaporation
The coffee machine pipework should be evaporated before it is stored for a long period of time or transported any distance – particularly at temperatures below freezing.
Evaporating the appliance involves removing all traces of water from the system to prevent the risk of water and frost damage.
The Drinks menu is displayed.
Danger of burning and scalding on the dispensing spouts.
Hot steam can cause scalding.
Keep well away from the area underneath the spouts when hot liquids or steam are being dispensed.
Do not touch hot components.
■ Touch ↻.
■ Touch Settings ▶.
■ Touch Service.
■ Touch Evaporate.
■ Touch Yes to confirm.
■ Follow the instructions in the display.
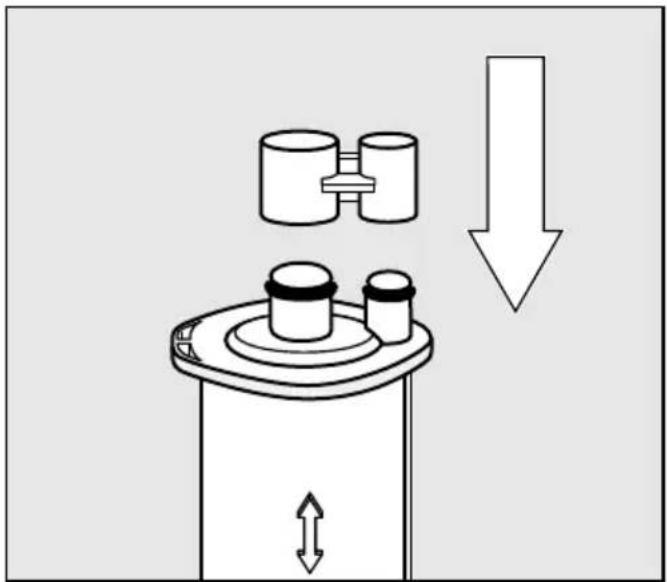
■ Remove the descaling cartridge and seal it with the cap.
Once filled with water, the descaling cartridge has a max. shelf life of three weeks outside of the machine. The cartridge should be stored upright, in a dark place and at room temperature (16 - 38 °C).

■ Insert the adapter in place of the cartridge.
When the display goes out, the machine has finished evaporating.
■ Clean the drip tray and waste container.
Vacuuming out the ground coffee chute using the attachment and cleaning the interior
To ensure coffee residues are removed thoroughly, you should vacuum out the ground coffee chute before transporting and clean out the interior of the machine carefully.
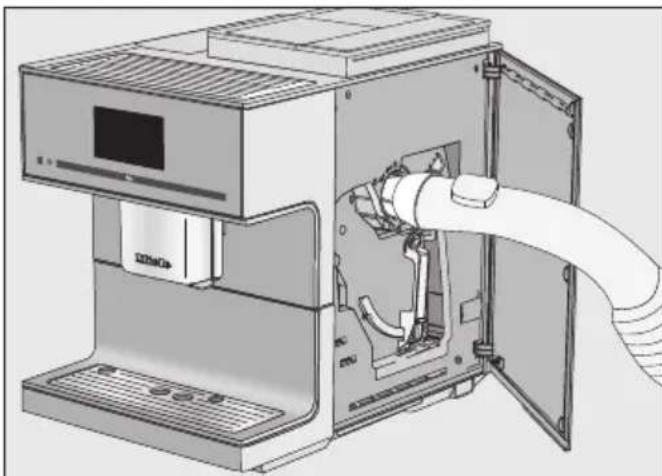
■ Attach the vacuum cleaner attachment included in the scope of delivery.
■ Use the suction tube of your vacuum cleaner to vacuum out the ground coffee chute.
■ Remove the brew unit.
■ Clean the inside of the appliance.
Tip: You can also use your vacuum cleaner to remove any dry ground coffee residues.
■ Clean the brew unit before refitting it.
Packaging
Make sure the appliance is clean and dry before packing it. Ground coffee residues can scratch the surfaces. In addition, coffee, milk and water residues cause a build-up of bacteria.
Use the original packaging to pack the coffee machine.
Keep the operating instructions in the box. This means that you have them to hand if you want to reuse the coffee machine.
These products and other useful accessories can be ordered via the Miele webshop, from Miele (see back cover for contact details) or from your Miele dealer.
- Microfibre cloth
for removing finger marks and light soiling - Cleaning agent for milk pipework
for cleaning the milk system - Cleaning tablets
for degreasing the brew unit - Descaling cartridge
for automatic descaling - Descaling tablets
for manual descaling - CJ Jug 1.0 l
Insulated flask for coffee or tea (pot function) - Miele Black Edition One for all
Whole coffee beans — perfect for making espresso, café crema and speciality coffees with milk - Miele Black Edition Espresso
Whole coffee beans – perfect for making espresso - Miele Black Edition Café Crema
Whole coffee beans – perfect for making coffee - Miele Black Edition Decaf
Whole coffee beans – perfect for making decaffeinated speciality coffees - Miele Tea – LivelyGreen
green tea - Miele Tea – BestBerry
fruit tea - Miele Tea – PerfectMorning
black tea
The coffee machine is supplied with a mains cable with moulded plug ready for connection to a suitable earthed socket.
The socket must be easily accessible after the coffee machine has been installed. If the socket is not easily accessible, ensure that a suitable means of disconnection is provided on the installation side for each pole.

Risk of fire from overheating.
Connecting the coffee machine to multi-socket adapters or extension cables can overload the cables.
For safety reasons, do not use multi-socket adapters, extension cables, adapters and/or energy-saving plug.
The electrical system must comply with local and national safety regulations (BS 7671 in the UK).
For safety reasons, we recommend using a type ☺ residual current device (RCD) in the relevant electrical installation for connecting the coffee machine.
If the mains connection cable is damaged, it must only be replaced with a specific mains connection cable of the same type (available from the Miele Customer Service Department). For safety reasons, such replacement may only be carried out by a qualified specialist or the Miele Customer Service Department.
The data plate indicates the nominal power consumption.
The fuse rating must be at least 10 A. Compare this information with the data of the on-site electrical connection. Consult a qualified electrician if in any doubt.
Temporary or permanent operation on an autonomous power supply system or a power supply system that is not synchronised with the mains power supply (e.g. island networks, back-up systems) is possible. A prerequisite for operation is that the power supply system complies with the specifications of EN 50160 or an equivalent standard. The function and operation of the protective measures provided in the domestic electrical installation and in this Miele product must also be maintained in isolated operation or in operation that is not synchronised with the mains power supply, or these measures must be replaced by equivalent measures in the installation.

a = 311 mm
b = 420 mm
c = 445 mm
| Electricity consumption in standby: < 0.4 W | |
| Electricity consumption in networked standby: | < 0.9 W |
| Pump pressure: Max. 15 bar | |
| Through-flow heater: 1 stainless steel thermo block | |
| Dimensions (W x H x D): 311 x 420 x 445 mm | |
| Net weight: 14.2 kg | |
| Mains connection cable length: 120 cm | |
| Water container capacity: | 2.2 l |
| Total capacity of bean containers: | |
| Coffee bean container A: | Approx. 540 g |
| Coffee bean container B: | Approx. 150 g |
| Coffee bean container C: | Approx. 210 g |
| Approx. 180 g | |
| Milk container capacity: | 0.5 l |
| Drip tray capacity: | 0.8 l |
| Waste container capacity: | Max. 16 portions of coffee grounds |
| Central spout: Height adjustable from 80–160 mm | |
| Grinder: Steel conical grinder | |
| Grinder setting: 5 settings | |
| Ground coffee amount: Max. 12 g | |
| Frequency band: 2.400–2.4835 GHz | |
| Max. transmission power < 100 mW | |
Miele hereby declares that this coffee machine complies with Directive 2014/53/EU.
The complete text of the EU declaration of conformity is available from one of the following internet addresses:
- Products, Download from www.miele.ie
- For service, information, operating instructions etc: go to https://miele.co.uk/manuals and enter the name of the product or the serial number
Miele hereby declares that this coffee machine complies with UK Radio Equipment Regulations 2017, as amended.
The complete text of the UK declaration of conformity is available from one of the following internet addresses:
- Products, Download from www.miele.co.uk
- For service, information, operating instructions etc: go to https://miele.co.uk/manuals and enter the name of the product or the serial number
ThisStatement of Compliance confirms this Miele product fully complies with the Product Security and Telecommunications Infrastructure (Security Requirements for Relevant Connectable Products) Regulations 2023.
1) Household Appliance – Household coffee maker 392, 393, 395, 396, 503, 505
2) Manufactured by: Miele & Cie KG,
Carl Miele Street 29, 33332 Gutersloh Germany
Imported by and contact point: Miele Company Ltd, Fairacres, Marcham Road,
Abingdon, Oxon, OX14 ITW Great Britain
3) The defined support period at the time of first supply is 10 years
To report vulnerabilities and cybersecurity issues please contact: psirt@miele.com4
5) Signature

Name: Paul Wright
Company Position: Head of Technical Management
Date of signature: 19th March 2024
Place of signature: Abingdon, Oxfordshire
United Kingdom
Miele Co. Ltd., Fairacres, Marcham Road, Abingdon, Oxon, OX14 1TW
Tel: 0330 160 6600, Internet: www.miele.co.uk, E-mail: info@miele.co.uk
Australia
Miele Australia Pty. Ltd.
ACN 005 635 398
ABN 96 005 635 398
Level 4, 141 Camberwell Road
Hawthorn East, VIC 3123
Tel: 1300 464 353
E-mail: info@miele.com.au
Internet: www.miele.com.au
China Mainland
Miele Electrical Appliances Co., Ltd.
1-3 Floor, No. 82 Shi Men Yi Road
Jing' an District
200040 Shanghai, PRC
Tel: +86 21 6157 3500
Fax: +86 21 6157 3511
E-mail: info@miele.cn
Kowloon Bay, Hong Kong
Tel:(852)26101025
Fax: (852) 3579 1404
E-mail:
customerservices@miele.com.hk
Website: www.miele.hk
India
Miele India Pvt. Ltd.
1st Floor, Copia Corporate Suites,
Commercial Plot 9, Mathura Road,
Jasola, New Delhi - 110025
E-mail: customercare@miele.in
Website: www.miele.in
Ireland
Miele Ireland Ltd.
2024 Bianconi Avenue
Citywest Business Campus
Dublin 24
Tel: (01) 461 07 10
Fax: (01) 461 07 97
E-mail: info@miele.ie
Internet: www.miele.ie
Malaysia
Miele Sdn Bhd
Suite 12-2, Level 12
Menara Sapura Kencana
Petroleum
Solaris Dutamas No. 1
Jalan Dutamas 1
50480 Kuala Lumpur, Malaysia
Phone: +603-6209-0288
Fax: +603-6205-3768
New Zealand
Miele New Zealand Limited
IRD 98 463 631
8 College Hill
Freemans Bay, Auckland 1011
Tel: 0800 464 353
E-mail: customercare@miele.co.nz
Internet: www.miele.co.nz
Singapore
Miele Pte. Ltd.
29 Media Circle
11-04 ALICE@Mediapolis
Singapore 138565
Tel: +65 6735 1191
Fax: +65 6735 1161
E-mail: info@miele.com.sg
Internet: www.miele.sg
South Africa
Miele (Pty) Ltd.
63 Peter Place, Bryanston 2194
P.O. Box 69434, Bryanston 202
Tel: (011) 875 9000
Fax: (011) 875 9035
E-mail: info@miele.co.za
Internet: www.miele.co.za
Thailand
Miele Appliances Ltd.
BHIRAJ TOWER at EmQuartier
43rd Floor Unit 4301-4303
689 Sukhumvit Road
North Klongton Sub-District
Vadhana District
Bangkok 10110, Thailand
United Arab Emirates
Miele Appliances Ltd.
Showroom 1, Eiffel 1 Building
Sheikh Zayed Road, Umm Al She
P.O. Box 114782 - Dubai
Tel. +971 4 3044 999
Fax. +971 4 3418 852
800-MIELE (64353)
E-mail: info@miele.ae
Website: www.miele.ae
Manufacturer: Miele & Cie. KG, Carl-Miele-Straße 29, 33332 Gütersloh, Germany
Miele
CM 7750 CoffeeSelect


- OPERATING INSTRUCTIONS COFFEE MACHINE
- THE FOLLOWING TIPS CAN HELP YOU SAVE ENERGY AND MONEY AS WELL AS CARE FOR THE ENVIRONMENT
- DISPOSING OF THE PACKAGING MATERIAL
- DISPOSING OF YOUR OLD APPLIANCE
- CARING FOR THE ENVIRONMENT 2
- WARNING AND SAFETY INSTRUCTIONS 7
- GUIDE TO THE MACHINE 14
- OPERATION 19
- MIELE@HOME 21
- UNPACKING AND INSTALLING 22
- BEFORE USING FOR THE FIRST TIME.... 24
- BEAN SYSTEM.... 27
- FILLING THE WATER CONTAINER.... 29
- SWITCHING ON AND OFF.... 30
- CENTRAL SPOUT WITH CUP RIM SENSOR.... 31
- CUP HEATING 32
- MAKING DRINKS 33
- PARAMETERS 41
- DEGREE OF GRINDING 42
- PORTION SIZE 43
- RESETTING DRINKS 44
- PROFILES...... 45
- EXPERT MODE 47
- SETTINGS 48
- CONTENTS
- CORRECT APPLICATION
- SAFETY WITH CHILDREN
- TECHNICAL SAFETY
- CORRECT USE
- ACCESSORIES AND SPARE PARTS
- CLEANING AND CARE
- FOR MACHINES WITH STAINLESS STEEL SURFACES
- APPLIANCE FRONT
- REAR OF MACHINE
- CENTRAL SPOUT IN DETAIL
- MILK FLASK AND MILK SIPHON
- THE MILK CONTAINER
- CONNECTING PIECE FOR MILK SIPHON AND MILK CONTAINER
- SYMBOLS IN THE DISPLAY
- GUIDE TO THE MACHINE
- TOUCH DISPLAY
- OPERATION
- SELECTING OR OPENING A MENU
- SCROLLING
- EXITING A MENU LEVEL ("BACK" ↩ SENSOR CONTROL)
- ENTERING NUMBERS
- ENTERING LETTERS
- AVAILABILITY OF THE WIFI CONNECTION
- MIELE@HOME AVAILABILITY
- MIELE APP
- UNPACKING THE COFFEE MACHINE
- ACCESSORIES SUPPLIED
- SETTING UP AND CONNECTING THE COFFEE MACHINE
- SETTING THE LANGUAGE
- SETTING THE DATE
- SETTING THE TIME OF DAY
- SETTING THE CLOCK DISPLAY
- FITTING THE DESCALING CARTRIDGE
- SET THE WATER HARDNESS LEVEL
- SET UP THE BEAN SYSTEM
- FILL THE BEAN CONTAINER
- NAME THE TYPES OF BEANS
- ALLOCATE TYPE OF BEANS
- CHANGING BEAN SYSTEM SETTINGS (TYPE OF BEANS)
- RENAMING TYPE OF BEANS
- CHANGING BEAN TYPE ALLOCATION
- SWITCHING THE COFFEE MACHINE ON
- SWITCHING THE COFFEE MACHINE OFF
- PREPARING FOR AN EXTENDED PERIOD OF INACTIVITY
- CENTRAL SPOUT POSITIONS
- SWITCHING THE SPOUT ADJUSTMENT ON AND OFF
- CUP HEATING
- SWITCHING CUP HEATING ON OR OFF
- COFFEE
- COFFEE DRINKS MADE WITH AND WITHOUT MILK
- THE MILK
- USING THE MILK CONTAINER
- USING A MILK CARTON WITH THE MILK SIPHON
- MAKING A COFFEE
- CANCELLING A DRINK
- CANCELLING INDIVIDUAL DRINK COMPONENTS
- CANCELLING THE ENTIRE DRINK PREPARATION
- DOUBLESHOT
- MAKING A DOUBLESHOT OF COFFEE
- MAKING TWO PORTIONS 📋
- COFFEE POT: MAKING SEVERAL CUPS OF COFFEE ONE AFTER THE OTHER
- CANCELLING COFFEE POT
- MAKING COFFEE DRINKS WITH GROUND COFFEE
- MAKING COFFEE WITH GROUND COFFEE
- TEA
- TEATIMER
- SWITCHING THE TEATIMER ON AND OFF
- MAKING TEA
- STARTING THE TEATIMER
- CANCELLING TEA PREPARATION
- TEA POT: MAKING SEVERAL CUPS OF TEA, ONE AFTER THE OTHER
- YOU CAN INTERRUPT PREPARATION AT ANY TIME
- DISPENSING HOT WATER
- CHANGING DRINK PARAMETERS
- QUANTITY OF COFFEE
- BREWING TEMPERATURE
- PRE-BREWING THE GROUND COFFEE
- TYPE OF BEANS
- DEGREE OF GRINDING
- IDENTIFYING THE IDEAL DEGREE OF GRINDING
- ADJUSTING THE DEGREE OF GRINDING
- RESETTING A DRINK
- RESETTING ALL DRINKS
- CREATING A PROFILE
- CALLING UP A PROFILE
- EDITING A PROFILE
- CHANGING PROFILE
- CHANGING A NAME
- DELETING A PROFILE
- CREATING A DRINK IN A PROFILE
- CHANGING A DRINK: CHANGING THE PORTION SIZE(S), DRINKS PARAMETERS AND NAMES
- DELETING A DRINK FROM A PROFILE
- MAKING A DRINK FROM A PROFILE
- SWITCHING EXPERT MODE ON AND OFF
- EXPERT MODE: CHANGING THE PORTION SIZE
- CHANGING PORTION SIZE
- OPENING THE "SETTINGS" MENU
- CHANGING AND SAVING SETTINGS
- LANGUAGE
- TIME
- CLOCK DISPLAY
- CLOCK FORMAT
- SETTING
- TIMER
- SELECTING A TIMER
- SWITCH ON AT
- SWITCH OFF AT
- SWITCH OFF AFTER
- ALLOCATING DAYS OF THE WEEK
- ACTIVATING AND DEACTIVATING THE TIMER
- ECO MODE
- LIGHTING
- WATER HARDNESS
- INFO (DISPLAY INFORMATION)
- SYSTEM LOCK 🔒
- ACTIVATING AND DEACTIVATING THE SYSTEM LOCK 🔒
- TEMPORARILY DEACTIVATING THE SYSTEM LOCK 🔒
- MIELE@HOME
- DISPLAY BRIGHTNESS
- VOLUME
- SERVICE
- EVAPORATE
- DEMO MODE
- FACTORY DEFAULT
- APPLIANCE SETTINGS
- NETWORK CONFIGURATION
- SETTING UP THE NETWORK (MIELE@HOME)
- SETTING UP THE NETWORK AGAIN
- REMOTE CONTROL
- SWITCHING REMOTE CONTROL ON OR OFF
- MOBILESTART
- SWITCHING MOBILESTART ON AND OFF
- REMOTEUPDATE
- ACTIVATING/DEACTIVATING
- RUNNING A REMOTEUPDATE
- OVERVIEW OF CLEANING INTERVALS
- CLEANING BY HAND OR IN THE DISHWASHER
- UNSUITABLE CLEANING AGENTS
- CLEANING THE DRIP TRAY AND WASTE CONTAINER
- CLEANING THE DRIP TRAY COVER
- CLEANING THE WATER CONTAINER
- REMOVING AND CLEANING THE WATER CONTAINER FILTER
- CLEANING THE CENTRAL SPOUT
- REMOVING AND DISMANTLING THE CENTRAL SPOUT
- INSERTING THE CENTRAL SPOUT
- CLEANING THE STEAM JET
- CLEANING THE CUP RIM SENSOR
- CLEANING THE MILK SIPHON
- CLEANING THE MILK CONTAINER
- CLEANING THE MILK PIPEWORK MANUALLY OR USING THE MAINTENANCE PROGRAMME
- CLEANING THE BEAN SYSTEM
- CLEANING THE GROUND COFFEE DRAWER
- VACUUMING OUT THE GROUND COFFEE CHUTE
- CLEANING THE CASING
- MAINTENANCE PROGRAMMES
- OPENING THE "MAINTENANCE" MENU
- RINSING THE APPLIANCE
- RINSING THE MILK PIPEWORK
- CLEANING THE MILK PIPEWORK
- PREPARING THE CLEANING SOLUTION
- CARRYING OUT THE CLEANING PROCESS
- DEGREASING THE BREW UNIT AND CLEANING THE INTERIOR
- MESSAGE ON DISPLAY
- DEGREASING THE BREW UNIT WHEN PROMPTED TO DO SO
- CLEANING THE BREW UNIT AND INTERIOR
- DESCALING THE MACHINE
- DESCALING AFTER PROMPT APPEARS IN THE DISPLAY
- PREPARING THE DESCALING SOLUTION
- CARRYING OUT DESCALING
- PLEASE NOTE BEFORE AND DURING AUTOMATIC DESCALING
- THE MIELE DESCALING CARTRIDGE
- REMOVING THE DESCALING CARTRIDGE
- AUTOMATIC DESCALING
- CHOOSING NOT TO USE A DESCALING CARTRIDGE
- START TIME FOR AUTOMATIC DESCALING (DESCALING TIMER)
- SETTING THE START TIME FOR AUTOMATIC DESCALING
- CANCELLING AUTOMATIC DESCALING
- PROBLEM SOLVING GUIDE
- MESSAGES IN THE DISPLAY
- CONTACT IN THE EVENT OF A FAULT
- WARRANTY
- TRANSPORTING THE MACHINE
- EVAPORATION
- VACUUMING OUT THE GROUND COFFEE CHUTE USING THE ATTACHMENT AND CLEANING THE INTERIOR
- PACKAGING
- UNITED KINGDOM
- AUSTRALIA
- CHINA MAINLAND
- INDIA
- IRELAND
- MALAYSIA
- NEW ZEALAND
- SINGAPORE
- ALICE@MEDIAPOLIS
- SOUTH AFRICA
- THAILAND
- UNITED ARAB EMIRATES
- MIELE
Brand : MIELE
Model : CM 7750 125 Edition
Category : Coffee maker