
GSP56012-030E - Dishwasher Exquisit - Free user manual and instructions
Find the device manual for free GSP56012-030E Exquisit in PDF.


| Product Type | Freestanding or Built-in Dishwasher |
| Model | GSP56012-030E |
| Brand | Exquisit |
| Dimensions (H x W x D) | 820 mm x 580 mm x 450 mm |
| Weight | Approximately 45 kg |
| Capacity | 12 place settings |
| Energy Consumption (ECO program) | 0.923 kWh per cycle |
| Water Consumption (ECO program) | 11.0 L per cycle |
| Programs | Intensive, ECO, Power+ |
| Water Supply Connection | Cold water, 3/4" threaded, pressure 0.4-10 bar |
| Electrical Connection | 220-240 V ~ 50 Hz, 10 A, with earthing |
| Water Softener | Adjustable from H1 to H6 |
| Rinse Aid Dispenser | Yes, adjustable dosage |
| Salt Container Capacity | Approximately 1.5 kg |
| Noise Level | Approximately 48 dB(A) |
| Safety Features | Child lock, anti-flood system, electronic protection |
| Spare Parts Availability | Minimum 7 years for electronic/mechanical parts, 10 years for door components and seals |
| Warranty | 24 months (12 months for commercial use) |
| Scope of Delivery | 2 crockery baskets, cutlery basket, funnel, vapour barrier, instruction manual, water inlet hose, service card |
| Color | Black (GSP 56012-030E black) |
Frequently Asked Questions - GSP56012-030E Exquisit
User questions about GSP56012-030E Exquisit
0 question about this device. Answer the ones you know or ask your own.
Ask a new question about this device
Download the instructions for your Dishwasher in PDF format for free! Find your manual GSP56012-030E - Exquisit and take your electronic device back in hand. On this page are published all the documents necessary for the use of your device. GSP56012-030E by Exquisit.
USER MANUAL GSP56012-030E Exquisit
Household dishwasher GSP 56012-030E black
Inhaltsverzeichnis
12 For your safety....35
12.1 Intended use 36
12.2 Misuse 36
12.3 Safety for certain groups of people 36
12.4 Residual risks 37
13 Environmental protection and saving energy 37
13.1 Disposing of packaging materials in an environmentally friendly manner......37
13.2 Saving energy and water 37
13.3 Disposing of old appliances....38
14 Setting up and installation....38
14.1 Free-standing installation ....39
14.2 Substructure installation....39
14.3 Aligning the appliance....40
14.4 Water connection ....40
14.5 Electrical connection ....41
15 Putting the appliance into operation....42
15.1 Setting the water hardness....42
15.2 Filling/topping up regenerating salt 43
15.3 Rinsing agent ....44
15.4 Dishwasher detergent....44
15.5 Loading dishes and cutlery 45
16 Daily use....47
16.1 Programme table 47
16.2 Information about the ECO programme....48
16.3 Starting the washing programme ....48
16.4 Changing the washing programme ....48
16.5 Switching off the dishwasher ....49
17 Cleaning and maintenance....50
18 Decommissioning the appliance....51
19 Faults....52
20 Technical data....55
21 Spare parts/After Sales Service....56
22 Warranty terms....57
natural_image
3D wireframe model of a mechanical assembly with no visible text or symbols
natural_image
Illustration of a portable electronic device with a handle and grid-patterned front panel (no text or symbols)Erklärung Tasten
Unterkorb

natural_image
Line drawing of a kitchen sink with a cabinet and tiled wall (no text or symbols)Gerät unterbauen
natural_image
Line drawing of a kitchen appliance with a cabinet and tiled wall (no text or symbols)

natural_image
Hand pressing down on a control panel with icons and a curved arrow (no text or symbols)
natural_image
Hand operating a device with a knob and control buttons (no text or symbols visible)
natural_image
Illustration of a hand pressing down on a button with icons (no text or symbols)


natural_image
Illustration of a hand pressing down on a kitchen control panel with a rotary knob (no text or symbols)Getting to know your appliance\*
Scope of supply
2x Crockery basket
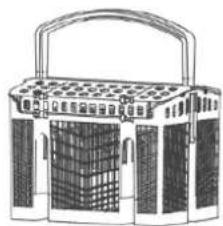
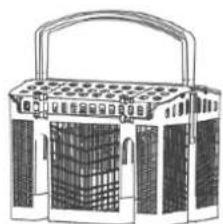
1x Cutlery basket
1x Funnel
1x Vapour barrier
1x Instruction manual
1x Water inlet hose installed
1x Service card
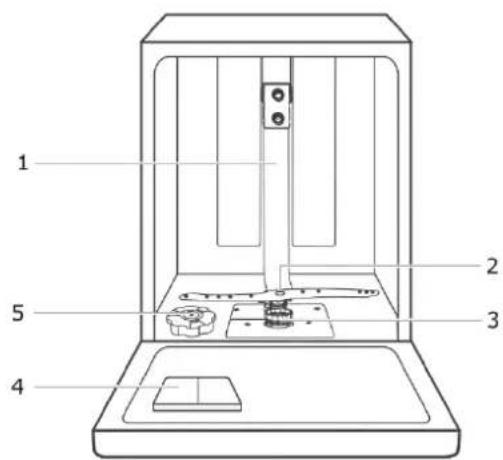

1 Water supply
2 Lower spray arm
3 Filter unit
4 cleaner containers
5 Salt container
6 inlet connection/hose
7 inlet connection/hose
Upper basket Lower basket Cutlery basket
with foldable cutlery tray and upper spray arm

natural_image
3D wireframe model of a mechanical assembly with no visible text or symbols
natural_image
Line drawing of a portable electronic device with a handle and grid-patterned front panel (no text or symbols)*) The term appliance is used throughout the text to refer to a household dishwasher.
Control panel

Explanation of buttons
| NO. | BUTTON/DISPLAY | DESCRIPTION |
| 1 | On/Off | Switch appliance ON/OFF |
| 2 | Programme selection | Select the washing programme; the display of the selected programme lights up |
| 3 | Start/Pause | Start the washing programme or stop it during washing |
| 4 | Lack of rinsing agent indicator Lack of salt indicator | Top up rinsing agent or regenerating salt if LED lights up |
Loading plan for household dishwashers
Unterkorb

All safety instructions in this instruction manual are marked with a warning symbol. They draw your attention to potential hazards. Be sure to read and observe this information.
Explanation of the safety instructions

DANGER
Indicates a hazardous situation which, if not avoided, will lead to very serious injuries or even death!

WARNING
Indicates a hazardous situation which, if not avoided, can lead to very serious injuries or even death!

CAUTION
ATTENTION
Indicates a hazardous situation which, if not avoided, can lead to minor or moderate injuries!
Indicates a situation which, if not avoided, will lead to material damage.

ELECTRIC SHOCK HAZARD!

RISK OF SCALDING!

FIRE HAZARD!

➢ Information and instructions to be observed.
Use the following symbols:
- List
√ Inspection steps in sequence
- Work steps in sequence
→ Response of the appliance to the work step
12.1 Intended use
- The appliance is intended for household use.
- The appliance is suitable for washing dishes. Every other form of use is not considered an intended use.
- Do not operate the appliance other than as described in this instruction manual otherwise as this would lead to the voiding of warranty claims in the event of faults.
- The appliance is not intended for outdoor use.
The intended use also implies compliance with the operating and maintenance conditions prescribed by the manufacturer. For safety reasons, modifications or alterations to the appliance are not permitted.
12.2 Misuse
The following activities are considered improper use and are therefore prohibited:
- The appliance is not suitable for commercial use.
- Do not connect the appliance to the mains power supply using multiple socket strips.
- Do not route the mains power cable or hoses under voltage.
- Do not kink mains power cables or hoses.
- Set up the appliance so that the mains plug is accessible at all times.
- Do not pull the mains plug out of the plug socket at the cable.
- Never pour solvents into the appliance.
- Do not place flammable products or objects that are wetted with flammable products in or near the appliance.
12.3 Safety for certain groups of people
The appliance may be operated by children over 8 years of age and persons whose physical, sensory or mental aptitude are impaired or who lack experience and/or knowledge. However, they must be supervised or instructed in the safe use of the appliance and understand the possible risks.
• Children may only clean and service the appliance under adult supervision.
- Supervise children to ensure that they do not play with the appliance.
RISK OF SUFFOCATION!
Packaging materials (e.g. plastic film, polystyrene) can be dangerous for children. Keep packaging materials out of the reach of children.

WARNING
RISK OF POISONING!

- Dishwasher detergent for dishwashers is corrosive! Keep children away.

CAUTION
RISK OF INJURY!
When automatic door opening is activated (depending on model), small children must not be within the opening range of the appliance door. In the event of a malfunction, there is a risk of injury.
12.4 Residual risks
ELECTRIC SHOCK HAZARD!

- Never hold the mains plug of the mains cable with damp or wet hands when plugging in or unplugging the appliance.
- In an emergency, pull the mains plug out of the plug socket immediately.
- Remove the mains plug from the plug socket before starting cleaning or service work.
- A damaged power supply cable must be replaced by the supplier, dealer or After Sales Service without delay. If cable or mains plug are damaged, do not use the appliance any longer.
- Do not carry out any work on the appliance other than the cleaning and service work described in this instruction manual.

CAUTION
RISK OF INJURY!
Do not leave the appliance door open unnecessarily, it increases the risk of tripping.
13 Environmental protection and saving energy
In order to use the newly purchased appliance in an environmentally friendly and energy-saving manner, observe the information in this chapter.
13.1 Disposing of packaging materials in an environmentally friendly manner

Sort packaging materials before disposal.
Paper and cardboard with the waste paper and plastic film in the recycled materials bin.
13.2 Saving energy and water
Observance of the following instructions has a positive influence on energy and water consumption and the service life of the appliance. Customer service calls can also be avoided.
- Load the dishwasher up to the specified capacity and follow the loading instructions. This saves energy and water.
- Remove food residues and other foreign material before loading, e.g. with cutlery, as these can make cleaning more difficult and (partially) clog filters. Foreign bodies can enter the water-bearing system, especially if filters are not inserted correctly or if the system is operated without filters. These can, for example, clog spray arms or block the pumps. Improper use can lead to customer service work that is subject to a charge.
- In particular, remove greasy food residues before loading to reduce clogging in the water-bearing system.
-
Manual pre-washing of the dishes, e.g. under running water, is not recommended. It leads to higher water and energy consumption.
-
Select a suitable programme depending on the crockery and soiling. Observe information on energy and water consumption, duration and temperatures.
- Correctly dose the detergent and rinsing agent and check the water softener setting.
- Cleaning dishes in a dishwasher generally uses less energy and water than washing by hand. This applies provided you follow the instructions in the instruction manual.
- Follow the cleaning and care instructions. (see chapter 6 "Cleaning and maintenance")
13.3 Disposing of old appliances

The appliance is marked with the symbol shown here in accordance with the European Directive on waste electrical and electronic equipment 2012/19/EU. The Directive contributes to the proper disposal of the appliance and the recovery of secondary raw materials.
Old appliances must not be disposed of with household waste
Every consumer is obliged by law to dispose of waste electrical and electronic equipment separately from the household waste. To avoid negative effects on the environment, hand in old appliances at the point of sale or at a municipal collection point for professional recycling.
Make appliances unserviceable before disposal:
- Disconnect the mains plug from the mains power cable.
14 Setting up and installation
Preparing the appliance
√ The packaging materials must be undamaged.
√ Inspect the appliance for transport damage.
√ On no account should a damaged appliance be put into operation.
√ In case of damage, please contact After Sales Service.
Removing transport protection
The appliance and some of the interior parts are secured for transport. Remove all adhesive tapes on the right and left side of the appliance door as well as adhesive tapes and packaging parts from the interior of the appliance. Remove residues of adhesive with alkaline water.
Setting up the appliance
Before setting up the appliance, read the instruction manual carefully and observe the illustrations.

WARNING
ELECTRIC SHOCK HAZARD!
Do not connect the appliance to the mains power supply during installation.

Place the appliance
- in a dry and frost-proof room with a solid surface.
- for the installation of the connection cables, be sure to place them near a washbasin/sink or floor drain.
Allow the necessary space for opening the appliance door
| 1 | Appliance |
| 2 | Appliance door |
| 3 | Worktop |


To ensure adequate ventilation, the distance between the wall and the front edge of the appliance must not be less than 60 cm.
14.1 Free-standing installation
The height of the dishwasher is designed to slide it between existing cabinets of the same height. Adjust the appliance feet so that they reach the correct height of the adjacent furniture. (For unit dimensions, see enclosed service card)
14.2 Substructure installation
The model purchased is also suitable for installation under a continuous worktop.
Overview undercounter niches

natural_image
Line drawing of a kitchen sink with a gridded wall and cabinet (no text or symbols)Substructure the appliance
-
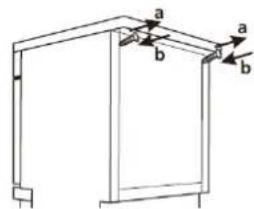
Stick the enclosed self-adhesive vapour barrier (protective film) to the underside of the worktop.
-
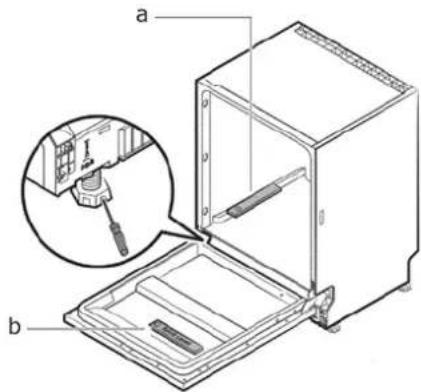
Unscrew the screws under the rear edge of the unit cover (a).
-
Screw the screws back in after removing the unit cover (b).
-
Unscrew the appliance feet and adjust and align the appliance to the height of the kitchen unit (if possible).
-
Push the appliance into the niche provided, taking care not to kink the hoses (see chapter 1.2 Misuse).
-
Turn out the front feet so that the appliance is fitted without a gap under the worktop (if possible).
-
Since the base unit heights vary according to the kitchen furniture manufacturer, the maximum appliance height may not always be sufficient for height adjustment.


natural_image
Line drawing of a kitchen sink with a gridded wall and cabinet (no text or symbols)
➢ Steam escapes from the appliance when the appliance door is open. The vapour barrier prevents this from flowing under the worktop and damaging it.
14.3 Aligning the appliance
The dishwasher must be in a horizontal position in order for the dishwasher basket to work properly and for the washing performance to be guaranteed.
-
Place a spirit level on the appliance door (b) and in the interior(a) and check that the appliance is level.
-
The appliance must be level for the dish racks to work properly.
14.4 Water connection
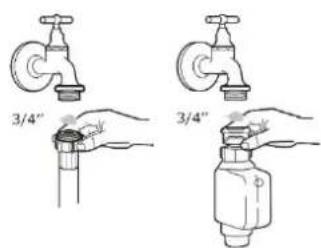
The appliance is designed for water pressure from 0.4 to
10 bar (0.04 to 1.0 MPa, 40 to 100N/ cm2). Install a pressure reducer for higher water pressure.
For ecological reasons, the connection to hot water can make sense if it is available from an energy-efficient hot water heating system (such as a solar system). In this way you can save energy for heating. A water temperature (temperature of the incoming water) of 40 to 45 °C and at most 60 °C is recommended.
Connection to hot water is not recommended if the water comes from an electric boiler. It should be noted that if hot water is supplied, the appliance will take less time to heat up, thus reducing the soaking time. This may have negative effects on the washing result.

A cold water connection is recommended for the appliance.
The appliance is designed for connection to drinking water.
If the water pipe is new or has not been used for a long time, let water run out to flush away impurities and deposits.
ATTENTION
RISK OF DAMAGE!
Do not connect the appliance to a water heater (instantaneous water heater, unpressurised water tanks, e.g. under-sink units, etc.). Components such as water hoses are not designed for temperatures hotter than 60 °C and can be damaged. In case of damage, guarantee is excluded.
Install drinking water connection
Ensure that the appliance is connected to a water supply with a safety device against drinking water contamination by backflow (according to DIN EN 1717). The connection valves/water taps provided for this purpose are equipped with this safety device if the house installation is correct.
Use a new water inlet hose with every new appliance.
Connecting the supply hose
-
Connect the water inlet hose to the 34 " threaded connection of the tap. Ensure correct screw connection (do not cant). Check tightness.
-
Ensure that the supply hose is not kinked or pinched.
Connect the drain hose.
- Ensure that the drain hose is not kinked or pinched.
→ The waste water must be able to drain unhindered.
- Do not insert sink plugs while the appliance is pumping
water out. Otherwise the water will run back into the appliance.

(a) Connect the drain hose to a floor drain. Observe the minimum connection height of 400mm.
(b) Direct connection to the siphon of a washbasin/sink. The maximum connection height of ≤ 1000mm must be observed. Connection should only be carried out by a specialist.
(c) Floor drain diameter
Hose extension
- Only use an identical drain hose as a hose extension and have it professionally installed. Contact After Sales Service.
- In order not to affect the cleaning power of the dishwasher, the hose extension must not be longer than 2 m.
14.5 Electrical connection
A prerequisite for the electrical connection is a properly installed protective contact plug socket, with its own adequate fuse protection (220-240V\~/50 Hz/10A). The use of a pulse-sensitive fault-current circuit breaker (RCD switch) is recommended.
ELECTRIC SHOCK HAZARD!
The appliance must be earthed according to the local regulations. For this purpose, the plug of the connecting cable is fitted with a contact provided for this purpose.

WARNING
FIRE HAZARD
Do not connect the appliance to a multiple socket, power strip or similar.

If the plug does not fit into the plug socket, contact a qualified electrician.
Do not use an extension cable with an adapter plug for this appliance.
15 Putting the appliance into operation
Before putting the appliance into operation, make the following settings and fill the appliance with regenerating salt, rinsing agent and dishwasher detergent.
15.1 Setting the water hardness
Before putting the appliance into operation for the first time, adjust it once to the local water hardness. You can obtain this information from the water supplier or on the Internet.
- The water softener serves to remove minerals and salts from the water that could damage the appliance or have an undesirable effect on the dishes.
• The more minerals and salts your water contains, the harder the water.
The dishwasher is designed so that the amount of salt used can be adjusted according to the hardness of the water used. This is to optimise and individually adjust salt consumption.
- Close the door and switch on the appliance.
- press and hold "ECO programme" for longer than 5 seconds.
- Select the appropriate water hardness with the "ECO Programme" H3>H4>H5>H6>H1>H2. After 5 seconds, the setting is automatically set or by pressing the "Start/Pause" key
Carry out the settings using the following table
Factory setting: H3
| WATER HARDNESS | |||||
| °dH | °fH | °Clark | °mmol/l | Display | Salt consumption (gr/cycle) |
| 0~5 | 0~9 | 0~6 | 0~0.94 | H1 | 0 |
| 6~11 | 10~20 | 7~14 | 1.0~2.0 | H2 | 9 |
| 12~17 | 21~30 | 15~21 | 2.1~3.0 | H3 | 12 |
| 18-22 | 31-40 | 22-28 | 3.1~4.0 | H4 | 20 |
| 23~34 | 41~60 | 29~42 | 4.1~6.0 | H5 | 30 |
| 35~55 | 61~98 | 43~69 | 6.2~9.8 | H6 | 60 |
1^ = 1.25^ Clark = 1.78^ = 0.178mmol / l
° dH: German hardness ° Clark: British hardness ° fH: French hardness
15.2 Filling/topping up regenerating salt
Add regenerating salt before using the appliance for the first time. Observe the following when filling the salt container:
√ Only use regenerating salts specially made for dishwashers.
√ The manufacturer will decline all liability for damage caused by the use of unsuitable salts and the warranty will be voided.
√ Fill in regenerating salt before putting into operation.

When using multitabs with regenerating salt, it is not necessary to add regenerating salt.
Do not pour in regenerating salt if the water hardness in the residential area is 0-5° dH.
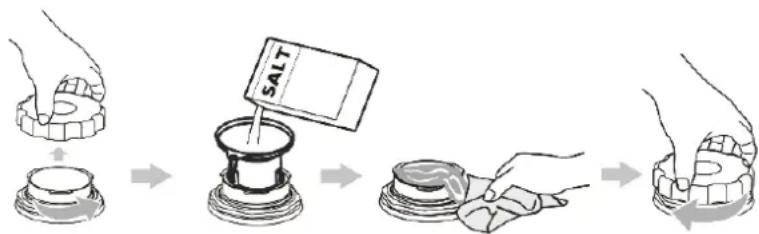
- Remove the lower basket and unscrew the lid of the salt container.
- When using for the first time, fill the salt container with approximately 1 litre of water.
- Position the funnel and pour in approx. 1.5 kg of regenerating salt. It is normal that a certain amount of water runs out of the container as the salt is added.
- Absorb spilt regenerating salt immediately with a damp cloth.
- Fit the cover correctly and screw it on as far as it will go.
- Start a washing programme immediately after filling.
Normally, the low-salt indicator switches off after running a washing programme.
Fill up with regenerating salt when the low-salt indicator

lights up.
ATTENTION
APPLIANCE DAMAGE!
- Never pour detergent into the salt container. Damage to the water softening system.
- Take care never to put the wrong powder in the salt container. A defect of the water softening system is likely.
- Tighten the salt container lid properly. If dishwasher detergent penetrates the salt container, the water softening system will be damaged.
- Do not leave spilled regenerating salt in the appliance. This will damage the appliance and the stainless steel tray.
15.3 Rinsing agent
The rinsing agent prevents water droplets from forming on the dishes, which can leave stains and streaks. The rinsing agent accelerates the drying process.
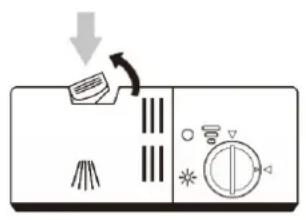
Filling/topping up rinsing agent
Fill/top up rinsing agent when the low-rinsing agent indicator on the control panel lights up.
When using multi-tab detergent that already contains rinsing agent, ignore the indicator.

voll

3/4 'voll

1/2 voll

1/4 voll

leer

natural_image
Hand pressing a button on a device control panel (no text or symbols visible)
natural_image
Illustration of a hand pressing down on a device with buttons and a knob (no text or symbols)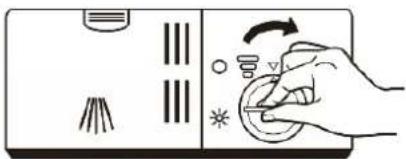
natural_image
Illustration of a hand pressing down on a control panel with icons for buttons and a timer (no text or symbols)
Immediately wipe up spilled rinsing agent with an absorbent cloth.
➢ Never pour in other substances (e.g. dishwasher detergent, dishwashing liquid) together with the rinsing agent.
Setting the rinsing agent consumption
The rinsing agent container has six or four settings. Factory setting "4". Should spots form or the dishes do not dry correctly, increase the rinsing agent dispensing rate:
- Remove the cover of the container.
- Set the wheel one level higher.
We recommend the factory setting "4".
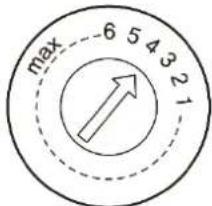
15.4 Dishwasher detergent
When selecting a dishwasher detergent, follow the instructions of the respective manufacturer.
√ Use only detergents for household dishwasher.
√ When dosing the detergent, follow the instructions on the detergent package.
√ Pour detergent powder into the chambers of the dishwasher detergent container.
√ Use only powder detergent for short washing programmes.
√ Follow the dosage recommendations in the programme table.

WARNING
RISK OF POISONING!

- Keep all dishwasher detergents in a safe place out of the reach of children. Fill the container with dishwasher detergent only just before starting the appliance.
- Dishwasher detergent for dishwashers is corrosive! Keep children away.
- Do not inhale powdered dishwasher detergent.
- Do not swallow dishwasher detergent.
- Dishwasher detergents can cause burns in the nose, mouth and throat.
- Keep children away from dishwasher detergent and an open dishwasher.
- Only add dishwasher detergent before the programme starts.
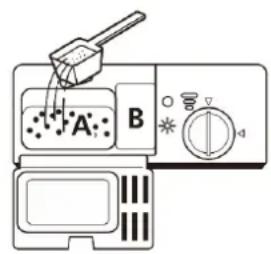
Filling dishwasher detergent
- Top up the detergent container just before starting the washing programme. If the dishwasher detergent is damp, it cannot dissolve.
- Observe the manufacturer's instructions for dosage and storage.

natural_image
Illustration of a hand pressing down on a kitchen control panel with buttons and a scroll (no text or symbols)(A) Dishwasher detergent main washing programme
(B) Dishwasher detergent pre-washing programme.
15.5 Loading dishes and cutlery
For optimum washing results, observe the following tips when loading the baskets.
√ Remove food residues, e.g. with cutlery. Pre-washing is not necessary.
√ Soften burnt fat in pans.
√ Align dishes with spray arms.
√ Fix plastic parts to prevent water residues in them.
√ Temperature-sensitive objects can deform under load, so make sure there is sufficient clearance.
√ Place hollow products such as cups, glasses, pans, etc. into the basket with the opening facing downwards. Do not stack.
√ Place smaller glasses in the upper basket. Place larger and taller glasses in the lower basket.
√ To avoid glass damage, glasses must not be touching one another.
√ Place large items that are difficult to clean in the lower basket. The water jet can then reach the dirty crockery.
√ Crockery and cutlery must not obstruct the rotation of the spray arms, otherwise the water jet cannot reach the wash items efficiently.

CAUTION
RISK OF INJURY!
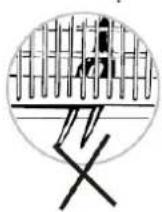
- Knifes facing upwards with long, sharp blades pose a potential hazard!
- Place long and/or sharp items such as carving knives horizontally in the upper basket.
Unsuitable tableware
Not all crockery and cutlery is suitable for dishwasher cleaning. To avoid damage, the following instructions are recommended.
| OBJECT | POSSIBLE DAMAGE |
| Sensitive glasses, e.g. made of lead crystal, | can become matt and milky |
| Decoration on tableware/glasses/cutlery | may fade, as not dishwasher safe |
| Silver | can tarnish |
| Anodised aluminium | can stain |
| Tin | can become matt |
| Wood | can deform and crack |
| Horn/heat sensitive plastic | can deform |
| Glued cutlery items | can come loose |
| Handicraft items | can be damaged |
| Electrical components of kitchen appliances, such as mixers | can cause electric shock |
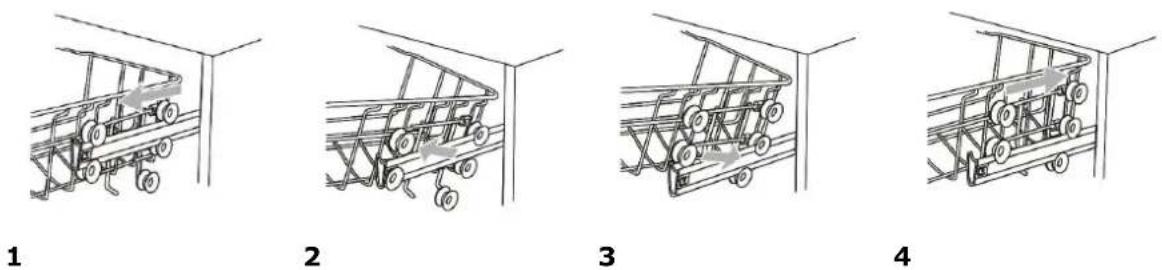
Setting the upper basket
Change from lower position (1) to upper position (4)
1
2
3
4
Select a suitable washing programme depending on the type of dishes and degree of soiling according to the following programme table.
16.1 Programme table
| PROGRAM | SYMBOL | DESCRIPTION |
| Intensive |  | For heavily soiled dishes, e.g. pots, plates, glasses, pans. |
| Power+ |  | For heavily soiled dishes, e.g. pots, plates, glasses, pans.Daily standard program. |
| ECO(EN60436) |  | For normally soiled dishes, e.g. plates, bowls, glasses and lightly soiled pans. |
| CYCLES | CONSUMPTION 12 settings | ||||||||
| PROGRAM | SYM | Prewash | Rinse | Post-rinse | Dry | Powder /tab | Duration (Min.) | Energy (kWh) | Water (l) |
| Intensive |  | 50°C | 65°C | 3x max. 65°C | √ | 4/16g 1 or 2 tabs | 205 | 1' 621 | 17.8 |
| ECO(EN60436) |  | cold | 45°C | 60°C | √ | 4/16g 1 or 2 tabs | 230 | 0923 | 11.0 |
| Power+ |  | 45°C | 55°C | 2xkalt max. 65°C | √ | 4/16g 1 or 2 tabs | 175 | 1' 302 | 14.2 |
16.2 Information about the ECO programme
The ECO programme is suitable for cleaning normally soiled dishes. The ECO programme is the most efficient programme in terms of combined energy and water consumption. ECO programme is used to check compliance with EU eco-design rules. The basis is DIN-EN 60436. The water hardness setting should be selected for 14dH or 2.5°mmol/l. Set the rinsing agent setting to "6" or maximum. The measurements are performed under defined conditions (laboratory conditions). Deviations in daily operation are possible. The specifications in the following table for other programmes are only reference values. The specifications for duration, energy consumption and water consumption cover one operating cycle.
16.3 Starting the washing programme
- Pull out the crockery baskets, fill with crockery and push in again.
- Load the cutlery basket/drawer and push it back in again.
- Pour in dishwasher detergent (see chapters on regenerating salt, rinsing agent, dishwasher detergent in the chapter "Putting into operation").
- Turn on the water tap completely.
- Press the "ON/OFF" button and switch on the appliance.
- select "Washing programme" (see "Programme table"). The corresponding programme lamp lights up.
- Press the "Start/Pause" button and the appliance starts the wash cycle.

➢ A click can be heard when the door is closed correctly.
Do not close the door until the crockery baskets have been pushed back in. This avoids unnecessary slamming of dishes.
Do not drop cutlery (especially knives) into the cutlery basket. A cautious approach increases the lifetime of the appliance.
16.4 Changing the washing programme
When the water has run in completely, or the dishwasher detergent has flowed in, a change of programme is no longer possible without a restart. In this case, fill the container with dishwasher detergent again. (see chapter "Filling dishwasher detergent").
- Press the "Start/Pause" button to interrupt the washing process.
- Select the desired washing programme.
- Press the "Start/Pause" button and the appliance starts the selected programme after 10 seconds.

flowchart
graph LR
    A["Hand icon"] --> B["3 sec touch"]
    B --> C["Hand icon with 'ECO' indicator"]
    C --> D["Hand icon with 'ECO' indicator"]
    D --> E["Hand icon with 'ECO' indicator"]
Interrupting the washing programme
Put in a forgotten item as long as the detergent container has not yet opened.
- Press the "Start/Pause" button to interrupt the washing process.
- Wait 5 seconds and then open the appliance door.
- Adjust forgotten dishes.
- Close the appliance door.
- Press the "Start/Pause" button and the appliance starts the selected programme after 10 seconds.

flowchart
graph LR
    A["Foot"] --> B["After 5 sec"]
    B --> C["Bar chart with arrow"]
    C --> D["Box with arrow"]
    D --> E["Bag with bag"]
End of the washing programme
An acoustic signal sounds for 8 seconds at the end of a washing programme.
ATTENTION
APPLIANCE DAMAGE!
Let the appliance cool down a little after the end of the programme (acoustic signal) and do not open it immediately.
16.5 Switching off the dishwasher
Switch on the appliance with the "ON/OFF" button.
-
Turn off the water tap and open the appliance door.
-
Wait around 15 minutes before unloading the appliance as the items are still very hot. They dry gradually.
ATTENTION
WATER DAMAGE!
To prevent uncontrolled water leakage, turn off the tap after each use of appliances without aqua-stop.
Emptying the dishwasher
In order to prevent water from the upper basket dripping onto the items in the lower basket, empty the lower basket first, then the upper crockery basket.
Regular cleaning and maintenance of the appliance not only protects the environment and saves energy, but also increases its service life. The attached brief overview provides valuable tips at a glance.
Cleaning the appliance and interior
√ Clean the control panel, rubber seal and housing with a damp cloth. Never use sharp objects, scrubbing pads, solvents or aggressive cleansing agents.
√ Remove stains or dirt inside the appliance with water and a cloth moistened with a little white vinegar or dishwasher detergent.
√ To avoid deposits and scale residues, allow the appliance to run with dishwasher detergent and without dishes at the highest setting.

If the dishwasher is not to be used for some time, e.g. during the holidays:
- run a washing process without dishes
- remove the mains plug from the plug socket and
- leave the appliance door slightly open. The seals then last longer and no unpleasant odours form in the dishwasher.
The basic cleaning of the appliance with special dishwasher detergents depends on the use and maintenance of the appliance. Follow the instructions from the manufacturer of the dishwasher detergent. Carry out basic cleaning at least once a year.
Now and then put a small lemon peel in the cutlery basket. This ensures a good cleaning result and a fresh scent.
➢ Switch the appliance on once a week so that the pump pumps water in and out and keeps the seals moist.
Cleaning the spray arms
- Pull the lower spray arm upwards
- Turn the screw nut on the upper spray arm in the direction of the arrow and pull the spray arm downwards.
- Hold the spray arms under a tap with running water and rinse the small nozzle opening.
- By shaking, larger foreign bodies (e.g. pieces of eggshells) can be removed through the connection opening.
- Clean nozzle openings with warm soapy water and a soft brush.
- Rinse well under running water.


➢ Blockages in the holes of the spray arms disturb the water flow and detergent tabs may not dissolve properly.
Cleaning the filter
The filter system is structured as follows.
Check the filters after each use and clean as necessary. Clean at least after every fifth use, but at least once a month as follows. It is essential to follow the instructions for saving energy and water (see section 2.1).

- Turn the coarse filter (C) anticlockwise and lift the filters upwards.
- Rinse all filters under running water.
- Clean the coarse and fine filters with a cleaning brush.
- Reinstall the filter system in the reverse order.
- Position the filter system in its support and press down.
- Turn the coarse filter clockwise as far as it will go (see also arrow markings).
Cleaning the appliance door
- Clean the door frame with a damp cloth.
- Never use spray cleaners or the like to prevent water from penetrating the door lock and electrical elements.
Frost protection measures
If the appliance is located in a place where temperatures are close to or below freezing, observe the following:
√ Remove the mains plug from the plug socket or switch off the fuse.
√ Turn off the water tap and unscrew the supply hose.
√ Allow the water to drain from the supply hose and inlet valve. (Place a vessel under the hose to collect the water.)
√ Connect the inlet hose to the inlet valve again.
√ Remove the filter from the tray in the bottom of the dishwasher and draw the water out of the rubber ring using a sponge.
18 Decommissioning the appliance
Observe the sequence of the work steps:
- Pull out the mains plug or switch off the fuse for the plug socket.
- Turn off the water tap.
- Loosen the inlet and outlet hose.
- Loosen fixing screws from the worktop, if present.
- Remove the base board, if present.
- Pull out the appliance, carefully pulling out the hoses at the same time.
Allow remaining water to drain from the hose
If the sink is 1000 mm or more from the floor, the remaining water cannot run out directly into the sink.
In this case, collect the remaining water from the hose in a suitable vessel outside the sink.
Transport
√ Empty the appliance and secure loose parts.
√ Transport the appliance only upright (so that no remaining water can run into the machine controller and cause programme errors).
Before you contact after-sales service
| FAULT | POSSIBLE CAUSE | REMEDY |
| Appliance is not working. | Fuse blown or fused circuit-breaker tripped. | Check fuses. |
| Plug is not plugged in to the plug socket. | Plug the mains plug into the plug socket. | |
| Low water pressure | Check whether the water supply hose is correctly connected and the tap is properly turned on. | |
| Appliance door does not close properly. | Close the appliance door. | |
| Dishes are not dry or not properly dry | No rinsing agent used or dosage set too low | 3. Fill with rinsing agent4. Regulate rinsing agent quantity |
| The detergent used has a poor drying performance | Use rinsing agent or combined detergent with higher drying capacity | |
| Selected programme has no "Dry" function | Select programme with "Dry" | |
| The "Extra dry" function was not activated. | Activate the "Extra dry" function, if available | |
| Water collects in recesses in the crockery or cutlery | Put away dishes at an angle if possible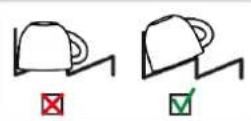 (see chapter 4.5 "Loading dishes and cutlery" (see chapter 4.5 "Loading dishes and cutlery" | |
| Drying process was not yet finished | Wait until the programme ends. Open the door a little after the end of the programme. Steam can escape and the dishes dry out. | |
| Plastic tableware is not properly dry | Normal phenomenon. Poorer drying performance for plastic. | No remedy possible |
| Cutlery is not dry | Cutlery incorrectly sorted | Put away cutlery correctly (see section 4.5 Loading dishes and cutlery) |
| Interior sides of the appliance are wet after the wash cycle | Normal phenomenon | No action necessary |
| Dishes are not properly clean | Dishes not properly arrangedRotation of the spray arms is blocked | Load the dishes and cutlery basket without the spray arms hitting them (see section 4.5 Loading dishes and cutlery). |
| Clogged spray arm nozzles | Clean spray arms (see chapter 6 "Cleaning and maintenance") | |
| Dirty filters | Clean filter (see chapter 6 "Cleaning and maintenance") | |
| Incorrectly inserted filters | Insert filters correctly | |
| Wrong washing programme | Select a more powerful washing programme | |
| The left and right upper crockery baskets are not adjusted to the same height | Adjust the left and right crockery basket to the same height. | |
| Detergent residues in the appliance | Tabs have not dissolved in the short programme | Set a more powerful programme or use powder detergent |
| Detergent is lumpy due to long storage time | Use new detergent product | |
| Water stains on plastic parts | Drop formation cannot be avoided | Topping up rinsing agentIncrease water softening system setting |
| Difficult to remove white coatings on dishes, inside the appliance or on the door | Deposits of detergent ingredients | Change detergent productClean appliance mechanically |
| Water hardness range is incorrectly set | Adjust water softening system to higher water hardnessRefill with regenerating salt | |
| Detergent with multiple functions or biological/ecological detergent used | Change detergent productUse separate agents (dishwasher detergent, regenerating salt, rinsing agent) | |
| Plastic items inside the appliance are discoloured | Normal phenomenon | No impairment of the operation of the appliance |
| Tea or lipstick remains on the dishes | Programme wash temperature is too low | Select programme with higher wash temperature |
| Detergent has too little bleaching effect | Change detergent product | |
| Coloured (blue, yellow, brown) coatings in the interior of the appliance or on stainless steel crockery that are difficult or impossible to remove | Coating is formed by metallic components on silver or aluminium tableware | Clean the appliance mechanically or use a machine cleaner. Coatings are harmless to health. |
| Plastic items are discoloured | Wash temperature is too low | Select programme with higher wash temperature |
| Removable streaks on glasses and cutlery | Signs of excess rinsing agent | Set rinsing agent quantity to a lower level |
| Lack of rinsing agent | Fill with rinsing agent | |
| Difficult to remove white coating on stainless steel, glass | Signs of an excess regenerating salt | Check water hardness setting (see chapter 4.1 "Setting the water hardness") |
| Glasses become dull | Glasses are not dishwasher safe | No remedy possible. Buy dishwasher safe glasses. |
| Rust marks on cutlery | Cutlery is not sufficiently rust-resistant Rusting parts were washed | Use rust-resistant cutlery and do not wash rusting items |
| Cleaner residues in the cleaner container | The detergent was not completely rinsed out due to blocked spray arms | Ensure that spray arms can rotate freely |
| Detergent container was moist when filling the detergent | Only fill the detergent into the dry detergent container | |
| Increased foaming | Spilled rinsing agent | Remove rinsing agent with a cloth |
| Used dishwasher detergent or machine care products form too much foam. | Change detergent product | |
| Noises | Noises during the washing programme are normal. | These noises are caused by the gentle removal of food residues and the opening ofthe detergent container. |
Error messages
| CODES/PROGRAMME DISPLAY | MEANING | POSSIBLE CAUSE AND REMEDY |
| (E1) ECO | Prolonged water supply time | Tap is not properly turned on or water pressure is too low.Water connection tap is scaled.Commission an plumber for checking.Customer service work will be charged in this case. |
| (E3) ECO & POWER | Washing programme temperature is not reached | Heating element is defective.Contact After Sales Service. |
| (E4) INTENSIVE | Flooding | Some parts of the appliance may have leaks.Contact After Sales Service. |
| (Ed) INTENSIVE & ECO | Electronics pcb has failed | Power circuit interrupted.Contact After Sales Service. |
20 Technical data
The technical data can be found on the type plate, enclosed service card and enclosed product fiche.
Call up the product fiche for your appliance online:
Access via https://eprel.ec.europa.eu. Enter the model identifier of your machine to retrieve the product data sheet. You will find the model identifier of your appliance on the type plate.
Alternatively, you can scan the QR code printed on the energy sticker or energy label.
CE Conformity
At the time of its placement on the market, this appliance conforms to the requirements laid down in the Council directives on the approximation of the laws of the Member States relating to electromagnetic compatibility, Directive 2014/30/EU, and relating to the making available on the market of electrical operating equipment designed for use within certain voltage limits, Directive 2014/35/EU.
This appliance bears the CE mark and has a declaration of conformity that can be examined by the responsible market supervisory authorities.
The following spare parts are available from After Sales Service (depending on the appliance):
If installed or required in the appliance, the following spare parts are available for a minimum period of seven years after the last appliance of the model has been placed on the market:
(1) Motors, circulation and drain pumps, heaters and heating elements including heat pumps, piping and associated equipment including hoses
(2) Valves, filters and aquastops, structural and interior parts associated with door components, printed circuit boards, electronic displays, pressure switches, thermostats and sensors, software and firmware, including reset software.
Door hinges and seals, other seals, spray arms, drain filters, crockery baskets and plastic accessories such as cutlery baskets and lids are available for a period of ten years.
For details and more information on After Sales Service and QR codes, see the attached service card.
EGS GmbH
Dieselstraße 1
33397 Rietberg / GERMANY
Enter repair orders online or scan QR code.

A visit by an After Sales Service technician is not free of charge even during the warranty period in the event of incorrect operation or one of the faults described above.
Have repairs to electrical appliances carried out only by a qualified electrician. An incorrectly performed repair can pose dangers for the user and lead to a voiding of warranty claims.
As the buyer of an Exquisit appliance, you are entitled to the statutory warranty under the purchase contract with your dealer. In addition, we grant you a warranty on the following terms:
Warranty period
The warranty period is 24 months from the date of purchase (proof of purchase must be presented). During the first 6 months, defects in the appliance are remedied free of charge, on condition that the appliance is accessible for repairs without any great effort. During the following 18 months, the buyer is obliged to prove that the defect already existed at the time of delivery.
In the case of commercial use (e.g. in hotels, canteens) or joint use by several households, the warranty period is 12 months from the date of purchase (proof of purchase must be presented). During the first 6 months, defects in the appliance are remedied free of charge, on condition that the appliance is accessible for repairs without any great effort. During the following 6 months, the buyer is obliged to prove that the defect already existed at the time of delivery.
The claim under warranty does not prolong the warranty period for either the appliance or for newly installed parts.
Scope of the defect remedy
Within the periods indicated, we will remedy all defects in the appliance that are demonstrably attributable to poor workmanship or material flaws. Replaced parts become our property.
The warranty does not cover:
Normal wear, deliberate or negligent damage, damage resulting from a failure to observe the instruction manual, improper installation and set-up or connection to the wrong mains power supply, damage caused by chemical or electrothermal effects or other abnormal environmental conditions, glass, paintwork or enamel damage and possible differences in colour as well as defective lamps.
Defects in the appliance resulting from transport damage are also not covered. We are also not obliged to perform defect remedies, if – without our express written authorisation – work is carried out on the Exquisit appliance by unauthorised persons or third-party parts have been used. This limitation shall not apply to faultless work carried out by a qualified person using our original parts to adapt the appliance to the technical safety regulations of another EU member state.
Scope
Our warranty applies to appliances purchased in an EU member state and operated in the Federal Republic of Germany or Austria.
For appliances purchased in one EU member state and moved to another EU member state, defect remedies will be carried out within the framework of the national warranty terms. The obligation to provide services under warranty shall apply only as long as the appliance satisfies the technical regulation of the country in which the warranty claim is made.
For repairs outside the warranty period:
- If an appliance is repaired, the repair invoices are payable immediately without deduction.
- If an appliance is inspected or a started repair is not completed, flat-rate travelling expenses and labour costs will be invoiced.
Advice from our After Sales Service centre is free of charge (see chapter "After Sales Service").
exquisit
GGV HANDELGES. MBH & CO. KG
AUGUST-THYSSEN-STR.8
41564 KAARST
GERMANY
GSP56012-030E_DE-EN_E1-1_2023-07.docx


- Inhaltsverzeichnis
- For your safety....35
- Environmental protection and saving energy 37
- Disposing of packaging materials in an environmentally friendly manner......37
- Gerät unterbauen
- Getting to know your appliance\*
- Scope of supply
- Upper basket Lower basket Cutlery basket
- Loading plan for household dishwashers
- Explanation of the safety instructions
- DANGER
- WARNING
- CAUTION
- ATTENTION
- Intended use
- Misuse
- The following activities are considered improper use and are therefore prohibited:
- Safety for certain groups of people
- RISK OF SUFFOCATION!
- RISK OF POISONING!
- RISK OF INJURY!
- Residual risks
- ELECTRIC SHOCK HAZARD!
- Environmental protection and saving energy
- Disposing of packaging materials in an environmentally friendly manner
- Saving energy and water
- Disposing of old appliances
- Old appliances must not be disposed of with household waste
- Setting up and installation
- Preparing the appliance
- Removing transport protection
- Setting up the appliance
- Place the appliance
- Free-standing installation
- Substructure installation
- Substructure the appliance
- Aligning the appliance
- Water connection
- RISK OF DAMAGE!
- Install drinking water connection
- Connecting the supply hose
- Connect the drain hose.
- Hose extension
- Electrical connection
- FIRE HAZARD
- Putting the appliance into operation
- Setting the water hardness
- Filling/topping up regenerating salt
- APPLIANCE DAMAGE!
- Rinsing agent
- Filling/topping up rinsing agent
- Setting the rinsing agent consumption
- Dishwasher detergent
- Filling dishwasher detergent
- Loading dishes and cutlery
- Unsuitable tableware
- Setting the upper basket
- Programme table
- Information about the ECO programme
- Starting the washing programme
- Changing the washing programme
- Interrupting the washing programme
- End of the washing programme
- Switching off the dishwasher
- WATER DAMAGE!
- Emptying the dishwasher
- Cleaning the appliance and interior
- Cleaning the spray arms
- Cleaning the filter
- Cleaning the appliance door
- Frost protection measures
- Decommissioning the appliance
- Allow remaining water to drain from the hose
- Transport
- Technical data
- CE Conformity
- For details and more information on After Sales Service and QR codes, see the attached service card.
- Warranty period
- Scope of the defect remedy
- The warranty does not cover:
- Scope
- For repairs outside the warranty period:
- exquisit
Brand : Exquisit
Model : GSP56012-030E
Category : Dishwasher