
vMix KM-IP8 - Logiciel photo/vidéo JVC - Free user manual and instructions
Find the device manual for free vMix KM-IP8 JVC in PDF.

| Type of product | Live production software (photo/video) |
| Brand | JVC |
| Model | vMix KM-IP8 |
| Supported resolutions | SD, HD, 4K |
| Input sources | HDMI, HD-SDI, SDI, NDI, AVI, WMV, MPEG, MXF, MP4, QuickTime, DVDs, PowerPoint, audio files, photos, web browsers, video calls |
| Output options | Fullscreen, recording, streaming, external output (NDI, SRT, AJA, Blackmagic, BlueFish) |
| Live mixing effects | Cut, fade, zoom, wipe, slide, fly, cross-zoom, cube, merge, stinger, chroma key |
| Audio mixing | Up to 8 independent audio mixes, VST3 plugin support, ASIO multi-channel input |
| Recording formats | AVI, MKV, MP4, FFMPEG, MPEG-2, WMV, DV (SD), MJPEG, MagicYUV, CineForm (HD) |
| Streaming protocols | RTMP, SRT, NDI, MPEG-TS, RTSP |
| System requirements | Windows 10/11, 4 GB RAM (8+ recommended), DirectX 11 graphics card, dual monitor support |
| Additional features | Instant Replay, MultiCorder, PTZ control, scripting (VB.NET), web controller, tally lights |
| Maintenance | Keep software updated, perform regular system backups, scan for malware |
| Safety | Use strong passwords for streaming accounts, secure network connections |
| Repairability / Parts | No physical parts; software updates and technical support available on vMix website |
Frequently Asked Questions - vMix KM-IP8 JVC
User questions about vMix KM-IP8 JVC
0 question about this device. Answer the ones you know or ask your own.
Ask a new question about this device
Download the instructions for your Logiciel photo/vidéo in PDF format for free! Find your manual vMix KM-IP8 - JVC and take your electronic device back in hand. On this page are published all the documents necessary for the use of your device. vMix KM-IP8 by JVC.
USER MANUAL vMix KM-IP8 JVC
Introduction and Features 6
Getting Started 10
Presets 12
New Preset 12
Open Preset 13
Save/Save As Preset 14
Last Preset 14
Preset Bundles 14
Video Controls 16
Fullscreen 17
Transitions 19
Quick Play 19
Cut 19
Fade/Transition Buttons 19
Merge Effect 20
Stinger Transitions 20
FTB (Fade To Black) 22
Production Clocks 23
Categories 25
Fade Bar 29
Pause Inputs 30
Overlays 31
Right Click Menus 33
Cog Icon Menu 34
SlideShow Settings 34
Settings 35
Import/Export/Default 35
Display 35
Outputs / NDI 36
Options 38
Performance 40
Decoders 41
Recording 42
External Output 43
Audio 44
Audio Outputs 45
Web Controller 46
Tally Lights 46
Shortcuts 47
Scripting 47
Alerts 47
About 48
Advanced Settings 48
Inputs 51
Add Input 52
Video 52
DVD 54
vMix User Guide
List 54
Camera 57
NDI / Desktop Capture 58
NDI - Network Device Interface 58
Local Desktop Capture 60
Desktop Capture 61
Stream / SRT 61
SRT 63
Instant Replay 64
Image Sequence / Stinger 64
Video Delay 65
Image 66
Photos 66
PowerPoint 66
Colour 66
Audio 66
Audio Input 66
Title 67
Virtual Set 69
Web Browser 71
Video Call 72
Mix 72
Output 74
Preview 74
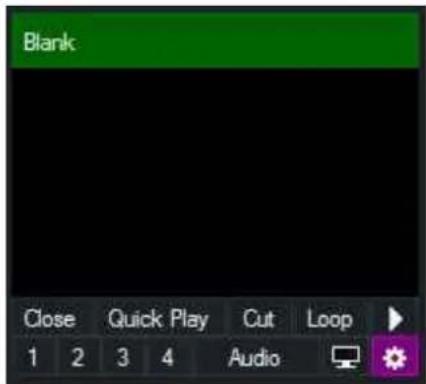
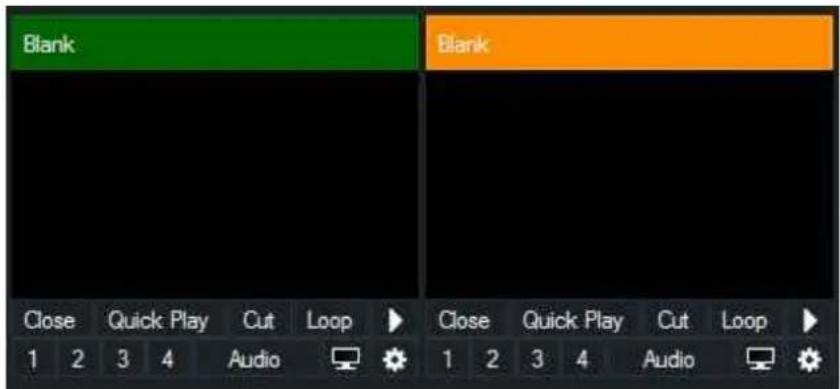
Input Buttons 75
Close 75
Quick Play 75
Cut 75
Loop 75
1,2,3,4 (Overlay) 75
Audio 75
Preview (TV Icon) 75
Settings (Cog Icon) 75
Live Pause 76
Input Settings 77
General 77
Colour Adjust 78
Colour Key 78
Colour Correction 80
Effects 85
Layers / Multi View 86
Position 88
Triggers 89
Tally Lights 91
PTZ 91
Advanced 91
Copy From 91
Audio 93
Audio Mixer 93
Audio Settings 96
Audio Plugins 100
Recording Audio 102
Audio Meters 106
Output Audio Channels 107
Recording 109
Recommended Recording Settings 109
Setup 110
Record 113
Second Recorder 113
Fault Tolerant Recordings 113
vMix Video Codec 114
WAV File Record 115
Live Streaming 116
Getting Started 116
Settings 119
Streaming Quality 121
Multi Bitrate Support 124
Using Multiple Destinations 125
Independent Stream Control 126
LiveLAN 127
Advanced 129
External Output 130
External Output with AJA, Blackmagic or Bluefish444 cards 130
Key and Fill output support 132
Keyboard, MIDI and Controller Shortcuts 134
Controller Options 134
How to add a Shortcut 135
Templates 138
Local and Global Shortcuts 139
Assigning Multiple Functions to a single Shortcut 139
Advanced MIDI Shortcuts 139
Dynamic Input and Value Shortcuts 140
Activators - MIDI Lights and Faders 142
Getting Started 142
Add/Edit Activator 143
Activator Examples 145
vMix Control Surface 148
Web Controller 151
Shortcuts 152
Switcher 153
Tally Lights 153
Title Editor 154
LiveLAN 155
Instant Replay 156
System Requirements 156
Workflow changes since version 23 157
Getting Started 158
Workflow Overview 160
Live and Recorded modes 161
Creating and Editing events 162
vMix User Guide
User Interface Overview 162
Control Options 163
Shortcut Reference 164
PTZ - Pan Tilt Zoom 167
PTZ control using Virtual Inputs 168
PTZ control using the mouse 170
PTZ control using shortcuts and joysticks 171
NDI - Network Device Interface 172
Alpha Channel Support 173
SRT - Secure Reliable Transport 174
Data Sources 178
Types of Data Sources 178
Setting up a new Data Source 179
Mapping a Data Source to a Title 181
Controlling Data Sources 183
Using Images in Data Sources 184
How to create a Google API Key for Google Sheets 184
vMix Call 187
Setting up a Call 187
Call Manager / Chat 189
Audio and Talkback 191
Troubleshooting / FAQ 191
Right click menu settings 193
GT Title Designer 195
vMix Title Designer (Legacy) 197
PlayList 199
MultiCorder 201
Tally Lights 204
Interlaced Support 205
Statistics 207
Snapshot 209
Padlock 210
Scripting and Automation 211
VB.NET Scripting 211
Web Scripting 213
Developer Information 215
HTTP WEB API 215
TCP API 217
Custom XAML 220
Shortcut Function Reference 221
Safe Areas 243
Undo Button 244
Waveform and Vectorscope Monitor 245
Vertical Video Production 249
Introduction and Features
Click here to Download this User Guide as a PDF
vMix is feature rich live production software that allows you to record and stream professional productions all from a single PC or Laptop.
vMix supports SD, HD and 4K productions.
System requirements can be found on the Supported Hardware page on our web site.
http://www.vmix.com/
Below is an overview of the features available in vMix. This User Guide will provide you with some in depth knowledge
of each of these features and enable you to create the best possible production in the least amount of time!
Features
Input Sources
- Video Capture from HDMI, HD-SDI, SDI, Component, S-Video. Composite as supported by source from SD up to 4K
• NDI Network Device Interface Sources
• AVI, WMV, MPEG, MXF, MP4 and QuickTime files
• Virtual Sets - Use live chroma keying to place talent in animated 3D virtual sets - List (load multiple video or audio files as a single input)
• DVDs including menu navigation - CGI Titles - High Quality CGI Titles with customisable text including Headline (lower two-thirds) and ScoreBoard templates
- PowerPoint (static slides only)
• Audio Files (MP3, WAV) - Audio Devices
- Photos
- Remote computer screen capture via Ethernet
- Flash (SWF) and Flash Video (FLV)
• RTSP and TS (Transport Stream) Sources (H264 Video / AAC Audio), Teradek Cube - RTMP Sources
- SRT Sources
- WPF (Xaml)
• Video Delay /Replay - Create a looping delay feed of any camera and save short video clips in real time
• Solid Colour and Colour Bars - Web Browser
• Video Call / Remote Guests
Live Video Mixing Effects
- Cross Fade
- Cut
- 3D Zoom
- Slide Effect
- Wipe Effect
- Cube Effect
- FlyRotate Effect
- Fly Effect
- CrossZoom Effect
- Merge Effect
• Colour Keying and Chroma Keying with Auto Green or Blue Screen - Stinger Transitions
Live Video Filters
- Colour Correction
- Black/White Level Adjustments
• Colour Keying and Chroma Keying (Blue or Green screen) - Luma Key
• Key and Fill sources - Deinterlacing and Sharpen
• Zoom, Rotate, Pan and Crop
Web/Tablet Interface
- Customisable grid of buttons for easy touch screen control of vMix
• Edit titles via any Smart Phone - Turn any Smart Phone into a Tally Light
Multi View
- Combine six inputs (background and five foreground) to create a multi view output in many configurations including split-screen and picture-in-picture.
Overlay
• Overlay any Input with alpha channel transparency as either a full overlay or PIP (Picture In Picture)
• Four Overlay Inputs supported at a time in 4K, HD and SD Editions
PlayList
• Automate playback of multiple inputs with the PlayList feature
- Set start time, duration and transition effect for each item in the PlayList
Output
- Output 4 formats simultaneously (Screen, Recording, External Output, Streaming)
- Default output to secondary computer display or projector
- Output to web sites such as USTREAM and YouTube Live
- Output over NDI - Network Device Interface to other devices on the same network
• Output over SRT - Secure Reliable Transport to other devices over the internet or local network. - Optional output to compatible rendering device such as from AJA, BlueFish and Blackmagic Design
• Output to streaming applications such as the Adobe Flash Media Live Encoder and Skype
Live Streaming
- Built in RTMP live streaming to three providers simultaneously such as Facebook, USTREAM, YouTube Live and more.
Recording
- Live Recording to local hard disk in DV in SD resolutions or the MJPEG, MagicYUV or CineForm Codec for recording in HD (CineForm Codec not included)
• Live Recording in up to 4K in vMix AVI format.
• Live Recording in HD to the Decklink MJPEG Encoder when using Intensity/Decklink cards.
• Live Recording in MPEG-2 Format in Program Stream or Transport Stream in SD or HD.
• Live Recording or Streaming in Windows Media format.
• Live Recording in MP4 in SD, HD or 4K.
• Live Recording in FFMPEG to a number of formats including MPEG-2, MP4 and VC-3
MultiCorder (4K and Pro Editions)
- Record the raw output from multiple capture inputs simultaneously to AVI, MKV, MP4, FFMPEG or MPEG-2.
Instant Replay (4K and Pro Editions)
Audio
- Full Audio Mixer for each input with configurable Master Audio Meter.
• Audio can be included with Video Recording using any available audio capture sources. - vMix Audio device available for easy audio recording with 3rd party applications
- Up to eight independent Audio Mixes can be created and sent out to Windows and ASIO compatible devices
• Support for multi-channel audio inputs from ASIO devices
• Supports VST3 audio plugins for flexible audio processing across all audio sources and output buses.
PTZ - Pan Tilt Zoom camera control
Video Call / Remote Guests
- vMix Call allows you to add remote guests to your vMix production with high quality audio and up to HD video.
Delay
- vMix introduces approximately 2 frames of delay between input and output. This is similar in performance to standard HD switchers. Other factors that will influence delay include delays in video cameras and video capture hardware and delays causing by video scaling of the output (such as by a projector)
Shortcuts and Macros
- Custom shortcuts to do everything from transitions to changing Title text
- An unlimited number of functions can be assigned to Keyboard, MIDI, Control Surface, X-Keys and ShuttlePROv2 buttons, faders and knobs.
Activators
- Setup lights and faders in MIDI and X-Keys controllers to respond to changes in vMix
Scripting (4K and Pro Editions)
- Create advanced code in VB.NET and assign it to a Shortcut
Data Sources
Languages
• Support for multiple translations such as Spanish and Korean from Google Translate
Getting Started
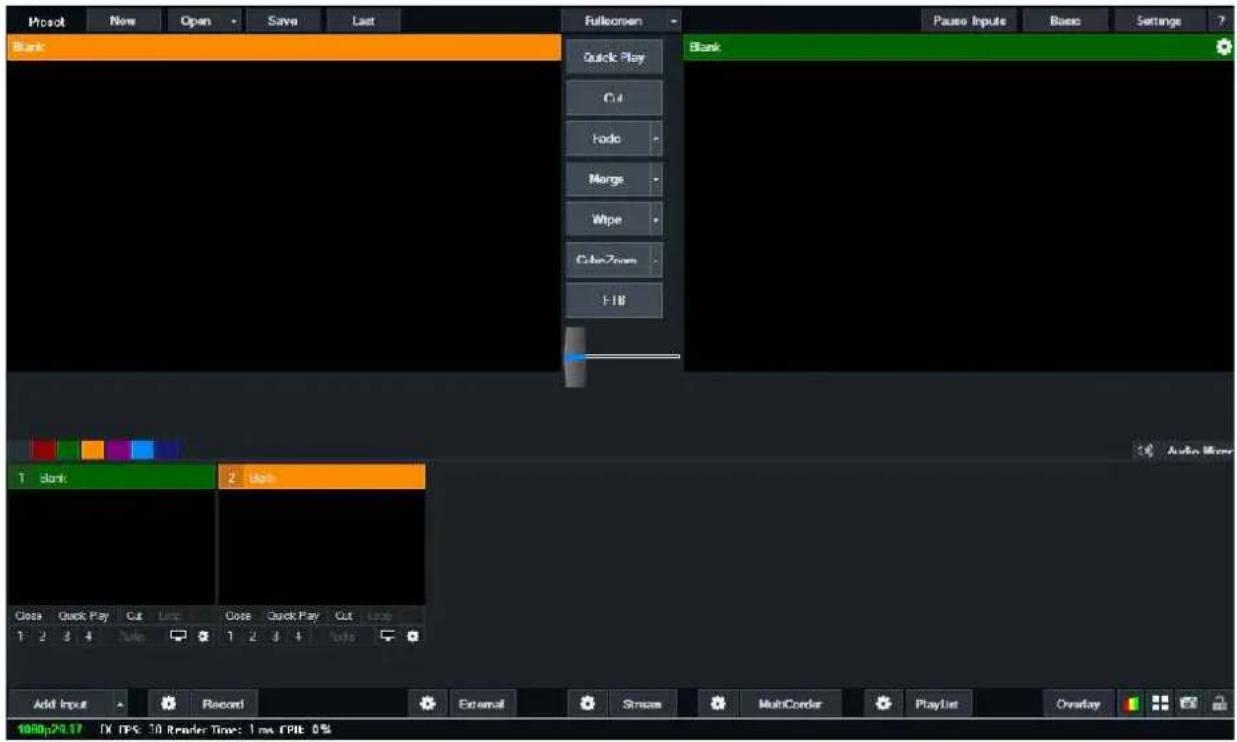
A screenshot of the vMix user interface below.
This main window is where all the video mixing takes place.
If you have used traditional video switchers before, the main window might look familiar.
There are four main elements:
1. Output Window
(Top-Right hand corner with the Green Title Bar)
This is the Live or Program video output window. This output is also displayed in a Fullscreen window that defaults to the computer's secondary display.
This output is also what is used when setting up a recording.
2. Preview Window
(Top-Left hand corner with the Orange Title Bar)
Just like a traditional video mixer, an input you wish to display should be placed in this preview window first. The Preview Window swaps with the Output Window whenever you select the Cut, Fade or Transition buttons, located along the center.
3. Tabs

Colour coded tabs on the left hand side can be used to organise Inputs into categories and tabs on the right hand side can be used to dock features such as the Audio Mixer and Instant Replay Controller
3. Input Bar
(Bottom row)
Each source such as Camera, Video and all other types of Inputs are loaded into this Input Bar. A small real-time preview window is shown for each of these inputs.
If you click any of these items they will be queued in the Preview Window ready to go.
If you double click any of these items the Input Settings window will be displayed.
Multiple rows of inputs can also be displayed at a time. See Inputs to find out more.
4. Footer Bar
(Bottom)
Along the bottom are buttons to Add Input and buttons to configure and start features such as Recordings, Streams and External Output.
vMix User Guide
Presets
| Preset | New | Open | Save | Save As | Last |
The Preset bar at the top left hand corner of vMix is where you can quickly save your production, including Inputs, recording and streaming settings to file.
This Preset can then be recalled again at a moments notice.
Each Preset contains the following information:
- Each input and it's associated input settings (including positions, colour adjustments, chroma key, multiview etc)
- Recording settings
- Overlay settings
• Any shortcut keys assigned as local
• Any activators assigned as local
• Audio settings for each input and all three audio buses (Master, A and B) - All PlayLists, including the active PlayList if applicable
• Category labels and settings - Streaming settings. All existing streaming profiles and settings will be replaced with the settings from when the Preset was last saved
- External Output settings including Size, Frame Rate and Device, as per corresponding tab in Settings
- Outputs configuration (for example if MultiView is selected for Fullscreen) as per corresponding tab in Settings
• Data Sources and related settings
In addition to the above, if the Preset was saved with a different Master Frame Rate or Output Size then what is currently configured (1920x1080 29.97p for example) then a message will appear asking to confirm these changes.
Any media used by inputs including Videos, Images, Photos, Title templates etc will be referred to by filename only.
So if the Preset is used on a different system, be sure to copy any media assets and place them in the same folder locations.
The exception to this is the special vMix Preset Bundle file which is described in more detail in the Preset Bundle section.
All other settings can be saved and recalled from the Settings Import/Export buttons
NOTE: In the Open Preset window, the Append button will add the selected inputs only, ignoring all other settings.
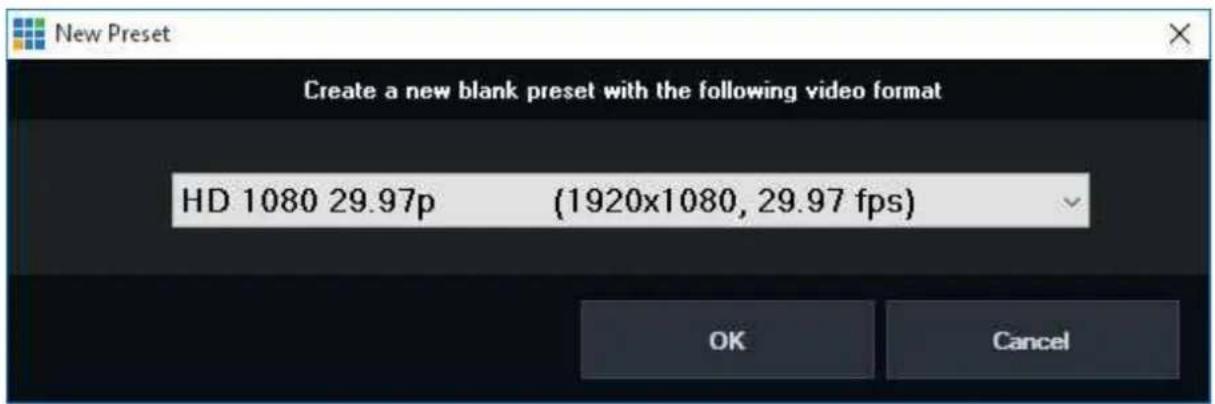
New Preset
Creates a new blank Preset and optionally changes the current output video format.
Open Preset
Open Preset opens up a file open dialog where you can select an existing Preset.
Once a Preset has been selected the Open Preset window will appear.
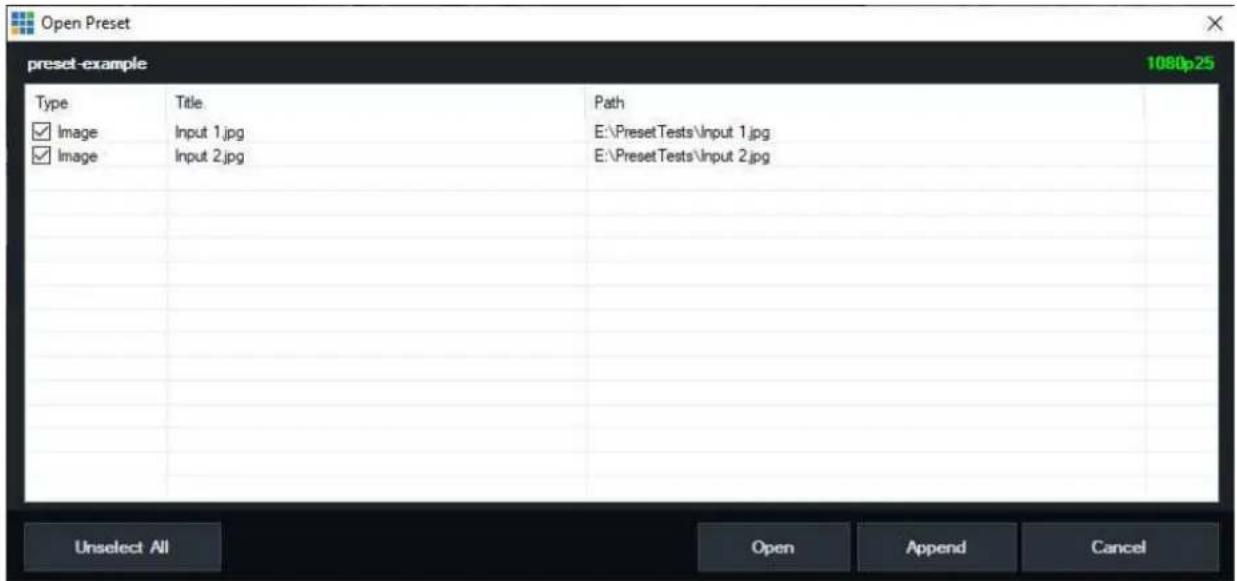
Click Open to close all open inputs and replace them with this Preset.
Any settings included with the Preset will also be applied (See here for more information)
Click Append to add the inputs in this Preset to the existing session.
Any settings included with the Preset will be ignored.
Each input can be unticked if you want to exclude it from being added
Missing Files
If a preset is opened with one or more files missing, the following will appear:
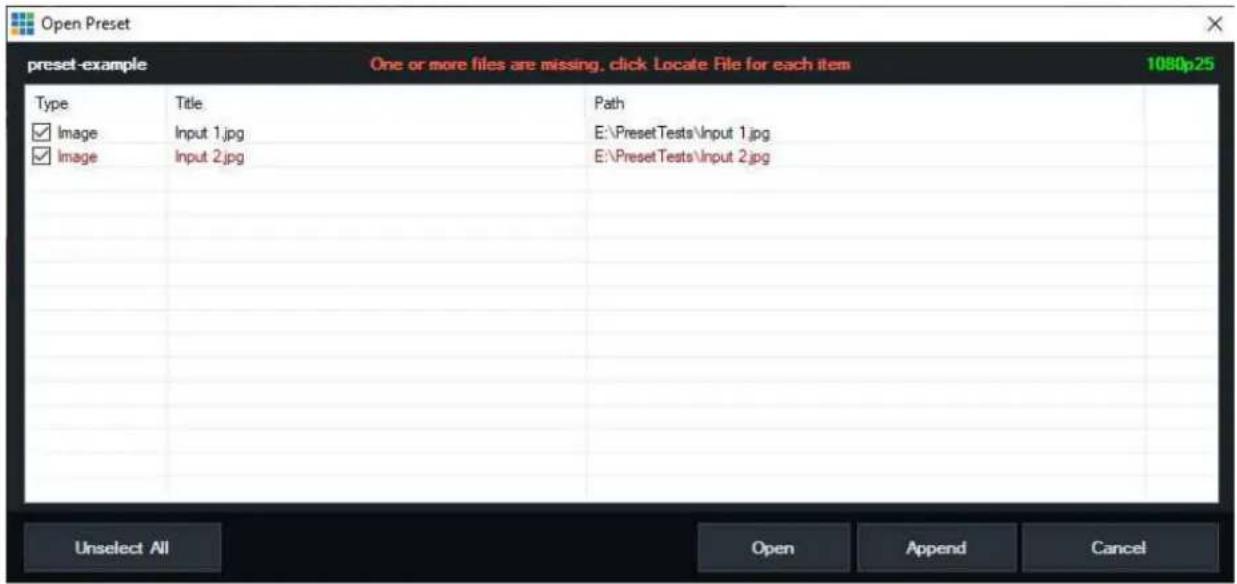
High light each item in red and a Locate File button will appear. Click this button to browser for the file. If the file cannot be found, it will be added to vMix in offline mode and can't be used until the file is located manually by right clicking the input and selecting Change.
Recent Presets
Quickly open a recent preset by clicking the arrow button next to the Open button.

Save/Save As Preset
Click Save to immediately overwrite the currently open preset with the latest settings and inputs. Save As can be used to save the current settings into a new separate file.
Last Preset
Periodically, vMix automatically saves the current Preset to a separate file. Click Last to load this Preset
Preset Bundles
A Preset Bundle can be saved by clicking the arrow next to the Save As button and selecting Save As Bundle.

This creates a .vmixZip file that bundles most of the files needed by the preset into a single file including:
- Video files
- Audio files
- Images
- Photos
-
PowerPoint
-
Titles (.gtzip files)
- Image Sequences
Note that due to the large file sizes, replay files are not included in a preset bundle.
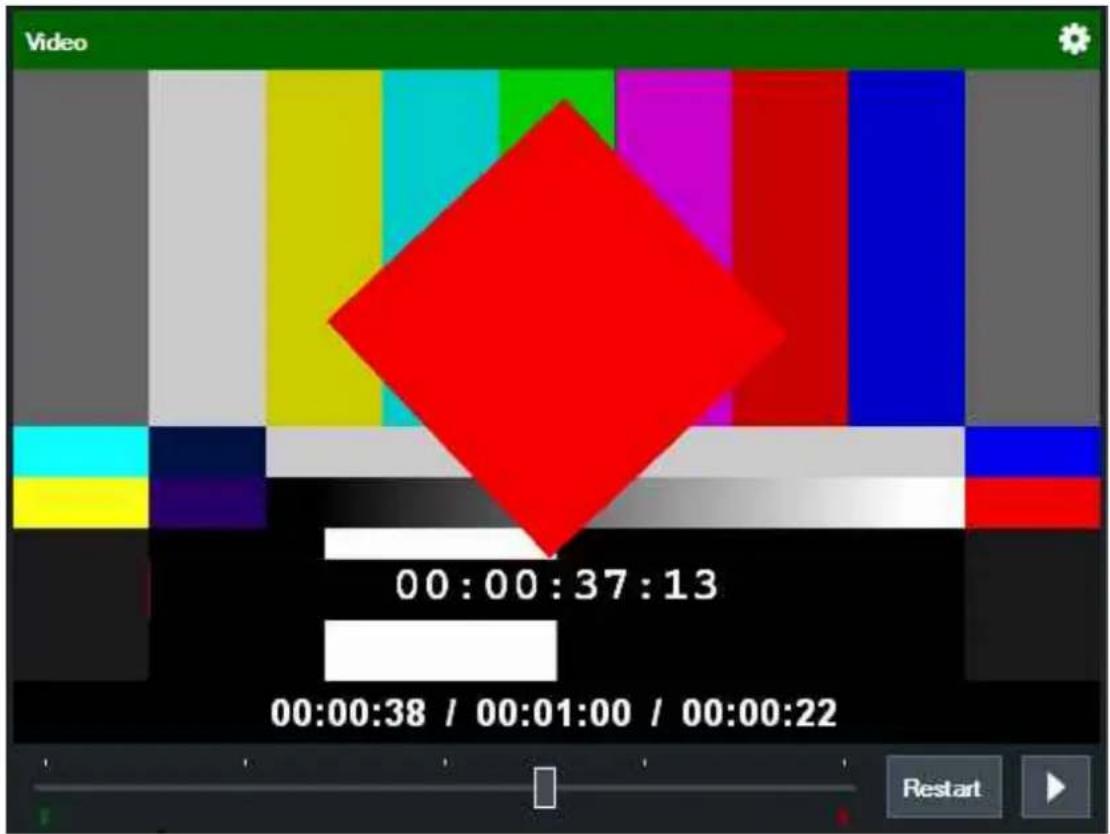
Video Controls
The Preview Window and Output Window have various video controls available:
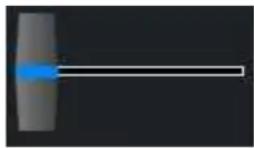
Position Control
For non-live inputs (such as Video and DVD) the position control allows you to skip to any point.
Restart Button
Restarts a non-live input (such as Video or DVD) from the beginning.
Play/Pause Button
Fullscreen
The Fullscreen button can be used to display video through one of the video outputs on your computer Graphics Card.
These can be connected to displays such as Monitors, Projectors and TVs.

First, connect these displays to your computer prior to opening vMix and make sure they are configured as "Extend these displays" in the Screen Resolution control panel in Windows.
See Windows 10 Display Instructions on the Microsoft web site for further instructions.
Second, select the display from Settings under the Display tab as shown below:
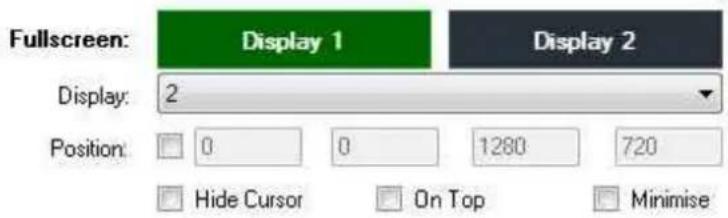

By default the Fullscreen will display the final mixed output of vMix. Click the arrow to the right of the Fullscreen button to select a different output option:
Output
The final mixed output of vMix, this is also shown on the right hand side of vMix.
Preview
Display the input currently selected in the "Preview" area of vMix (left hand side).
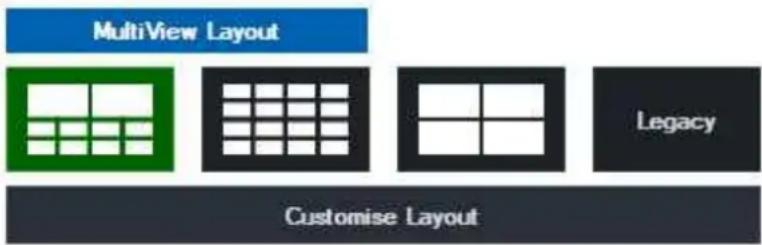
MultiView
Display Preview, Output and 8 or more Inputs in one of the configurations below. All configurations with the exception of Legacy include audio meters and titles.
Preview / Output + 8 Inputs

Preview / Output + 14 Inputs
Preview / Output + 2 Inputs

Legacy
Preview / Output + 8 Inputs without titles and audio meters.
The Preview and Output inputs will be identified by a coloured border.
Input X
Display the input at position X
Multiple Outputs
vMix 4K supports up to two Fullscreen outputs.
The second Fullscreen output is available on graphics cards that support three simultaneous displays.
Transitions
Quick Play
Cut
Fade / Transition Buttons
Merge Effect
Stinger Transitions
FTB (Fade To Black)
Quick Play
The Quick Play button automatically transitions the Preview Window to the Output Window and for video inputs, starts playing input from current position.
There is also a Quick Play button for each input.
By default Quick Play is set to a half second fade. This can be customised in Settings - Options
Cut

The Cut button instantly swaps the Preview Window with the Output Window without any delay or transition effect.
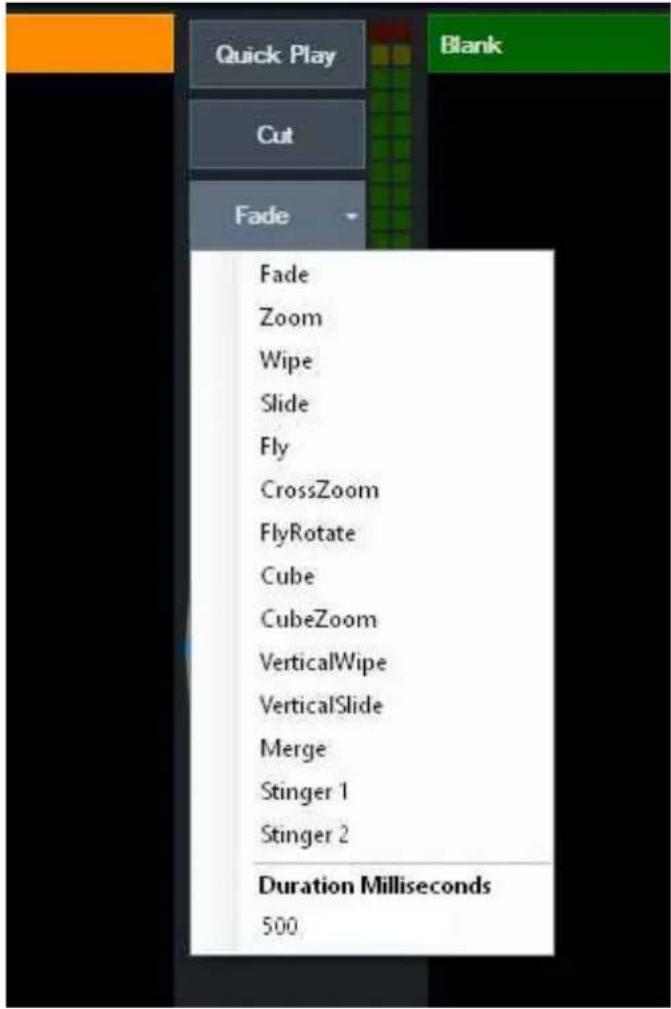
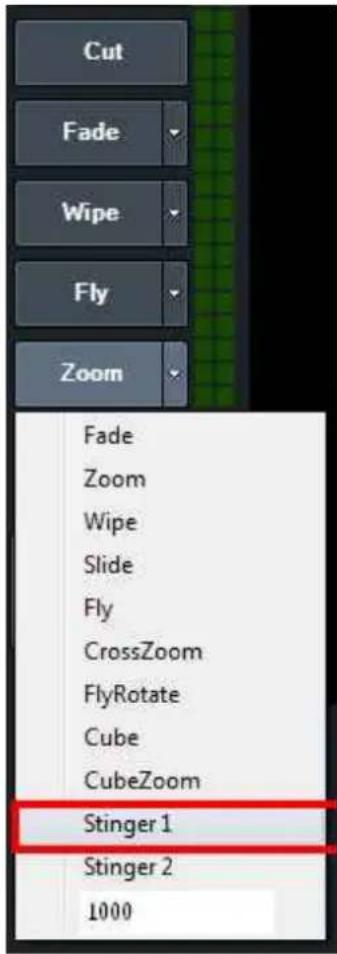
Fade/Transition Buttons
vMix provides four customisable buttons that can be used to set the transition effect when switching from Preview to Output
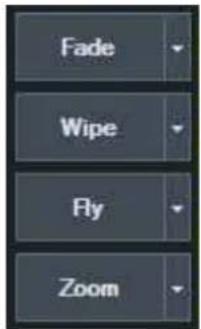
Click the arrow next to each button to customise the transition effect and the duration.
The Stinger 1 and Stinger 2 can be configured in the Overlay settings. See Stinger Transitions
The first effect button also determines the transition used by the Fade Bar / T-Bar.
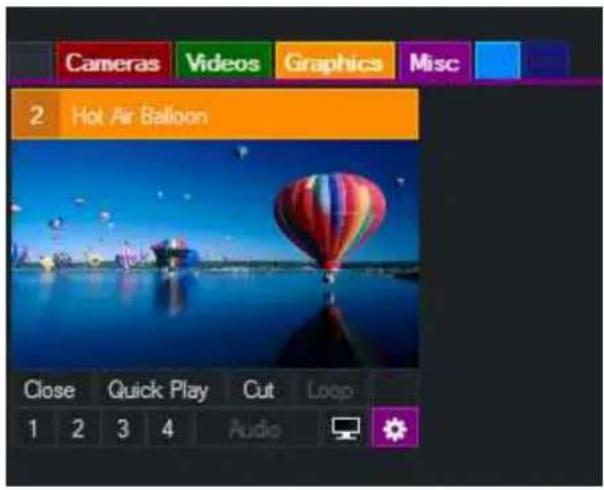
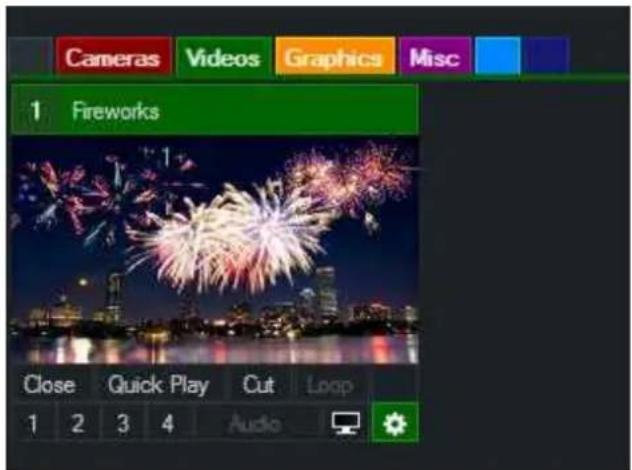
Merge Effect
The Merge effect is a unique transition effect that seamlessly animates matching Inputs between Preview and Output.

In the above example, clicking the Merge transition will zoom the fireworks graphic out of the double box until it fills the screen.
Any other layers or inputs that do not appear in both Preview and Output will transition using the Fade transition effect.
Stinger Transitions
Note: Stinger Transitions are only supported on vMix editions with more than one Overlay channel
such as vMix HD.
Stinger Transitions allow the use of an animation instead of a fade or cut when transition between Preview and Output.
Configuration
- Add the animation you wish to use as an Input. The Image Sequence option is recommended as it supports high quality animations with full alpha transparency.
- In the Overlay settings window, select Stinger 1 from the Number dropdown box.
- Configure the following settings:
Effect: This specifies an additional effect when transitioning to and from the stinger transition. In most cases this will be set to Cut
Duration: Specify the total duration of the animation in milliseconds or frames. This will usually be the length of the animation.
Stinger Input: Select the Input added in step 1
Stinger Cut Point: Specify the point in time when the transition will cut between the Preview and Output inputs. If your animation has alpha channel, this will usually be the point where the animation covers the entire screen.
Display underneath overlays: Tick this box if the stinger transition should appear underneath any overlays (1-4) currently on screen.
- Once all your settings have been configured click OK.
Using the Stinger Transition
In the main window, select Stinger 1 as one of the four transition buttons in the middle of the screen.
When the stinger transition is required, simply click the transition button as you would any other effect
FTB (Fade To Black)
Fade to black the following:
- Recordings
- External Output
- Fullscreen
The Output window will not be affected by the Fade to black in order to make it easier to queue up a source for later.
Production Clocks
Getting Started
Two production clocks are available which can be enabled by ticking the Production Clocks checkbox in Settings -> Options
A 1920x1080 display or higher is recommended, as the Production Clocks will be hidden if there is no space available below the T-Bar.
Other elements above the Production Clocks can be disabled from Settings -> Options as well in order to free up space.
Overview
Two production clocks can be configured to independently display two of the following options:
Clock: The current time with an optional hour offset to show a different time zone.
Event: The remaining time before, during and after predetermined event times.
Recording: The total duration so far of any active recording.
Streaming: The total duration so far of any active streams.
Settings
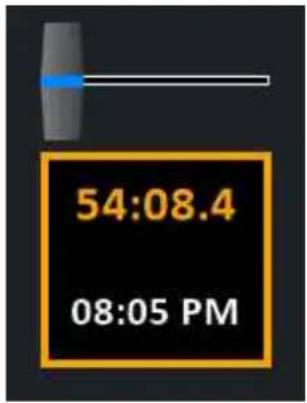
Double click the Production Clocks display below the T-Bar to open the Settings window.
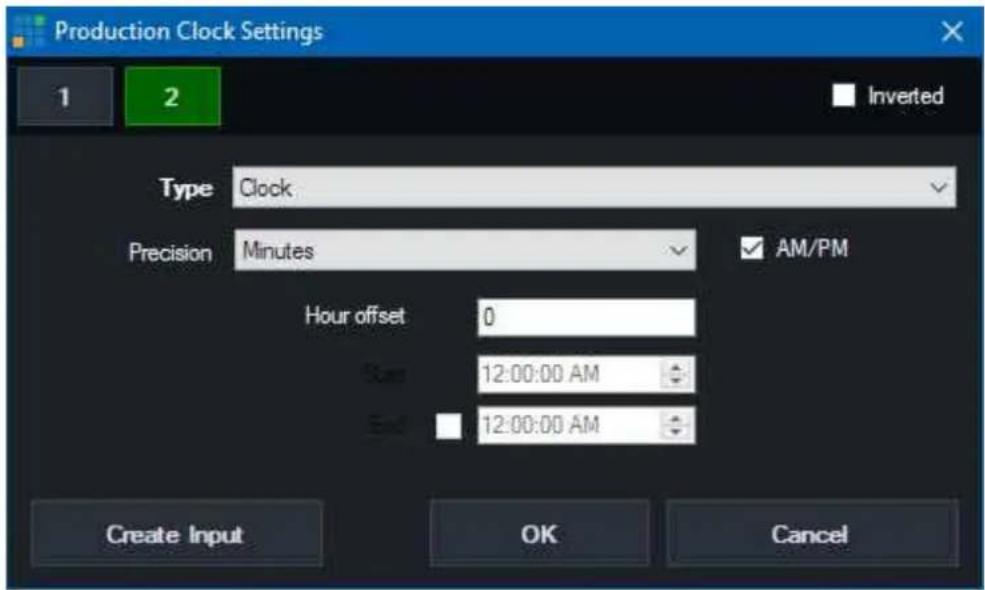
The two clocks available can be configured from the 1 and 2 buttons which represent the Top and Bottom clocks on the display respectively.
Inverted: By default the display will have a black background. Click the Inverted button to switch this to white.
Type: Select the type of time to display out of Clock, Event, Recording and Streaming.
Precision: Determine how accurate the time is that is displayed out of Minutes, Seconds and Fractions. The font size will automatically decrease at higher accuracies so the entire time will still be displayed, so if a bigger font is desirable select Minutes here.
Clock Settings
Hour offset: Select an offset, positive or negative in hours, to add to the current system time before display. AM/PM: Tick to show the time in 12 hour format with AM or PM next to the time on the display, otherwise display in 24 hour format.
Event Settings
Start/End: Select a start time and optionally an end time for the event.
Before the Start time, the clock will show a countdown in amber.
With End Time
During the event, the clock will show a green countdown. After the End Time, the clock will show a red of the duration since the event ended.
Without End Time
After the Start time, the clock will show a green duration.
Create Input
Create Input will create a high resolution version of the clocks as a standard vMix input, allowing it to be displayed on the MultiView Output or on outputs such as Fullscreen.
If the "Cameras / Calls / Audio Inputs" tickbox is enabled in Settings -> Outputs / NDI this input will also be available via NDI for display anywhere on the local network.
Note: Only one Production Clocks input can be created at a time.
Categories
Inputs can be placed into up to six (6) built-in colour coded categories and up to sixteen (16) custom categories.
These categories can be selected from the left hand side of the Inputs Row

The six built-in categories are RED, GREEN, ORANGE, PURPLE, AQUA and BLUE Each colour has no special significance and can be used for any purpose that suits your production. For example, Titles could be placed in the PURPLE category and Video Clips in the ORANGE category.
The additional custom categories will appear when enabled from the Input Categories settings window which is described below.
Input Categories Settings
Categories can be edited and text labels provided by right clicking any category button so the Input Categories window appears.
vMix User Guide
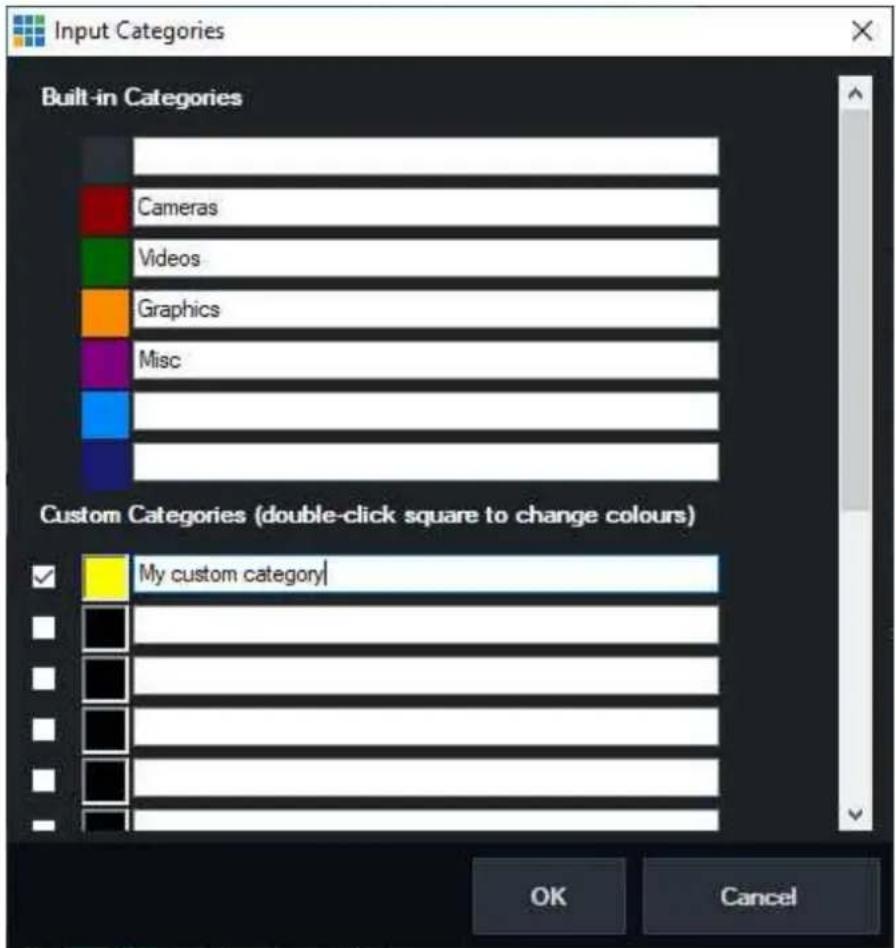
Labels can be given to any of the built-in or custom categories.
To enable a custom category, tick the box next to it. To select the colour for a custom category, double click the colour box next to the checkbox.
Once the categories have been edited as required, click OK and the buttons will change as follows:
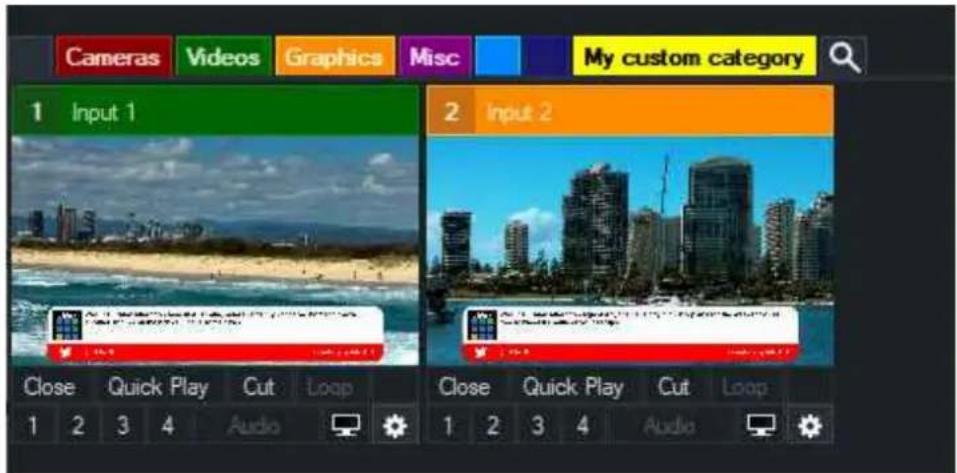
View All Inputs
All inputs can be viewed at any time by clicking the left most button. This button is GREY under the default vMix theme.
Search
The last button on the right is a special search category. When selected it will prompt for a search query.
Only input titles that match the search query will be displayed in this category.
To change the search query, simply select the category button again.
Currently Selected Category
The currently selected category will be indicated by a matching coloured separating line between the category buttons and the inputs as shown below.
Changing An Input's Category
There are two ways to change an Input's category:
- Drag and drop the inputs preview window (the video thumbnail square, not the title) over the top of the category button you wish to assign it to.
- Select the Category from the Input Settings window.
When an Input has been assigned to a particular category, the Input Settings button will be changed to a matching colour.
vMix User Guide
Fade Bar
The Fade Bar (also known as a T-Bar) just below the FTB button allows you to manually transition from the Preview Window and the Output Window.
The transition effect used is taken from the first Transition button. See Fade/Transition Buttons
Pause Inputs
Pauses all currently playing Inputs
Overlays
The Overlay feature allows you to display an Input on top of the currently displayed Input. An Overlay can be activated by clicking the Overlay (1,2,3,4) buttons from the Input Bar.
Alpha Channel and Colour Keys
If the Input contains an alpha channel. (for example a PNG image with a transparent background) then it will be taken into account when displaying the overlay. A Colour Key can also be set for an Input from the Input Settings. When set, the selected colour will display as transparent.
Overlay Settings
The Overlay Settings window specifies how an Overlay will display.
The window can be accessed by clicking the Overlay button in the bottom right hand corner of the main window.
Number
Select the overlay channel to configure. 4 Channels are supported in the SD and HD editions.
Type
There are two types of overlay available:
Fullscreen
Display on top of the currently selected Input.
Picture In Picture
Display on top of the currently selected Input using the specified Pan and Zoom settings.. The blue box will display a preview of what the Picture In Picture will look like.
Effect
Specify the transition effect to use when the Overlay is activated.
Animated transition effects will run forward when the overlay is activated and run in reverse when the overlay is closed.
Effect Duration
Specify how long the effect should last, in milliseconds.
Duration
Specify how long the overlay should appear before automatically closing. Set this to 0 to disable automatic closing.
Stinger Cut Point / Stinger Input
See Stinger Transitions
Border
vMix User Guide
A custom border can be specified for Picture In Picture overlays.
Colour: Double click the colour box to set the border colour.
Thickness: Specify how large the border will appear
Radius: Specify how rounded the corners of the border will appear. Set to 0 for square borders.
Right Click Menus
Different types of Inputs provide a right click menu to quickly access advanced settings associated with a particular input type.
The following is a list of some of the right click menus available
Video
Show/Hide Playback Speed: Displays a dropdown box next to the input to control the speed of video playback in real time.
Pictures/PowerPoint
SlideShow Settings: Shows the SlideShow settings window.
DVD
DVD Menu, Next Chapter, Previous Chapter, Jump To Title
NDI / Desktop Capture
Change the NDI or desktop capture source on the fly using the right click menu
Titles
Title Editor: Show the Title Editor window.
Title Presets: The Titles right click menu will also show title presets if they have been configured.
List
Select a video or audio file to jump to in the List.
See List for more information.
Capture/Flash
Reset: Resets the input to the settings when it was first added.
Web Browser
Go Back / Go Forward
Properties: Displays a window to change the web site URL.
Cog Icon Menu
The cog icon underneath each input can be right clicked to access some commonly used tasks:
Create Virtual Input
See the Create Virtual Input section of Input Settings - General
Create Snapshot
See Snapshot section of this help file.
SlideShow Settings
The SlideShow Settings window is available for Photos and PowerPoint inputs from a right-click menu.
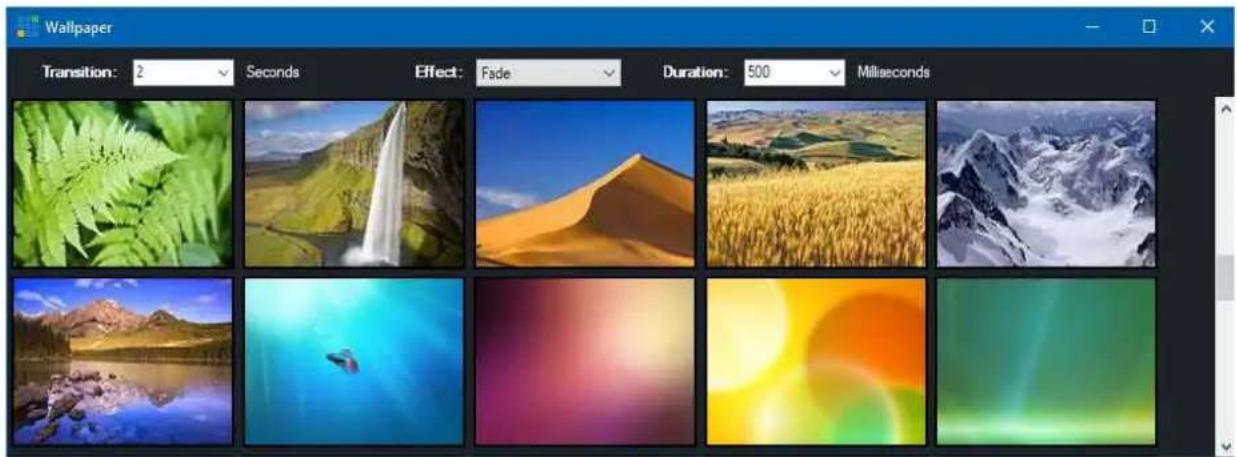
This window can be resized and placed on a separate screen if required.
Settings
The Settings window provides options within the following categories:
Import/Export
Display
Outputs
Options
Performance
Decoders
Recording
External Output
Audio
Audio Outputs
Web Controller
Tally Lights
Shortcuts
Scripting
About
Import/Export/Default
Import
Import all settings from file. This includes all settings configurable from the Settings window.
Export
Export all settings to file. These settings can be imported from any other vMix installation as long as the version is the same.
Default
Restores settings to when vMix was first installed.
Display
Theme
There are multiple themes available that change the colour scheme of the user interface.
Preview/Output Colour
Customise the colour to display for the input currently set as Preview or Output.
Master Frame Rate
All inputs will be converted to this Frame Rate. This should be set to match the frame rate of the Video Camera sources where possible.
Output Size
This is the master resolution all inputs are scaled to prior to being sent to Fullscreen, Recording, External Output or Streaming.
Output Aspect Ratio
Set the Aspect Ratio of the output display. For example, if you have a widescreen monitor or projector set this to Widescreen.
Fullscreen
Display
Screen number to output Fullscreen to. By default this is set to the secondary display.
The numbering in vMix is defined as follows and may differ from the display numbering in Windows:
1 Always the primary display with the Windows desktop.
2-4 Secondary displays in order of their location on the Windows desktop, left to right, top to bottom.
Note: All monitors on the computer must be connected to the same Graphics Card. Multiple Graphics Cards are not supported.
Two output screens are supported in vMix 4K and can be configured here by clicking the Fullscreen 1 or Fullscreen 2 buttons.
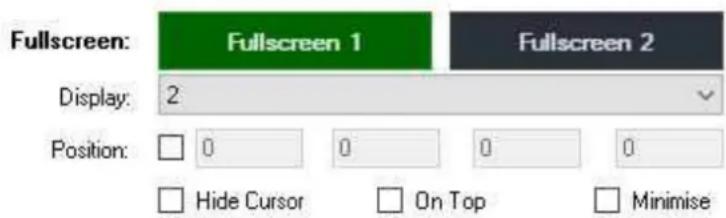
Position
By default the Output Screen will be set to fill the entire screen. Output Position can be used to set a custom size if necessary.
The four boxes are Top, Left, Width and Height.
Hide Cursor: Hide cursor from Fullscreen window.
On Top: Fullscreen window will always be on top of other windows if displayed on a different display. If displayed on the same display as vMix this option will have no effect.
Minimise: Minimise Fullscreen window when vMix is minimised.
Input Size
Size of the Input previews. If you have a large screen this can be increased to be able to see each input more clearly.
Outputs / NDI
vMix supports a number of independently controllable outputs depending on the edition.
vMix 4K and higher supports 2x Fullscreen and 4x External outputs with all other editions supporting 1x Fullscreen and 1x External output.
Outputs can be configured show a different source out of the options described on the Fullscreen help page.
For example the Fullscreen output can be configured to show the MultiView Output without affecting what is sent to the Recording or Stream.
Outputs can be sent to Video Call, Instant Replay, SRT and NDI, for more information refer to the relevant topic for each feature.
Fullscreen 1 and 2
These outputs control the computer Display outputs configured under the Display tab and are only available from the output ports on the Graphics Card.
Output 1
This is the primary output in vMix, also known as "Program". This is the Output that is used by the Recording, Stream and External 1.
Output 2
This is the secondary output in vMix which is also shared with the External 2 output. Any changes to the source here will affect what is seen on the External 2 output as well.
Output 3, 4
These additional outputs are available for use with Video Call, Instant Replay, SRT and NDI only.
Cameras / Calls / Audio Inputs
This option can be enabled to automatically convert any cameras, calls and audio inputs in the current vMix session into live NDI outputs. See the NDI section for more information.
Audio Outputs
This option can be enabled to convert all enabled audio buses under the Audio Outputs tab into live audio-only NDI outputs. See the NDI section for more information.
Overlays
If the Source option set to "Output" the Overlay check boxes can be used to customise which overlays are displayed on that particular Output. For example a "clean feed" can be set for the recording with all overlays turned off, while all the overlays can be retained on Fullscreen.
MultiView
flowchart
graph TD
    A["MultiView Layout"] --> B["Grid Layout"]
    B --> C["Grid Layout"]
    C --> D["Grid Layout"]
    D --> E["Legacy"]
    F["Customise Layout"]
MultiView - Customise Layout
Click Customise Layout to change the order inputs appear in the MultiView monitor. The order of inputs can be changed according to their number.
Additionally they can be ordered by type.
In the example below the first two cameras in a production will be shown in the first two MultiView input slots regardless of where those cameras actually appear in your production.
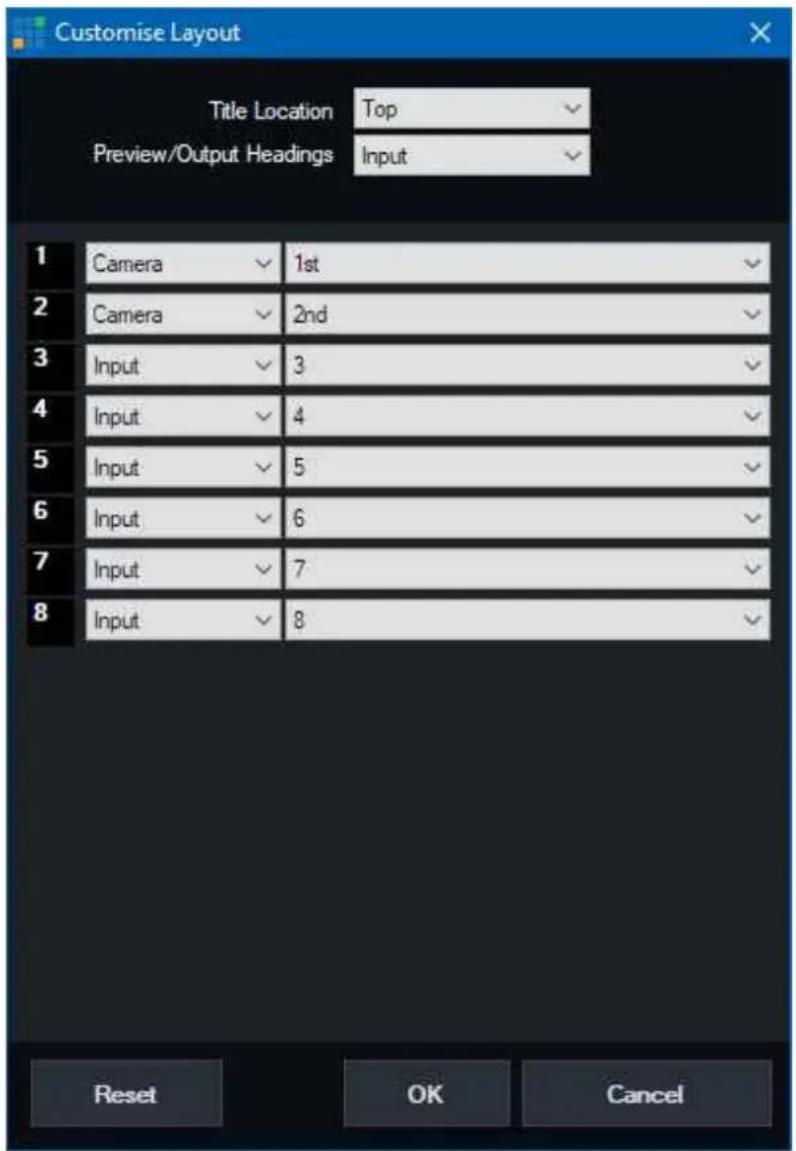
Title Location
The headings for each item in the MultiView can be placed either above or below the preview.
Preview/Output Headings
The headings on the Preview/Output windows is set to display "Preview" and "Output" by default but can be changed
here to display the actual input title.
Options
Select the language vMix will use for buttons, labels and messages.
These languages are provided by Google Translate and are not guaranteed to be accurate.
Start in Advanced mode
Automatically clicks the Advanced button on startup.
Start Fullscreen display
Ticking this open will automatically display the Fullscreen window on startup.
Start Maximised
Start External Output
Automatically start the External Output according to the settings under the External Output tab
Start SRT Output
When starting up vMix without a preset, any configured SRT outputs will be left in a disabled (stopped) status.
If you would like any enabled SRT outputs to always start, even when a preset has not yet been loaded, tick this box.
Remember Window Position
If the main vMix window is not maximised, this checkbox will remember the position this window and restore its position each time vMix is opened.
Display confirmation for ...
Checking this box will display a confirmation box before stopping certain tasks such as recording.
Automatically Play Active Input with Transition
If the input is a video clip it will be automatically started when a transition begins.
If the input is a title, the TransitionIn animation will play as the transition in.
When this is disabled, the title will use the standard Overlay transition instead.
Automatically Restart Active Input with Transition
If the input is a video clip it will be restarted automatically when a transition begins.
Automatically Pause Preview Input after Transition
If the input is a video clip it will be automatically paused when a transition to another input ends.
If this input is a title, the TransitionOut animation will play when the Overlay is turned off.
When this is disabled, the title will use the standard Overlay transition instead.
Transition Display
This option allows turning off the Quick Play, Transitions 2-4, FTB, Overlay, T-Bar and Production Clocks from the main interface in order
to free up space. Production Clocks is turned off by default.
QuickPlay Transition
Customise the transition used when the Quick Play button is pressed.
QuickPlay Duration
Customise how long the QuickPlay transition lasts in milliseconds (default 500 milliseconds)
Activate QuickPlay by clicking Preview Window
Controller Plug And Play Enabled
When ticked, vMix supports detecting when MIDI and X-Keys controllers are plugged in / unplugged while vMix is running.
Save Data Sources in Global Settings
This saves and loads any data sources currently in vMix as global settings which will load up again each time vMix is opened.
When unchecked, vMix will start up with empty data sources each time, only loading data sources when opened as part of a previously saved preset.
Performance
Graphics Adapter
This displays the graphics card vMix is using systems with multiple graphics cards installed.
For best performance this should match the graphics card that monitor displaying the vMix interface is attached to.
For laptops with hybrid graphics (also known as NVIDIA Optimus), the graphics card shown here can only be changed from the NVIDIA control panel. It cannot be selected or changed from within vMix directly.
Low Latency Capture
This will reduce the latency of Camera inputs by approximately one frame.
This will substantially increase the load on the graphics card and may lead to dropped frames under heavy load, so it should used with caution.
High Input Performance Mode
If you plan on using a large number of cameras (typically > 8) and a large number of inputs, performance can be improved by ticking this checkbox.
Note that this only works on graphics cards with a large amount of built in memory (3GB+) and will result in poor performance if enabled on graphics cards with less memory, or Intel graphics.
Show preview thumbnails when browsing NDI sources
By default, thumbnails of NDI sources on the network will generate periodically while vMix is running.
This is via a background application called vMixNDIHelper. This may consume small amounts of CPU and network bandwidth while in progress
and can be disabled by unchecking this box if you have a large number of NDI sources on the network.
Disable Windows Update while vMix is running
Windows Update may automatically install updates to the computer in the background at any time.
This option will disable Windows Update while vMix is running in order to avoid any potential performance drops as a result of windows installing updates during a production.
Display Method
This option selects the method by which vMix presents video to the computer display (both for
Preview/Output windows and the Fullscreen outputs).
Note that these options do not impact the recording / stream / external outputs in any way, and only apply to the outputs on the graphics card.
Auto Let vMix select the best option based on the current settings. This will usually be the same as selecting Low Latency for frame rates less than 30 and Smooth otherwise.
Low Latency Displays video as fast as possible to the computer display to ensure the lowest possibly latency. Video playback may be less than smooth as a result.
Smooth vMix will make every effort to ensure the video playback is as smooth as possible on the display but may add a couple of frames of delay as a result.
Legacy Use the display method employed by vMix 20 and earlier.
Decoders
Preferred Deinterlacing
Select the preferred deinterlacing method, when using Progressive output formats in vMix.
For example, if you have a camera set to 59.94i and the Master Frame Rate is set to 29.97p, then vMix will deinterlace the camera according to the settings here.
Blend: Blends the two fields together to form a single progressive frame. Motion blur may be seen on fast movement.
Discard: Uses the first field for each frame and discards the second. No motion blur during fast movement, lower vertical resolution than Blend.
FFMPEG
Select the file formats that will be played using the built in FFMPEG decoder.
QuickTime files and MXF files are enabled by default.
Note: This option is only available under the 64bit version of vMix.
DirectShow
Select custom decoders to be used for various video formats. It is recommended that these be set to Auto.
MPEG 2 Video
Select a custom MPEG 2 codec to use when playing DVDs and MPG files.
Use vMix Deinterlacing
Tick this box to automatically set deinterlacing in vMix for DVD/MPG sources.
Set this option only if the selected MPEG 2 codec does not support deinterlacing. (such as the codec included with Windows 7)
MPEG Audio
Select a custom MPEG audio codec to use when playing DVDs and MPG files.
x264 Video
Select a custom video codec to use when playing x264, (h264) sources.
Filters - Blocked Filter List
This feature can be used to enable/disable problematic directshow filters from use within vMix. By default ffdshow is disabled.
Recording
Default Folder for Recordings
Select a default folder to use when storing recorded videos.
Filename Format
The filename format is for advanced users that need to change the way video recordings are named.
The default is 0 - 1:dd MMMM yyyy - hh-mm-ss tt
Recording Memory Buffer
Set the memory buffer to use when recording video. This can be used to reduce dropped frames on systems with slow hard drives.
The recommended value is 10.
Automatically Setup Recording With Previous Settings
This will automatically configure the recording using the last known settings when clicking Start in the main vMix window.
External Output
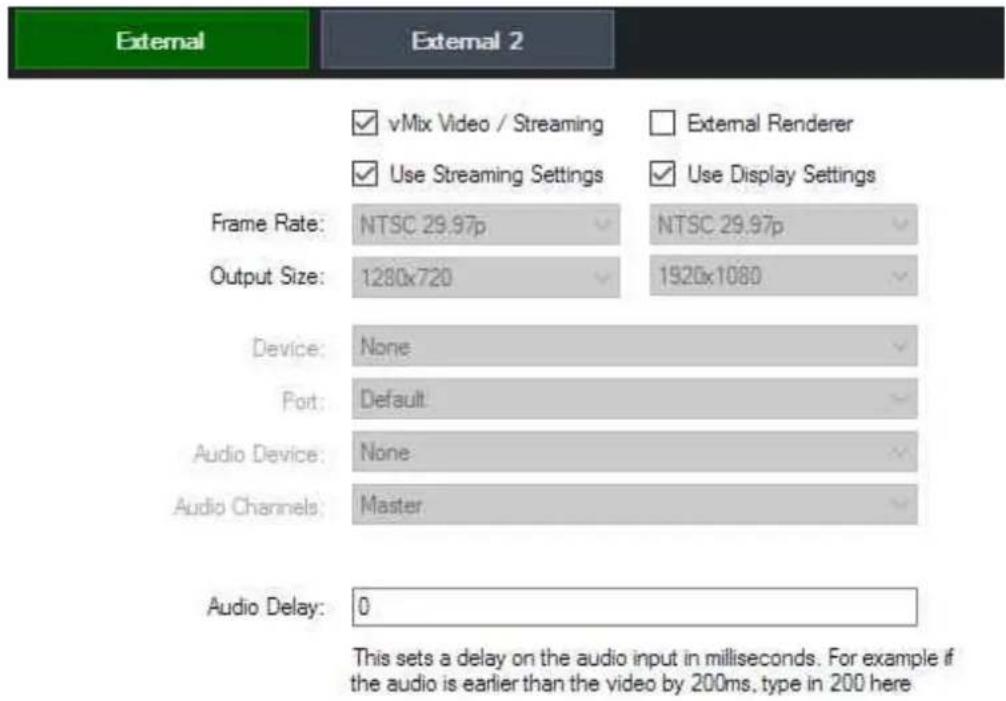
vMix Video / Streaming
Select this option to output to the vMix Video device when External Output is running.
vMix Video is a device that appears in 3rd party applications such as Adobe Flash Media Live Encoder and Skype and is also used for the built in Streaming feature.
Use Streaming Settings: When ticked this option will match the streaming quality settings and should remain ticked for the best results when streaming.
See Streaming
External Renderer
Select this option to send video and audio out to compatible output devices.
Some examples of hardware that support output including most AJA, Blackmagic Design and BlueFish devices.
Use Display Settings: When ticked this option will match the Frame Rate and Output Size settings under the Display tab at all times.
See External Output for more information.
External 2
In vMix 4K and Pro a second independent output can be configured for both vMix Video and External Renderer.
This vMix Video device is called vMix Video External 2 in 3rd party applications.
Frame Rate
Select the Frame Rate for the External Output. When using the External Renderer this should be set to the
frame rate required by the device's output.
For vMix Video / Streaming, this should be set to the Master Frame Rate set under the Display tab for optimal performance.
Output Size
Resolution for the External Output. This must be set to the output format when using the External Renderer. For example if using the Composite/S-Video output this will usually be 720x576 for PAL and 720x480 for NTSC.
Device (External only)
Select the output device to use. (Such as the AJA Kona 4)
Port (External only)
Select the Port to use on the output device, for example HDMI or SDI.
Audio Device (External only)
Some output devices require selecting an Audio Device as well which can be selected here. If this option is not visible, then the audio will automatically be included.
Audio Channels (External only)
See Output Audio Channels
Audio Delay
This sets a delay on the audio input in milliseconds. For example if the audio is earlier than the video by 200ms, type in 200 here.
Audio
√ Automatically Mix Audio
Show Master Audio Meter in Main Window
Show Audio Meter next to Inputs
☑ Fade To Black includes Audio
Default Input Audio Delay:
0 milliseconds
Automatically mix audio
By default vMix will automatically swap the active audio to match the active input.
If this box is unticked, vMix will leave the audio as is and any changes will need to be done manually.
Show Master Audio Meter in Main Window
Display a master audio meter in the middle of the main window.
Show Audio Meter next to Inputs
Each input with an audio source can have a stereo audio meter displayed beside it.
Fade To Black includes Audio
When selecting the FTB (Fade To Black) option in vMix, the audio will fade in or out if this option is ticked.
Default Input Audio Delay
Set an audio delay value in milliseconds to apply to all inputs added to vMix by default. This can be useful to offset an audio delay of an audio mixer. See Recording Audio.
Audio Gap Handling
Audio clocks from various sources can run at slightly different rates. For example an audio source running only 0.5% slower than vMix will be missing 5ms of audio every second. This setting defines how vMix handles these gaps in audio from the source.
Drop: This is the default and involves vMix placing a gap of silence to make up time. This results in a short usually inaudible "drop" in the audio. Resample: Audio will be stretched over time to compensate for the different timing. The side effect of this is a very slight, imperceptible change in pitch.
Audio Outputs
| Master Output | Default Windows Playback Device | 1 + 2 |
| Headphones | Default Windows Playback Device | 1 + 2 |
| A | Enabled | √ | 1+2 | √ |
| B | None | √ | 1+2 | √ |
| C | None | √ | 1+2 | √ |
| D | None | √ | 1+2 | √ |
| E | None | √ | 1+2 | √ |
| F | None | √ | 1+2 | √ |
| G | None | √ | 1+2 | √ |
| Default Bus for New Inputs | Master |
Audio Outputs allows up to eight independently controllable audio outputs (excluding Headphones output) If both Master Output and Headphones are set to the same device, Headphones will take priority.
Master Output
Select the output to send the Master audio mix to. This is the default audio mix
used for streaming, recording and external output.
Headphones
Select the output to send the Headphones audio mix to.
This mix is the same as Master Output except when Solo is enabled on an input.
When Solo is enabled on an input only that input will be heard.
A, B, C, D, E, F, G
These are optionally auxiliary audio buses that can be configured as an independent mix from the Audio Mixer.
For additional information about the audio buses feature, see the Audio Mixer documentation.
Audio Channels
Many sound cards provide 3 or more stereo outputs from a single device.
These are typically used to output surround sound, but can be used to output up to three independent stereo audio mixes in vMix.
1 + 2 The most common setting for standard stereo audio outputs
3 + 4 This will send a stereo mix out over the output usually used for Center-Subwoofer
5 + 6 This will send a stereo mix out over the output usually used for RearLeft-RearRight
VST devices may offer more than 3 outputs in mono or stereo (1+2) configurations which can also be selected here.
When selecting a mono output, the stereo mix in vMix will be mixed down to mono automatically.
Default Bus for New Inputs
Advanced audio scenarios may require inputs to be sent to an auxiliary bus such as A and B when they are added for the first time.
This default can be configured here.
Web Controller
See the Web Controller section for information about this tab.
Tally Lights
This section will cover using Tally Lights with Arduino based hardware.
For other tally light options see Tally Lights
The Tally Lights settings can be used to specify the pin numbers for each tally light when using Arduino based hardware.
Reset to Default: Reset to the default pin order as of vMix 2012 v4.
Reset to Legacy Mode: Revert to the pin order used in all previous versions of vMix.
| Tally Number | Preview Pin | Active Pin | |
| 1 | 2 | 3 | |
| 2 | 4 | 5 | |
| 3 | 6 | 7 | |
| 4 | 8 | 9 | |
| 5 | 10 | 11 | |
| 6 | 12 | 13 | |
| 7 | 0 | 0 | |
| 8 | 0 | 0 | |
| 9 | 0 | 0 | |
| 10 | 0 | 0 | |
| 11 | 0 | 0 | |
| 12 | 0 | 0 | |
| 13 | 0 | 0 | |
| 14 | 0 | 0 | |
| 15 | 0 | 0 | |
| 16 | 0 | 0 | |
| Reset to Default Reset to Legacy Mode | |||
Shortcuts
Add and edit Shortcuts here.
Click here to read the User Guide for Keyboard and Controller Shortcuts.
Scripting
Add and edit custom programming scripts here in 4K and Pro editions of vMix
See Scripting and Automation for more information
Alerts
Alerts can be used to display various alerts over the top of the Output window in vMix as shown below.
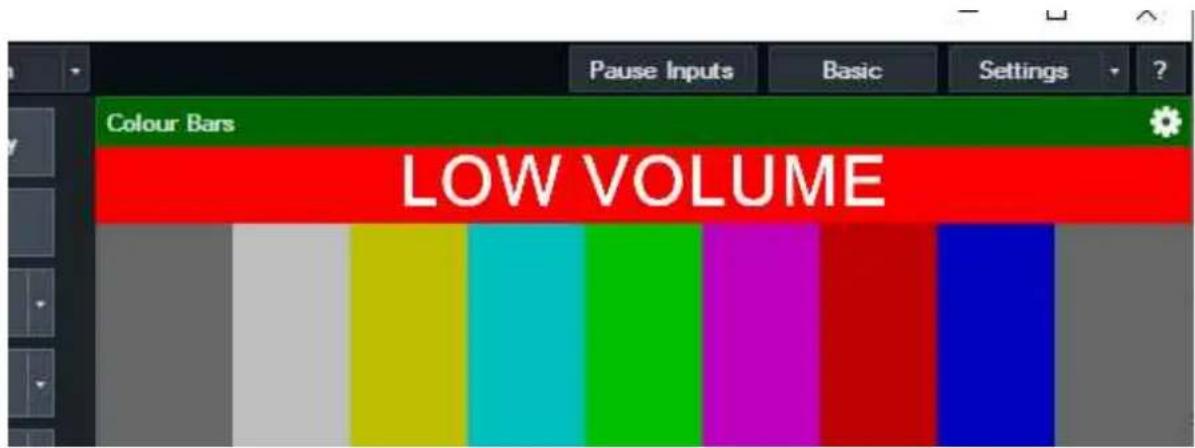
NOTE: This alert will only display within the vMix Interface and MultiView output. It is hidden in the Output used by Recording, Streaming etc.
Volume Alert
□ Display alert on UI and MultiView when Volume drops below
-20
dB for
5
seconds.
Fade To Black Alert
□ Display alert on UI and MultiView when Fade To Black (FTB) enabled
No Recording Alert
□ Display alert on UI and MultiView when NOT Recording
Volume Alert
Show a "LOW VOLUME" alert when the audio drops below a certain dB for 5 seconds. This volume is based on the Master audio levels.
Fade To Black Alert
Show a "FADE TO BLACK" alert when the Fade To Black (FTB) button is enabled.
No Recording Alert
Show a "NO RECORDING" alert when NOT Recording.
Multiple Alerts
When multiple alerts are checked, only one alert will display at a time. As soon as that alert no longer applies, the other alerts will display instead if applicable.
About
Change Registration Key
Upgrade your software license here.
Advanced Settings
The following are Advanced Settings that are only visible when the Show Advanced Settings tick box is enabled.
IMPORTANT: These settings should not be changed unless instructed to do so by vMix Support. Many of these settings can potentially have an adverse effect on performance and quality on most systems.
Performance
Output Format
Renders to recordings, vMix Virtual Capture and External Output in the specified format if supported by the graphics hardware.
This should be left at the default of UYVY in most cases.
Video Renderer
Some codecs such as H264 perform better under the new EVR renderer which can be selected here.
For reliability the VMR9 renderer should be selected if you are unsure.
Preview Skip
Tick this option to skip every x frames when rendering the preview.
For example if the output is rendering at 30fps and the Preview Skip is set to one, Preview windows will render at 15fps.
This is useful to improve performance on older Graphics Cards.
Application Priority
If you have other programs running alongside vMix, you can set a higher priority here to prevent dropped frames.
Automatically convert 16-235 to 0-255 for YUV inputs
Tick this box if the black level on inputs such as videos and cameras displays as dark grey.
This setting is automatically handled and detected by vMix internally and should not be changed under most circumstances.
Disable Effects on Input Windows
Disable render effects such as Deinterlacing and Colour Correction on the Input Windows.
Synchronise Output with Refresh Rate
Tick this option to eliminate tearing on the Fullscreen Output Window. (Tearing looks like flickering lines in the middle of the video)
This option is not required and may actually reduce performance when using vMix with Windows 7 in Aero Glass mode or Windows 8 and higher
Enable FlipEx on Fullscreen / Previews
When enabled this setting improves video smoothness on the Fullscreen and/or Preview windows. This may need to be disabled on some laptops with hybrid graphics.
Memory Lock
This option is not documented.
Recording
Interlaced Recording
Enables interlaced recording and external output under the following scenarios:
Master Frame Rate is 50p or higher and recording or external Frame Rate is interlaced Master Frame Rate is interlaced and recording or external Frame Rate is interlaced
Note: NTSC 480i recordings are lower field first, all other recordings are upper field first.
See Interlaced Support for more information.
Audio
Master Sample Rate
Specify the master sampling rate to use for all audio mixes including the vMix Audio device. Either 44.1khz or 48khz are supported.
Master Bit Rate
Specify the master bit rate to use for all audio mixes including the vMix Audio device. Either 16bit or 32bit are supported.
NOTE: 32bit is not supported by most recording formats.
Recording Audio
Select the audio source to use in recordings, external output and streaming.
This should be vMix Audio by default.
See Recording Audio for more information.
Inputs
Inputs are the various sources that can be loaded into vMix. For example Camera (Video Camera), Video or a DVD.
They will appear along the Input Bar as shown in the screenshot below.
There are a couple of mouse shortcuts available:
- Clicking an Input Window will set it as the current Preview Input.
- Double Clicking the Title Bar will open up the Input Settings window.
- Right clicking an Input Window for a Photos or PowerPoint source will display a list of slides and/or photos in a menu. Clicking one of these items will load it as the active image.
This feature can be used to build a set of titles in an image editing program and load them all into a single input.
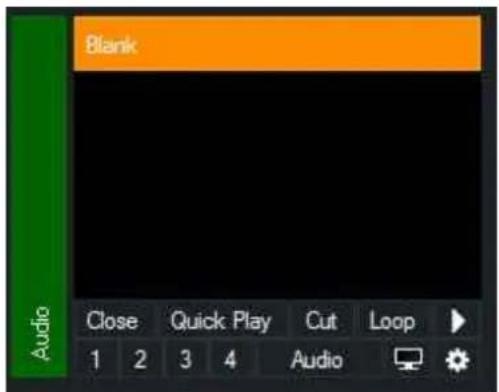
Collapsing Inputs
Right click the title of an input to collapse it. This can be used to save space or hide blank inputs such as audio sources.
Moving and Dragging Inputs
Inputs can be placed in a different order via drag and drop.
To move an input, drag the preview area of the input (below the title bar) on top of another input.
Adding and Removing rows
Multiple rows of inputs can be displayed in the main vMix window by dragging up or down the dividing line as shown below:
vMix User Guide

The number of rows that can be added or removed depends on the display resolution set in Windows. 1920x1080 is recommended and allows up to three rows of inputs to be displayed at a time.
If more inputs are added than can be displayed, a scroll bar will appear to the right of the inputs.
Add Input
Click this button from the Main Window to bring up the Add Input window.
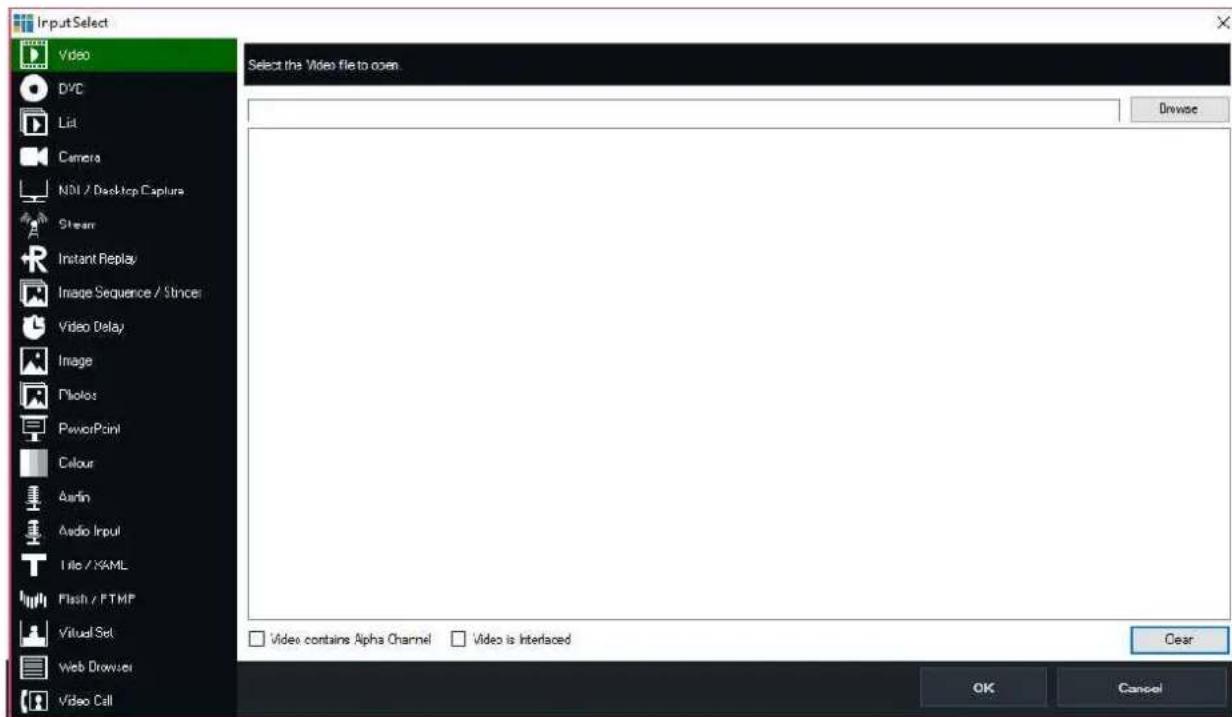
Video
Use the Video Input to load video files such as AVI, MPG, MXF, MP4, WMV and QuickTime. DVD files should be loaded through the DVD option instead.
Mark In/Out
The Video Input supports specifying custom Start (Mark In) and End (Mark Out) points for playback.
vMix User Guide
The Start and End points are marketed by a Green square for Start and a Red square for End. To change the Start point, drag the bar to the chosen position and right click to select Mark In from the menu.
vMix User Guide
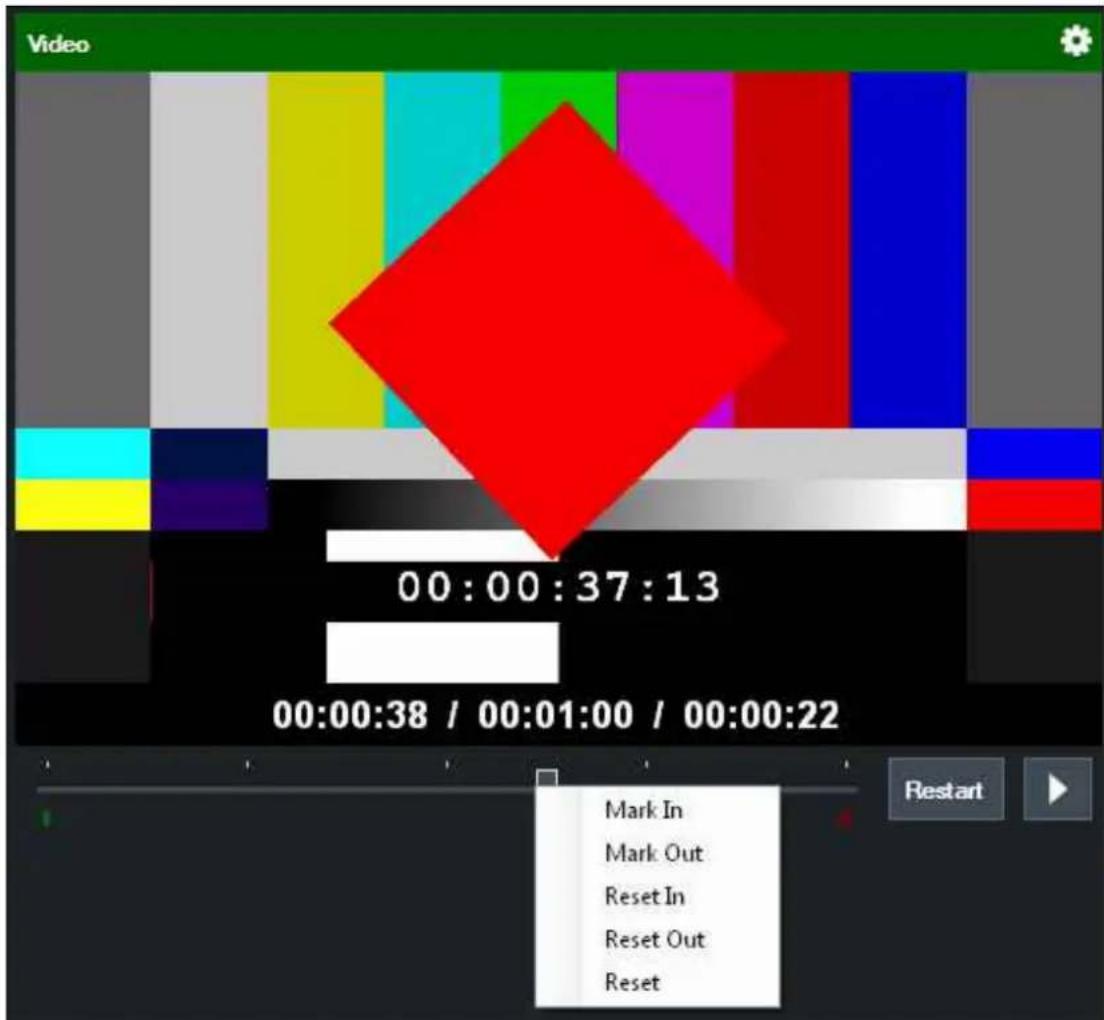
To change the End point, repeat these steps only select Mark Out from the menu instead.
DVD
Select a DVD drive or folder to load a DVD as an input.
Controlling DVD playback
vMix supports clicking on DVD menu items from the Preview or Output windows. You can also manually select chapters and go to the menu by right clicking the Input, Preview or Output window where a DVD is currently playing.
List
The List feature can be used to create a playlist of video and audio files.
The Randomise button can be used to shuffle the list (useful for example when playing a set of music videos for example)
M3U files are supported which can contain a combination of video and audio filenames.
List Control
To switch between items with the playlist, right click the preview area of the input and left click the item from the dropdown list.
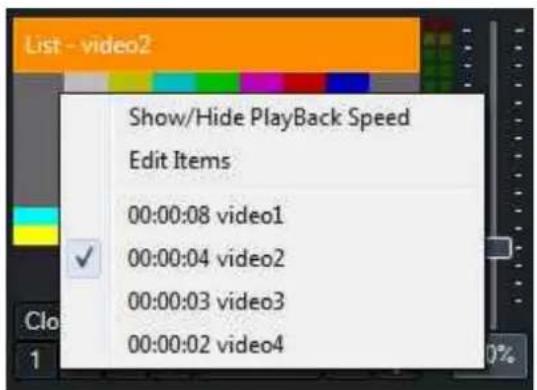
Edit Items
Click Edit Items in the right click menu to open up the List Editing Tab in the main vMix window.
This tab can be undocked and placed on a separate monitor by clicking the pin button at the top left hand corner.
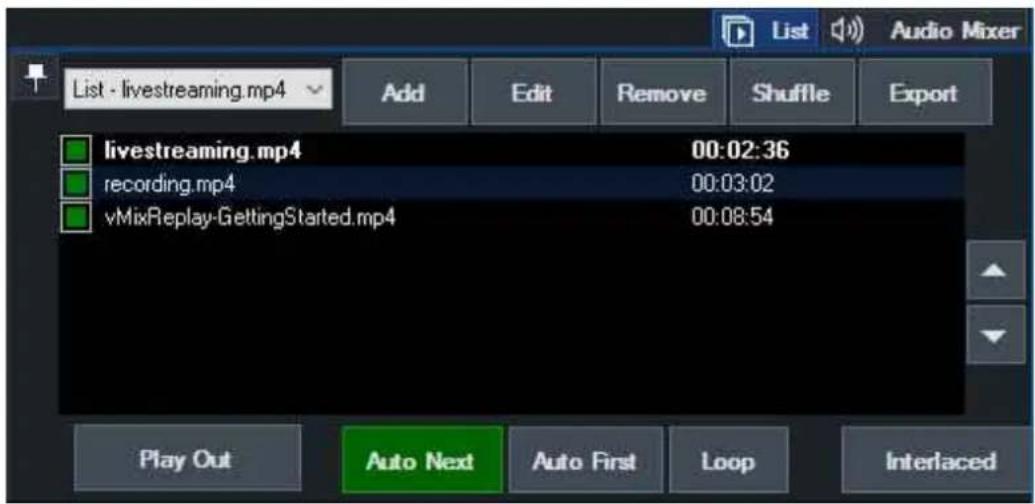
Auto Next
Toggle the "Auto Next" button to enable/disable automatic playback of the next item in the list. This option is enabled by default.
Auto First
Toggle the "Auto First" button to enable/disable always playing from the first item in the list before a transition to output.
Loop
Toggle the "Loop" button to have the list play from the beginning when it reaches the end of the list.
Interlaced
Individual videos in the list may not be detected as Interlaced in some situations. Toggle this button to enable interlaced processing for a particular video.
Add
Click the Add button to add one or more items to the list.
Files can also be dragged and dropped into the Edit - List window
Edit/Remove
Click Edit to change the name of the selected item
Click Remove to remove one or more items from the list. There must be at least one active item in the List at all times
Note: These options do not change the underlying files, so files will not be deleted or renamed.
Shuffle
Randomise the order of items in the list
Export
Export the current List as an M3U file
Checkboxes
A list item can be disabled by clicking the checkbox. When disabled the item will be skipped during playback.
Up/Down Arrows
The up and down arrows can be used to move the selected item up or down in the list.
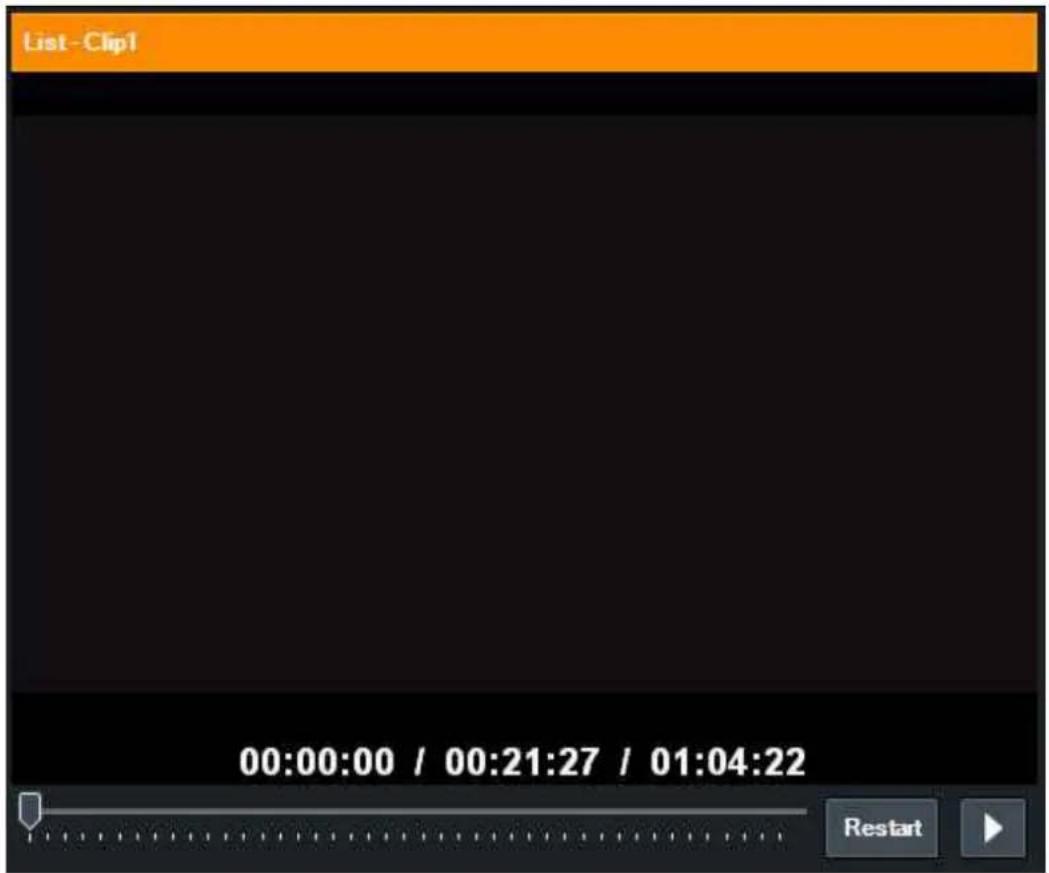
List Duration
If supported by the video or audio format, vMix will display a Total Time Remaining for the entire List. In the screenshot below, Clip 1 is 21 minutes and 27 seconds in length and there is 1 hour, 4 minutes and 22 seconds remaining.
vMix User Guide
Camera
Camera is used to load in supported Video Capture Devices and Video Cameras.
Camera
Select the device to use here.
Input
Specify the capture input to select such as SDI or HDMI.
Resolution
Specify the capture resolution to use.
Frame Rate
Specify the frame rate to use.
Interlaced
Untick the interlaced Check Box if the source video is in PsF format. (Progressive segmented frame)
Video Format
If the selected Video Capture Device supports more than one video format (such as YUY2 and YV12), vMix will select one of these formats automatically.
If the automatically selected format is not suitable, a specific format can be enforced here.
Audio Input
Some cameras support selecting a particular audio input or channel here.
If using an AJA, Blackmagic or Magewell device, EmbeddedAllChannels can be selected to bring up to 8 channels of audio in at once.
These channels can be then be mixed from the Channel Mixer.
Audio Device
Select an Audio Device that matches the video capture device.
Audio Format
Select the Audio Format for the audio device above.
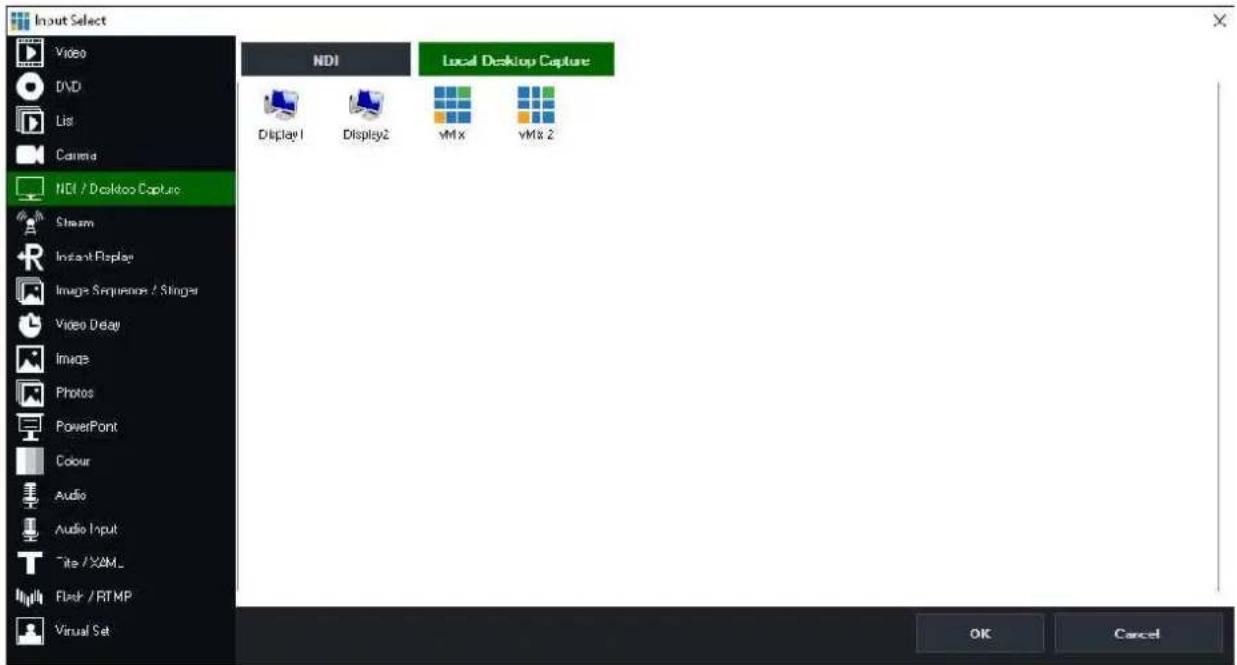
NDI / Desktop Capture
NDI / Desktop Capture is used to add two types of sources into vMix:
NDI
Easily add audio and video sources on the local network that support the NDI standard.
This also includes capturing remote desktops on PCs and Macs using vMix Desktop Capture.
Local Desktop Capture
NDI - Network Device Interface

Network Device Interface
NDI is an easy way to send and receive high quality, low latency video and audio between supported devices using a standard Gigabit enabled network.
For example you can produce one aspect of your show on one computer and send the output to vMix running on another.
You can also add any NDI enabled source to vMix as long as it is on the same network. This might be a NDI enabled hardware device
or another computer or laptop running 3rd party software that supports the NDI standard.
Adding NDI Inputs
Sources detected on the network will appear automatically in the list with a preview thumbnail and organised by device or computer name as shown below.
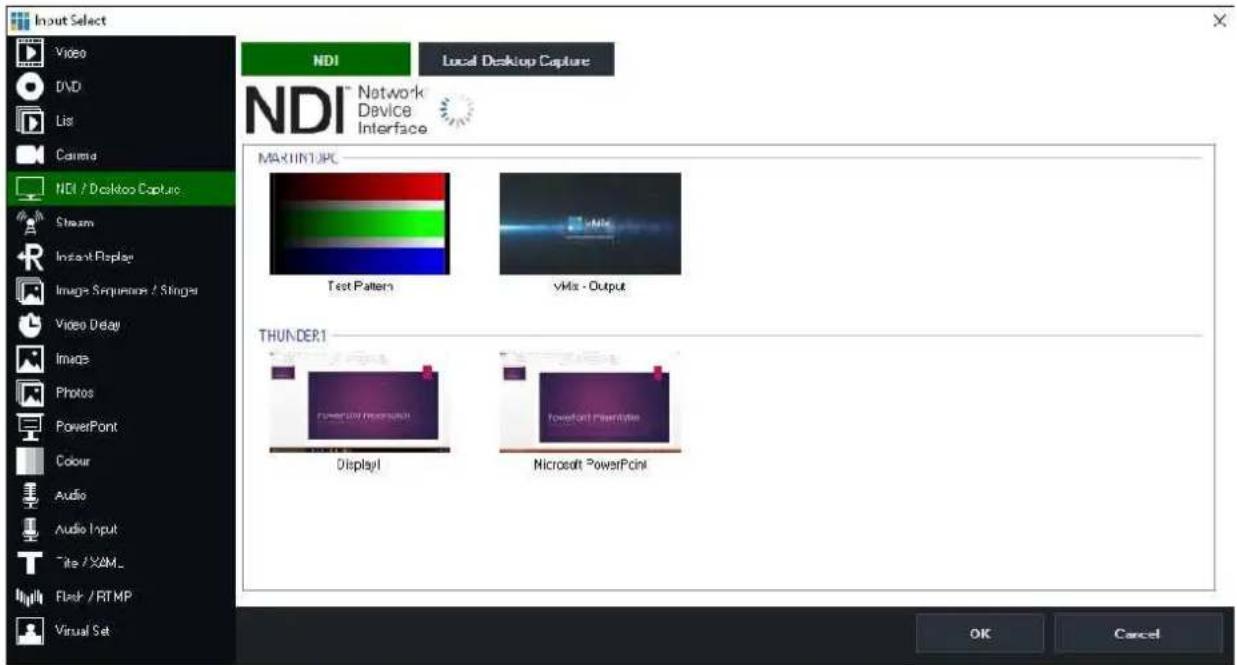
In the screenshot above, there are four NDI sources available across two different computers.
Adding Remote Desktops
You can bring into vMix the desktop of a remote PC or Mac simply by downloading and running the free vMix Desktop Capture application from the vMix web site.
http://www.vmix.com/software/download.aspx
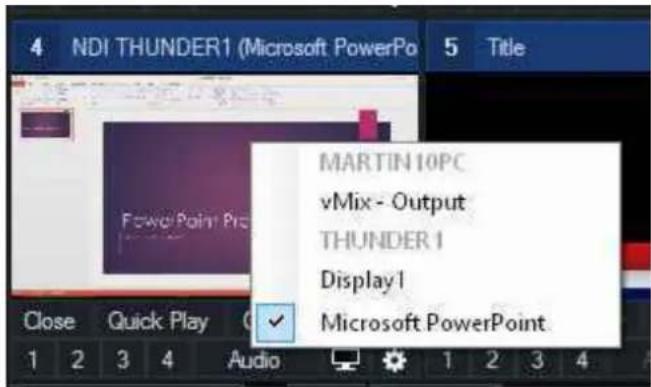
While the vMix Desktop Capture program is running, any windows open on that computer will appear in the NDI list.
In the screenshot above, Microsoft PowerPoint is running on a laptop called "THUNDER1" and can be added to vMix simply by double clicking it from the list.
vMix Desktop Capture Features
• Capture multiple displays, windows at high quality and in full resolution
- Games can now be captured from computers running Windows 8 or higher, including fullscreen games powered by Direct3D or OpenGL.
• Audio is captured automatically
• The mouse cursor is also captured
NOTE: users running versions of vMix Desktop Capture older than 17 will need to upgrade the software to the latest version
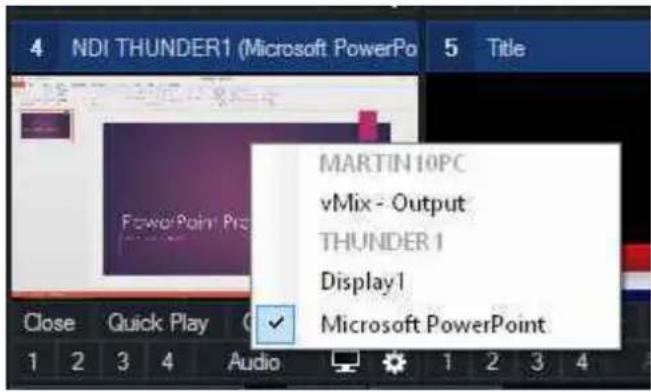
Changing NDI source through right click menu
Once the initial NDI source or desktop capture has been added, a right click menu is available to change the source at any time.
Additional Settings
Low Bandwidth Mode: This will switch NDI to use a low resolution / low bandwidth version of the source video.
Audio Only: Disable video, only bring in audio from NDI source.
PsF: If NDI source is a camera that sends progressive over interlaced video, tick this box to improve video quality.
Increase Buffer Size: On unstable/wireless networks, ticking this option can improve the smoothness of the video. Will increase latency by approximately 5 frames.
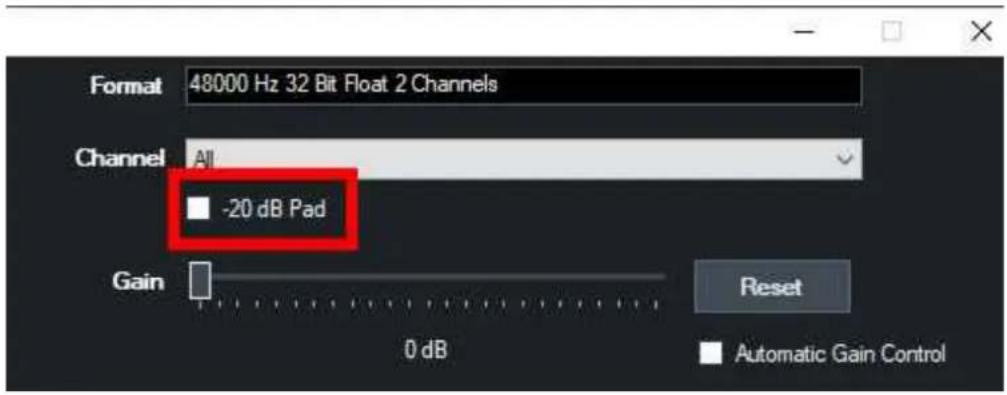
Audio Levels
Some NDI sources may have audio that appears too loud in vMix.
To fix this, in the Audio Settings window for the NDI input tick the -20dB Pad checkbox.
Local Desktop Capture
Adding Local Desktops
From the NDI / Desktop Capture tab, a tab called Local Desktop Capture can be selected to capture the screen or window from the same computer.
This enables high performance full frame rate capture of any active window, including windows hidden behind vMix or running on a separate display.
This is great for capturing programs like Skype.
Windows 7 Note: "Aero" theme must be enabled in order to capture individual windows. Windows 8 or higher will always work when capturing individual windows regardless of theme.
Window Capture Method
Select the method used to capture individual Windows.
GDI: This will work on the vast majority of systems with the exception of Windows Store apps and browsers such as FireFox and Chrome.
WindowsGraphicsCapture: This is available on Windows 10 1809 or higher and captures most applications including browsers and Windows Store apps.
DWM: This is available on earlier versions of Windows 10 and Windows 7 and can capture the same windows as GDI but with slightly lower CPU/GPU resource usage.
Desktop Capture
For Desktop Capture support in vMix, see the NDI / Desktop Capture topic.
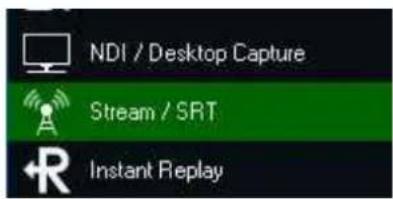
Stream / SRT
The Stream input supports adding IP Cameras and Streaming Servers that support the RTSP, Transport Stream or SRT protocols.
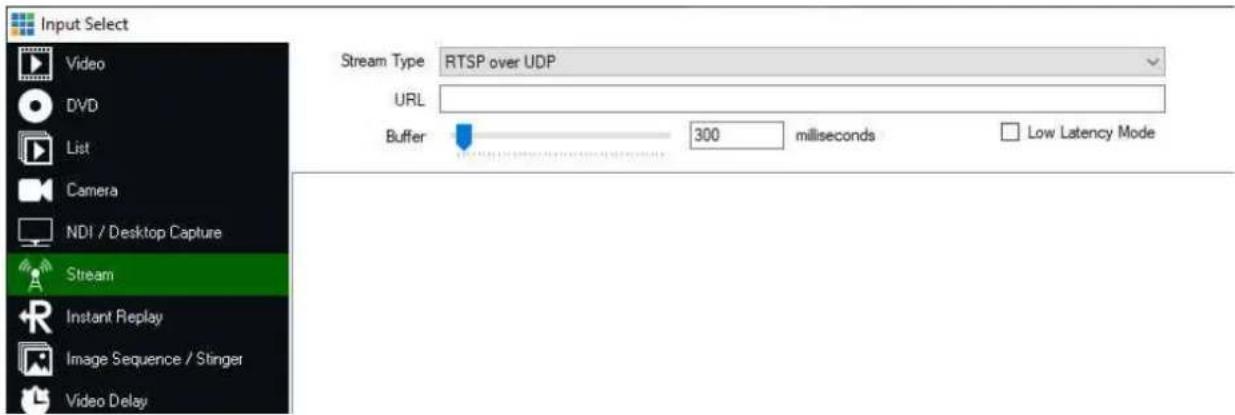
Stream Type
RTSP over UDP / RTSP over TCP
RTSP based sources such as the Teradek Cube and IP Cameras
Enter the URL in the following format: rtsp://0.0.0.0/stream1
Transport Stream over UDP
Select this option if a Transport Stream is being sent directly to the vMix machine over UDP
Enter the port number of the stream
Transport Stream over TCP
Selecting this option sets up vMix as a TCP server that can accept connections from remote streams Enter the port to listen for connections
Transport Stream over TCP Pull
Select this option to connect to a remote Transport Stream server such as the Teradek Sputnik using the TCP protocol.
Enter the hostname and port of the remote Transport Stream server
VLC
The VLC option uses the free VLC Media Player software to connect to the stream.
This requires installing a special version of VLC which can be downloaded and installed from here:
http://www.vmix.com/vlcdownload
vMix currently supports only RTMP, UDP, RTP, RTSP and TS streams using this method.
Other stream types such as HLS and M3U8 are not supported.
SRT (Caller, Listener, Rendezvous)
See SRT Input for more information
Buffer
The network buffer in milliseconds can be configured to reduce jitter when receiving high latency network streams.
For local network streams, this should be set between 0 and 500 milliseconds or 1000 to 5000 milliseconds for Internet streams.
Low Latency Mode
Local streaming devices such as the Teradek cube support a delay of less than 5 frames in Low Latency Mode.
To use this mode, set the Buffer to 0 and tick the Low Latency Mode checkbox.
NOTE: If this option is enabled and the stream does not support Low Latency the video will show compression artefacts and will play back at a lower frame rate.
Video and Audio Formats
H264
AAC-HBR
Network Formats
RTSP
RTP (UDP and TCP)
TS (UDP, TCP and TCP Pull)
Firewall
UDP ports 35000 to 35500 will need to be open on your Firewall in order to receive streams in vMix.
SRT
To connect to an SRT source, select the Stream / SRT option from the Add Input window and select either SRT (Caller), SRT (Listener) or SRT (Rendezvous) from the Stream Type dropdown.
The following settings are available:

Stream Type
Listener: Listen on the specified Port on all network adapters on the computer for connections. Hostname is ignored.
Caller: Connect to the specified Hostname and Port.
Rendezvous: Connect to the specified Hostname and Port. The other side must also be set to Rendezvous with an identical port number specified.
This mode allows connecting through most firewalls automatically.
Latency
Specify the latency of the connection in milliseconds to adapt to network congestion.
The higher this value, the better SRT can handle difficult network conditions.
As a general rule this should be set to at least 4x the ping time destination IP. So 20ms would require a latency setting of at least 80
This must be set to the same value on both ends.
Decoder Delay
Some encoders may not send evenly spaced frames, also known as jitter.
Encoders may also send audio long before or after the associated video frame.
To compensate for this, a Decoder Delay can be configured to allow for any potential jitter on the encoder side.
For example if frames may arrive 100ms apart, set the decoder delay here to at least 150.
Passphrase
Specify a password to encrypt the connection. This password must be used by both sides for the
connection to be established.
Key Length
This is the encryption strength to use. Multiple by 8 to convert to bits, for example 32 = 256bit encryption.
Stream ID
Optional Stream ID that may be required by your streaming provider to uniquely identify the stream.
Use Hardware Decoder
Use accelerated decoding where available on the graphics card. The majority of modern graphics cards support both H264 and HEVC hardware decoding. vMix will fall back to CPU decoding where available.
NOTE: To use an SRT source in Instant Replay, this option will need to be disabled so that CPU decoding is used only.
MultiCorder Recordings
Due to SRT using an already compressed video stream (in Transport Stream .ts format) Any MultiCorder recordings of this input will save the stream directly to file without using the compression settings specified in the MultiCorder window.
Multi-Track Audio
Many SRT encoders will separate stereo pairs into separate audio tracks within the stream. vMix will automatically combine these stereo pairs into a single multi-channel stream that can be controlled via the Audio Channel Matrix and Mixer features.
Instant Replay
Full documentation on Instant Replay can be found below:
Instant Replay User Guide
Image Sequence / Stinger
Image Sequence / Stinger can be used to automatically load a series of images as an animation. This feature can be used to create animations with or without alpha channels that can be used as Overlays or Stingers in vMix.
vMix will automatically search for the next image in the list based on the filename of the selected file. For example if the image is called image1.png then vMix will load image2.png, image3.png and so on, until no more files can be found.
Sound
Sound can be added to an image sequence by creating an MP3 or WAV file and naming it to match the first image in the sequence. For example if the first image is image1.png then the sound file should be called image1.png.wav or image1.png.mp3 This sound file will need to be in the same folder as the rest of the images.
The sound will then start playing each time the Image Sequence is played.
NOTE: When adding sound to an existing image sequence, the input will need to be added to vMix again for it to be detected.
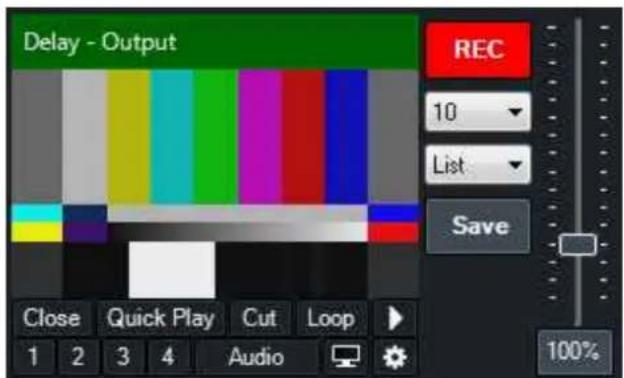
Video Delay
The Video Delay Input allows you to select a custom delay to the Output or a Capture Input. This feature can be used to achieve many types of effects including slow motion replay.
Setup
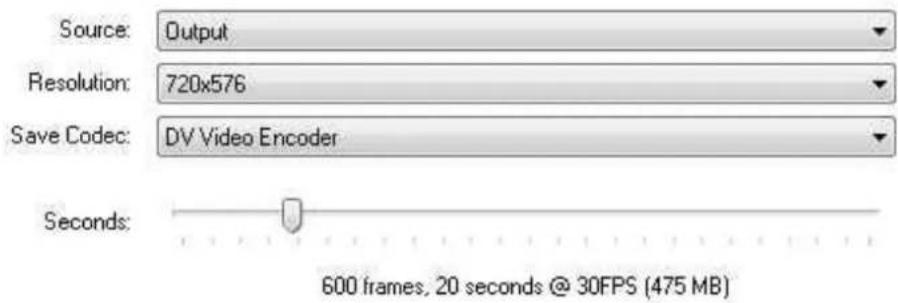
Source: Select either Output or an Input such as a Video Camera
Resolution: Select the quality of the Video Delay. If you select a video camera to delay, this option will be the same as the camera resolution.
Save Codec: Select the Video Codec to use when saving clips from the Video Delay to file.
NOTE: DV Video Encoder supports a maximum resolution of 720x576, choose a different codec if you wish to save video clips in HD
Seconds: Select the delay buffer size in seconds. This is an approximate value based on a 30FPS input.
Control
Record: Turn on or off the updating of the Video Delay.
Speed (100%): The delay can be played back at a variety of speeds including full speed and slow motion such as 50%.
Save Seconds (10): Select the number of seconds of the most recent Video Delay footage to save to file.
Save Location (List): Select the location to save the video delay clip once the Save button has been clicked. See Saved Delay Clips section below.
Save: Click this button to begin saving the Video Delay footage to file. This button will light up red while the save is in progress. The video delay will stop recording until the file has been completed.
Saved Delay Clips
Video clips of delay footage can be saved at any time by clicking the Save button (see Save in the Control section above)
There are two locations in vMix the delay clips can be saved to:
List
Each saved clip will automatically be added to a separate List Input when complete. This List Input is dedicated to holding all video delay clips in a vMix session regardless of source.
Category
Each saved clip will be added as a separate Input in the selected colour category. See Categories.
Image
Add an Image to vMix in PNG, JPEG, TIFF or BMP format.
Photos
Load all photos in a directory into a single Input in vMix using this option.
Selecting a Photo
Once the Input has been loaded you can right click the Input to select a photo to display from the SlideShow Settings window.
The controls on the Preview or Output windows can also be used to move backward and forward through the list of photos.
Selecting a Transition time
By default, the Photos input will remain on the first image until the backward and forward buttons are pressed.
You can automatically transition through the list by right clicking the Input and selecting a transition time from the SlideShow Settings window.
PowerPoint
Load a PowerPoint slideshow with this option.
You must have a copy of PowerPoint installed to use this option.
A SlideShow Settings window is available for this input.
Colour
Select a solid colour to use as a separate input. This can be used with the Multi View feature as a background colour.
Audio
Play Audio Files such as MP3 and WAV.
Audio Input
Audio Input can be used to add multiple audio sources to vMix such as Microphones, USB audio devices and any sources compatible with the ASIO drivers.
Each of these inputs can be independently controlled from the vMix Audio Mixer, turning vMix into a fully fledged audio mixer alongside your video production.
Audio Device
Select the Audio Device or Microphone to add.
Audio Channels
Some devices support multiple channels, you can select any stereo pair or a single mono channel here. To add more than two channels, add multiple inputs selecting a different channel each time.

Title
The Title input is a quick and easy way to bring in Titles and Lower Thirds into your production. Each Title input can have its own customisation text and Title Presets can be created to make it easy to change the text of a title during a production.
You can select one of the many built in Title Templates or build your own using the GT Designer.
The text in each template can be edited through a right click menu on the Input.
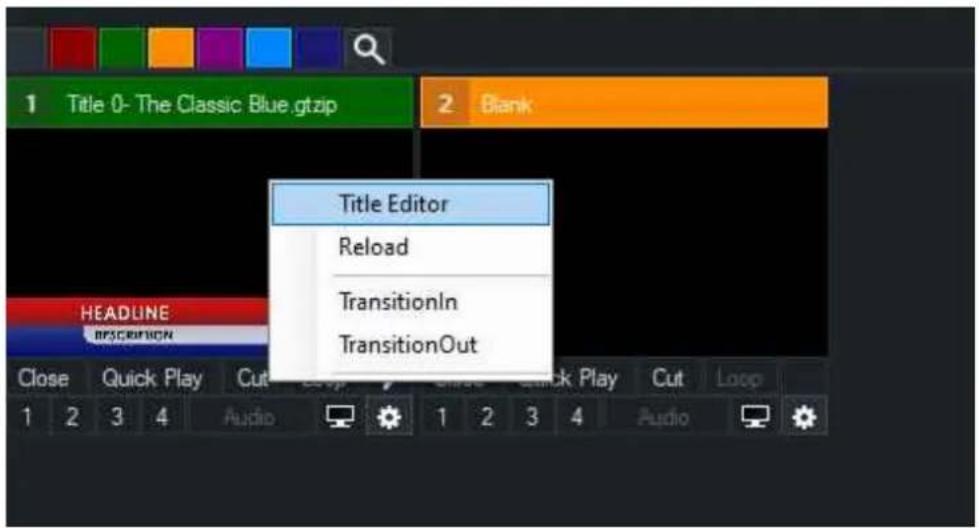
Editing Title Content (Text Editor)
Titles can be edited from the Text Editor right click menu (see above) Objects in a title are organised into Text, Images and Color categories.
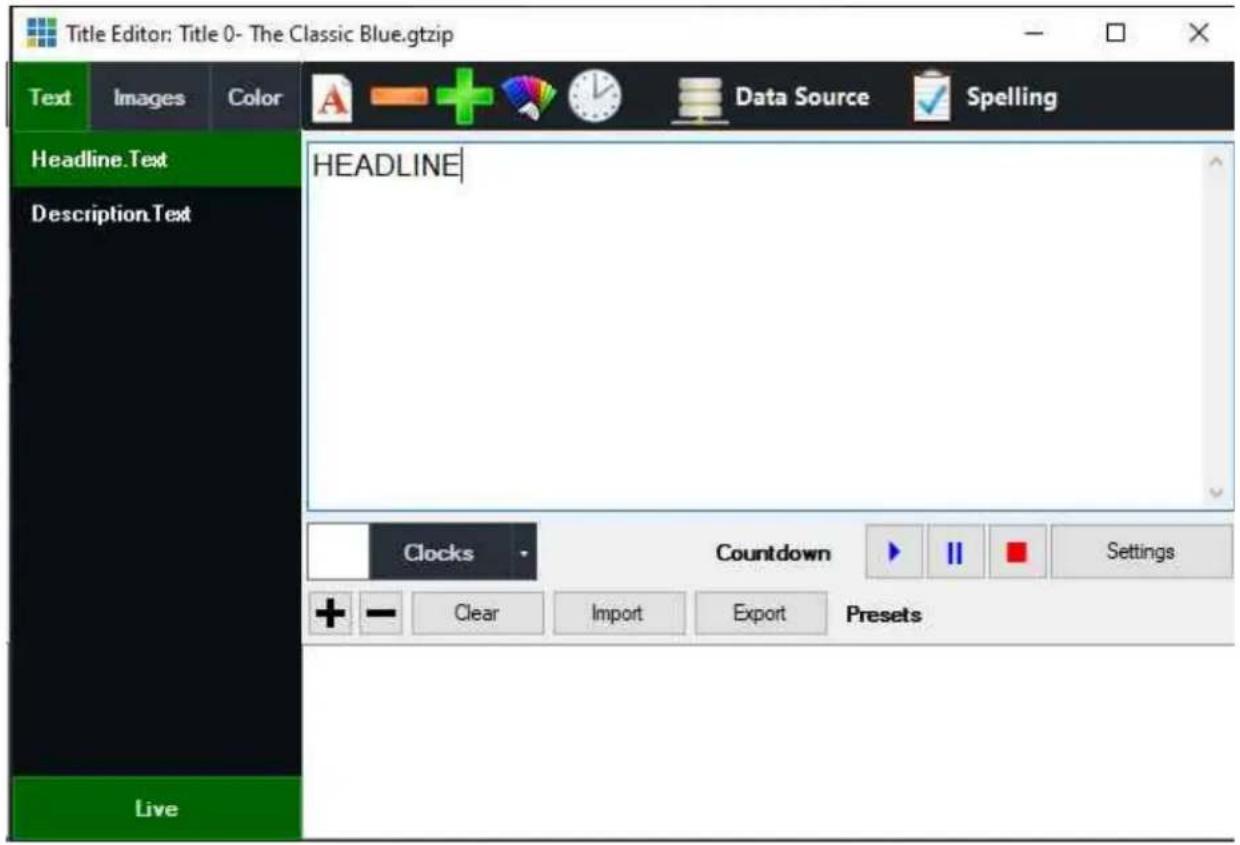
The six icons, from left to right are:
Font
Decrease Font Size
Increase Font Size
Font/Object Colour
Ticker Settings (To set Ticker duration/speed and other ticker related settings)
Data Source See Data Sources
Spelling
Editing Color Objects
Titles created in GT support the editing of solid color shapes/objects from within vMix.
To enable this feature, first edit the title in GT Designer and untick "Hidden" in the Data tab for each object you wish to edit.
These objects will then appear in the Color tab here and can be changed by using HTML colors or by clicking the Font/Object Color button in the toolbar.
Live Mode
While the Live button is green, all text typed into the Title Editor window will update the title in real time. Click the Live button to display live updating and click it again once all changes have been made.
Title Presets
Click the + button to save the text from all the elements in the title as a preset.
This preset can be selected by right clicking the input in the main vMix window to recall these values at any time.
Title Presets can be Imported and Exported in CSV format using the Import and Export buttons
Countdown Timer
The countdown timer can be used to automatically update the title with a timer that runs either in reverse (countdown to 0) and optionally forward. To specify the countdown parameters click the Settings button to bring up the Countdown Settings window.
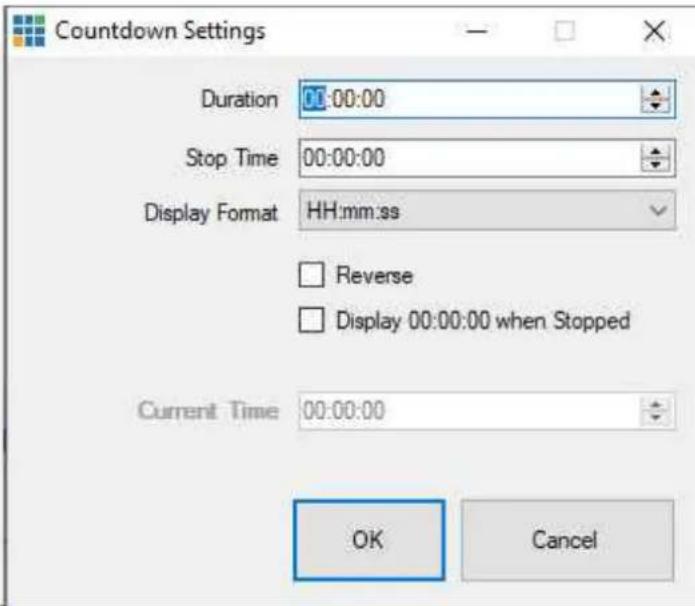
Duration
Specify the duration in hours, minutes and seconds the timer will count. For example 00:15:00 for a 15 minute timer.
Stop Time (or Start Time when in Reverse mode)
Specify the to either begin or end with depending on the countdown direction. For example, in countdown mode with a duration of 15 minutes, if the Stop Time is set as 00:05:00 (5 minutes) the countdown will run from 00:20:00 to 00:05:00 and then stop. In reverse mode the countdown would run from 00:05:00 to 00:20:00.
Display Format
Specifies how the timer will be displayed within the title. When the display format is set to mm:ss or mm, the hours remaining will be added to the minutes display, for example 120:30 for 2 hours and 30 seconds.
Reverse
Change the direction of the Countdown so it counts up instead.
Virtual Set
The Virtual Set features provides the ability to integrate a chroma keyed live camera and other graphic elements into a real-time 3D rendered virtual set. This virtual set can then be smoothly zoomed and panned just like in a live television studio.
Setup
Choose from one of the built-in Virtual Set presets to add it to vMix. Each will show a placeholder image giving an idea of where the camera and other elements will be located
within the virtual set.
Control
Each Virtual Set has two tabs that can be used for customisation.
Camera
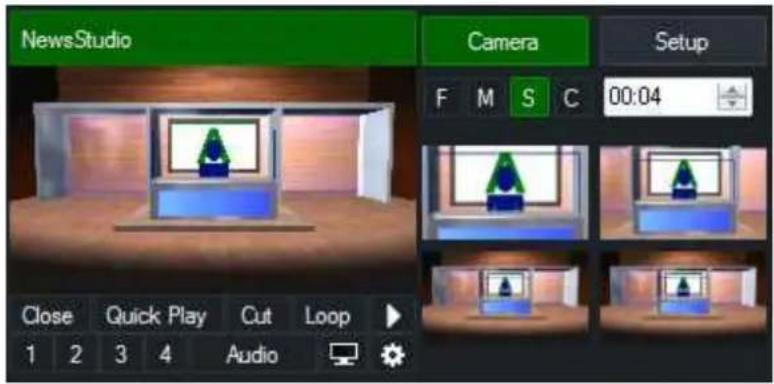
The Camera Tab provides thumbnail previews of the camera angles available within the Virtual Set. To switch to a camera angle, simply click on the thumbnail. To customise the camera angle, right click on the thumbnail.
The speed of the camera zoom is determined by the F (Fast), M (Medium), S (Slow) and C (Cut) buttons above the thumbnail previews.
Setup
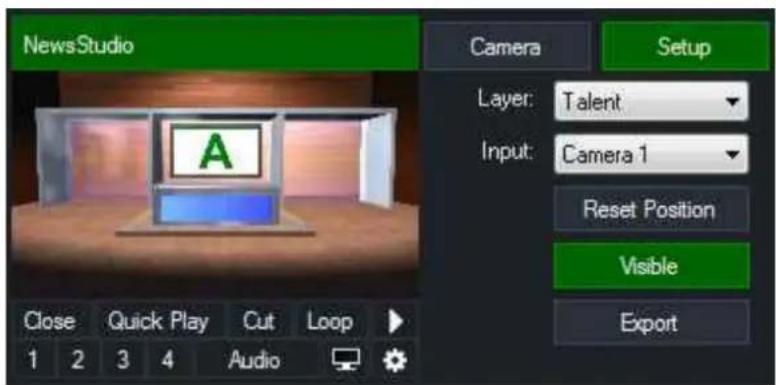
The Setup Tab can be used to adjust the various layers that form a complete Virtual Set.
Layer: Select the layer, such as a background to adjust.
Input: If a layer supports cameras (such as the Talent layer) or video clips (such as the Screen layer), the input can be selected here.
While in the Setup Tab the mouse can be used to click and drag on the preview window to change the location of the layer.
Hold down the Shift key to resize the layer.
Reset Position: Revert the layers position and scale to the default setting.
Visible: Toggle on or off this layer. This can be used to hide desk in some Virtual Sets.
Web Browser
Use the Web Browser input to add any web page to vMix.
Settings
URL
Type in the full web page URL that you wish to display. For example: http://www.vmix.com/
Width, Height
Specify the Width and Height in pixels when rendering the web page.
If these are set to a size smaller than the vMix Output Size, the web page will initially be displayed centred and at the reduced size.
This is handy for HTML widgets you may wish to use as Overlays as they will show at the correct size and simply need to be moved into position
from Input Settings - Position.
Mouse Control
Once added, the web page can be controlled by clicking and dragging the mouse on either the Input window or the Preview/Output within vMix.
Keyboard Control
Keyboard use within the web page can be enabled by right clicking the input and selecting the Keyboard Enabled option.
IMPORTANT: When this option is enabled, keyboard shortcuts in vMix will no longer be active. To enable the keyboard shortcuts again, right click the web page and disable the Keyboard Enabled option.
Transparency
The Web Browser input in vMix supports transparent backgrounds and alpha channel when used by sites such as TwitchAlerts.
To create your own page with transparent background, simply create a page where the background colour for the
element is not specified.
Right Click Menu
Right click on the Web Browser input to Go Back, Go Forward or change the web page from the Properties window.
Media
The Web Browser Input utilises the Chromium Embedded Framework (CEF) and has most of the features available in the Google Chrome browser.
This includes HTML5 video and audio playback and other media features such as WebRTC.
Audio
Audio is fully supported with the Web Browser input and can be independently mixed just like any other
audio source in vMix, no desktop audio capture needed.
Video Call
See vMix Call
Mix
The Mix input allows adding up to 15 additional "mini mixers" that support basic transitions and cuts between two different inputs.
To add a Mix input, click the arrow next to Add Input in the main vMix window and click the Mix option.
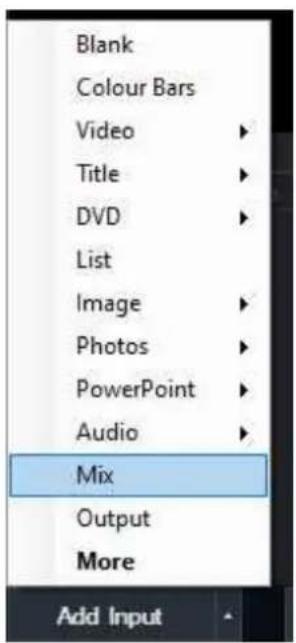
Note: Mix is only available in 4K, Pro and Max editions of vMix.
Once added, the input looks like the following:
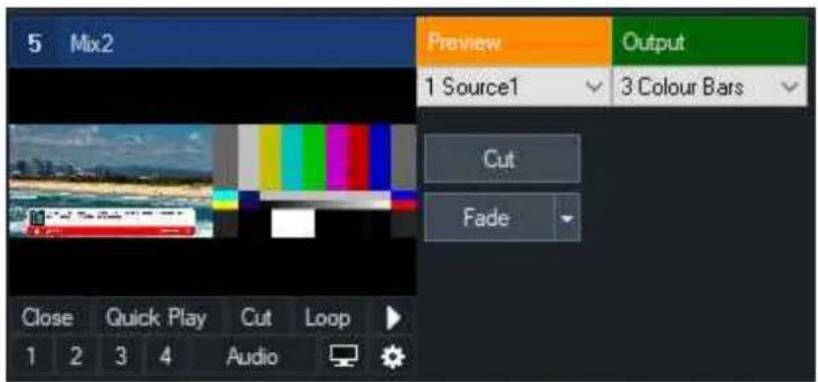
The Preview and Output dropdown boxes can be used to select the inputs you wish to mix. Cut will cut between the inputs and Fade will transition between the inputs. Click the arrow next to Fade to customise the transition effect.
Input Preview
The input preview window will show both the Preview and Output window side by side in the vMix window and in the MultiView Output. (Except when in Output Only mode, see the relevant section below) All other outputs will only show the mixed Output as expected, as demonstrated below:
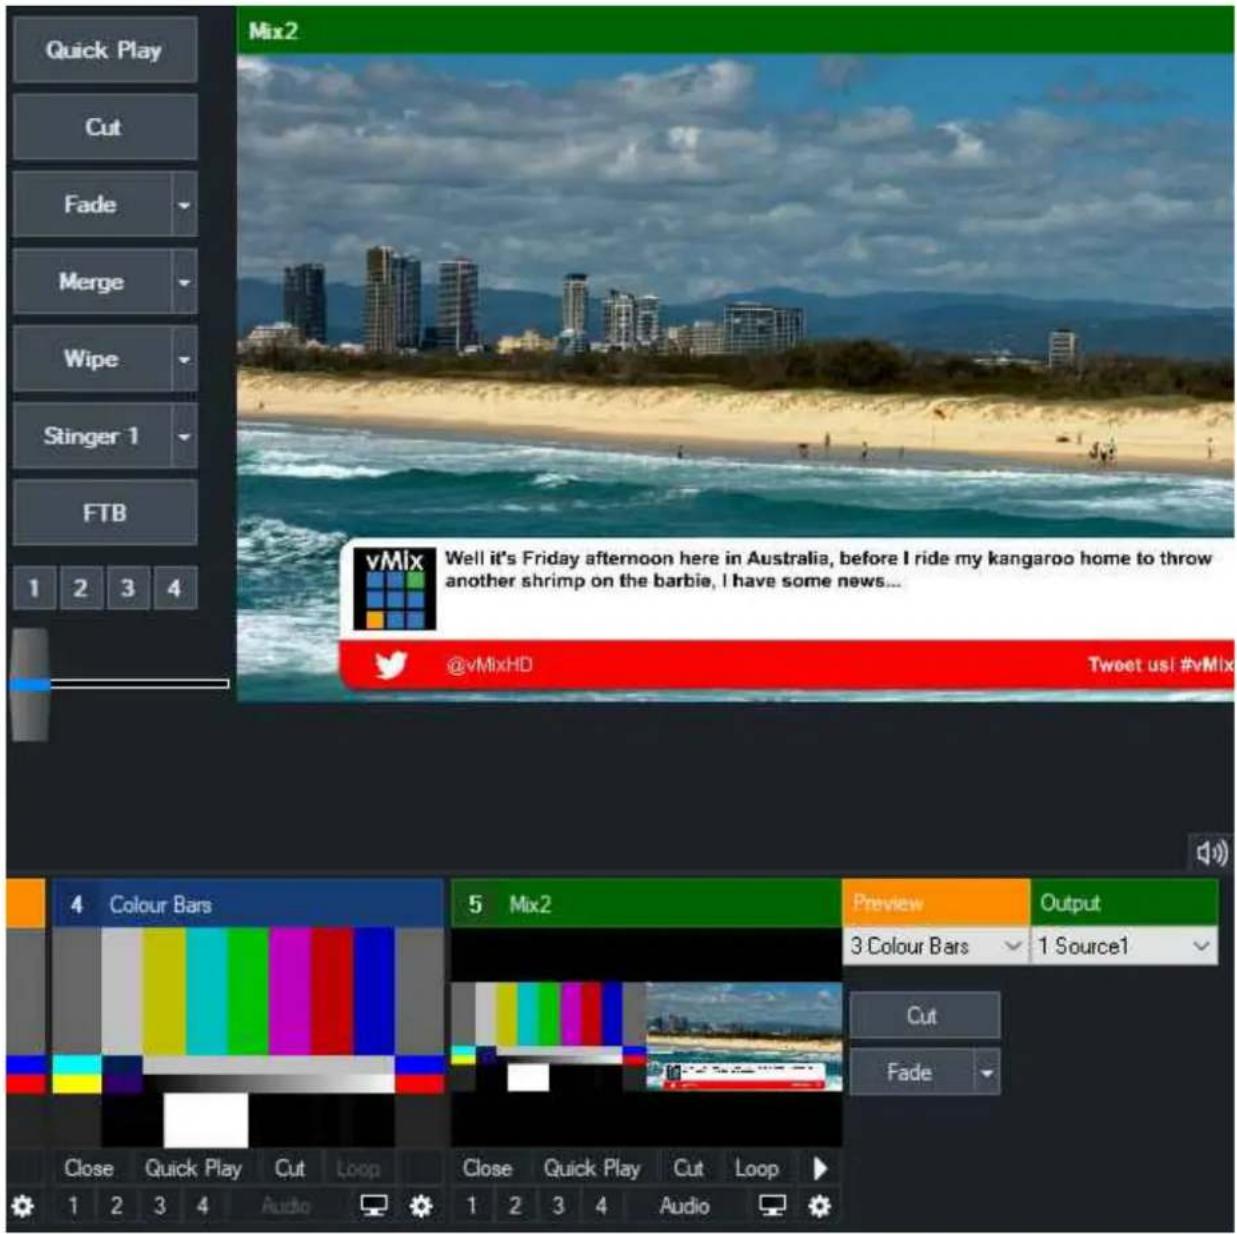
Output Only Mode
To disable the Preview/Output and Transition controls, right click the Mix input window and turn on Show Output Only.
In this mode, the additional controls will be hidden and only the output will be displayed.
The Input source for this mix can still be controlled via the right click menu and shortcuts can still be used to transition between Input sources if required.
Shortcuts
The following shortcuts can be used with an optional Mix parameter, where 1 is equal to the main mix in vMix and 2 is equal to the first Mix input.
PreviewInput
ActiveInput
Fade, Zoom, Wipe etc
Restrictions
The Mix input is intended as a basic video mixer/switcher only, as a result the following features are not available:
- Stinger transitions
• Overlays (inputs can still be setup manually through the standard input MultiView feature) - Auto play/pause/restart of inputs. (This is to prevent unexpected situations where inputs are used by both the main mix and an input mix)
• Audio auto mixing.
• T-Bar transitions - Re-entrancy: You can use a Mix input as a source of another Mix input as long as they are done in order. For example using Mix 3 in Mix 4 is possible, but Mix 4 in 2 is not.
Output
The Output input simply adds the current main vMix Output 1 (Program) as an input for use elsewhere. This is handy for situations where a different source is needed for Outputs 2-4 or for a Video Call, but with the Program feed still showing as a picture in picture.
To add the Output input, click the arrow next to Add Input in the main vMix window and click the Output option.
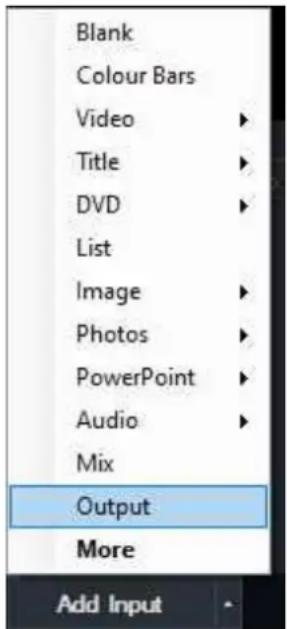
Note: This input is only available in 4K, Pro and Max editions of vMix.
Limitations
- Sending to output: Note that while sending this input to the main output is possible and won't cause any errors, it will simply show the last frame over and over as it will be referring to itself.
- Maximum 1 Output input at a time: For more copies, right click the input's clog icon to create virtual inputs as needed, or simply refer to input using a layer on another input.
- Only Output 1 is supported: This is a side effect of ensuring all outputs are available in real time and without infinite loops. (For example, Output 4 is rendered after all others outputs and therefore would not be available for use)
Preview
The Preview input simply shows a copy of what is displayed in the Preview area of vMix. This is useful for creating a custom MultiView Output when used in conjunction with the Output input.
To add the Preview input, click the arrow next to Add Input in the main vMix window and click the Preview option.
Note: This input is only available in 4K, Pro and Max editions of vMix.
Input Buttons
Input Buttons are the buttons available underneath each input.
Close
Close the Input and remove it from the Input Bar.
Quick Play
Fades directly to the Output Window and for video inputs, starts playing input from current position.
Cut
Cuts directly to the Output Window and for video inputs, starts playing input from current position.
Loop
The input will automatically begin from the start again once it has finished playing.
1,2,3,4 (Overlay)
Click one of the numbered buttons to overlay this input on top of the currently displayed Input.
The input will display according to the overlay settings.
Click the button again to remove the overlay with the transition running in reverse.
Overlay Preview
Each overlay can be displayed in the Preview window by using a right click instead of a left click.
Use a right click again to remove the overlay.
When in preview mode the Picture In Picture Zoom feature described below is activated with a left click instead.
TIP: An Overlay that is being previewed will be sent to the Output automatically when the next transition or cut occurs
Picture In Picture Zoom
When an overlay is active and set to "Picture In Picture" mode you can right click the numbered button to expand it to fill the screen.
Right click again to reduce the size back to the Picture In Picture settings.
Audio
Mute/unmute Audio.
Preview (TV Icon)
Displays a large preview of the Input. Click the preview window to close when done.
Settings (Cog Icon)
See the Input Settings section.
Live Pause
Live inputs such as Camera, NDI and Desktop Capture can be paused without turning off the underlying live feed.
Click the pause button under the input to activate this feature. To resume the live video click the button again to play.
NOTE: This will not affect MultiCorder, Instant Replay or Video Delay. These will continue to receive the live feed from the inputs as normal while pause.
Input Settings
Input Settings are available by clicking the cog button underneath an input while in by double clicking the thumbnail preview area below the title bar.
Advanced mode or

The Input Settings window has the following tabs:
General
Colour Adjust
Colour Key / Chroma Key
Colour Correction
Effects
Position
Layers / MultiView
Triggers
Tally Lights
PTZ
Advanced
Copy From
General
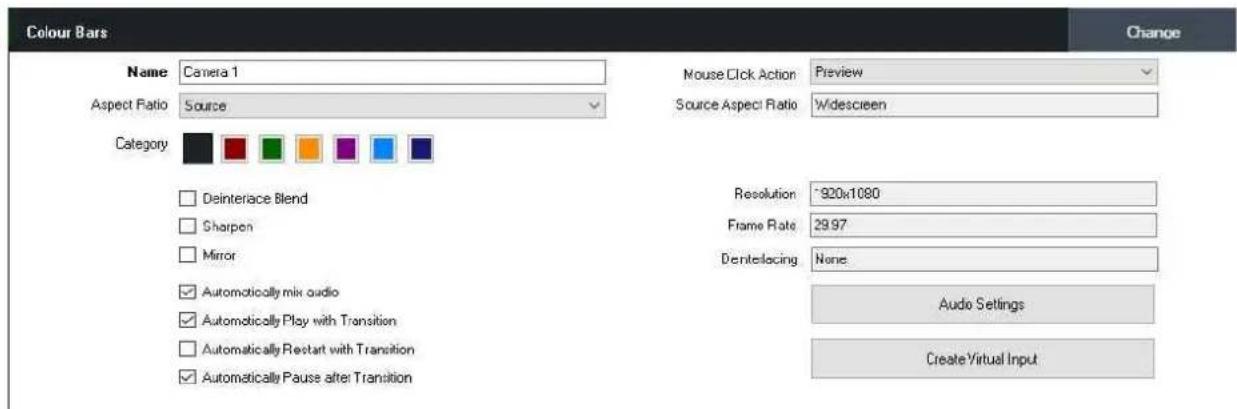
Change
Click Change to change the source of this input while preserving all settings including colour adjustments, chroma key, position and multi view.
Settings
Name: Change the name of the input as it displays in the title bar.
Mouse Click Action: Select the action to take when the preview window of this input is clicked. By default this is to send the Input to preview.
Aspect Ratio: manually change the aspect ratio of the input.
Category: see Categories
Deinterlace Blend: Turn on blend deinterlacing
Sharpen: Sharpen blurry video. (This requires a high end Graphics Card)
Mirror: Horizontal mirror
Automatically mix audio
Automatically Play/Restart/Pause with Transition
Audio Settings
Create Virtual Input
Copies the settings and contents of this input into a new Input.
The Virtual Input depends on the original input in order to display video, so if a camera input is closed any virtual inputs created from that camera will become blank.
Colour Adjust
Black Stretch: Increase the black level of the video.
White Stretch: Increase the white level (or brightness) of the video.
Red / Green / Blue: Independently adjust the rgb channels of the video.
Alpha: Independently adjust the transparency of the video.
Saturation: Drag this bar to the right to increase colour saturation or drag it to the left to convert colours into black and white (greyscale).
Premultiplied Alpha: Tick this box if the source is using premultiplied alpha which is often the case with MOV and other video formats containing an alpha channel.
Colour Key
Colour Key can be used to select a transparent colour when using an input as an Overlay or inside a Virtual Set.
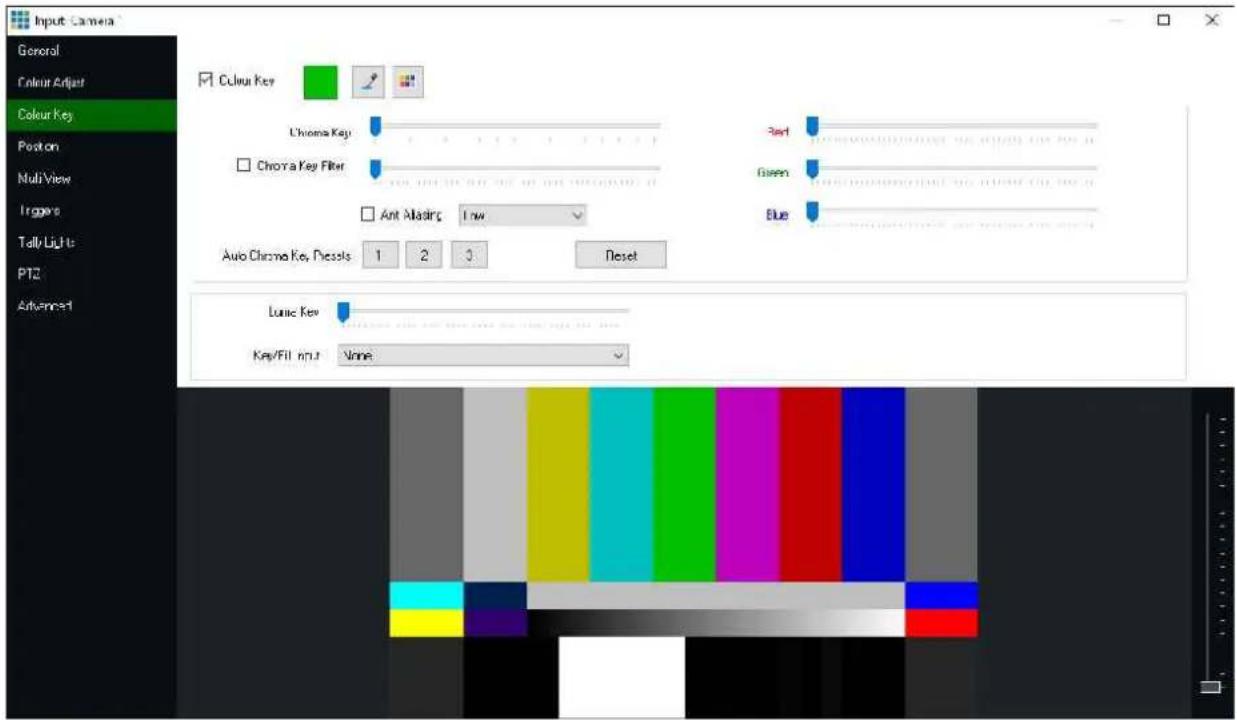
This option can also be used with a green screen, see the options below for more information.
Select: Manually select the colour that will be made transparent.
Auto Colour Key: Brings up a window a colour can be selected directly from the currently displaying input.
Tolerance: Set how close vMix should match to the Red/Green/Blue values in the colour key. The sliders all the way to the left represent an exact match.
Chroma Key: Move this slider slightly to the right to improve the colour key quality when a green/blue screen is being used.
Chroma Key Filter: Removes green/blue halos from an image when using a green screen. The scroll bar can also be used to increase the transparency of the green elements.
Auto Chroma Key Presets: Click the 1, 2 or 3 button presets to automatically select settings suitable for use with a green/blue screen.
Depending on your green screen setup some of these presets may work better than others. The sliders can then be adjusted slightly to fine tune.
Advanced Chroma Key
To achieve a high quality chroma key:
- Click Auto Colour Key at the top of the window and select a colour.
- Click Auto Chroma Key towards the bottom of the window.
- Drag the Chroma Key slider all the way to the right, this will initially appear to decrease the effectiveness of the colour key until step 4 is utilised below.
- Drag the Chroma Key Filter slider towards the right to increase the transparency of the background.
- If objects or actors appear transparent, try dragging back the Chroma Key slider and repeating step 4 until the most effective combination has been found.
- Click Anti Aliasing if jagged edges appear.
Luma Key
Luma Key is used to key out the background based on brightness or luminance. For example white text on black background.
Key/Fill Input
Select another input to use as the Key channel for this input.
The input selected should be grey scale with black representing fully transparent (0) and white as opaque (255).
Colour Correction
vMix allows professional colour correction for every input in addition to the basic tools provided by the Colour Adjust tab.
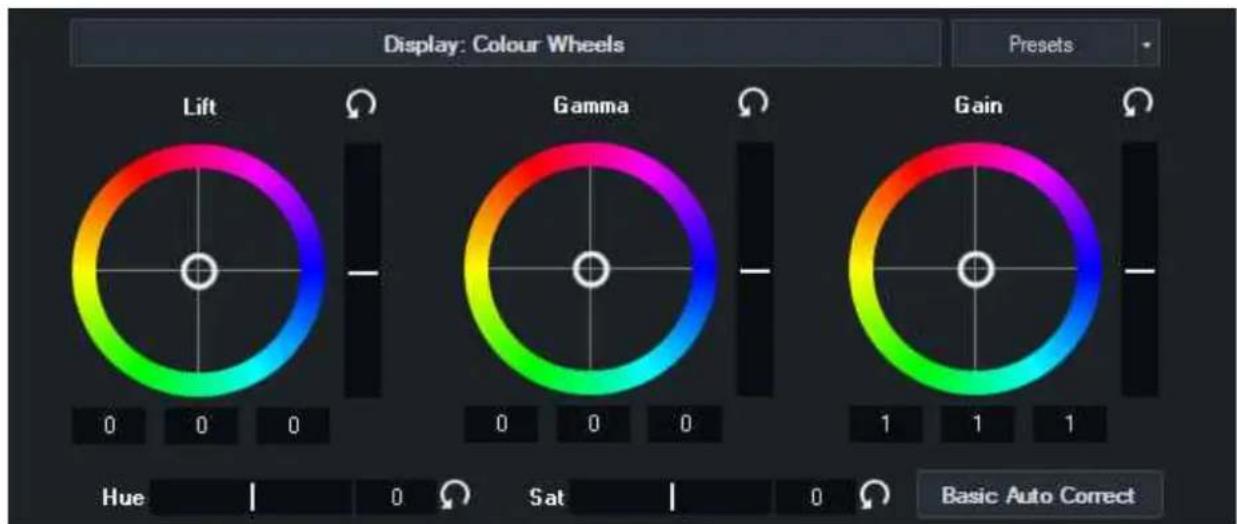
Colour correction is achieved using the industry standard Lift, Gamma and Gain controls as described below:
Lift: adjusts the dark areas of the image the most (such as shadows)
Gamma: adjusts the colours half way between black and white the most (e.g mid-tones)
Gain: adjusts the bright areas of the image the most (such as highlights)
Basic Auto Correct
The Basic Auto Correct button will automatically adjust the Lift and Gain controls to their optimal levels.
Reset Button

Press the reset button to to reset the levels to default.
Colour Wheel / Luminance Bar
Drag the white circle in the direction of the colours you wish to boost in the image.
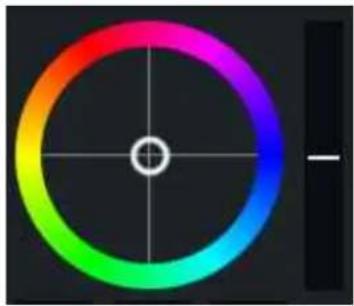
natural_image
Color wheel with gradient rings and center mark, no text or symbols presentTo adjust all colours equally, drag up or down the bar on the right of the colour wheel.
Colour Bars

Press the top button labelled "Display: Colour Wheels" to switch to colour bar mode.
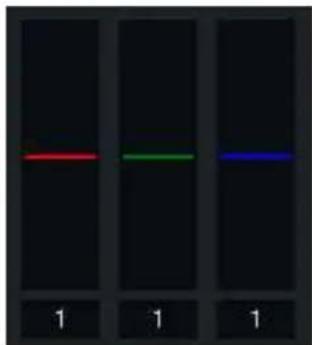
natural_image
Three horizontal colored lines (red, green, blue) on a dark background with '1' labels below each (no text or symbols on the lines themselves)Each of these three bars can be dragged up and down to adjust the Red, Green and Blue levels of the image respectively.
Hue / Saturation
Drag these bars left or right to adjust the image Hue or Saturation respectively.
Presets
A file containing the Lift, Gamma, Gain, Hue and Saturation settings can be imported and exported from the Presets menu for use in other productions.
Colour Correction Tutorial
The easiest way to visualise how these controls work is to turn on the Parade RGB Waveform Monitor as shown below:
vMix User Guide
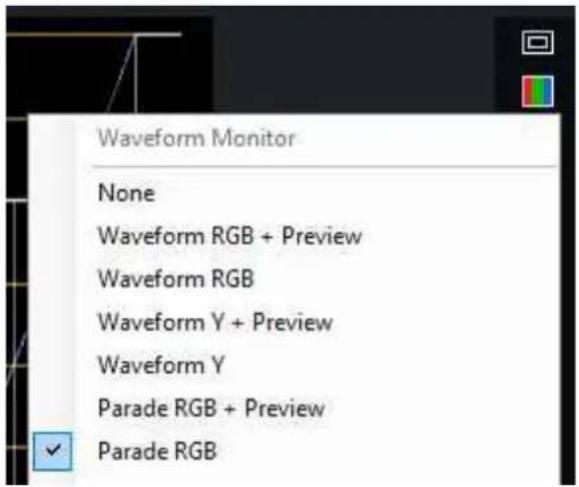
A typical video source in need of correction may look something like the following:
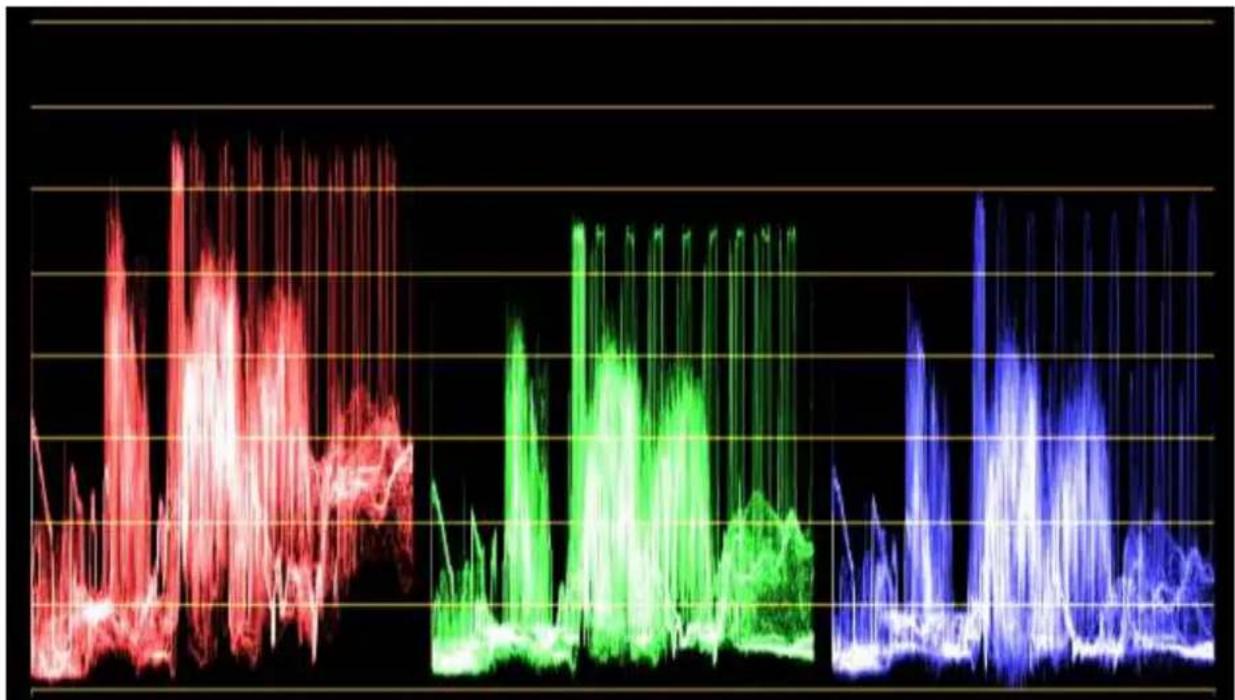
line
| Time | Red Line | Green Line | Blue Line | White Line | |------|----------|------------|-----------|------------| | 0 | 0 | 0 | 0 | 0 | | 1 | 1 | 0 | 0 | 0 | | 2 | 0 | 0 | 0 | 0 | | 3 | 1 | 0 | 0 | 0 | | 4 | 0 | 0 | 0 | 0 | | 5 | 1 | 0 | 0 | 0 | | 6 | 0 | 0 | 0 | 0 | | 7 | 1 | 0 | 0 | 0 | | 8 | 0 | 0 | 0 | 0 | | 9 | 1 | 0 | 0 | 0 | | 10 | 0 | 0 | 0 | 0 | | 11 | 1 | 0 | 0 | 0 | | 12 | 0 | 0 | 0 | 0 | | 13 | 1 | 0 | 0 | 0 | | 14 | 0 | 0 | 0 | 0 | | 15 | 1 | 0 | 0 | 0 | | 16 | 0 | 0 | 0 | 0 | | 17 | 1 | 0 | 0 | 0 | | 18 | 0 | 0 | 0 | 0 | | 19 | 1 | 0 | 0 | 0 | | 20 | 0 | 0 | 0 | 0 | | 21 | 1 | 0 | 0 | 0 | | 22 | 0 | 0 | 0 | 0 | | 23 | 1 | 0 | 0 | 0 | | 24 | 0 | 0 | 0 | 0 | | 25 | 1 | 0 | 0 | 0 | | 26 | 0 | 0 | 0 | 0 | | 27 | 1 | 0 | 0 | 0 | | 28 | 0 | 0 | 0 | 0 | | 29 | 1 | 0 | 0 | 0 | | 30 | 0 | 0 | 0 | 0 | | 31 | 1 | 0 | 0 | 0 | | 32 | 0 | 0 | 0 | 0 | | 33 | 1 | 0 | 0 | 0 | | 34 | 0 | 0 | 0 | 0 | | 35 | 1 | 0 | 0 | 0 | | 36 | 0 | 0 | 0 | 0 | | 37 | 1 | 0 | 0 | 0 | | 38 | 0 | 0 | 0 | 0 | | 39 | 1 | 0 | 0 | 0 | | 40 | 0 | 0 | 0 | 0 | | Note: The actual values for the red, green, and blue lines are not provided in the code. The actual values may vary due to the use of random numbers or data generation. There is no label for the red line in the chart.The red green and blue channels will typically look quite similar. In this example however, we can see the highlights (top of each waveform) are well below optimal brightness.
To adjust these channels so they match, change the colour wheels to colour bars by pressing the "Display: Colour Wheels" button.
vMix User Guide
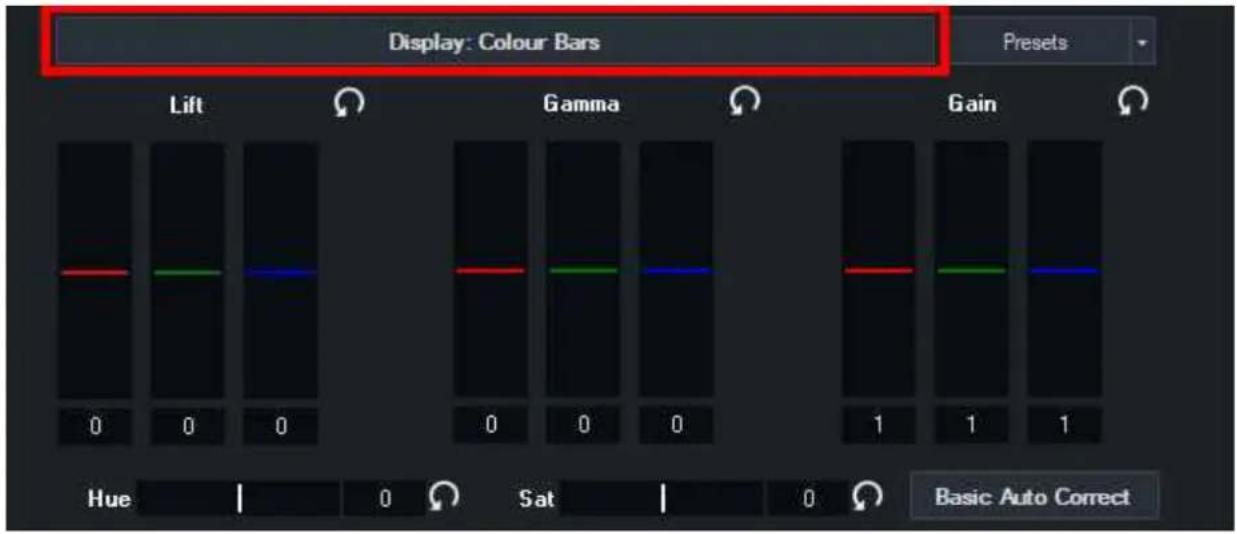
Next, slowly drag the red green and blue bars below the Gain heading upwards until the waveforms reach the top line.

Lift can be used to drag the waveforms towards the bottom line, and finally Gamma can be used to adjust the waveform around the middle of the image.
Switching back to Colour Wheels allows us to see how these adjustments look from a different perspective.
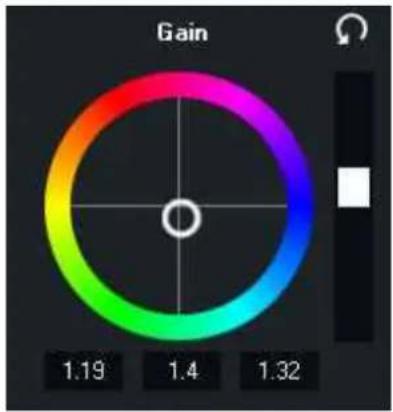
pie
| Gain Value | |------------| | 1.19 | | 1.4 | | 1.32 |As you can see the colour has been shifted slightly towards the blue/green, with a small amount of overall brightness added to all colour channels.
(Black/White bar to the right of the colour wheel)
Effects
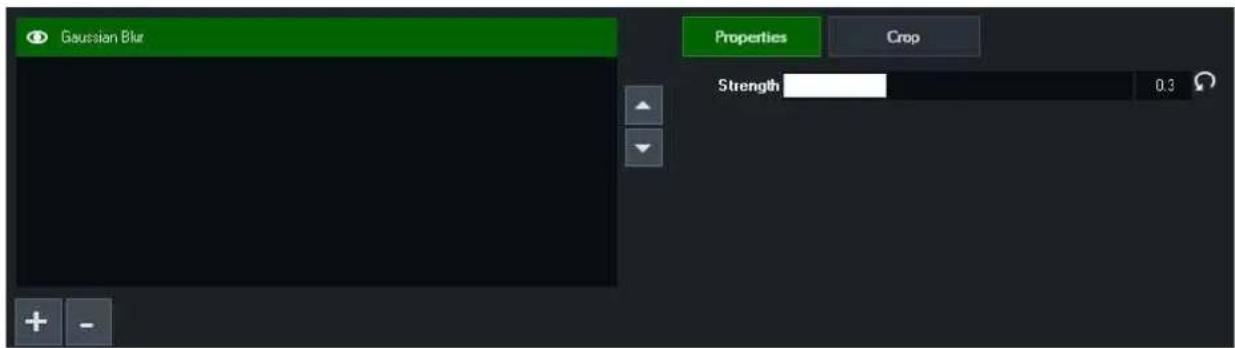
Input Effects allow multi-layered effects to be added to any input.
Add Effect
Click the + button to add one of the built in effects.
Order Effects
Multiple effects can be added to the list, with each processed in the order they are added from top to bottom.
Use the up and down arrows to the right of the list to change the order of effects.
Crop Effects
Each effect can have a crop applied that will limit it to a portion of the input only. For example this could be used to blur just a portion of the screen.
Disable Effects
Effects can be temporarily disabled by clicking the eye icon next to the effect.
Rename Effect
Double click and item name in the list to rename it.
Effect Types
Gaussian Blur
This is a standard blur effect with a Strength property. The higher the strength the stronger the blur. Note that blur effects are extremely GPU intensive, a blur may use a significant fraction of GPU resources even on a high end graphics card.
WARNING: Blur effects should not be relied upon for obscuring sensitive items or people's faces. Adjustments elsewhere in vMix may cause the blur effect to temporarily deactivate at any time, revealing whatever is underneath.
LUT
LUT, short for Look Up Table, is a special type of file that specifies a new colour to apply to every colour within the Red Green Blue 3D colour space.
vMix supports PNG style LUTs (64x64x64 8-bit PNGs as used by OBS) and CUBE style 3D LUTs (as exported by programs like DaVinci Resolve)
Click Browse to select a LUT file to apply and use the strength slider as required.
A strength of 1 replaces all colours with their equivalents in the LUT. A strength less than one blends the original colour with the new colour.
Exporting a LUT with DaVinci Resolve
- Select the Color section from the tabs along the bottom
- In the middle sources panel, right click the media with colour corrections you wish to export
- Click Generate LUT from the menu then select 65 Point Cube.
- Save the file
- Go to vMix and add the LUT to an Input from the Effects tab as per the instructions in the LUT section above.
Alpha Mask
This effect uses transparency information in a PNG file to generate a mask.
All colour information is ignored.
For example a circle of any colour with a transparent background will mask the vMix input so that only the circle area is shown.
Blurring/anti-aliasing the edges of the PNG mask in photo editing software will also lead to a softened edge in vMix.
Layers / Multi View
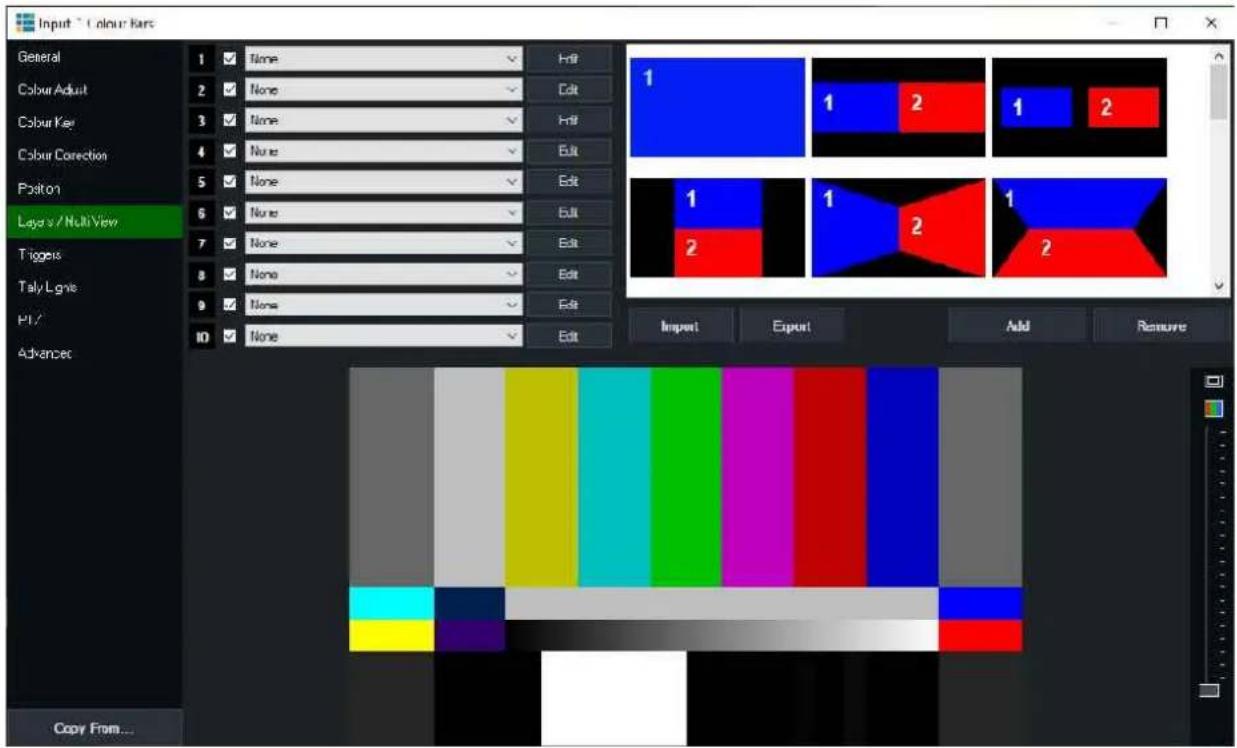
Overview
Select up to 10 inputs to display together in one of the selected configurations. For example, split screen and picture in picture.
Each of these inputs can be positioned by dragging the windows within the preview box at the bottom of the window.
Hold down shift while dragging to resize each input. Alternatively click one of the Edit buttons to adjust manually from the Position tab..
Once the positions have been configured, the Add button on the right hand side can be used to create a template.
This template will be saved outside of vMix presets and sessions allowing custom templates to be used in multiple productions.
NOTE: When selecting inputs that have layers of their own, only two layers deep will be rendered. E.G the input, it's layers, and the layers within those layers will be rendered only.
Import
Import from file a previously exported layout. This layout contains information such as the position, border and cropping of all 10 layers.
Export
Export the position, border and cropping of all 10 layers to file. This can then be imported on other systems as needed.
Add
Click Add to save the current position, border and cropping of all 10 layers to the list of templates.
Remove
Click Remove to remove the current selected template from the list.
Show / Hide
It is possible to hide a Layer while keeping its settings by unchecking the checkbox
Move / Change Order
Layers can be moved to different numbers by dragging and dropping the number boxes.
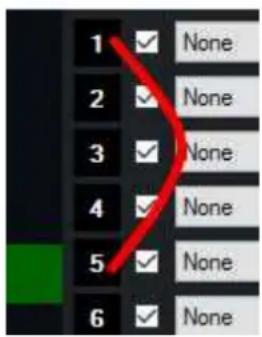
Moving a Layer will change its order while preserving all position and cropping information.
This is useful in situations where you want to move an Input so that it appears "on top" of another where 10 is the top most layer.
(This is also known as the Z-Index, or Z-Order)
Layer 10 will always appear on top of Layer 9, Layer 9 on top of Layer 8 and so on.
Edit
Click edit next to a layer to edit settings such as position, crop and border.
Position
Zoom: Zoom in or out.
Pan X: Pan from left to right
Pan Y: Pan from top to bottom
Rotate: Rotate image from right to left.
Crop X1: Crop from the left hand side
Crop X2: Crop from the right hand side
Crop Y1: Crop from the top
Crop Y2: Crop from the bottom
Each of these options can also be changed for one of the 10 layers through the dropdown menu.
Copy/Paste
The Copy and Paste buttons at the top of the Position window can be used to copy all position, crop and border settings from one layer and apply them to any other layer, evene on a different input. Simply click Copy on the layer to be copied, then go to the Input or Layer to copy to and click Paste.
Source Rotation Button

The source rotation button will adjust for the rotation of the source automatically zooming as appropriate to
fit the newly rotated input in frame.
This is useful for inputs like vertical video.
Click the button to rotate 90 degrees each time, click multiple times to continue rotating in the clockwise direction.
Layer Borders
Borders can be displayed around layers by selecting one of the layers (1-10) in the dropdown box, ticking the Border check box and adjusting the settings as required.
Restrictions and Limitations
- Setting a thickness of only a few pixels in size may not completely cover the edges of the layer. Increase the thickness until the edges are covered as expected.
- A large radius may not completely cover the layer's border. Increase the thickness and/or reduce the radius until the corners are covered.
- The Merge transition effect is not able to dynamically change the border in real time for performance reasons.
If the border of an input is different between the source and destination of a merge, or the cropping is different then it will be hidden for the duration of the transition.
- The thickness of the border is impacted by the Zoom, so if Zoom is set to 0.5 (50%), the thickness will need to be double that of a 1 (100%) zoom to look the same size.
- Layer Borders support standard aspect ratios only (Widescreen 16:9, Normal 4:3 or Anamorphic) sources with different aspect ratios such a square will result in the border becoming distorted or stretched on either axis.
Triggers
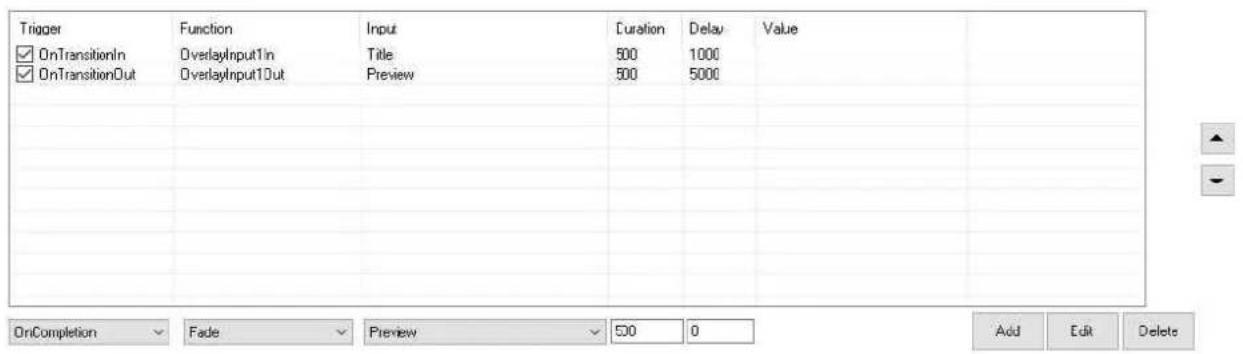
Triggers can be used to automate tasks when an Input either begins a transition (OnTransitionIn), begins a transition out (OnTransitionOut) or when a video completes playback (OnCompletion)
OnOverlayIn and OnOverlayOut can also be used when an Input is used as an Overlay
An unlimited number of tasks can be added, with each task running in the order it appears in the list.
In the example above the Title 1 input is turned on as an overlay 1 second after the current input begins a transition. After 5 seconds the overlay is turned off again.
Trigger
- OnTransitionIn
- OnTransitionOut
- OnOverlayIn
- OnOverlayOut
vMix User Guide
- OnCompletion (applies to video, list, photos and powerpoint inputs when they reach the end assuming Loop is not enabled).
- OnCountdownCompleted (applies to the title input, when a configured countdown clock reaches 0)
Function
Select a task or transition effect (such as Fade, Cut etc)
Note that in order to prevent loops, transition effects have no effect for OnTransitionIn or OnTransitionOut.
Input
Select the Input the Function applies to (if applicable)
Duration
Select the duration of the transition effect (if applicable)
Delay
This trigger will wait for the selected amount of time (in milliseconds) before completing the selected Function and moving on to the next item in the list.
Triggers that use the same triggering name (such as OnTransitionIn) will run one after the other in the order that they are listed. In the example below, the OverlayInput1 function will be triggered 5 seconds after the 'Input 1: Sample Video' has transitioned to the main screen, and then an additional 2 seconds after this, the OverlayInput2 function will be triggered.
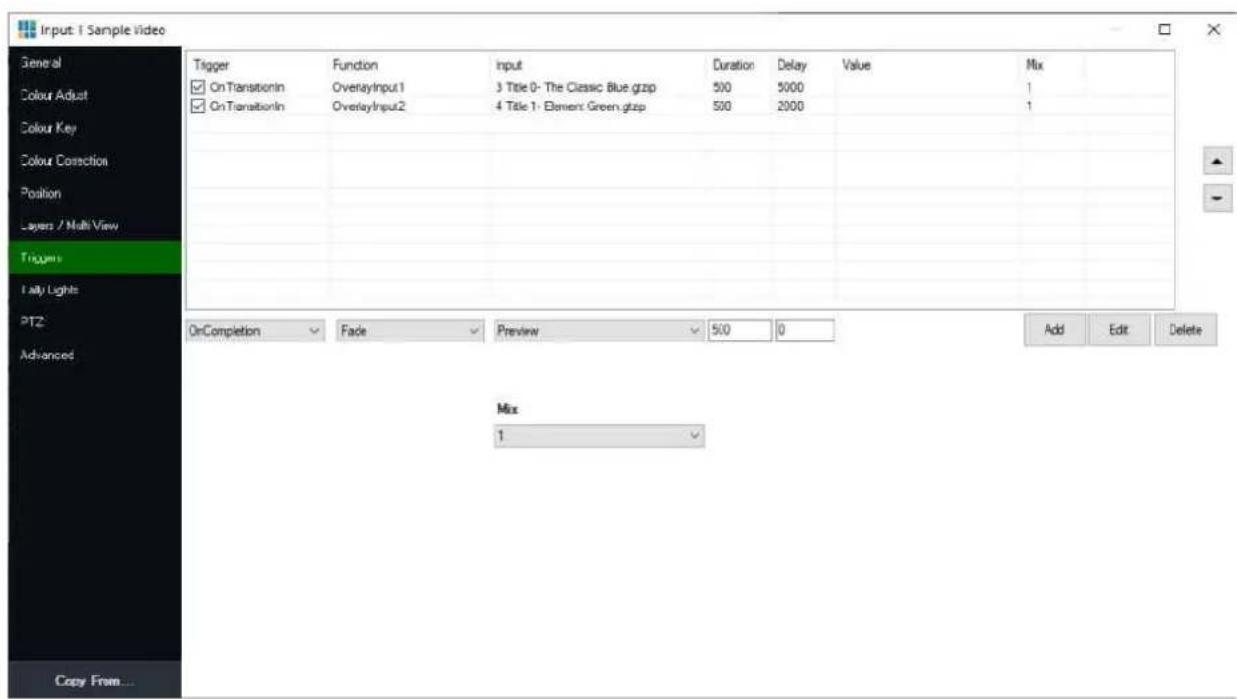
Important Note: Delay is limited to 30 seconds maximum (30000 ms). Any delay higher than this will be limited to 30 seconds by vMix, to prevent triggers occurring later in a production unexpectedly. Therefore, Triggers should not be used for long running operations, instead look at the PlayList or Scripting features.
Triggers and MultiView Overlays
Triggers will only be activated on the primary input. For example if Input A is setup with Input B and C as
vMix User Guide
MultiView Overlays, only the Input A trigger will be used.
The exception to this is OnCountdownCompleted which will trigger regardless.
Tally Lights
See Tally Lights
PTZ
See PTZ - Pan Tilt Zoom
Advanced
Filters
View and change properties for the DirectShow filters used to display this input.
Delay (Capture inputs only)
Set a fixed video delay in frames. For example if the capture input is 25p and a delay of 4 is set, this equals a delay of 160ms
Copy From
The Copy From button can be found at the bottom of the left hand side of the input settings window and allows copying settings from another input.
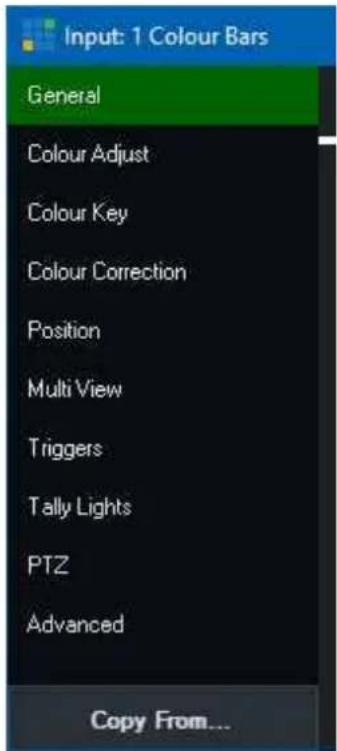
Clicking the button will display a window of multiple settings that can be copied at the same time:
vMix User Guide
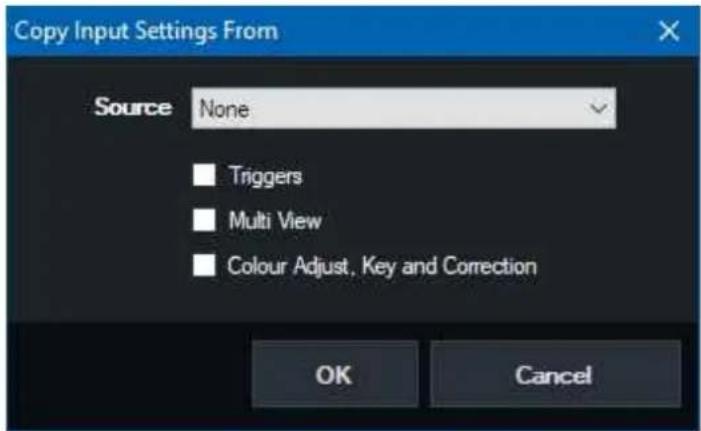
NOTE: To copy settings from one Layer to another, use the Copy and Paste buttons in the Position tab instead.
Audio
Audio Mixer
Audio Settings
Control settings such as Gain and add effects including Compression, EQ and Noise Gate here
Audio Plugins
Recording Audio
Audio Meters
Audio Mixer
Click the Audio Mixer button on the right hand side of the main interface to bring up the Audio Mixer tab as shown below.
Each fader also includes an Audio Level Meter for the Left and Right channels respectively.
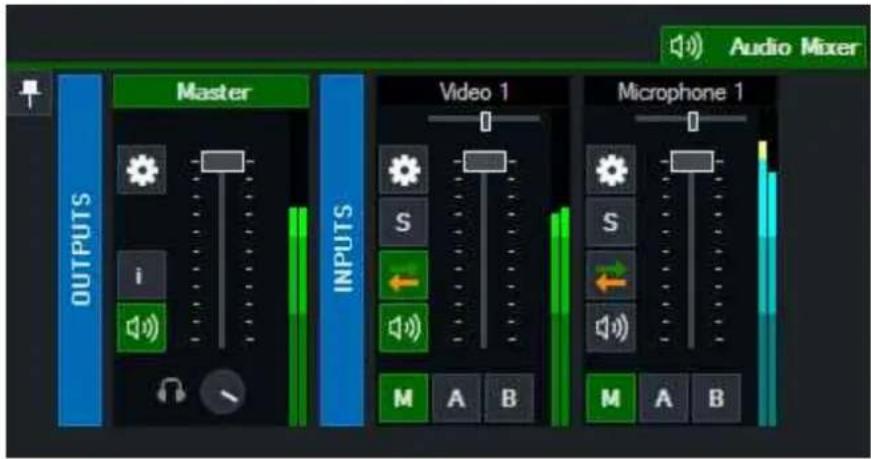
Detach Button

The Audio Mixer can be detached from the main vMix window by clicking the Pin button. To dock the Audio Mixer back again, click the Minimise button of the detached Audio Mixer window.
Outputs
The Master audio mix is displayed here alongside Bus A and B if they have been configured.
Headphones volume can be configured independently by spinning the Headphone volume control knob.

Inputs
Each Input that contains audio will be displayed here.
Audio Settings

Click the cog button to display the Audio Settings window.
Solo

Click the Solo button to preview Input audio in the Headphones without affecting the mix. Solo audio is Post-Effects and Post-Fader and will be audible even if the Input is muted.
Right click the Solo button to Solo multiple inputs at the same time.
Mute

Click the speaker icon to Mute/Unmute an audio input.
Automatically Mix Audio

Click the Green and Orange Arrow button to enable/disable automatic mixing of audio. This option is also known as "Follow" on traditional video switchers.
Audio Buses
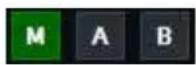
vMix allows for up to eight independent audio buses (including Master) to allow for complex audio routing scenarios including mix minus.
M
M is the Master or Default audio mix and is sent to Recording, Streaming and External Output.
A, B, C, D, E, F, G
These are seven additional audio mixes that are sent to the respective Audio Output devices configured in the Audio Outputs settings window.
Click the M, A or B buttons underneath each input to configure each independent each mix. By default all new inputs will be sent to the Master mix only.
To enable or disable mixes C-G right click the A or B buttons to display a selection menu.
Sending Audio Bus to Master
Click the M button underneath buses A-G to include the audio in Master and Headphones.
Note: vMix Call Master/Headphones audio excludes any buses sent to master using this method as doing so would prevent mix minus from working correctly.
Note: The Speaker/Mute button controls the audio for all audio buses not just the Master or M bus.
Collapsing Mixers
All mixers can be collapsed and restored by right clicking the Title of the mixer.
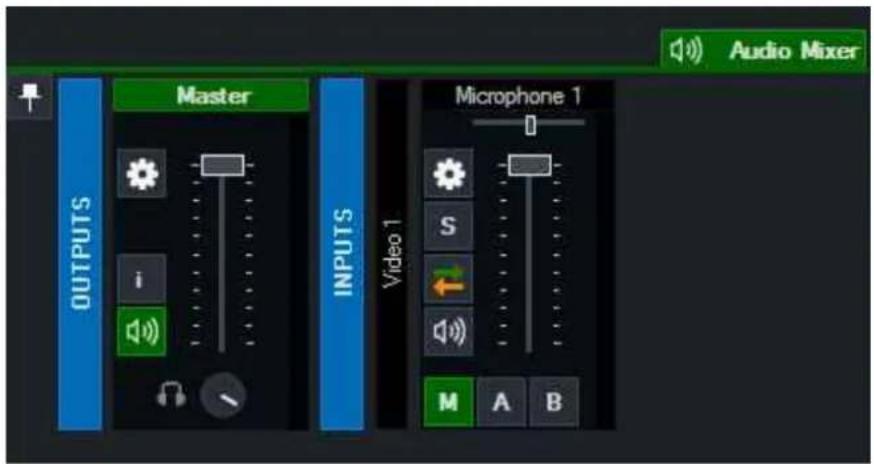
Audio Settings

bar
Audio Settings - Video 1 | Category | Pre (dBFS) | Post (dBFS) | | :--- | :--- | :--- | | General | -23.8 | -23.4 | | Plugins | -19.6 | 36 | | EQ | 0 | 12 | | Compressor | 0 | 18 | | Noise Gate | 0 | 24 | | Channel Mixer | 0 | 36 | | Channel Matrix | 0 | 90 | Format: 48000 Hz 16 Bit 2 Channels Channel: All Gain: 0 dB Delay: 0 milliseconds Reset: Automatic Gain Control Reset: 0 milliseconds CloseGeneral
Headphones Volume
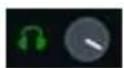
Each audio input can have its own independent headphones volume set.
This is great for situations where you want an audio source such as a microphone audible on the final recording or stream but do not want to hear
it in your own headphones as the slight audio delay coming from your own microphone can be disorienting.
The headphones volume circle can be dragged up to move to the right (more volume) or dragged down to move to the left (less volume).
Or the headphones icon can be clicked to toggle between full volume (green) and muted (grey).
Pre / Post
These audio meters can be used to monitor the audio audio at the pre-effects stage (for any effects, volume or gain, including delay)
and the post-effects stage (after all effects, volume, gain and delay have been applied)
Format
Displays the current audio format of the input
Channel
Select the audio channel to use for this input.
If you have a Microphone plugged into the left channel or right channel independently. Select
SeparateMono here.
Separate mono allows you to adjust the volume of both mono channels independently from the Audio Mixer.
The audio from each microphone will be audible on both the left and right channels simultaneously.
For finer control of how different channels are mixed. See Channel Mixer and Channel Matrix below.
Gain
Select the gain (or amplification) in decibels.
Gain is added after the compressor. (See below)
Delay
Delay the audio source in milliseconds
Visible in Mixer
Untick this box to hide this Input from being displayed in the Audio Mixer.
Plugins
See Audio Plugins
EQ
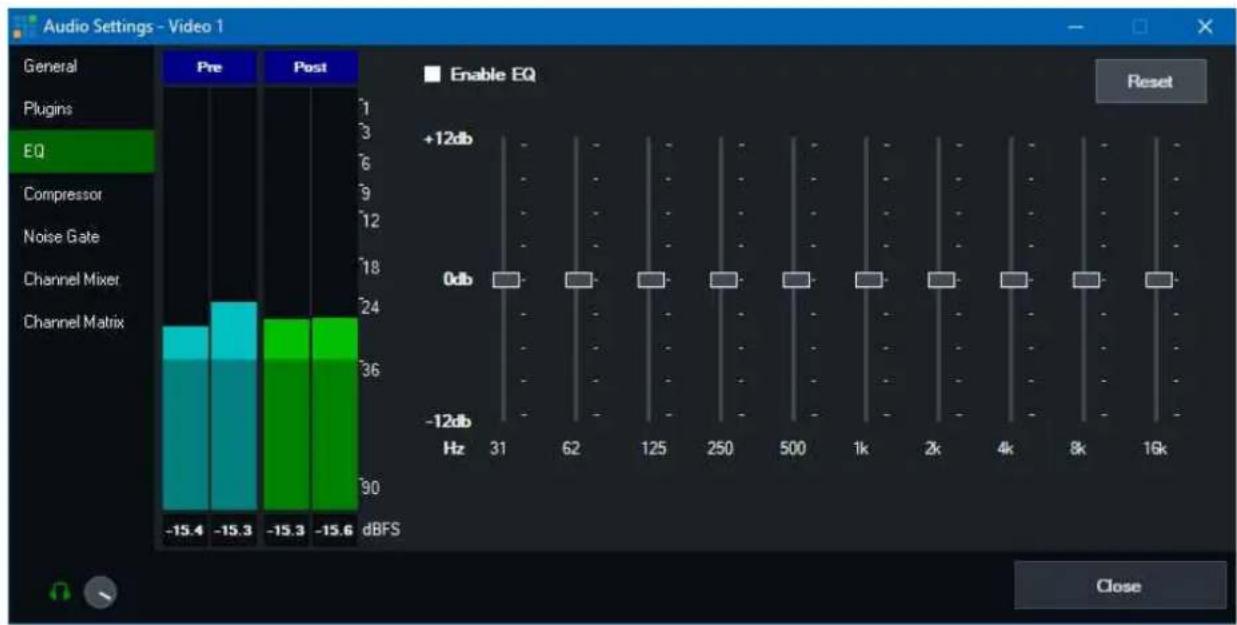
bar
| Category | Pre | Post | | ---------------- | ----- | ----- | | General | -15.4 | -15.6 | | Plugins | -15.3 | -15.6 | | EQ | -15.3 | -15.6 | | Compressor | -15.3 | -15.6 | | Noise Gate | -15.3 | -15.6 | | Channel Mixer | -15.3 | -15.6 | | Channel Matrix | -15.3 | -15.6 |Compressor
Compressor is a standard dynamic audio compressor.
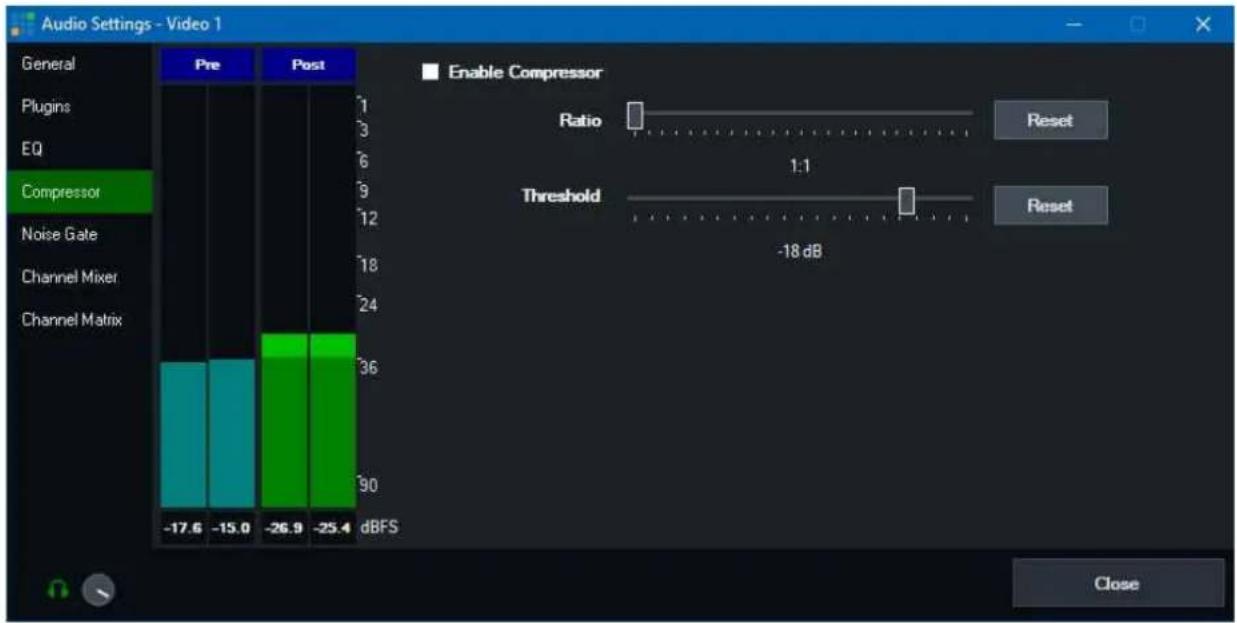
bar
Audio Settings - Video 1 | Category | Pre (dBFS) | Post (dBFS) | | :--- | :--- | :--- | | General | -17.6 | -25.4 | | Plugins | -15.0 | -26.9 | | EQ | - | | | Compressor | | | Enable Compressor Ratio 1:1 Threshold -18 dB Reset CloseRatio: Specify a Ratio other than 1:1 to turn on the compressor.
Threshold: Specify the sound level for compression. Any audio above the threshold will be compressed (volume reduced) according to the ratio above.
Noise Gate
The Noise Gate is a handy way of reducing noise on an Audio Input such as a Microphone. It works by quickly fading out the audio when it drops below a certain dB (decibel) Threshold
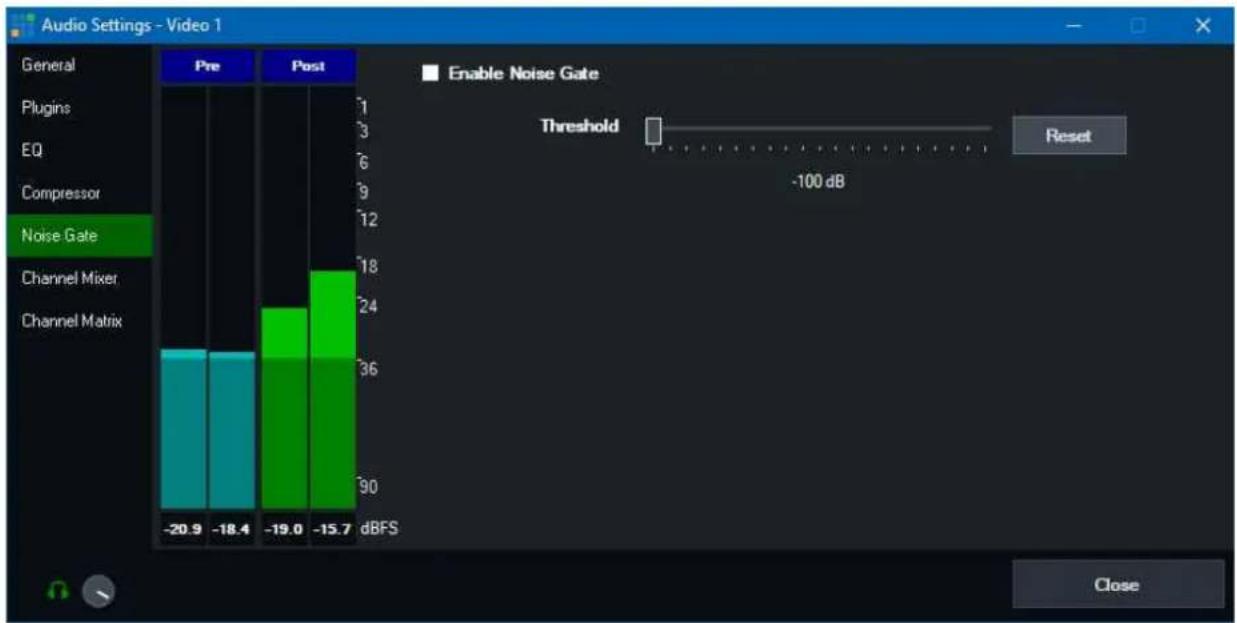
bar
Audio Settings - Video 1 | Category | Pre (dBFS) | Post (dBFS) | | :--- | :--- | :--- | | General | -20.9 | -18.4 | | Plugins | -19.0 | -15.7 | | EQ | -19.0 | -15.7 | | Compressor | -19.0 | -15.7 | | Noise Gate | -19.0 | -15.7 | Channel Mixer | -19.0 | -15.7 | | Channel Matrix | -19.0 | -15.7 | Enable Noise Gate Threshold -100 dB CloseChannel Mixer
The channel mixer can be used to set the volume level of individual channels. An independent audio meter is also available for each channel.
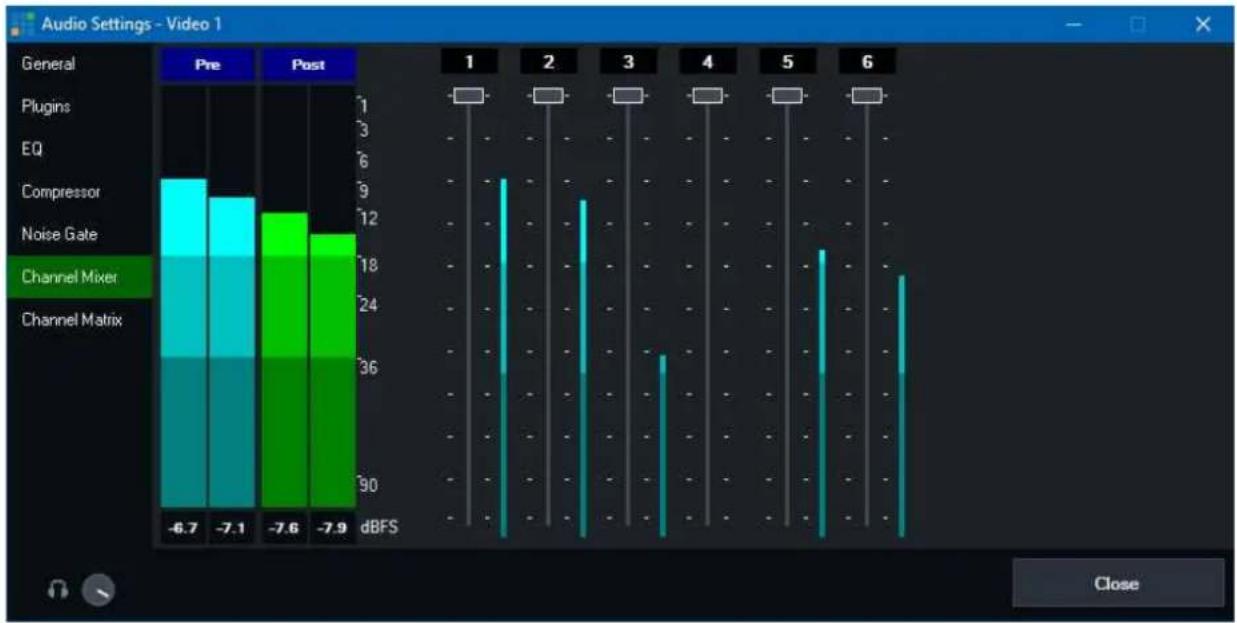
bar
Audio Settings - Video 1 | Category | Pre (dBFS) | Post (dBFS) | |---|---|---| | Compressor | -6.7 | -7.1 | | Noise Gate | -7.6 | -7.9 | | Channel Mixer | 12 | 18 | | Channel Matrix | 36 | 36 |Channel Matrix
Channel Matrix is an 16x16 audio router built in to every input.
This can be used for simple setups such as routing a mono Microphone channel to both Left and Right, all the way up to advanced scenarios
where each of the independent NDI or SDI Embedded audio channels can be routed to one of the eight stereo audio buses.
Each column represents a source channel, each row represents a destination bus that the channel can be routed to.
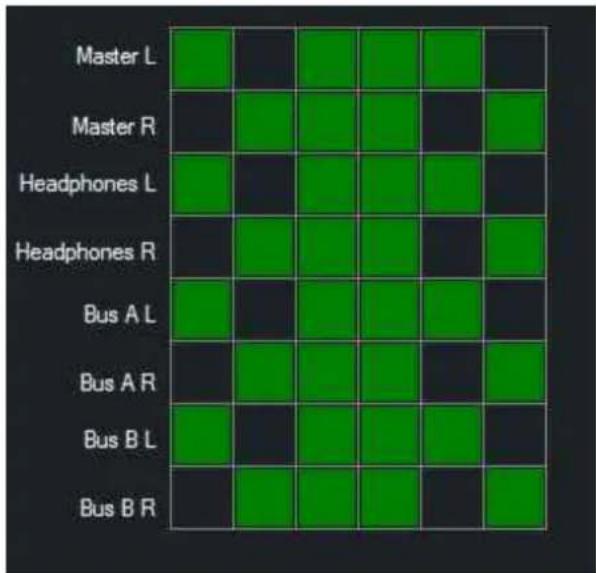
Example: Convert Mono Microphone on Channel 1 to Stereo
Click all the boxes so they are green like the following:

bar
| Category | 1 | 2 | |---|---|---| | Master L | Green | Black | | Master R | Green | Black | | Headphones L | Green | Black | | Headphones R | Green | Black | | Bus A L | Green | Black | | Bus A R | Green | Black | | Bus B L | Green | Black | | Bus B R | Green | Black |Example: Route 3 independent stereo audio language pairs to the 3 output buses.
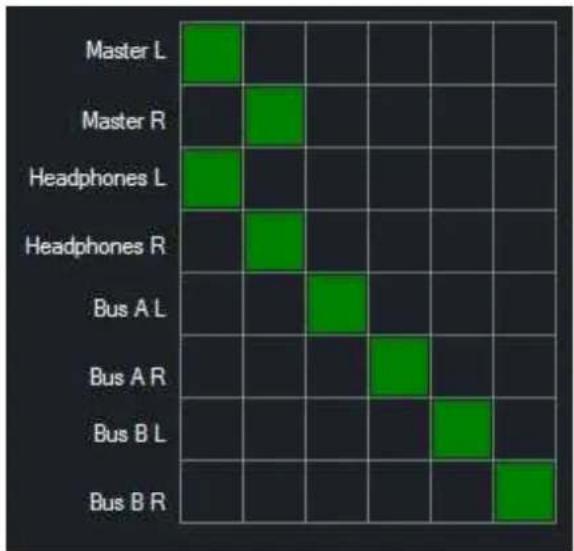
The first two channels are routed to Master/Headphones L+R, the second two are routed to Bus A L+R and the final
two are routed to Bus B L + R.
Audio Plugins
The Audio Plugins feature allows adding 3rd party audio plugins to inputs and outputs in vMix. vMix supports all 64-bit VST3 audio plugins. VST3 is a popular audio plugin standard by Steinberg commonly used by DAW (Digital Audio Workstation) software.
Installing audio plugins
To install an audio plugin, simply install it to the computer using the provided installer from the plugin vendor. Once installed, it will appear automatically in vMix without any additional configuration required.
Adding an audio plugin to an Input or an Output Bus
- Open the Audio Mixer in vMix by clicking the Audio Mixer tab in the middle right of vMix.
- For Inputs: Locate the mixer for the audio input and click the cog icon to open up Audio Settings.
For Audio Buses: Locate the audio bus such as Master and click the cog icon to open up Audio Settings.
- Click the Plugins tab as shown below:
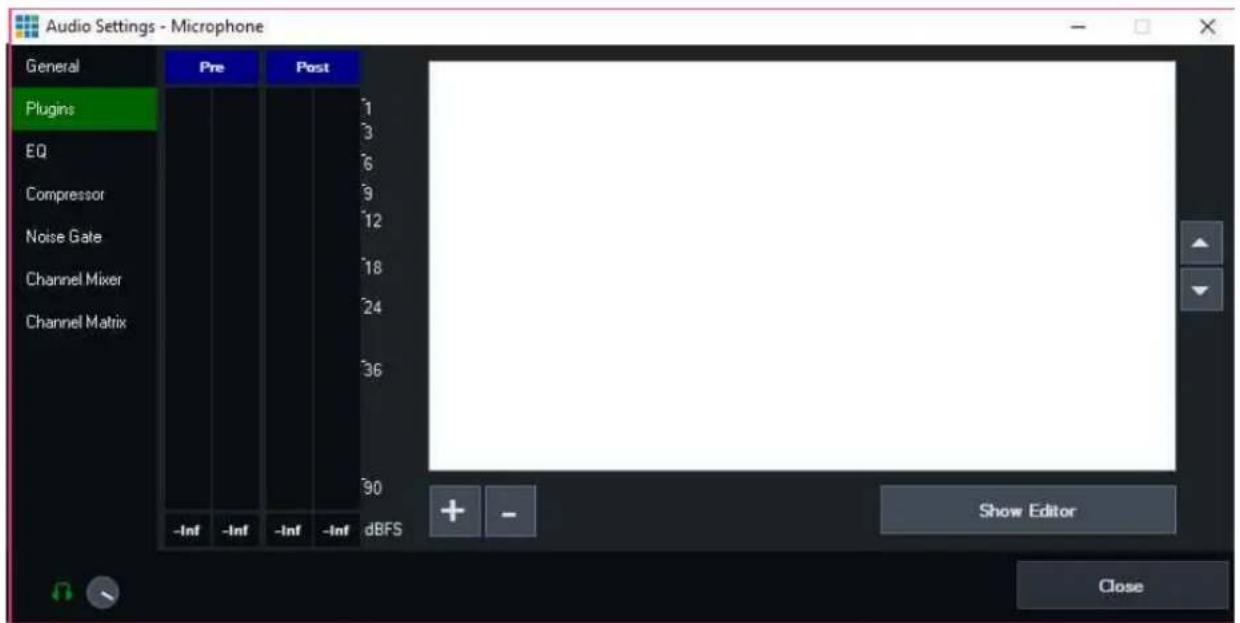
- Click the + button to add a new plugin.
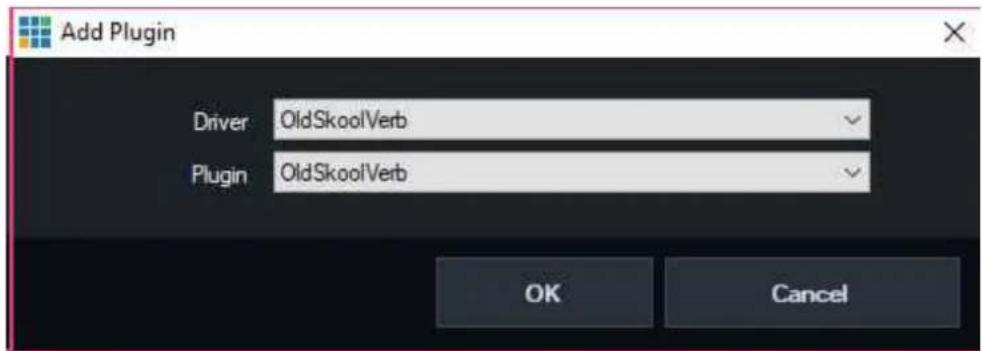
Select the plugin to add from the Driver and Plugin dropdown boxes and click OK.
There are two boxes because some plugins may have multiple variations available within a single plugin set.
In the above example the free "OldSkoolVerb" plugin has been selected, which is an audio reverb plugin.
- Once added, the plugin will appear in the list. To configure the plugin's settings click Show Editor.
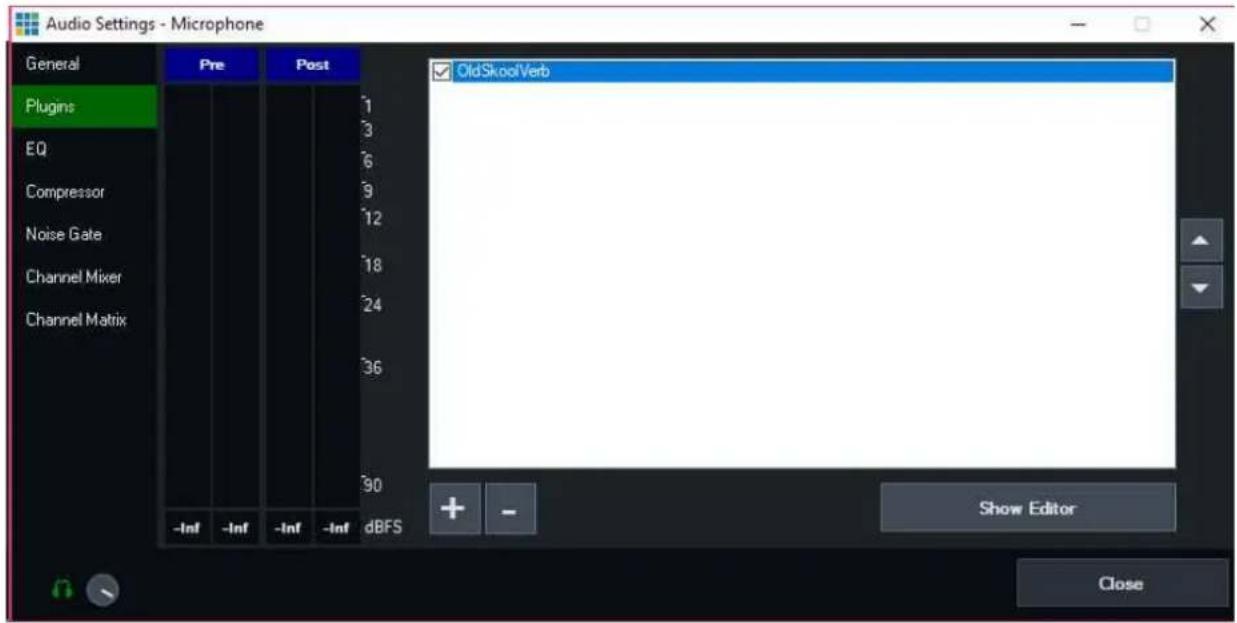
Temporarily turning on or off individual plugins
A checkbox next to each plugin in the list can be used to turn on or off that plugin.
Adjusting the plugin processing order
Plugins are applied to the audio in the order they appear in the list starting from top to bottom. The two arrow buttons at the right side of the list can be used to change the order.
Recording Audio
There are a number of ways to use audio in a vMix production. A couple of these approaches are described below including an advanced setup using an external audio mixer.
Basic - Use the built in vMlx Audio Mixer
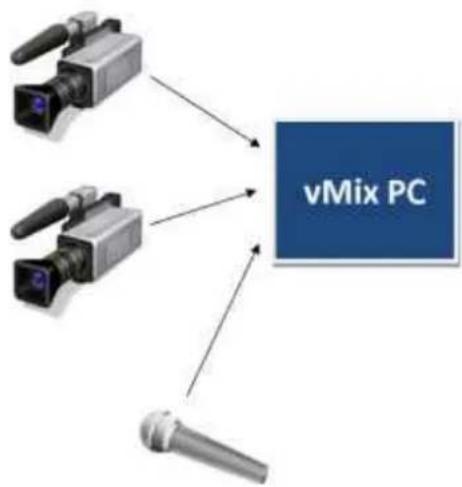
flowchart
graph TD
    A["Camera 1"] --> C["vMix PC"]
    B["Camera 2"] --> C["vMix PC"]
    D["Camera 3"] --> C["vMix PC"]
In the diagram above, all audio sources such as Microphones and Cameras run directly into vMix. vMix provides a built in fully functional professional audio mixer with built in EQ, Compression and Gain
controls.
More details can be found in the Audio Settings section.
The Master audio mix includes all inputs in vMix, including Cameras, Microphones and Videos and will be recorded according to the levels set in the built in Audio Mixer.
Make note of the Automatically Mix Audio setting as this determines if audio sources are automatically muted when not in use.
Multiple microphones can be connected to your vMix PC using a USB ASIO audio interface, such as from Behringer, M-Audio, Focusrite and others.
The Behringer UMC404 is an example of an audio interface that supports up to 4 XLR microphones and each can be added separately to the vMix audio mixer for independent control.
Advanced - Using an External Audio Mixer

flowchart
graph TD
    A["Camera"] --> C["vMix PC"]
    B["Camera"] --> C
    D["Sensor"] --> C
    C --> E["Audio Mixer"]
    F["Speaker Output"] --> E
    G["Audio Mixer Output"] --> E
In the diagram above, all external audio sources such as Microphones are connected to a separate external Audio Mixer.
There are two connections that need to be made to vMix:
1. vMix Audio Output connected to External Audio Mixer Input
This contains all the audio from vMix inputs such as video clips.
This can be connected using a stereo audio cable from the computers built in Speaker Output or a USB Audio Interface such as the Behringer UMC404.
Many Audio Mixers include built in USB connectivity which is recommended to ensure the highest possible audio quality.
Regardless of which output method you choose, this output can be selected under the Master option Settings -> Audio Outputs in vMix

2. External Audio Mixer Main Mix / Output connected to vMix
This is the final audio mix that should include all audio needed for the recording and stream.
This connection from the mixer to vMix can be made using a USB Audio Interface or the built in USB capabilities of some audio mixers (recommended)
Or using the Line In / Microphone input on the computer. If using the computers Line In, be sure to confirm the audio mixer output is "unbalanced".
As "balanced" audio signal will result in heavily muted and/or distorted audio.
Finally, to add this audio mix to vMix, follow the instructions below:
- Click Add Input in vMix and select Audio Input
- Select the Audio Device and optionally the Channel(s) and click OK.
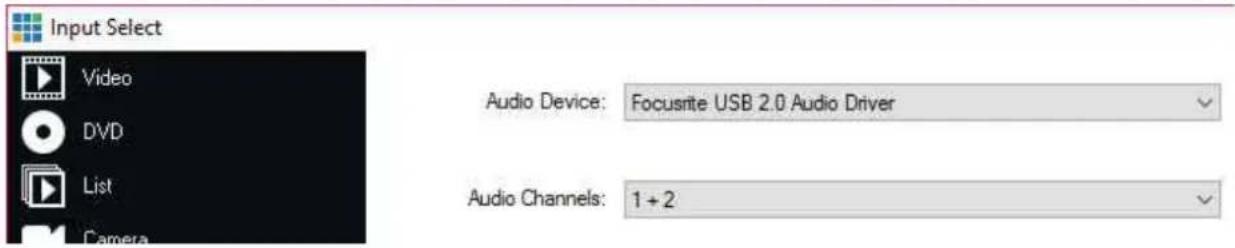
- Open up the vMix Audio Mixer and turn off the "M" bus and enable bus "A" instead.
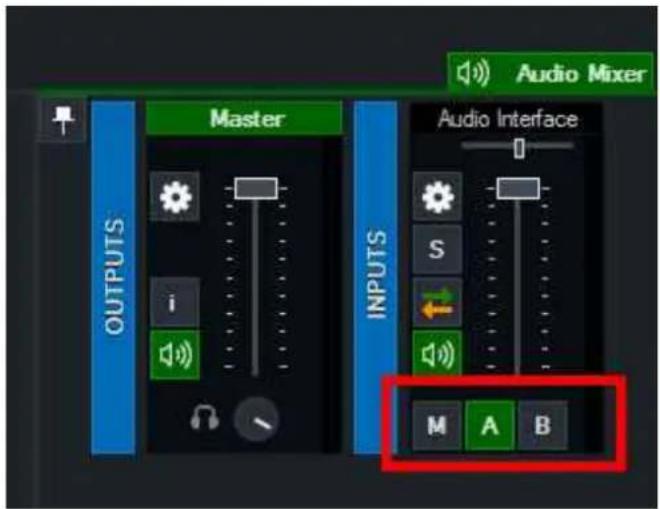
- From Recording Setup, select BusA as the audio source and also from Streaming Settings -> Quality as shown below:
vMix User Guide
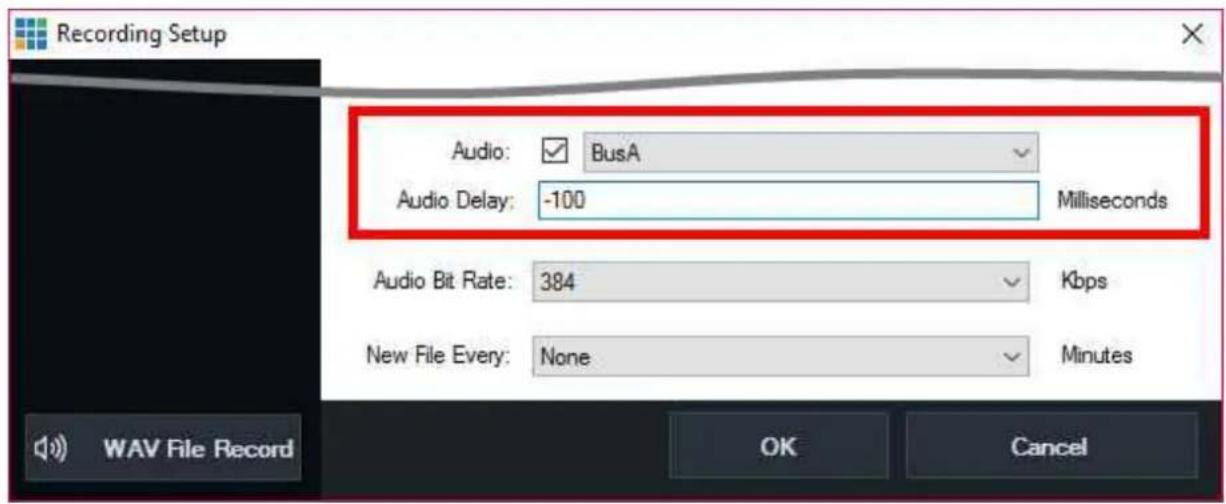
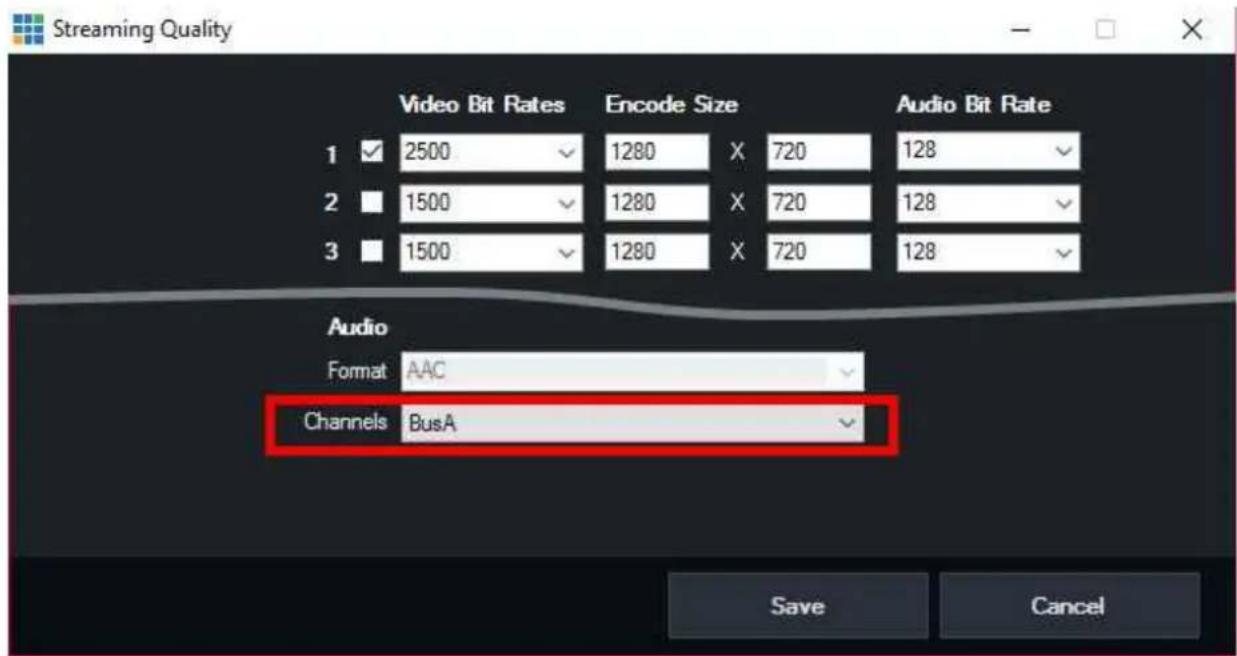
- A negative audio delay should also be used to compensate for the delay of routing all audio externally. This can be done from the Recording Setup window and also Settings -> External Output for the Stream
You may need to adjust this to suit your particular setup, but in general a delay of -80 for 30p and -100 for 25p works best.
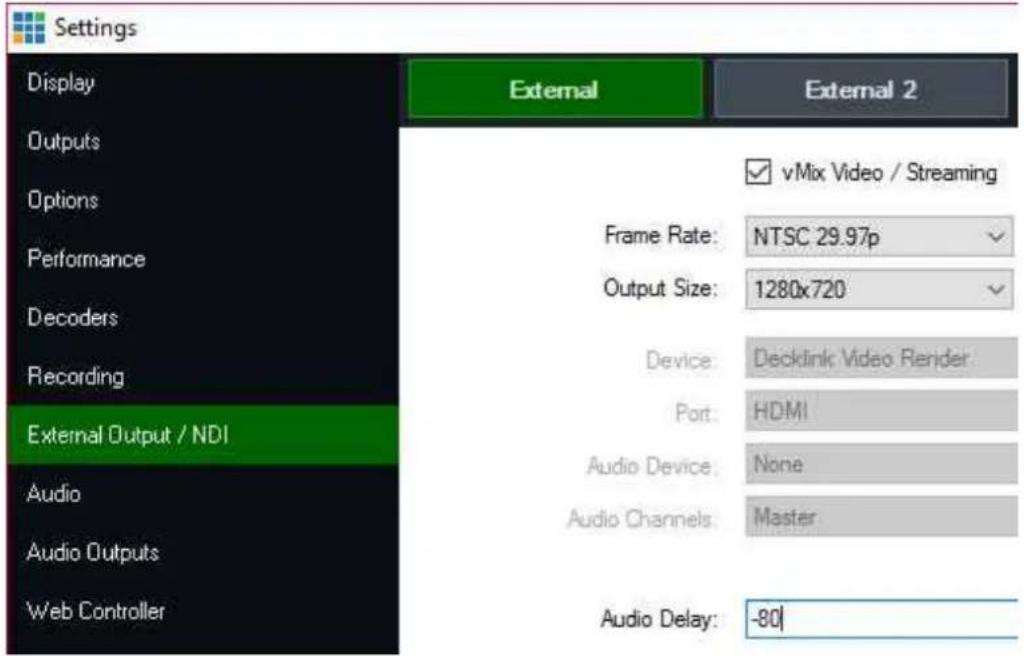
Audio Meters
vMix displays Audio Meters in four different locations:
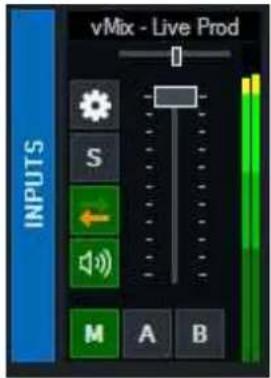
- Main interface (next to transition buttons)
- Next to each Input containing audio
- Audio Mixer
- Audio Settings
Each audio meter will display green levels when the audio is turned on and blue levels when muted.
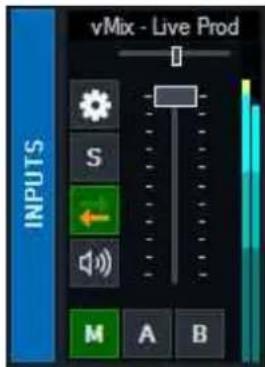
The audio meters are also colour coded into 5 distinct bands to make it easy to determine the approximate audio level at a glance.
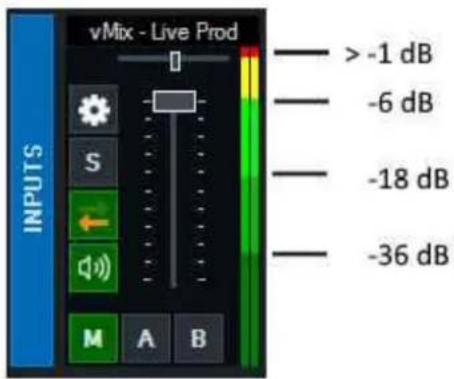
Levels are always displayed in dBFS (digital "full scale") where 0 dB equals the maximum possible volume for a given bit rate.
Peak Levels
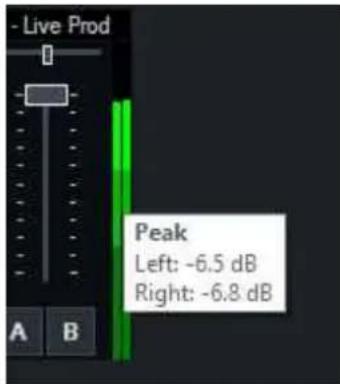
So see the maximum peak levels of an audio source at any time, hover the mouse over the audio meters. The peak level displayed here is calculated as the maximum audio volume (amplitude) received in the past \~2 seconds.
Output Audio Channels
vMix supports eight independent stereo audio mixes or buses called Master (or M), A, B, C, D, E, F and G. The output of this audio mixes can also be independently selected for the Recording, Stream and External
Output as described below.
Enabling an Audio Bus/Mix
The Master mix is enabled at all times however, the A to G buses will only be enabled if a device is selected from the dropdown.
To enable the A to G buses, do one of the following in Settings -> Audio Outputs
- Select Enabled from the dropdown box.
or - Select from the dropdown a free device and channel on an audio device (such as ASIO audio interface)
Audio Mix Channel Options
Master: 2 Channel Master mix
BusA: 2 Channel A mix
BusB: 2 Channel B mix
MA: 2 Channel Master + 2 Channel A (4 channels)
MAB: 2 Channel Master + 2 Channel A + 2 Channel B (6 channels)
MABC: 2 Channel Master + 2 Channel A + 2 Channel B + 2 Channel C (8 channels)
MABCDEFG: 16 channels
Selecting the Audio Mix
Recording
Select the audio mix from the dropdown box next to Audio in Recording Setup

NOTE: Only the AVI video format and the WAV File Record options supports more than 2 channels, if a 4 or 6 channel option is selected here for other formats then only the first 2 channels will be included.
Streaming
Select the audio mix from the Channels dropdown box in Streaming Quality Settings
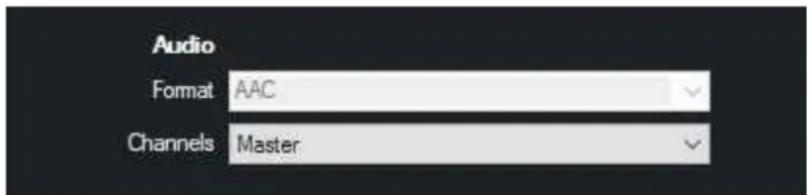
External Output

Select the audio mix from the Audio Channels dropdown box in Settings -> External Output
AJA and Blackmagic devices support 2, 4, 6 and 8 channel output. When embedding up to 8 channels in SDI, the remaining
8 channels will be left silent.
Recording
vMix supports recording the Output into a number of formats including AVI and MP4.
Recommended Recording Settings
Setup
Record
Second Recorder
Fault Tolerant Recordings
vMix Video Codec
WAV File Record
Recommended Recording Settings
Highest quality HD and SD
vMix AVI
Pros: Near Lossless video quality, fast post production editing, fault tolerant.
Cons: Very large file sizes, need to install vMix on any computers used for post production.

Uploading to YouTube
MP4
Bit Rate: 25 Mbps (HD) or 8 Mbps (SD)
Audio Bit Rate: 192 Kbps
Pros: Files can be played anywhere and can be easily uploaded to most web sites
Cons: Provides good video quality for file size, but may not be suitable for high quality post production video editing.
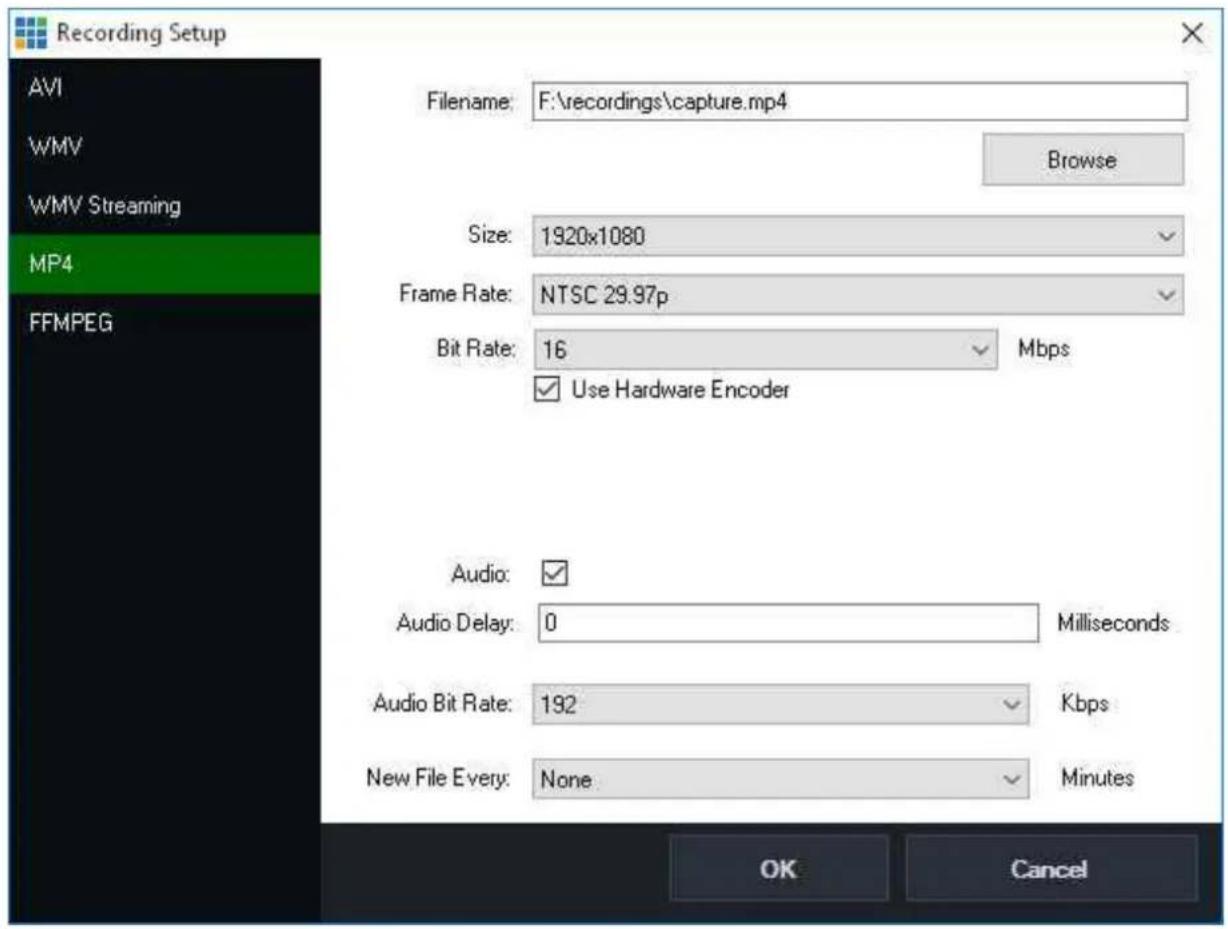
Setup
Click the Cog Button next to Record from the Main Window to bring up the Recording Setup window.

These settings will need to be configured before starting a recording.
Some video formats do not support partial recordings in the event of a power outage or system failure. Read about Fault Tolerant recordings here
vMix AVI
For more information on the vMix AVI recording format, see the vMix Video Codec section of this help file.
AVI
Filename
File to save the recording to.
Frame Rate
Frame rate of the recording. (Set this to match the Frame Rate set under the Display tab under Settings)
Codec
Codec to use when recording.
For SD recordings the DV Video Encoder is recommended.
For HD recordings the MJPEG Encoder or MagicYUV codecs are recommended and come built in to vMix
3rd party codecs such as CineForm or HQX can also be used
File Format
AVI: Standard AVI file
MKV: The MKV file format supports partial recordings that can be recovered in the event of a power outage or system failure.
Audio
Enable audio on this recording and select the audio channels to include. See Output Audio Channels
Audio Delay
This sets a delay on the audio input in milliseconds. For example if the audio is earlier than the video by 200ms, type in 200 here.
New File Every
Automatically start a new recording every x minutes.
Each file is split seamlessly to enable easy editing.
FFMPEG
FFMPEG is an open source encoding tool that provides the ability to record to a number of formats including MPG, TS, MP4, MOV and MXF.
Codec
Select the recording format to use out of MPEG-2, MP4 X264 with AAC audio and VC-3
Format
Depending on the codec a number of file formats will be available.
MXF or the MOV/MP4 non-Indexed formats are recommended as they support file recovery in the event of a power or system failure.
MP4
MP4 creates a video file containing H264 video and AAC audio.
Due to the complexity of H264 compression, this option requires a faster processor for optimal performance.
Bit Rate
Select the Bit Rate for the H264 video stream in Mbps (Megabits per second). 25 is recommended for high quality HD (similar to AVCHD)
Audio Bit Rate
Select the Audio Bit Rate for the AAC audio stream in Kbps (Kilobits per second). A maximum of 192kbps can be selected. 128kbps is the default.
Windows 7 File Size
MP4 recordings have a maximum file size limit of 4GB under Windows 7.
For larger recordings, choose a different recording format or upgrade to Windows 10.
MPEG-2
Options are the same as above but with the following additional settings:
Bit Rate
Specify the Bit Rate for the MPEG-2 recording in Mbps (Megabits per second). 8 is recommended for SD, 25 for HD.
File Format
Specify either Program Stream (MPG) or Transport Stream (TS)
Transport Stream is recommended if the video will be edited by a program such as Sony Vegas.
WMV / WMV Streaming
NOTE: WMV Streaming is no longer officially supported.
HTTP Port (Streaming only)
Port that Windows Media Player can connect to to view the stream.
Width/Height
Width/Height of the WMV recording
Bitrate
Bitrate of the WMV recording
FPS
Frames Per Second
Quality
Quality from 1 to 100. 100 is the highest quality.
Codec
WMV codec to use. WMV1 is the fastest but the lowest quality. WMV3 is the slowest with the highest quality.
Audio Compression
WMV Audio Format to use
Record
Click Record to start the video recording.

Note: The Cog Button must be clicked first to configure the recording prior to starting
A duration counter will begin next to the Start button as well as a dropped frame counter.
Dropped frames may indicate a computer performance issue, or merely as a side effect of using a different frame rate.
(For example of recording at 30fps from a 25fps source, 5 dropped frames will show up per second)
Second Recorder
A second recorder is available in the vMix 4K edition and higher.

To configure the second recording, select the 2 button at the top of the Recording Setup window and tick the Enabled checkbox to enable it.
This second recording has its own settings independent of the first recording including format, codec and the video and audio sources used.
This can provide a lot of flexibility, such as recording a second lower quality recording for internet publishing whilst retaining a higher quality master for editing and archival.
However, the second recording cannot be independently controlled and will always start and stop at the same time as the primary recording.
Fault Tolerant Recordings
Some video formats hold some important information in memory until the recording is complete.
This means in the event of a power outage or system failure these recordings may be corrupt and difficult to recover.
TIP: Use the "New File Every" option to create new recordings at regular intervals so if one file is lost in event of a power outage, the majority of the recording can be recovered.
The following table describes the fault tolerance of each recording format supported by vMix:
| Type | File Format | Fault Tolerant? |
| vMix AVI | AVI | Yes |
| AVI AVI | No | |
| AVI | MKV | Yes |
| MPEG-2 | MPG | Yes |
| MPEG-2 | TS | Yes |
| MP4 MP4 No | ||
| MP4 MP4(with Fault Tolerant checkbox ticked) | Yes(Important Note: Fault tolerant MP4 recordings do not work in all devices and software and should be thoroughly tested for compatibility prior to use in any productions.) | |
| WMV VMV | Yes | |
| FFMPEG | MXF | Yes |
| FFMPEG | MOV | Yes |
| FFMPEG | MP4 | Yes |
| FFMPEG | MOV (Indexed) | No |
| FFMPEG | MP4 (Indexed) | No |
vMix AVI is the best fault tolerant format out of the above.
vMix Video Codec
The vMix Video Codec is a free recording format that provides high video quality with low CPU usage, suitable for use in post production video editing on Windows PCs.
The following is an overview of its features and capabilities:
- Easy to use with no configuration settings required such as bitrate or quality.
- Very low CPU usage requirements, allowing multiple channels of HD and 4K on a modern Intel i7 or i9 PC.
- Records to the standard AVI video format which is compatible with most Windows video editors such as Adobe Premiere and Magix Vegas Pro.
- Recordings are fault tolerant which means they can be recovered in the event of a power outage.
● Supports SD, HD and 4K at all frame rates including interlaced broadcast formats. - Variable bitrate codec adapts to the content being recorded to provide an optimal balance between quality and practical file sizes for post production editing.
File Size Estimates
- 4K60: 700 - 900 Mbps (\~350 GB per hour)
- 4K30: 350 - 450 Mbps (\~175 GB per hour)
- HD1080p60: 200 - 300 Mbps (\~110 GB per hour)
- HD1080p30: 100 - 150 Mbps (\~55 GB per hour)
Editing recordings on other computers
vMix AVI files recorded using the vMix Video Codec can be edited on any Windows PC in most video editors including Adobe Premiere and Magix Vegas Pro.
Simply install a copy of vMix on any system used for editing. vMix does not need a license on these computers and does not need to be activated, but does need to be installed.
Converting vMix AVI files to ProRes MOV
vMix includes a program called vMix Media Converter that can transcode multiple vMix AVI files to ProRes MOV files.
This program can be located in the Windows Start Menu.
WAV File Record
The WAV File Record button in the Recording Setup can be toggled to turn on (green) or off recording a separate uncompressed (PCM) WAV file alongside the video recording.
It does not affect the audio in the recording itself. The audio format is fixed and can't be modified in vMix but can be converted into other audio formats such as MP3 once completed using a 3rd party application. (not included with vMix).
Live Streaming
Getting Started
Step by step instructions to get started streaming
Settings
Detailed information on all the streaming settings available
Streaming Quality
Information on the encoding quality settings
Multi Bitrate Support
How to use Multi Bitrate streaming
Advanced
Information on the advanced options available in the Advanced streaming window.
Getting Started
The following is a quick overview of the steps needed to begin streaming to the web
1. Open the streaming window in vMix

Click the cog icon next to the Stream button in the main vMix window.
2. The streaming window will appear
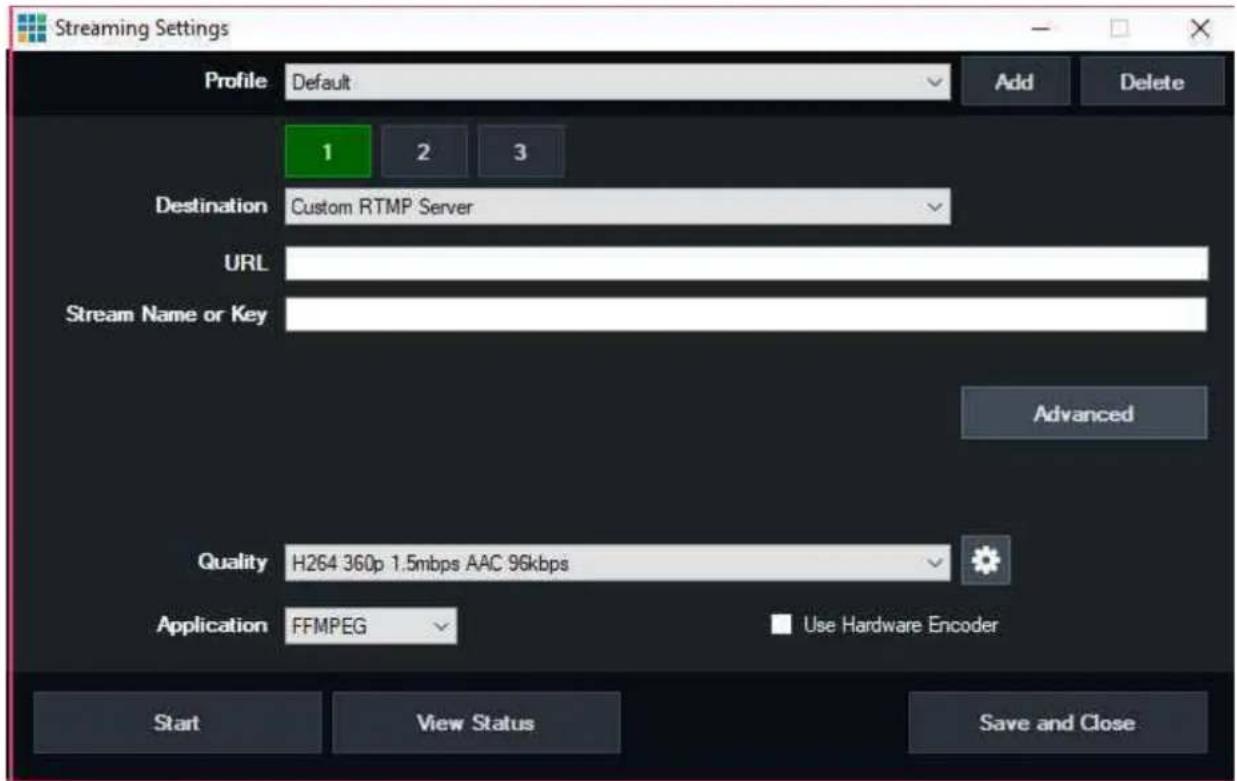
3. Enter in your streaming provider details
Select your streaming provider from the drop down list or select Custom RTMP Server if your provider is not listed.
If your provider is listed, you can simply login and select a Channel to stream to directly from vMix as shown:
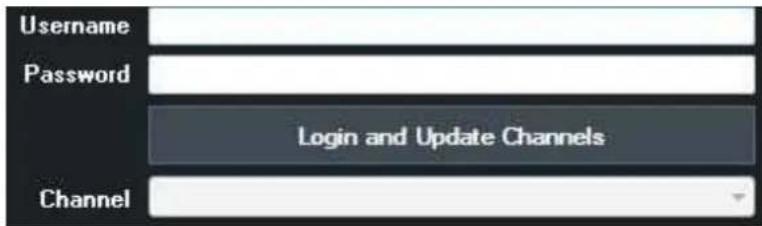
Alternatively, the channel settings can be specified manually using the instructions below.
Custom RTMP Server
vMix supports most 3rd party streaming providers (also known as CDNs) and dedicated streaming servers such as WOWZA.
The following information is needed from your chosen streaming provider:
URL For example rtmp://example.com/live
Stream Name or Key This may also be called Stream or Stream Name.
Once you have retrieved this information, type it into the boxes provided.
4. Select a quality setting
The Quality setting you select will depend on a variety of factors, including the speed of your internet connection and your viewers.
The default setting of 360p 1.5mbps provides a low to medium quality stream that can be viewed by most broadband internet connections.
The cog icon can also be clicked to open up the Streaming Quality window where you can customise these settings to suit your requirements.
5. Select an Application
By default the free FFMPEG is installed with vMix and provides high quality streaming with H264 video and AAC audio.
Optionally, the free Adobe Flash Media Live Encoder (FMLE) can be installed in order to stream with vMix.
This can be downloaded from the Adobe web site.
FMLE can be used if your streaming provider does not support FFMPEG, or if you need MP3 audio encoding support.
6. Start Streaming!
Click Start All to begin streaming. The button will light up red in both the Streaming window and in the main vMix window when streaming.
After a few seconds if you receive an error, double check the settings in step 3. to ensure they match the details given to you by your streaming provider.
7. Advanced settings
An overview of all the settings available can be found in the Streaming - Settings section.
Settings
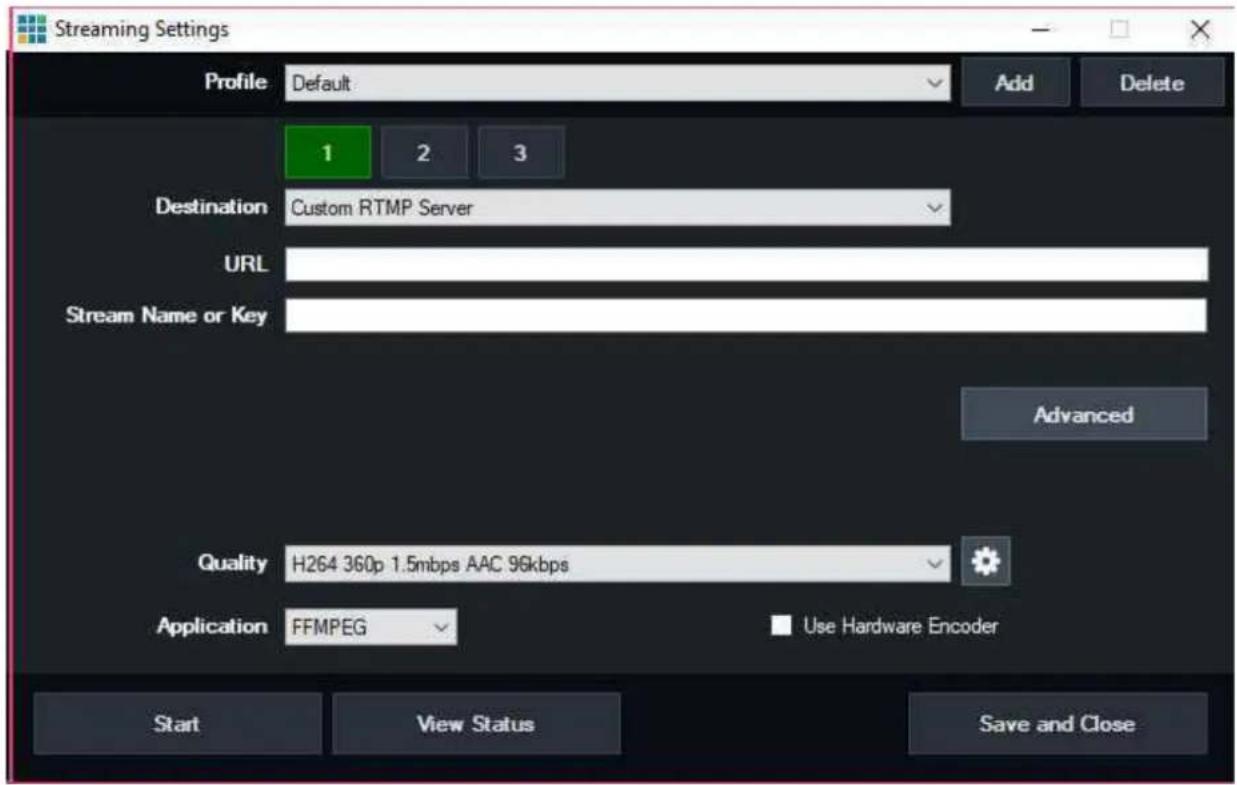
1,2,3 Buttons
These buttons allow streaming to up to three different streaming providers simultaneously. See Using Multiple Destinations for more information.
These buttons will only appear when selecting FFMPEG as the application. (See Applications section below).
Profile
Create one or more profiles with unique streaming settings, for example one for each streaming provider. Only one profile can be used at a time.
Click Add to add a new profile that contains a COPY of the settings from the current profile. Delete to delete the currently selected profile.
Destination
Select from one of the built in streaming providers, or select Custom RTMP Server if you want to enter in the streaming details manually.
When using a built in streaming provider destination
Type in the username and password given to you by the streaming provider and click Login to retrieve a list of Channels.
Select the channel you wish to stream to.
When using Custom RTMP Server
URL
Enter in the streaming provider URL for example rtmp://example.com/live
Stream Key
Also known as a Stream Name or Stream. For example myStream
Advanced
See Streaming - Advanced
Quality
Select the encoding profile to use for the stream. A number of built in presets are included or you can click the cog icon to customise these.
See Streaming Quality for more information
Application
FMLE
Use Adobe Flash Media Live Encoder as the streaming encoder. Requires Adobe Flash Media Live Encoder to be installed which is free from the Adobe web site.
FMLE has built in support for H264 video and MP3 audio. For AAC audio an additional plugin can be purchased from MainConcept.
FFMPEG
This is a free streaming encoder installed with vMix.
FFMPEG supports H264 video and AAC audio.
FFMPEG provides better quality and AAC audio support, but may not be supported by some providers.
Use Hardware Encoder
This check box is available for most NVIDIA graphics cards and substantially reduces the CPU usage of the computer when streaming by taking advantage
of the hardware encoder built into most recent NVIDIA graphics cards, including the 750, 9xx and 10xx series.
NOTE: NVIDIA GeForce cards support a maximum of 2 simultaneous hardware encodes.
This means if you record to MP4 with Use Hardware Encoder ticked, than only one of your streams can also have the Use Hardware Encoder checkbox ticked as well.
Otherwise you will receive an error message when starting the second or third stream. The Quadro series cards do not have this restriction.
Start
Save all streaming settings and start the stream. This button will light up Red when running in addition to the Stream button in the main vMix window.
View Status
View some technical information on the stream while it is running. This is useful when troubleshooting
connection issues.
Save and Close
Save all streaming settings and close the Streaming window.
Streaming Quality
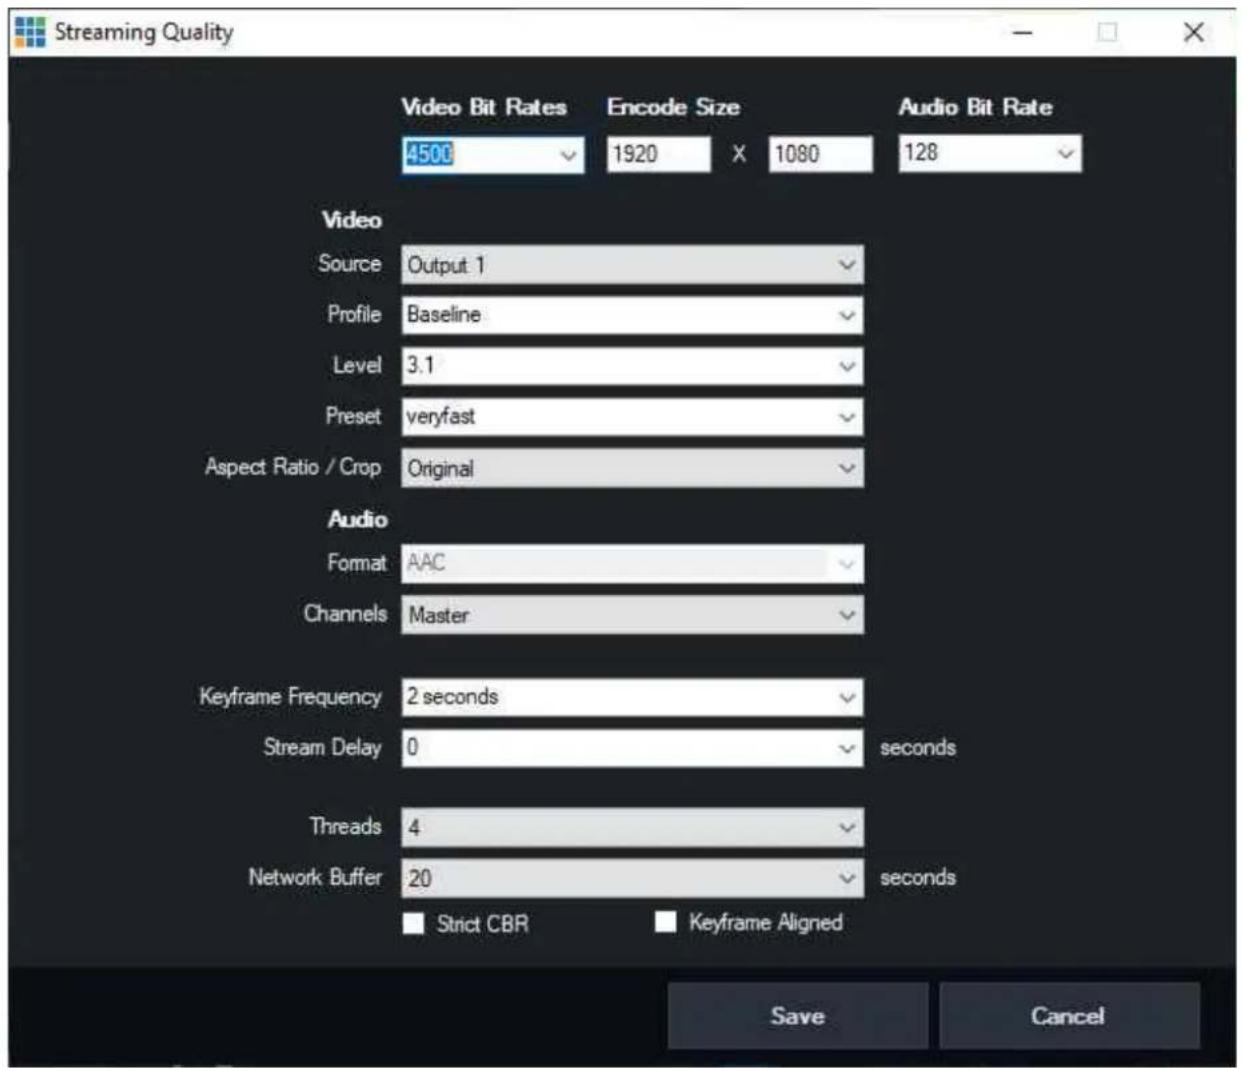
The Streaming Quality window allows you to customise your streaming quality settings to suit your production.
Video Bit Rates
Set the video encoding bit rate in kbps.
Encode Size
Set the resolution of the stream here. These sizes should match the aspect ratio you are using in vMix. For example 640x360 for Widescreen and 640x480 for Normal (4:3)
Audio Bit Rate
Set the audio encoding bit rate in kbps. A minimum of 96 is supported for MP4 and a minimum of 64 is supported for AAC.
128 provides good near CD quality audio for both MP3 and AAC.
Video
Source
Select either Output 1 or Output 2 as the source for the stream in vMix 4K and Pro.
In all other editions Output 1 will be used and this dropdown will not appear here.
To configure what is sent to Output 2, refer to the Settings - Outputs section.
Profile
Select the H264 encoding profile to use. Baseline is lower quality, but uses less CPU. Main is higher quality at the expense of higher CPU usage.
Level
This is an advanced setting for users wishing to specify a particular encoding level to match the capabilities of an end point decoder.
Preset
This is an advanced setting for users who wish to fine tune the FFMPEG encoder (x264)
veryfast is the recommended setting which provides the best balance of CPU usage and quality
Aspect Ratio / Crop
The stream can be cropped to a custom aspect ratio such as Square (1:1) and Vertical (9:16) to suite specialised streaming workflows.
The video is cropped to fit this aspect ratio by cutting the sides off the image.
To easily see the viewable area of the image from within the vMix production use Safe Areas to enable the Square or Vertical lines.
Keyframe Frequency
Select the number of seconds between each keyframe in the video stream. Higher numbers generally result in better video quality. 2 seconds is recommended
by some streaming providers and is the default here.
Stream Delay
Specify a minimum delay in seconds between when the video is seen in vMix vs when it is first sent to the steaming provider.
Note that due to streaming provider limitations, vMix cannot start connecting to the streaming provider until the delay is reached.
For example, if you specify 1 or more seconds here and click Start on the stream, vMix will immediately begin encoding the stream
according to the parameters chosen, and start saving this stream to memory.
vMix will display a countdown in seconds on the Stream button to indicate how long until the delay is
reached.
Once the delay has been reached, it will then connect to the streaming provider and start streaming from memory ensuring that at all times the minimum specified delay is met.
If a stream is stopped, it will immediately disconnect from the streaming provider, vMix will not wait until the delay buffer is emptied and that portion of the stream will be lost.
Note that the stream delay here is only the minimum delay, the overall delay is usually much longer and determined by the streaming provider's own internal requirements and viewer connections/browsers etc.
Memory Requirements
Stream Delay will first encode the stream according to the quality parameters and then save temporarily to system memory.
For an 8mbps stream, this means it requires 1 megabyte per second of memory, therefore only a very small amount of memory is needed, even for large delays.
Threads
Specify the number of threads to use when encoding video and audio with FFMPEG as the Application. 4 is the default and is recommended. For 4K streaming, extra threads may provide better performance.
Network Buffer
This is the maximum number of seconds vMix can keep buffered at any time and reflects the maximum streaming latency
from vMix. (Note that streaming servers and players add their own buffers on to this time)
Increase the Network Buffer if the maximum network speed available is unreliable.
Strict CBR
When this is enabled, the encoder will try to keep the streaming speed as close to the selected bit rates as possible.
Note that this option may reduce the quality of the stream.
NAL CBR
When this is enabled, the encoder will insert empty data if the bitrate drops below the set amount. This mode is known as "NAL-HRD CBR" mode in some encoders.
Combining this option with Strict CBR will result in a stream that very closely matches the bitrate at all times, at the expense of quality.
Note: This is not necessary or optimal for RTMP streaming and is usually only helpful for diagnosing network issues.
It may also cause issues with MP4 recordings of streams, if the streaming provider does not support this option.
Keyframe Aligned
When sending multiple bitrates, select this option to ensure all streams are aligned on the same keyframe. This can improve seamless switching support at the expense of slightly lower quality.
Auto Adjust
When using FMLE as the encoder, the quality of the stream can be dynamically adjusted to suit the conditions of the internet connection.
Audio
Select the Audio encoding format to use with the stream.
MP3 is supported when using FMLE (Flash Media Live Encoder) as the encoder, while AAC is the only option when using FFMPEG.
If you would like to use FMLE with AAC, an additional plugin needs to be purchased from MainConcept.
Audio Channels
See Output Audio Channels
Multi Bitrate Support
vMix supports Multi Bitrate streaming with both the FMLE and FFMPEG streaming applications.
There are two methods of configuring Multi Bitrate depending on the requirements of your streaming provider. Please check with your streaming provider if you are unsure.
Single Stream Key
- Select your streaming provider from the Destination dropdown box under stream 1.
- Configure the first stream bitrate from Quality.
- Configure up to two additional streams by selecting Stream 1 Multi-Bitrate as the Destination for stream 2 and optionally stream 3.
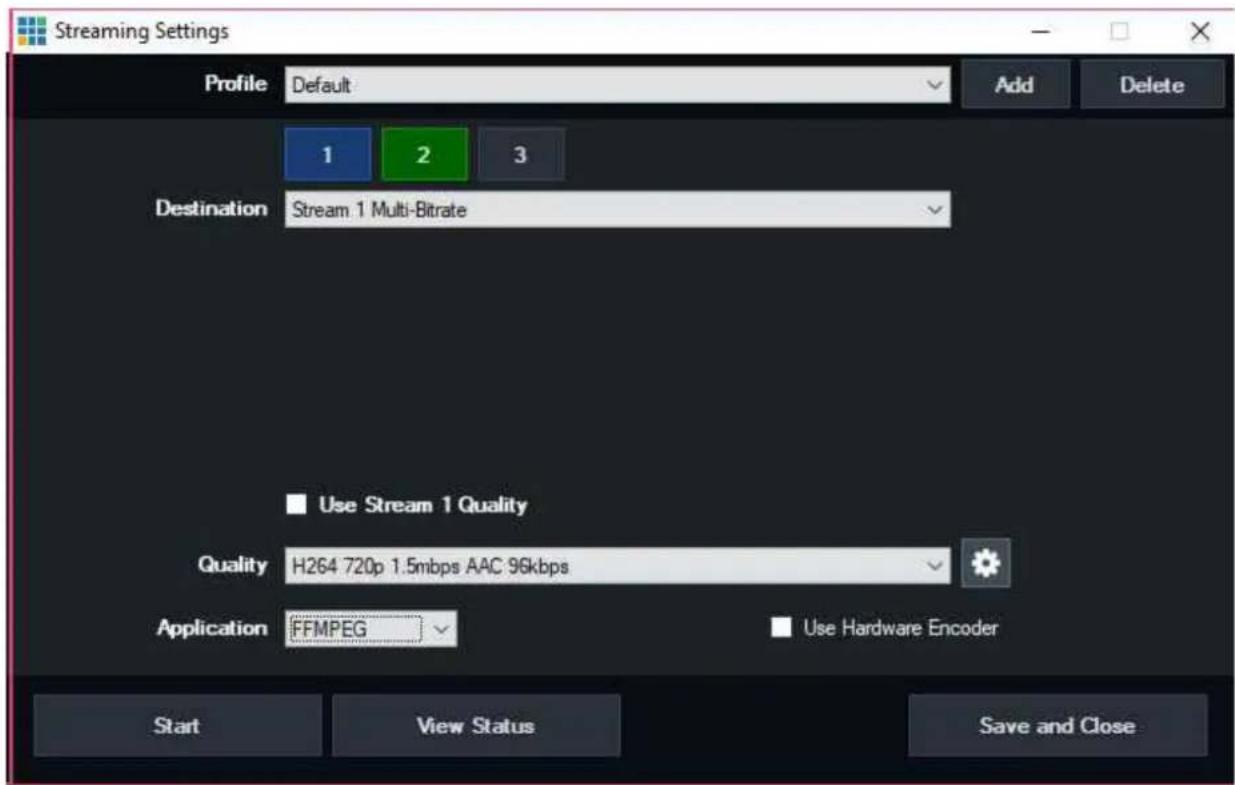
- Untick Use Stream 1 Quality on each of these streams to configure an independent bitrate from the Quality dropdown box.
Multiple Stream Keys
If your stream provider has given you a separate stream key for each stream, then configure these streams by selecting Custom Multi-Bitrate as the Destination dropdown and type in the separate URL and Stream Key for each stream.
Using Multiple Destinations
Up to three streaming destinations can be used by selecting the 1,2 and 3 buttons at the top of the Streaming Settings window.

NOTE: If you do not see these buttons, make sure Application has been set to FFMPEG.

Note
- Multi Bitrate support is disabled when using multiple destinations
Independent Bit Rates
By default, all three destinations will use the same quality settings such as video and audio bitrate and encode size.
To customise this, untick the Use Stream 1 Quality checkbox as shown below.
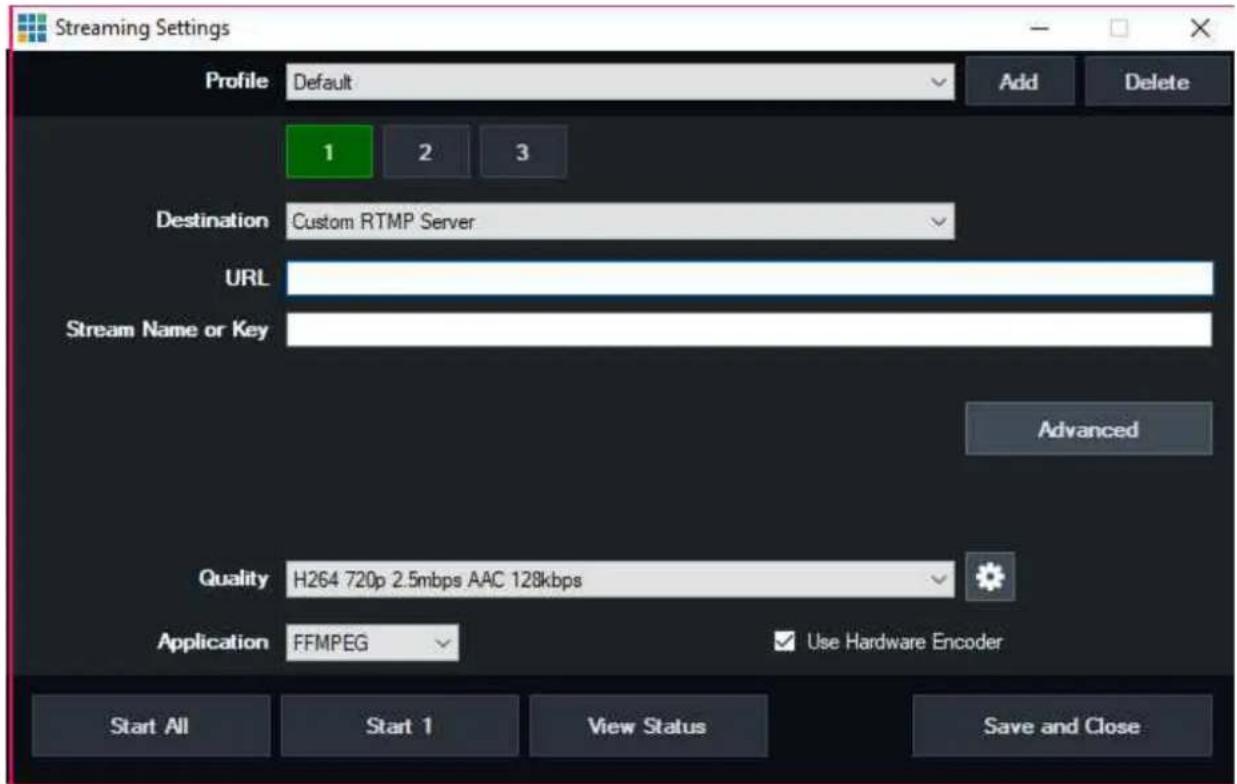
Independent Stream Control
vMix supports up to three independent streams which can be started and stopped independently of each other.
Starting/Stopping All Streams
Click Stream in the main vMix window to start or stop all configured streams at the same time.

Alternatively click Start All / Stop All in the streaming settings window.
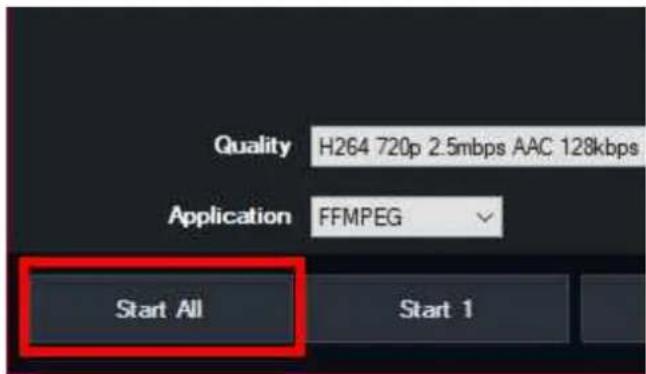
Starting/Stopping Streams Independently
To start or stop a particular stream, click the arrow next to the Stream button in the main vMix window.
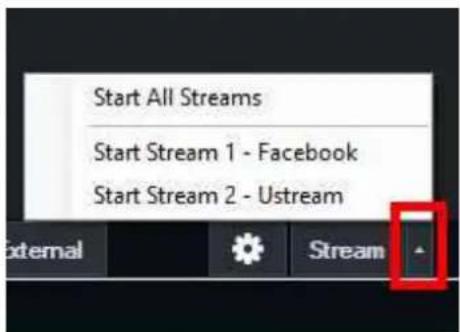
Streams can also be controlled from the Streaming Settings window by selecting the top stream button to select the stream, then the Start x / Stop x button at the bottom of the window.
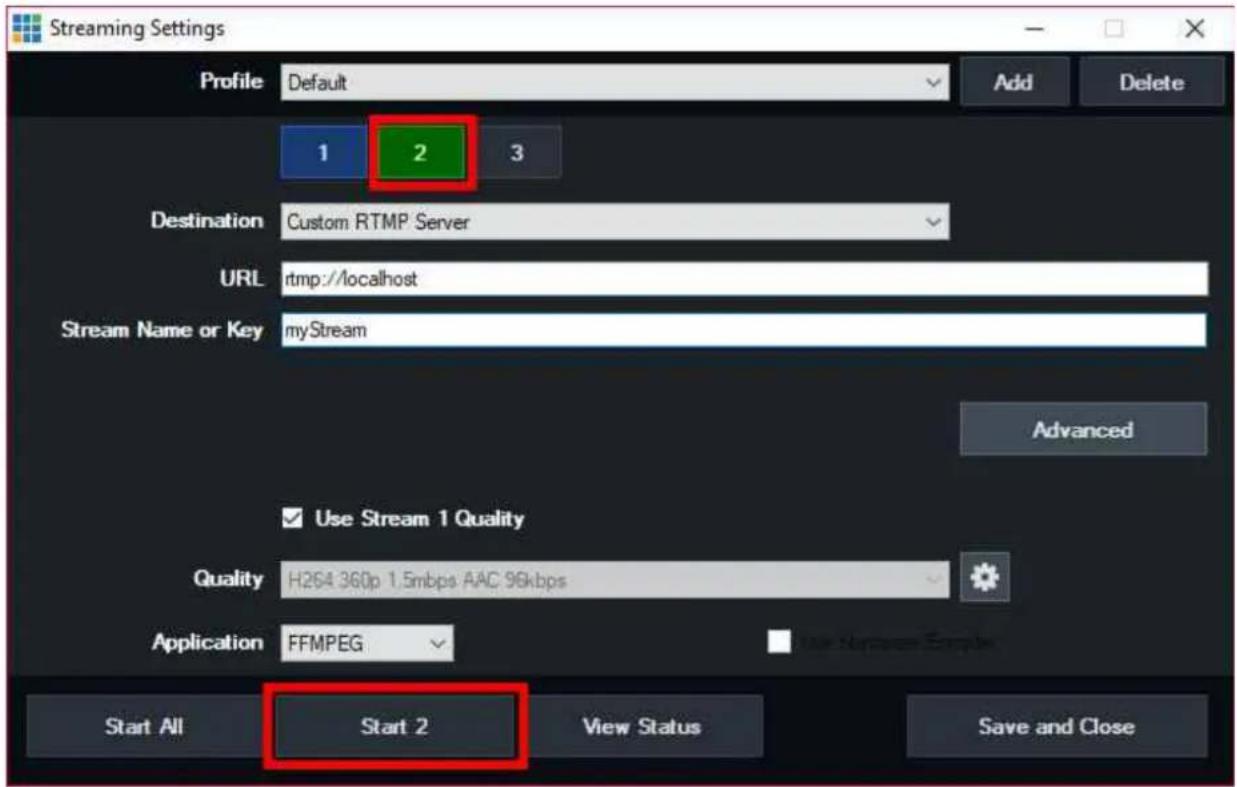
Stream Errors
If a particular stream encounters an error, it will be displayed on screen and the stream stopped. However, all other streams will continue to run as normal, and the stream that stopped can be started manually again when the problem is resolved.
LiveLAN
LiveLAN is a built in streaming destination in vMix that streams directly to a web page built into the vMix Web Controller.
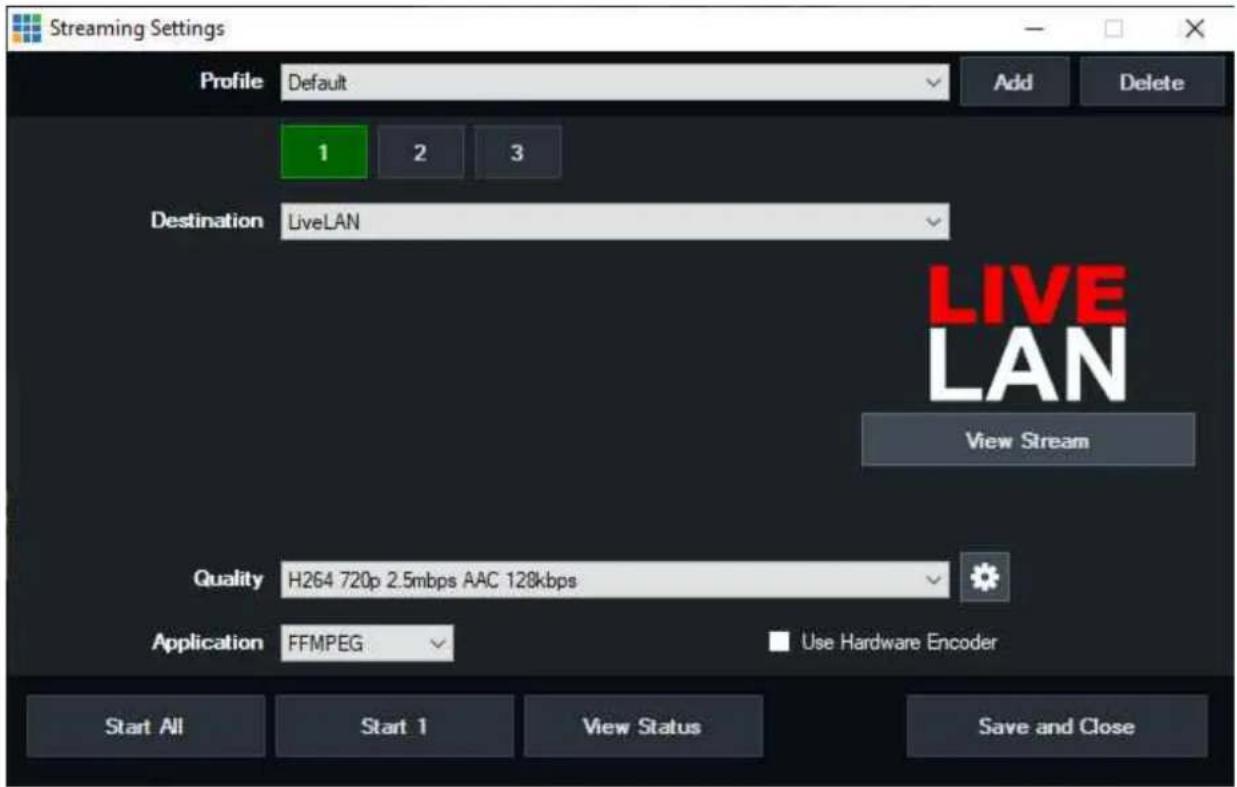
Simply select the destination as you would any other streaming provider.
While the stream is running, the LiveLAN page on the web controller can be used to watch the stream from any supported web browser on the same local network as vMix.
This can be on laptops, PCs, smart phones and smart TVs that support HTML5 live streaming.
Performance Considerations
LiveLAN has been tested for up to 100 viewers at a time on a reasonably powerful six-core 3ghz CPU. There is no fixed limit to the number of viewers, but both the performance of the PC and the available network speeds (see below) will factor in to the maximum possible.
Network Considerations
LiveLAN is intended for use on the local network only. To calculate the amount of bandwidth needed, multiply the number of viewers by the bitrate specified in the Streaming Quality, adding in approximately 10 to 20% extra to account for potential overheads.
For example, in the above screenshot 2.5mbps has been set as the Streaming Quality.
If there will be 50 viewers on the stream, this will require approximately 2.5mbps * 50 = 125mbps + 20% = 150mbps.
Note that browsers standards including HTML5 and HLS do not support any form of Multicast, so bandwidth allocated to each viewer is necessary.
Security Considerations
As the Web Controller can also provide access to control certain parts of vMix, care should be taken to ensure it is adequately secured before setting up LiveLAN.
For example the Web Controller Settings can be configured with a password, with certain pages excluded. Therefore it is recommended that a password be configured and only the LiveLAN page be excluded from password access.
Latency
A delay from vMix to browser of around 10 seconds is typical with LiveLAN and it is not possible to reduce this.
HLS
LiveLAN uses a HLS compatible stream internally for streaming to the web page.
This can be accessed on the local network by HLS compatible software like VLC by using the following URL format:
http://x.x.x.x:8088/livelan/stream.m3u8
Where x.x.x.x is the IP address of the computer running vMix.
Note this HLS stream is not compatible with streaming to internet streaming providers requiring HLS and is only for viewing streams directly from vMix.
Advanced
Click the Advanced button for the following additional options:
Stream
Username/Password
Specify additional login details if required by the streaming provider.
Backup Stream
URL
Specify a backup URL if the primary stream URL is not available (FMLE only)
Save to file
Save a copy of the stream in file format here. (FMLE only)
External Output
External Output allows you to send audio and video out of vMix in a number of different ways:
- To HDMI, SDI or Analog outputs through compatible hardware from AJA, Blackmagic Design and Bluefish.
- To other applications running on the same PC such as Skype
- To other devices on the network using NDI
Setting up External Output
Click the cog icon next to the External button in the main vMix window and then click Settings.

External
The External Output Settings window will be displayed. For more information on the options available see Settings - External Output.
Starting External Output
Click the External Button next to the Cog Button to start or stop the output.

External
Selecting a source for Output 2, 3 and 4
The Cog Button contains a drop down menu for selecting a source for any additional outputs in real time (Available in vMix 4K and Pro)
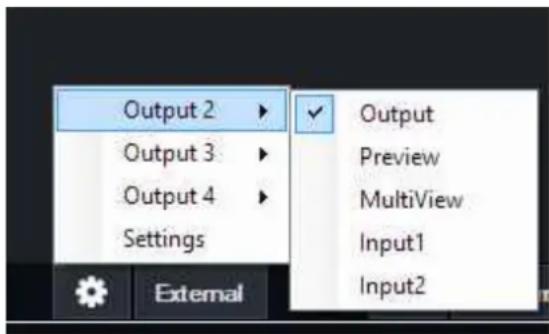
Key and Fill Output
See the Key and Fill output support section for more information.
External Output with AJA, Blackmagic or Bluefish444 cards
vMix features the ability to output video to AJA, Blackmagic and Bluefish444 cards.
Follow the steps below to begin using the External Output feature.
Important Note: Many older Blackmagic cards can only perform one task at a time, either Capture or Output.
- Click Settings to open up vMix settings
2. Under the External Output tab check the External Renderer box
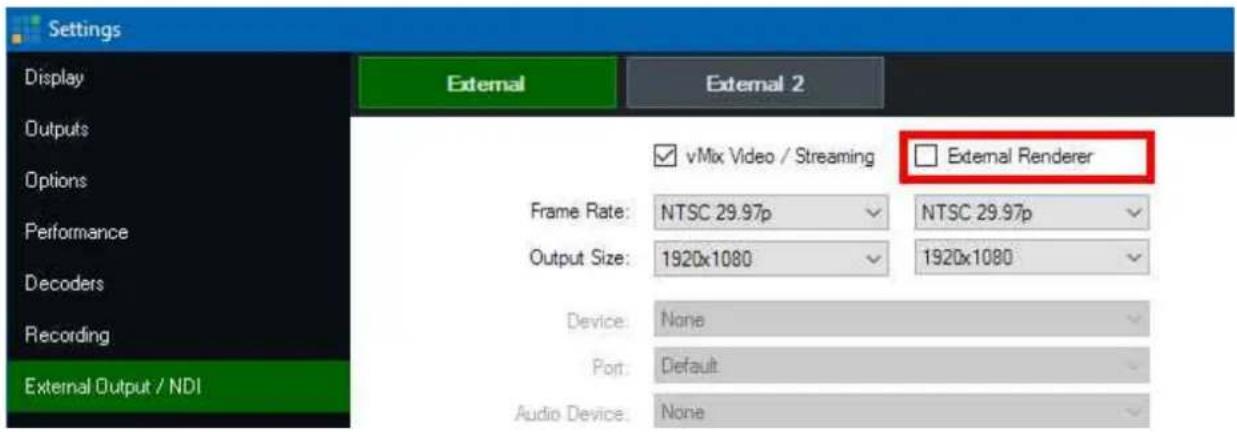
- Under the Device dropdown box, select the item that matches the name of your output card.
(For example "Intensity Pro", "AJA Kona" etc)
Frame Rate: In most cases this should be set to either PAL 50i, PAL 25p or NTSC 59.94i, NTSC 29.97p
Output Size: For full HD select 1920x1080, for SD select either 720x576 (For PAL) or 720x480 (For NTSC)
Port: This setting should match the connector being used, for example HDMI or Component
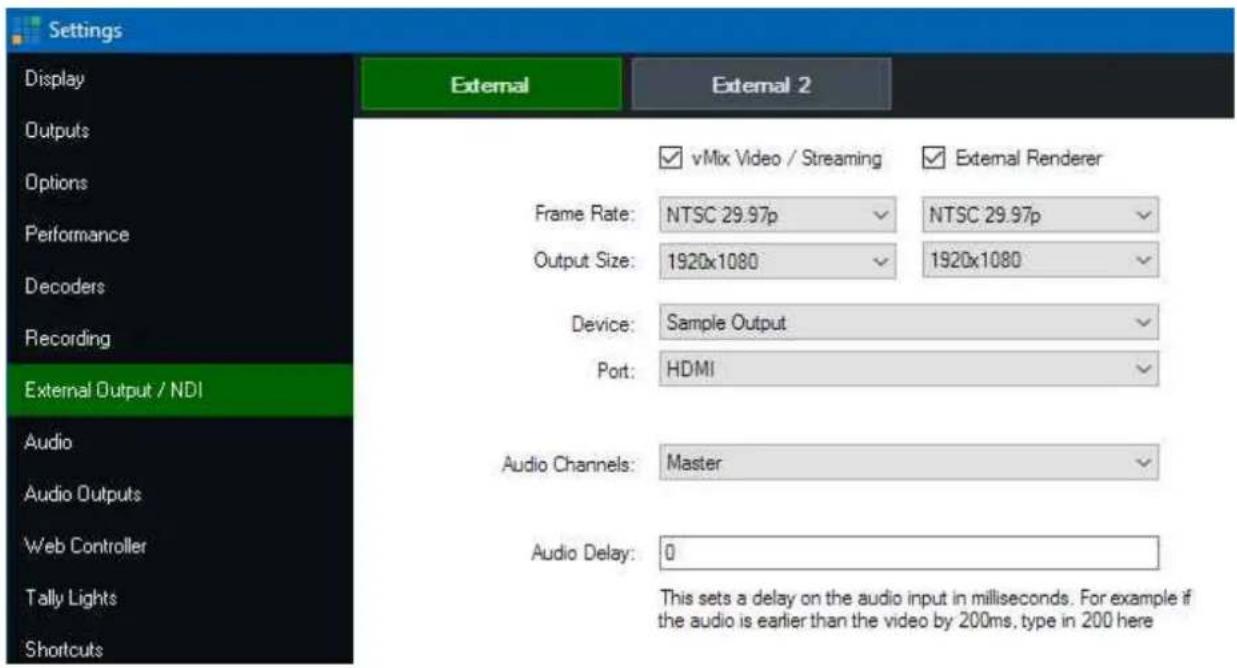
- Click OK to confirm your settings and head back to the main vMix Window.
- Click the External Button on the bottom right hand corner of the screen next to the Cog Button. The output of vMix should now appear on your external display.
If the external display is blank, make sure the correct connector is being used on the device. (There are separate outputs for input and output for both HDMI and Component on the Intensity Pro for example)
vMix User Guide
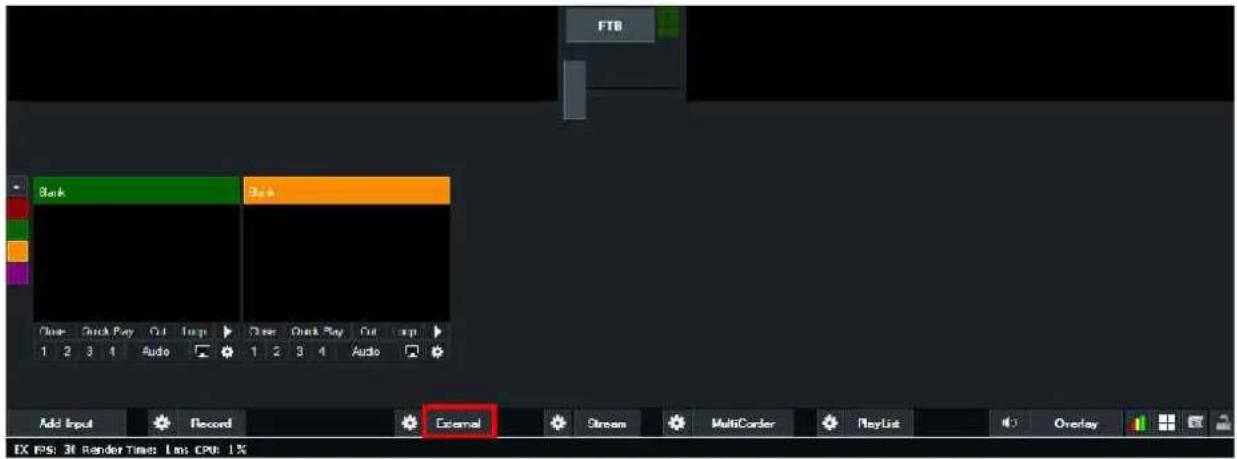
Key and Fill output support
Key/Fill output is supported on selected Blackmagic capture cards.
Supported Devices
• Decklink 4K Extreme / Extreme 12G / Pro
- Decklink Duo 2 / Quad 2 (see additional configuration steps below)
• UltraStudio 4K / 4K Extreme / 4K Extreme 3 / HD Mini
• Bluefish444 KRONOS series cards
Configuration for Duo 2 / Quad 2
When using the Decklink Duo 2 or the Decklink Quad 2, port 1 will need to be configured in the Blackmagic Desktop Video Utility
to group together SDI ports 1 and 2 as shown below:
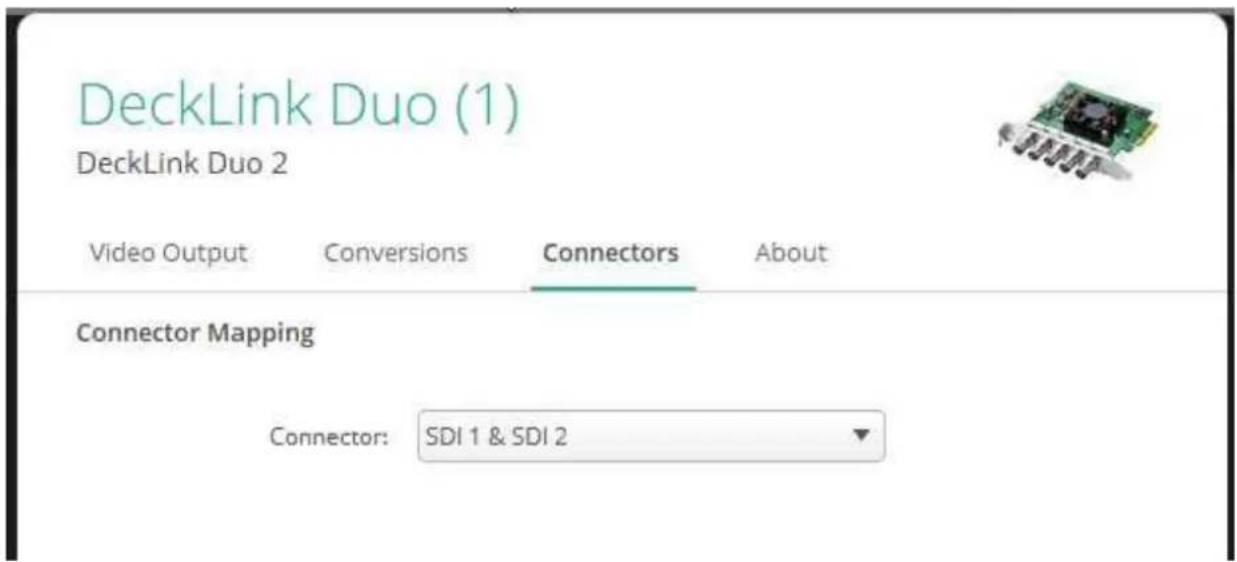
External Output Configuration
When selecting a supported device in External Output settings in vMix, an Alpha Channel dropdown box will appear as shown below:
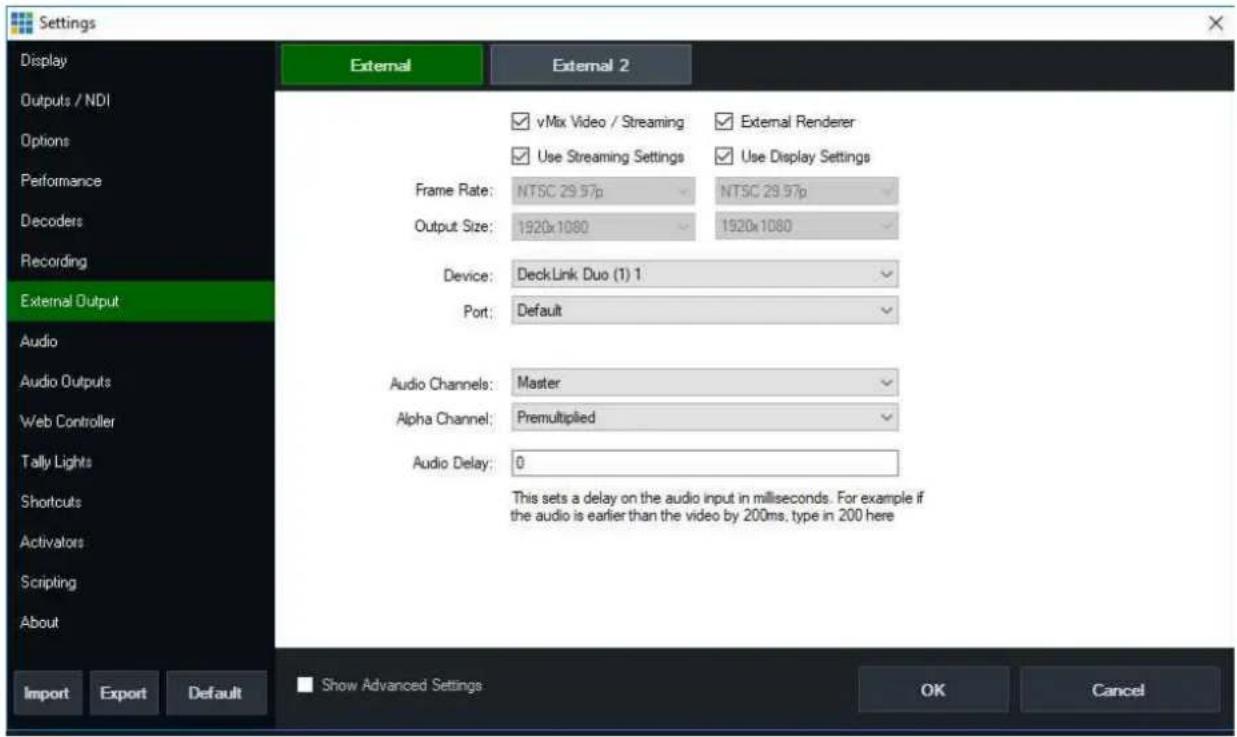
None: No alpha channel, send the video output to the device as normal.
Straight: Output two channels over the device, Key + Fill on separate SDI ports. (This is also known as Linear)
Premultiplied: Same as Straight except the Fill channel will be "Premultiplied" check with the receiving device documentation to determine which of these options should be selected.
Blackmagic ATEM Configuration
The Key + Fill outputs will be sent over SDI 1 and SDI 2 (or SDI A / SDI B) respectively. These can then be connected to two spare inputs on an ATEM switcher.
From the ATEM switcher control panel keyer settings, these two inputs can be selected as Key and Fill to complete the process.
Keyboard, MIDI and Controller Shortcuts
vMix supports an unlimited number of Shortcuts that can be assigned to anything from Keyboard Keys to MIDI Faders.
In other systems you may know these as Macros.
All of these shortcuts can be configured from the Shortcuts tab in Settings
Controllers you can use with vMix (Keyboard, MIDI, X-Keys etc) How to add a Shortcut
Templates
Local and Global Shortcuts
Assigning Multiple Functions to a single Shortcut
Advanced MIDI Shortcuts
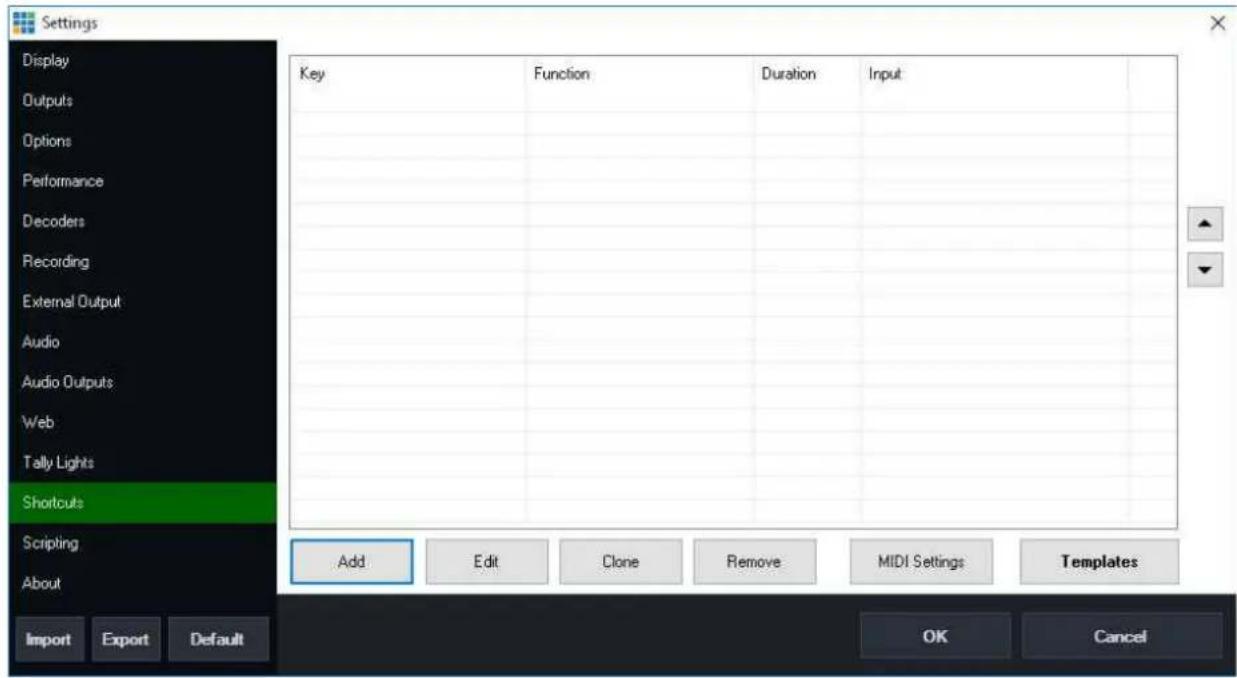
Controller Options
Keyboard
Shortcuts can be assigned to almost any key on the keyboard.
Web Interface
All shortcuts are available from the built in web interface allowing you to use any web enabled device to control vMix. See Web for more information.
MIDI / X-Keys
Shortcuts can be assigned to buttons, faders and knobs on any MIDI compatible device.
X-keys controllers are also supported automatically by vMix and show up as MIDI commands as well.
Contour Design ShuttlePROv2
Shortcuts can be assigned to any button on the ShuttlePROv2.
The shuttle/jog wheel also works as a MIDI JogWheel which can be assigned to various shortcuts such as ReplayJumpFrames and ReplayChangeSpeed.
Elgato Stream Deck / Stream Deck Mini
Elgato Stream Deck devices can be used as a vMix controller.
Simply install the vMix Shortcuts plugin in the Stream Deck software from the Plugin Store. (version 4.0 or higher of the Stream Deck is required)
and then drag the Shortcut plugin on to the buttons you wish to use with vMix from within the Stream Deck software.
Once assigned to a button, create a shortcut within vMix as normal (See How to add a Shortcut).
To locate the button on the controller, click the Find button in the Add Shortcut window.
If the shortcut Function relates to a particular input, the Display setting can be changed to Thumbnail to show a live video preview
of that input. The button display on the Stream Deck updates approximately 4 times a second.
How to add a Shortcut
From the vMix Settings window click the Shortcuts tab and then click Add
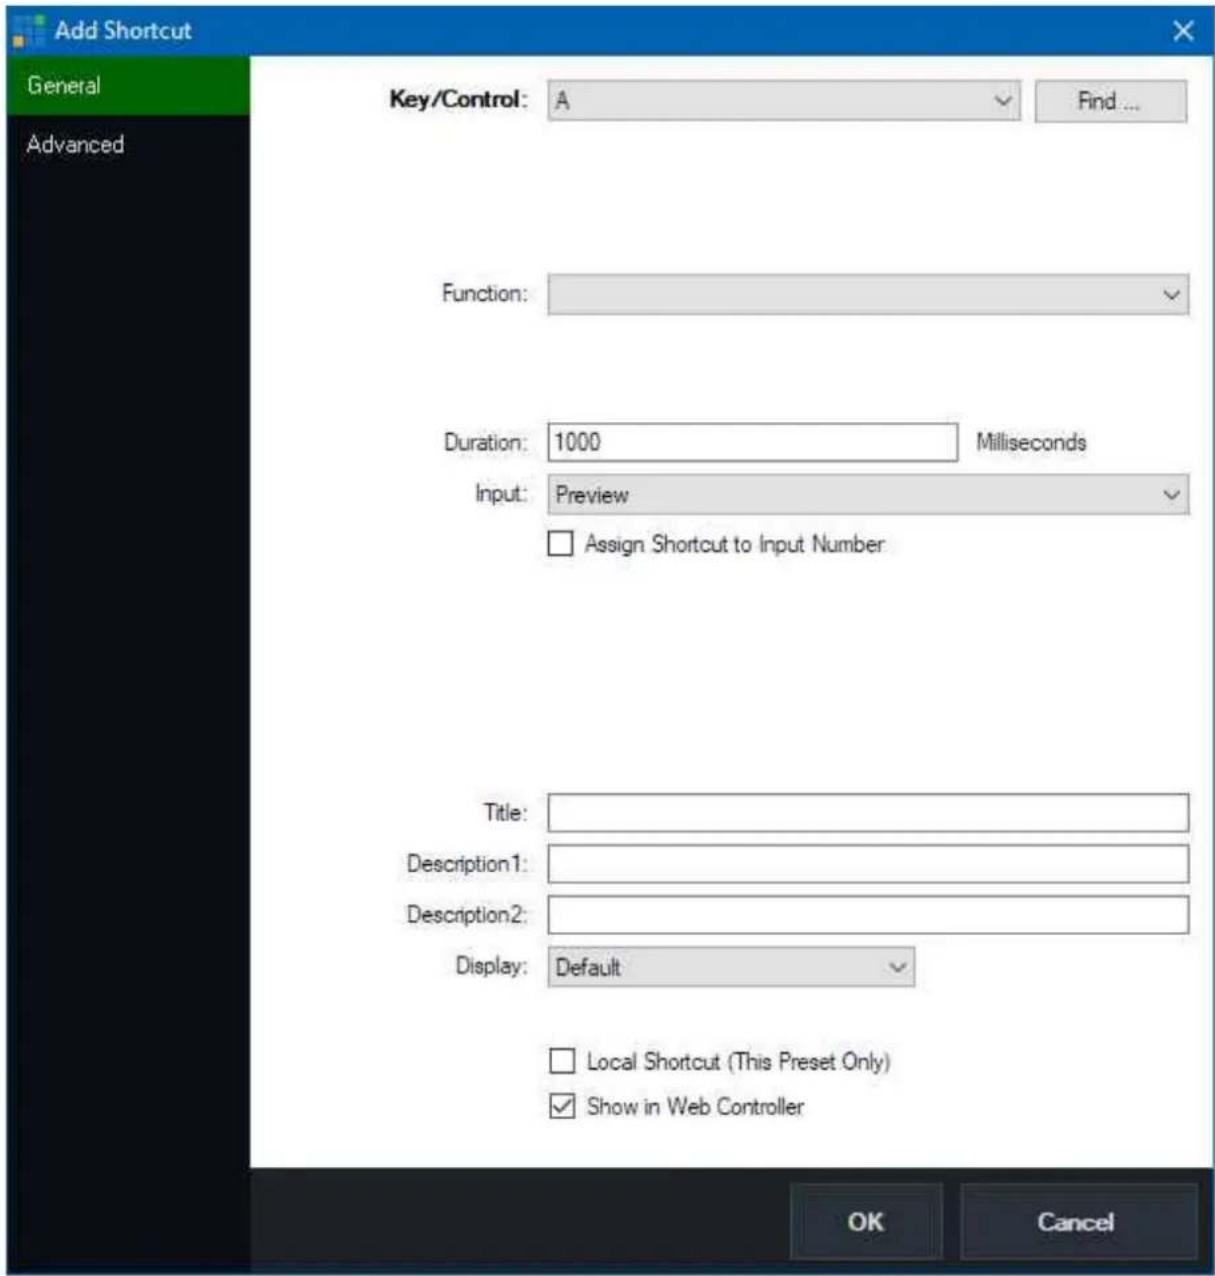
To quickly select the Key or Control you wish to assign this shortcut to, click the Find ... button and then press or move the control you wish to use.
MIDI Note: If using a MIDI controller, make sure it has been plugged in and turned on before starting vMix.
Then from the Shortcuts tab in Settings click the MIDI Settings button to enable the device.
Function
Click the arrow next to the Function dropdown box and the Select Function window appear with a number of commands or macros to choose from, organised by category.
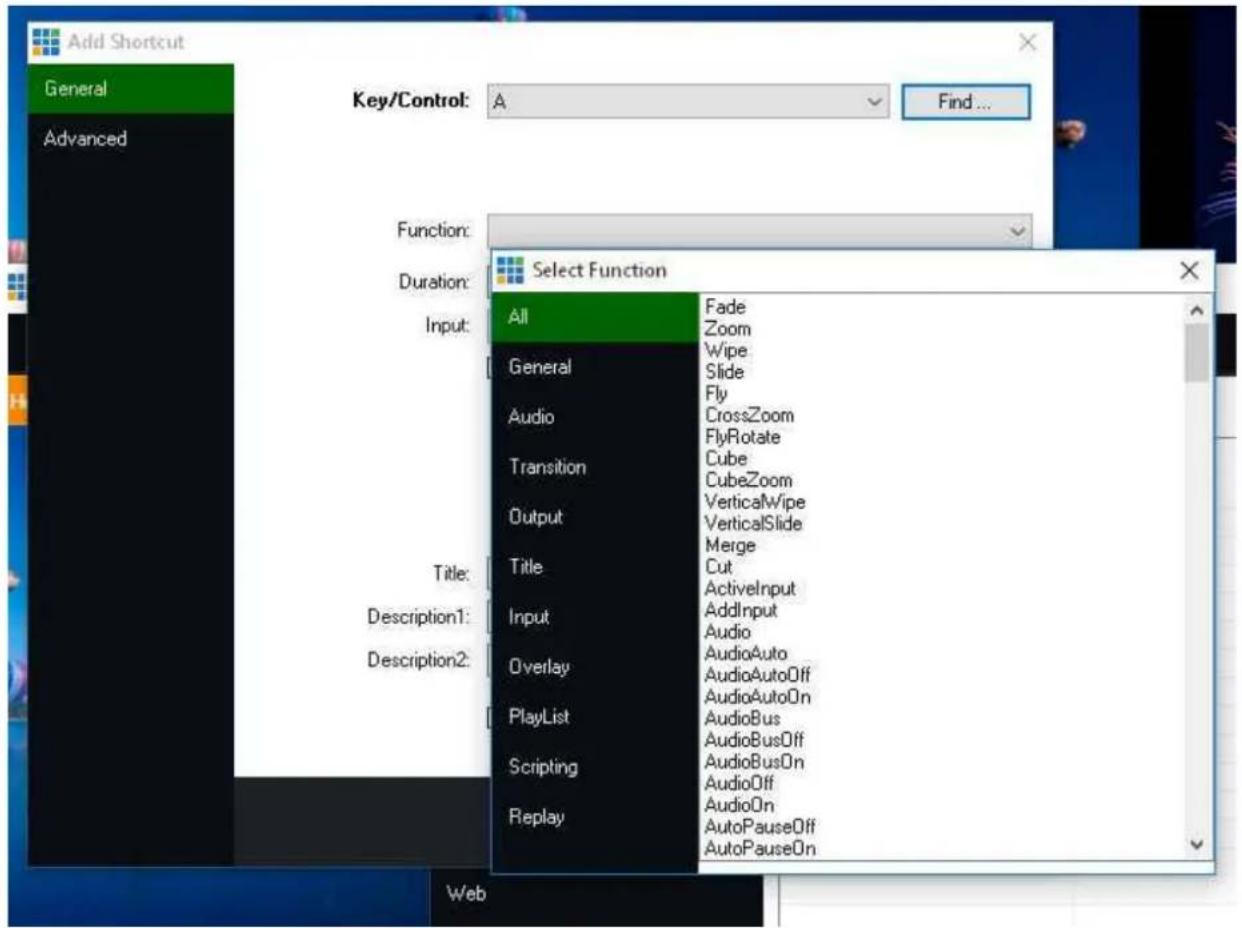
Duration
If the function selected is a transition, configure the duration here in Milliseconds
Input
If the function controls a particular Input, select it here.
You can also tick Assign Shortcut to Input Number so this shortcut will always control any input assigned to a particular Number, otherwise the shortcut will control the same input even if it has been moved.
Title, Description1, Description2
Assign some optional text to uniquely identify your shortcut when it is displayed in the Web Controller
Display
Configure the display options when showing this shortcut in the Web Controller.
Default: The standard button with text.
Colour: Customise the background colour of the standard button with text.
Image: Select a custom image file to display in place of the button. The image will be stretched to fit the button dimensions.
Thumbnail: Display a thumbnail preview of the Input's contents at the time when the Web Controller page was last refreshed.
(Note: This is not a live thumbnail preview, but the latest image can be downloaded by refreshing the page in the web browser).
Local Shortcut (This Preset Only)
Assigns the shortcut to the currently open Preset, otherwise the shortcut will be available to use with any preset.
See Local and Global Shortcuts for more information.
Show in Web Controller
Untick this box to hide this shortcut from the vMix Web Controller interface.
Templates
The Shortcut Templates feature allows you to import and export sets of shortcut keys and save graphical layouts for reference and printing purposes.
How to load a shortcut template
-
Click the template from the right hand list so it is highlighted green. If you don't see your template in the list, click Import to locate the file and add it to the list.
-
Click the Apply button. This will override any existing Shortcuts that share any of the buttons.
![Shortcut Templates Current Audio LaunchControl Default Keyboard Replay ShuttlePIOv2 Display as Keyboard [1] Fade Preview (1s) [2] Fade Preview (2s) [3] Fade Preview (3s) [4] Fade Preview (4s) [5] Cut Preview (1s) [6] PreviewInput Input1 [7] PreviewInput Input2 [8] PreviewInput Input3 [9] PreviewInput Input4 [10] PreviewInput Input5 [11] PreviewInput Input6 [12] PreviewInput Input7 [13] PreviewInput Input8 [14] PreviewInput Input9 [15] PreviewInput Input10 [16] PreviewInputPrevious [17] PreviewInputNext [18] Cut Input1 (1s) [19] Cut Input2 (1s) [20] Cut Input3 (1s) [21] Cut Input4 (1s) [22] Cut Input5 (1s) [23] Cut Input6 (1s) [24] Cut Input7 (1s) [25] Cut Input8 (1s) [26] Cut Input9 (1s) [27] Fade Input1 (1s) [28] Fade Input2 (1s) [29] Fade Input3 (1s) [30] Fade Input4 (1s) [31] Fade Input5 (1s) [32] Fade Input6 (1s) [33] Fade Input7 (1s) [34] Fade Preview (0.5s) [35] PreviewInputPrevious [36] PreviewInputNext Import Export Save Graphic Apply Dose](/content/2026/05/853210/images/d78346c1898194f361d9183c9162790f051c5dd6da2d1f16ee22da472e1ad0ae.jpg)
A number of templates are provided built-in:
AudioLaunchControlXL
This template is designed to be used with the novation LaunchControlXL USB MIDI controller. It assigns the first 7 faders to the first 7 inputs in vMix and the final fader is assigned as the Master volume control.
Default Keyboard
This template contains the default keyboard shortcuts that were included with previous versions of vMix.
Replay ShuttlePROv2
This template assigns common Instant Replay functions to the ShuttlePROv2 USB controller
Local and Global Shortcuts
vMix supports two types of Shortcuts: Local and Global.
Global shortcuts are saved in the vMix settings and will be remembered each time vMix is opened.
Local shortcuts are saved in Presets and will only be remembered if a Preset is saved and subsequently opened later.
Local shortcuts take preference over Global shortcuts, so if you have two shortcuts assigned to the letter A, one local and one global, the local shortcut will be triggered and the global shortcut will be ignored.
Assigning Multiple Functions to a single Shortcut
Multiple functions can be easily assigned to as single keyboard or controller button press.
To do this, simply add multiple shortcuts, assigning them to the same button.
When the button is pressed they will be called in the order in which they appear in the Shortcuts list.
Use the up and down buttons to change the order if necessary.
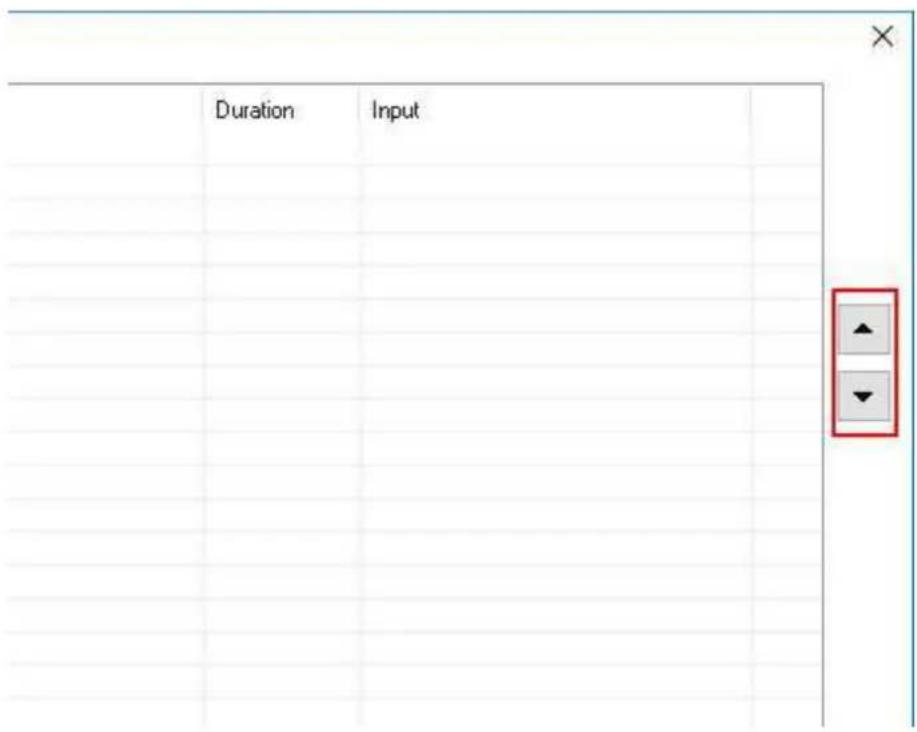
Advanced MIDI Shortcuts
For most MIDI and X-Keys controllers with buttons and faders, simply following the steps in How to add a Shortcut is all that is needed.
However, some controllers may have controls that operate a bit differently to what vMix expects, which is why
there are a couple of extra MIDI control options available in the Edit Shortcut window as shown below.
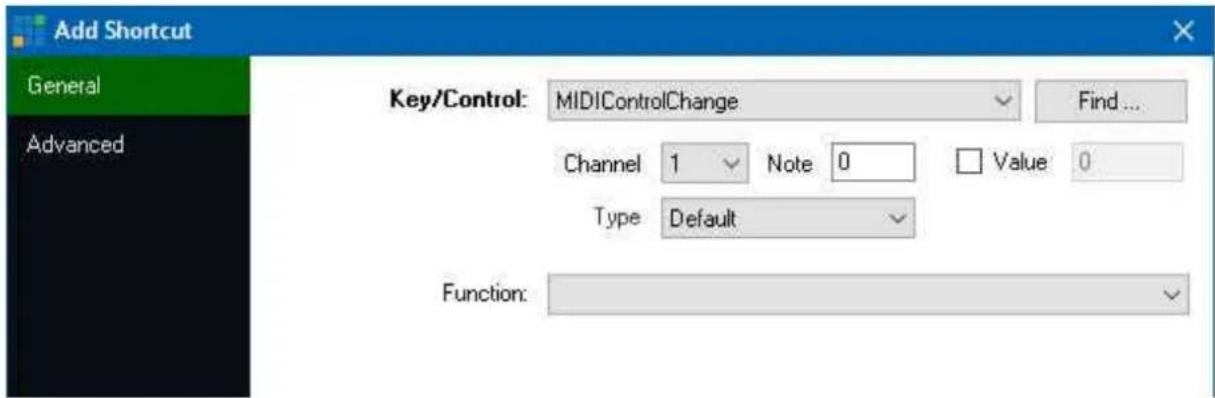
Channel, Note
Channel and Note are automatically detected by clicking Find and pressing the MIDI button or moving the fader or knob.
Value
If you would like to assign different shortcuts to different positions of a single control, such as a rotary knob, you can tick
the Value box and specify a number between 0 and 127.
Type
For most controls that provide a linear value from 0-127 theDefault setting is recommended here.
Other controls, known as Jog Wheels are continuous and only send a value for left and a value for right, and some may even provide different values depending on how fast the wheel is turned.
For these controls, set the Type to one of the JogWheel settings.
There are four speeds of JogWheel available in vMix so that the jog wheel either controls the corresponding Function in slow (JogWheel and JogWheel2X) or fast (JogWheel5X and JogWheel10X) increments.
For example, setting the Type to JogWheel and setting the Function to SetMasterVolume will increase the volume when turning the control right and lower the volume when turning the control left.
For instant replay, JogWheel MIDI controls can be assigned to the ReplayJumpFrames function to move backwards/forwards through a replay frame by frame
or ReplayChangeSpeed to slow down playback when moving the control left, and speed up again when moving the control right.
NOTE: Both the Shuttle and Jog Wheel controls on X-Keys controllers should be configured as JogWheel here.
Dynamic Input and Value Shortcuts
Dynamic shortcuts allow changing the Value or Input a shortcut uses with the press of a button.
This can be used to reduce the number of buttons needed to be setup in complex productions.
For example, consider a controller where one button is for Mute, and one for Solo.
Normally these would only control a single input. With dynamic inputs you can have a row of buttons to select what these buttons control live.
Dynamic Inputs
- When selecting an Input for a shortcut (for example "Fade"), scroll up the Input dropdown box to select
either Dynamic1, Dynamic2, Dynamic3 or Dynamic4.
By default these are set to nothing, so the shortcut will have no effect when pressed.
- To choose what input this shortcut will Fade, create another shortcut on a separate button and set the Function to SetDynamicInput1, SetDynamicInput2, SetDynamicInput3 or SetDynamicInput4 (matching the number you used in Step 1)
- Set the Value of this shortcut to a Number or Name of the input you wish to assign.
- Press this button to assign the input to Dynamic1. Now when you press the Fade shortcut it will fade to that input as expected.
With this style of shortcuts you can assign a row of buttons to select various inputs into Dynamic1, then have other inputs (such as transition buttons) that will transition to that input.
The order of pressing buttons is important, you press the shortcut to assign the input first, then press the shortcut you wish to run on that input second.
Dynamic Values
Dynamic Values are similar to Dynamic Inputs above expect they can be used to change the Value a Shortcut uses.
-
Add a shortcut that requires a Value (for example "SetText") and type in Dynamic1, Dynamic2, Dynamic3 or Dynamic4 as the Value.
If using SetText be sure to select the Title input to use and also the Title dropdown to select the field. By default this shortcut will have no effect when pressed as Dynamic1 has not yet been set to anything. -
Create another shortcut on a separate button and set the Function to SetDynamicValue1, SetDynamicValue2, SetDynamicValue3 or SetDynamicValue4
-
Set the Value to the text you wish to use, for example "Hello!".
-
Press the second shortcut and then press the first, the text selected by the second shortcut will appear in the title assigned to the first.
Activators
Activators are supported for Dynamic Inputs. If an activator is assigned to Input 5 and Event InputDynamic1 then that button will light up
when Input 5 has been selected into Dynamic1.
Examples
Transitions
- A row of input buttons and another row of transition effects. Press the input button then press the transition effect button to complete the action.
Audio
- A row of input buttons and another row of audio control buttons (Mute, Solo, Bus selection etc)
Replay
- A row of tag names and a separate button for each camera to assign the tags to replay events
Activators - MIDI Lights and Faders
Activators can be used to activate lights, button LEDs and motorised faders in response to changes in vMix. For example, you can assign a row of LED buttons on MIDI controller to a row of Inputs in vMix and have them each light up when the corresponding input is live.
Activators supports most MIDI and X-Keys controllers.
Getting Started Add/Edit Activator Activator Examples
Getting Started
- Go to vMix Settings and click the Activators tab
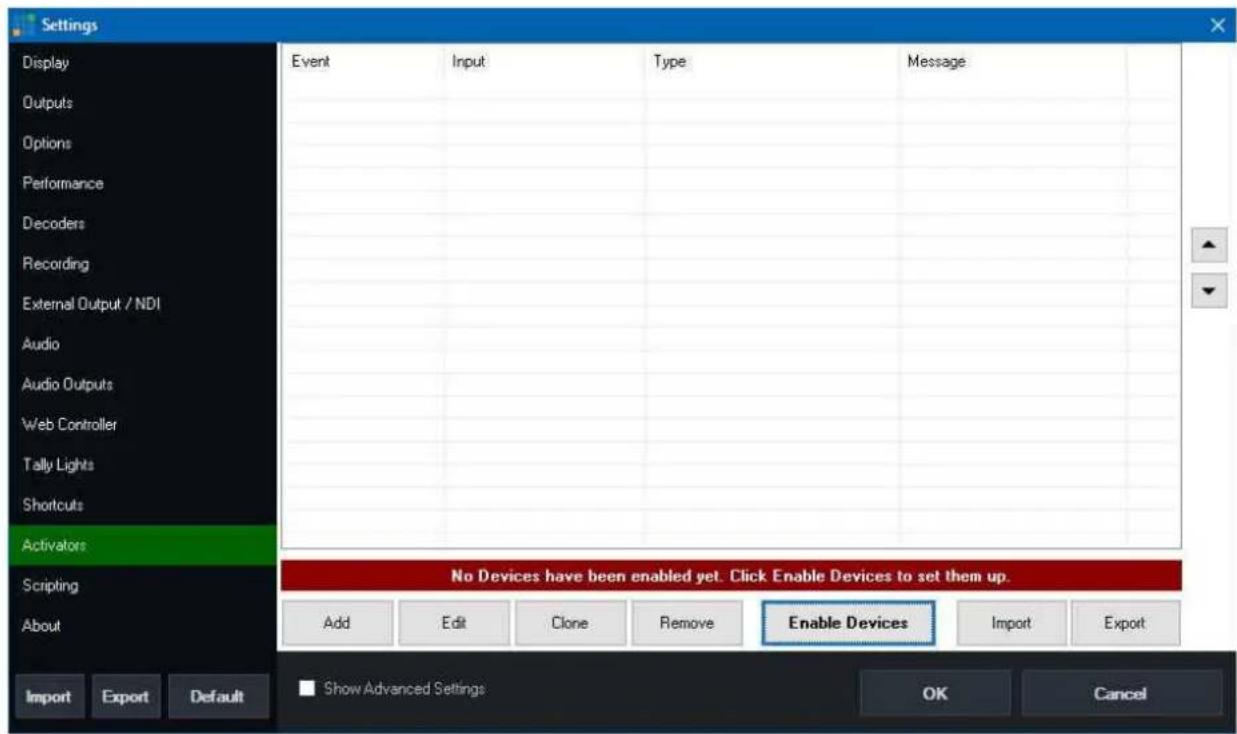
- By default no devices (i.e MIDI or X-Keys controllers) are enabled, so to select the controller you wish to use click Enable Devices.
vMix User Guide
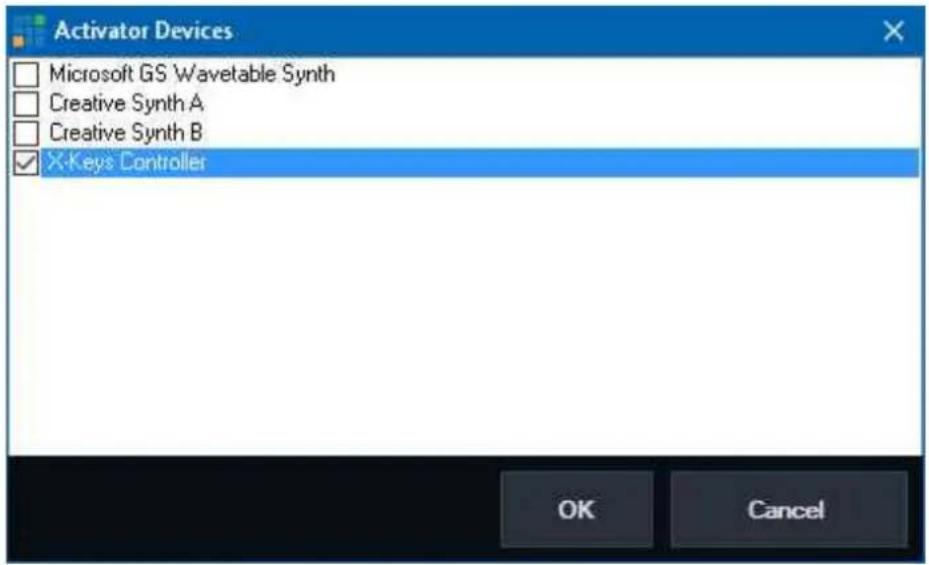
Select the controller and click OK
NOTE: For best results, also make sure the corresponding controller is enabled under the Shortcuts tab by clicking MIDI Devices X-Keys Controllers are enabled by default under Shortcuts and do not need to be selected.
- Click Add to add a new Activator then click OK.
For some examples of Activators that can be setup see Activator Examples
For help on all the settings available when adding an Activator see Add/Edit Activator
Add/Edit Activator

Control
Select and configure the type of control. For X-Keys controllers this will also be "Note". For MIDI controllers this is usually Note for buttons and ControlChange for things like knobs and faders.
This is also where the Channel and Note need to be selected that correspond with the button, light or fader you wish to setup.
To make things easier you can click Find and press the button or control to locate the correct settings.
Event
This is the change in vMix that you want to turn on a button light, or move a motorised fader.
There are a number of events to choose from as described below:
Default
Default is handy for configuring a default color for buttons that support multiple colors when the button state is "off".
For example you may want a row of buttons to be orange when none are selected here.
When using this option you can also type in a range of notes up the top.
Input
This will turn on when the selected input is currently live and in the vMix Output.
InputPreview
This will turn on when the selected input is currently in Preview
InputPlaying
This will turn on when the selected Input is playing.
InputVolume, InputHeadphones, MasterVolume, MasterHeadphones, BusAVolume, BusBVolume
This will assign a MIDI value from 0 to 127 when the volume of an Input, Headphones or Master volume changes.
This can be used with motorised faders or rotary controls with LED indicators
InputAudio, InputSolo, InputBusAAudio, InputBusBAudio, InputMasterAudio
This will turn on when the selected input's audio/solo/bus etc button is turned on.
MasterAudio, BusAAudio, BusBAudio
This will turn on when the Master or Bus audio button is turned on.
FadeToBlack
This will turn on when the FTB button in vMix is turned on.
Recording, Streaming, External, Fullscreen
This will turn on when the Recording, Streaming, External or Fullscreen output are turned on.
Input
Select the input you wish to use with the selected event.
Tick the "Assign Activator to Input Number" box if you want this activator assigned to a particular input position only, so if inputs are moved around in vMix, the activator will not move.
Type
Select the type of button, fader or other type of MIDI control here.
There are a number of options available, depending on the model of MIDI controller.
This is also where the button color is selected if the MIDI controller supports different colors, such as the AKAI APC40
Local (this preset only)
Tick this box to have this Activator saved only within the current preset.
Activator Examples
Toggle ON/OFF LED Button when Input 1 is in Output
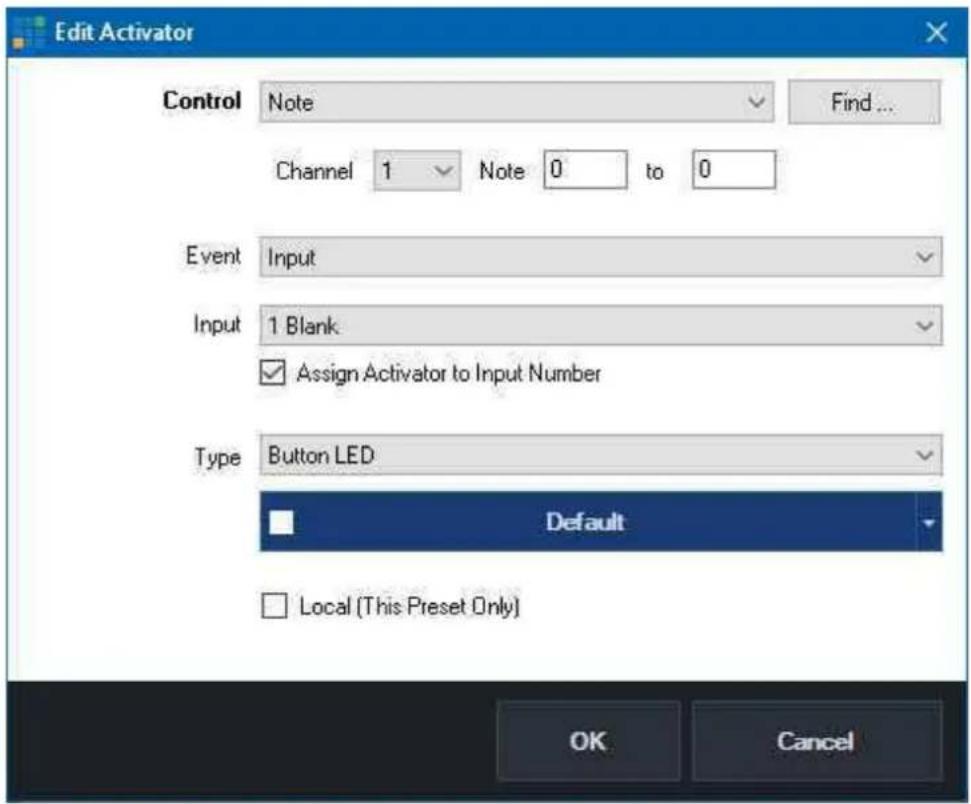
This is for MIDI buttons that only have a single color on/off light.
Turn X-Keys button blue when Input 1 is playing.
vMix User Guide
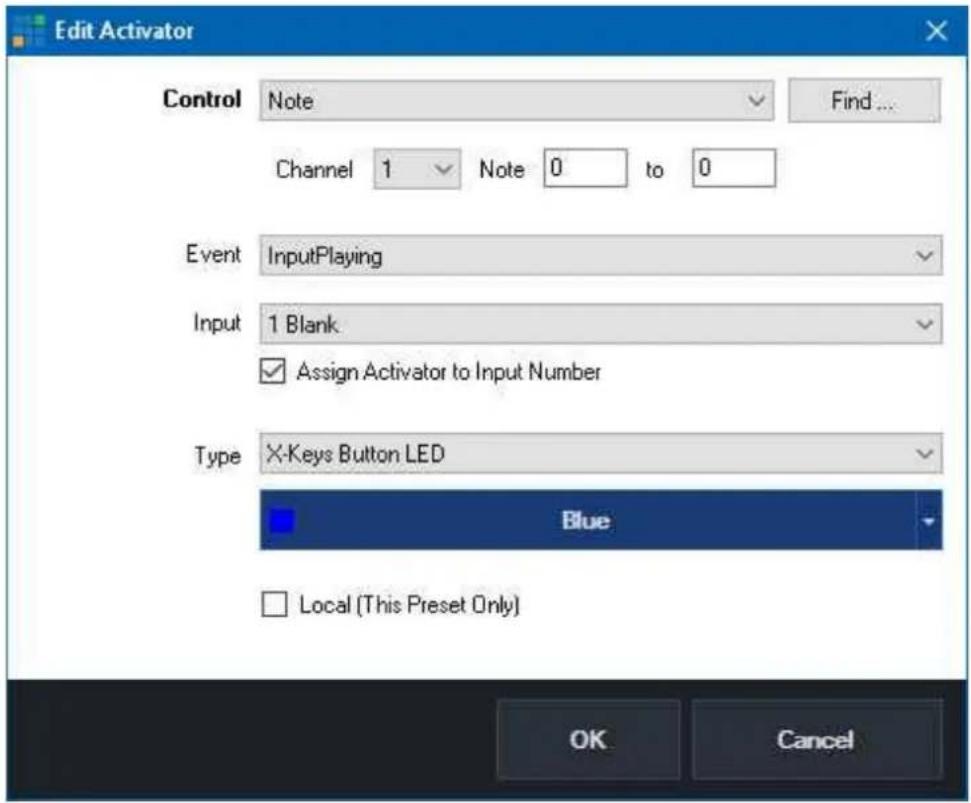
Move the first motorized fader on the Behringer X-Touch Compact when volume on Input 1 is changed
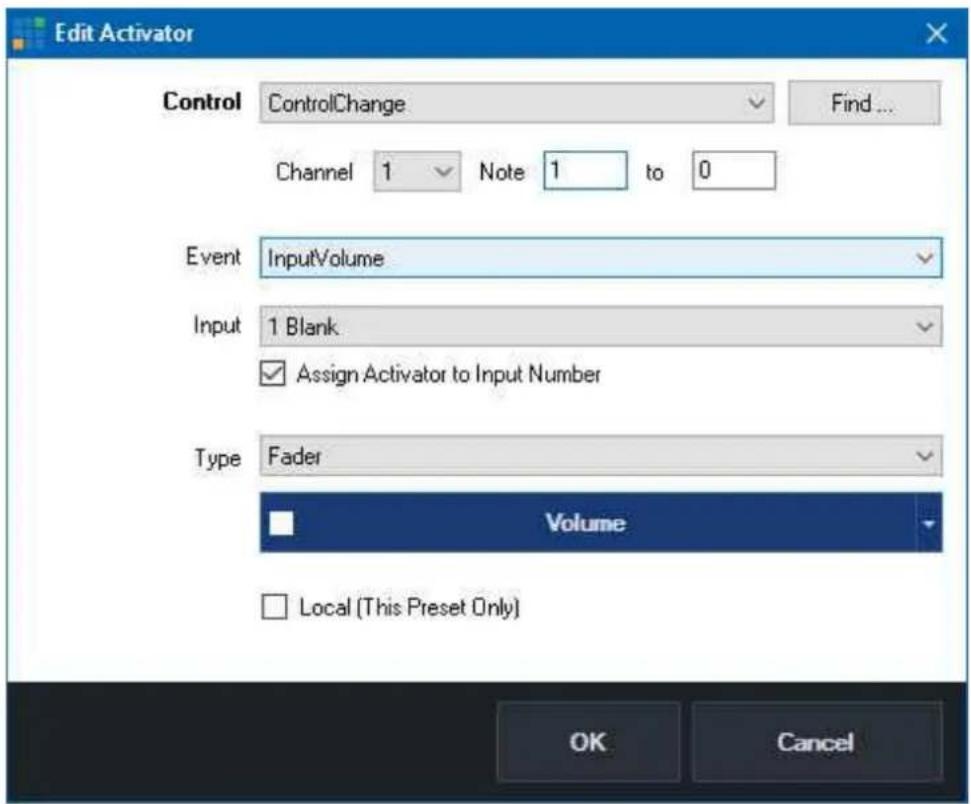
This example may also work on other MIDI controllers with motorized faders.
Turn a button on the AKAI APC40 MK2 controller blue when Input 1 is in Preview
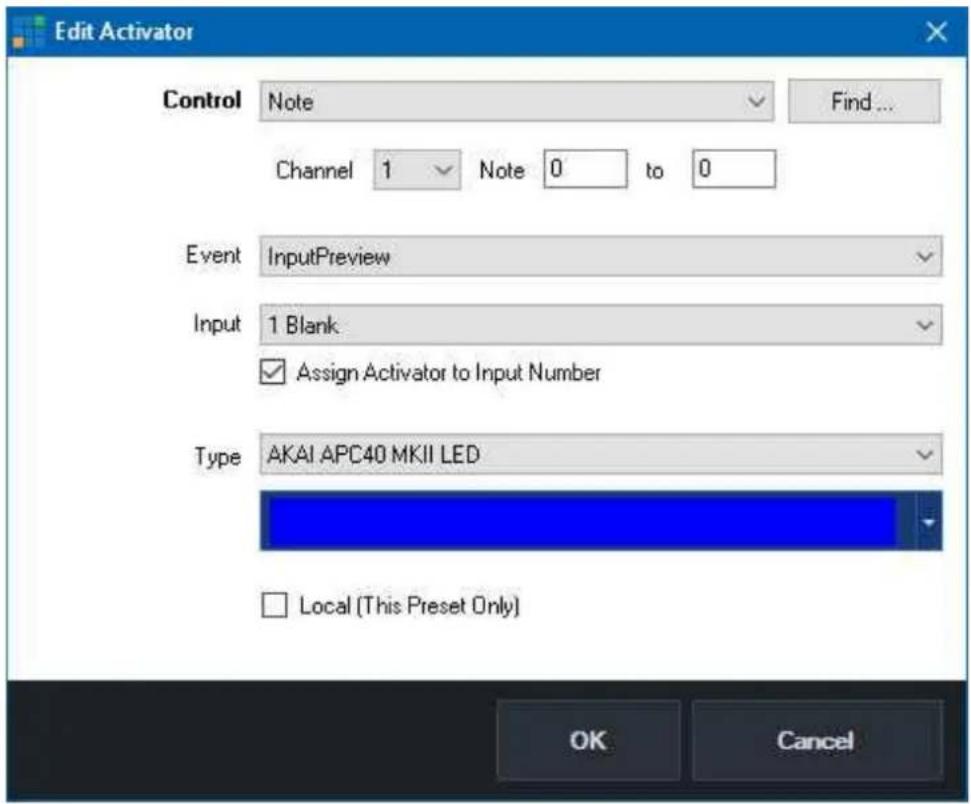
vMix Control Surface
NOTE: The Control Surface is no longer available. This documentation is for reference by existing users only.
vMix Control Surface is an optional hardware control surface for vMix that connects via USB. The following is a User Guide that describes the capabilities of each of the buttons and controls.
Setting Up
Visit http://www.vmix.com/controlsurfacedownload/ to download the latest drivers.
Run the installer and accept the prompts to install. Once installed, verify you have the latest version of vMix. vMix Control Surface is compatible with all installations of vMix version 15 and beyond.
Plug in USB cable from vMix Control Surface to Computer. The lights should flash briefly indicating the unit is receiving power over the USB connection. When using the Control Surface, it must be plugged in prior to opening vMix in order to be recognized. If you plug the unit in while vMix is running, you may need to restart vMix to recognize the Control Surface is connected.
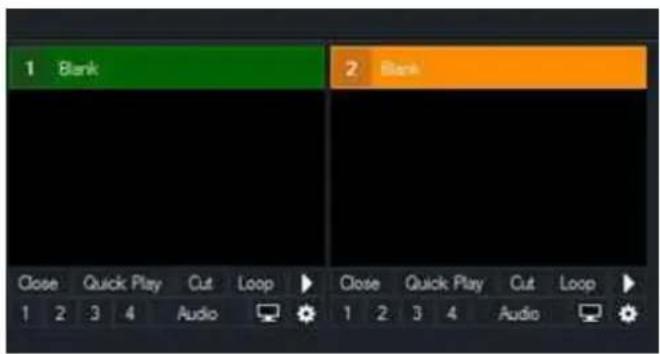
The Control Surface uses an industry standard cross point layout consisting of Preview, Program and Overlay keys.
Each input in vMix has a number next to the input name. These correspond to numbers on the Overlay, Program and Preview rows on the Control Surface.
The Control Surface provides access to the first 12 inputs. Inputs can be dragged and dropped in vMix to
position the most frequently used sources for use by the control surface.
Preview Bus (Bottom Row)
Press the number of the input on the Preview row that you want to assign to Preview.
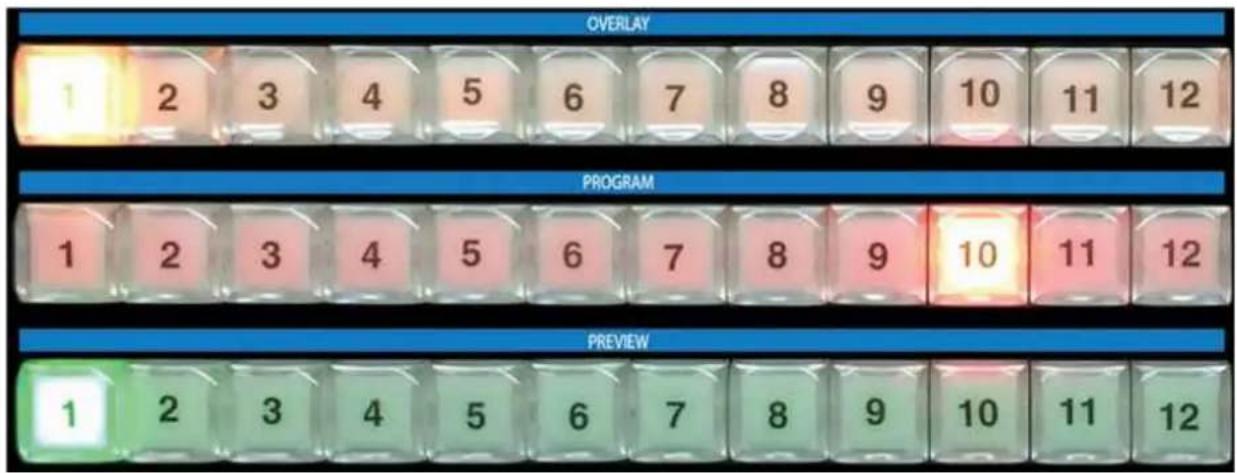
Program Bus (Middle Row)
Press the number of the input on the Program row that you want to assign to the Program or Output. This will cut or take the input directly to output without any transitions.
Overlay Bus (Top Row)
In vMix, graphics placed on top of other sources are known as Overlays. These are also known as Down Stream Keyers (DSK) because the graphics are usually "keyed" over live video after any upstream effects are applied. The DSK buttons on the Control Surface correspond to the 1 through 4 numbers underneath each input in vMix (see graphic on page 1).
- Select the Overlay channel you wish to use. Example: if you want to overlay an input on channel 1, press the DSK1 button. It will now light up indicating overlay channel one on the first 12 inputs is ready to be used.
- Press the desired input you wish to overlay. Example: if you have a lower third title in input 6, press button 6 on the Overlay row. Button 6 will then light up indicating that input 6 is overlaid on channel 1 of the chosen input.
- To see which inputs are currently active on each overlay channel, you can cycle through the 4 DSK buttons. If an overlay channel has an active input, the corresponding input will light up.

Function Buttons (F1, F2, F3)
- To program the Function buttons, open up the settings window in vMix and click the Shortcuts tab.
- Click Add and a new window opens, with drop down menus showing usable keys and available vMix shortcuts.
- Click the Key drop down and scroll down to SurfaceF1, SurfaceF2, SurfaceF3. These correspond to the F1, F2 and F3 keys on the Control Surface.
- Select the desired Function. Example: if you wanted a button to start recording, select Start Recording.
- Press Ok and the selected function button is now ready to be used.
ALT Button
The ALT button can be held down in conjunction with other buttons in order to change their functionality. This will allow enhancements to be added to future updates of vMix.
It presently operates as follows:
- Hold down ALT while pressing a Preview row button to start playing that input if it is a video clip.
- Hold down ALT while pressing one of the Overlay row buttons to turn on that overlay in the Preview window instead of directly to Program/Output.
During the next transition the previewed Overlay will automatically be activated over the top of Program/Output.
Transition Buttons
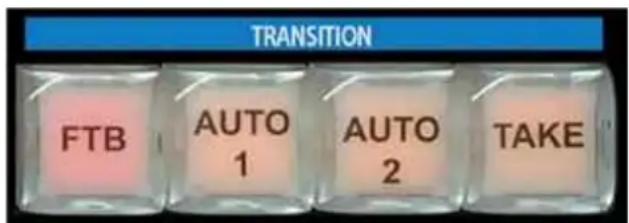
In live switching, changing from one camera or clip to another is called a transition. The vMix Control Surface has three available transition types available, corresponding to transition buttons in vMix.
- For a hard cut between two inputs, press the "Take" button
- To use a stylized transition such as a wipe, fade or zoom, there are customizable transitions located at the top of the vMix interface. "Auto 1" and "Auto 2" correspond to the first two transitions below Cut. When these transition types are changed in the vMix window, the transition will also change for the buttons.
- Press "FTB" to fade the live output to a black screen. (Fade To Black)
T-Bar Operation
By default, the T-Bar allows a manual fade transition between Preview and Program.
The transition effect is linked with the Auto 1 and the first transition button in the vMix interface. If this button is changed from Fade to Wipe for example the T-Bar movement will create a wipe transition instead of a fade.
Web Controller
vMix Web Controller allows any web capable device to remotely control Shortcuts, Switching, Titles and also watch live streams using LiveLAN.
Additionally, it can be used to turn any mobile phone into a wireless tally light.
Examples of web capable devices include tablets, iPads, mobile phones and many smart TVs.
The vMix Web Controller is turned on by default and you can find the web site address to type in our device by clicking
Settings in the main vMix window and then clicking the Web Controller tab.

TIP: The Web Site Address above can be used to control vMix from any device on the same network including Android, iPad, Surface and Mobile Phones. Simply type it into the browser on that device.
After typing in the Web Site Address into your device's browser, the following page will be displayed:
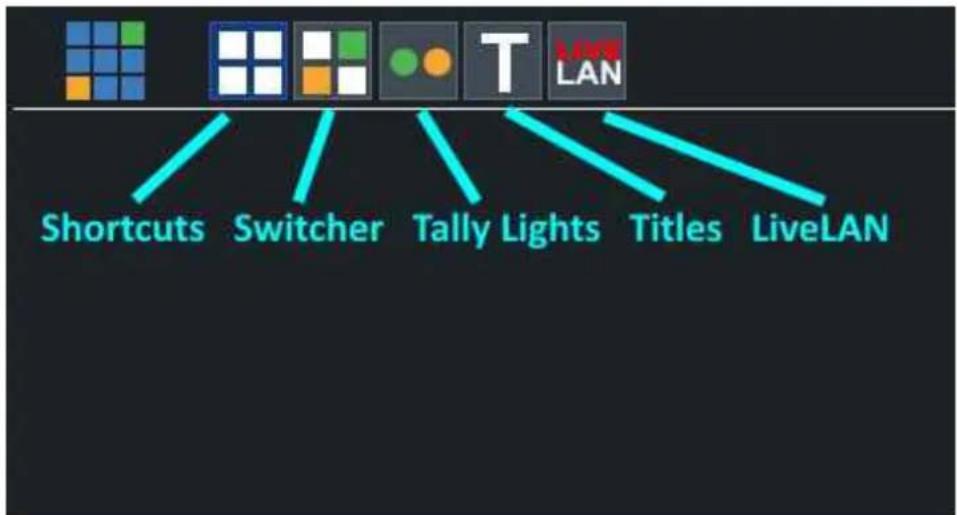
flowchart
graph TD
    A["Shortcuts"] --> B["Switcher"]
    B --> C["Tally Lights"]
    C --> D["Titles"]
    D --> E["LiveLAN"]
There are four buttons available:
Shortcuts
Switcher
Tally Lights
Title Editor
LiveLAN
Password Protection
Password protection can be enabled from the Web Controller tab in Settings by setting a password as shown below.
vMix User Guide
Username: admin
Password: •••••••
Allow access to following pages without login:

☑ Allow software on this computer access without login.
☑ Enable enhanced security on Web and TCP API
☑ Restrict access to LAN only
Access can be granted to individual pages without requiring a password by ticking the boxes in the list provided.
Note: If password is blank, no login will be required, regardless of the access settings.
Security
Additional security settings are described below:
Allow software on this computer access without login.
Regardless of password or page restrictions, ticking this box will allow other apps on the same computer access to all web controller functionality.
This is needed for apps like vMix Social which access the vMix API without a login.
Enable enhanced security on Web and TCP API
Ticking this box will disable certain features which may be pose risks on unsecured networks or computers. For example this disables dynamic scripting, and also disables a web browser from running scripts that could in turn access the Web or TCP APIs.
Restrict access to LAN only
This is turned on by default and prevents all internet access to the Web and TCP APIs. If remote access to the web controller is needed
it is strongly recommended to ensure a firewall is used with adequate security policies in place before disabling this option.
Shortcuts
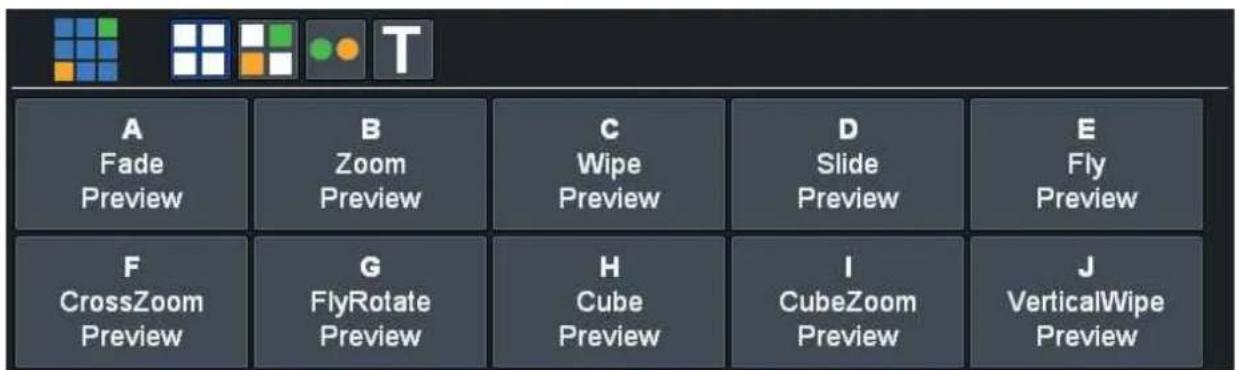
The shortcuts button will display any Shortcuts that have been added to vMix.
You can assign each of these Shortcuts a memorable title or description from the Edit Shortcut window in
vMix.
Switcher
Click the Switcher button to display the web interface in a mode similar to the hardware controller available on a traditional video switcher.
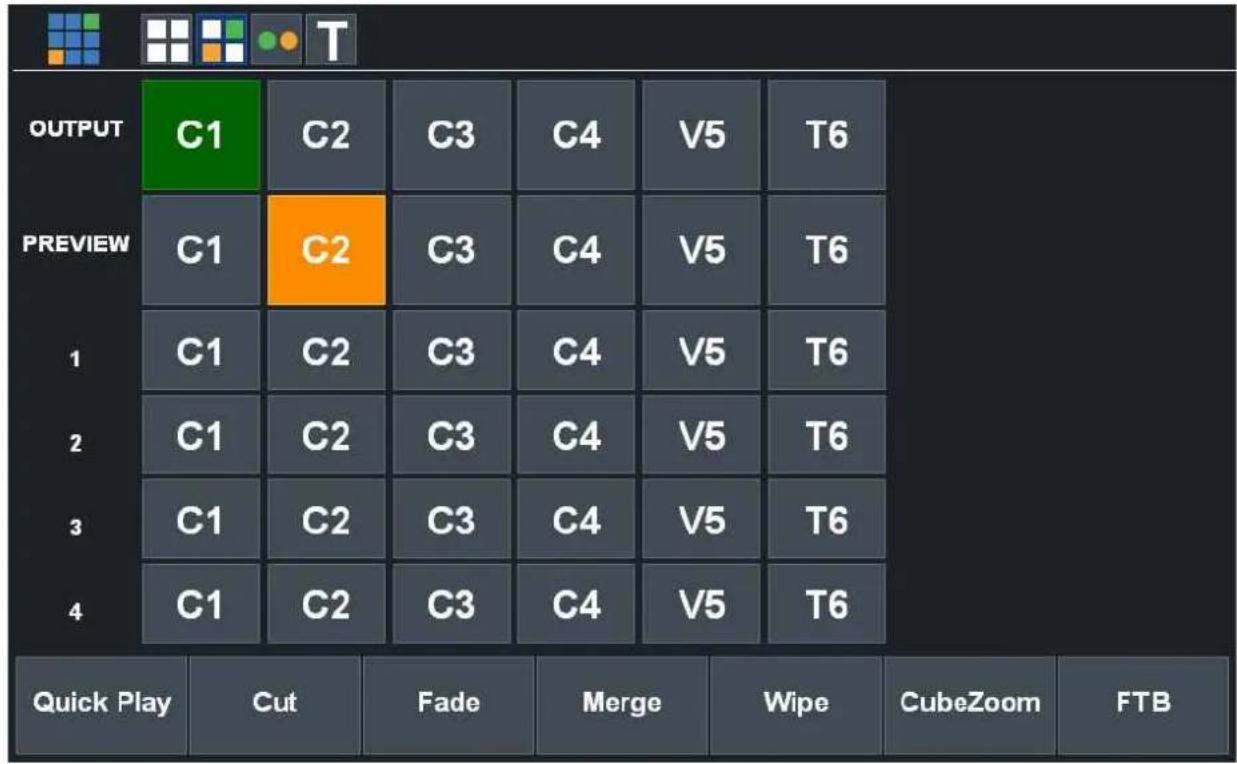
The transition effects along the bottom match the transition buttons seen in the middle of the vMix main window. (See Transition Buttons)
Tally Lights
The Tally Lights feature allows you to turn any WiFi enabled smart phone into an instant tally light! The entire screen will be used as a tally light allowing you to mount it on top of the camera or place it near your on air talent.
Setting up a Tally Light
- Make sure both the vMix PC and the smart phone are both connected to the same WiFi network.
- Open up the smart phone browser and type in the Web Controller URL. (This URL can be found by clicking Settings in vMix and looking under the Web Controller tab.)
- Select the Tally Light icon in the menu to bring up the following page:
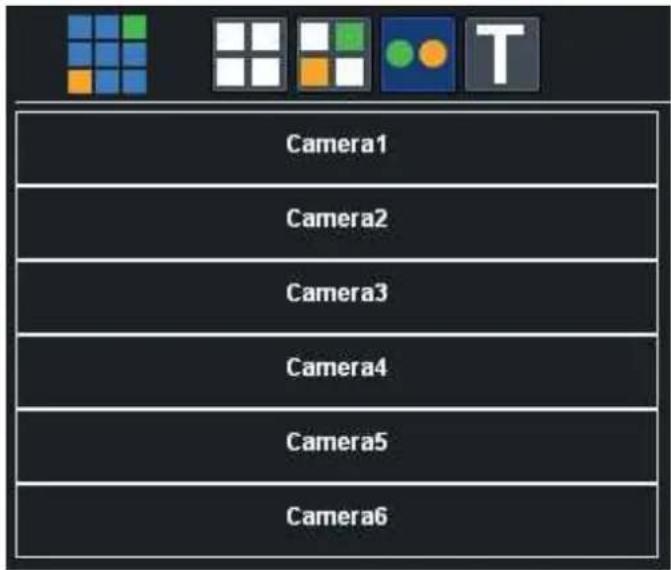
- Select any Input from the list to start the tally light display.


The tally light display will change between the Preview and Output colours depending on the status of that input.
WARNING: Most smart phones will automatically switch off or lock the display after a certain period of time.
On Apple smart phones this can be turned off through the "Auto Lock" settings.
On Android smart phones you can install an app such as "Screen Timeout Toggle"
Title Editor
The title editor allows you to edit the text of any Title or XAML input in vMix from any WiFi web enabled device.
This includes smart phones, tablets etc.
Select the Title Editor icon T from the web interface and select a Title from the list.
vMix User Guide
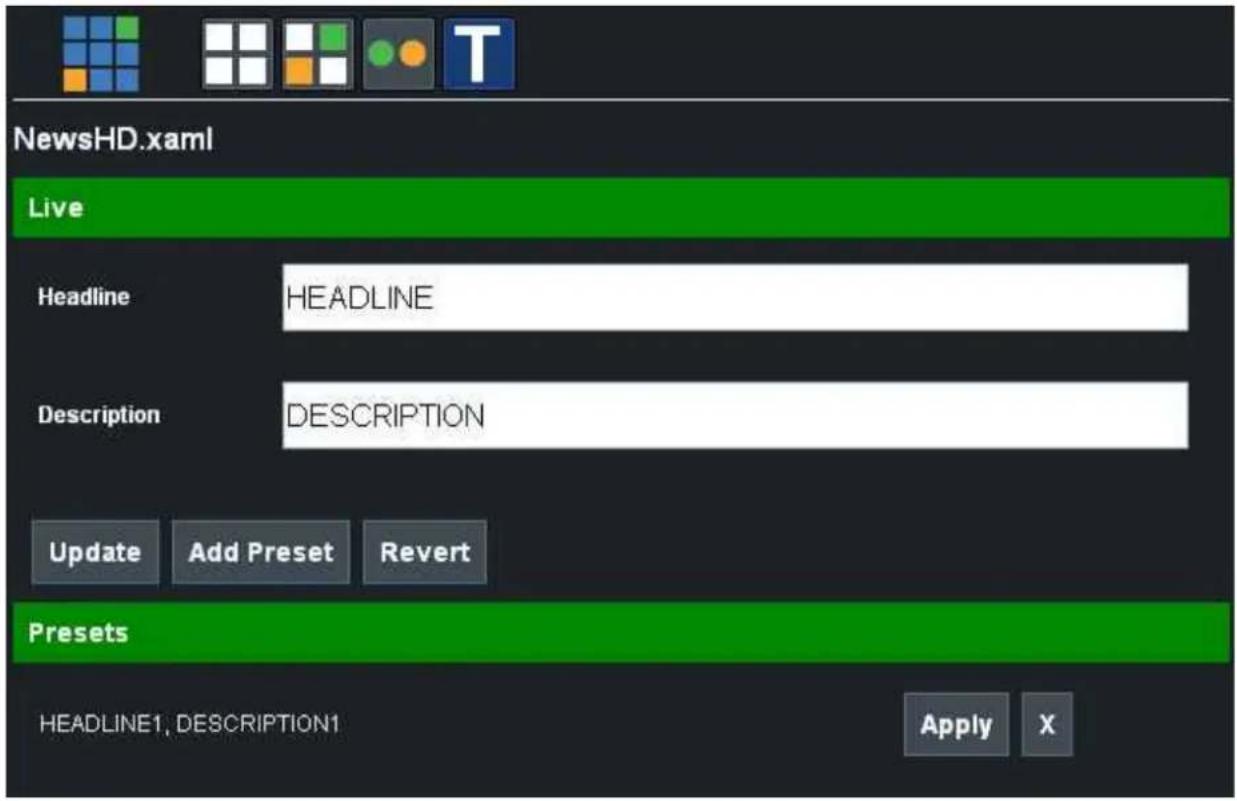
Live
This section allows quick editing of each title field. Simply change the text and click Update. To add the changed text to a Preset instead of updating the live title click Add Preset Click Revert to go back to the title text the last time it was updated.
Presets
Presets uses the same presets found within the Title Editor Window. To apply a preset to the Title click Apply. To delete the preset click X
LiveLAN
See LiveLAN for more information.
Instant Replay

vMix Replay
vMix Replay is a powerful Instant Replay system that adds full slow motion replay capabilities to vMix for up to eight camera inputs.
Features
- Eight channel continuous recording of up to eight camera inputs including 4 channel audio.
- Recordings are high quality vMix AVI 4:2:2 files with resolution support up to 4K and Progressive and Interlaced support.
• Audio is recorded as uncompressed 48khz 4 channel 32Bit Float. - Two output playback channels that can be controlled independently or in sync and have any camera angle assigned to each.
- Precise slow motion playback control from 0 to 100% .
- Reverse playback, Fast Forward and frame by frame control.
- Twenty (20) Events lists are available that include an unlimited number of Mark In and Mark Out points that can be added on the fly and changed at any time.
- Each event can have a default camera angle selected for playback and text comments can also be included with each angle for easy recall.
- Easily playback entire Events lists or selected entries as a highlight reel, complete with transition effects and background music.
- Auto mark in / out controls allow quick event creation with the click of a button with 5, 10 and 20 second presets.
• Keyboard shortcut support for all replay functions - Many hardware control options available including X-Keys, JLCooper, Contour ShuttlePro and Scroll Wheel slow motion control.
- Export events to separate video files on the fly, or use the recordings straight away in your favourite video editor in MP4 or AVI format.
- Use vMix Replay as a dedicated instant replay system or incorporate it into your existing vMix based production.
• Dedicated Replay MultiView output with two playback channels alongside eight live camera previews.
System Requirements
The table below shows the minimum requirements to use vMix Replay.
| One Channel HD Four C | Channel HD / One Channel 4K | Eight Channel HD / Two Channel 4K | |
| Operating System Wind | ows 10 (64 bit only) Windows | ws 10 (64 bit only) Windows | 10 (64 bit only) |
| CPU Quad Core 3.4 Ghz | Six Core 3.6 Ghz | 18 Core 3.0 Ghz | |
| Memory | 8GB DDR4 8GB DDR4 | 16GB DDR4 | |
| Graphics Card | NVIDIA GeForce GTX 1050 or higher | NVIDIA GeForce GTX 1060 or higher | NVIDIA GeForce GTX 1080 Ti or higher |
| Storage | Dedicated SSD for Replay 200GB and higher. | Dedicated SSD for Replay 500GB and higher. 1TB recommended. | NVME SSD with minimum 500MB/sec Read/Write. |
| Storage Connection | Internal SATA or M.2 only | Internal SATA 3, M.2 or faster only. (M.2 recommended) | M.2 only |
Camera Requirements
Instant Replay primarily works with cameras connected to a capture card.
This includes HDMI and SDI cameras connected to a capture card either via PCI Express, Thunderbolt or USB 3.0.
NDI sources can also be used with Instant Replay as long as they are in the same format as the current Replay Session.
Webcams, IP cameras, and other types of video sources are not directly supported.
To use these types of inputs, the "Output" camera option can be selected in the Instant Replay settings. Output will capture everything that is currently playing to the output in vMix.
Camera Resolution / Frame Rate
All cameras must have the same resolution.
Different frame rates are permitted as long as all cameras are sending Progressive or PsF video.
Frame rates will be converted by either duplicating or deleting frames to match the Replay Session frame rate.
High Frame Rate Requirements
High frame rates such as 120FPS or higher require specialised cameras and capture cards.
In particular the camera must support outputting at 120FPS or higher, as many cameras have recording support for high frame rates but do not actually output at this rate via the HDMI or SDI output.
CPU requirements also change for high frame rate sources, as a general rule 1x 120FPS is the equivalent of 2x 60FPS sources.
vMix Requirements
Note: Instant Replay and MultiCorder cannot be used at the same time.
Workflow changes since version 23
vMix Replay has undergone some significant workflow changes in version 24 which are outlined below for reference.
New Replay Session and Recording Format
To facilitate higher camera and 4K formats, vMix Replay now uses the vMix AVI format for its recordings instead of the previous MPEG-2 MPG files.
vMix User Guide
As a result, a new replay session folder will need to be created.
Existing replay session folders can be opened and viewed in 24, but should no longer be used for new productions.
vMix AVI files can be imported into Adobe Premiere, Magix Vegas Pro directly, or the Export Clips feature can be used to export in MP4 format.
vMIx AVI cannot be uploaded directly to sites such as YouTube, Twitter etc, so exporting in MP4 will be required to use these platforms.
vMix AVI files also have a slightly higher bitrate as they are higher quality at 4:2:2 vs the previous format's 4:2:0 format, so recording remaining times
may be reduced by up to 20%.
Independent Output Channels
In previous releases, A and B outputs were fixed to the same time for both.
In 24, these are still linked by default, but can now be used completely independently if required.
Events can be played back in A while events are edited in B and vice versa.
Shortcuts also allow assigning tasks to a particular channel as needed.
Event Transition Overlapping
In previous releases, a transition effect between events would occur after the out point of the previous event and before the in point of the next, leading to playing back extra video at the end and start of the two events.
In 24, this has been changed so the transition effect will overlap the end and start of the two events.
Operators will need to consider expanding the in and out times of events if they wish to emulate the previous behaviour.
ShuttlePro v2 Controller Changes
ShuttlePro v2 Jog/Shuttle controls in previous releases were fixed and could not be changed.
In 24, the ShuttlePro v2 now works as a fully customisable replay controller.
As a result shortcuts need to be added to replicate the previous jog/shuttle behaviour.
The buttons have also changed from ReplayA, ReplayB functions to standard MIDI numbers.
The new built in ShuttlePro v2 replay template in Shortcuts has been updated to emulate all the previous behaviour
and will need to be imported into shortcuts for all users that used this controller in version 23 and prior.
Event Cut/Copy/Paste
Events can now be copied and pasted using a cut/copy/paste workflow.
The previous workflow of copying and moving via menu numbers is still available if preferred.
Per-Event Speeds
Each event can now have independent speeds assigned on playback, or left as default.
See Creating and Editing events for the specific playback behaviour of this feature.
Getting Started
To begin using vMix Replay, first add all of the cameras you will be using to vMix as inputs.
Next, click Add Input and select the Instant Replay tab as shown below:
Important: Click here to see the Instant Replay system requirements.

Session Folder
This is the location where all Instant Replay recordings will be saved. This must be dedicated SSD based storage
After selecting a folder, vMix will display an estimated recording time based on the selected recording format and bit rate.
Recording Format
The recording format must match all camera sources that will be used.
Delete All
This button will delete all video, audio and events within the selected session folder while keeping all replay settings intact, including music and tags. This allows you to use the same session folder and configuration for each game.
Automatically delete prior video when disk space is low
vMix Replay automatically splits each camera recording every 20 minutes. If disk space is running low, vMix Replay can automatically delete the earliest 20 minutes of the recording to continue. Note that any events that occurred in this deleted video will be lost.
If this option is left unticked, vMix Replay will automatically stop recording and notify the user that the disk space is low.
Cameras
Select any Camera input already added to vMix here, if you add an input later on you can revisit this
configuration window by clicking the cog icon in the Instant Replay Controller window.
Output is also supported as one of the camera inputs, and will record all video and audio playing in the vMix output just like a standard recording.
Playback Audio Source
This is the audio source vMix will use when playing back events.
Master can be selected which represents the master audio mix at the time the event being played back occurred.
Follow can be used to automatically switch the audio to the embedded audio of the active camera angle.
Master Audio Channels
Selects the audio channels to record from the Master audio mix.
By default this is the standard stereo master audio but can also be an audio bus or a combination of two buses (for 4 channels total)
In Transition
Select the transition to use when playing back events. This can be a standard transition, or optionally any stinger that has already been configured.
Out Transition
Select the transition to use once the event playback has completed.
Event Transition
Select the transition to use between each event when more than one event is selected for playback, such as in a highlight reel.
Match Replay Speed
When ticked, any transitions between events will be slowed down to match the current replay speed. (For example a 200ms transition will become 400ms when the replay speed is 50% )
Workflow Overview
Once a new Instant Replay session has been configured and added to vMix (See Getting Started) two new Inputs will appear. Replay A and Replay B.
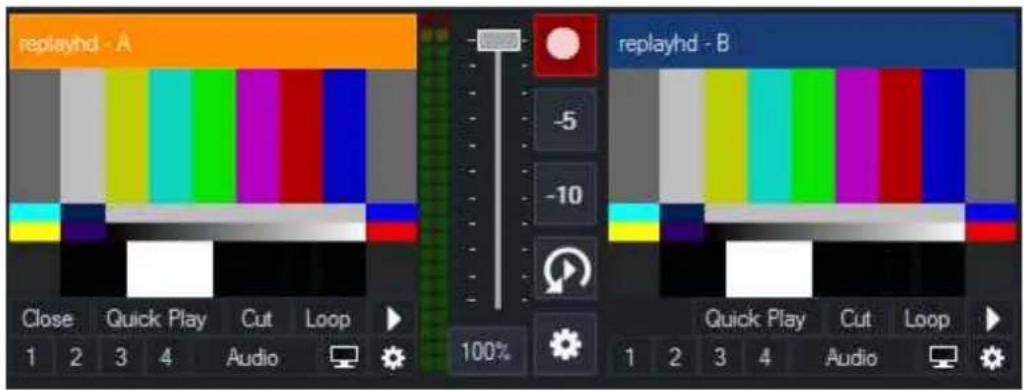
These are two playback channels that can be used to play previously recorded footage at any time. Each can have a camera angle assigned from any of the recorded cameras and these can be switched live.
Basic Replay Example
Consider a basketball game where the live Camera 1 is currently selected into the vMix output.
-
Make sure vMix Replay is recording by clicking the record button so it lights up red.
-
When a team scores a goal, click the -5 button to instantly create a replay.
- When you are ready to play back that goal, click the automatic replay button.
This will transition input A to output, play the event then transition back to Camera 1 when completed. While the event is playing, try moving the scroll wheel on your mouse to change the playback speed.
Advanced Replay
The example above allows you create quick replays of a single camera with only a single click. But what if you want to playback one or more previous events or change camera angles and add notes? The Main Interface can be displayed by clicking the vMix Replay tab
+R Instant Replay Audio Mixer located next to the Audio Mixer tab.
on the bottom right hand side of the main vMix window.
See User Interface Overview for the controls available.
Live and Recorded modes
Events are created in two modes based on the color of the Live button in the Instant Replay Controller
Live Mode (RED)

When in Live Mode, all new events are created are based on the current time "as it happens" on the live cameras.
Starting a recording will turn on Live Mode automatically.
Recorded Mode

When in Recorded Mode, all new events are created based on the time displayed above the position bar in the Instant Replay controller.
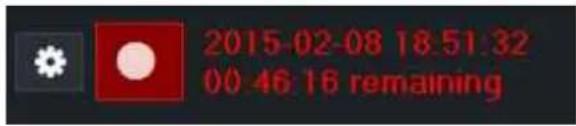
This allows the operator to move the position bar back and forth through previous video to create events that may have been missed live.
TIP: Be sure to enable Live Mode again when finished if you are in the middle of a recording
Creating and Editing events
In vMix Replay, events represent short clips of time for one or more camera angles.
As vMix Replay records continuously, these events can be edited, changed and deleted at any time without losing any footage.
Use the Mark In/Out buttons, shortcuts or controller buttons to create new events as required.
See the Live and Recorded modes overview to find out which times are used when creating events.
Within the user interface, each event has the following columns:
ID
A 3 or 4 digit number (customisable in replay settings) that unequally identifies each event.
This number is fixed when created and cannot be manually changed.
When copying an event, the copy will have a new number assigned.
In
The start time of the event.
Out
The finish time of the event.
Duration
The time between In and Out
Speed
When -- this means it will play the event at whatever the previous event speed is. If no events specify a speed, this will be the speed the controller is currently set to.
When set to a specific speed, the event will play at that speed, and that speed will become the new default speed for any subsequent events with no speed set.
1,2,3,4,5,6,7,8
These columns represent the up to 8 camera angles available. Checking each box enables playback of that angle when playing the event.
Right click the text boxes next to the check boxes to input text to help identify each event and angle.
User Interface Overview
vMix Replay includes a centralised Instant Replay Controller that can either be docked to the main vMix window or opened separately.
Main Interface
vMix User Guide

Mini Interface
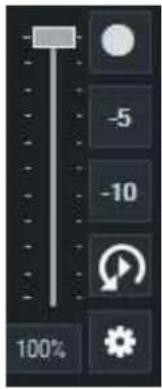
The mini interface is located next to the Instant Replay channel "A" input and includes common controls such as recording, quick 5 second or 10 second mark in / out buttons, a playback last event button and a settings button.
Slow motion can also be controlled here in addition to the main interface.
Control Options
MIDI and X-Keys Controllers
The buttons on most MIDI and X-Keys controllers can be programmed vis the Shortcut feature to activate most functions in Instant Replay.
For more information see Shortcuts User Guide
Jog and shuttle wheels can also be used on supported devices such as the Behringer CMD PL-1 or the X-Keys XK-12 Jog and Shuttle.
Pay special attention to the Jog wheel configuration options when setting up a MIDI Shortcut. See Advanced MIDI Shortcuts
The ShuttlePro has 14 configurable buttons in addition to the Jog and Shuttle wheels. To buttons will be detected as MIDI buttons when creating a Shortcut in vMix.
See Shortcut Reference for a list of Instant Replay related functions that can be assigned.
The following diagram shows the functions that are applied when applying the Replay ShuttlePROv2 Template. This template is found in Shortcuts - Templates.
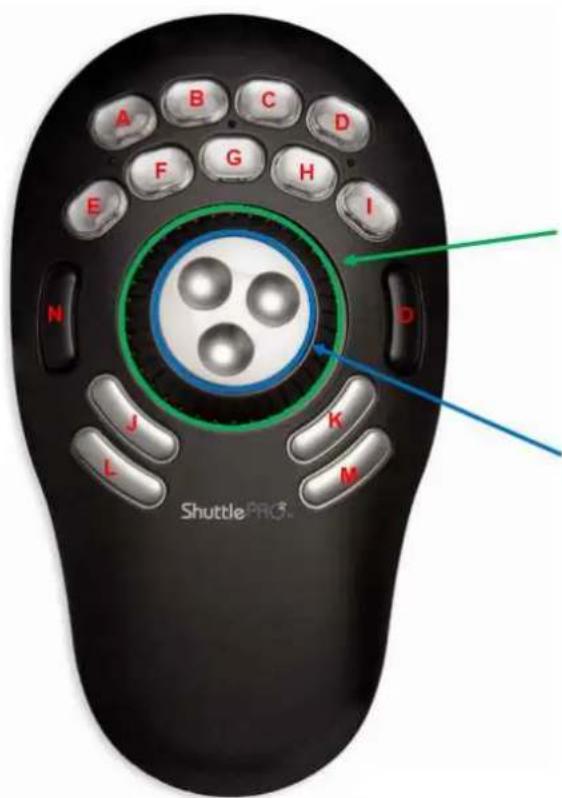
Jog left to slow down playback speed, jog right to speed up.
Move frame by frame backwards or forwards by turning wheel Hold down L button to move one second at a time
Keyboard
A number of keyboard shortcuts can be configured using the existing Shortcuts feature in vMix. For a full list of what is available see Shortcut Reference.
Mouse
The mouse scroll wheel can be used at any time in the following ways:
With Shift key pressed: Slow down or speed up playback With Ctrl key pressed: Move backwards or forwards one frame at a time. With Alt key pressed: Move backwards or forwards one second at a time.
Shortcut Reference
The shortcuts below can be configured as keyboard or controller shortcuts to allow easy control of common Instant Replay functions. See the Shortcuts User Guide
For a complete list of Instant Replay Shortcuts see Shortcut Function Reference.
| ReplayStartRecording | |
| ReplayStopRecording | |
| ReplayMarkIn | Create a new event with the In Point set to the current time (when live), or the time displayed in the Replay Controller (when in recorded mode) |
| ReplayMarkInRecordedReplayMarkInLive | Create a new event with the In Point set to either the current time or the time displayed in the Replay Controller |
| ReplayMarkInRecordedNow | Jumps to recorded mode and starts a new event from the most recent frame allowing the operator to move the position bar backwards to set the out point. |
| ReplayMarkOut Complete | An event started with ReplayMarkIn and set the Out Point to the time described in Live and Recorded modes |
| ReplayMarkInOut | Create an event with Value specifying the number of previous seconds to use according to the time described in Live and Recorded modes |
| ReplayMarkInOutLiveReplayMarkInOutRecorded | Create an event With Value specifying the number of previous seconds to use from either the current time or the time displayed in the Replay Controller |
| ReplayMarkCancel | Cancel incomplete event and delete it from the list |
| ReplayMoveSelectedInPoint | Set Value to the number of frames (positive or negative) to add to the InPoint of the selected event |
| ReplayMoveSelectedOutPoint | Set Value to the number of frames (positive or negative) to add to the OutPoint of the selected event |
| ReplayLive | Set all new event timing to Live mode. See Live and Recorded modes |
| ReplayRecorded | Set all new event timing to Recorded mode. See Live and Recorded modes |
| ReplayLiveToggle | Toggle between Live and Recorded modes.See Live and Recorded modes |
| ReplayACamera1,2,3,4 | Change camera angle for playback channel A |
| ReplayBCamera1,2,3,4 | Change camera angle for playback channel B |
| ReplaySelectEvents1,2,3,4,5,6,7,8 | Select the Event List to display in the Instant Replay Controller and to use as a reference for any related controls |
| ReplayPlayEvent | Set Value to a positive number starting from 0 where 0 is the most recent event and 1 is the next most recent and so on. |
| ReplayPlayEventTo Output | Same as ReplayPlayEvent but this will also automatically transition Replay A to output if it is not already. |
| ReplayPlayLastEvent | Play the most recent event (based on time) |
| ReplayPlayLastEventToOutput | Same as ReplayPlayLastEvent but this will automatically transition Replay A to output if it is not already. |
| ReplayPlaySelected Event | Play all of the selected events in the current Events list |
| ReplayPlaySelected EventToOutput | Same as ReplayPlaySelectedEvent but this will automatically transition Replay A to output if it is not already. |
| ReplayShowHide | Show/hide the Instant Replay Controller interface. |
| ReplayChangeDirection | Change current playback direction |
| ReplaySetLastEvent Text | Set text of the most recent event (based on time) to Value |
| ReplaySetSelected EventText | Set text of the selected event to Value |
| ReplayPlayPause | This is the same as the PlayPause shortcut except it will always apply to the Replay regardless of what Input is selected for the shortcut. |
| ReplayJumpFrames | Specify Value as the number of frames, positive or negative to jump |
| ReplayChangeSpeed | Specify Value as a number, positive or negative, to subtract from the current playback speed. For example 0.5 will increase current speed by 50% |
| ReplayExportLastEvent | Export last event (based on time) as a separate video file. This will default to the export folder in the Replay Session Folder, otherwise Value can be used to specify a custom folder. |
| ReplaySelectNextEvent | Move to next item in the currently selected Event list |
| ReplaySelectPreviousEvent | Move to previous item in the currently selected Event list |
| ReplayPlayNext | Transition to next event or angle in the currently playing events list |
| ReplayPlayPrevious | Transition to the previous event or angle in the currently playing events list |
| ReplayMoveLastEvent | Specify Value as the number from 0 to 3 specifying the Events list to move the last event (based on time). |
| ReplayMoveSelectedEvent | Specify Value as the number from 0 to 3 specifying the Events list to move the selected events |
| ReplayToggleLastEventCamera1,2,3,4 | Toggle on or off playing back the Camera 1,2,3 or 4 of the last event. |
| ReplayToggleSelectedEventCamera1,2,3,4 | Toggle on or off playing back the Camera 1,2,3 o 4 of the selected event. |
| ReplayStopEvents Stop | stop any currently playing events. |
| ReplayJumpToNow | Jump to recorded mode and move the playback position to the most recent frame of video. |
PTZ - Pan Tilt Zoom
PTZ Control is an advanced feature found in the 4K and Pro editions of vMix.
vMix supports controlling multiple Pan Tilt and Zoom cameras directly from the main interface and by shortcut and/or joystick control.
PTZ support can be enabled on any input, providing the ability to enable PTZ support regardless of how the camera is connected, be it SDI, HDMI, NDI or RTSP Stream.
NOTE: PTZ cameras will need to be connected to the same network as vMix in order to be controlled.
This is usually done over Ethernet and is a separate cable connection if the video is coming in via SDI or HDMI through a Capture Card.
Enabling PTZ Control
To enable PTZ support on a particular camera, go to the Input Settings of that camera and select the PTZ tab as show below.
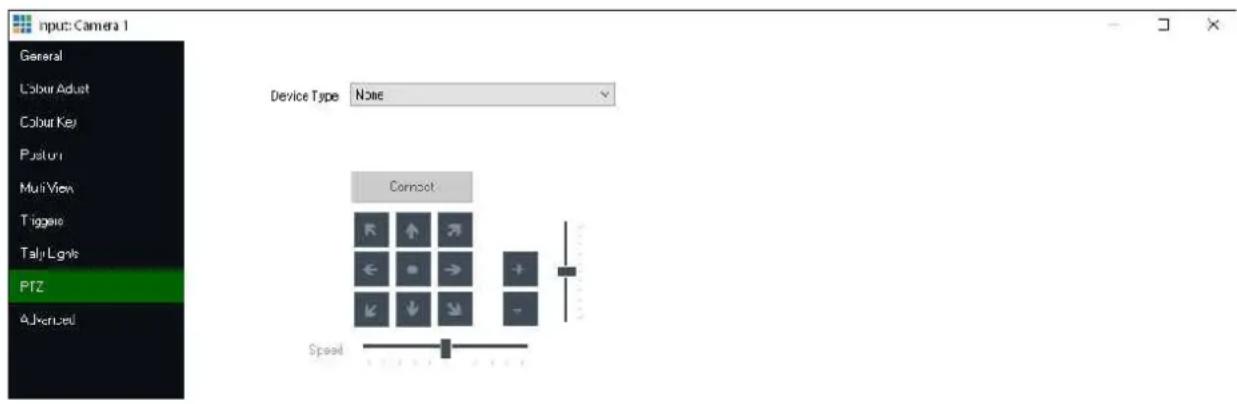
Selecting the PTZ camera Device Type
Select the device type that matches your camera from the Device Type dropdown box. vMix currently supports the following types of PTZ cameras:
Virtual PTZ
- Turns any input into a virtual Pan Tilt and Zoom controller. Select from the dropdown box the desired digital zoom level.
PTZ Cameras
- An up to date list of supported PTZ cameras can be found at the link below: https://www.vmix.com/software/supported-hardware.aspx#ptz-cameras
It is important to note that for simplicity and ease of use, only PTZ cameras that support network control are supported.
Cameras that only have serial control such as via the VISCA or Pelco RS-422 or RS-232 protocols are not currently supported.
Entering in the PTZ camera network address
Once the Device Type is selected, a box to enter either a Web Address or IP Address will be displayed.
This is the IP address configured for the camera as per the camera's network documentation.
For more information on how to configure and locate this IP address, refer to the cameras documentation.
Connecting to the PTZ camera
Once the Device Type and Address have been selected click Connect to connect to the camera. If successful, the controls below the Connect button will be enabled.
Controlling a PTZ Camera
vMix provides three different methods for controlling a PTZ camera, you can either pick the method that suits your production or use a combination of all three!
PTZ control using Virtual Inputs
This method allows assigning a PTZ position to its own Input in vMix, turning one camera into potentially unlimited "Virtual" cameras!
PTZ control using the mouse
Simple push button controls for up, down, left, right etc to move the camera into position
PTZ control using shortcuts and joysticks
Assign shortcut keys or controls to PTZ movements, including the ability to assign the joysticks on an XBOX controller to a PTZ camera.
PTZ control using Virtual Inputs
Perhaps the easiest way to control PTZ cameras is to create a number of "Virtual Inputs" for a particular PTZ camera and assign a particular pan, tilt and zoom position when selected.
In vMix, this is relatively straightforward to setup:
Step 1 - Enable PTZ Control
Follow the instructions under PTZ - Pan Tilt Zoom to enable PTZ control for a particular Camera input.
Step 2 - Move the camera into position
Use the provided controls under the Input Settings PTZ tab to move the camera into the position you wish to create a virtual input for.
Step 3 - Click Create Input at this Position
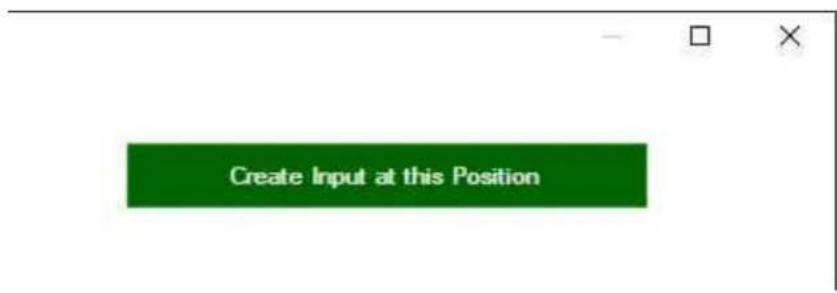
This will create a new input based on the current camera and PTZ position.
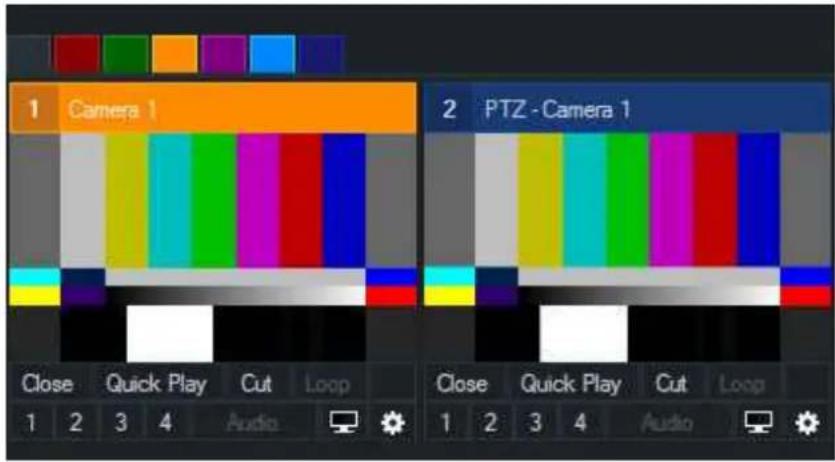
You can see these two inputs side by side in the screenshot above.
TIP: You can also right click the cog icon underneath the PTZ camera to create PTZ Virtual Inputs without going into Input Settings
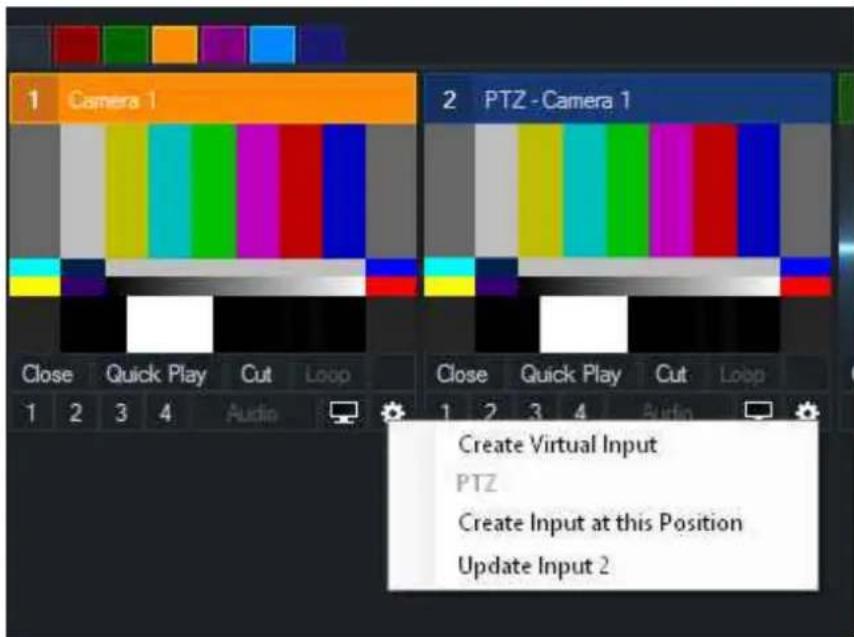
Step 4 - Repeat steps 2 and 3 to create as many virtual inputs as needed
Step 5 - Use these inputs just as you would if multiple real cameras were available
Any time one of these inputs is selected into Preview, the PTZ camera will automatically move into position. When the input is not visible in either Preview or Output, a static image of what the camera was seeing when the input was created will be displayed to make it easy to locate a particular camera angle.
PTZ enables the operator to create the illusion of a large multi camera production with just 2 PTZ cameras!
The basic work flow involves swapping between the two cameras, paying careful attention to make sure the movement of a camera is complete in Preview before switching it to Output.
Updating PTZ Virtual Inputs
Each virtual input that is created will create a corresponding update button in the Input Settings PTZ tab.
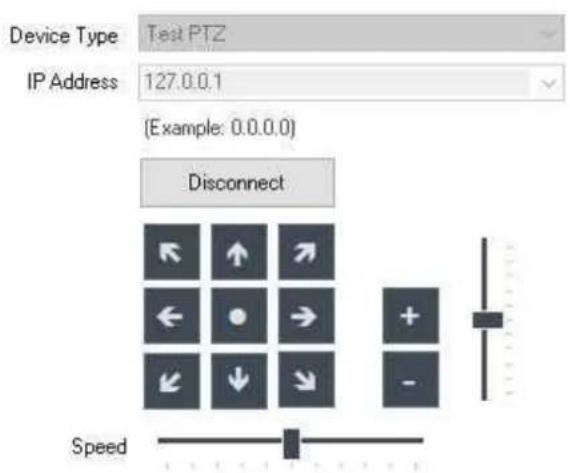
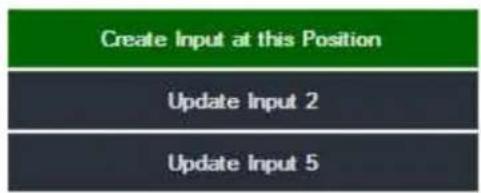
The number next to each button (for example "Update Input 2") corresponds to the number of the input in the main window.
Moving the camera and then clicking the corresponding update button will update that virtual input so that it recalls that position in the future.
TIP: You can also right click the cog icon underneath the PTZ camera to update any of the PTZ Virtual Inputs without going into Input Settings
Automation using shortcuts
Most of the buttons available for PTZ are also available a shortcuts.
See the PTZ section of Shortcut Function Reference for more information.
PTZ control using the mouse
PTZ cameras can be controlled using the buttons provided in the PTZ tab under Input Settings.
The options available are described in the following diagram.
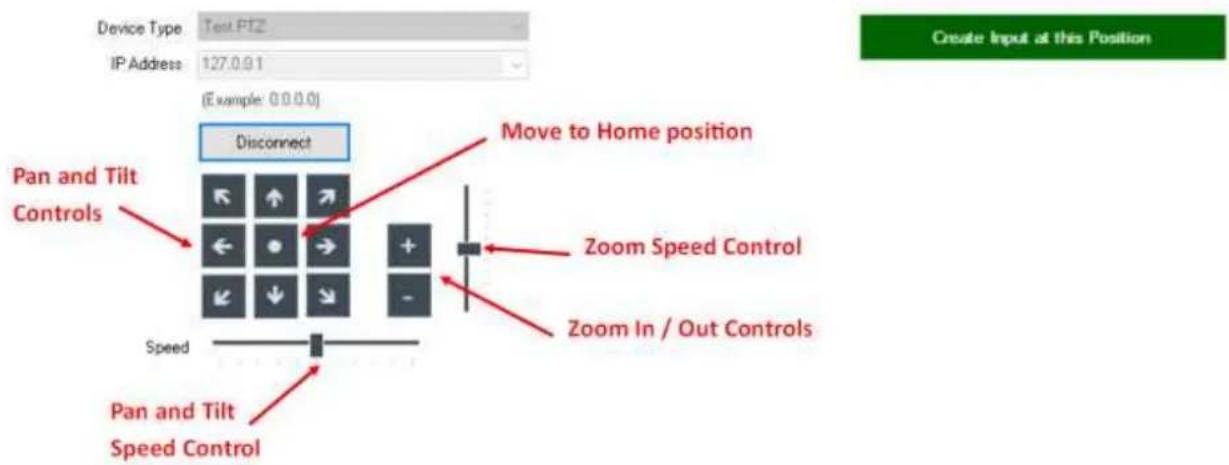
PTZ control using shortcuts and joysticks
PTZ cameras can be controlled by assigning a PTZ shortcut to an input where PTZ has been configured. For example the shortcut "PTZMoveUp" once activated will keep the camera moving upward until a corresponding "PTZMoveStop" shortcut is activated.
For more information on the shortcuts available see Shortcut Function Reference
PTZ Control using an XBOX compatible controller
vMix includes a shortcut template that assigns PTZ control to joysticks and buttons on a USB XBOX controller
![Shortcut Templates Current Audio AKAI APC 40 MK.2 Audio LaunchControl Default Keyboard PTZ Joystick -XBOX Controller ReplayShuttlePROv2 Display as Joystick /XBOXController [1] PTZHome Preview [2] PTZUpdateVirtualInput Preview [3] PTZMoveUp Preview [4] PTZMoveUpLeft Preview [5] PTZMoveUpRight Preview [6] PTZMoveLeft Preview [7] PTZMoveStop Preview [8] PTZMoveRight Preview [9] PTZMoveDownLeft Preview [10] PTZMoveDown Preview [11] PTZMoveDownRight Preview [12] PTZMoveUp Preview [13] PTZMoveUpLeft Preview [14] PTZMoveUpRight Preview [15] PTZMoveLeft Preview [16] PTZMoveStop Preview [17] PTZMoveRight Preview [18] PTZMoveDownLeft Preview [19] PTZMoveDown Preview [20] PTZMoveDownRight Preview [21] PTZZomIn Preview [22] PTZZomStop Preview [23] PTZZomOut Preview Import Export Save Graphic Apply Close](/content/2026/05/853210/images/ccd4e66651a4570d8118ccb8229fa107c37291f248d1b82d6cf155aa4900390b.jpg)
By default this template assigns all the buttons to the Preview input which means as long as a PTZ enabled camera is in input it can be moved and controlled using this template. Of course, the shortcuts in this template can be edited to assign to a particular input if you prefer.
PTZ Shortcuts and Speed Control
By default, PTZ shortcuts will use the speeds defined by the sliders in the Input Settings PTZ tab. To specify a custom speed, specify a fractional number between 0 and 1 as the Value of the shortcut.
Variable Speed Control / Pressure Sensitive Control
To enable variable speeds on pressure sensitive controllers (such as joysticks and the XBOX controller), from shortcuts tick the Pressure Enabled checkbox for all applicable shortcuts.
NDI - Network Device Interface
NDI™ Network Device Interface
NDI is an easy way to send and receive high quality, low latency video and audio between supported devices using a standard Gigabit enabled network.
For example you can produce one aspect of your show on one computer and send the output to vMix running on another.
vMix supports both sending and receiving NDI.
Receiving NDI Sources
See NDI / Desktop Capture for more information.
Sending video and audio from vMix using NDI
vMix supports sending a number of different types of output via NDI.
To enable a particular type of output for NDI, it must first be turned on from Settings - Outputs / NDI
Output 1
This is the main Output (or "Program") feed and includes the Master stereo audio mix
Output 2, 3, 4
These are independent outputs that can be configured to show Output, Preview, MultiView or a particular input.
See Settings - Outputs / NDI for more information.
Cameras / Calls / Audio Inputs
Any Camera, Video Call or Audio inputs currently being used in vMix can also be viewed remotely via NDI.
Audio Outputs
Master, Headphones, A and B mixes in vMix can all be independently accessed over the network using NDI.
The A and B mixes can be enabled by assigning them to Enabled in the dropdown list in Settings - Audio Outputs
and also by checking the Audio Output box in the NDI section under Settings - Outputs / NDI
Changing additional settings such as audio channel on an Output
Output 1,2,3 and 4 each have a cog button that provides access to additional options when using these outputs with NDI, SRT, MultiCorder or with Instant Replay.
(Note; vMix Call has a separate option to select an audio track for a caller, so in this case, changing the audio source here will have no effect).
The two options currently available allow sending a particular audio bus, or enabling alpha channel support.
Output Audio Levels
The audio levels from vMix may appear 20dB lower than expected in some applications. To fix this tick the 20dB Boost option in the NDI output settings.
Alpha Channel Support
Alpha Channel Support for NDI Sources
vMix automatically supports alpha channel when it is detected on an NDI source.
If the source provides the video as "pre-multiplied alpha", be sure to turn on the checkbox in the Colour Adjust tab in Input Settings
Alpha Channel Support for NDI Output
When using the Output options with NDI, these will by default send standard "YUV" video without alpha channel.
To enable Alpha Channel on output follow the steps below:
- Open vMix Settings and go to the Outputs / NDI tab
- Click the cog icon next to the Output you wish to enable Alpha Channel for.
- Under the Alpha Channel setting, select Straight or Premultiplied depending on the receiving application requirements.
SRT - Secure Reliable Transport
Secure Reliable Transport is an open source video transport protocol. It optimises streaming performance across unpredictable networks, such as the Internet, by dynamically adapting to the real-time network conditions.
Features
- Input and Output (send and receive) support for Caller, Listener and Rendezvous connection methods.
- 256 bit encryption through use of PassPhrase.
- Hardware (GPU) accelerated encoding and decoding of HEVC or H264 video in up to 4K (where supported by the underlying hardware and operating system).
- Up to 8 channels of AAC audio which can optionally be split into separate stereo audio tracks on output.
Technical/System Requirements
- Windows 10 x64 or higher
- Graphics card with support for HEVC and H264 encoding and decoding.
NVIDIA Quadro P2000 or higher series recommended.
NOTE: NVIDIA GeForce 9xx series or lower should not be used with SRT, and is unsupported. - When using HEVC on Windows 10, the "HEVC Video Extensions" from the Microsoft Store is required to be installed.
- Progressive video formats are supported only. (interlaced support is not available)
- vMix supports HEVC or H264 video and AAC audio (AAC-LC) wrapped in a transport stream only. Other codecs are not supported.
Setting up an input stream
See SRT Input for more information.
Setting up an output stream
- From the vMix Settings, go to the Outputs tab and click the cog icon next to the output channel you wish to send.
- The following settings will appear:
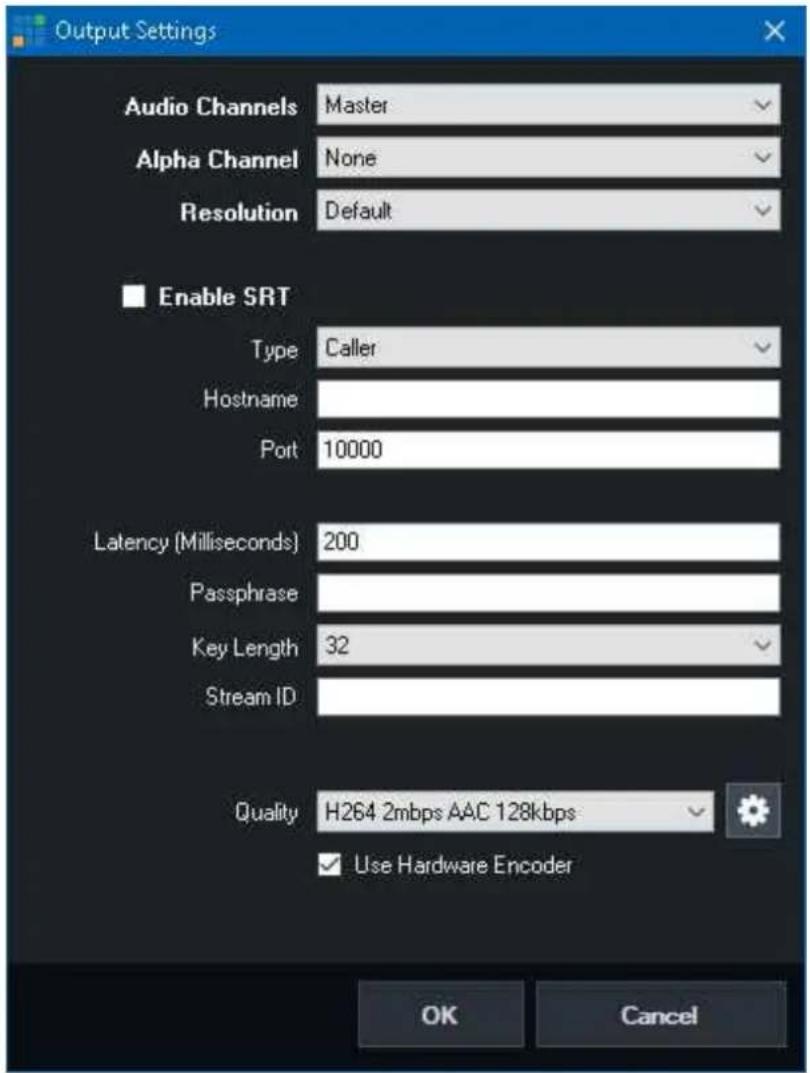
Enable SRT
Check this box to enable the SRT output.
Type
Listener: Listen on the specified Port on all network adapters on the computer for connections. Hostname is ignored.
Caller: Connect to the specified Hostname and Port.
Rendezvous: Connect to the specified Hostname and Port. The other side must also be set to Rendezvous with an identical port number specified.
This mode allows connecting through most firewalls automatically.
Latency
Specify the latency of the connection in milliseconds to adapt to network congestion.
The higher this value, the better SRT can handle difficult network conditions.
As a general rule this should be set to at least 4x the ping time destination IP. So 20ms would require a latency setting of at least 80
This must be set to the same value on both ends.
Passphrase
Specify a password to encrypt the connection. This password must be used by both sides for the connection to be established.
Key Length
This is the encryption strength to use. Multiple by 8 to convert to bits, for example 32 = 256bit encryption.
Stream ID
Optional Stream ID that may be required by your streaming provider to uniquely identify the stream.
Quality
Select one of the built in compression profiles from the list or click the cog icon to customise the encoding settings.
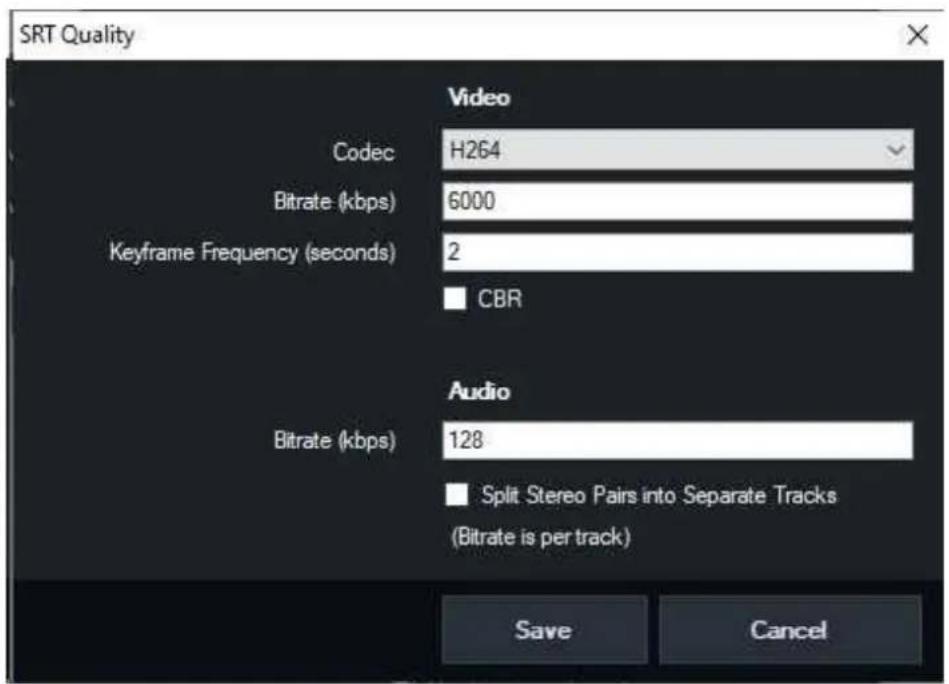
Video Codec
Select either H264 or HEVC as the video compression method.
Video Bitrate / Audio Bitrate
Specify the bandwidth in kbps per second for Video and Audio. Example 2000 = 2mbps and 128 = 128kbps. Audio bandwidth is total for all channels when in a single track. For example for 8 channels, 384 = 48 kbps per channel.
When audio is in separate tracks, bitrate is for each stereo pair.
Keyframe Frequency (seconds)
Set the maximum distance between keyframes in the stream in seconds.
CBR
Ticking this box will enable constant bit rate mode on the SRT stream.
This will pad the stream with additional dummy data in cases where the bitrate drops below the target (for example when showing still images).
For example, if the bitrate is 6000 kbps and the stream is currently 2000 kbps, CBR will add an additional 4000 kbps of data to keep at a constant rate.
NOTE: CBR will increase the overall bitrate by approximately 10%. The Video Bitrate setting above can be reduced to compensate if an exact bitrate is required.
Split Stereo Pairs into Separate Tracks
When this option is ticked, all audio channels in the stream will be split into stereo pairs and encoded as
separate audio tracks.
The tracks will use the default stream PIDs of 256, 257, 258 and so on for each stereo pair.
For example if MAB is selected, bus A will be a stereo track with PID 257.
Use Hardware Encoder
Use accelerated encoding where available on the graphics card. NVIDIA GeForce cards (and some low end Quadro cards) are limited to 2 simultaneous encodes per system.
This includes the Streaming and Recording features in vMix, so care should be taken to ensure this tick box is only enabled at two locations when using these types of cards.
(such as 1x Stream and 1x SRT)
Use Low Power Encoder
Some Intel Graphics drivers included support for "VDENC" which is a low power, high performance encoder built in to some CPUs.
Tick this box to enable using this encoder where available.
Audio Channels
Specify the audio source for this output. A maximum of 8 channels of audio is supported by AAC.
Resolution
Optionally specify a resolution to downscale to. Only progressive formats are supported.
Alpha Channel
This setting must be set to None as alpha is not supported by the video codecs used by SRT.
Data Sources
Data Sources in vMix can be used to assign dynamic text and images to Titles from a variety of sources including Google Sheets, Excel, CSV, XML and Text.
These sources can be from files on the local system, network or internet and data will update the title automatically as it changes.
For example, you can create a Spreadsheet with a list of speakers and have somebody update the data from a different computer on the same network or even from the other side of the world!
Types of Data Sources
Setting up a new Data Source
Mapping a Data Source to a Title
Controlling Data Sources
Using Images in Data Sources
Types of Data Sources
Excel/CSV
This data source supports XLSX, XLS, ODS, CSV, HTML, PDF and XPS tables. Multiple tables can be utilised from a single file simultaneously.
If the first row of each table contains the names of each column, tick the "Use first row as column names" tick box in the Settings window.
Google Sheets
This data source supports Google Sheets that have been shared to be viewed by anyone. From within Google Docs, click the Share button in the top right hand corner.

Then click Get shareable link
Share with others
Get shareable link
People
Enter names or email addresses...
Can edit
Done
Advanced
Finally copy the link provided into the URL box in the vMix Data Source Settings.
Share with others
Get shareable link

Link sharing on Learn more
Anyone with the link can view ▼
https://docs.google.com/spreadsheets/d/
Google Sheets also requires an API Key which can be created by following the instructions below. How to create a Google API Key
RSS
Use any web site address in RSS format with this data source. RSS is commonly used by news sites, blogs and other online information sites.
Text
Select any text file to use as a data source, for example Stream Labels on Twitch Alerts.
XML
Select any XML compliant web site or file to use as a data source. To select which XML element to use as a data source, the XPath setting will need to be filled in.
For more information on the XPath format, refer to the Wikipedia page below: https://en.wikipedia.org/wiki/XPath
JSON
This supports JSON data that is stored as an object array. Each element in the array will be treated as a row.
Setting up a new Data Source
- Open up the Data Sources Manager from the menu in the bottom right hand corner of the main vMix window.
vMix User Guide
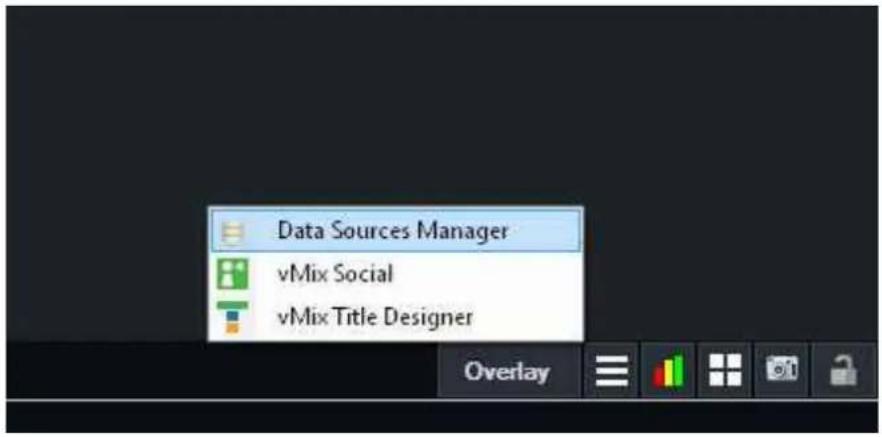
- The following window will appear. click the button to add the first Data Source

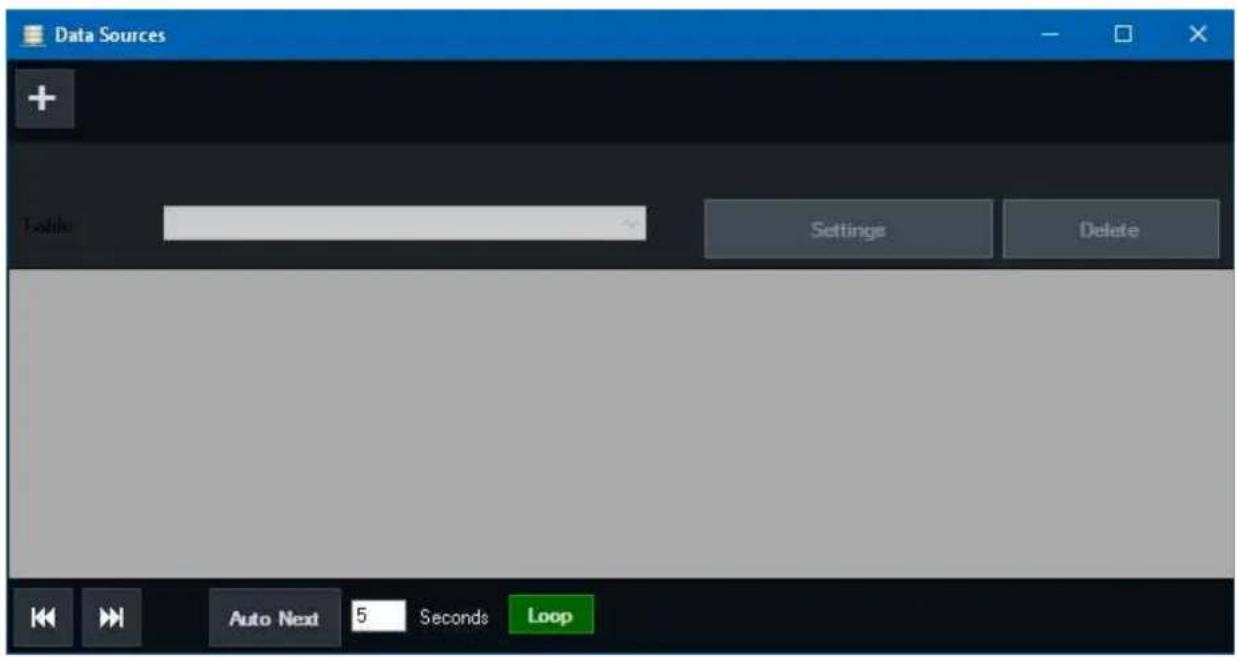
- Once added, a window will appear where you can type either the web address to the data file or browse for it on the local computer.
Depending on the Data Source type, a number of other settings may appear in this window.
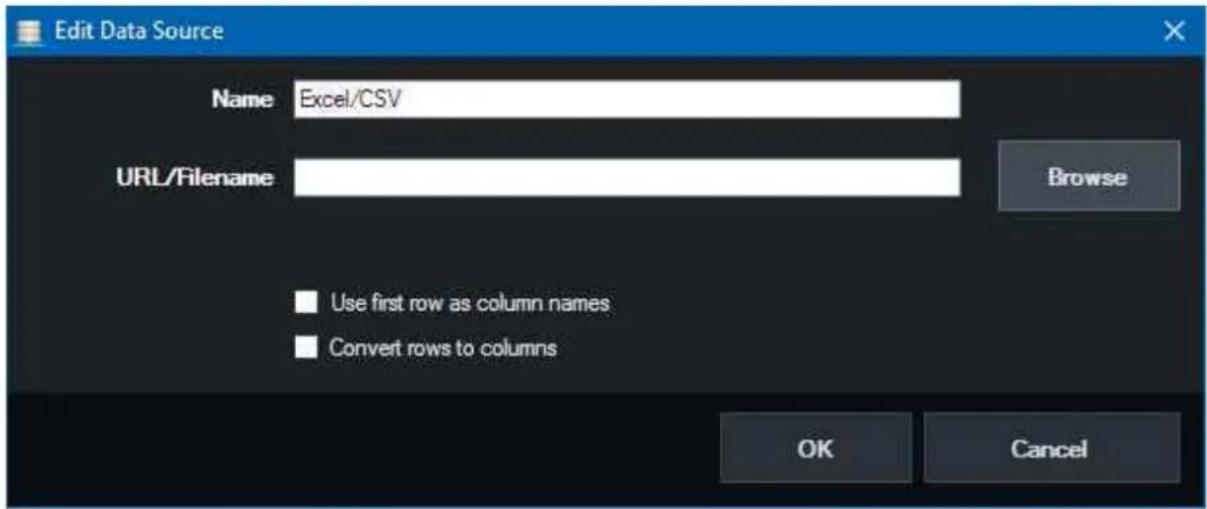
Name: Provide a memorable name to identify this data source.
Use first row as column names: If the first row of a spreadsheet contains the column names, tick this box.
Convert rows to columns: Ticking this box will group all rows in the data source into a single row, numbering the column names in the process. For example a spreadsheet
with Name and Description and 3 rows will become Name1, Description1, Name2, Description2, Name3, Description3 with all data contained in a single row.
When ready click OK to complete setting up the new Data Source.
- To remove a data source, simply click the Delete button
Mapping a Data Source to a Title
Once one more Data Sources have been added, they can be easily assigned to any Title input from within vMix.
(See Setting up a new Data Source for help on setting up a new Data Source)
- Right click a Title input from within vMix and click Title Editor from the menu.
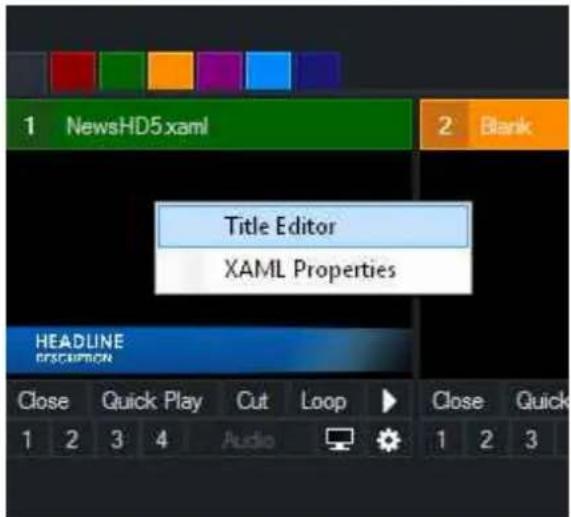
- Select one of the Title fields from the left hand column (such as Headline, Description etc) then click Data Source from the top menu bar.
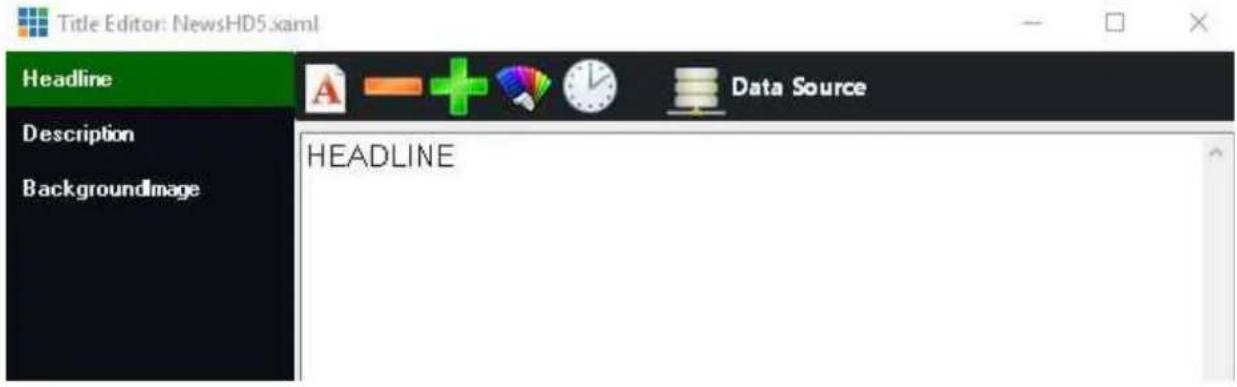
- Select the Data Source and other settings such as Table and Column.
Table: Select the table you wish to source the data from. Some data sources may only have a default table available to select here.
Column: Select the column to use for this particular Title Field, if you leave this set to Auto, the data source will map based on the following:
a) Will first look for the first column with the same name as the Title field, for example "Headline"
b) If no column is found, use the column index that matches the Title field index. For example Headline would be Column1, Description Column2 and so on.
Format: This option can be used to add additional text to the data, for example "Name: {0}" will output the data as "Name: Bob"
A preview will be displayed showing the data that will be assigned to the title.
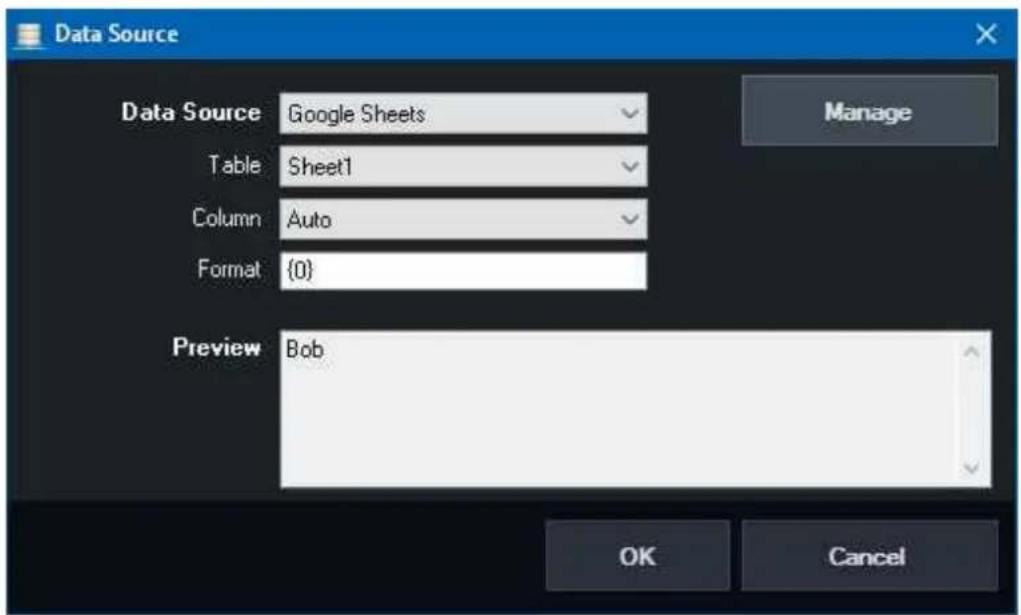
- Click OK and the data will automatically populate the text box in the Title Editor
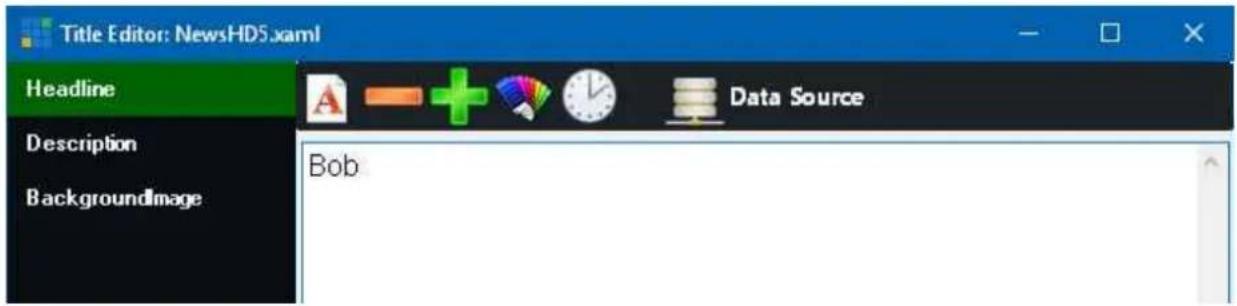
- Repeat steps 1 to 4 for each Title field you wish to assign to data.
Controlling Data Sources
Once a Data Source has been added and assigned to a title, it may contain a number of rows you want to select from, for example a list of speakers during a conference.
There are a number of methods to select rows that are described in the following section. When a row is selected, all Titles that refer to that data source will update automatically.
Using the Data Sources Manager
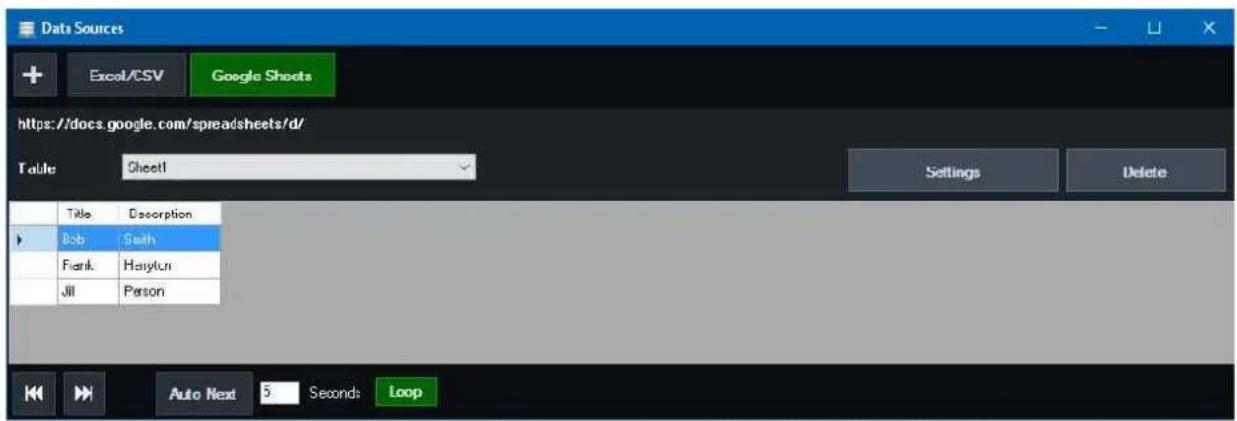
For manual control, select any data source from the buttons along the top and click a row in the table to select it.
To automatically move down the list, click the Auto Next button so that it lights up green and type in the number of seconds between each row in the provided text box. Click Loop to jump to the start of the list after the last row.
TIP: The Data Sources window can be left option and setup on a separate monitor for quick and easy access.
Using Shortcuts
A number of Shortcut Functions are available for controlling data sources such as DataSourceNextRow, DataSourcePreviousRow and DataSourceSelectRow These are described in the Shortcut Function Reference guide.
Editing the Data Source directly
As all Data Sources automatically update, you can control what data is sent by moving things around at the source, consider the following example:
- A Title mapped to a Excel data source with the first row selected
2. The Excel file is open on another computer
The computer that has opened the excel file can move or copy the data they wish select into the first row and click save.
Each time they click save, the data will update in vMix.
Using Images in Data Sources
If your title includes an image field, this can also be assigned to a data source.
The data source text data must be either a full URL or file path in order to load correctly.
For example
http://www.example.com/image.jpg
c:\images\logo.png
How to create a Google API Key for Google Sheets
- Open https://console.developers.google.com/ in a web browser
- Login to your Google Account
- From the left hand menu select Credentials

API Manager

Dashboard

Library

Credentials
- For new users of Google APIs and Services, you will need to create a new project by clicking on the New Project button and providing a project name such as "My Project", then clicking Create.

Google APIs
New Project

You have 11 projects remaining in your quota. Request an increase or delete projects. Learn more
MANAGE QUOTAS
Project name *
My Project

Project ID: helical-cascade-303707. It cannot be changed later. EDIT
Location *

No organisation
BROWSE
Parent organisation or folder
CREATE
CANCEL
- Click the Create credentials button and select API key
Credentials
OAuth consent screen
Domain verification
Create credentials
Delete
API key
Identifies your project using a simple API key to check quota and access.
For APIs like Google Translate.
tion for det
- A new API key will be created that can be used with Google Sheets data sources
IMPORTANT: Once the API key has been created, Google Sheets will also need to be enabled from the Dashboard:
-
Select Dashboard in the left hand menu
-
Select Enable API
Dashboard

ENABLE API
-
Select Sheets API from the list
-
Select Enable up the top. If Google prompts for additional steps after this, they can be safely ignored and the key will be ready to use.
vMix User Guide

Google Sheets API

ENABLE
- The API key can now be used in vMix Data Sources.

vMix Call allows you to add remote guests to your vMix production with high quality audio and up to HD video.
Features
- Quickly add remote guests to any production using only a web browser and a web cam.
- Supports guests connecting with Google Chrome (Version 56 or higher) and FireFox (Version 50 or higher) on Windows, Mac and Android.
As well as iOS devices (iPhone, iPad) running iOS 11+ using the Safari browser. - Peer to Peer Encryption between each guest and vMix ensures a secure, low latency connection.
- Auto Mix Minus technology automatically handles the audio mixing for each guest, preventing echo and saving time.
• Full Duplex high quality audio for all guests and return feed
• Built in return video/audio feed for each guest with configurable quality up to HD 1080p 4Mbps. - Select any of the four outputs (4K and Pro) as the return video for all guests.
- Select Master, Headphones, Bus A to Bus G as the return audio feed for all guests. All options have Auto Mix Minus technology built in.
- Dynamic bandwidth estimation automatically adapts the quality of each guests video on the fly to match changing network conditions.
• Video and audio for each guest is available over NDI automatically.
Requirements
- vMix Call requires a copy of vMix HD (1 Guest), vMix 4K (4 Guests) or vMix Pro (8 Guests)
- vMix Network Connection: Recommended 2Mbps Up/2Mbps Down network bandwidth per guest.
- Guest Network Connection: 2 Mbps Down / 600 Kbps Up network bandwidth for the guest side connection.
• Quad Core Processor 2Ghz (up to 2 guests) or 4Ghz+ (up to 8 guests)
• Recommended Guest Requirements
Help Topics
Setting up a Call
Call Manager / Chat
Audio and Talkback
Troubleshooting / FAQ
Setting up a Call
Setting up a Call
- Click Add Input in vMix then select the Video Call tab:
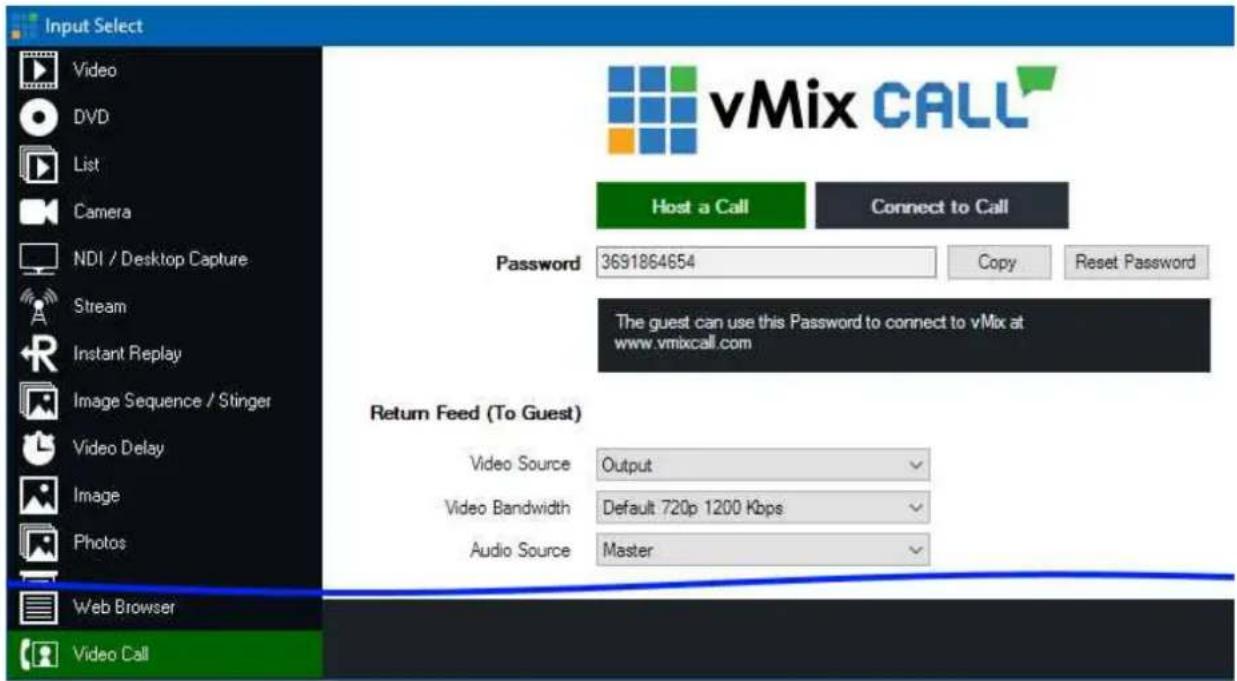
Host a Call: Select this button to host a new call for a remote guest (default)
Connect to Call: Connect to an existing call on another vMix PC.
Password: This is an automatically generated number that can be used to identify the call and allow the remote guest to connect.
Return Feed (To Guest): The following settings control what the guest sees and hears on their end.
Video Source: Select either Output 1, Output 2-4 (4K and Pro editions only) or None as the return video feed the remote guest will see
If None is selected, no audio or video will be sent to the remote guest, this is useful for situations where you need a remote feed only and don't expect to interact with the caller.
Video Bandwidth: Select the video quality and bandwidth of the return video.
NOTE: This setting is the same for all guests and cannot be configured independently.
Audio Source: Select the audio mix to send back as the audio the guest will hear.
Note that regardless of the setting selected, Auto Mix Minus will be applied so that the guest will never hear themselves back again as an echo.
Selecting Master here is usually recommended as using Bus A to G to apply a Mix Minus is not necessary.
Allow only direct peer to peer connections: Sometimes due to firewall and network restrictions a call may go via one of the vMix servers which may not be desirable due to increased latency and lower video quality.
Tick this box to force peer to peer connections only when establishing a call. If the call does not connect all when this is ticked, a firewall will be blocking UDP traffic on either side.
Show Advanced Options: These options should only be selected when diagnosing call issues as directed to by the vMix support team.
- Click OK to add this call as an Input in vMix
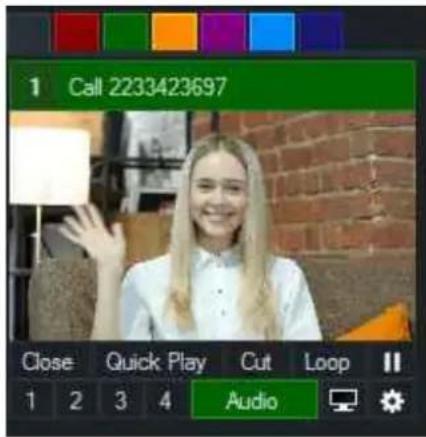
- Direct your guest to visit www.vmixcall.com using any Google Chrome or Firefox browser with a Webcam and Microphone connected.
The guest should type in any Name to identify themselves and the generated Password and then click Join Call
-
After a brief connection process you should see the remote guests video and audio
-
To end the call, the guest can click the red phone icon from their toolbar.
The input can also be closed in vMix, however it is possible to reuse the Password for subsequent calls in the future.
- To add additional guests, repeat these steps as many times as needed.
Call Manager / Chat
vMix Call includes a call manager window that provides the ability to monitor all calls and text chat with guests.
Open the Call Manager by right clicking any vMix Call input and selecting Open Call Manager from the menu.
Call Manager Window
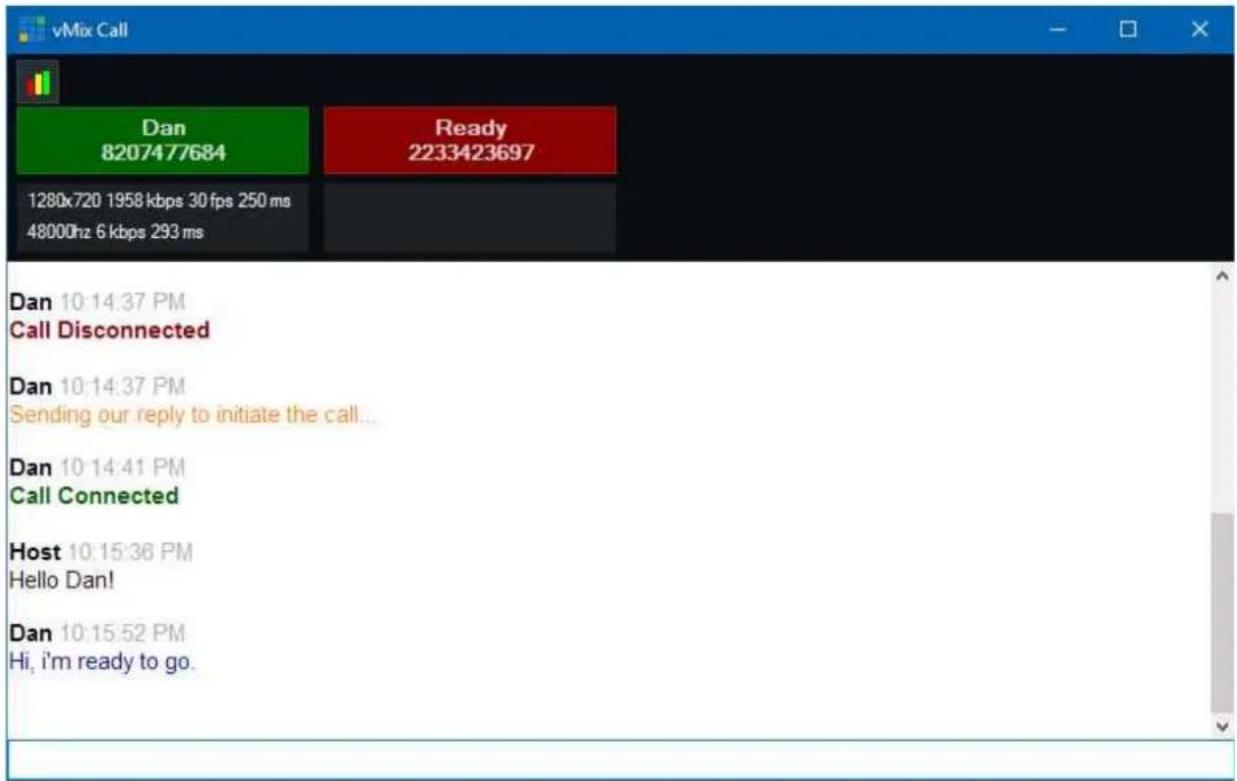
The Call Manager window lists the Name, Password and Receiver Statistics for each caller along the top panel from left to right, in the same order as the inputs in vMix.
TIP: Click any of the coloured panels to change what is displayed between Name + Password, Name + Input Title and Name.
The colour of the box listing the Name and Password indicates the status of that particular call.
Green: Call is connected and audio and video is coming in smoothly
Red: Call is either disconnected or no audio and video is being received
Amber: Call is experiencing dropped frames or missing audio due to current network conditions.
See Troubleshooting for more information on call connection and quality issues.
Chat
The chat window allows sending and receiving text messages to all currently connected guests.
Any message typed into this window will be seen by all guest in vMix, and any message sent by a guest will be seen by both vMix and any other guests within the same vMix session.
Status information may also appear in the chat list, indicating when a guest logged in with their browser and the progress of the connection.
Statistics
Statistics appear below the Guest's name during each call as described below:
1280x720 1958 kbps 30fps 250 ms
From left to right this indicates the video resolution received from the guest, their current video bandwidth, frame rate and jitter buffer latency.
48000hz 6 kbps 293 ms
From left to right this indicates the audio sample rate from the guest, their current audio bandwidth and jitter buffer latency.
Advanced Statistics
Advanced diagnostic information can be found by clicking the

Audio and Talkback
vMix Call provides three different audio feed options that can be sent to all guests.
All three include built in automatic mix minus, so regardless of the option selected the guest microphone audio will not be returned back to them.
Master
This is the default and simplest option where the guest will hear the same audio as the stream and recording, minus their microphone.
Headphones
This option will allow the guest to hear everything the vMix operator hears, minus their microphone.
This allows the vMix operator to Solo any audio sources in the audio mixer they want the guest to hear without being heard on the recoding or stream.
This is useful for Talkback scenarios where a producer's microphone and guests are muted with solo turned on, creating a private conversation
between the producer's and guests that the audience can't hear until they are unmuted.
Bus A, Bus B, Bus C, Bus D, Bus E, Bus F, Bus G
vMix provides seven independent audio mixes / buses in addition to Master and Headphones which can be controlled using the A and B toggle buttons
underneath each audio input in vMix. (right click these buttons to see Bus C-G) For more information see the Audio Buses section of Audio Mixer.
These separate audio buses allow full flexibility when configuring guests audio in advanced production scenarios.
For example, a "virtual green room" could be created whereby any waiting guests can be turned on in Bus A to talk amongst themselves
with the M or Master being turned on just before they go on air.
When using this option, be sure to enable any sources before hand you wish the guests to hear such as the interviewer's microphone and any video clips
they might need to hear as well.
Troubleshooting / FAQ
Recommended Guest/Caller Requirements
For best results, the following is recommended for each guest/caller:
Intel Laptop/PC from 2009 or higher
Windows 10
Google Chrome 56 or higher
HD USB Webcam such as the Logitech C920
Headset/Mic combo or Earphones + USB Microphone such as the Yeti from Blue Microphones
Guest is able to connect but no video and audio is received
Check to make sure the caller has a Webcam and Microphone plugged in and these have been selected in the browser.
In Google Chrome the camera and microphone can be configured by clicking the grey Camera icon at the top right hand corner of the address bar.
In FireFox, the browser will prompt to select the camera and microphone each time the call is connected.

Guest dropped out, video/audio is no longer being received
This may occur if the internet connection is interrupted. The caller simply needs to refresh/reload the browser page to reconnect automatically.
Guest is flashing orange/amber in the Call Manager
This indicates network congestion between vMix and the caller.
The video and audio from the caller will adapt automatically after several seconds, however if the Return Video bandwidth is too high for the callers
internet connection, then you may need to select a lower quality by right clicking the Call input in vMix.
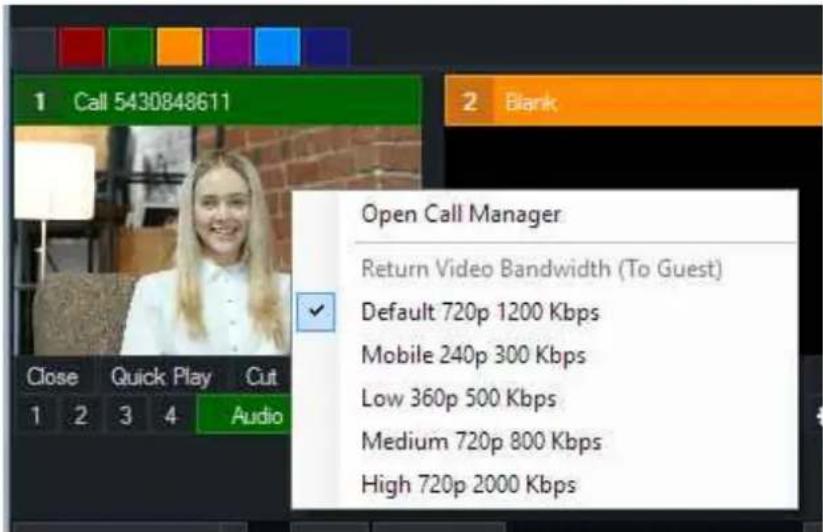
Guest's video/audio is low quality
vMix Call adapts to the available network conditions which may result in low quality video and audio if the callers network upload speed is lower than 2Mbps
Audio quality may also briefly drop to Telephone quality during periods of network congestion
If network congestion can be ruled out, try a different webcam.
Guest's video/audio is not smooth
During periods of network congestion, the received frame rate may drop as low as 1 frame per second. The video frame rate may also lower in response to camera lighting or performance limits of the caller's laptop, PC or mobile device.
High Latency
vMix Call uses what is known as a Jitter Buffer which adds a variable amount of latency to each call to ensure smooth video and synchronised audio.
This latency can range from approx 200ms for guests on the same or nearby network to between 1 and 1.5 seconds for guests located on different continents or on congested networks.
As vMix Call will generally adapt to the worst case scenario, if a brief period of network congestion results in higher than expected latency during a call, the guest can refresh their browser
to re-establish the call and reset the Jitter Buffer.
Audio echo from guest
Check to make sure the guest is using headphones/earphones instead of speakers to ensure the return audio is not feeding back through their microphone.
If speakers must be used (such as in a boardroom environment), the Microphone will need to be directional to ensure it is not picking up the speakers audio.
Right click menu settings
A number of settings can be adjusted for calls on the fly through the right click menu on each call input.
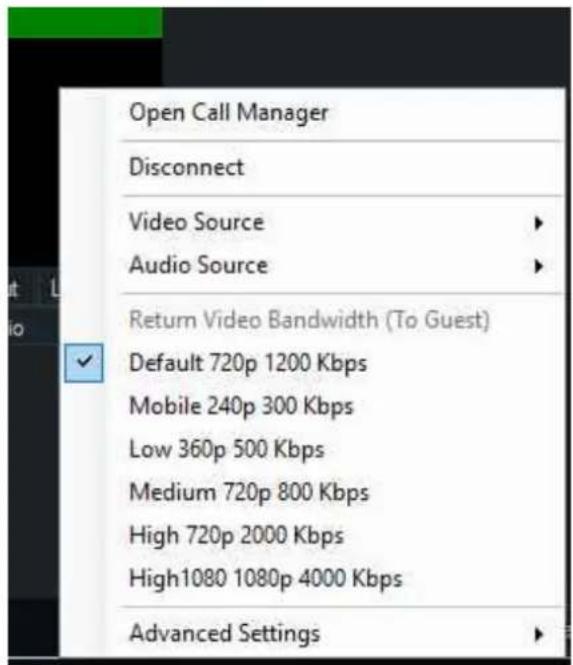
Open Call Manager
Disconnect
Disconnect the call. The guest will need to either refresh their browser or if using vMix right click and select Reconnect to connect again.
Video Source / Audio Source
Select a custom video and/or audio source to send the guest on this particular input.
Return Video Bandwidth (To Guest)
Select the video quality to send back to the guest from vMix. As this is generally used for preview purposes
vMix User Guide
by the guest
it is recommended to select this as low as practical.
NOTE: This setting is the same for all guests and cannot be configured independently.
Advanced Settings
Remote Guest Video Bandwidth
NOTE: This applies only to guests connecting using a browser as vMix callers will have specified their own bandwidth manually.
Manually select the maximum bandwidth the guest can use when sending video to vMix.
This is set to Auto by default which will adapt to internet conditions automatically.
Allow only direct peer to peer connections
See the Setting up a Call section on this topic for more information.
GT Title Designer
GT Designer is an easy to use application for creating title and lower third templates for use with vMix. These templates are high quality, GPU accelerated and support animations in the 4K and Pro editions of vMix.
For detailed instructions on the GT Designer, visit http://help.vmix.com/graphics/2/
Adding GT Titles to vMix
- In the vMix main window click Add Input
- Select the Title tab
- Click Browse and browse for the title file you wish to add and click ok.
- A thumbnail preview will appear with a GT icon at the top left hand corner, if this is the correct template click OK to add to vMix.
Playing Animations
Animations are supported in the 4K and Pro editions of vMix only.
The exception is the included built in GT templates provided with vMix which will work in all editions.
To play an animation, click one of the overlay channel buttons underneath the title (1,2,3,4) to start the Transition In animation
and bring the title on screen.
To Transition Out, click the overlay channel button again.
Animations can be manually started as well by right clicking the input and selecting the transition from the menu.
If a particular transition does not appear in the menu, it means no animation has yet been assigned to that particular Storyboard in the GT Title Designer.
Reloading Titles
If you already have a title added to vMix but have made further changes to it in the title designer you can right click that
input in vMix and select Reload to update vMix with the changes.
Note that any Font, Text or Image changes made in vMix directly will always override any equivalent changes made in the designer.
To open the Title exactly as it is in the designer, close the input and add it again.
Changing Ticker Settings
Settings such as speed and direction of Tickers can be changed in real time from the Title Editor.
Right click the Ticker input in vMix and go to Title Editor.
Click the clock icon in the toolbar to open the Ticker settings window.
vMix User Guide
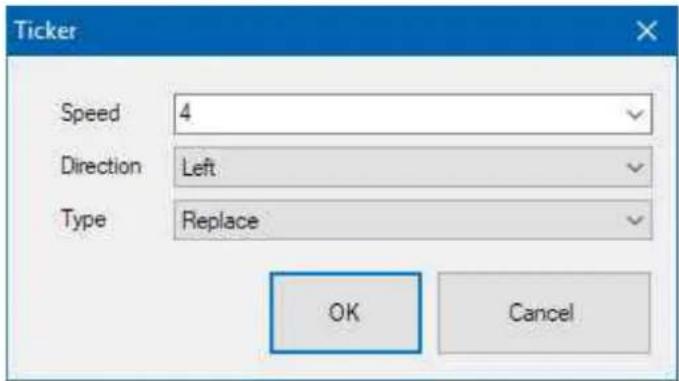
Speed is defined in pixels per frame. For example a speed of 4 equals 120 pixels per second @ 30 fps. Type can be Add or Replace. Replace restarts the ticker each time the contents changes, Add will append the new content to the end of the ticker without affecting the currently playing content.
vMix Title Designer (Legacy)
vMix Title Designer has now been replaced with the improved GT Title Designer. The existing title designer is still included in vMix for editing files using the older title format.
vMix Title Designer is included with vMix and can be found in the Start Menu.
vMix Title Designer allows you to create high quality titles that combine dynamic text and graphics. The interface is shown below:
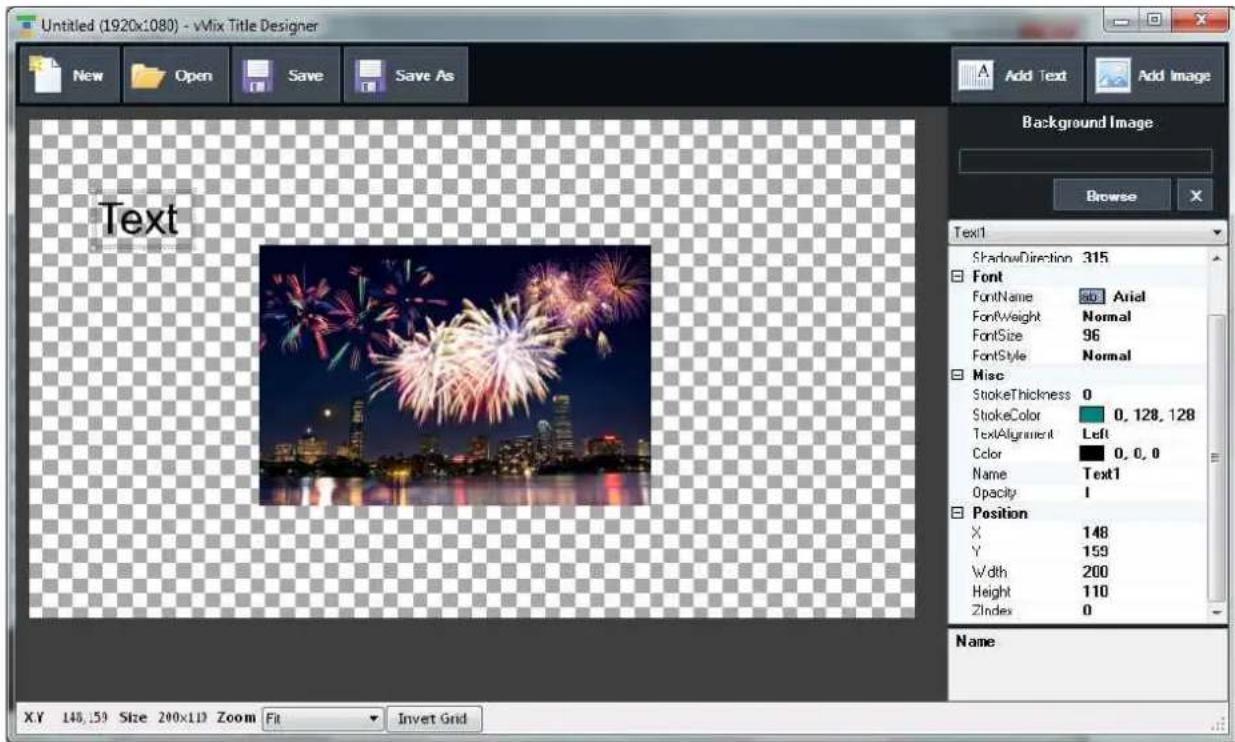
New, Open, Save, Save As
Open or create a new title
Add Text
Add a new dynamic text element to the title. When selected the properties pane on the right hand side will contain the following options.
Drop Shadow
Specify a drop shadow for the text with colour, radius and direction
Font
Specify font and font size for the text. This can be changed later from within vMix.
StrokeThickness / StrokeColor
Create an outline around the text.
Name
Specify a unique name to identify this text box. This name will appear in the Title Editor within vMix.
Position
Specify X and Y co-ordinates in pixels for precise positioning
Add Image
Add an image to the title. If the image will act as a background image, use the Background Image option instead.
Background Image
If you have a full resolution graphic created that includes an alpha channel (such as PNG) this can be set as the title background.
This image should be the same size as the title (for example 1920x1080)
Click Browse to browse for the background or click X to remove it.
PlayList
PlayList provides the ability to automate switching tasks or play multiple videos sequentially.

Click the Cog Button next to PlayList to bring up the PlayList window. Click PlayList to start or stop the PlayList once it has been configured.
PlayList Window
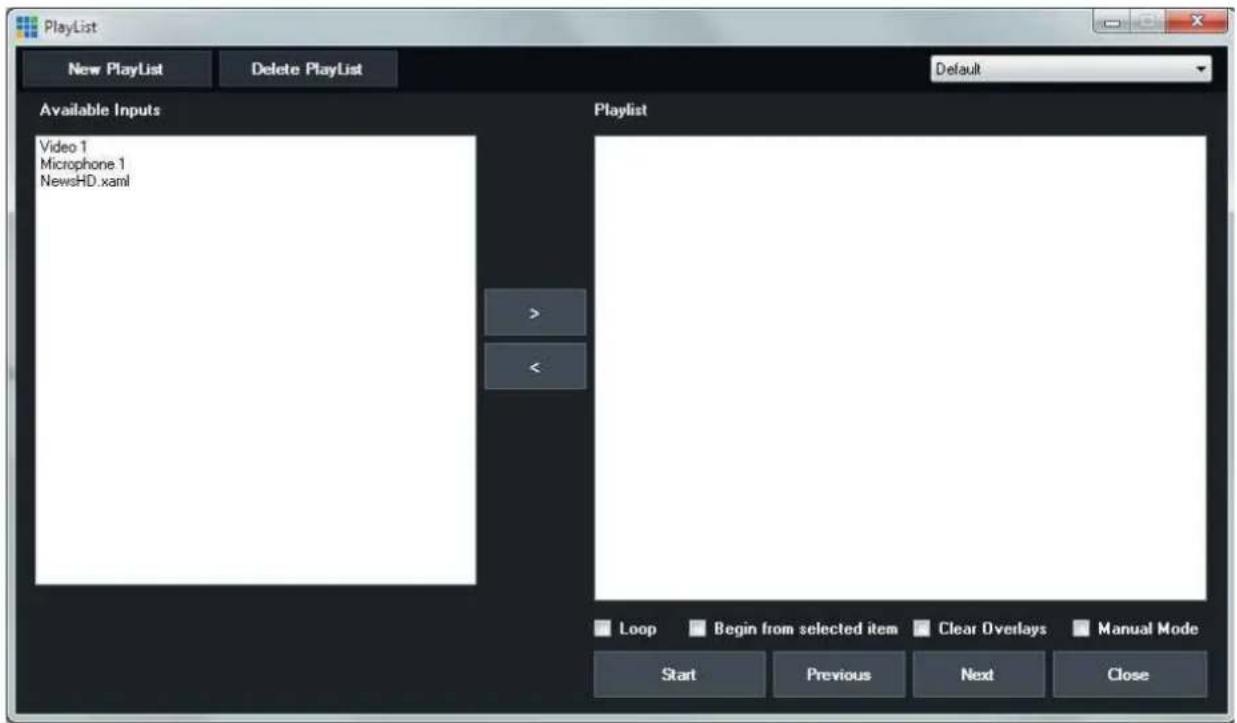
Loop: Start PlayList from the beginning again when completed.
Begin from selected item: Start the PlayList from the item currently selected in the list.
Clear Overlays: Turn off all overlays before starting playlist.
Manual Mode: When in Manual Mode, the playlist will not automatically progress to the next input until Next is clicked.
Start: Start the PlayList from the beginning
Previous: Jump to the previous item in the playlist using the PlayList item's transition
Next: Skip to the next item in the playlist using the PlayList item's transition.
Creating a PlayList
To create a PlayList, click the PlayList button from the bottom left hand corner of vMix. Select an input from the Available Inputs column and click the > arrow to add it to the Playlist.
Editing PlayList item
Each item in the right hand Playlist can have its own starting position, duration, transition and transition time.
Double click the item in the list to bring up the settings window.
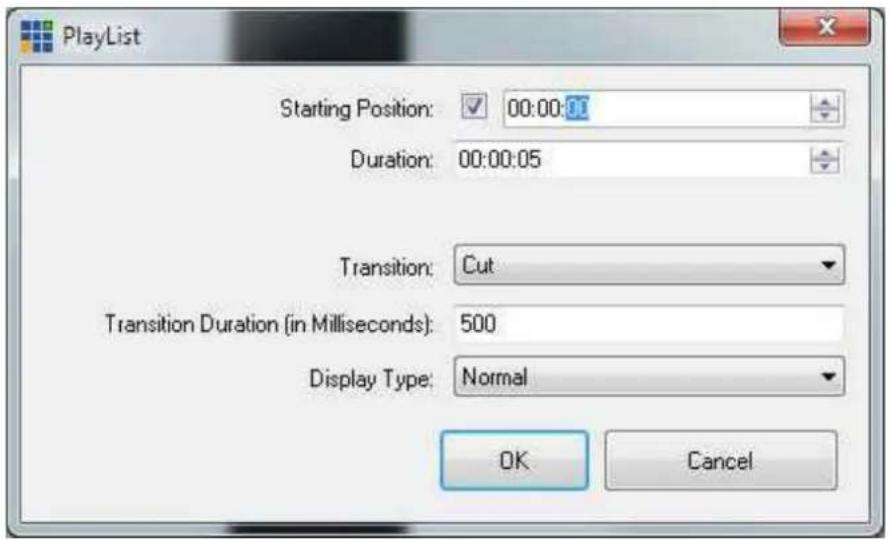
Starting Position: If the PlayList item is a video clip, a starting position can be set here. If the Starting Position checkbox is not checked the item will start playing from the current position.
Duration: Set length of time this PlayList item will run before moving to the next item in the list. If the duration is 0 the PlayList will default to the inputs duration.
Transition: Set a Transition Effect for this PlayList item.
Transition Duration: Set the Transition Duration for the Transition Effect in milliseconds.
Display Type: Optionally select the display type for this PlayList item. When an Overlay is set as the Display Type this PlayList item will appear as an overlay over the previous PlayList item, display for the length of the duration before moving to the next item.
Opening/Saving a PlayList
PlayLists are linked to the currently active Preset in vMix. This means any saved playlists can only be loaded alongside the preset in which they were created.
MultiCorder
MultiCorder is an advanced feature found in the 4K and Pro editions of vMix.
It provides the ability to record the raw video and audio from capture inputs to separate files in addition to the main vMix Recording.
Note: Instant Replay and MultiCorder cannot be used at the same time.
MultiCorder has the following minimum system requirements:
• Solid State Disk (SSD) for storing recordings.
• Intel Core i7 Quad Core processor or higher
• High end graphics card with at least 1GB of on board memory
The number of simultaneous recordings and the type of recording formats will depend on the processing capabilities of the computer.
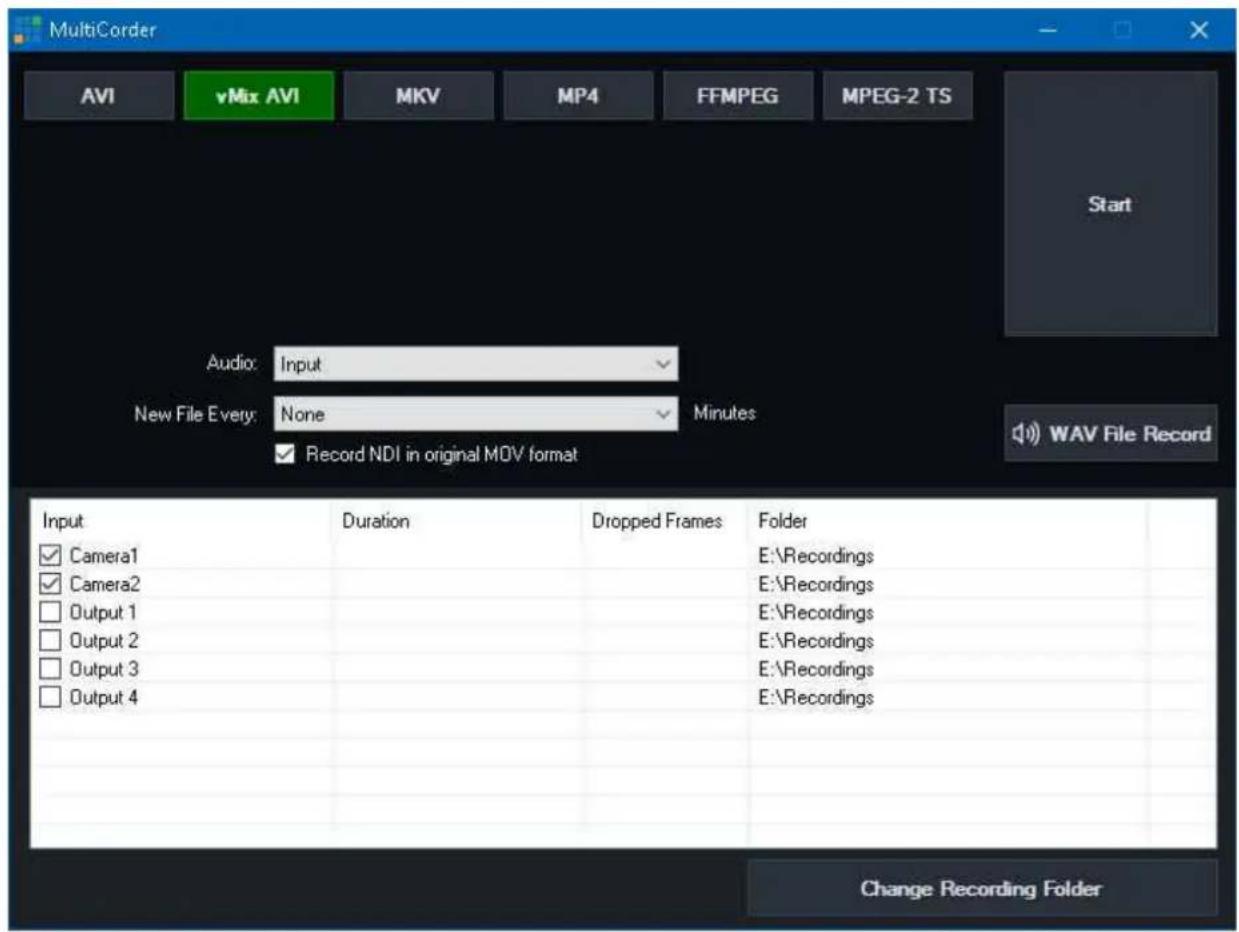
The interface above appears by clicking the Cog Button next to MultiCorder in the main interface.

MultiCorder
All available Camera. NDI inputs are listed within the MultiCorder window along with the four Output channels. Tick the source you wish to record and click Start.
SRT inputs can also be recorded, however please note that SRT will always be recorded in its native Transport Stream (.ts) format and any recording settings except the recording folder will be ignored.
NOTE: Any source with irregular timing such as NDI-HX, Desktop Capture, Stream and vMix Call are not supported by MultiCorder and should not be used.
The following options are also available:
Recording Format
vMix AVI, AVI, MKV, MP4 and FFMPEG are available as recording options in MultiCorder. For more information about these formats see Recording Setup.
Fault Tolerant Recordings
It is recommended that a fault tolerant recording format is selected when using MultiCorder. This means in the event of a power outage, the recording will still be recoverable. See Fault Tolerant Recordings for a list of options available.
Folder
Select the folder to place the video files. This will need to be a fast storage device as listed above under the system requirements. The more cameras that are recorded simultaneously, the greater chance of dropped frames if the storage device is unable to keep up.
Audio
Select and audio source to include with each recording. This can either be Input which includes the embedded audio in the source, or Master to record the main audio mix.
Note: If recording one of the Output channels (Output 1-4) the audio recorded will always match the audio bus selected in Settings - Outputs / NDI for that particular output.
New File Every
Split the recording into a new file every x Minutes.
Record NDI in original MOV format
When recording NDI sources, you can select to record in the same compression format as NDI itself (MOV) by checking this tickbox. This allows recording NDI sources without any additional system load or CPU usage as the video does not need to be re-compressed.
When recording NDI in this mode, all MultiCorder settings except the recording folder are ignored, including audio source and "new file every".
NOTE: This is a special NDI MOV file, and may not be compatible with some programs and editors. Refer to the NDI.TV web site for the tools and plugins available for this format.
Change Recording Folder
Each source can be saved into its own folder or storage by highlighting the item in the list and selecting Change Recording Folder. To change the folder of two or more sources, highlight them in the list before selecting Change Recording Folder. To change all sources to the same folder again, deselect all items then select Change Recording Folder.
WAV File Record
See WAV File Record
Tally Lights
vMix supports a number of Tally Lights options
Smart Phone Tally Lights
vMix supports turning any Smart Phone into an instant Tally Light! See the Web Controller Tally Lights section for more information.
Tally-Lights.com
Tally lights can be purchased from http://www.tally-lights.com and connected via USB. These lights work automatically with vMix and will be assigned to Inputs according to the tally number. (Tally 1 = Input 1, Tally 2 = Input 2, ...)
metaSETZ
USB Tally lights from metaSETZ are supported by vMix and can be found at http://www.metasetz.com/
Radio-Far
More information on Radio-Far tally lights can be found at http://www.radio-far.com/
Arduino Tally Lights
vMix supports the use of custom built Tally Lights through use of the open source Arduino hardware platform. (See http://www.arduino.cc/) vMix required that the StandardFirmata firmware be loaded on to the Arduino device.
To connect to the Arduino device, go to the Input properties (click the i button) and from the Tally Light tab, select the COM port of the Arduino device and select the Tally Number. The Tally Numbers are assigned to individual Digital Pins on the Arduino in the order specified in the Tally Lights tab in Settings.
The following is an overview of the digital pins and how to attach LED lights to them:
http://arduino.cc/en/Tutorial/DigitalPins
Interlaced Support
To enable interlaced processing in vMix, set Master Frame Rate to one of the settings below. This can be done from Settings -> Display
Master Frame Rate
50p, 59.94p, 60p, 50i, 59.94i, 60i
Interlaced sources will be separated into two separate frames for frame rates 50p and higher. All other master frame rates are progressive and any Interlaced inputs will be deinterlaced automatically.
Inputs
| Input Interlaced Support | Notes | |
| Camera | Yes Select an Interlaced Frame Rate and tick the Interlaced check box | |
| Video MOV, MXF | To enable additional file types for full interlaced processing, add them to the FFMPEG section of Settings -> Decoders | All other formats will be converted to progressive using Blend deinterlacing |
| List | Same as for Video above | Interlaced can be set for each video independently. |
| Image Sequence | Yes, one image per field Each image | in an image sequence is treated as a field when using an interlaced output. For example, 50 images are needed for 1 second of 50i video. |
| Video Delay | Yes, saved clips progressive | Saved clips are saved as Interlaced but will playback in vMix as Progressive only |
Recording
NOTE: Interlaced Recording must be checked under Settings -> Recording
Interlaced recording is supported for AVI and MPEG-2 formats by setting the Recording Frame Rate to 50i, 59.94i or 60i All recordings are Upper Field First with the exception of NTSC 480i which is Lower Field First
MP4 and WMV support progressive recording only.
External Output
NOTE: Interlaced Recording must be checked under Settings -> Recording
Interlaced recording is supported by setting the Frame Rate to 50i, 59.94i or 60i in External Output
Fullscreen Display
Fullscreen and preview windows will display the first field only when the Master Frame Rate is set to 50i,
59.94i or 60i
For full field display, set the Master Frame Rate to 50p or higher.
Progressive output from Interlaced source
The following table describes how each Master Frame Rate is processed when using progressive frame rates for recording or external output.
| Master Frame Rate Output Frame Rate | Processing |
| 50p, 59.94p, 60p 25p, 29.97p, 30p | |
| 50i, 59.94i, 60i | 25p, 29.97p, 30p |
| 50i, 59.94i, 60i | 50p, 59.94p, 60p |
Statistics
The statistics window can be displayed by clicking the icon in the bottom right hand corner as shown below
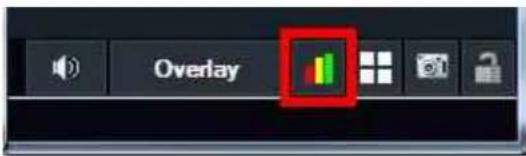
This window displays real time statistics of each live input including dropped frames and audio sync.
Each column is described in detail below:
Source Dropped
This shows the number of dropped frames as a result of the capture card / camera running slowly. For example, the camera clock might be slower than vMix or the capture card is experiencing a bandwidth bottleneck.
Renderer Dropped
This shows the number of dropped frames as a result of the graphics card running slowly.
Resync
This number shows the number of dropped frames as a result of the capture card / camera running too fast. For example, the camera clock might be running slightly faster than vMix.
Video
This column shows timing statistics relating to the arrival time of each frame from the source.
Example: 33 33 33 33 (49)
In the above example, the four previous frames arrived 33 milliseconds after each other (indicating approx. 30 fps)
The number in brackets shows how long it took for the frame to be displayed on screen. (1.5 frames in this case)
These numbers will coincide with the results seen in the other dropped columns.
If a 30p camera shows 38 38 38 38 consistently, this indicates that it is running slow. This will show up in the Source Dropped column.
If a 30p camera shows 25 25 25 25 consistently, this indicates that is running fast. This will show up in the Resync column.
Audio
This column shows timing statistics relating to the arrival time of each sample of audio from the source.
Example: 60/67 ms Dropped: 2/0 Resampled: 0/40
60/67 ms
These values show the fullness of the audio buffer.
Dropped: 2/0
Number of dropped audio samples read/write.
Resampled: 0/40
Number of milliseconds of audio that has been resampled to stay in sync.
Snapshot
A snapshot of the live production (that is a still image taken at a particular point in time) can be created in one of the following ways:
Output Snapshot
Click the camera icon to take a Snapshot of the final vMix Output. This will browse to save the file as a PNG, JPEG or BMP image. If saved as a PNG, transparency is preserved, where applicable.
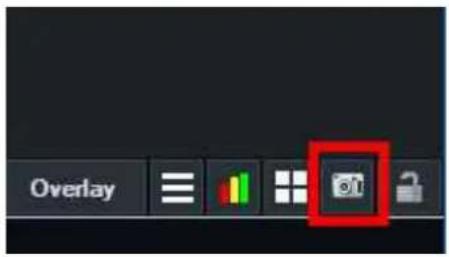
Input Snapshot
Right click the cog icon under an input to take a Snapshot of that particular input at full resolution. This will browse to save the file as a PNG, JPEG or BMP image. If saved as a PNG, transparency is preserved, where applicable.
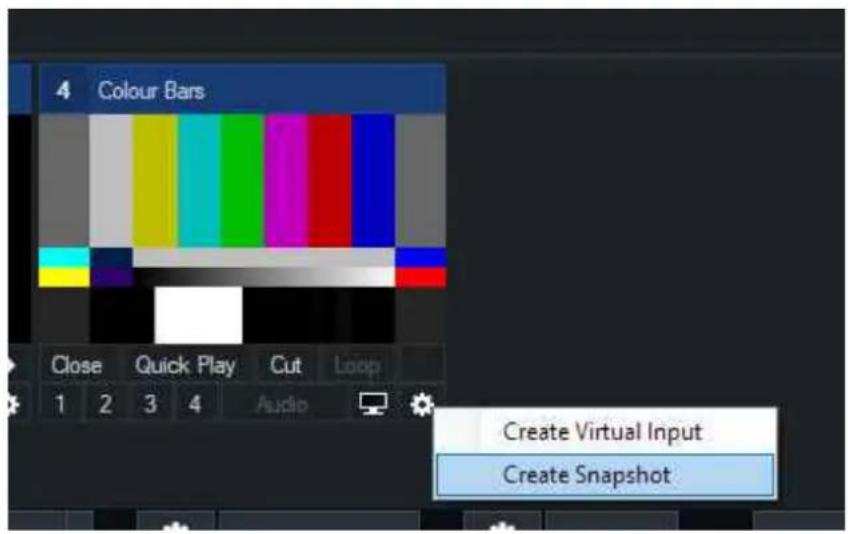
Padlock
The Padlock icon in the bottom right hand corner of vMix can be used to lock certain buttons in vMix so they are not clicked accidentally.
When the icon is grey and open, everything is unlocked, when the icon is orange and closed, the functions below are locked:
- vMix Close Button
- Input Close Button
- Open Preset
- Last Preset
- Recording Stop
- Streaming Stop
- External Output Stop
- MultiCorder Stop
Scripting and Automation
4K and Pro editions of vMix include powerful programming capabilities through the Scripting feature.
Consider this is a highly advanced version of Shortcuts, instead of a simple function assigned to a keyboard key
you can assign any code you can think of including tasks like downloading internet content and assigning it to a title.
The process goes like this:
-
Create a Script from the Scripting tab in Settings and assign it a unique Name.
-
Create a Shortcut and select "ScriptStart" as the function and type in the name of the script in the Script Name box.
Scripting supports two different languages when writing your script:
VB.NET Scripting
Web Scripting
Local Scripts
Similar to shortcuts, scripts can be globally (accessible regardless of what Preset is open) or locally (only loaded with a particular Preset)
When editing a script, tick the box Local Script (This Preset Only) if you would like the script saved in the Preset.
Local scripts show up as Bold in the list. If two scripts have the same name, the first in the list will always be used when using shortcuts that refer to a script by name.
VB.NET Scripting
vMix Scripting supports the powerful and easy to understand VB.NET language when writing your script.
Hello World Example
Consider the following vMix take on the infamous "Hello World" application:
Input.Find("NewsHD.xaml").Text("Headline") = "Hello World!"
Or put another way:
dim i = Input.Find("NewsHD.xaml")
i.Text("Headline") = "Hello World!"
Both of these scripts do the same thing, that is to find the Title Input with name "NewsHD.xaml" and assign the "Headline" field with the text "Hello World!"
To try it out add the NewsHD.xaml title template to vMix and then run the script.
VB.NET
vMix Scripting supports the majority of VB.NET 2.0 code that will work within a single sub or function. This means that custom classes and structures are not supported, however you can use the vast majority of the built in base classes in the .NET framework including the handy System.Net.WebClient for downloading data over the internet.
vMix Objects
There are a number of built in objects that can be used from within vMix scripting:
Input
Shared Properties
Output As Input Preview As Input Find(inputNameNumberOrKey as String) As Input
Example:
Input.Preview.Function("Cut")
Instance Properties
Text(Optional fieldName As String = """) As String
Change the text of a Field within an Title input, or read the current value
Instance Methods
Function(functionName As String, Optional value As String = "", Optional duration As Integer = 0, Optional selectingName As String = "", Optional selectldIndex As Integer = 0)
Function can be used to call any Shortcut function in vMix
WaitForCompletion(timeoutMilliseconds As Integer) As Boolean
Wait for a video to finish playing and return True, otherwise return False if timed out.
Overlay
Shared Properties
Find(number as Integer) As Overlay
Instance Methods
In(input as String) Out Off
Examples:
Overlay.Find(1).In("NewsHD.xaml")
For i As Integer = 1 to 4
Overlay.Find(i).Off
Next
Console
Shared Methods
WriteLine(message as String)
Write the message string to the vMix Script console accessible from the Scripting tab of Settings.
This is useful for debugging purposes
Examples:
Console.WriteLine("Beginning Example Script")
Overlay.Find(1).In("NewsHD.xaml")
Console.WriteLine("Title should now appear in Overlay 1, now we wait 5 seconds")
Sleep(5000)
Console.WriteLine("Now we will transition out Overlay 1")
Overlay.Find(1).Out
Console.WriteLine("Finished!")
API
Shared Methods
XML() As String
Returns the XML state of vMix as per the vMix Web API
Function(functionName As String, Optional input As String = "", Optional value As String = "", Optional duration As Integer = 0, Optional selectingName As String = "", Optional selectedIndex As Integer = 0)
Calls an API function as per the vMix Web API
Examples:
API.Function("CubeZoom", 1000)
Web Scripting
Web Scripting supports a basic URL syntax to execute multiple functions one after the other.
Example
Function=OverlayInput1In&Input=NewsHD.xaml
Sleep 2000
Function=OverlayInput1Out
Syntax
The syntax for each line is the same as the query string used with the vMix Web API exception without the URL portion
For example http://localhost:8088/API/?Function=Cut in the Web API would be just Function=Cut with Web Scripting
All the same parameters apply for example:
Function=Slide&Input=NewsHD.xaml&Duration=1000
Function=SetText&Input=NewsHD.xaml&SelectedName=Description&Value=Hello World
The only exception is the Sleep command which is unique to Web Scripting and will pause for a number of milliseconds between two functions.
URL encoding may need to be used when using special characters in the Value parameter.
Developer Information
vMix provides the following interfaces for developers:
HTTP Web API
TCP API
HTTP WEB API
The vMix API provides access to common functions through the HTTP protocol.
For example, the following command will signal vMix to fade Preview to Active within 1 second:
http://127.0.0.1:8088/api/?Function=Fade&Duration=1000
Setup
The API uses the same web address as the standard Web Interface and can be configured from the Web tab in Settings.
Parameters
Function
Specify a function to execute.
This can be any of the functions provided for the Shortcuts feature.
To view a list of what is possible, in vMix go to Settings, Shortcuts and click Add.
All the functions in the "Function" dropdown box can be called from the API.
Click here to view a list of some of the Shortcut Functions that are available.
Duration
If the specified function is a transition this parameter can be set to a time in milliseconds.
Input
Input can be used to specify the Input in one of three ways:
- By number starting from 1.
0 can be used for Preview and -1 for Active.
-
By name. (note that it is case sensitive, and requires the full title name including spaces)
-
A GUID can be used to specify an exact input. The GUID can be found from the "Key" attribute in the XML.
For example:
http://127.0.0.1:8088/API/?Function=Fade&Duration=1000&Input=877bb3e7-58bd-46a1-85ce-0d673aec6bf5
SelectedName
When using Title or XAML inputs, SelectedName can be used to specify the name of the text field to
modify.
For example:
http://127.0.0.1:8088/API/?Function=SetText&Input=877bb3e7-58bd-46a1-85ce-0d673aec6bf5&SelectedName=Headline&Value=Hello
When using GT titles, the name should include ".Text" at the end for text fields and ".Source" at the end for images or rectangles with brush images.
For reference, these full names are displayed in the Title Editor built into vMix.
For example:
http://127.0.0.1:8088/API/?Function=SetText&Input=877bb3e7-58bd-46a1-85ce-0d673aec6bf5&SelectedName=Headline.Text&Value=Hello
http://127.0.0.1:8088/API/?Function=SetImage&Input=877bb3e7-58bd-46a1-85ce-0d673aec6bf5&SelectedName=MyImage.Source&Value=filename.jpg
SelectedIndex
Specify an index to pass to the input
The following Inputs support the SelectedIndex parameter:
VideoList: Specify the video to play starting from 1
Virtual Set: Specify the camera zoom to transition to
Title: Specify the text item to configure starting from 0
Value
Value is used with many different API Functions including the following.
For a full list of functions that use Value parameters refer to the Shortcut Function Reference.
SetImage: Specify the image to display in an image field within a supported XAML or Title input
SetText: Specify the text to display in the text field specified by SelectedIndex above.
SetPosition: In milliseconds
SetCountdown: As a timespan (00:00:00)
SetFader: As a number between 0 and 255
AddInput: Specify the Video/Image/Photos or Xaml input filename in the following formats:
Video|c:\filename.wmv
Image|c:\filename.jpg
...
Mix
In the 4K and Pro editions up to three separate Mix inputs are available.
This parameter can be used to select the Mix to use where 0 = main mix, 1 = first Mix input, 2 = second Mix input etc.
Channel
Some replay functions can be applied to a specific channel. If this parameter is left blank it will default to the currently selected channel in the Replay user interface.
The value should be A, B, Current or left blank.
Return
If successful, the API will return the standard 200 response code.
If an error occurs, the API will return the standard 500 error code.
Information
If all parameters are left blank the API will return state information in XML format.
The following is an example of the XML output:
<vmix>
    <version>11.0.0.16</version>
    <inputs>
    <input key="26cae087-b7b6-4d45-98e4-de03ab4feb6b" number="1" type="Xaml" title="NewsHD.xaml" state="Paused" position="0" duration="0" muted="True" loop="False" selectedIndex="0">
    NewsHD.xaml
    <text index="0" name="Headline">Hello</text>
    <text index="1" name="Description">Hello</text>
    </input>
    <input key="55cbe357-a801-4d54-8ff2-08ee68766fae" number="2" type="VirtualSet" title="LateNightNews" state="Paused" position="0" duration="0" muted="True" loop="False" selectedIndex="0">
    LateNightNews
    <overlay index="0" key="2fe8ff9d-e400-4504-85ab-df7c17a1edd4"/>
    <overlay index="1" key="20e4ee9a-05cc-4f58-bb69-cd179e1c1958"/>
    <overlay index="2" key="94b88db0-c5cd-49d8-98a2-27d83d4bf3fe"/>
    </input>
    </inputs>
    <overlays>
    <overlay number="1"/>
    <overlay number="2">1</overlay>
    <overlay number="3"/>
    <overlay number="4"/>
    <overlay number="5"/>
    <overlay number="6"/>
    </overlays>
    <preview>1</preview>
    <active>2</active>
    <fadeToBlack>False</fadeToBlack>
    <transitions>
    <transition number="1" effect="Fade" duration="500"/>
    <transition number="2" effect="Wipe" duration="500"/>
    <transition number="3" effect="Fly" duration="500"/>
    <transition number="4" effect="CubeZoom" duration="3000"/>
    </transitions>
    <recording>False</recording>
    <external>False</external>
    <streaming>False</streaming>
    <playList>False</playList>
    <multiCorder>False</multiCorder>
    </vmix>
In the example above Input 2 is active and Input 1 is currently running as Overlay 2.
TCP API
The vMix TCP API provides the same functionality as the HTTP WEB API but with lower processing
overhead making it suitable for use in embedded devices that have limited XML parsing capabilities.
It also provides the ability to subscribe to a TALLY event that will automatically send TALLY updates to the client.
Preface
The vMix TCP API is designed to be a simple protocol that can be expanded in the future without breaking compatibility with existing clients.
Therefore it employs a simple text command/response architecture, similar to other standard protocols such as SMTP.
As a result, fixed length binary structures have been avoided.
The <> symbols in this specification refer to mandatory commands/responses while [] are always optional.
Connection
TCP connection on fixed port 8099
Formatting
All messages are UTF8 encoded and \n terminated unless specified otherwise.
This is compatible with ASCII only devices for the vast majority of commands with the exception of those that might retrieve incompatible characters such as in Titles.
Responses
Responses are space delimited \n terminated strings with optional binary data in the following format:
<command> <status/length> [response]\r\n[data]
Examples:
MYCOMMAND OK This is the response to MYCOMMAND\r\n
MYCOMMAND ER This is an error message in response to MYCOMMAND\r\n
MYCOMMAND 28\r\n
This is optional binary data
MYCOMMAND 28 This is a message in addition to the binary data\r\n
This is optional binary data
Notes:
a. Optional binary data is the exact length specified in
which are always appended to the end of multiline text such as from XMLTEXT.
b. Single line responses such as ER should always be expected and handled, even for commands that usually return binary data.
c. OK (Success), ER (Error) and length are the only three statuses to expect.
Events
Events are responses that can be sent at any time to the client in response to state changes.
All clients should be written to handle any response at any time, as these may be received in the middle of sending a command but before
receiving that particular commands response. Therefore it is recommended clients operate
"asynchronously" without waiting for a particular command response.
Commands
TALLY
Event Supported: Yes
Example Request: TALLY\r\n
Example Response: TALLY OK 0121...\r\n
Description: Returns a list of tally values where 0 = off, 1 = program, 2 = preview.
The list is padded to the total number of inputs currently added to vMix and may have up to 1000 entries as a result.
(Maximum possible length = 9 + 1000 + 2 = 1011 bytes)
FUNCTION
Format: FUNCTION
vMix User Guide
Example Request: FUNCTION PreviewInput Input=5\r\n
Example Request: FUNCTION SetText Input=3&SelectedName=Headline&Value=Hello world\r\n
Example Response: FUNCTION OK PreviewInput\r\n
Example Response: FUNCTION ER Error message\r\n
Description: Calls a Shortcut Function with optional Query String. This Query String exactly matches the syntax
and layout of HTTP WEB API. Standard URL escape/encoding characters should be used.
ACTS
Event Supported: Yes
Format: ACTS
Example Request: ACTS Input 1\r\n
Example Response: ACTS OK Input 1 1\r\n
Description: Retrieves the current state of an Activator. This can be used even if a particular activator has not been added in vMix and is handy
for retrieving state information for use with custom controllers.
To subscribe to all activator events use the command SUBSCRIBE ACTS. This will retrieve all events as it is not possible to subscribe to only a particular activator.
The input number can be left blank for Input, InputPreview and Overlay1,2,3,4 to show the currently assigned input, if any, otherwise ER No Input will be returned.
Return values will always be between 0 and 1. In contrast to the XML output this means boolean True/False becomes 1/0 and integer values such as Volume become 32bit floating point values.
XML
Example Request: XML\r\n
Example Response: XML 37\r\n
Description: Returns the current XML state as binary data encoded in UTF-8 format.
The data length has no size limit and can be quite large, therefore embedded devices should use the XML parsing commands below to efficiently retrieve values.
XMLTEXT
Format: XMLTEXT XPATH
Example Request: XMLTEXT vmix/inputs/input[1]/@title\r\n
Example Response: XMLTEXT OK This is the title of the first input\r\n
Example Request: XMLTEXT vmix/inputs/input[6]/text[@name='Headline']\r\n
Example Response: XMLTEXT OK This is the value of Headline text field in title input that is the number 6 (index 5) input.\r\n
Description: Uses the XPATH syntax to retrieve individual text values of the XML state.
To simplify parsing, multiline text will use the status length, while single line data will always use a single line response.
SUBSCRIBE
Format: SUBSCRIBE
Example Request: SUBSCRIBE TALLY\r\n
Example Response: SUBSCRIBE OK TALLY\r\n
Description: Subscribe to an event/command. Event responses matching the selected command may begin immediately, even before the SUBSCRIBE response is received.
Event responses will continue to be received until either a. UNSUBSCRIBE is called or b. the connection is closed.
UNSUBSCRIBE
Format: UNSUBSCRIBE
Example Request: UNSUBSCRIBE TALLY\r\n
Example Response: UNSUBSCRIBE OK TALLY\n
Description: Due to the internal event queue in vMix, event responses may continue to be received briefly after the UNSUBSCRIBE command has been called.
QUIT
Description: Closes the connection
Custom XAML
Warning: The following API is deprecated as of vMix 24 and may be removed in a future update.
vMix supports the use of custom WPF User Controls compiled into an assembly.
Custom User Controls can implement the vMixWPFUserControl interface from the vMixInterop.dll in the vMix installation directory.
This interface allows vMix to communicate with the User Control and gather duration and position information.
Implementation Guidelines
- All controls must be compatible with .NET Framework 3.5 SP1 (4.0 is not supported at this time)
- ShowProperties should display a WinForms window without blocking (Form.Show instead of Form.ShowDialog)
- Displaying WPF windows through ShowProperties is untested and unsupported.
- Any code within ShowProperties will not run in the context of the WPF UI thread so the use of Dispatcher is required to modify UI elements.
- All other methods run within the WPF UI thread so cpu intensive procedures should be avoided to prevent frame drops.
- Any media related controls such as MediaElement and WebBrowser are not supported and will display a blank window.
How to add a Custom WPF User Control to vMix
- First make sure the user control has been compiled as a DLL and follows the implementation guidelines above.
- Click Add Input in vMix and then select the Title / XAML tab
- Click Browse and browse for the DLL file and click OK
- Click OK and the control will now be available in vMix.
- If you have built custom properties through the ShowProperties function, this can be displayed through a right click menu:
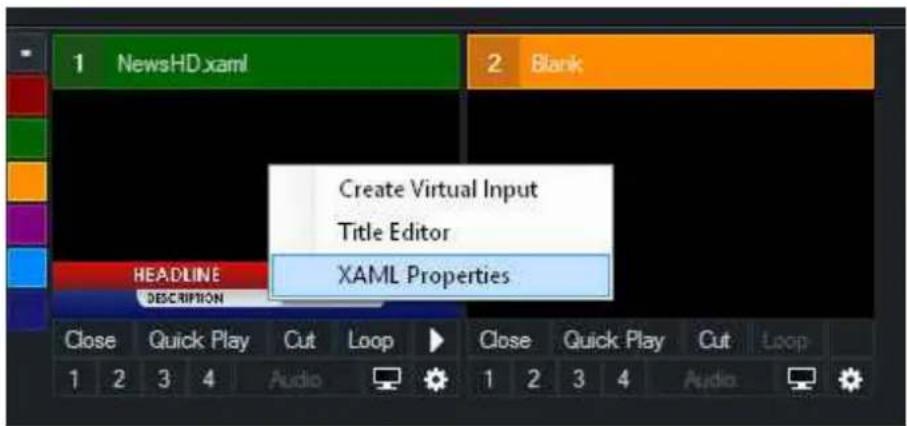
Shortcut Function Reference
The following shortcut functions can be called either via a Shortcut or via the API.
Transitions: Transitions such as Fade, Zoom, Cut etc can be used as Functions in shortcuts or the API and are in addition to those listed below. The names of these exactly match the transition names in vMix user interface.
| Name | Description |
| General | |
| ActivatorRefresh Refresh all activator device lights and controls | |
| CallManagerShowHide | |
| KeyPress | Value = Key |
| SendKeys | Send keys to active windowValue = Keys |
| SetDynamicValue1 Set Dynamic Value to use when specifying Dynamic1 as a shortcut valValue = Value | |
| SetDynamicValue2 Set Dynamic Value to use when specifying Dynamic2 as a shortcut valValue = Value | |
| SetDynamicValue3 Set Dynamic Value to use when specifying Dynamic3 as a shortcut valValue = Value | |
| SetDynamicValue4 Set Dynamic Value to use when specifying Dynamic4 as a shortcut valValue = Value | |
| Audio | |
| Audio | Toggle Audio Mute On/Off |
| AudioAuto | |
| AudioAutoOff | |
| AudioAutoOn | |
| AudioBus | M,A,B,C,D,E,F,GValue = Bus |
| AudioBusOff | M,A,B,C,D,E,F,GValue = Bus |
| AudioBusOn | M,A,B,C,D,E,F,GValue = Bus |
| AudioChannelMatrixApplyPreset | Apply preset to channel matrixValue = Preset Name |
| AudioMixerShowHide | |
| AudioOff | |
| AudioOn | |
| AudioPluginOff | Turn off Audio Plugin, starting from 1Value = Plugin Number |
| AudioPluginOn | Turn on Audio Plugin, starting from 1Value = Plugin Number |
| AudioPluginOnOff | Toggle on/off Audio Plugin, starting from 1Value = Plugin Number |
| AudioPluginShow | Show Audio Plugin Editor, starting from 1Value = Plugin Number |
| BusAAudio | |
| BusAAudioOff | |
| BusAAudioOn | |
| BusAAudioPluginOff | Turn off Audio Plugin, starting from 1Value = Plugin Number |
| BusAAudioPluginOn | Turn on Audio Plugin, starting from 1Value = Plugin Number |
| BusAAudioPluginOnOff | Toggle on/off Audio Plugin, starting from 1Value = Plugin Number |
| BusAAudioPluginShow | Show Audio Plugin Editor, starting from 1Value = Plugin Number |
| BusBAudio | |
| BusBAudioOff | |
| BusBAudioOn | |
| BusBAudioPluginOff | Turn off Audio Plugin, starting from 1Value = Plugin Number |
| BusBAudioPluginOn | Turn on Audio Plugin, starting from 1Value = Plugin Number |
| BusBAudioPluginOnOff | Toggle on/off Audio Plugin, starting from 1Value = Plugin Number |
| BusBAudioPluginShow | Show Audio Plugin Editor, starting from 1Value = Plugin Number |
| BusXAudio | M,A,B,C,D,E,F,GValue = Bus |
| BusXAudioOff | M,A,B,C,D,E,F,GValue = Bus |
| BusXAudioOn | M,A,B,C,D,E,F,GValue = Bus |
| BusXAudioPluginOff | Turn off Audio Plugin, starting from 1Value = Bus,PluginNumber |
| BusXAudioPluginOn | Turn on Audio Plugin, starting from 1Value = Bus,PluginNumber |
| BusXAudioPluginOnOff | Toggle on/off Audio Plugin, starting from 1Value = Bus,PluginNumber |
| BusXAudioPluginShow | Show Audio Plugin Editor, starting from 1Value = Bus,PluginNumber |
| BusXSendToMaster M,A,B,C,D,E,F,G | Value = Bus |
| BusXSendToMasterOff M,A,B,C,D,E,F,G | Value = Bus |
| BusXSendToMasterOn M,A,B,C,D,E,F,G | Value = Bus |
| BusXSolo | M,A,B,C,D,E,F,GValue = Bus |
| BusXSoloOff | M,A,B,C,D,E,F,GValue = Bus |
| BusXSoloOn | M,A,B,C,D,E,F,GValue = Bus |
| MasterAudio | |
| MasterAudioOff | |
| MasterAudioOn | |
| MasterAudioPluginOff | Turn off Audio Plugin, starting from 1Value = Plugin Number |
| MasterAudioPluginOn | Turn on Audio Plugin, starting from 1Value = Plugin Number |
| MasterAudioPluginOnOff | Toggle on/off Audio Plugin, starting from 1Value = Plugin Number |
| MasterAudioPluginShow | Show Audio Plugin Editor, starting from 1Value = Plugin Number |
| SetBalance | Value = Balance -1-1 |
| SetBusAVolume | Value = Volume 0-100 |
| SetBusBVolume | Value = Volume 0-100 |
| SetBusCVolume | Value = Volume 0-100 |
| SetBusDVolume | Value = Volume 0-100 |
| SetBusEVolume | Value = Volume 0-100 |
| SetBusFVolume | Value = Volume 0-100 |
| SetBusGVolume | Value = Volume 0-100 |
| SetGain | Value = Gain dB 0-24 |
| SetGainChannel1 | Value = Gain dB 0-24 |
| SetGainChannel2 | Value = Gain dB 0-24 |
| SetHeadphonesVolume | Value = Volume 0-100 |
| SetMasterVolume | Value = Volume 0-100 |
| SetVolume | Value = Volume 0-100 |
| SetVolumeChannel1 | When using SeparateMono on an Audio Input, this can be used to set volumes independently.Value = Volume 0-100 |
| SetVolumeChannel2 | When using SeparateMono on an Audio Input, this can be used to set volumes independently.Value = Volume 0-100 |
| SetVolumeChannelMixer | Set Volume of an Input's sub channel (1 to 16)Value = Channel,Volume 0-100 |
| SetVolumeFade | Set volume gradually over x milliseconds.Value = Volume 0-100,Milliseconds |
| Solo | |
| SoloOff | |
| SoloOn | |
| Transition | |
| CutDirect | Cuts the input directly to Output without changing Preview |
| FadeToBlack | Toggle FTB On/Off |
| QuickPlay | |
| SetFader | Set Master Fader T-Bar, 255 will cut to PreviewValue = Fader 0-255 |
| SetTransitionDuration1 | Change Transition Duration for Button 1Value = Duration MS |
| SetTransitionDuration2 | Change Transition Duration for Button 2Value = Duration MS |
| SetTransitionDuration3 | Change Transition Duration for Button 3Value = Duration MS |
| SetTransitionDuration4 | Change Transition Duration for Button 4Value = Duration MS |
| SetTransitionEffect1 | Change Transition for Button 1Value = Transition |
| SetTransitionEffect2 | Change Transition for Button 2Value = Transition |
| SetTransitionEffect3 | Change Transition for Button 3Value = Transition |
| SetTransitionEffect4 | Change Transition for Button 4Value = Transition |
| Stinger1 | |
| Stinger2 | |
| Stinger3 | |
| Stinger4 | |
| Transition1 | Clicks one of the four Transition buttons in the main vMix window. |
| Transition2 | |
| Transition3 | |
| Transition4 | |
| Output | |
| Fullscreen | Toggles Fullscreen On or Off |
| FullscreenOff | |
| FullscreenOn | |
| Output2 Change what is displayed on Output | Output,Preview,MultiView,InputValue = Output, Preview, MultiView, Input |
| SetOutput3 Change what is displayed on Output | Output 3. |
| Output,Preview,MultiView,Input | |
| Value = Output, Preview, MultiView, Input | |
| SetOutput4 Change what is displayed on Output | Output 4. |
| Output,Preview,MultiView,Input | |
| Value = Output, Preview, MultiView, Input | |
| SetOutputExternal2 Change what is displayed | on the External2 output. |
| Output,Preview,MultiView,Input | |
| Value = Output, Preview, MultiView, Input | |
| SetOutputFullscreen | Change what is displayed on the Fullscreen output. |
| Output,Preview,MultiView,Input | |
| Value = Output, Preview, MultiView, Input | |
| SetOutputFullscreen2 | Change what is displayed on the Fullscreen2 output. |
| Output,Preview,MultiView,Input | |
| Value = Output, Preview, MultiView, Input | |
| Snapshot | Create a snapshot image of the current Output. Optional Value specif Filename, otherwise a save file window will appear. Filename can sp for example mysnapshot {0:dd MMM yyyy}.jpg |
| Value = Value | |
| SnapshotInput | Create a snapshot image of the selected Input. Optional Value specif Filename, otherwise a save file window will appear. Filename can sp for example mysnapshot {0:dd MMM yyyy}.jpg |
| Value = Value | |
| StartExternal | |
| StartMultiCorder | |
| StartRecording | |
| StartSRTOutput | Optional output number starting from 0. Leave blank to control Outp |
| Value = Output | |
| StartStopExternal | |
| StartStopMultiCorder | |
| StartStopRecording | |
| StartStopSRTOutput | Optional output number starting from 0. Leave blank to control Outp |
| Value = Output | |
| StartStopStreaming | Optional stream number starting from 0. Leave blank to control all strValue = Stream |
| StartStreaming Optional stream number starting from 0. Leave blank to control all strValue = Stream | |
| StopExternal | |
| StopMultiCorder | |
| StopRecording | |
| StopSRTOutput Optional output number starting from 0. Leave blank to control OutputValue = Output | |
| StopStreaming | Optional stream number starting from 0. Leave blank to control all strValue = Stream |
| StreamingSetKey | Set Key on Custom RTMP Stream. Optional stream number starting first start followed by comma, e.g 0,mystreamkeyValue = Stream |
| StreamingSetPassword | Set Password on Custom RTMP Stream. Optional stream number starting at start followed by comma, e.g 0,passwordValue = Stream |
| StreamingSetURL | Set URL on Custom RTMP Stream. Optional stream number starting first start followed by comma, e.g 0,rtmp://myurl/Value = Stream |
| StreamingSetUsername | Set Username on Custom RTMP Stream. Optional stream number starting at start followed by comma, e.g 0,usernameValue = Stream |
| WriteDurationToRecordingLog | Write current recording duration to log file with optional tag text Value = Tag Text |
| Title | |
| AdjustCountdown | Seconds to add or subtract from current Countdown timeValue = Seconds |
| ChangeCountdown Change countdown time according to Value as hh:mm:ss (00:00:00)Value = Time 00:00:00 | |
| NextTitlePreset | |
| PauseCountdown | Pause or Resume Countdown or if complete, Start from beginning. |
| PauseRender | Freeze Title Input while making multiple updates |
| PreviousTitlePreset | |
| ResumeRender | Resume Title Input rendering after making multiple updates |
| SelectTitlePreset | Value = Preset Index |
| SetColor | Change Color in Title using HTML #xxxxxxxx format. SelectedIndex or SelectedValue can be used to select object. Value = Color |
| SetCountdown | Set countdown duration according to Value as hh:mm:ss (00:00:00) Value = Duration 00:00:00 |
| SetImage | Change Image in Title according to Filename or empty to clear. SelectedIndex or SelectedValue can be used to select image. Value = Filename |
| SetImageVisible | Toggle Image Visibility in Title SelectedIndex or SelectedValue can be used to select image. |
| SetImageVisibleOff | Hide Image in Title SelectedIndex or SelectedValue can be used to select image. |
| SetImageVisibleOn | Show Image in Title SelectedIndex or SelectedValue can be used to select image. |
| SetText Change Text in Title according to Value parameter. SelectedIndex or SelectedName can be used to select Text Field Value = Text | |
| SetTextColour | Change Colour of Text in Title in HTML format (#xxxxxx) Value = Colour |
| SetTextVisible | Toggle Text Visibility in Title SelectedIndex or SelectedValue can be used to select text field. |
| SetTextVisibleOff | Hide Text in Title SelectedIndex or SelectedValue can be used to select text field. |
| SetTextVisibleOn | Show Text in Title SelectedIndex or SelectedValue can be used to select text field. |
| SetTickerSpeed | Change Ticker Speed. SelectedIndex or SelectedValue can be used to select ticker field. Value = Speed 0-1000 |
| StartCountdown | |
| StopCountdown | Stop and Reset Countdown |
| SuspendCountdown | Pause Countdown Only |
| TitleBeginAnimation | Value = Animation |
| Input | |
| ActiveInput | Send to Output the selected Input |
| AddInput | Create a new Input based on information provided in Value.Video |c:\path\to\video.aviImage |c:\path\to\image.jpgPhotos |c:\path\to\folderTitle |c:\path\to\title.gtzipVideoList |c:\path\to\playlist.m3uColour |HTMLColorAudioFile |c:\path\to\audio.wavFlash |c:\path\to\flash.swfPowerPoint |c:\path\to\powerpoint.pptxValue = Type |Filename |
| AutoPauseOff | |
| AutoPauseOn | |
| AutoPlayFirst | Toggle automatically playing first item in a List with Transition |
| AutoPlayFirstOff | Turn Off automatically playing first item in a List with Transition |
| AutoPlayFirstOn | Turn On automatically playing first item in a List with Transition |
| AutoPlayNext | Toggle automatically playing next item in a List |
| AutoPlayNextOff | Turn Off automatically playing next item in a List |
| AutoPlayNextOn | Turn On automatically playing next item in a List |
| AutoPlayOff | |
| AutoPlayOn | |
| AutoRestartOff | |
| AutoRestartOn | |
| ColourCorrectionAuto Basic Auto Colour Correction. | |
| ColourCorrectionReset Reset Colour Correction to Default Values. | |
| CreateVirtualInput | Create a new Virtual Input from the specified Input. |
| DeinterlaceOff | |
| DeinterlaceOn | |
| InputPreviewHide | Hides large preview of input |
| InputPreviewShow | Shows large preview of input |
| InputPreviewShowHide | Toggles large preview of input |
| LayerOff Turn Off Layer For Input At Index (starting from 1) | |
| Value = Index | |
| LayerOn Turn On Layer For Input At Index (starting from 1) | |
| Value = Index | |
| LayerOnOff Toggle On/Off Layer For Input At Index (starting from 1) | |
| Value = Index | |
| ListAdd | Add Filename to List |
| Value = Filename | |
| ListExport | Export List as M3U to Filename |
| Value = Filename | |
| ListPlayOut | |
| ListRemove | Remove from List by Index starting from 1 |
| Value = Index | |
| ListRemoveAll | Remove all items from List |
| ListShowHide | |
| ListShuffle | Shuffle (randomize) List |
| LivePlayPause | |
| LoopOff | |
| LoopOn | |
| MarkIn | |
| MarkOut | |
| MarkReset | |
| MarkResetIn | |
| MarkResetOut | |
| MirrorOff | |
| MirrorOn | |
| MoveInput | Value = Number |
| MoveLayer Move Layer in Input according to Value parameter. | |
| NextItem | Move to next item in List |
| NextPicture | Move to Next Picture for Photo and PowerPoint Inputs |
| Pause | |
| Play | |
| PlayPause | |
| PreviewInput | Send to Preview the selected Input |
| PreviewInputNext | Send to Preview the next Input |
| PreviewInputPrevious | Send to Preview the previous Input |
| PreviousItem | Move to previous item in List |
| PreviousPicture | Move to Previous Picture for Photo and PowerPoint Inputs |
| RemoveInput | |
| ResetInput | |
| Restart Restart selected Input | |
| SaveVideoDelay | Save video clip from Video Delay according to Duration in millisecond |
| SelectCategory | Change to Category according to Value(All,Red,Green,Orange,Purple,Aqua,Blue,Search)Value = Category |
| SelectIndex | Photos,List: Selects item in List according to Value starting from numbVirtual Set: Zooms to selected preset using the current speed settingValue = Index |
| SetAlpha | Set Input transparency according to Value. 0 is transparent, 255 is openValue = Alpha 0-255 |
| SetCCGainB | Change Gain R level of Input.1=OriginalValue = Value 0-2 |
| SetCCGainG | Change Gain R level of Input.1=OriginalValue = Value 0-2 |
| SetCCGainR | Change Gain R level of Input.1=OriginalValue = Value 0-2 |
| SetCCGainRGB | Change Gain RGB level of Input.1=OriginalValue = Value 0-2 |
| SetCCGammaB Change Gamma B level of Input.0=OriginalValue = Value -1-1 | |
| SetCCGammaG | Change Gamma G level of Input.0=OriginalValue = Value -1-1 |
| SetCCGammaR Change Gamma R level of Input. | 0=OriginalValue = Value -1-1 |
| SetCCGammaRGB Change Gamma RGB level of Input. | 0=OriginalValue = Value -1-1 |
| SetCCHue | Change Hue level of Input.0=OriginalValue = Value -1-1 |
| SetCCLiftB | Change Lift B level of Input.0=OriginalValue = Value -1-1 |
| SetCCLiftG Change Lift G level of Input. | 0=OriginalValue = Value -1-1 |
| SetCCLiftR | Change Lift R level of Input.0=OriginalValue = Value -1-1 |
| SetCCLiftRGB Change Lift RGB level of Input. | 0=OriginalValue = Value -1-1 |
| SetCCSaturation Change Saturation level of Input. | 0=Original, -1=GreyscaleValue = Value -1-1 |
| SetDynamicInput1 Set Dynamic Input from Input | put Name or NumberValue = Input |
| SetDynamicInput2 Set Dynamic Input from Input | Put Name or NumberValue = Input |
| SetDynamicInput3 Set Dynamic Input from Input | Put Name or NumberValue = Input |
| SetDynamicInput4 Set Dynamic Input from Input | Put Name or NumberValue = Input |
| SetInputName | Set the Display Name of the InputValue = Name |
| SetLayer | Change Layer in Input according to Value parameter.Example: 1,2 changes Layer1 to Input2Value = Index,Input |
| SetPanX | Change current PanX value of Input.0=centered, -2=100% to left, 2=100% to rightValue = Value -2-2 |
| SetPanY Change current PanY value of Input. | 0=centered, -2=100% to bottom, 2=100% to topValue = Value -2-2 |
| SetPictureEffect | Set transition effect for Photos and PowerPoint Inputs (Fade, Zoom, eValue = Transition |
| SetPictureEffectDuration Set duration of transition effect in Milliseconds | Value = Duration MS |
| SetPictureTransition | Set transition time between Photos and PowerPoint slides in Second.Value = Seconds |
| SetPosition | Set Position of selected Input according to Value in MillisecondsValue = Milliseconds |
| SetRate | Set Playback speed/rate for Videos and Video Delays0.5=50%,1=100%,2=200% etcValue = Speed 0.1-4 |
| SetRateSlowMotion Set Slow Motion speed for Instant Replay | 0.5=50%,1=100% etcValue = Speed 0-1 |
| SetZoom | Change current Zoom level of Input.1=100%, 0.5=50%, 2=200%Value = Value 0-5 |
| SharpenOff | |
| SharpenOn | |
| VideoCallAudioSource | Master,Headphones,BusA,BusB,BusC,BusD,BusE,BusF,BusGValue = Source |
| VideoCallVideoSource | Output1,Output2,Output3,Output4Value = Source |
| VideoDelayStartRecording | Start Video Delay Recording |
| VideoDelayStartStopRecording | Toggle Video Delay Recording |
| VideoDelayStopRecording | Stop Video Delay Recording |
| WaitForCompletion Wait for a Video Input to | reach the end of playback. |
| Overlay | |
| MoveMultiViewOverlay | Move Overlay in Input MultiView according to Value parameter.Example: 1,2 moves Overlay1 to Overlay2Value = FromIndex,Tolndex |
| MultiViewOverlay | Toggle On/Off MultiView Overlay For Input At Index (starting from 1)Value = Index |
| MultiViewOverlayOff | Turn Off MultiView Overlay For Input At Index (starting from 1)Value = Index |
| MultiViewOverlayOn | Turn On MultiView Overlay For Input At Index (starting from 1)Value = Index |
| OverlayInput1 | Toggle Overlay1 On/Off with selected Input using configured Transitic |
| OverlayInput1In | Transition Out to Overlay1 with selected Input |
| OverlayInput1Last Toggle Overlay1 On/Off with last used Input on this channel | |
| OverlayInput1Off | Immediately switch Overlay1 Off (Cut) |
| OverlayInput1Out Transition Out Overlay1 | |
| OverlayInput1Zoom | Zooms PIP Overlay to fill Fullscreen and vice versa |
| OverlayInput2 | |
| OverlayInput2In | |
| OverlayInput2Last Toggle Overlay2 On/Off with last used Input on this channel | |
| OverlayInput2Off | |
| OverlayInput2Out | |
| OverlayInput2Zoom | |
| OverlayInput3 | |
| OverlayInput3In | |
| OverlayInput3Last Toggle Overlay3 On/Off with last used Input on this channel | |
| OverlayInput3Off | |
| OverlayInput3Out | |
| OverlayInput3Zoom | |
| OverlayInput4 | |
| OverlayInput4In | |
| OverlayInput4Last Toggle Overlay4 On/Off with last used Input on this channel | |
| OverlayInput4Off | |
| OverlayInput4Out | |
| OverlayInput4Zoom | |
| OverlayInputAllOff | Immediately switch all Overlays Off |
| PreviewOverlayInput1 | Preview Overlay1 using the selected Input |
| PreviewOverlayInput2 | |
| PreviewOverlayInput3 | |
| PreviewOverlayInput4 | |
| SetMultiViewOverlay | Change Layer in Input MultiView according to Value parameter. Example: 1,2 changes Layer 1 to Input2 Value = Index,Input |
| PlayList | |
| NextPlayListEntry | Move to Next Item in a running PlayList |
| PreviousPlayListEntry | Move to Previous Item in a running PlayList |
| SelectPlayList | Open PlayList with Name matching Value Value = PlayList |
| StartPlayList | |
| StopPlayList | |
| Scripting | |
| ScriptStart Value = Script Name | |
| ScriptStartDynamic Start a dynamic script using code specified as the Value. Value = Code | |
| ScriptStop Value = Script Name | |
| ScriptStopAll | |
| ScriptStopDynamic | |
| Replay | |
| ReplayACamera1 | |
| ReplayACamera2 | |
| ReplayACamera3 | |
| ReplayACamera4 | |
| ReplayACamera5 | |
| ReplayACamera6 | |
| ReplayACamera7 | |
| ReplayACamera8 | |
| ReplayBCamera1 | |
| ReplayBCamera2 | |
| ReplayBCamera3 | |
| ReplayBCamera4 | |
| ReplayBCamera5 | |
| ReplayBCamera6 | |
| ReplayBCamera7 | |
| ReplayBCamera8 | |
| ReplayCamera1 | |
| ReplayCamera2 | |
| ReplayCamera3 | |
| ReplayCamera4 | |
| ReplayCamera5 | |
| ReplayCamera6 | |
| ReplayCamera7 | |
| ReplayCamera8 | |
| ReplayChangeDirection | |
| ReplayChangeSpeed | Value = Speed |
| ReplayCopyLastEvent | Value = Event List 0-19 |
| ReplayCopySelectedEvent | Value = Event List 0-19 |
| ReplayDeleteLastEvent | |
| ReplayDeleteSelectedEvent | |
| ReplayDuplicateLastEvent | |
| ReplayDuplicateSelectedEvent | |
| ReplayExportLastEvent Value = Folder | |
| ReplayFastBackward | 1-30xValue = Speed |
| ReplayFastForward | 1-30xValue = Speed |
| ReplayJumpFrames | Value = Frames |
| ReplayJumpFramesFastOff | ReplayJumpFrames jumps 1 frame for each value instead of 1 second. |
| ReplayJumpFramesFastOn | ReplayJumpFrames jumps 1 second for each value instead of 1 frame. |
| ReplayJumpToNow | |
| ReplayLastEventCameraOff Turns off the speci | fied camera angle (1-8) |
| Value = Camera | |
| ReplayLastEventCameraOn Turns on the speci | fied camera angle (1-8) |
| Value = Camera | |
| ReplayLastEventSingleCameraOn | Turns on only the specified camera angle (1-8) |
| Value = Camera | |
| ReplayLive | |
| ReplayLiveToggle | |
| ReplayMarkCancel | |
| ReplayMarkIn | |
| ReplayMarkInLive | |
| ReplayMarkInOut Number of previous seconds to use when creating a new event. | |
| ReplayMarkInOutLive | Number of previous seconds to use when creating a new event. |
| ReplayMarkInOutLiveFuture | Number of seconds into the future to use when creating a new event. |
| ReplayMarkInOutRecorded Number of previous seconds to use when creating a new event. | |
| ReplayMarkInRecorded | |
| ReplayMarkInRecordedNow | |
| ReplayMarkOut | |
| ReplayMoveLastEvent | Value = Event List 0-19 |
| ReplayMoveSelectedEvent | Value = Event List 0-19 |
| ReplayMoveSelectedEventDown | |
| ReplayMoveSelectedEventUp | |
| ReplayMoveSelectedInPoint | Value = Frames |
| ReplayMoveSelectedOutPoint | Value = Frames |
| ReplayPause | |
| ReplayPlay | |
| ReplayPlayAllEvents | Play all Events in active list |
| ReplayPlayAllEventsToOutput | Play all Events in active list |
| ReplayPlayBackward | |
| ReplayPlayEvent | Value = Event Number 0-1000 |
| ReplayPlayEventsById | Value = List of IDs |
| ReplayPlayEventsByIDToOutput | Value = List of IDs |
| ReplayPlayEventToOutput | Value = Event Number 0-1000 |
| ReplayPlayForward | |
| ReplayPlayLastEvent | |
| ReplayPlayLastEventToOutput | |
| ReplayPlayNext | |
| ReplayPlayPause | |
| ReplayPlayPrevious | |
| ReplayPlaySelectedEvent | |
| ReplayPlaySelectedEventToOutput | |
| ReplayRecorded | |
| ReplaySelectAllEvents | Select all events in active channel. |
| ReplaySelectChannelA | |
| ReplaySelectChannelAB | |
| ReplaySelectChannelB | |
| ReplaySelectedEventCameraOff | Turns off the specified camera angle (1-8)Value = Camera |
| ReplaySelectedEventCameraOn | Turns on the specified camera angle (1-8)Value = Camera |
| ReplaySelectedEventSingleCameraOn | Turns on only the specified camera angle (1-8)Value = Camera |
| ReplaySelectEvents1 | |
| ReplaySelectEvents10 | |
| ReplaySelectEvents11 | |
| ReplaySelectEvents12 | |
| ReplaySelectEvents13 | |
| ReplaySelectEvents14 | |
| ReplaySelectEvents15 | |
| ReplaySelectEvents16 | |
| ReplaySelectEvents17 | |
| ReplaySelectEvents18 | |
| ReplaySelectEvents19 | |
| ReplaySelectEvents2 | |
| ReplaySelectEvents20 | |
| ReplaySelectEvents3 | |
| ReplaySelectEvents4 | |
| ReplaySelectEvents5 | |
| ReplaySelectEvents6 | |
| ReplaySelectEvents7 | |
| ReplaySelectEvents8 | |
| ReplaySelectEvents9 | |
| ReplaySelectFirstEvent | |
| ReplaySelectLastEvent | |
| ReplaySelectNextEvent | |
| ReplaySelectPreviousEvent | |
| ReplaySetAudioSource | Name as per dropdown box. e.g 'Camera1'Value = AudioSource |
| ReplaySetChannelAToBTimecode Set A Timecode to B Timecode | |
| ReplaySetChannelBToATimecode Set B Timecode to A Timecode | |
| ReplaySetDirectionBackward | |
| ReplaySetDirectionForward | |
| ReplaySetLastEventText | Value = Text |
| ReplaySetLastEventTextCamera | Changes the text of the specified angle (1-4), example: 3,angle3textValue = Camera,Text |
| ReplaySetSelectedEventText | Value = Text |
| ReplaySetSelectedEventTextCamera | Changes the text of the specified angle (1-4), example: 3,angle3textValue = Camera,Text |
| ReplaySetSpeed | See SetRateSlowMotionValue = Speed 0-1 |
| ReplaySetTimecode | Set position to Timecode in format yyyy-MM-ddTHH:mm:ss.fffValue = Timecode |
| ReplayShowHide | |
| ReplayStartRecording | |
| ReplayStartStopRecording | |
| ReplayStopEvents | |
| ReplayStopRecording | |
| ReplaySwapChannels | Swap A to B and vice versa, includes angles and playback status. |
| ReplayToggleLastEventCamera1 | |
| ReplayToggleLastEventCamera2 | |
| ReplayToggleLastEventCamera3 | |
| ReplayToggleLastEventCamera4 | |
| ReplayToggleLastEventCamera5 | |
| ReplayToggleLastEventCamera6 | |
| ReplayToggleLastEventCamera7 | |
| ReplayToggleLastEventCamera8 | |
| ReplayToggleSelectedEventCamera1 | |
| ReplayToggleSelectedEventCamera2 | |
| ReplayToggleSelectedEventCamera3 | |
| ReplayToggleSelectedEventCamera4 | |
| ReplayToggleSelectedEventCamera5 | |
| ReplayToggleSelectedEventCamera6 | |
| ReplayToggleSelectedEventCamera7 | |
| ReplayToggleSelectedEventCamera8 | |
| ReplayUpdateSelectedInPoint | Update In point of Selected Event to current Position. |
| ReplayUpdateSelectedOutPoint | Update Mark Out point of Selected Event to current Position. |
| ReplayUpdateSelectedSpeed | Update Selected Event to use Current Speed. |
| ReplayUpdateSelectedSpeedDefault | Update Selected Event to use Default Speed. |
| NDI | |
| NDICommand Send specified command to NDI source | |
| NDISelectSourceByIndex | Value = Index 0-100 |
| NDISelectSourceByName | Value = Name |
| NDIStartRecording | |
| NDIStopRecording | |
| PTZ | |
| PTZCreateVirtualInput | Creates a PTZ Virtual Input with the current Position |
| PTZFocusAuto | |
| PTZFocusFar Value = Speed 0-1 | |
| PTZFocusManual | |
| PTZFocusNear Value = Speed 0-1 | |
| PTZFocusStop | |
| PTZHome | |
| PTZMoveDown Value = Speed 0-1 | |
| PTZMoveDownLeft Value = Speed 0-1 | |
| PTZMoveDownRight Value = Speed 0-1 | |
| PTZMoveLeft Value = Speed 0-1 | |
| PTZMoveRight Value = Speed 0-1 | |
| PTZMoveStop Stop all PTZ movement | |
| PTZMoveToVirtualInputPosition | Moves to the Position of the PTZ Virtual Input without selecting it int |
| PTZMoveToVirtualInputPositionByIndex | Moves to the Position of the PTZ Virtual Input associated with this Inp is first Input found starting from 0 |
| Value = Index 0-100 | |
| PTZMoveUp | Value = Speed 0-1 |
| PTZMoveUpLeft | Value = Speed 0-1 |
| PTZMoveUpRight Value = Speed 0-1 | |
| PTZUpdateVirtualInput | Updates selected PTZ Virtual Input with current Position |
| PTZZoomIn Value = Speed 0-1 | |
| PTZZoomOut Value = Speed 0-1 | |
| PTZZoomStop | |
| Preset | |
| LastPreset | Load the last preset. |
| OpenPreset | Load preset from the specified Filename. Value = Filename |
| SavePreset | Save preset to the specified Filename. Value = Filename |
| DataSources | |
| DataSourceAutoNextOff | Name of the Data Source, Table Name (optional) eg 'Excel/CSV,Sheet: Value = Name,Table |
| DataSourceAutoNextOn | Name of the Data Source, Table Name (optional) eg 'Excel/CSV,Sheet: Value = Name,Table |
| DataSourceAutoNextOnOff | Name of the Data Source, Table Name (optional) eg 'Excel/CSV,Sheet: Value = Name,Table |
| DataSourceNextRow | Name of the Data Source and Table Name (optional) eg 'Excel/CSV,Sh Value = Name,Table |
| DataSourcePause Name of Data Source eg 'Excel/CSV' Value = Name | |
| DataSourcePlay Name of Data Source eg 'Excel/CSV' Value = Name | |
| DataSourcePlayPause Name of Data Source eg 'Excel/CSV' Value = Name | |
| DataSourcePreviousRow | Name of the Data Source and Table Name (optional) eg 'Excel/CSV,Sh Value = Name,Table |
| DataSourceSelectRow | Name of the Data Source, Table Name (optional) and Row Index start eg 'Excel/CSV,Sheet1,5' Value = Name,Table,Index |
| Browser | |
| BrowserBack | |
| BrowserForward | |
vMix User Guide
| BrowserKeyboardDisabled | |
| BrowserKeyboardEnabled | |
| BrowserMouseDisabled | |
| BrowserMouseEnabled | |
| BrowserNavigate | URLValue = URL |
| BrowserReload |
Safe Areas
Safe Areas for the Preview Window can be enabled by clicking the icon at the top right hand corner of the Preview Title Bar as shown below.
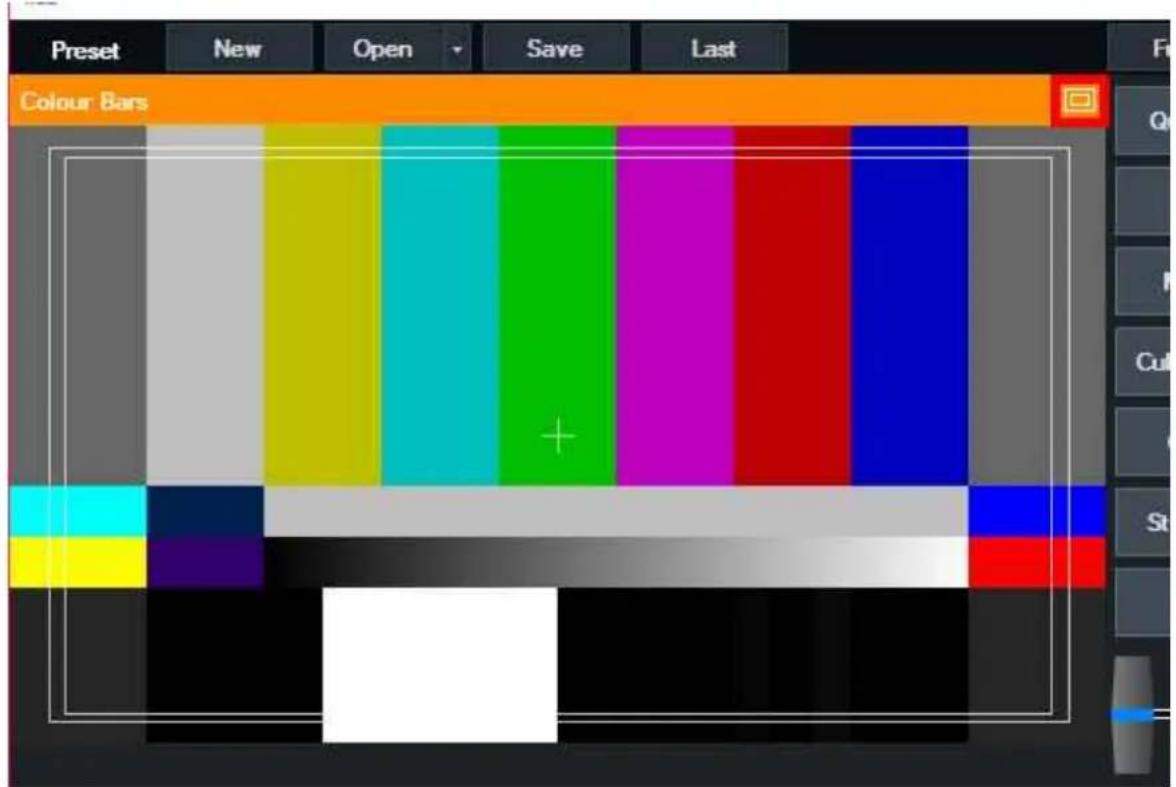
A number of display options are supported including EBU/SMPTE, 80/90% and grids of various sizes.
Safe Areas can also be displayed and controlled from the Input Settings window.
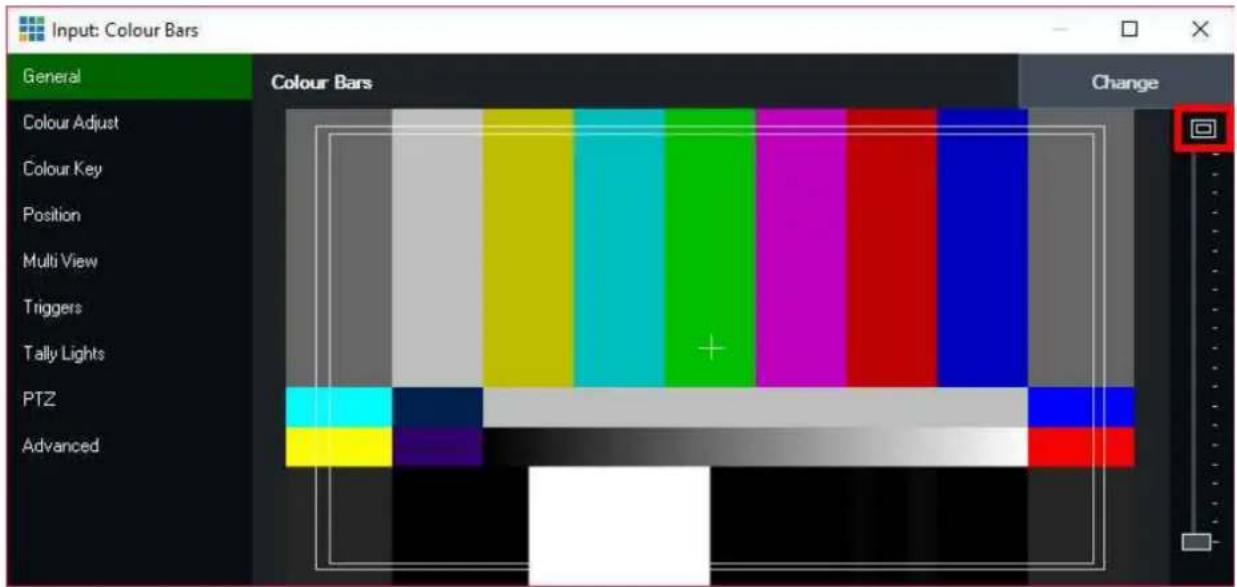
Undo Button
After completing an action in vMix, an Undo button may appear next to the Preset buttons at the top right of vMix

Press this button to undo that action.
Currently the following actions are supported with more expected to be added in the future.
- Closing Inputs
Waveform and Vectorscope Monitor
The professional waveform monitor can be turned on within the Preview window and the Input settings window by clicking the colour bar icon as shown below.
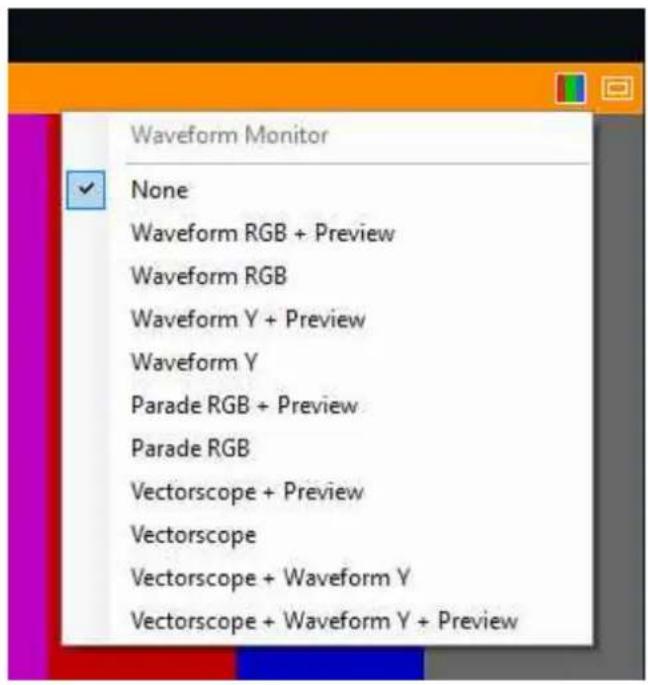
Waveform RGB
Displays a waveform of the red, green and blue colour channels on top of each other as shown below.
vMix User Guide
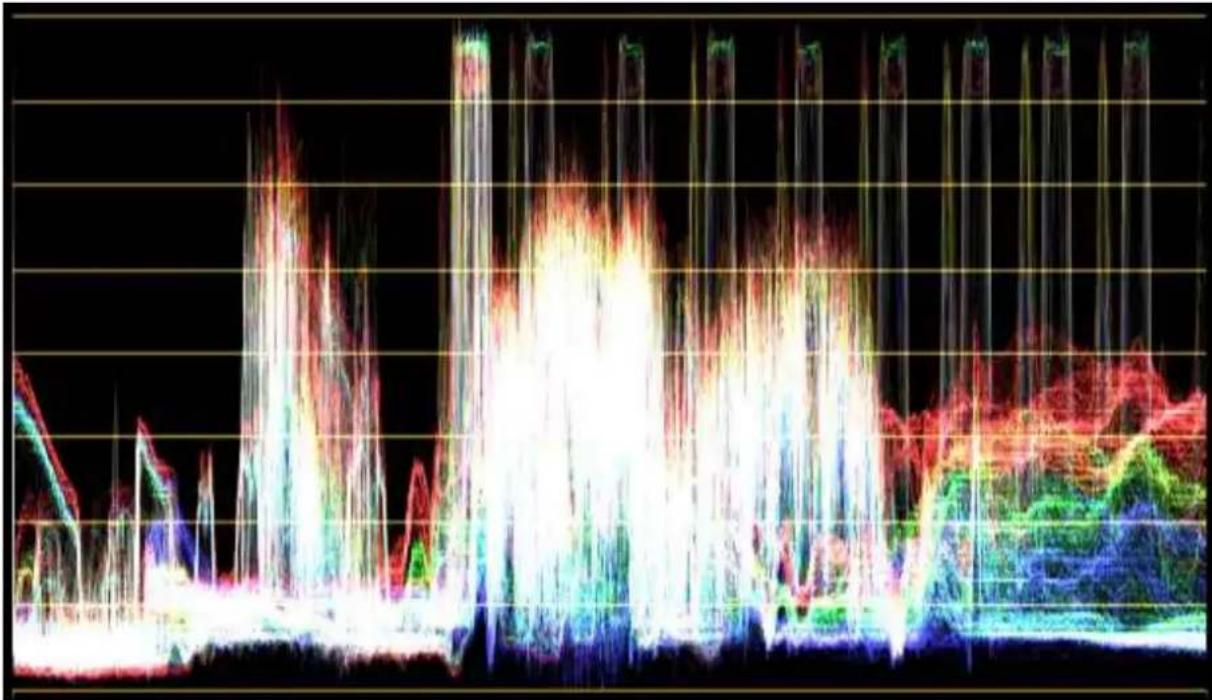
line
| Time Point | Energy Consumption | | ---------- | ------------------ | | 1 | 0.5 | | 2 | 0.8 | | 3 | 1.2 | | 4 | 0.9 | | 5 | 1.5 | | 6 | 2.0 | | 7 | 1.8 | | 8 | 2.5 | | 9 | 2.2 | | 10 | 2.8 | | 11 | 3.0 | | 12 | 2.7 | | 13 | 3.2 | | 14 | 3.5 | | 15 | 3.3 | | 16 | 3.1 | | 17 | 3.4 | | 18 | 3.6 | | 19 | 3.8 | | 20 | 4.0 | | 21 | 3.9 | | 22 | 4.1 | | 23 | 4.2 | | 24 | 4.3 | | 25 | 4.4 | | 26 | 4.5 | | 27 | 4.6 | | 28 | 4.7 | | 29 | 4.8 | | 30 | 4.9 | | 31 | 5.0 | | 32 | 5.1 | | 33 | 5.2 | | 34 | 5.3 | | 35 | 5.4 | | 36 | 5.5 | | 37 | 5.6 | | 38 | 5.7 | | 39 | 5.8 | | 40 | 5.9 | | 41 | 6.0 | | 42 | 6.1 | | 43 | 6.2 | | 44 | 6.3 | | 45 | 6.4 | | 46 | 6.5 | | 47 | 6.6 | | 48 | 6.7 | | 49 | 6.8 | | 50 | 6.9 | | 51 | 7.0 | | 52 | 7.1 | | 53 | 7.2 | | 54 | 7.3 | | 55 | 7.4 | | 56 | 7.5 | | 57 | 7.6 | | 58 | 7.7 | | 59 | 7.8 | | 60 | 7.9 | | 61 | 8.0 | | 62 | 8.1 | | 63 | 8.2 | | 64 | 8.3 | | 65 | 8.4 | | 66 | 8.5 | | 67 | 8.6 | | 68 | 8.7 | | 69 | 8.8 | | 70 | 8.9 | | 71 | 9.0 | | 72 | 9.1 | | 73 | 9.2 | | 74 | 9.3 | | 75 | 9.4 | | 76 | 9.5 | | 77 | 9.6 | | 78 | 9.7 | | 79 | 9.8 | | 80 | 9.9 | | 81 | 10.0 | | 82 | 10.1 | | 83 | 10.2 | | 84 | 10.3 | | 85 | 10.4 | | 86 | 10.5 | | 87 | 10.6 | | 88 | 10.7 | | 89 | 10.8 | | 90 | 10.9 | | 91 | 11.0 | | 92 | 11.1 | | 93 | 11.2 | | 94 | 11.3 | | 95 | 11.4 | | 96 | 11.5 | | 97 | 11.6 | | 98 | 11.7 | | 99 | 11.8 | | Note: The data is in a single column format with values for each row in the chart.Waveform Y
Displays the Luminance waveform only.
Parade RGB
Displays three separate waveforms representing the three colour channels Red, Green and Blue.
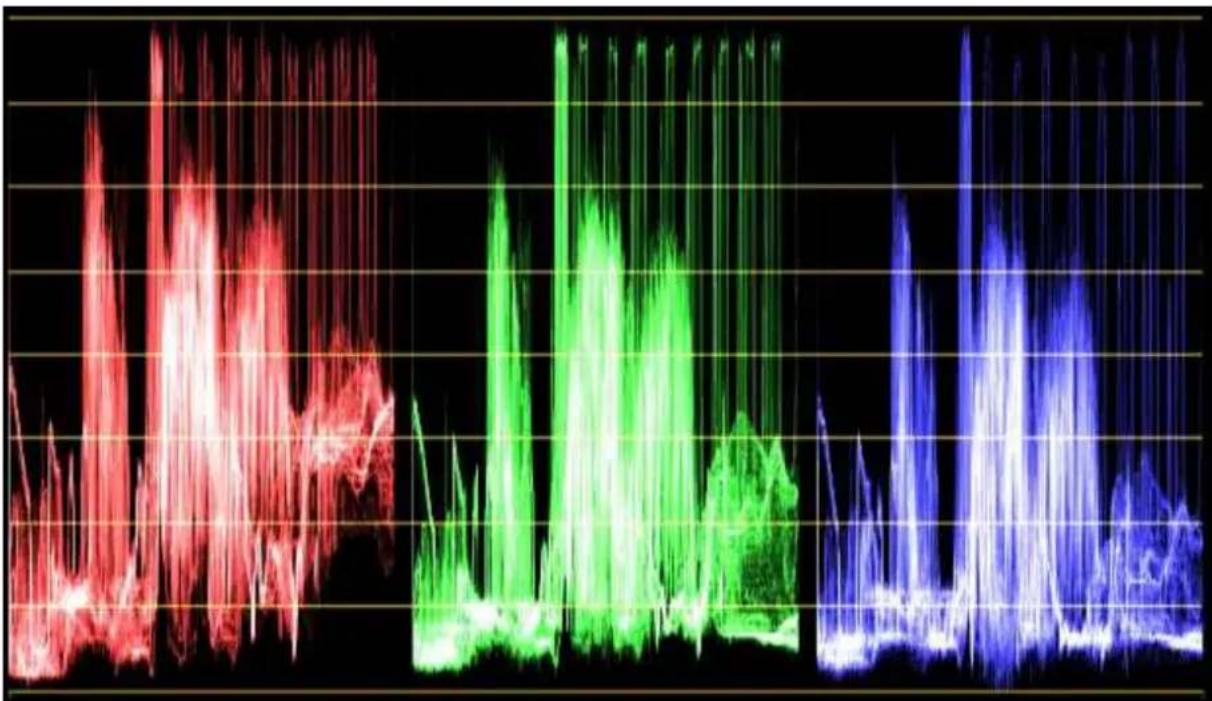
line
| Time | Red Line | Green Line | Blue Line | |------|----------|------------|-----------| | 0 | 0 | 0 | 0 | | 1 | 1 | 0 | 0 | | 2 | 0 | 0 | 0 | | 3 | 1 | 0 | 0 | | 4 | 0 | 0 | 0 | | 5 | 1 | 0 | 0 | | 6 | 0 | 0 | 0 | | 7 | 1 | 0 | 0 | | 8 | 0 | 0 | 0 | | 9 | 1 | 0 | 0 | | 10 | 0 | 0 | 0 | | 11 | 1 | 0 | 0 | | 12 | 0 | 0 | 0 | | 13 | 1 | 0 | 0 | | 14 | 0 | 0 | 0 | | 15 | 1 | 0 | 0 | | 16 | 0 | 0 | 0 | | 17 | 1 | 0 | 0 | | 18 | 0 | 0 | 0 | | 19 | 1 | 0 | 0 | | 20 | 0 | 0 | 0 | | 21 | 1 | 0 | 0 | | 22 | 0 | 0 | 0 | | 23 | 1 | 0 | 0 | | 24 | 0 | 0 | 0 | | 25 | 1 | 0 | 0 | | 26 | 0 | 0 | 0 | | 27 | 1 | 0 | 0 | | 28 | 0 | 0 | 0 | | 29 | 1 | 0 | 0 | | 30 | 0 | 0 | 0 | | 31 | 1 | 0 | 0 | | 32 | 0 | 0 | 0 | | 33 | 1 | 0 | 0 | | 34 | 0 | 0 | 0 | | 35 | 1 | 0 | 0 | | 36 | 0 | 0 | 0 | | 37 | 1 | 0 | 0 | | 38 | 0 | 0 | 0 | | 39 | 1 | 0 | 0 | | 40 | 0 | 0 | 0 | | 41 | 1 | 0 | 0 | | 42 | 0 | 0 | 0 | | 43 | 1 | 0 | 0 | | 44 | 0 | 0 | 0 | | 45 | 1 | 0 | 0 | | 46 | 0 | 0 | 0 | | 47 | 1 | 0 | 0 | | 48 | 0 | 0 | 0 | | 49 | 1 | 0 | 0 | | 50 | 0 | 0 | 0 | | ... (repeated) for all lines: X-axis represents time points from '1' to '5' (labeled as 'Blue' at bottom), Y-axis represents signal amplitude (Y-axis values). Legend indicates four series: 'Red', 'Green', 'Blue', 'White'. The chart displays repeated 'Blue' markers at specific time points (e.g., '1', '2', '3', '4') with varying frequencies (e.g., '5', '6').Vectorscope
Graphs the chrominance portion of the video (Cb,Cr or U,V channels) as an X/Y plot.
Colour squares indicators representing 75% and 100% Red, Magenta, Blue, Cyan, Green and Yellow are displayed at the relevant points
for easy calibration. For example the lines on a standard colour bars or test chart (such as those provided in Add Input -> Colour) will line up perfectly
with the coloured squares when the colour is calibrated correctly. Thus using a test chart on a camera source will allow accurate colour correction to be achieved.
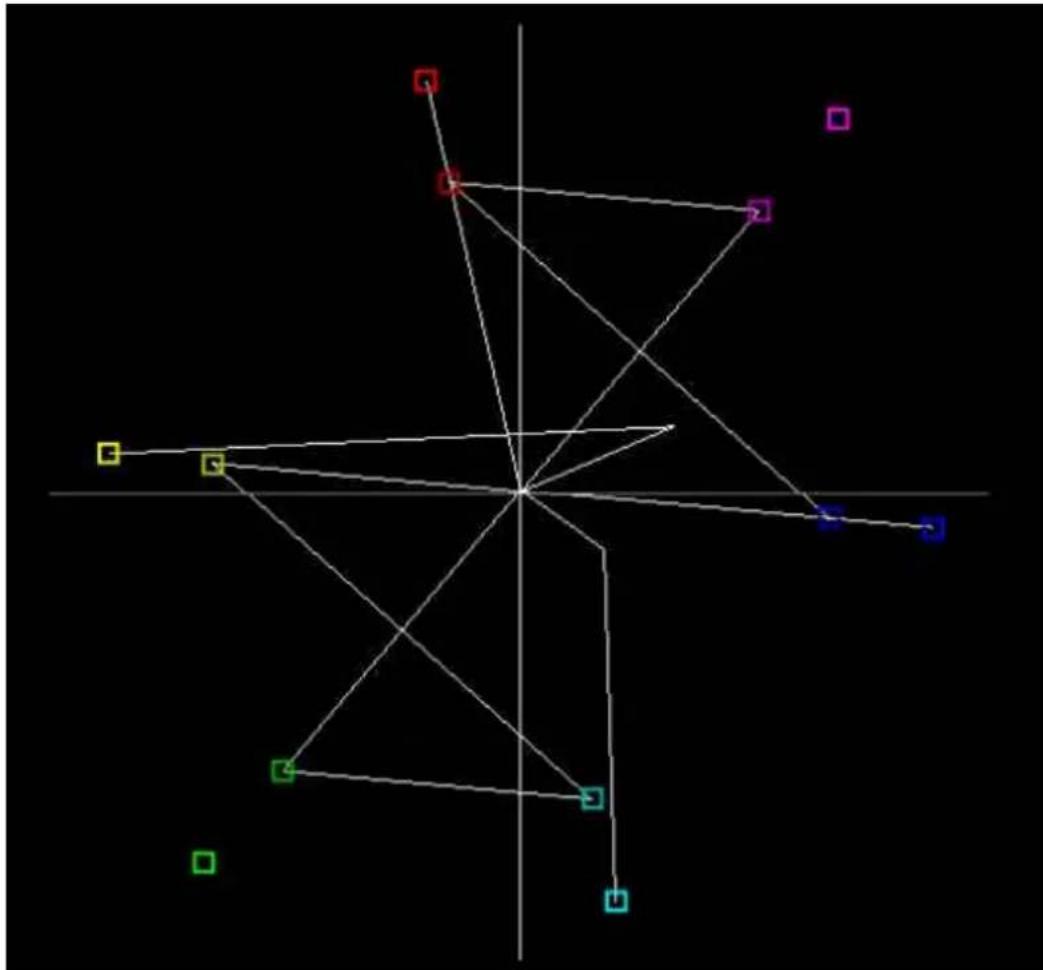
radar
| Category | Value | | -------- | ----- | | Red | 100 | | Purple | 80 | | Blue | 60 | | Green | 70 | | Cyan | 50 |Preview
Some monitoring options have a + Preview option which shows the monitor side by side with a live video preview of the input.
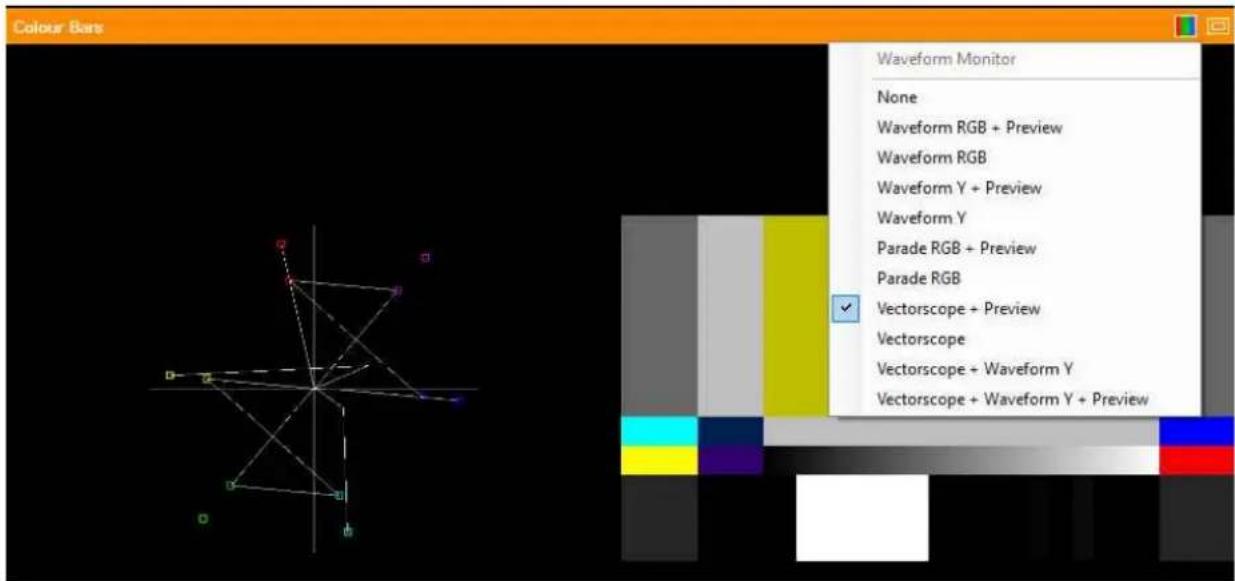
Vertical Video Production
vMix provides a number of tools to assist in vertical video production while still maintaining a standard 16:9 / Widescreen production:
Vertical HD Preset
When selecting New in vMix a number of Vertical HD presets are available for the most common frame rates.
These ensure the vertical portion of the screen is exactly 1080x1920 (3412x1920 in total)
This allows streaming out the vertical portion of the screen in full HD without sacrificing resolution.
NOTE: As Vertical HD (1920p) is larger than HD (1080p), this preset requires either the 4K, Pro or Max editions of vMix.
Safe Areas
A Vertical 9:16 Safe Area option is available to display margins on screen for vertical production. See Safe Areas for more information.
Source Rotation
Easily rotate Inputs 90 degrees for use in Vertical HD production from the Input Settings - Position tab. For example video cameras that have been rotated 90 degrees specifically for a vertical production.
GT Vertical Title Templates
A number of animated title templates are included specifically designed to fit within the vertical portion of the screen.
- vMix User Guide
- Introduction and Features
- Click here to Download this User Guide as a PDF
- http://www.vmix.com/
- Features
- Input Sources
- Live Video Mixing Effects
- Live Video Filters
- Web/Tablet Interface
- Multi View
- Overlay
- PlayList
- Output
- Live Streaming
- Recording
- MultiCorder (4K and Pro Editions)
- Instant Replay (4K and Pro Editions)
- Audio
- PTZ - Pan Tilt Zoom camera control
- Video Call / Remote Guests
- Delay
- Shortcuts and Macros
- Activators
- Scripting (4K and Pro Editions)
- Data Sources
- Languages
- Getting Started
- Output Window
- (Top-Right hand corner with the Green Title Bar)
- Preview Window
- (Top-Left hand corner with the Orange Title Bar)
- Tabs
- Input Bar
- (Bottom row)
- Footer Bar
- (Bottom)
- Presets
- New Preset
- Open Preset
- Missing Files
- Recent Presets
- Save/Save As Preset
- Last Preset
- Preset Bundles
- Video Controls
- Position Control
- Restart Button
- Play/Pause Button
- Fullscreen
- Preview
- MultiView
- Legacy
- Input X
- Multiple Outputs
- Transitions
- Quick Play
- Cut
- Fade/Transition Buttons
- Merge Effect
- Stinger Transitions
- such as vMix HD.
- Configuration
- Using the Stinger Transition
- FTB (Fade To Black)
- Production Clocks
- Overview
- Settings
- Clock Settings
- Event Settings
- With End Time
- Without End Time
- Create Input
- Categories
- Input Categories Settings
- View All Inputs
- Search
- Currently Selected Category
- Changing An Input's Category
- Fade Bar
- Pause Inputs
- Overlays
- Alpha Channel and Colour Keys
- Overlay Settings
- Number
- Type
- Picture In Picture
- Effect
- Effect Duration
- Duration
- Stinger Cut Point / Stinger Input
- Border
- Right Click Menus
- Video
- Pictures/PowerPoint
- DVD
- NDI / Desktop Capture
- Titles
- List
- Capture/Flash
- Web Browser
- Cog Icon Menu
- Create Virtual Input
- Create Snapshot
- SlideShow Settings
- Import/Export/Default
- Import
- Export
- Default
- Display
- Theme
- Preview/Output Colour
- Master Frame Rate
- Output Size
- Output Aspect Ratio
- Note: All monitors on the computer must be connected to the same Graphics Card. Multiple Graphics Cards are not supported.
- Position
- Input Size
- Outputs / NDI
- Fullscreen 1 and 2
- Output 1
- Output 2
- Output 3, 4
- Cameras / Calls / Audio Inputs
- Audio Outputs
- MultiView - Customise Layout
- Title Location
- Preview/Output Headings
- Options
- Start in Advanced mode
- Start Fullscreen display
- Start Maximised
- Start External Output
- Start SRT Output
- Remember Window Position
- Display confirmation for ...
- Automatically Play Active Input with Transition
- Automatically Restart Active Input with Transition
- Automatically Pause Preview Input after Transition
- Transition Display
- QuickPlay Transition
- QuickPlay Duration
- Activate QuickPlay by clicking Preview Window
- Controller Plug And Play Enabled
- Save Data Sources in Global Settings
- Performance
- Graphics Adapter
- Low Latency Capture
- High Input Performance Mode
- Show preview thumbnails when browsing NDI sources
- Disable Windows Update while vMix is running
- Display Method
- Decoders
- Preferred Deinterlacing
- FFMPEG
- DirectShow
- MPEG 2 Video
- Use vMix Deinterlacing
- MPEG Audio
- x264 Video
- Filters - Blocked Filter List
- Default Folder for Recordings
- Filename Format
- Recording Memory Buffer
- Automatically Setup Recording With Previous Settings
- External Output
- vMix Video / Streaming
- External Renderer
- External 2
- Frame Rate
- Device (External only)
- Port (External only)
- Audio Device (External only)
- Audio Channels (External only)
- Audio Delay
- Automatically mix audio
- Show Master Audio Meter in Main Window
- Show Audio Meter next to Inputs
- Fade To Black includes Audio
- Default Input Audio Delay
- Audio Gap Handling
- Master Output
- Headphones
- A, B, C, D, E, F, G
- Audio Channels
- Default Bus for New Inputs
- Web Controller
- Tally Lights
- Shortcuts
- Scripting
- Alerts
- Volume Alert
- Fade To Black Alert
- No Recording Alert
- Multiple Alerts
- About
- Change Registration Key
- Advanced Settings
- Output Format
- Video Renderer
- Preview Skip
- Application Priority
- Automatically convert 16-235 to 0-255 for YUV inputs
- Disable Effects on Input Windows
- Synchronise Output with Refresh Rate
- Enable FlipEx on Fullscreen / Previews
- Memory Lock
- Interlaced Recording
- Master Sample Rate
- Master Bit Rate
- Recording Audio
- Inputs
- Collapsing Inputs
- Moving and Dragging Inputs
- Adding and Removing rows
- Add Input
- Mark In/Out
- Controlling DVD playback
- List Control
- Edit Items
- Auto Next
- Auto First
- Loop
- Interlaced
- Add
- Edit/Remove
- Shuffle
- Checkboxes
- Up/Down Arrows
- List Duration
- Camera
- Input
- Resolution
- Video Format
- Audio Input
- Audio Device
- Audio Format
- NDI
- Local Desktop Capture
- NDI - Network Device Interface
- Adding NDI Inputs
- Adding Remote Desktops
- vMix Desktop Capture Features
- Changing NDI source through right click menu
- Additional Settings
- Audio Levels
- Adding Local Desktops
- Window Capture Method
- Desktop Capture
- Stream / SRT
- Stream Type
- VLC
- Buffer
- Low Latency Mode
- Video and Audio Formats
- Network Formats
- Firewall
- SRT
- Latency
- Decoder Delay
- Passphrase
- Key Length
- Stream ID
- Use Hardware Decoder
- MultiCorder Recordings
- Multi-Track Audio
- Instant Replay
- Instant Replay User Guide
- Image Sequence / Stinger
- Sound
- Video Delay
- Setup
- Control
- Saved Delay Clips
- Category
- Image
- Photos
- Selecting a Photo
- Selecting a Transition time
- PowerPoint
- Colour
- Title
- Editing Title Content (Text Editor)
- Font
- Editing Color Objects
- Live Mode
- Title Presets
- Countdown Timer
- Stop Time (or Start Time when in Reverse mode)
- Display Format
- Reverse
- Virtual Set
- URL
- Width, Height
- Mouse Control
- Keyboard Control
- Transparency
- Right Click Menu
- Media
- Video Call
- Mix
- Input Preview
- Output Only Mode
- Restrictions
- Limitations
- Input Buttons
- Close
- 1,2,3,4 (Overlay)
- Overlay Preview
- TIP: An Overlay that is being previewed will be sent to the Output automatically when the next transition or cut occurs
- Picture In Picture Zoom
- Preview (TV Icon)
- Settings (Cog Icon)
- Live Pause
- Input Settings
- General
- Change
- Colour Adjust
- Colour Key
- Advanced Chroma Key
- Luma Key
- Key/Fill Input
- Colour Correction
- Basic Auto Correct
- Reset Button
- Colour Wheel / Luminance Bar
- Colour Bars
- Hue / Saturation
- Colour Correction Tutorial
- Effects
- Add Effect
- Order Effects
- Crop Effects
- Disable Effects
- Rename Effect
- Effect Types
- Gaussian Blur
- LUT
- Exporting a LUT with DaVinci Resolve
- Alpha Mask
- Remove
- Show / Hide
- Move / Change Order
- Edit
- Copy/Paste
- Source Rotation Button
- Layer Borders
- Restrictions and Limitations
- Triggers
- Trigger
- Function
- Triggers and MultiView Overlays
- PTZ
- Advanced
- Filters
- Delay (Capture inputs only)
- Copy From
- Detach Button
- Outputs
- Audio Settings
- Solo
- Mute
- Audio Buses
- M
- Sending Audio Bus to Master
- Collapsing Mixers
- Headphones Volume
- Pre / Post
- Format
- Channel
- SeparateMono here.
- Gain
- Visible in Mixer
- Plugins
- EQ
- Compressor
- Noise Gate
- Channel Mixer
- Channel Matrix
- Example: Convert Mono Microphone on Channel 1 to Stereo
- Audio Plugins
- Installing audio plugins
- Adding an audio plugin to an Input or an Output Bus
- Temporarily turning on or off individual plugins
- Adjusting the plugin processing order
- Basic - Use the built in vMlx Audio Mixer
- Advanced - Using an External Audio Mixer
- vMix Audio Output connected to External Audio Mixer Input
- External Audio Mixer Main Mix / Output connected to vMix
- Audio Meters
- Peak Levels
- Output Audio Channels
- Enabling an Audio Bus/Mix
- Audio Mix Channel Options
- Selecting the Audio Mix
- Streaming
- Recommended Recording Settings
- Highest quality HD and SD
- Uploading to YouTube
- vMix AVI
- AVI
- Filename
- Codec
- File Format
- New File Every
- MP4
- Bit Rate
- Audio Bit Rate
- Windows 7 File Size
- MPEG-2
- WMV / WMV Streaming
- HTTP Port (Streaming only)
- Width/Height
- Bitrate
- FPS
- Quality
- Audio Compression
- Record
- Second Recorder
- Fault Tolerant Recordings
- vMix Video Codec
- File Size Estimates
- Editing recordings on other computers
- Converting vMix AVI files to ProRes MOV
- WAV File Record
- Streaming Quality
- Multi Bitrate Support
- Open the streaming window in vMix
- The streaming window will appear
- Enter in your streaming provider details
- Custom RTMP Server
- Select a quality setting
- Select an Application
- Start Streaming!
- Advanced settings
- 1,2,3 Buttons
- Profile
- Destination
- When using a built in streaming provider destination
- When using Custom RTMP Server
- Stream Key
- Application
- FMLE
- Use Hardware Encoder
- Start
- View Status
- Save and Close
- Video Bit Rates
- Encode Size
- Source
- Level
- Preset
- Aspect Ratio / Crop
- Keyframe Frequency
- Stream Delay
- Memory Requirements
- Threads
- Network Buffer
- Strict CBR
- NAL CBR
- Keyframe Aligned
- Auto Adjust
- Single Stream Key
- Multiple Stream Keys
- Using Multiple Destinations
- Note
- Independent Bit Rates
- Independent Stream Control
- Starting/Stopping All Streams
- Starting/Stopping Streams Independently
- Stream Errors
- LiveLAN
- Performance Considerations
- Network Considerations
- Security Considerations
- HLS
- Stream
- Backup Stream
- Save to file
- Setting up External Output
- Starting External Output
- Selecting a source for Output 2, 3 and 4
- Key and Fill Output
- External Output with AJA, Blackmagic or Bluefish444 cards
- Under the External Output tab check the External Renderer box
- Key and Fill output support
- Supported Devices
- Configuration for Duo 2 / Quad 2
- External Output Configuration
- Blackmagic ATEM Configuration
- Keyboard, MIDI and Controller Shortcuts
- Controller Options
- Keyboard
- Web Interface
- MIDI / X-Keys
- Contour Design ShuttlePROv2
- Elgato Stream Deck / Stream Deck Mini
- How to add a Shortcut
- Title, Description1, Description2
- Local Shortcut (This Preset Only)
- Show in Web Controller
- Templates
- How to load a shortcut template
- AudioLaunchControlXL
- Default Keyboard
- Replay ShuttlePROv2
- Local and Global Shortcuts
- Assigning Multiple Functions to a single Shortcut
- Advanced MIDI Shortcuts
- Channel, Note
- Value
- Dynamic Input and Value Shortcuts
- Dynamic Inputs
- Dynamic Values
- Examples
- Replay
- Activators - MIDI Lights and Faders
- Add/Edit Activator
- Event
- InputPreview
- InputPlaying
- FadeToBlack
- Local (this preset only)
- Activator Examples
- Toggle ON/OFF LED Button when Input 1 is in Output
- Turn a button on the AKAI APC40 MK2 controller blue when Input 1 is in Preview
- vMix Control Surface
- Setting Up
- Preview Bus (Bottom Row)
- Program Bus (Middle Row)
- Overlay Bus (Top Row)
- ALT Button
- Transition Buttons
- T-Bar Operation
- Password Protection
- Security
- Allow software on this computer access without login.
- Enable enhanced security on Web and TCP API
- Restrict access to LAN only
- Switcher
- Setting up a Tally Light
- Title Editor
- Live
- vMix Replay
- System Requirements
- Camera Requirements
- Camera Resolution / Frame Rate
- High Frame Rate Requirements
- vMix Requirements
- Workflow changes since version 23
- New Replay Session and Recording Format
- Independent Output Channels
- Event Transition Overlapping
- ShuttlePro v2 Controller Changes
- Event Cut/Copy/Paste
- Per-Event Speeds
- Session Folder
- Recording Format
- Delete All
- Automatically delete prior video when disk space is low
- Cameras
- Playback Audio Source
- Master Audio Channels
- In Transition
- Out Transition
- Event Transition
- Match Replay Speed
- Workflow Overview
- Basic Replay Example
- Advanced Replay
- Live and Recorded modes
- Live Mode (RED)
- Recorded Mode
- TIP: Be sure to enable Live Mode again when finished if you are in the middle of a recording
- Creating and Editing events
- ID
- In
- Out
- Speed
- 1,2,3,4,5,6,7,8
- User Interface Overview
- Main Interface
- Mini Interface
- Control Options
- MIDI and X-Keys Controllers
- Mouse
- Shortcut Reference
- PTZ - Pan Tilt Zoom
- Enabling PTZ Control
- Selecting the PTZ camera Device Type
- Virtual PTZ
- PTZ Cameras
- Entering in the PTZ camera network address
- Connecting to the PTZ camera
- Controlling a PTZ Camera
- PTZ control using Virtual Inputs
- PTZ control using the mouse
- PTZ control using shortcuts and joysticks
- Step 1 - Enable PTZ Control
- Step 2 - Move the camera into position
- Step 3 - Click Create Input at this Position
- Updating PTZ Virtual Inputs
- TIP: You can also right click the cog icon underneath the PTZ camera to update any of the PTZ Virtual Inputs without going into Input Settings
- Automation using shortcuts
- PTZ Control using an XBOX compatible controller
- PTZ Shortcuts and Speed Control
- Variable Speed Control / Pressure Sensitive Control
- NDI™ Network Device Interface
- Receiving NDI Sources
- Sending video and audio from vMix using NDI
- Output 2, 3, 4
- Changing additional settings such as audio channel on an Output
- Output Audio Levels
- Alpha Channel Support
- Alpha Channel Support for NDI Sources
- Alpha Channel Support for NDI Output
- SRT - Secure Reliable Transport
- Technical/System Requirements
- Setting up an input stream
- Setting up an output stream
- Enable SRT
- Video Codec
- Video Bitrate / Audio Bitrate
- Keyframe Frequency (seconds)
- CBR
- Split Stereo Pairs into Separate Tracks
- Use Low Power Encoder
- Alpha Channel
- Types of Data Sources
- Excel/CSV
- Google Sheets
- RSS
- Text
- XML
- JSON
- Setting up a new Data Source
- Mapping a Data Source to a Title
- Controlling Data Sources
- Using the Data Sources Manager
- Using Shortcuts
- Editing the Data Source directly
- The Excel file is open on another computer
- Using Images in Data Sources
- How to create a Google API Key for Google Sheets
- Google APIs
- New Project
- Google Sheets API
- Requirements
- Help Topics
- Setting up a Call
- Call Manager / Chat
- Call Manager Window
- Chat
- Statistics
- 1280x720 1958 kbps 30fps 250 ms
- 48000hz 6 kbps 293 ms
- Advanced Statistics
- Audio and Talkback
- Master
- Bus A, Bus B, Bus C, Bus D, Bus E, Bus F, Bus G
- Troubleshooting / FAQ
- Recommended Guest/Caller Requirements
- Guest is able to connect but no video and audio is received
- Guest dropped out, video/audio is no longer being received
- Guest is flashing orange/amber in the Call Manager
- Guest's video/audio is low quality
- Guest's video/audio is not smooth
- High Latency
- Audio echo from guest
- Right click menu settings
- Open Call Manager
- Disconnect
- Video Source / Audio Source
- Return Video Bandwidth (To Guest)
- Remote Guest Video Bandwidth
- Allow only direct peer to peer connections
- GT Title Designer
- Adding GT Titles to vMix
- Playing Animations
- Reloading Titles
- Changing Ticker Settings
- vMix Title Designer (Legacy)
- New, Open, Save, Save As
- Add Text
- Drop Shadow
- StrokeThickness / StrokeColor
- Name
- Add Image
- Background Image
- PlayList Window
- Creating a PlayList
- Editing PlayList item
- Opening/Saving a PlayList
- MultiCorder
- Note: Instant Replay and MultiCorder cannot be used at the same time.
- Folder
- Record NDI in original MOV format
- Change Recording Folder
- Smart Phone Tally Lights
- Tally-Lights.com
- metaSETZ
- Radio-Far
- Arduino Tally Lights
- Interlaced Support
- Fullscreen Display
- Progressive output from Interlaced source
- Source Dropped
- Renderer Dropped
- Resync
- Snapshot
- Output Snapshot
- Input Snapshot
- Padlock
- Scripting and Automation
- Local Scripts
- VB.NET Scripting
- Hello World Example
- VB.NET
- vMix Objects
- Shared Properties
- Instance Properties
- Instance Methods
- Console
- Shared Methods
- API
- Web Scripting
- Example
- Syntax
- Developer Information
- HTTP WEB API
- Parameters
- SelectedName
- SelectedIndex
- Return
- Information
- TCP API
- Preface
- Connection
- Formatting
- Responses
- Examples:
- Notes:
- Events
- Commands
- TALLY
- ACTS
- XMLTEXT
- SUBSCRIBE
- UNSUBSCRIBE
- QUIT
- Custom XAML
- Implementation Guidelines
- How to add a Custom WPF User Control to vMix
- Shortcut Function Reference
- Safe Areas
- Undo Button
- Waveform and Vectorscope Monitor
- Waveform RGB
- Waveform Y
- Parade RGB
- Vectorscope
- Vertical Video Production
- Vertical HD Preset
- Source Rotation
- GT Vertical Title Templates
Brand : JVC
Model : vMix KM-IP8
Category : Logiciel photo/vidéo