
ED-BIO5FMTSS2 - Oven Eurotech - Free user manual and instructions
Find the device manual for free ED-BIO5FMTSS2 Eurotech in PDF.


| Product Type | Built-in Electric Oven |
| Dimensions (WxHxD) | 595 x 595 x 550 mm |
| Weight | 35 kg |
| Power Supply | 230V ~ 50Hz, 16A |
| Energy Rating | A+ |
| Oven Capacity | 72 liters |
| Functions | Conventional, Fan-Forced, Grill, Defrost, Pizza, Eco |
| Temperature Range | 50°C – 250°C |
| Interior Light | Yes |
| Display | Digital LED |
| Timer | Yes, with automatic shut-off |
| Child Lock | Yes |
| Cool Touch Door | Yes, double-glazed |
| Cleaning Method | Easy-clean enamel interior |
| Spare Parts Availability | Door seal, heating elements, thermostat, knobs |
| Warranty | 2 years |
Frequently Asked Questions - ED-BIO5FMTSS2 Eurotech
User questions about ED-BIO5FMTSS2 Eurotech
0 question about this device. Answer the ones you know or ask your own.
Ask a new question about this device
Download the instructions for your Oven in PDF format for free! Find your manual ED-BIO5FMTSS2 - Eurotech and take your electronic device back in hand. On this page are published all the documents necessary for the use of your device. ED-BIO5FMTSS2 by Eurotech.
USER MANUAL ED-BIO5FMTSS2 Eurotech
EUROTECH 60CM BUILT-IN SINGLE OVEN
ED-BIO5FMTBK/SS
INSTRUCTION MANUAL

natural_image
Line drawing of an open oven with three doors and a front panel (no text or symbols)PLEASE READ THIS MANUAL CAREFULLY BEFORE USING YOUR PRODUCT AND KEEP IT FOR FUTURE REFERENCE.
DEAR CUSTOMER
Congratulations on your purchase. Our products are exceptionally easy to use and extremely efficient. After reading the instruction manual, operating the oven will be easy.
Before being packaged and leaving the manufacturer, the cooker was thoroughly checked with regard to safety and functionality.
These instructions have been compiled in order to help you learn how to handle the appliance. So please read them carefully before you use the appliance for the first time in order to avoid possible accidents.
Please keep the instruction manual and store it in a safe place so that it can be consulted at any time.
It is necessary to follow the instructions in the manual carefully in order to avoid possible accidents.
TABLE OF CONTENTS
Safety instructions....4
How to save energy....5
Disposal of the appliance....5
Unpacking....5
Description of the appliance....6
Installation....8
Operation....10
Prior first use....10
Mechanical timer 10
Electronic programmer.... 11
Oven....16
Cleaning and maintenance....17
Operation in case of emergency....20
Baking in the oven 21
Technical information....27
● The appliance becomes very hot during operation. Take care not to touch the heating elements inside the oven.
● WARNING: Accessible parts may become hot during use. To avoid burns young children should be kept away.
● Mains lead of adjacent appliances may be damaged by hobs or stuck between the oven doors, and produce short circuit, therefore keep them at safe distance from the appliance.
● Never put pans weighing over 15Kg on the opened door of the oven.
- Do not use the oven in the event of a technical fault, once a technical fault caused, disconnect the power and report the fault to the service centre to be repaired.
● Never clean the oven with the high-pressure steam cleaning device, as it may provoke short circuit.
- Do not use harsh abrasive cleaners or sharp metal scrapers to clean the door glass as they can scratch the surface, which could then result in the glass shattering.
● The rules and provisions contained in this instruction manual should be strictly observed. Do not allow anybody who is not familiar with the contents of this instruction manual to operate the oven.
- If the supply cord is damaged, it must be replaced by the manufacturer, its service agent or similarly qualified persons in order to avoid a hazard.
● The appliance is not intended for use by persons(including children) with reduced physical,sensory or mental capabilities,or lack of experience and knowledge,unless they have been given supervision or instruction concerning use of the appliance by a person responsible for their safety.
● Children should be supervised to ensure that they do not play with the appliance.
● WARNING: Ensure that the appliance is switched off before replacing the lamp to avoid the possibility of electric shock.
● WARNING: The appliance and its accessible parts become hot during use.
● Care should be taken to avoid touching heating elements.
● Children less than 8 years of age shall be kept away unless continuously supervised.
● This appliance can be used by children aged from 8 years and above and persons with reduced physical, sensory or mental capabilities or lack of experience and knowledge if they have been given supervision or instruction concerning use of the appliance in a safe way and understand the hazards involved. Children shall not play with the appliance. Cleaning and user maintenance shall not be made by children without supervision.
● WARNING: Accessible parts may become hot during use.
● Young children should be kept away
● During use the appliance becomes hot. Care should be taken to avoid touching heating elements inside the oven
HOW TO SAVE ENERGY

natural_image
Simple line drawing of a tree with cloud and water waves (no text or symbols)Using energy in a responsible way not only saves money but also helps the environment.
So let's save energy! And this is how you can do it:
● Make use of residual heat from the oven. If the cooking time is greater than 40 minutes, switch off the oven 10 minutes before the end time. Important when using the timer, set appropriately shorter cooking times according to the dish being prepared.
● Make sure the oven door is properly closed.
Heat can leak through spillages on the door seals. Clean up any spillages immediately.
- Do not install the oven in the direct vicinity of refrigerators/freezers. Otherwise energy consumption increases unnecessarily.
UNPACKING
During transportation, protective packaging was used to protect the appliance against any damage.
After unpacking, please dispose of all elements of packaging in a way that will not cause damage to the environment. All materials used for packaging the appliance are environmentally friendly; they are 100% recyclable and are marked with the appropriate symbol.
Caution!
During unpacking, the packaging materials (polythene bags, polystyrene pieces, etc.) should be kept out of reach of children.
DISPOSAL OF THE APPLIANCE

natural_image
Pure electrical circuit lines without any symbolsOld appliances should not simply be disposed of with normal household waste, but should be delivered to a collection and recycling centre for electric and electronic equipment.
A symbol shown on the product, the instruction manual or the packaging shows that it is suitable for recycling.
Materials used inside the appliance are recyclable and are labeled with information concerning this. By recycling materials or other parts from used devices you are making a significant contribution to the protection of our environment.
Information on appropriate disposal centers for used devices can be provided by your local authority.
DESCRIPTION OF THE APPLIANCE

1 Temperature control knob
2 Oven function selection knob
3 Oven temperature signal light red
4 Mechanical timer
5 Oven door handle
6 Electronic programmer

ED-BIO5FMT SS/BK
Installing the oven
● The kitchen should be dry and have effective ventilation according to the existing technical provisions.
● Main lead behind the oven must be placed in such manner to avoid touching the back panel of the oven because of the heat it develops during operation.
- Remove any packaging materials (foils, artificial foam, nails, etc.) from the reach of children, because they represent potential danger. Children may swallow small parts, or suffocate with foils.
This is a built-in oven, which means that its back wall and one side wall can be placed next to a high piece of furniture or a wall. Coating or veneer used on fitted furniture must be applied with a heat resistant adhesive (100°C), This prevents surface deformation or detachment of the coating. If you are unsure of your furniture's heat resistance, you should leave approximately 2cm of free space around the oven. The wall behind the oven should be resistant to high temperatures. During operation, its back side can warm up to around 50°C above the ambient temperature.
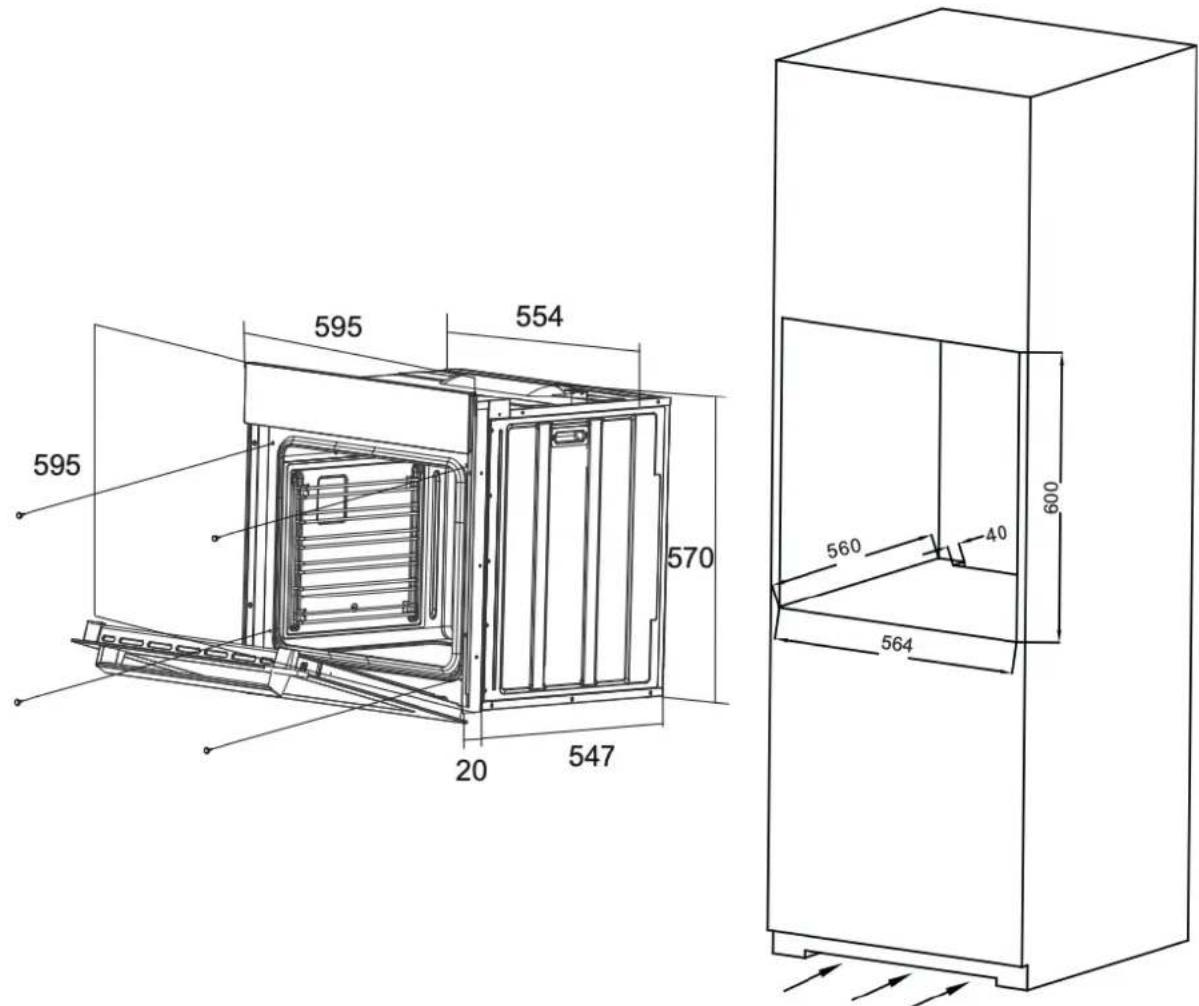
● Make an opening with the dimensions given in the diagram for the oven to be fitted.
● The appliance must be earthed.
- Insert the oven completely into the opening without allowing the four screws in the places shown in the diagram to fall out.


Electrical connection
Warning!
All electrical work must be carried out by a suitably qualified and authorized electrician. No alterations or willful changes in the electricity supply should be carried out.
● Before attempting the connection, check whether the voltage indicated on the rating plate corresponds to the actual mains voltage.
● Mains lead should be minimum1.5m long.
● Earthing wire should be installed in such manner to be the last one pulled out in case the safety relief device of the mains lead should fail.
● Mains lead behind the oven must be placed in such manner to avoid touching the back panel of the oven because of the heat it develops during operation.
● The cable of correct size rating must be used cable type HO5RR-F 3×1.5m m ^2 . the grounding wire shall be longer than the other wires.
● The means for disconnection from the supply mains having a contact separation in all poles that provide full disconnection under over voltage fixed wiring in accordance with the wiring rules.
Connection (by authorised electrician)
● Using the screwdriver open the connector cover at the rear of the appliance. Release two locks located at either side of the connector bottom.
● Mains lead must be led through the relief safety device, protecting the mains lead cable from disconnection.
● Tighten the relief device securely and close the connector cover.


Colour code
L = exterior live wires, usually coloured black, brown.
N=neutral
The colour is usually blue.
Beware of the correct N-connection!
1- = earthing wire, the colour is
green/yellow.
Prior first use
- Remove packaging, clean the interior of the oven.
Take out and wash the oven fittings with warm water and a little washing-up liquid. - Switch on the ventilation in the room or open a window.
- Heat the oven (to a temperature of 250°C, for approx. 30 min.), remove any stains and wash carefully.
Caution!
When heating the oven for the first time, it is normal phenomenon tog ive off smoke and peculiar smell. This will disappear about 30 min later.
Mechanical timer ED-BIO5FMT SS/BK
When use oven, user must set food cooking time.
- Turn mechanical timer in a clockwise way to the time position (between 10 and 120 minutes) you want.

- Turn function knob to the function position you want.

natural_image
Simple diagram with a central circle and surrounding symbols (no text or labels)- Turn temperature knob to the temperature position you want.

- After above operation, oven knob runs normally.
- When oven works till pre-set time, timer will have sound which means the cooking is finished.
If you don't want the oven work controlled by the mechanical timer, a anti-clockwiseway to the position

Caution: Don't turn mechanical timer in a clockwise way from 120 to “ ”
Electronic programmer ED-BIO8FDT SS/BK

A - Display field
B - Seconds Icon
C- Buttons
D - Timer
E - Current time
F - Cooking time
G - End of cooking time
M - Function
- To decrease the numbers on the digital display
+ - To increase the numbers on the digital display
Setting the time
- At power on, displayed "12.00", and Ⓤ flashes.

- The current time can be set with button 1 and 3, 5 seconds after the time has been set, the new data will be saved.
Timer
The timer can be activated at any time and any function. The timer can be set from 1 minute to 23 hours and 59 minutes.
To set the timer you should:
- Press button 2, flashing △ .Enter the timer setting.

- Set the timer using buttons 1 and 3.

- 5 seconds after the time is set, or directly press the button 2, the signal function is on. your setting is saved.

- When the set time is up the alarm signal will be activated and the signal function ⚠ starts flashing again.

- Press any button, the signal function and alarm signal will go off. Or the alarm signal will be turned off automatically after 2 minutes.
Caution!
Besides timer alarm, any other alarms can be turned off by pressing any button, If the alarm signal is not turned off manually, it will be turned off automatically after 2 minutes.
Semi-automatic operation
If the oven is to be switched off at a given time, or after defined period, you should:
- Set the oven function knob and the temperature regulator knob to the setting at which you want the oven to operate.
- Press the function button, the oven will begin to work and the function signal flashing.
- Press button 1 or 3 to adjust the cooking time, within a range from 1 minute to 10 hours.
- Or press button "MODE" twice. then the display will show flashing →|. Set the end time by buttons 1 and 3.
- The set time is introduced to the memory after 5 seconds.
- When the set time passed, the oven is switched off automatically, the alarm is activated.
- Press any button, the alarm signal and the || icon will go off, Or the alarm signal will be turned off automatically after 2 minutes.
Caution!
● The cooking time and end of cooking time range:
Cooking time range: 0<t≤10hours
End of cooking time range: current time<
end of cooking time ≤ current time + 10 hours
End of cooking time = current time + cooking time
- When using the semi-automatic operation, set either the cooking time or the end of cooking time.
- If you set the cooking time to 0 or set the end of cooking time to the current time, the auto function will be off.
● After the auto function be off, the cooking time to 0, end of cooking time and current time remains the same.
For example:
The current time is 2:00, want to oven work of 3 hours, end of cooking time is set to be 5:00 (2:00+3:00 = 5:00).

There are two methods to achieve this setting:
First method:
- Set the cooking time using buttons 1 and 3.

- End of cooking time automatically change to 5:00.
Second method:
- Set the end of cooking time using buttons 1 and 3.

- Cooking time automatically change to 3:00. 5 seconds after the setting, the auto function is on. 3 hours later, the current time shows "5.00" The alarm signal is activated.
Automatic operation
If the oven is to be switched on for a specified period of time and switched off at a fixed hour then you should set the cooking time and the end of cooking time:
-
Set the oven function knob and the temperature regulator knob to the setting at which you want the oven to operate.
-
Press button 2, the oven will begin to work and the function signal flashing.
-
Press button 1 or 3 to adjust the cook time, within a range from 1 minute to 10 hours.
-
And press button 2. then the display will show flashing → | . Set the cooking time using buttons 1 and 3 .
-
The set time is introduced to the memory after 5 seconds, the || and | always on.
-
When the set time passed, the oven is switched off automatically, the alarm is activated. and the || will go off.
-
Press any button, the alarm signal and the | icon will go off, Or the alarm signal will be turned off automatically after 2 minutes.
Caution!
● Work time = end of cooking time-cooking time
For example:
If the current time is 2:00; cooking time set to be 3 hours; end of cooking time set to be 10:00, the work time will be 7:00 (7:00=10:00-3:00).

- Set the cooking time to be "3.00" with buttons 1 and 3.

- Set the end of cooking time. time to be "10.00" with buttons 1 and 3.

- 5 seconds after setting, the auto function is on.
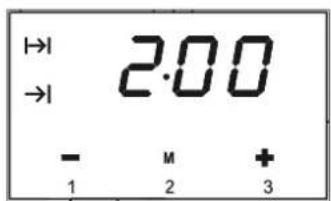
- When it up to 7:00, the oven will begin to work.
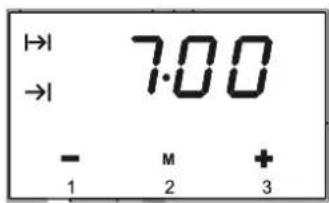
- When it up to 10:00, the alarm signal is activated. The oven is switched off automatically.

Caution!
● End of cooking time > current time + cooking time <= 10 hours
- At least more than one minute cooking time, cooking time and end of cooking time must be set.
- If the cooking time set to be 0 or the end of cooking time set to be the current time, the auto function will be off.
● After the auto function be off, the cooking time to 0, end of cooking time and current time remains the same.
OPERATION

Oven
Oven is controlled by the function knob and the temperature control knob.
Caution!
When selecting any heating function the oven will be switched on only after the temperature has been set by the temperature control knob.
Possible settings of the oven function knob

Bottom and top element on
Setting the knob to this position allows the oven to be heated conventionally.

Full Grill
(Grill and the top element)
When the “combined grill” is active it enables grilling with the grill and with the top element switched on at the same time. This function allows a higher temperature at the top of the cooking area, which causes more intense browning of the dish and permits larger portions to be grilled.

Fan and bottom heater on
At this oven function, the oven activates the bottom heater and fan function.
The mode is useful for baking low pastry and preparation of preserved fruit and vegetables.

Fan, grill element
When the knob is turned to this position, the oven activates the grill and fan function. In practice, this function allows the grilling process to be speeded up and an improvement in the taste of the dish, you should only use the gill with the oven door shut.

Grill heater on
Setting the knob to this position allows dishes to be grilled on the grate.
Warning!
When using function grill it is recommended that the oven door is closed.
When the grill is in use accessible parts can become hot.
It is best to keep children away from the oven.

Circular heater Fan
At this funtion, allows the oven to be heated up in a forced way with the thermofan, which is in the central part of the oven chamber.
Heating the oven up in this way permits everheat circulation around the dish that is in the oven. The advantage of this heating method is:
- reduction of oven heating-up time and of the initial heating stage.
- Possibility to bake at two cooking levels simultaneously.
- Reduction in the amount of fats and juices coming out of meat dishes, which results in an improvement in taste.

Separate oven lighting
By setting the knob to this position the lighting inside the oven is switched on

Fan (Defrost)
At this function, the fan only works. You can cool the dish or the oven chamber or defrost food.
CLEANING AND MAINTENANCE
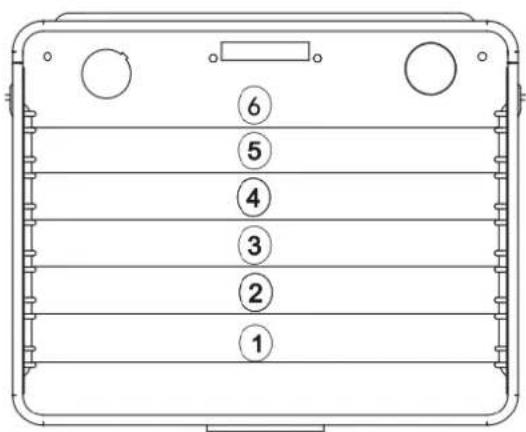
Baking pans and accessories (oven grid, baking tray, etc) may be inserted into the oven in 6 guiding levels.
Appropriate levels are indicated in the tables that follow.
Always count levels from the bottom upwards!
Catalytic liners (for ED-BIO8FDT SS/BK)
These models contain:
2 catalytic side liners(to be fitted by you)
Operation
The catalytic liners are coated with a specially formulated enamel coating, over a base of regular enamel. This enamel coating has a rough surface which is also porous. During normal cooking, fats and other food spatter
is partially absorbed into the surface and then oxidised away. This oxidisation of the fat works best if the oven is set at high temperatures. If you do a lot of lower temperaturebaking, say around the normal 180°C, then the cleaning process may not be complete. Every now and then you should turn the oven on to 260°C for around one hour to completely remove the soil.
Cleaning
Should the panels become heavily, they will need to be taken out of the oven and cleaned by hand. They should be soaked in warm, soapy water for at least 2 hour sand then rinsed with clean water, last wiped clean with a soft cloth.
NOTE: Solid cleaning powders, creamy cleaners, caustic oven cleaners, steel wool or other scourers will ruin the catalytic surface and must NEVER BE USED.
Removing the catalytic liner and the catalytic fan
- Detach the screws to remove catalytic liners.

natural_image
Technical line drawing of an open industrial oven with visible fan and vent (no text or symbols)Removing the catalytic liners

natural_image
Technical line drawing of an open industrial oven with fan and ventilation duct (no text or symbols)Remove and replace the catalytic fan baffle(where fitted)
CLEANING AND MAINTENANCE
By ensuring proper cleaning and maintenance of your oven you can have a significant influence on the continuing fault-free operation of your appliance.
Before you start cleaning, the oven must be switched off and you should ensure that all knobs are set to the "0" position. Do not start cleaning until the oven has completely cooled.

Oven
● The oven should be cleaned after each use.
● Cool the oven completely before cleaning.
● Never clean the appliance with pressurized hot steam cleaner.
- The oven chamber should only be washed with warm water and a small amount of washing-up liquid.
- Steam cleaning
-pour 250ml of water (1 cup) into a bowl placed in the oven on the first level from the bottom.
-Close the oven door.
-Set the temperature knob to 100°C, and the function knob to the bottom heater position.
- Heat the oven chamber for approximately 30 minutes.
-Open the oven door, wipe the chamber inside with a cloth or sponge and wash using warm water with washing-up liquid.
● After cleaning the oven chamber wipe it dry.

Changing the Oven Lamp
Before any maintenance is started involving electrical parts, the appliance must be disconnected from the power supply. If the oven has been in use, let the oven cavity and the heating elements cool down before attempting any maintenance.
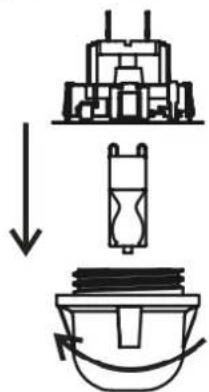
Changing the bulb
● Unscrew the protective cover. We recommend that you wash and dry the glass cover at this point.
- Carefully remove the old bulb and insert the new bulb suitable for high temperatures (300°C) having the following specifications: 220-240V, 50Hz, 25W, G9 fitting.
● Refit the protective cover.
IMPORTANT
Never use screwdrivers or other utensils to remove the light cover. This could damage the enamel of the oven or the lampholder. Remove only by hand.
IMPORTANT
Never replace the bulb with bare hands as contamination from your fingers can cause premature failure. Always use a clean cloth or gloves.
Please note:
The bulb replacement is not covered by your guarantee
CLEANING AND MAINTENANCE

Door removal
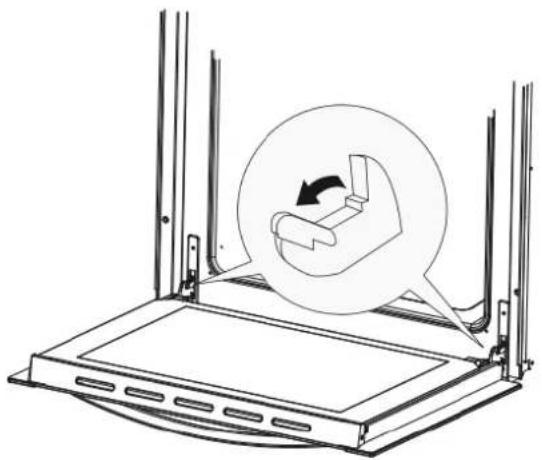
In order to obtain easier access to the oven cavity for cleaning, it is possible to remove the door.
To do this, tilt the safety catch part of the hinge upwards. Close the door lightly, lift and pull it out towards you. In order to fit the door back on to the cooker, do the reverse. When fitting, ensure that the notch of the hinge is correctly placed on the protrusion of the hinge holder. After the door is fitted to the oven, the safety catch should be carefully lowered down again. If the safety catch is not set it may cause damage to the hinge when closing the door.

Removal of the internal glass panel
Press the symbol“ ” and outward the plastic latch that is in the corner at the top of the door. Next take out the glass from the second blocking mechanism and remove. After cleaning, insert and block the glass panel, and insert in the blocking mechanism.

natural_image
Technical line drawing of a rectangular electronic device with mounting bracket and side arm (no text or symbols)Removal of the internal glass panel
natural_image
Diagram of a hand gripping a device with an arrow indicating rotation (no text or symbols present)Tilting the hinge safety catches

natural_image
Technical line drawing of a door frame with arrows indicating direction (no text or symbols)Door removal
OPERATION IN CASE OF EMERGENCY
In the event of an emergency, you should:
● Call the service center from the Hotline Label
- Some minor faults can be fixed by referring to the instructions given in the table below. Before calling the customer support centre or the service centre check the following points that are presented in the table.
| PROBLEM | REASON | ACTION |
| 1. The appliance does not work. | Break in power supply. | Check the household fuse box; if there is a blown fuse replace it with a new one |
| Choose wrong function. | Check if function knob ,temperature Knob are set to the correct position. | |
| 2. The programmer display is flashing"0.00". | The appliance was disconnected from the mains or there was a temporary power cut. | Set the current time (see Use of the programmer ) |
| 3. The oven lighting does not work. | The bulb is loose or damaged. | Tighten up or replace the blown bulb (see Cleaning and Maintenance') |

Baking Cakes and Loaves
Most appropriate position for baking is the application of both upper and lower heater, or the hot air.
Warning!
- The baking parameters given in Tables are approximate and can be corrected based on your own experience and cooking preferences;
- In case you may not find any particular type of cake in the tables, use the information available for the next most similar type of cake.
Baking with "upper and lower elements" and "fan and upper and lower elements"
- Use only a single guide level.
- This baking position is especially suitable for baking dry pastry, bread and teacakes. Use dark baking pans. Light pans reflect heat and pastry is not adequately browned.
● Always place baking pans on the grid rack. Remove the grid only if baking in the flat biscuit tray, supplied with the appliance. - Preheating shortens the baking time. Do not put the cake in the oven until proper temperature is obtained.
Baking tips
Is cake baked?
Pierce the cake with a wooden skewer at the thickest part, if the dough does not stick to it, the cake is baked. You may switch off the oven and use the remaining heat.
Cake has fallen
Check the recipe. Use less liquid next time. Follow the mixing times, especially when using electric kitchen mixers.
Cake is too light on the bottom
Use dark baking pan next time, or place the pan one level lower, or switch on the lower heater a while before the completion.
Cheese cake is undercooked
Next time reduce the baking temperature and extend the baking time.
Warnings regarding the baking tables
● The tables indicate the temperature range. Always select lower temperature first. You may always increase the temperature in case pastry needs more baking.
● Baking times are indicative only.
● The asterix indicates that the oven requires preheating.
Pastry Baking Table
| Type of pastry | Guide level (from down upwards) | Temp(°C)  | Guide level (from down upwards) | Temp(°C)  | Baking time (in min.) |
| Sweet pastry | |||||
| Raisin cake | 2 | 160-170 | 2 | 150-160 | 55-70 |
| Ring cake | 2 | 160-170 | 2 | 150-160 | 60-70 |
| Tree cake (tart form) | 2 | 160-170 | 2 | 150-160 | 45-60 |
| Cheese cake (tart form) | 2 | 180-190 | 3 | 160-170 | 60-80 |
| Fruit cake | 2 | 190-200 | 3 | 170-180 | 50-70 |
| Fruit cake with icing | 2 | 180-190 | 3 | 160-170 | 60-70 |
| Sponge cake | 2 | 180-190 | 2 | 160-170 | 30-40 |
| Flake cake | 3 | 190-200 | 3 | 170-180 | 25-35 |
| Fruit cake mix dough | 3 | 180-190 | 3 | 160-170 | 50-70 |
| Cherry cake | 3 | 190-210 | 3 | 170-200 | 30-50 |
| Jelly roll | 3 | 190-200 | 3 | 170-180 | 15-25 |
| Fruit fan | 3 | 160-170 | 3 | 150-160 | 25-35 |
| Plait bun | 2 | 190-210 | 3 | 180-210 | 35-50 |
| Christmas cake | 2 | 180-190 | 3 | 170-200 | 45-70 |
| Apple pie | 2 | 190-210 | 3 | 170-200 | 40-60 |
| Puff paste | 2 | 180-190 | 3 | 160-170 | 40-60 |
| Salted pastry | |||||
| Bacon roll | 2 | 190-200 | 3 | 170-180 | 45-60 |
| Pizza | 2 | 220-240 | 3 | 210-230 | 30-45 |
| Bread | 2 | 200-220 | 3 | 180-210 | 50-60 |
| Rolls | 2 | 210-230 | 3 | 200-220 | 30-40 |
| Cookies | |||||
| Caraway roll | 3 | 180-190 | 3 | 160-170 | 15-25 |
| Biscuits | 3 | 180-190 | 3 | 160-170 | 20-30 |
| Danish pastry | 3 | 190-210 | 3 | 170-200 | 20-35 |
| Flaky pastry | 3 | 200-210 | 3 | 180-200 | 20-30 |
| Cream puff | 3 | 190-210 | 3 | 170-200 | 25-45 |
| Deep frozen pastry | |||||
| Apple pie, cheese pie | 2 | 190-210 | 3 | 170-200 | 50-70 |
| Cheese cake | 2 | 190-200 | 3 | 170-180 | 65-85 |
| Pizza | 2 | 210-230 | 3 | 200-220 | 20-30 |
| Chips for oven | 2 | 210-230 | 3 | 200-220 | 20-35 |
| Potato fries for | 2 | 210-230 | 3 | 200-220 | 20-35 |

Roasting
Best results are obtained with the engagement of both upper and lower elements.
Tips regarding roasting pans
- For best results, use light enamel pans, temperature resistant glass pans, clay dishes or cast iron dishes.
- As stainless steel dishes reflect the heat, they are not recommended.
- If you cover your roast or wrap it in foil, it will preserve its juices and the oven will remain clean.
● The roast will be cooked quicker if it is left uncovered. Large roasts can be placed directly on the grid with the oven tray below for catching the juices and melted fat.
Attention when roasting!
Roasting tables indicate suggested temperatures, guide level and roasting times. Roasting time largely depends upon the type of meat, its size and quality. So you may expect some variations
- Roasting of large chunks of meat may produce excessive steaming and condensation on the oven door. This is quite normal, and does not affect the operation of the oven.
However, after the completion of roasting wipe the oven door and the glass thoroughly.
- Add as much liquid as necessary to prevent burning of juice, dripping from meat. Roast must be checked regularly and liquid added if necessary.
- At approximately the middle of the indicated time turn the roast round, especially if you use the deep roast dish.
- When roasting on the grill grid, place the grid in the deep roasting pan and insert both into the sliding guide. The bottom pan will intercept dripping fat.
● Never leave roast to cool in the oven, as it might produce condensation and corrosion of the oven.
Roasting table
| Type of meat | Weight (in grams) | Guide level (from bottom up) | Temp (℃)  | Roasting time (in min.) | temp (℃)  | Roasting time (in min.) |
| Beef | ||||||
| Beef loin | 1000 | 2 | 210-230 | 2 | 200-220 | 100-120 |
| Beef loin | 1500 | 2 | 210-230 | 2 | 200-220 | 120-150 |
| Roast beef, rare | 1000 | 2 | 230-240 | 2 | 220-230 | 30-40 |
| Roast beef, well done | 1000 | 2 | 230-240 | 2 | 220-230 | 40-50 |
| Pork | ||||||
| Pork roast with skin | 1500 | 2 | 190-200 | 2 | 170-180 | 140-160 |
| Flank | 1500 | 2 | 200-210 | 2 | 180-190 | 120-150 |
| Flank | 2000 | 2 | 190-210 | 2 | 170-200 | 150-180 |
| Pork loin | 1500 | 2 | 210-230 | 2 | 200-220 | 120-140 |
| Meat roll | 1500 | 2 | 210-230 | 2 | 200-220 | 120-140 |
| Pork cutlet | 1500 | 2 | 190-210 | 2 | 170-200 | 100-120 |
| Minced meat roast | 1500 | 2 | 220-230 | 2 | 210-220 | 60-70 |
| Veal | ||||||
| Veal roll | 1500 | 2 | 190-210 | 2 | 170-200 | 90-120 |
| Veal knuckle | 1700 | 2 | 190-210 | 2 | 170-200 | 120-130 |
| Lamp | ||||||
| Lamp prime ribs | 1500 | 2 | 200-210 | 2 | 180-200 | 100-120 |
| Mutton blade bone | 1500 | 2 | 200-210 | 2 | 180-200 | 120-130 |
| Venison | ||||||
| Hare ribs | 1500 | 2 | 200-220 | 2 | 180-210 | 100-120 |
| Hare blade bone | 1500 | 2 | 200-220 | 2 | 180-210 | 100-120 |
| Boar ham | 1500 | 2 | 200-220 | 2 | 180-210 | 100-120 |
| Poultry | ||||||
| Chicken entire | 1200 | 2 | 210-220 | 2 | 200-210 | 60-70 |
| Hen | 1500 | 2 | 210-220 | 2 | 200-210 | 70-90 |
| Duck | 1700 | 2 | 190-210 | 2 | 170-200 | 120-150 |
| Goose | 4000 | 2 | 170-180 | 2 | 150-160 | 180-200 |
| Turkey | 5000 | 2 | 160-170 | 2 | 140-150 | 180-240 |
| Fish | ||||||
| Fish, entire | 1000 | 2 | 210-220 | 2 | 200-210 | 50-60 |
| Fish soufflé | 1500 | 2 | 190-210 | 2 | 170-200 | 50-70 |

Grilling
● Take extra precautions when grilling. Intensive heat from infrared element makes the oven and the accessories extremely hot. Use protective gloves and barbecue accessories!
● Perforated food may produce spurting of hot grease(e. g.sausages). Use long grill tongs to prevent skin burns and protect your eyes.
● Supervise the grill at all time. Excessive heat may quickly burn your food and provoke fire!
- Do not let the children in the vicinity of the grill.
Grill heater is especially suitable for the preparation of low-fat sausages, meat and fish fillets and steaks, and for browning and crisping the roast skin.
Tips for grilling
- Grilling should be carried out with the oven door closed.
- Grilling tables indicate the recommended temperature, guide levels and grilling times, which may vary according to the weight and quality of meat
- Grill element should be pre-heated for 3 minutes.
- Oil the grill grid before placing food on it, to avoid food sticking to the grid.
- Place the meat on the grid, then place the grid on the grease interception pan. Insert both trays into the oven guides.
- Turn the meat round after half of the grilling time has expired. Thinner slices will require only one turn, for larger chunks you might need to repeat the procedure. Always use barbecue tongs to avoid losing excessive juice from meat.
● Dark beef meat is grilled quicker than lighter pork or veal. - Clean the grill, the oven and the accessories each time after use.
Grill table
| Type of meat for grill | Weight (in grams) | Guide level (from bottom up) | Temp (°C) | Grill time (in min.) |
| Meat and sausages | ||||
| 2 beefsteaks, rare | 400 | 5 | 240 | 14-16 |
| 2 beefsteaks, medium | 400 | 5 | 240 | 16-20 |
| 2 beefsteaks, well done | 400 | 5 | 240 | 20-23 |
| 2 pork scrag fillets | 350 | 5 | 240 | 19-23 |
| 2 pork chops | 400 | 5 | 240 | 20-23 |
| 2 veal staeks | 700 | 5 | 240 | 19-22 |
| 4 lamb cutlets | 700 | 5 | 240 | 15-18 |
| 4 grill sausages | 400 | 5 | 240 | 9-14 |
| 2 slices of meat cheese | 400 | 5 | 240 | 9-13 |
| 1 chicken, halved | 1400 | 3 | 240-250 | 28-33(1.side) 23-28(2.side.) |
| Fish | ||||
| Salmon fillets | 400 | 4 | 240 | 19-22 |
| Fish in aluminium foil | 500 | 4 | 230 | 10-13 |
| Toast | ||||
| 4 slices of white bread | 200 | 5 | 240 | 1,5-3 |
| 2 slices of whole meal | 200 | 5 | 240 | 2-3 |
| Toast sandwich | 600 | 5 | 240 | 4-7 |
| Meat/poultry | ||||
| Chicken | 1000 | 3 | 180-200 | 60-70 |
| Pork roast | 1500 | 3 | 160-180 | 90-120 |
| Pork scrag | 1500 | 3 | 160-180 | 100-180 |
| Pork knuckle | 1000 | 3 | 160-180 | 120-160 |
| Roast beef/ beef fillet | 1500 | 3 | 190-200 | 40-80 |
| Model | ED-BIO5FMT SS/BKED-BIO8FDT SS/BK |
| Voltage rating | 220-240V50Hz |
| Total power | 2000W |
| Top element | 850W |
| Grill element | 1100W |
| Bottom element | 1150W |
| Circular element | 1600W |
| fan | ● |


- EUROTECH 60CM BUILT-IN SINGLE OVEN
- INSTRUCTION MANUAL
- DEAR CUSTOMER
- TABLE OF CONTENTS
- HOW TO SAVE ENERGY
- UNPACKING
- Caution!
- DISPOSAL OF THE APPLIANCE
- DESCRIPTION OF THE APPLIANCE
- Installing the oven
- Electrical connection
- Warning!
- Connection (by authorised electrician)
- Prior first use
- Mechanical timer ED-BIO5FMT SS/BK
- Electronic programmer ED-BIO8FDT SS/BK
- Setting the time
- Timer
- Semi-automatic operation
- For example:
- Automatic operation
- OPERATION
- Oven
- Possible settings of the oven function knob
- Bottom and top element on
- Full Grill
- (Grill and the top element)
- Fan and bottom heater on
- Fan, grill element
- Grill heater on
- Circular heater Fan
- Separate oven lighting
- Fan (Defrost)
- CLEANING AND MAINTENANCE
- Catalytic liners (for ED-BIO8FDT SS/BK)
- Cleaning
- Removing the catalytic liner and the catalytic fan
- Changing the Oven Lamp
- Changing the bulb
- IMPORTANT
- Please note:
- Door removal
- Removal of the internal glass panel
- OPERATION IN CASE OF EMERGENCY
- Baking Cakes and Loaves
- Baking with "upper and lower elements" and "fan and upper and lower elements"
- Baking tips
- Is cake baked?
- Cake has fallen
- Cake is too light on the bottom
- Cheese cake is undercooked
- Warnings regarding the baking tables
- Roasting
- Tips regarding roasting pans
- Attention when roasting!
- Grilling
- Tips for grilling
Brand : Eurotech
Model : ED-BIO5FMTSS2
Category : Oven