
EAPC10RC1 - Air-conditioner Emerson - Free user manual and instructions
Find the device manual for free EAPC10RC1 Emerson in PDF.


| Product Type | Portable Air Conditioner |
| Model | EAPC10RC1 |
| Brand | Emerson |
| Power Supply | 115V, 60Hz, 15A (dedicated circuit) |
| Modes | Cool, Dry, Fan, Heat (for heat/cool models), Eco, Timer, Sleep |
| Fan Speeds | High, Medium, Low, Auto |
| Temperature Range | Adjustable (Cool: 60-90°F, Heat: 60-90°F) |
| Key Features | Remote control, digital display, programmable timer, sleep mode, auto louver sweep, filter reset indicator, integrated circuit breaker |
| Included Accessories | Exhaust hose, window kit (slider kit), window adapter, foam seals, remote control (with batteries), screws |
| Filter Cleaning | Clean every 2 weeks; wash with mild detergent and warm water; air dry completely before reinstalling |
| Drainage | Manual drain via bottom drain cap (for full tank) or continuous drain hose (Dry mode); tank capacity triggers P1 error when full |
| Safety | Grounded plug required; do not use extension cord; integrated circuit breaker; test/reset buttons on plug |
| Error Codes | AS (room temp sensor), ES (pipe temp sensor), P1 (full water tank) |
| Weight | Approximately 50 lbs (22.7 kg) |
| Dimensions (approx.) | 18 x 14 x 30 inches (45.7 x 35.6 x 76.2 cm) |
Frequently Asked Questions - EAPC10RC1 Emerson
User questions about EAPC10RC1 Emerson
0 question about this device. Answer the ones you know or ask your own.
Ask a new question about this device
Download the instructions for your Air-conditioner in PDF format for free! Find your manual EAPC10RC1 - Emerson and take your electronic device back in hand. On this page are published all the documents necessary for the use of your device. EAPC10RC1 by Emerson.
USER MANUAL EAPC10RC1 Emerson
natural_image
White portable air conditioner unit with 'EMERSON SWEET WORLD' branding on top (no other text or symbols visible)PORTABLE AIR CONDITIONER
| >100% |
| >100% |
| >100% |
| >100% |
| >100% |
| >100% |
| >100% |
| >100% |
| >100% |
| >100% |
| >100% |
| >100% |
| >100% |
THANK YOU!
Congratulations on your purchase and welcome to the EMERSON.
QUIET KOOL® Family. Your new
EMERSON QUIET KOOL® Air Conditioner combines high-efficiency operation with portable convenience.
By following the operating and care instructions in this manual, your air conditioner will provide you with many years of reliable service.
Basic Safety Precautions 01
Electrical Safety 03
Key Parts and Components---- 05
Control Panel 06
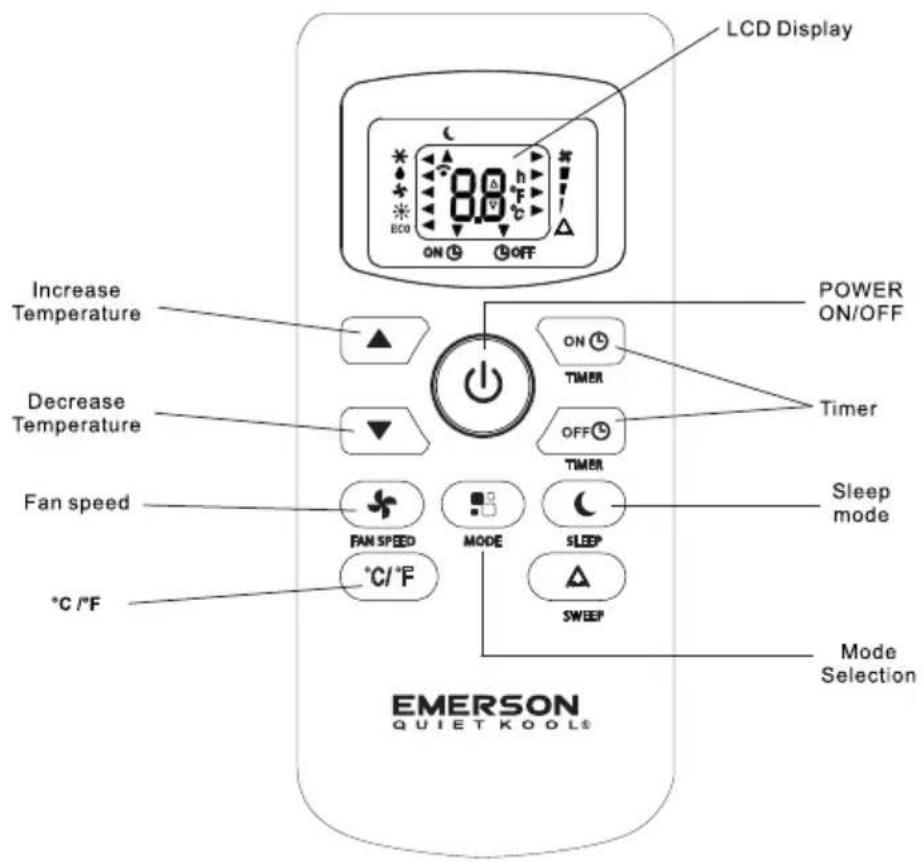
Remote Controller 09
Using the remote control 10
Preparing For Installation 13
Emptying the Water Collection Tank 15
Cleaning 16
Before Calling for Service 17
IMPORTANT SAFETY INSTRUCTIONS
PARTS AND FEATURES
HOW TO USE
INSTALLATION INSTRUCTIONS
CARE AND CLEANING
TROUBLESHOOTING
READ ALL INSTRUCTIONS BEFORE USE
Your safety and the safety of others is very important.
We have provided important safety messages in this manual and on your appliance. Always read and obey all safety messages.

This is the safety alert symbol.
This symbol alerts you to potential hazards that can hurt you and others.
All safety messages will follow the safety alert symbol and either the word "WARNING" or "CAUTION".
These words mean:

WARNING This symbol indicates the possibility of death or serious injury.

CAUTION This symbol indicates the possibility of injury or damage to property.
BASIC SAFETY PRECAUTIONS

WARNING
To reduce the risk of fire, electric shock, or injury
to persons when using this appliance, follow the basic precautions below:
- Do not attempt to repair or replace any part of your air conditioner unless it is specifically recommended in this manual. All other services should be referred to a qualified technician.
- If the power cord becomes worn or damaged, the cord should only be replaced by a qualified service technician using genuine replacement parts.
● The air conditioner should be plugged into its own grounded circuit (15A, 60Hz, 115VAC). - Do not plug other appliances into the same outlet; it can overload the circuit and cause a fire or electric shock.
- Do not remove the round grounding prong from the plug. It can result in the risk of electric shock.
● Young children should be supervised to ensure that they do not play with or climb on the air conditioner. - Be sure all packaging materials are removed from the air conditioner before use.
- Do not disassemble or modify the air conditioner or the power cord. It can result in the risk of electric shock or fire.
- Do not place the power cord or air conditioner near a heater, radiator, or other heat source. It can result in the risk of electric shock or fire.
- Do not use this or any appliance near flammable gases or liquids or other combustibles, such as gasoline, benzene, thinner, etc. It can result in the risk of electric shock or fire.
● Make sure the power cord is plugged firmly and completely into the outlet. It can result in the risk of electric shock or fire.
READ ALL INSTRUCTIONS BEFORE USE
- Do not start or stop operation by plugging in or unplugging the power cord. It can result in the risk of electric shock.
- If the air conditioner is making unusual sounds or is emitting smoke or an unusual odor, unplug it immediately.
- Do not use if the electrical socket is loose or damaged. It can result in the risk of electric shock or fire.
- Do not operate with wet hands or in a damp environment.
- Do not use this or any electrical appliance if you smell gas. It can result in the risk of fire or explosion.
● Turn off and unplug the air conditioner before cleaning to avoid the risk of electric shock. - Do not clean the unit with water. Water can enter the unit and damage the insulation, creating a shock hazard. If water enters the unit, unplug it immediately and contact Customer Service. It can result in the risk of electric shock.
- Utilize two or more people to lift and install the unit.
BASIC SAFETY PRECAUTIONS

CAUTION To reduce the risk of fire, electric shock, or injury
to persons when using this appliance, follow the basic precautions below:
- To avoid possible cuts, avoid contacting the metal parts of the air conditioner when removing or re-installing the filter. It can result in the risk of personal injury.
- Do not block the air inlet or outlet of the air conditioner. Reduced air flow will result in poor performance and could damage the unit.
● Always grasp the plug when plugging in or unplugging the air conditioner. Never unplug by pulling on the cord. It can result in the risk of electrical shock and damage.
● Always turn off and unplug the air conditioner when it will not be used for extended period of time. This conserves energy and reduces the chance of accidents. - Secure the wheels with wheel locks to prevent the air conditioner from rolling on smooth floors.
- Install the air conditioner on a sturdy, level floor capable of supporting up to 110 lbs (50 kg). Installation on a weak or unlevel floor can result in the risk of property damage and personal injury.
● Make sure the air conditioner is the correct size for the area you wish to cool. - Close all doors and windows to the room for most efficient operation.
- To prevent damage to the surface finish, use only a soft cloth to clean the air conditioner. Do not use wax, thinner, or a strong detergent.
IMPORTANT SAFETY INSTRUCTIONS
READ ALL INSTRUCTIONS BEFORE USE
- Do not position the air conditioner so that pets or house plants are exposed to the direct air flow.
● This air conditioner is designed for normal household use. - Do not drink the water from the drain pan. Dispose of it properly outdoors or down the drain.
- Do not operate air conditioner without the filter securely in place. Operation without the filter could damage the unit.
- Clean the filter every two weeks, or more often if needed.
ELECTRICAL SAFETY

WARNING
Electrical Shock Hazard
● Failure to follow these instructions can result in death, fire, or electrical shock.
- This unit must be properly grounded.
- Do not, under any circumstances, cut or remove the ground prong.
- If you do not have a properly grounded outlet, or if there is any doubt that the outlet is not properly grounded, a qualified electrician should check the outlet and circuit, and, if necessary, install a properly grounded outlet.
- This air conditioner must be plugged into a grounded 60 Hz, 115 VAC outlet protected by a 15 amp time delay fuse or circuit breaker.
- This air conditioner must be installed in accordance with national wiring codes.
- Do not use an extension cord.
READ ALL INSTRUCTIONS BEFORE USE
ELECTRICAL SAFETY
INTEGRATED CIRCUIT BREAKER
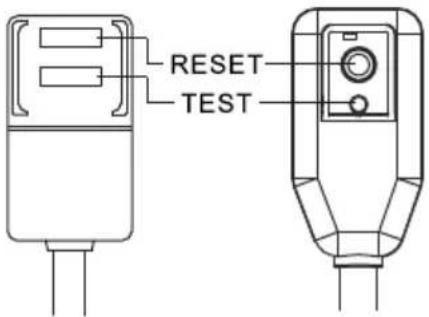
For additional safety, the power cord features an integrated circuit breaker. Test and reset buttons are provided on the plug case.
The circuit breaker should be tested periodically by pressing the TEST button. If it does not cause the circuit breaker to trip, or if the RESET button will not stay engaged, unplug the air conditioner immediately and contact your EMERSON QUIET KOOL service technician.
Note: Your unit's power cord and plug may differ from the one pictured above.
PREFERRED GROUNDING METHOD
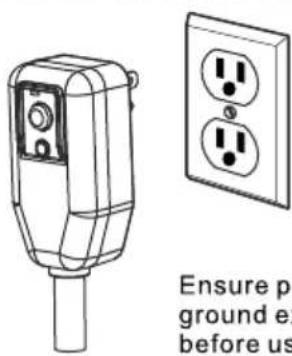
TEMPORARY GROUNDING METHOD
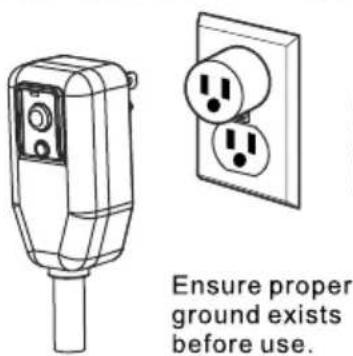
(Use of adapter plugs is not permitted in Canada)
Due to potential safety hazards, the use of an adapter plug is strongly discouraged.
To prevent damage to the adapter's ground terminal, hold the adapter in place while plugging in or unplugging the air conditioner.
Attaching the adapter ground terminal to the wall receptacle cover screw does not ground the appliance unless the cover screw is metal and not insulated, and the wall receptacle is grounded through the house wiring.
Frequent connection and disconnection can damage the ground terminal on the adapter. Never use a broken or damaged adapter.
SAVE THESE INSTRUCTIONS
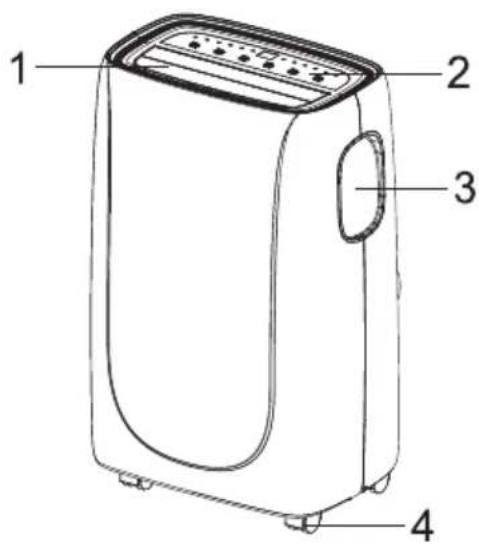
KEY PARTS AND COMPONENTS
- Air Outlet Grill
- Control Panel
- Carrying Handle
4.Casters/wheels
5.Power cord - Air Filter
7.Middle drainage - Air Exhaust
- Air Intake Grill
10.Condensation Drain hole
11.Exhaust Hose - Window Kit Adapter
13.Exhaust hose connector - Window Kit
15.Rubber plug
16.Remote Controller
17.Screws
18.Foam seal type 1 - Foam seal type 2
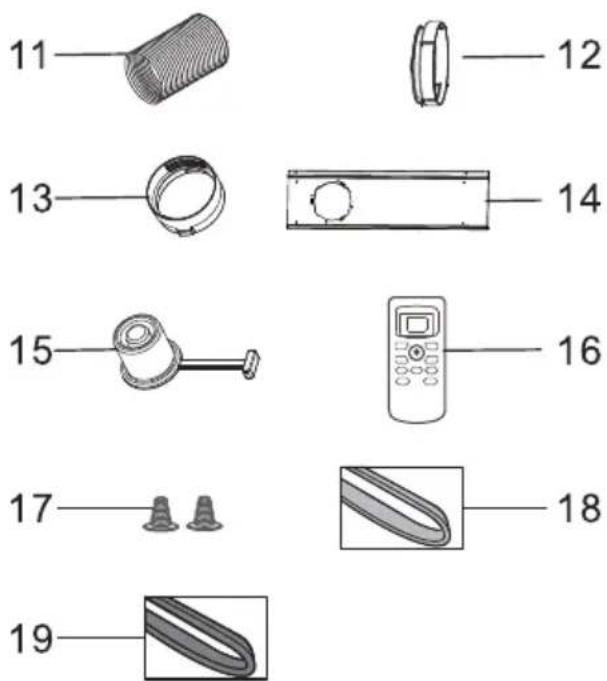
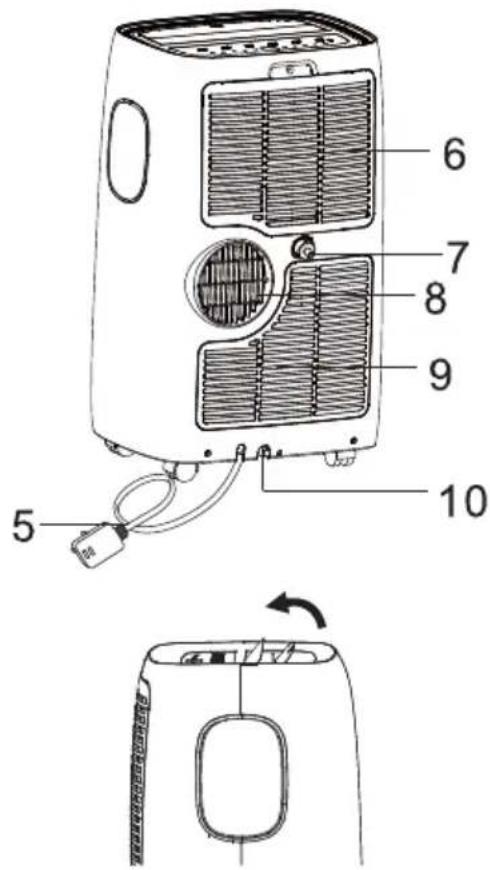
CONTROL PANEL
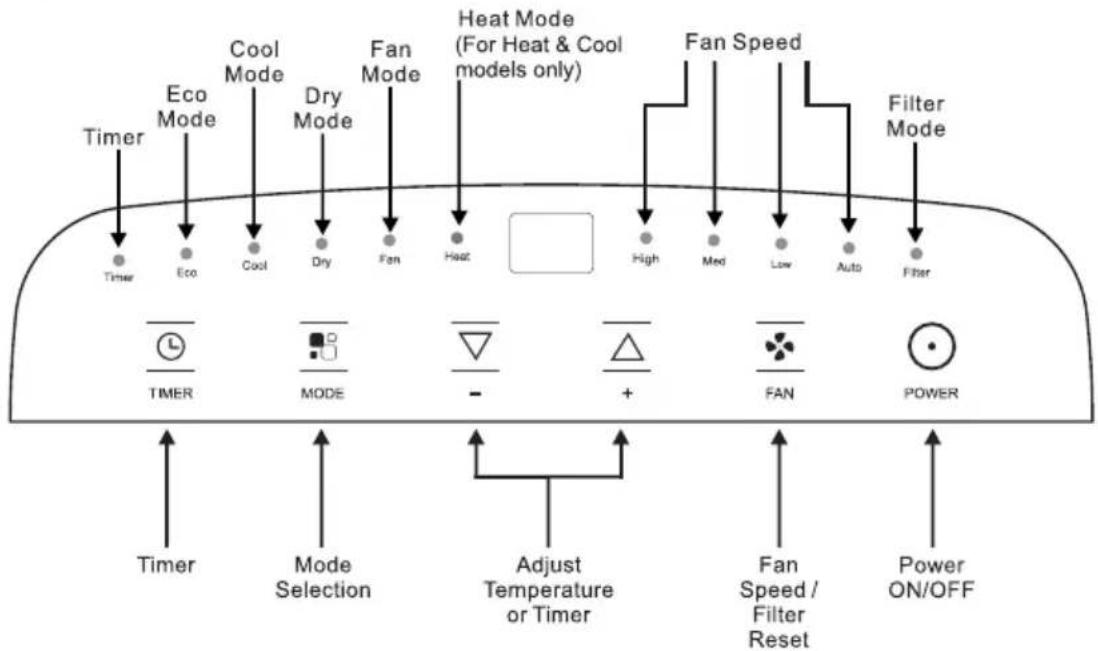
CONTROL PANEL
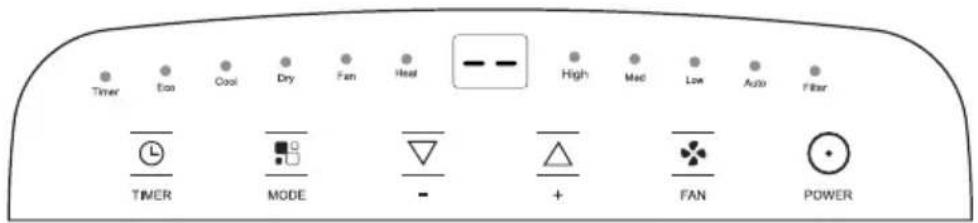
Power On and Off
Plug into the main socket. And the screen will display " — — ", like the picture below.
Press the POWER button once to manually turn the unit on.
Press the POWER button once more to turn the unit off.
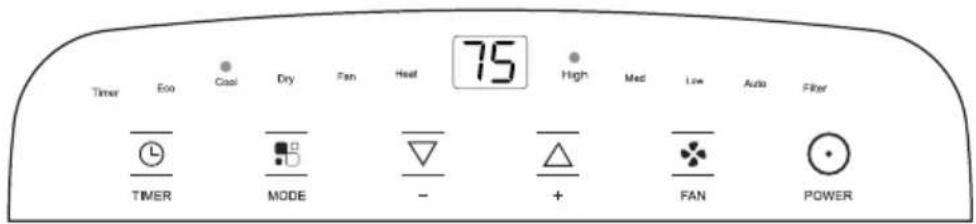
Cool Mode
Press the POWER button to manually turn the unit on.
Press the MODE button until the Cool mode indicator is lit.
Press the Fan Speed button to select from Hi, Med, Low, or Auto.
The indicator light will illuminate above the current speed.
Press the "▼" and "▲" button to set the temperature.
Dry Mode
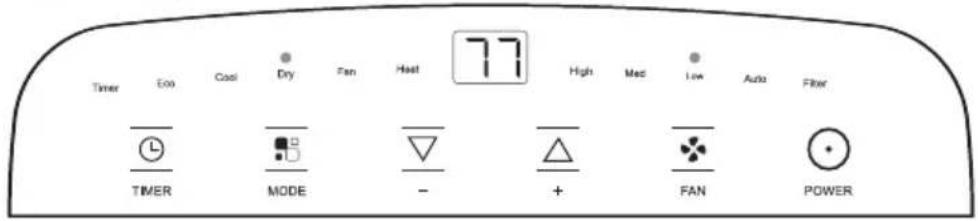
Press the "mode" button until the Dry mode indicator lit. The screen will display the room's current temperature and the fan will automatically turn on Low speed.
Note: In this mode, fan speed cannot be adjusted.
Fan Mode
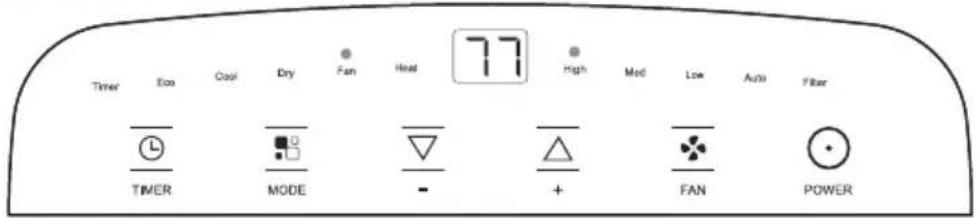
Press the "mode" button until the Fan mode indicator lit.
The screen will display the room's current temperature and you can choose your fan speed: Hi, Med, Low, or Auto.
Note: In this mode, the air exhaust hose does not need to be connected.
Heat mode(For Heat & Cool models only)
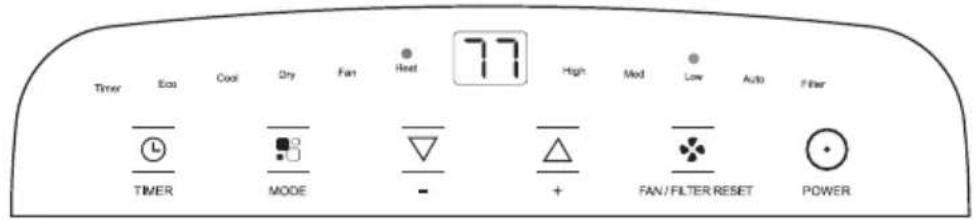
Press the "mode" button until the Heat mode indicator lights. Press the "▼" or "▲" button to choose the temperature you want. At the same time, the "low" fan indicator lights.
Note: In this mode, fan speed cannot be selected.
When this mode initiates, the fan may not operate for the first 2 minutes to avoid blowing out cool air.
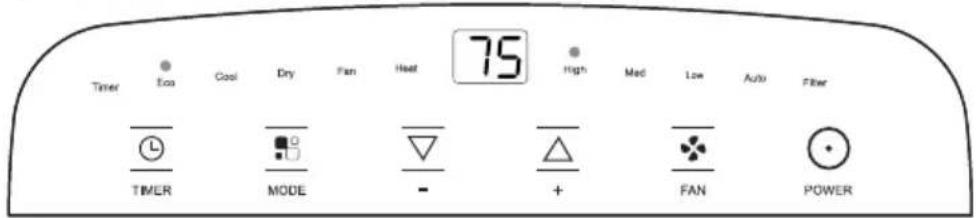
Eco Mode
Press the "mode" button until the ECO mode indicator lit.
Press the Fan Speed button to select from Hi, Med, Low, or Auto. The indicator light will illuminate above the current speed.
Press the "▼" or "▲" button to set the temperature.
In few seconds after you set the temperature, the screen will display the room temperature.
Note: The unit will run in energy saver(ECO) mode when used for the first time. In this mode, the fan will continue to run for 3 minute after the compressor shuts off. The fan then cycles on for 90 seconds at 10 minute intervals until the room temperature is above the set temperature, at which time the compressor turns back on.
Timer Mode
The timer function allows the user to delay the unit startup or shutdown.
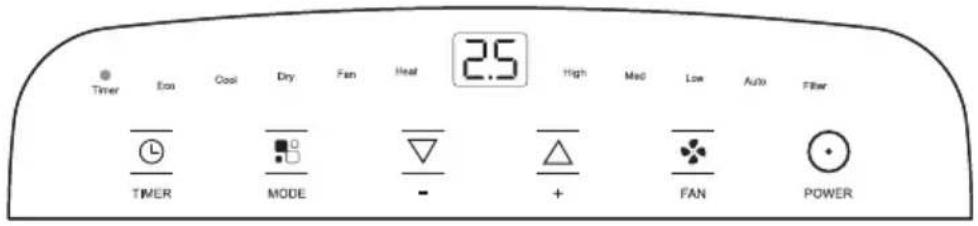
How to delay startup
Plug in the unit, so the unit turns to standby.
Press the "timer" button, the Timer indicator and number of hours on the screen will flash.
Tap or hold the UP arrow (▲) or DOWN arrow (▼) to change delay start timer at 0.5 hour increments up to 10 hours, then at 1 hour increments up to 24 hours.
After 5 seconds, the Timer indicator and the display will stop flashing. The control will count down the time remaining until startup.
The unit will start up in the mode it was set to prior to using the timer function.
To cancel the timer, press the timer button again. The Timer indicator light will turn off.
How to delay shutdown
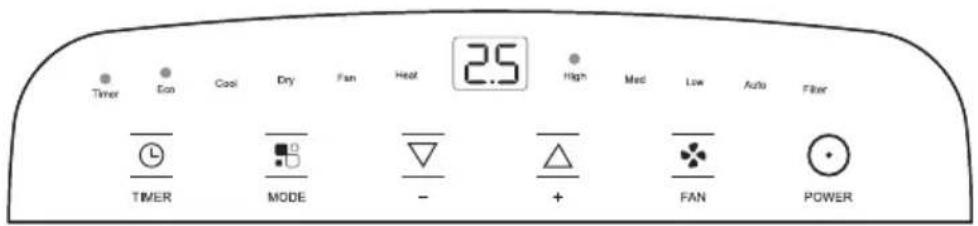
You can delay shutdown when the unit is on.
Press the "timer" button, the Timer indicator and number of hours on the screen will flash.
Tap or hold the UP arrow (▲) or DOWN arrow (▼) to change delay stop timer at 0.5 hour increments up to 10 hours, then at 1 hour increments up to 24 hours.
After 5 seconds, the Timer indicator and the display will stop flashing, and the display shows the time remaining until the unit shuts down.
To cancel the timer, press the timer button again. The Timer indicator light will turn off.
Filter reset
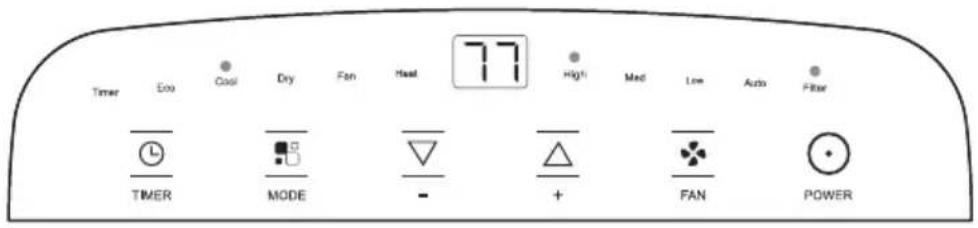
This feature is a reminder to clean the Air Filter (See Care and Cleaning) for more efficient operation. The filter indicator will illuminate after 250 hours of operation. To reset after cleaning the filter, hold the "Fan Speed" button for 5 seconds, then the "filter" indicator will go off.
REMOTE CONTROL
INSERTING OR REPLACING THE BATTERIES
Remove the cover on the back of the remote control;
Insert two new "AAA" 1.5V batteries (see instructions inside the remote section and add battery compartment).
Replace the cover.
Point the remote control at the control panel on the unit. The remote control must be no more than 16 ft (5 meters) away from the unit (without obstacles between the remote control and the unit).
The remote control must be handled with extreme care. Do not drop it or expose it to direct sunlight or sources of heat.
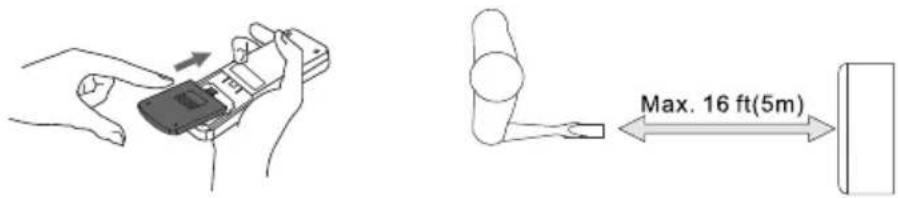
If the remote control unit is replaced or discarded, the batteries must be removed and disposed of in accordance with current legislation as they are harmful to the environment. Do not mix old and new batteries. Do not mix alkaline, standard (carbon-zinc) or rechargeable (nickel-cadmium) batteries. Do not dispose of batteries in fire. Batteries may explode or leak. If the remote control is not being used for a certain length of time, remove the batteries.
USING THE REMOTE CONTROL
TURNING THE UNIT ON
Plug unit into the outlet. Press the POWER button (when turned on, the unit starts operating in the same mode as when it was turned off).
To switch the unit off, press POWER button again.
Do NOT switch the unit off by removing the plug
Always switch it off by pushing on the POWER button and waiting few minutes before
removing the plug. Always switch it off by pushing the POWER button and waiting a few minutes before removing the plug, allowing the unit to perform its standard checks.
Cool Mode
Press the MODE button " 🔊 " until the "◀" displays on the left side of the LCD display next to the "*" icon.
Press the Fan Speed button " ✕ " to choose the fan speed to choose the Fan Speed. The "▶" will indicate the selected speed: Hi, Med, Low, or Auto.
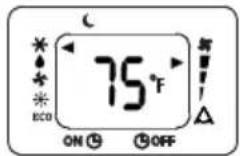
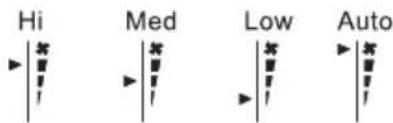
Press the "▼" and "▲" button to set the temperature.
Dry Mode
Press the MODE button "■" until the arrow "◀" is next to the icon "♠".
In Dry Mode the fan will automatically turn on Low speed.
Note: In this mode, fan speed cannot be adjusted.
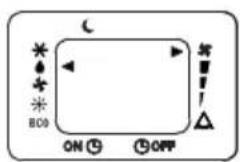
Fan Mode
Press the MODE button " ■ " until the arrow "◀" is next to the icon " ✦ "
In this mode, you can selected fan speed "hi", "med", "low", or "auto" by press the Fan speed button.
In this mode the air exhaust hose does not need to be connected.
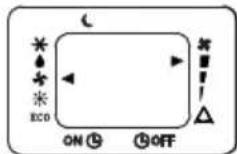
Heat mode(For Heat & Cool models only)
Press the "mode" button until the left side of LCD screen displays " *".
Press the "▲" and "▼" button to choose the temperature you want.
At the same time, the "low" fan indicator lights.
Note: In this mode, fan speed cannot be selected.
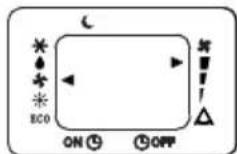
Eco Mode
Press the MODE button " □ "until the arrow " ◀ " light up next " ECO "
In this mode, you can selected fan speed "Hi", "Med", "Low" or "Auto" by press the Fan speed button.
Press the “▼” and “▲” button to choose the temperature you want.
Note: The unit will run in energy saver(ECO) mode when used for the first time. In this mode, the fan will continue to run for 3 minute after the compressor shuts off. The fan then cycles on for 90 seconds at 10 minute intervals until the room temperature is above the set temperature, at which time the compressor turns back on.
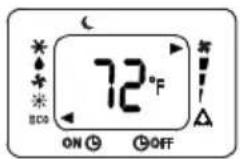
Sleep Mode
When the unit is in Cool, Heat or ECO mode, you can press the "sleep" button to activate Sleep Mode. In this mode, the fan speed will be set to Low automatically and cannot be adjusted.
In Cool or ECO Mode the selected temperature will increase by 1 °F 60 minutes after the mode is selected. The temperature will then increase by another 1 °F after an additional 60 minutes. This new temperature will be maintained for 6 hours before it returns to the original temperature. This ends the "Sleep" mode and the unit will continue to operate as originally programmed. In Heat mode, the air conditioner will automatically decrease 1 °F per hour in a 3 hour period. The set temperature will be steady for the next 5 hours, then this mode will be terminated.
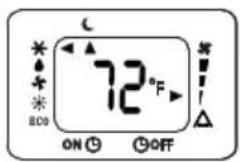
The "Sleep" Mode program can be cancelled at any time by pressing the "Sleep", "mode" or "fan speed" button.
Note: In Fan or Dry Mode, Sleep Mode cannot be set.
Louver Sweep Function
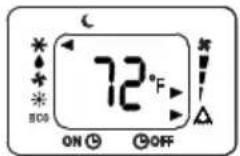
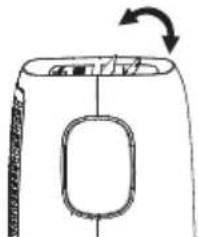
Press the "sweep" button to enable louver sweep function, and the arrow "▶" light up next "△". The louver on the top panel will sweep up and down.
Press this button again to disable the louver sweep function.
natural_image
Simple line drawing of a mechanical component with an arrow indicating rotation (no text or symbols)°C/°F function
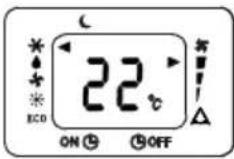
Press the "°C/°F" button to switch between Fahrenheit and Celsius.
Timer Mode
How to program the delayed start up
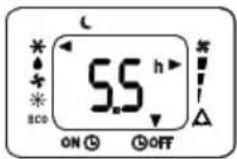
Plug the unit into the outlet and turn the unit to standby. Press the Timer button "ON", the arrow "▼" will flash above "ON". Choose the Mode, Fan Speed, and Temperature. Confirm the settings by pressing the timer button "ON". The time is displayed and the "h" symbol will flashes.
Set the time you want the unit to switch off using the buttons "▲" or "▼" (from 30 minutes to 24 hours). For up to ten hours, the time can be set in half hour intervals. After ten hours, the time can be set in hour intervals. Press the Timer button "ON⑨" again to confirm the start-up time. A beep sounds a countdown of the time left on remote control display. At the end of the set time the unit will start up automatically, with the with the previous settings. To cancel the timer, press the timer button "ON⑨" again. The unit emits a beep and the display will reset to stand-by.
How to program the delayed shutdown
The delayed shutdown function can be used in any more.
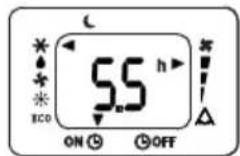
Press the Timer button "Goff", the arrow "▼" will show above "Goff" indicator and "h" will flash. Press "▲" or "▼" to set the delay before the unit turns off.
Press Timer button "OFF" again to confirm the shutdown time. A beep sounds a countdown of the time left on remote control display. At the end of the set time the unit will shutdown automatically. To cancel the timer, press the Timer button again. The timer indicator switches off.
Fault Code
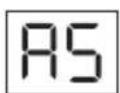
If the screen on the unit displays "AS", the room temperature sensor has failed. Contact your Authorize EMERSON QUIET KOOL Service Center.
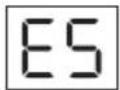
If the screen on the unit displays "ES", the pipe temperature sensor has failed. Contact your Authorize EMERSON QUIET KOOL Service Center.
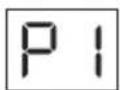
If the screen on the unit displays "P1", the water collection tank inside the unit is full. Refer to the "Drainage Instructions" on Page 15 for more instructions to drain the successive condensate. If error repeats, contact your Authorize EMERSON QUIET KOOL Service Center.
PREPARING FOR INSTALLATION
EXHAUSTING HOT AIR
Follow the simple steps below to set up your air conditioner.
natural_image
Diagram of a cylindrical mechanical component with two circular ends and rotational arrows indicating motion (no text or symbols)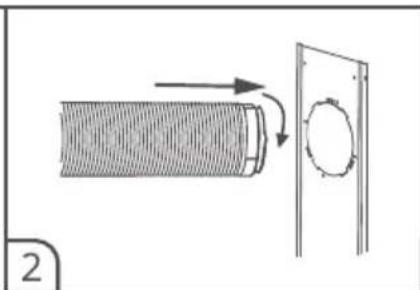
natural_image
Diagram showing a pipe being inserted into a door with a circular component, no text or symbols present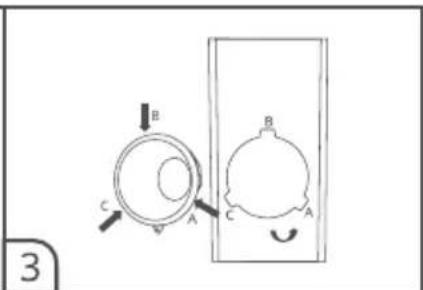
natural_image
Diagram of a car air vent with airflow arrows indicating flow direction (no text or symbols)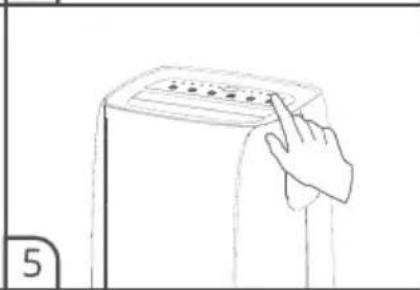
natural_image
Line drawing of a hand pressing down on a device with control buttons (no text or symbols)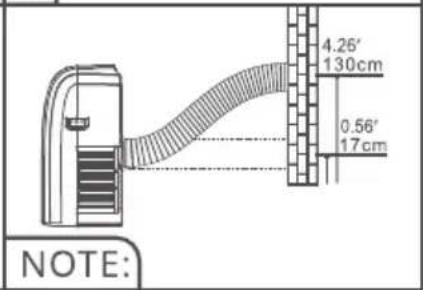
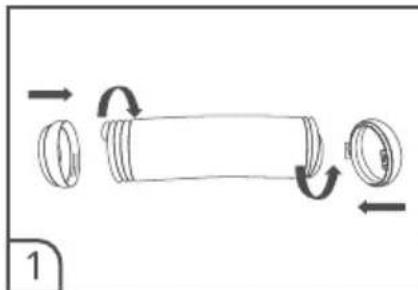
STEP 1: Extend both sides of hose, connect hose outlet & hose inlet collar.
STEP 2: Insert the other end of the group to the window outlet.
STEP 3: Install the hose outlet in the window slider and screw counterclockwise.
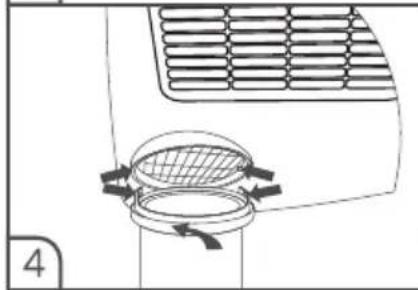
STEP 4: Attach hose to back of the unit and screw counterclockwise.
STEP 5: Turn on the air conditioner and adjust the temperature to your comfort level.
NOTE : The maximum vertical height from the window adapter to the back of air conditioner is 4.26', and the appearance of autual product may vary.
Installation in a double-hung sash window
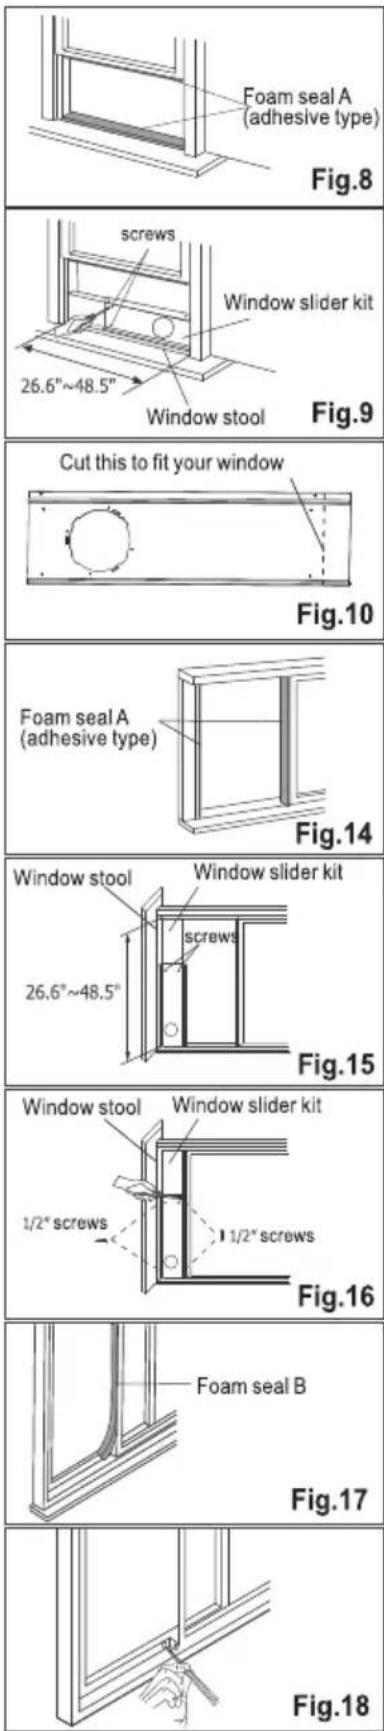
- Cut the foam seals A (adhesive type) to the proper lengths and attach them to the window and stool. (Fig.8)
- Open the window sash and place the window slider kit on the window stool (Fig.9). Attach the window slider kit to the window stool and adjust the length of the window slider kit to the width of the window.
Screw down the two screws on the window slider kit. See Fig.9.
Cut the adjustable window slider kit if the width of window is less than 26.6 inches (Fig.10).
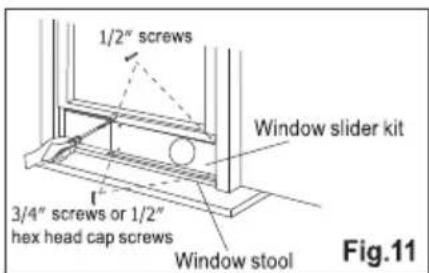
- Close the window sash securely against the window slider kit. (Fig.11)
- Drive two 1/2" screws to secure the window slider kit to the window sash. (Fig.11)
- Secure the window slider kit to the window stool (Fig.11):
A: For wooden window: Use 3/4" screws for securing.
B: For Vinyl-Clad windows: Use 1/2" hex head cap screws for securing.
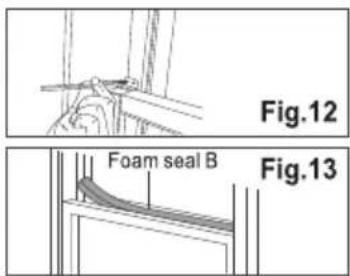
- To secure lower sash in place, attach right angle sash lock with 1/2" (12.7mm) screw as shown(Fig.12).
NOTE: It is difficult to lock the windows with the sash lock for Vinyl-Clad windows, so you can use lock by window itself. - Cut the foam seal B to an appropriate length and seal the open gap between the top window sash and outer window sash, as shown in Fig.13.
Installation in a sliding sash window
- Cut the foam seals A(adhesive type) to the proper lengths and attach them to the window frame. See Fig.14.
- Open the window sash and place the window slider kit on the window stool (Fig.15). Attach the window slider kit to the window stool and adjust the length of the window slider kit to the height of the window. Screw down the two screws on the window slider kit. See Fig.15. Cut the adjustable window slider kit if the height of window is less than 26.6 inches (Fig.10).
- Close the window sash securely against the window slider kit. (Fig.16)
- Drive two 1/2" screws to secure the window slider kit to the window sash. (Fig.16)
- Drive two 3/4" screws to secure the window slider kit to the window stool. (Fig.16)
- Cut the foam seal B to an appropriate length and seal the open gap between the sliding sash and outer window sash, as shown in Fig.17.
- To secure sliding sash in place, attach right angle sash lock with 1/2" (12.7mm) screw as shown (Fig.18).
Continuous Drainage
During the DRY Mode, you will need a garden hose (sold separately) to drain the condensate from the unit. Follow the steps below:
• Unscrew the drain cap of continuous drain outlet (Fig.20).
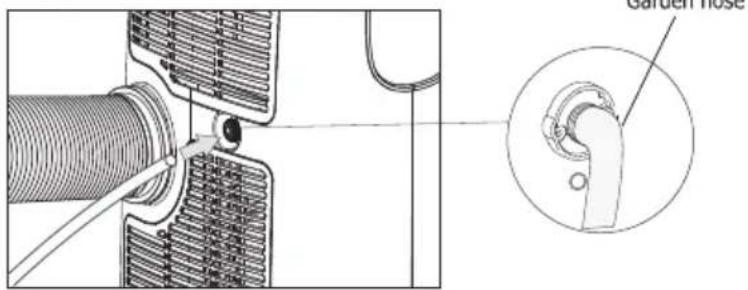
- Connect one end of the garden hose (sold separately) to the drain outlet then lead the other end into a drain that is lower than the unit (Fig.21).
Figure 20
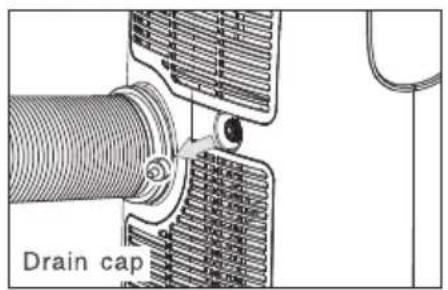
Figure 21
NOTE
- Condensate may flow out after removing the drain cap, if the unit is running in Cool or ECO Mode. Prior to removing the garden hose, prepare a drip try (sold separately) to collect the condensate from the drain outlet.
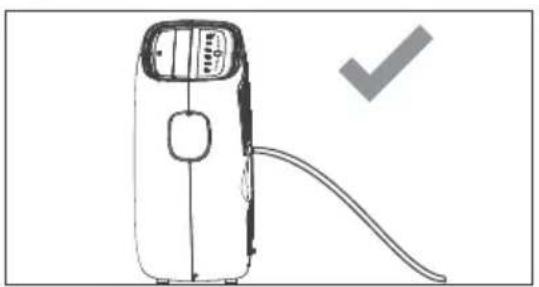
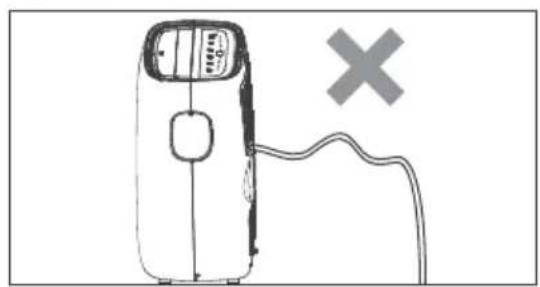
- In order for the continuous drainage to function properly, please be sure the drain hose is on a downward angle and the drainage location is lower than the drain outlet. (Fig. 22, 23)
- During Cool or ECO Mode, it is recommended to disable continuous drainage by replacing the drain cap to the drain outlet, to reach the maximum performance.
Figure 22
natural_image
Line drawing of a portable air purifier with a cable, no text or symbols presentFigure 23
natural_image
Simple line drawing of a portable device with a cable and a cross symbol (no text or labels)Emptying the condensate residue inside the unit during winter storage.
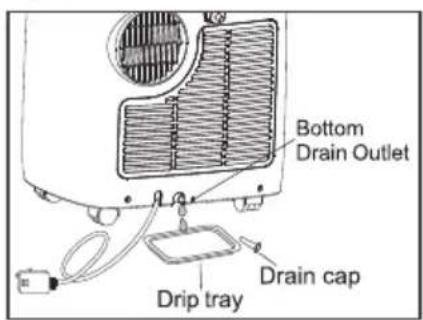
Place a drip tray (not supplied) under the continuous drain outlet, then unscrew the drain cap to allow the condensate to flow into the drip tray. Replace the drain cap to the continuous drain outlet when no condensate flows out.
Place the drip tray under the bottom drain outlet, then remove the rubber stopper from the drain outlet, to allow the condensate to flow into the drip tray. Depending on the size of your drip tray, it may need to be emptied multiple times during this process. (Fig. 19) Replace the drain cap to the bottom drain outlet when no condensate flows out.
Note: To ensure all condensate residue has been removed, tilt the unit by lifting it slightly upwards from the front until no more condensate comes out from the drain outlet.
Figure 19
Clean your air conditioner occasionally to keep it looking like new. Be sure to unplug the unit before cleaning to prevent shock or fire hazards.
CLEANING THE UNIT
The cabinet and front may be dusted with an oil-free cloth or washed with a cloth dampened in a solution of warm water and mild liquid dishwashing detergent.
Never use harsh cleaners, wax or polish on the cabinet front. Be sure to wring excess water from the cloth before wiping around the controls. Excess water in or around the controls may cause damage to the air conditioner.
CLEANING THE FILTERS
To keep your air conditioner working efficiently, you should clean the filter every week of operation.
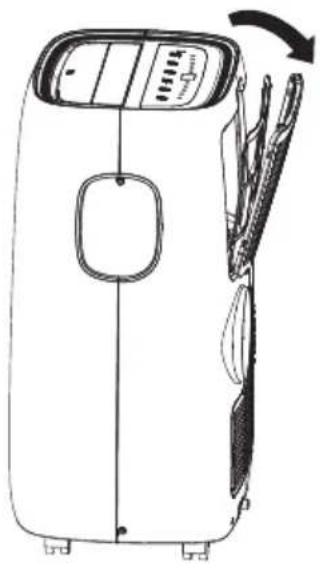
Grasp the upper panel tab to remove the back grill panel, the filter is located behind the grill (see illustration).
Wash the filter using liquid dishwashing detergent and warm water.
Rinse filter thoroughly and gently shake excess water from the filter.
Be sure filter is completely dry before replacing. The filter can also be cleaned by vacuuming the dust and debris.
natural_image
Line drawing of a car interior showing front and rear views with no text or symbolsWinter Storage
If the air conditioner will not be used for an extended period of time:
- Drain the water collection tank completely and follow the instructions for emptying the condensate residue inside the unit during winter storage.
- Remove and clean the filter, allow it to dry completely, then reinstall it.
- Remove the batteries from the remote control.
- Store the air conditioner in a cool, dry location, away from direct sunlight, extreme temperature, and excessive dust.
Before using the air conditioner again:
- Make sure the filter and drain cap are in place.
- Check the cord to make sure it is in good condition, without cracks or damage.
- Place new batteries in the remote control.
- Install the air conditioner using the installation instructions.
BEFORE CALLING FOR SERVICE
Before you call for service, review this list. It may save you time and money.
| Problem | Possible Causes | Solutions |
| Air conditioner will not start | The air conditioner plug is not completely inserted into the electrical outlet.The fuse is blown or the circuit breaker has tripped.Power failure."PI" appears in the display.Room temperature is less than the set temperature. | Make sure electrical plug is plugged completely into a live, properly grounded outlet.Replace the fuse or reset the circuit breaker. Make sure that there are no other appliances on the same circuit.If a power failure occurs, turn the power OFF. When power is restored, wait 3 minutes before restarting the air conditioner.The water collection tank is full. Drain the tank and reset your settings.See the Care and Cleaning section.This is normal. The air conditioner automatically shuts off when the room equals or is less than (Cool mode) or is more than (Heat mode)the set temperature. Adjust the temperature setting, if needed. |
| Air conditioner does not cool properly | Airflow is restricted.The air filter is dirty.The room is very hot, or not enough time allowed for cooling.Cold air is escaping.Cooling coils have iced up. | Make sure there is sufficient clearance around the air conditioner and that the air inlet and outlet are not blocked.Clean the air filter at least every two weeks. See the Care and Cleaning section.When first turned on, allow the air conditioner sufficient time to cool the room.Check for open furnace,floor registers,cold air returns, open windows or doors.In especially cool, humid weather and when the air conditioner is running frequently or for extended periods, ice can form on the cooling coils, blocking air flow. It is normal, please adjust the temperature higher and High fan speed. |
| Air conditioner runs too often or too long | Area to be cooled is too large for the air conditioner.Doors or windows are open. | Consult your dealer for the air conditioner capacity necessary to cool the desired area.Make sure doors and windows are closed. |
For any questions or Technical Support, Please Call Customer Service: 1-844-801-8880
| >100% |
| >100% |
| >100% |
| >100% |
| >100% |
| >100% |
| >100% |
| >100% |
| >100% |
| >100% |
| >100% |
| >100% |
| >100% |
| >100% |
| >100% |
| >100% |
| >100% |
| >100% |
| >100% |
| >100% |
| >100% |
| >100% |
| >100% |
| >100% |
| >100% |
| >100% |
EMERSON QUIETKOOL®
- THANK YOU!
- IMPORTANT SAFETY INSTRUCTIONS
- PARTS AND FEATURES
- HOW TO USE
- INSTALLATION INSTRUCTIONS
- CARE AND CLEANING
- TROUBLESHOOTING
- READ ALL INSTRUCTIONS BEFORE USE
- Your safety and the safety of others is very important.
- BASIC SAFETY PRECAUTIONS
- WARNING
- CAUTION To reduce the risk of fire, electric shock, or injury
- ELECTRICAL SAFETY
- Electrical Shock Hazard
- SAVE THESE INSTRUCTIONS
- KEY PARTS AND COMPONENTS
- CONTROL PANEL
- Power On and Off
- Cool Mode
- Dry Mode
- Fan Mode
- Heat mode(For Heat & Cool models only)
- Eco Mode
- Timer Mode
- How to delay startup
- How to delay shutdown
- Filter reset
- INSERTING OR REPLACING THE BATTERIES
- USING THE REMOTE CONTROL
- TURNING THE UNIT ON
- Sleep Mode
- Louver Sweep Function
- °C/°F function
- How to program the delayed start up
- How to program the delayed shutdown
- Fault Code
- PREPARING FOR INSTALLATION
- EXHAUSTING HOT AIR
- Installation in a double-hung sash window
- Installation in a sliding sash window
- Continuous Drainage
- NOTE
- Emptying the condensate residue inside the unit during winter storage.
- CLEANING THE UNIT
- CLEANING THE FILTERS
- Winter Storage
- BEFORE CALLING FOR SERVICE
- EMERSON QUIETKOOL®
Brand : Emerson
Model : EAPC10RC1
Category : Air-conditioner