Quiet Kool EAPC8RSC1 - Air-conditioner Emerson - Free user manual and instructions
Find the device manual for free Quiet Kool EAPC8RSC1 Emerson in PDF.


| Product Type | Window Air Conditioner |
| Model | Quiet Kool EAPC8RSC1 |
| Brand | Emerson |
| Cooling Capacity (BTU) | 8,000 |
| Cooling Area (sq ft) | Up to 350 |
| Dimensions (W x H x D) | 18 x 12 x 13 inches |
| Weight | 50 lbs |
| Power Supply | 115V ~ 60Hz, 7.5A |
| Plug Type | NEMA 5-15P |
| Refrigerant | R32 |
| Modes | Cool, Fan, Dehumidify |
| Fan Speeds | 3 (Low, Medium, High) |
| Thermostat | Electronic, with remote |
| Timer | 24-hour on/off |
| Sleep Mode | Yes |
| Remote Control | Yes, included |
| Air Filter | Washable mesh |
| Filter Access | Front grille, no tools |
| Noise Level (dB) | 52 (approx) |
| Energy Star Rated | Yes |
| Installation Type | Window, double/single hung |
| Window Kit Included | Yes |
| Certifications | ETL, DOE, ENERGY STAR |
Frequently Asked Questions - Quiet Kool EAPC8RSC1 Emerson
User questions about Quiet Kool EAPC8RSC1 Emerson
0 question about this device. Answer the ones you know or ask your own.
Ask a new question about this device
Download the instructions for your Air-conditioner in PDF format for free! Find your manual Quiet Kool EAPC8RSC1 - Emerson and take your electronic device back in hand. On this page are published all the documents necessary for the use of your device. Quiet Kool EAPC8RSC1 by Emerson.
USER MANUAL Quiet Kool EAPC8RSC1 Emerson
5,000 BTU
6,000 BTU
8,000 BTU
10,000 BTU
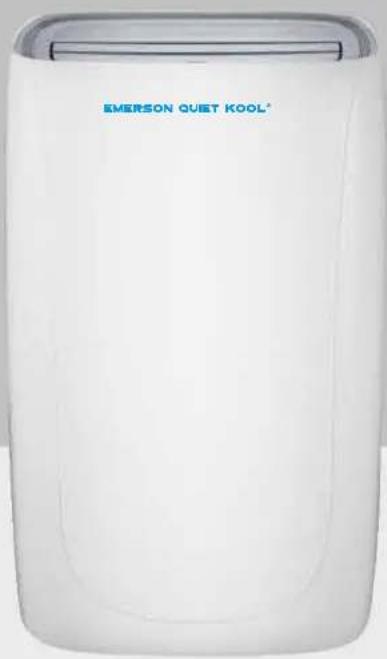
Thank you very much for purchasing our air conditioner. Please read this owner's manual carefully before using your air conditioner.

THANK YOU!
Congratulations on your purchase and welcome to the EMERSON QUIET KOOL® Family. Your new EMERSON QUIET KOOL® Air Conditioner combines high-efficiency operation with portable convenience. By following the operating and care instructions in this manual, your air conditioner will provide you with many years of reliable service.
CONTENTS
IMPORTANT SAFEGUARDS 01
IMPORTANT - GROUNDING METHOD 03
ELECTRICAL CONNECTIONS 04
DESCRIPTION 05
INSTALLATION INSTRUCTIONS 06
DESCRIPTION OF THE DISPLAY SCREEN 08
MANUAL OF REMOTE CONTROL 15
WATER DRAINAGE METHOD 21
CLEANING 23
TECHNICAL SPECIFICATIONS 24
TROUBLESHOOTING 24
IMPORTANT SAFEGUARDS
● This appliance can be used by children aged from 8 years and above and persons with reduced physical, sensory or mental capabilities or lack of experience and knowledge if they have been given supervision or instruction concerning use of the appliance in a safe way and understand the hazards involved.
● Children shall not play with the appliance.
● Cleaning and user maintenance shall not be made by children without supervision.
- Disconnect the appliance from its power source during service and when replacing parts.
● Warning: before obtaining access to terminals, all supply circuits must be disconnected.
- If the supply cord is damaged, it must be replaced by the manufacturer, its service agent or a similarly qualified person in order to avoid a hazard.
● Disconnect the power supply before cleaning and maintenance.
● The appliance shall not be installed in the laundry.
- Please note: Check the nameplate for the type of refrigerant gas used in your appliance.
● Specific information regarding appliances with refrigerant gas.
R410A, R134a, R290 is a refrigerant that complies with European ecological standards; nevertheless, it is recommended not to pierce the cooling circuit of the machine. At the end of its useful life, deliver the appliance to a special waste collection centre for disposal.
● This hermetically sealed system contains fluorinated greenhouse gases.
● ENVIRONMENTAL INFORMATION: This unit contains fluorinated greenhouse gases covered by the Kyoto Protocol.
● The maintenance and disposal operations must be carried out by qualified personnel only. (For more details on the refrigerant, see back cover). GWP(Global Warming Potential): R410A: 2088, R134a: 1430, R290: 3.
- Do not use this unit for functions other than those described in this instruction manual.
- If the power cord becomes worn or damaged, the cord should only be replaced by a qualified service technician using genuine replacement parts.
● Make sure the plug is plugged firmly and completely into the outlet. It can result in the risk of electric shock or fire.
- Do not plug other appliances into the same outlet, it can result in the risk of electric shock.
- Do not disassemble or modify the appliance or the power cord, it can result in the risk of electric shock or fire. All other services should be referred to a qualified technician.
- Do not place the power cord or appliance near a heater, radiator, or other heat source. It can result in the risk of electric shock or fire.
IMPORTANT SAFEGUARDS
● This unit is equipped with a cord that has a earthed wire connected to an earthed pin or grounding tab. The plug must be plugged into a socket that is properly installed and earthed. Do not under any circumstances cut or remove the earthed pin or grounding tab from this plug.
● The unit should be used or store in such a way that it is protected from moisture e.g. condensation, splashed water, etc. Unplug unit immediately if this occurs.
● Always transport your appliance in a vertical position and place on a stable, level surface during use. If the unit is transported laying on its side it should be stood up and left unplugged for 6 hours.
● Always use the switch on the control panel to turn the unit or remote control off, and do not start or stop operation by plugging in or unplugging the power cord. It can result in the risk of electric shock.
- Do not press the buttons on the control panel with anything other than your wet or damp fingers.
- Do not use hazardous chemicals to clean or come into contact with the unit. To prevent damage to the surface finish, use only a soft cloth to clean the appliance. Do not use wax, thinner, or a strong detergent. Do not use the unit in the presence of inflammable substance or vapour such as alcohol, insecticides, gasoline, etc.
● Young children should be supervised to ensure that they do not play with, operate or climb on the appliance.
- If the appliance is making unusual sounds or is emitting smoke or an unusual odor, unplug it immediately.
- Do not clean the unit with water. Water can enter the unit and damage the insulation, creating a shock hazard. If water enters the unit, unplug it immediately and contact Customer Service.
● Utilize two or more people to lift and install the unit.
- Be sure all accessories are removed from the packing before use.
● To avoid possible cuts, avoid contacting the metal parts of the appliance when removing or re-installing the filter. It can result in the risk of personal injury.
- Do not block the air inlet or outlet of the appliance. Reduced air flow will result in poor performance and could damage the unit.
● Always grasp the plug when plugging in or unplugging the appliance. Never unplug by pulling on the cord. It can result in the risk of electrical shock and damage.
● Install the appliance on a sturdy, level floor capable of supporting up to 110lbs(50kg). Installation on a weak or unlevel floor can result in the risk of property damage and personal injury.
- Close all doors and windows to the room for most efficient operation.
IMPORTANT - GROUNDING METHOD
This product is factory equipped with a power supply cord that has a three-pronged grounded plug. It must be plugged into a mating grounding type receptacle in accordance with the National Electrical Code and applicable local codes and ordinances. If the circuit does not have a grounding type receptacle, it is the responsibility and obligation of the customer to exchange the existing receptacle in accordance with the National Electrical Code and applicable local codes and ordinances. The third ground prong should not, under any circumstances, be cut or removed. Never use the cord, the plug or the appliance when they show any sign of damage. Do not use your appliance with an extension cord unless it has been checked and tested by a qualified electrical supplier. Improper connection of the grounding plug can result in risk of fire, electric shock and/or injury to persons associated with the appliance. Check with a qualified service representative if in doubt that the appliance is properly grounded.
ELECTRICAL CONNECTIONS
Before plugging the appliance into the mains socket, check that:
● The mains power supply corresponds to the value indicated on the rating plate on the back of the appliance.
● The power socket and electrical circuit are adequate for the appliance.
● The mains socket matches the plug. If this is not the case, have the plug replaced.
● The mains socket is adequately earthed. Failure to follow these important safety instructions absolves the manufacturer of all liability.
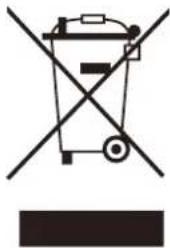
Important information for correct disposal of the product in accordance with EC Directive 2012/19/EU.
natural_image
Symbol of a trash bin crossed with a diagonal line, representing no waste or discharge (no text or labels)At the end of its working life, the product must not be disposed of as urban waste. It must be taken to a special local authority differentiated waste collection centre or to a dealer providing this service. Disposing of a household appliance separately avoids possible negative consequences for the environment and health deriving from inappropriate disposal and enables the constituent materials to be recovered to obtain significant savings in energy and resources. As a reminder of the need to dispose of household appliances separately, the product is marked with a crossed-out wheeled dustbin.
DESCRIPTION
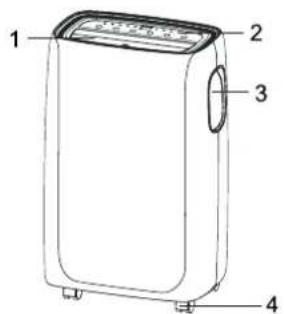
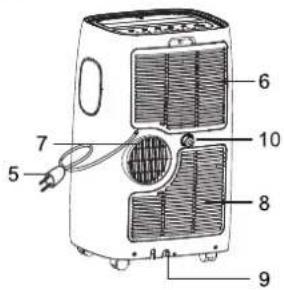
- Deflector
- Control panel
- Handle (both sides)
- Castors
- Power cable
- Intake grille
- Air outlet grille
- Intake grille
- Condenser drain
10.Continuous drain outlet
Appearance of A:
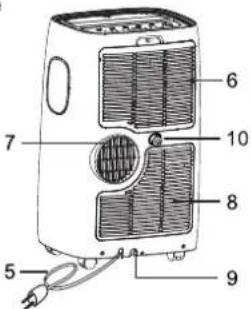
Appearance of B:
ACCESSORIES
| PARTS | PARTS NAME | QUANTITY | ||
 |  | Exhaust hose Hose outlet Hose inlet | 1 set (for appearance of A) | |
 | | Exhaust hose Hose outlet Hose inlet | 1 set (for appearance of B) | |
| Window slider kit | 1 set | |||
| Remote Control Battery | 1 set | |||
Note: All the illustrations in this manual are for explanatory purposes only. Your appliance may be slightly different.
INSTALLATION INSTRUCTIONS
EXHAUSTING HOT AIR
In the Cool Mode the appliance must be placed close to a window or opening so that the warm exhaust air can be ducted outside.
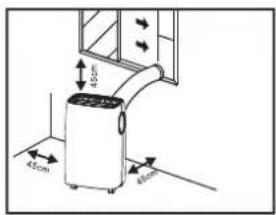
First position unit on a flat floor and make sure there's a minimum of 12" (30cm) clearance around the unit, and is within the vicinity of a single circuit outlet power source.
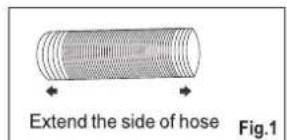
- Extend either side of the hose (Fig.1) and screw the hose inlet (Fig.2).
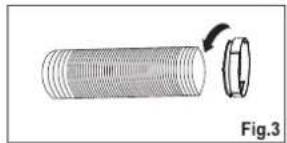
- Extend the other side of the hose and screw it to the hose outlet (Fig.3).
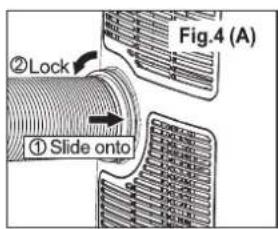
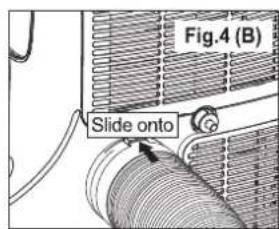
- Install the hose inlet into the unit (Fig.4).
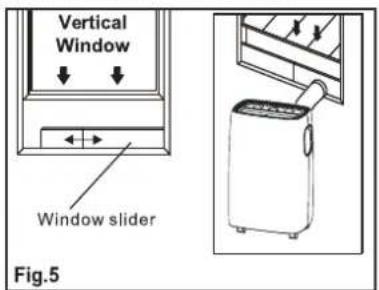
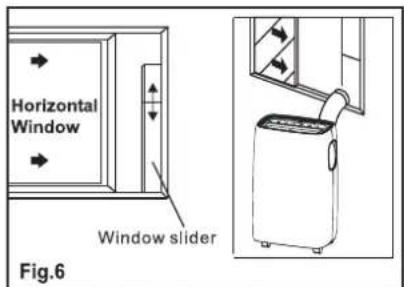
4 .Affix the hose outlet into the window slider kit and seal. (Fig.5 &6).
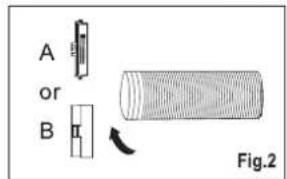
natural_image
Diagram of a cylindrical object with a curved arrow indicating rotation, labeled Fig.3 (no text or symbols on the object itself)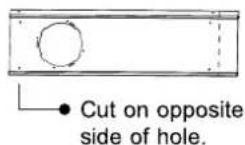
Your window slider kit has been designed to fit most standard vertical and horizontal window applications, however, it may be necessary for you to modify some aspects of the installation procedures for certain types of windows. The window slider kit can be fastened with screws.
NOTE: If the window opening is less than the minimum length of the window slider kit, cut the end without the hold in it short enough to fit in the window opening. Never cut out the hole in window slider kit.
INSTALLATION INSTRUCTIONS
WINDOW SLIDER KIT INSTALLATION
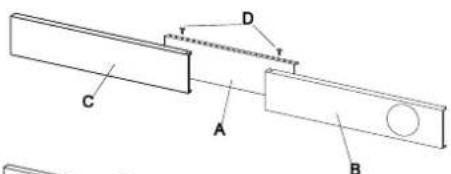
1:Parts:
A) Panel
B) Panel with one hole
C) Panel without hole (maybe not supplied)
D) Screw to lock window kit in place
2: Assembly:
Slide Panel B and C into Panel A and size to widow width. Windows sizes vary. When sizing the window width, be sure that the window kit assembly is free from gaps from gaps and/or air pockets when taking measurements.
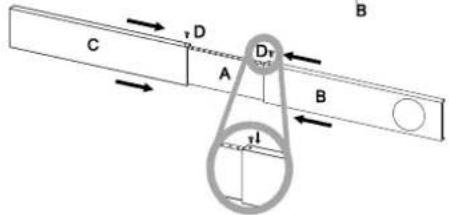
- Lock the screw into the holes that correspond With the width that your window requires to ensure that there are no gaps or air pockets in the window kit assembly after installation.
LOCATION
● The unit should be placed on a firm foundation to minimize noise and vibration. For safe and secure positioning, place the unit on a smooth, level floor strong enough to support the unit.
● The unit has casters to aid placement, but it should only be rolled on smooth, flat surfaces. Use caution when rolling on carpeted surfaces. Use caution and Protect floors when rolling over wood floors. Do not attempt to roll the unit over objects.
● The unit must be placed within reach of a properly rated grounded socket.
● Never place any obstacles around the air inlet or outlet of the unit.
- Allow at least 45cm of space away from the wall for efficient air conditioning.
● The hose can be extended, but it is the best to keep the length to minimum required. Also make sure that the hose does not have any sharp bends or sags.
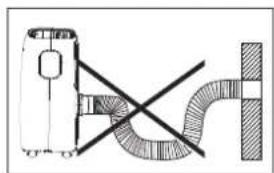
natural_image
Pure mechanical diagram showing a pipe connection with no text, numbers, or symbolsDESCRIPTION OF THE DISPLAY SCREEN
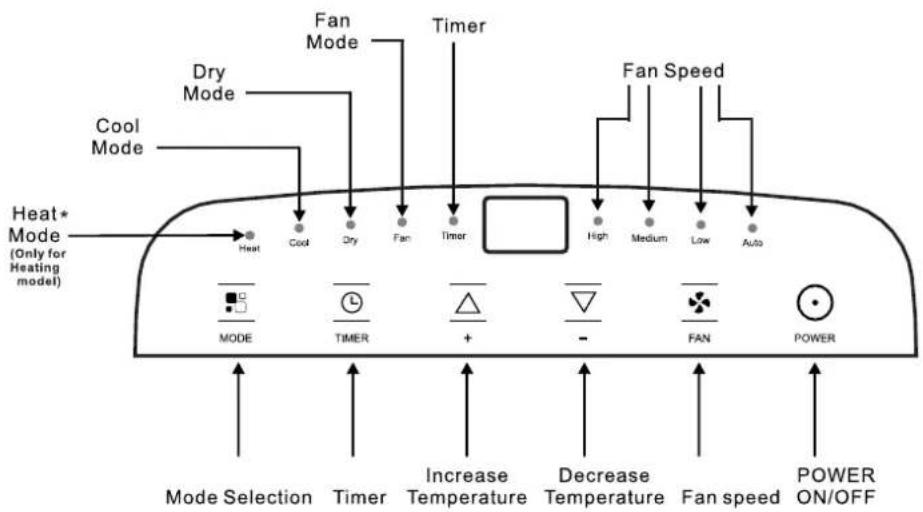
“*”means only the heat pump model have this function.
There is WIFI module, and the display is as follows:
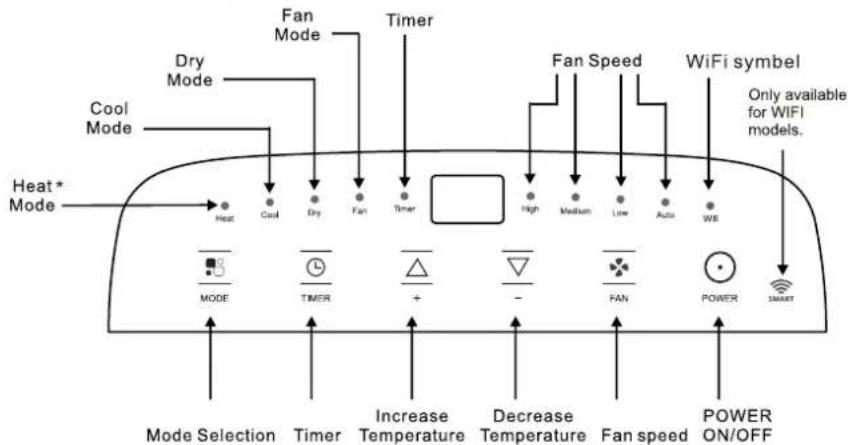
“*”means only the heat pump model have this function. Note: When the unit is connected with phone, the WIFI symbol is light on, and how to connected with phone, please see the wifi manual.
DESCRIPTION OF THE DISPLAY SCREEN
OPERATING FROM THE CONCTROL PANEL
The control panel is on the top of the appliance, enables you to manage part functions without remote controller, but to fully exploit its potential, you must use the remote controller.
TURNING THE APPLIANCE ON
Plug into the mains socket, then the appliance is standby.
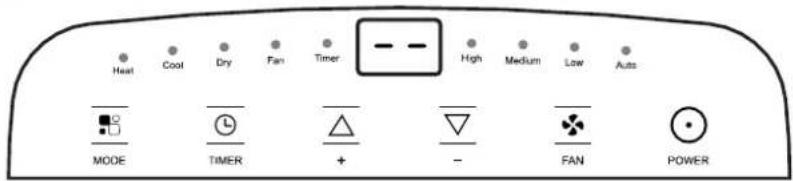
Press the ⏻ button to make the appliance turn on. The last function active when it was turned off will appear.
√ Never turn the appliance off by unplugging from the mains. Always press the button ⏻, then wait for a few minutes before unplugging. This allows the appliance to perform a cycle of checks to verify operation.
COOL mode
Ideal for hot muggy weather when you need to cooling and dehumidify the room.
To set this mode correctly:
- Press the button a number of times until the Cool symbol appears.
- Select the target temperature 18^ C - 32^ C(64^ F - 90^ F) by pressing the ▲ or ▼ button until the corresponding value is displayed.
- Select the required fan speed by pressing the ✝ button.
Four speeds are available: High / Medium / Low / Auto.
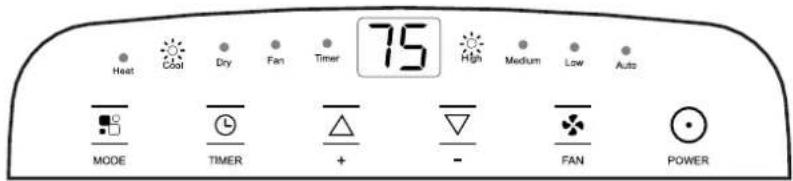
The most suitable temperature for the room during the summer varies from 24°C to 27°C (75°F to 81°F). You are recommended, however, not to set a temperature much below the outdoor temperature. The fan speed difference is more noticeable when the appliance is under Fan mode but may not be noticeable under Cool mode.
DESCRIPTION OF THE DISPLAY SCREEN
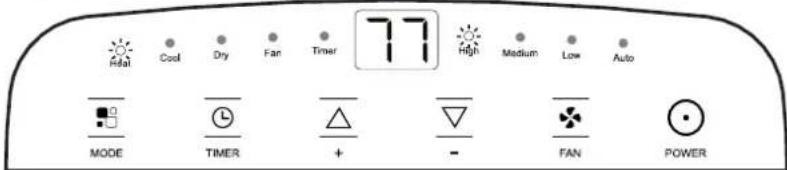
HEAT mode\*
“*”meansonly the heat pump model have this function.
To set this mode correctly:
- Press the button a number of times until the Heat symbol appears.
- Select the target temperature 13^ C - 27^ C(55^ F - 81^ F) by pressing the ▲ or ▼ button until the corresponding value is displayed.
- Select the required fan speed by pressing the ✧ button.
Four speeds are available: High / Medium / Low / Auto.
• Water is removed from the air and collected in the tank.
- When the tank is full, the appliance shuts down and "F t" (full tank) appears on the display. The tank cap must be extracted and emptied. Run off all water left into a basin. When all the water has been drained, put the cap back in place.
- When the tank has been emptied, the appliance starts up again.
N.B.
- When operating in very cold rooms, the appliance defreezes automatically, momentarily interrupting normal operation. "L L" appears on the display. During this operation, it is normal for the noise made by the appliance to change.
- In this mode, you may have to wait for a few minutes before the appliance starts giving out hot air.
- In this mode, the fan may operate for short periods, even though the set temperature has already been reached.
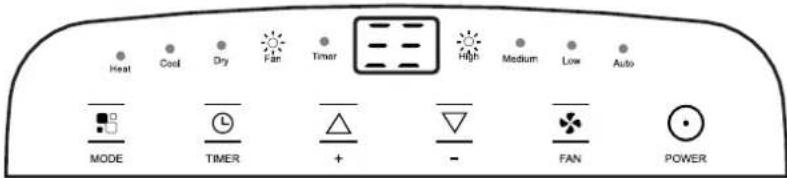
FAN mode
When using the appliance in this mode, the air hose does not need to be attached.
- Press the 📁 button a number of times until the Fan symbol appears.
- Select the required fan speed by pressing the button.
Three speeds are available: High / Medium / Low.
The screen display “≡≡” as high speed, “==” as medium speed, “____” as low speed.
DESCRIPTION OF THE DISPLAY SCREEN
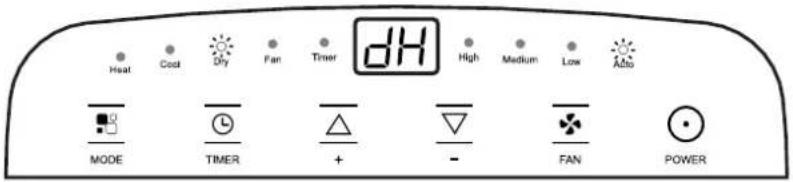
DRY mode
Ideal to reduce room humidity (spring and autumn, damp rooms rainy periods, etc). In dry mode, the appliance should be prepared in the same way as for cool mode, with the air exhaust hose attached to enable the moisture to be discharged outside.
To set this mode correctly:
- Press the □ button a number of times until the Dry symbol appears. The screen display "DH".
- In this mode, fan speed is selected automatically by the appliance and can not be set manually.
Note:
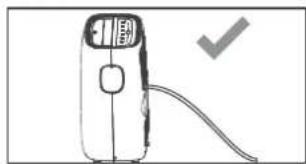
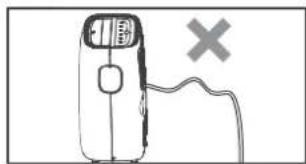
- Condensate may flow out after removing the drain cap, if the unit is running in Cool mode. When you want to remove the garden hose, prepare a drip tray (not supplied) to collect the condensate from the drain outlet
- Please be sure that the height of the drain and section of the drain hose should not be higher than that of the drain outlet, or the continuous drainage may not work properly(Fig.22 Fig.23).
- During Cool mode, it is recommended to disable continuous drainage by replacing the drain cap to the drain outlet, to reach the maximum performance.
Figure 22
natural_image
Simple line drawing of a handheld device with a handle and a checkmark (no text or symbols)Figure 23
natural_image
Simple line drawing of a handheld device with a 'X' mark and a circular button, no text or symbols present.DESCRIPTION OF THE DISPLAY SCREEN
AUTO mode
The appliance chooses automatically whether to operate in cool, fan or heat mode (some certain models have not heat mode).
To set this mode correctly:
- Press the button a number of times until the screen display like below:

flowchart
graph LR
    A["Rectangular Grid"] --> B["Dashed Square"]
    B --> C["Rectangular Grid"]
    C --> D["Dashed Square"]
    D --> E["Rectangular Grid"]
    E --> F["Dashed Square"]
It is AUTO mode when the display will be running circulating.
- Select the required fan speed by pressing the button.
Four speeds are available: High / Medium / Low / Auto.
If the appliance is cooling only model, the unit operates in Fan mode. when the room temperature is below 73^ F ( 23^ C), and Cool mode when the room temperature is above 73^ F ( 23^ C).
If the unit is cooling and heating model, the unit operates in Heat mode when the room temperature is below 68^(20^) , and Fan mode. When the room temperature is from 68^(20^) to 73^(23^) , and Cool mode when the room temperature is above 73^(23^) .
DESCRIPTION OF THE DISPLAY SCREEN
SETTING THE TIMER
-This timer can be used to delay the appliance startup or shutdown, this avoids wasting electricity by optimising operating periods.
Programming start up
- Turn on the appliance, choose the mode you want, for example cool, 24°C, high fan speed. Turn off the appliance.
- Press the Timer button, the Ⓛ symbol and number of hours flash.
- Press the ▲ or ▼ button to set the number of hours delay before the appliance comes on. The timer can set in intervals of 0.5 hours up to 10 hours, the in intervals of 1 hour to 24 hours.
- A few second after set, the setting is memorized, the timer indicator is light and the display shows that the appliance is in standby.
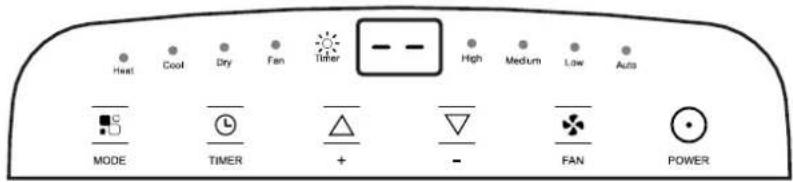
- Press again the Timer button or the ⏻ button, the timer will be canceled, and the ⏻ symbol will disappear from screen.
Programming shut down
- When the appliance is running, press the ⏻ button, the Timer indicator and the hours flash.
- Press the ▲ or ▼ buttons to set the number of hours delay before the unit turns off.
- A few second after set, the setting is memorized, the timer indicator is light and the display shows the current mode. At the end of the set time the unit automatically turns to standby mode.
DESCRIPTION OF THE DISPLAY SCREEN
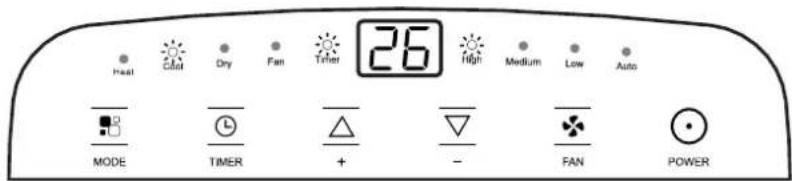
- Press again the Timer button or the ⏻ button, the timer will be canceled, and the ⏻ symbol will disappear from screen.
SELF-DIAGNOSIS
The appliance has a self diagnosis system to identify a number of malfunctions. Error messages are displayed on the appliance display.
| IF IS DISPLAYED | WHAT SHOULD I DO? |
 LOWTEMPERATURE(frost prevention) LOWTEMPERATURE(frost prevention) | The appliance is fitted with a frost protection device to avoid excessive formation of ice.The appliance starts up again automatically when the defrosting process is completed. |
 PROBE FAILURE(sensor damaged) PROBE FAILURE(sensor damaged) | If this is displayed, contact your local authorised service centre. |
 FULL TANK(safety tank full) FULL TANK(safety tank full) | Empty the internal safety tank, following the instructions in the "End of season operations" paragraph. |
MANUAL OF REMOTE CONTROL
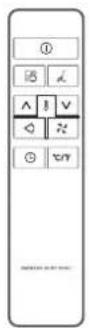
| 1 | On/Off button | Fan speed button | |
| ^ | Increase button | Mode button | |
| ∨ | Decrease button | Swing button | |
| ◎ | Timer button | Sleep button | |
| °C/°F | Unit Switch button |
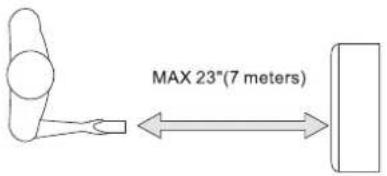
√ Point the remote control at the sensor on the appliance.
√ The remote control must be no more than 23"(7 meters) away from the appliance (without obstacles between the remote control and the receiver).
√ The remote control must be handled with extreme care. Do not drop it or expose it to direct sunlight or sources of heat. If the remote control do not work, please try to take out the batteries, and put it back.
MANUAL OF REMOTE CONTROL
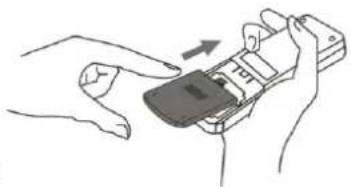
INSERTING OR REPLACING THE BATTERIES
- Remove the cover on the rear of the remote control;
- Insert two "AAA" 1.5V batteries in the correct position (see instructions inside the battery compartment);
NOTE:
√ If the remote control unit is replaced or disposed of, the batteries must be removed and discarded in
accordance with current legislation as they are harmful to the environment.
√ Do not mix old and new batteries. Do not mix alkaline, standard (carbon-zinc) or rechargeable (nickel-cadmium) batteries.
√ Do not dispose of batteries in fire. Batteries may explode or leak.
√ If the remote control is not be used for a certain length of time, remove the batteries.
COOL mode
Ideal for hot muggy weather when you need to cooling and dehumidify the room. To set this mode correctly:
- Press the ☐ button a number of times until the "Cool" symbol appears.
- Select the target temperature 18^ C - 32^ C(64^ F - 90^ F) by pressing, the or button until the corresponding value is displayed.
- Select the required fan speed by pressing the ✗ button.
Four speeds are available: High/Med/Low/Auto.
The most suitable temperature for the room during the summer varies from 75°F to 81°F (24°C to 27°C). You are recommended, however, not to set a temperature much below the outdoor temperature. The fan speed difference is more noticeable when the appliance is under FAN mode but may not be noticeable under COOL mode.
HEAT mode \*
"*"means only the heat pump model have this function.
- Press the button a number of times until the "Cool" symbol appears.
- Select the target temperature 64^ F - 90^ F(18^ C - 32^ C) by pressing, the or button until the corresponding value is displayed.
- Select the required fan speed by pressing the ✗ button.
Four speeds are available: High/Med/Low/Auto.
natural_image
Illustration of hands holding a mobile phone with a scroll (no text or symbols visible)MANUAL OF REMOTE CONTROL
• Water is removed from the air and collected in the tank.
- When the tank is full, the appliance shuts down and “Ft (full tank) appears on the display. The tank cap must be extracted and emptied. Run off all water left into a basin. When all the water has been drained, put the cap back in place.
- When the tank has been emptied, the appliance starts up again.
N.B.:
- When operating in very cold rooms, the appliance defreezes automatically, momentarily interrupting normal operation. "L L" appears on the display. During this operation, it is normal for the noise made by the appliance to change.
- In this mode, you may have to wait for a few minutes before the appliance starts giving out hot air.
- In this mode, the fan may operate for short periods, even though the set temperature has already been reached.
FAN mode
When using the appliance in this mode, the air hose does not need to be attached.
- Press the 📁 button a number of times until the "Fan" symbol appears.
- Select the required fan speed by pressing the ✗ button.
Three speeds are available: High/Med/Low.
DRY mode
Ideal to reduce room humidity (spring and autumn, damp rooms rainy periods, etc). In dry mode, the appliance should be prepared in the same way as for cool mode, with the air exhaust hose attached to enable the moisture to be discharged outside.
To set this mode correctly:
- Press the ☐ button a number of times until the "Fan" symbol appears.
- Select the required fan speed by pressing the ✗ button.
Three speeds are available: High/Med/Low.
MANUAL OF REMOTE CONTROL
AUTO mode
The appliance chooses automatically whether to operate in cool, fan or heat mode (some certain models have not heat mode).
- Press the 📄 button a number of times until the screen display like below:

flowchart
graph LR
    A["Step 1: Square with arrow"] --> B["Step 2: Square with dashed arrow"]
    B --> C["Step 3: Square with dashed arrow"]
    C --> D["Step 4: Square with arrow"]
It is AUTO mode when the display will be running circulating.
- Select the required fan speed by pressing the ✗ button.
Four speeds are available: High / Medium / Low / Auto.
If the appliance is cooling only model, the unit operates in Fan mode when the room temperature is below 73^ F ( 23^ C), and Cool mode when the room temperature is above 73^ F ( 23^ C).
If the appliance is cooling and heating model, the unit operates in Heat mode when the room temperature is below 68^(20^) , and Fan mode when the room temperature is from 68^(20^) to 73^(23^) , and Cool mode when the room temperature is above 73^(23^) .
SWING function
This function is useful for select the up/down swing of air delivery.
To set this function correctly:
- Select the operating mode (Cool, Dry, Fan) as described above.
- Press the ◁ button the deflector will stop different positions or swing continuously.
SLEEP function
This function is useful for the night as it gradually reduces operation of the appliance.
To set this function correctly:
- Select the cool or heat mode as described above.
- Press the 📁 button.
The appliance operates in the previously selected mode.
When you choose the sleep function, the screen will reduce the brightness, and the fan speed is low.
MANUAL OF REMOTE CONTROL
The SLEEP function maintains the room at optimum temperature without excessive fluctuations in either temperature or humidity with silent operation. Fan speed is always at Low, while room temperature and humidity vary gradually to ensure the most comfortable.
When in COOL mode, the selected temperature will increase by 1^ C( 19^ F) per hour in a 2 hour period. This new temperature will be maintained for the next 6 hours. Then the appliance turn it off.
When in HEAT mode, the selected temperature will decrease by 1^ C( 19^ F) per hour in a 3 hour period. This new temperature will be maintained for the next 5 hours. Then the appliance turn it off.
The SLEEP function can be canceled at any time during operation by pressing the "Sleep", "Mode" or "fan speed" button.
In FAN or DRY mode, SLEEP function cannot be set.
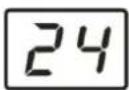
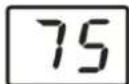
Switch the unit of temperature
When the appliance is standby, press the button, then you can change the unit of temperature.
For example:
Before change, in cool mode, the screen display like fig left.
After change, in cool mode, the screen display like fig right.
MANUAL OF REMOTE CONTROL
SETTING THE TIMER
-This timer can be used to delay the appliance startup or shutdown, this avoids wasting electricity by optimising operating periods.
Programming start up
- Turn on the appliance, choose the mode you want, for example cool, 75°F(24°C), high fan speed. Turn off the appliance.
- Press the ⏻ button, the screen will display 1-24 hours.
- Press several times until the corresponding time is displayed. Wait about 5 seconds, the timer will be active, then only the symbol is displayed on screen.
- Press again the Ⓛ button or the ⏱ button, the timer will be canceled
Programming shut down
- When the appliance is running, press the Ⓛ button, the screen will display hours.
- Press several times until the corresponding time is displayed. Wait about 5 seconds, the timer will be active.
- Press again the ⏻ button or the ⏱ button, the timer will be canceled.
TIPS FOR CORRECT USE
To get the best from your appliance, follow these recommendations:
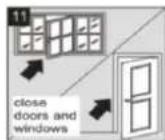
- Close the windows and doors in the room to be air conditioned (fig. 11). When installing the appliance semi-permanently, you should leave a door slightly open (as little as 1cm ) to guarantee correct ventilation;
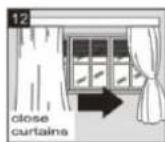
- Protect the room from direct exposure to the sun by partially closing curtains and/or blinds to make the appliance much more economical to run (fig. 12);
- Never rest objects of any kind on the appliance;
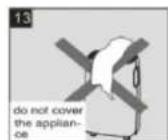
- Do not obstruct the air intake and outlet (fig. 13). Leave the grilles free;
• Make sure there are no heat sources in the room;
- Never use the appliance in very damp rooms (laundry room, for example.).
- Never use the appliance outdoors.
- Make sure the appliance is standing on a level surface. If necessary, place the castor locks under the front wheels.
WATER DRAINAGE METHOD
When there is excess water condensation inside the unit, the appliance stops running and shows "F E" (FULL TANK as mentioned in SELF-DIAGNOSIE). This indicates that the water condensation needs to be drained using the following procedures:
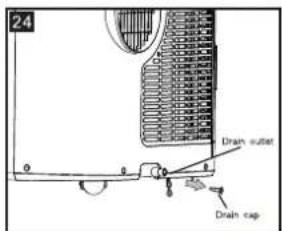
Manual Draining (fig.24)
Water may need to be drained in high humidity areas
- Unplug the unit from power source.
- Place a drain pan under the lower drain plug. See diagram.
- Remove the lower drain plug.
- Water will drain out and collect in the drain pan (maybe not supplied).
- After the water is drained, replace the lower drain plug firmly.
- Turn on the unit.
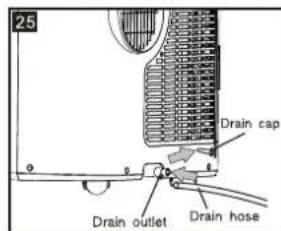
Continuous Draining ( fig.25)
While using the unit in dehumidifier mode, continuous drainage is recommended.
1. Unplug the unit from the power source.
2. Remove the drain plug. While doing this operation some residual water may spill so please have a pan to collect the water.
3. Connect the drain hose (1/2" or 12.7mm, maybe not supplied). See diagram.
4. The water can be continuously drained through the hose into a floor drain or bucket.
5. Turn on the unit.
NOTE
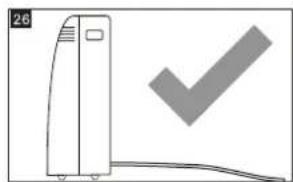
Please be sure that the height of and section of the drain hose should not be higher than that of the drain outlet, or the water tank may not be drained. (fig.26 and fig.27)
natural_image
Illustration of a vertical air conditioner unit with a checkmark symbol (no text or labels)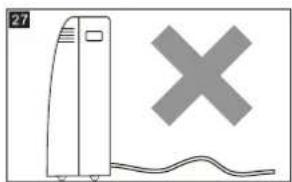
natural_image
Simple line drawing of a device with a cross symbol and wavy base (no text or labels)WATER DRAINAGE METHOD
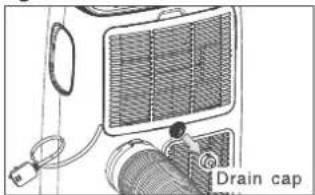
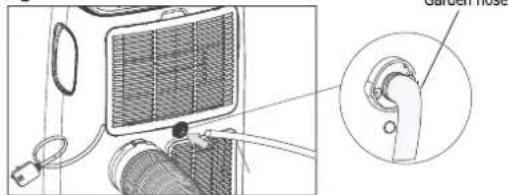
Middle drainage
For appearance of B, when unit running in Dry mode, you can choose the way below to drainage.
- Unplug the unit from the power source.
- Remove the drain plug(fig A). While doing this operation some residual water may spill so please have a pan to collect the water.
- Connect the drain hose (1/2" or 12.7mm, maybe not supplied). (fig B)
- The water can be continuously drained through the hose into a floor drain or bucket.
- Turn on the unit.
fig A
natural_image
Diagram of a drain cap with visible components and wiring (no text or symbols)fig B
Note:
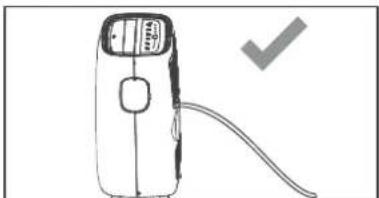
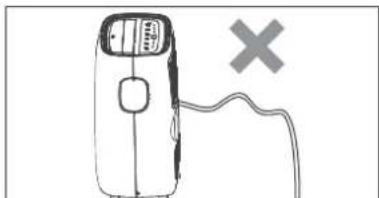
- Condensate may flow out after removing the drain cap, if the unit is running in Cool and Dry mode. When you want to remove the garden hose, prepare a drip tray (not supplied) to collect the condensate from the drain outlet.
- Please be sure that the height of the drain and section of the drain hose should not be higher than that of the drain outlet, or the continuous drainage may not work properly (Fig.C Fig.D).
- During Cool mode, it is recommended to disable continuous drainage by replacing the drain cap to the drain outlet, to reach the maximum performance.
fig C
natural_image
Line drawing of a handheld device with a scroll and a checkmark (no text or symbols)fig D
natural_image
Simple line drawing of a portable device with a switch and a cross mark, no text or symbols present.CLEANING
Before cleaning or maintenance, turn the appliance off by pressing the ⏻ button on the control panel or remote control, wait for a few minutes then unplug from the mains socket.
CLEANING THE CABINET
You should clean the appliance with a slightly damp cloth then dry with a dry cloth.
- Never wash the appliance with water. It could be dangerous.
- Never use petrol, alcohol or solvents to clean the appliance.
- Never spray insecticide liquids or similar.
CLEANING THE AIR FILTERS
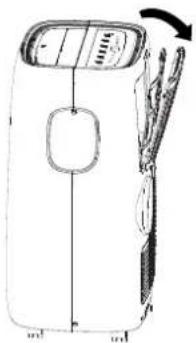
To keep your appliance working efficiently, you should clean the filter every week of operation. The evaporator filter can take out like below fig.
Use a vacuum cleaner to remove dust accumulations from the filter. If it is very dirty, immerse in warm water and rinse a number of times. The water should never be hotter than 40^ C(104°F). After washing, leave the filter to dry then attach the intake grille to the appliance.
natural_image
Line drawing of a portable electronic device with buttons and a handle (no text or symbols)START-END OF SEASON OPERATIONS
START OF SEASON CHECKS
Make sure the power cable and plug are undamaged and the earth system is efficient.
Follow the installation instructions precisely.
END OF SEASON OPERATIONS
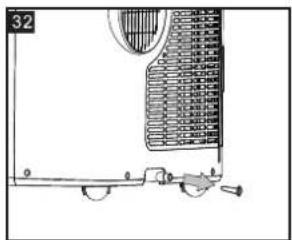
To empty the internal circuit completely of water, remove the cap(fig. 32).
Run off all water left into a basin. When all the water has been drained, put the cap back in place.
Clean the filter and dry thoroughly before putting back.
TECHNICAL SPECIFICATIONS
TECHNICAL SPECIFICATIONS
| Mains voltage | see rating label |
| Maximum power in cooling mode | -- |
| Refrigerant | -- |
| Cooling capacity | -- |
LIMIT CONDITIONS
| Temperature of room | 18°C-35°C (64°F-95°F)(Cooling) |
| Temperature of room | 10°C-25°C (50°F-77°F)(Heating) |
TROUBLESHOOTING
| PROBLEM | CAUSE | SOLUTION |
| The appliance does not come on | There is no currentIt is not plugged into the mainsThe internal safety device has tripped | WaitPlug into the mainsWait 30 minutes, if the problem persists, contact your service center |
| The appliance works for a short time only | Here are bends in the air exhaust hose | Position the air exhaust hose correctly, keeping it as short and free of curves as possible to avoid bottlenecks |
TROUBLESHOOTING
| Something is preventing the air from being discharged | Check and remove any obstacles obstructing air discharge | |
| The appliance works, but does not cool the room | Windows, doors and/or curtains open | Close doors, windows and curtains, bearing in mind the "tips for correct use" given above |
| There are heat sources in the room (oven, hairdryer, etc) | Eliminate the heat sources | |
| The air exhaust hose is detached from the appliance | Fit the air exhaust hose in the housing at the back of the appliance | |
| The technical specification of the appliance is not adequate for the room in which it is located | ||
| During operation, there is an unpleasant smell in the room | Air filter clogged | Clean the filter as described above |
| The appliance does not operate for about three minutes after restarting it | The internal compressor safety device prevents the appliance from being restarted until three minutes have elapsed since it was last turned off | Wait. This delay is part of normal operation |
| The following message appears on the display: LE/ PF / FE | The appliance has a self diagnosis system to identify a number of malfunctions | See the SELF-DIAGNOSIS Chapter |
For any questions or Technical Support,
Please Call Customer Service: 1-844-801-8880


EMERSON QUIET KOOL®

- THANK YOU!
- CONTENTS
- IMPORTANT SAFEGUARDS
- IMPORTANT - GROUNDING METHOD
- ELECTRICAL CONNECTIONS
- DESCRIPTION
- INSTALLATION INSTRUCTIONS
- EXHAUSTING HOT AIR
- WINDOW SLIDER KIT INSTALLATION
- LOCATION
- DESCRIPTION OF THE DISPLAY SCREEN
- OPERATING FROM THE CONCTROL PANEL
- TURNING THE APPLIANCE ON
- COOL mode
- HEAT mode\*
- N.B.
- FAN mode
- DRY mode
- Note:
- AUTO mode
- SETTING THE TIMER
- SELF-DIAGNOSIS
- MANUAL OF REMOTE CONTROL
- INSERTING OR REPLACING THE BATTERIES
- HEAT mode \*
- N.B.:
- SWING function
- SLEEP function
- Switch the unit of temperature
- Programming start up
- Programming shut down
- TIPS FOR CORRECT USE
- WATER DRAINAGE METHOD
- Manual Draining (fig.24)
- Continuous Draining ( fig.25)
- NOTE
- Middle drainage
- CLEANING
- CLEANING THE CABINET
- CLEANING THE AIR FILTERS
- START-END OF SEASON OPERATIONS
- START OF SEASON CHECKS
- END OF SEASON OPERATIONS
- TECHNICAL SPECIFICATIONS
- TROUBLESHOOTING
Brand : Emerson
Model : Quiet Kool EAPC8RSC1
Category : Air-conditioner