
NH-U14S DX-4677 - Computer Cooling Component Noctua - Free user manual and instructions
Find the device manual for free NH-U14S DX-4677 Noctua in PDF.


| Product Type | CPU Cooler |
| Model | NH-U14S DX-4677 |
| Brand | Noctua |
| Socket Compatibility | Intel LGA4677 |
| Cooler Dimensions (with fan) | 140 x 150 x 165 mm (W x D x H) |
| Weight | 935 g (cooler only), 1.2 kg (with fan and accessories) |
| Fan Size | 140 x 140 x 25 mm |
| Fan Speed | 300 – 1500 RPM (with L.N.A. 1200 RPM) |
| Airflow | 140.2 m³/h (with L.N.A. 114.6 m³/h) |
| Noise Level | 19.2 – 24.6 dB(A) (with L.N.A. 14.9 – 19.2 dB(A)) |
| Heatpipe Material | Copper (nickel-plated) |
| Fin Material | Aluminum |
| Base Material | Copper (nickel-plated) |
| Fan Connector | 4-pin PWM |
| Included Accessories | Mounting kit for LGA4677, fan clips, Low-Noise Adaptor (L.N.A.), thermal paste (NT-H1), screwdriver |
| Maintenance | Clean dust from fins and fan using compressed air or soft brush every 6 months |
| Safety | Keep away from liquids; do not obstruct airflow; ensure proper installation to avoid short circuits |
| Spare Parts | Fan (NF-A14), fan clips, mounting kit, thermal paste available separately |
| Repairability | Fan is replaceable; mounting kit can be re-used for other sockets with additional parts |
| Warranty | 6 years (manufacturer warranty) |
Frequently Asked Questions - NH-U14S DX-4677 Noctua
User questions about NH-U14S DX-4677 Noctua
0 question about this device. Answer the ones you know or ask your own.
Ask a new question about this device
Download the instructions for your Computer Cooling Component in PDF format for free! Find your manual NH-U14S DX-4677 - Noctua and take your electronic device back in hand. On this page are published all the documents necessary for the use of your device. NH-U14S DX-4677 by Noctua.
USER MANUAL NH-U14S DX-4677 Noctua
Thank you very much for choosing the Noctua NH-U14S DX-4677.
Our DX line of coolers has become a default choice in high performance quiet cooling solutions for Intel Xeon processors, and I'm confident that you will be able to sense some of the research, attention and care we've put into making this product.
Enjoy your NH-U14S DX-4677!
Yours sincerely,

Ming
This manual will guide you through the installation process of the SecuFirm2 ^TM mounting system step by step.
Prior to installing the cooler, please consult the compatibility centre on our website (ncc.noctua.at) and verify that the cooler is fully compatible with your motherboard.
Please also make sure that your PC case offers sufficient clearance for the cooler and that there are no compatibility issues with any other components (e.g. tall RAM modules).
Double check that the heatsink and fan clips do not make contact with the VGA card, other PCIe cards, motherboard heatsinks or any other components.
Noctua cannot be held responsible for any damage or losses caused by compatibility issues.
Should you encounter any difficulties, please check the FAQs on our website (www.noctua.at/faqs) and don't hesitate to contact our support team at support@noctua.at.
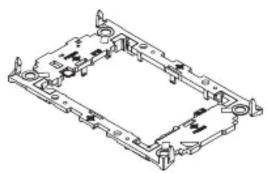
Required mounting parts:
natural_image
Technical line drawing of a mechanical housing or bracket assembly (no text or symbols)Plastic CPU carrier frame
Please note that installing an LGA4677 processor and heatsink requires a plastic CPU carrier frame such as the one shown above. These carrier frames are included with boxed retail CPUs and available separately via Intel sales partners for tray type CPUs. As different CPUs require different carrier frame types (E1A, E1B or E1C), please make sure to purchase the correct carrier frame for tray type CPUs.
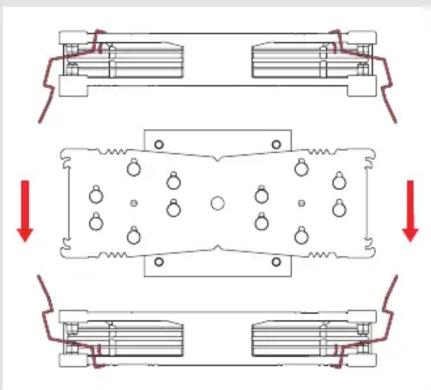
Removing the fans1
Take the fans off the cooler.
natural_image
Pure mechanical assembly diagram showing three stages of a component with mounting holes and internal springs (no text or symbols)2 Assembly of carrier frame, CPU and heatsink & installation to the socket
Please follow the official Intel installation manual for how to attach the CPU carrier frame to the heatsink, insert the CPU to the carrier frame and install the CPU/heatsink assembly to the socket: www.intel.com/processorinstall

Note that while the Intel illustrations show a 2U heatsink, the Noctua NM-XFB9 brackets use the same mounting parts, so the procedure is identical for Noctua heatsinks.
When attaching the CPU carrier frame to the base of the heatsink, turn the heatsink upside down so that the base is facing upwards.
Carefully put it down onto the tips of the heatpipes and secure it with your hand so that it cannot tilt and that the fins cannot get bent.
Remove the plastic protection cover from the base of the heatsink and be careful not to damage the layer of pre-applied thermal compound.
Caution: If you are not using the heatsink for the first time and it therefore doesn't have a fresh layer of pre-applied thermal compound anymore, you need to apply a thin layer of thermal compound to the CPU yourself before clipping it to the heatsink.
If there are residual traces of previous thermal paste or thermal pads on your CPU or on the heatsink, please clean them off first.
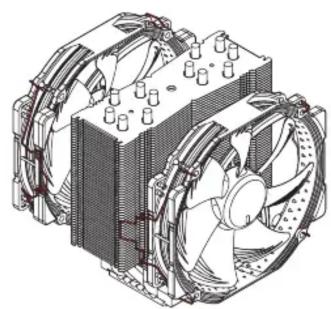
Installing the fans3
Reattach the fans to the heatsink using the supplied fan clips:
natural_image
Technical line drawing of a computer cooling fan assembly (no text or symbols)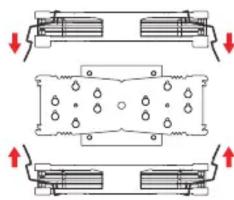
natural_image
Pure mechanical assembly diagram showing three stages of a component with arrows indicating direction (no text or symbols)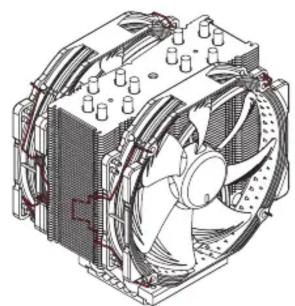
natural_image
Technical line drawing of a computer cooling fan assembly (no text or labels)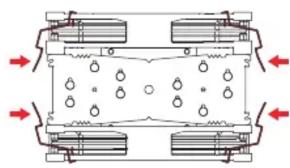
natural_image
Pure mechanical diagram showing two blocks with internal components and directional arrows, no text or symbols present.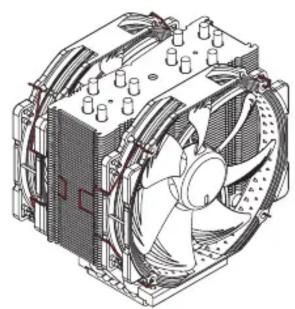
natural_image
Technical line drawing of a computer cooling fan assembly (no text or symbols)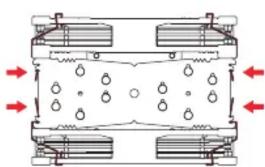
natural_image
Pure mechanical diagram showing two parallel plates with internal holes and directional arrows, no text or symbols present.Connect the fans to the motherboard's CPU fan headers.
! Removing the heatsink from the socket and the CPU from the heatsink
Please follow the official Intel guidelines for how to remove the heatsink and how to take off the CPU and carrier frame: www.intel.com/processorinstall

Transporting your system!
As it is not possible to reliably calculate or control the forces that act upon a system during transport (e.g. in shipping), we generally recommend, for safety reasons, taking the cooler off.
Noctua cannot be held responsible for any damage that may arise due to excessive stress during transport if you keep the heatsink installed.
! Warranty, support and FAQs
Even with high-grade products and strict quality control, the possibility of defects cannot be eliminated entirely. Therefore, we aim at providing the highest possible level of reliability and convenience by offering a warranty period of 6 years and direct, fast and straightforward RMA service.
Should you encounter any problems with your NH-U14S DX-4677, please don't hesitate to contact our support team at support@noctua.at.
Please also consult the FAQ section on our website: www.noctua.at/faqs

Brand : Noctua
Model : NH-U14S DX-4677
Category : Computer Cooling Component