
StrongPhone Z6 - Smartphone Evolveo - Free user manual and instructions
Find the device manual for free StrongPhone Z6 Evolveo in PDF.


| Product Type | Smartphone |
| Brand | Evolveo |
| Model | StrongPhone Z6 |
| Display Size | 2.8 inches |
| Protection Rating | IP68 (waterproof and dustproof) |
| Impact Resistance | Yes |
| Battery Capacity | 4000 mAh |
| SIM Card Type | Dual SIM (Standard SIM slots) |
| Memory Card Slot | MicroSD (up to 32GB, not specified) |
| SOS Button | Yes, with customizable emergency contacts and SMS |
| Power Bank Function | Yes (OTG charging via long press of button 8) |
| Connectivity | Bluetooth, GSM, USB (charging/data) |
| Camera | Built-in camera (no resolution specified) |
| FM Radio | Yes, with background play |
| Flashlight | Yes, via long press of button 0 |
| Headphone Jack | Yes (standard 3.5mm) |
| Operating System | Proprietary (feature phone) |
| Weight | Approximately 250 g (estimation based on battery size) |
| Maintenance | Clean with soft, lint-free cloth; do not use detergents or solvents |
| Warranty Note | Does not cover damage from improper use, firmware modification, or normal wear |
Frequently Asked Questions - StrongPhone Z6 Evolveo
User questions about StrongPhone Z6 Evolveo
0 question about this device. Answer the ones you know or ask your own.
Ask a new question about this device
Download the instructions for your Smartphone in PDF format for free! Find your manual StrongPhone Z6 - Evolveo and take your electronic device back in hand. On this page are published all the documents necessary for the use of your device. StrongPhone Z6 by Evolveo.
USER MANUAL StrongPhone Z6 Evolveo
Putting your phone into service ....7
Basic functions....8
Settings....10
Phone settings....11
Multimedia....13
FM radio....13
Maintenance instructions .... 16
Welcome to
Thank you for purchasing our durable mobile phone EVOLVEO StrongPhone Z6!
The main advantages of the phone are:
- large 2.8" display
- impact resistance
- IP68 waterproof
- SOS button
- two SIM cards
- power bank function
- large 4,000 mAh battery
We believe that you will be fully satisfied with our product!
Phone description
| Functions | Functions | ||
| 1 | Handset | 10 | # button |
| 2 | Display | 11 | End call button |
| 3 | Left function button | 12 | Right function button |
| 4 | Navigation button | 13 | Battery cover |
| 5 | Call button | 14 | Camera |
| 6 | Alphanumeric buttons | 15 | Flashlight |
| 7 | The * button | 16 | Speaker |
| 8 | Button 0: Flashlight | 17 | Headphone connector |
| 9 | Button 8: Power banka | 18 | SOS button |
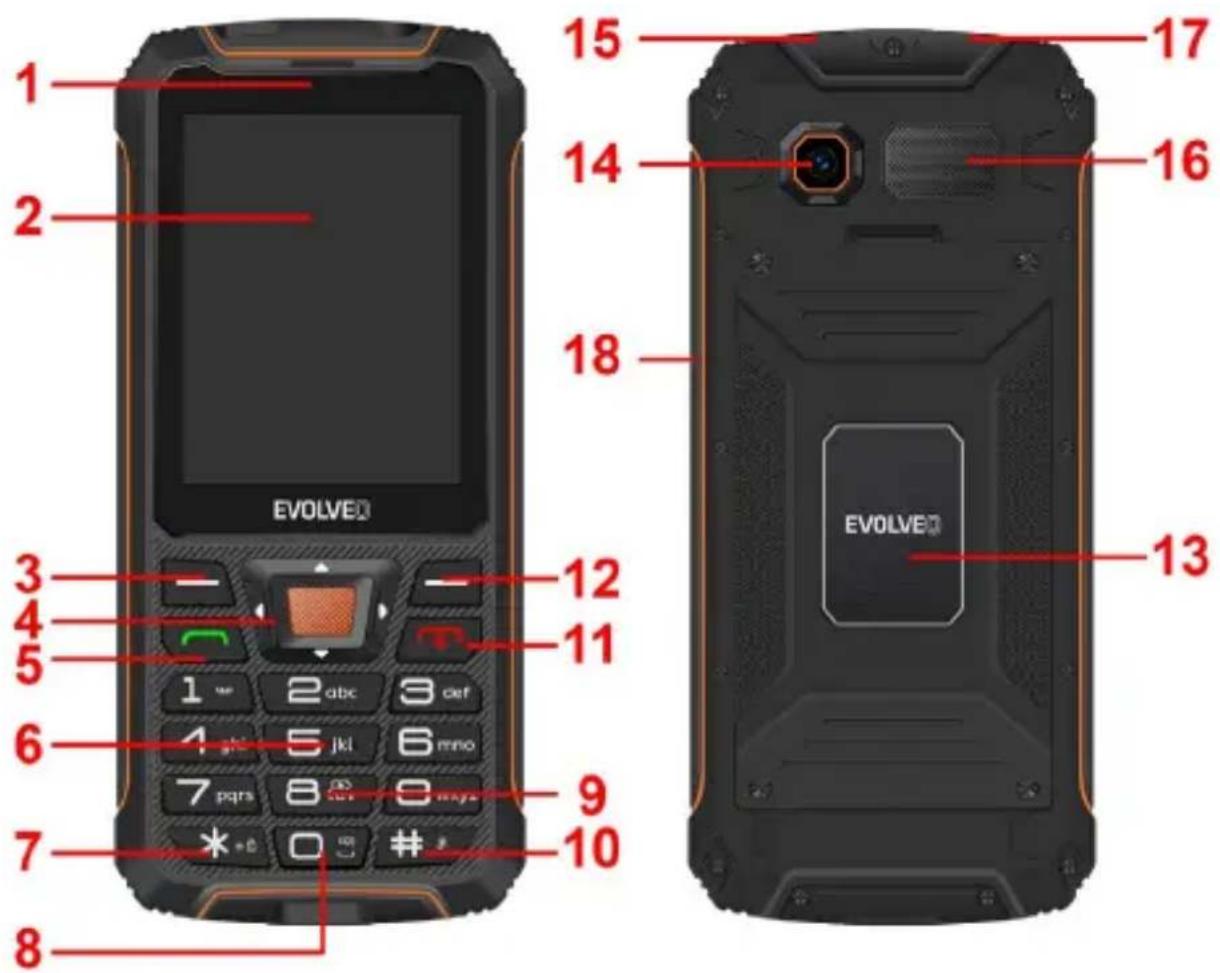
| PRINTS | FEATURES |
| Left function button LFT (3) | Press this button to enter the standby menu. You start the function, which is immediately displayed in the bottom left corner of the screen. |
| Right PFT function button (12) | Press this button to go to the contact list. You will go back to the previous menu. Delete the information you have written down. |
| Call button (5) | Press this button to start a call to the selected phone number. You will receive an incoming call. In standby mode, you can access your call history. |
| End of call button (11) | Switching off the phone: Hold the standby button longer to turn off the phone. Switching on your phone: Press and hold the button for a longer time to switch the phone back on. Press this button to return to standby mode. Press this button to end the call. Press on the main screen to turn off the display and lock the keyboard. |
| Navigation button (4) | You can move up and down, left and right in the menu. On the home screen, you will find quick access functions that can be set freely. The middle button is used to confirm an action or enter the menu. |
| Alphanumeric buttons (6) | In standby mode, they allow you to type in a phone number to dial, and in edit mode they allow you to type letters and numbers. |
| * button (7) | Press the "*" button twice in standby mode to enter the "+" symbol for international calls. In text writing mode, it allows you to insert special characters |
| Button 0 - flashlight (8) | Long press the button to switch the flashlight on/off |
| Button 9 - power bank (9) | Long press the button to turn the power bank on/off |
| Tlačítko # (10) | Switches the way you enter characters in text mode. Change profiles (long press). |
| Tlačítko SOS (18) | Long press the button to activate the SOS alarm |
Putting your phone into service
Inserting the battery
Follow these instructions to correctly and safely insert the battery into your phone.
- Remove the four screws on the battery cover and insert the battery. Make sure the battery is aligned correctly.
- Put the battery cover back on your phone.
- Check that the rubber seal is correctly fitted.
- Screw the four screws on the battery cover until they are tight.
To insert a SIM card and a MicroSD memory card
- Remove the four screws on the battery cover.
- Remove the battery cover.
- Remove the battery.
- Insert the SIM card(s) / MicroSD card into the slot marked SIM 1(2) / MicroSD.
- Check that the rubber seal is correctly fitted.
- Screw the four screws on the battery cover until they are tight.
Charging the battery
Connect the charger to the USB connector. Charging starts automatically. The phone can be charged both on and off Condition. The battery level is indicated on the phone screen.
Switching your phone on/off
Press and hold the end of call button (11) for 3 seconds.
Unlocking/locking the keypad
To wake up your phone, press the left function key (3) or the end of call key (11). Then press LFT (3) and then the * button (7) to unlock. To lock the keypad, press the end of call button (11) briefly. You can set the keypad to lock automatically in Menu/Settings/Phone settings/Show properties/Automatic keypad lock
Call
Enter the desired number on the keypad and then press the green button (5) to make the call.
To answer an incoming call, press the green button (5).
To reject the call, press the red button (11).
To adjust the volume during a call, use the Up/Down navigation button (4).
Basic functions
News
Your phone can receive and send SMS text messages. Use the navigation button Left (4) or LFT (3)/Menu/Messages to enter the menu.
From the Messages menu, you can write text messages, view, reply to, forward and delete received and sent text messages, write message concepts and make other settings.
Telephone directory
From this menu, you can edit contacts, e.g. add a new contact, move, copy or delete existing contacts. You can also set speed dials for numbers 2-9.
To enter the menu, use PFT (12) Names or LFT (3)/Menu/Phone List.
To add a phone number to the Phonebook
- Go to Phonebook → Add new entry.
- Select the storage (On SIM or To phone).
- Enter your name and phone number.
- Press LFT (3) and select Option → Save or Cancel, or press the navigation button (4) and save directly.
Speed dial settings
If you want to dial certain phone numbers even faster, you can assign contacts from the phone book to each of the 2-9 buttons.
- Go to Phonebook/Option/Directory Settings/Speed Dial/Status/Disabled.
- Select Set up numbers/Modify to assign speed dial numbers to contacts already stored in the phonebook.
Call history
To enter the menu, use LFT (3)/Menu/Call History.
Call history
Here's a list of your Missed Calls, Called Calls, Received Calls and All Calls. Press LFT (3) to open various options, e.g. View, Call, Send text message, Save to contacts, Add to blocked, Delete.
Call settings
Press LFT (3) to open the settings for each of your SIM cards, such as call waiting and call forwarding, you can also select the answer mode and set up blocked numbers.
Call waiting: Specify whether to signal a new incoming call with a call waiting tone when a call is already in progress.
- Go to Call history/Call settings/SIM 1 (SIM 2)/Call waiting
- Select Activate or Deactivate to save the settings.
- You need to check if the service is available.
To enable the service, contact your mobile service provider. Please note that the range of available features may vary depending on your mobile service provider.
Call forwarding:
Determine whether and in what situations incoming calls to your mobile phone should be forwarded to another designated phone number.
- Go to Call history/Call settings/Call settings SIM 1 (SIM 2)/Call forwarding
- Select the desired call forwarding settings (Forward all voice calls, Forward if not answered, Forward if call not answered, Forward if busy, Forward all data calls.)
- Select Activate/To new number to forward your calls to.
4. You can also Activate/Do voicemail
Confirm with Options/Ready and the settings will be saved.
Blocked numbers - Blacklist
You can block up to 20 phone numbers. If you use this feature, you will not be able to reach the phone numbers in the blocked numbers list.
The caller will automatically receive a signal that your number is busy. To add a phone number to the blocked numbers
- Go to Call history/Call settings/Advanced settings/Blacklist.
- Enter the phone numbers you want to add to the blocked numbers.
- Confirm by pressing Option/Finish and the settings will be saved.
Settings
Profiles
This mobile phone offers several profiles: Main, Silent, Meeting, Outside. You can tailor the settings to specific events or environments.
Here is a customization of Normal mode for demonstration.
- To access the menu, use LFT
(3)/Menu/Settings/Profiles/Main/Option/Activate
-
You can adjust the settings in the Customize menu.
-
Type of notice: Ring only, Vibrate only, Vibrate and ring, Vibrate and then ring
● Type of ringing: Repeat, Once - Ringtone: Sound 1, Sound 2....or select from the file.
- Adjust the ringtone volume using the navigation button.
● Report: Quiet, Tone 1, Tone 2,...Tone 5 - Use the navigation button to adjust the tone volume of the buttons.
- Switching on your phone: Quiet, Tone 1, Tone 2,...Tone 5
- Switching off the phone: Quiet, Tone 1, Tone 2,...Tone 5
Phone settings
Setting the SOS function
This mobile phone is equipped with an SOS function - if you long press the side button and hold for 1.5 seconds, the phone will automatically call and/or send a text message to your selected emergency contacts. If no SOS number is set, the "No emergency SOS number" warning will be displayed. Then you should first set up emergency contacts.
- To access the menu, use LFT (3)/Menu/Settings/Phone Settings/SOS/SOS/On.
- Press SOS Number - Press the navigation button to select a contact from the phone book, or press the left button to enter a phone number. There are 4 numbers available in the list.
- Select SOS SMS content to set the SMS content and whether to send an SOS message after an emergency call.
- You can also set the alarm sound status: on/off in the Alarm sound menu.
SOS will be stopped if any person answers the call or if no person answers the call even after the third dial.
Important Notice: The phone is equipped with the function of sending the approximate location of the phone via SOS message after triggering the SOS alarm. The phone uses the GSM mobile network to determine its location. The accuracy of positioning depends on the density of GSM network coverage - in cities the accuracy is tens to hundreds of metres, outside cities the accuracy is significantly lower.
There is no guarantee for this service and the accuracy of the results or availability of the service is in no way guaranteed phone supplier, operator or map provider. The provision of the service may be without the notification is terminated at any time.
Date and time settings
- To access the menu, use LFT (3)/Menu/Settings/Phone settings/Time and date/Set time/date.
- Enter the current time and date.
- Click Save to activate the settings.
Scheduled switch-on
Two scheduled times can be set to turn the phone on or off
Setting the language / writing language
To access the menu, use LFT (3)/Menu/Settings/Phone settings/Language or Typing language. Select the desired language.
View properties
Setting the wallpaper and home screen data, automatic keyboard lock
Navigation keys
Allows you to set four shortcuts from the phone menu.
Airplane mode
Shuts down all transmitters on the phone.
LCD settings
Adjust the brightness and backlight time.
Security settings
SIM 1 (SIM2) security: In this case, that means a PIN lock. You must enter the correct PIN code to activate the PIN lock. If you turn on the PIN lock, you must enter your PIN every time you switch on your mobile phone. If you enter an incorrect PIN three times in a row, you must enter the PIN Unblocking Key (PUK). The PUK is used to unlock and change the PIN. To get the PUK code, contact your SIM card provider.
Phone security
This feature allows you to lock/unlock your phone. If you enable it, you must enter the password, which defaults to 1234, every time you turn on your phone.
Restore factory settings
The default password is 1234. Keep in mind that once you restore the factory settings, everything you have stored on the device will be erased!
Multimedia
Your mobile phone can display and play various forms of multimedia content (photos, music and videos). Various applications are available.
- To access the menu, use LFT (3)/Menu/Multimedia
- To play music stored on your device or on a micro-SD memory card, select Audio player.
- To view the photos stored on your device or micro-SD memory card, select Image Viewer.
- To play videos stored on your device or on a micro-SD memory card, select Video player.
- Select VCR to record a video file
- Select Sound Recorder to record an audio file
FM radio
The mobile phone is equipped with an integrated radio that allows you to receive FM radio stations.
- To access the menu use LFT (3)/Menu/FM radio
- Go to FM Radio/Select, where you can either manually enter or automatically search for a channel, set to play in the background.
- Press the navigation button to switch on or pause the radio.
- Press the * (7) and # (10) buttons to adjust the volume.
- Use the right and left navigation buttons to switch to the previous or next available channel.
- Use the up and down buttons to increase or decrease the frequency value.
File management
Use the file manager to manage your files as needed. View, copy, move and perform other maintenance operations on files such as pictures, videos, music and apps stored on your phone or microSD card.
To access the menu, use LFT (3)/Menu/File Management
Camera
To enter the menu, use LFT (3)/Menu/Photo
The camera supports the shooting function, you can take photos by pressing the navigation button. Insert a microSD memory card into your mobile phone before using the camera.
Organizer
To enter the menu, use LFT (3)/Menu/Organiser
OTG charger
Your phone can be used as a power bank with OTG function to charge other devices.
- Go to Organizer/Charging OTG/Closed. It can also be activated and deactivated by holding down the 8 key in the main menu
- Connect your phone to another device using the OTG connector and USB cable.
Alarm clock
Five deactivated alarms are set by default. You can activate one, more or all of them as required. You can customize the settings for each alarm.
- Go to Organiser/Alarm clock/Select alarm settings/Edit
- Select Status/On to turn it on.
- Enter the desired time.
-
Select the number of repetitions: Once/Every day/Own
-
Select the alarm tone, five ringtones are available
- Save the selected settings.
Calendar
Use Calendar to create and manage events, appointments and visits.
- Go to Organizer/Calendar and the current month with the days of the week will appear.
- Use the navigation buttons to navigate horizontally and vertically.
Add an event to the calendar
- Press LFT (3) to open the main menu.
- Go to Calendar/Choices/Add Event.
- Enter the subject of the event - enter the date and time of the event - set the event type, reminder, recurrence method, event location, event description and save.
Calculator
The phone's handy built-in calculator allows you to perform basic mathematical operations.
- Go to Organizer/Calculator.
- Enter numbers using the numeric keypad.
- Press the appropriate button for the arithmetic operation
- Press the navigation button (=) for the result.
- Press the * button to enter 00.
- Press the # key to insert a decimal point.
- Press LFT (3) to clear all numbers.
Bluetooth
With Bluetooth, you can exchange data with other Bluetooth-enabled devices for free.
Bluetooth on/off:
- Go to Organiser/Bluetooth/Connections.
- Select On/Off to turn Bluetooth on/off.
Visibility:
You can choose whether to make your mobile phone visible to other Bluetooth devices in the vicinity.
- Select on/off to make your phone visible/invisible.
My device:
Find other Bluetooth-enabled devices in your area that you can connect to.
- Go to Organiser/Bluetooth/My devices/Search for a new device. Select the device you want to pair with and press the left or navigation button to pair.
- Follow the on-screen instructions. Your mobile phone is connected to the selected device.
Receiving information via Bluetooth
- When another device attempts to send a file to your phone via Bluetooth, a notification will appear.
- Press the left button to confirm receipt of the file.
Sending information via Bluetooth
- Find the files you want to share, press Options/Send/Transmit via Bluetooth.
- Select the name of the device you want to share the data with, or choose to search for a new device (see My devices for more information), then press the left key to send.
Notes
- Go to Organiser/Notes.
- Enter a note and save.
Maintenance instructions
Clean with a soft, lint-free cloth. Do not use detergents or solvents to clean the equipment.
The warranty does NOT cover:
- Installing firmware other than the one originally installed on the EVOLVEO phone.
- Electrical or mechanical damage to your phone caused by improper use (e.g. cracked display, cracked front or back cover, damaged USB power connector, SIM card slot, microSDHC card slot, headphone input, etc.)
- Damage to the speaker and headphones caused by metal particles.
- Damage from natural influences such as fire, water, static electricity, high temperature.
- Failures caused by normal wear and tear.
- Damage caused by repairs carried out by an unqualified person
- Your phone's firmware, if it needs updating due to changes in mobile network parameters.
- Mobile network failures
- The battery if it does not retain its original capacity after 6 months or more (the battery capacity warranty is 6 months).
- Intentional damage.
Warranty and post-warranty service
Repairs and servicing can only be carried out at an authorized service point for EVOLVEO products (more at www.evolveo.com), otherwise you may damage your mobile phone and lose your warranty.

Disposal: The crossed-out container symbol on the product, in the accompanying documentation or on the packaging means that in EU countries, all electrical and electronic equipment, batteries and accumulators must be disposed of separately at the end of their useful life as separated waste. Do not dispose of these products in unsorted municipal waste.
DECLARATION OF CONFORMITY
The company Abacus Electric, s.r.o. hereby declares that the EVOLVEO StrongPhone Z6 meets the requirements of the standards and regulations that are relevant for this type of device.
The full text of the Declaration of Conformity can be found at
http://ftp.evolveo.com/ce/
Importer / Manufacturer
Abacus Electric, s.r.o.
Planá 2, 370 01, Czech Republic
Producer / Producer / Manufacturer / Gyártó
Made in China
Copyright © Abacus Electric, s.r.o.
www.evolveo.com
www.facebook.com/EvolveoCZ
All rights reserved. The appearance and technical specifications of the product are subject to change without notice.

- Welcome to
- Phone description
- Putting your phone into service
- Inserting the battery
- To insert a SIM card and a MicroSD memory card
- Charging the battery
- Switching your phone on/off
- Unlocking/locking the keypad
- Call
- Basic functions
- News
- Telephone directory
- To add a phone number to the Phonebook
- Speed dial settings
- Call history
- Call settings
- Call forwarding:
- You can also Activate/Do voicemail
- Blocked numbers - Blacklist
- Settings
- Profiles
- Phone settings
- Setting the SOS function
- Date and time settings
- Scheduled switch-on
- Setting the language / writing language
- View properties
- Navigation keys
- Airplane mode
- LCD settings
- Security settings
- Phone security
- Restore factory settings
- Multimedia
- FM radio
- File management
- Camera
- Organizer
- OTG charger
- Alarm clock
- Calendar
- Add an event to the calendar
- Calculator
- Bluetooth
- Bluetooth on/off:
- Visibility:
- My device:
- Receiving information via Bluetooth
- Sending information via Bluetooth
- Notes
- Maintenance instructions
- The warranty does NOT cover:
- Warranty and post-warranty service
- DECLARATION OF CONFORMITY
Brand : Evolveo
Model : StrongPhone Z6
Category : Smartphone