
Crater L - Charging Station / Docking Station Orava - Free user manual and instructions
Find the device manual for free Crater L Orava in PDF.


| Product Type | Speaker system with Bluetooth, FM radio, USB, microSD, AUX, microphone inputs, LED lighting, remote control |
| Dimensions (W x H x D) | 26.8 x 61.6 x 27.1 cm |
| Weight | 5.5 kg |
| Power Supply | AC 230 V, 50 Hz via adapter (DC 9 V, 1 A) or built-in rechargeable Li-Ion battery 7.4 V, 4000 mAh |
| Battery Play Time | Approx. 2 - 5 hours (depending on volume) |
| Audio Output Power | 50 W (RMS) |
| Bluetooth | Version 5.0, profiles A2DP and AVRCP, range up to 10 m |
| FM Radio Tuning Range | 87.5 - 108 MHz |
| Playback Media | USB flash drive (up to 16 GB), microSD card (up to 16 GB), MP3/WMA files |
| Input Connectors | AUX IN 3.5 mm, MIC 1 & 2 (6.3 mm audio), USB, microSD, DC 9 V power |
| Equalizer Presets | POP, ROCK, JAZZ, CLASSICAL, FLAT |
| Audio Control | Volume, treble, bass, echo, microphone level adjustment |
| Recording | Microphone recording to USB/microSD in MP3 format; playback and delete functions |
| True Wireless Stereo (TWS) | Pair two Crater L speakers for stereo sound |
| LED Lighting | Around speakers, on/off/effect change via LED button |
| Safety Class | Class II (double insulation) |
| Cleaning | Soft cloth with mild cleaning solution; no abrasive pads or solvents |
| Repair and Spare Parts | No user-serviceable parts; battery non-removable; contact authorized service center |
| Intended Use | Home and similar indoor use (shops, offices, hotels, etc.) |
Frequently Asked Questions - Crater L Orava
User questions about Crater L Orava
0 question about this device. Answer the ones you know or ask your own.
Ask a new question about this device
Download the instructions for your Charging Station / Docking Station in PDF format for free! Find your manual Crater L - Orava and take your electronic device back in hand. On this page are published all the documents necessary for the use of your device. Crater L by Orava.
USER MANUAL Crater L Orava
Speaker system with Bluetooth interface, FM radio, USB and microSD slot

Crater-L
Instruction manual
EN
natural_image
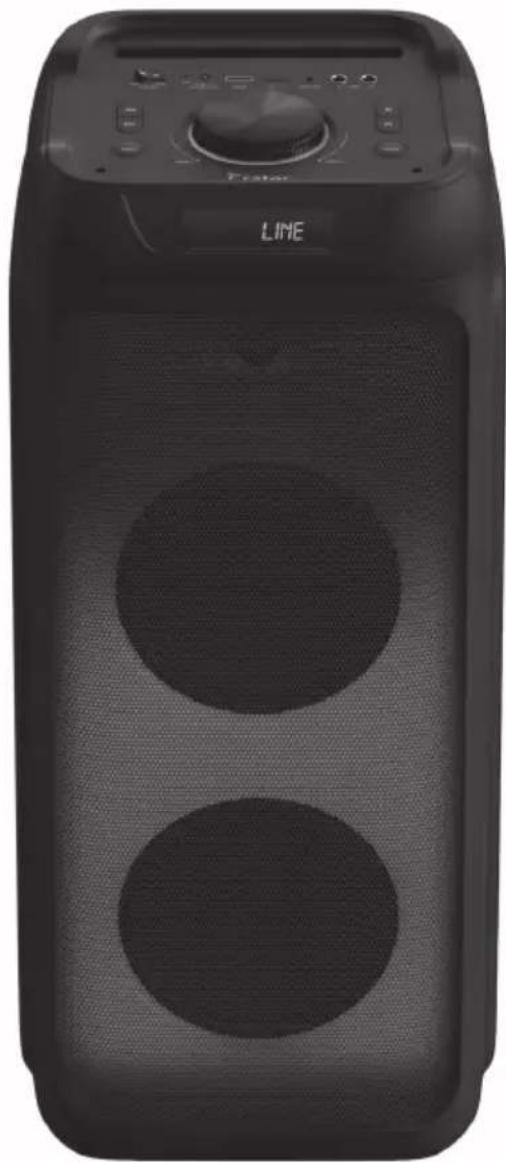
Black electronic device with two circular cutouts and a digital display showing 'LINE' (no readable text or symbols on body)CE
Crater L
Intended use of the device
The device is intended solely for playback of audio signal from a mobile phone or other digital device or source (wirelessly using Bluetooth® technology, or even via a cable connection), to the extent determined by technical and operational parameters and functions, security and user instructions and external impacts of the operating environment.
ORAVA electrical appliances are manufactured according to the state of the art and recognized safety rules. Nevertheless, improper and unprofessional use or use contrary to the intended use may result in injury or danger to the life of the user or third party. damage to equipment and other material values.
1. GENERAL SAFETY INSTRUCTIONS AND WARNINGS
- This document contains important safety instructions and warnings for safe, correct and economical operation of the electrical equipment. Its compliance helps the user avoid risks, increase reliability and product life.
- In this document, the general term product is used in text parts such as: electrical equipment - any device used for the production, conversion, transmission, distribution or use of electricity.
-
From the point of view of the purpose of using electricity, the concept of electrical equipment in the strict sense of the word will include the following categories:
-
household electric appliances,
- information and communication equipment,
- consumer electronics,
- lighting equipment,
- electrical and electronic tools,
- toys and equipment for sporting and recreational purposes,
- medical devices (aids),
- monitoring and control devices,
- vending machines.
1.1 General safety instructions
- Before operating the unit, we recommend that you carefully read the instruction manual and operate the equipment in accordance with the instructions!
- The safety instructions and warnings in this manual do not cover all the possible conditions and situations that may arise when using the device. The user must understand that a factor that cannot be incorporated into any of the products is personal responsibility and caution. These factors must therefore be ensured by users serving this device.
- Failure to follow the safety instructions and warnings is forbidden by the manufacturer for any damage to health or property!
- Keep the instruction manual as close to the device as possible throughout its service life. Always keep the instruction manual together with the appliance for future use and use by new users.
- Use the appliance only for the intended purpose and in the manner specified by the manufacturer.
-
The appliance is intended for home and similar indoor use without special focus.
-
This appliance is intended, in addition to domestic use, for the following uses:
- in shops, offices and other similar work environments;
- in economic buildings;
- in hotels, motels and other residential environments;
- in bed and breakfast establishments.
- It is not a professional device for commercial use.
- Do not change the technical parameters and features of the device by unauthorized modification or modification of any part of the device.
- The manufacturer is not responsible for damages caused during transportation, misuse, damage or destruction of the equipment due to adverse weather conditions.
1.2 Safety of the operating environment
- Do not use the device in an industrial environment or outside environment!
- Do not expose the appliance to:
- sources of excessive heat or open flame,
- dripping or splashing water,
- vibration and excessive mechanical stress,
- insects, animals and plants,
- aggressive and chemical substances.
- The operating environment of the device must always be in accordance with the basic characteristics set out.
- Features of the operating environment:
-
Ambient temperature: +5 \~ +40 °C
-
Humidity: 5 \~ 85%
-
Altitude: ≤ 2 000 m
-
Occurrence of water: intermittent condensation of water or occurrence of water vapor
-
Occurrence of foreign bodies: quantity and type of dust are insignificant
-
Protection degree: min. IP20 (device protected from touching dangerous parts by hand and non-waterproof)
- This degree of protection is not indicated on the product and on the technical parameters in the operating instructions.
- If the protection class of the product is different from IPX0, this information is then displayed on the label of the appliance or in the technical data of the operating instructions.
- Other characteristics of the domestic operating environment (mechanical stress - vibrations and vibrations, occurrence of plant, animals, weather effects ...) are negligible in terms of effect on the correct and safe use of electrical equipment.
1.3 Electrical safety
- Before connecting the appliance to the power supply for the first time, make sure that the voltage on the appliance label corresponds to that of the household electrical outlet.
- The electric appliance is designed to power from 1 / N / PE \~ 230 V 50 Hz.
- The electrical safety of the appliance is guaranteed only if it is properly connected to the mains.
- Electrical protection class I equipment is equipped with a protection against electric shock by means of protective earthing of inanimate parts, which can become dangerous when the device is malfunctioning. Always connect such devices to properly installed mains sockets that are equipped with earthing conductors and have a properly grounded earthing conductor.
All electrical equipment is equipped with a three-wire power supply.
- Class II electrical equipment is protected against electric shock by double insulation or by enhanced insulation of hazardous live electrical parts. Device of protection class II it must not be equipped with means to connect protective earthing.
All electrical equipment is equipped with two-wire power supply.
- Class III electrical equipment is a device that is powered by a small safe voltage source (battery or accumulator) and does not present any danger to the user from electrical shock.
- In order to provide increased safety against the risk of electric shock due to the use of electrical appliances by laypersons, it is recommended to install the power supply circuit for sockets with a rated current not exceeding 20 A RCD with a rated operating current not exceeding 30 mA.
To ensure the safety and correctness of the electrical installation, consult a qualified electrician. - Only use a power cord with a plug (mains lead) supplied with the device and compatible with a wall socket. Using another cable may result in fire or electric shock.
- Always connect an electrical appliance to an easily accessible mains socket. In the event of an operating fault, the appliance must be switched off as soon as possible and disconnected from mains supply.
- The power cord and mains plug must always be easily accessible for safe disconnection of the electrical appliance from the power supply.
- Do not pull off the power cord by pulling the cable. Disconnect the power cord by pulling the plug behind the power cord plug.
- If you use an extension cord, make sure that the total rated power of all devices connected to the extension cord does not exceed the max. current load on the extension cable.
- If you need to use an extension cord or power supply block, make sure that the extension cord or power pack is plugged into a power socket, and not to another extension cord or power supply. The extension power cord or power supply block must be designed for grounded electrical plugs and connected to a properly grounded electrical socket.
- The power plug of the appliance must be compatible with the mains socket. Never use any adapters or modify the socket in any other way. Do not use inappropriate or damaged drawers!
- To avoid electrical shock, plug the power cables into properly grounded electrical sockets. If the device is equipped with a 3-pole plug, do not use adapters that do not have a grounding element or remove the grounding element from the plug or adapter.
- Do not bend, crush or otherwise expose the power cord of the appliance to mechanical stress or external heat sources. Damage to the power cord may result in electric shock.
- When the power cord is damaged, disconnect the appliance from the mains and do not use it again.
- If the power cord is damaged, it must be replaced by the manufacturer, its service department or a similarly qualified person to avoid the risk of electric shock.
- Regularly check and maintain the electrical appliance as well as the power cord and power socket. Disconnect the power plug regularly and clean it if necessary. Pollution by dust or other substances may cause disruption of the insulating state and consequently fire.
- Do not expose the appliance to water or moisture. The ingress of water into the appliance increases the risk of electric shock.
If the power cord is wet or the water has penetrated the water, disconnect it immediately from the mains. If the appliance is plugged into a mains socket and if possible, turn off the power circuit before attempting
unplug the power. If you are pulling wet wires from a live power source, be very careful.
- If the electrical equipment is installed (connecting) the protective covers are dismantled, the electrical parts must not be accessible to the user when the installation is finished.
1.4 Safety of persons
- This appliance is intended for use and operation by persons without electrotechnical qualification - lay people, according to the instructions specified by the manufacturer.
- Device operation includes activities such as switching on and off, user manipulation and setting of operating parameters, visual or auditory inspection of the equipment, and user cleaning and maintenance.
- This appliance can be used by children under the age of 8 and persons with reduced physical, sensory or mental capabilities or lack of experience or knowledge when supervised or instructed to use the appliance safely and understand the dangers involved.
• Children may not play with the appliance.
• Cleaning and maintenance for users may not be performed by children unattended.
- Always keep the appliance out of reach of children during use and operation. Be sure to download the appliance even for a freely accessible power cord.
- Always be careful when operating the electric appliance! Do not use an electric appliance if you are overly tired, under the influence of medication or narcotic drugs that reduce attention and focus.
- Inattention during operation may result in serious injury.
1.5 Cleaning, maintenance and repairs
- Observe the normal user cleaning and maintenance of the appliance in the recommended way. Do not use solvents or harsh cleaners for cleaning. Pollution and visible stains from finger contact, respectively. The hands can be cleaned using detergent detergents specially designed to clean household appliances.
- If you do not use the appliance, clean it or disconnect the appliance from the power supply when the appliance is faulty.
- Electrical appliances that are cleaned after use and are not intended to be completely or partly immersed in water or other liquid, protect against the effects of dripping and / or splashing water and before immersion.
- Electric household appliances, like all other technical devices, are subject to the surrounding environment and natural wear. Since the legal framework of regular maintenance is not laid down for lay-in electrical household appliances, the manufacturer recommends that the user have the appliance checked and cleaned at least once a year by a specialist workshop.
- By doing so, it is possible to achieve safety, operational reliability and increased service life.
- Do not disassemble the electric appliance! The appliance works with a dangerous voltage. For this reason, always switch off the appliance and disconnect it from the mains supply during user maintenance. In the event of a fault, please have the repair serviced by an authorized service center.
• Before calling a service: - Verify that you are unable to remedy the malfunction yourself according to the procedure described in the chapter „Remedy of operating faults“.
- Turn the appliance off and on to make sure the fault reappears.
- If the malfunction of the appliance still persists after these operations, call the nearest specialist service center.
- Never repair the electric appliance yourself!
- Unauthorized, unqualified and improper use of an electric appliance may result in electric shock or other serious injury.
- Only carry out the warranty or post-warranty repair of an electrical appliance to an authorized qualified person (*).
(*) Competent qualified expert: the sales department of the manufacturer or importer or the person qualified and authorized to carry out this type of activity with the ability to avoid all risks.
2. Special safety instructions. Read carefully!
- The electrical equipment is designed and manufactured in such a way as to enable safe operation and use by unqualified persons. Despite all measures taken by the manufacturer for safe use, operation and use, there are certain residual risks and the associated hazards.
- To warn of possible dangers, the equipment and the following symbols are used in the accompanying documentation and their meaning:
This symbol alerts users that the device is working with dangerous electrical voltage. Do not remove the protective covers on the device. Failure to observe the safety instructions for the use and operation of the device may result in:
Danger of electric shock! Danger of serious injury or death!
This symbol alerts users to the risk of serious injury or death if the safety instructions for the use and operation of the device are not observed! Danger of equipment damage or other property damage!

This symbol means that the product is made with double insulation between dangerous live parts (parts with dangerous mains voltage) and parts that are accessible during normal use.
Transportation/Transfer
- Only transport / transport the device after a thorough inspection of the area and the route, which must be unobstructed.
- Never carry the device while it is in operation. Do not carry the device while it is plugged in.
- When carrying, make sure that your hands and the device are not wet or slippery.
Danger of serious injury or death!
Danger of damaging the device!
Expand/Packaging
- Before putting the device into operation, unpack the device and dispose of all its parts and accessories with residues of packaging materials, labels and tags. Keep all packaging materials in a safe place or keep them out of the reach of children and incompetent persons.
Danger of serious injuries!
Danger of suffocation!
Inspection/Commissioning
- Never use the appliance if it is incomplete, damaged or any part of it has been damaged during use. Have the device repaired by a specialist garage.
Danger of serious injuries! - Children under the age of 3 must be denied access to the appliance unless they are constantly supervised.
- Children from the age of 3 and under the age of 8 must not plug, regulate or clean the appliance or perform maintenance by the user.
Warning!
- Cleaning and maintenance that can be performed by the user must not be performed by children without supervision. Keep the appliance and its mains cord out of the reach of children under 8 years of age when it is plugged in or cold.
• The device is intended for household use.
- Do not use the device in an industrial environment or outdoors.
- Before connecting the appliance to the mains, make sure that the rated voltage indicated on the type plate of the appliance corresponds to the voltage in your socket.
- Only connect the device to a properly grounded outlet.
- Do not leave the appliance unattended when it is connected to the mains.
Operation/Use
Warning!
- In places where the use of mobile phones is not permitted, or where the device may cause interference or danger, such as on an airplane, in hospitals, or near highly sensitive electronic medical devices, fuels, chemicals, or shots. with the help of explosives, switch off mobile devices.
- Follow all safety instructions and warnings in these areas.
- Wireless audio devices that operate in the 2.4 GHz band may interfere with other wireless devices or networks.
- If this unit is placed too close to other Bluetooth® devices or devices using the 2.4 GHz or 5 GHz frequency band, it may not work properly and noise and / or audio dropouts may occur due to radio wave interference.
Warning!
- The speaker system for a mobile phone is a device that, in use, is associated with a change (reduction) in the perception of the surrounding sound stimuli. If you perform any activities that are accompanied by an increased level of risk or endangerment of yourself or others in your area, always monitor your surroundings carefully to avoid causing injury to yourself or others.
- Be very careful when using the device. In particular, be careful when: driving a car, driving and riding a motorcycle, riding a bicycle, or driving and riding another means of transport, where ATTENTION is required in the conditions of movement on public roads or public spaces where there are many people in the pursuit of leisure activities.
Warning!
- The device is intended only for operation with a built-in battery, which must not be replaced by the user (the device is non-removable) and whose type and technical parameters are specified in the technical information of the operating instructions.
- Make sure that all cable connections are securely and correctly connected. Do not insert any conductive objects into the connectors on the device.
- When connecting and disconnecting connector connections, pull the connections by the connectors, never pull the connection by the cable itself.
- Do not tie signal cables in common bundles. Do not wind the cables together. Do not subject signal cables to mechanical stress or damage.
- Do not let the signal cables hang freely and allow them to be freely accessible and accessible to children.
Danger of serious injuries!
There is a risk of electric shock!
- The device contains parts of covers (eg ventilation grilles), which can become hot during normal operation. Do not cover the ventilation grilles.
- Never leave the device freely accessible and do not store it with a freely accessible cable. Children could pull the device by the cord.
Danger of serious injuries!
- Do not store the device with the cord wrapped around its body. Cable loose "Fold" in the way it was folded in the original packaging from the manufacturer.
- Never overload the device above the limits set by the technical parameters!
- If you notice any abnormalities (sounds, odors, smoke ...) while using the device, turn off the device immediately and disconnect it from the mains. Have the device checked by a specialist garage.
- Never underestimate the possible dangers and take extra care !!!
Bluetooth® technology
- Bluetooth ^® technology is a wireless short-range radio signal transmission technology that enables wireless data communication and synchronization between a digital device, mobile phone, and headset.
- ORAVA is not responsible for any incidental or consequential damages or other damages or disclosure of data and/or information that may occur during wireless transmission.
Frequency band
- This technology uses the 2.4 GHz non-licensed microwave radio frequency band.
Certifications
- This device adheres to frequency constraints and has been certified to comply with statutory regulations concerning frequency bands. Therefore, no wireless transmission authorization is required.
The following actions are illegal:
- separation from the main device,
- removing parameter labels.
Designation of use
• This system is intended for normal general use.
- Microwaves from Bluetooth devices may adversely affect the functions of electronic medical devices.
- Do not use this system near equipment or in a high-frequency interference sensitive environment, for example:
- places with the presence of combustible gas,
- spaces near automatic door systems, alarm systems such as:
- airports,
- Hospital
- laboratories
- gas stations etc.,
as interference to broadcasting can cause an accident
Restrictions in use
- Wireless transmission and/or use with all Bluetooth® devices can not be guaranteed.
- All devices must comply with standards set by Bluetooth SIG, Inc.
- Depending on the parameters and settings of the devices, connection may not be performed or some operations may be different.
- This system supports Bluetooth® security features. However, in some operating environments or under certain settings this may not be sufficient. Be careful when transmitting data wirelessly to this system.
Range of use
- Use a wireless device at a distance of up to 10 m.
- Various types and environmental characteristics, barriers or interference can reduce the range of transmission (eg metal barriers, walls, people ...).
Interference with other devices
- If this device is located too close to other Bluetooth ^ devices or devices using the 2.4 GHz frequency band, they may not work properly and may problems with noise and/or sound interruptions caused by radio waves interference.
- This system may not work properly if radio waves broadcast by a nearby radio station or similar device are too strong.
Other
- If you feel inconvenience when using Bluetooth ^® , stop using the Bluetooth device immediately.
- If any problem persists, contact your nearest ORAVA dealer.
Licenses
- The Bluetooth ^® word mark and logo are owned by Bluetooth SIG, Inc. and any use thereof by ORAVA retail 1, a.s. is subject to a license.
- Other trademarks and trade names are the property of their respective owners.
Power supply
Power supply
The device is powered from the mains 230 V, 50 Hz via the supplied AC adapter. Connect the output connector of the AC adapter to the DC 9V-1 A connector on the device and connect the AC adapter to the specified electrical socket.
Use the power switch on the top to turn the device to the ON position.
You can then switch the device to standby mode and only switch it on using the ⏻ button on the remote control.
When you have finished using the device for an extended period of time, turn off the device with the main power switch to the OFF position and disconnect the adapter cord from the electrical socket.
Powered by built-in rechargeable battery
The device can also be powered by a built-in rechargeable Li-Ion battery 7.4 V, 4000 mAh. Before using for the first time or whenever the battery is low (the battery/power LED will turn red, or the sound will be distorted, weak, or the device will turn off completely at will), charge the battery.
The device battery is charged automatically from the mains when the device is connected to the mains.
When the battery is fully charged, the battery indicator light turns green.
The device will be powered by the built-in battery when the AC adapter is not connected to the device to the DC 9V-1 A connector. Then you can use it on a battery (for example in nature).
When running on battery power, the playback time is about 2 - 5 hours, depending on the set volume.
Parts description
Elements on the device (Top side)
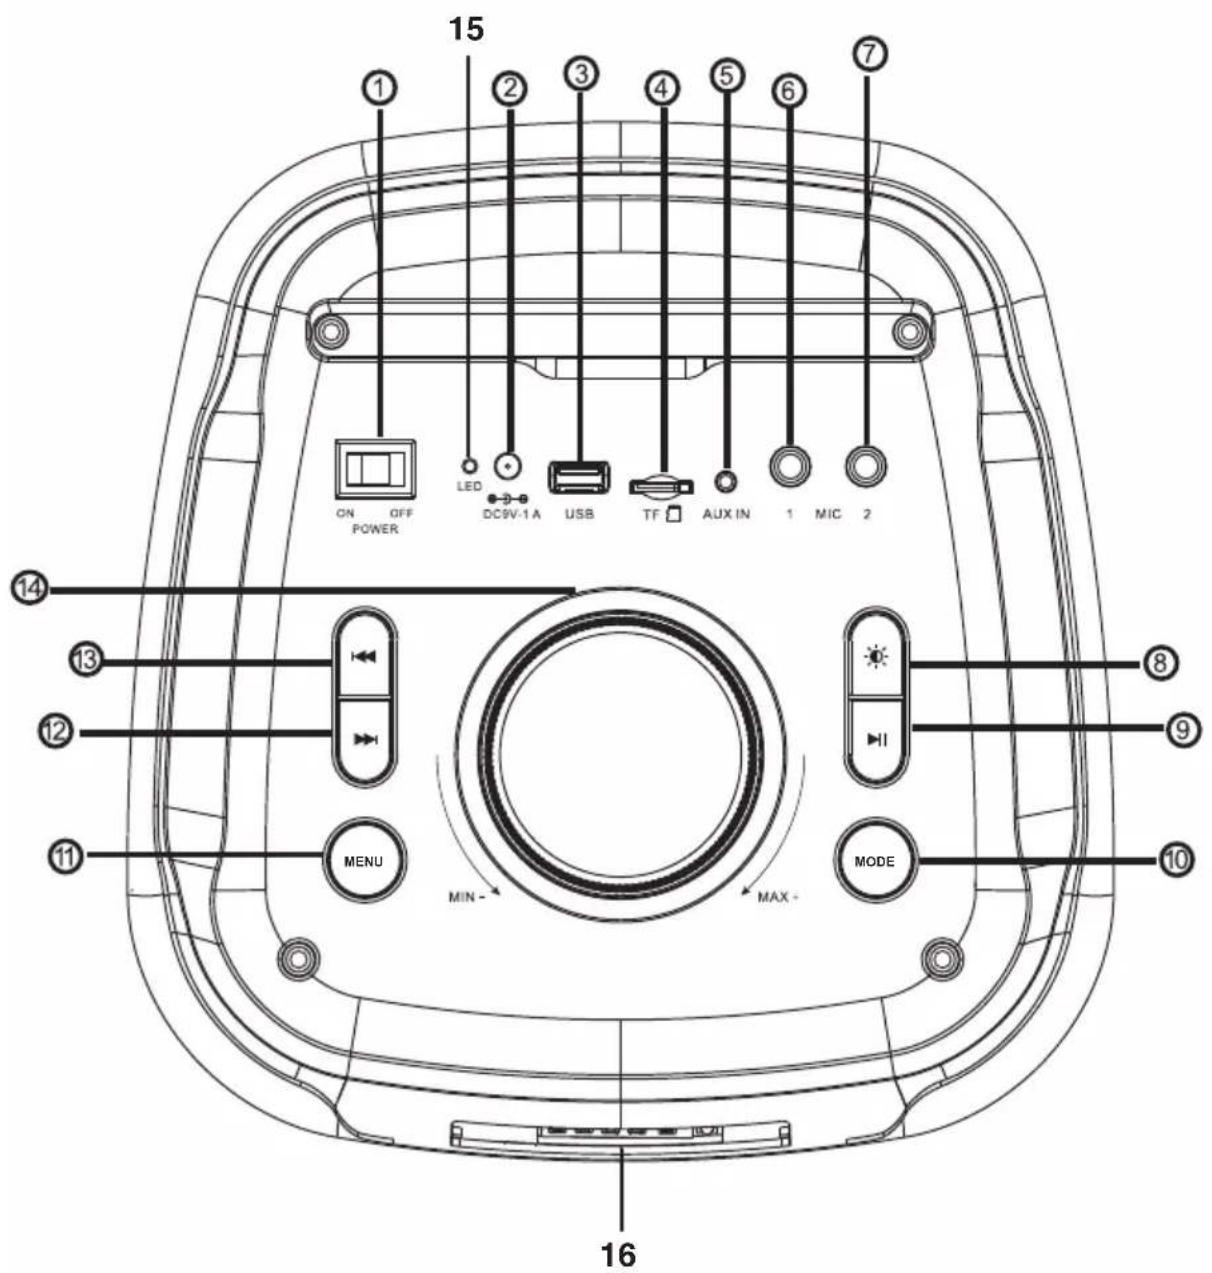
Top side
1 ON/OFF switch
2 DC 9V 1 A (AC adapter power connection)
3 USB connector (Playback from a USB memory device)
4 microSD card slot ( playback from microSD memory unit)
5 3.5 mm AUX IN mini connector (Connecting an external audio source)
6 6.3 mm audio connector MIC 1 (Cable microphone connection 1)
7 6.3 mm audio connector MIC 2 (Cable microphone connection 2)
8 LED (LED) button (Turn on/off/ change the effect LED lighting around the speakers)
9 Button ▷□□
(Play/Pause/Stop playback/Start auto tuning and store all available FM stations)
10 MODE button
(BT/FM/AUX/USB/microSD audio source switching
When pressed and held for approx. 3 seconds, switch on/off sound messages)
11 MENU button
(Switching items for treble/bass/echo/microphone level adjustment. After selecting an item, turn the volume knob to adjust)
12 ▷▶ button
(Switching tracks forward/Switching stored FM presets up - short press/Fast forward in the track being played/Starts manual tuning of an FM station up (push and hold))
13 ◀◀◀ button
(Rewind tracks/Rewind stored FM presets - Short press/Fast rewind in the track being played/Start FM tuning down manually (push and hold))
14 VOLUME control
(Adjust volume and sound level - rotate left and right)
15 LED indicator (Power/battery charge indicator)
16 LED display
(Viewing audio source and various information)
Front of the device - not shown.)
Remote control
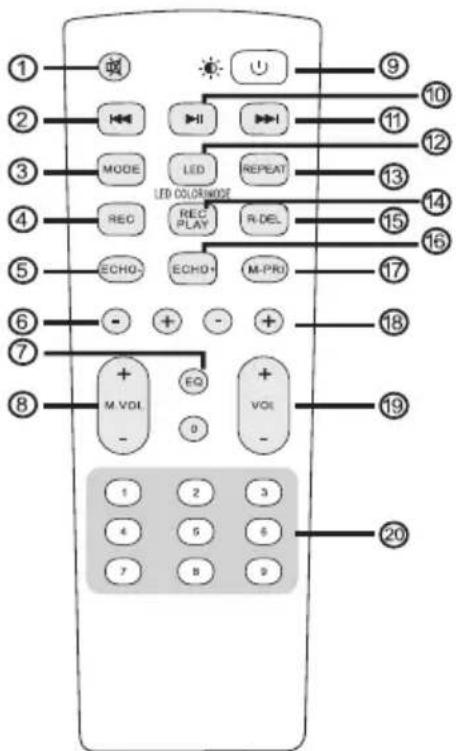
1 ◀ (MUTE) button (Mute. Press again to turn on the sound)
2 ◀◀ button (Rewind tracks/Switch to the previously stored FM preset Press and hold: Fast rewind the track being played/Start FM station manual tuning down)
3 MODE button (Switches the BT/FM/AUX/USB/microSD audio source Press and hold for approx. 3 seconds to turn voice messages on/off)
4 REC button (Start recording)
5 ECHO- (Decrease echo level) button
6 -/+ button (Decreases / increases bass level)
7 EQ button (POP/ROCK/JAZZ/CLASICAL/FLAT equalizer)
8 M.VOL -/+ button (Decreases/increases the microphone level)
9 Button ⏻ (Switch the device to and from standby mode)
10 Button ▷□ (Play/Pause/Stop playback/Start auto tuning and store all available FM stations)
11 ▷▶ button (Switch tracks forward/Switch to the next stored FM preset Press and hold: Fast forward the track being played/Start FM station manual tuning up)
12 LED button (Turn on/off/change the effect LED lighting around the speakers)
13 REPEAT button (Repeat 1 track/entire content)
14 REC PLAY button
15 Start R-DEL button
16 ECHO+ button (Increase echo level)
17 M-PRI button (Singing/speaking to the track being played: when the button is pressed during playback from a USB/microSD card, the playback sound is suppressed and the sound from the microphone is played)
18 -/+ button (Decrease/increase treble level)
19 VOL -/+ button (Decrease/increase volume level)
20 Number buttons 1-9
(Entering tracks directly when playing from USB/microSD. To enter, for example, track 12, first press button 1 and then button 2)
Switch the device on/off and adjust the sound
1 After connecting to the mains, switch on the device with the main switch on the top to the ON position for mains supply. To power from the built-in battery, disconnect the AC adapter from the DC 9V-1 A connector on the device.
The LED display and LED indicator light up and the device turns on.
2 Rotate the VOLUME control during playback to adjust the volume.
3 To switch off the device to standby mode, press ⏻ on the remote control. Then you can also turn it on from standby mode.
Connection of external devices
Connect the desired audio device to the 3.5 mm AUX IN connector, 6.3 mm MIC 1 or 2 connector with a suitable optional audio cable. Then use the MODE button to select the desired audio source.
Play audio from external audio device/TV/microphone
1 Connect an audio or headphone output from another audio device, TV, microphone to the appropriate audio input connector on the top of the device using a suitable optional audio cable.
2 Turn on this unit, then briefly press the MODE button on the unit or remote control to select the audio source for the connected audio source (AUX, etc.).
3 Start playback on the connected external audio device / TV, speak into the connected microphone and set the volume on the connected device to the appropriate volume.
4 Turn VOLUME on the unit or press VOL +/- on the remote control during playback to adjust the volume. The set volume is shown on the display.
You can select the desired treble/bass/echo level item with the MENU button, then turn the VOLUME control to adjust the level of the desired item. You can also make these settings directly using the remote control and the corresponding buttons.
You can use the EQ button to select the desired POP/ROCK/JAZZ/CLASICAL/FLAT equalizer preset.
When playing sound from the microphone, adjust the microphone volume by pressing the M.VOL button -/+ on the remote control.
For these audio sources, you can also adjust the echo by pressing the button ECHO-/ECHO+ on the remote control. The MIC 1 or MIC 2 function works simultaneously with all inputs (KARAOKE).
5 When playing sound from the microphone by pressing the M-PRI button, the currently playing sound is muted when singing into the microphone. Pressing the button again will turn off the mute function and the sound from the microphone will sound at the same time as the music.
Bluetooth playback from a Bluetooth device
1 Turn on the Bluetooth interface on your Bluetooth device (phone, tablet, etc.). For details, refer to the operating instructions of the device.
2 Turn on this unit, then press MODE to select Blue (Bluetooth) audio source. The device will be in Bluetooth mode, the Blue indicator will flash slowly on the display and the device will be ready for pairing.
3 On your Bluetooth device (phone, tablet, etc.), search for available Bluetooth devices. For details, refer to the operating instructions of the device.
When Crater L appears on the display of your Bluetooth device, select it and wait until a confirmation message with the Crater L appears on the display of your Bluetooth device and a the message “Bluetooth Connected” sounds from that device and the Blue indicator stops flashing and stays lit.
If a password is required, enter 0000.
4 After pairing, you can start playback on your Bluetooth device and set the volume on it. For details on controlling playback on your device, refer to the operating instructions of the device.
The sound from the paired device will be reproduced by this speaker system.
Playback operations
(The paired device must be compatible with the AVRCP bluetooth profile, if not, playback cannot be controlled from this speaker system, only from the connected device)
Playing
Press ▷ to start playback.
Suspension
During playback, press ▷. Playback pauses. While paused, press ▷ again.
Playback resumes.
Feed back:
Scroll to the beginning of the current (single press) or previous tracks (press repeatedly) and play them automatically.
Feed forward:▶▶▶
Skip to the next track (s) (single press or repeat) and play it automatically.
5 Turn VOLUME on the unit or press VOL +/- on the remote control during playback to adjust the volume. The set volume is shown on the display.
You can select the desired treble/bass/echo level item with the MENU button, then turn the VOLUME control to adjust the level of the desired item. You can also make these settings directly using the remote control and the corresponding buttons.
You can use the EQ button to select the desired POP/ROCK/JAZZ/CLASICAL/FLAT equalizer preset.
6 When playback is finished, turn off the Bluetooth source on this unit, stop playback on your Bluetooth device, and turn off the Bluetooth interface on it.
Note
It is no longer necessary to pair again after pairing the devices. The devices will reconnect automatically when you turn on the Bluetooth audio source on this device and turn on the Bluetooth interface on your Bluetooth device.
Warning
There may be sound when playing via Bluetooth.
These outages are caused by interference, greater distance, obstacles, etc. This is not a malfunction of the unit.
True Wireless Stereo (TWS)
If you have two Crater L speakers, you can pair them with each other and reproduce real stereo sound from the connected speaker using the two speakers and a paired Bluetooth device via Bluetooth.
1 Turn on the Bluetooth interface on your Bluetooth device (phone, tablet, etc.). For details, refer to the operating instructions of the device.
2 Turn on these two Crater L devices and turn on Bluetooth mode on them. The devices will be ready to pair with another Bluetooth device.
3 Press and hold ▷ on any speaker for approx.
For 2 seconds, you activate the search for one speaker by another (during the search, "SLAV" will flash on the LED display). Both speakers automatically pair with each other and connect to each other. After a successful interconnection, "SLAV" will be lit continuously on the display of the given speaker, which means that both speakers are paired with each other and connected to each other. One speaker will reproduce the left channel and the second right channel speaker.
The speaker on which “BLUE” is lit is the host speaker, and the speaker labeled “SLAV” will be a connected speaker (Slave).
4 On your Bluetooth device (phone, tablet, etc.), search for available Bluetooth devices. For details, refer to the operating instructions of the device.
When Crater L appears on the display of your Bluetooth device, select it and wait until a confirmation message with the Crater L appears on the display of your Bluetooth device and a beep sounds from that device and the Blue indicator stops flashing and stays lit.
Now both speakers can simultaneously play music via Bluetooth in real stereo sound.
Follow the steps in "Playing via Bluetooth from a Bluetooth Device" to play.
5 Disconnect two paired speakers
To clear the TWS pairing memory, press and hold ▷.
Notes:
- This function requires 2 Crater L speakers on.
- If no Crater L speaker is connected to another Bluetooth device before TWS pairing, you will need to pair.
- If both Crater L speakers have already been paired with another (third) Crater L speaker, the TWS pairing memory must be cleared first, otherwise the two speakers cannot be paired successfully.
Press and hold ▷ on both of these speakers to clear their pairing memory.
Playback from USB drive
MP3/WMA file playback
The speaker can play MP3/WMA format in audio quality comparable to a CD. You can play files from a USB memory device with a capacity of up to 16 GB. You can play the files using the buttons on the device.
1 Connect a USB memory device to the USB connector.
The unit must contain audio files.
2 Automatically switches the input to USB even if another input was previously selected.
3 Playback from that media starts automatically from the first audio file on the media. If playback does not start automatically, press ▷ on the device to start it.
4 Press ▶▶▶ and ◀◀◀ on the unit or remote control briefly during playback to switch tracks back and forth.
Press and hold ▷▶▶ and ▪◀◀ on the unit or remote control during playback to fast forward or rewind the current track.
5 Turn VOLUME on the unit or press VOL +/- on the remote control during playback to adjust the volume. The set volume is shown on the display.
You can select the desired treble/bass/echo level item with the MENU button, then turn the VOLUME control to adjust the level of the desired item. You can also make these settings directly using the remote control and the corresponding buttons.
You can use the EQ button to select the desired POP/ROCK/JAZZ/CLASICAL/FLAT equalizer preset.
Playback operations
Playing
Press ▷ to start media playback from the first track.
Suspension
During playback, press ▷. Playback pauses. While paused, press ▷ again. Playback resumes.
Switching backwards: ◀◀◀
Scroll to the beginning of the current (single press) or previous tracks (press repeatedly) and play them automatically.
Switching forward: ▷▶▶
Skip to the next track (s) (single press or repeat) and play it automatically.
Fast reverse: ◀◀◀ on the unit / remote control Hold down I on the unit or remote control.
Fast forward: ▷▶ on the unit/remote Hold L on the unit or remote.
MicroSD card playback
MP3/WMA file playback
The speaker can play MP3/WMA format in audio quality comparable to a CD. You can play files from a microSD card with a capacity of up to 16 GB.
You can play the files using the buttons on the device.
1 Insert a microSD card into the microSD card slot Insert the card in the correct direction. The media must contain audio files.
2 Automatically switches to the microSD input even if another input has been previously selected.
3 Playback from that media starts automatically from the first audio file on the media. If playback does not start automatically, press ▷ on the device to start it.
4 Press ▶▶▶ and ◀◀◀ on the unit or remote control briefly during playback to switch tracks back and forth.
Press and hold ▶▶▶ and ◀◀◀ on the unit or remote control during playback to fast forward or rewind the current track.
5 Turn VOLUME on the unit or press VOL +/- on the remote control during playback to adjust the volume. The set fire extinguisher is shown on the display.
You can select the desired treble/bass/echo level item with the MENU button, then turn the VOLUME control to adjust the level of the desired item. You can also make these settings directly using the remote control and the corresponding buttons.
You can use the EQ button to select the desired POP/ROCK/JAZZ/CLASICAL/FLAT equalizer preset.
Playback operations
Playback operations are the same as playback from USB media.
Tuning and storing stations
Tuning and storing stations
1 Turn on the unit and press the MODE button to select the radio (FM) audio source (a small FM indication and frequency number will appear on the display).
2 Press ▷. All available FM radio stations are automatically tuned in and stored in the unit's memory.
3 You can then switch the tuned and stored presets by briefly pressing the buttons ▶▶▶ and ◀◀◀ on the remote control.
4 To perform continuous manual tuning, hold down the▶▶▶ and ▶◀◀ buttons on the unit or remote control. Tuning starts in the appropriate direction and stops when you tune to a station with a good signal.
5 After tuning in / selecting the desired station, turn the VOLUME control on the unit or press VOL +/- on the remote control during playback to adjust the volume. The set volume is shown on the display.
You can select the desired treble/bass/echo level item with the MENU button, then turn the VOLUME control to adjust the level of the desired item. You can also make these settings directly using the remote control and the corresponding buttons.
You can use the EQ button to select the desired POP/ROCK/JAZZ/CLASICAL/FLAT equalizer preset.
Switching preferences
In radio mode, briefly press the ▶▶▶ and ◀◀◀ buttons on the remote control. Switches by 1 preset in the corresponding direction (up/down).
Listening to the radio
For the best possible reception, extend the wire antenna as much as possible so that the reception is good.
Note
When the FM mode is switched off and on again, the last station listened to is tuned in.
Recording to USB drive/microSD card from connected microphone
The speaker allows you to record audio from a microphone to a connected USB drive/inserted microSD card in MP3 format. There must be free space on the USB drive/microSD card. You can then play the recorded file using the REC PLAY button on the remote control.
1 Insert a microSD card into the microSD card slot / connect a free USB drive to the USB connector. Insert the card in the correct direction.
2 Connect a microphone to MIC 1 or 2.
3 Turn on the unit, then briefly press the MODE button to select SD or USB audio source.
4 Press REC on the remote control to speak or sing into the microphone. The recording of the sound from the microphone to the audio file on the media starts.
5 Press REC PLAY on the remote control to play the recorded sound.
6 Turn VOLUME on the unit or press VOL +/- on the remote control during playback to adjust the volume. The set volume is shown on the display.
You can select the desired treble/bass/echo level item with the MENU button, then turn the VOLUME control to adjust the level of the desired item. You can also make these settings directly using the remote control and the corresponding buttons.
You can use the EQ button to select the desired POP/ROCK/JAZZ/CLASICAL/FLAT equalizer preset.
7 To delete a recording, press R-DEL on the remote control to delete the recording from the media.
More details
Wireless BLUETOOTH technology
BLUETOOTH wireless technology is a short-range technology that enables wireless data communication between digital devices such as PC and digital camera. Wireless BLUETOOTH technology works within a range of about 10 m.
The two devices are connected to each other, but some devices can be connected to more than one device at a time.
No cable is required for the connection, nor is it necessary to place the devices opposite each other as with infrared technology. For example, you can use the device even if it is in a backpack or pocket.
The BLUETOOTH standard is an international standard supported and used by many companies around the world.
Maximum communication range
The maximum communication range may be shorter in the following conditions. There are obstacles such as people, metal or a wall between this system and the BLUETOOTH device.
A LAN device is used near this system. A microwave oven is used near this system.
Electromagnetic radiation generating equipment is used near this system.
Interference from other devices
BLUETOOTH and wireless LAN (IEEE802.11b / g) devices use the same frequency, so if you use this system near a wireless LAN device, microwave interference may occur, which may result in poor communication speed, noise, or poor connection. In this case, do the following.
Use this system at least 10 m from a wireless LAN device.
If you use this system less than 10 m away from the wireless LAN device, turn off the wireless LAN device.
Interference from other devices
Microwaves emitted by BLUETOOTH devices may affect the operation of electronic medical devices. Turn off both the system and the BLUETOOTH device in the following places, as there is a risk of danger.
Near flammable gases, in hospitals, trains, planes or petrol stations.
Near automatic doors or fire alarms.
Notes
- In order to use the BLUETOOTH function, the connected BLUETOOTH device must have the same profile as this system.
- Even if the profiles are the same, the devices may work differently depending on their specifications.
- Due to the characteristics of wireless BLUETOOTH technology, the sound reproduced by this system is slightly delayed compared to the sound from the BLUETOOTH playback device during a telephone call or listening to music.
- This system supports security standards that comply with BLUETOOTH standards to ensure a secure connection when using BLUETOOTH wireless technology. However, depending on your settings, security may not be enough. Be careful when communicating using BLUETOOTH wireless technology.
• We are not responsible for information leakage during BLUETOOTH communication.
- A device with BLUETOOTH function is required to ensure compliance with BLUETOOTH standards specified by the Bluetooth SIG standard and authentication. Even if the connected device complies with the above BLUETOOTH standards, some devices may not be able to be connected or may not work properly depending on the functions or technical specifications of the device.
- Depending on the BLUETOOTH device connected to this system, the communication environment, or the operating environment, noise or outages may occur.
Troubleshooting
Warning:
If you're having trouble with this device, try this report. If precautions do not help, do not attempt to remove the device cover or repair it yourself. There is a risk of electric shock.
No sound
- Make sure the sound is not muted.
- Check that the device is connected properly.
- Make sure the audio file is supported by the device.
- Try connecting this unit to another device with a different audio cable.
The device does not switch on
- Check that the power cord is plugged in, that the power is working, and that the power switch is in the correct ON position.
- Check that the battery is charged.
Bluetooth connection issues
Bluetooth signal is interrupted:
The effective distance between the speakers and the device is up to 10 m.
The signal will be interrupted if the distance between the Bluetooth device and the speakers is more than 10 m.
The Bluetooth device will find several other Bluetooth devices during the search:
Wait for the search to complete and select “Crater L” to pair. Do not hold the mobile device too close to the speaker when using the phone to avoid echo (feedback).
There is no sound from the microphone
- Connect the microphone to the MIC 1 or 2 jack correctly
- Turn on the microphone switch
- The microphone volume is at its lowest level. Increase the microphone volume with the M.VOL + button
Maintenance
Equipment surface cleaning
Use a soft cloth slightly moistened with a mild cleaning solution to clean the surface, panel, and controls. Do not use any type of abrasive pad, scouring powder, or solvent, such as thinner, petrol, or alcohol.
Technical specifications
Generally
Audio output power: 50 W (RMS)
Connectors - input: AUX IN - 3.5 mm mini connector (For external audio device)
MIC 1 - 6.3 mm audio connector (For microphone)
MIC 2 - 6.3 mm audio connector (For microphone/electric guitar)
USB connector for USB microSD memory unit microSD card slot
9 V power connector for power supply from the supplied AC adapter
Speakers: 1x tweeter, diameter 25 mm
2x subwoofer, diameter 203 mm
FM radio: Tuning range: 87.5 MHz \~ 108 MHz
Bluetooth: Bluetooth standard 5.0
Profile: A2DP (Advanced Audio Distribution Profile) Profile for wireless
music transmission in stereo quality Profile: AVRCP (Advanced
Audio Distribution Profile) Profile for playback control
Frequency range: 20 Hz - 20 kHz Distortion: 10% or less
MP3 bitrate: 32 to 320 kbps
Power consumption: Approx. 9 W
Power supply (AC adapter): AC voltage from an electrical socket 230 V, 50 Hz
Power supply (DC): DC 9 V, 1 A from the supplied AC adapter
Battery powered: Built-in rechargeable lithium-ion (Li-Ion) battery 7.4 V, 4,000 mAh
Battery play time: Approx. 2 - 5 hours, depending on the set volume
Dimensions: 26.8 x 61.6 x 27.1 cm (W x H x D, including protruding parts)
Weight: 5.5 kg
Supplied accessories: Operating instructions (1)
Remote control (1)
AC adapter (1)
3.5 mm audio cable (1)
We reserve the right to make changes!
Producer:
ORAVA retail 1, a.s.
Seberíniho 2
821 03 Bratislava
Slovenská republika
Importer:
ORAVA retail 1, a.s.
Seberíniho 2
821 03 Bratislava
Slovenská republika
ORAVA distribution CZ, s.r.o.
Ostravská 494
739 25 Sviadnov
Ceská republika
INSTRUCTIONS AND INFORMATION REGARDING THE DISPOSAL OF USED PACKAGING
Dispose of used packaging material at a municipal waste disposal site.
DISPOSAL OF USED ELECTRICAL AND ELECTRONIC EQUIPMENT
natural_image
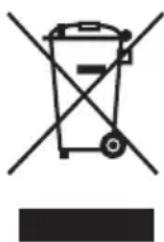
Symbol of a trash bin crossed with no text or numbers, representing waste sorting or disposal (no text present)This symbol on the products or in the accompanying documents means that used electrical and electronic products should not be mixed with general household waste. For proper disposal, recovery and recycling, please return these products to designated collection points. Alternatively, in some countries of the European Union or other European countries, you may return your products to your local retailer when purchasing an equivalent new product. By ensuring this product is disposed of correctly, you will help prevent potential negative consequences for the environment natural resources and help prevent potential negative effects on environment and human health, which could be the consequences of improper disposal waste. Contact your local authority or nearest office for more detailscollection point. Improper disposal of this type of waste may result in penalties in accordance with national regulations.
For business entities in the countries of the European Union
If you wish to discard electrical and electronic equipment, please request the necessary information from your seller or supplier.
Disposal in other countries outside the European Union
This symbol is valid in the European Union. If you wish to discard this product, please request obtain the necessary information on the correct method of disposal from the local authorities or from the your supplier.

This product meets all the essential requirements of the EU directives that apply to it.
DECLARATION OF CONFORMITY
Short text Declaration of Conformity:
ORAVA retail 1, a.s. hereby declares that the Crater L complies with the essential requirements and other relevant conditions of Directive 2014/53/ EU of the European Parliament and of the Council.
The full text of the Declaration of Conformity is available at: www.orava.eu

- Intended use of the device
- GENERAL SAFETY INSTRUCTIONS AND WARNINGS
- General safety instructions
- Safety of the operating environment
- Electrical safety
- Safety of persons
- Cleaning, maintenance and repairs
- Special safety instructions. Read carefully!
- Transportation/Transfer
- Expand/Packaging
- Inspection/Commissioning
- Warning!
- Operation/Use
- Bluetooth® technology
- Frequency band
- Certifications
- Designation of use
- Restrictions in use
- Range of use
- Interference with other devices
- Other
- Licenses
- Power supply
- Powered by built-in rechargeable battery
- Parts description
- Top side
- Remote control
- Switch the device on/off and adjust the sound
- Connection of external devices
- Play audio from external audio device/TV/microphone
- Bluetooth playback from a Bluetooth device
- Playback operations
- Playing
- Suspension
- Note
- Warning
- True Wireless Stereo (TWS)
- Disconnect two paired speakers
- Notes:
- Playback from USB drive
- MP3/WMA file playback
- Switching backwards: ◀◀◀
- Switching forward: ▷▶▶
- MicroSD card playback
- Tuning and storing stations
- Switching preferences
- Listening to the radio
- Recording to USB drive/microSD card from connected microphone
- More details
- Wireless BLUETOOTH technology
- Maximum communication range
- Interference from other devices
- Notes
- Troubleshooting
- Warning:
- No sound
- The device does not switch on
- Bluetooth connection issues
- There is no sound from the microphone
- Maintenance
- Equipment surface cleaning
- Technical specifications
- Generally
- Producer:
- Importer:
- INSTRUCTIONS AND INFORMATION REGARDING THE DISPOSAL OF USED PACKAGING
- DISPOSAL OF USED ELECTRICAL AND ELECTRONIC EQUIPMENT
- For business entities in the countries of the European Union
- Disposal in other countries outside the European Union
- DECLARATION OF CONFORMITY
Brand : Orava
Model : Crater L
Category : Charging Station / Docking Station