
PureStar E70 Aqua Pro - Vacuum Cleaner TESLA - Free user manual and instructions
Find the device manual for free PureStar E70 Aqua Pro TESLA in PDF.


| Product Type | Vacuum Cleaner |
| Brand | Tesla |
| Model | PureStar E70 Aqua Pro |
| Dimensions (H x W x D) | Approximately 43 x 28 x 28 cm |
| Weight | Approximately 5.2 kg |
| Power Consumption | 800 W |
| Dust Capacity | 1.5 L |
| Filtration System | HEPA and water filtration |
| Cable Length | 6 m |
| Noise Level | Approximately 75 dB |
| Functions | Dry and wet vacuuming (Aqua Pro) |
| Attachments Included | Floor nozzle, crevice tool, brush tool |
| Filter Maintenance | Washable HEPA filter and water tank |
| Overheat Protection | Automatic shut-off |
| Repairability | Spare parts available (motor, filter, wheels) |
| Certifications | CE, RoHS |
Frequently Asked Questions - PureStar E70 Aqua Pro TESLA
User questions about PureStar E70 Aqua Pro TESLA
0 question about this device. Answer the ones you know or ask your own.
Ask a new question about this device
Download the instructions for your Vacuum Cleaner in PDF format for free! Find your manual PureStar E70 Aqua Pro - TESLA and take your electronic device back in hand. On this page are published all the documents necessary for the use of your device. PureStar E70 Aqua Pro by TESLA.
USER MANUAL PureStar E70 Aqua Pro TESLA
natural_image
Technical line drawing of a mechanical device with no visible text or symbolsnatural_image
Line drawing of a portable electric shaver with attached power cord (no text or symbols)natural_image
Diagram of a mechanical assembly showing a connector, shaft, and housing with directional arrows indicating motion (no text or symbols)natural_image
Technical line drawings of four different types of hair dryers or pumps, labeled A and B, showing mechanical components and assembly (no text or symbols beyond labels)natural_image
Technical line drawings of a mechanical device with exploded and assembled views (no text or symbols)Before using the device, please read the rules of safe use carefully and follow all common safety rules.
IMPORTANT SAFETY INSTRUCTIONS
THIS PRODUCT IS INTENDED FOR HOUSEHOLD USE ONLY.
This appliance is a complex electromechanical device, please pay attention to the following instructions:
- This appliance is intended for domestic use; The brand bears no responsibility for improper use or for use contrary to the instructions for use and is not covered by the warranty.
- Improper use of the vacuum cleaner is considered, among other things, non-compliance with regular replacement or maintenance of all filters, as well as the use of non-original filters, due to the properties of which the vacuum cleaner has failed or been da maged.
- The device is intended for indoor use only at room temperature (max. 40^ ).
- Check if the information on the type plate of the appliance corresponds to the voltage in your electrical socket.
- It is strictly forbidden to vacuum the following objects, otherwise the vacuum cleaner may be damaged or a fire may occur: hot objects such as coals, burning matches, hot ashes; large pieces of sharp fragments such as glass, etc.; solvents, caustics, water and liquids; plasterboard dust, fine sand, cement, construction dust, parts of plaster; grease, oil, flammable and explosive objects.
• Always switch off the vacuum cleaner when cleaning or temporarily not using it. - Never immerse the AC adapter, the battery and the motor part of the device in water (even partially) and protect it from moisture. Do not touch the vacuum cleaner with wet or damp hands.
- The vacuum cleaner must not be used in humid or wet environments and in any environment with a risk of fire or explosion.
- Never vacuum without filters. Each time you use the vacuum cleaner, make sure that the filters are fitted correctly.
- Do not allow children to play with the vacuum cleaner to avoid an accident.
- When handling the vacuum cleaner, avoid contact (eg loose clothing, hair, fingers, jewelry, bracelets, etc.) with the rotating brush.
- Do not touch the driven moving parts of the vacuum cleaner during operation.
- In the event of a fall and obvious damage or unusual operation, do not continue to use the vacuum cleaner and send it immediately to an authorized service center for repair.
- If the suction opening is clogged, avoid long-term operation to prevent damage to the motor and heat generation in the vacuum cleaner.
- If you do not use the vacuum cleaner for a long time, we recommend charging its battery once every three months. When the vacuum cleaner is shut down, its battery must be removed and safely recycled.
- The AC adapter becomes shot while charging the battery. Always switch off the vacuum cleaner when charging the battery and after using it.
- Never recharge a battery that leaks electrolyte. Do not dispose of the battery in a fire.
- Only use original accessories that are designed for this model of vacuum cleaner.
- The manufacturer and importer into the European Union are not liable for damages caused by the operation of the vacuum cleaner, such as injuries, scalds, fire, injuries, deterioration of other items, etc.
PACKAGE CONTENTS
Carefully check that you have unpacked all the supplied accessories, we recommend that you keep the original paper box, user manual and packing material during the warranty period.
DESCRIPTION
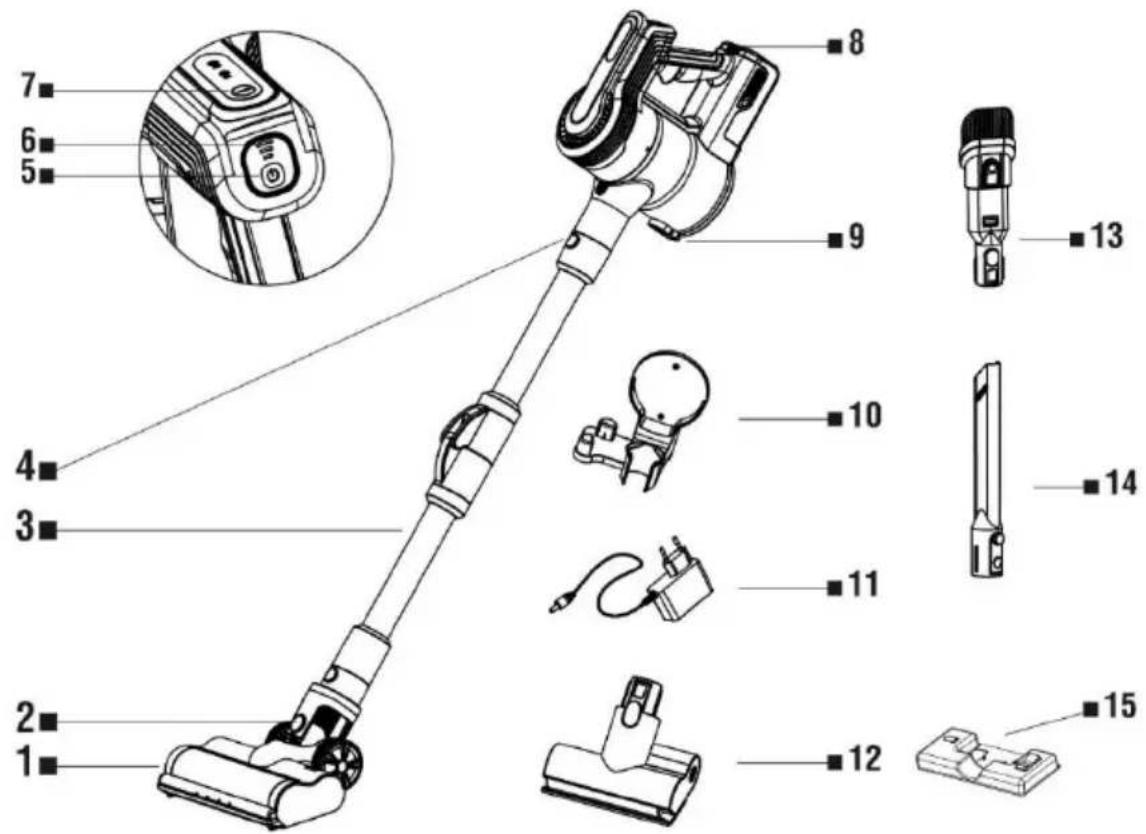
- Turbo brush
- Floor head release button
- Flexible tube
- Flexible tube release button
- On/Off button
- Battery status indicator
- Power regulation
-
Battery release button
-
Dust container release button
- Wall mount
- Power supply
- Mini turbo rotary brush
- 2in1 brush
- Long nozzle
- Water tank
VACUUM CLEANER ASSEMBLY
1.
natural_image
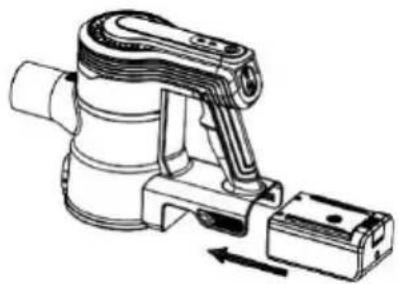
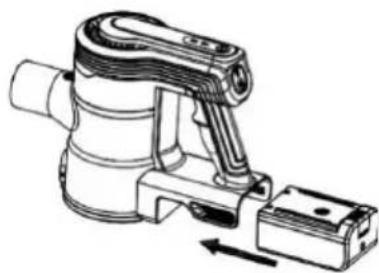
Technical line drawing of a mechanical device with no visible text or symbolsInsert the battery into the slot in the body of the vacuum cleaner.
natural_image
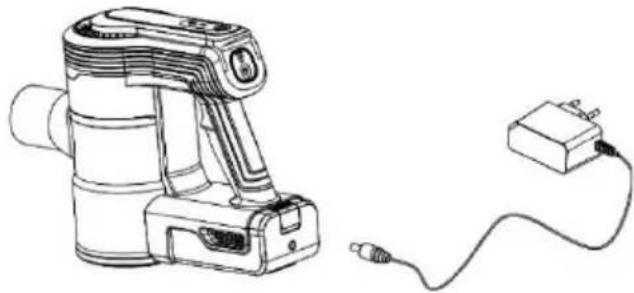
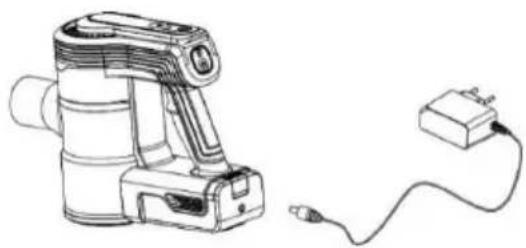
Line drawing of a portable device with attached power cord and cable (no text or symbols)Connect the power supply to the battery. The battery charge status is indicated by the battery status indicator (6) lighting up gradually. Unplug the charger when it is fully charged. You can charge the battery either inserted in the body of the vacuum cleaner or separately.
If the Battery status indicator (6) flashes, the battery is flat - charge it immediately.
natural_image
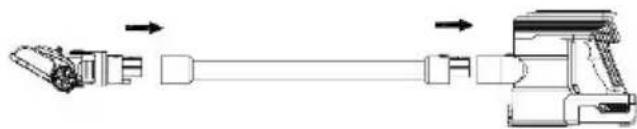
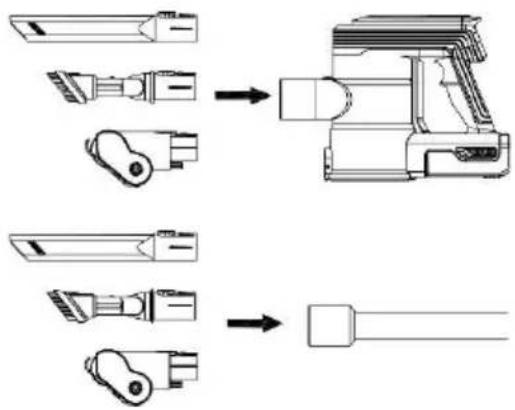
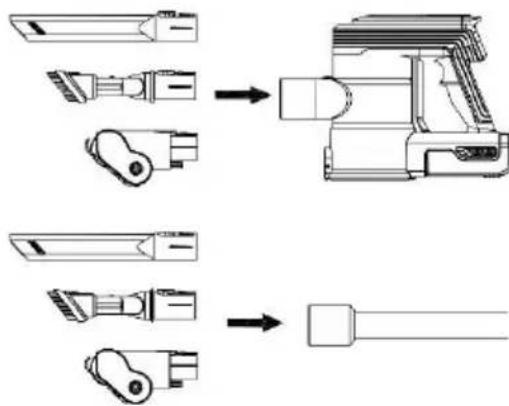
Diagram of a mechanical assembly showing a connector and shaft with directional arrows (no text or symbols)Connect the turbo brush to the flexible tube and then connect the tube to the body of the vacuum cleaner.
flowchart
graph TD
    A["Pinning"] --> B["Assembly"]
    C["Cut"] --> B
    D["Insert"] --> B
    E["Final Assembly"] --> B
You can connect the vacuuming attachments directly to the body of the vacuum cleaner or to a flexible tube.
Use the On/Off button to turn on the device. You can switch between MIN or MAX modes by pressing the power control button. To switch off the vacuum cleaner, press the On/Off button again.
EMPTYING THE DUST TANK
We recommend emptying the dust tank and cleaning the filters after each cleaning for hygienic reasons. To empty the dust tank, press the button on its lid and empty the contents into the waste bin.
CLEANING THE HEPA FILTER
natural_image
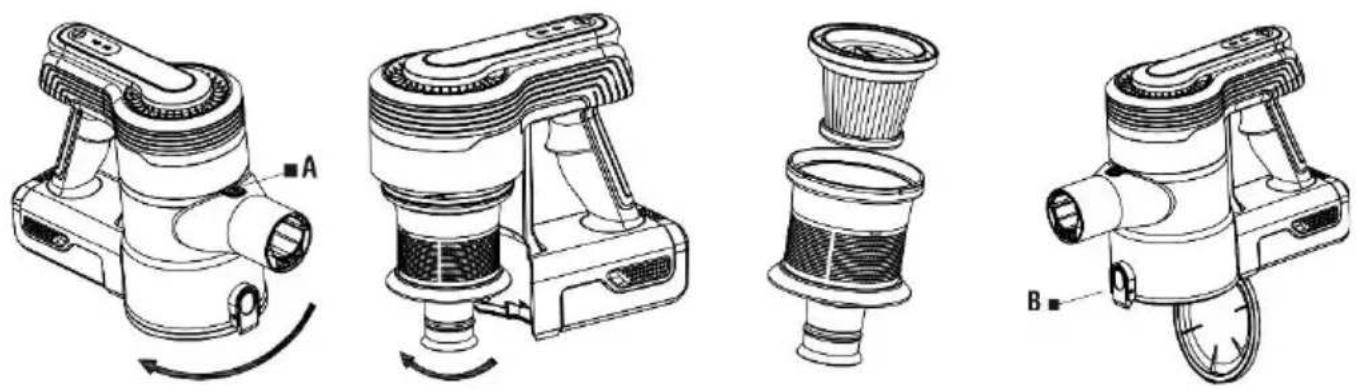
Technical line drawings of four different types of hairdresser devices (no text or symbols present)Switch off the vacuum cleaner.
- Release the dust tank (A) and remove it from the body of the vacuum cleaner.
- Turn to remove the HEPA filter from the metal filter body.
- Open the dust tank lid (B) for rough cleaning, gently tap the dirt from the HEPA filter into the waste bin.
- Both filters can also be rinsed under running water. Allow the filters to dry thoroughly before using them again.
- Replace both filters.
HEPA filter
In case of heavy soiling or poor performance of the vacuum cleaner, replace it with a new one.
We recommend replacing it once every 6 months.
WARNING
• Failure to clean or replace the filters can lead to a vacuum cleaner failure!
• Do not use any aggressive detergents or cleaning agents or hot water to clean the filters.
• To maintain the filtration parameters of the HEPA filter, we recommend dry cleaning.
- If you decide to wash the HEPA filter with water, its filtration capacity will be reduced. The maximum number of filter washes is 3 times, then it is necessary to purchase a new HEPA filter.
- Replace the filters if they can no longer be cleaned properly or are damaged.
• The filters are not dishwasher safe.
• Make sure that the seating surfaces and sealing elements are clean and functional.
- Before putting the filters back in the vacuum cleaner, make sure that they are completely dry (ideally put them back in after 24 hours).
All of the above instructions are very important if you feel that the vacuum cleaner has poor suction power or poorly sucks dirt from the floor. This condition is a clear indication that the vacuum cleaner's filtration system requires cleaning.
IMPORTANT - never use the vacuum cleaner without filters installed!
WIPE WITH WATER
Unfold the plastic cap and pour warm water (max. 60°C) into the Water tank (15) and then close it tightly. Use soft or distilled water to avoid limescale. The cleaning agent can cause foaming and thus worsen the water dripping onto the mop or cause streaks on the floor after it dries. If necessary, add a non-foaming detergent suitable for cleaning hard floors. Do not use perfumes, stain removers, concentrated cleaners or substances containing alcohol and chemicals.
Moisten a microfiber mop with water for faster and smoother water mopping and place it on the Water tank. Connect the Water tank to the Turbo brush (1) until you hear a click. Turn the switch on the Water Tank to the "ON" position so that the water can drip and turn on the vacuum cleaner at the desired power.
Move across the floor in slow, smooth forward and backward motions. After cleaning, turn off the vacuum cleaner and switch the switch on the Water tank to the "OFF" position. The water tank can be used with vacuuming on and off. If you are vacuuming and mopping with water at the same time, first move the vacuum cleaner forward on the floor and then go back on the already vacuumed and washed floor. This procedure ensures cleaning in the correct order - first vacuuming the dust and then wiping the floor with water.
CLEANING THE MOP
Switch off the vacuum cleaner with the On/Off button (5) and remove the Water tank from the Turbo brush. You can machine wash the microfiber mop at a maximum temperature of 40^ C with a mild detergent. Never use bleach or fabric softener.
CLEANING THE BRUSH
natural_image
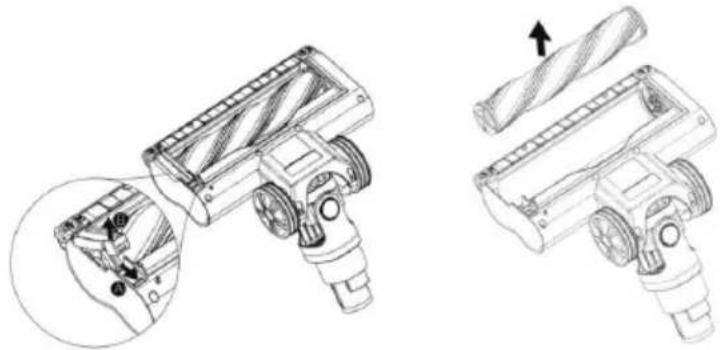
Technical line drawing of a mechanical device with exploded and assembled views (no text or symbols)Visually inspect the brush for dirt after each vacuuming. Remove hairs, animal hairs, etc.
MAINS ADAPTOR
If the mains adapter of this appliance is damaged, it must be repaired by the manufacturer, its service technician or a similarly qualified person in order to avoid a dangerous situation.
NOTE: To charge the battery, use only the AC adapter supplied with the vacuum cleaner.
- The vacuum cleaner must only be supplied with a safe low voltage corresponding to the marking of the appliance.
- Use the AC adapter only in a room.
- The mains adapter supplied with the vacuum cleaner is intended for this appliance only, do not use it for other purposes.
- The power cord of the adapter must not be damaged by sharp or hot objects, open flames, immersed in water or bent over sharp edges.
- If you need to use an extension cord, make sure that it is not damaged and complies with the applicable standards.
- Check the condition of the AC adapter power cord regularly.
Treat the surface of the vacuum cleaner and adapter with a soft damp cloth, do not use harsh and aggressive cleaning agents.
TECHNICAL SUPPORT
Do you need advice on setting up and operating the TESLA PureStar E70 Aqua Pro appliance?
Contact us: www.tesla-electronics.eu
CONSUMABLES
Consumables can be purchased in the official TESLA eshop eshop.tesla-electronics.eu.
WARRANTY REPAIR
For warranty repair, contact the dealer where you purchased the TESLA product.
WARRANTY EXCLUSIONS
- If the device or part of it has worn out due to normal use. Typical wear and tear of the device or its parts due to normal use includes, for example, the discharge of the battery or the reduction of the capacity of the battery or accumulator after the usual service life of 6 months, wear of the display parts of the device, mechanical wear of the remote controls and their surfaces, wear of the filter, wear of the supply cables and others.
- Failure to observe the "Important safety instructions" listed in the user manual.
• Electromechanical or mechanical damage to the device caused by improper use.
• Damage caused by natural elements such as water, fire, static electricity, overvoltage, etc. - Damage caused by unauthorized repair.
- Unreadable device serial number.
DECLARATION OF CONFORMITY
We, TESLA Electronics LTD, declare that this device complies with the essential requirements and other relevant provisions of the standards and regulations relevant to the type of equipment.

This product complies with the requirements of the European Community.
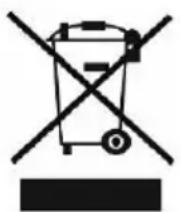
Please inform yourself about the local separate collection system for electrical and electronic products. Please act according to your local rules and do not dispose of your old products with your normal household waste. Correct disposal of your old product helps to prevent potential negative consequences for the environment and human health.
Due to the fact that the product is being developed and improved, we reserve the right to edit the user manual. You can always find the latest version of the this user manual at www.tesla-electronics.eu.
Design and specification may be changed without prior notice, print errors reserved.
GE
natural_image
Technical line drawing of a mechanical device with no visible text or symbolsnatural_image
Line drawing of a portable electric shaver and a connected power strip (no text or symbols)natural_image
Diagram of a mechanical assembly with directional arrows indicating motion (no text or symbols)natural_image
Technical line drawing of a mechanical device with exploded and assembled views (no text or symbols)natural_image
Technical line drawing of a mechanical device with no visible text or symbolsnatural_image
Line drawing of a portable device with attached power cord (no text or symbols)natural_image
Diagram of a mechanical assembly showing a shaft connected to a motor, with directional arrows indicating motion (no text or labels)natural_image
Technical line drawings of four different types of hair lifters (A, B, and a partially assembled device), showing mechanical components and fluid flow direction (no text or symbols present)natural_image
Technical line drawings of a mechanical assembly with exploded and assembled views (no text or symbols)natural_image
Technical line drawing of a mechanical device with no visible text or symbolsnatural_image
Line drawing of a portable device with attached cable and power plug (no text or symbols)natural_image
Diagram of a mechanical assembly with directional arrows indicating motion (no text or symbols)natural_image
Technical line drawing of a mechanical assembly with exploded and assembled views (no text or symbols)natural_image
Technical line drawing of a mechanical device with no visible text or symbolsnatural_image
Line drawing of a portable air purifier with attached power cord (no text or symbols)natural_image
Diagram of a mechanical assembly showing a connector, shaft, and housing with directional arrows indicating motion (no text or symbols)natural_image
Technical line drawing of a mechanical device with exploded and assembled views (no text or symbols)- Turbokefa
- Uvolňovacie tlačidlo podlahové hlavice
- Flexibilná trubica
- Uvolňovacie tlačidlo flexibilnej trubice
- Tlačidlo Zapnutia/Vypnutia
- Indikátor stavu nabitia batérie
- Regulácia výkonu
-
Uvolňovacie tlačidlo batérie
-
Uvolňovacie tlačidlo nádoby na nečistoty
- Úchyt na stenu
- Napájací zdroj
- Mini turbo rotačná kefa
- Kefa 2v1
- Dlhá štrbinová trubica
- Zásobník na vodu
ZOSTAVENIE VYSÁVAČA
1.
natural_image
Technical line drawing of a mechanical device with no visible text or symbolsVložte batériu do slotu v tele vysávača.
2.
natural_image
Line drawing of a portable handheld device connected to a small electrical outlet (no text or symbols)natural_image
Diagram of a mechanical assembly with directional arrows indicating motion (no text or symbols)Pripojte k flexibilné trubici turbokefa a potom trubicu pripojte do tela vysávača.
4.
flowchart
graph TD
    A["Tool"] --> B["Component 1"]
    B --> C["Component 2"]
    C --> D["Component 3"]
    D --> E["Component 4"]
    E --> F["Component 5"]
    F --> G["Final Assembly"]
natural_image
Technical line drawing of a mechanical assembly with two views: one showing a drill bit and the other showing a drill bit (no text or symbols present)
- IMPORTANT SAFETY INSTRUCTIONS
- PACKAGE CONTENTS
- DESCRIPTION
- VACUUM CLEANER ASSEMBLY
- EMPTYING THE DUST TANK
- HEPA filter
- WARNING
- IMPORTANT - never use the vacuum cleaner without filters installed!
- WIPE WITH WATER
- CLEANING THE MOP
- CLEANING THE BRUSH
- MAINS ADAPTOR
- TECHNICAL SUPPORT
- CONSUMABLES
- WARRANTY REPAIR
- WARRANTY EXCLUSIONS
- DECLARATION OF CONFORMITY
- GE
- ZOSTAVENIE VYSÁVAČA
Brand : TESLA
Model : PureStar E70 Aqua Pro
Category : Vacuum Cleaner