
CopyCentre C32 - Copier XEROX - Free user manual and instructions
Find the device manual for free CopyCentre C32 XEROX in PDF.


| Product Type | Digital Copier |
| Brand | Xerox |
| Model | CopyCentre C32 |
| Copy Speed (A4) | 32 copies per minute |
| First Copy Out Time | 4.5 seconds |
| Warm-up Time | Less than 60 seconds |
| Resolution | 600 x 600 dpi |
| Paper Input Capacity | 2,500 sheets (standard) |
| Paper Output Capacity | 500 sheets |
| Paper Sizes Supported | A3, A4, A5, B4, B5, Letter, Legal |
| Dimensions (W x D x H) | 640 x 630 x 600 mm |
| Weight | 80 kg |
| Power Consumption (Standby) | Less than 150 W |
| Power Consumption (Operating) | Less than 1.5 kW |
| Power Supply | 220-240 V, 50/60 Hz |
| Toner Type | Dry toner (black) |
| Toner Yield | Approximately 20,000 pages |
| Drum Life | Approximately 60,000 copies |
| Maintenance Interval | Every 100,000 copies (recommended) |
| Safety Certifications | CE, UL, Energy Star |
| Repairability | Replacement parts available: feed rollers, fuser, toner cartridge, drum unit |
Frequently Asked Questions - CopyCentre C32 XEROX
User questions about CopyCentre C32 XEROX
0 question about this device. Answer the ones you know or ask your own.
Ask a new question about this device
Download the instructions for your Copier in PDF format for free! Find your manual CopyCentre C32 - XEROX and take your electronic device back in hand. On this page are published all the documents necessary for the use of your device. CopyCentre C32 by XEROX.
USER MANUAL CopyCentre C32 XEROX
Spodc QRG.book Page 1 Tuesday, May 13, 2003 10:51 AM


Quick Reference Guide
604P13000




MAXIMIZE YOUR PRODUCTIVITY by taking advantage of all the capabilities of your device. A Training and Information CD was supplied with your product. The CD provides animated tutorials and interactive screens. When installed on your network it will always be available to everyone, or load it on your hard drive for easy access.
©Copyright 2002, 2003 by Xerox Corporation. All Rights Reserved.
Copyright protection claimed includes all forms and matters of copyrighted material and information now allowed by statutory or judicial law or hereinafter granted, including without limitation, material generated from the software programs that are displayed on the screen such as styles, templates, icons, screen displays, looks, etc.
Internet Explorer is a copyright protected program of Microsoft Corporation. Novell® and NetWare® are registered trademarks of Novell, Inc. Netscape® is a registered trademark of Netscape Communications Corporation. Adobe® and PostScript® are registered trademarks of Adobe Systems Incorporated. TIFF is a copyright of Adobe Systems Incorporated. AppleTalk, LaserWriter, and Macintosh are trademarks of Apple Computer, Inc. PCL® and HP-GL® are registered trademarks of Hewlett-Packard Corporation. WinZip® is a registered trademark of Nico Mak Computing, Incorporated. ACITS LPR Printing for Windows 95 is a copyright of the University of Texas at Austin.
Xerox ^® , The Document Company ^® , The stylized X ^® , and all Xerox product names and product numbers mentioned in this publication are trademarks of XEROX CORPORATION. Other company brands and product names may be trademarks or registered trademarks of the respective companies and are also acknowledged.
Table of Contents
1 Welcome....1-1
Introduction.... 1–2
About this Guide.... 1-2
Conventions 1–2
Additional Resources 1–4
Overview of Features at the machine.... 1–5
Overview of Features at the Workstation.... 1-7
Safety....1-8
Introduction 1-8
Safety Notes.... 1–8
Environmental Compliance....1-13
ENERGY STAR® 1-13
Environmental ChoiceM 1-13
Regulatory Information....1-14
FCC Part 15 1-15
Illegal Copying....1-16
2 Getting Started....2-1
Machine Overview.... 2-2
Control Panel Overview.... 2-3
Power On or Off.... 2-4
Loading Paper.... 2-5
Making Copies.... 2–6
Sending a Fax.... 2-7
Sending an Internet Fax....2-8
Scanning a Document.... 2–9
Sending an E-mail.... 2-10
Printing from a PC....2-11
Printing with Internet Services....2-12
Logging On / Logging Off.... 2-13
Further Assistance.... 2-14
3 Copy 3-1
Copy.... 3-2
Basic Copying.... 3-3
Output 3-4
2-Sided....3-5
Reduce/Enlarge 3-6
Paper Supply 3-8
Colour Options .... 3–10
Output Colour 3-10
Preset Colour Options.... 3-11
Colour Balance 3–12
Sharpness/Saturation 3–12
Colour Shift 3-13
Image Adjustment.... 3-14
Image Quality.... 3–15
Original Type.... 3–16
Bound Originals 3–17
Edge Erase 3-18
Original Input.... 3–19
Image Shift 3-20
Output Format.... 3-21
Transparencies 3–22
Booklet Creation 3-23
Multi-Up.... 3-24
Invert Image 3-25
Covers.... 3-26
Job Assembly.... 3-27
Build Job 3-28
Sample Set 3-30
Stored Programming.... 3-31
4 Fax....4-1
Fax....4-2
Sides Scanned.... 4–5
More Fax Features.... 4-6
Image Quality.... 4–7
Original Type....4-8
Original Input....4-9
Delayed Send 4-10
Authentication Mode.... 4-11
5 Internet Fax ....5-1
Internet Fax....5-2
Send: 5-3
Address List 5-3
Entering an E-mail Address for Internet Fax 5-4
Colour Options 5-6
Output Colour 5-6
Image Adjustment.... 5-7
Image Quality 5-8
Original Type....5-9
Sides Scanned 5-10
Resolution 5-11
Original Input....5-12
Output Format.... 5-13
Document Format 5-14
Acknowledgment Report 5–15
Reply To....5-15
Message Body 5-16
Authentication Mode.... 5–17
6 Network Scanning 6-1
Scan....6-2
Scanning Resources 6-2
Network Scanning.... 6-3
Repositories 6-4
Template Overview 6-4
Template Destinations 6-5
Destination Details 6-5
Colour Options 6-6
Output Colour 6-6
Image Adjustment.... 6-7
Image Quality 6-8
Original Type....6-9
Sides Scanned 6-10
Edge Erase 6-11
Original Input....6-12
Resolution 6-13
Output Format.... 6-14
Document Name 6-15
If File Already Exists.... 6–15
Document Format 6–16
Document Management Fields 6–17
Add File Destinations 6–17
Refresh Destinations.... 6–18
Authentication Mode....6-18
7 E-mail 7-1
E-mail....7-2
Send: 7-3
Address List 7-3
Entering an E-mail Address 7-4
Colour Options 7-6
Output Colour....7-6
Image Adjustment.... 7-7
Image Quality....7-8
Original Type....7-9
Sides Scanned....7-10
Edge Erase 7-11
Original Input....7-12
Resolution 7-13
Output Format.... 7-14
Document Format 7-15
Reply To....7-16
Message Body 7-16
Authentication Mode .... 7–17
8 Print....8-1
Introduction to Print....8-2
Printer Driver Features.... 8-3
Control Options 8-3
Advanced 8-4
Paper/Output....8-4
Image Options....8-4
Layout/Watermark 8-5
About....8-5
9 Maintenance ....9-1
Customer Replaceable Units.... 9-2
Cleaning the Machine.... 9-3
User Interface 9-3
Further Assistance....9-4
10 Troubleshooting ....10-1
General 10-2
Fault Clearance....10-3
Paper jams 10-3
Document jams 10-3
Xerox Welcome and Support Center.... 10-4
Locating the serial number.... 10-4
Troubleshooting Tips.... 10-5
Power 10-5
Document Handler 10-5
Paper Handling 10–5
Finisher 10-6
Output Quality 10-7
11 Index ....1

Spode QRG.book Page vi Tuesday, May 13, 2003 10:51 AM







1 W ELCOME
Introduction.... 1-2
Overview of Features at the machine... ..... 1-5
Overview of Features at the Workstation.....1-7
▶ Safety.... 1-8
Environmental Compliance.... 1-13
Regulatory Information....1-14
▶ Illegal Copying.... 1-16
WELCOME
INTRODUCTION...
Thank you for choosing the Xerox CopyCentre/WorkCentre Pro.
Your CopyCentre/WorkCentre Pro is a digital device capable of being used for copying, faxing, printing and scanning. If your needs change, your machine can be upgraded with the appropriate optional software or hardware units. For further information contact your Xerox representative.
Depending on your model, your machine will print/copy 32 or 40 prints per minute.
The digital design of the CopyCentre/WorkCentre Pro enables:
- more output options - for example creating booklets, putting multiple images on a single page, inserting dividers into a transparency set and combining multiple segments into a single job.
- fewer jams and damaged originals because originals are only scanned once
- high quality output which can be enhanced and customised to your unique specifications.
About this Guide
This Quick Reference Guide supports the various features that may be available on your configuration.
Refer to Chapter 2 Getting Started for a brief overview of the main features to help you get started. Further chapters offer more information on the options available.
For additional assistance at the machine press the Help button. If your CopyCentre/WorkCentre Pro is connected to the network, use the CentreWare Help system or click on the Help button in the Print Driver.
Conventions
Throughout this Guide, you will find that some terms are used interchangeably:
➢ Paper is synonymous with media.
Document is synonymous with original.
Page is synonymous with sheet.
CopyCentre/WorkCentre Pro 32/40 is synonymous with the machine.
The following pages offer further information about the conventions used within this Guide.
Orientation
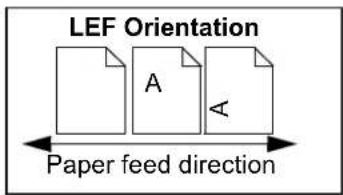
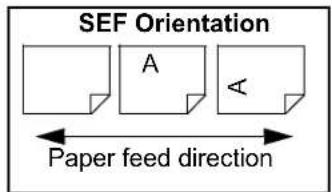
Orientation refers to the direction of images on the page. When the image is upright, the paper (or other media) can be one of two ways:
Long Edge When observed from the front of the machine, paper or originals with the long edges Feed (LEF) / to the left and right of the paper tray or document handler. Portrait
WELCOME
Short Edge When observed from the front of the machine, paper or originals with the short Feed (SEF) / Landscape edges to the left and right of the paper tray or document handler.
Italic typeface
The Italic typeface is used to emphasise a word or phrase. In addition, references to other publications are displayed in Italic typeface. For example:
- For more information refer to the System Administrator CD (CD1), contained in the CopyCentre/WorkCentre Pro CD Pack delivered with your CopyCentre/WorkCentre Pro.
Bracket text typeface:
The [Bracket Text] typeface is used to emphasise the selection of a feature mode or button. For example:
Select [Machine Details].
Notes
Notes are statements that provide additional information. For example:
NOTE: Originals must be loaded in the Document Handler when using this feature.
Hints
Hints help users to perform a task. For example:

HINT: This option is useful for saving toner (dry ink) consumption for images with a dark background and white text.
Specification note
Offers more in-depth specification information relating to the machine. For example:
i Tray 2 holds 520 sheets of 20 lb., 80 gsm paper. Sizes range from 5.5" x 8.5" to 11" x 17", A5 to A3.
Cautions
Cautions are statements that suggest mechanical damage as a result of an action. For example:
CAUTION: Use of controls or adjustments or performance of procedures other than those specified herein may result in hazardous radiation exposure.
Warnings
Warnings are statements that alert users to the possibility of personal injury. For example:
WARNING: This product must be connected to a protective earthing circuit.
Additional Resources
Should you require more detailed information about any of the features available on your CopyCentre/WorkCentre Pro 32/40, please refer to the Training and Information CD (CD2), contained in the CopyCentre/WorkCentre Pro CD Pack delivered with your CopyCentre/WorkCentre Pro.
The Training and Information CD is intended for all users, including Machine Administrators. It contains comprehensive information about your new product including interactive how-to's and tutorials. To ensure maximum productivity is gained from your CopyCentre/WorkCentre Pro, please copy the programme contained on the CD onto your network so that all users have access.
OVERVIEW OF FEATURES AT THE MACHINE...
Using the powerful CopyCentre/WorkCentre Pro features you can:
Scan Once and Print Many
When making copies the CopyCentre/WorkCentre Pro only has to scan a document once regardless of the number of copies needed. This reduces the risk of jams and damage to originals.
Perform Different Tasks Simultaneously
The CopyCentre/WorkCentre Pro performs different tasks simultaneously. A job can be added to the job queue by scanning it, even while the CopyCentre/WorkCentre Pro is printing another job.
Make Copies Look Like Originals
The CopyCentre/WorkCentre Pro allows the reproduction of high quality images, especially photographs, graphics, text, or a combination. Compare your output to that from other copiers and see the difference.
Customise Image Size and Placement
You can manipulate the appearance of the image on the output stock.
- Shift the image to create margins for binding.
- Automatically reduce, enlarge, or center your images.
- Print multiple reduced images on a single page.
Use Digital Features to Simplify your Work Process
Use the Build Job feature to divide a copy job into different segments and apply different settings to each of the segments. This allows you to:
- combine originals from the Document Glass and the Document Handler into a single job.
- create a single job, using different programming features for each original.
- feed more than the maximum number of originals through the Document Handler without reprogramming.
Use the Transparency feature to produce transparencies with transparency separators in one step.
Use the Booklet Creation feature to automatically sequence and reduce or enlarge the images when making booklets.
Use the Covers feature to automatically add covers to your documents.
Use the Mixed Size Originals feature to copy mixed size originals simultaneously. Produces copies on uniform size paper or mixed size paper.
Be Environmentally Friendly
This product complies with a variety of international standards for environmental protection and is compatible with most recycled paper.
Scan Documents to Create Electronic Files (Optional)
This optional feature allows you to create electronic files from your originals which can be:
- filed on the server
- routed over the network to your desktop
- distributed through an e-mail system
- Automatically placed into a Document Management Application
- Once your original paper document has been converted to an electronic digital document you can change, manage, share and distribute the document in electronic form, using a wide variety of software applications.
Fax (Network Server Fax) Documents (Optional)
The optional Fax feature, allows you to scan documents and send them to any type of fax machine that is connected to a telephone network. Your images are sent from your machine to your Third Party fax server, which relays them to the fax number of your choice.
The optional Internet Fax feature allows you to scan and send your documents to another fax machine. This type of fax travels over the internet or intranet.
OVERVIEW OF FEATURES AT THE WORKSTATION...
If your CopyCentre/WorkCentre Pro is connected to a network you can use the following features. Contact your System Administrator to get connected.
CentreWare Print Drivers
The Print Driver extends the productivity power of the CopyCentre/WorkCentre Pro to your desktop. Options include:
• 1-sided or 2-sided
• Stapled sets if you have a Finisher
• Resolutions up to 1800x1800 dpi
- Add standard or customised watermarks
- Secure Printing (print your confidential document after you get to the printer)
CentreWare Tools
The CentreWare software suite also offers optional User Management Tools and Network Scanning tools.
CentreWare Internet Services
Every CopyCentre/WorkCentre Pro has a 'built in' web Home Page which allows print-ready files to be sent to any CopyCentre/WorkCentre Pro via the World Wide Web. This feature is accessed via Internet Services.
SAFETY...
Your Xerox product and supplies have been designed and tested to meet strict safety requirements. These include Safety Agency approval, and compliance to established environmental standards. Please read the following instructions carefully before operating the product and refer to them as needed to ensure the continued safe operation of your product.
The safety testing and performance of this product have been verified using XEROX materials only.
Follow all warnings and instructions marked on, or supplied with the product.

This WARNING Mark alerts users to the possibility of personal injury.
This WARNING Mark alerts users to heated surfaces.

WARNING: This product must be connected to a protective earthing circuit.
This product is equipped with a 3-wire type plug, provided with an earthed (grounded) power outlet. This is a safety feature. To avoid risk of electric shock, contact your electrician to replace the receptacle if you are unable to insert the plug into the outlet. Never use an earthed (grounded) adapter plug to connect the product to a power source receptacle that lacks an earth connection terminal.
This product should be operated from the type of power source indicated on the marking label. If you are not sure of the type of power available, consult your local power company.
Do not allow anything to rest on the power cord. Do not locate the product where persons will step or trip on the cord.
Use of an extension cord with this product is not recommended or authorized. Users should check building codes and insurance requirements if a properly earthed (grounded) extension cord is to be used. Ensure that the total ampere ratings of the products plugged into the extension cord do not exceed the extension cord ampere rating. Also, make sure that the total amperage of all products plugged into the wall outlets does not exceed the outlet rating.
Disconnect Device for this product is the power cord. To remove all electrical power to the product, disconnect the power cord from the power receptacle.
Your equipment is equipped with an energy saving device to conserve power when the machine is not in use. The machine may be left on continuously.
natural_image
Pure geometric crosshair symbols without any text or labels
natural_image
Pure geometric diagram with crosshair and circular target-like shapes (no text or symbols)Unplug this product from the wall outlet before cleaning. Always use materials specifically designated for this product. Use of other materials may result in poor performance and could create a hazardous situation.
Do not use aerosol cleaners. Follow the instructions in the User Guide for proper cleaning methods.
Never use supplies or cleaning materials for purposes other than those for which they were intended. Keep all supplies and materials out of reach of children.
Do not use this product near water, wet locations, or outdoors.
Do not place this product on an unstable cart, stand or table. The product may fall, causing personal injury or serious damage to the product.
Slots and Openings in the cabinet and in the back and sides of the product are provided for ventilation. To ensure reliable operation of the product and to protect it from overheating, these openings must not be blocked or covered. The product should never be located near or over a radiator or heat register. This product should not be placed in a built-in installation unless proper ventilation is provided.
Never push objects of any kind into the slots of the product as they may touch dangerous voltage points or short out parts which could result in a fire or electric shock.
Never spill liquid of any kind on the product.
Never remove covers or guards that require a tool for removal, unless directed to do so in a Xerox approved maintenance kit.
Never defeat interlock switches. Machines are designed to restrict operator access to unsafe areas. Covers, guards and interlock switches are provided to ensure that the machine will not operate with covers opened.
Do not put your hands into the fuser area, located just inside the exit tray area, as you may be burned.
Moving the machine
Before moving the machine to another location, please contact your Xerox representative.
Quality Standards
The product is manufactured under a registered ISO9002 Quality system.
If you need additional safety information concerning this XEROX product or XEROX supplied materials you may call the following number:
EUROPE +44 (0) 1707 353434
USA/CANADA 1 800 928 6571
Laser Safety

WARNING: Use of controls or adjustments or performance of procedures other than those specified herein may result in hazardous radiation exposure.
With specific regard to lasers, the equipment complies with laser product performance standards set by governmental, national and international agencies as a Class 1 Laser Product. It does not emit hazardous radiation as the beam is totally enclosed during all phases of customer operation and maintenance.
The Electricity at Work Regulations - UK ONLY
The Electricity at Work Regulation 1989 came into force in England and Wales on the 1 April 1990. This 1989 Regulation places a duty on all employers and self-employed persons to ensure the electrical system in their premises is constructed, maintained and operated in such a manner as to prevent, so far as reasonably practical, danger. This includes ensuring all electrical equipment connected to such electrical systems safely constructed, maintained and operated.
All Xerox equipment has been designed to exacting safety standards and has undergone a variety of stringent safety tests including earth bond, insulation resistance and electrical strength tests. Xerox Limited manufacturing plants have been awarded ISO 9000 quality certification and are subject to regular audits by the British Standards Institution or equivalent national standards body.
Xerox equipment which has been properly and regularly serviced and maintained should not have to undergo additional specific safety tests pursuant to the 1989 Regulation. Customers wishing to complete safety testing should contact Xerox Limited Technical Centre (see page B1-12) for advice prior to any test implementation.
XEROX equipment should, however, be properly and regularly serviced and maintained at all times.
QUESTION: What is the Electricity at Work Regulation?
ANSWER: The Electricity at Work Regulation 1989 came into force in England and Wales on the 1 April 1990. This 1989 Regulation places a duty on all employers and self-employed persons to ensure the electrical systems in their premises are constructed, maintained and operated in such a manner as to prevent, so far as reasonably practicable, danger. This includes ensuring that all electrical products connected to such electrical systems are safely constructed, maintained and operated.
QUESTION: Does XEROX Limited comply with the Electricity at Work Regulation?
ANSWER: The regulation places a duty on all employers and self-employed persons to ensure the electrical systems in their premises are, effectively safe.
The regulation does not impose on, amongst others, manufacturers or suppliers of such electrical systems. However, rest assured that all XEROX equipment which XEROX Limited and its authorized distributors supplies to customers, conforms with all the relevant safety legislation and standards.
QUESTION: Is XEROX equipment safe?
ANSWER: All XEROX equipment supplied by XEROX Limited and their authorized distributors conforms to all relevant safety legislation and standards.
QUESTION: Is the XEROX equipment in my premises safe?
ANSWER: All XEROX equipment supplied by XEROX Limited and their authorized distributors conforms to all relevant safety legislation and standards. However, like all electrical equipment, they have to be regularly serviced and maintained by competent persons.
XEROX Limited Customer Service Engineers ensure XEROX equipment is serviced and maintained to exacting XEROX safety standards. If you would like your XEROX equipment to be serviced and maintained to such high standards, please contact your local XEROX Limited Customer Service Organization. They will be pleased to assist you.
QUESTION: Does the XEROX equipment in my premises comply with the Electricity at Work Regulations?
ANSWER: All employers and self-employed persons must ensure that the electrical systems in their premises are safe. This will include ensuring XEROX equipment in such premises is safe.
XEROX Limited's Product Safety function has prepared a guide which contains a list of tests which may be completed by your XEROX Limited Customer Service Organization.
THESE TESTS MUST BE CARRIED OUT ONLY BY PERSONS WHO POSSESS THE RELEVANT SKILL, KNOWLEDGE AND EXPERIENCE TO CARRY OUT SUCH TESTS.
Please contact the XEROX Limited Customer Service Organization for further information.
THE USE OF INAPPROPRIATE TEST PROCEDURES AND TEST EQUIPMENT MAY PROVIDE MISLEADING RESULTS AND MAY CAUSE DEATH, PERSONAL INJURY AND/OR DAMAGE TO PROPERTY.
QUESTION: I would like to carry out my own safety tests on the XEROX equipment in my premises.
ANSWER: You may, of course, request such tests as you deem necessary to satisfy yourself that your XEROX equipment is safe. Your XEROX Limited Customer Support will be pleased to advise you on such testing.
QUESTION: I require records of all tests.
ANSWER: After safety testing, your XEROX Limited Customer Service Engineer will provide you with a certificate which details the results of all tests completed.
In the event of any defect being noted, the XEROX equipment will be switched off and disconnected from the supply until the defect has been corrected. You will be advised of such action to enable such defects to be corrected.
PLEASE NOTE: YOU MUST ENSURE THAT YOUR XEROX EQUIPMENT IS SAFE AT ALL TIMES.
Please contact us if you have any queries regarding the information provided in this document.
Environment, Health and Safety
XEROX Limited
PO Box 17
Bessemer Road
Welwyn Garden City
Herts
AL7 1HE
England
Tel Number +44 (0) 1707 353434
Safety Standards
This XEROX product is certified by the following Agency using the Safety Standards listed.
EUROPE This XEROX product is certified by the following Agency using the Safety Standards listed.
Agency: TUV Rheinland
Standard: EN60950:1992 Amendments A1, A2, A3, A4 and A11.
USA/CANADA This XEROX product is certified by the following Agency using the Safety Standards listed.
Agency: UNDERWRITERS LABORATORIES INC
Standard: ul 1950 Certification is based on reciprocity agreements, which include requirements for Canada.
ENVIRONMENTAL COMPLIANCE...
ENERGY STAR®
Xerox Corporation designed this product to comply with the guidelines of the ENERGY STAR® programme of the Environmental Protection Agency. As an ENERGY STAR® Partner, Xerox has determined that this product meets the ENERGY STAR® guidelines for energy efficiency.
The CopyCentre/WorkCentre Pro 32/40 will be delivered with the timer for switching to Low Power Mode from the last copy/print out, set at 15 minutes. The time to switch to power save (auto off/sleep) mode is set at 60 minutes from the last copy/print out. A more detailed description of these modes, together with instructions on changing the default times to suit your work pattern, can be found in Tutorial, Machine Administration, Power Save Mode of the Training and Information CD (CD2).
Environmental Choice ^M

Terra Choice Environmental Services, Inc., of Canada has verified that this Xerox product conforms to all applicable Environmental Choice ^M EcoLogo ^M requirements for minimised impact to the environment.
Product Recycling and Disposal
Xerox operates a worldwide equipment take-back and reuse/recycle programme. Contact your Xerox sales representative (1-800-ASK-XEROX) to determine whether this Xerox product is part of the programme. For more information about Xerox environmental programmes, visit www.xerox.com/environment.html.
If your product is not part of the Xerox programme and you are managing its disposal, please note that the product may contain lead*, mercury* and other materials whose disposal may be regulated due to environmental considerations. For recycling and disposal information, contact your local authorities. In the United States, you may also refer to the Electronic Industries Alliance web site: www.eiae.org.
REGULATORY INFORMATION...
CE
The CE marking applied to this product symbolizes Xerox Limited Declaration of Conformity with the following applicable Directives of the European Union as of the dates indicated:
January 1, Council Directive 73/23/EEC amended by Council Directive 93/68/EEC, 1995: approximation of the laws of the member states related to low voltage equipment.
January 1, Council Directive 89/336/EEC, approximation of the laws of the member states 1996: related to electromagnetic compatibility.
March9, 1999: A full declaration, defining the relevant directives and referenced standards can be obtained from your Xerox representative or by contacting: Environment, Health and Safety Xerox Limited PO Box 17 Bessemer Road Welwyn Garden City Herts. AL7 1HE England Tel Number +44 (0) 1707 353434
WARNING: This product is certified manufactured and tested in compliance with strict safety and radio frequency interference regulations. Any unauthorized alteration which includes the addition of new functions or the connection of external devices may impact this certification. Please contact your local XEROX Limited representative for a list of approved accessories.
WARNING: In order to allow this equipment to operate in proximity to Industrial, Scientific and Medical (ISM) equipment, the external radiation from the ISM equipment may have limited or special mitigation measures taken.
WELCOME
WARNING: Shielded cables must be used with this equipment to maintain compliance with Council Directive 89/336/EEC.
FCC Part 15 This device complies with Part 15 of the FCC Rules. Operation is subject to the following two conditions:
(1) This device may not cause harmful interference and (2) This device must accept any interference received, including interference that may cause undesired operation.
Shielded cables must be used with this equipment to maintain compliance with FCC regulations.
Contact: Xerox Corporation
800 Phillips Road,
Webster,
New York 14580
USA
Telephone: 1-800-828-6571
ILLEGAL COPYING...
Congress, by statute, has forbidden the copying of the following subjects under certain circumstances. Penalties of fine or imprisonment may be imposed on those guilty of making such copies.
Obligations or Securities of the United States Government, such as:
Certificates of Indebtedness
Coupons from Bonds
Silver Certificates
United States Bonds
Federal Reserve Notes
Certificates of Deposit
National Bank currency
Federal Reserve Bank Notes
Gold Certificates
Treasure Notes
Fractional Notes
Paper money
Bonds and obligations of certain agencies of the government, such as FHA Bonds (US Savings Bonds may be photographed only for publicity purposes in connection with the campaign for the sale of such bonds.)
Internal Revenue Stamps (If it is necessary to copy a legal document on which there is a canceled revenue stamp, this may be done provided the reproduction of the document is performed for lawful purposes.)
Postage Stamps, canceled or uncanceled (For philatelic purposes, postage stamps may be photographed provided the reproduction is black and white and less than 3/4 or more than 1 1/2 times the linear dimensions of the original.)
Postal Money Orders
Bills, checks, or drafts for money drawn by or on authorised officers of the United States
Stamps and other representatives of value, of whatever denomination, which may be or have been issued under any Act of Congress
Adjusted compensation Certificates for veterans of the World Wars
➢ Obligations or Securities of any foreign government, bank, or corporation
Copyrighted material (unless permission of the copyright owner has been obtained or the copying falls within the "fair use" or library reproduction provisions of the copyright law). Further information of these provisions may be obtained from the Copyright Office, Library of Congress, Washington, DC 20559 (circular R21)
➢ Certificates of Citizenship or Naturalisation. (Foreign naturalisation certificates may be photographed.)
Passports (Foreign passports may be photographed.)
Immigration papers
Draft Registration cards
➢ Selective Service Induction papers which bear any of the following information:
Registrant's earnings or income
Registrant's dependency status
Registrant's court record
Registrant's previous military service
Registrant's physical or mental condition
NOTE: Exception: US Army and Navy discharge certificates may be photographed.
Badges, identification cards, passes or insignias carried by military or Naval personnel, or by members of the various Federal Departments and Bureaus, such as the FBI and Treasury (unless the photograph is ordered by the head of such Department or Bureau)
Copying of the following is also prohibited in certain states: automobile licences, driver's licenses, and automobile Certificates of Title. This list is not all-inclusive. In case of doubt, consult your attorney.


Spode QRG.book Page 18 Tuesday, May 13, 2003 10:51 AM


WELCOME





2 G ETTING STARTED
Machine Overview....2-2
▶ Control Panel Overview....2-3
Power On or Off....2-4
Loading Paper....2-5
Making Copies....2-6
Sending a Fax....2-7
▶ Sending an Internet Fax....2-8
➢ Scanning a Document....2-9
Sending an E-mail....2-10
➢Printing from a PC...... 2-11
➢Printing with Internet Services... 2-12
Logging On / Logging Off....2-13
➢Further Assistance....2-14
GETTING STARTED
MACHINE OVERVIEW...
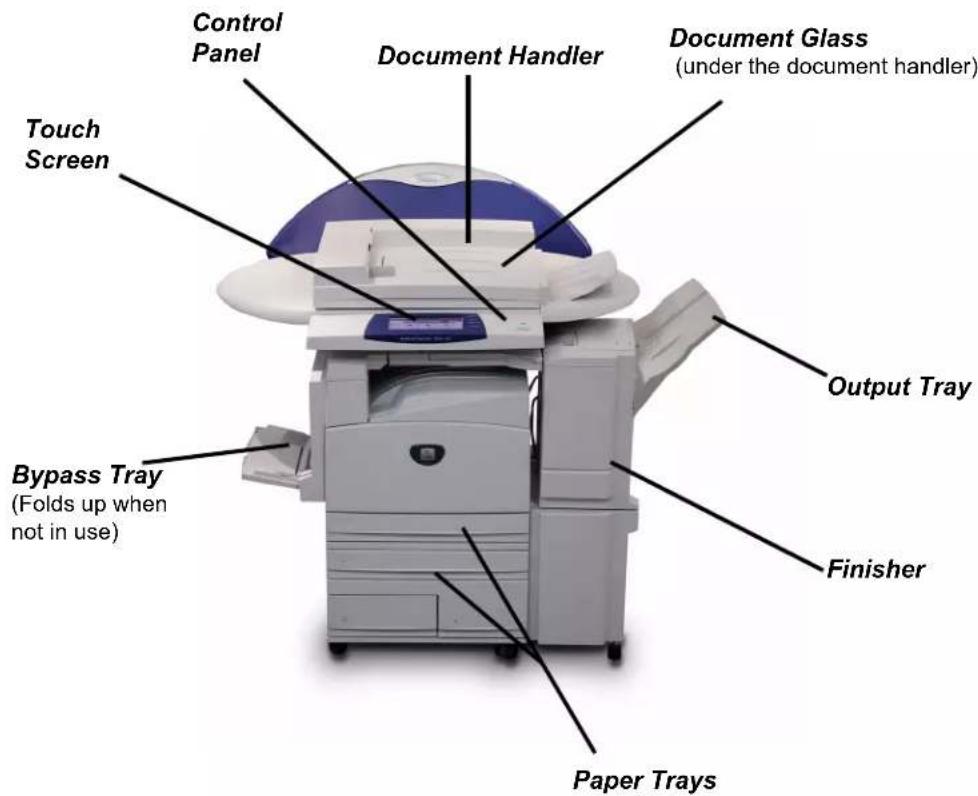
NOTE: This is a photograph of a fully configured WorkCentre Pro 32/40. The features available are dependent on your machine configuration.
CONTROL PANEL OVERVIEW...

Help
Accesses additional information.

Clear All
Resets all the features to their default settings.
The touch screen
Displays and selects all the available programming features, plus fault clearance procedures and general machine information.

Language
Changes text to an alternative language.

Interrupt
Temporarily stops the current job to allow a priority job to be run.

Access
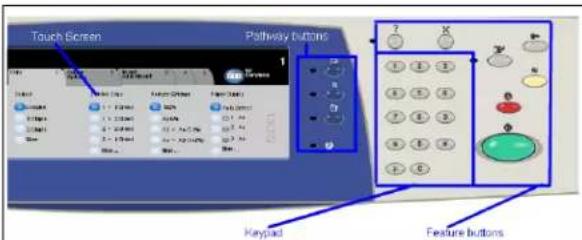

Start
Starts the job.
Features
Displays the job features on the screen.
Dial Pause
Enters a pause in a telephone number when transmitting a fax.
Hash
Indicates the dialing character or designates a group dial number. Also used when entering a password.

Job Status
Displays job progress information.
Deletes numeric values or the last digit entered.

Machine Status
Displays the current status of the machine.
GETTING STARTED
POWER ON OR OFF...

To power ON:
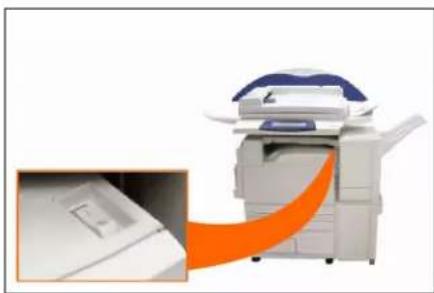
➢ Press the ON/OFF switch. The entire powering up process takes less than 4 minutes. Hold the ON/OFF switch down for 5 seconds. The lights on the control panel will flash. It may be up to 30 seconds before you see any lights on the control panel or screens appear on the touch screen.
natural_image
Illustration of a printer with a paper airplane being inserted, showing no text or symbols on the device itself.NOTE: Certain functions of the machine, e.g. copying, will be available before other functions e.g. printing.
To power OFF:
➢ Press the ON/OFF switch. Hold the ON/OFF switch down for 5 seconds. A confirmation screen will appear asking you to select a power down option.
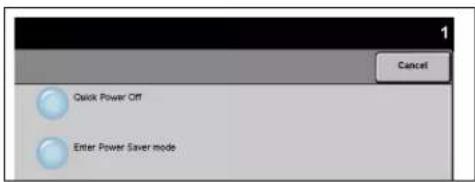

If Quick Power Off is selected and confirmed, the machine will begin a controlled power down sequence.
NOTE: The machine remains on for approximately 30 seconds before the power is terminated.
If there are any jobs in the queue, a second pop-up screen will appear warning that jobs in the queue will be deleted if the machine is powered off. Confirmation of this screen will result in the deletion of any jobs in the queue during the power down sequence.
If Enter Power Save is selected and confirmed, the machine will immediately enter Low Power Mode. If there are any jobs in the queue, a second pop-up screen is displayed.
NOTE: The ON/OFF switch is disabled in Low Power Mode.
To re-activate the machine when in this mode, touch a button on the touch screen or control panel.
LOADING PAPER...
1
➢ Open the required paper tray.
NOTE: For the High Capacity Feeder with 2-Tray Module, paper trays 1 and 2 are fully adjustable. Paper trays 3 and 4 are dedicated paper trays which hold 8.5" x 11" or B5, or A4 long edge feed paper only. On the 4-Tray Module, paper trays 1 to 4 are fully adjustable. On the 2-Tray Module, paper trays 1 and 2 are fully adjustable.
2
Load paper. Paper must not be loaded above the fill line.
Close the tray
NOTE: For paper trays 1 to 4, make sure the guides are just touching the paper, otherwise the size automatically detected may be incorrect.
3
➢ Select [Confirm] OR select [Change Size] and/or [Change Description] to reprogramme the tray if the paper size, type or colour has changed.
NOTE: Make sure the Size, Type and Colour are all correct. For standard copy paper the following should apply:
Size - A4
Type - Plain paper
Colour - White
GETTING STARTED
MAKING COPIES...

Load the documents.
NOTE: Documents are only scanned once.

- Access the Copy tab - if necessary select the Features button on the control panel.
Select the required features on the touch screen.
Press Start.
Copy Features include...
Colour options
➢ Image quality adjustment
➢ Auto Reduce/Enlarge
➢ Copying mixed size originals
➢ Adding blank dividers into transparency sets
Arranging multiple images on a page
➢ Adding printed or blank covers
Image Shift
➢ Erasing edges and borders
Build Job to apply different programming within a stack of documents
Storing the programming for frequently run jobs
Creating booklets
SENDING A FAX...
Network Server Fax will be available if your machine is connected to the network, a supported third party supplied network server fax is available on the network, and the optional Network Server Fax Integration kit has been enabled and set up for use.
1
Load the documents.
2
Select [Fax].
NOTE: You may need to select [All Services] first.
Enter the telephone number.
3
Select the required features on the touch screen.
Press Start.
Fax Features include...
Colour options
Adjusting the resolution
➢ Faxing double sided originals
▶ Programming the size of the originals being scanned
➢ Image quality adjustment
▶ Delaying the start time of a fax
GETTING STARTED
SENDING AN INTERNET FAX...
Internet Fax will be available if your machine is connected to the network and the optional Internet Fax kit has been enabled and set up for use.

Load the documents.
Select [Internet Fax].
NOTE: You may need to select [All Services] first.
➢ Select [To..], enter the recipient e-mail details and select [Save].
Select [Edit Subject], enter a subject and select [Save].

Select the required features on the touch screen.
Press Start.
Internet Fax Features include...
Colour options
➢ Setting up a Public or Internal Address Book
Adjusting the resolution
➢ Scanning double sided originals
➢ Programming the size of the originals being scanned
➢ Image quality adjustment
➢ Changing the default file format setting
SCANNING A DOCUMENT...
Network Scanning will be available if your machine is connected to the network and the optional Network Scanning kit has been enabled and set up for use.
1
Load the documents.
2
Select [Network Scanning].
NOTE: You may need to select [All Services] first.
3
Select the template required.
Select the required features on the touch screen.
Press Start.
On completion access your job at your workstation.
Scan Features include...
Colour options
Adjusting the image output requirements
Adjusting the resolution
➢ Scanning double sided originals
Programming the size of the originals being scanned
➢ Changing the destination for the scanned image
GETTING STARTED
SENDING AN E-MAIL...
E-mail will be available if your machine is connected to the network and the optional E-mail kit has been enabled and set up for use.

Load the documents.
Select [E-mail].
NOTE: You may need to select [All Services] first.
Select [From], enter your e-mail details and select [Enter].
Select [To], enter the recipient e-mail details and select [Enter].
Select [Edit Subject], enter a subject and select [Save].
Select the required features on the touch screen.
Press Start.
Scan to E-mail Features include...
Colour options
➢ Setting up a Public or Internal Address Book
Adjusting the resolution
➢ Scanning double sided originals
▶ Programming the size of the originals being scanned
➢ Image quality adjustment
PRINTING FROM A PC...
If the WorkCentre Pro is connected to a network, documents can be printed directly from your PC via the CentreWare print driver supplied.
1
Select [Print] in your application.
Select the WorkCentre Pro as your printer.
2
Select [Properties], make your selections and click [OK].
➢ Click [OK] and then [Print].
Print Features include...
Colour options
▶ Printing 1 or 2 sided
➢ Printing stapled sets if the machine has a Finisher
➢ Changing the printing resolution
- Adding a banner sheet
- Adding a front cover
Adjusting the image quality
- Adding watermarks
GETTING STARTED
PRINTING WITH INTERNET SERVICES...
Internet Services uses the embedded Web User Interface which enables communication between the HTTP server and the machine. This option is available when the WorkCentre Pro is connected to a network.

Open your Web Browser, then enter: http:// and the printer TCP/IP address.
➢ Touch the Enter key on your workstation keyboard.
▶ Click on [Services].
Make your selections.
Use the scroll bar on the right to move to the bottom of the page.
➢ Click on [Browse] and locate the file to be printed.
➢ Click on [Submit Job].
Internet Services Features include...
Creating, modifying and deleting scan templates if Network Scanning is available
➢ Promoting, deleting or releasing a job in the Print Queue
➢ Reviewing the status of the WorkCentre Pro
NOTE: For more detailed information on using Internet Services please contact your System Administrator.
LOGGING ON / LOGGING OFF...
If the Internal Auditron or the optional Network Accounting has been enabled to track machine use, a valid User Number needs to be entered in order to access the machine functions.
1
To Log on when the Internal Auditron has been enabled, enter a valid User Number (Password).
To Log on when Network Accounting has been enabled, enter a valid User ID and Account ID.
2
➢ Select [Enter] and complete your job
3
To Log out, press the Access button on the control panel, then select [Logout] on the touch screen.
FURTHER ASSISTANCE...

Access the Job Queue
➢ Press the Job Status button on the control panel. The All Incomplete Jobs queue will be displayed.
➢ Review the status of the job.
Select [Other Queues] to access and review the other queues available.
Access the on-line Help
Select [Help] at any time to access the on-line help screens.
- Messages, screen instructions and animated graphics provide additional information.
For additional Help
If you need any additional help on using your CopyCentre 32/40 colour copier or WorkCentre Pro 32/40 colour copier/printer you can:
Refer to the Training and Information CD (CD2), contained in the CopyCentre/WorkCentre Pro CD Pack delivered with your CopyCentre/WorkCentre Pro.
Contact your System and/or Machine Administrator.
Visit our Customer Web Site at www.xerox.com or contact the Xerox Welcome and Support Center quoting the machine serial number.
➢ Press the Machine Status button on the control panel.
Select [Machine Details] to display the machine serial number.
NOTE: The serial number can also be found on a metal plate toward the rear of the machine in Area 1, in the back of the fuser module.
3 COPY
Copy....3-2
Basic Copying....3-3
Colour Options .... 3-10
➢Image Adjustment....3-14
Output Format.... 3-21
Job Assembly....3-27
COPY...
The Copy feature is standard on the CopyCentre/WorkCentre Pro. Access to the Copy features is gained using the Features button on the control panel. This chapter contains information about the options available within Copy.
The tabs available for selecting the Copy features are:
Copy
Colour Options
Image Adjustment
Output Format
Job Assembly
BASIC COPYING...
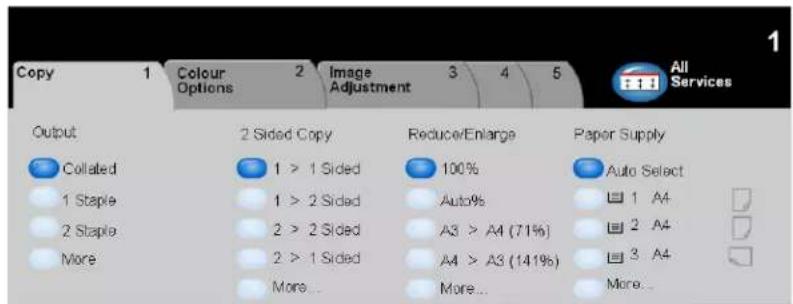
The Copy tab is the default screen for the Features Pathway. Use the Copy tab to select the standard features for a copy job.
Touch any of the top level buttons to select a feature. Multiple options can be selected for each copy job if required.
To view all the options for a feature, select More....
Most feature screens include three buttons to confirm or cancel your choices.
The Undo button resets the current screen to the default values that were displayed when the screen was opened.
The Cancel button resets the screen and returns to the previous screen.
The Save button saves the selections made and returns to the previous screen.
COPY
Output
Output is used to select the finishing requirements for the job. The options will depend on the finishing output device available.
Options:
COLLATED Select Collated for output stacked in sets to match the sequence of the originals.
UNCOLLATED Select Uncollated for output sorted into stacks of individual pages.
The above output will be delivered in one of the following depending on the output tray:
| WITH OFFSET | Each copy set will be slightly offset to allow easy separation. |
| WITHOUT OFFSET | The copy sets will not be offset. |
STAPLED Available if the CopyCentre/WorkCentre Pro is equipped with the 2000 Sheet Stacker/Stapler. It offers a selection of single or double stapling options. Collated and uncollated stapled sets will be delivered offset in the finisher.
① Staples 2 - 50 sheets. The 50-sheet maximum applies to up to 24lb / 90 gsm paper.
2-Sided
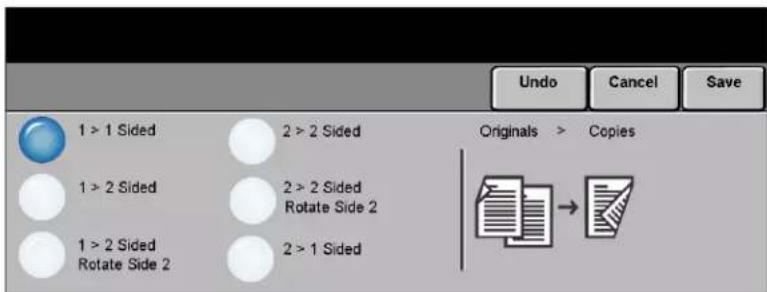
Up to 50 double-sided copies, ranging in size from 8.5" x 5.5" to 11" x 17" (A4 to A3). can be made automatically from one or two-sided originals.
Options:
1→1 SIDED Use this option for originals that are printed on 1 side only and single-sided copies are required.
1 → 2 SIDED Use this option for originals that are printed on 1 side only and double-sided copies are required.
1→2 S This option produces double-sided copies from single-sided originals and rotates every second side image. Use this option to create documents which can be read in a "head to toe" manner, for example a calendar.
2→2 SIDED Use this option for originals that are printed on 2 sides and double-sided copies are required.
2→2 S iThis option produces double-sided copies from double-sided originals and rotates ROTATE SIDE 2 every second side image. The "read" orientation for this option varies depending on the input originals. For example, if "head to head" orientation originals are scanned, the output will be "head to toe". If "head to toe" orientation originals are scanned the output produced will be "head to head".
2→1 SIDED Use this option for originals that are printed on 2 sides and single-sided copies are required.
Reduce/Enlarge
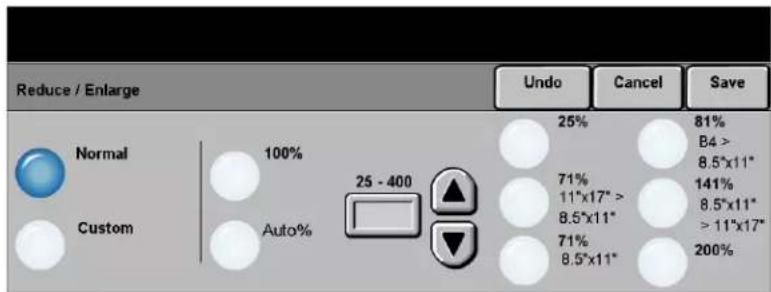
The Reduce / Enlarge option provides a variety of reduction and enlargement options. Originals placed on the Document Glass or sent to the machine electronically can be reduced or enlarged between 25% to 400%. Originals fed through the Document Handler can be reduced or enlarged between 25% to 200%. The preset Reduce/Enlarge options that appear on the Copy tab can be set in Tools mode.
Options:
The following options appear after pressing the More... button on the Copy tab.
NORMAL Use this option to proportionately reduce or enlarge the output image in both directions by the % selected.
Normal options are as follows
| 100% | Produces an image on the copies the same size as the image on the original. |
| AUTO % | Proportionally reduces or enlarges the image on the copies based on the size of the original and the size of the selected output paper. |
| % SET 25 - 400 | Use this option to select the percentage of reduction or enlargement required using the keypad on the control panel. To use the keypad, select the box displaying the current reduce/enlarge percentage.The scroll buttons can also be used to adjust the reduce/enlarge percentage, in 1% increments. |
| PRESET OPTIONS | The most commonly used reduce/enlarge percentages have been provided as preset options. These preset options can be customised to meet individual needs. |
CUSTOM Use this option to adjust the height (Y) and the width (X) dimensions for reduction or enlargement of each dimension independently.
COPY
Custom options are as follows:
| 100% | Produces an image on the copies the same size as the image on the original. |
| AUTO % | Automatically fits the image of the original onto the paper selected. |
| X: Y: 25 - 400% | Enables you to customize the width(X) and height(Y) reduction or enlargement to suit your own requirements. A percentage can also be entered by touching the X or Y box and using the keypad. |
| NOTE: Output will NOT be reduced or enlarged proportionally. |
Paper Supply
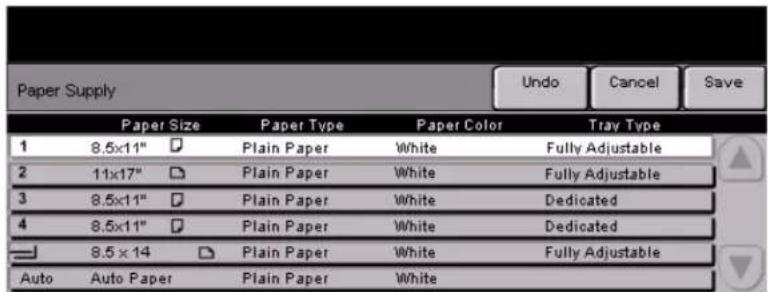
Use the Paper Supply options to select Auto Paper or a paper tray for the copy job.
① Transparencies can be fed from Tray 1 or the Bypass Tray.
Options:
There are three possible tray configurations on the CopyCentre/WorkCentre Pro. You can choose a 2-Tray module, a 4-Tray module, or a High Capacity Feeder with 2-Tray module.
2-Tray Module
AUTO With this option selected the machine chooses the correct paper for the copy job based on the size of the originals being scanned.
TRAYS 1 & 2 Use this option to select the paper loaded in Trays 1 and 2.
i Trays 1 and 2 each hold 520 sheets of 20 lb., 75 gsm paper. Sizes range from 5.5" x 8.5" to 11" x 17" (A5 through A3).
BYPASS TRAY Use this option when feeding individual types of stock, for example letterhead or labels for one-off jobs.
The Bypass Tray holds 100 sheets of paper based on paper weight. Sizes range up to 12" x 18" or SRA3.
4-Tray Module
AUTO With this option selected the machine chooses the correct paper for the copy job based on the size of the originals being scanned.
COPY
TRAYS 1 TO 4 Use this option to select the paper loaded in Trays 1 to 4.
i Trays 1 to 4 each hold 520 sheets of 20 lb., 75 gsm paper. Sizes range from 5.5" x 8.5" to 11" x 17" (A5 through A3).
BYPASS TRAY Use this option when feeding individual types of stock, for example letterhead or labels for one-off jobs.
① The Bypass Tray holds 100 sheets of paper based on paper weight. Sizes range up to 12" x 18" or SRA3.
High Capacity Feeder with 2-Tray Module
AUTO With this option selected the machine chooses the correct paper for the copy job based on the size of the originals being scanned.
TRAYS 1 & 2 Use these options to select the paper loaded in Trays 1 and 2.
(i) Tray 1 and 2 each hold 520 sheets of 20 lb., 75 gsm paper. Sizes range from 5.5" x 8.5" to 11" x 17" (A5 through A3).
TRAYS 3 & 4 Use these options to select the paper loaded in Trays 3 and 4.
i Tray 3 can hold 867 sheets of 20 lb., 75 gsm paper, and tray 4 holds 1133 sheets of 20 lb., 75 gsm paper, for a total of 2000 sheets. 8.5" x 11", A4, and B5 size paper can be loaded.
BYPASS TRAY Use this option when feeding individual types of stock, for example letterhead or labels for one-off jobs.
① The Bypass Tray holds 100 sheets of paper based on paper weight. Sizes range up to 12" x 18" or SRA3.
COLOUR OPTIONS ...
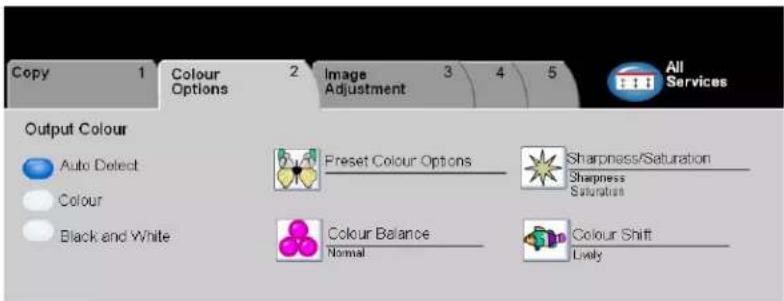
The Colour Options tab is used to select different colour features for the finished output.
Touch any of the top level buttons to select a feature. To view all the options for a feature, select the feature required. Multiple options can be selected for each copy job if required.
The text next to the feature button, called a Job Review Summary, reflects the current settings for that feature. A green light indicates that this feature has been modified from its initial default settings.
Most feature screens include three buttons to confirm or cancel your choices.
The Undo button resets the current screen to the default values that were displayed when the screen was opened.
The Cancel button resets the screen and returns to the previous screen.
The Save button saves the selections made and returns to the previous screen.
Output Colour
Use this feature to select the desired output colour.
Options:
AUTO DETECT This option enables the copier to determine if the document is black and white or colour. If the document is black and white, the Black & White option is selected automatically. If the document is colour, the Colour option is selected automatically.
COLOUR This option enables the copier to make copies using all four toner colours: Yellow, Magenta, Cyan, and Black.
BLACK & WHITE This option should be selected when the desired output is a black and white copy. When Black & White is selected only Black toner is used.
Preset Colour Options
COPY
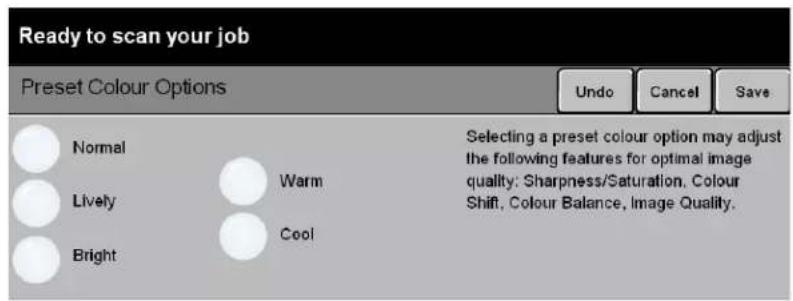
Use this feature to change colour settings to produce various predetermined effects.
Options:
NORMAL This option makes no changes to the image quality and produces copies with the same quality and density of the original.
LIVELY This option uses the highest colour saturation to produce rich, vivid output colours.
BRIGHT This option produces a sharp, clear image on the copy.
WARM This option produces a soft image on the copy by transforming low density colours into light and reddish colours.
Cool This option produces a strong, clear blue tone on the copy.
Colour Balance
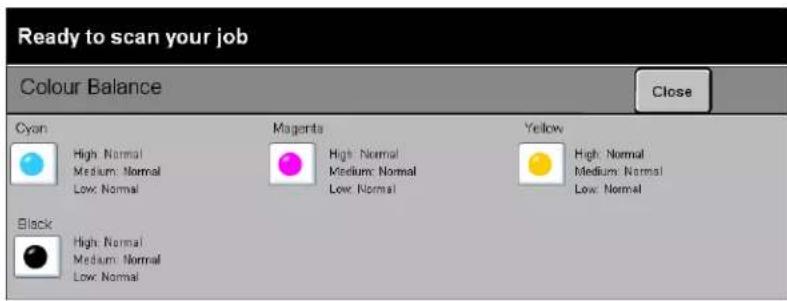
Use this feature to adjust the balance between colours and the overall amount of colour on the output using the up and down scroll buttons for each colour.
Sharpness/Saturation
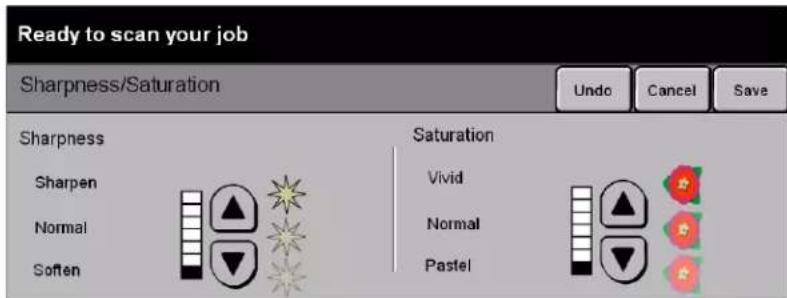
Use this feature to adjust the amount of definition and overall richness of colour on the copy.
Options:
SHARPNESS This option allows you to adjust the amount of edge definition using the up and down scroll buttons.
SATURATION This option allows you to adjust the overall richness of colour using the up and down scroll buttons.
Colour Shift
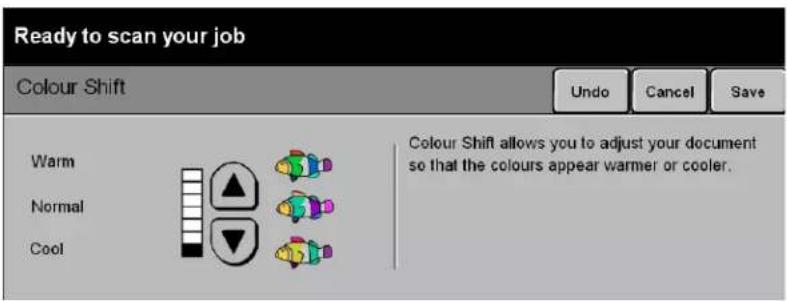
Use this feature to shift all of the copy colours toward the adjacent hue using the up and down scroll buttons.
If you scroll toward Warm, the red colours shift toward the yellow hue, the green colours shift toward the cyan hue, and the blue colours shift toward the magenta hue.
If you scroll toward Cool, the red colours shift toward the magenta hue, the blue colours shift toward the cyan hue, and the green colours shift toward the yellow hue.
COPY
IMAGE ADJUSTMENT...
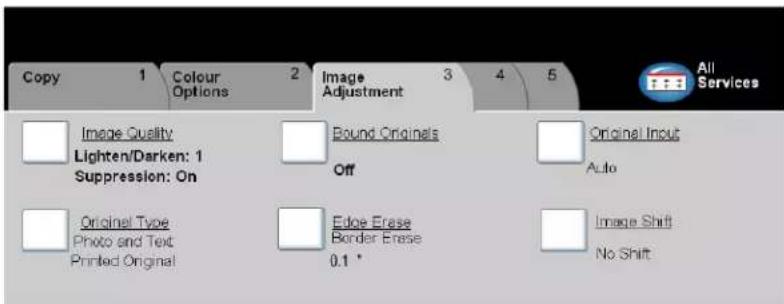
The Image Adjustment tab provides copy features used for adjusting the appearance of the copy output.
Touch any of the top level buttons to select a feature. To view all the options for a feature, select the feature required. Multiple options can be selected for each copy job if required.
The text next to the feature button, called a Job Review Summary, reflects the current settings for that feature. A green light indicates that this feature has been modified from its initial default settings.
Most feature screens include three buttons to confirm or cancel your choices.
The Undo button resets the current screen to the default values that were displayed when the screen was opened.
The Cancel button resets the screen and returns to the previous screen.
The Save button saves the selections made and returns to the previous screen.
natural_image
Pure geometric crosshair symbols without any text or labels
natural_image
Pure geometric diagram with crosshair and circular target-like shapes (no text or symbols)Image Quality
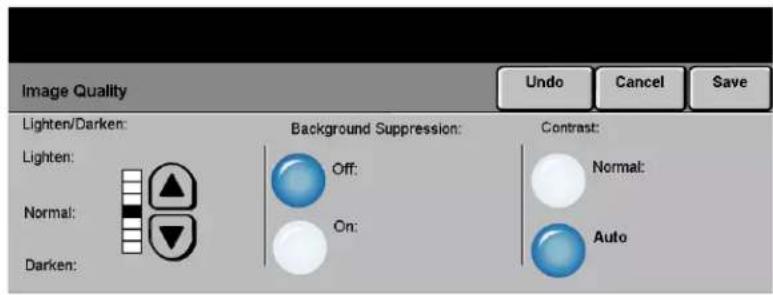
Use this feature to enhance the quality of your output.
Options:
LIGHTEN / DARKEN Adjusts the lightness or darkness of the output. To darken the output, select the down scroll button. To lighten the output, select the up scroll button.
BACKGROUND Prevents undesired marks or images that are printed on the back of an original from SUPPRESSION appearing on the output copies.
CONTRAST This option controls the differences between the image densities within the copy. Select a lower setting to improve the copy quality of pictures. Select a higher setting to produce more vivid colours for sharper text and lines.
Original Type
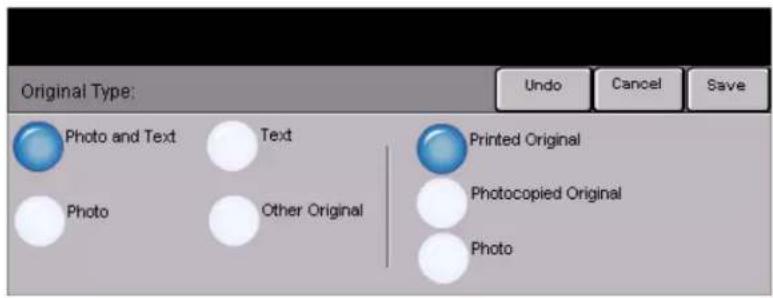
Use this feature to enhance the copy quality of the output based on the type of original being scanned.
Options:
PHOTO & TEXT Use this option for original documents that contain lithographs, or pictures and printed text.
PHOTO Use this option for original documents that contain photographs.
Photo & Text and Photo options are as follows:
| PRINTED ORIGINAL | Use this option when copying from magazines, lithographs, or other printed documents. |
| PHOTOCOPIED ORIGINAL | Use this option when copying Xerographic reproductions. |
| PHOTOGRAPH | Use this option when copying photographs. |
TEXT Use this option when copying text documents composed of fine line characters or other high contrast documents with bright, dense colours.
OTHER ORIGINALS Use this option when copying original documents containing coloured backgrounds, originals marked by highlighter pens, and documents printed on inkjet printers.
COPY
Other Originals options are as follows:
| MAP | Use this options when copying originals with fine details. |
| INKJET ORIGINALS | Use this option when copying originals made on inkjet printers. |
| HIGHLIGHTED ORIGINALS | Use this option when copying originals marked with a highlighter pen. |
Bound Originals
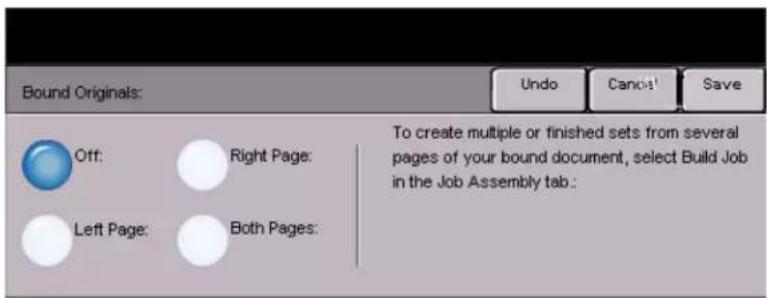
This feature is used to copy pages from bound documents onto separate single-sided or double-sided pages.
The bound original is placed face down on the Document Glass with the spine of the book lined up with the marker on the rear edge of the glass. Align the top of the bound original against the rear edge of the document glass. Do not close the document handler during the copying process if Auto Reduce/Enlarge is selected.

HINT: If necessary, apply a little pressure to the center of the book to flatten it during scanning. Do not close the document handler and apply pressure. Applying pressure to the closed document handler may result in machine damage.
Options:
OFF The feature is switched off.
LEFT PAGE Copies only the page on the left when looking at the open book, face up.
RIGHT PAGE Copies only the page on the right when looking at the open book, face up.
BOTH PAGES Copies both pages of an open book and places each page on a separate sheet of paper.
BINDING ERASE Erases a specified area from the center of the book to eliminate unwanted marks caused by scanning the binding. When Left Page or Right Page is selected between 0 and 1.0 inch can be erased. When Both Pages is selected, between 0 and 2.0 inches can be erased.
Edge Erase
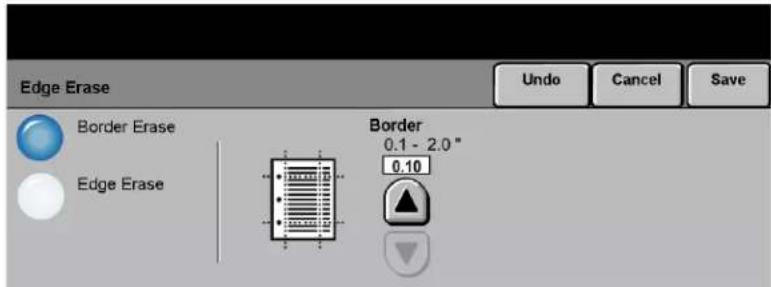
Use this feature to "refresh" the quality of an original that has become torn or frayed at the edges, or that has hole punch, staple or other marks.
Options:
BORDER ERASE Erases equal amounts on all edges of the copies. Up to 2.0 inches (0 - 50 mm) in 0.05 inch (0.1 mm) increments can be erased.
EDGE ERASE Use to erase a specific amount from a specific edge of the copy. Up to 2.0 inches (0 - 50 mm) in 0.05 inch (0.1 mm) increments can be erased from each edge.
Original Input
COPY
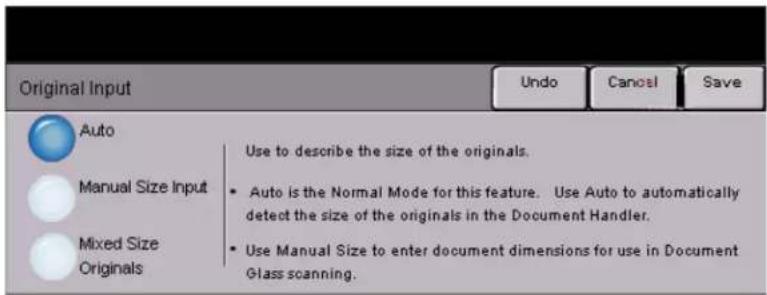
Use this option to programme the size of the originals being scanned or enable the machine to recognise the size of the originals.
Options:
AUTO Use this option to allow the machine to recognise the size of the originals being fed through the document handler.
MANUAL SIZE Use this option to specify the dimensions of the document scanning region when INPUT scanning from the document glass. There are several dimensions that correspond to common document sizes and orientations.
Select a standard size or use Custom to manually adjust the scanning dimensions.
MIXED SIZE Use this feature to input original documents of mixed sizes and produce them as a single copy job. To produce copies which are all on the same size paper, select a specific paper tray and Auto% Reduce/Enlarge. To produce mixed size output, select Auto Paper and 100% Reduce/Enlarge.
COPY
Image Shift
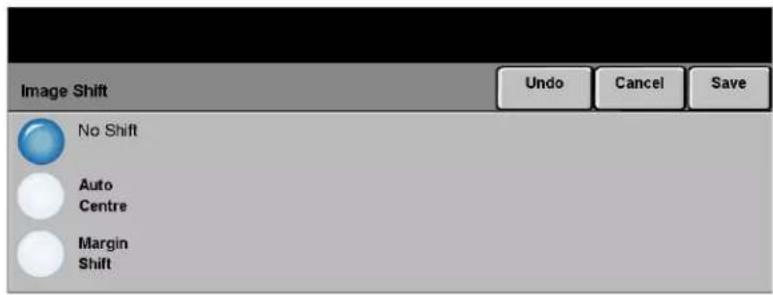
This feature enables the position of the image on the page to be adjusted.
Options:
No SHIFT The image position is not adjusted.
AUTO CENTER Use to automatically center the scanned image on the output paper.
MARGIN SHIFT Use to create a binding edge for the document. The image can be adjusted up or down on the page and/or shifted to the right or left. Use the scroll buttons to adjust the amount of shift. The image can be shifted between 0.0 and 2.0 inches, in 0.05in. increments.
Margin Shift options are as follows:
| SIDE 1 | Shifts the image on Side 1. |
| SIDE 2 | Shifts the image on Side 2. The shift on Side 2 can be set to mirror the shift on Side 1 or adjusted independently. |
OUTPUT FORMAT...
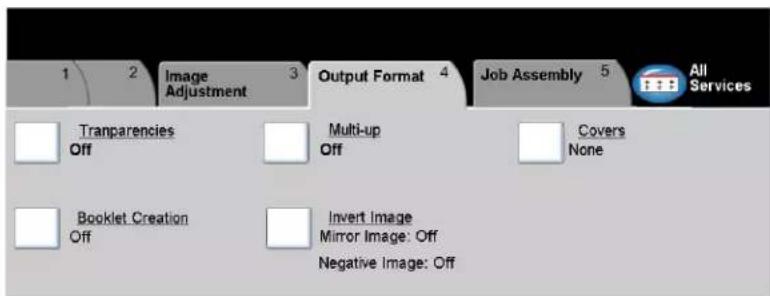
The Output Format tab is used to produce different options for the finished output.
Touch any of the top level buttons to select a feature. To view all the options for a feature, select the feature required. Multiple options can be selected for each copy job if required.
The text next to the feature button, called a Job Review Summary, reflects the current settings for that feature. A green light indicates that this feature has been modified from its initial default settings.
Most feature screens include three buttons to confirm or cancel your choices.
The Undo button resets the current screen to the default values that were displayed when the screen was opened.
The Cancel button resets the screen and returns to the previous screen.
The Save button saves the selections made and returns to the previous screen.
COPY
Transparencies
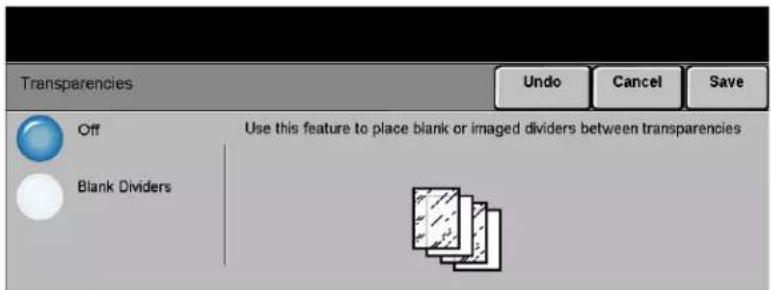
This feature allows the creation of a single set of transparencies with blank dividers. When dividers are selected a transparency set will always be single-sided on transparency stock with no stapling.
Options:
OFF The feature is switched off.
BLANK DIVIDERS Use this option to place a blank sheet between each transparency. If you select Blank Dividers, select the desired paper tray source for the Transparency paper and the Divider paper.
Booklet Creation
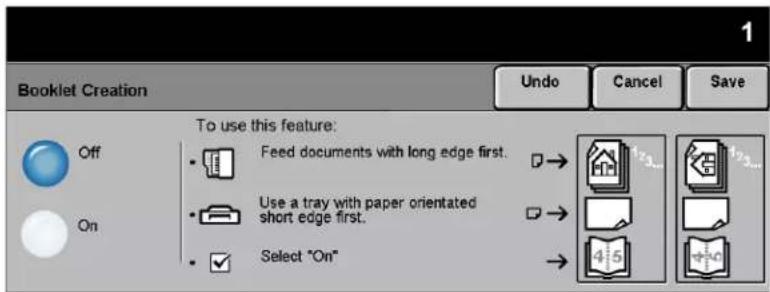
Use this feature to create multipage booklets from a sequential set of either single-sided or double-sided originals. The machine will reduce and correctly position each image to fit on the required page. When the page is folded a booklet will be created.
NOTE: Your originals should be loaded Long Edge Feed (LEF) in the document handler with the output paper loaded Short Edge Feed (SEF) in the paper tray.
Options:
OFF The feature is switched off.
ON Use this option to enable the Booklet Creation feature.
Booklet Creation On options are as follows:
| 1 SIDED ORIGINALS | Select this option if the originals are single-sided. |
| 2 SIDED ORIGINALS | Select this option if the originals are double-sided. |
Multi-Up
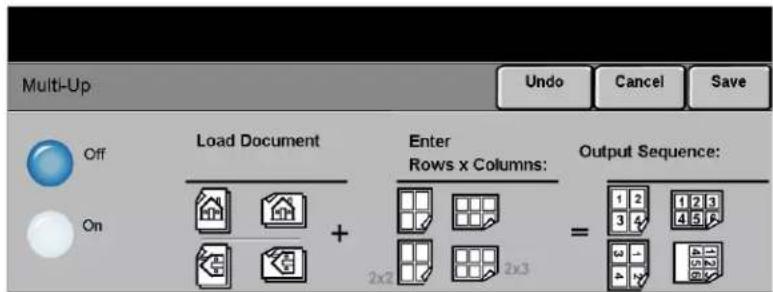
This feature is used to create documents with multiple images. It is ideal for creating handouts, storyboards or documents used for archival purposes.
NOTE: Originals must be loaded in the Document Handler when using this feature.
Options:
OFF The feature is switched off.
On Use to enable the Multi-Up feature.
Multi-Up On options are as follows:
| ORIENTATION | Use to select the image and load orientation of the input originals. |
| Rows | Selects the required number of Rows, between 1 and 6. |
| COLUMNS | Selects the required number of columns, between 1 and 6. |
NOTE: The number of images will be limited by the minimum reduction value of 25% and the size of the selected output.
Invert Image
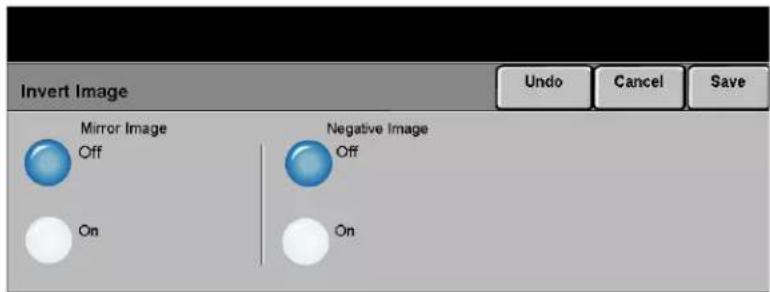
This feature enables Mirror Image or Negative Image copies to be produced.
Options:
MIRROR IMAGE Use this option to change the direction of the original image, creating a mirror of the original. This option is primarily used to change the position of a graphic.
NEGATIVE IMAGE Use Negative Image to create copies that are the opposite of the original document. For black and white images, the white areas become black and the black areas become white. For colour images, the magenta areas become green, the cyan areas become red, and the yellow images become blue.

HINT: This option is useful for saving toner (dry ink) consumption for black and white images with a dark background and white text.
Covers
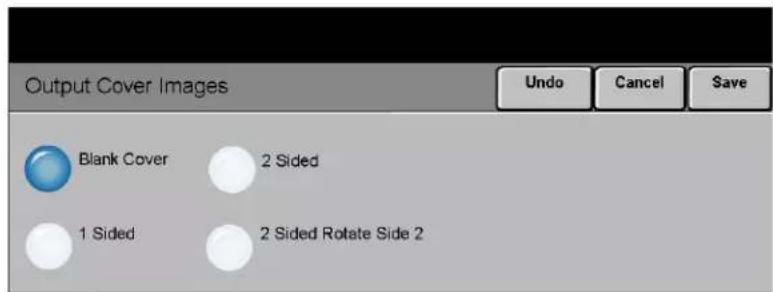
Use this feature to automatically add covers to your copied set using stock taken from a different tray than the copies.
Options:
No COVERS The feature is switched off.
FRONT ONLY Use this option to add a front cover to the copies.
BACK ONLY Use this option to add a back cover to the copies.
FRONT AND BACK Use this option to add both a front and back cover to the copies. If Covers options are selected, programme the following options:
OUTPUT COVER Use this option to select the imaging requirements for the covers. Output Cover IMAGES Images options are as follows:
| BLANK COVER | Adds Blank covers to the copies. |
| 1 SIDED | Places the first original in the job as the front cover image, and the last image as the image on the inside back cover of the document. |
| 2 SIDED | Places the first two images of the original set on the front and back of the front cover. The back cover will use the last two images in the job. |
| 2 SIDED, ROTATE SIDE 2 | Produces 2 sided covers with the second side rotated to enable a “head to toe” style output. |
COVER PAPER Use this option to select the tray required for the cover paper.
JOB ASSEMBLY...
COPY
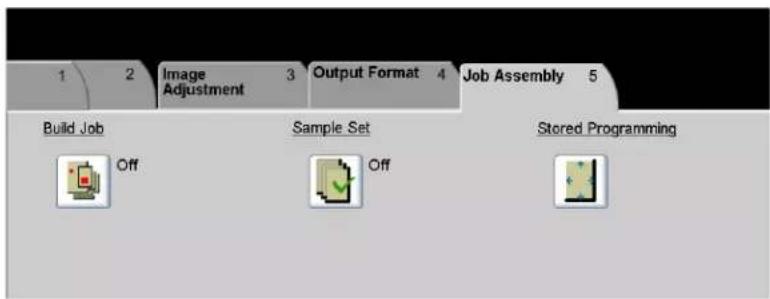
The Job Assembly tab is used to combine multiple documents into a single job, produce a sample set of a job or for storing the programming of up to 1000 images.
Touch any of the top level buttons to select a feature. To view all the options for a feature, select the feature required. Multiple options can be selected for each copy job if required.
The text next to the feature button, called a Job Review Summary, reflects the current settings for that feature. A green light indicates that this feature has been modified from its initial default settings.
Most feature screens include three buttons to confirm or cancel your choices.
The Undo button resets the current screen to the default values that were displayed when the screen was opened.
The Cancel button resets the screen and returns to the previous screen.
The Save button saves the selections made and returns to the previous screen.
Build Job
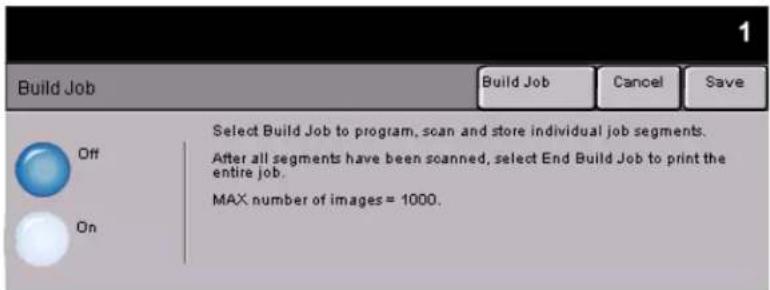
Use this feature to build a job that requires different settings for each page. For example, if a set of documents consists of some pages with text and some with photos, the appropriate setting for each original can be applied and the job can still be completed as a single job.

HINT: Quantity, Stapling and Collation options can be adjusted at any time and will assume the values of the last job segment.
To use Build Job, split the job into programming and scanning segments. Ensure Build Job is selected and programme and scan the first segment. Continue to programme and load segments until the whole job has been scanned. Select End Build Job when the entire job has been scanned.
Options:
OFF The feature is switched off.
On Use to enable the Build Job feature.
BUILD JOB Offers options which can be selected when using Build Job.
CONTROLS Build Job Controls options are as follows:
| END BUILD JOB | Select this option after the last segment of the job has been scanned. The job will be sent to print. |
| SAMPLE LAST SEGMENT | Select to see a proof of the last segment scanned. |
| DELETE LAST SEGMENT | Use to delete the last segment scanned. |
| CANCEL SAMPLE PRINTING | Use to stop and cancel the sample segment that is currently printing. |
| DELETE ALL SEGMENTS | Use to delete the current job and return to the main Build Job screen. |
Sample Set
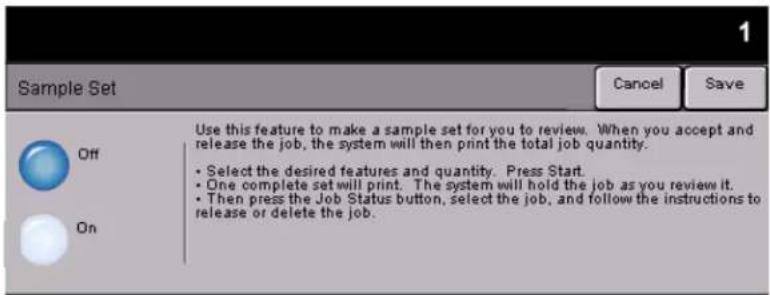
This feature is used to review the output to ensure that it is exactly what is required prior to printing a large quantity.
Options:
OFF The feature is switched off.
ON Use to enable the Sample Set feature. One complete set of the job will be printed. To print the remainder of the job, press the Job Status button and select your job in the queue.
If the output is acceptable, select Release, the job will be completed.
If the output was not acceptable or the job is no longer required, select Delete to delete the job from the queue. Reprogramme and rescan the entire job.
Stored Programming
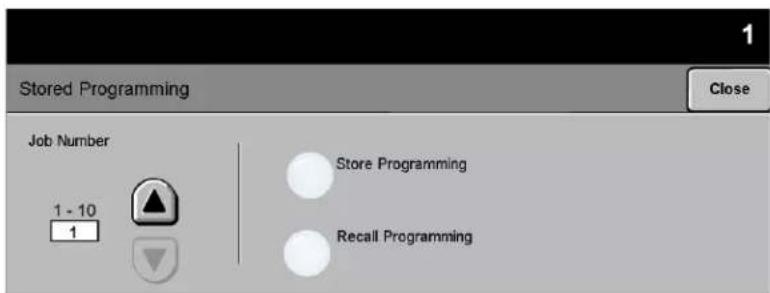
Use this feature to programme up to 10 commonly used programming sequences. For example, combinations of selections such as Edge Erase and Bound Originals.
The machine stores only the programming features for the job, NOT the images. Each time a stored job is used the images must be scanned.
To use this feature, use the up and down scroll buttons on the scrolling list to select the required storage location, then select a function button - Store or Recall Programming.
Options:
JOB NUMBER Use to scroll to a job number between 1 and 10.
STORE Use this option to store the current programming selections. If a job has already been stored under the selected Job Number, an Overwrite Confirmation Message appears. If Overwrite is selected, the new programming will be stored.
RECALL Use this option to retrieve programming that has been stored under a specified job programming number. First select a Job Number, then select Recall Programming. The recalled programming will overwrite the current copy programming.
After being recalled, the selection can be modified further and re-stored if required.


Spode QRG.book Page 32 Tuesday, May 13, 2003 10:51 AM


COPY





4 F AX
➢Fax (Network Server Fax)... 4-2
Basic Faxing....4-3
▶More Fax Features....4-6
▶Authentication Mode.... 4-11
FAX
FAX (NETWORK SERVER FAX)...
Fax (Network Server Fax) is an optional feature on the WorkCentre Pro. It is not available on the CopyCentre. This chapter contains information about the options available within Fax.
When enabled, the Fax feature will scan your documents and send them to any type of fax machine that is connected to a telephone network. Your images are sent from your machine to your Third Party fax server, which relays them to the fax number of your choice.
NOTE: This type of fax travels over normal telephone lines and will therefore be charged at telephone rates.
Access to the Basic Faxing features is gained using the Features button on the control panel.
Depending on the options enabled and how your machine has been configured, you may have to select All Services in the top right-hand corner first.
The tabs available for selecting Fax features are:
Basic Faxing
More Fax Features
BASIC FAXING...
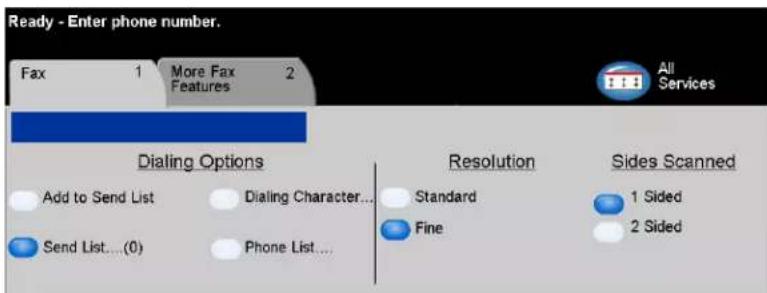
The Basic Faxing tab is the default screen for the Fax function. Use this tab to enter the recipient telephone number and to select the standard features for a fax job.
Touch any of the top level buttons to select a feature. Multiple options can be selected for each fax job if required.
Most feature screens include three buttons to confirm or cancel your choices.
The Undo button resets the current screen to the default values that were displayed when the screen was opened.
The Cancel button resets the screen and returns to the previous screen.
The Save button saves the selections made and returns to the previous screen.
Dialing Options
The Dialing Options area contains a window where the telephone number entered is displayed. Once it is displayed, it can be added to a list of destination telephone numbers, a special character can be added, or a list of up to 30 stored telephone numbers can be accessed.
There are two methods of entering a phone number - Manually using the keypad or by selecting a number already stored in the Phone List.

Options:
ADD TO SEND LIST
Used when you want to send a fax to more than one destination. Enter the number using the keypad or select the Phone List button and select a stored number. Then select the Add to Send List button. Continue to add numbers until all the locations have been entered.
SEND LIST
Stores the list of telephone numbers to be entered to enable faxing to multiple locations. The number on the Send List button will change, indicating how many telephone numbers currently reside in the Send List.
Select the Send List button to view or delete telephone numbers.
DIALING CHARACTERS
Dialing characters are special characters used for entering fax numbers and are entered as part of the telephone number. Depending on your fax server, some of the following characters may not be supported:
| DIAL PAUSE [,] | Allows the WorkCentre Pro time to switch from an inside line to an outside line. The delay depends on the fax server. |
| LONG PAUSE [I] | This pause is used if a longer period is required to gain a dial tone. |
| GROUP DIAL [] | Indicates that an identifier for a previously set up group is about to be entered. |
| MASK DATA [/] | Used to hide information on printed reports. Characters between the forward slash symbols will appear as asterisks. |
| PASSWORD CHECK SWITCH [S] | Used for remote terminal identification. This character verifies that the correct number has been dialled. |
| PULSE-TO-TONE SWITCH [:] | Use to switch from Pulse dialing to Tone dialing. |
| WAIT FOR NETWORK TONE DETECTION [W] | Use to suspend dialing until an expected network tone is detected. |
| LOCAL ID [+] CHARACTER CHECK [+] | May be required as part of some international telephone numbers (n + place of 00). |
| LOCAL ID [SPACE] CHARACTER CHECK [] | Used to improve readability. For example, adding spaces to a telephone number as 1 234 5678 instead of 12345678. |
PHONE LIST
The Phone List can store up to 30 fax numbers. Enter the fax number and select Phone List. Select an empty number and then Enter Phone List, the number will be stored. Fax numbers in the Phone List can also be added to the Send List. Entries displayed in the list will not be deleted once a fax job has been completed.
Resolution
The Resolution affects the appearance of the fax at the receiving fax terminal. A higher resolution yields better quality for photos. A lower resolution reduces communication time.
Options:
STANDARD Recommend for text documents. It requires less communication time, but does not produce the best image quality for graphics and photos.
FINE Recommended for line art and photos. This is the default resolution and the best choice in most cases.
Sides Scanned
This is used to specify whether the originals are single-sided or double-sided. For 2-sided originals the orientation can also be programmed.
Options:
1 SIDED Use this option for originals that are printed on 1 side only.
2 SIDED Use this option for originals that are printed on both sides.

MORE FAX FEATURES...
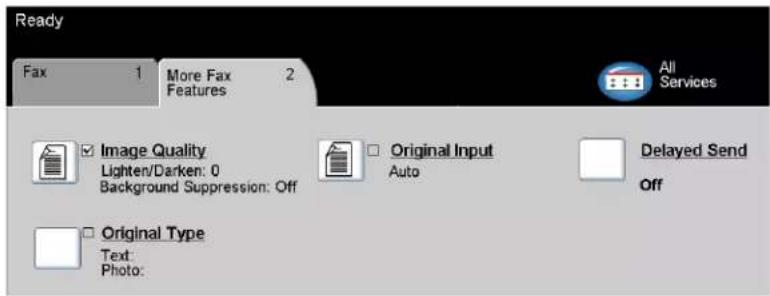
The More Fax Features tab provides fax features used for adjusting the appearance of the faxed output.
Touch any of the top level buttons to select a feature. To view all the options for a feature, select the feature required. Multiple options can be selected for each fax job if required.
The text next to the feature button, called a Job Review Summary, reflects the current settings for that feature. A green light indicates that this feature has been modified from its initial default settings.
Most feature screens include three buttons to confirm or cancel your choices.
The Undo button resets the current screen to the default values that were displayed when the screen was opened.
The Cancel button resets the screen and returns to the previous screen.
The Save button saves the selections made and returns to the previous screen.
Image Quality
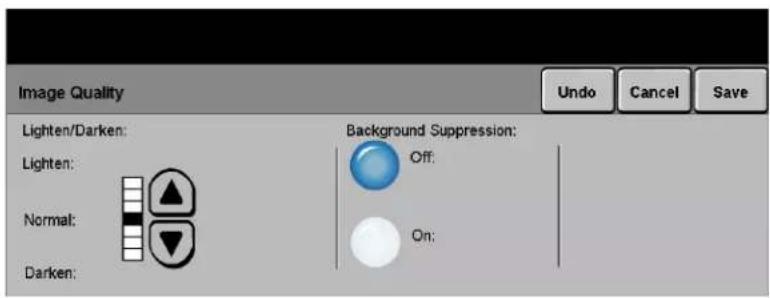
Use this feature to enhance the quality of the outgoing fax.
Options:
LIGHTEN / DARKEN Adjusts the lightness or darkness of a black and white fax. To darken the fax, select the down scroll button. To lighten the fax, select the up scroll button.
BACKGROUND Prevents undesired marks or images that are printed on the back of an original from SUPPRESSION appearing on the output.

Original Type
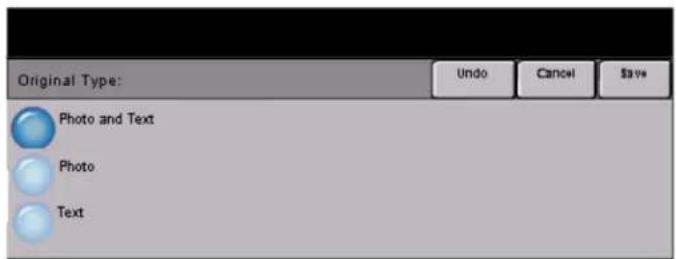
Use this feature to enhance the quality of the output based on the type of original being scanned.
Options:
PHOTO & TEXT Use this option for original documents that contain lithographs, or pictures and printed text.
PHOTO Use this option for original documents that contain photographs.
TEXT Use this option when copying text documents composed of fine line characters or other high contrast documents with bright, dense colours.
Original Input
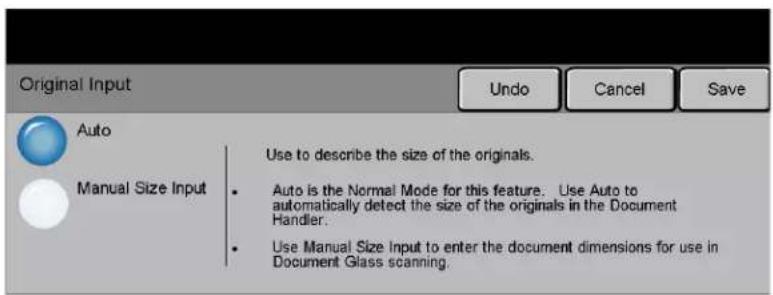
Use this option to programme the size of the originals being scanned or enable the machine to recognise the size of the originals automatically.
Options:
AUTO Use this option to enable the machine to recognise the size of the originals being fed through the document handler.
MANUAL SIZE Use this option to specify the dimensions of the document scanning region when INPUT scanning from the document glass. There are several dimensions that correspond to common document sizes and orientations.
Select a standard size or use Custom to manually adjust the scanning dimensions.

Delayed Send
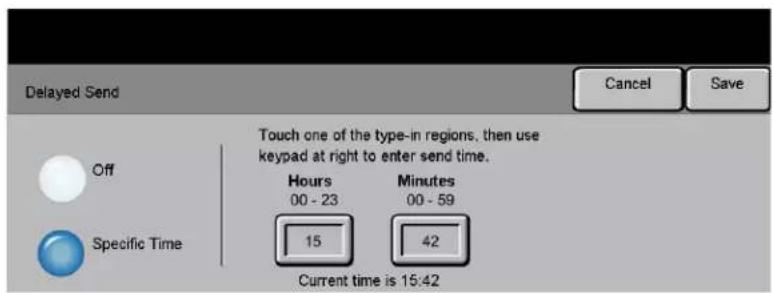
Use Delayed Send to specify a time, within the next 24 hours, at which to send a fax. This feature can be used to transmit faxes during off-peak hours or is useful when sending to another country or time zone. The time to send is added to the job information sent to the fax server with the scanned image. The Third Party Fax Server retains the fax for sending at the specified time.
This feature can be set as a 12 or 24 hour clock. If the 12 hour clock is set, you must also select either the AM or PM button.
Options:
OFF The feature is switched off.
SPECIFIC TIME Enables users to enter the actual time the fax is to be sent.
AUTHENTICATION MODE...
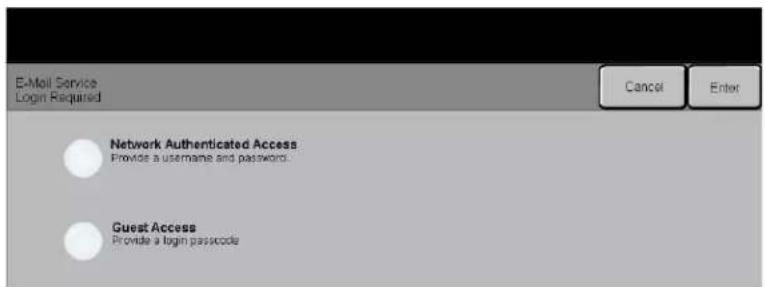
Authentication is a useful network security management tool - limiting, restricting and monitoring access to the network via the machine. Authentication can be set up by the System Administrator to restrict access to the features within Scan to E-mail, Network Scanning and Internet Fax. Once enabled, it will apply to all three services.
There are two authentication modes available:
NETWORK Requires your network login name and password. If you do not have a network AUTHENTICATION account on the local network you will not be authenticated using this mode.
GUEST ACCESS Requires a generic passcode that is set up by the System Administrator. You will need to obtain the passcode from the System Administrator.
Contact your System Administrator for further assistance.


Spode QRG.book Page 12 Tuesday, May 13, 2003 10:51 AM


FAX





5 INTERNET FAX
Internet Fax....5-2
Colour Options ....5-6
➢Image Adjustment....5-7
Output Format....5-13
▶Authentication Mode....5-17
INTERNET FAX...
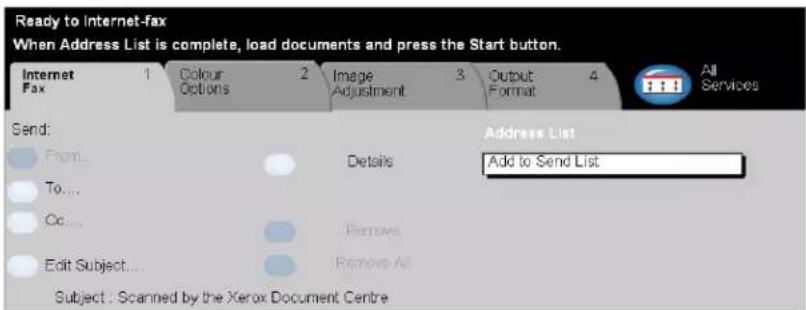
The Internet Fax feature is optional on the WorkCentre Pro. This chapter contains information about the options available within Internet Fax.
When enabled, Internet Fax will allow you to send your scanned images as an e-mail attachment to a specified recipient or recipients. This type of fax travels over the internet or intranet.
The basic Internet Fax screen allows you to enter the SMTP (Simple Mail Transfer Protocol) e-mail addresses for your fax. You can also use this screen to add and remove recipients and edit the subject line.
NOTE: An SMTP compliant e-mail address format must be used. For example, anyone@anycompany.com.
Access to the Internet Faxing features is gained using the Features button on the control panel.
Depending on the options enabled and how your machine has been configured, you may have to select All Services in the top right-hand corner first.
The tabs available for selecting the Internet Fax features are:
Internet Fax
Colour Options
➢ Image Adjustment
Output Format
Touch any of the top level buttons to select a feature. Multiple options can be selected for each fax job if required.
Most feature screens include three buttons to confirm or cancel your choices.
The Undo button resets the current screen to the default values that were displayed when the screen was opened.
The Cancel button resets the screen and returns to the previous screen.
The Save button saves the selections made and returns to the previous screen.
Send:
Use the Send options to enter recipient information.
Options:
FROM Use this option to enter the From e-mail address.
NOTE: If you accessed Internet Fax via Authentication Mode, the From e-mail address will be linked with the login name and cannot be changed.
To Use this option to enter the e-mail address of the required recipient.
Cc Use this option to enter the e-mail address of the required recipient you wish to be copied on the e-mail job.
EDIT SUBJECT Use this option to edit the default e-mail subject. The subject is the title of the e-mail and not the text contained within the e-mail. The subject line can contain up to 248 characters and is displayed on the touch screen under the Edit Subject button.
DETAILS Use this option to view the details of the selected recipient. The information displayed is determined by how the address was originally added to the Address List - from either the Internal or Public Address Book, or entered manually.
REMOVE Use this option to delete the selected address from the Address List.
REMOVE ALL Use this option to delete all the addresses from the Address List. A confirmation pop-up message will be displayed.
SCROLL BUTTONS Use the Scroll Buttons located to the right of the Address List to move through the list.
Address List
Displays all the recipient addresses entered for the current Internet Fax job. Up to 128 recipients addresses can be entered in the list.
Entering an E-mail Address for Internet Fax
E-mail addresses can be entered in one of two ways - manually or via an address book.
NOTE: When entering e-mail details you can change the keypad to show upper or lower case, accented characters or numbers by selecting any Back button.
Manually
If you already know the full SMTP e-mail address of your recipient, or if you know that the recipient is not in any of the configured address books, you can select the To... button and use the keypad on the touch screen to enter the e-mail address. Your machine will check that it is an SMTP address. If it is not an SMTP address, your machine will search the address book for a matching entry.
The entered e-mail address will be shown in the Address List.
Selecting the details for a manually entered e-mail address will only display the e-mail address, no other details are available.
Address Books
Address books contain a list of e-mail addresses and details that are relevant to your company and/or you. If configured, your machine is able to support two types of e-mail address books - Public and Internal. When an entry is made in To, From or Cc the Address Book displays search results for one or both configured address books.
Use the keypad on the touch screen to enter the e-mail recipients name. As with most search facilities you do not need to enter the full name and can search the address book on the first few letters.
When you have entered the required e-mail search criteria select the Enter button. If there are no matching entries select the Change Address Book button to search the other address book.
NOTE: The Change Address Book button will only be displayed if both the address books have been configured.
If one or more matches are found based on the search criteria, the matches are displayed on the touch screen. Use the up and down scroll bars to locate the required recipient. Highlight the recipient in the list and select the Add button. Continue this process until you have added all the required recipients and on completion select Done. The entered e-mail address will be shown in the Address List.
Address Book Types
Public Address Book
The Public Address Book stores external company addresses on the machine. The address book contains a list of user names and their e-mail addresses.
The file must be a CSV (Comma Separated Value) format for your machine to be able to read the file contents. The completed file is imported to the machine via CentreWare Internet Services. Your machine will not allow the import of a Public Address Book file that does not end with the .CSV file extension.
A valid CSV file is in the format: Name, SMTP e-mail address. For example the following are both valid CSV format file entries:
Smith, smith@company.com
"Smith, John", john.smith@company.com
The order in which the entries are sorted in the CSV file determines the order displayed in the Public Address Book at your machine.
Internal Address Book
Otherwise known as the LDAP (Lightweight Directory Access Protocol), the Internal Address Book stores internal company addresses on the company network. The System Administrator creates the Internal Address Book.
The display of the search results is defined by the LDAP. For example, the LDAP server can return a search query "And" as "Andrew Smith" when the result "Andrews, James" may have been expected. The lastname, firstname or firstname, lastname display is controlled by the LDAP server and not your machine.
If you have successfully logged in via Authentication mode, your machine will automatically attempt to match your login name to your e-mail address. Your name will then be entered into the From e-mail address field. You will not be able to change this.
COLOUR OPTIONS ...
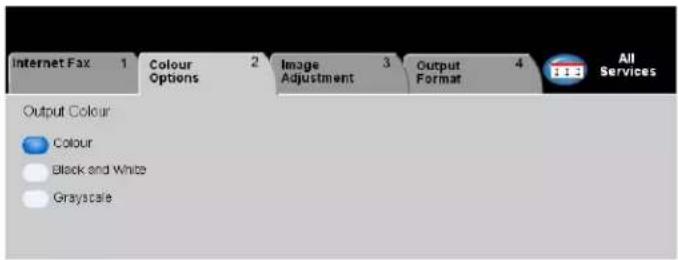
The Colour Options tab is used to select different colour features for the scanned Internet Fax image.
Touch any of the top level buttons to select a feature. To view all the options for a feature, select the feature required. Multiple options can be selected for each copy job if required.
The text next to the feature button, called a Job Review Summary, reflects the current settings for that feature. A green light indicates that this feature has been modified from its initial default settings.
Most feature screens include three buttons to confirm or cancel your choices.
The Undo button resets the current screen to the default values that were displayed when the screen was opened.
The Cancel button resets the screen and returns to the previous screen.
The Save button saves the selections made and returns to the previous screen.
Output Colour
Use this feature to select the desired output colour.
Options:
COLOUR This option scans and sends the job in colour.
BLACK & WHITE This option should be selected when the desired output is a black and white copy. When Black & White is selected only Black toner is used.
GRAYSCALE Use this option when the original contains halftone images.
IMAGE ADJUSTMENT...
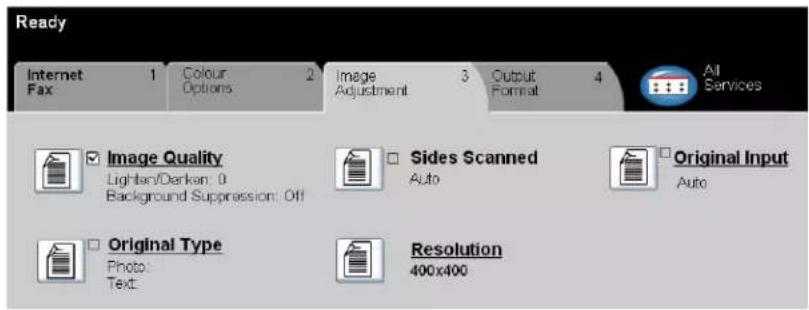
The Image Adjustment tab is used to temporarily programme features to enhance the appearance and style of the scanned Internet Fax image.
Touch any of the top level buttons to select a feature. To view all the options for a feature, select the feature required. Multiple options can be selected for each fax job if required.
The text next to the feature button, called a Job Review Summary, reflects the current settings for that feature. A green light indicates that this feature has been modified from its initial default settings.
Most feature screens include three buttons to confirm or cancel your choices.
The Undo button resets the current screen to the default values that were displayed when the screen was opened.
The Cancel button resets the screen and returns to the previous screen.
The Save button saves the selections made and returns to the previous screen.
Image Quality
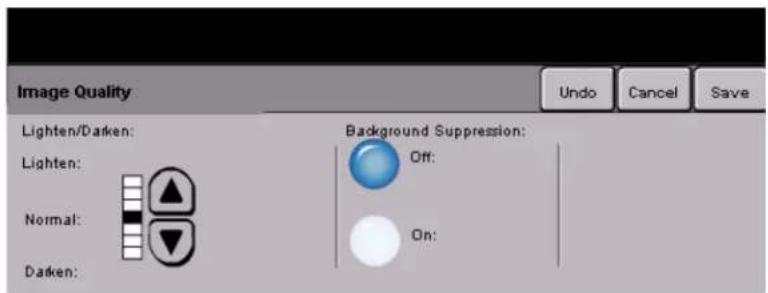
Use this feature to enhance the quality of your scanned originals.
Options:
LIGHTEN / DARKEN This option provides controls to adjust the lightness or darkness of black and white output. To darken the output, press the down scroll button. To lighten the output, press the up scroll button.
BACKGROUND Prevents undesired marks or images that are printed on the back of an original from SUPPRESSION appearing on the output.
Original Type
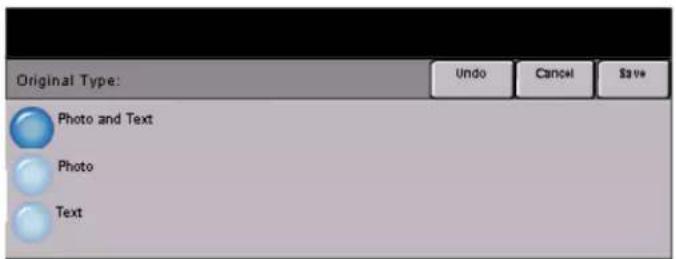
INTERNET FAX
Use this feature to enhance the quality of the output based on the type of original being scanned.
Options:
PHOTO & TEXT Use this option for original documents that contain lithographs, or pictures and printed text.
PHOTO Use this option for original documents that contain photographs.
TEXT Use this option when copying text documents composed of fine line characters or other high contrast documents with bright, dense colours.
Sides Scanned
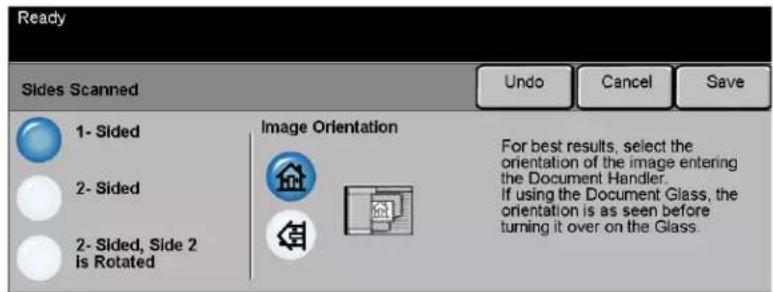
This feature is used to specify whether the originals are single-sided or double-sided. For 2-sided originals the orientation can also be programmed.
Options:
1 SIDED Use this option for originals that are printed on 1 side only.
2 SIDED Use this option for originals that are printed on both sides.
2 SIDED, ROTATE Use this option for originals that are printed on both sides. This option creates SIDE 2 documents which can be read in a "head to toe" manner, for example a calendar.
Resolution
Resolution affects the appearance of the scanned image. The higher the scanning resolution the better the image quality.
Options:
200x100 Produces the smallest image file size and is only recommended for use with simple (STANDARD) text documents.
NOTE: 200x100 is disabled if the Document Format is PDF.
200x200 (FINE) Recommended for use with average quality text documents and line art. Does not produce the best image quality for photos and graphics. This is the default setting.
300x300 Recommended for use with high quality text documents that are destined to pass through Optical Character Reference (OCR) applications. Also recommended for high quality line art or medium quality photos and graphics. This is the default resolution and the best choice in most cases.
400x400 Recommended for use with high quality photos and graphics. It produces a larger (NON-STANDARD) image file size, but delivers a better image quality.
600x600 Recommended for use with high quality photos and graphics. It produces the (NON-STANDARD) largest image file size, but delivers the best image quality.
LARGEST FILE Very little compression. It produces the largest file size, but delivers the best image quality. (BEST IMAGE QUALITY)
SMALLER FILE Some compression. It produces a larger file size, but delivers a better image quality. (BETTER IMAGE QUALITY)
SMALLEST FILE Maximum compression. It produces the smallest file size, but delivers good image (GOOD IMAGE) quality. QUALITY)
Original Input
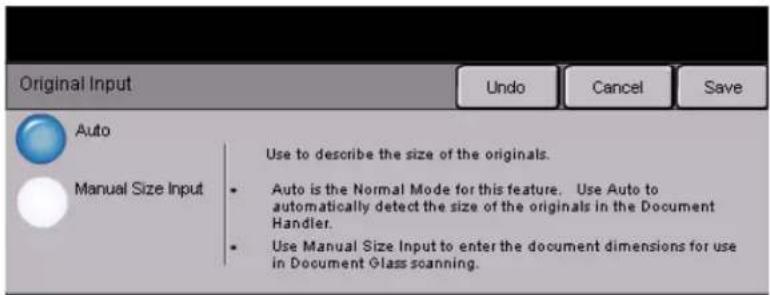
Use this option to programme the size of the originals being scanned or programme the machine to determine the size of the originals automatically.
NOTE: It is recommended that the originals are of the same size. Using originals that are not of the same size may result in a reduced-size image being processed by the Fax recipient.
Options:
AUTO Use this option to allow the machine to determine the size of the originals being fed through the document handler automatically.
MANUAL SIZE Use this option to specify the dimensions of the document scanning region when INPUT scanning from the document glass. There are several dimensions that correspond to common document sizes and orientations.
Select a standard size or use Custom to manually adjust the scanning dimensions.
OUTPUT FORMAT...
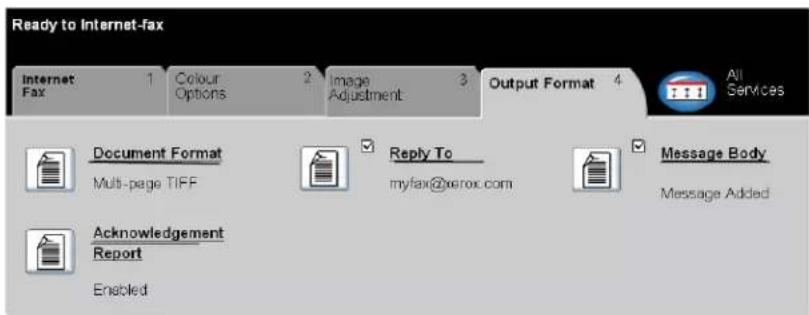
Use this feature to temporarily change the settings required for the scanned image.
Touch any of the top level buttons to select a feature. To view all the options for a feature, select the feature required. Multiple options can be selected for each fax job if required.
The text next to the feature button, called a Job Review Summary, reflects the current settings for that feature. A green light indicates that this feature has been modified from its initial default settings.
Most feature screens include three buttons to confirm or cancel your choices.
The Undo button resets the current screen to the default values that were displayed when the screen was opened.
The Cancel button resets the screen and returns to the previous screen.
The Save button saves the selections made and returns to the previous screen.
Document Format
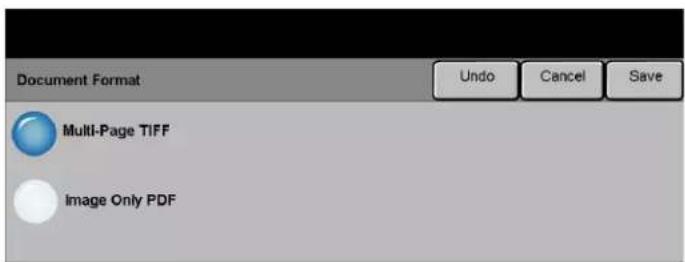
Use the Document Format option when your job is to be sent with a different file format than that set as the default.
Options:
MULTI-PAGE TIFF Multi-Page Tagged-Image File Format. One TIFF file containing several pages of scanned images.
IMAGE ONLY PDF Image Only Portable Document Format. This format can be viewed with a PDF viewer.
Acknowledgment Report
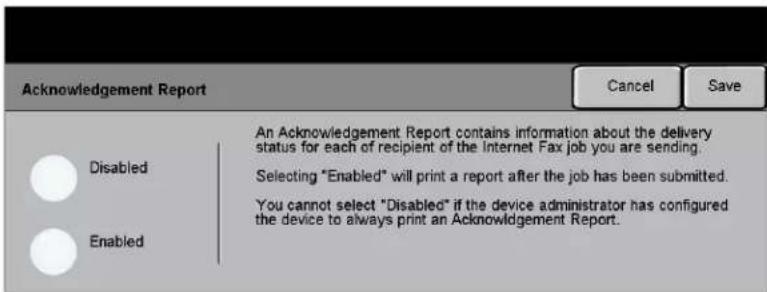
INTERNET FAX
Use this feature to print a report containing the delivery status of your job. The report will include the number of successful, failed and unconfirmed recipients.
Options:
ENABLED Use this option to print a status report after the job has been sent.
DISABLED Use this option to switch the feature off.
NOTE: If the default setting for this feature is already Enabled you will not be able to disable this feature.
Reply To
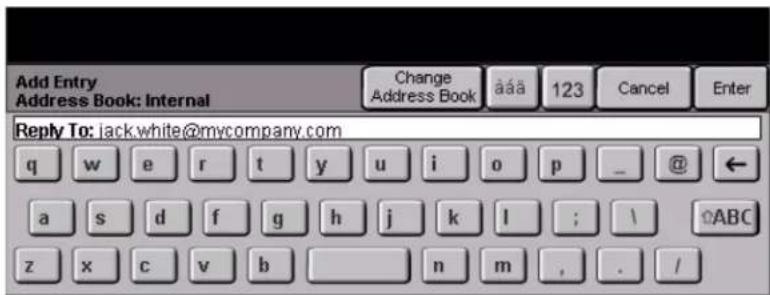
Use the Reply To feature to alter the default address to which replies to your Internet Fax job can be sent.
Message Body
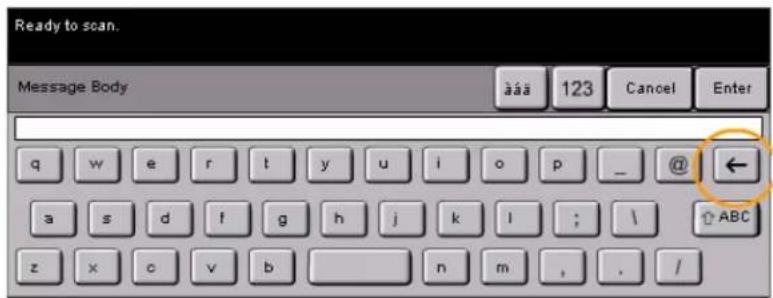
Use this feature to edit the default e-mail message being transmitted with the job. The message body is the text contained within the e-mail and not the e-mail subject line. The message entered will only be available for the current job.
NOTE: The default message is set up by your System Administrator.
AUTHENTICATION MODE...
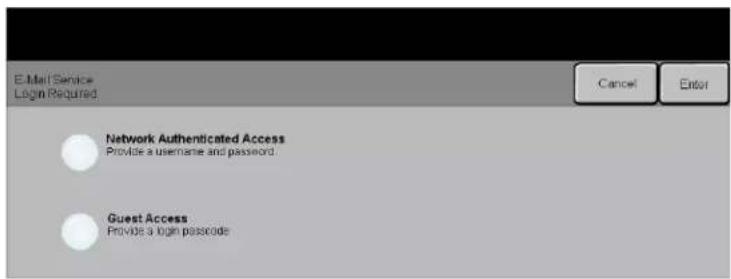
INTERNET FAX
Authentication is a useful network security management tool - limiting, restricting and monitoring access to the network via the machine. Authentication can be set up by the System Administrator to restrict access to the features within Scan to E-mail, Network Scanning and Internet Fax. Once enabled, it will apply to all three services.
There are two authentication modes available:
NETWORK Requires your network login name and password. If you do not have a network authentication account on the local network you will not be authenticated using this mode.
GUEST ACCESS Requires a generic passcode that is set up by the System Administrator. You will need to obtain the passcode from the System Administrator.
Contact your System Administrator for further assistance.


Spode QRG.book Page 18 Tuesday, May 13, 2003 10:51 AM


INTERNET FAX





6 N ETWORK SCANNING
➢ Scan....6-2
▶Network Scanning....6-3
Colour Options ....6-6
➢Image Adjustment....6-7
Output Format....6-14
➢Refresh Destinations......6-18
▶Authentication Mode....6-18
SCAN...
The Network Scanning feature is optional on the WorkCentre Pro. It is not available on the CopyCentre.
If the Network Scanning option has been enabled, an electronic file can be created from a hard copy original. The scanned document is converted to an electronic file and stored electronically. The electronic file can be filed, faxed, or distributed through e-mail.
This chapter contains information about the options available within Network Scanning.
Scanning Resources
There are other sources of information available:
CentreWare Network Scanning Services
Enables the installation, set up and management of Network Scanning Services on the network. Network Scanning Services is composed of several different elements that work together to create and deliver the scanned document to its final destination. Refer to the CentreWare Network Scanning Services Pack delivered with the Scanning Services Kit.
CentreWare Internet Services
Internet Services is the embedded HTTP server application that is available on network enabled models. Internet Services enables you to access printing and scanning features, view status, manage jobs, and perform CopyCentre/WorkCentre Pro management using a browser application over the Internet or intranet. To access Internet Services open your web browser and enter the CopyCentre/WorkCentre Pro IP Address in the Address or Location field.
Resources Provided on the World Wide Web
| WEB SITE | GENERAL CONTENTS |
| www.xerox.com This is | a source of general solution overview and options for upgrade. |
| www.centreware.com | Contains CentreWare general information with links to the latest drivers and utilities. |
NETWORK SCANNING...
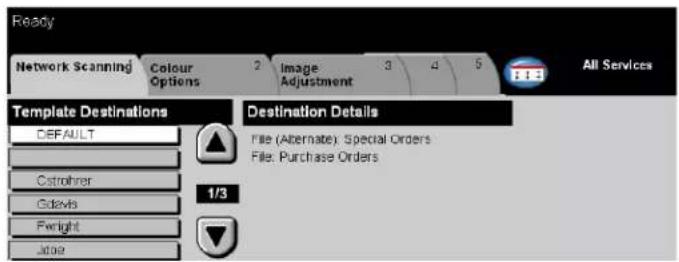
Access to the Network Scanning features is gained using the Features button on the control panel.
Depending on the options enabled and how your machine has been configured, you may have to select All Services in the top right-hand corner first.
Use the Network Scanning tab on the touch screen to select the standard features for a scan to file job.
The tabs available for selecting Network Scanning features are:
Network Scanning
Colour Options
Image Adjustment
Output Format
Refresh Destinations
Touch any of the top level buttons to select a feature. Multiple options can be selected for each scan job if required.
Most feature screens include three buttons to confirm or cancel your choices.
The Undo button resets the current screen to the default values that were displayed when the screen was opened.
The Cancel button resets the screen and returns to the previous screen.
The Save button saves the selections made and returns to the previous screen.
Repositories
Repositories are directories or filing locations set up on a server where your scanned files are held. Before you can use Network Scanning your System Administrator must set up the repositories available to your machine. The repositories are defined in the template and cannot be changed at the WorkCentre Pro.
NETWORK SCANNING
Template Overview
Successful network scanning requires selecting a template at the WorkCentre Pro. Templates contain pre-selected options which will be applied to the scanned original, for example, information about the final destination of your job (the repository) and the image quality settings are defined within the template, along with the template name.
MAKING Templates can be created or changed using CentreWare Scan Services or TEMPLATES CentreWare Internet Services. Contact your System Administrator for further information.

HINT: Template names are limited to 20 characters. Template names containing more than 20 characters will be shortened to the first 20 characters. Remember this when searching for existing templates or assigning template names.
SELECTING A Select a template based on where the file is required to be sent. Normally, the TEMPLATE System Administrator will have established a template for use by each user.
CHANGING After a template is selected, most of the preprogrammed settings can be temporarily PREPROGRAMMED changed such as sides scanned, image quality and resolution.
TEMPLATE The output destination assigned to the template cannot be changed at the machine. SELECTIONS
Template Destinations
The Template Destination lists the templates stored on the machine. On installation it will contain the factory default template that is supplied with the WorkCentre Pro. The default template appears at the top of the list and is selected automatically. All other templates follow in alpha-numeric order. There is a maximum limit of 250 templates.
There are two types of templates:
Template names starting with the @ symbol have been created using Internet Services.
Templates without the @ symbol are templates that have been created using CentreWare Network Scanning Software.
SCROLLING Use the Scroll Buttons located to the right of the Template List to move through the THROUGH THE list one page at a time and select a Template.
TEMPLATE LIST To quickly get to a specific page in the Template list, use the keypad to identify the page number then select the hash (#) key. The counter will display the page location.
Destination Details
The Destination Details section on the right side of the screen displays information about the selected template. Each time you select another template file, this area will update to display information associated with the selected template.
COLOUR OPTIONS ...
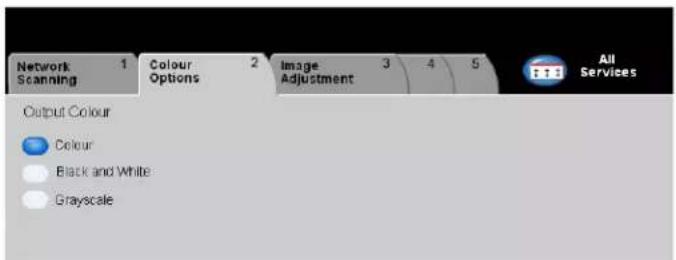
The Colour Options tab is used to select different colour features for the scanned image.
Touch any of the top level buttons to select a feature. To view all the options for a feature, select the feature required. Multiple options can be selected for each copy job if required.
The text next to the feature button, called a Job Review Summary, reflects the current settings for that feature. A green light indicates that this feature has been modified from its initial default settings.
Most feature screens include three buttons to confirm or cancel your choices.
The Undo button resets the current screen to the default values that were displayed when the screen was opened.
The Cancel button resets the screen and returns to the previous screen.
The Save button saves the selections made and returns to the previous screen.
Output Colour
Use this feature to select the desired output colour.
Options:
COLOUR This option scans and sends the job in colour.
BLACK & WHITE This option should be selected when the desired output is a black and white copy. When Black & White is selected only Black toner is used.
GRAYSCALE Use this option when the original contains halftone images.
IMAGE ADJUSTMENT...
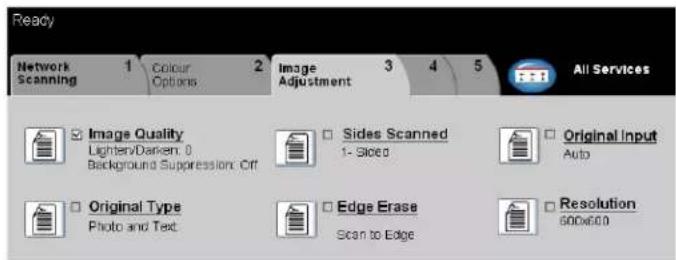
NETWORK SCANNING
The Image Adjustment tab is used to program features relating to the scanned images.
Touch any of the top level buttons to select a feature. To view all the options for a feature, select the feature required. Multiple options can be selected for each scan job if required.
Most feature screens include three buttons to confirm or cancel your choices.
The Undo button resets the current screen to the default values that were displayed when the screen was opened.
The Cancel button resets the screen and returns to the previous screen.
The Save button saves the selections made and returns to the previous screen.
Image Quality
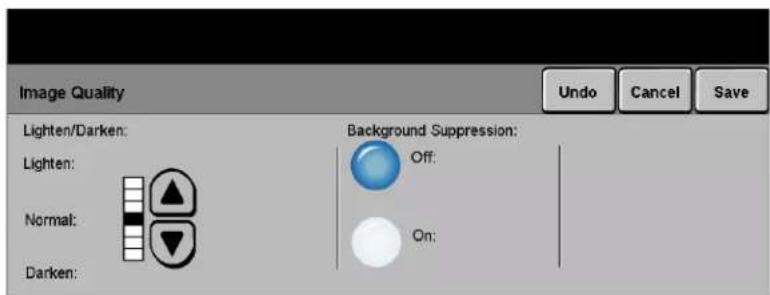
Use this feature to enhance the quality of your scanned originals.
Options:
LIGHTEN / DARKEN Adjusts the lightness or darkness of black and white output. To darken the output, select the down scroll button. To lighten the output, select the up scroll button.
BACKGROUND Prevents undesired marks or images that are printed on the back of an original from SUPPRESSION appearing on the output.
Original Type
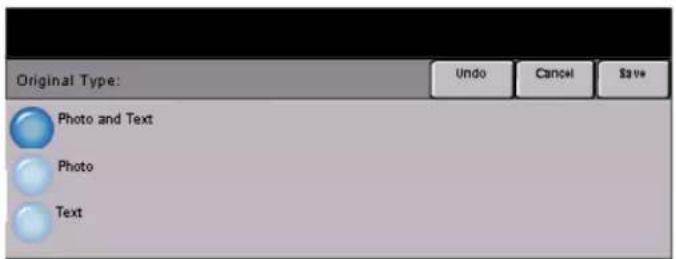
Use this feature to enhance the quality of the output based on the type of original being scanned.
Options:
PHOTO & TEXT Use this option for original documents that contain lithographs, or pictures and printed text.
PHOTO Use this option for original documents that contain photographs.
TEXT Use this option when copying text documents composed of fine line characters or other high contrast documents with bright, dense colours.
Sides Scanned
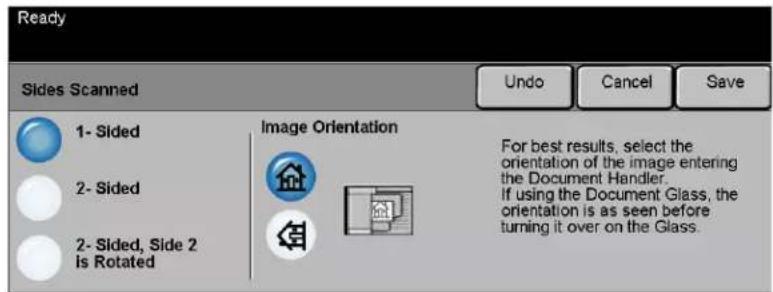
This is used to specify whether the originals are single-sided or double-sided. For 2-sided originals the orientation can also be programmed.
Options:
1 SIDED Use this option for originals that are printed on 1 side only.
2 SIDED Use this option for originals that are printed on both sides.
2 SIDED, ROTATE Use this option for originals that are printed on both sides. This option creates SIDE 2 documents which can be read in a "head to toe" manner, for example a calendar.
IMAGE Use this option to identify the image orientation before scanning.
ORIENTATION
Edge Erase
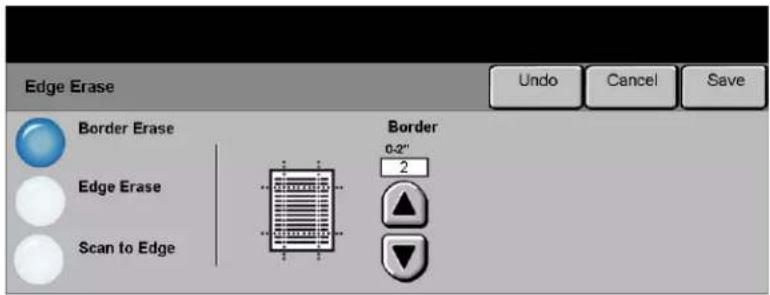
NETWORK SCANNING
Use this feature to "refresh" the quality of an original that has become torn or frayed at the edges, or that has hole punch, staple or other marks.
Options:
BORDER ERASE Erases equal amounts on all edges of your output image. Up to 2.0 inches (0 - 50 mm) in 0.05 inch (0.1 mm) increments can be erased.
EDGE ERASE Use to erase a specific amount from a specific edge of the image. Up to 2.0 inches (0 - 50 mm) in 0.05 inch (0.1 mm) increments can be erased from each edge.
SCAN TO EDGE Use this option to scan to the edge of the output stock.
Original Input
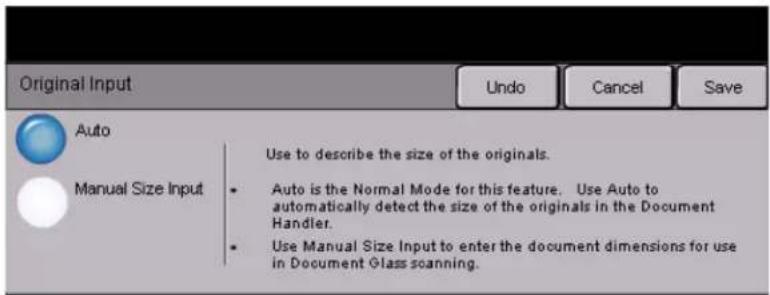
Use this option to programme the size of the originals being scanned or enable the machine to recognise the size of the originals.
Options:
AUTO Use this option to allow the machine to determine the size of the originals being fed through the document handler.
MANUAL SIZE Use this option to specify the dimensions of the document scanning region when INPUT scanning from the document glass. There are several dimensions that correspond to common document sizes and orientations.
Select a standard size or use Custom to manually adjust the scanning dimensions. Use this option to scan the image to the edges of the original.
Resolution
Resolution affects the appearance of the scanned image. The higher the scanning resolution the better the image quality.
Options:
200x200 Recommended for use with average quality text documents and line art. Does not produce the best image quality for photos and graphics.
300x300 Recommended for use with high quality text documents, that are destined to pass through OCR applications. Also recommended for high quality line art or medium quality photos and graphics. This is the default resolution and the best choice in most cases.
400x400 Recommended for use with high quality photos and graphics. It produces a larger (NON-STANDARD) image file size, but delivers a better image quality.
600x600 Recommended for use with high quality photos and graphics. It produces the (NON-STANDARD) largest image file size, but delivers the best image quality.
LARGEST FILE Very little compression. It produces the largest file size, but delivers the best image (BEST IMAGE quality. QUALITY)
SMALLER FILE Some compression. It produces a larger file size, but delivers a better image quality. (BETTER IMAGE QUALITY)
SMALLEST FILE Maximum compression. It produces the smallest file size, but delivers good image (GOOD IMAGE) quality. QUALITY)
OUTPUT FORMAT...
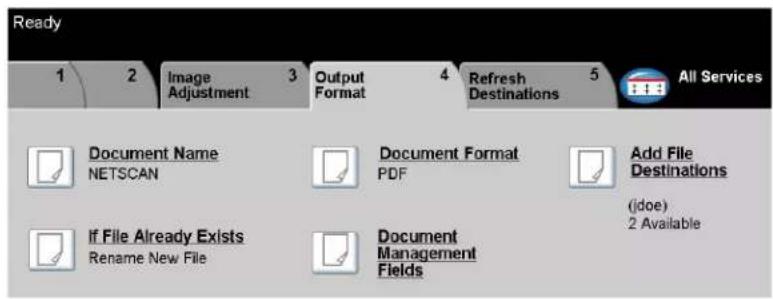
Use the features available to temporarily change the format of the scanned image file at the destination server.
Touch any of the top level buttons to select a feature. To view all the options for a feature, select the feature required. Multiple options can be selected for each scan job if required.
The text next to the feature button, called a Job Review Summary, reflects the current settings for that feature. A green light indicates that this feature has been modified from its initial default settings.
Most feature screens include three buttons to confirm or cancel your choices.
The Undo button resets the current screen to the default values that were displayed when the screen was opened.
The Cancel button resets the screen and returns to the previous screen.
The Save button saves the selections made and returns to the previous screen.
Document Name
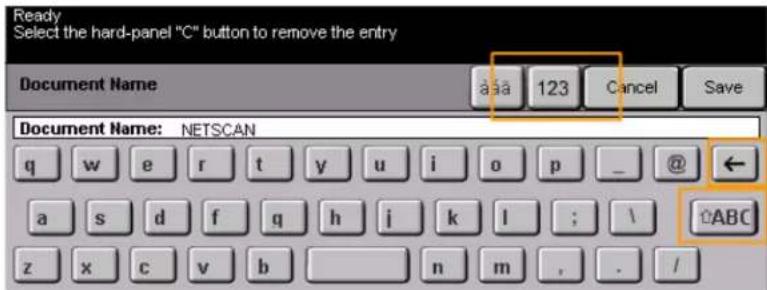
NETWORK SCANNING
Use Document Name to specify the name of the folder that you want your scanned image stored to. This option only applies to the folder name.
If File Already Exists
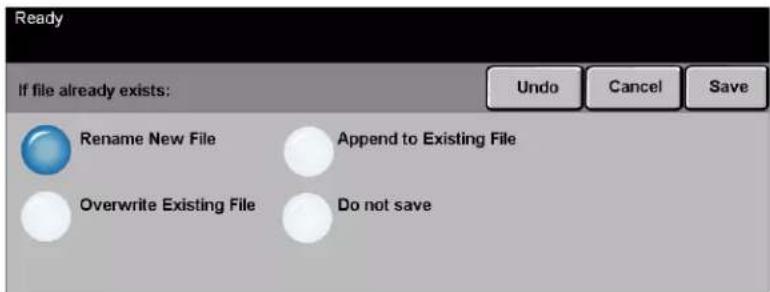
Use this option to tell the machine what to do when the document destination folder already contains a document with the same name as your current scan job.
Options:
RENAME NEW FILE Use this option when you want the machine to name the new file (or folder) with a unique name.
OVERWRITE Use this option to replace the existing file that has the same filename as the newly EXISTING FILE created scanned image file
APPEND TO Use this option to add the newly created scanned image file to an existing document EXISTING FILE with the same name as the document being scanned.
NOTE: This option is not available with Multi-Page Tiff and PDF file format options.
Do NOT SAVE Use this option to abort the scanning operation if a file with the same name as the newly created scanned image file is detected.
Document Format
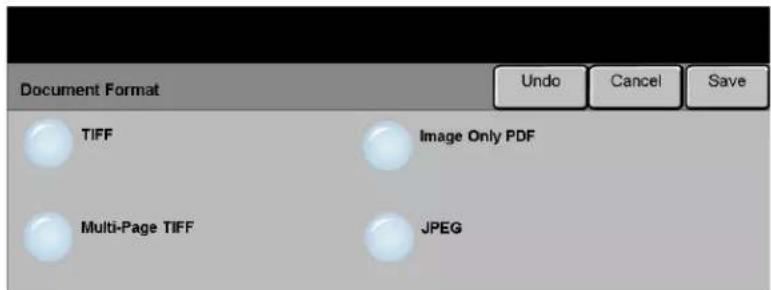
Use this feature to temporarily change the file type of the scanned image file at the destination server. The default setting is the same as the value entered in the selected template.
Options:
TIFF Tagged-Image File Format. A graphic file that can be opened in a variety of graphic software packages across a variety of computer platforms.
MULTI-PAGE TIFF Multi-Page Tagged-Image File Format. One TIFF file containing several pages of scanned images.
IMAGE ONLY PDF Image Only Portable Document Format. This format can be viewed with a PDF viewer.
JPEG Joint Photographic Experts Group. A graphic file that can be opened in a variety of graphic software packages across a variety of computer platforms.
Document Management Fields
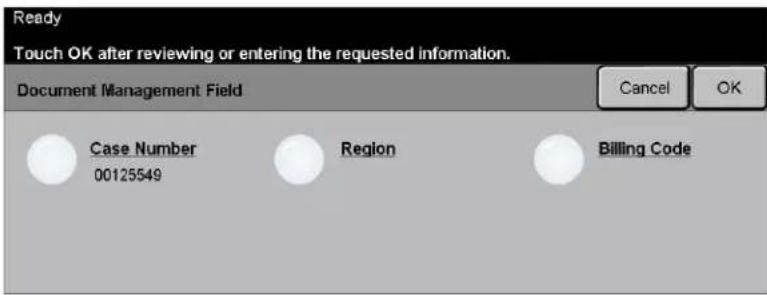
NETWORK SCANNING
Document Management Fields allows you to enter information into the template from your machine which is unique to your scanning requirements. These fields must be enabled when creating the template at the Web UI.
NOTE: If your selected template does not contain any enabled fields the Document Management Fields button will not be available.
Add File Destinations
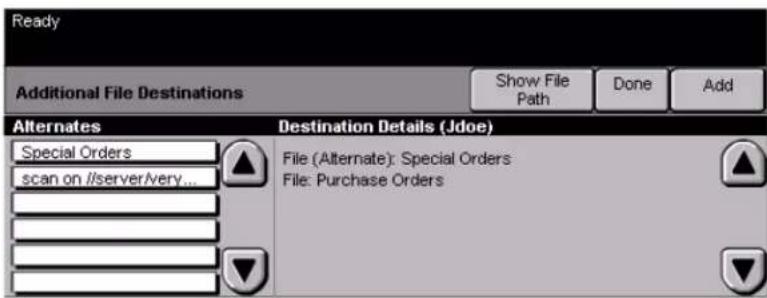
Use this feature to add file destinations to any template. A maximum of 5 file destinations can be added to a template. If the selected template contains 1 destination you can add an additional 4 destinations using this feature, however if the selected template contains 5 destinations the Add File Destination button is not available.
REFRESH DESTINATIONS...
Select the Refresh Destinations tab to access the Update Template List feature.
Touch the Update Template List button if the template has been recently created or modified. The system automatically updates the Template List.
AUTHENTICATION MODE...
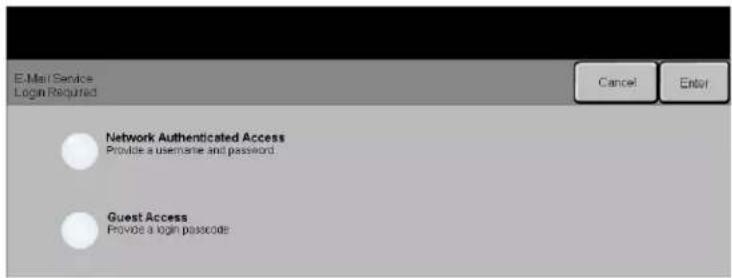
Authentication is a useful network security management tool - limiting, restricting and monitoring access to the network via the machine. Authentication can be set up by the System Administrator to restrict access to the features within Scan to E-mail, Network Scanning and Internet Faxing. Once enabled, it will apply to all three services.
There are two authentication modes available:
NETWORK Requires your network login name and password. If you do not have a network AUTHENTICATION account on the local network you will not be authenticated using this mode.
GUEST ACCESS Requires a generic passcode that is set up by the System Administrator. You will need to obtain the passcode from the System Administrator.
Contact your System Administrator for further assistance.
7 E - MAIL
E-mail....7-2
Colour Options .... 7-6
➢ Image Adjustment....7-7
Output Format....7-14
▶Authentication Mode .... 7-17
E-MAIL...
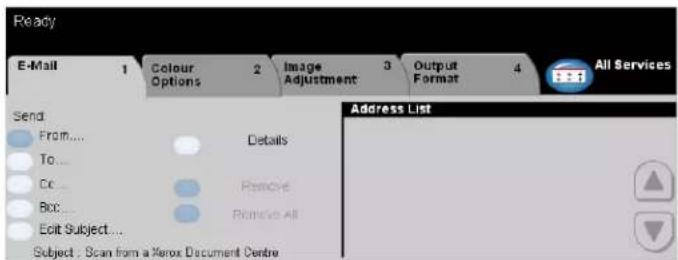
The E-mail feature is optional on the WorkCentre Pro. It is not available on the CopyCentre. This chapter contains information about the options available within E-mail.
When enabled, scanned images can be sent as an e-mail attachment to a specified e-mail recipient or recipients. To use scan to e-mail you must enter an SMTP (Simple Mail Transfer Protocol) e-mail address, for example, anyone@anycompany.com.
NOTE: Sending high-resolution colour documents using the E-mail feature may cause documents to exceed file size limits.
Access to the E-mail features is gained using the Features button on the control panel. Use the E-mail tab to add and remove recipients and edit the subject line.
Depending on the options enabled and how your machine has been configured, you may have to select the All Services button in the top right-hand corner to access E-mail.
The tabs available for selecting E-mail features are:
E-mail
Colour Options
Image Adjustment
Output Format
Touch any of the top level buttons to select a feature. Multiple options can be selected for each scan job if required.
Most feature screens include three buttons to confirm or cancel your choices.
The Undo button resets the current screen to the default values that were displayed when the screen was opened.
The Cancel button resets the screen and returns to the previous screen.
The Save button saves the selections made and returns to the previous screen.
Send:
Use the Send options to enter recipient information.
Options:
FROM Use this option to enter the From e-mail address. The From e-mail address is set by the System Administrator.
NOTE: If you accessed E-mail via Authentication Mode, the From e-mail address will be associated with the login name and cannot be changed.
To Use this option to enter the e-mail address of the recipient.
Cc Use this option to enter the e-mail address of the recipient you wish to be copied on the e-mail job.
Bcc Use this option to enter the e-mail address of the recipient you wish to be copied on the e-mail job, without their name being displayed on the e-mail.
EDIT SUBJECT Use this option to edit the default e-mail subject. The subject is the title of the e-mail and not the text contained within the e-mail. The subject line can contain up to 248 characters and is displayed on the touch screen under the Edit Subject button.
DETAILS Use this option to view the details of the selected recipient. The information displayed is determined by how the address was originally added to the Address List - from either the Internal or Public Address Book, or entered manually.
REMOVE Use this option to delete the selected address from the Address List.
REMOVE ALL Use this option to delete all the addresses from the Address List. A confirmation pop-up message will be displayed.
SCROLL BUTTONS Use the Scroll Buttons located to the right of the Address List to move through the list.
Address List
Displays all the recipient addresses entered for the current scan to e-mail job. Up to 128 recipients addresses can be entered in the list.
Entering an E-mail Address
The e-mail address can be entered in one of two ways - manually or via an address book.
NOTE: When entering e-mail details you can change the keypad to show upper or lower case, accented characters or numbers by selecting any Back button.
Manually
If you already know the full SMTP e-mail address of the recipient, or if you know that the recipient is not in any of the configured address books, you can select the To... button and use the keypad on the touch screen to enter the e-mail address. Your machine will check that it is an SMTP address. If it is not an SMTP address, your machine will search the address book for a matching entry.
The entered e-mail address will be shown in the Address List.
Selecting the details for a manually entered e-mail address will only display the e-mail address, no other details are available.
Address Books
Address books contain a list of e-mail addresses and details that are relevant to your company and/or you. If configured, your machine is able to support two types of e-mail address books - Public and Internal. When an entry is made in To, From or Cc the Address Book displays search results for one or both configured address books.
Use the keypad on the touch screen to enter the e-mail recipient's name. As with most search facilities you do not need to enter the full name and can search the address book on the first few letters.
When you have entered the e-mail search criteria, select the Enter button. If there are no matching entries, select the Change Address Book button to search the other address book.
NOTE: The Change Address Book button will only be displayed if both the address books have been configured.
If one or more matches are found based on the search criteria, the matches are displayed on the touch screen. Use the up and down scroll bars to locate the recipient. Highlight the recipient in the list and select the Add button.
Continue this process until you have added all the required recipients and on completion select Done. The entered e-mail addresses will be shown in the Address List.
Address Book Types
Public Address Book
The Public Address Book stores external company addresses on the machine. The address book contains a list of user names and their e-mail addresses.
The file must be a .CSV (Comma Separated Value) format for your machine to be able to read the file contents. The completed file is imported to the machine via CentreWare Internet Services. Your machine will not allow the import of a Public Address Book file that does not end with the .CSV file extension.
A valid CSV file is in the format: Name, SMTP e-mail address. For example the following are both valid CSV format file entries:
Smith, smith@company.com
"Smith, John", john.smith@company.com
The order in which the entries are sorted in the CSV file determines the order displayed in the Public Address Book at your machine.
Internal Address Book
Otherwise known as the LDAP (Lightweight Directory Access Protocol), the Internal Address Book stores internal company addresses on the company network. The System Administrator creates the Internal Address Book.
The display of the search results is defined by the LDAP. For example, the LDAP server can return a search query "And" as "Andrew Smith" when the result "Andrews, James" may have been expected. The lastname, firstname or firstname, lastname display is controlled by the LDAP server and not your machine.
If you have successfully logged in via Authentication mode, your machine will automatically attempt to match your login name to your e-mail address. Your name will then be entered into the From e-mail address field. You will not be able to change this.
COLOUR OPTIONS ...
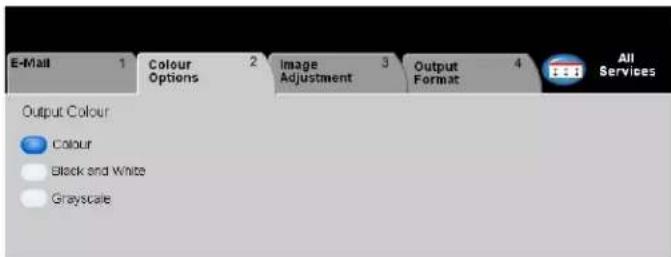
The Colour Options tab is used to select different colour features for the scanned image.
Touch any of the top level buttons to select a feature. To view all the options for a feature, select the feature required. Multiple options can be selected for each copy job if required.
The text next to the feature button, called a Job Review Summary, reflects the current settings for that feature. A green light indicates that this feature has been modified from its initial default settings.
Most feature screens include three buttons to confirm or cancel your choices.
The Undo button resets the current screen to the default values that were displayed when the screen was opened.
The Cancel button resets the screen and returns to the previous screen.
The Save button saves the selections made and returns to the previous screen.
Output Colour
Use this feature to select the desired output colour.
Options:
COLOUR This option scans and sends the job in colour.
BLACK & WHITE This option should be selected when the desired output is a black and white copy. When Black & White is selected only Black toner is used.
GRAYSCALE Use this option when the original contains halftone images.
IMAGE ADJUSTMENT...
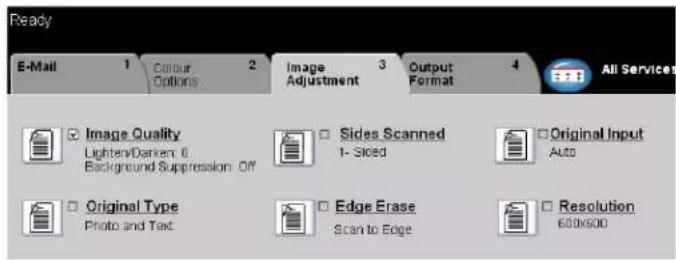
The Image Adjustment tab is used to temporarily programme features to enhance the appearance and style of the scanned e-mail image.
Touch any of the top level buttons to select a feature. To view all the options for a feature, select the feature required. Multiple options can be selected for each e-mail job if required.
The text next to the feature button, called a Job Review Summary, reflects the current settings for that feature. A green light indicates that this feature has been modified from its initial default settings.
Most feature screens include three buttons to confirm or cancel your choices.
The Undo button resets the current screen to the default values that were displayed when the screen was opened.
The Cancel button resets the screen and returns to the previous screen.
The Save button saves the selections made and returns to the previous screen.
Image Quality
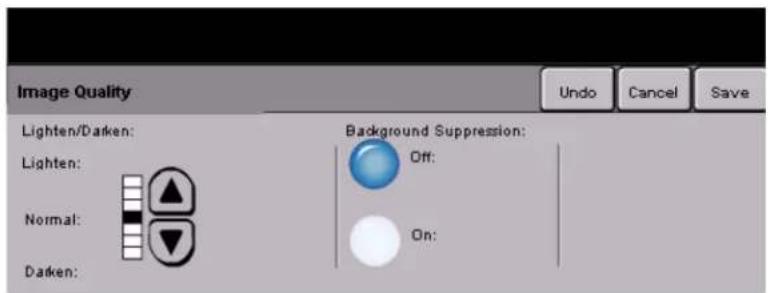
Use this feature to enhance the quality of your scanned originals.
Options:
LIGHTEN / DARKEN Adjusts the lightness or darkness of black and white output. To darken the output, press the down scroll button. To lighten the output, press the up scroll button.
BACKGROUND Prevents undesired marks or images printed on the back of an original from SUPPRESSION appearing on the output.
Original Type
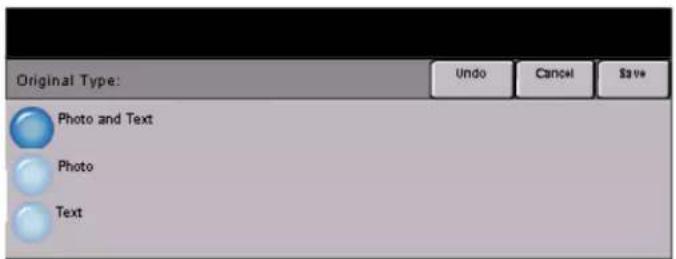
Use this feature to enhance the quality of the output based on the type of original being scanned.
Options:
PHOTO & TEXT Use this option for original documents that contain lithographs, or pictures and printed text.
PHOTO Use this option for original documents that contain photographs.
TEXT Use this option when copying text documents composed of fine line characters or other high contrast documents with bright, dense colours.
Sides Scanned
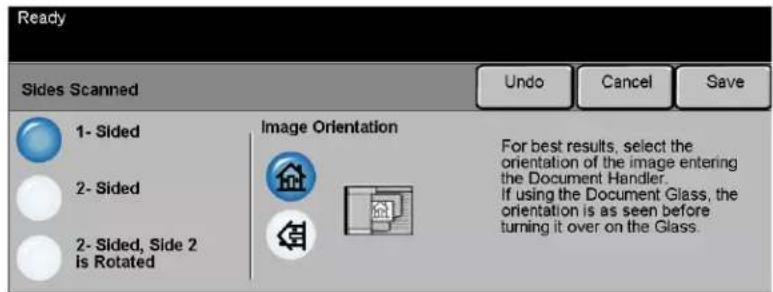
This is used to specify whether the originals are single-sided or double-sided. For 2-sided originals the orientation can also be programmed.
Options:
1 SIDED Use this option for originals that are printed on 1 side only.
2 SIDED Use this option for originals that are printed on both sides.
2 SIDED, ROTATE Use this option for originals that are printed on both sides. This option creates SIDE 2 documents which can be read in a "head to toe" manner, for example a calendar.
IMAGE Use this option to identify the image orientation before scanning.
ORIENTATION
Edge Erase
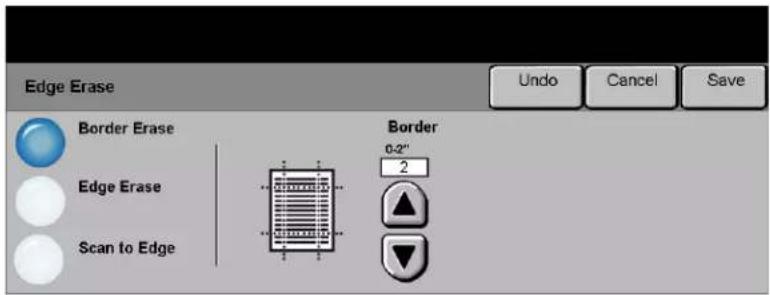
Use this feature to "refresh" the quality of an original that has become torn or frayed at the edges, or that has hole punch, staple or other marks.
Options:
BORDER ERASE Erases equal amounts on all edges of your output image. Up to 2.0 inches (0 - 50 mm) in 0.05 inch (0.1 mm) increments can be erased.
EDGE ERASE Use to erase a specific amount from a specific edge of the image. Up to 2.0 inches (0 - 50 mm) in 0.05 inch (0.1 mm) increments can be erased from each edge.
SCAN TO EDGE Use this option to scan to the edge of the output stock.
Original Input
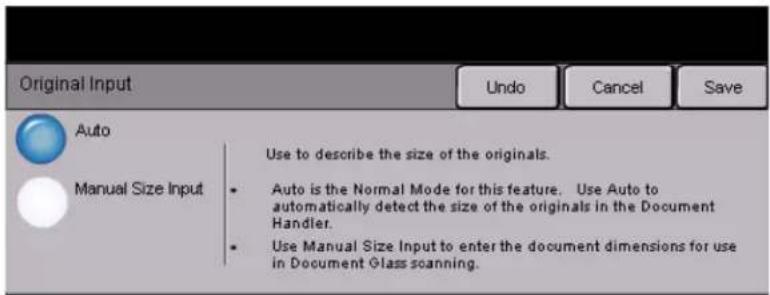
Use this option to programme the size of the originals being scanned or enable the machine to recognise the size of the originals automatically.
Options:
AUTO Use this option to allow the machine to recognise the size of the originals being fed through the document handler.
MANUAL SIZE Use this option to specify the dimensions of the document scanning region when INPUT scanning from the document glass. There are several dimensions that correspond to common document sizes and orientations.
Select a standard size or use Custom to manually adjust the scanning dimensions.
Resolution
Resolution affects the appearance of the scanned image. The higher the scanning resolution the better the image quality.
Options:
200x200 Recommended for use with average quality text documents and line art. Does not produce the best image quality for photos and graphics.
300x300 Recommended for use with high quality text documents, that are destined to pass through Optical Character Recognition (OCR) applications. Also recommended for high quality line art or medium quality photos and graphics. This is the default resolution and the best choice in most cases.
400x400 Recommended for use with high quality photos and graphics. It produces a larger (NON-STANDARD) image file size, but delivers a better image quality.
600x600 Recommended for use with high quality photos and graphics. It produces the largest image file size, but delivers the best image quality.
LARGEST FILE Very little compression. It produces the largest file size, but delivers the best image (BEST IMAGE quality. QUALITY)
SMALLER FILE Some compression. It produces a larger file size, but delivers a better image quality. (BETTER IMAGE QUALITY)
SMALLEST FILE Maximum compression. It produces the smallest file size, but delivers good image (GOOD IMAGE quality. QUALITY)
OUTPUT FORMAT...
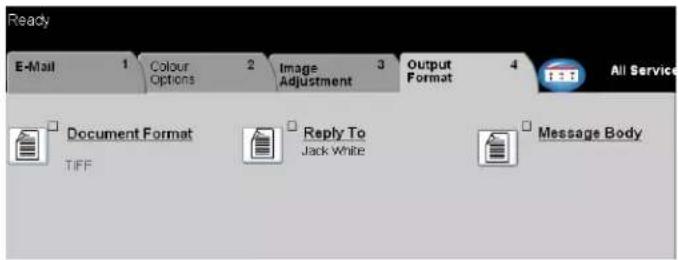
Use this feature to change the Reply To e-mail address and to identify the file format required for the e-mail scanned image.
Touch any of the top level buttons to select a feature. To view all the options for a feature, select the feature required. Multiple options can be selected for each e-mail job if required.
The text next to the feature button, called a Job Review Summary, reflects the current settings for that feature. A green light indicates that this feature has been modified from its initial default settings.
Most feature screens include three buttons to confirm or cancel your choices.
The Undo button resets the current screen to the default values that were displayed when the screen was opened.
The Cancel button resets the screen and returns to the previous screen.
The Save button saves the selections made and returns to the previous screen.
Document Format
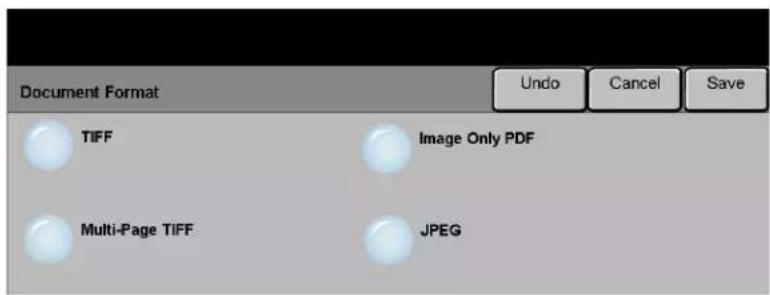
Use the Document Format option when the job is to be sent with a different file format than that set as the template default.
Options:
TIFF Tagged-Image File Format. A graphic file that can be opened in a variety of graphic software packages across a variety of computer platforms.
MULTI-PAGE TIFF Multi-Page Tagged-Image File Format. One TIFF file containing several pages of scanned images.
IMAGE ONLY PDF Image Only Portable Document Format. This format can be viewed with a PDF viewer.
JPEG Joint Photographic Experts Group. A graphic file that can be opened in a variety of graphic software packages across a variety of computer platforms.
Reply To
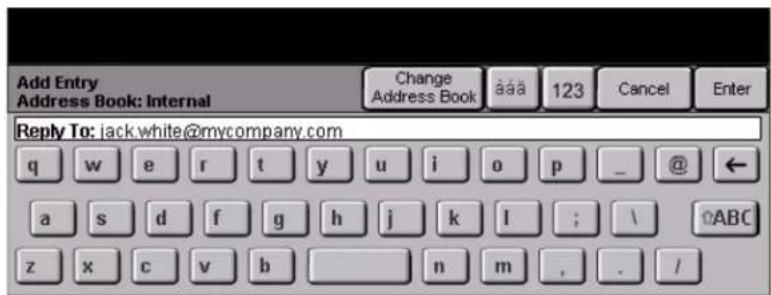
Use the Reply To feature to alter the default address to which replies to an e-mail job can be sent.
Message Body
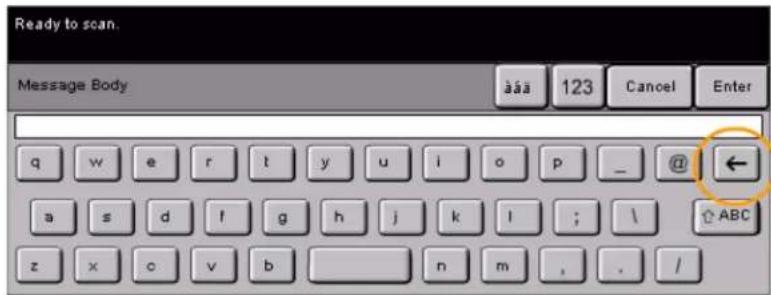
Use this feature to edit the default e-mail message. The message body is the text contained within the e-mail and not the e-mail subject line.
AUTHENTICATION MODE ...
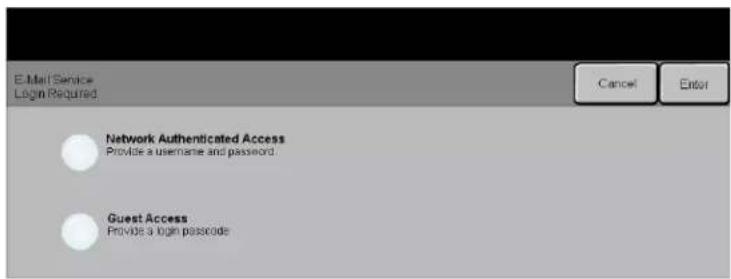
Authentication is a useful network security management tool - limiting, restricting and monitoring access to the network via the machine. Authentication can be set up by the System Administrator to restrict access to the features within Scan to E-mail, Network Scanning and Internet Faxing. Once enabled, it will apply to all three services.
There are two authentication modes available:
NETWORK Requires your network login name and password. If you do not have a network AUTHENTICATION account on the local network you will not be authenticated using this mode. GUEST ACCESS Requires a generic passcode that is set up by the System Administrator. You will need to obtain the passcode from the System Administrator. Contact your System Administrator for further assistance.


Spode QRG.book Page 18 Tuesday, May 13, 2003 10:51 AM







8 P RINT
Introduction to Print....8-2
➢Printer Driver Features....8-3




INTRODUCTION TO PRINT..
When the CopyCentre/WorkCentre Pro is connected to the network, electronic jobs that require printing can be sent from a workstation directly to the machine.
The CentreWare printer drivers enable printing from a workstation to a CopyCentre/WorkCentre Pro on a network. The CentreWare drivers contain a variety of feature options which enable print jobs to be customised.
For further information please refer to the CentreWare Network Services CD delivered with your CopyCentre/WorkCentre Pro.
PRINTER DRIVER FEATURES...
There are a number of Printer Drivers available for the CopyCentre/WorkCentre Pro. The features available will depend on the printer driver being used. The following descriptions provide an overview of the typical features provided by the CopyCentre/WorkCentre Pro Printer Drivers.
For information about a specific Printer Driver feature, please refer to the on-line Help facility provided as part of the Printer Driver software.
Control Options
There are a number of options which appear on all of the printer driver screens:
OK Saves all the new settings and closes the driver or dialog. These new settings remain in effect until changed.
CANCEL Closes the dialog and returns all settings in the tabs to the values that were in place before the dialog was opened. Any changes made are lost.
APPLY Saves all the changes made without closing the driver.
DEFAULTS Resets the current tab and all its settings to the system default values. The action of this button applies only to the current tab. All other tabs remain unchanged.
DEFAULT ALL Resets options to default system values on the Paper Output, Layout, and Image Options tabs. Other features and tabs may not have specific default settings and will not be affected by this button.
HELP Select Help in the bottom right of the printer driver screen or [F1] on the PC keyboard for information on the displayed printer driver screen.
If the tip of the mouse pointer is rested on top of a control, Microsoft Windows will display a brief Help Tip about that control. If the right mouse button selects a control, the Help system provides more detailed information.
Advanced
This tab can be used to select options such as Number of Copies, Image Orientation, and Colour Correction. Banner sheets and set offsets can also be requested on this tab.
Paper/Output
This tab can be used to select options such as the Job Type, Paper Type, Covers, Transparency Separators, 2 Sided Printing, Output Colour, and Output Destination. Stapling and other finishing options can be set on this tab if you have an optional finisher on your machine. The choices available are based on the options enabled on the machine. Use the scroll arrows to change the settings. To display the job type list, use the arrow scroll button next to Normal Print.
Available Job Types:
NORMAL PRINT Displays the print driver screen features.
SECURE PRINT Enables a password to be entered to protect a job. The job will be held in a queue and not printed until the same password is entered at the CopyCentre/WorkCentre Pro. To print the job, select the job in the Print Queue and press the Release button. The Secure Print Login pop-up window prompts a password to be entered to release and print the job.
SAMPLE PRINT Enables users to print and proof a single copy of a document before printing the remaining document sets/copies. The remaining sets are held in the CopyCentre/WorkCentre Pro print queue until the job is released via the CopyCentre/WorkCentre Pro control panel.
When using this feature ensure that the Print dialog in the application does not provide a Collate option. If it does, turn the Collate option OFF in order for the Sample Set feature to work properly. If Collate is not turned OFF, the application may submit the entire job as a single document.
DELAYED PRINT Delays processing a job until a later time. After selecting Delayed Print, enter the time of day the job is to be processed. The job will be placed on hold until the specified time. The job is then released automatically and placed at the end of the list of pending jobs in the Print Queue. The job is then formatted and printed as a normal job.
Image Options
This tab can be used to select a Negative Image and Mirror Image for a document. This tab also contains features to adjust the Image Quality, Margins, and to set Reduce/Enlarge values.
Layout/Watermark
This tab can be used to change the layout of a document and add watermarks. In addition, documents can be printed 1 Up, 2 Up and so on, up to 16 Up. Booklet Creation is also available on this tab.
About
This tab provides the copyright and printer driver information information.


Spode QRG.book Page 6 Tuesday, May 13, 2003 10:51 AM







9 M AINTENANCE
➢Customer Replaceable Units... 9-2
▶Cleaning the Machine....9-3
➢ Further Assistance....9-4
CUSTOMER REPLACEABLE UNITS...
There are several replaceable units on the machine:
Drum Cartridges (4)
Toner (Dry Ink) Cartridges (4)
Fuser Module
Waste Toner Collector
The machine will display a message on the Touch Screen when any of the above need to be reordered. This message is a warning that the unit is nearing the end of its life.
Only replace the unit when a message actually instructs you to do so.
CAUTION: Do NOT remove the covers or guards that are fastened with screws. You cannot maintain or service any of the parts that are behind these covers and guards. Do NOT attempt any maintenance procedure that is NOT specifically described in the documentation supplied with your machine.
To replace a Replaceable Unit, simply follow the detailed instructions contained within the replacement box.
To find out more information about each replaceable unit please refer to the Training and Information CD (CD2), contained in the CopyCentre/WorkCentre Pro CD Pack delivered with your CopyCentre/WorkCentre Pro.
HINT: To place an order for replaceable units or any other Xerox consumables, please contact your local Xerox Representative giving your Company Name, product number and the machine serial number.
CLEANING THE MACHINE...
WARNING: When cleaning the machine do NOT use organic or strong chemical solvents or aerosol cleaners. Do NOT pour fluids directly onto any area. Use supplies and cleaning materials only as directed in this documentation. Keep all cleaning materials out of the reach of children.
1
User Interface
Use a soft, lint-free cloth, lightly dampened with water.
Wipe clean the entire area, including the touch screen.
Remove any residue with a clean cloth or paper towel.
FURTHER ASSISTANCE...
For any additional help visit our customer web site at www.xerox.com or contact the Xerox Welcome and Support Center quoting the machine serial number.

➢ Press the Machine Status button on the control panel.
The Machine Information screen will be displayed.
Select [Machine Details].

The Customer Support Number for the Welcome and Support Center and the Machine Serial Number for your machine will be displayed.

HINT: The Machine Serial Number can also be found on a metal plate, toward the back of the machine in Area 1, in the back of the fuser module.
10 TROUBLESHOOTING
➢General …… 10-2
▶Fault Clearance....10-3
Xerox Welcome and Support Center... .....10-4
➢Troubleshooting Tips....10-5
GENERAL ...
A variety of situations can affect the quality of your output. For optimal performance, ensure the following guidelines are followed:
- Do not position the CopyCentre/WorkCentre Pro in direct sunlight or near a heat source such as a radiator.
- Avoid sudden changes in the environment surrounding the CopyCentre/WorkCentre Pro. When a change occurs, allow the CopyCentre/WorkCentre Pro at least two hours to adjust to its new environment, depending on the extent of the change.
- Follow routine maintenance schedules for cleaning areas such as the Document Glass and User Interface.
- Always set the Edge Guides in the paper trays to the size of the media in the tray and ensure the screen is displaying the correct size.
- Ensure paper clips and paper debris do not contaminate the machine.
FAULT CLEARANCE...
1
When a fault occurs, a fault screen is displayed which provides recovery instructions.
➢ Follow these instructions to clear the fault.
NOTE: The jammed sheets will automatically be reprinted.
2
Paper jams
The fault screen will indicate the location of the jam.
➢ Open the doors indicated in the instructions displayed to remove the jammed paper.
NOTE: Any printed sheets removed will automatically be reprinted once the paper jam is cleared.
3
Document jams
Remove all the documents from the document handler and document glass as instructed.
➢ Re-order the documents as at the start of the job and reload. The documents will be recycled automatically to recover the job.
If you are unable to clear the fault, refer to the next section to contact your local Xerox Welcome and Support Center for assistance.
XEROX WELCOME AND SUPPORT CENTER...
If a fault cannot be resolved by following the touch screen instructions, check the Troubleshooting Tips in the next section - they may help to solve the problem quickly. If the difficulty persists, contact the Xerox Welcome and Support Center. The Welcome and Support Center will want to know the following information: The nature of the problem, the Machine Serial number, the fault code (if any) plus the name and location of your company.
Locating the serial number

➢ Press the Machine Status button on the control panel.

The Machine Information screen will be displayed.
Select [Machine Details].
The Customer Support Number for the Welcome and Support Center telephone number and Machine Serial Number for your machine will be displayed.
NOTE: The serial number can also be found on a metal plate toward the rear of the machine in Area 1, in the back of the fuser module.
TROUBLESHOOTING TIPS...
Power
The machine will not power on:
➢ Check to see that the machine is not in Low Power Mode as indicated by the green light on the User Interface.
Switch the ON/OFF button to the ON position.
➢ Check to see if the power cord is correctly installed.
Document Handler
Documents will not feed through the Document Handler
➢ Ensure that all staples or paper clips have been removed from the originals.
➢ Ensure the Document Handler is not overloaded. The Document Handler can hold 50 sheets of 20lb paper. Use Build Job if you have more originals than this.
Check to see if the document set is fully inserted into the Document Handler. The green light on the Document Handler will light when documents are fully inserted.
➢ Ensure that the edge guides are adjusted to touch the sides of the originals.
➢ Check for obstructions or paper debris in the Document Handler.
➢ Ensure that the Document Handler cover is closed.
➢ Check that the machine is not in diagnostics mode as indicated by a message on the User Interface.
Paper Handling
Repeated paper jams or misfeeds
➢ Ensure that the correct paper size is displayed on the Touch Screen.
Remove the stock and reload the tray. Remove the paper, combine the additional paper with the paper from the tray, turn the paper over, and reload the tray.
➢ Ensure the paper tray is not filled above the MAX line.
➢ Ensure that the Edge Guides are adjusted to touch the sides of the paper.
➢ Check for obstructions at the paper entrance.
Paper Jams inside the machine
▶ Check the Paper Path for obstructions.
➢ Flip the paper over in the paper tray.
➢ Check the paper tray Edge Guides to see if they are against the edges of the paper.
➢ Check that the Touch Screen is displaying the correct size for the paper in use.
Load fresh paper.
Repeated Check Tray Messages on the User Interface and the paper is loaded in the tray
Adjust the edge guides against the stack of paper in the tray.
If the edge guides were not set against the paper stock in the tray when Start was selected, delete the job in the job queue and begin again.
Paper Curls
➢ Load the paper in the paper trays seam side of the paper up. Load the paper in the Bypass Tray with the seam side down.
The seam refers to the side of a ream of paper with a split in the wrapping. It may also be referred to as arrow side first.
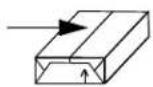
Load non-standard media in the Bypass Tray.
If the paper curls excessively, flip the paper over in the applicable paper tray.
Finisher
The Finisher does not stack the output correctly
▶ Unload the finisher tray frequently.
Do not remove stapled sets while the finisher is compiling.
The Finisher does not staple or staple well
Use less than 50 sheets of paper if they are heavier than 20 lb., 80 gsm.
① The maximum number of sheets is 20 when stapling heavyweight paper.
➢ Check the User Interface for a message indicating a need for staples. Replace the staple cartridge.
Output Quality
Stray marks or black marks from hole punched originals are not removed
➢ Use the Edge Erase to erase the edge with the drilled holes.
➢ Copy from the document glass with the Document Cover down.
Images are out of sequence or upside down when the Booklet Creation Feature is used
➢ Ensure that the originals are in the correct sequence.
➢ Feed LEF originals to SEF orientated paper stock.
➢ Enable the display options for Booklet Creation and ensure that the correct sequence is selected (i.e. Left to Right or Right to Left).
The output is blank
➢ Ensure the originals are loaded either face up in the Document Handler or face down on the Document Glass.
Streaks, lines, spots, or black, solid, or dotted lines on the prints
➢ Run the job from the Document Glass.
➢ Check the quality of the original. Use Border Erase or Edge Erase to remove lines from the edges of the document.
➢ Turn on Background Suppression.
Load fresh paper.
Image Loss
When copying a document from a larger paper size to a smaller size, use Auto% to reduce the image onto the smaller size.
Use reduction i.e., copy at 90% instead of 100%.
Select [Auto Center] and run the job again.
If scanning from the Document Glass, select [Manual Platen Input] and define the document size. Register the document in the right rear corner and copy with the cover down.
Blurred images on output
Load fresh paper.
If copying from the Document Glass, check the quality of the originals, set the input to Manual Size Input, close the cover and try again. Ensure that the original is entirely flat against the Document Glass.
Missing characters on output
Load fresh paper.
➢ Try using a smoother paper.
Select darken if the original is light or the font is coloured.
Gloss variations
▶ Check the quality of the original.
If the original has large areas of solid density, adjust the contrast.
Ghosting
➢ Check the quality of the original.
Clean the Document Glass, if it is being used.
Rotate the original 180 degrees and try the job again.
The machine cannot sense the size of the original on the glass
Select [Original Input] in the Image Adjustment Tab and enter the size.
➢ Rescan the original, leaving the cover down.
Jobs scan but do not print
Some jobs require image processing before printing.
➢ Check the Job Status queue to determine if a job is processing. There may be a job in the queue with a status of paused. Delete this job if it remains in the state over 5 minutes.
This may possibly be a result of an incorrect feature combination. The software may need to be reset. Contact your System Administrator.
Output does not reflect the selections made on the Touch Screen
➢ Press Clear All between jobs.
11 INDEX
Numerics
2-Sided
Copy 3-5
A
About Tab
Print 8-5
About this Guide 1-2
Acknowledgment Report Internet Fax 5–15
Add File Destination
Network Scanning 6–17
Additional Resources 1-4
Advanced Tab Print 8-4
Authentication Mode
E-mail 7-17
Fax 4-11
Internet Fax 5-17
Network Scanning 6–18
B
Basic Copying 3–3
Booklet Creation
Copy 3-23
Bound Originals
Copy 3–17
Build Job
Copy 3-28
C
Cleaning the Machine 9-3
Colour Balance
Copy 3-12
Colour Options
Copy 3-10
E-mail 7-6
Internet Fax 5-6
Network Scanning 6–6
Colour Shift
Copy 3-13
Control Panel Overview 2-3
Conventions 1–2
Copy 3-2
Paper Supply 3-8
Covers
Copy 3-26
Customer Replaceable Units 9-2
D
Delayed Send
Fax 4-10
Destination Details
Network Scanning 6–5
Dialing Options
Fax 4-3
Document Format
E-mail 7-15
Internet Fax 5-14
Network Scanning 6–16
Document Handler
Troubleshooting Tips 10-5
Document Management Fields
Network Scanning 6–17
Document Name
Network Scanning 6–15
E
Edge Erase
INDEX
Copy 3–18
E-mail 7-11
Network Scanning 6–11
E-mail 7-2
Energy Star 1–10
Entering an Address
E-mail 7-4
Internet Fax 5-4
Environmental Choice 1-13
Environmental Compliance 1-13
F
Fault Clearance
Troubleshooting 10–3
Fax 4-2
Finisher
Troubleshooting Tips 10–6
Further Assistance 2–14, 9–4
G
General 10–2
|
If File Already Exists
Network Scanning 6–15
Illegal Copying 1-16
Image Adjustment
Copy 3-14
E-mail 7-7
Internet Fax 5-7
Network Scanning 6–7
Image Options Tab
Print 8-4
Image Quality
Copy 3–15
E-mail 7-8
Fax 4-7
Internet Fax 5-8
Network Scanning 6–8
Image Shift
Copy 3-20
Internet Fax 5-2
Invert Image
Copy 3-25
J
Job Assembly
Copy 3-27
L
Layout/Watermark Tab
Print 8-5
Loading Paper 2–5
Locating the Serial Number 10-4
Logging On / Off 2–13
M
Machine Features Overview 1-5
Machine Overview 2-2
Making Copies 2–6
Message Body
E-mail 7-16
Internet Fax 5–16
More Fax Features 4–6
Multi-up
Copy 3-24
N
Network Scanning 6–3
0
Original Input
Copy 3–19
E-mail 7-12
Fax 4-9
Internet Fax 5-12
Network Scanning 6–12
Original Type
Copy 3–16
E-mail 7-9
Fax 4-8
Internet Fax 5-9
Network Scanning 6-9
Output
Copy 3-4
Output Colour
Copy 3-10
E-mail 7-6
Internet Fax 5–6
Network Scanning 6–6
Output Format
Copy 3-21
E-mail 7-14
Internet Fax 5-13
Network Scanning 6–14
Output Quality
Troubleshooting Tips 10–7
P
Paper Handling
Troubleshooting Tips 10-5
Paper Supply
Copy 3-8
Paper/Output Tab
Print 8-4
Power
Troubleshooting Tips 10–5
Power On or Off 2-4
Preset Colour Options
Copy 3-11
Print 8-2
Printer Driver Control Options 8-3
Printer Driver Features 8-3
Printing from a PC 2-11
Printing with Internet Services 2–12
R
Reduce/Enlarge
Copy 3-6
Refresh Destinations
Network Scanning 6–18
Regulatory Information 1-14
Reply To
E-mail 7-16
Internet Fax 5-15
Repositories
Network Scanning 6-4
Resolution
E-mail 7-13
Fax 4-5
Internet Fax 5-11
Network Scanning 6–13
S
Safety 1-8
Safety Notes 1-8
Sample Set
Copy 3-30
Scan 6-2
Scanning a Document 2-9
Scanning Resources
Network Scanning 6-2
Send
E-mail 7-3
Internet Fax 5-3
Sending a Fax 2-7
Sending an E-mail 2-10
Sending an Internet Fax 2-8
Sharpness/Saturation
Copy 3-12
Sides Scanned
E-mail 7-10
Fax 4-5
Internet Fax 5-10
Network Scanning 6–10
Stored Programming
Copy 3-31
T
Template Destinations
Network Scanning 6-5
Template Overview
Network Scanning 6-4
Transparencies
Copy 3-22
Troubleshooting 10-2
Troubleshooting Tips 10-5
W
Welcome 1-2
Workstation Features Overview 1-7
X
Xerox Welcome and Support Center 10-4


Spode QRG.book Page 4 Tuesday, May 13, 2003 10:51 AM


INDEX


PAGE 11-4
XEROX COPYCENTRE/WORKCENTRE PRO 32/40 COLOUR QUICK REFERENCE GUIDE




604P13000
May 2003
Xerox Corporation
Global Knowledge and Language Services
780 Salt Road
Webster, New York 14580
- Quick Reference Guide
- Table of Contents
- Welcome....1-1
- Getting Started....2-1
- Copy 3-1
- Fax....4-1
- Internet Fax ....5-1
- Network Scanning 6-1
- E-mail 7-1
- Print....8-1
- Maintenance ....9-1
- Troubleshooting ....10-1
- Index ....1
- W ELCOME
- WELCOME
- INTRODUCTION...
- About this Guide
- Conventions
- Orientation
- Italic typeface
- Bracket text typeface:
- Notes
- Hints
- Specification note
- Cautions
- Warnings
- Additional Resources
- OVERVIEW OF FEATURES AT THE MACHINE...
- Scan Once and Print Many
- Perform Different Tasks Simultaneously
- Make Copies Look Like Originals
- Customise Image Size and Placement
- Use Digital Features to Simplify your Work Process
- Be Environmentally Friendly
- Scan Documents to Create Electronic Files (Optional)
- Fax (Network Server Fax) Documents (Optional)
- OVERVIEW OF FEATURES AT THE WORKSTATION...
- CentreWare Print Drivers
- CentreWare Tools
- CentreWare Internet Services
- SAFETY...
- Moving the machine
- Quality Standards
- Laser Safety
- The Electricity at Work Regulations - UK ONLY
- QUESTION: What is the Electricity at Work Regulation?
- QUESTION: Does XEROX Limited comply with the Electricity at Work Regulation?
- QUESTION: Is XEROX equipment safe?
- QUESTION: Is the XEROX equipment in my premises safe?
- QUESTION: Does the XEROX equipment in my premises comply with the Electricity at Work Regulations?
- THESE TESTS MUST BE CARRIED OUT ONLY BY PERSONS WHO POSSESS THE RELEVANT SKILL, KNOWLEDGE AND EXPERIENCE TO CARRY OUT SUCH TESTS.
- Safety Standards
- ENVIRONMENTAL COMPLIANCE...
- ENERGY STAR®
- Environmental Choice M
- Product Recycling and Disposal
- REGULATORY INFORMATION...
- CE
- ILLEGAL COPYING...
- G ETTING STARTED
- CONTROL PANEL OVERVIEW...
- Help
- Clear All
- The touch screen
- Language
- Interrupt
- Access
- Start
- Features
- Dial Pause
- Hash
- Job Status
- Machine Status
- GETTING STARTED
- POWER ON OR OFF...
- To power ON:
- To power OFF:
- LOADING PAPER...
- 1
- 2
- 3
- MAKING COPIES...
- Copy Features include...
- SENDING A FAX...
- Fax Features include...
- SENDING AN INTERNET FAX...
- Internet Fax Features include...
- SCANNING A DOCUMENT...
- Scan Features include...
- SENDING AN E-MAIL...
- Scan to E-mail Features include...
- PRINTING FROM A PC...
- Print Features include...
- PRINTING WITH INTERNET SERVICES...
- Internet Services Features include...
- LOGGING ON / LOGGING OFF...
- FURTHER ASSISTANCE...
- Access the Job Queue
- Access the on-line Help
- For additional Help
- COPY
- COPY...
- BASIC COPYING...
- COPY
- Output
- Options:
- 2-Sided
- Reduce/Enlarge
- Paper Supply
- 2-Tray Module
- 4-Tray Module
- High Capacity Feeder with 2-Tray Module
- COLOUR OPTIONS ...
- Output Colour
- Preset Colour Options
- Colour Balance
- Sharpness/Saturation
- Colour Shift
- IMAGE ADJUSTMENT...
- Image Quality
- Original Type
- Bound Originals
- Edge Erase
- Original Input
- Image Shift
- OUTPUT FORMAT...
- Transparencies
- Booklet Creation
- Multi-Up
- Invert Image
- Covers
- JOB ASSEMBLY...
- Build Job
- Sample Set
- Stored Programming
- F AX
- FAX
- FAX (NETWORK SERVER FAX)...
- BASIC FAXING...
- Dialing Options
- ADD TO SEND LIST
- SEND LIST
- DIALING CHARACTERS
- PHONE LIST
- Resolution
- Sides Scanned
- MORE FAX FEATURES...
- Delayed Send
- AUTHENTICATION MODE...
- INTERNET FAX
- INTERNET FAX...
- Send:
- Address List
- Entering an E-mail Address for Internet Fax
- Manually
- Address Books
- Address Book Types
- Public Address Book
- Internal Address Book
- Document Format
- Acknowledgment Report
- Reply To
- Message Body
- N ETWORK SCANNING
- SCAN...
- Scanning Resources
- CentreWare Network Scanning Services
- NETWORK SCANNING...
- Repositories
- NETWORK SCANNING
- Template Overview
- Template Destinations
- Destination Details
- Document Name
- If File Already Exists
- Document Management Fields
- Add File Destinations
- REFRESH DESTINATIONS...
- E - MAIL
- E-MAIL...
- Entering an E-mail Address
- AUTHENTICATION MODE ...
- P RINT
- INTRODUCTION TO PRINT..
- PRINTER DRIVER FEATURES...
- Control Options
- Advanced
- Paper/Output
- Image Options
- Layout/Watermark
- About
- M AINTENANCE
- CUSTOMER REPLACEABLE UNITS...
- CLEANING THE MACHINE...
- User Interface
- TROUBLESHOOTING
- GENERAL ...
- FAULT CLEARANCE...
- Paper jams
- Document jams
- XEROX WELCOME AND SUPPORT CENTER...
- Locating the serial number
- TROUBLESHOOTING TIPS...
- Power
- The machine will not power on:
- Document Handler
- Documents will not feed through the Document Handler
- Paper Handling
- Repeated paper jams or misfeeds
- Paper Jams inside the machine
- Repeated Check Tray Messages on the User Interface and the paper is loaded in the tray
- Paper Curls
- Finisher
- The Finisher does not stack the output correctly
- The Finisher does not staple or staple well
- Output Quality
- Stray marks or black marks from hole punched originals are not removed
- Images are out of sequence or upside down when the Booklet Creation Feature is used
- The output is blank
- Streaks, lines, spots, or black, solid, or dotted lines on the prints
- Image Loss
- Blurred images on output
- Missing characters on output
- Gloss variations
- Ghosting
- The machine cannot sense the size of the original on the glass
- Jobs scan but do not print
- Output does not reflect the selections made on the Touch Screen
- INDEX
- Numerics
- A
- B
- C
- D
- E
- INDEX
- F
- G
- |
- J
- L
- M
- N
- 0
- P
- R
- S
- T
- W
- X
Brand : XEROX
Model : CopyCentre C32
Category : Copier