JMK2442 - Uncategorized Emerson - Free user manual and instructions
Find the device manual for free JMK2442 Emerson in PDF.


| Product Type | Programmable Security Timer |
| Brand | Emerson |
| Model | JMK2442 |
| Power Supply | 120V AC, 60Hz |
| Maximum Load | 1800W |
| Number of Programs | 4 On/Off cycles per 24 hours |
| Day Selection Modes | Everyday, Mon-Sat, Mon-Fri, Sat-Sun, or any individual day |
| Random Mode | Varies On/Off times by up to 75 minutes |
| Untimed Outlet | Yes (one extra outlet for continuous use) |
| Battery Backup | CR2032 lithium (3V) with low battery indicator |
| Auto Daylight Saving Time | Yes, automatically adjusts through year 2099 |
| Display | Multi-function LCD with backlight |
| Safety | Indoor use only; Type 1B disconnection; do not use with irons or cooking appliances |
| Warranty | 90 days limited from date of purchase |
Frequently Asked Questions - JMK2442 Emerson
User questions about JMK2442 Emerson
0 question about this device. Answer the ones you know or ask your own.
Ask a new question about this device
Download the instructions for your Uncategorized in PDF format for free! Find your manual JMK2442 - Emerson and take your electronic device back in hand. On this page are published all the documents necessary for the use of your device. JMK2442 by Emerson.
USER MANUAL JMK2442 Emerson
This Emerson Research model JMK2442 security timer allows you to program a lamp in your house to turn on and off automatically to create the impression that the house is occupied even when no one is at home. You can program up to 4 different 'On' and 'Off' times within 24 hours, and you can select from among the following operation options:
Every Day, Monday thru Saturday, Weekdays Only, Weekends Only, or any individual day.
In addition you can select Random operation to vary the programmed On and Off times by up to 75 minutes, rather than have the lights turn On and Off at exactly the same time each day.
The timer also includes a second “untimed” AC outlet, not controlled by the timer. This means that if you currently have two devices plugged in to your AC outlet you do not ‘lose’ the use of one of the outlets when you connect this timer. Simply plug the other device that does not require timer control into the “untimed” outlet.
Because this timer uses Emerson's patented SmartSet ^ auto time setting technology it will automatically reset itself after any power interruption, and Daylight Saving Time adjustments are made automatically through the year 2099.
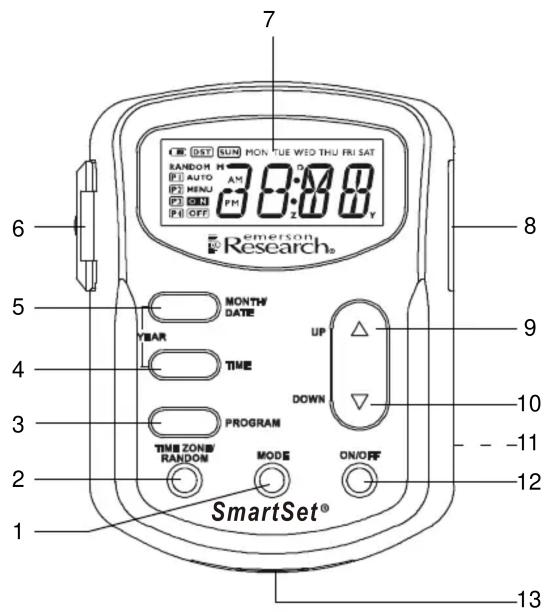
Location of Controls and Indicators
1.) MODE Button.
2.) TIME ZONE/RANDOM Button.
3.) PROGRAM Button.
4.) TIME Button.
5.) MONTH/DATE Button.
6.) EXTRA UNTIMED OUTLET With Cover.
7.) Multi-Function LCD Display.
8.) TIMED OUTLET.
9.) UP Button.
10.) DOWN Button.
11.) RESET Button (On Back Cabinet).
12.) ON/OFF Button.
13.) Lithium Battery Compartment.
Initial Set Up
Battery Information
The long life 3V lithium battery (Type CR2032) is pre-installed in the timer. There is no need to install any battery at this time. The original battery should provide back up power for between 3 and 5 years at a minimum. When it is time to replace the battery a Low Battery indicator will begin flashing in the display. Refer to the “Replacing The Battery” section in these instructions.
Display and Backlighting Information
Battery Power
When the timer is not connected to the AC outlet, the built in battery will power the display. Pressing any one of the control buttons will turn the display 'On'. This allows you to program the timer and make all necessary adjustments while holding the timer in your hand. The display will turn 'Off' again 60 seconds after the last control input.
Note: The display backlighting does not come on until the timer is connected to the AC outlet.
AC Power
When the timer is connected to your AC outlet the display remains 'On' constantly. Pressing any one of the control buttons will turn on the display backlighting for 10 seconds. After 10 seconds with no control input the display backlighting goes 'Off' automatically, but the display remains 'On'.
Setting The Time For The Correct Zone
The first time that you press any button on the timer the display will turn 'On' and show the correct time in the Eastern Time zone. Eastern Time is the initial default setting. If Daylight Saving Time is in effect, the DST indicator will appear in the display. If the DST indicator does not appear in the display, the time displayed is Eastern Standard Time.
If you live in the Eastern Time zone, there is nothing else to do. The clock is already set correctly. If you live in a different time zone you must set the timer for your own zone as follows:
1.) Press any button to turn the display 'On'. The display shows Eastern Time.
2.) Press the TIME ZONE/RANDOM button once.
The display will show "ET" indicating the Eastern Time zone.
Depress and hold the TIME ZONE/RANDOM button until the ET indicator flashes, then release the button.
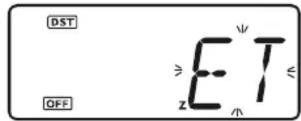
3.) While the ET indicator is flashing, press the ▲ UP or ▼ DOWN buttons to select your own time zone according to the following table:
AT – Atlantic Time Zone.
PT – Pacific Time Zone.
CT – Central Time Zone.
YT – Yukon Time Zone.
MT – Mountain Time Zone.
HT – Hawaiian Time Zone.
4.) When your time zone is flashing in the display press the TIME ZONE/RANDOM button once more. The selected zone indicator stops flashing and the display will show the correct time in the zone that you selected.
Manual Time, Month/Date, and Year Adjustments
Although your timer was pre-programmed with the correct time at our factory it is possible that over time it may gain or lose a few minutes, especially if it is not connected to the AC outlet for long periods of time. If it become necessary to adjust the Time, Month/Date, or Year display, remove the timer from the AC outlet, and then:
1.) Press any button to turn the display 'On' if necessary.
2.) Depress and hold the TIME button until the time display begins flashing.
3.) Press the ▲ UP or ▼ DOWN button to set the display to the correct time.
4.) Press the TIME button once more. The display stops flashing and the new time is set.
5.) If necessary to adjust the Month/Date, depress the MONTH/DATE button until the current Month/Date display begins flashing. Press the ▲ UP or ▼ DOWN buttons to set the display to the correct date, then press the MONTH/DATE button once more to enter the new date and return to the correct time display.
6.) If necessary to adjust the Year, depress the MONTH/DATE and TIME buttons together until the current Year display begins flashing. Press the ▲ UP or ▼ DOWN buttons to set the display to the correct year, then press the MONTH/DATE button once more to enter the new year and return to the correct time display.
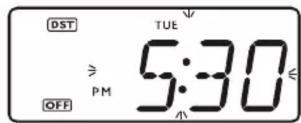
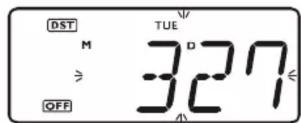
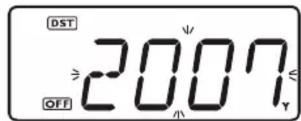
- To check the date at any time, press the MONTH/DATE button once. The display changes from Time to Month/Date for 5 seconds and then returns to the Time display.
- To check the year at any time, press the MONTH/DATE and TIME buttons together. The display changes from Time to Year for 5 seconds and then returns to the Time display.
Programming The On/Off Timer Settings
This SmartSet ^® timer has 4 separate On/Off programs that can be set to switch a lamp on and off at 4 different times within a 24 hour period. In addition each of the 4 programs may be set to operate everyday, Monday thru Saturday, weekdays only, weekends only or for any one day.
To make the programming process a little easier we have set the following On and Off times as the defaults for each of the 4 programs:
“P1” – ON Time 5:00 PM / OFF Time 9:00 PM.
“P2” – ON Time 6:00 PM / OFF Time 10:00 PM.
“P3” – On Time 7:00 PM / OFF Time 11:00 PM.
“P4” – ON Time 8:00 PM / OFF Time 12:00 AM.
In addition the default setting for each of the 4 programs is Everyday operation.
To change the settings for any of the individual programs proceed as follows:
Press the PROGRAM button to select the specific program that you wish to change.
Each time you press the PROGRAM button the display advances from P1 > P2 > P3 > P4 > P1, etc.
The display will show the ‘turn on’ time for each program and all 7 day indicators will appear to show that the program is set for Everyday operation.
When the 'turn on' time is on the display you can press the ▲ UP or ▼ DOWN button to change the display to the 'turn off' time.
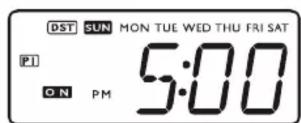
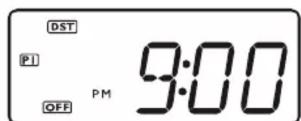
To change the ‘On’, Day Mode, and ‘Off’ settings for Program 1:
1.) When the 'On' time is showing on the display depress the PROGRAM button for 2 seconds until the 'On' time and Day indicators begin flashing and the AUTO indicator appears.
This is your indication that Program 1 is 'On'.
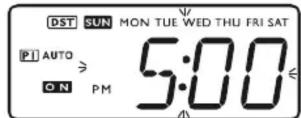
2.) Press the ▲ UP or ▼ DOWN button adjust the turn 'On' time as desired.
3.) If you wish to adjust the Day Mode, press the MODE button repeatedly to scroll through the Day Mode options as follows:
• Monday thru Saturday operation.
• Monday thru Friday operation.
- Saturday / Sunday operation.
- Sunday only.
- Monday only.
- Tuesday only.
- Wednesday only.
- Thursday only.
- Friday only
- Saturday only
- All Indicators Flashing – The timer will operate every day.
When the desired Day Mode is flashing, press the PROGRAM button again. The 'Off' time begins flashing in the display.
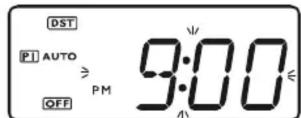
4.) Press the ▲ UP or ▼ DOWN buttons to adjust the turn 'Off' time as desired.
5.) When the desired 'Off' time is flashing press the PROGRAM button once more. The display returns to the 'On' time.
After 5 seconds the display exits the Program setting mode and return to the correct time. The AUTO indicator disappears.
To change the settings for Programs 2, 3, or 4, press the PROGRAM button until the desired Program number appears and the display is showing the turn 'On' time for that program. Then follow steps 1 – 5 above to change the settings for that program.
To Enable or Disable The Programs
When you enter the ‘On’ time setting mode for any one of the programs, that program is automatically turned ‘On’ (Enabled). The AUTO indicator appears in the display together with the specific program number and any lamp connected to the “Timed” outlet of this timer will be switched ‘on’ and ‘off’ according to the programmed settings.
To cancel (Disable) one or more of the programs, press the PROGRAM button repeatedly to scroll through the 4 'On' time displays. If the AUTO indicator appears together with any of the Program indicators, that program is 'On' (Enabled).
To cancel (Disable) that program so that it does not operate, press the ON/OFF button. The AUTO indicator disappears and that specific program is cancelled.
Pressing the ON/OFF button, while any of the 4 program indicators appears on the display, switches that specific program 'On' or 'Off'.
To Disable all of the Programs, press the MODE button when the display is showing the correct time. All of the Program indicators will disappear from the display and all the timer programs are disabled.
To Enable all of the Programs, press the MODE button again. The Program indicators will reappear in the display and all of the Programs are enabled again.
Random Mode
The Random Mode provides an extra measure of security by randomly varying the programmed ‘On’ and ‘Off’ times so that the lamp connected to this timer is not turning on and off at exactly the same time each day. The variation in the ‘On’ and ‘Off’ time ranges from 0 minutes to 75 minutes.
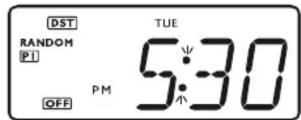
To activate the Random Mode, press the PROGRAM button to display the P1 turn 'On' time, then press the RANDOM button. The RANDOM indicator appears. The display returns to correct time in 5 seconds.
NOTE: When the Random Mode is selected it will apply to all of the timer programs that are 'On' (Enabled).
To cancel the Random Mode, press the PROGRAM button to display the P1 turn 'On' time, then press the RANDOM button again. The RANDOM indicator disappears.
Final Connections
After adjusting one or more of the 4 programs with your desired 'On', 'Off', and Day Mode settings, connect the timer to your AC outlet. Connect the lamp that you wish to control to the TIMED OUTLET of this timer.
IMPORTANT! REMEMBER TO SET YOUR LAMP SWITCH TO THE 'ON' POSITION. THIS TIMER CAN TURN YOUR LAMP 'ON' AND 'OFF' WHEN THE LAMP SWITCH IS IN THE "ON" POSITION, BUT IT CANNOT TURN 'ON' YOUR LAMP IF THE LAMP SWITCH IS IN THE "OFF" POSITION.
NOTE: To switch the lamp that is connected to the TIMED OUTLET 'On' or 'Off' at any time, press the ON/OFF button.
Use the “EXTRA UNTIMED OUTLET” to power a second device intended for continuous, uninterrupted operation.
Replacing The Battery
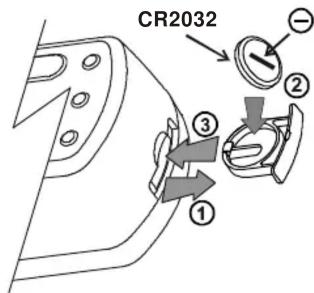
When the Low battery indicator ☐ begins flashing you should purchase a replacement CR2032 lithium battery as soon as possible.
Remove the timer from your AC outlet and remove the battery holder from the timer as shown.
Remove the original battery and install the new battery as illustrated.
The timer can maintain all of the programmed settings for about 5 minutes even after the original battery is removed, so be sure you have purchased a fresh battery and have it ready to install before you disconnect the timer from your AC outlet.
If the timer is disconnected from the AC outlet and the battery is removed for more than 5 minutes, the timer memory may be erased and all settings must be reprogrammed after a fresh battery is installed.
Timer Protection Circuit / Resetting The Timer
This timer is equipped with a special protection circuit designed to prevent permanent damage from sudden ‘spikes’ in you household AC power supply.
If such a power ‘spike’ occurs the timer may ‘freeze’ and all of the controls will be inoperable.
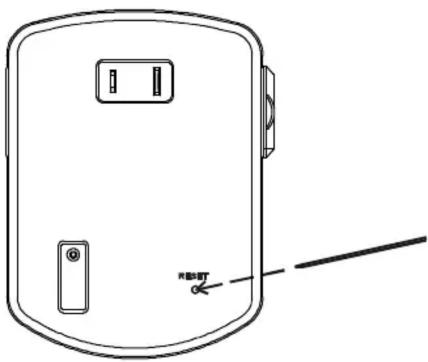
If this occurs, use the tip of a straightened paper clip of similar object to press the RESET button on the back panel of the timer cabinet.
NOTE: Pressing the RESET button erases the timer memory. All indicators in the display will turn 'On' for one second, and then the timer will return to its original factory default settings. It will be necessary for you to reset the Time Zone, Year, Month/Date, Time, and all timer program settings.

SAFETY WARNING
Risk Of Electric Shock
- Do not open or tamper with unit.
- Plug directly into an electric outlet.
- For indoor use only.
- Remove timer from outlet before cleaning.
- Keep children away from timer and outlet.
Risk Of Fire
- For only 120V AC 60Hz voltage usage.
- Do not use to control irons and cooking appliances, etc.
- Do not exceed the recommended electrical ratings.

Warnings:
Do not use the timer to turn off power for maintenance work (repairs, removing broken bulbs, etc).
Always turn power off at the service panel by removing a fuse or tripping the circuit breaker before doing any electric repairs.
Never Submerge Unit Into Water
Ratings:
Rated Impluse Voltage = 1500V.
Maximum Power Output: 1800W.
Type of Disconnection: Type 1B.
For household use only.
LIMITED WARRANTY
Emerson Radio Corp. warrants manufacturing defects in original material, including original parts and workmanship, under normal use and conditions, for a period of ninety (90) days from the date of original purchase in the U.S. With your dated proof of purchase, we will provide repair service at no charge for labor and parts at an authorized Depot Repair Facility, or replace the product in our discretion. For repair or replacement, pack your unit in a padded box, enclose your check or money order payable to Emerson Radio Corp. in the amount of \$5.00 (not required by California residents) to cover shipping and handling costs, and enclose a copy of your proof of purchase. Send your unit to:
Emerson Radio Corp.,
5101 Statesman Drive,
Irving, TX 75063.
1-800-898-9020.
This warranty does not cover damage from negligence, misuse, abuse, accident, failure to follow operating instructions, commercial use, rental, repairs by an unauthorized facility, or products purchased, used, serviced or damaged outside of the United States.
THIS WARRANTY GIVES YOU SPECIFIC LEGAL RIGHTS, AND YOU MAY ALSO HAVE OTHER RIGHTS WHICH VARY FROM STATE TO STATE.
AU898H
- Every Day, Monday thru Saturday, Weekdays Only, Weekends Only, or any individual day.
- Location of Controls and Indicators
- Initial Set Up
- Battery Information
- Display and Backlighting Information
- Battery Power
- AC Power
- Setting The Time For The Correct Zone
- Manual Time, Month/Date, and Year Adjustments
- Programming The On/Off Timer Settings
- To change the ‘On’, Day Mode, and ‘Off’ settings for Program 1:
- To Enable or Disable The Programs
- Random Mode
- Final Connections
- Replacing The Battery
- Timer Protection Circuit / Resetting The Timer
- SAFETY WARNING
- Risk Of Electric Shock
- Risk Of Fire
- Warnings:
- Never Submerge Unit Into Water
- LIMITED WARRANTY
Brand : Emerson
Model : JMK2442
Category : Uncategorized