
EH-LS800B - Video projector EPSON - Free user manual and instructions
Find the device manual for free EH-LS800B EPSON in PDF.


| Product Type | Video Projector |
| Brand | Epson |
| Model | EH-LS800B |
| Dimensions (W x H x D) | 695 mm x 145 mm x 341 mm (excluding raised section) |
| Weight | Approx. 12.3 kg |
| Power Supply | 100-240V AC ±10%, 50/60Hz, 3.5-1.6 A |
| Power Consumption (Operating) | 350 W (100-120V), 335 W (220-240V) |
| Power Consumption (Standby) | 2.0 W (Communication On), 0.4 W (Communication Off) |
| Light Source Type | Laser Diode |
| Light Source Power | Up to 88 W |
| Light Source Life | Up to approx. 20,000 hours (until brightness halves) |
| Display Technology | Poly-silicon TFT Active Matrix, 0.62" panel |
| Native Resolution | Full HD (1920 x 1080) x 3, 2,073,600 pixels (4K via pixel shifting) |
| Focus Adjustment | Manual (Focus lever) |
| Speaker Output | 2.1 ch (2 speakers + woofer), Max 20 W |
| Connectivity Inputs | HDMI1, HDMI2 (ARC), HDMI3 (Game), 2 x USB-A, 1 x USB Mini-B (Service) |
| Connectivity Outputs | Audio Out (3.5 mm stereo mini), Optical Out (S/PDIF), DC Out 2.0A (USB Type A) |
| Wireless | Bluetooth 5.0, Wi-Fi, Chromecast built-in |
| Projection Modes | Front, Front/Upside Down, Rear, Rear/Upside Down |
| Image Correction | Keystone correction, Flexible Picture (size, position, flip, blur edges) |
| Color Modes | Dynamic, Vivid, Cinema, Natural |
| Sound Modes | Theatre, TV, Studio, Stadium, Concert, Karaoke |
| Operating Temperature | 0 to +40°C (0-2286 m altitude), 0 to +35°C (2287-3048 m altitude) |
| Storage Temperature | -10 to +60°C |
| Humidity (Operating) | 20% to 80% (non-condensing) |
| High Altitude Mode | Supported (set to On above 1500 m) |
| Air Filter | Cleanable and replaceable (part # available) |
| Security | Kensington lock slot, safety wire installation, laser safety (Class 1) |
| Included Accessories | Remote control (with batteries), power cord, side covers |
Frequently Asked Questions - EH-LS800B EPSON
User questions about EH-LS800B EPSON
0 question about this device. Answer the ones you know or ask your own.
Ask a new question about this device
Download the instructions for your Video projector in PDF format for free! Find your manual EH-LS800B - EPSON and take your electronic device back in hand. On this page are published all the documents necessary for the use of your device. EH-LS800B by EPSON.
USER MANUAL EH-LS800B EPSON
Notations Used in This Guide 5
Introduction to Your Projector 8
Projector Parts and Functions 9
Projector Parts - Front 9
Projector Parts - Top/Side 10
Projector Parts - Base 11
Projector Parts - Interface Ports 12
Projector Parts - Projector Remote Control.... 13
Setting Up the Projector 15
Projector Placement 16
Projector Setup and Installation Options.... 18
Precautions on Installation 19
Installing the Safety Wire.... 21
When Using the Ceiling Mount ELPMB22.... 21
When Using the Ceiling Mount ELPMB30.... 22
Projector Connections 24
Connecting to Video Sources 24
Connecting to External USB Devices 24
Connecting to External Audio Devices 25
Connecting to a Streaming Media Player 25
Connecting to an ARC Compatible AV System.... 26
Connecting to a Gaming Device 27
Connecting Headphones.... 28
Attaching and Removing the Side Cover.... 29
Installing Batteries in the Remote Control.... 30
Remote Control Operation 30
Setting Up Android TV on the Projector 32
Android TV Home Screen....33
Using Basic Projector Features 34
Turning On the Projector 35
Turning Off the Projector 37
Projection Modes 38
Changing the Projection Mode Using the Menus 38
Adjusting the Image Height.... 39
Focusing the Image Using the Focus Lever.... 40
Adjusting Image Color when Projecting on to a Wall 41
Correcting Distortion in the Image 42
Adjusting the Light Source Brightness Based on the Brightness of Your Surroundings 44
Adjusting the Light Source Brightness Manually 45
Adjusting Contrast Based on the Brightness of the Content ..... 46
Selecting an Image Source.... 48
Image Aspect Ratio 49
Changing the Image Aspect Ratio 49
Available Image Aspect Ratios 50
Color Mode 51
Changing the Color Mode 51
Available Color Modes....52
Adjusting the Image Quality.... 53
Adjusting Image Quality in Detail 53
Adjusting the Image Resolution....54
Setting Frame Interpolation.... 55
Controlling the Volume with the Volume Buttons 56
Adjusting the Sound Settings (Sound Mode) 57
Contents
Available Sound Modes 58
Detailed Sound Settings.... 58
Turning Off the Sound Temporarily (Audio Mute) 60
Shutting Off the Image Temporarily (Blank)....61
Adjusting Projector Features 62
Changing the Image Size or Position (Flexible Picture).... 63
Flipping the Image Horizontally (Flexible Picture).... 64
Blurring the Edges of the Image (Flexible Picture) 65
Using the Projector as a Bluetooth Speaker 66
Bluetooth Specifications....66
Using Your Projector as Chromecast.... 68
HDMI CEC Features 69
Operating Connected Devices Using the HDMI CEC Features 69
Installing a Security Cable.... 71
Updating Projector Firmware 72
Initializing the Projector.... 73
Adjusting the Menu Settings 74
Using the Projector Settings 75
Image Quality Settings - Picture Menu 76
Sound Quality Settings - Sound Menu.... 78
Projector Installation Settings - Installation Menu.... 80
Projector Feature Settings - Settings Menu 81
Projector Information Display - Information Menu.... 83
Projector Bluetooth Speaker Settings - Bluetooth Speaker Mode Menu 84
Maintaining the Projector 85
Projector Maintenance 86
Cleaning the Projection Window.... 87
Cleaning the Obstacle Sensor and Motion Sensor 88
Cleaning the Projector Case.... 89
Air Filter and Vent Maintenance 90
Cleaning the Air Filter 90
Replacing the Air Filter....91
Cleaning the Air Intake Vents 93
Solving Problems 94
Projection Problems.... 95
Projector Indicator Status 96
Solving Projector Power-On or Power-Off Problems 98
Solving Projector Power Problems 98
Solving Projector Shutdown Problems.... 98
Solving Image Problems 99
Solving Missing Image Problems 99
Solving Curved or Not Rectangular Image Problems 100
Solving Flipped Image Problems.... 100
Solving Small Image Problems 100
Adjusting a Fuzzy or Blurry Image 100
Fixing Partial Image Problems 101
Adjusting an Image that Contains Noise or Static 101
Adjusting an Image with Incorrect Brightness or Colors.... 101
Solving Sound Problems 103
Contents
Solving Missing or Low Audio Problems 103
Solving Bluetooth Speaker Mode Problems.... 103
Solving Remote Control Operation Problems.... 105
Solving HDMI CEC Problems 106
Solving Wi-Fi Network Problems.... 107
Solving Android TV Problems.... 108
Appendix 109
Optional Accessories and Replacement Parts.... 110
Mounts 110
External Devices 110
Screens 110
Replacement Parts 110
Screen Size and Projection Distance.... 111
Supported Monitor Display Resolutions 113
Projector Specifications 114
Connector Specifications 114
External Dimensions.... 115
List of Safety Symbols and Instructions 116
Laser Safety Information.... 118
Laser Warning Labels.... 118
Glossary 120
Notices 121
FCC Compliance Statement.... 121
Indication of the manufacturer and the importer in accordance with
requirements of EU directive.... 122
Restriction of Use 122
Trademarks 122
Copyright Notice 122
Copyright Attribution....123
Notations Used in This Guide
Safety Symbols
The projector and its manuals use graphical symbols and labels to indicate content that tells you how to use the projector safely.
Read and carefully follow the instructions that are marked with these symbols and labels to avoid injury to persons or damage to property.
| Warning | This symbol indicates information that, if ignored, could possibly result in personal injury or even death. | |
| Caution | This symbol indicates information that, if ignored, could possibly result in personal injury or physical damage due to incorrect handling. |
General Information Notations
| Attention | This label indicates procedures that may result in damage or injury if sufficient care is not taken. |
 | This label indicates additional information that may be useful to know. |
| [208C] | Indicates the buttons on the remote control or the projector.Example: button |
| Menu/Setting name Indicates projector menu and setting names.Example:Select the Image menu.Image > Color | |
| ▶ | This label indicates links to the related pages. |
| arrow | This label indicates the projector's current menu level. |
Using the Manual to Search for Information
The PDF manual allows you to search for information you are looking for by keyword, or jump directly to specific sections using the bookmarks. You can also print only the pages you need. This section explains how to use a PDF manual that has been opened in Adobe Reader X on your computer.
Searching by keyword
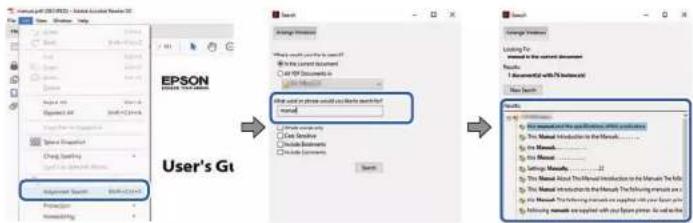
Click Edit > Advanced Search. Enter the keyword (text) for information you want to find in the search window, and then click Search. Hits are displayed as a list. Click one of the displayed hits to jump to that page.
Jumping directly from bookmarks
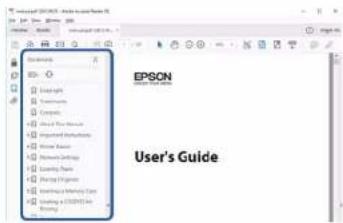
Click a title to jump to that page. Click + or > to view the lower level titles in that section. To return to the previous page, perform the following operation on your keyboard.
- Windows: Hold down Alt, and then press .
• Mac OS: Hold down the command key, and then press ←.
Printing only the pages you need
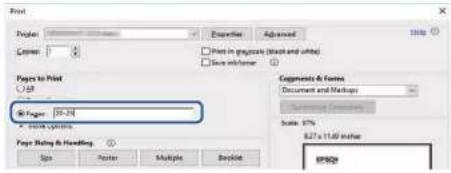
You can extract and print only the pages you need. Click Print in the File menu, and then specify the pages you want to print in Pages in Pages to Print.
• To specify a series of pages, enter a hyphen between the start page and the end page.
Example: 20-25
• To specify pages that are not in series, divide the pages with commas.
Example: 5, 10, 15
Introduction to Your Projector
See these sections to learn more about your projector.
Related Links
- "Projector Parts and Functions" p.9
Projector Parts and Functions
9
The following sections explain the projector parts and their functions.
Related Links
• "Projector Parts - Front" p.9
• "Projector Parts - Top/Side" p.10
• "Projector Parts - Base" p.11
• "Projector Parts - Interface Ports" p.12
- "Projector Parts - Projector Remote Control" p.13
Projector Parts - Front
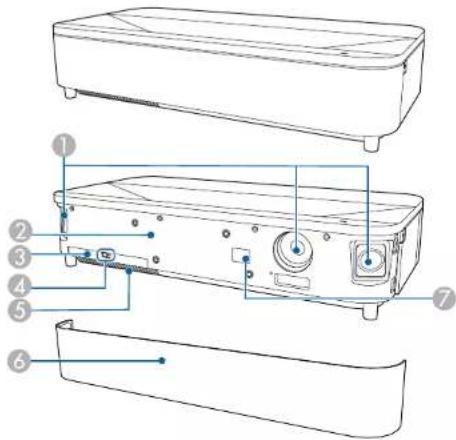
| Name Function | ||
| 1 | Speaker Outputs audio. | |
| 2 | Illumination sensor Detects the brightness of the surroundings, and automatically adjusts the brightness of the screen. | |
| Name Function | ||
| 3 | Air filter cover Open to access the air filter. | |
| 4 | Air filter cover latch Slide to remove the air filter cover. | |
| 5 | Air intake vent (air filter) | Takes in air to cool the projector internally. |
| 6 | Front cover Open to access the air filter cover. | |
| 7 | Remote receiver Receives signals from the remote control. | |
Related Links
• "Air Filter and Vent Maintenance" p.90
• "Remote Control Operation" p.30
- "Adjusting the Light Source Brightness Based on the Brightness of Your Surroundings" p.44
Projector Parts - Top/Side
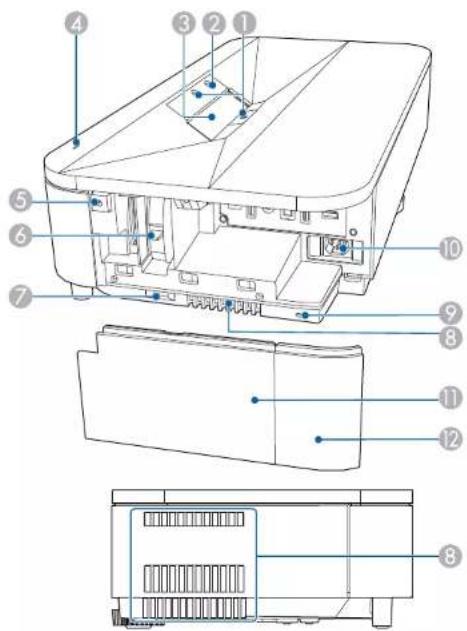
| Name Function | ||
| 1 | Obstacle sensors Detects obstacles that are interfering with the projection area and reduces the brightness of the light source for safety. | |
| Name Function | ||
| 2 | Motion sensor Detects | movement near the projection window and reduces the brightness of the light source for safety.·The detection range may vary depending on the temperature of the surroundings.·Movement may not be detected through transparent material such as glass. |
| 3 | Projection window Images are projected from the lens inside the projector.Warning·Do not look into the projection window while projecting.·Do not place any objects or put your hand near the projection window. It could cause burns, fire, or the object to warp because this area reaches a high temperature due to the concentrated projection light. | |
| 4 | Status indicator Indicates the projector's status. | |
| 5 | Power button Turns the projector on or off. | |
| 6 | Focus lever Adjusts the image focus. | |
| 7 | Side cover latch Slide to remove the side cover. | |
| 8 | Air exhaust vent Exhaust vent for air used to cool the projector internally. | |
Projector Parts and Functions
| Name Function | ||
| 9 | Security slot The security slot is compatible with the Microsaver Security System manufactured by Kensington. | |
| 10 | Power inlet Connects | the power cord to the projector. |
| 11 | Side cover A Open to | access the interface ports and focus lever. |
| 12 | Side cover B | The side cover can be divided into two parts; side cover A and side cover B. This allows you to use just side cover A if necessary, such as when you want to connect a streaming media player. |
>>Related Links
• "Air Filter and Vent Maintenance" p.90
- "Projector Indicator Status" p.96
• "Turning On the Projector" p.35
- "Cleaning the Obstacle Sensor and Motion Sensor" p.88
• "Cleaning the Projection Window" p.87
- "Focusing the Image Using the Focus Lever" p.40
• "Installing a Security Cable" p.71
- "Attaching and Removing the Side Cover" p.29
Projector Parts - Base
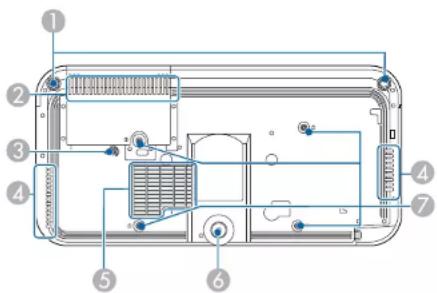
| Name Function | ||
| 1 | Front adjustable feet | When the projector is setup on a surface such as a desk, turn the feet to correct image distortion.⚠ CautionRemove all feet when you install the projector on the ceiling. |
| 2 | Air intake vent (air filter) | Takes in air to cool the projector internally. |
| 3 | Wire clamp fixing point | When you use the optional ceiling mount, fix the carabiner here to attach the safety wire and prevent the projector from falling from the ceiling.This point is marked with aon the projector. |
| 4 | Air exhaust vent Exhaust | vent for air used to cool the projector internally.⚠ CautionWhile projecting, do not put your face or hands near the air exhaust vent, and do not place objects that may become warped or damaged by heat near the vent. Hot air from the air exhaust vent could cause burns, warping, or accidents to occur. |
| 5 | Air intake vent Takes | in air to cool the projector internally. |
| 6 | Rear adjustable foot W | When setup on a surface such as a desk, extend the foot to adjust the position of the image.⚠ CautionRemove all feet when you install the projector on the ceiling. |
| 7 | Ceiling mount fixing points (four points) | Attach the optional ceiling mount here when suspending the projector from a ceiling.This point is marked with aon the projector. |
>>Related Links
• "Air Filter and Vent Maintenance" p.90
• "Installing the Safety Wire" p.21
Projector Parts - Interface Ports
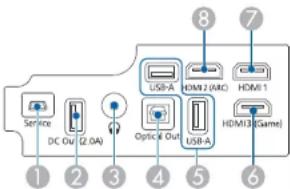
| Name Function | ||
| 1 | Service port This port | is used by service technicians and should not normally be used. |
| 2 | DC Out (2.0A) port P | provides a connection for an optional or commercially available streaming media player allowing you to power it.USB data transfer is not available. |
| 3 | Audio Out port Outputs | audio from the current input source to headphones. |
| 4 | Optical Out port Outputs | audio from the current input source to an external audio device by connecting an optical digital audio cable. |
| Name Function | ||
| 5 | USB-A port Connects | a commercially available USB device such as a webcam, microphone, external HDD, USB memory, and receivers for microphones or game controllers. Connects a commercially available RJ45 adapter to enable wired LAN connections.This port is not guaranteed to operate for all devices that support USB. |
| 6 | HDMI3 (Game) port | Connects a gaming device. Suitable for enjoying games that require fast response times.Compatible with HDCP 2.3. |
| 7 | HDMI1 port Inputs vi | deo signals from HDMI compatible video equipment and computers.Compatible with HDCP 2.3. |
| 8 | IIDMI2 (ARC) port In | Inputs video signals from IIDMI compatible video equipment and computers.Compatible with HDCP 2.3 and HDMI ARC. |
Related Links
- "Connecting to Video Sources" p.24
- "Connecting to External USB Devices" p.24
- "Connecting to External Audio Devices" p.25
- "Connecting to a Streaming Media Player" p.25
- "Connecting to an ARC Compatible AV System" p.26
- "Connecting to a Gaming Device" p.27
• "Connecting Headphones" p.28
Projector Parts - Projector Remote Control
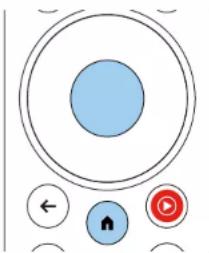
When the input source is set to HDMI3 (Game), you can only use the remote control buttons that have been shaded in blue in the following image.
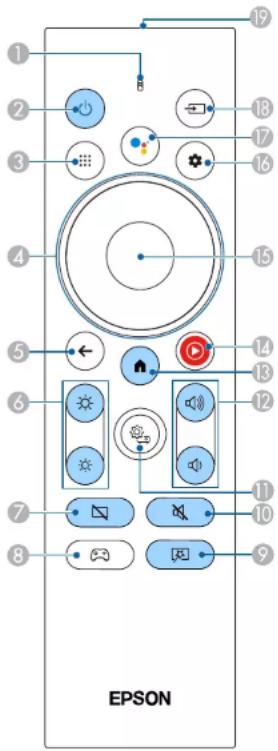
| Name Function | ||
| 1 | Indicator/Microphone | Turns on when outputting signals from the remote control.Detects audio when you press the Google Assistant button. |
| 2 | Power button Turns the projector on or off.⊕ | Hold down this button to display menus for turning and restarting.The capture function is not supported. |
| 3 | Apps button * Displays a list of applications.≡ | |
| 4 | Directional pad * Selects menu items while displaying the projector's menu.⊖ | |
| 5 | Esc button * Stops the current function← | current function.Moves back to the previous menu level while displaying the projector's menu. |
| 6 | Brightness buttons Adjusts the brightness of the projected image.☀️ | |
| 7 | Blank button Turns the video off temporarily to output sound only.⇨ | |
| 8 | Gaming mode button*⇨ | Displays the HDMI3 (Game) source image.Suitable for enjoying games that require fast response times. |
| 9 | Flexible Picture menu button⇨ | Displays the Flexible Picture menu where you can change the image size and position, flip the image horizontally, or blur the edges of the image. |
Projector Parts and Functions
| Name Function | ||
| 10 | Audio mute button Turns the audio on or off temporarily. | |
| 11 | Projector Settings button * | Displays the projector's menu. You can use the projector's menu to adjust the settings that control how your projector works. |
| 12 | Volume buttons Adjusts the volume of the speaker and headphones. | |
| 13 | Home button Displays  | the Android TV home screen. |
| 14 | YouTube Music button *[2WHT] | Displays the YouTube Music app. |
| 15 | [Enter] button * Enters the current selection and moves to the next level while displaying the projector's menu. | |
| 16 | Android TV Settings button * | Displays the Android TV menu. |
| 17 | Google Assistant button * | Press the Google Assistant button on your remote to quickly search 500,000+ movies and shows, get recommendations to match your mood, control smart home devices, and more. Google Assistant is not available in certain languages and countries. Availability of services varies by country and language. |
| Name Function | ||
| 18 | Source Search button *max | Displays a list of available input sources for HDMI1 and HDMI2. |
| 19 | Remote control light emitting area | Outputs remote control signals. |
*When the input source is set to HDMI3 (Game), these buttons are not available.
Related Links
- "Color Mode" p.51
• "Android TV Home Screen" p.33
• "Remote Control Operation" p.30 - "Selecting an Image Source" p.48
- "Adjusting the Light Source Brightness Manually" p.45
- "Changing the Image Size or Position (Flexible Picture)" p.63
- "Flipping the Image Horizontally (Flexible Picture)" p.64
- "Blurring the Edges of the Image (Flexible Picture)" p.65
• "Turning On the Projector" p.35 - "Controlling the Volume with the Volume Buttons" p.56
- "Shutting Off the Image Temporarily (Blank)" p.61
- "Turning Off the Sound Temporarily (Audio Mute)" p.60
- "Using the Projector Settings" p.75
- "Connecting to a Gaming Device" p.27
Setting Up the Projector
Follow the instructions in these sections to set up your projector.
Related Links
- "Projector Placement" p.16
• "Installing the Safety Wire" p.21
• "Projector Connections" p.24 - "Attaching and Removing the Side Cover" p.29
- "Installing Batteries in the Remote Control" p.30
- "Setting Up Android TV on the Projector" p.32
Projector Placement
You can place the projector on almost any flat surface to project an image.
You can also install the projector in a ceiling mount if you want to use it in a fixed location. An optional ceiling mount is required when suspending the projector from a ceiling.
The projector can be installed at various angles. There is no vertical or horizontal limit to how the projector can be installed.
Note the following points when selecting a projector location:
• To change the projected image size, move the projector back and forth.
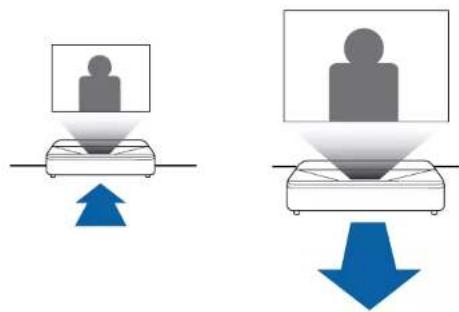
- Place the projector on a sturdy, level surface or install it using a compatible mount.
natural_image
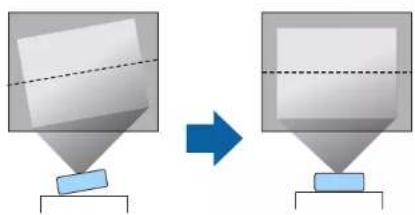
Diagram showing two identical 3D shapes with a blue arrow pointing from one to the other, no text or symbols present.- Leave plenty of space around and under the projector for ventilation, and do not place it on top of or next to anything that could block the vents.
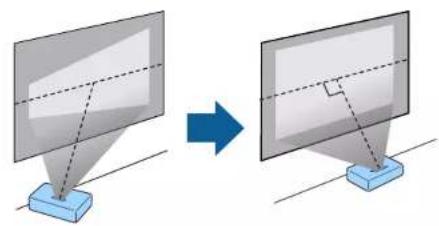
- Place the projector so it squarely faces the screen, not at an angle.
natural_image
Diagram showing two presentation screens with projection lines and a blue arrow indicating transformation (no text or symbols)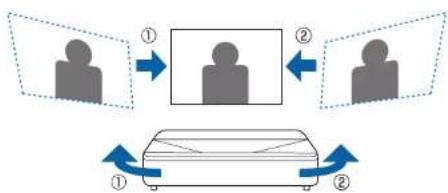
flowchart
graph TD
    A["User 1"] --> B["Central Platform"]
    C["User 2"] --> B
    B --> D["Bed"]
    style A fill:#f9f,stroke:#333
    style C fill:#f9f,stroke:#333
    style D fill:#ccf,stroke:#333

You can adjust distortion and the height of the projected image using the front adjustable feet and rear adjustable foot.
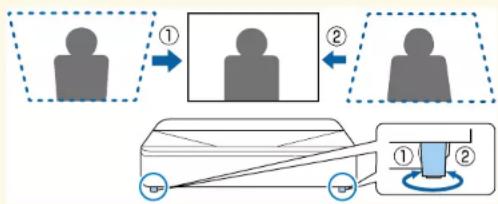
flowchart
graph TD
    A["Human silhouette ①"] --> B["Car collision diagram"]
    C["Human silhouette ②"] --> B
    B --> D["Car collision setup with collision points ① and ②"]
    style A fill:#f9f,stroke:#333
    style C fill:#f9f,stroke:#333
    style B fill:#ccf,stroke:#333
    style D fill:#cff,stroke:#333

Warning
- You must install a ceiling mount when suspending the projector from a ceiling. If you do not install the projector correctly, it could fall and cause damage or injury.
- A special method of installation is required when suspending the projector from a ceiling. If you do not install the projector correctly, it could fall and cause damage or injury.
- Do not use adhesives on the ceiling mount fixing points to prevent the screws from loosening, or use lubricants, oils, or similar substances on the projector; the projector case may crack causing it to fall from its ceiling mount. This could cause serious injury to anyone under the ceiling mount and could damage the projector.
- Failure to install the ceiling mount and projector may cause the projector to fall. After installing the specific Epson mount that supports your projector, make sure you secure the mount to all of the projector's ceiling mount fixing points. Also, secure the projector and the mounts using the safety wire supplied with the projector or an optional wire.
- Do not install the projector in a location subject to high levels of dust or humidity, or in a location subject to smoke or steam. Otherwise, it could cause a fire or electric shock to occur. The projector's case could also deteriorate and be damaged causing the projector to fall from the mount.
Examples of environments that could cause the projector to fall due to case deterioration - Locations subject to excessive smoke or airborne oil particles, such as factories or kitchens
- Locations containing volatile solvents or chemicals, such as factories or laboratories
- Locations where the projector could be subjected to detergents or chemicals, such as factories or kitchens
- Locations in which aroma oils are often used, such as relaxation rooms
- Near devices that produce excessive smoke, airborne oil particles, or foam at events
- Locations near humidifiers
Projector Placement
Warning
- Do not cover the projector's air intake or air exhaust vents. If the vents are covered, the internal temperature could rise and cause a fire.
- Do not use or store the projector in locations where it will be subject to dust or dirt. Otherwise, the quality of the projected image may decline, or the air filter may become clogged, resulting in a malfunction or fire.
- Do not install the projector on an unstable surface or in a location beyond the weight specifications of the projector. Otherwise, it could fall or topple causing an accident and injury.
- When installing the projector in a high position, take measures to prevent falling by using wires to ensure safety in an emergency, such as an earthquake, and to prevent accidents. If it is not installed correctly, it could fall causing an accident and injury.
- Do not install in locations where salt damage could occur, or in locations subject to corrosive gas such as sulphuric gas from hot springs. Otherwise, corrosion could cause the projector to fall. It could also cause the projector to malfunction.
Attention
- If you are using the projector at altitudes above 1,500 m, set the High Altitude Mode setting to On in the projector's menu to ensure the projector's internal temperature is regulated properly.
- Try not to setup the projector in locations subject to high humidity and dust, or in locations subject to smoke from fires or tobacco smoke.
»»Related Links
- "Projector Setup and Installation Options" p.18
• "Precautions on Installation" p.19
• "Screen Size and Projection Distance" p.111 - "Projector Installation Settings - Installation Menu" p.80
- "Projector Feature Settings - Settings Menu" p.81
- "Changing the Image Size or Position (Flexible Picture)" p.63
- "Focusing the Image Using the Focus Lever" p.40
Projector Setup and Installation Options
You can set up or install your projector in the following ways: Front/Rear
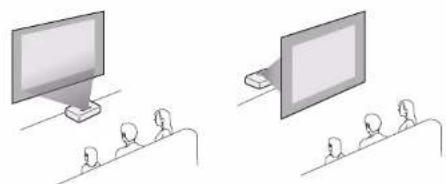
natural_image
Illustration of two presentation screens with people seated at desks (no text or symbols)Front Upside Down/Rear Upside Down
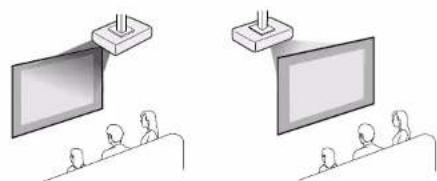
natural_image
Two identical line drawings of a presentation setup with speakers at podiums and a monitor, no text or symbols present.
• The default Projection setting is Front.
Related Links
- "Projection Modes" p.38
Precautions on Installation
Attention
- If the projector is installed at an angle, it should be installed by qualified technicians using mounting hardware designed for use with this projector.
• Install the projector appropriately to prevent it from falling down. - Use M4 screws (up to a depth of 9 mm) to fix the projector's ceiling mount fixing points and the mounting hardware at four points.
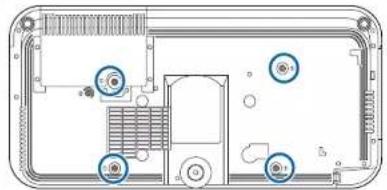
natural_image
Top-down schematic of a computer monitor case with labeled ports and connectors (no text or symbols present)Installation space
Attention
Be sure to leave the following amount of space around the projector so as not to block the air exhaust and intake vents.
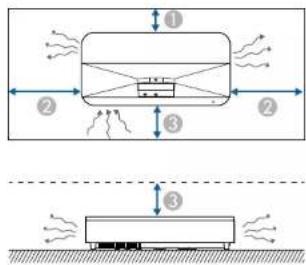
1 2.3 cm
20 cm
③ 10 cm
Projector Placement
Installation space (When installing multiple projectors side by side)
Attention
- If you are installing multiple projectors next to each other, make sure hot air from the exhaust vent does not go into the air intake vent of another projector.
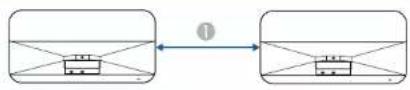
1 110 cm
- If you use a partition, you can narrow the space between the projectors.
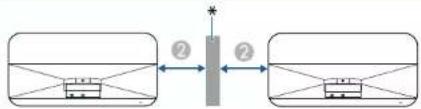
② 20 cm
* Partition
Installing the Safety Wire
You can install the safety wire to prevent the projector from falling from the ceiling.
Warning
Be sure to use the safety wire provided with the Epson ceiling mount. The safety wire is available as an optional Safety Wire Set ELPWR01.
Related Links
- "When Using the Ceiling Mount ELPMB22" p.21
- "When Using the Ceiling Mount ELPMB30" p.22
When Using the Ceiling Mount ELPMB22
You can attach a safety wire to your projector for increased safety as shown.
Before you start, you need to remove the front adjustable feet and the rear adjustable foot from the projector. Also, make sure you have securely attached the ELPMB22 ceiling mount to the projector and have the following items that are included in the safety wire set:
- Safety wire × 1
- Carabiner × 2 (Only one carabiner is used for the ELPMB22.)
- Wire clamp × 1
- Attaching screw (M4 × 10 mm) × 1

For details on installing the ELPMB22, see the Ceiling Mount ELPMB22/ELPMB23 Instruction Manual.
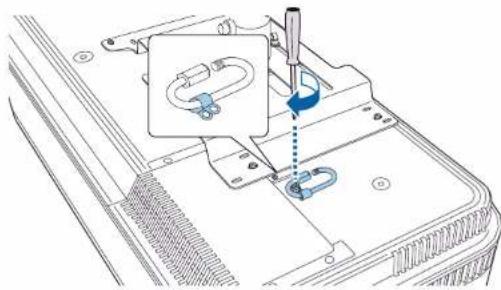
1 Attach the wire clamp to the carabiner, and then use the screw to fix the wire clamp to the wire clamp fixing point②() on the projector.
natural_image
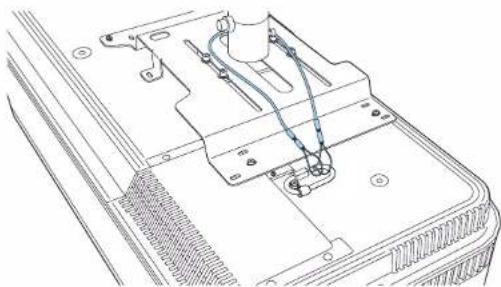
Technical line drawing of a mechanical assembly with no visible text or symbols2 Loop the safety wire around the support shaft of the ceiling mount, and attach both ends to the carabiner on the projector.
natural_image
Technical line drawing of a mechanical assembly with no visible text or symbolsInstalling the Safety Wire
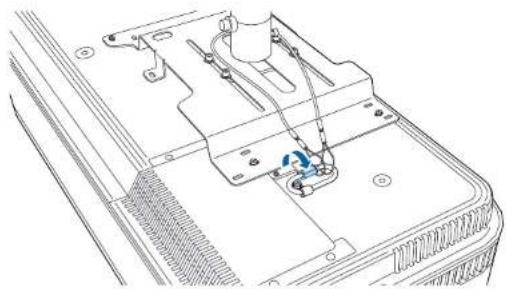
3 Tighten the carabiner lock.
natural_image
Technical line drawing of a mechanical assembly with no visible text or symbolsWhen Using the Ceiling Mount ELPMB30
You can attach a safety wire to your projector for increased safety as shown. Before you start, you need to remove the front adjustable feet and the rear adjustable foot from the projector. Also, make sure you have securely attached the projector plate for the ELPMB30 ceiling mount to the projector and have the following items that are included in the safety wire set:
- Safety wire × 1
- Carabiner × 2 (Only one carabiner is used for the ELPMB30.)
- Wire clamp × 1
- Attaching screw (M4 × 10 mm) × 1

For details on installing the ELPMB30, see the ELPMB30 User's Guide.
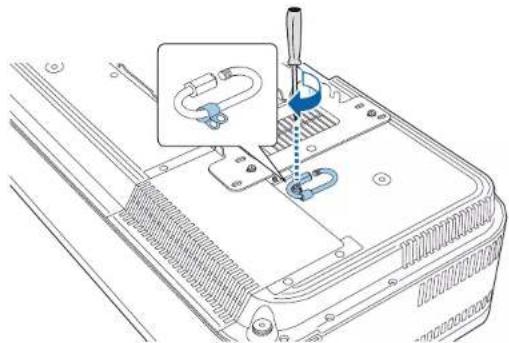
1 Attach the wire clamp to the carabiner, and then use the screw to fix the wire clamp to the screw into the wire clamp fixing point ^② ( ) on the projector.
natural_image
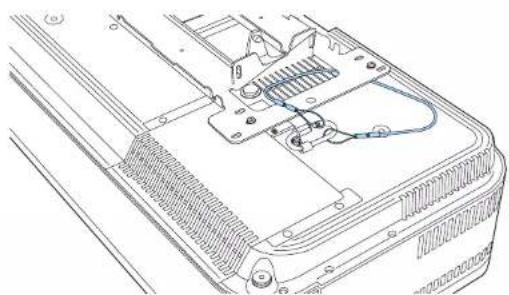
Technical line drawing of a computer monitor with a close-up inset showing a blue-labeled component (no text or symbols present)2 Loop the safety wire through the hole in the ceiling mount, and then attach both ends to the carabiner.
natural_image
Technical line drawing of a computer chassis with visible internal components and wiring (no text or symbols)Installing the Safety Wire
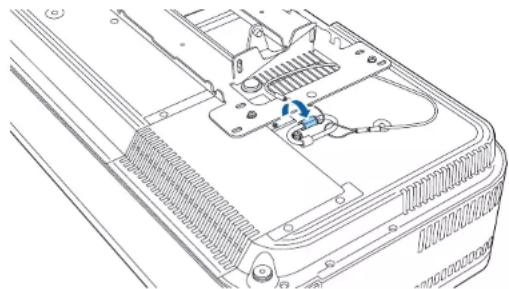
3 Tighten the carabiner lock.
natural_image
Technical line drawing of a computer chassis showing internal components and a blue circular annotation (no text or symbols)Projector Connections
See these sections to connect the projector to a variety of projection sources.
Attention
- Check the shape and orientation of the connectors on any cable you plan to connect. Do not force a connector into a port if it does not fit. The device or your projector could be damaged or could malfunction.
- Depending on the connected device and the shape of the cable, you may not be able to attach the side cover to the projector. In that case, do not force the cover into place. The device or your projector could be damaged or could malfunction.
Related Links
• "Connecting to Video Sources" p.24
- "Connecting to External USB Devices" p.24
• "Connecting to External Audio Devices" p.25
- "Connecting to a Streaming Media Player" p.25
- "Connecting to an ARC Compatible AV System" p.26
• "Connecting to a Gaming Device" p.27
• "Connecting Headphones" p.28
Connecting to Video Sources
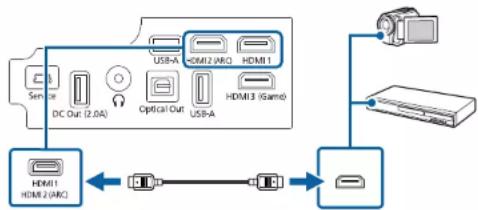
If your video source has an HDMI port, you can connect it to the projector using an HDMI cable and send the image source's audio with the projected image.
Attention
Do not turn on the video source before connecting it to the projector. Doing so could damage the projector.

- If the port on the device you connect has an unusual shape, use the cable supplied with the device or an optional cable to connect to the projector.
- Some video equipment is capable of outputting different types of signals. See your video equipment manual to confirm what type of signals can be output.
- When sending 18 Gbps images such as 4K 60Hz 4:4:4, use an HDMI cable (premium-high speed). If you use an incompatible cable, images may not be displayed correctly.
1 Connect the HDMI cable to your video source's HDMI output port.
2 Connect the other end to the projector's HDMI port.
flowchart
graph TD
    A["Service"] --> B["DC Out (2.0A)"]
    B --> C["Optical Out"]
    C --> D["USB-A"]
    D --> E["HDMI1"]
    E --> F["HDMI13 (Game)"]
    F --> G["USB-A"]
    G --> H["Hardware"]
    H --> I["Server"]
    I --> J["Internet"]
    J --> K["Device"]
    K --> L["Switch"]
    L --> M["Switch 2 (ARC)"]
    M --> N["Switch 1"]
    N --> O["Switch 2"]
Connecting to External USB Devices
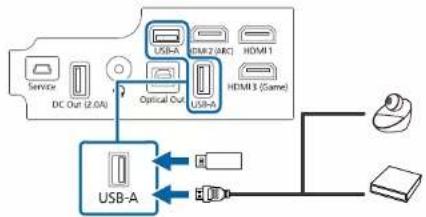
By connecting any of these devices to your projector, you can project images and other content or play audio without using a video device.
- Microphone
- USB flash drive
- Digital camera
- USB hard drive
Projector Connections

- USB-A port is not guaranteed to operate all devices that support USB.
- You may need an app to project content from your USB device. Download the app on Google Play if necessary.
-
USB hard drives must meet these requirements:
-
USB Mass Storage Class-compliant (not all USB Mass Storage Class devices are supported)
- Formatted in FAT16/32
- Self-powered by their own AC power supplies (bus-powered hard drives are not recommended)
- Avoid using hard drives with multiple partitions
1 If your USB device came with a power adapter, plug the device into an electrical outlet.
2 Connect the USB device to the projector's USB-A port as shown.
flowchart
graph TD
    A["Service"] --> B["DC Out (2.0A)"]
    B --> C["Optical Out"]
    C --> D["USB-A"]
    D --> E["USB-B"]
    E --> F["HDMI 1"]
    E --> G["HDMI 3 (Same)"]
    D --> H["USB-A"]
    H --> I["USB-A"]
    I --> J["USB-A"]
    J --> K["Device"]
Attention
- Use the USB cable supplied with or specified for use with the device.
- If the USB cable is too long, the device may not operate correctly. We recommend using a USB cable that is three meters or less.
- If you use a USB hub, the device may not operate correctly. We recommend checking the operation in advance.
3 Connect the other end to your device, if necessary.
Connecting to External Audio Devices
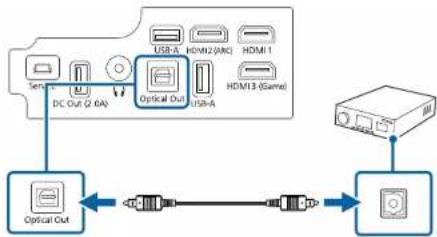
If your amplifier or speaker has an optical digital audio input port, you can connect it to the projector using an optical digital audio cable and project audio from the image source.
1 Connect the optical digital audio cable to your audio device's optical digital audio input port.
2 Connect the other end to the projector's Optical Out port.
flowchart
graph TD
    A["Sensor"] --> B["DC Out (CAN)"]
    B --> C["Optical Out"]
    C --> D["Optical Out (CAN)"]
    D --> E["USB-A"]
    D --> F["USB1"]
    D --> G["USB2 (CAN)"]
    D --> H["USB3 (Game)"]
    D --> I["USB4"]
    J["Optical Out"] <--> K["Switch"]
    K --> L["Switch"]
    L --> M["Switch"]
    M --> N["Switch"]

To change the audio settings, you can set Sound Output in the projector's Sound menu.
Related Links
• "Detailed Sound Settings" p.58
Connecting to a Streaming Media Player
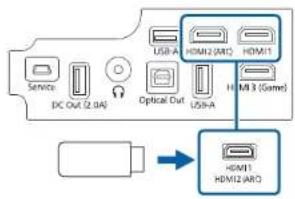
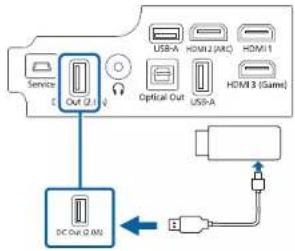
You can connect your streaming media player to the projector's HDMI port. By connecting the power supply USB cable, you can power the streaming media player from the projector.
Projector Connections
1 Connect your streaming media player to the projector's HDMI port.
2 Connect the power supply USB cable to the projector's DC Out port.
flowchart
graph TD
    A["Service"] --> B["Out (2.1)"]
    B --> C["Optical Out"]
    C --> D["USB-A"]
    C --> E["USB-A"]
    C --> F["HDMI (ARC)"]
    C --> G["HDMI 3 (Game)"]
3 Connect the other end to the streaming media player.

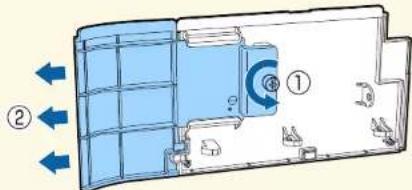
The side cover can be divided into two parts; side cover A and side cover B. This allows you to use just side cover A if necessary, such as when you want to connect a streaming media player.
Connecting to an ARC Compatible AV System
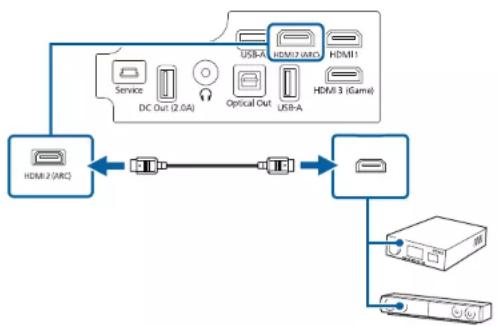
If your AV system or speakers, such as a sound bar, has an HDMI port, you can connect them to the projector using an HDMI cable (with Ethernet) to output audio to these devices.
1 Connect the HDMI cable to your AV system's HDMI output port (ARC compatible).
2 Connect the other end to the projector's HDMI2 (ARC) port.
flowchart
graph TD
    A["HDMI 2 (ARC)"] <--> B["USB-A"]
    B --> C["Service"]
    C --> D["DC Out (2.0A)"]
    D --> E["Optical Out"]
    E --> F["USB-A"]
    F --> G["HDMI 3 (Game)"]
    G --> H["USB-A"]
    H --> I["HDMI 2 (ARC)"]
    I --> J["Service"]
    J --> K["DC Out (2.0A)"]
    K --> L["Optical Out"]
    L --> M["USB-A"]
    M --> N["HDMI 3 (Game)"]
    N --> O["USB-A"]
    O --> P["HDMI 2 (ARC)"]
    P --> Q["Service"]
    Q --> R["DC Out (2.0A)"]
    R --> S["Optical Out"]
    S --> T["USB-A"]
    T --> U["HDMI 3 (Game)"]
    U --> V["USB-A"]
    V --> W["HDMI 2 (ARC)"]
    W --> X["Service"]
    X --> Y["DC Out (2.0A)"]
    Y --> Z["Optical Out"]
    Z --> AA["USB-A"]
    AA --> AB["HDMI 3 (Game)"]
    AB --> AC["USB-A"]
    AC --> AD["HDMI 2 (ARC)"]

- To output audio from the projector's HDMI2 (ARC) port, set HDMI2 ARC to On and Other Than HDMI3 (Game) to ARC/Optical (PCM) or ARC/Optical (Auto) in the projector's menu.
Settings > HDMI CEC > CEC Control > HDMI2 ARC
Sound > Sound Output > Other Than HDMI3 (Game)
- If you want to output higher quality audio from the projector's HDMI2 (ARC) port, set Sound Output to ARC/Optical (Auto) in the projector's Sound menu.
- Audio format that is output from the projector's HDMI2 (ARC) port varies depending on the input source.
- When the input source is HDMI, audio is output up to 5.1 ch (AC 3 or DTS).
- When playing Android TV contents, audio is output in 2 ch (PCM).
- See the Supplemental A/V Support Specification for ARC audio supported formats.
- You cannot output sound from the HDMI2 (ARC) port when the input source is set to HDMI3 (Game).
Related Links
• "Detailed Sound Settings" p.58
Connecting to a Gaming Device
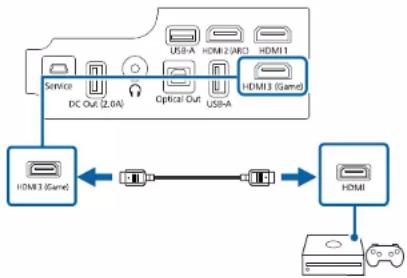
If your gaming device has an HDMI port, you can connect it to the projector's HDMI3 (Game) port using an HDMI cable and send the gaming device's audio with the projected image. The projector's HDMI3 (Game) port is suitable for enjoying games that require fast response times.
1 Connect the HDMI cable to your gaming device's HDMI output port.
2 Connect the other end to the projector's HDMI3 (Game) port.
flowchart
graph LR
    A["Service"] --> B["DC Out (2.6A)"]
    B --> C["Optical/Out"]
    C --> D["USB-A"]
    D --> E["HDMI13 (Gamd)"]
    E --> F["HDMI"]
    F --> G["No port"]
    H["HDMI3 (Gamd)"] <--> I["Switch"]
    I --> J["Switch"]
    J --> K["Switch"]
    K --> L["Switch"]

- When you want to play audio on an external audio device, connect it to the projector using an optical digital audio cable. Set Sound Output in the projector's Sound menu.
- You cannot output sound from the HDMI2 (ARC) port when the input source is set to HDMI3 (Game).
Related Links
- "Connecting to External Audio Devices" p.25
Connecting Headphones
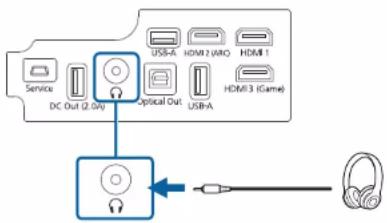
You can connect headphones to the projector's Audio Out port. You can control the volume using the projector's remote control.
Attention
The projector's Audio Out port only supports 3-pin headphones. If you use any other headphones, audio may not be output normally.
1 Connect the stereo headphone's mini-jack cable to the projector's Audio Out port.
flowchart
graph TD
    A["Service"] --> B["DC Out (2.0A)"]
    B --> C["Optical Out"]
    C --> D["USB-A"]
    C --> E["USB-A (AVQ)"]
    C --> F["HDMI 1"]
    C --> G["HDMI 3 (Game)"]

Caution
Do not start a playback at a high volume setting. Sudden loud noises may cause hearing loss.
Always lower the volume before powering off, so that you can power on and then gradually increase the volume.
Attaching and Removing the Side Cover
You can attach the side cover to hide the attached cables from view.
1 Remove the side cover from the projector.
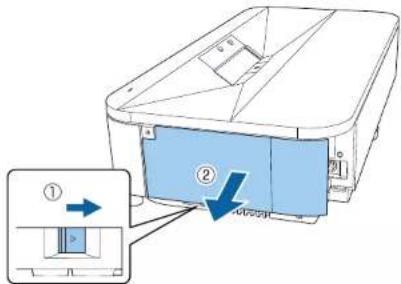
2 Pass a commercially available cable tie through the cable holder and tie the cables together.
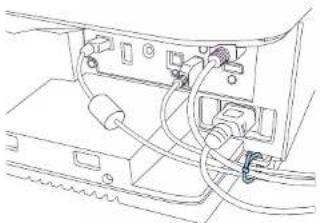
natural_image
Line drawing of a device's internal components including cables and connectors (no text or symbols)Caution
Do not bundle the power cord to the other cables. Otherwise, a fire may occur.
3 Replace the side cover.

The side cover can be divided into two parts; side cover A and side cover B. This allows you to use just side cover A if necessary, such as when you want to connect a streaming media player.
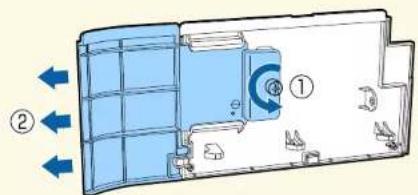
Installing Batteries in the Remote Control
The remote control uses the two AAA batteries that came with the projector.
Attention
Make sure you read the Safety Instructions before handling the batteries.
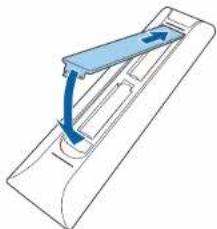
1 Remove the battery cover as shown.
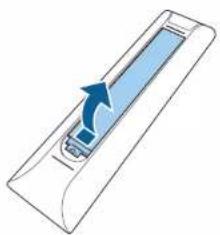
natural_image
Diagram of a device with a blue arrow pointing to a component, no text or symbols present2 Remove the old batteries, if necessary.

Dispose of used batteries according to local regulations.
3 Insert the batteries with the + and - ends facing as shown.
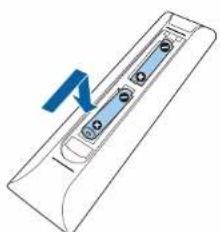
natural_image
Pure diagram of a device casing with internal components and a blue arrow indicating direction (no text or symbols)Warning
Check the positions of the (+) and (−) marks inside the battery holder to ensure the batteries are inserted the correct way. If the batteries are not used correctly, they could explode or leak causing a fire, injury, or damage to the product.
4 Replace the battery cover and press it down until it clicks into place.
natural_image
Pure technical diagram of a mechanical assembly without any text, numbers, or symbolsRelated Links
• "Remote Control Operation" p.30
Remote Control Operation
The remote control lets you control the projector from almost anywhere in the room.
Installing Batteries in the Remote Control
It is recommended that you aim the remote control at the projector's receivers within the distance and angles listed here.
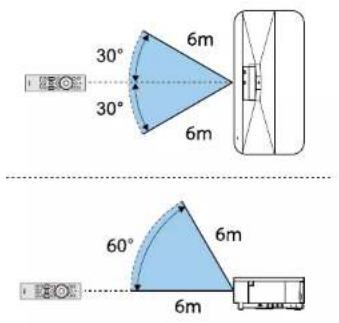

The projector may not respond to commands if you use the remote control in conditions with bright fluorescent lights or in direct sunlight. If you are not going to use the remote control for a long time, remove the batteries.
Setting Up Android TV on the Projector
When you turn on the projector for the first time, you need to setup Android TV.

You can change each of the settings even after completing the initial setup. Press the button on the remote control to display the menu and change the settings.
1 Turn on the projector.
2 When the paring screen is displayed, hold down the [Enter] button and ⏻ button on the remote control at the same time to pair the remote control and the projector.
natural_image
Simple diagram with concentric circles and directional icons (arrow, up, play) without any text or labels
When pairing starts, the indicator on the remote control flashes. When pairing is complete, the indicator turns off.
3 When pairing ends, follow the on-screen instructions to make the necessary settings.
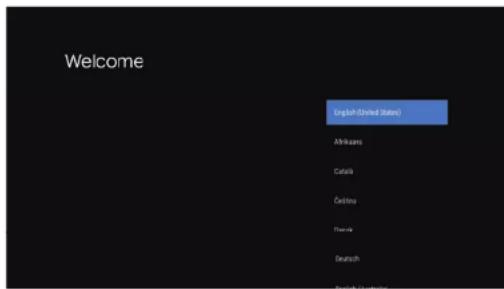
4 When the language selection screen is displayed, select the language you want to use.
5 When the Wi-Fi setting screen is displayed, select the wireless network you want to use, and then follow the on-screen instructions to make necessary settings.
- An internet connection is required to view online content. Make sure you can use the Wi-Fi service.
- The customer is responsible for any communication charges incurred when downloading the app or watching online content.
6 When the login screen is displayed, sign in using your Google Account.
- You can download various popular apps and games on Google Play by signing in with your Google Account.
- You can also create a Google Account on your computer or smart device.
When you have finished the initial setup, the home screen is displayed.
Related Links
• "Android TV Home Screen" p.33
Android TV Home Screen
When you turn on the projector or press the button on the remote control, the Android TV home screen is displayed.
You can easily access online content, applications, and projector settings from the home screen.
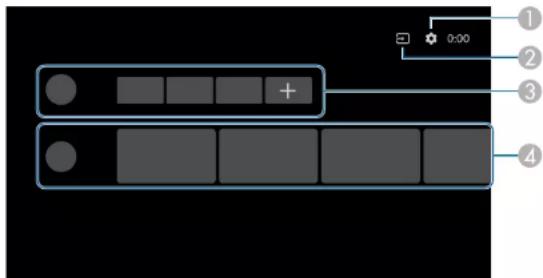
| Description | |
| 1 | Displays the Settings menu. You can select various settings such as Wi-Fi setting, language setting, and Google Account information. |
| 2 | Displays a list of available input sources. |
| 3 | Displays the applications downloaded on the projector. You can add applications to this list by selecting the + icon. |
| 4 | Displays the online content recommended by the applications. |
Using Basic Projector Features
Follow the instructions in these sections to use your projector's basic features.
Related Links
• "Turning On the Projector" p.35
• "Turning Off the Projector" p.37
- "Projection Modes" p.38
- "Adjusting the Image Height" p.39
- "Focusing the Image Using the Focus Lever" p.40
- "Adjusting Image Color when Projecting on to a Wall" p.41
- "Correcting Distortion in the Image" p.42
- "Adjusting the Light Source Brightness Based on the Brightness of Your Surroundings" p.44
- "Adjusting the Light Source Brightness Manually" p.45
- "Adjusting Contrast Based on the Brightness of the Content" p.46
- "Selecting an Image Source" p.48
• "Image Aspect Ratio" p.49
- "Color Mode" p.51
- "Adjusting the Image Quality" p.53
- "Controlling the Volume with the Volume Buttons" p.56
- "Adjusting the Sound Settings (Sound Mode)" p.57
- "Turning Off the Sound Temporarily (Audio Mute)" p.60
- "Shutting Off the Image Temporarily (Blank)" p.61
Turning On the Projector
Turn on the projector before use.

When you connect the video equipment to the projector, turn on the video equipment you want to use after you turn on the projector.
1 Remove the side cover.
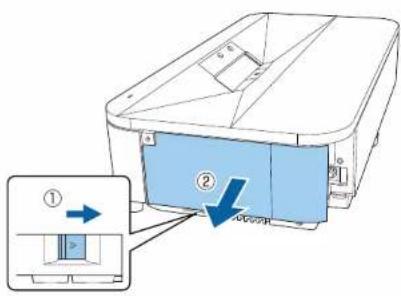
2 Connect the power cord to the projector's power inlet and plug it into an electrical outlet.
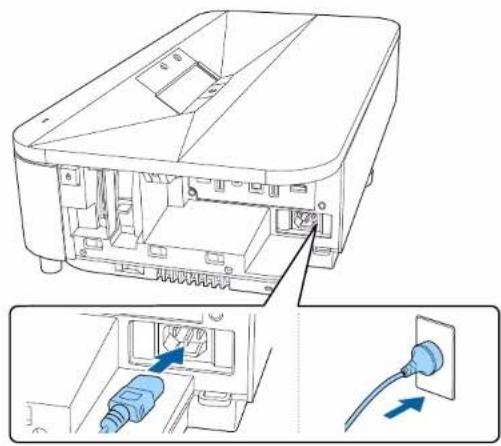
natural_image
Technical line drawing of an electronic device showing internal components and a close-up of the plug outlet (no text or symbols present)The projector enters standby mode. This indicates that the projector is receiving power, but is not yet turned on.
3 Press the power button on the projector or remote control to turn on the projector.
The status indicator flashes blue as the projector warms up. Once the projector is warmed up, the status indicator stops flashing and turns blue.
The first time you turn on the projector, the remote control pairing screen and initial setup screen are displayed. Follow the on-screen instructions to complete the settings.
Turning On the Projector
Warning
- Never look into the projector lens when the light source is on. This can damage your eyes and is especially dangerous for children.
- When turning on the projector at a distance using the remote control, make sure there is no one looking into the lens.
- During projection, do not block the light from the projector with a book or other objects. If the light from the projector is blocked, the area on which the light shines becomes hot which could cause it to melt, burn, or start a fire. Also, the lens may get hot due to the reflected light which could cause the projector to malfunction. To stop projection, turn off the projector.

When using at an altitude of 1,500 m or more, set High Altitude Mode to On.
Settings > High Altitude Mode
>>Related Links
- "Projector Feature Settings - Settings Menu" p.81
Turning Off the Projector
Turn off the projector after use.

- Turn off this product when it is not in use to prolong the life of the projector. Light source life varies depending on the environmental conditions and usage. Brightness decreases over time.
- The operation performed by the power button depends on the setting made in Power Button Setting from the projector's Settings menu.
1 Press the power button on the projector or remote control.
The light source turns off, and the status indicator turns off.
2 To transport or store the projector, make sure the status indicator on the projector is off, and then unplug the power cord.
Related Links
- "Projector Feature Settings - Settings Menu" p.81
Projection Modes
Depending on how you positioned the projector, you may need to change the projection mode so your images project correctly.
- Front lets you project from a table in front of the screen.
- Front/Upside Down flips the image over top-to-bottom to project upside-down from a ceiling mount.
- Rear flips the image horizontally to project from behind a translucent screen.
- Rear/Upside Down flips the image over top-to-bottom and horizontally to project from a ceiling mount and behind a translucent screen.
>>Related Links
- "Changing the Projection Mode Using the Menus" p.38
- "Projector Setup and Installation Options" p.18
Changing the Projection Mode Using the Menus
You can change the projection mode to flip the image over top-to-bottom and/or left-to-right using the projector menus.
1 Turn on the projector and display an image.
2 Press the button on the remote control.

This button is not available when the input source is set to IIDMI3 (Game). Press the button on the remote control to return to the Android TV home screen, and then perform the procedure.
3 Select the Settings menu and press the [Enter] button.
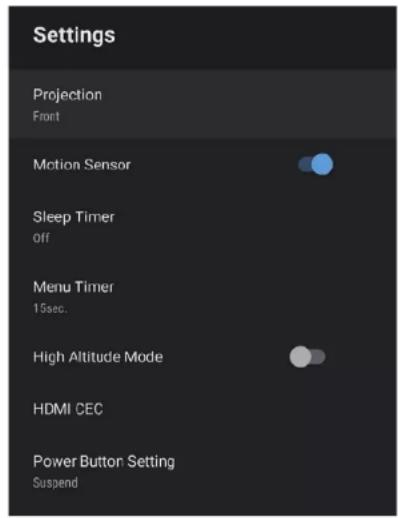
4 Select Projection and press [Enter].
5 Select a projection mode and press [Enter].
6 Press to exit the menus.
Adjusting the Image Height
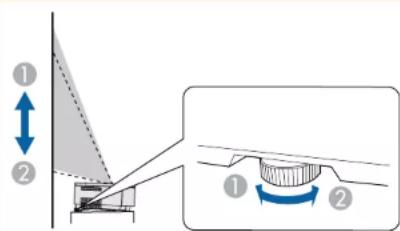
If you are projecting from a table or other flat surface and the image is too high or low, you can adjust the image height using the projector's adjustable feet.
The larger the angle of tilt, the harder it becomes to focus. Locate the projector so that it only needs to be tilted at a small angle.
1 Turn on the projector and display an image.
2 Rotate the rear feet to adjust the image height.
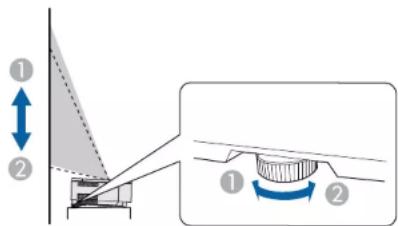
① Extend the rear foot
② Retract the rear foot
If the projected image is unevenly rectangular, you need to adjust the image shape.
>>Related Links
- "Correcting Distortion in the Image" p.42
Focusing the Image Using the Focus Lever
You can correct the focus using the focus lever.
1 Turn on the projector and display an image.
2 Remove the side cover.
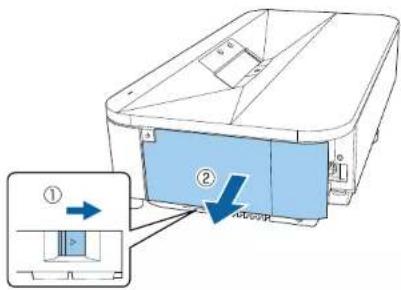
3 Move the focus lever to adjust the focus.
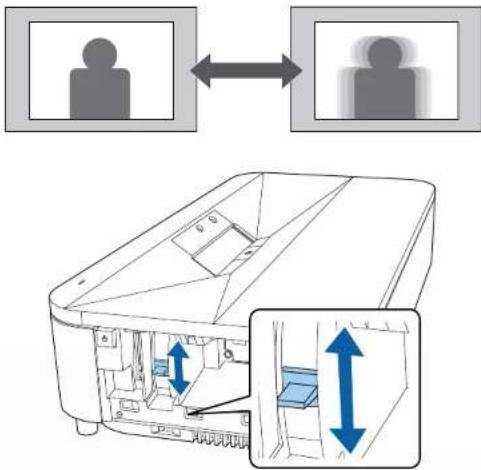
4 Replace the side cover.
Adjusting Image Color when Projecting on to a Wall
When projecting on to a wall, you can use the preset color correction to compensate for the color of the wall.
You can make further detailed color adjustments in the projector's Picture menu.
1 Turn on the projector and display an image.
2 Press the button on the remote control.

This button is not available when the input source is set to HDMI3 (Game). Press the button on the remote control to return to the Android TV home screen, and then perform the procedure.
3 Select the Installation menu and press the [Enter] button.
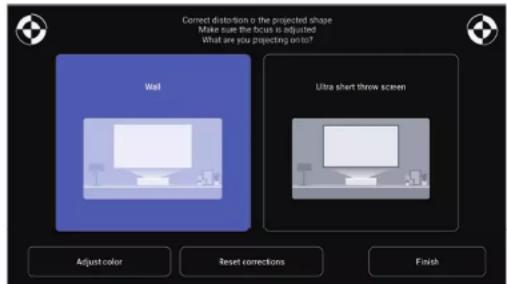
4 Select Adjust color and press the [Enter] button.
5 Select the color that is closest to the color of the wall, select OK, and then press the [Enter] button.
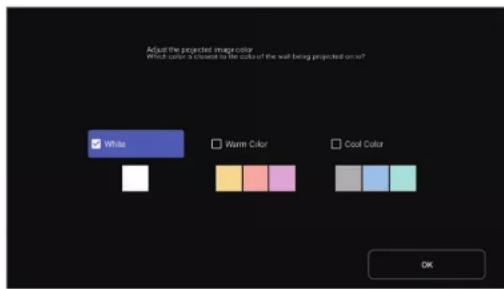
Correcting Distortion in the Image
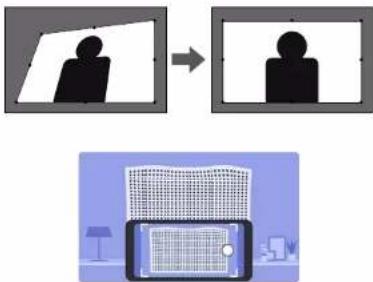
When the projected image is curved or not rectangular, you can correct distortion in the projected image by following the on-screen instructions from the Installation menu.
After correction, your image is slightly smaller.

To correct distortion more easily, you can use the Epson Setting Assistant application on a smart phone or tablet that has a camera function. Install the application by using the QR code displayed on the projected screen. The customer is responsible for any communication charges incurred when downloading the app.
1 Turn on the projector and display an image.
2 Press the button on the remote control.

This button is not available when the input source is set to HDMI3 (Game). Press the button on the remote control to return to the Android TV home screen, and then perform the procedure.
3 Select the Installation menu and press the [Enter] button.
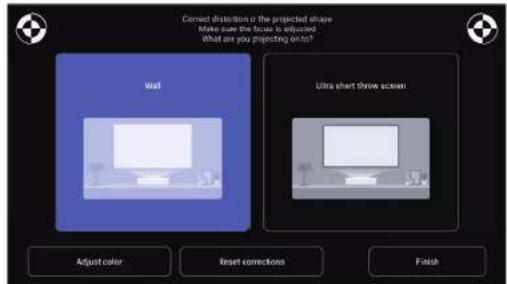
4 While looking at the marks at the upper right and upper left of the screen, adjust the focus using the focus lever.
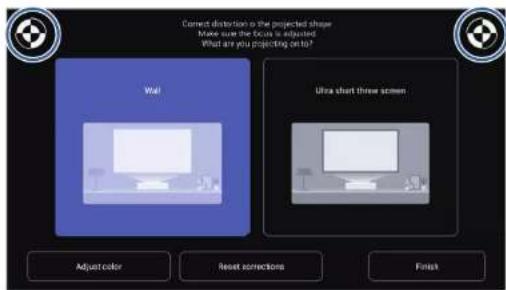
5 Follow the on-screen instructions to correct distortion in the image.
flowchart
graph TD
    A["3D Object"] --> B["2D Object"]
    B --> C["3D Screen Display"]
    C --> D["Final Output"]

You can use the button on the remote control to close the menus.
Correcting Distortion in the Image
>>Related Links
- "Projector Installation Settings - Installation Menu" p.80
Adjusting the Light Source Brightness Based on the Brightness of Your Surroundings
You can turn on Adaptive Light Output to automatically adjust the brightness of your projector's light source based on the brightness of the surroundings.

- You can also adjust the brightness of your projector's light source manually by using the remote control. Manually set values take priority over automatically set values.
- This setting is not an absolute value as it varies relative to the manually set value.
- This function may not work properly if you use the projector in conditions with bright fluorescent lights or in direct sunlight.
1 Turn on the projector and display an image.
2 Press the button on the remote control.

This button is not available when the input source is set to HDMI3 (Game). Press the button on the remote control to return to the Android TV home screen, and then perform the procedure.
3 Select the Picture menu and press the [Enter] button.
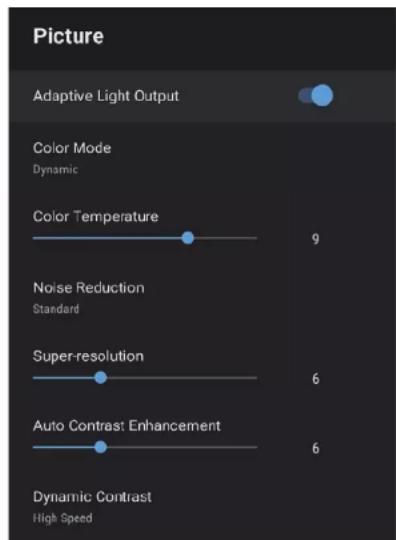
4 Select the Adaptive Light Output menu and press [Enter] to enable the setting.
5 Press to exit the menus.
Related Links
- "Image Quality Settings - Picture Menu" p.76
Adjusting the Light Source Brightness Manually
You can adjust the brightness of your projector's light source.

This function is not available under the following conditions.
- When the light source brightness dims if the surrounding temperature gets too high
- When a problem has occurred
1 Turn on the projector and display an image.
2 To decrease or increase the light output, press the or button on the remote control.
A light output gauge is displayed on the screen.
Adjusting Contrast Based on the Brightness of the Content
You can turn on Dynamic Contrast to automatically optimize the image luminance. This improves the image contrast based on the brightness of the content you project.
1 Turn on the projector and display an image.
2 Press the button on the remote control.

This button is not available when the input source is set to HDMI3 (Game). Press the button on the remote control to return to the Android TV home screen, and then perform the procedure.
3 Select the Picture menu and press the [Enter] button.
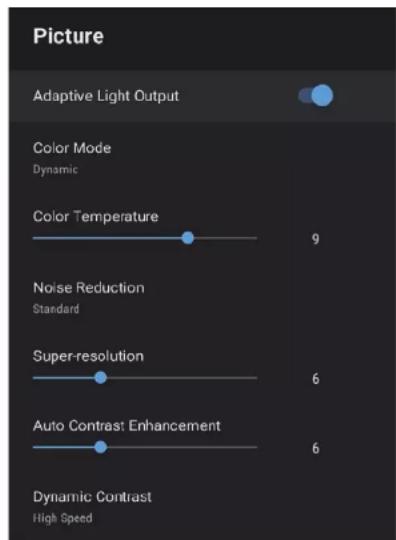
4 Select Dynamic Contrast and press [Enter].
5 Select one of the following options and press [Enter]:
• High Speed to adjust brightness as soon as the scene changes.
• Normal for standard brightness adjustment.
6 Press to exit the menus.
Adjusting Contrast Based on the Brightness of the Content
>>Related Links
- "Image Quality Settings - Picture Menu" p.76
Selecting an Image Source
When multiple image sources are connected to the projector, you can switch from one image source to the other.
1 Make sure the connected image source you want to use is turned on.
2 For video image sources, insert a DVD or other video media and press play.
3 Do one of the following:
- If you want to switch the image source to HDMI1 or HDMI2, press the button on the remote control.
Next, select the source you want to use from the screen displayed.
- If you want to switch the image source to HDMI3 (Game), press the button on the remote control.
- If you want to switch the image source to the Android TV home screen, press the button on the remote control.

- When the input source is set to HDMI3 (Game), some buttons on the remote control are not available.
- When no image signal is detected, check the cable connections between the projector and the image source.
>>Related Links
• "Projector Connections" p.24
• "Sound Quality Settings - Sound Menu" p.78
- "Projector Parts - Projector Remote Control" p.13
Image Aspect Ratio
The projector can display images in different width-to-height ratios called aspect ratios. Normally, the input signal from your video source determines the image's aspect ratio. However, you can change the aspect ratio for certain images to fit your screen.
If you always want to use a particular aspect ratio for a certain video input source, you can select it using the projector's Picture menu.
>>Related Links
- "Changing the Image Aspect Ratio" p.49
• "Available Image Aspect Ratios" p.50
Changing the Image Aspect Ratio
You can change the aspect ratio of the displayed image.
1 Turn on the projector and display an image.
2 Press the button on the remote control.

This button is not available when the input source is set to HDMI3 (Game). Press the button on the remote control to return to the Android TV home screen, and then perform the procedure.
3 Select the Picture menu and press the [Enter] button.
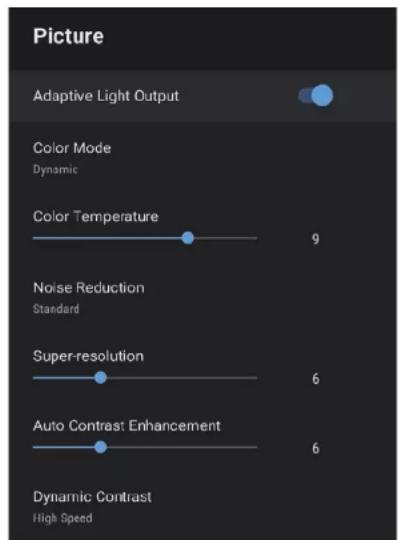
4 Select Aspect Ratio and press [Enter].
5 Select one of the available aspect ratios for your input signal and press [Enter].
6 Press to exit the menus.
Available Image Aspect Ratios
You can select the following image aspect ratios, depending on the input signal from your image source.

- Note that using the aspect ratio function of the projector to reduce, enlarge, or split the projected image for commercial purposes or for public viewing may infringe upon the rights of the copyright holder of that image based on copyright law.
| Aspect mode Description | |
| Normal Automatically sets | the aspect ratio according to the input signal. |
| Full Displays images using | the full size of the projection area, but does not maintain the aspect ratio. |
| Zoom Displays images using | the full width of the projection area and maintains the aspect ratio of the image. |
Color Mode
The projector offers different color modes to provide optimum brightness, contrast, and color for a variety of viewing environments and image types. You can select the mode designed to match your image and environment, or experiment with the available modes.
Related Links
- "Changing the Color Mode" p.51
• "Available Color Modes" p.52
Changing the Color Mode
You can change the projector's Color Mode using the remote control to optimize the image for your viewing environment.
1 Turn on the projector and display an image.
2 Press the button on the remote control.

This button is not available when the input source is set to HDMI3 (Game). Press the button on the remote control to return to the Android TV home screen, and then perform the procedure.
3 Select the Picture menu and press the [Enter] button.
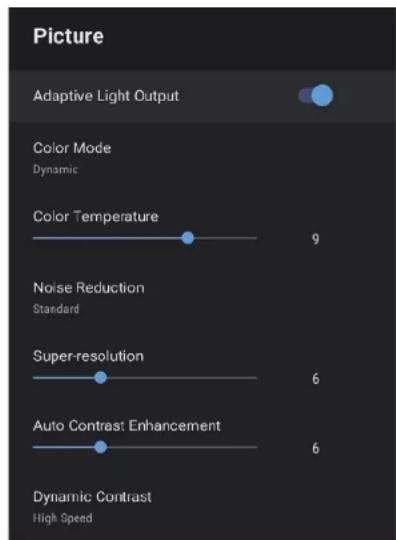
4 Select Color Mode and press [Enter].
5 Select the color mode you want to use from the list and press [Enter].
6 Press to exit the menus.
Related Links
- "Image Quality Settings - Picture Menu" p.76
Available Color Modes
You can set the projector to use these color modes, depending on your environment and image types.
| Color mode Description | |
| Dynamic This is the brightest mode. Best for prioritizing brightness. | |
| Vivid Best for enjoying content with bright colors. | |
| Cinema Best for enjoying content such as movies. | |
| Natural Reproduces natural colors. This is the best option when you want to adjust the image color. | |
Adjusting the Image Quality
You can fine-tune various aspects of the quality of your projected images.
>>Related Links
- "Adjusting Image Quality in Detail" p.53
- "Adjusting the Image Resolution" p.54
- "Setting Frame Interpolation" p.55
Adjusting Image Quality in Detail
You can fine-tune various aspects of how quality and colors are displayed in your projected images.

To optimize the color tone according to the scene, and to obtain a more vivid image, correct the image by adjusting the Scene Adaptive Gamma setting.
1 Turn on the projector and display an image.
2 Press the button on the remote control.

This button is not available when the input source is set to HDMI3 (Game). Press the button on the remote control to return to the Android TV home screen, and then perform the procedure.
3 Select the Picture menu and press the [Enter] button.
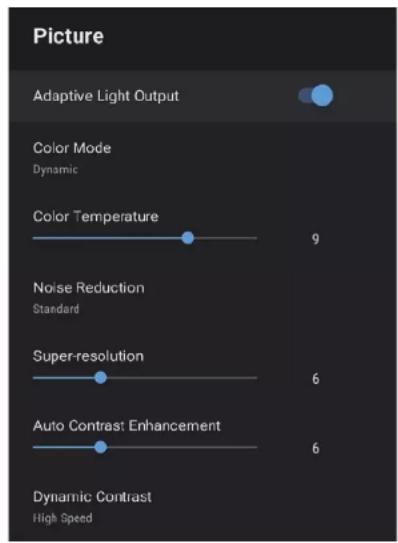
4 Select Custom Settings and press [Enter].
5 Select one of the following options:
- To adjust the overall color brightness of the color, adjust the Brightness setting.
- To adjust the difference between light and dark areas of the image, adjust the Contrast setting.
- To adjust the overall vividness of the color, adjust the Saturation setting.
Adjusting the Image Quality
- To adjust the balance of green to magenta tones in the image, adjust the Tint setting.
- To adjust the outline of the image, adjust the Sharpness setting.
6 Press to exit the menus.

You can set the overall color tone by adjusting the Color Temperature setting in the Picture menu if the image is too bluish or reddish.
>>Related Links
- "Image Quality Settings - Picture Menu" p.76
Adjusting the Image Resolution
You can adjust the resolution of the image to reproduce a clear image with an emphatic texture and material feel.
1 Turn on the projector and switch to the image source you want to use.
2 Press the button on the remote control.

This button is not available when the input source is set to HDMI3 (Game). Press the button on the remote control to return to the Android TV home screen, and then perform the procedure.
3 Select the Picture menu and press the [Enter] button.
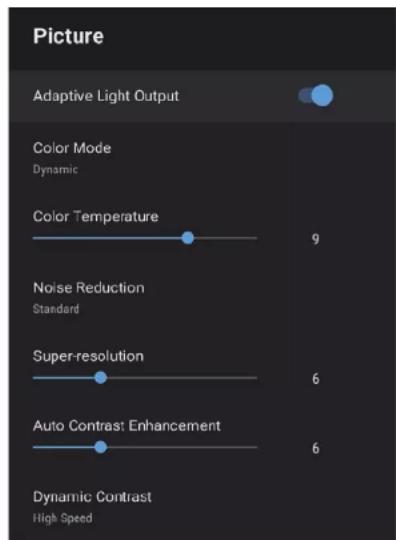
4 Adjust each setting in the projector's Picture menu individually as necessary.
- To reduce flickering in images, adjust the Noise Reduction setting.
- To reduce blurring appeared when projecting low resolution image, adjust the Super-resolution setting.
- To create a clearer and sharper image by automatically adjusting the contrast, adjust the Auto Contrast Enhancement setting.
5 Press to exit the menus.
Setting Frame Interpolation
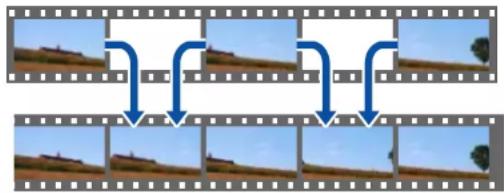
You can use the projector's Frame Interpolation feature to smooth fast-moving video by comparing consecutive image frames and inserting an intermediate image frame between them.
flowchart
graph TD
    A["Top Film"] --> B["Step 1"]
    B --> C["Step 2"]
    C --> D["Step 3"]
    D --> E["Step 4"]
    E --> F["End"]

Frame Interpolation is available when the image source is anything except for HDMI3 (Game).
1 Turn on the projector and switch to the image source you want to use.
2 Press the button on the remote control.
3 Select the Picture menu and press the [Enter] button.
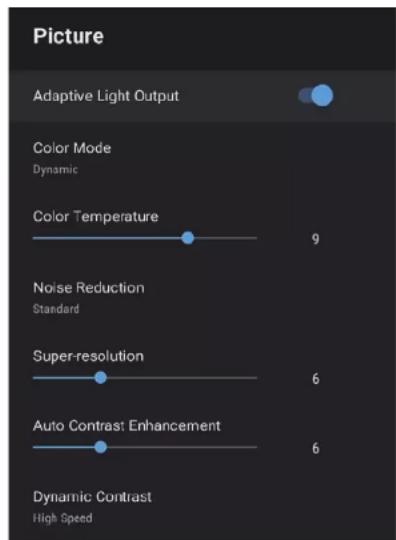
4 Select Frame Interpolation, and press [Enter].
5 Select the level of interpolation and press [Enter].
6 Press to exit the menus.
Controlling the Volume with the Volume Buttons
You can control the volume with the volume buttons.
1 Turn on the projector and start a video.
2 To lower or raise the volume, press the or button on the remote control.
A volume gauge appears on the screen.
Caution
Do not start a playback at a high volume setting. Sudden loud noises may cause hearing loss.
Always lower the volume before powering off, so that you can power on and then gradually increase the volume.
Related Links
- "Projector Feature Settings - Settings Menu" p.81
Adjusting the Sound Settings (Sound Mode)
The projector offers various sound settings to fine-tune the sound quality for a variety of listening environments.
You can select the mode designed to match your image, or experiment with the available modes.

Sound settings explained in the following section are only available for sound that is being output from the projector's speaker.
1 Turn on the projector and start a video.
2 Press the button on the remote control.

This button is not available when the input source is set to HDMI3 (Game). Press the button on the remote control to return to the Android TV home screen, and then perform the procedure.
3 Select the Sound menu and press the [Enter] button.
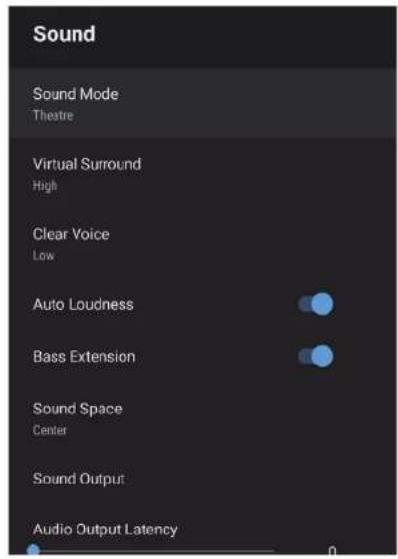
4 Select Sound Mode and press [Enter].
5 Select your sound mode and press [Enter].
6 Select detailed sound settings such as surround-sound effect and make settings according to your listening environment as necessary.
7 Press to exit the menus.
Adjusting the Sound Settings (Sound Mode)
>>Related Links
• "Available Sound Modes" p.58
• "Detailed Sound Settings" p.58
• "Sound Quality Settings - Sound Menu" p.78
Available Sound Modes
You can set the following sound modes in the projector's Sound menu.
| Sound mode Description | |
| Theatre The surround effect | recreates the acoustic environment of a movie theater. Allows you to enjoy realistic and powerful sound. |
| TV Plays back voice clearly. | This is ideal for watching news, documentaries, and other TV shows. |
| Studio With a wide frequency | range of playback and balanced sound quality, this feature reproduces the sound intended by creators and artists. |
| Stadium This realistically reproduces the atmosphere of stadiums and crowds, providing you with clear, live voice play back. Allows you to enjoy watching sports in a realistic atmosphere. | |
| Concert This reproduces the | echoes and expanse of a concert venue, giving you a true sense of elation. |
| Karaoke Mode This is ideal | for playing back karaoke content as it reproduces the echoes and expanse of a concert venue. Allows you to play songs without sacrificing the vocal effects provided by karaoke apps and microphones. |
Detailed Sound Settings
You can set the projector to use these detailed sound menus depending on your listening environment.
| Setting Description | |
| Virtual Surround Adjusts | the strength of the surround effect. This setting is saved for each Sound Mode. |
| Clear Voice Adjusts the voice so that it can be heard clearly. This setting is saved for each Sound Mode. | |
| Auto Loudness | Even when playing at low volumes, this automatically corrects the balance between high and low tones in the audio so that they are not out of balance. |
| Bass Extension | Emphasizes the bass levels to reproduce a powerful bass. |
| Sound Space | Adjusts the sound quality to suit your viewing position |
| Sound Output | Select the input source and audio output device.Other Than HDMI3 (Game)Speaker/Optical (PCM): Outputs sound in PCM format (2 ch) to the projector's speakers and an external audio device connected to the Optical Out port.Speaker/Optical (Auto): Outputs sound in PCM format (2 ch) to the projector's speakers. Outputs higher quality sound to an external audio device connected to the Optical Out port.ARC/Optical (PCM): Outputs sound in PCM format (2 ch) to an ARC compatible external audio device connected to the HDMI2 (ARC) port and an external audio device connected to the Optical Out port.ARC/Optical (Auto): Outputs higher quality sound to an ARC compatible external audio device connected to the HDMI2 (ARC) port and an external audio device connected to the Optical Out port.Auto supports the following audio codecs:PCM (2 ch)AC-3 (up to 5.1 ch)DTS (up to 5.1 ch) |
Adjusting the Sound Settings (Sound Mode)
| Setting Description | |
 If sound is not output correctly, select PCM.Audio format that is output from the projector's HDMI2 (ARC) port varies depending on the input source.When the input source isHDMI, audio is output up to 5.1 ch (AC-3 or DTS).When playing Android TV contents, audio is output in 2 ch (PCM). If sound is not output correctly, select PCM.Audio format that is output from the projector's HDMI2 (ARC) port varies depending on the input source.When the input source isHDMI, audio is output up to 5.1 ch (AC-3 or DTS).When playing Android TV contents, audio is output in 2 ch (PCM). | |
HDMI3 (Game)Speaker (PCM): Outputs sound in PCM format (2 ch) to the projector's speakers.Optical (PCM): Outputs sound in PCM format (2 ch) to an external audio device connected to the Optical Out port.Optical (Digital Audio): Outputs higher quality sound to an external audio device connected to the Optical Out port.Digital Audiosupports the following audio codecs:PCM (2 ch)AC-3 (up to 5.1 ch)DTS (up to 5.1 ch) If sound is not output correctly, select PCM. If sound is not output correctly, select PCM. |
| Setting Description | |
| Audio Output Latency Adjusts the audio latency. If the audio is fast, select a higher value.This item is only available for the following types of audio.audio output from the projector's speakeraudio output from the HDMI2 (ARC) portaudio output from the Optical Out portWhen the input source is set to IIDMI3 (Game), this setting is not available. | |
Turning Off the Sound Temporarily (Audio Mute)
You can temporarily mute the sound.
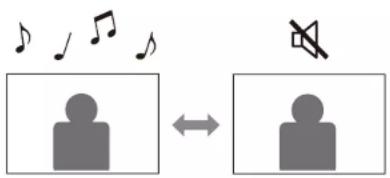
1 Press the button on the remote control to temporarily mute the sound.
2 To turn the sound back on, press again.
Shutting Off the Image Temporarily (Blank)
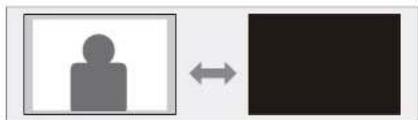
You can temporarily turn off the projected image. This feature is useful when you want to use the projector as a speaker.
natural_image
Simple diagram showing a person silhouette inside a square and a black rectangle with bidirectional arrow (no text or symbols)1 Press the button on the remote control to temporarily stop projection.
2 To turn the image back on, press the button again.

Any video action continues to run, however, so you cannot resume projection at the point that you stopped it.
Adjusting Projector Features
Follow the instructions in these sections to use your projector's adjustment features.
Related Links
- "Changing the Image Size or Position (Flexible Picture)" p.63
- "Flipping the Image Horizontally (Flexible Picture)" p.64
- "Blurring the Edges of the Image (Flexible Picture)" p.65
- "Using the Projector as a Bluetooth Speaker" p.66
• "Using Your Projector as Chromecast" p.68
• "HDMI CEC Features" p.69
• "Installing a Security Cable" p.71 - "Updating Projector Firmware" p.72
- "Initializing the Projector" p.73
Changing the Image Size or Position (Flexible Picture)
You can reduce the projected image size and change the position of the image without moving the projector.
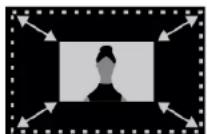
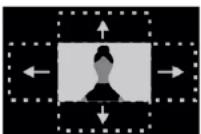
1 Turn on the projector and display an image.
2 Press the button on the remote control to display the Flexible Picture menu.

You cannot use this button when displaying the Installation menu.
3 Press the or button on the remote control to adjust the image size.

You can reduce the image size to 30%.
4 Use the directional pad to change the position of the image.
5 Press to close the Flexible Picture menu.

You can reset all settings in the Flexible Picture menu by pressing the button while displaying the Flexible Picture menu.
Flipping the Image Horizontally (Flexible Picture)
You can flip the projected image horizontally.
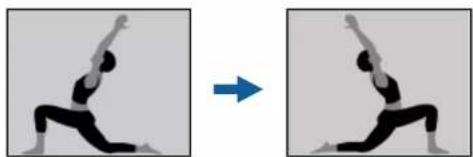
natural_image
Two sequential images showing a person performing a kunge motion, with no text or symbols present.1 Turn on the projector and display an image.
2 Press the button on the remote control to display the Flexible Picture menu.

You cannot use this button when displaying the Installation menu.
3 Press the button again to flip the projected image horizontally.

You can reset the function by pressing the button again.
4 Press to close the Flexible Picture menu.

You can reset all settings in the Flexible Picture menu by pressing the button while displaying the Flexible Picture menu.
Blurring the Edges of the Image (Flexible Picture)
You can blur the edges of the projected image so that the image blends into the wall you are projecting on to.
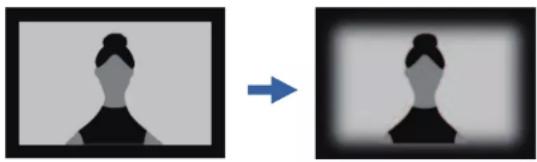
natural_image
Two side-by-side images showing a person's head and shoulders, one with dark hair and the other with light-colored hair, connected by an arrow (no text or symbols)1 Turn on the projector and display an image.
2 Press the button on the remote control to display the Flexible Picture menu.

You cannot use this button when displaying the Installation menu.
3 Press the button to blur the edges of the projected image.

You can reset the function by pressing the button again.
4 Press ⑥ close the Flexible Picture menu.

You can reset all settings in the Flexible Picture menu by pressing the button while displaying the Flexible Picture menu.
Using the Projector as a Bluetooth Speaker
You can use the projector's speaker to output audio from a device connected by Bluetooth.
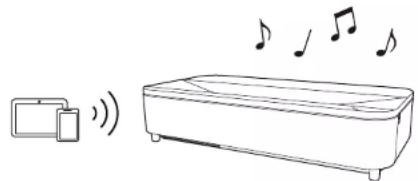
natural_image
Simple line drawing of a device with a file and musical notes, no text or symbols present
1 Turn on the projector and display an image.
2 Press the button on the remote control.
This button is not available when the input source is set to HDMI3 (Game). Press the button on the remote control to return to the Android TV home screen, and then perform the procedure.
3 Select the Bluetooth Speaker Mode menu and press [Enter] to enable the setting.
4 Enable the Bluetooth function on the device you want to connect and select Projector from the available device list. See the documentation supplied with the device for more information.

- By default, the name of the projector is Projector. You can select another name or use a custom name from Device Preferences displayed when pressing the button on the remote control.
- When you want to enjoy the sound only from the projector, you can temporarily turn off the projected image by pressing the button on the remote control.
- To cancel a Bluetooth connection, disconnect from the connected device.
5 To exit Bluetooth Speaker Mode, set it to Off.

- There is a slight delay in the audio output from any Bluetooth device.
- You cannot connect multiple devices by Bluetooth at the same time.
- You can also connect the projector to Bluetooth audio devices, such as speakers or headphones, to output the projector's audio from these
devices. Press the button on the remote control and perform pairing from the menu displayed. - Bluetooth devices are not supported in some countries and regions.
Related Links
- "Bluetooth Specifications" p.66
Bluetooth Specifications
| Version Bluetooth Ver. 5.0 | |
| Output Class 2 | |
| Communication distance | Approx. 10 m |
| Supported profiles A2DP, | AVRCP, HID, HOGP |
| Frequency used 2.4 GHz | band (2.402 to 2.480 GHz) |
Using the Projector as a Bluetooth Speaker
Supported codecs SBC, AAC
Warning
Do not use the device near any medical equipment or equipment that is automatically controlled, such as automatic doors or fire alarms. Electromagnetic interference from the device may cause such equipment to malfunction and cause an accident.

- You may not be able to connect depending on the standard and type of device.
- Even when connecting within the specified communication distance, connections can be lost due to the status of the signal.
- The communication method for Bluetooth uses the same frequency (2.4 GHz) as wireless LAN (IEEE802.11b/g/n) or microwave ovens. Therefore, if these devices are used at the same time, radio wave interference may occur, the audio may be interrupted, or communication may not be possible. If you do need to use these devices at the same time, make sure there is enough distance between them and the Bluetooth device.
Using Your Projector as Chromecast
Your projector has Chromecast built-in, allowing you to cast content from Chromecast-enabled apps.
1 Connect your device or computer to the same wireless network as the projector.
2 Open the Chromecast-enabled app and press.
3 Select your projector from the list of devices.

By default, the name of the projector is Projector. To select another name or use a custom name, press the button on the remote control.
The app connects and starts casting to the projector.
4 To stop casting, press in the app and choose the disconnect option.
When an audio/video source that meets the HDMI CEC standard is connected to the projector's HDMI port, you can use the projector's remote control to control certain features of the linked device.
>>Related Links
- "Operating Connected Devices Using the HDMI CEC Features" p.69
Operating Connected Devices Using the HDMI CEC Features
You can control connected audio/video devices using the HDMI CEC features.

- You must also configure the connected device. See the documentation supplied with the device for more information.
- Some connected devices or functions of those devices may not operate properly even if they meet the HDMI CEC standard. See the documentation supplied with the device for more information.
- Use a cable that supports the HDMI standard.
1 Press the button on the remote control.

This button is not available when the input source is set to HDMI3 (Game). Press the button on the remote control to return to the Android TV home screen, and then perform the procedure.
2 Select the Settings menu and press the [Enter] button.
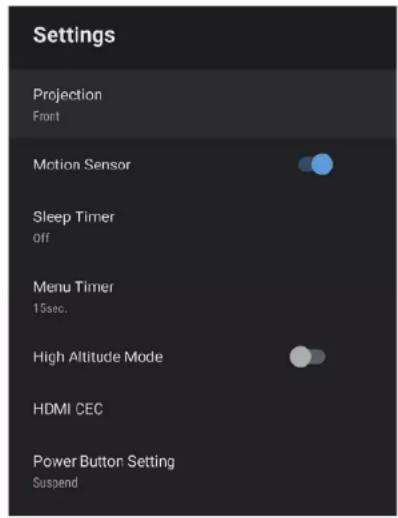
3 Select HDMI CEC and press [Enter].
4 Set HDMI CEC to On.
5 Adjust the following HDMI CEC settings as necessary.
- To automatically turn off the connected device when you turn off the projector, set Device Auto Power Off to On.
- To automatically switch the language settings of the connected device according to the projector's language settings, set Auto Language Change to On.
HDMI CEC Features
- To output audio to an HDMI ARC compatible AV system, set HDMI2 ARC to On.
6 Press to exit the menus.
You can use the projector's remote control to control the linked device such as playback, stop, or adjust the volume.
>>Related Links
- "Projector Feature Settings - Settings Menu" p.81
Installing a Security Cable
You can use the security slot on the projector to attach a Kensington Microsaver Security system as a theft deterrent.

For more details on the Microsaver Security System, see http://www.kensington.com/.
Updating Projector Firmware
You can get the latest version of the projector firmware over a network.

When the latest projector firmware is available, a notification is automatically displayed on the screen. Follow the on-screen instructions to update the firmware.
1 Press the button on the remote control.

This button is not available when the input source is set to HDMI3 (Game). Press the button on the remote control to return to the Android TV home screen, and then perform the procedure.
2 Select from the application list and press the [Enter] button.
3 Follow the on-screen instructions to update the firmware.
Caution
Do not turn off the projector while updating the firmware.
Initializing the Projector
You can reset all of the projector settings to their default values.

If you initialize the projector, all the information such as installed applications, Google Account login information, and Projector Settings are deleted. Write down the settings you do not want to lose before performing initialization.
1 Press the button on the remote control.
2 Select Device Preferences and select the reset menu.
3 Follow the on-screen instructions to start initializing the projector.
Adjusting the Menu Settings
Follow the instructions in these sections to access the projector menu system and change projector settings.
Related Links
• "Using the Projector Settings" p.75
- "Image Quality Settings - Picture Menu" p.76
• "Sound Quality Settings - Sound Menu" p.78
- "Projector Installation Settings - Installation Menu" p.80
- "Projector Feature Settings - Settings Menu" p.81
- "Projector Information Display - Information Menu" p.83
- "Projector Bluetooth Speaker Settings - Bluetooth Speaker Mode Menu" p.84
Using the Projector Settings
You can use the projector's menus to adjust the settings that control how your projector works. The projector displays the menus on the screen.
1 Press the button on the remote control.

This button is not available when the input source is set to HDMI3 (Game). Press the button on the remote control to return to the Android TV home screen, and then perform the procedure.
You see the Projector Settings on the screen.
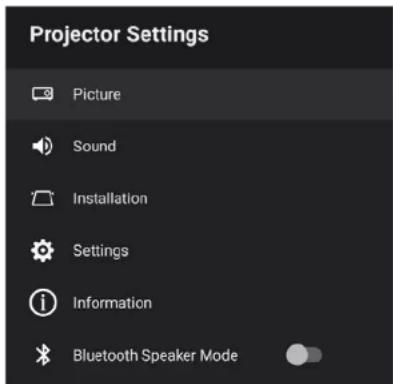
2 Use the directional pad to move through the menus listed on the screen.
3 To change settings in the displayed menu, press the [Enter] button.
4 Use the directional pad to move through the settings.
5 Change the settings using the buttons as necessary.
6 When you finish changing settings on a menu, press
7 Press to exit the menus.
Image Quality Settings - Picture Menu
Settings on the Picture menu let you adjust the quality of your image for the input source you are currently using.
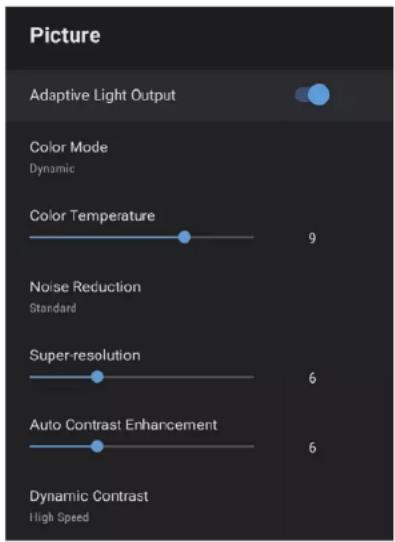
| Setting Options Description | ||
| Adaptive Light Output | On Off | Adjusts the brightness of the light source automatically according to the brightness of the surroundings.This function is not available under the following conditions.When the projector is connecting to an external device from the Installation menuWhen the light source brightness dims if the surrounding temperature gets too highWhen the motion sensor detects any movements or obstacles around the projection window |
| Color Mode Dynamic | VividCinemaNatural | Selects the color mode suitable for the contents you are projecting. |
| Color Temperature | Varying levels available | Sets the color temperature according to the color mode you selected. Higher values tint the image blue and lower values tint the image red. |
| Noise Reduction Strong | StandardWeakOff | Reduces flickering in analog images.Select the intensity of the Noise Reduction.When the input source is set to HDMI3 (Game), this setting is not available. |
| Super-resolution Varying levels available | Reduces blurring when projecting low resolution images. | |
| Auto Contrast Enhancement | Varying levels available | Creates a clearer and sharper image by automatically adjusting the contrast of the projected image. |
| Dynamic Contrast High SpeedNormalOff | High SpeedNormalOff | Adjusts the projected luminance based on the image brightness for each Color Mode. |
Image Quality Settings - Picture Menu
| Setting Options Description | ||
| Scene Adaptive Gamma | Varying levels available | Adjusts the coloring according to the scene, and obtains a more vivid image. Select a large number to enhance contrast. |
| Frame Interpolation | OffLowNormal1High | Adjusts the smoothness of image movement.When the input source is set to HDMI3 (Game), this setting is fixed to Off. |
| Custom Settings Brightness Lightens or darkens the overall image. | ||
| HDR Varying levels available | Changes the range of dark and bright areas in images.When the input source is set to HDMI3 (Game), this setting is fixed to 2. | |
| Aspect Ratio NormalFullZoom | Sets the aspect ratio (width-to-height ratio) for the input source.When the input source is set to HDMI3 (Game), this setting is fixed to Normal. | |
| HDMI Video Range | AutoFullLimited | Sets the video range to match the setting of the device connected to the HDMI port.When the input source is set to HDMI3 (Game), this setting is fixed to Auto. |
| Setting Options Description | ||
| EDID HDMI1 | HDMI2HDMI3 (Game) | Describes the display capabilities of your projector. Change this setting as necessary according to the resolution of the current input source.You can select the EDID settings for individual input sources without changing the input source. |
Related Links
- "Color Mode" p.51
• "Available Color Modes" p.52 - "Adjusting Image Quality in Detail" p.53
- "Adjusting the Light Source Brightness Based on the Brightness of Your
Surroundings" p.44 - "Adjusting the Light Source Brightness Manually" p.45
- "Adjusting Contrast Based on the Brightness of the Content" p.46
Sound Quality Settings - Sound Menu
Settings on the Sound menu provide optimum sound for a variety of image types. You can select the mode designed to match your image, or experiment with the available modes.
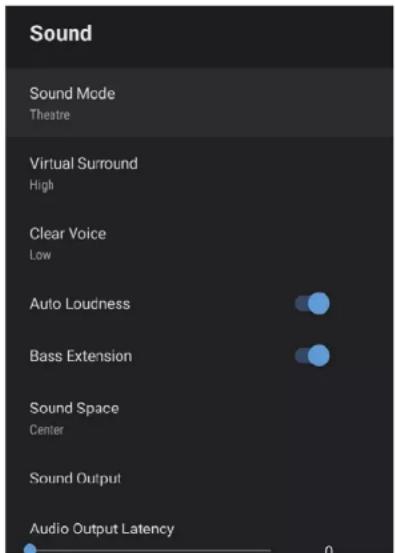
| Setting Options Description | ||
| Virtual Surround High | ghLowOff | Adjusts the strength of the surround effect. This setting is saved for each Sound Mode. |
| Clear Voice High | LowOff | Adjusts the voice so that it can be heard clearly. This setting is saved for each Sound Mode. |
| Auto Loudness On | Off | Even when playing at low volumes, this automatically corrects the balance between high and low tones in the audio so that they are not out of balance. |
| Bass Extension On | Off | Emphasizes the bass levels to reproduce a powerful bass. |
| Sound Space Right | CenterLeft | Adjusts the sound quality to suit your viewing position. |
| Sound Output Select the input source and sound output device. | ||
| Setting Options Description | |
| Sound Mode Theatre | Select your favorite mode for sound output from the projector's speaker system according to the playback contents. |
| TVStudioStadiumConcertKaraoke Mode |
Sound Quality Settings - Sound Menu
| Setting Options Description | ||
| Other Than HDMI3 (Game) | Speaker/Optical (PCM): Outputs sound in PCM format (2 ch) to the projector's speakers and an external audio device connected to the Optical Out port.Speaker/Optical (Auto): Outputs sound in PCM format (2 ch) to the projector's speakers. Outputs higher quality sound to an external audio device connected to the Optical Out port.ARC/Optical (PCM): Outputs sound in PCM format (2 ch) to an ARC compatible external audio device connected to the HDMI2 (ARC) port and an external audio device connected to the Optical Out port.ARC/Optical (Auto): Outputs higher quality sound to an ARC compatible external audio device connected to the HDMI2 (ARC) port and an external audio device connected to the Optical Out port.Auto supports the following audio codecs:PCM (2 ch)AC-3 (up to 5.1 ch)DTS (up to 5.1 ch)If sound is not output correctly, select PCM.Audio format that is output from the projector's HDMI2 (ARC) port varies depending on the input source.When the input source is HDMI, audio is output up to 5.1 ch (AC-3 o DTS).When playing Android TV contents, audio is output in 2 ch (PCM). | |
| Setting Options Description | ||
| HDMI3 (Game) Speaker (PCM): Outputs sound in PCM format (2 ch) to the projector's speakers.Optical (PCM): Outputs sound in PCM format (2 ch) to an external audio device connected to the Optical Out port.Optical (Digital Audio): Outputs higher quality sound to an external audio device connected to the Optical Out port.Digital Audio supports the following audio codecs:PCM (2 ch)AC-3 (up to 5.1 ch)DTS (up to 5.1 ch)If sound is not output correctly, select PCM. | ||
| Audio Output Latency | Varying levels available | Adjusts the audio latency. If the audio is fast, select a higher value.This item is only available for the following types of audio.audio output from the projector's speakeraudio output from the HDMI2 (ARC) portaudio output from the Optical Out portWhen the input source is set to HDMI3 (Game), this setting is not available. |
Related Links
- "Adjusting the Sound Settings (Sound Mode)" p.57
Projector Installation Settings - Installation Menu
You can correct distortion in the projected image by following the on-screen instructions from the Installation menu.
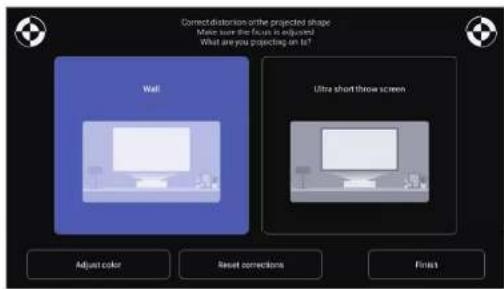
You can make the following corrections to the image shape and the projected image from this menu.
- Correct distortion in the projected image quickly using the Epson Setting Assistant app.
- Correct the position of the four corners of the projected image or fine-tune point correction using a remote control.
- Correct the top of the projected image so that it is straight by using a remote control (correct the bottom of the projected image when the projector is installed on the ceiling).
- Compensate the color of the projected image to match colored walls.

When you use the Epson Setting Assistant app, the Flexible Picture setting will be reset.
Related Links
- "Correcting Distortion in the Image" p.42
Projector Feature Settings - Settings Menu
Options on the Settings menu let you customize various projector features.
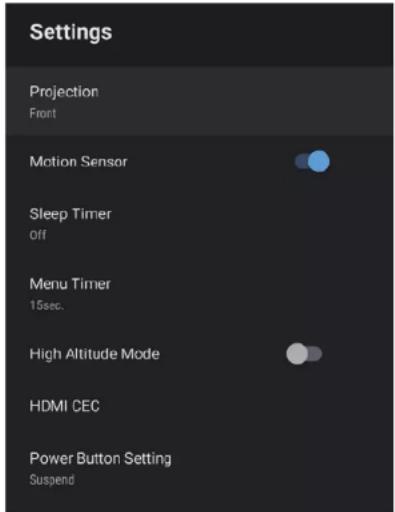
| Setting Options Description | ||
| Projection Front | RearFront/UpsideDownRear/Upside Down | Sets the way the projector faces the screen so the image is oriented correctly |
| Motion Sensor On | Off | Select On to automatically reduce the brightness of the light source for safety when someone comes close to the projector light while projecting. |
| Setting Options Description | ||
| Sleep Timer Off to | 120 minutes Sets the | interval of time before the projector turns off automatically. |
| Menu Timer Off to | 240 seconds Sets the | interval of inactivity before closing the projector's menu automatically.When the input source is set to HDMI3 (Game), this setting is not available. |
| High Altitude Mode | OnOff | Regulates the projector's operating temperature at altitudes above 1,500 m. |
| HDMI CEC CEC Control Enables CEC | Control features when an audio/video device that meets the HDMI CEC standard is connected to the projector's HDMI port. | |
| HDMI CEC: Select On to control the connected audio/video device using the projector's remote control.When this is set to On, the projector automatically turns on when you turn on the connected device, or when you start playback on the connected device. | ||
| Device Auto Power Off: Select On to automatically turn off the connected audio/video device when you turn off the projector. | ||
| Auto Language Change: Select On to automatically switch the language settings of the connected audio/video device according to the projector's language settings. | ||
| HDMI2 ARC: Select On to enable HDMI ARC on the HDMI2 (ARC) port. | ||
Projector Feature Settings - Settings Menu
| Setting Options Description | ||
| Power Button Setting | SuspendShutdown | Sets the operation performed by the projector when you press the power button.Suspend:Starts the projector quickly from standby mode.Shutdown:Minimizes power consumption in standby mode. However it takes longer to start the projector than when inSuspendmode. |
>>Related Links
• "HDMI CEC Features" p.69
Projector Information Display - Information Menu
You can display information about the licenses and privacy statements, and set whether or not to allow the acquisition of operation logs.
| Information item Description | |
| License Agreement Displays | the license agreement. |
| Privacy Statement Displays | the privacy statement. |
| Projector Operation Log Information | Sets whether or not to allow Epson to acquire projector operation logs. |
Projector Bluetooth Speaker Settings - Bluetooth Speaker Mode Menu
You can use the projector's speaker to output audio from an external device connected by Bluetooth.
| Options Description | |
| On | Select On to use the projector as a Bluetooth speaker. |
| Off |
Related Links
• "Using the Projector as a Bluetooth Speaker" p.66
Maintaining the Projector
Follow the instructions in these sections to maintain your projector.
Related Links
- "Projector Maintenance" p.86
• "Cleaning the Projection Window" p.87 - "Cleaning the Obstacle Sensor and Motion Sensor" p.88
• "Cleaning the Projector Case" p.89
• "Air Filter and Vent Maintenance" p.90
Projector Maintenance
You may need to clean the projection window, obstacle sensor, and motion sensor periodically, and clean the air filter and air vents to prevent the projector from overheating due to blocked ventilation.
The only parts you should replace are the air filter and remote control batteries. If any other part needs replacing, contact Epson or an authorized Epson servicer.
Warning
Before cleaning any part of the projector, turn it off and unplug the power cord. Never open any cover on the projector, except as specifically explained in this manual. Dangerous electrical voltages in the projector can injure you severely.
Cleaning the Projection Window
Clean the projection window periodically, or whenever you notice dust or smudges on the surface.
- To remove dust or smudges, gently wipe the projection window with clean and dry lens-cleaning paper.
- If the projection window is dusty, blow off dust using a blower, and then wipe the projection window.

Warning
- Before cleaning the projection window, turn off the projector and unplug the power cord.
- Do not use any flammable gas sprays such as air dusters to blow off dust. The high heat generated by the projector may cause a fire.
Attention
- Do not wipe the projection window right after you turn off the projector. Doing so could damage the projection window.
- Do not use any harsh materials to clean the projection window and do not subject the projection window to any impacts; otherwise, it could be damaged.
Cleaning the Obstacle Sensor and Motion Sensor
Clean the projector's obstacle sensor and motion sensor periodically, or if you see a message telling you to remove any obstacles that are interfering with the projection area. To remove dust or smudges, gently wipe the sensors with lens-cleaning paper.
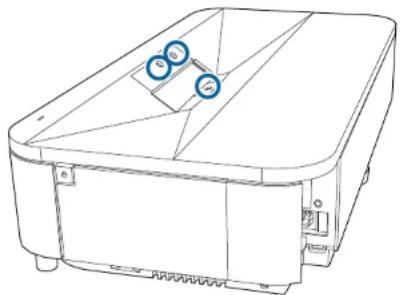
natural_image
Line drawing of a rectangular electronic device with two blue circular components on top (no text or symbols)Warning
Do not use a lens cleaner that contains flammable gas to clean the obstacle sensor and motion sensor. The high heat generated by the projector may cause a fire.
Attention
Do not use glass cleaner or any harsh materials to clean the sensors and do not subject the sensors to any impacts. Damage to the surface of the sensors may cause malfunctions.
Cleaning the Projector Case
Before cleaning the projector case, turn off the projector and unplug the power cord.
• To remove dust or dirt, use a soft, dry, lint-free cloth.
• To remove stubborn dirt, use a soft cloth moistened with water and mild soap. Do not spray liquid directly on the projector.
Attention
Do not use wax, alcohol, benzene, paint thinner, or other chemicals to clean the projector case. These can damage the case. Do not use canned air, or the gases may leave a flammable residue.
Air Filter and Vent Maintenance
Regular filter maintenance is important to maintain your projector. Clean the air filter when a message appears telling you the temperature inside the projector has reached a high level. It is recommended that you clean these parts over a 20,000 hour period. Clean them more often than this if you use the projector in an environment that is dustier than expected. (Assuming the projector is used in an atmosphere in which airborne particulate matter is less than 0.04 to 0.2 mg/m3.)
Attention
If regular maintenance is not performed, your Epson projector will notify you when the temperature inside the projector has reached a high level. Do not wait until this warning appears to maintain your projector filter as prolonged exposure to high temperatures may reduce the life of your projector.
Related Links
• "Cleaning the Air Filter" p.90
• "Replacing the Air Filter" p.91
• "Cleaning the Air Intake Vents" p.93
Cleaning the Air Filter
You need to clean the projector's air filters in the following situations:
• The filter get dusty.
- You see a message telling you to clean it.
1 Turn off the projector and unplug the power cord.
2 Remove the front cover.
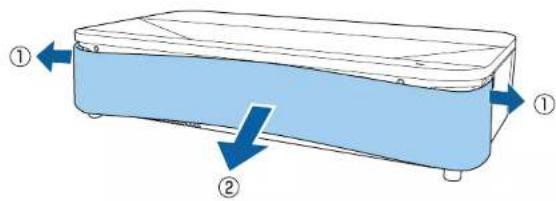
3 Slide the air filter cover latch and pull out the air filter cover.
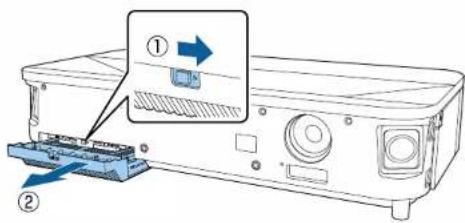
4 Pull the air filter out of the air filter cover.
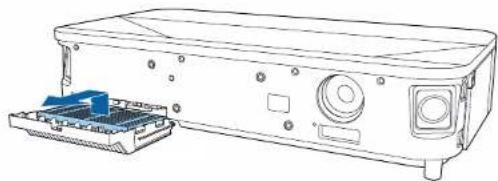
natural_image
Line drawing of a computer monitor with ports and a blue plastic cover (no text or symbols)Air Filter and Vent Maintenance
5 Vacuum the front of the air filter (the side with the tabs) to remove any remaining dust.
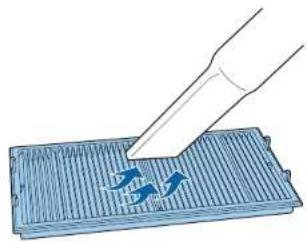
natural_image
Illustration of a pipette dispensing blue liquid onto a striped surface (no text or symbols)Attention
- Do not rinse the air filter in water, or use any detergent or solvent to clean it.
- Do not use canned air. The gases may leave a flammable residue or push dust and debris into the projector's optics or other sensitive areas.
6 Place the air filter with the four tabs facing down as shown.
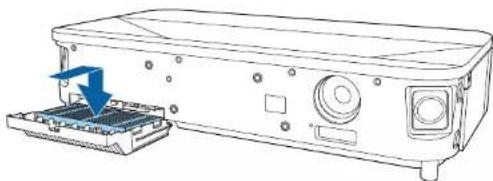
natural_image
Line drawing of a computer chassis with a blue arrow indicating a component or process (no text or symbols present)Attention
Do not force the air filter cover to close with the tabs on the air filter facing up. Doing so could damage the projector.
7 Insert the air filter cover until it clicks into place.
8 Replace the front cover.
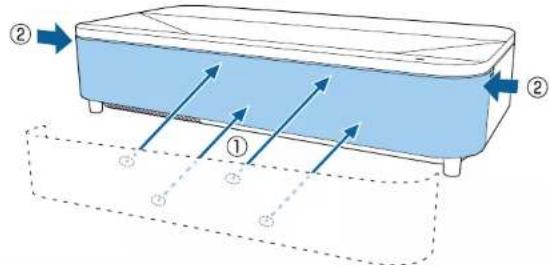
Replacing the Air Filter
You need to replace the air filter in the following situations:
• After cleaning the air filter, you see a message telling you to clean or replace it.
• The air filter is torn or damaged.
You can replace the air filter while the projector is mounted to the ceiling or placed on a table.
1 Turn off the projector and unplug the power cord.
Air Filter and Vent Maintenance
2 Remove the front cover.
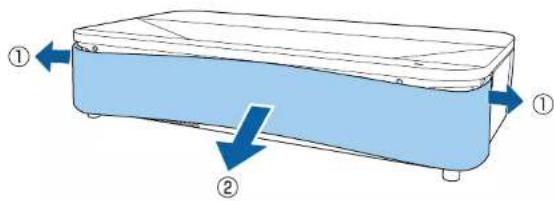
3 Slide the air filter cover latch and pull out the air filter cover.
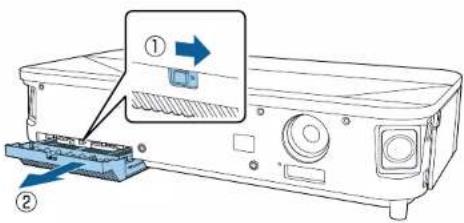
4 Pull the air filter out of the projector.
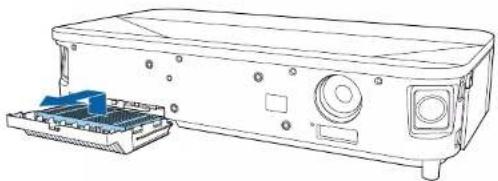
natural_image
Line drawing of a computer chassis with a blue CPU socket and control panel (no text or symbols)
Dispose of used air filters according to local regulations.
• Filter frame: Polypropylene
• Filter: Polypropylene, PET
5 Place the new air filter with the four tabs facing down as shown.
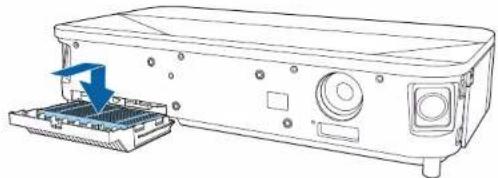
natural_image
Line drawing of a computer monitor with a blue arrow indicating a loading or insertion process (no text or symbols present)Attention
Do not force the air filter cover to close with the tabs on the air filter facing up. Doing so could damage the projector.
6 Insert the air filter cover until it clicks into place.
7 Replace the front cover.
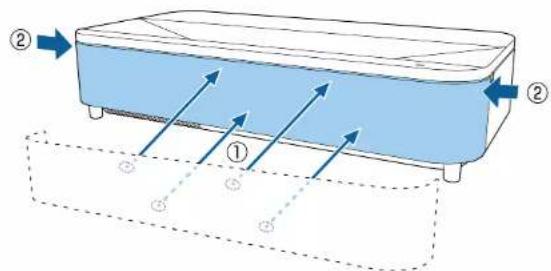
>>Related Links
- "Replacement Parts" p.110
Cleaning the Air Intake Vents
Clean the projector's air intake vents periodically, or whenever you notice dust on the surface of the vents to prevent the projector from overheating due to blocked ventilation.
1 Turn off the projector and unplug the power cord.
2 Turn the projector upside down.
3 Carefully remove the dust using a vacuum cleaner or a brush.
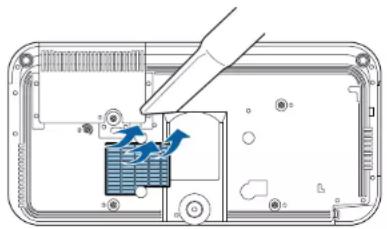
natural_image
Diagram of a device interior with a tool inserted, showing internal components and a blue arrow indicating flow or movement (no text or symbols present)Solving Problems
Check the solutions in these sections if you have any problems using the projector.
Related Links
• "Projection Problems" p.95
- "Projector Indicator Status" p.96
- "Solving Projector Power-On or Power-Off Problems" p.98
• "Solving Image Problems" p.99
• "Solving Sound Problems" p.103
- "Solving Remote Control Operation Problems" p.105
• "Solving HDMI CEC Problems" p.106
• "Solving Wi-Fi Network Problems" p.107
• "Solving Android TV Problems" p.108
Projection Problems
If the projector is not working properly, turn it off, unplug it, and then plug it back in and turn it on.
If this does not solve the problem, check the following:
- The indicators on the projector may indicate the problem.
- The solutions in this manual can help you solve many problems.
If none of these solutions help, contact Epson for technical support.

After repairing the projector, Epson may return the projector to you in its initial status. Make sure you make a note of the account information of each online service before you contact your local dealer or the nearest Epson repair center.
Projector Indicator Status
The indicators on the projector indicate the projector status and let you know when a problem occurs. Check the status and color of the indicators and then refer to this table for a solution.

If the indicators display a pattern not listed in the table below, turn the projector off, unplug it, and contact Epson for help.
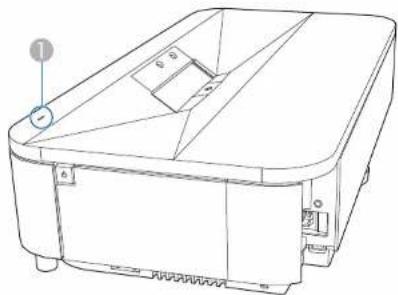
natural_image
Line drawing of a rectangular electronic device with a labeled component (no text or symbols present)
Status indicator
Projector status
| Indicator status Problem and solutions | |
| Lit blue Normal operation. | |
| Flashing blue Warming up | or shutting down the projector.Remote control operations may be disabled when the indicator is flashing blue. |
| Off Standby mode. | When you press the power button, projection starts. |
| Indicator status Problem and solutions |
| Lit orange Projector has overheated and turned off. Leave it turned off to cool down for 5 minutes.Make sure that the vents and air filter are not clogged with dust or obstructed by nearby objects.Make sure the environmental temperature is not too hot.Clean or replace the air filter.If operating the projector at high altitude, set the High Altitude Mode setting to On in the projector's menu Settings > High Altitude ModeIf the problem persists, unplug the projector and contact Epson for help. |
| Obstacle detection warning.A beep sounds, and the message "Playback has been stopped for safety reasons. Move away from the lens or remove any obstacles around the lens." is displayed.The brightness of the light source is reduced.Make sure that there are no obstacles interfering with the projection window. Remove any obstacles.Clean the obstacle sensor if there are no obstacles.The projector turns off automatically if no action is taken. |
| Movement detection warning.A beep sounds, and the message "Playback has been stopped for safety reasons. Move away from the lens or remove any obstacles around the lens." is displayed.The brightness of the light source is reduced.Make sure that there are no one looking into the projection window. Move away from the projection window.Clean the motion sensor if there is no one near the projection window. |
| Laser warning.Turn the projector off, unplug it, and contact Epson for help. |
Projector Indicator Status
| Indicator status Problem and solutions | |
| Flashing orange Laser has | a problem.Turn the projector off, unplug it, and contact Epson for help. |
| A fan or sensor has a problem.Turn the projector off, unplug it, and contact Epson for help. | |
| Obstacle detection error.If there are no obstacles interfering with the projection window, turn the projector off, unplug it, and contact Epson for help. | |
| Internal projector error.Turn the projector off, unplug it, and contact Epson for help. | |
Related Links
- "Projector Feature Settings - Settings Menu" p.81
• "Cleaning the Air Filter" p.90
• "Replacing the Air Filter" p.91
• "Cleaning the Air Intake Vents" p.93
Solving Projector Power-On or Power-Off Problems
Check the solutions in these sections if the projector does not turn on when you press the power button or it turns off unexpectedly.
>>Related Links
- "Solving Projector Power Problems" p.98
- "Solving Projector Shutdown Problems" p.98
Solving Projector Power Problems
If the projector does not turn on when you press the power button, try the following steps until the problem is solved.
1 Make sure the power cord is securely connected to the projector and to a working electrical outlet.
2 If you are using the remote control, check the batteries of the remote control.
3 The power cord may be defective. Disconnect the cord and contact Epson for help.
>>Related Links
• "Turning On the Projector" p.35
- "Installing Batteries in the Remote Control" p.30
Solving Projector Shutdown Problems
If the projector turns off unexpectedly, try the following steps until the problem is solved.
The projectors may have entered standby mode after the interval of time specified in Sleep Timer in the projector's Settings menu has passed. Press the power button on the projector or remote control to wake the projector.

After waking the projector, Sleep Timer is automatically set to Off.
2 When the status indicator is lit orange, the projector has overheated and turned off.

The cooling fans may run in standby status depending on the projector settings. Also, when the projector wakes from standby status, the fans may cause an unexpected noise. This is not a malfunction.
3 Check the following items:
- Make sure that there are no obstacles interfering with the projection window. Remove any obstacles.
- Clean the obstacle sensor if there are no obstacles.
Related Links
- "Projector Feature Settings - Settings Menu" p.81
Check the solutions in these sections if you have any problems with projected images.
>>Related Links
• "Solving Missing Image Problems" p.99
- "Solving Curved or Not Rectangular Image Problems" p.100
• "Solving Flipped Image Problems" p.100
- "Solving Small Image Problems" p.100
- "Adjusting a Fuzzy or Blurry Image" p.100
- "Fixing Partial Image Problems" p.101
- "Adjusting an Image that Contains Noise or Static" p.101
- "Adjusting an Image with Incorrect Brightness or Colors" p.101
Solving Missing Image Problems
If no image is displayed, try the following steps until the problem is solved.
1 Check the projector's status:
- Press the button on the remote control to see if the image was temporarily turned off.
- Check the status indicator to confirm that the projector is in normal operating status.
- Press the projector's power button to wake it from standby mode.
Settings > Sleep Timer
2 Check the cable connection:
- Make sure all necessary cables are securely connected and the power is on for the projector.
- Connect the video source directly to the projector.
- Replace the HDMI cable with the shorter one.
- When sending 18 Gbps images such as 4K 60Hz 4:4:4, use an HDMI cable (premium-high speed).
3 Make sure you have selected the appropriate EDID setting in the projector's Picture menu, according to the standards supported by the video equipment, image signals, and HDMI cables.
4 Check the status of your video source:
- If you are projecting from a streaming media player, make sure it is powered by the power supply USB cable on the projector.
- Turn on the connected streaming media player or video source, and press the play button to start a video, if necessary.
- Make sure the connected device meets the HDMI CEC standard. See the documentation supplied with the device for more information.
- If you are projecting from a laptop computer, make sure it is set up to display on an external monitor.
5 Check the following items:
- You need an Internet connection to view online content. Make sure your Wi-Fi is on.
- Turn off the projector and the connected streaming media player or video source, and then turn them back on.
- Turn off the projector and the connected video source, and then turn them back on.
- Set the CEC function for the connected device again and restart the device.
- Make sure the computer's display resolution does not exceed the projector's resolution and frequency limits. If necessary, select a different display resolution for your computer. (See your computer manual for details.)
- Resets all of the projector settings to their default values.
Related Links
- "Projector Feature Settings - Settings Menu" p.81
Solving Curved or Not Rectangular Image Problems
If the projected image is curved or not evenly rectangular, try the following steps until the problem is solved.
1 Place the projector directly in front of the center of the screen, facing it squarely, if possible.
2 Correct the distortion in the projected image by using the Installation menu.
>>Related Links
- "Correcting Distortion in the Image" p.42
Solving Flipped Image Problems
If the projected image is flipped horizontally, try the following steps until the problem is solved.
1 If you flipped the projected image using the Reverse Flip Picture function, press the button on the remote control to display the Flexible Picture menu, and then press the button again to disable the function.
Related Links
- "Flipping the Image Horizontally (Flexible Picture)" p.64
Solving Small Image Problems
If the projected image is too small, try the following steps until the problem is solved.
1 If you adjusted the size of the projected image, press the button on the remote control to display the Flexible Picture menu, and then press the button until the projected image is the right size.
Related Links
- "Changing the Image Size or Position (Flexible Picture)" p.63
Adjusting a Fuzzy or Blurry Image
If the projected image is fuzzy or blurry, try the following steps until the problem is solved.
1 Adjust the image focus using the focus lever.
2 Position the projector close enough to the screen.
3 Clean the projection window.

To avoid condensation on the lens after bringing the projector in from a cold environment, let the projector warm up to room temperature before using it.
4 Adjust the Sharpness setting in the projector's Picture menu to improve image quality.
Picture > Custom Settings > Sharpness
5 If you have blurred the edges of the projected image using the Edge Blur function, press the button on the remote control to display the Flexible Picture menu, and then press the button to disable the function.
6 If you are projecting from a computer, use a lower resolution or select a resolution that matches the projector's native resolution.
>>Related Links
- "Image Quality Settings - Picture Menu" p.76
- "Focusing the Image Using the Focus Lever" p.40
- "Cleaning the Projection Window" p.87
- "Blurring the Edges of the Image (Flexible Picture)" p.65
Fixing Partial Image Problems
If only a partial computer image is displayed, try the following steps until the problem is solved.
1 If you adjusted the size of the projected image, press the button on the remote control to display the Flexible Picture menu, and then press the button until the projected image is the right size.
2 If Aspect Ratio in the Picture menu is set to Zoom, change it to Normal.
3 Make sure you selected the correct projection mode. You can select this using the Projection setting in the projector's Settings menu.
4 Check your computer display settings to disable dual display and set the resolution within the projector's limits. (See your computer manual for details.)
>>Related Links
- "Projector Feature Settings - Settings Menu" p.81
- "Changing the Image Size or Position (Flexible Picture)" p.63
Adjusting an Image that Contains Noise or Static
If the projected image contains electronic interference (noise) or static, try the following steps until the problem is solved.
1 Check the cables connecting your video source to the projector. They should be:
- Separated from the power cord to prevent interference
- Securely connected at both ends
- Not connected to an extension cable
2 Adjust the Noise Reduction setting in the projector's Picture menu.
3 If you adjusted the image shape using the projector controls, try decreasing the Sharpness setting in the projector's Picture menu to improve image quality.
Picture > Custom Settings > Sharpness
4 Make sure you have selected the appropriate EDID setting in the projector's Picture menu, according to the standards supported by the video equipment, image signals, and HDMI cables.
5 If you connected an extension power cable, try projecting without it to see if it caused interference in the signal.
6 Select a computer video resolution and refresh rate that are compatible with the projector.
Related Links
- "Image Quality Settings - Picture Menu" p.76
Adjusting an Image with Incorrect Brightness or Colors
If the projected image is too dark or bright, or the colors are incorrect, try the following steps until the problem is solved.
1 Try different color modes for your image and environment by selecting the Color Mode setting in the projector's Picture menu.
Solving Image Problems
2 Try different settings by selecting the Adaptive Light Output setting in the projector's Picture menu.
3 Check your video source settings.
4 Adjust the following settings in the Picture menu for the current input source.
- Scene Adaptive Gamma
- Custom Settings
• Color Temperature - Frame Interpolation
• Dynamic Contrast - Noise Reduction
- Super-resolution
• Auto Contrast Enhancement - Aspect Ratio
5 Make sure you selected the correct HDMI Video Range, HDR or EDID setting in the projector's Picture menu, if available for your image source.
6 When you are projecting your image onto a wall, try different wall color types for the image and environment by selecting the Adjust color setting in the projector's Installation menu.
7 Make sure all the cables are securely connected to the projector and your video equipment. If you connected long cables, try connecting shorter cables.
8 Position the projector close enough to the screen.
»»»Related Links
- "Image Quality Settings - Picture Menu" p.76
Check the solutions in these sections if you have any problems with projected sound.
>>Related Links
- "Solving Missing or Low Audio Problems" p.103
- "Solving Bluetooth Speaker Mode Problems" p.103
Solving Missing or Low Audio Problems
If there is no sound or the volume is too low, try the following steps until the problem is solved.
1 Adjust the projector's volume settings using the or button on the remote control.
2 Check the cable connection between the projector and your video source.
3 Press the button on the remote control to resume audio if it was temporarily muted.
4 Check the following settings on your video equipment:
- Check your video source to make sure the volume is turned up and the audio output is set for the correct source.
- Set the connected device to PCM output.
5 If you want to output audio from the projector's speaker, check that the Sound Output setting is correct in the Sound menu.
6 If you want to output audio to an external audio device using an HDMI cable, try the following solutions:
- Make sure the HDMI cable is connected to the projector's HDMI2 (ARC) port.
- Make sure the sound is output from the projector's speaker or Optical Out port.
- Set HDMI CEC to On in the Settings menu.
Settings > HDMI CEC > CEC Control
- Set HDMI2 ARC to On in the Settings menu.
Settings > HDMI CEC > CEC Control
- Set Other Than HDMI3 (Game) to ARC/Optical (PCM) in the Sound menu.
- Make sure you are using an HDMI cable (with Ethernet).

When outputting audio to an external audio device that does not support HDMI ARC using an HDMI cable, set HDMI CEC to Off in the Settings menu.
7 If you want to output audio to an external audio device using an optical digital audio cable, check that the Sound Output setting is correct in the Sound menu.
Related Links
• "Sound Quality Settings - Sound Menu" p.78
Solving Bluetooth Speaker Mode Problems
If you cannot connect a Bluetooth audio device to the projector, try the following solutions.
1 Set Bluetooth Speaker Mode to On in the projector's menu.
2 Select Projector from the available Bluetooth device list displayed on your device.
3 Make sure only one Bluetooth device is connected to the projector.
Solving Sound Problems
You cannot connect multiple Bluetooth audio devices to the projector at the same time.
4 Make sure the device meets the projector's Bluetooth specifications.
5 Check the following items:
- Check for obstacles between the Bluetooth audio device and the projector, and change their positions to improve communication.
- Make sure the connected Bluetooth audio device is within the specified communication distance.
- Avoid using the projector near wireless networks, microwave ovens, 2.4 GHz cordless phones, or other devices that use the 2.4 GHz frequency band. These devices can interfere with the signal between the projector and the Bluetooth audio device.
Related Links
- "Bluetooth Specifications" p.66
- "Using the Projector as a Bluetooth Speaker" p.66
Solving Remote Control Operation Problems
If the projector does not respond to remote control commands, try the following steps until the problem is solved.

If you lose the remote control, you can order another one from Epson.
1 Check that the remote control batteries are installed correctly and have power. If necessary, replace the batteries.
2 Check that the input source is not set to HDMI3 (Game).

When the input source is set to HDMI3 (Game), some buttons on the remote control are not available.
3 Check to see if a button on the remote control is stuck down, causing it to enter standby mode. Release the button to wake the remote control up.
4 Make sure you are operating the remote control within the reception angle and range of the projector.
5 Check the status indicator to confirm that the projector is in normal operating status.
6 Strong fluorescent lighting, direct sunlight, or infrared device signals may be interfering with the projector's remote receivers. Dim the lights or move the projector away from the sun or interfering equipment.
7 If the pairing screen is displayed, perform pairing again by holding down the [Enter] button and button on the remote control at the same time for about three seconds.
>>Related Links
- "Projector Parts - Projector Remote Control" p.13
-
"Remote Control Operation" p.30
-
"Projector Indicator Status" p.96
- "Installing Batteries in the Remote Control" p.30
Solving HDMI CEC Problems
If you cannot operate the connected devices from the projector, try the following steps until the problem is solved.
1 Make sure the cable meets the HDMI CEC standard.
2 Make sure the connected device meets the HDMI CEC standard. See the documentation supplied with the device for more information.
3 Set HDMI CEC to On in the Settings menu.
Settings > HDMI CEC > CEC Control
4 Make sure all the cables are securely connected to the projector and your video equipment.

Make sure you connect the HDMI cable to the projector's HDMI2 (ARC) port.
5 Make sure the connected devices are turned on and in standby status. See the documentation supplied with the device for more information.
6 If you connect a new device or change the connection, set the CEC function for the connected device again and restart the device.
>>Related Links
- "Projector Feature Settings - Settings Menu" p.81
- "Operating Connected Devices Using the HDMI CEC Features" p.69
Solving Wi-Fi Network Problems
If you cannot connect to a Wi-Fi network, try the following solutions.
1 Make sure your Wi-Fi router and modem are working properly. Rebooting these devices may solve the network connection problem.
2 Check for obstacles between the Wi-Fi router and the projector, and change their positions to improve communication.
3 You can check the network settings from the menu displayed when you press button on the remote control.
4 If you initialize the projector, you need to select the network settings again on the initial setup screen.
>>Related Links
- "Initializing the Projector" p.73
Solving Android TV Problems
108
See the following page for issues regarding Android TV.
https://support.google.com/androidtv/
Appendix
Check these sections for the technical specifications and important notices about your product.
Related Links
- "Optional Accessories and Replacement Parts" p.110
- "Screen Size and Projection Distance" p.111
• "Supported Monitor Display Resolutions" p.113
• "Projector Specifications" p.114 - "External Dimensions" p.115
• "List of Safety Symbols and Instructions" p.116
• "Laser Safety Information" p.118 - "Glossary" p.120
- "Notices" p.121
Optional Accessories and Replacement Parts
The following optional accessories and replacement parts are available. Please purchase these products as and when needed.
The following list of optional accessories and replacement parts is current as of: July 2022.
Details of accessories are subject to change without notice and availability may vary depending on the country of purchase.
Related Links
- "Mounts" p.110
• "External Devices" p.110 - "Screens" p.110
• "Replacement Parts" p.110
Mounts
Ceiling mount ELPMB22
Ceiling mount (Low profile) ELPMB30
Use when installing the projector on a ceiling.
Safety Wire Set ELPWR01
Use when connecting the projector to the installation mount to prevent the projector from falling down.
Ceiling pipe (450 mm) ELPFP13
Ceiling pipe (700 mm) ELPFP14
Use when installing the projector on a high ceiling.

Special expertise is required to suspend the projector from a ceiling. Contact Epson for help.
External Devices
Streaming Media Player ELPAP12
Use this streaming media player to watch online content.
Screens
Ultra Short Throw Screen ELPSC35 (100")
Ultra Short Throw Screen ELPSC36 (120")
Screens to be installed on a wall. (Aspect ratio 16:9)
Replacement Parts
Air filter ELPAF64
Use as a replacement for used air filters.
Related Links
• "Replacing the Air Filter" p.91
Screen Size and Projection Distance
Check the table here to determine how far to place the projector from the screen based on the size of the projected image.

You can reduce the projected image size and change the position of the image without moving the projector by using the Flexible Picture menu.
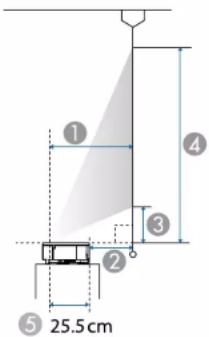
1 Projection distance (cm)
② Distance from the back of the projector to the screen (cm)
③ Distance from the projector to the bottom of the screen (cm)
4 Distance from the projector to the top of the screen (cm)
⑤ Distance from the center of the lens to the rear of the projector (cm)
| 16:9 screen size | 1 2 3 | 4 | |||||||
| Wide | |||||||||
| 80" | 177 | × | 100 | 27.8 | 2.3 | 10.8 | 110.4 | ||
| 90" | 199 | × | 112 | 31.6 | 6 | 12.9 | 124.9 | ||
| 100~ | 221 | × | 125 | 35.3 | 9.8 | 14.9 | 139.4 | ||
| 16:9 screen size | 1 2 3 Wide | 4 | |||
| 110" 24 | 4 × 137 39 13.5 | 16.9 153.9 | |||
| 120" 26 | 6 × 149 42.8 17.3 | 19 168.4 | |||
| 130" 28 | 8 × 161 46.5 21 | 21 182.9 | |||
| 150" 33 | 2 × 187 54 28.5 | 25.1 211.9 | |||
| 4:3 screen size | 1 2 3 | 4 | |||||||
| Wide | |||||||||
| 66" | 134 | × | 101 | 28.1 | 2.6 | 11 | 111.6 | ||
| 70" | 142 | × | 107 | 29.9 | 4.4 | 12 | 118.7 | ||
| 80" | 163 | × | 122 | 34.5 | 9 | 14.5 | 136.4 | ||
| 90" | 183 | × | 137 | 39.1 | 13.6 | 17 | 154.1 | ||
| 100" | 203 | × | 152 | 43.7 | 18.1 | 19.5 | 171.9 | ||
| 110" | 226 | × | 168 | 48.3 | 22.7 | 22 | 189.6 | ||
| 120" | 244 | × | 183 | 52.8 | 27.3 | 24.5 | 207.3 | ||
| 122" | 248 | × | 186 | 53.8 | 28.2 | 25 | 210.9 | ||
| 16:10 screen size | 1 2 3 Wide | 4 | |||||||
| 74" | 159 | × | 100 | 27.8 | 2.3 | 10.8 | 110.4 | ||
| 80" | 172 | × | 108 | 30.2 | 4.7 | 12.1 | 119.8 | ||
| 90" | 194 | × | 121 | 34.3 | 8.8 | 14.3 | 135.5 | ||
| 100" | 215 | × | 135 | 38.3 | 12.8 | 16.5 | 151.2 | ||
| 110" | 237 | × | 148 | 42.4 | 16.9 | 18.8 | 166.8 | ||
| 120" | 259 | × | 162 | 46.4 | 20.9 | 21 | 182.5 | ||
| 130" | 280 | × | 175 | 50.5 | 24.9 | 23.2 | 198.2 | ||
| 138" | 297 | × | 186 | 53.7 | 28.2 | 24.9 | 210.7 | ||
Screen Size and Projection Distance
>>Related Links
- "Changing the Image Size or Position (Flexible Picture)" p.63
Supported Monitor Display Resolutions
See the Supplemental A/V Support Specification for detailed information on compatible refresh rates and resolutions for each compatible video display format.
Projector Specifications
| Product name EH-LS800W | /EH-LS800B |
| Dimensions 695 (W) × 145 | (H) × 341 (D) mm (not including raised section) |
| LCD panel size 0.62" | |
| Display method Poly-silicon TFT active matrix | |
| Resolution 2,073,600 pixels | *Full HD (1,920 (W) × 1,080 (H) dots) × 3 |
| Focus adjustment Manual | |
| Light source Laser diode | |
| Light source output power | Up to 88 W |
| Wavelength 449 to 461 nm | |
| Light source life ** Up to | about 20,000 hours |
| Max. audio output 20 W | |
| Speaker 2.1ch (Speaker × 2, Woofer × 1) | |
| Power supply 100-240V AC±10% 50/60Hz 3.5 - 1.6 A | |
| Power consumption (100 to 120 V area) | Operating power consumption: 350 W |
| Power consumption (220 to 240 V area) | Operating power consumption: 335 W |
| Standby power consumption | Communication On: 2.0 WCommunication Off: 0.4 W |
| Operating altitude Altitude | 0 to 3,048 m |
| Operating temperature Altitude of 0 to 2,286 m: 0 to +40°C (Humidity of 20 to 80%, No condensation)Altitude of 2,287 to 3,048 m: 0 to +35°C (Humidity of 20 to 80%, No condensation) | |
| Storage temperature | -10 to +60°C (Humidity of 10 to 90%, No condensation) |
| Mass | Approx. 12.3 kg |
* Pixel shifting technology achieves 4K resolution on screen.
** Approximate time until the light source brightness decreases to half of its original value. (Assuming the projector is used in an atmosphere in which airborne particulate matter is less than 0.04 to 0.2mg / m^3 . The estimated time varies depending on the projector usage and operating conditions.)
This product is also designed for IT power distribution system with phase-to-phase voltage 230V.
Angle of tilt
There is no vertical or horizontal limit to how the projector can be installed.
Related Links
- "Connector Specifications" p.114
Connector Specifications
| HDMI1 port | 1 | HDMI |
| HDMI2 (ARC) port | 1 | HDMI |
| HDMI3 (Game) port | 1 | HDMI |
| USB-A port | 2 | USB connector (Type A) |
| Service port | 1 | USB connector (Mini-B) |
| Audio Out port | 1 | Stereo mini jack (3.5Φ) |
| Optical Out port | 1 | Optical digital audio connector (S/PDIF) |
| DC Out (2.0A) port | 1 | USB connector (Type A) |

USB-A port supports USB 2.0. However, USB ports are not guaranteed to operate all devices that support USB.
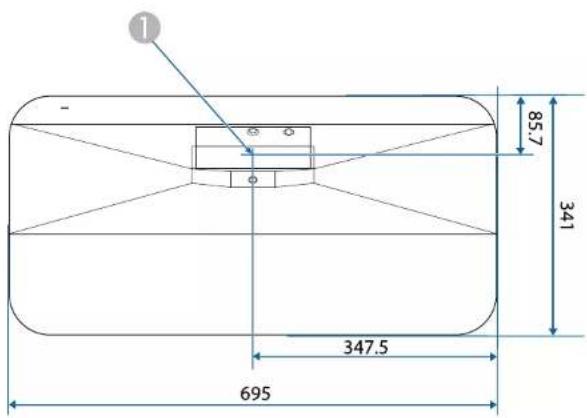
① Center of the projection window
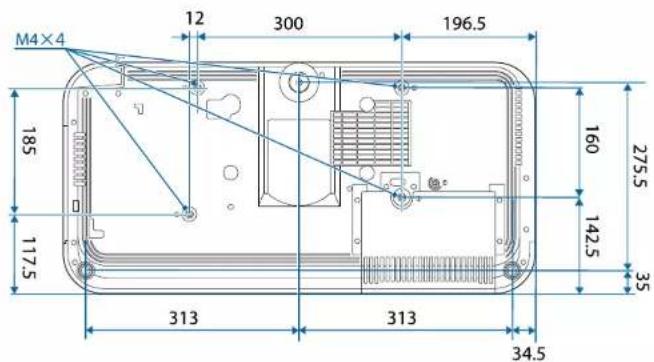
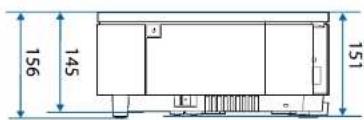
The unit in these illustrations is mm.
List of Safety Symbols and Instructions
The following table lists the meaning of the safety symbols labeled on the equipment.
| No. | Symbol mark | Approved standards | Description |
| 1 | IEC60417No. 5007 | "ON" (power)To indicate connection to the mains. | |
| 2 | IEC60417No. 5008 | "OFF" (power)To indicate disconnection from the mains. | |
| 3 | IEC60417No. 5009 | Stand-byTo identify the switch or switch position by means of which part of the equipment is switched on in order to bring it into the stand-by condition. | |
| 4 | ISO7000No. 0434B,IEC3864-B3.1 | CautionTo identify general caution when using the product. | |
| 5 | IEC60417No. 5041 | Caution, hot surfaceTo indicate that the marked item can be hot and should not be touched without taking care. | |
| 6 | IEC60417No. 6042ISO3864-B3.6 | Caution, risk of electric shockTo identify equipment that has risk of electric shock. | |
| 7 | IEC60417No. 5957 | For indoor use onlyTo identify electrical equipment designed primarily for indoor use. | |
| 8 | IEC60417No. 5926 | Polarity of d.c. power connectorTo identify the positive and negative connections (the polarity) on a piece of equipment to which a d.c. power supply may be connected. |
| No. | Symbol mark Approved standards | Description | |
| 9 | 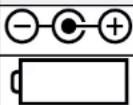 | — The same as No. 8. | |
| 10 | IEC60417No. 5001B | Battery, generalOn battery powered equipment. To identify a device for instance a cover for the battery compartment, or the connector terminals. | |
| 11 | 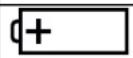 | IEC60417No. 5002 | Positioning of cellTo identify the battery holder itself and to identify the positioning of the cell(s) inside the battery holder. |
| 12 | 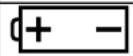 | — The same as No. 11. | |
| 13 |  | IEC60417No. 5019 | Protective earthTo identify any terminal which is intended for connection to an external conductor for protection against electric shock in case of a fault, or the terminal of a protective earth electrode. |
| 14 |  . . | IEC60417No. 5017 | EarthTo identify an earth (ground) terminal in cases where neither the symbol No. 13 is explicitly required. |
| 15 |  | IEC60417No. 5032 | Alternating currentTo indicate on the rating plate that the equipment is suitable for alternating current only; to identify relevant terminals. |
| 16 |  | IEC60417No. 5031 | Direct currentTo indicate on the rating plate that the equipment is suitable for direct current only; to identify relevant terminals. |
List of Safety Symbols and Instructions
| No. | Symbol mark | Approved standards | Description |
| 17 |  | IEC60417No. 5172Class II equipmentTo identify equipment meeting the safety requirements specified for Class II equipment according to IEC 61140. | |
| 18 |  | ISO 3864 General prohibitionTo identify actions or operations that are prohibited. | |
| 19 |  | ISO 3864 Contact prohibitionTo indicate injury that could occur due to touching a specific part of the equipment. | |
| 20 | 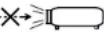 | — Never look into the optical lens while the projector is on. | |
| 21 |  | — To indicate that the marked item don't place anything on projector. | |
| 22 |  | ISO3864IEC60825-1Caution, laser radiationTo indicate the equipment has a laser radiation part. | |
| 23 |  | ISO 3864 Disassembly prohibitionTo indicate a risk of injury, such as electric shock, if the equipment is disassembled. | |
| 24 |  | IEC60417No. 5266Standby, partial standbyTo indicate that part of the equipment is in the ready status. | |
| 25 |  | ISO3864IEC60417No. 5057Caution, movable partsTo indicate that you must keep away from movable parts according to protection standards. | |
| 26 |  | IEC60417No. 6056Caution (Moving Fan Blades)As a safety precaution, stay away from the moving fan blades. |
| No. | Symbol mark | Approved standards | Description |
| 27 |  | IEC60417No. 6043Caution (Sharp Corners)To indicate sharp corners that should not be touched. | |
| 28 |  | — To indicate that looking into the lens while projecting is prohibited. | |
| 29 |  | ISO7010No. W027ISO 3864Warning, Optical radiation (such as UV, visible radiation, IR)Taking care to avoid injury to eyes and skin when in the vicinity of optical radiation. | |
| 30 |  | IEC60417No. 5109Not to be used in residential areas.To identify electrical equipment which is not suitable for a residential area. |
This projector is a Class 1 laser product that complies with the IEC/EN60825-1:2014 international standard for lasers.
Follow these safety instructions when using the projector.

Warning
- Do not open the projector's case. The projector contains a high-powered laser.
- Possibly hazardous optical radiation emitted from this product. Do not look at operating light source. Eye injury may result.

Caution
Do not disassemble the projector when disposing of it. Dispose according to your local or national laws and regulations.

The projector uses a laser as the light source. The laser has the following characteristics.
- Depending on the surroundings, the brightness of the light source may decline. The brightness declines a lot when the temperature gets too high.
- The brightness of the light source declines the longer it is used. You can change the relationship between usage time and decline in brightness settings.
»»Related Links
• "Laser Warning Labels" p.118
Laser Warning Labels
Laser warning labels are attached on the projector.
Inside

DANGER
As with any bright source, do not stare into the beam, RG2 IEC/EN 62471-5:2015.
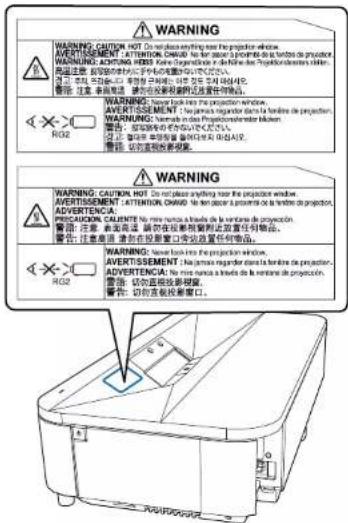

Warning
- Never look into the projector lens when the laser is on. This can damage your eyes and is especially dangerous for children and pets.
- When turning on the projector at a distance using the remote control, make sure no one is looking into the lens.
- Do not allow small children to operate the projector. Children must be accompanied by an adult.
- Do not look into the lens during projection. Also, do not look into the lens using optical devices, such as a magnifying glass or telescope. This could cause visual impairment.
For North/South America
This projector is a Class 1 laser product that complies with the IEC/EN60825-1:2014 international standard for lasers. Follow these safety instructions when using the projector.
Complies with FDA performance standards for laser products except for conformance as a Risk Group 2 LIP as defined in IEC 62471-5: Ed. 1.0. For more information see Laser Notice No. 57, dated May 8, 2019.
Glossary
This section briefly explains the difficult terms that are not explained in the text of this guide. For details, refer to other commercially available publications.
| Aspect Ratio The ratio between an image's length and its height.Screens with a horizontal:vertical ratio of 16:9, such as HDTV screens, are known as wide screens.SDTV and general computer displays have an aspect ratio of 4:3. | |
| Contrast The relative brightness of the light and dark areas of an image can be increased or decreased to make text and graphics stand out more clearly, or to make them appear softer. Adjusting this particular property of an image is called contrast adjustment. | |
| Full HD A screen size standard with a resolution of 1,920 (horizontal) × 1,080 (vertical) dots. | |
| HDCP HDCP is an abbreviation for High-bandwidth Digital Content Protection.It is used to prevent illegal copying and protect copyrights by encrypting digital signals sent over DVI and HDMI ports.Because the HDMI port on this projector supports HDCP, it can project digital images protected by HDCP technology.However, the projector may not be able to project images protected with updated or revised versions of HDCP encryption. | |
| HDMI ^® | An abbreviation for High Definition Multimedia Interface.HDMI ^® is a standard aimed at digital consumer electronics and computers. This is the standard by which HD images and multichannel audio signals are digitally transmitted.By not compressing the digital signal, the image can be transferred at the highest quality possible. It also provides an encryption function for the digital signal. |
| HDTV An abbreviation for High-Definition Television that refers to high-definition systems which satisfy the following conditions:Vertical resolution of 720p or 1080i or greater (p = Progressive, i = Interlace)Screen aspect ratio of 16:9 | |
| Pairing Register devices in advance when connecting with Bluetooth devices to ensure mutual communication. | |
| Refresh Rate The light-emitting element of a display maintains the same luminosity and color for an extremely short time.Because of this, the image must be scanned many times per second to refresh the light-emitting element.The number of refresh operations per second is called the Refresh rate and is expressed in hertz (Hz). |
| SDTV An abbreviation for Standard Definition Television that refers to standard television systems which do not satisfy the conditions for HDTV High-Definition Television. |
Check these sections for important notices about your projector.
>>Related Links
• "FCC Compliance Statement" p.121
- "Indication of the manufacturer and the importer in accordance with requirements of EU directive" p.122
- "Restriction of Use" p.122
- "Trademarks" p.122
• "Copyright Notice" p.122
• "Copyright Attribution" p.123
FCC Compliance Statement
Supplier's DECLARATION of CONFORMITY
According to 47CFR, Part 2 and 15
Class B Personal Computers and Peripherals; and/or
CPU Boards and Power Supplies used with Class B Personal Computers
We: Epson America, Inc.
Located at: 3131 Katella Avenue, Los Alamitos, CA
Tel: 562-981-3840
Declare under sole responsibility that the product identified herein, complies with 47CFR Part 2 and 15 of the FCC rules as a Class B digital device. Each product marketed, is identical to the representative unit tested and found to be compliant with the standards. Records maintained continue to reflect the equipment being produced can be expected to be within the variation accepted, due to quantity production and testing on a statistical basis as required by 47CFR 2.906. Operation is subject to the following two conditions: (1) this device may not cause harmful interference, and (2) this device must accept any interference received, including interference that may cause undesired operation.
Trade Name: EPSON
Type of Product: LCD Projector
Model: HA90B
FCC Compliance Statement For United States Users
This device complies with part 15 of the FCC Rules. Operation is subject to the following two conditions: (1) This device may not cause harmful interference, and (2) this device must accept any interference received, including interference that may cause undesired operation.
This equipment has been tested and found to comply with the limits for a Class B digital device, pursuant to Part 15 of the FCC Rules. These limits are designed to provide reasonable protection against harmful interference in a residential installation. This equipment generates, uses, and can radiate radio frequency energy and, if not installed and used in accordance with the instructions, may cause harmful interference to radio communications. However, there is no guarantee that interference will not occur in a particular installation. If this equipment does cause interference to radio and television reception, which can be determined by turning the equipment off and on, the user is encouraged to try to correct the interference by one or more of the following measures.
- Reorient or relocate the receiving antenna.
- Increase the separation between the equipment and receiver.
- Connect the equipment into an outlet on a circuit different from that to which the receiver is connected.
- Consult the dealer or an experienced radio/TV technician for help.
WARNING
The connection of a non-shielded equipment interface cable to this equipment will invalidate the FCC Certification or Declaration of this device and may cause interference levels which exceed the limits established by the FCC for this equipment. It is the responsibility of the user to obtain and use a shielded equipment interface cable with this device. If this equipment has more than one interface connector, do not leave cables connected to unused interfaces. Changes or modifications not expressly approved by the manufacturer could void the user's authority to operate the equipment.
Indication of the manufacturer and the importer in accordance with requirements of EU directive
Manufacturer: SEIKO EPSON CORPORATION
Address: 3-5, Owa 3-chome, Suwa-shi, Nagano-ken 392-8502 Japan
Telephone: 81-266-52-3131
http://www.epson.com/
Importer: EPSON EUROPE B.V.
Address: Atlas Arena, Asia Building, Hoogoorddreef 5,1101 BA Amsterdam Zuidoost
The Netherlands
Telephone: 31-20-314-5000
http://www.epson.eu/
Restriction of Use
When this product is used for applications requiring high reliability/safety such as transportation devices related to aviation, rail, marine, automotive etc.; disaster prevention devices; various safety devices etc; or functional/precision devices etc, you should use this product only after giving consideration to including fail-safes and redundancies into your design to maintain safety and total system reliability. Because this product was not intended for use in applications requiring extremely high reliability/safety such as aerospace equipment, main communication equipment, nuclear power control equipment, or medical equipment related to direct medical care etc, please make your own judgment on this product's suitability after a full evaluation.
Trademarks
EPSON is a registered trademark, EXCEED YOUR VISION and its logos are registered trademarks or trademarks of Seiko Epson Corporation.
Mac, OS X, and macOS are trademarks of Apple Inc.
Microsoft, Windows, and the Windows logo are trademarks or registered trademarks of Microsoft Corporation in the United States and/or other countries.
Google, Google Play, Android TV, Chromecast built-in and other marks are trademarks of Google LLC.
Google Assistant is not available in certain languages and countries. Availability of services varies by country and language.
Manufactured under license from Dolby Laboratories. Dolby, Dolby Audio, and the double-D symbol are trademarks of Dolby Laboratories.
HDMI, the HDMI Logo and High-Definition Multimedia Interface are trademarks or registered trademarks of HDMI Licensing Administrator, Inc. HDMI
"QR Code" is a registered trademark of DENSO WAVE INCORPORATED.
Wi-Fi is a trademark of the Wi-Fi Alliance
The Bluetooth word mark and logos are registered trademarks owned by Bluetooth SIG, Inc. and any use of such marks by Seiko Epson Corporation is under license. Other trademarks and trade names are those of their respective owners.
Adobe and Adobe Reader are either registered trademarks or trademarks of Adobe Systems Incorporated in the United States and/or other countries.
Other product names used herein are also for identification purposes only and may be trademarks of their respective owners. Epson disclaims any and all rights in those marks.
Copyright Notice
All rights reserved. No part of this publication may be reproduced, stored in a retrieval system, or transmitted in any form or by any means, electronic, mechanical, photocopying, recording, or otherwise, without the prior written permission of Seiko Epson Corporation. No patent liability is assumed with respect to the use of the information contained herein. Neither is any liability assumed for damages resulting from the use of the information contained herein.
Notices
Neither Seiko Epson Corporation nor its affiliates shall be liable to the purchaser of this product or third parties for damages, losses, costs, or expenses incurred by the purchaser or third parties as a result of: accident, misuse, or abuse of this product or unauthorized modifications, repairs, or alterations to this product, or (excluding the U.S.) failure to strictly comply with Seiko Epson Corporation's operating and maintenance instructions.
Seiko Epson Corporation shall not be liable against any damages or problems arising from the use of any options or any consumable products other than those designated as Original Epson Products or Epson Approved Products by Seiko Epson Corporation.
The contents of this guide may be changed or updated without further notice.
Illustrations in this guide and the actual projector may differ.
Copyright Attribution
This information is subject to change without notice.
© 2022 Seiko Epson Corporation
2022.7 414293900EN

- Notations Used in This Guide 5
- Introduction to Your Projector 8
- Setting Up the Projector 15
- Using Basic Projector Features 34
- Contents
- Adjusting Projector Features 62
- Adjusting the Menu Settings 74
- Maintaining the Projector 85
- Solving Problems 94
- Appendix 109
- Notations Used in This Guide
- Safety Symbols
- Using the Manual to Search for Information
- Searching by keyword
- Jumping directly from bookmarks
- Printing only the pages you need
- Introduction to Your Projector
- Projector Parts and Functions
- Related Links
- >>Related Links
- Projector Parts - Interface Ports
- Projector Parts - Projector Remote Control
- Setting Up the Projector
- Projector Placement
- Warning
- Attention
- »»Related Links
- Projector Setup and Installation Options
- Precautions on Installation
- Installation space
- Installing the Safety Wire
- When Using the Ceiling Mount ELPMB22
- When Using the Ceiling Mount ELPMB30
- Tighten the carabiner lock.
- Projector Connections
- Connecting to Video Sources
- Connecting to External USB Devices
- Connecting to External Audio Devices
- Connecting to a Streaming Media Player
- Connecting to an ARC Compatible AV System
- Connecting to a Gaming Device
- Connecting Headphones
- Caution
- Attaching and Removing the Side Cover
- Installing Batteries in the Remote Control
- Remote Control Operation
- Setting Up Android TV on the Projector
- Android TV Home Screen
- Using Basic Projector Features
- Turning On the Projector
- Turning Off the Projector
- Projection Modes
- Changing the Projection Mode Using the Menus
- Adjusting the Image Height
- Focusing the Image Using the Focus Lever
- Adjusting Image Color when Projecting on to a Wall
- Correcting Distortion in the Image
- Adjusting the Light Source Brightness Based on the Brightness of Your Surroundings
- Adjusting the Light Source Brightness Manually
- Adjusting Contrast Based on the Brightness of the Content
- Selecting an Image Source
- Image Aspect Ratio
- Changing the Image Aspect Ratio
- Available Image Aspect Ratios
- Color Mode
- Changing the Color Mode
- Available Color Modes
- Adjusting the Image Quality
- Adjusting Image Quality in Detail
- Press to exit the menus.
- Adjusting the Image Resolution
- Setting Frame Interpolation
- Controlling the Volume with the Volume Buttons
- Adjusting the Sound Settings (Sound Mode)
- Available Sound Modes
- Detailed Sound Settings
- Turning Off the Sound Temporarily (Audio Mute)
- Shutting Off the Image Temporarily (Blank)
- Adjusting Projector Features
- Changing the Image Size or Position (Flexible Picture)
- Flipping the Image Horizontally (Flexible Picture)
- Blurring the Edges of the Image (Flexible Picture)
- Using the Projector as a Bluetooth Speaker
- Using Your Projector as Chromecast
- Operating Connected Devices Using the HDMI CEC Features
- HDMI CEC Features
- Installing a Security Cable
- Updating Projector Firmware
- Initializing the Projector
- Adjusting the Menu Settings
- Using the Projector Settings
- Image Quality Settings - Picture Menu
- Sound Quality Settings - Sound Menu
- Projector Installation Settings - Installation Menu
- Projector Feature Settings - Settings Menu
- Projector Information Display - Information Menu
- Projector Bluetooth Speaker Settings - Bluetooth Speaker Mode Menu
- Maintaining the Projector
- Projector Maintenance
- Cleaning the Projection Window
- Cleaning the Obstacle Sensor and Motion Sensor
- Cleaning the Projector Case
- Air Filter and Vent Maintenance
- Cleaning the Air Filter
- Replacing the Air Filter
- Cleaning the Air Intake Vents
- Solving Problems
- Projection Problems
- Projector Indicator Status
- Solving Projector Power-On or Power-Off Problems
- Solving Projector Power Problems
- Solving Projector Shutdown Problems
- Solving Missing Image Problems
- Solving Curved or Not Rectangular Image Problems
- Solving Flipped Image Problems
- Solving Small Image Problems
- Adjusting a Fuzzy or Blurry Image
- Fixing Partial Image Problems
- Adjusting an Image that Contains Noise or Static
- Adjusting an Image with Incorrect Brightness or Colors
- Solving Image Problems
- »»»Related Links
- Solving Missing or Low Audio Problems
- Solving Bluetooth Speaker Mode Problems
- Solving Sound Problems
- Solving Remote Control Operation Problems
- Solving HDMI CEC Problems
- Solving Wi-Fi Network Problems
- Solving Android TV Problems
- Appendix
- Optional Accessories and Replacement Parts
- Mounts
- External Devices
- Screens
- Replacement Parts
- Screen Size and Projection Distance
- Supported Monitor Display Resolutions
- Projector Specifications
- Angle of tilt
- List of Safety Symbols and Instructions
- Laser Warning Labels
- DANGER
- For North/South America
- Glossary
- FCC Compliance Statement
- Supplier's DECLARATION of CONFORMITY
- FCC Compliance Statement For United States Users
- Indication of the manufacturer and the importer in accordance with requirements of EU directive
- Restriction of Use
- Trademarks
- Copyright Notice
- Notices
- Copyright Attribution
Brand : EPSON
Model : EH-LS800B
Category : Video projector