BRI-85N - Heating Ravanson - Free user manual and instructions
Find the device manual for free BRI-85N Ravanson in PDF.


| Product Type | Portable Gas Heater |
| Model | Ravanson BRI-85N |
| Gas Type | LPG (G30) |
| Supply Pressure | 37 mbar |
| Maximum Heating Power | 3.4 kW (246 g/h) |
| Nozzle Diameter | 0.85 mm |
| Device Category | I3P(B/P) |
| Dimensions (Approx.) | Height: 70 cm, Width: 40 cm, Depth: 30 cm |
| Weight (Approx.) | 10 kg |
| Intended Use | Outdoor heating only, not for residential spaces |
| Ignition | Manual (match or igniter) |
| Safety Features | Thermocouple flame failure device, overheat protection |
| Gas Connection | Via certified hose (min 50 cm) and pressure-reducing valve (37 mbar, EN 12864) |
| Minimum Room Volume for Indoor Use | 35 m³ (with ventilation of at least 85 cm²) |
| Minimum Clearances | Sides/rear: 100 cm, Front: 200 cm from walls or obstacles |
| Maintenance | Keep burner, control system, and air circuits clean; inspect hose quarterly; yearly professional check |
| Storage | Disconnect cylinder; store heater indoors only with cylinder removed |
| Spare Parts & Service | Authorized service via Quadra-Net; helpline 61 853 44 44; www.ravanson.pl |
| Warranty | Void if improperly connected or modified |
Frequently Asked Questions - BRI-85N Ravanson
User questions about BRI-85N Ravanson
0 question about this device. Answer the ones you know or ask your own.
Ask a new question about this device
Download the instructions for your Heating in PDF format for free! Find your manual BRI-85N - Ravanson and take your electronic device back in hand. On this page are published all the documents necessary for the use of your device. BRI-85N by Ravanson.
USER MANUAL BRI-85N Ravanson
EN User's Manual Gas heater
EN NOTE: FOLLOW THE INSTRUCTIONS IN THIS MANUAL. FAILURE TO FOLLOW THESE INSTRUCTIONS MAY RESULT IN A FIRE OR AN EXPLOSION, AND AS A CONSEQUENCE MAY LEAD TO PROPERTY DAMAGE, HEALTH DAMAGE AND EVEN DEATH.
This product cannot be used as a primary heating source
SK POZNÁMKA: POSTUPUJTE PODLA POKYNOV V TEJTO PRÍRUČKE. NEDODRŽANIE TÝCHTO POKYNOV MÔŽE SPÓSOBIŤ POŽIAR ALEBO VÝBUCH, A TO MÔŽE VIESŤ K ŠKODE NA MAJETKU, ŠKODE NA O ZDRAVÍ A AJ SMRTI.
natural_image
Technical line drawing of a mechanical assembly with bracket and mounting bracket (no text or symbols)natural_image
Technical line drawing of a mechanical assembly with mounting bracket and clamping mechanism (no text or symbols)natural_image
Technical line drawing of a mechanical assembly with a cylindrical component and mounting bracket (no text or symbols)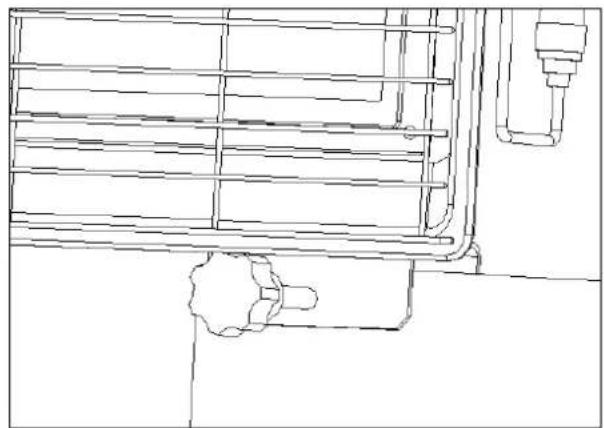
natural_image
Line drawing of a mechanical or architectural component with no visible text, numbers, or symbolsnatural_image
Line drawing of a vehicle interior with structural elements and a small vehicle (no text or symbols)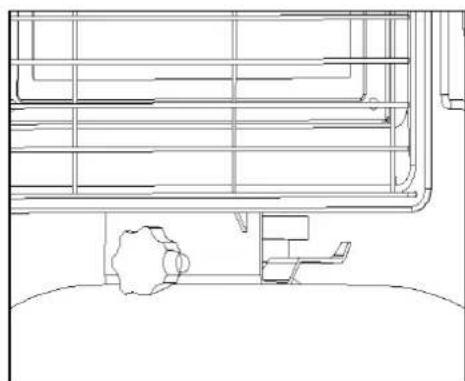
natural_image
Line drawing of a room interior with furniture and structural lines (no text or symbols)Before the first use of this gas heater, please read this manual carefully, including instructions and guidelines for the appropriate use and operation of the device. The manual should be kept for reference as it contains important information.

PLEASE NOTE! Please read the entire manual carefully before installing, switching on or operating the heater. Incorrect use of the heater may lead to serious injuries or death due to burns, fire and carbon oxide poisoning.


Save all warnings and safety instructions for future reference.
GENERAL SAFETY INSTRUCTIONS

The device should be installed in accordance with applicable law and used only outdoors. READ THE INSTRUCTIONS BEFORE INSTALLING AND USING.
The user bears every risk related to installing and operating the gas heater. The failure to comply with the warnings and instructions included in this manual may cause serious injuries, death or property damage. If the user cannot read or understand the manual fully s/he should contact the seller. The distributor shall not be held liable for the user's negligence.
FOR YOUR OWN SAFETY
If you smell gas:
- Turn off the gas supply to the appliance.
- Extinguish any open flame.
- If odor continues, immediately call your gas supplier or your fire Department.
DANGER OF EXPLOSION AND FIRE!
Do not store or use gasoline or other flammable vapors and liquids near this device - risk of explosion and fire!
Gas cylinders not connected for use can't be stored near this appliance!
Do not place anything on or near this device!
Clothing or other flammable materials can't be hung on, placed on or near the heater!
THE DEVICE IS NOT USED FOR HEATING RESIDENTIAL BUILDINGS
- This device must be installed in accordance with the applicable law.
- The device installation and maintenance must be carried out by a qualified person.
- Before using, remove all the protections installed for transport.
-
Do not install the heater in any of the places mentioned below:
-
Bedroom or bathroom
• Car, caravan or camper - In places where the curtains, furniture, clothes or other flammable objects are located closer than 2 metres to the heater front, top or sides
- Fireplace
- Rooms and areas where the device will be exposed to the direct impact of wind or draught
- Places with high circulation intensity
- Basements or rooms below the ground level
-
Blocks of flats and multi-floor buildings
-
Any repairs must be carried out by the authorised repair service.
-
Incorrect installation, adjustment, modification can lead to
injuries or property losses.
- Do not modify the device in any way.
- The device should be used solely for heating space.
- Do not place any objects on the device or beside it.
- Do not hang or put clothes or other flammable materials on the heater, or beside it.
- Do not store chemicals, flammable materials or aerosols near the device.
- Do not use the device in places with flammable substance vapours or dust suspended. Do not use it also in places where petrol or other flammable materials are stored.
-
If you smell the gas, turn off all the gas valves immediately - both the valve on the device and on the gas cylinder. Please follow the guidelines below:
-
Put out any open flame
- Do not switch any device
- Do not touch any electric switch
- Do not use the telephone in the building
- Call your gas provider immediately, by calling from your neighbour's phone. Follow the instructions received from the gas provider
-
If it is impossible to contact the gas provider, call the fire brigade
-
Always use the heater in a well ventilated room!
- The heater must be supplied with fresh air. Otherwise the burning process will not be correct.
- This heater must be ensured correct ventilation supplying fresh air from outside. The device has a thermocouple that will cut off the gas supply if the flame accidentally goes out.
- Do not switch the heater on in closed rooms. The device emits the combustion products to the room where it is used which is why fresh air supply is that important.
-
If the heater keeps switching off, do not light it up again before ensuring fresh air supply. If the heater would not light up, contact the maintenance service.
-
Do not use natural gas to fuel the device. The device is designated for LPG (G30 37mbar I _3B/P ).
-
The device must be used with a hose and pressure-reducing valve. Contact your gas provider.
-
Do not replace the pressure-reducing valve with another one, not recommended by the heater manufacturer. The device supply parameters are specified on the rating plate.
-
Do not connect the device directly to a gas cylinder. The device must be used with a pressure-reducing valve with the output pressure of 37 mbar.
-
Do not store or use petrol or other flammable gases and liquids near the heater.
-
Before every use the entire gas system, hose, controller, pressure-reducing valve, fumes analyser system and burners should be inspected for any leaks or damage and at least once a year by a qualified technician.
-
Any leak tests should be carried out with the soapy water or specialist measurement instruments. Do not use open flame to detect the leaks.
-
Do not use the heater until all the connections have been inspected for leaks.
-
Do not move the heater when in use.
-
Before any maintenance, cleaning or repair, switch the heater off and leave to cool down.
-
After switching off do not move the heater until the temperature falls down.
-
Controllers, burner, fume analyser and air circuits must be kept clean.
-
Clean the heater frequently to ensure correct operation.
-
The gas cylinder should be disconnected when the heater is not used.
-
ATTENTION! Do not expose the device to rain and moisture.
-
Do not use the heater if any part has been covered with water. Call a qualified technician to inspect the heater and
replace any part of the control system or gas control systems that had contact with water.
-
Do not twist flexible tubes and hoses. The hose cannot go close to sharp edges or objects with sharp ends.
-
Every cover or other protective device removed to inspect the heater must be installed before the heater is switched on again.
-
Adults and children should stay away from the hot surface to avoid scalds and clothes' ignition.
-
Please pay attention to children staying in the heater's vicinity. Do not let them sit, stand or play near the heater. Children and the disabled must not be left unattended near the heater.
-
Please pay attention to pets staying in the heater's vicinity.
-
Do not leave the turned-on heater unattended!
-
Keep the place where the heater is located neat and tidy. Near the heater do not accumulate flammable materials, petrol and other flammable gases and liquids.
-
The surface of the room in which the heater is to be placed should not be less than 35 m3.
-
The size of the ventilation openings should be at least 85 cm2.
-
Due to the risk of fire, never install the heater in a place where curtains, furniture, clothing or other flammable objects are within 200 cm of the front, top surface or sides of the heater
-
NEVER place the heater against a wall, keep a safe distance of 200 cm from the wall. ALWAYS position the front of the heater towards the center of the room. Be especially careful when the heater is placed on a surface that is likely to be knocked over by children or pets.
-
Despite proper use of the device and following all safety guidelines some specific residual risks cannot be completely eliminated.
GENERAL SAFETY INSTRUCTIONS
- Equip the space with at least one smoke, gas and carbon oxide detector.
- At least one ready to use dry powder extinguisher should be available.
- Do not store paper or waste near the source of heat.
- Paints, solvents and other flammable liquids should be stored far from the sources of heat and ignition.
- Develop evacuation plan in case of fire and ensure everyone understands the plan and is able to follow it in emergency.
- The first symptoms of carbon oxide poisoning resemble flu, with headache, nausea or dizziness. If the user notices such symptoms, the heater may not work properly. GO OUTSIDE IMMEDIATELY and have the heater serviced. Some people are especially susceptible to carbon oxide. This pertains to pregnant women, people suffering from heart or diseases, anemia, under the influence of alcohol or with acute mountain sickness.
Keep children away from the heater during use
DESIGNATION
The heater may only be used outdoors. Never use it indoors.
This device needs oxygen to work properly, so if there is a need to use the heater indoors, access to fresh air should be provided.
Combustion of gas produces flue gases that should be discharged.
This device is not a residential space heater!
It is forbidden to use it to heat residential spaces (offices and other working environments and residential environments)!
Do not expose the device to rain; do not use the device in a wet or humid environment. Do not use the device near flammable liquids or gases.
PLEASE NOTE!
The protective cover of this device prevents the risk of fire or scalds and it is not recommended to remove any of its parts permanently.
THE PROTECTIVE COVER DOES NOT ENSURE COMPREHENSIVE PROTECTION FOR CHILDREN
OR THE DISABLED!
Every cover or other protective device removed to inspect the heater must be installed before the heater is switched on again.
LEAK TEST (CHECKING THE TIGHTNESS OF GAS CIRCUIT CONNECTIONS)
PLEASE NOTE!
- Put out any open flame.
- Do not smoke cigarettes during the leak test.
Gas tubes in the heater were factory tested for leaks before delivery. A complete leak test must be carried out in the installation site due to any possible incorrect handling of the shipment or excess pressure put on the heater. The heater must be checked with a full gas cylinder.
Do not check tightness with open flame (e.g. match or candle). This may cause explosion! Use soapy water, spray or specialist measurement instruments to check tightness.
- Ensure the safety valve is switched off.
- Mix one unit of soap and one unit of water. Soapy water can be applied by means of a sprayer bottle, brush or cloth for all gas hoses. If there is any leaks, soap bubbles will appear.
- Turn on the valve on the gas cylinder (paying special attention to the connections of the flexible hose and the pressure-reducing valve and device).
- If there is any leak, cut off the gas flow. Seal the leak sites, turn on the gas flow again and check all the connections again. If the bubbles keep forming, contact the seller or gas provider.
- The leak test can be carried out also by means of specialist measuring instruments.
PLEASE NOTE!
- The entire gas system, hose, controller, starter, pressure-reducing valve and burner should be tested for leaks before use.
- Check the hose installation for any major abrasion, cuts or wear. Any suspected places should be tested for leaks. If the hose is leaky, it should be replaced with a new one, compliant with the local standards. Do not seal the hose with insulation tape!
- Do not twist flexible tubes and hoses.
- Ensure the ventilation opening of the gas cylinder is patent, and the control chamber, burner and air circuits in the heater are not dirty. If any dirt, cobwebs or insects' nests are found, clean the openings with heavy-duty pipe cleaner or compressed air.
- The control knob should always be pressed and turned by hand. Do not use any tools. If the knob cannot be pressed or turned by hand, do not try to fix it. Call a service technician or gas provider. Using force or attempted repairs can cause fire or gas explosion.
- Always ensure dry powder extinguisher or fire blanket ready to use nearby.
HEATER LOCATION
- The heater is designated for placing on the floor. Please ensure a distance from the walls and other items. The heater location should ensure easy access to control parts
(including the valve on the gas cylinder).
-
The heater must not be placed in passages so as it does not hamper circulation. Access to the heater must not be obstructed with other objects.
-
The heater should be placed in the location ensuring unrestricted air supply for combustion and fume discharge. Do not place any chairs, armchairs etc. where people could rest for a longer time along the fume discharge route.
-
The minimum distance to be ensured while placing the heater:
-
The minimum distance to the rear and sides of the heater - at least 100cm
- The minimum distance to the obstacles in front of the heater - at least 200cm
-
Other sources of heat near the heater - at least 200cm
-
Do not install the heater in:
-
Bedrooms
- Bathrooms, bathhouses, near swimming pools or in other places where the heater could be exposed to water
• In cars, caravans and campers - In places where the curtains, furniture, clothes or other flammable objects are located closer than 200 cm to the heater front, top or sides
- As a fireplace insert
-
In rooms and places entered by wind or draughts (where the burner flame could be blown out)
• In rooms with high circulation intensity
• In cellars and basements
• In blocks of flats and multi-floor buildings -
Do not use the heater in dusty rooms or rooms with vapours of flammable liquids or gases.
-
Do not switch the heater on in places where flammable substances are stored, e.g. petrol or other flammable liquids and gases.
GAS REQUIREMENTS
- This device must be used solely with the gas indicated on the rating plate (G30 37 mbar). This device cannot be adapted for use with other gas types.
- The device requires a certified gas supply hose, at least 50 cm long, and a pressure-reducing valve with the output pressure 37 mbar (EN 12864).
- The maximum adjustable input pressure must not exceed 37 mbar.
- The hose and gas pressure-reducing valve assembly must comply with the applicable standards and local regulations.
- The installation must comply with local regulations and in their absence with the standards for storage and handling of LPG.
- Indented, corroded or damaged gas cylinder may be hazardous and should be inspected by the gas provider. Do not use a gas cylinder with damaged threaded connection between the gas cylinder, valve or thread for installing the pressure-reducing valve.
- The flexible hose connecting the cylinder with the device via the pressure-reducing valve cannot be twisted or exposed to contact with hot or sharp objects.
- Do not connect an unchecked gas cylinder to the heater.
- When the heater is not used, the cylinder must be disconnected.
PLEASE NOTE!
This heater needs fresh air supply to operate properly. Otherwise, gas may not burn as appropriate. To ensure fresh air supply to this device and other fuel-burning devices in your house, please read the instructions below.
All rooms in houses belong to one of three categories with respect to ventilation:
1. STANDARD AIRTIGHT STRUCTURE
Air getting inside by doors and windows can ensure sufficient quantity of fresh air for combustion and ventilation. However, in buildings with above-standard airtight structure it is necessary to ensure additional fresh air supply.
THE STANDARD AIRTIGHT STRUCTURE is defined as the structure where:
- Walls and ceilings exposed to air from outside are equipped with vapour barrier with the permeability ratio not exceeding 1 perm with sealed openings
and
- Sealing tape was used for openable windows and doors
- Seals and sealants are used in such places as joints round the door and window frames, between the substructure and floor, between the walls and ceiling, between wall panels, in passages for systems, electric and gas ducts and other.
2. UNCONFINED SPACE
UNCONFINED SPACE ensuring at least 1.4 m ^-3 per 290 W of the total power output of all devices installed in it. The rooms adjoining the space where the devices are installed, not equipped with doors, are considered to be parts of the unconfined space.
3. CONFINED SPACE
CONFINED SPACE ensuring less than 1.4 m3 per 290 W of the total power output of all devices installed in it. To facilitate ventilation, open the door to the adjoining room. It is also possible to ensure additional ventilation system.
STRUCTURE AND TECHNICAL PARAMETERS
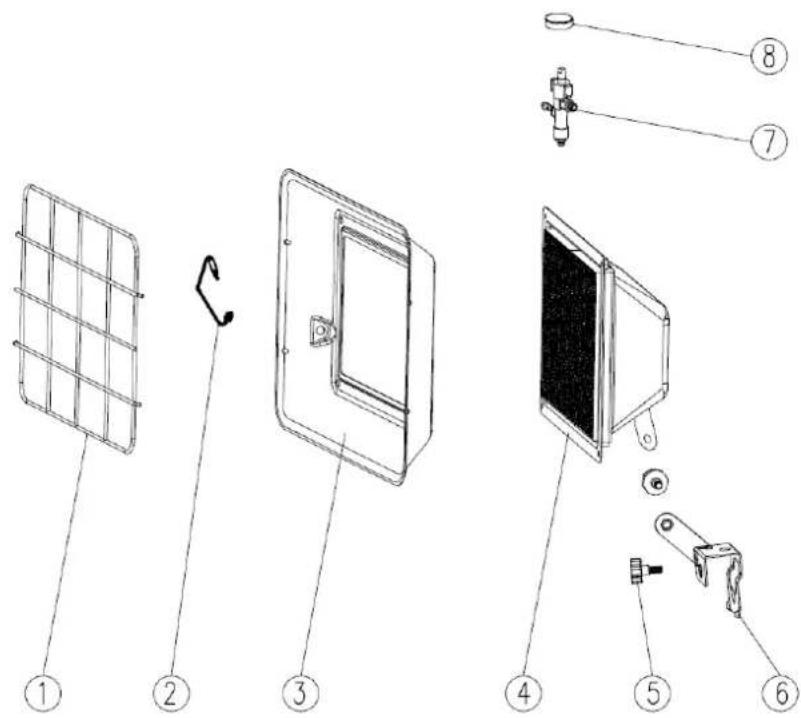
- 1.Grill
- Thermocouple
- Heat reflector
- Burner
- Rubber head screw
- Fixed seat unit
- Valve
- Control knob
PARAMETERS
- Gas type G30
• Supply pressure 37 mbar
• Device category I 3P(B/P) - Destination country: PL (Poland)
• Maximum heating power (gas consumption): 3.4 kW (246 g/h) - Nozzle diameter: 0.85mm
• PIN: 0063CM7144
INSTALLATION INSTRUCTIONS
ATTENTION!
The heater has been factory assembled and tested. Before installation, check that the available gas source is suitable for this heater, referring to the data on the rating plate located on the back of the appliance.
Before starting the installation, make sure that the device itself as well as the hose and reducer are not damaged.
If any defects are found, please contact the seller. The valve on the gas cylinder and the valve on the appliance must be closed during all the following operations.
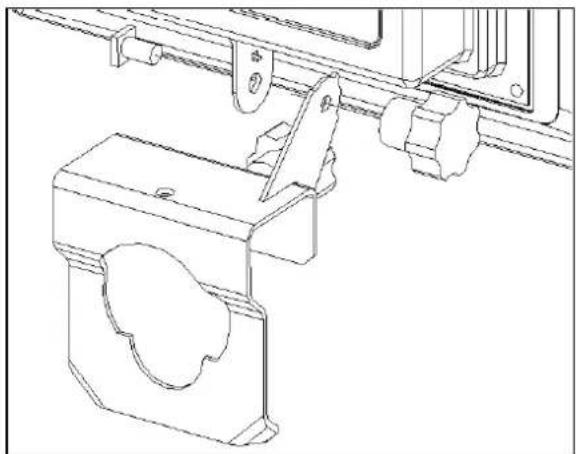
- First, attach the heater's support element to its housing.
The support must be connected to the housing with a knob as shown in Figure 1.1 and 1.2
Depending on the type of gas cylinder (with or without a flange), you must choose the appropriate method of attaching the support element to the housing.
Attaching the support element to the heater housing
natural_image
Technical line drawing of a mechanical assembly with bracket and mounting bracket (no text or symbols)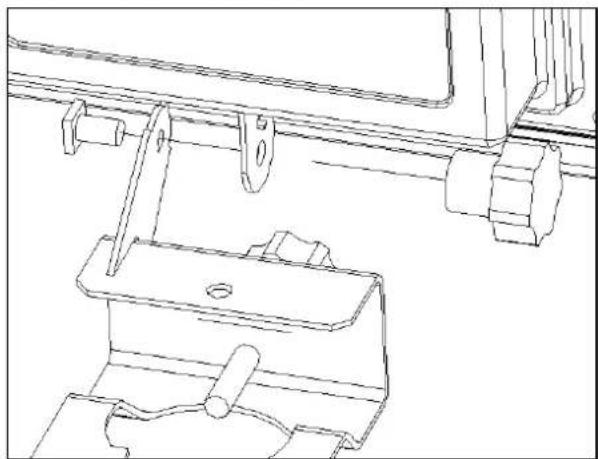
natural_image
Technical line drawing of mechanical components including a bracket and mounting bracket (no text or symbols)Fig. 1.1 Flange cylinder without flange Fig. 1.2 Cylinder
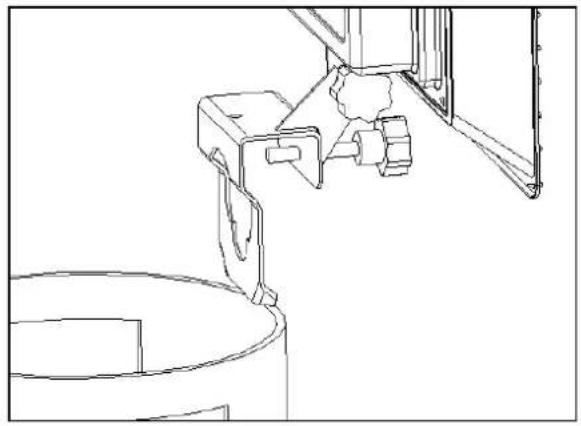
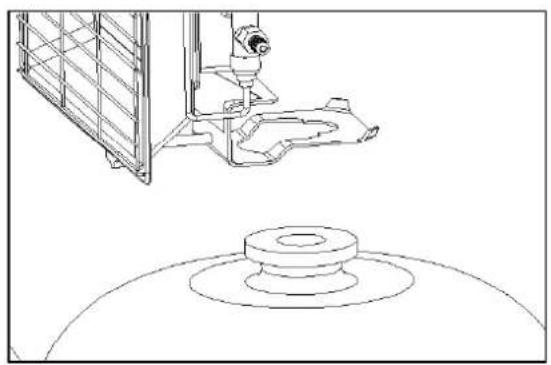
- Attach the heater support element to the gas cylinder.
Figure 2.1 ad 2.2 shows two ways of attaching the support element to the cylinder structure (depending on the type of cylinder).
After attaching the heater's support element to the cylinder, make sure that the SUPPORT ELEMENT IS WELL
natural_image
Line drawing of a mechanical assembly or mounting bracket with no visible text or symbols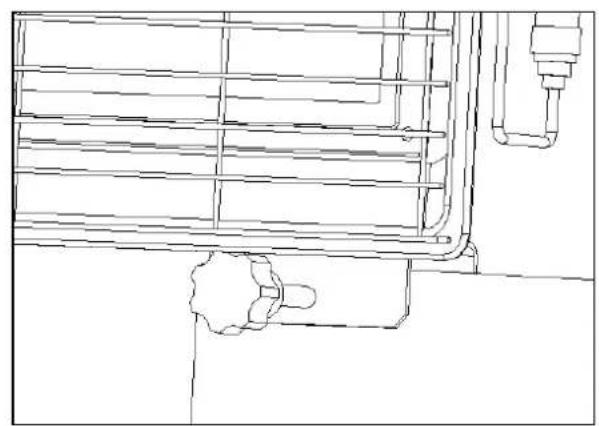
natural_image
Technical line drawing of a mechanical assembly with no visible text or symbolsFig. 2.1 Flange cylinder
natural_image
Technical line drawing of a mechanical assembly with a cylindrical base and a vertical component (no text or symbols)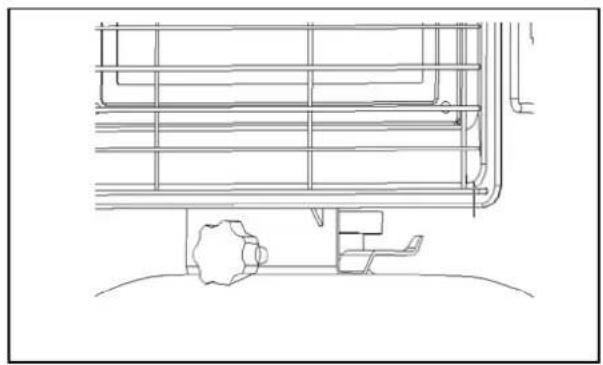
natural_image
Technical line drawing of a vehicle front view showing structural components and roof (no text or symbols)Fig. 2.2 Cylinder without flange
PLEASE NOTE!
- The device needs a controller defined in the "GAS REQUIREMENTS".
- The cylinder must be connected in a room with no fire.
-
Please ensure the gas control system is switched off - the valves on the cylinder and device are closed.
-
The heater should be connected to the gas source using a hose and a suitable reducer. Use a gas regulator with a constant pressure of 37 mbar. The reducer and flexible hose are not included in the equipment of the heater. You must purchase these items separately, on your own.
-
Connect the 50 cm hose to the outlet port on the device and on the pressure-reducing valve.
Fix both connections with metal hose clamps.
- Connect the pressure-reducing valve to the cylinder valve. Tighten it with an adjustable
spanner and check if the connection is tight.
- Do not forget to place a gasket at the pressure-reducing valve nut. The pressure-reducing valve should be appropriate for 37 mbar.
- Test the tightness of the entire connection (see the "LEAK TEST" below).
ATTENTION! The heater cannot be connected directly to the cylinder!
Before starting, make sure that the gas regulator, flexible hose and other elements are properly connected!
PLEASE NOTE!
Before lighting the heater, smell to device vicinity for the presence of fire. Gas can be smelled at the floor level as LPG is heavier than air and keeps near the floor.
IF YOU SMELL ANY GAS:
- Turn off all the gas valves immediately
- Put out any open flame.
- Do not turn on any gas or electric device
- Do not touch any electric switches
-
Do not use a phone in the room
-
Call your gas provider immediately, by calling from your neighbour's phone. Follow the instructions received from the gas provider
- If it is impossible to contact the gas provider, call the fire brigade.
- Whenever possible, open the windows or doors, or increase the ventilation in the room (remember not to turn on any fans or any other devices increasing the air flow).
TO TURN THE HEATER ON
- Turn on the gas valve on the gas cylinder.
- Start the heater - press the knob (located on the back of the heater housing) that activates the gas valve and turn it fully counterclockwise
- Bring the flame of a match or igniter closer to the ceramic plates of the heater. They must be reached through the protective grille. When ignited, an open flame should be visible above the ceramic tiles and cover all ceramic tiles
- With visible flame, continue to press down on the valve actuator knob for approximately 15 seconds. Then release the valve. If the operation fails, try again
- To reduce the heating effect, turn the valve to the SMALL FLAME position by turning it clockwise
- To turn off the gas heater, close the heater valve (knob) by turning it clockwise as far as it will go and close the gas cylinder valve.
ATTENTION!
The heater should not be moved or lifted while it is operating.
ATTENTION!
The heater is hot during operation! Pay special attention to children and pets to keep them away from the operating device.
ATTENTION!
If the flame goes out and you smell gas, close the valve on the gas cylinder immediately!
ATTENTION!
If the heater has not been used for a long time, carefully inspect all its components for damage before restarting.
PLEASE NOTE!
Do not move and do not cover the heater after it is switched off until it cools.
CYLINDER REPLACEMENT
The cylinder must be replaced in a room with no fire, the air free of fire, away from sources of flames and electrical devices.
Please ensure the gas control system is in OFF position.
1 Before replacing the cylinder, turn off the heater by turning the valve on the back of the casing clockwise and the valve at the gas cylinder.
2 Disconnect the heater from the gas source (cylinder) by disconnecting the hose with the reducer from the cylinder. After the heater has been turned off and cooled down, take the cylinder from the housing (first check the cylinder valve is turned off!).
3 Disconnect the pressure-reducing valve from the cylinder in accordance with the manual attached to the pressure-reducing valve.
4 Replace the cylinder.
5 Connect the new cylinder, checking if no gas connections were loosened or damaged.
6 Before connecting the pressure-reducing valve to the cylinder check if the gasket is present and if it is in good condition.
7 Leak test the system using e.g. soapy water.
ATTENTION! If in any doubt, contact a licensed installer.
STORAGE
- Always close the gas cylinder valve after use or in the case of any troubles.
- If the heater is not to be used for a long time, disconnect the cylinder. Disconnect also the pressure-reducing valve and hose.
- The cylinder must be stored outside the room, in a well-ventilated place out of reach of children.
- The disconnected cylinder must possess protections on the threaded connections and valve and cannot be stored in the garage or another confined space.
- The heater can be stored at home solely after the cylinder has been disconnected and removed from the heater.
-
Check the gas valve for its tightness and possible damage. If the user suspects any damage, she should have the gas provider replace it.
-
Do not store the LPG cylinder in below-grade rooms, in multi-floor buildings and houses or in places without the sufficient ventilation.
CLEANING AND MAINTENANCE
PLEASE NOTE!
- Do not carry out maintenance works after switching the heater off and before it cools down.
- Ensure the gas supply has been disconnected and the gas control knob is in the OFF position.
- Do not expose the starter, controllers and parts under the burner to water. Do not use the heater if any of those parts was exposed to water until the device has been inspected or repaired by the service technician.
Periodically verify the technical condition of the device.
At least once a quarter: - Check the condition of the gas hose and replace it if necessary.
At least once a year: - Check the device for signs of corrosion. A corroded device must not be used.
Dirt, or pollution can affect performance of the heater. The heater absorbs air during normal operation. In that process the dirt or pollution will be absorbed into the heater and cobwebs will form when the heater is not used. Keep the burner, gas control system, combustion and air circulation circuits neat and tidy. Inspect the above-mentioned components or have them inspected by a qualified service technician once a year. Heater may require frequent cleaning due to the accumulated floccules or other deposits depending on the operating environment.
FIRST AID FOR SCALDS
A. EYES
Seek medical advice IMMEDIATELY. Do not put any ointments or liquids to the eye.
B. OTHER PLACES
- If the scald has not healed in 24 hours or it exceeds the hand size, seek medical advice.
- If the scald is serious, call the ambulance or doctor immediately.
- Whenever possible, put the affected area under cold water for 10-15 minutes if the skin is intact. Do not use ice or icy water. Cut and remove the clothes from the burned area delicately, not tearing the clothes off Leave the clothes stuck to the burned area. Do not put any creams or ointments on the burned areas.
- If the victim has burned hands or wrists, take off any jewellery if possible without causing any further injuries (rings, watches etc.). This will prevent the need to cut the jewellery as scalds are usually accompanied by swelling.
- Do not pierce the blisters. Protect the burned area with a lightweight gauze dressing.
- If the blisters break, apply soft antibiotic ointment and dress as above.
TROUBLESHOOTING
The three most common problems related to gas heaters include:
A. Gas leaks
B. Incorrect gas pressure
A. GAS LEAKS
DO NOT USE THE HEATER WITHOUT INSPECTING FOR LEAKS. The leaks can take place in transport and installation. Ordinary soapy water applied on the device will indicate any leaks in the form of soap bubbles.
B. INCORRECT GAS PRESSURE
Excess gas pressure can damage the heater seriously. Insufficient pressure will lead incorrect operation of the heater. If the fitter is unable to check gas pressure, contact the gas provider.
SERVICE
The current list of service points can be found at www.ravanson.pl
Service is provided by the Quadra-Net network, please visit www.quadra-net.pl
And the helpline number 61 853 44 44
If the device does not work or does not work properly, turn off the gas valves and contact the service. Do not attempt to repair it yourself. Always contact a service agent, licensed installer, or other qualified person for repair or replacement of parts. Only repairs carried out by authorized persons ensure safe use of the device after repair.
Incorrect connection, improper maintenance, improper use or service may damage the heater and void the warranty.
IMPORTER/Authorized Representative:
RAVANSON Ltd., Sp z.o.o, ul. Mazowiecka 6, 09-100 Płońsk
tel. (0-23) 622 68 01, fax (0-23) 62268 02
www.ravanson.pl
natural_image
Technical line drawings of mechanical components and mounting brackets (no text or symbols)Obr. 1.1 Fl'aša s hrdlom Obr. 1.2 Fl'aša bez hrdla
natural_image
Technical line drawing of a mechanical assembly with no visible text or symbolsObr. 2.1 Fl'aša s hrdlom
natural_image
Technical line drawing of a mechanical assembly and a circular component (no text or symbols)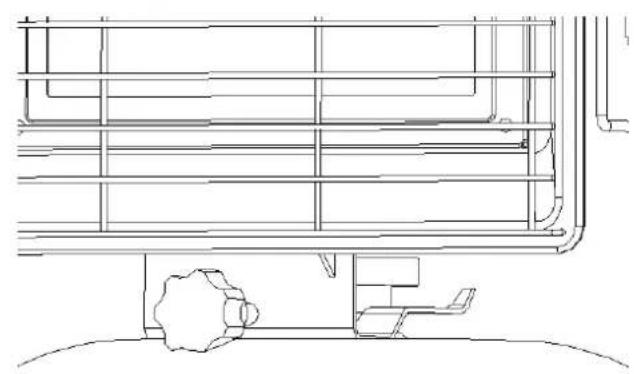
natural_image
Line drawing of a vehicle cabin interior with railings and a seat (no text or symbols)Obr. 2.1 Fl'aša bez hrdla
natural_image
Technical line drawing of a mechanical assembly with mounting bracket and housing (no text or symbols)natural_image
Technical line drawing of a mechanical assembly with mounting brackets and a bracket (no text or symbols)Obr. 1. Láhev bez manžety
natural_image
Technical line drawing of a mechanical assembly with no visible text or symbolsnatural_image
Technical line drawing of a mechanical assembly with a cylindrical component underneath (no text or symbols)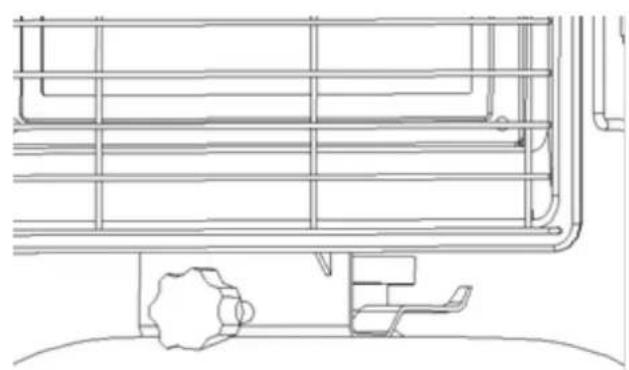
natural_image
Technical line drawing of a vehicle rearview structure with no text or symbolsObr. 2.2 Láhev bez manžety
- GENERAL SAFETY INSTRUCTIONS
- FOR YOUR OWN SAFETY
- DANGER OF EXPLOSION AND FIRE!
- THE DEVICE IS NOT USED FOR HEATING RESIDENTIAL BUILDINGS
- Keep children away from the heater during use
- DESIGNATION
- PLEASE NOTE!
- OR THE DISABLED!
- LEAK TEST (CHECKING THE TIGHTNESS OF GAS CIRCUIT CONNECTIONS)
- Do not check tightness with open flame (e.g. match or candle). This may cause explosion! Use soapy water, spray or specialist measurement instruments to check tightness.
- HEATER LOCATION
- GAS REQUIREMENTS
- STANDARD AIRTIGHT STRUCTURE
- UNCONFINED SPACE
- CONFINED SPACE
- STRUCTURE AND TECHNICAL PARAMETERS
- PARAMETERS
- INSTALLATION INSTRUCTIONS
- ATTENTION!
- IF YOU SMELL ANY GAS:
- TO TURN THE HEATER ON
- CYLINDER REPLACEMENT
- ATTENTION! If in any doubt, contact a licensed installer.
- STORAGE
- CLEANING AND MAINTENANCE
- FIRST AID FOR SCALDS
- EYES
- OTHER PLACES
- TROUBLESHOOTING
- GAS LEAKS
- INCORRECT GAS PRESSURE
- SERVICE
- IMPORTER/Authorized Representative:
- Obr. 2.1 Fl'aša bez hrdla
Brand : Ravanson
Model : BRI-85N
Category : Heating