
Luna - Treadmills Spokey - Free user manual and instructions
Find the device manual for free Luna Spokey in PDF.


| Product Type | Treadmill for home use |
| Brand | Spokey |
| Model | Luna |
| Voltage | 220 V |
| Frequency | 60 Hz |
| Speed Range | 1.0 – 12 km/h |
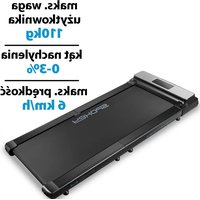
| Maximum User Weight | 110 kg |
| Display | Digital console showing Distance, Time, Calories |
| Preset Programs | 12 programs (P1-P12), default 30 minutes each |
| Emergency Stop | Safety key that pauses the machine immediately |
| Folding | Yes, with locking knobs for easy storage |
| Assembly | Includes hardware and tools; assembly steps provided |
| Lubrication | Apply silicone oil every 30 hours of use |
| Belt Adjustment | Adjustable using provided wrenches for alignment and tension |
| Usage Environment | Indoor, flat surface, well-ventilated area |
| Safety Precautions | Do not use outdoors; keep children away; wear proper attire |
| Power Connection | Dedicated socket; avoid sharing with computers or air conditioners |
| Maintenance | Clean belt and deck weekly; check and tighten screws regularly |
| Intended Users | Adults; not recommended for children, elderly, or pregnant women without medical advice |
| Included Accessories | Safety key, wrenches, silicone oil, assembly screws and pads |
Frequently Asked Questions - Luna Spokey
User questions about Luna Spokey
0 question about this device. Answer the ones you know or ask your own.
Ask a new question about this device
Download the instructions for your Treadmills in PDF format for free! Find your manual Luna - Spokey and take your electronic device back in hand. On this page are published all the documents necessary for the use of your device. Luna by Spokey.
USER MANUAL Luna Spokey
EN Home use treadmill
B


C
D







EN INSTRUCTION
Thank you very much for purchasing our product. Please read this instruction carefully before use it and keep the instruction at proper place.
1. CAUTION
To avoid any hurts, please read this manual carefully before using.

- For safety purpose do not stand on running belt while start.
- Please stop immediately for any feeling of vomit jerky during using.
- Children elder pregnant women patients are prohibited to use the machine.
2. SAFETY NOTIICE
- Please put the machine on flat ground. It is unsuitable to put the machine at following places:
- Outdoors.(The machine is specially designed for indoor use only)
- Slant ground or slant places on balcony.
- Sunlight area or near heater
-
Error may be appeared if the power is not stable. Please do not use the same socket together with computer air conditioner etc.
-
It is suggested to wear sports shoes and gym suit when use the machine.
- Please increase or decrease speed slowly.
- Do not put the machine near to wet object. Error maybe caused by waterdrop.
3. CAUTION DURING USE
- If you do not feel well before using, please consult with your doctor or coach.
- It is not our company's responsibility for any improper use by user to cause body injured.
- Please place the machine on flat places. Do not locate any objects 2M behind the machine.
- Do not start the machine when it is folded.
- Waterdrop is prohibited to run into the machine, especially to motor, power line and plug.
- Danger may cause if wearing long dress or other unsuitable dresses during use.
- Encloser spaces, air uncirculated places and with flammability places are prohibited to use the machine.
- Do not put any objects on the machine.
- Please switch off all functions and pull out plug after using.
- Please make sure the running belt is fastened before using.
4. TECHNICAL SPECIFICATION
| Product Name Treadmill | |
| Voltage 220V | |
| Frequency 60Hz | |
| Speed 1.0-12 km/h | |
| User Capacity 110 kg |
5. HARDWARE AND TOOLS
(A)
| NO. Part Name Spec unit | |||
| 1 Cover PCS | |||
| 2 Screw M8*40 PCS | |||
| 3 Pad PCS | |||
| 4 Safety Key | PCS | ||
| 5 Wrench | PCS | ||
| 6 Silicone oil | PCS | ||
| 7 Wrench | PCS | ||
6. ASSEMBLE INSTRUCTION
(B 1-3)
- Take out the machine and parts to the flat floor carefully.
- Loose the Knobs at the bottom of support frames, then lift the support frames at right position and tighten the knobs.
-
Put the computer on support frame, and tighten screw M6*25 and M6 nut (already put on the frame); Connect the connection line (at the right side of the frame and computer), make the computer in flat position and use the screws and pads to connect the computer to the frame. Put on the cover.
-
Put on the safety key to finish assemble.
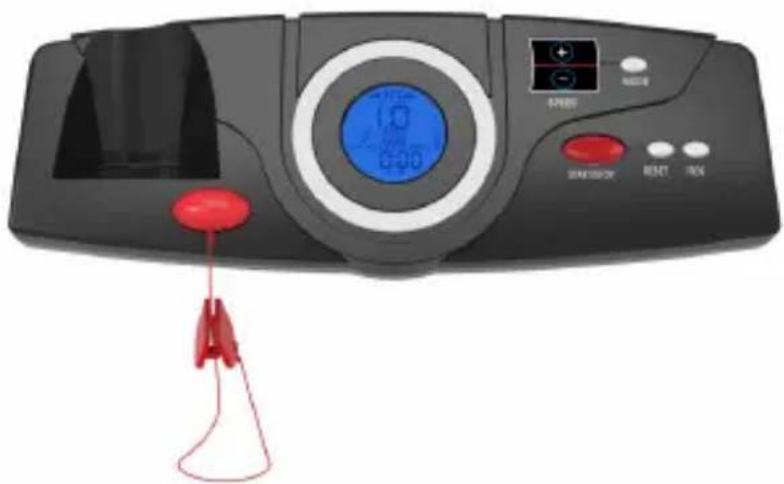
7. CONTROL PANEL
(C)
- 1Check that the red power switch on the back of the machine is turned off.
- Turn on the power supply at the wall and turn on the red power switch at the back of the machine.
-
Place the emergency stop safety key on the front of the console. Clip the other end of the safety key onto your clothes and stand on the running belt facing the console.
-
Press the „START/STOP“ key, the machine will start at 1.0KM/H after 3 seconds.
-
Press" + " key to increase the speed and ,, - " key to decrease the speed. The fastest speed is 12KM/h and lowest is 1.0KM/h.
-
Press„MODE“ key, the screen will show Distance, Time, Calorie.
-
12 programs range from P1-P12. When in stand by PROG, press "PROG" key to set the programs then press "START/STOP" to start the machine.
-
In case of emergency, please pull out safety key. The machine will stop very slowly.
-
To stop the machine you can also press the „START/STOP“.
-
Press "Reset" key, all data will cleared to standby status.
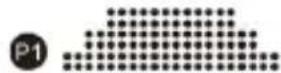
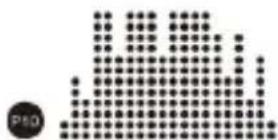
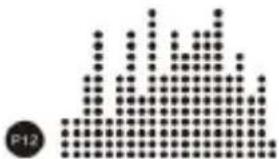
PRE-SET PROGRAMS x 12
(D)
The speed and time of the pre-set programs are fixed and cannot be changed.
The default time for the pre-set programs is 30 minutes.
8. FOLD AND UNFOLD

Take off the covers on the handle bar, then take off the M8*40 screws and Pads, folded the computer; Loose the knobs at the bottom of the frame, folded the support frame, make the support frame computer and the base of the frame in flat position, then tighten the knob to lie the machine against the wall. Please not: KEEP CHIILDREN AWAY to avoid the machine fall down.
9. USAGE OF SILICONE OIL

Pull up tightly of the running belt. Then put the silicone oil to running board. Then start the machine to running 3 minutes without loading. It is better to maintain like this every 30 hours working of the machine. This can save lifetime of parts properly.
10. RUNBELT ADJUSTION


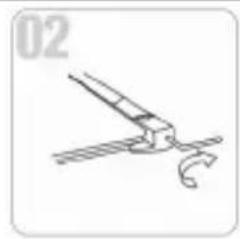
1. Running belt deviate to left
Start the machine by speed at 5-6km/h without loading, use die nut to make the screw go 1/4 circle(see fig1). Then make the machine running without loading 1-2 minutes. Please adjust like this to make the belt till to mid place.
2. Running belt deviate to right
Start the machine by speed at 5-6km/h without loading, use die nut to make the screw go 1/4 circle(see fig2). Then make the machine running without loading 1-2 minutes. Please adjust like this to make the belt till to mid place.
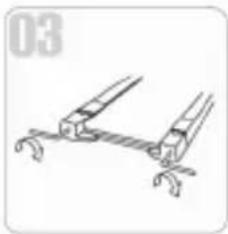
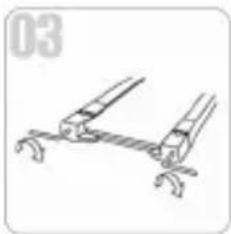
3. Running belt logjam
If the running belt is in dead condition, use die nut to make the screw 1/2 circle both left and right till this logjam solved.
11. DAILY MAINTAINANCE
- Please disconnect power before checking the machine or cleaning.
- Clear belt and dial plate after use, at least once a week.
- Check and tighten screws and spines at fixing point.
PL INSTRUKCJA OBSŁUGI
6. NÁVOD NA MONTÁŽ (B 1-3)
Odstráňte kryty na rukovätiach, odskrutkujte skrutky M8*40 a podložky, zostavte počítač; Uvolnite gombíky na spodnej časti rámu, zostavte nosný rám, počítač a základňu rámu do plochej polohy, potom dotiahnite gombík, aby ste stroj mohli opriet' o stenu. UCHOVÁVAJTE MIMO DOSA-HU DETÍ, aby ste predišli pádu zariadenia na dieta.
9. APLIKÁCIA SILIKÓNOVÉHO OLEJA


1. Bežecký pás odbieha dol'ava


Skinite poklopce na upravljaču, zatim odvrnite vijke i podloške M8 * 40, sastavite računalo; Ot-pustite gumbe na dnu okvira, preklopite potporni okvir, računalo i postolje okvira u ravni položaj, a zatim zategnite okretni gumb da se uređaj nasloni na zid. ČUVATI NA SIGURNOM MJESTU U VODO-RAVNOM ILI USPRAVNOM POLOŽAJU
9. APLIKACIJA SILIKONSKOG ULJA

Čvrsto povucite traku za trčanje. Nakon toga nanesite silikonsko ulje. Zatim pustite uređaj 3 minute bez opterećenja. Gornji postupak preporučuje se ponoviti svakih 30 sati rada uređaja. To će vam pomoći produžiti život dijelova.
10. PODEŠAVANJE TRAKE

1. Traka uređaja se naginje ulijevo
Pustite uređaj da radi brzinom 5-6 km/h bez opterećenja, koristite ključ, da zategnete vijak za 1/4 okretaja (vidi sliku 2). Zatim pokrenite uređaj bez opterećenja na 1-2 minute. Podesite tako da se traka nađe na sredini.
2. Traka uređaja se naginje udesno
Pokrenite uređaj brzinom 5-6 km/h bez opterećenja, koristite ključeve, da okrenete vijak za 1/4 okretaja (vidi sliku 1). Zatim pokrenite uređaja bez opterećenje na 1-2 minute. Podesite tako da se traka nađe u sredini
3. Blokiranje trake
U slučaju blokiranja trake, koristite ključ da okre- nete vijak za 1/2 okretaja (slika 2) ulijevo a zatim udesno da se traka odblokira.
11. DNEVNO ODRŽAVANJE



- EN INSTRUCTION
- THANK YOU VERY MUCH FOR PURCHASING OUR PRODUCT. PLEASE READ THIS INSTRUCTION CAREFULLY BEFORE USE IT AND KEEP THE INSTRUCTION AT PROPER PLACE
- CAUTION
- SAFETY NOTIICE
- CAUTION DURING USE
- TECHNICAL SPECIFICATION
- HARDWARE AND TOOLS
- ASSEMBLE INSTRUCTION
- CONTROL PANEL
- PRE-SET PROGRAMS X 12
- FOLD AND UNFOLD
- USAGE OF SILICONE OIL
- RUNBELT ADJUSTION
- RUNNING BELT DEVIATE TO LEFT
- RUNNING BELT DEVIATE TO RIGHT
- RUNNING BELT LOGJAM
- DAILY MAINTAINANCE
- PL INSTRUKCJA OBSŁUGI
- NÁVOD NA MONTÁŽ (B 1-3)
- APLIKÁCIA SILIKÓNOVÉHO OLEJA
- BEŽECKÝ PÁS ODBIEHA DOL'AVA
- APLIKACIJA SILIKONSKOG ULJA
- PODEŠAVANJE TRAKE
- TRAKA UREĐAJA SE NAGINJE ULIJEVO
- TRAKA UREĐAJA SE NAGINJE UDESNO
- BLOKIRANJE TRAKE
- DNEVNO ODRŽAVANJE
Brand : Spokey
Model : Luna
Category : Treadmills