
Z-2000 - Air purifier TRUSENS - Free user manual and instructions
Find the device manual for free Z-2000 TRUSENS in PDF.


| Product Type | Air Purifier |
| Brand | TruSens |
| Model | Z-2000 |
| Color | White |
| Dimensions (L x W x H) | 275 x 275 x 550 mm |
| Weight | 5.5 kg |
| Power Supply | 120V / 60Hz |
| Power Consumption | 50W |
| Coverage Area | Up to 520 sq ft (48 m²) |
| Filtration System | Pre-filter, True HEPA, Activated Carbon |
| CADR (Smoke/Dust/Pollen) | 200 / 200 / 200 CFM |
| Fan Speeds | 4 (Sleep, Low, Medium, High) |
| Noise Level | 25 - 50 dB |
| Air Quality Sensor | Yes (SensorPod) |
| Timer | 1 - 8 hours |
| Auto Mode | Yes |
| Filter Replacement Indicator | Yes |
| Night Mode | Yes |
| Warranty | 2 years |
| Includes | Air purifier, SensorPod, user manual |
| Maintenance | Replace HEPA filter every 6-12 months, clean pre-filter monthly |
Frequently Asked Questions - Z-2000 TRUSENS
User questions about Z-2000 TRUSENS
0 question about this device. Answer the ones you know or ask your own.
Ask a new question about this device
Download the instructions for your Air purifier in PDF format for free! Find your manual Z-2000 - TRUSENS and take your electronic device back in hand. On this page are published all the documents necessary for the use of your device. Z-2000 by TRUSENS.
USER MANUAL Z-2000 TRUSENS
natural_image
Abstract logo design featuring a stylized white 'U' with a circular dot above, set against a gray background (no text or symbols)Z-2000 OWNER'S MANUAL
AIR PURIFIER, MEDIUM
TrùSens®
Welcome to clean air with TruSens. Thank you for allowing us to join you on your journey towards wellness.
The air you breathe should be clean, no matter where you are in the room. TruSens SensorPod™, PureDirect™ Technology & DuPont™ Filtration ensure the whole room benefits from cleaner air.
CONTENTS
SAFETY INFORMATION.... 4
FEATURE HIGHLIGHTS 6
PRODUCT OVERVIEW 7
GETTING STARTED 8
CONTROL PANEL 10
AIR QUALITY DISPLAY 11
SPECIFICATIONS 12
CARE & MAINTENANCE.... 13
Replacing HEPA Drum Filter 13
Replacing the Standard Carbon Filter 14
Washing the Prefilter 14
Replacing UV Bulb 15
Cleaning the SensorPod™ 16
FAQ & TROUBLESHOOTING 17
WARRANTY & SUPPORT 19
SAFETY INFORMATION
READ AND SAVE THESE INSTRUCTIONS/READ LABEL AND OPERATING MANUAL BEFORE USING
PRECAUTIONS
This appliance has a polarized plug (one blade is wider than the other). To reduce the risk of electric shock, this plug is intended to fit in a polarized outlet only one way. If the plug does not fit fully in the outlet, reverse the plug. If it still does not fit, contact a qualified electrician. Do not attempt to defeat this safety feature.
Unplug or disconnect the appliance from the power supply before replacing filters or UV bulb, or when appliance is not in use.

WARNING: To reduce the risk of fire or electric shock, do not use this fan with any solid-state speed control device. Do not operate any purifier with a damaged cord or plug, or if the wall socket is loose.
Do not run cord under carpeting, throw rugs, runners or similar coverings. Do not run cord under furniture or appliances. Arrange cord away from traffic area and where it will not be tripped over.

WARNING: Skin or eye damage may result from directly viewing the light produced by the bulb in this apparatus. Always disconnect power before relamping or servicing. Replace bulb with UVLZ2000-01, manufactured by ACCO Brands.

WARNING: UV radiation emitted from this device.
Unintended use of the device or damage to the housing may result in exposure to ultraviolet radiation.
Ultraviolet radiation may cause eye and skin irritation.
Avoid exposing eyes and skin to ultraviolet radiation.
- Remove all packaging, including the filter bag, before use.
- Appliances that are obviously damaged must not be operated.
- This appliance must only be connected to a wall socket outlet matching the supply plug type and rating stated on the rating plate.
- Locate air purifier near the outlet wall socket and do not use extension cords.
- This appliance can be used by children aged from 8 years and above and persons with reduced physical, sensory or mental capabilities or lack of experience and knowledge, if they have been given supervision or instruction concerning use of the appliance in a safe way and understand the hazards involved.
- KEEP OUT OF THE REACH OF CHILDREN. Children shall not play with the appliance.
- Replace the UV bulb with the models specified within this manual. The bulb contains mercury. Ensure safe handling, cleanup and disposal of bulb per local laws.
- Do not attempt to service or repair this product yourself.
- Only use the purifier and SensorPod™ with the power cable provided.
- Only clean this machine with a damp cloth. Do not use solvents or bleach.
- Ensure appliance is always placed on firm level surface before operation.
- Do not block or obstruct the air intake or outlet vents.
- Do not insert fingers or other items into the air intake or outlet vents.
- When the air purifier is in standby mode the SensorPod™ is still transmitting a signal/data.
- The use of this device is a supplement to and not a substitute for standard infection control practices; users must continue to follow all current infection control practices, including those practices related to cleaning and disinfection of environmental surfaces.
FIRST AID INSTRUCTIONS: Seek medical attention in the event of an injury.


LAMP CONTAINS MERCURY Do not dispose of lamp. Recycle in accordance with local Disposal Laws Visit www.Lamprecycle.org
Z-2000:
FCC ID: GV3-22Z2000 IC: 6128A-22Z2000
SensorPod™:
FCC ID: GV3-22SP01 IC: 6128A-22SP01
EPA Est. No. indicated by 3rd and 4th digits of the serial number on the package and/or machine. 23 and higher = 91680-CHN-1; 22 and lower = 93166-CHN-1
This device complies with part 15 of the FCC Rules.
Operation is subject to the following two conditions:
(1) This device may not cause harmful interference, and
(2) this device must accept any interference received, including interference that may cause undesired operation.
Any changes or modifications not expressly approved by the party responsible for compliance could void the user's authority to operate the equipment.
This equipment has been tested and found to comply with the limits for a Class B digital device, pursuant to Part 15 of the FCC Rules. These limits are designed to provide reasonable protection against harmful interference in a
residential installation. This equipment generates, uses and can radiate radio frequency energy and, if not installed and used in accordance with the instructions, may cause harmful interference to radio communications.
However, there is no guarantee that interference will not occur in a particular installation. If this equipment does cause harmful interference to radio or television reception, which can be determined by turning the equipment off and on, the user is encouraged to try to correct the interference by one or more of the following measures:
- Reorient or relocate the receiving antenna.
- Increase the separation between the equipment and receiver.
- Connect the equipment into an outlet on a circuit different from that to which the receiver is connected.
- Consult the dealer or an experienced radio/TV technician for help.
CAN ICES-3 (B)/NMB-3(B)
FCC RF Radiation Exposure Statement: This equipment should be installed and operated with minimum distance of 20cm between the radiator and all persons.
This device contains licence-exempt transmitter(s)/receiver(s) that comply with Innovation, Science and Economic Development Canada's licence-exempt RSS(s). Operation is subject to the following two conditions:
(1) This device may not cause interference.
(2) This device must accept any interference, including interference that may cause undesired operation of the device.
FEATURE HIGHLIGHTS

SensorPod™
Remote air quality monitor that ensures cleaner air, right where you need it.
PureDirect™ Technology
Independent lab testing confirms that two airflow streams are better than one, moving air effectively and more comfortably throughout the room.

Informs and Adapts
Color-coded, illuminated ring provides additional information by communicating air quality in real time.

360^ Purification
DuPont™ HEPA filter captures pollutants and VOC gases/odors from all directions. UV-C light inactivates germs and bacteria that can get trapped in the filter.


Thoughtful Execution
Exceptional functionality wrapped in a contemporary design that fits any environment.
PRODUCT OVERVIEW
Air Purifier

SensorPod™

Filter & UV-C Light

GETTING STARTED

1. Remove plastic bag from filter
Unscrew the bottom cover and remove the plastic bag from the filter.

natural_image
Three-step diagram showing a cylindrical device being folded into a ring, with arrows indicating the process (no text or symbols present)2. Reattach filter
Secure filter on the bottom cover and replace inside the purifier.

natural_image
Two technical diagrams showing mechanical assembly steps: one with a cylindrical component being inserted, the other with a coiled component being inserted (no text or symbols present)3. Set up
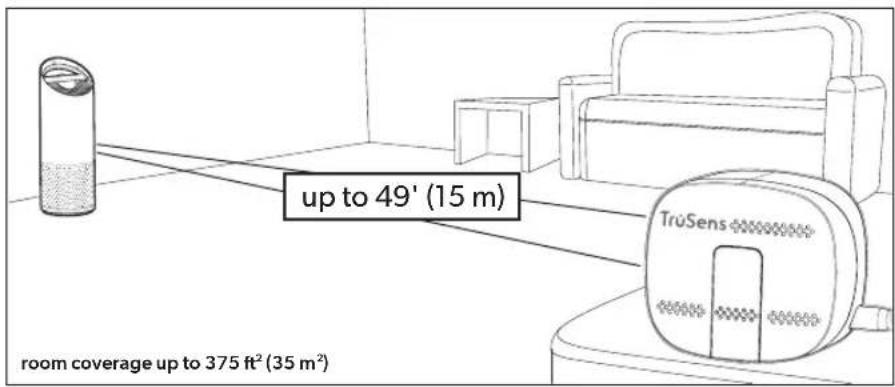
Plug in your SensorPod™, and place upright on tabletop or counter across the room, within line of sight of the purifier.
Plug in your air purifier unit and power on. Place the purifier on a flat surface, free from obstructions.
Signal strength may vary by location. In the rare occasion that it doesn't work, see page 18.
4. Start living with cleaner air
The purifier will automatically adjust fan speeds based on the air quality readings from SensorPod, and proprietary PureDirect™ technology will deliver purified air throughout the room!

natural_image
Abstract diagram with overlapping curved lines and two black arrows pointing upward (no text or symbols)CONTROL PANEL


Power Button

Fan Speed Settings
Select fan speed or AUTO mode. In AUTO mode, purifier automatically adjusts fan speed based on air quality readings from SensorPod™.
(AUTO mode only available when purifier is paired with SensorPod and receiving signal.)

Dimmer Mode
Display illumination turns off (for use while sleeping) without sacrificing the effectiveness of the purifier. Simply press the button again to bring back all display features.

Timer Mode
Purifier will automatically turn off after 2, 4, 8 or 12 hours. To cancel this countdown, simply press button until no timer setting is displayed.
UV
UV Mode
UV bulb within the purifier's filter chamber is on when the symbol is white. The symbol will glow red when it is time to replace the UV bulb.
(See page 15 for replacement instructions.)
Reset
Filter and UV Indicator Reset
HEPA, Carbon and UV indicators glow red when it is time for each to be replaced.
When 1 indicator is on, simply hold Reset button for 3 seconds to reset that indicator. When 2+ indicators are on, tap the Reset button to select the correct indicator (selected indicator will blink) before holding 3 seconds to reset that indicator.
(See pages 13-15 for replacement instructions. Follow above Reset button instructions after replacing filter.)
AIR QUALITY DISPLAY
Real-time Feedback
The revolutionary SensorPod™ evaluates the condition of your air by measuring both small (PM2.5) and larger (PM10) particulate matter. It calculates the overall air quality using a proprietary algorithm that is reactive to genuine increases in pollutants without overreacting to someone entering the room or settling into the couch.
The illuminated, color-coded display communicates good, moderate or poor air quality and a numeric value provides a greater level of detail.
In AUTO mode, the purifier automatically adjusts the fan speed in response to these air quality readings.
GOOD BLUE | 0 - 50

MODERATE YELLOW | 50 - 100
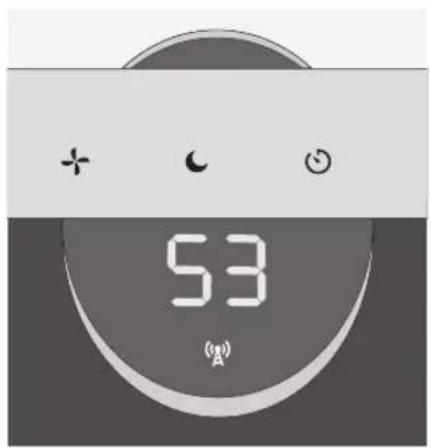
POOR RED | 100 - 500

SPECIFICATIONS
| Air Inlet 360° | |
| Room size at 2 ACH (air changes per hour) | 375 ft2 (35 m2) |
| Air Delivery Type PureDirect | TM |
| Sensor SensorPod | TM, works up to 49 ft (15 m) from purifier |
| Fan Speed Settings Whisper, 1, 2, Turbo, AUTO | |
| Purification Levels Washable Prefilter, Carbon, HEPA, UV-C Light | |
| Timer Settings 2, 4, 8, 12 hr | |
| Replacement Indicators Carbon, HEPA, UV | |
| Noise 33–64 dB | |
| Dimensions 8.8 x 8.8 x 22.3 in (223 x 223 x 567 mm) | |
| Weight 9.0 lbs (4.1 kg) | |
| Motor Type DC motor | |
| Power Requirements | 120v / 60 Hz |
| Power Consumption | 28 W |
| Warranty | 2 years |
| Replacement Filters & UV Bulb | Standard | Allergy & Flu | Odor & VOC | Pet |
| HEPA Drum Filter | AFHZ2000-01 | AFHZ2000-AGY01 | AFHZ2000-SMK01 | AFHZ2000-PET01 |
| Carbon Filter | AFCZ2000-01 | AFCZ2000-AGY01 | AFCZ2000-SMK01 | AFCZ2000-PET01 |
| UV Bulb | UVLZ2000-01 | — | — | — |
CARE & MAINTENANCE

WARNING: Always power off the purifier by pressing the Power Button and unplugging the power cord.
To access the filter chamber, carefully remove the filter cover so that the filter chamber is exposed (Fig. A).
REPLACING HEPA DRUM FILTER
The HEPA indicator will glow red when it is time to change the entire HEPA drum filter.
- Gently pull the HEPA drum filter away from its place secured to the filter cover (Fig. B).
- Secure the replacement HEPA filter onto the filter cover (Fig. C).
- Gently replace the filter cover with filter drum into the filter chamber and onto the threading, then turn the knob clockwise until the knob and filter chamber cover are securely tightened (Fig. D).
- Plug in and power on your purifier, and hold the Reset button until the red HEPA indicator turns off.
Refer to page 12 for HEPA Drum Filter replacement part numbers.

natural_image
Cross-sectional diagram of a mechanical component with internal gear and housing (no text or symbols)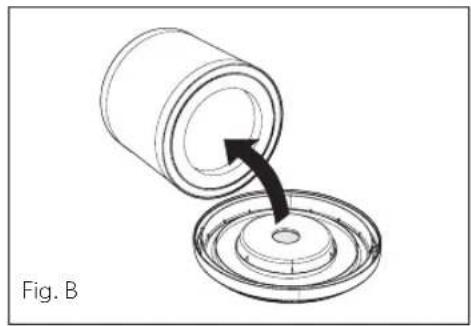
natural_image
Diagram of a cylindrical container being inserted into a circular base, with an arrow indicating the process (no text or symbols present)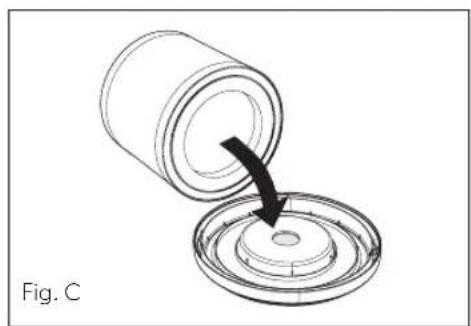
natural_image
Diagram of a cylindrical container being inserted into a circular base, with an arrow indicating the process (no text or symbols)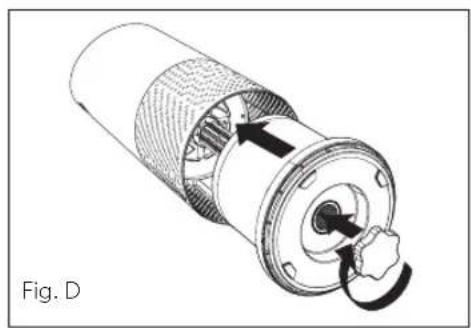
natural_image
Technical illustration of a mechanical component with internal structure and rotation arrow (no text or symbols)REPLACING THE STANDARD CARBON FILTER
The Carbon indicator will glow red when it is time to replace the Carbon layer.
- Gently peel away the Prefilter from the fastener strips (Fig. E).
- Gently peel away the used Carbon layer from the fastener strips (Fig. F).
- Wrap a new Carbon layer around the filter drum and attach to the same fastener strips (Fig. G).
- Replace the Prefilter by wrapping it around the Carbon layer and attach to the fastener strips (Fig. H).
- Once the purifier is powered on, hold the Reset button until the red Carbon indicator turns off.
Note: Standard Carbon filter 3-pack (on page 12) will cover 3 Carbon changes between replacing the entire HEPA drum filter assembly (on page 13).
Note: Specialty Filters feature a Carbon drum filter that slides away from the HEPA filter layer.
WASHING THE STANDARD AND PET PREFILTER
We recommend that you visually inspect the Prefilter every month and clean as needed. At minimum, you should hand wash the Prefilter every time you change the Carbon filter.
- Gently peel away the Washable Prefilter from the fastener strips (Fig. E).
- Gently rinse Prefilter with running water and allow to air dry before reinstalling.
- Replace the Prefilter by wrapping it around the filter drum and attaching to the fastener strips (Fig. H).

natural_image
Diagram of a mechanical component with directional arrows indicating flow or movement (no text or symbols)
natural_image
Diagram of a mechanical component with rotational arrows indicating motion (no text or symbols)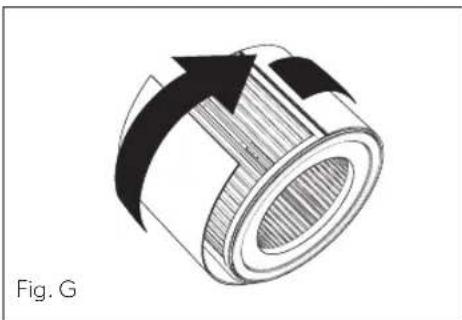
natural_image
Technical illustration of a cylindrical mechanical component with internal structure and directional arrows (no text or symbols)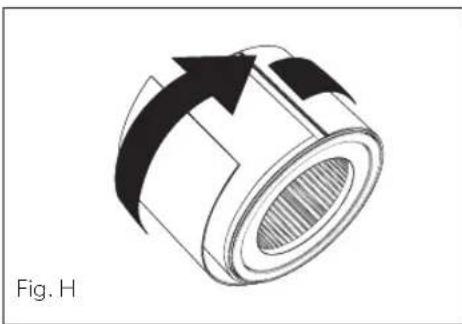
natural_image
Diagram of a mechanical component with directional arrows indicating motion (no text or symbols)REPLACING UV BULB
- The indicator will glow red when it is time to replace the UV bulb.
- Remove HEPA filter drum (Fig. A) and use a screwdriver to remove the screw securing the UV housing (Fig. I).
-
Gently remove the UV housing (Fig. J) and disconnect the UV bulb from the socket (Fig. K).
-
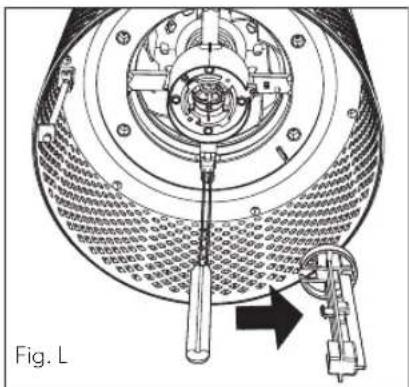
Release carriage from the UV bulb (Fig. L).
-
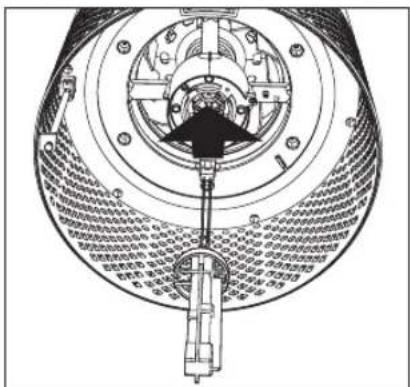
Secure carriage to new UV bulb (page 12) (Fig. M) and connect UV bulb into purifier (Fig N).
-
Replace the UV housing and use a screwdriver to tighten the fastening screw.
-
Once the purifier is powered on, hold the Reset button until the ⚙ indicator turns white.

natural_image
Technical line drawing of a mechanical assembly with a hand pointing to a component (no text or symbols present)
natural_image
Technical diagram of a mechanical component with no visible text or symbols
natural_image
Technical diagram of a mechanical assembly with labeled parts and directional arrow (no readable text or symbols)
CLEANING THE SENSORPOD™
Cleaning the air quality sensor
The SensorPod™ uses an infrared light to detect particulate matter, so it is important that you clean the viewing chamber every 1-2 months to remove any dust or particles that may affect the accuracy of the sensor's readings.
- Turn off the SensorPod by unplugging the power cord.
- Open the easy-access door on the front side by pulling the door up at a 90° angle.
- Use a damp cotton swab to wipe the lens and intake area of the dust sensor (Fig. O).
- Use a dry cotton swab to wipe away any remaining moisture.
- Close the cover by rotating the door back down and sliding it back into place until you hear a click.

natural_image
Line drawing of a hand using a tool to adjust or install a mechanical component (no text or symbols visible)FAQ & TROUBLESHOOTING
| Where do I place the SensorPodTM? | Anywhere you want to measure the air quality within the room. For optimal results, place the SensorPod up to 49 ft (15 m) away from the air purifier on a counter or table within line of sight of the purifier. In Auto Mode, the purifier will work to distribute clean air until the SensorPod reads an acceptable level of air quality. |
| How often do I need to change the filters? | That's easy. The purifier's replacement indicators will notify you when it is time to replace the Carbon or HEPA filters, or the UV bulb.Plan on replacing the Carbon every 3-4 months, HEPA every 12-15 months, and UV bulb every 1-3 years. |
| How often do I need to wash the Prefilter? | The Prefilter captures larger particles and preserves the efficiency of the other filters, so we recommend that you visually inspect the prefilter every month and wash as needed. Another good habit is to wash the prefilter every time you replace the Carbon filter. |
| How often do I need to clean the dust sensor within SensorPodTM? | For the most accurate measurement of your air quality, we'd recommend you clean the surface of the dust sensor every 1-2 months. |
| Purifier won't turn on. | Check that the power cord is connected securely to both the wall outlet and the purifier. Check if there is a power outage in the outlet by trying a nearby light or device, or by trying a working device in the same outlet.Check that the HEPA filter is fitted properly into filter chamber.Please contact us if you're still having a problem (page 19). |
FAQ & TROUBLESHOOTING
| Purifier won’t go into Auto Mode.ORAir quality indicators are off.ORPurifier’s sensor signal indicator is blinking. | First, check that the SensorPod is plugged in and that its light is solid.Next, check that the SensorPod is within range of the purifier (up to 49 ft/15 m).If both are true and the connection is still failing, see below instructions on repairing the SensorPod monitor’s connection. |
| I’ve lost my SensorPod. | Don’t worry. Please contact our customer support team and you can order a replacement SensorPod. Follow the easy pairing instructions below to pair your replacement SensorPod with your existing air purifier. |
Pairing SensorPod™ and Purifier
The SensorPod communicates with the purifier using radio frequency signals and will be paired on the production line and ready for use when you open the box. In the rare event that the signal is interrupted, the purifier's sensor indicator light (A) will blink. You can repair the connection in just a few easy steps.
- Unplug the SensorPod.
- HOLD the Power Button on the purifier for 3 seconds; you should hear two chimes.
-
Plug in the SensorPod and use an item with a small point (paper clip) to press and HOLD the pairing button underneath the SensorPod for 5-7 seconds (Fig. P).
-
The connection is established when the purifier's sensor indicator light is lit with no blinking and the air quality indicators turn on.

natural_image
Line drawing of a hand holding a small electronic device with a connector (no text or symbols)WARRANTY
TruSens warrants the machine will perform to the specifications stated and be free from defects in materials and workmanship for a period of 2 years from date of purchase, subject to normal use. Dated proof of purchase will be required. Defects due to shipping, misuse, improper maintenance are not covered under this warranty. Only the use of TruSens brand accessories will guarantee the proper functioning and lifetime of your TruSens machine. Any damage to or malfunction of your air purifier resulting from the use of non TruSens filters or UV bulbs may not be covered by this warranty or may result in a service fee if the damage or malfunction is determined to be caused by such use.
Within the warranty period, TruSens will at its own discretion either repair or replace the defective machine free of charge. Repairs or alternations made by persons not authorized by TruSens will void the warranty.
This warranty only applies to air purifiers operated in the United States and Canada. This warranty does not affect the legal rights which consumers have under applicable national legislation governing the sale of goods.
SUPPORT
We value your feedback. Please contact us to share your experience.
Visit our website at www.trusens.com
Email us at support@trusens.com
Call us at 1-833-TRUSENS (1-833-878-7367)
Subscribe to our YouTube channel TruSens
& Follow us @TruSensWellness


TrùSens.
www.trusens.com

- Z-2000 OWNER'S MANUAL
- TrùSens®
- CONTENTS
- SAFETY INFORMATION
- READ AND SAVE THESE INSTRUCTIONS/READ LABEL AND OPERATING MANUAL BEFORE USING
- PRECAUTIONS
- Z-2000:
- SensorPod™:
- CAN ICES-3 (B)/NMB-3(B)
- FEATURE HIGHLIGHTS
- SensorPod™
- PureDirect™ Technology
- Informs and Adapts
- 360° Purification
- Thoughtful Execution
- PRODUCT OVERVIEW
- GETTING STARTED
- Remove plastic bag from filter
- Reattach filter
- Set up
- Start living with cleaner air
- CONTROL PANEL
- Fan Speed Settings
- Dimmer Mode
- Timer Mode
- UV
- UV Mode
- Reset
- Filter and UV Indicator Reset
- AIR QUALITY DISPLAY
- Real-time Feedback
- CARE & MAINTENANCE
- REPLACING HEPA DRUM FILTER
- REPLACING THE STANDARD CARBON FILTER
- WASHING THE STANDARD AND PET PREFILTER
- REPLACING UV BULB
- CLEANING THE SENSORPOD™
- Cleaning the air quality sensor
- Pairing SensorPod™ and Purifier
- WARRANTY
- SUPPORT
- TrùSens.
Brand : TRUSENS
Model : Z-2000
Category : Air purifier