
P5506 - Digital timer Emos - Free user manual and instructions
Find the device manual for free P5506 Emos in PDF.


| Product Type | Digital Timer Socket |
| Model Number | P5506 (EMT757-F) |
| Brand | Emos |
| Rated Voltage | 230 V AC, 50 Hz |
| Max Load | 16 A (resistive), 3680 W |
| Display Type | LCD screen |
| Number of Programs | 10 on/off programs |
| Countdown Function | Yes, from 1 minute to 99 hours |
| Time Setting | Weekday and time setting |
| Summer Time Adjustment | Yes, manual |
| Operating Temperature | -10°C to +40°C |
| Dimensions (approx.) | 60 x 60 x 30 mm |
| Weight | 100 g |
| Housing Material | Flame-retardant plastic |
| Protection Class | IP20 |
| Safety Features | Overload protection, child safety shutter |
| Power Supply | Built-in rechargeable battery (Ni-MH) for time backup |
| Battery Backup | Yes, maintains settings during power outage |
| Cleaning | Wipe with a dry cloth; do not use water or cleaners |
| Compliance | CE, RoHS |
Frequently Asked Questions - P5506 Emos
User questions about P5506 Emos
0 question about this device. Answer the ones you know or ask your own.
Ask a new question about this device
Download the instructions for your Digital timer in PDF format for free! Find your manual P5506 - Emos and take your electronic device back in hand. On this page are published all the documents necessary for the use of your device. P5506 by Emos.
USER MANUAL P5506 Emos
Digital switching socket, type EMT757-F
A Functions
-
The Programmable Digital Timer (hereinafter refer as "Timer") can preset specific on/off time of your home electrical appliances. It is ideal for energy saving and home security.
-
The countdown function can switch on/off your appliance on your pre-set time and random functions allows you to switch on and off the appliance in irregular time, it is not only ideal for home automation, also prevent burglary during your absence.
The LCD displays program setting status and real time
4. With maximum 140 on/off progr
B Specifications
Current: 230 V\~, 50 Hz, 8
Max. Power: 2
IP Rating: IP20
Working Temperature: 0 to 55 °C
Time Setting Interval: 1 minute
C. Diagram & Descriptions
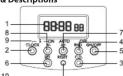
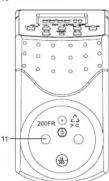
No. Description Functions
1 LCD Display Shows time and program setting.
2 CLOCK button
Return to real time display when in program
setting
press together with SET Button to set real time
and week goes together with ∥ Button to change to
press together with v - Button to change to Summer Time
3 CD button Press the button to start/stop countdown
program when it is in AUTO status
4 BND butto
(1) 本报告书
5 On/Off button
Change the setting mode to ON, AUTO or OFF.
When press the button each time, the horizontal
line in the LCD moves to ON
were silk printed on the Time
6 SET button
7 A + button Press the button to increase
广力云
8 v-button
[Non-Text]
9 S - silk screen Press CLOCK Button and v-B
time to change to printing Su
display adds one hour autom
[Non-Text]
10 Reset button Press once to reset all your preset program
11 Socket & Plug Connect your appliance to the socket and plug
the timer to the wall AC socket to get power
D Time Displa
There are two different kinds of time displays:
- 12-hour display: the digital number is from 11:59 to 12:00 with AM or
PM shown on the LCD
- 24-hour display: the digital number is from 00:00 to 23:59, no AM or PM
B shown on the LCD
- To change from 12-hour display to 24-hour display, or vice versa, press SLOSOB to ensure Life Will the 16th hour before SLOSOB to
CLOCK button and hold it till the Lo
Week & Time Setting
1. Week setting
- Week Setting
1.1 Press and hold the SET button until the week display flashes, which indicates setting is ready:
1.2. Dress + Button to increase the day, or Button to reduce the day, the
1.2 Press x+ button to inc sequence of the disc
Sequence of the display is shown as follows:
需>指>能>指>作>第>第>
1.3 Press A+/V- Button once will increase or reduce the day by sequence
slowly. To press and hold the button, the week display moves quickly
Release the button until your desired day of the week shown on the
display. Press SET button to conh
2. Time Setting
2.1 After setting the day of the week, hour display flashes to indicate setting
time can be started
e EMT757-F
2.2 Press + Button to increase number of hour, or - Button to reduce hour. 2.3 Press + - Button once will increase or reduce each hour slowly. To press and hold the button, the hour display moves quickly. Release the button until your desired hour shown on the display. Press SET Button to confirm your setting.
2.4 "Minute" display then flashes to indicate setting minute is ready. Repeat the same procedures in setting hour as in #2.2 and #2.3 to set minutes.
3. Summer Time Setting
3.1 Press CLOCK Button and v-Button at the same time to change to summer time, time display automatically adds one hour and "S" is shown on the LCD.
3.2 By pressing Clock Button and v-Button again to cancel the summer time setting
Noted: LCD must be in real time display to start week and time setting. If LCD is in program setting display, press CLOCK Button once to return to real time display.
F. Program Setting
- When the LCD is in real time display, press ▲ Button once to change to program setting display, "ION" will be shown on the lower left corner of the LCD:
1.1 "1" indicates the program group's number (program group is from 1 to 14)
1.2 "ON" indicates power on time.
1.3 "OFF" indicates power off time
- To chose the program group and on/off status, press + Button to increase the group number sequence as follows:
1ON >1OFF >..... 20ON >20OFF >d ON/OFF (for countdown) >real time display >
- To reduce the program group number, press-Button, LCD displays in the
following sequence: d ON/OSE (for syntropic) = 2005E - 200N = 105E - 10N = real
d ON/OFF (for countdown) >20OFF >20ON >...... TOFF >TON Steel time display >
- After choosing the program group, then can set the week and time. Press
SET Button until the week display flashes, press ↕ Button each time, the
LCD will display the following in sequence:
4.1 MO TU WE TH FR SA SU
4.2 MO>TU>WE>TH>FR>SA>SU
4.3 MOWEFR
4.4 TUTHSA
4.5 SA SU
4.6 M O T U W
4.7 TH FR SA
4.8 MO TU WE TH FR and
4.9 MO TU WE TH FRSA
- By pressing the →Button, the week display will be shown in the opposite
direction as above sequence.
- Press + / - Button once will increase or reduce the week display slowly.
To press and hold the button, the display moves quickly. Release the button until your desired week pattern shown on the display. Press SET
Button to confirm, week display stops flashing.
- After set the day of the week, the hour display flashes, repeat procedures
mentioned in Part E 2 – Time Setting to set time.
- To set other program group's on/off time, repeat procedures mentioned
from #2 to #7.
Noted:
(a). To change a preset program, repeat procedures #2 to #7 as mentioned in Part
F and input the new data to replace the old setting
(b). After program setting, press CLOCK Button to return to clock display at
once, or it will be returned automatically after 15 seconds without pressing any
other buttons.
G. Countdown Setting
- When the LCD is in real time display, press ▼ Button once to change to
countdown setting display, "d ON (or OFF)" will be shown on the lower
left corner of the LCD
1.1 "d": indicates the program is in countdown mode
1.2 "ON": counting down the power on time
1.3 "OFF": counting down the power off time
- Press SET Button until the on/off display flashes, setting the countdown
power on/off status is ready
- Press N+/V- Button to chose countdown on/off program and press SET
Button to confirm
- Hour display flashes after setting the on/off status, then press nn/√-
Button to increase or reduce hour and press SET Button to confirm.
- Minute display then flashes, press A+/A- Button to increase or reduce
minute and press SET Button to confirm
- Second display flashes, press A+/V- Button to increase or reduce the hour
display and press SET Button to confirm. Setting interval is from 99:59:59
to 1 second.
- Connect the Timer to the AC socket and set the Timer to AUTO status in
order to start/stop the countdown functions.
- Press CD Button once to start the countdown function, "d ON (or OFF)"
flashes in the lower corner of the LCD to indicate countdown is in progress.
Press CD button again to stop the countdown function.
Notes: (a) U23 on countdown is in previous LCO is in active time display power.
(a). When countdown is in progress, LCD is in real time display, press v– button
Once to view the countdown details. (b) To change a packet program, repeat the above procedure #7 to #6 in Part G.
(5) To change a preset program, repeat the above procedures #2 to #4 in Full O-Countdown Setting and input the new data to replace the old setting.
(c) After program setting, rear CLOCK button to return to clock display once or it
(3). Filter program setting, PICS/LOCKBathroom to claim to clockwise play of once, or will be returned automatically after 1.5 seconds without reusing any other button.
Worcelanica automatically
H. Random Setting
- Random function turns on and off the appliance irregularly:
1.1 Minimum time for power off: 26 minutes
1.2 Maximum time for power off: 42 minutes 1.3 Minimum time for power on 10 minutes
1.3 Minimum time for power on: 10 minutes 1.4 Maximum time for power on: 26 minutes
1.4 Maximum time for power on 20 minutes 2. Connect the Times to the AC socket and so
- Connect the timer to the AC socket and set the program to ROTO status in order to start/stop the random function.
In order to start/stop the random function. 3. Pass SND Button case, "x-OFF" is flashing in
- Press AND button once, TOFF is hashing in the lower corner of the LCD; random function is activated. Power is off for 26 to 47 minutes. The mode
will change to "r ON", where power turns on from 10 to 26 minutes. Then
Back to "TOFF" again.
- Press RND Button again can stop the random function, "r OFF" or "r ON"
disappears from the LCD.
. Override/Resume Preset Program
ress ON/OFF Button each time can override/resume the preset program, LCD
changes the display in the following sequence:
- ON: override the preset program and appliance remains on at all
time
- AUTO: resume the preset program, appliance will be turned on and
off automatically according to the preset time
- OFF: override the preset program and appliance remains off at all
time
Ioted:
a). The preset countdown or random functions only activates when the Timer
in AUTO status.
3). When countdown function is activated, random and auto on/off program
setting will not active.
c). When random function is activated, countdown and auto on/off program
erming will not active.
. Connections
-
Preset your desired On/off programs on the Timer as mentioned above.
-
Switch off your electrical appliance
-
Connect your appliance's power cord to the Timer's socket, then connect
the Timer to the AC socket to get power
-
Switch on your appliance.
-
Appliance will then be turned on/off according to your preset programs
unless manual
Safety Precaution
- The appliance is designed only for use in a dry interior environment.
- The appliance is designed only for use in a dry interior environment. Protect it from rain, snow and other extreme conditions. Using of the
Protect it from rain, snow and other c appliance in the outdoors is forbidden!
• Do not overload the appliance to avoid damage
- The appliance may be connected and used only in the electricity.
- The appliance may be connected and used only in the electricity network 230 V AC (\~)/50 Hz, with grounding according to the valid
electricity regulations
• The extension line may connect only to electrical appliances, which are
powered and connected to the voltage of 230 V AC (\~)/50 Hz.
• Pay attention to the data on the type label of the electrical appliances
connected to the equipment. The maximum power input of all the
connected appliances must not exceed 2000 W (max. current 8.7 A).
Maximum induction load is 1 A.
- Any other use of this appliance, than the one defined above, can damage
the product and is connected with the risk of short-circuit, electric shock.
etc. The appliance must not be modified or tampered with! Follow the
safety warnings.
• We do not provide any warranty for damages or injuries caused by
improper handling of the appliance or by negligence to the safety
warnings in the manual. In such situations, the warranty is invalidated.
- The grounding safety conduit the appliance must not be broken – oth
erwise people may be in the risk of death.
- The recommended operating temperatures are -10 °C to +40 °C. - The appliance must not be operated in hazardous environment such as
- The appliance must not be operated in hazardous environment such as
hammable gases, vapours and dust.
- Do not tamper with the appliance installation and do not take it apart. In case of damage or malfunction of the appliance, contact the soiles
- When cleaning the appliance and its LCD use only a soft dry cloth. Do not
- When cleaning the appliance and is BCD, use only a rotary cloth. Do not use any detergents and do not dip the appliance into water.
- The appliance must not be operated by children and by persons.
- The appliance must not be operated by children and by persons, whose physical sensory or mental incapability or lack of experience.
whose physical, sensory or mental incapability of lack of experience prevents them from safe use of the appliance, unless they are under
a supervision of a person overseeing their safety. The charger must be
A superposition of a person everseeing them through. The energy must be kept out of the reach of children. Children must be watched not to play
with this equipment.
[Unreadable]
Do not throw electrical appliances into unsorted communal waste.
Use sorted waste collection points instead. For the latest info about
waste collecting points, contact your local authorities. If there are
any electrical appliances on waste dumps, the hazardous substance
may leak into underground water and may get into the food chain and
rm your health.
[Non-Text]
[Non-Text]
[Non-Text]
![Emos P5506 - [Non-Text] - 1](/content/2026/05/849642/images/8a47b64b4eca6e7a94f50682fa3a5e7fec00a71a0c1dfec0963bc03f1eebdbf4.jpg)
![Emos P5506 - [Non-Text] - 2](/content/2026/05/849642/images/d5d2f5d0d01b4ffa0d2973a831117d1ae35f917d21c32412f6e9ccadf54b6dfe.jpg)
![Emos P5506 - [Non-Text] - 3](/content/2026/05/849642/images/db08bb036c6aa6503cc6ea804bdf9c5726a766898f59bc531c030ece582ed0d5.jpg)
4.1 MO TU WE TH FR SA SU
4.2 MO >TU >WE >TH >FRvSA >SU
4.3 MOWEFF
4.4 TUTHSA
4.5 SA SU
4.6 M O T U W
4.7 TH FR SA
4.8 MO TU WE
4.9 MO TU WE TH FR SA
(a) Cricete-irizemi predemnabitively program postopaje zpuboem popsonym
(5) For a shift program, that will be done by the projector.
č. popis funkcia
Man Two Won The Fan Fan Fu
Mo>10>We>11>H>Sa>Sa
Mo = pondelok, Tu = utorok, We = streda, Th = štvrtok, Fr = piatok, Sa =
sobota, Su = nedela
4.1 MO TU WE TH FR SA SU
4.2 MO>TU>WE>TH>FR>SA>SU
4.3 MOWEFR
4.4 TUTH SA
4.5 SA SU
4.6 MO TU WE
4.7 THFRSA
4.8 MOTUWETHER
4.9 MO TU WETHFRSA
- Sbacenim tlačidla v- sa jednotrive dni v tyzodni budu zobrazovat v opac-

- Digital switching socket, type EMT757-F
- A Functions
- With maximum 140 on/off progr
- B Specifications
- No. Description Functions
- D Time Displa
- Week & Time Setting
- Week setting
- Time Setting
- Summer Time Setting
- Program Setting
- other buttons.
- Countdown Setting
- Worcelanica automatically
- Random Setting
- Override/Resume Preset Program
- time
- erming will not active.
- unless manual
- Safety Precaution
- [Unreadable]
- [Non-Text]
- č. popis funkcia
Brand : Emos
Model : P5506
Category : Digital timer