
VT440k - Video projector NEC - Free user manual and instructions
Find the device manual for free VT440k NEC in PDF.


| Product Type | LCD Video Projector (MultiSync VT440/VT540) |
| Dimensions (W x H x D) | 243 mm x 103 mm x 284 mm (9.57" x 4.0" x 11.2") |
| Weight | 3.9 kg (8.8 lbs) |
| Power Requirements | 100-120 / 200-240 VAC, 50/60 Hz |
| Power Consumption | 240 W (205 W in Eco mode) |
| Lamp Type | 160 W NSH (130 W in Eco mode) |
| Lamp Life | Up to 2000 hours (3000 hours in Eco mode) |
| Image Size | 25" - 300" diagonal (0.64 m - 7.62 m) |
| Projection Distance | 1.2 m - 12.0 m (3.94 - 39.04 ft) |
| Lens | Manual zoom and focus, F2.0-2.3, f=35.8-43.0 mm |
| Native Resolution | SVGA 800x600 (VT440) / XGA 1024x768 (VT540) |
| Keystone Correction | Vertical up to ±15 degrees |
| Video Compatibility | NTSC, PAL, PAL60, SECAM, NTSC4.43 |
| Inputs | RGB (D-Sub 15-pin), Video (RCA), S-Video (Mini DIN 4-pin), Audio (RCA and mini jack), PC Control (Mini DIN 8-pin) |
| Output | RGB Monitor Output (D-Sub 15-pin), Audio output |
| Remote Control | Wireless card remote (CR2025 battery) with storage slot |
| Built-in Speakers | Built-in audio system (mono speaker) |
| Ceiling Mount | Compatible (professional installation required) |
| Filter Cleaning | Every 100 hours of use (vacuum through cover) |
| Lamp Replacement | NEC VT40LP lamp, user-replaceable |
| Safety Features | Lamp cover interlock, overheating protection, Kensington security slot |
| Operating Temperature | 0°C to 35°C (32°F to 95°F) |
| Regulatory Approvals | FCC Class B, UL, CSA, CE, EMC Directive |
| Manual Language | English (40 pages) |
Frequently Asked Questions - VT440k NEC
User questions about VT440k NEC
0 question about this device. Answer the ones you know or ask your own.
Ask a new question about this device
Download the instructions for your Video projector in PDF format for free! Find your manual VT440k - NEC and take your electronic device back in hand. On this page are published all the documents necessary for the use of your device. VT440k by NEC.
USER MANUAL VT440k NEC
MultiSync VT440/VT540
LCD Projector
User's Manual
English
Precautions
Please read this manual carefully before using your NEC MultiSync VT440/VT540 Projector and keep the manual handy for future reference.
Your serial number is located under the name plate label on the right side of your MultiSync VT440/VT540. Record it here:
CAUTION

To turn off main power, be sure to remove the plug from power outlet.
The power outlet socket should be installed as near to the equipment as possible, and should be easily accessible.
CAUTION

TO PREVENT SHOCK, DO NOT OPEN THE CABINET.
NO USER-SERVICEABLE PARTS INSIDE. REFER SERVICING TO QUALIFIED NEC SERVICE PERSONNEL.

This symbol warns the user that uninsulated voltage within the unit may be sufficient to cause electrical shock. Therefore, it is dangerous to make any kind of contact with any part inside of the unit.

This symbol alerts the user that important information concerning the operation and maintenance of this unit has been provided. The information should be read carefully to avoid problems.
WARNING
TO PREVENT FIRE OR SHOCK, DO NOT EXPOSE THIS UNIT TO RAIN OR MOISTURE. DO NOT USE THIS UNIT'S GROUNDED PLUG WITH AN EXTENSION CORD OR IN AN OUTLET UNLESS ALL THREE PRONGS CAN BE FULLY INSERTED. DO NOT OPEN THE CABINET. THERE ARE HIGH-VOLTAGE COMPONENTS INSIDE. ALL SERVICING MUST BE DONE BY QUALIFIED NEC SERVICE PERSONNEL.
DOC Compliance Notice
This Class B digital apparatus meets all requirements of the Canadian Interference-Causing Equipment Regulations.
3. GSGV Acoustic Noise Information Ordinance:
The sound pressure level is less than 70 dB (A) according to ISO 3744 or ISO 7779.
RF Interference
WARNING
The Federal Communications Commission does not allow any modifications or changes to the unit EXCEPT those specified by NEC Technologies in this manual. Failure to comply with this government regulation could void your right to operate this equipment.
This equipment has been tested and found to comply with the limits for a Class B digital device, pursuant to Part 15 of the FCC Rules. These limits are designed to provide reasonable protection against harmful interference in a residential installation. This equipment generates, uses, and can radiate radio frequency energy and, if not installed and used in accordance with the instructions, may cause harmful interference to radio communications. However, there is no guarantee that interference will not occur in a particular installation. If this equipment does cause harmful interference to radio or television reception, which can be determined by turning the equipment off and on, the user is encouraged to try to correct the interference by one or more of the following measures:
- Reorient or relocate the receiving antenna.
- Increase the separation between the equipment and receiver.
- Connect the equipment into an outlet on a circuit different from that to which the receiver is connected.
- Consult the dealer or an experienced radio / TV technician for help.
In UK, a BS approved power cable with moulded plug has a Black (five Amps) fuse installed for use with this equipment. If a power cable is not supplied with this equipment please contact your supplier.
- IBM is a registered trademark of International Business Machines Corporation.
• Macintosh and PowerBook are registered trademarks of Apple Computer, Inc. - Other product and company names mentioned in this user's manual may be the trademarks of their respective holders.
Important Safeguards
These safety instructions are to ensure the long life of your projector and to prevent fire and shock. Please read them carefully and heed all warnings.
Installation
- For best results, use your projector in a darkened room.
- Place the projector on a flat, level surface in a dry area away from dust and moisture.
- Do not place your projector in direct sunlight, near heaters or heat radiating appliances.
- Exposure to direct sunlight, smoke or steam can harm internal components.
- Handle your projector carefully. Dropping or jarring can damage internal components.
- Do not place heavy objects on top of the projector.
- If you wish to have the projector installed on the ceiling:
a. Do not attempt to install the projector yourself.
b. The projector must be installed by qualified technicians in order to ensure proper operation and reduce the risk of bodily injury.
c. In addition, the ceiling must be strong enough to support the projector and the installation must be in accordance with any local building codes.
d. Please consult your dealer for more information.
Power Supply
- The projector is designed to operate on a power supply of 100-120 or 200-240 V 50/60 Hz AC. Ensure that your power supply fits this requirement before attempting to use your projector.
- Handle the power cable carefully and avoid excessive bending. A damaged cord can cause electric shock or fire.
- If the projector is not to be used for an extended period of time, disconnect the plug from the power outlet.
Cleaning
- Unplug the projector before cleaning.
- Clean the cabinet periodically with a damp cloth. If heavily soiled, use a mild detergent. Never use strong detergents or solvents such as alcohol or thinner.
- Use a blower or lens paper to clean the lens, and be careful not to scratch or mar the lens.
CAUTION
Do not unplug the power cable from the wall outlet under any one of the following circumstances. Doing so can cause damage to the projector:
* While the Hour Glass icon appears.
* While the message "Please wait a little." appears. This message will be displayed after the projector is turned off.
* Immediately after the power cable is plugged into the wall outlet (the POWER indicator has not changed to a steady amber glow).
* Immediately after the cooling fan stops working (The cooling fan continues to work for 30 seconds after the projector is turned off with the POWER OFF button).
* While the POWER and the STATUS indicators are alternately flashing.
Lamp Replacement
- To replace the lamp, follow all instructions provided on page E-33.
- Be sure to replace the lamp when the message "The lamp has reached the end of its usable life. Please replace the lamp."appears. If you continue to use the lamp after the lamp has reached the end of its usable life, the lamp bulb may shatter, and pieces of glass may be scattered in the lamp case. Do not touch them as the pieces of glass may cause injury. If this happens, contact your NEC dealer for lamp replacement.
- Allow a minimum of 30 seconds to elapse after turning off the projector. Then disconnect the power cable and allow 60 minutes to cool the projector before replacing the lamp.
Fire and Shock Precautions
- Ensure that there is sufficient ventilation and that vents are unobstructed to prevent the build-up of heat inside your projector. Allow at least 3 inches (10 cm) of space between your projector and a wall.
- Prevent foreign objects such as paper clips and bits of paper from falling into your projector. Do not attempt to retrieve any objects that might fall into your projector. Do not insert any metal objects such as a wire or screwdriver into your projector. If something should fall into your projector, disconnect it immediately and have the object removed by a qualified NEC service personnel.
-
Do not place any liquids on top of your projector.
-
Do not look into the lens while the projector is on. Serious damage to your eyes could result.
- Keep any items such as magnifying glass out of the light path of the projector. The light being projected from the lens is extensive, therefore any kind of abnormal objects that can redirect light coming out of the lens, can cause unpredictable outcome such as fire or injury to the eyes.
- Do not cover the lens with the supplied lens cap or equivalent while the projector is on. Doing so can lead to melting of the cap and possibly burning your hands due to the heat emitted from the light output.
TABLE OF CONTENTS
1. INTRODUCTION
Introduction to the MultiSync VT440/VT540 Projector ...... E-6
Getting Started E-6
What's in the Box E-7
Getting to Know Your MultiSync VT440/VT540 Projector ...... E-8
Front / Side Features ...... E-8
Rear / Side Features ...... E-9
Top Features E-10
Terminal Panel Features ...... E-11
Remote Control Features..... E-12
2. INSTALLATION
Setting Up Your Projector..... E-14
Selecting a Location E-14
Using a Tabletop or Cart ...... E-14
Distance Chart..... E-15
Ceiling Installation E-16
Reflecting the Image.... E-16
Wiring Diagram E-17
Connecting Your PC ...... E-18
Connecting Your Macintosh Computer ...... E-19
Connecting an External Monitor.... E-21
Connecting Your DVD Player.... E-22
Connecting Your VCR or Laser Disc Player ...... E-23
3. OPERATION
General Controls E-24
Enlarging and Moving a Picture.... E-24
Using the Menus.... E-25
Menu Tree..... E-26
Menu Elements..... E-27
Menu Descriptions & Functions ...... E-28
Source Select E-28
RGB/Video/S-Video
Picture E-28
Brightness/Contrast/Color/Hue/Sharpness
Volume..... E-28
Image Options ...... E-28
Keystone E-28
Color Temperature E-28
Lamp Mode E-29
Gamma Correction.... E-29
Aspect Ratio.... E-29
Noise Reduction..... E-29
Color Matrix.... E-29
White Balance E-30
Auto Adjust..... E-30
Position/Clock E-30
Resolution E-30
Factory Default E-30
Menu....E-31
Menu Mode E-31
Basic/Advanced..... E-31
Language E-31
Projector Pointer E-31
Source Display E-31
Volume Bar (Direct Button) E-31
Menu Display Time.... E-31
Setup E-31
Orientation E-31
Background E-31
Signal Select E-32
Auto Start E-32
Power Management E-32
Power Off Confirmation E-32
Keystone Save E-32
Clear Lamp Hour Meter E-32
Help E-32
Contents..... E-32
Information E-32
4. MAINTENANCE
Replacing the Lamp.... E-33
Remote Control Battery Installation E-34
Cleaning or Replacing the Filters E-34
5. TROUBLESHOOTING
Power / Status Light Messages ...... E-35
Common Problems & Solutions.... E-35
6. SPECIFICATIONS
Optical/Electrical/Mechanical..... E-36
Cabinet Dimensions E-37
D-Sub Pin Assignments.... E-38
Timing Chart E-39
PC Control Codes.... E-40
Cable Connection E-40
Introduction to the MultiSync VT440/VT540 Projector
This section introduces you to your new MultiSync VT440 (SVGA)/VT540 (XGA) Projector and describes the features and controls.
Congratulations on Your Purchase of The MultiSync VT440/VT540 Projector
The MultiSync VT440/VT540 is one of the very best projectors available today. The MultiSync VT440/VT540 enables you to project precise images up to 300 inches across (measured diagonally) from your PC or Macintosh computer (desktop or notebook), VCR, DVD player, document camera, or even a laser disc player.
You can use the projector on a tabletop or cart, you can use the projector to project images from behind the screen, and the projector can be permanently mounted on a ceiling ^*1 . The remote control can be used wirelessly.
Features you'll enjoy:
- Simple set up and operation.
- Front ventilation directs hot air away from your audience.
- A high-performance 160 watt NSH (130 watt in Eco mode) lamp. The lamp life can be extended up to 3000 hours by using the Eco mode.
- The supplied wireless remote control that operates the projector from any angle.
- Manual zoom control enables you to adjust the image between 25 (0.63 m) and 300 inches (7.6 m) (measured diagonally).
- Keystone correction allows you to correct trapezoidal distortion so that the image is square.
- You can choose between video modes depending on your source: "normal" for a typical picture, "natural" for true color reproduction.
- An image can be projected from in front or behind a screen, and the projector can even be installed on the ceiling.
- NEC Technologies' exclusive Advanced AccuBlend intelligent pixel blending technology - an extremely accurate image compression technology - offers a crisp image with SXGA (1280 x 1024) resolution ^*3 .
- Supports most IBM VGA, SVGA, XGA ^2 , SXGA(with Advanced AccuBlend) ^3 , Macintosh, component signal (YCbCr / YPbPr) or any other RGB signals within a horizontal frequency range of 15 to 100kHz and a vertical frequency range of 50 to 117Hz . This includes NTSC, PAL, PAL60, SECAM and NTSC4.43 standard video signals.
NOTE: Composite video standards are as follows: NTSC: U.S. TV standard for video in U.S. and Canada. PAL: TV standard used in Western Europe. PAL60: TV standard used for NTSC playback on PAL TVs. SECAM: TV standard used in France and Eastern Europe. NTSC4.43: TV standard used in Middle East countries.
- The supplied remote control can be used without a cable.
- You can control the projector with a PC using the PC Control port.
- The contemporary cabinet design is light, compact, easy to carry, and complements any office, boardroom or auditorium.
- Eight pointers are available for your presentation.
*1 Do not attempt to mount the projector on a ceiling yourself.
The projector must be installed by qualified technicians in order to ensure proper operation and reduce the risk of bodily injury. In addition, the ceiling must be strong enough to support the projector and the installation must be in accordance with any local building codes. Please consult your dealer for more information.
*2 An XGA image (1024×768) is converted into an 800×600 crisp image with NEC technology's Advanced AccuBlend on VT440.
*3 An SXGA image (1280×1024) is converted into a 1024×768 crisp image with NEC technology's Advanced AccuBlend on VT540.
Getting Started
The fastest way to get started is to take your time and do everything right the first time. Take a few minutes now to review the user's manual. This may save you time later on. At the beginning of each section of the manual you'll find an overview. If the section doesn't apply, you can skip it.
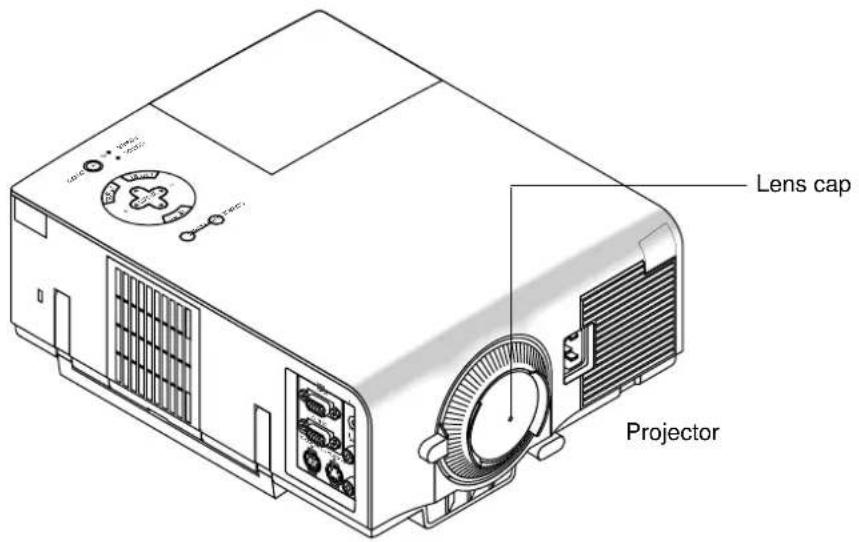
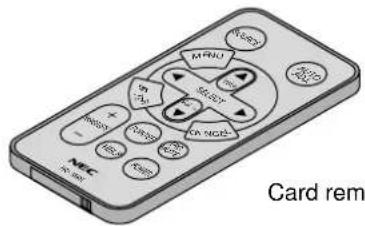
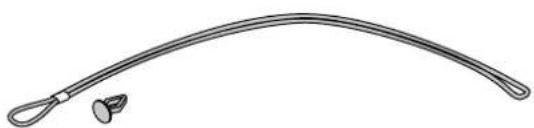
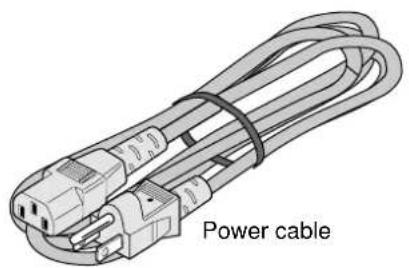
What's in the Box?
Make sure your box contains everything listed. If any pieces are missing, contact your dealer.
Please save the original box and packing materials if you ever need to ship your MultiSync VT440/VT540 Projector.
natural_image
Line drawing of a curved medical or anatomical device with a looped end (no text or symbols)String and rivet
natural_image
Illustration of a power cable with multiple connectors and a strap (no text or symbols on the cable itself)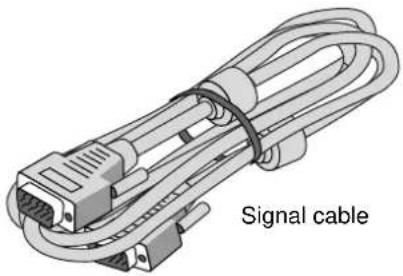
natural_image
Diagram of a signal cable connector with multiple Ethernet ports and coiled cables (no text or symbols)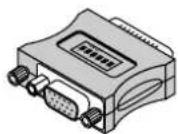
Pin adapter for Macintosh
Getting to Know Your MultiSync VT440/VT540 Projector
Front/ Side Features
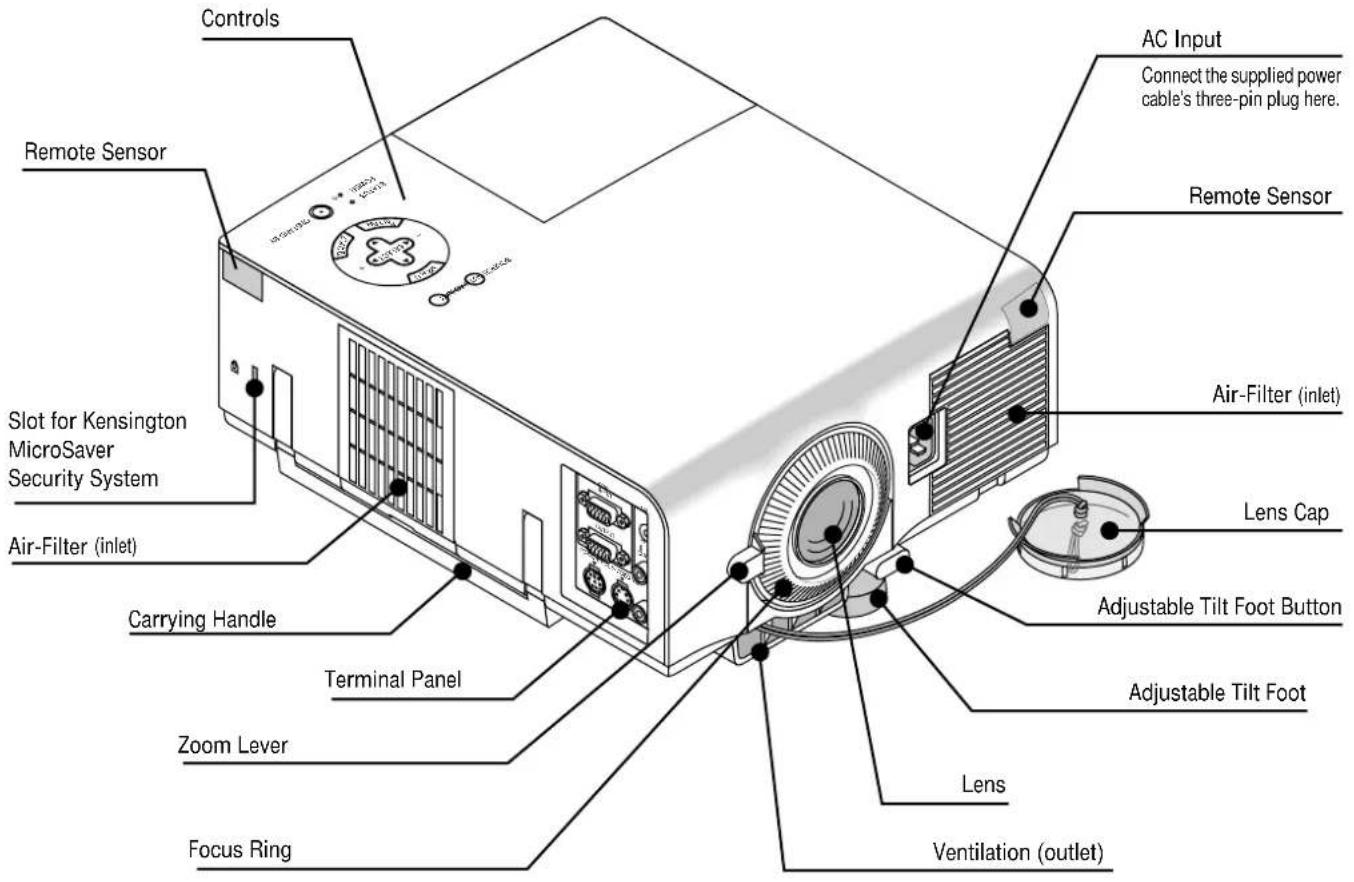
NOTE: Built-in Security Slot (
This security slot supports the MicroSaver ^® Security System. MicroSaver ^® is a registered trademark of Kensington Microwave Inc. The logo is trademarked and owned by Kensington Microwave Inc.
Carrying the Projector:
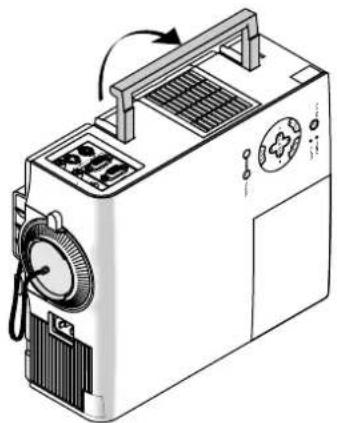
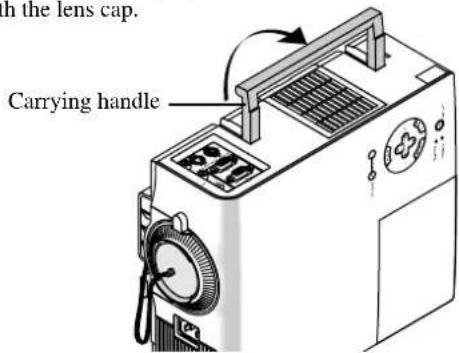
Raise the carrying handle up. Always carry your projector by the carrying handle.
NOTE: When moving the projector or when it is not in use, cover the lens with the lens cap.
natural_image
Line drawing of a portable electronic device with control panel and fan (no text or symbols)Rear/ Side Features
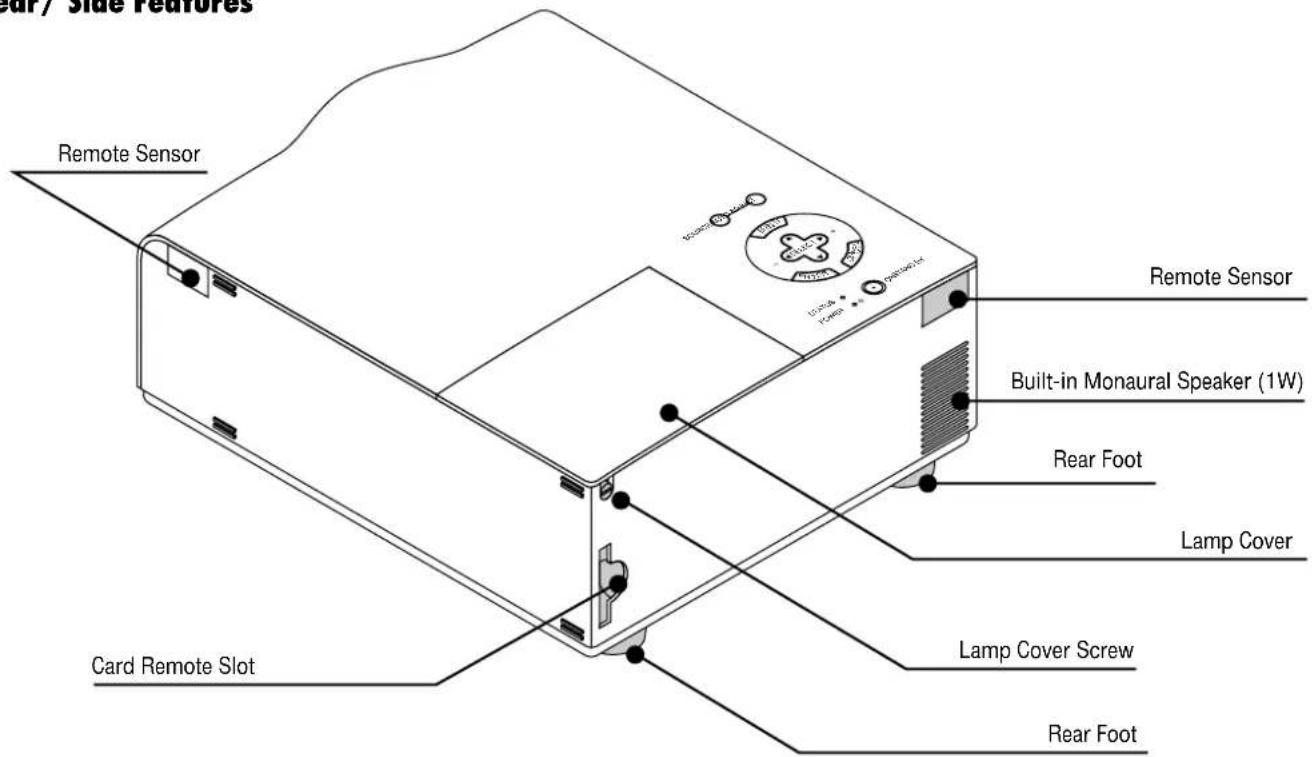
Slot for Card Remote Control
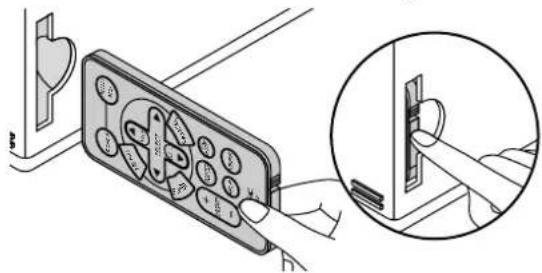
The supplied card remote control can be stored in the cabinet. To store the card remote control:
- Insert the card remote control STRAIGHT into the slot.
- Push the card remote control until it is into place.
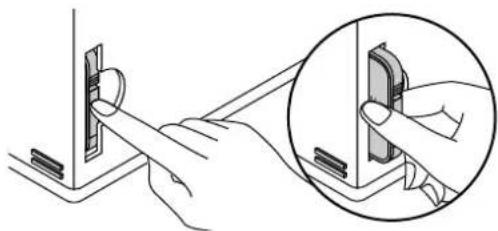
To pull out the card remote control:
-
Push the bottom of the card remote control straight to eject the card remote control.
-
Pull out the card remote control.
natural_image
Illustration of a hand inserting a component into a device, with an inset showing the same component being inserted (no text or symbols present)NOTE: Do not push or pull the card remote control in a slanting direction. Unless you push the card remote control straight, you may not eject the card remote control. Should this happen, try pushing the card remote control straight again.
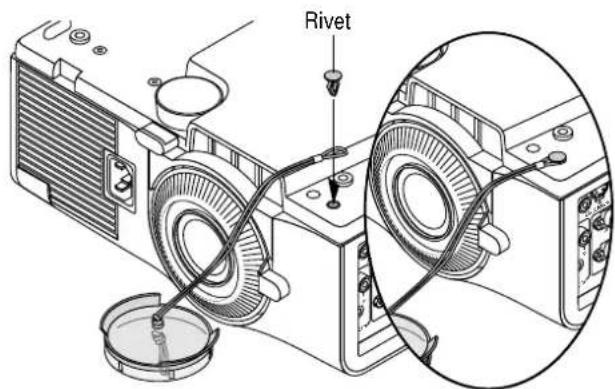
Attaching the lens cap to the lens hood with the supplied string and rivet
- Thread the string through the hole on the lens cap and then tie a knot in the string.
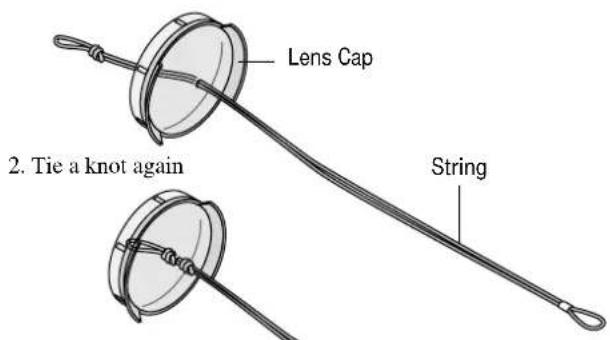
- Use the rivet to attach the string to the bottom of the lens hood.
Top Features
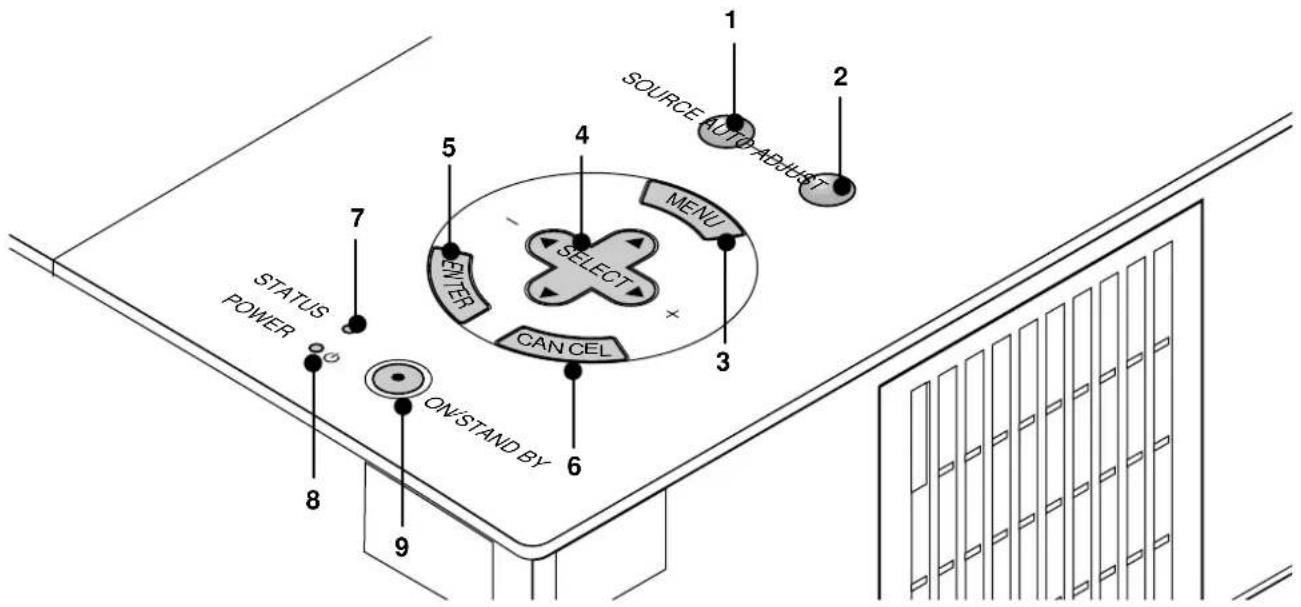
1 Source Button
Use this button to select a video source such as a PC, VCR or DVD player.
2 Auto Adjust Button
Use this button to adjust Position-H/V and Pixel Clock/Phase for an optimal picture. Some signals may not be displayed correctly or take time to switch between sources.
3 Menu Button
Displays the menu.
4 Select (▲▼◀▶) / Volume (+) (-) Buttons
▲▼: Use these buttons to select the menu of the item you wish to adjust.
◀▶: Use these buttons to change the level of a selected menu item.
A press of the ▶ button executes the selection. When no menus appear, these ▲▼ buttons work as a volume control.
When the pointer is displayed, these ◀▶ ▲▼ buttons move the pointer.
5 Enter Button
Executes your menu selection and activates items selected from the menu.
6 Cancel Button
Press this button to exit the menu. Press this button to return the adjustments to the last condition while you are in the adjustment or setting menu.
7 Status Indicator
When this is lit red (orange in Eco mode) continually, it's warning you that the projection lamp has exceeded 2000 hours (up to 3000 hours in Eco mode) of service. After this light appears, it is advisable to replace the projection lamp as soon as possible. (See page E-33). In addition the message "The lamp has reached the end of its usable life. Please replace the lamp." appears continually until the lamp is replaced.
If this light blinks red rapidly, it indicates that the lamp cover or filter cover is not attached properly or the projector is overheated.
See the Power / Status Light Messages on page E-35 for more details.
8 Power Indicator (1)
When this indicator is green, the projector is on; when the indicator is orange, it is in standby mode.
9 Power Button (ON / STAND BY)
Use this button to turn the power on and off when the power is supplied and the projector is in standby mode.
NOTE: To turn off the projector, press and hold this button for minimum of two seconds.
Terminal Panel Features
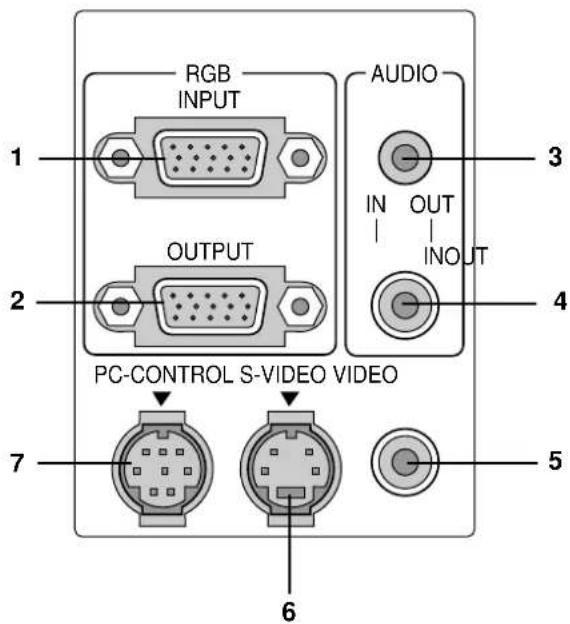
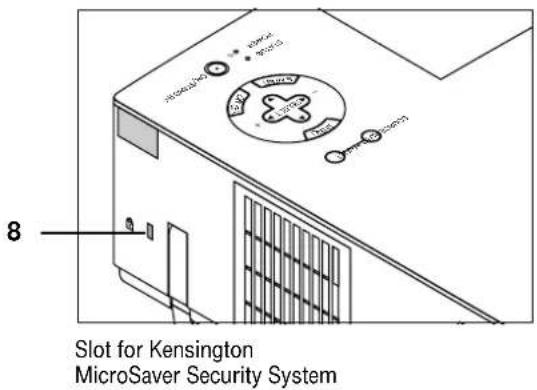
- RGB Input Connector(Mini D-Sub 15 pin)
Connect your PC or other RGB equipment. Use the supplied signal cable to connect to a PC.
- RGB Monitor Output Connector (Mini D-Sub 15 pin)
You can use this connector to loop your computer image to an external monitor from the RGB input source.
- Audio Input / Output Mini Jack
This is where you connect audio output from your computer. Or connect additional external speakers here to listen to audio coming from your Video or S-Video input.
- Audio Input / Output Connector (RCA)
This is where you connect audio output from a VCR, DVD player, or laser disc player. Or connect additional external speakers to listen to audio coming from your RGB source.
NOTE: Either connector 3 or 4 can be used for input or output, however they cannot both be used for input simultaneously. It can damage your equipment.
- Video Input (RCA)
Connect a VCR, DVD player, laser disc player, or document camera here to project video.
- S-Video Input Port (Mini DIN 4 Pin)
Connect the S-Video input from an external source like a VCR.
- PC Control Port (Mini DIN 8 Pin)
Use this port to connect your PC to control your projector. This enables you to use your PC and serial communication protocol to control the projector. If you are writing your own program, typical PC control codes are on page E-40.
A cap is put on the port at the factory. Remove the cap when using the port.
- Built-in Security Slot (R)
This security slot supports the MicroSaver ® Security System. MicroSaver ® is a registered trademark of Kensington Microwave Inc. The logo is trademarked and owned by Kensington Microwave Inc.
Remote Control Features
1 Source Button
Press to select a video source.
2 Auto Adjust Button
Use this button to adjust Position-H/V and Pixel Clock/Phase for an optimal picture. Some signals may not be displayed correctly, or in some cases it may take some time for a source to switch between sources.
3 Menu Button
Displays the menu.
4 Select (▲▼◀▶) / Volume (+) (-) Buttons
▲ ▼: Use these buttons to select the menu of the item you wish to adjust.
◀▶: Use these buttons to change the level of a selected menu item.
A press of the ▶ button executes the selection. When no menus appear, these ▲▼ buttons work as a volume control.
When the pointer is displayed, these ◀▶ ▲▼ buttons move the pointer.
5 Enter Button
Use this button to enter your menu selection.
6 Cancel Button
Press this button to exit "Menus". Press this button to return the adjustments to the last condition while you are in the adjustment or setting menu.
7 Magnify Button
Use the (+) or (−) button to adjust the image size up to 400%. When the Pointer is displayed, the magnified image is displayed at the center of the Pointer. When the Pointer is not displayed, the magnified image is displayed at the center of the screen.
When the image is magnified, the pointer is changed to the magnifying icon.
8 Pointer Button
Press this button to display one of the eight pointers; press again to hide the pointer. You can move your pointer icon to the area you want on the screen using the Select button.
9 Picture Mute Button
This button turns off the image and sound for a short period of time. Press again to restore the image and sound.
10 Help Button
Provides information about operation and adjustment procedures or the set information for the current menu or adjustment during menu operation. This also displays information how to use the Help.
11 Power Button
If power is applied, you can use this button to turn your projector on and off.
NOTE: To turn off the projector, press and hold the POWER button for a minimum of two seconds.
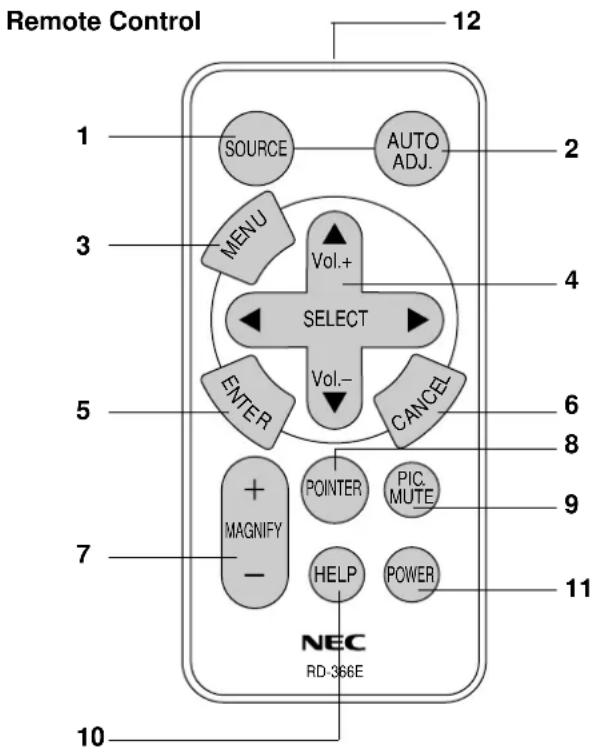
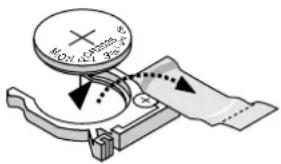
NOTE: Remove the transparent insulation tape before use. See page E-34 for battery installation.
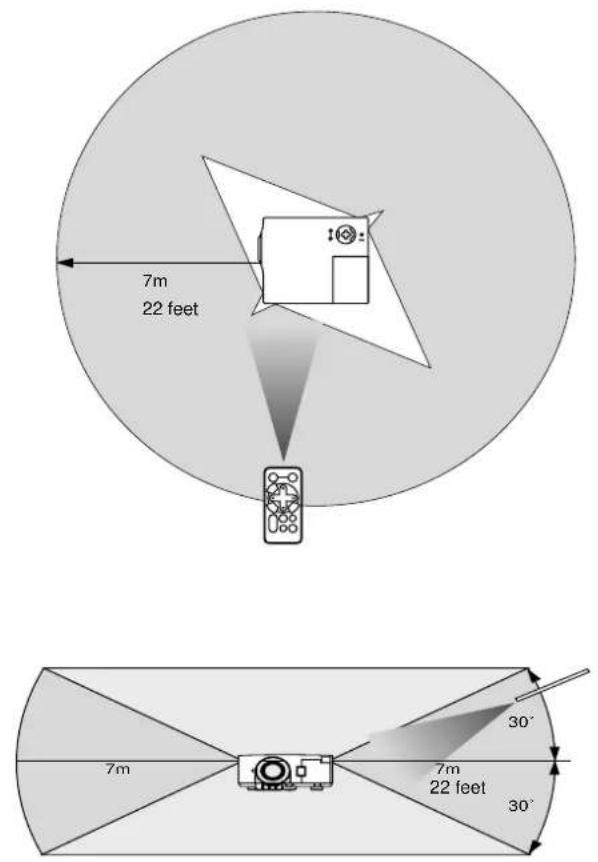
12 Infrared Transmitter
Direct the remote control toward the remote sensor on the projector cabinet.
Remote Control Precautions
- Handle the remote control carefully.
- If the remote control gets wet, wipe it dry immediately.
- Avoid excessive heat and humidity.
- Do not place the battery upside down.
NOTE: Before you use the card remote control for the first time, be sure to remove the insulation tape from the card remote control.
* Keep the coin cell battery out of reach of children so as not to allow them to swallow the cell battery.
CAUTION:
Danger of explosion if battery is incorrectly replaced.
Replace only with the same or equivalent type recommended by the manufacturer.
Dispose of used batteries according to your local regulations.
Operating Range
2. INSTALLATION
This section describes how to set up your MultiSync VT440/VT540 projector and how to connect video and audio sources.
Setting up Your Projector
Your MultiSync VT440/VT540 Projector is simple to set up and use. But before you get started, you must first:
- Determine the image size.
- Set up a screen or select a non-glossy white wall onto which you can project your image.
Carrying the Projector: Always carry your projector by the handle. Ensure that the power cable and any other cables connecting to video sources are disconnected before moving the projector.
When moving the projector or when it is not in use, cover the lens with the lens cap.
Selecting a Location
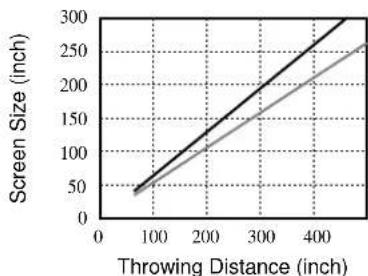
The further your projector is from the screen or wall, the larger the image. The minimum size the image can be is approximately 25" (0.64 m) measured diagonally when the projector is roughly 4 feet (1.2 m) from the wall or screen. The largest the image can be is 300" (7.6 m) when the projector is about 39.3 feet (12.0 m) from the wall or screen.
Using a Tabletop or Cart
- Place your projector on a flat level surface at the optimal distance from the screen or wall so you realize the size image you want. (Avoid having bright room lighting or sun light directly on the screen or wall where you'll be projecting the image.)
- Connect the power cable, remove the lens cap and turn the projector on. (If no input signal is available, the projector will display a background image.)
- Ensure that the projector is square to the screen.
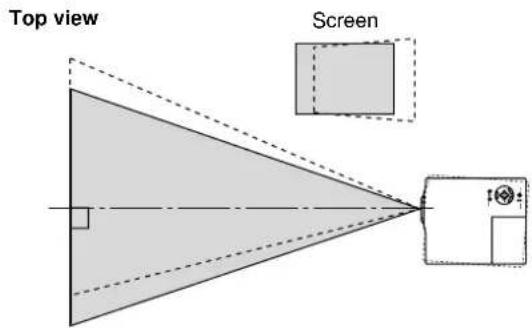
- Move the projector left or right to center the image horizontally on the screen.
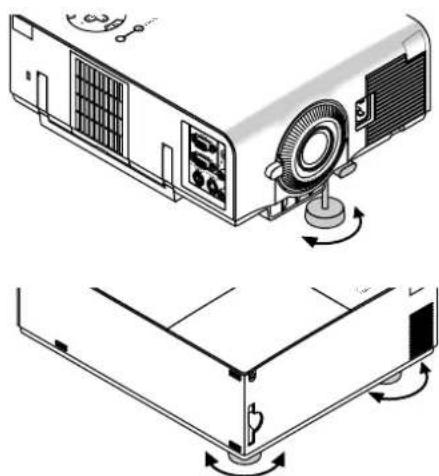
- To center the image vertically, lift the front edge of the projector and press the One-Touch Tilt button on the front side of the projector to release the Front Adjustable foot.
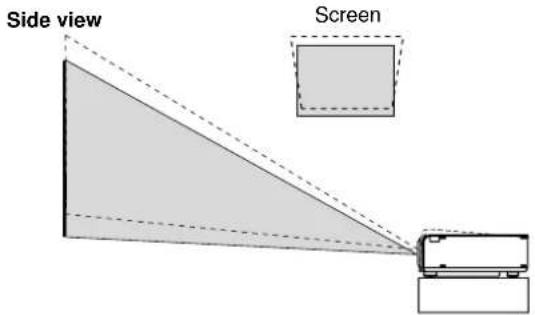
(There is approximately 10 degrees of up and down adjustment for the front of the projector.)
Adjusting the Tilt Foot
1) Press and hold the Tilt button on the front of the projector.
2) Lift the front edge of the projector to the height you want, and release the button to lock the Adjustable Tilt Foot.
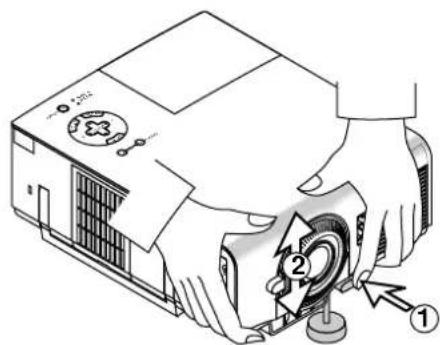
To fine-tune the image's position vertically on the screen, rotate the foot. Each of the rear feet height can be changed up to 0.6" (4mm).
natural_image
Technical line drawing of a projector with base mount and fan assembly (no text or symbols)- If the projected image does not appear square to the screen then use keystone correction for proper adjustment.
- Adjust the size of the image using the Zoom ring on the lens.
Distance Chart
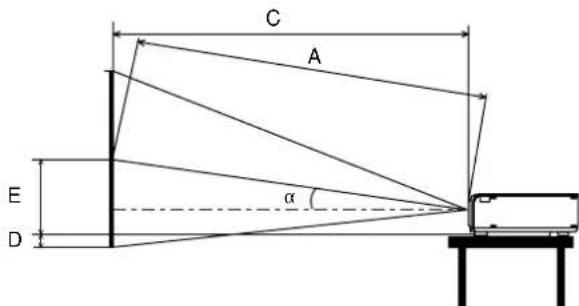
Formulas(mm)
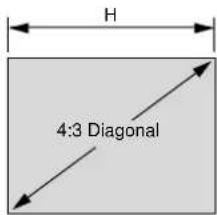
"H = Horizontal Screen Width
A = C/cosα
C (wide) = 36.8712 · (diagonal screen size/ 0.92205) - 43.5689
C (tele) = C(wide) · 1.2
D = 1.45 · M - 62.9
E = 62.9 + 5.5M
M = 1.25H / 22.86
A: Distance between the lens and the screen center
C: Horizontal throw distance between screen surface and the lens
D: Vertical distance between projector base and base of image
E: Vertical distance between projector base and screen center
Formulas(inch)
"H = Horizontal Screen Width
A = C/cosa
C (wide) = (36.8712 · (diagonal screen size/0.92205) - 43.5689) / 25.4
C (tele) = C (wide) · 1.2
D = 1.45 - M - 62.9 / 25.4
E = (62.9 + 5.5M) / 25.4
M = 1.25H / 0.9
Screen (inch)
Zoom Lens (Wide)
| α degree 9.01 8.93 8.85 | 8.82 8.81 | 8.79 8.78 8.77 | 8.75 8.74 | 8.74 8.73 | 8.72 8.72 | |||||||||||
| β (=sina) | 0.16 | 0.16 | 0.15 | 0.15 | 0.15 | 0.15 | 0.15 | 0.15 | 0.15 | 0.15 | 0.15 | 0.15 | 0.15 | 0.15 | 0.15 | |
| γ (=cosα) | 0.99 | 0.99 | 0.99 | 0.99 | 0.99 | 0.99 | 0.99 | 0.99 | 0.99 | 0.99 | 0.99 | 0.99 | 0.99 | 0.99 | 0.99 | |
| Screen Size H-Width inch | 24 32 48 | 56 64 72 80 | 96 120 144 | 160 192 | 216 240 | |||||||||||
| 4:3 Diagonal inch 30 40 | 80 70 80 90 | 100 120 150 | 180 200 | 240 270 300 | ||||||||||||
| A mm 1171 1575 2384 | 2789 3193 | 3598 4002 | 4811 6025 | 7238 8047 | 9666 10879 | 12093 | ||||||||||
| inch 46 | 62 94 110 | 126 142 158 | 189 237 | 285 317 381 | 428 476 | |||||||||||
| C mm 1156 1556 2356 | 2756 3155 | 3555 3955 | 4755 5955 | 7154 7954 | 9554 10753 | 11953 | ||||||||||
| inch 46 | 61 93 108 | 124 140 156 | 187 234 | 282 313 376 | 423 471 | |||||||||||
| D | mm | -15 | 2 | 34 | 50 | 68 | 82 | 98 | 130 | 179 | 227 | 259 | 324 | 372 | 420 | |
| inch | -1 | 0 | 1 | 2 | 3 | 3 | 4 | 5 | 7 | 9 | 10 | 13 | 15 | 17 | ||
| E | mm | 246 | 307 | 430 | 491 | 552 | 613 | 674 | 796 | 980 | 1163 | 1285 | 1530 | 1713 | 1896 | |
| inch 10 | 12 17 19 | 22 24 27 31 | 39 46 51 60 | 67 | 75 |
Zoom Lens (Tele)
| degree 6.28 7.46 7.39 | 7.37 7.36 | 7.35 7.34 7.32 7.31 7.30 | 7.30 7.29 | 7.29 7.28 | |||||||||||
| (= ) | 0.11 | 0.13 | 0.13 | 0.13 | 0.13 | 0.13 | 0.13 | 0.13 | 0.13 | 0.13 | 0.13 | 0.13 | 0.13 | 0.13 | |
| (= ) | 0.99 | 0.99 | 0.99 | 0.99 | 0.99 | 0.99 | 0.99 | 0.99 | 0.99 | 0.99 | 0.99 | 0.99 | 0.99 | 0.99 | |
| Screen Size H-Width inch | 20 32 48 | 56 64 72 80 | 96 120 144 | 160 192 | 216 240 | ||||||||||
| 4:3 Diagonal inch 25 40 | 60 70 80 | 90 100 120 | 150 180 200 | 240 270 | 300 | ||||||||||
| A mm 1396 1883 2851 | 3334 3818 | 4302 4785 | 5753 7204 | 6655 9623 | 11558 | 13009 14460 | |||||||||
| inch 55 | 74 112 131 | 150 169 | 88 226 284 | 341 379 45 | 5 512 569 | ||||||||||
| C mm 1387 1867 2827 | 3307 3787 | 4266 4746 | 5706 7146 | 8585 9545 | 11464 | 12904 14344 | |||||||||
| inch 55 | 74 111 130 | 149 168 | 87 225 281 | 338 376 45 | 1 508 565 | ||||||||||
| D | mm | -23 | 2 | 34 | 50 | 66 | 82 | 98 | 130 | 179 | 227 | 259 | 324 | 372 | 420 |
| inch | -1 | 0 | 1 | 2 | 3 | 3 | 4 | 5 | 7 | 9 | 10 | 13 | 15 | 17 | |
| E | mm | 216 | 307 | 430 | 491 | 552 | 613 | 674 | 796 | 980 | 1163 | 1285 | 1530 | 1713 | 1896 |
| inch | 8 | 12 | 17 | 19 | 22 | 24 | 27 | 31 | 39 | 46 | 51 | 60 | 67 | 75 |
Distance Chart
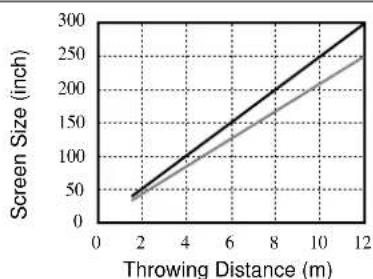
line
| Throwing Distance (m) | Screen Size (inch) | | --------------------- | ------------------ | | 2 | 50 | | 4 | 100 | | 6 | 150 | | 8 | 200 | | 10 | 250 | | 12 | 300 |
NOTE: Distances may vary +/-5%.
line
| Throwing Distance (inch) | Screen Size (inch) | | ------------------------ | ------------------ | | 0 | 50 | | 100 | 100 | | 200 | 150 | | 300 | 200 | | 400 | 250 | | 500 | 300 || Throwing Distance Screen Size (inch) | |||
| (inch) | (m) | Wide | Tele |
| 45 1.2 | 30 | 25 | |
| 61 1.6 | 40 | 33 | |
| 93 2.4 | 60 | 50 | |
| 108 2.8 | 70 | 58 | |
| 124 3.2 | 80 | 67 | |
| 140 3.6 | 90 | 75 | |
| 156 4.0 | 100 83 | ||
| 187 4.8 | 120 100 | ||
| 234 6.0 | 150 125 | ||
| 282 7.2 | 180 150 | ||
| 313 8.0 | 200 167 | ||
| 376 9.6 | 240 200 | ||
| 423 | 10.8 | 270 225 | |
| 471 | 12.0 | 300 250 | |
Ceiling Installation
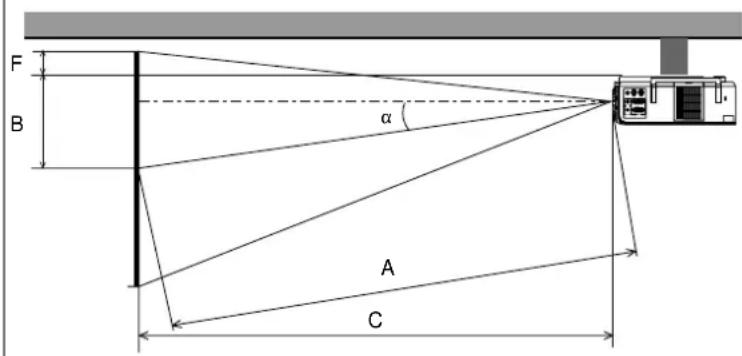
A: Distance between the lens and the screen center
B: Vertical distance between the top of the supplied ceiling mount and the screen center
C: Horizontal throw distance between screen surface and the lens
F: Vertical distance between projector base and top of image
Formulas(mm)
H" = Horizontal Screen Width (inch)
A = C/cosa
B = 94 + 5.5 · M
C (wide) = 36.8712 · (diagonal screen size/ 0.92205) - 43.5689
C (tele) = C(wide) · 1.2
F = 1.4516 · M - 94
M = 1.25H" / 22.86
Formulas(inch)
H" = Horizontal Screen Width
A = C/cosa
B = (T.B.D. +5.5 · M) / 25.4
C (wide) = (36.8712 · (diagonal screen size/0.92205) - 43.5689) / 25.4
C (tele) = C (wide) · 1.2
F = 1.4516 · M - 94 / 25.4
M = 1.25H / 0.9
Zoom Lens (Wide)
| α degree 9.01 8.93 8.85 | 8.82 8.81 | 8.79 | 8.78 | 8.77 | 8.75 | 8.74 | 8.74 | 8.73 | 8.72 | 8.72 | |||||||||||
| β (=sinα) | 0.16 | 0.16 | 0.15 | 0.15 | 0.15 | 0.15 | 0.15 | 0.15 | 0.15 | 0.15 | |||||||||||
| γ (=cosα) | 0.99 | 0.99 | 0.99 | 0.99 | 0.99 | 0.99 | 0.99 | 0.99 | 0.99 | 0.99 | |||||||||||
| Screen Size H-Width | inch | 24 | 32 | 48 | 56 | 64 | 72 | 80 | 96 | 120 | 144 | ||||||||||
| 4:3 Diagonal | inch | 30 | 40 | 60 | 70 | 80 | 90 | 100 | 120 | 150 | 180 | ||||||||||
| A | mm | 1171 | 1471 | 2242 | 2628 | 3013 | 3399 | 3785 | 4556 | 5713 | 6870 | ||||||||||
| inch | 46 | 58 | 88 | 103 | 119 | 134 | 149 | 179 | 225 | 270 | |||||||||||
| C | mm | 1156 | 1452 | 2214 | 2595 | 2976 | 3357 | 3738 | 4500 | 5644 | 6787 | ||||||||||
| inch | 46 | 57 | 87 | 102 | 117 | 132 | 147 | 177 | 222 | 267 | |||||||||||
| B | mm | 277 | 338 | 461 | 522 | 583 | 644 | 705 | 827 | 1011 | 1194 | ||||||||||
| inch | 11 | 13 | 18 | 21 | 23 | 25 | 28 | 33 | 40 | 47 | |||||||||||
| F | mm | -46 | -29 | 3 | 19 | 35 | 51 | 67 | 100 | 148 | 196 | ||||||||||
| inch | -2 | -1 | 0 | 1 | 1 | 2 | 3 | 4 | 6 | 8 | |||||||||||
Zoom Lens (Tele)
| α | degree | 6.28 | 7.1 | 7.0 | 7.0 | 7.0 | 7.0 | 6.9 | 6.9 | 6.9 | 6.9 | 6.9 | 6.9 | 6.9 |
| β (=sinα) | 0.11 | 0.12 | 0.12 | 0.12 | 0.12 | 0.12 | 0.12 | 0.12 | 0.12 | 0.12 | 0.12 | 0.12 | 0.12 | |
| γ (=cosα) | 0.99 | 0.99 | 0.99 | 0.99 | 0.99 | 0.99 | 0.99 | 0.99 | 0.99 | 0.99 | 0.99 | 0.99 | 0.99 | |
| Screen Size H-Width | inch | 20 | 32 | 48 | 56 | 64 | 72 | 80 | 96 | 120 | 144 | 160 | 192 | 216 |
| 4:3 Diagonal | inch | 25 | 40 | 60 | 70 | 80 | 90 | 100 | 120 | 150 | 180 | 200 | 240 | 270 |
| A | mm | 1396 | 1902 | 2900 | 3399 | 3898 | 4397 | 4896 | 5893 | 7390 | 8887 | 9885 | 11881 | 13378 |
| inch | 55 | 75 | 114 | 134 | 153 | 173 | 193 | 232 | 291 | 350 | 389 | 468 | 527 | |
| C | mm | 1387 | 1887 | 2878 | 3373 | 3869 | 4364 | 4860 | 5851 | 7337 | 8823 | 9814 | 11796 | 13282 |
| inch | 55 | 74 | 113 | 133 | 152 | 172 | 191 | 230 | 289 | 347 | 386 | 464 | 523 | |
| B | mm | 247 | 338 | 461 | 522 | 583 | 644 | 705 | 827 | 1011 | 1194 | 1316 | 1561 | 1744 |
| inch | 10 | 13 | 18 | 21 | 23 | 25 | 28 | 33 | 40 | 47 | 52 | 61 | 69 | |
| F | mm | -54 | -29 | 3 | 19 | 35 | 51 | 67 | 100 | 148 | 196 | 229 | 293 | 341 |
| inch | -2 | -1 | 0 | 1 | 1 | 2 | 3 | 4 | 6 | 8 | 9 | 12 | 13 |
WARNING
- Installing your projector on the ceiling must be done by a qualified technician. Contact your NEC dealer for more information.
* Do not attempt to install the projector yourself. - Only use your projector on a solid, level surface. If the projector falls to the ground, you can be injured and the projector severely damaged.
- Do not use the projector where temperatures vary greatly. The projector must be used at temperatures between 32^ (0^) and 95^ (35^) .
- Do not expose the projector to moisture, dust, or smoke. This will harm the screen image.
- Ensure that you have adequate ventilation around your projector so heat can dissipate. Do not cover the vents on the side or the front of the projector.
If your projector is mounted on the ceiling and your image is upside down, use the "Menu" and "Select" buttons on your projector cabinet or ▲▼ button on your remote control to correct the orientation. (See page E-31.)
Reflecting the Image
Using a mirror to reflect your projector's image enables you to enjoy a much larger image. Contact your NEC dealer if you need a mirror. If you're using a mirror and your image is inverted, use the "Menu" and "Select" buttons on your projector cabinet or ▲▼ buttons on your remote control to correct the orientation. (See page E-31.)
Wiring Diagram
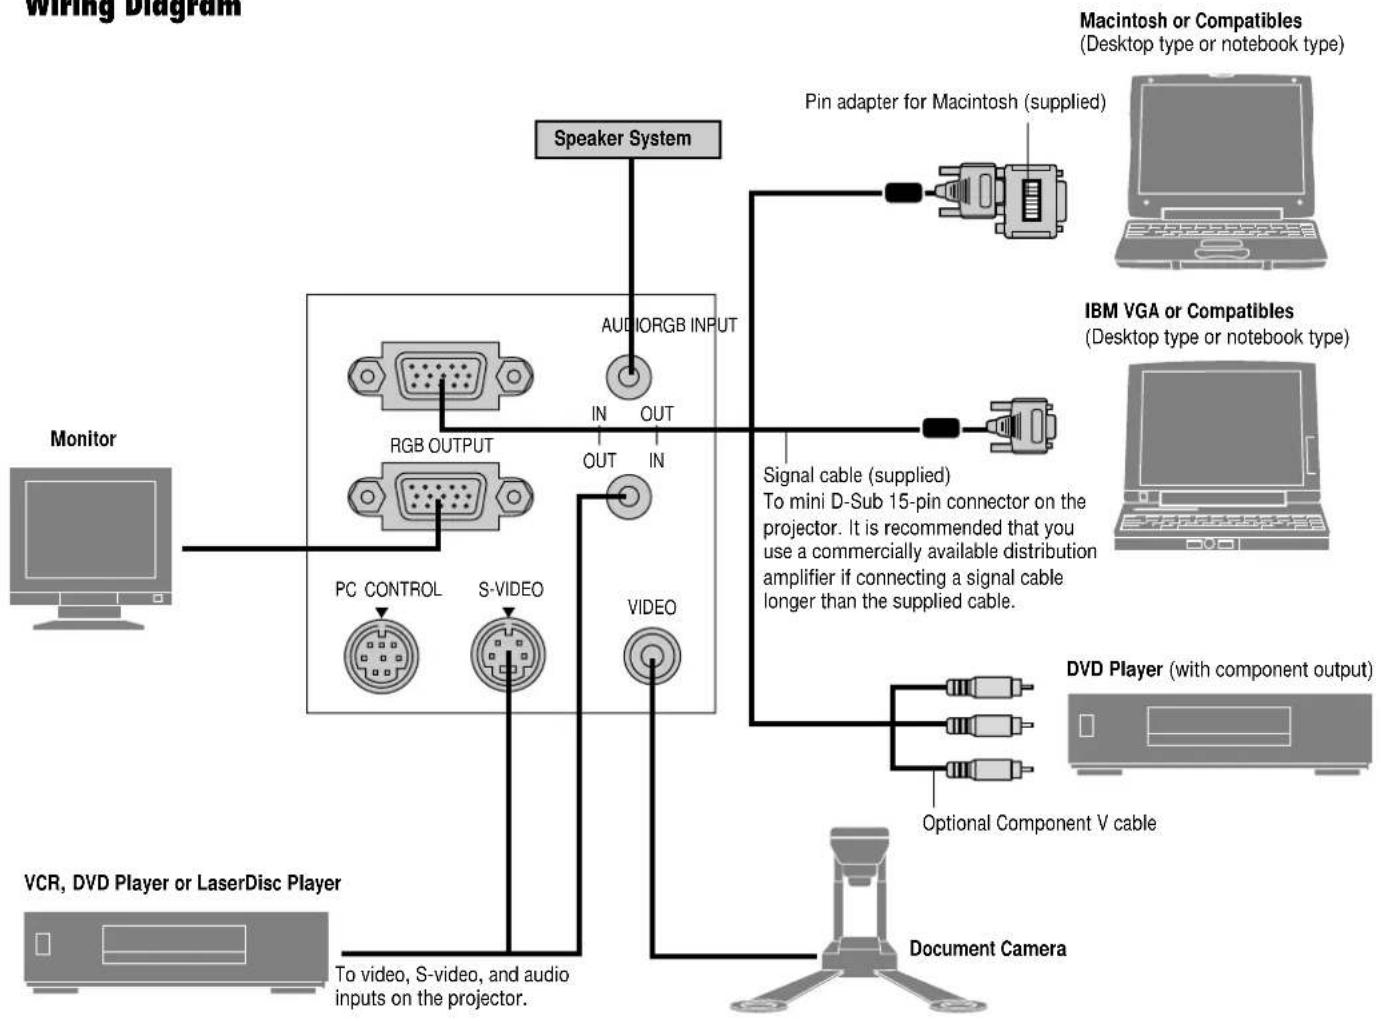
flowchart
graph TD
    A["Monitor"] --> B["Speaker System"]
    B --> C["Macintosh or Compatibles (Desktop type or notebook type)"]
    B --> D["Pin adapter for Macintosh (supplied)"]
    B --> E["IBM VGA or Compatibles (Desktop type or notebook type)"]
    B --> F["Signal cable (supplied) To mini D-Sub 15-pin connector on the projector. It is recommended that you use a commercially available distribution amplifier if connecting a signal cable longer than the supplied cable."]
    B --> G["DVD Player (with component output)"]
    B --> H["Optional Component V cable"]
    B --> I["Document Camera"]
    B --> J["Video"]
    B --> K["PC CONTROL"]
    B --> L["S-VIDEO"]
    B --> M["RGB OUTPUT"]
    B --> N["AUDIORGB INPUT"]
    B --> O["To video, S-video, and audio inputs on the projector."]
NOTE: When using with a notebook PC, be sure to connect between the projector and the notebook PC before turning on the power to the notebook PC. In most cases signal cannot be output from RGB output unless the notebook PC is turned on after connecting with the projector.
NOTE:
* If the screen goes blank while using your remote control, it may be the result of the computer's screensaver or power management software.
* If you accidentally hit the POWER button on the remote control, wait 30 seconds and then press the POWER button again to resume.
NOTE: If using video, S-video, or audio cables, the cables should be 3 m (9.8 feet) or shorter.
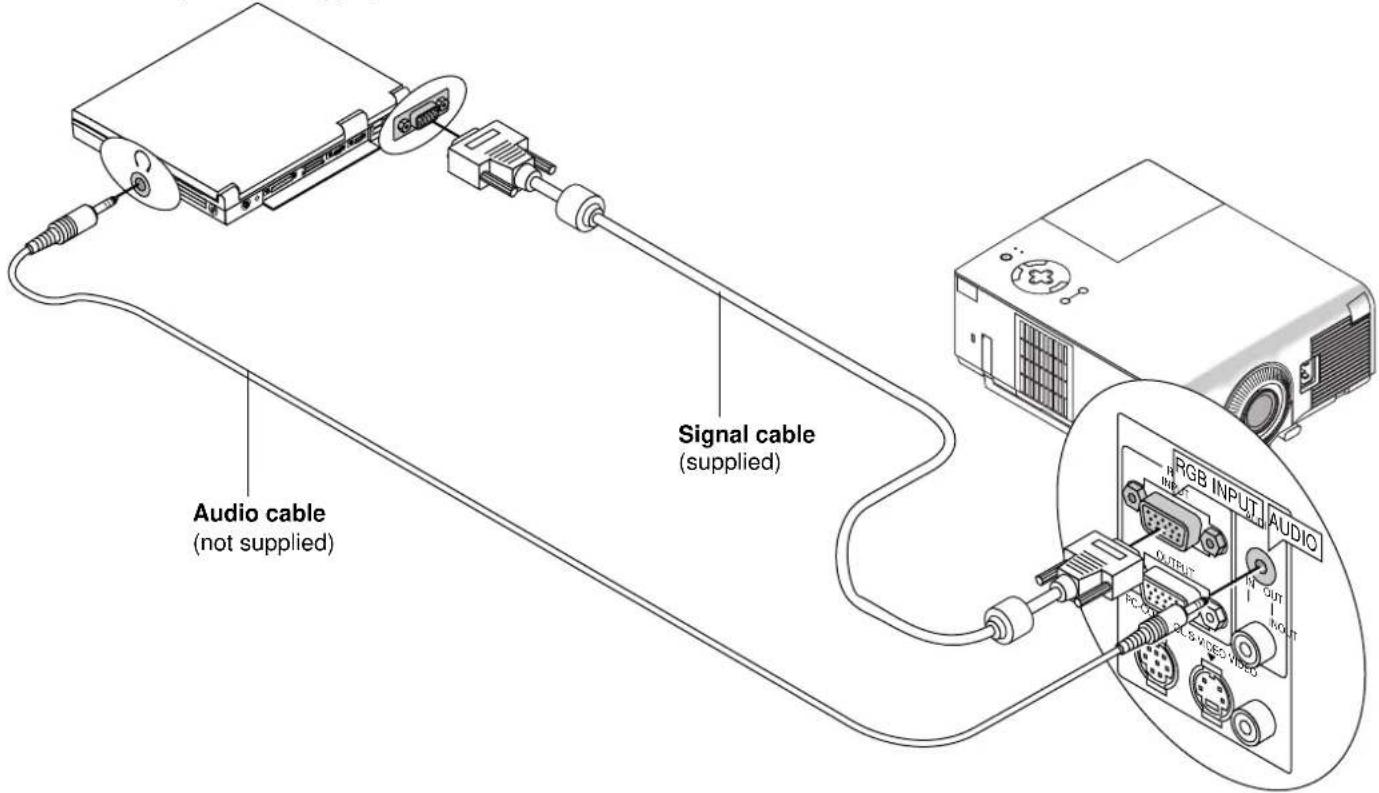
Connecting Your PC
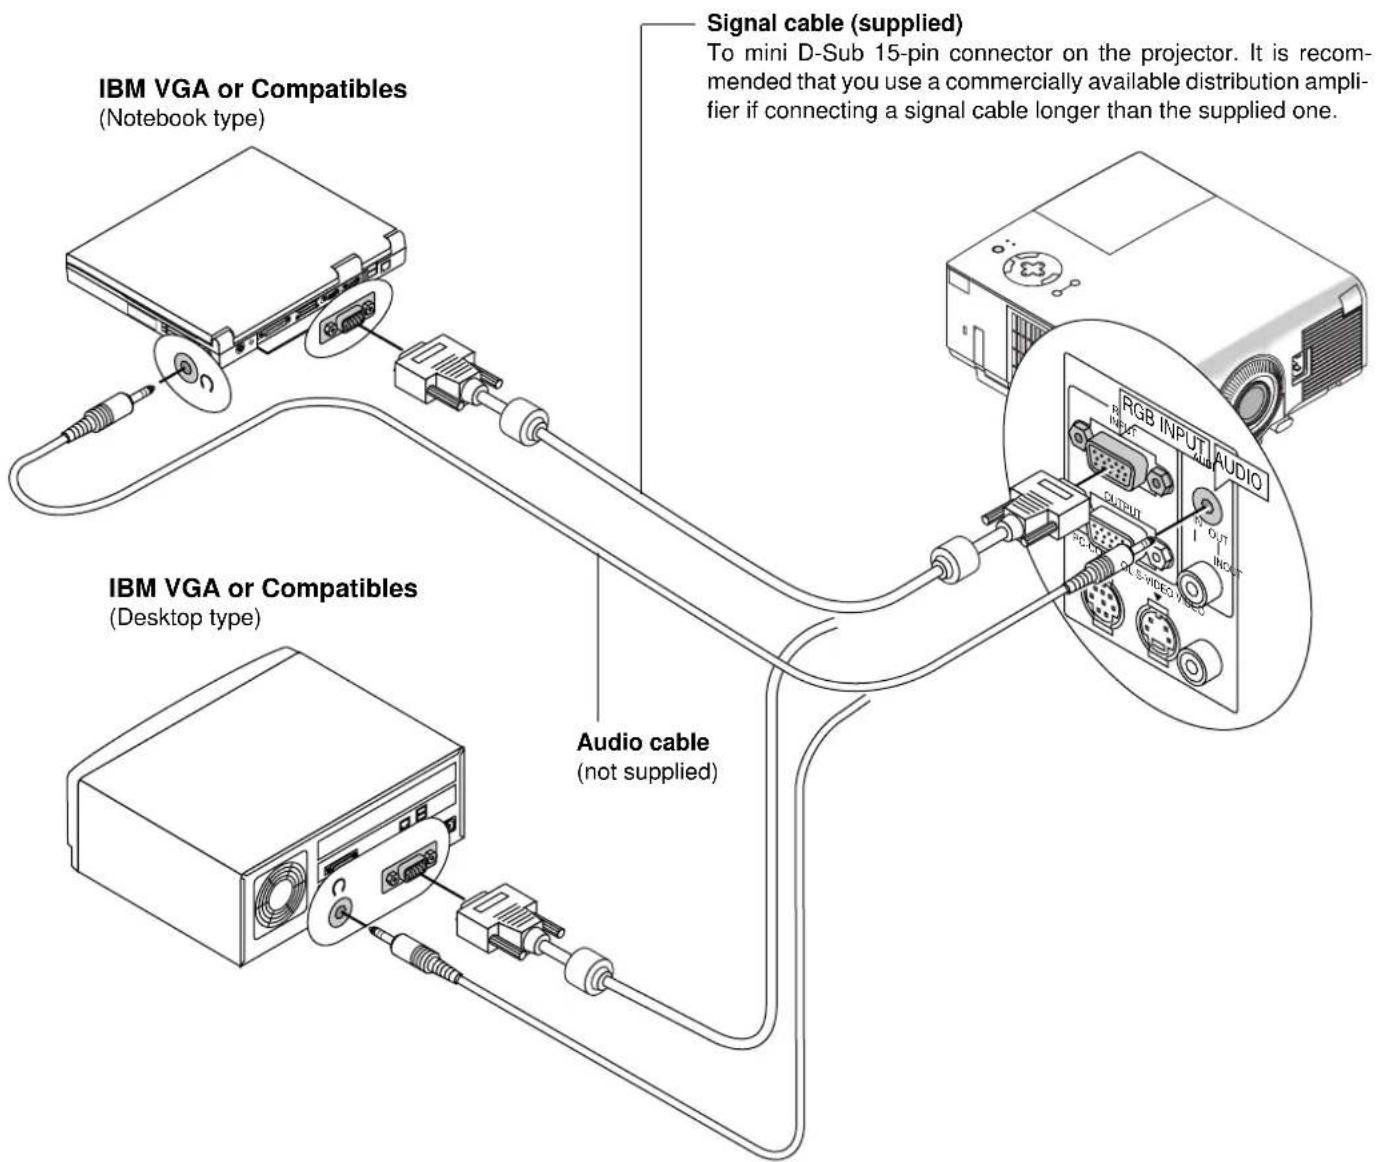
Connecting your PC to your MultiSync VT440 (SVGA)/VT540 (XGA) projector will enable you to project your computer's screen image for an impressive presentation.
To connect to a PC, simply:
- Turn off the power to your projector and computer.
- Use the supplied signal cable to connect your PC to the projector.
- Turn on the projector and the computer.
- If the projector goes blank after a period of inactivity, it may be caused by a screen saver installed on the computer you've connected to the projector.
Connecting Your Macintosh Computer
Macintosh (Notebook type)
Macintosh (Desktop type)
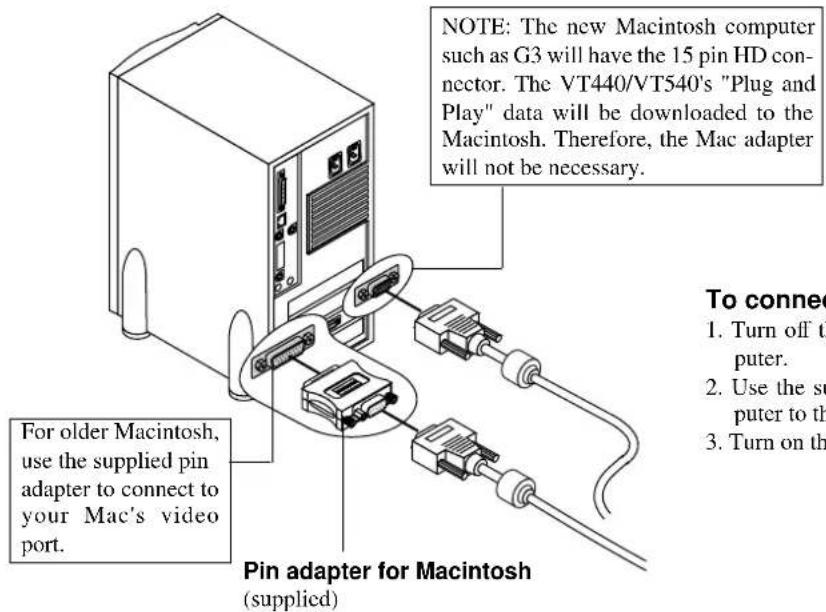
To connect to a Macintosh, simply:
- Turn off the power to your projector and your Macintosh computer.
- Use the supplied signal cable to connect your Macintosh computer to the projector.
- Turn on the projector and the Macintosh computer.
When using a Macintosh computer with the projector, set the DIP switches of the supplied pin adapter according to your resolution.
After setting, restart your Macintosh computer.
See the following pages for setting of the DIP switches.
- When using with a Macintosh, SVGA(800×600 :VT440)/XGA(1024×768 : VT540) is recommended if your Macintosh supports this mode.
- When using with a Macintosh PowerBook, output may not be set to 800 × 600 unless "mirroring" is off on your PowerBook. Refer to owner's manual supplied with your Macintosh computer for mirroring.
NOTE: A Video Adapter cable manufactured by Apple Computer is needed for a PowerBook which does not have a mini D-Sub 15-pin connector.
Settings for Monitor Mode
| Resolution\Number of DIP switch | 1 | 2 | 3 | 4 | 5 | ||
| 13" multi-scan mode /16"-13" ON ON | ON ON | ||||||
| 17" multi-scan mode /19"-13" ON ON | ON | ||||||
| 21" multi-scan mode /21"-13" ON ON | ON | ||||||
| 13" fixed mode /640x480 ON ON | |||||||
| VGA/SVGA mode ON ON | |||||||
| 16" fixed mode /832x624 ON ON | |||||||
| 19" fixed mode /1024x768 ON ON | |||||||
| 21" fixed mode /1152x870 ON ON ON | ON |
NOTE: For settings other than display modes supported by your Macintosh and the projector, use of the DIP switch may bounce an image slightly or may display nothing. If this happens, set the DIP switch to the 13" fixed mode and then restart your Macintosh. After that, restore to a displayable mode and then restart the Macintosh again. Make sure that the projector and your Macintosh are connected with the pin adapter and the supplied signal cable (mini D-Sub 15-pin connector) and then restart your Macintosh.
Examples of DIP switch setting

NOTE: Refer to your computer's owner's manual for more information about your computer's video output requirements and any special identification or configuring your projector's image and monitor may require.
Connecting an External Monitor
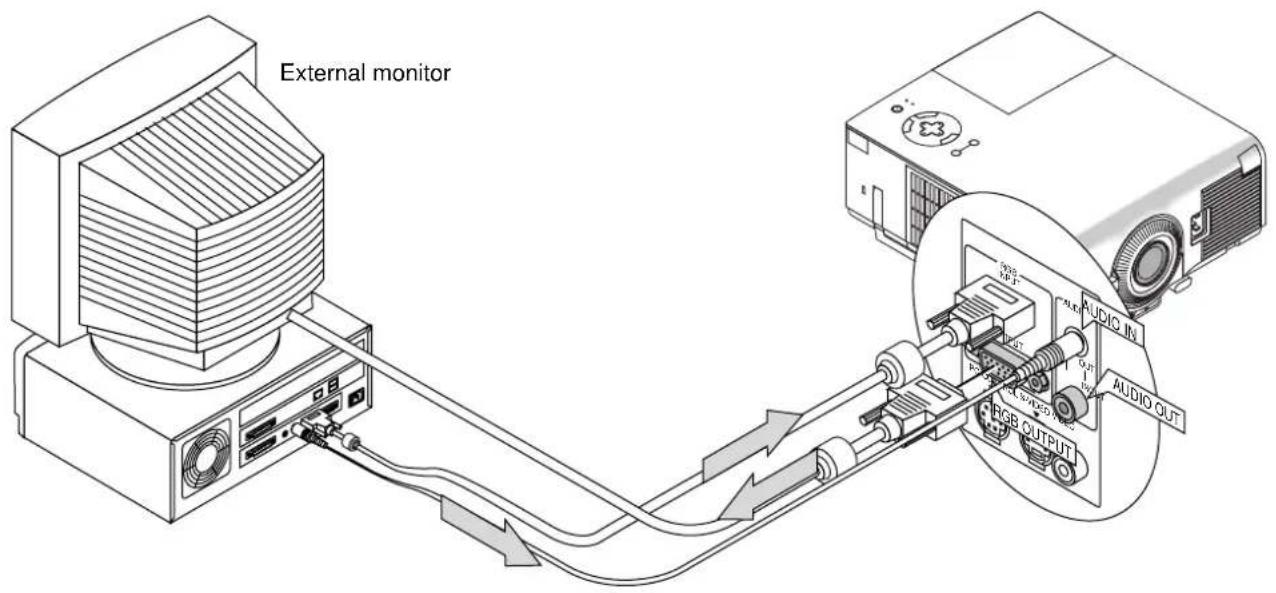
You can connect a separate, external monitor to your VT440/VT540 to simultaneously view on a monitor the image you're projecting. To do so:
- Turn off the power to your projector, monitor and computer.
- Use a 15-pin cable to connect your monitor to the RGB Monitor Output (Mini D-Sub 15 pin) connector on your projector.
- Turn on the projector, monitor and the computer.
Connecting Your DVD Player
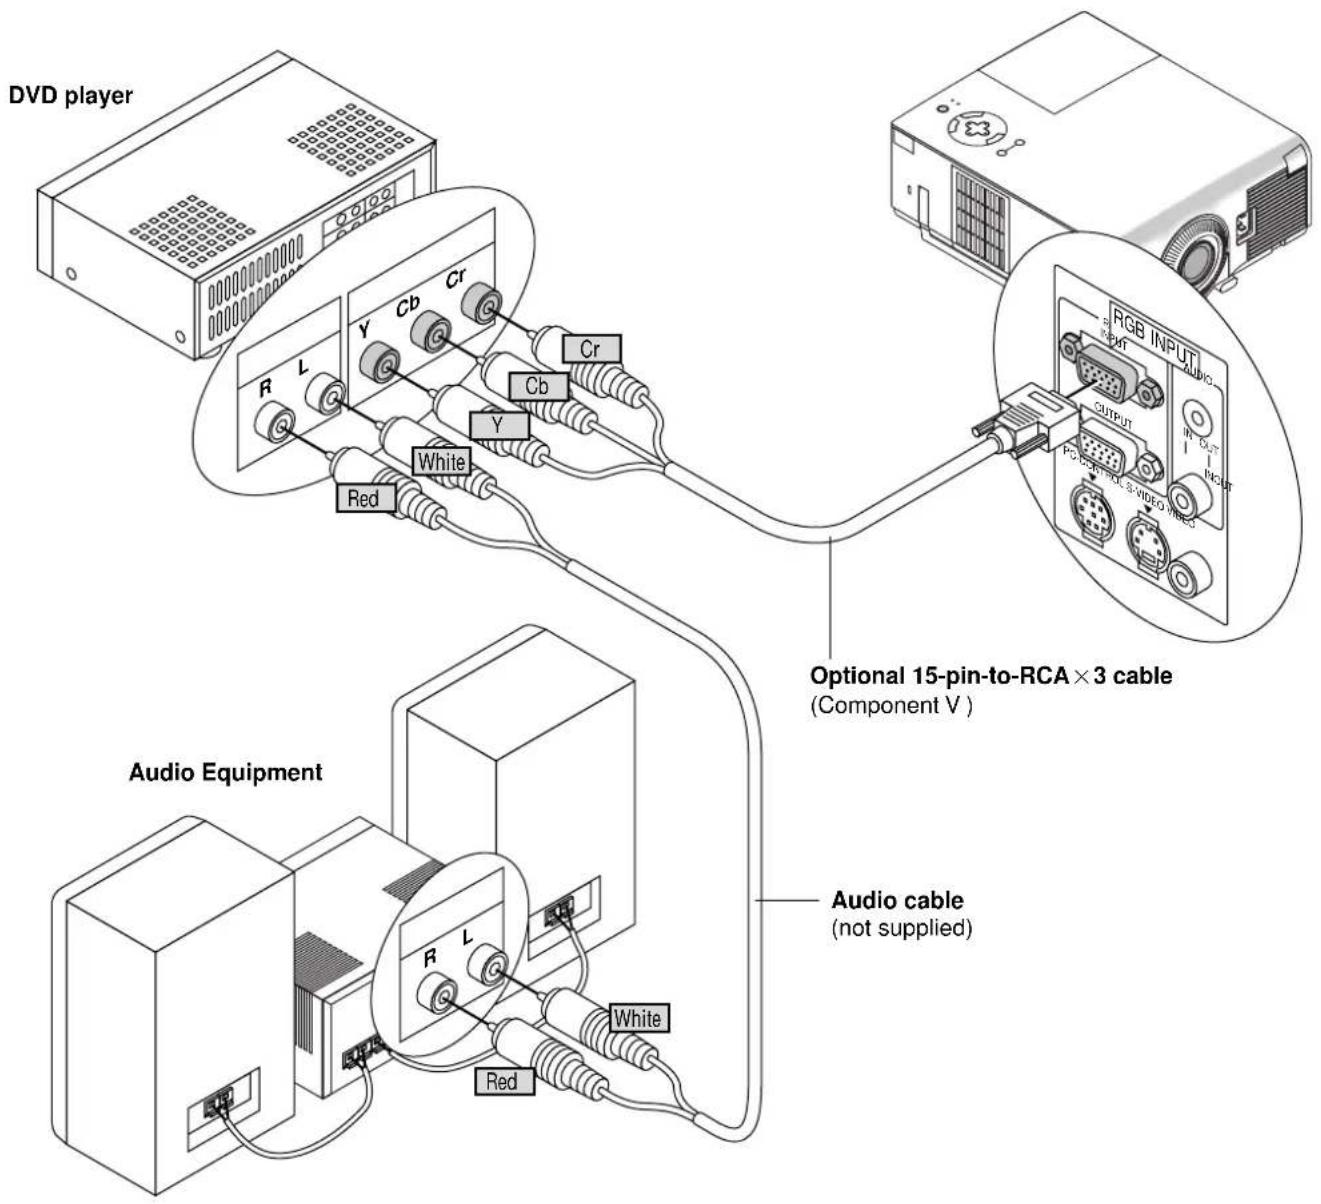
You can connect your projector to a DVD player with component outputs or Video output. To do so, simply:
-
Turn off the power to your projector and DVD player.
-
If your DVD player has the component video (Y,Cb,Cr) output, use the optional 15-pin-to-RCA×3 cable to connect your DVD player to the RGB INPUT connector on the projector.
For a DVD player without component video (Y,Cb,Cr) outputs, use common RCA cables (not provided) to connect a composite VIDEO output of the DVD player to the Video Input of the projector.
- Turn on the projector and DVD player.
NOTE: Refer to your DVD player's owner's manual for more information about your DVD player's video output requirements,
Connecting Your VCR or Laser Disc Player
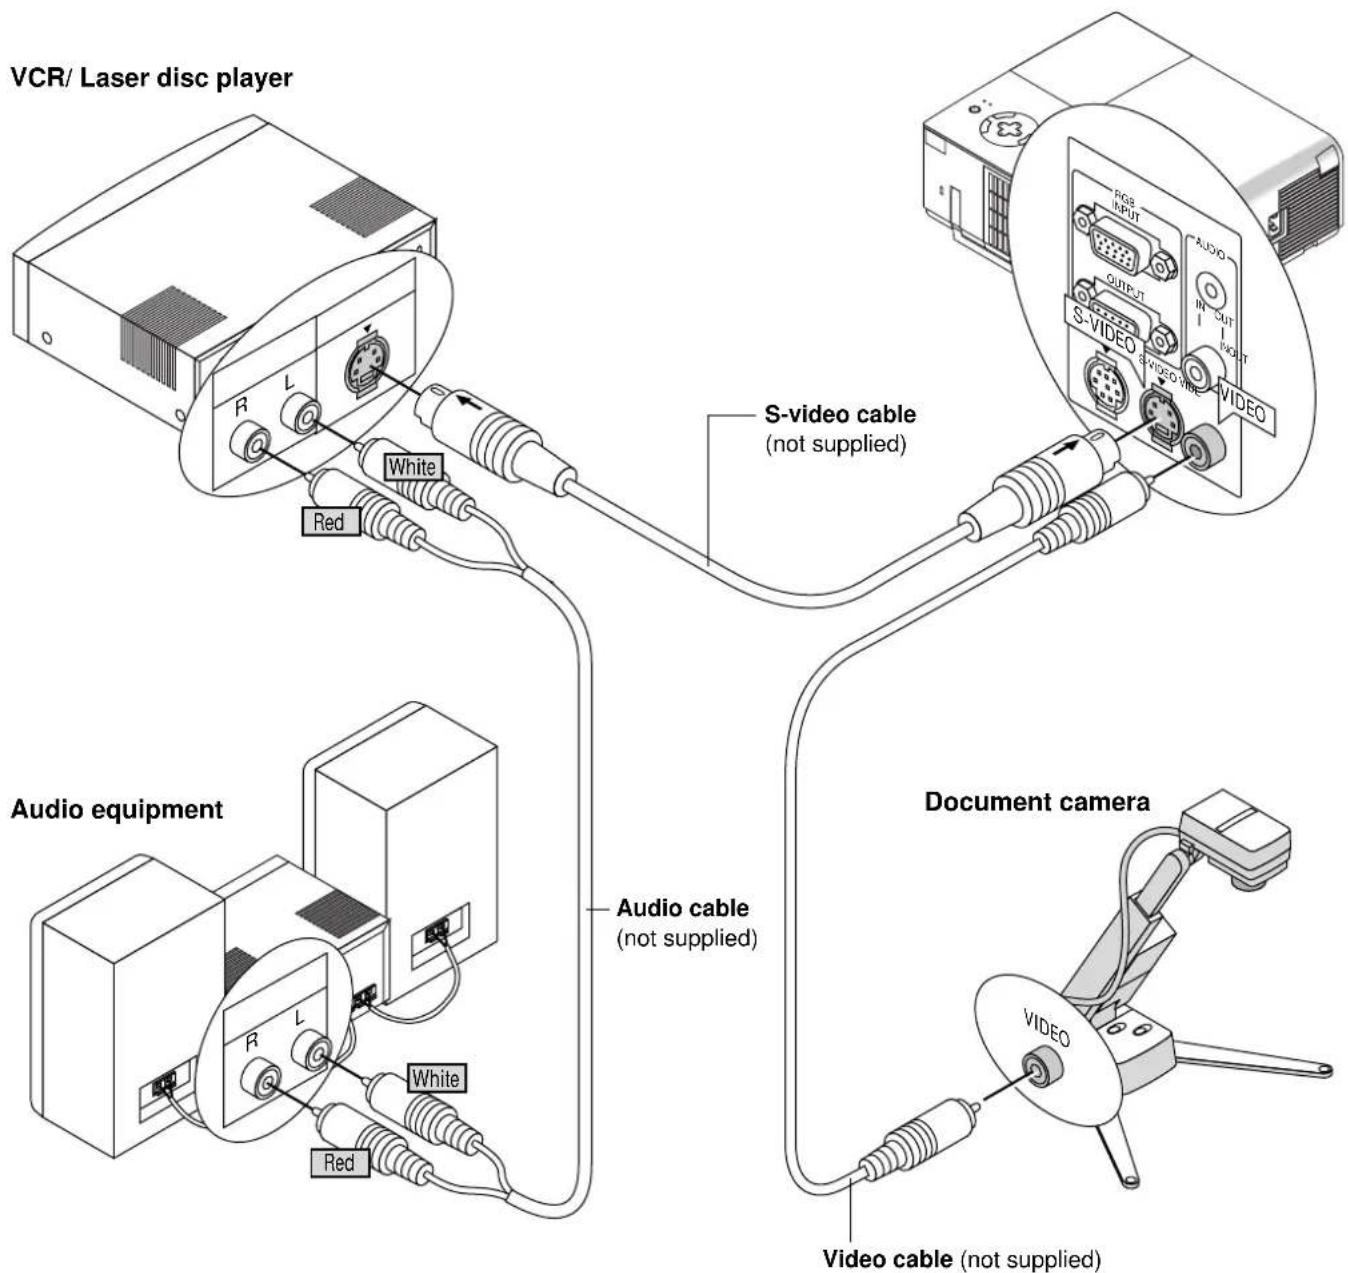
Use common RCA cables (not provided) to connect your VCR, laser disc player or document camera to your projector.
To make these connections, simply:
- Turn off the power to the projector and VCR, laser disc player or document camera.
- Connect one end of your RCA cable to the video output connector on the back of your VCR or laser disc player, connect the other end to the Video input on your projector. Use an audio cable (not supplied) to connect the audio from your VCR or laser disc player to your audio equipment (if your VCR or laser disc player has this capability). Be careful to keep your right and left channel connections correct for stereo sound.
- Turn on the projector and the VCR or laser disc player.
NOTE: Refer to your VCR or laser disc player owner's manual for more information about your equipment's video output requirements.
3. OPERATION
This section describes how to select a computer or video source, how to adjust the picture, and how to customize the menu or projector settings.
General Controls
Before you turn on your projector, ensure that the computer or video source is turned on and that your lens cap is removed.
1. Turn on the Projector
Plug the supplied power cable in the wall outlet. The projector will go into its standby mode and the power indicator will glow orange.
Only after you press the "POWER" button on the projector cabinet or the remote control will the power indicator turn to green and the projector become ready to use.
NOTE: To turn the projector on by plugging in the power cable, use the menu and enable the "Auto Start" feature. (See page E-32.)
NOTE: Regardless of the lamp mode setting, the lamp always stays in High-Bright mode for 3 minutes after the projector is turned on. If you have selected the Eco mode, the STATUS indicator blinks green and the lamp will change to Eco mode in 3 minutes.
2. Select the Computer or Video Source
Press the Source button on the remote control or the projector cabinet to select "Video" (VCR, document camera, or laser disc player), S-Video" or "RGB" (computer or DVD with component output) to display the image.
Or press the "Menu" button on the remote control or the cabinet and use the menu to select your video source: "Video", "S-Video" or "RGB".
3. Adjust the Image Size and the Focus
Use the Zoom lever to adjust the image size, then use the Focus ring to obtain the best focus.
Use the "Magnify" button (+) or (-) on the remote control to make the image larger up to 400%.
4. Turning off the Projector
First press the "POWER" button on the projector cabinet or the remote control for a minimum of two seconds. The power indicator will glow orange. After the projector turns off, the cooling fans keep operating for 30 seconds.
Do not disconnect the power cable during this time. Then, unplug the power cable. The power indicator will go out.
IMPORTANT:
- The projector should be unplugged if it will not to be used for an extended period.
- To turn off the image and sound briefly (five minutes or less), use the "Picture Mute" button instead of turning the projector off and on.
- The projector will display a black, blue image or logo if no input signal is present.
- Do not turn the projector off and then immediately back on. The projector needs to cool for 30 seconds before it can be restarted.
Enlarging and Moving a Picture
You can enlarge the area you want up to 400 percent. To do so:
1) Press the POINTER button on the card remote control to display the pointer.
natural_image
Technical line drawing of a mechanical bracket assembly (no text or symbols)2) Move the pointer to the area you want to enlarge.
natural_image
Technical line drawing of a mechanical assembly with mounting brackets and mounting holes (no text or symbols)3) Adjust the image size up to 400 percent.

natural_image
Pure mechanical assembly diagram without any text, numbers, or symbols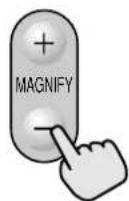
natural_image
Pure mechanical assembly diagram without any text, numbers, or symbolsUsing the Menus
NOTE: An interlaced motion video image may be blurred while the menu is displayed.
- Press the "Menu" button on the remote control or the projector cabinet to display the Main Menu.
- Press the ▲▼ buttons on the remote control or the projector cabinet to highlight the menu for the item you want to adjust or set.
- Press the ▶ button or the "Enter" button on the remote control or the projector cabinet to select a submenu or item.
- Adjust the level or turn the selected item on or off by using "Select" ◀ or ▶ buttons on the remote control or the projector cabinet. The on-screen slide bar will show you the amount of increase or decrease.
- The change is stored until you adjust it again.
ENTER: Stores the setting or adjustments.
CANCEL: Return to the previous screen without storing settings or adjustments.
- Repeat steps 2-5 to adjust an additional item, or press "Cancel" on the remote control or the projector cabinet to quit the menu display.
MENU Tree
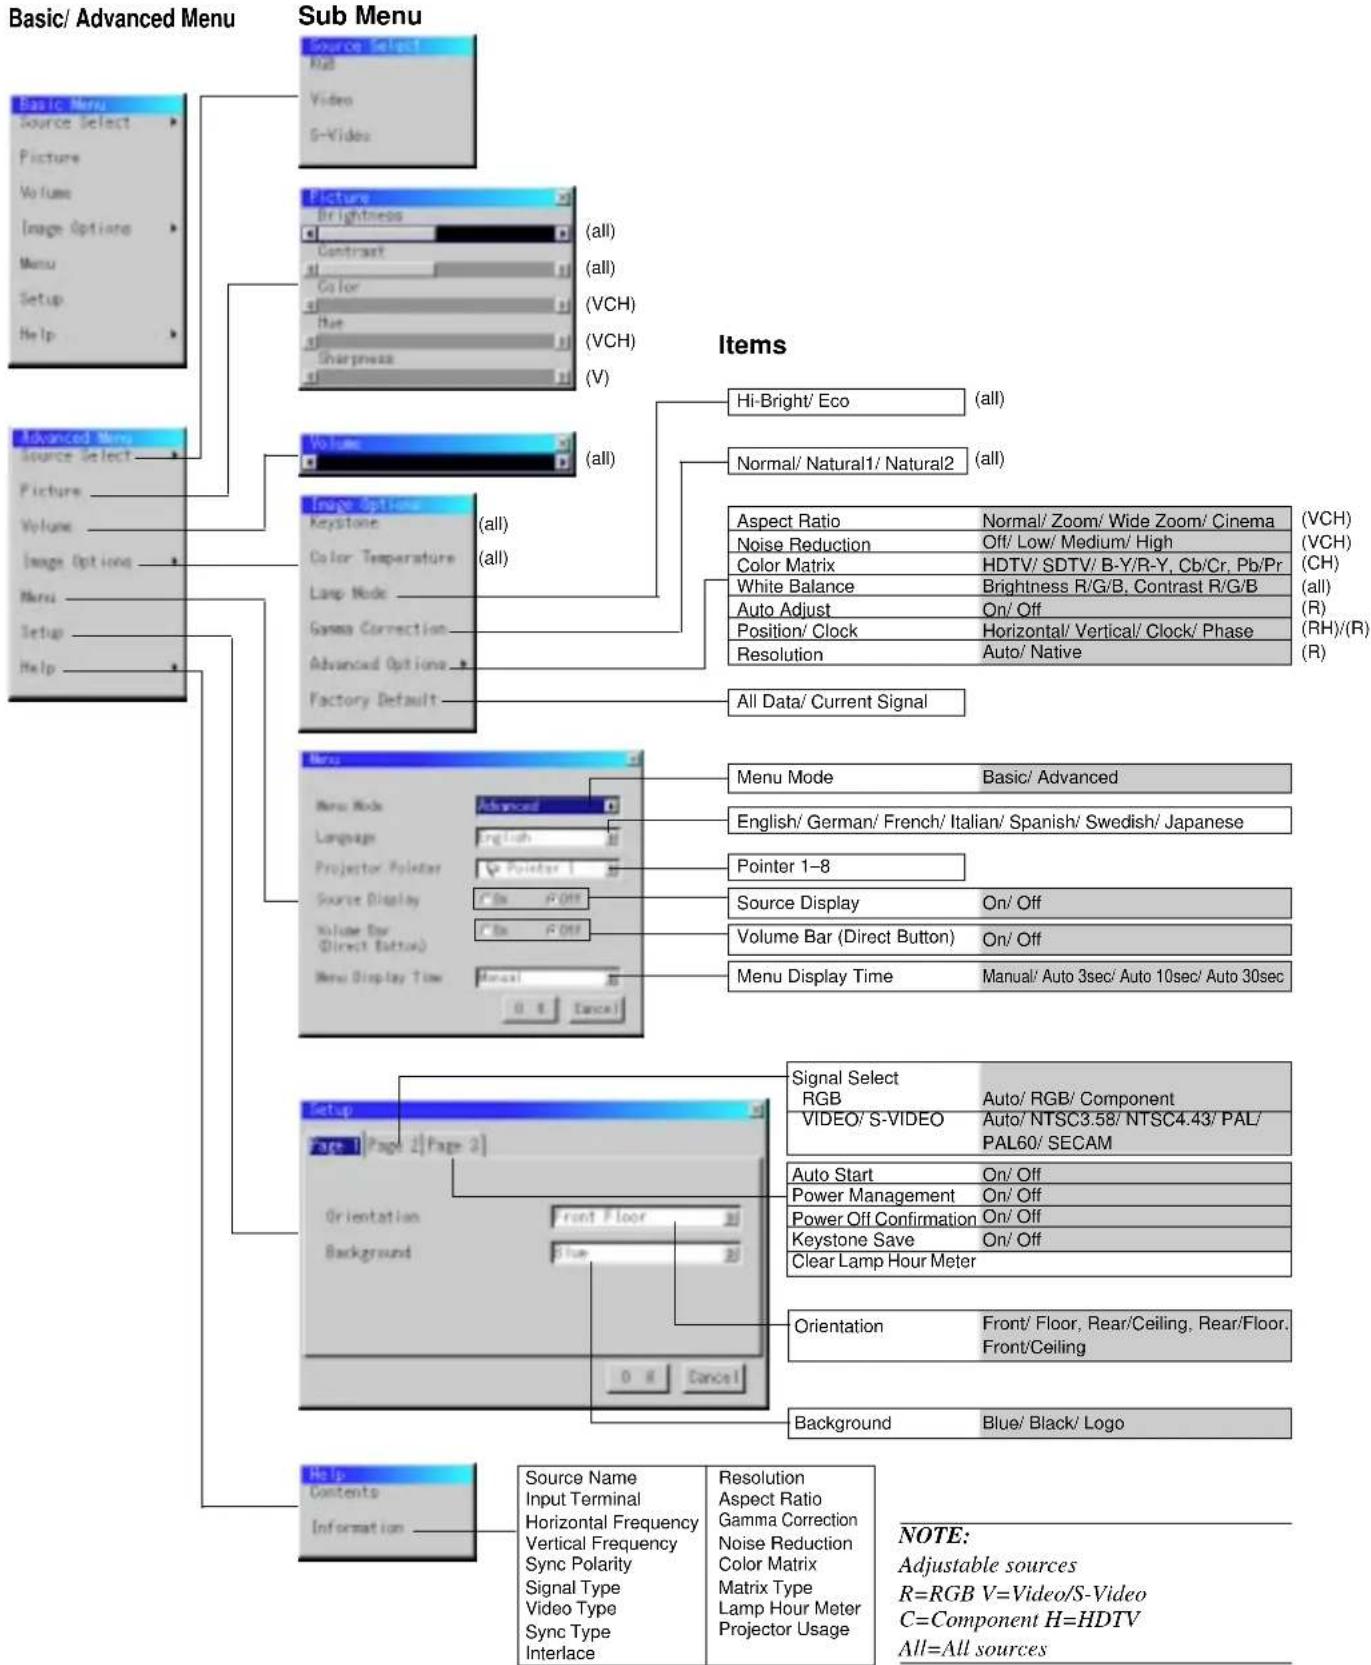
Menu Elements
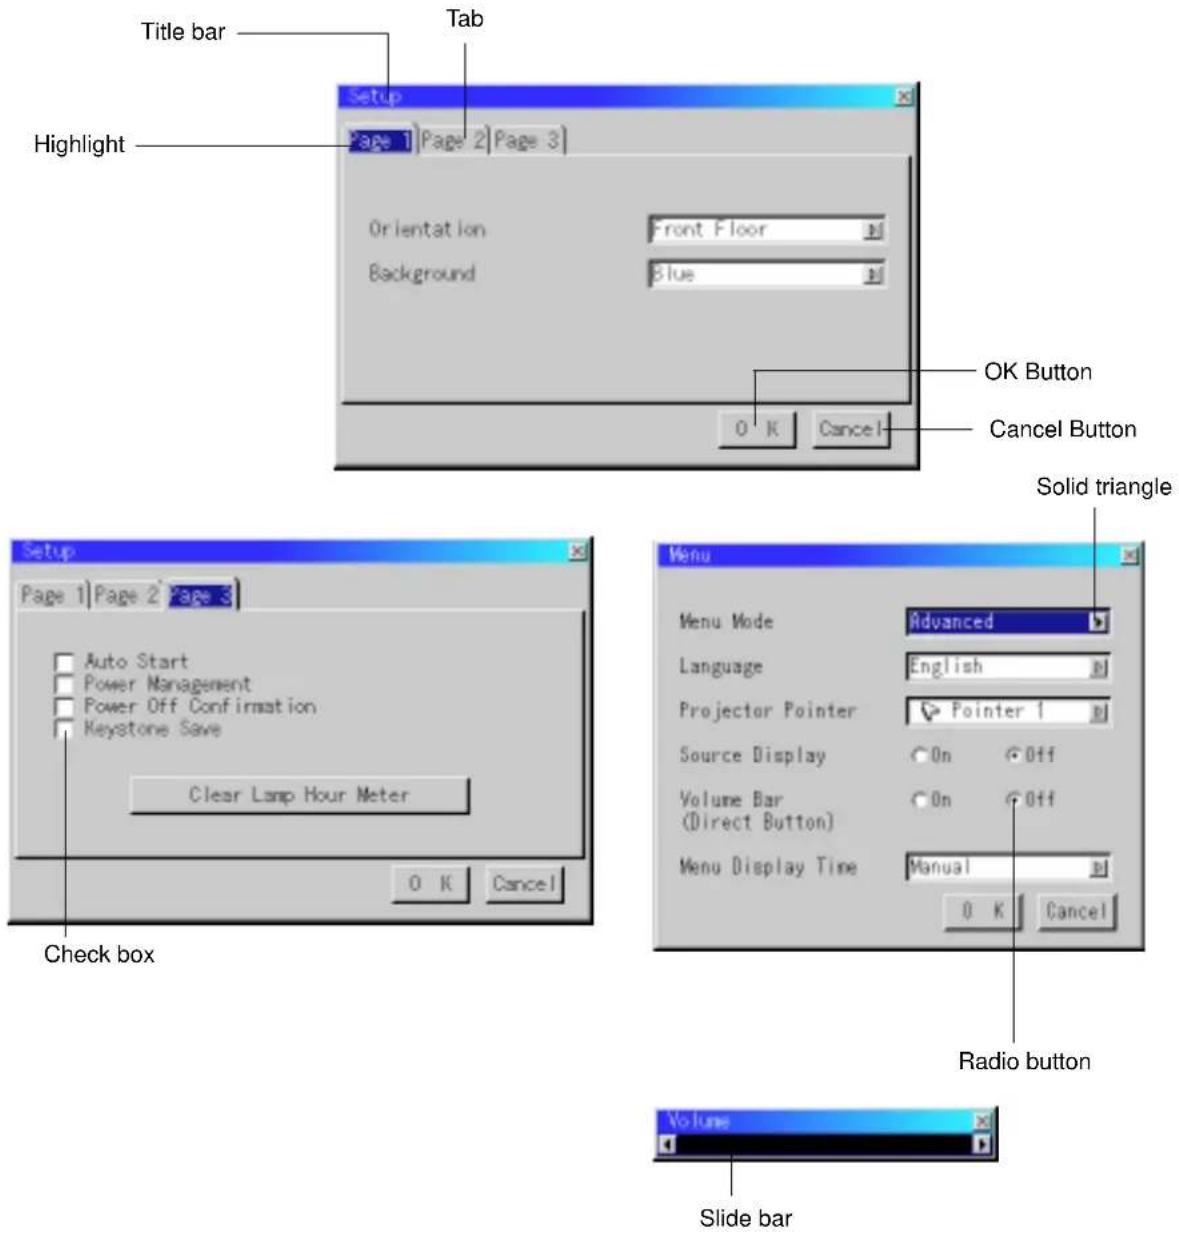
Menu windows or dialog boxes typically have the following elements:
Title bar: Indicates the menu title.
Highlight: Indicates the selected menu or item.
Solid triangle: Indicates further choices are available. A highlighted triangle indicates the item is active.
Tab: Indicates a group of features in a dialog box. Selecting on any tab brings its page to the front.
Radio button: Use this round button to select an option in a dialog box.
Check box: Place a checkmark in the square box to turn the option On.
Slide bar: Indicates settings or the direction of adjustment.
OK button: Press to confirm your setting. You will return to the previous menu.
Cancel button: Press to cancel your setting. You will return to the previous menu.
Menu Descriptions & Functions
Source Select
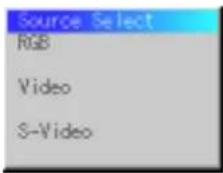
Enables you to select a video source such as a VCR, DVD player, laser disc player, computer or document camera depending on what is connected to your inputs. Press the "Select" button on the projector cabinet or ▲▼ buttons on your remote control to highlight the menu for the item you want to adjust.
RGB
Selects the computer connected to your RGB or component signal.
NOTE: An optional component cable (Component V cable) is needed for a component signal.
Video
Selects what is connected to your Video input-VCR, laser disc player, DVD player or document camera.
S-Video
Selects what is connected to your S-Video input-VCR, DVD player, or laser disc player.
NOTE: A frame may freeze for a brief period of time when a video is played back in fast-forward or fast-rewind with a Video or S-Video source.
Picture
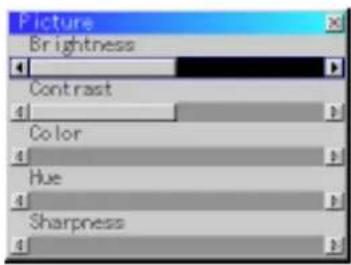
Provides access to controls for your image. Use the "Select" button on the projector cabinet or the remote control to highlight the menu for the item you want to adjust.
Brightness
Adjusts the brightness level or the back raster intensity.
Contrast
Adjusts the intensity of the image according to the incoming signal.
Color
Increases or decreases the color saturation level (not valid for RGB).
Hue
Varies the color level from +/- green to +/-blue. The red level is used as reference. This adjustment is only valid for Video and Component inputs (Not RGB).
Sharpness
Controls the detail of the image for Video (Not for RGB and Component).
Volume
Adjusts the sound level of the projector.

NOTE: You can display the volume bar without opening the menu. See "Volume Bar (Direct Button)" on page E-31 for more details.
Image Options
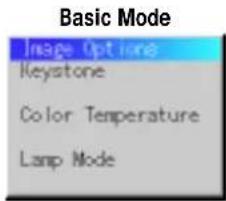
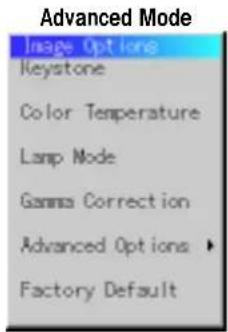
Provides optional controls such as Keystone Correction, Color Temperature and Lamp Mode. When you select Advanced Mode, the following options are available: Gamma Correction, Aspect Ratio, Noise Reduction, Color Matrix, White Balance, Auto Adjust, Position/Clock, Resolution, and Factory Default.
Keystone

This feature corrects the keystone (trapezoidal) distortion to make the top of the screen longer or shorter to be the same as the bottom. Use the ◀ or ▶ buttons on the slide bar to correct the keystone (trapezoidal) distortion.
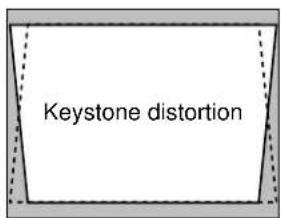
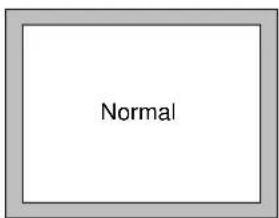
NOTE: The maximum keystone angle that can be corrected is 15 degrees upward and downward with the projector placed horizontally. However, a picture will be blurred if you correct the keystone angle beyond +12 degrees or more for SXGA signal on VT440.
Color Temperature

This feature adjusts the color temperature using the slide bar. Move the slide bar to the right to increase the color temperature for a bluish image; to the left to decrease it for a reddish image.
Lamp Mode
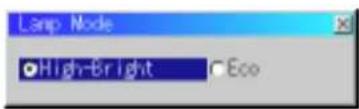
This feature enables you to select two brightness mode of the lamp: High-Bright and Eco modes. The lamp life can be extended up to 3000 hours by using the Eco mode.
High-Brigh Mode: This is the default setting.
Eco Mode: Select this mode to increase the lamp life.
NOTE: If you have selected the Eco mode, the lamp lights in High-Bright mode for 3 minutes after the projector is turned on. After 3 minutes the lamp will change to Eco mode.
Gamma Correction (Advanced mode)
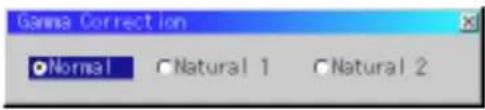
Use the ◀ or ▶ buttons to choose "Normal" when in a lighted room and "Natural 1&2" when in a darkened room. "Natural 1" for better flesh tone; "Natural 2" for true reproduction of middle tones.
Each mode is recommended for :
Normal: the regular picture
Natural 1: true color reproduction of natural tones
Natural 2: dark portions of a picture
Advanced Options (Advanced mode)
Allows for adjustments of image position and stability.
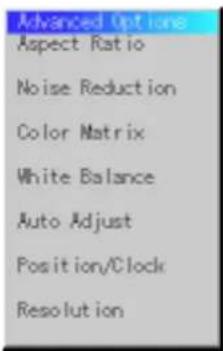
When you select Advanced Options in Advanced mode, the following options are available: Aspect Ratio, Noise Reduction, Color Matrix, White Balance, Auto Adjust, Position/Clock, Resolution, and Factory Default.
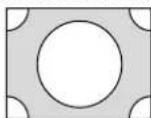
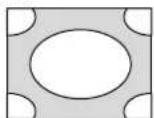
Aspect Ratio

Aspect Ratio allows you to select the best Aspect mode to display your source image.
When 4:3 is selected from the source (i.e. DVD player), the following selections will display:
Normal Zoom Wide Zoom Cinema
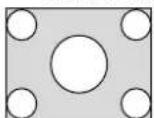
A-Standard 4:3 Aspect
B-All 4 sides stretched
C-Left & Right
stretched
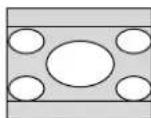
D-Left and right stretched
When Anamorphic or 16:9 is selected from the source (i.e. DVD player), the following selections will display:
Normal Zoom Wide Zoom Cinema
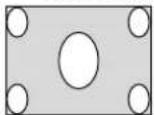
A-16:9 image displayed in 4:3 mode
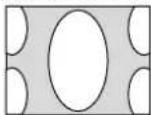
B- All 4 sides stretched
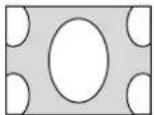
C- Left & right stretched
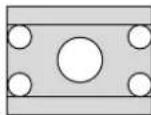
D- Left and right stretched to display the true aspect
NOTE: Aspect Ratio is not available for "RGB".
Noise Reduction:

You can select three levels video noise reduction.
NOTE: The lower the Noise Reduction level, the better the image quality by way of higher video bandwidth.
Color Matrix
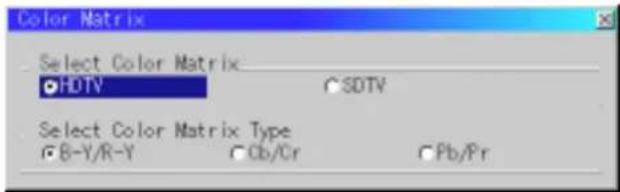
First select an appropriate color matrix to fit your component signal for HDTV or SDTV. Then select an appropriate matrix type from B-Y/R-Y, Cb/Cr or Pb/Pr.
NOTE: The Color Matrix feature is available for component video signal only.
White Balance:
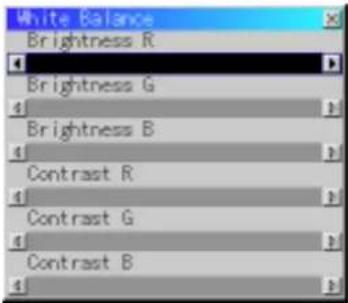
This allows you to adjust the white balance. Brightness for each color (RGB) is used to adjust the black level of the screen;
Contrast for each color (RGB) to adjust the white level of the screen.
First use the up or down buttons to select R, G, or B for the brightness and the contrast. Next use the ◀ or ▶ buttons to adjust the level.
Auto Adjust:
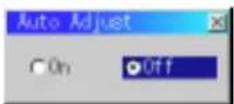
When "Auto Adjust" is set to "On", the projector automatically determines the best resolution for the current RGB input signal to project an image using NEC's Advanced AccuBlend Intelligent Pixel Blending Technology.
The image can be automatically adjusted for geometry and stability; "Horizontal Position", "Vertical Position", "Clock" and "Phase".
On: Automatically adjusts image "Horizontal Position", "Vertical Position", "Clock" and "Phase".
Off: User can adjust the image display functions (“Horizontal Position”, “Vertical Position”, “Clock” and “Phase”) manually.
Position/ Clock (when Auto Adjust is off)
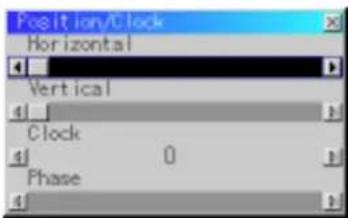
This allows you to manually adjust the image horizontally and vertically, and adjust Clock and Phase.
Horizontal/Vertical Position:
Adjusts the image location horizontally and vertically using the ◀ and ▶ buttons.
This adjustment is made automatically when the Auto Adjust is turned on.
Clock: Use this item with the "Auto Adjust off" to fine tune the computer image or to remove any vertical banding that might appear. This function adjusts the clock frequencies that eliminate the horizontal banding in the image. Press the ◀ and ▶ buttons until the banding disappears. This adjustment may be necessary when you connect your computer for the first time. This adjustment is made automatically when the Auto Adjust is turned on.
Phase: Use this item to adjust the clock phase or to reduce video noise, dot interference or cross talk. (This is evident when part of your image appears to be shimmering.) Use the ◀ and ▶ buttons to adjust the image.
Use "Phase" only after the "Clock" is complete.
This adjustment is made automatically when the Auto Adjust is turned on.
Resolution (when Auto Adjust is off):
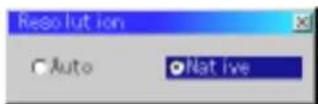
This allows you to activate or deactivate the Advanced AccuBlend feature.
Auto: Turns on the Advanced AccuBlend feature. The projector automatically reduces or enlarges the current image to fit the full screen.
Native: Turns off the Advanced AccuBlend feature. The projector displays the current image in its true resolution.
NOTE: While you are displaying an image with higher resolution than the projector's native resolution, even when you are in the Native mode, the image is displayed full screen using the Advanced AccuBlend feature.
Factory Default (Advanced mode)
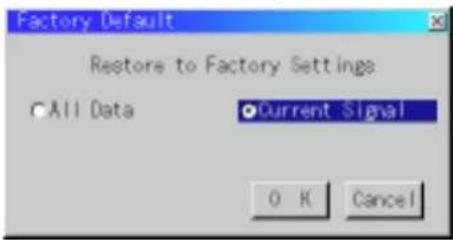
Changes all adjustments and setting to the factory preset for each source individually except Lamp Usage Hours. (To reset the lamp usage time, see "Clear Lamp Hour Meter" on page E-32.)
All Data: Reset all the adjustments and settings for all the signals to the factory preset.
Current Signal: Resets the adjustments for the current signal to the factory preset levels.
The items that can be reset are: Picture, Color Temperature, Gamma Correction, Aspect Ratio, Noise Reduction, Color Matrix, White Balance, Position/Clock and Resolution.
Menu
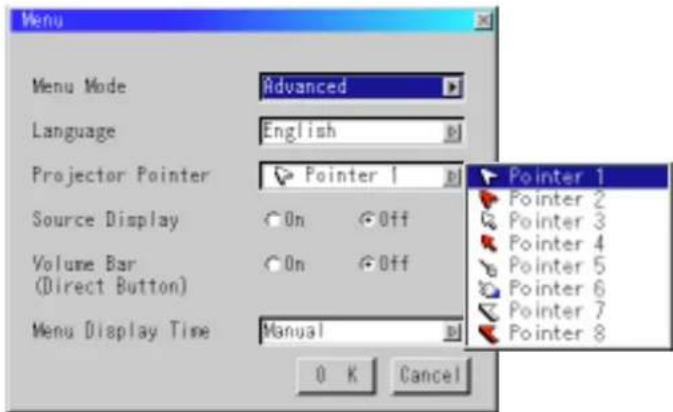
Allows you to set preferences for the on-screen menu.
Menu Mode:
This feature allows you to select two menu modes: one has basic functionality and the other more advanced functionality.
Basic Mode...... This is the normal mode.
Advanced Mode ... This mode is used for advanced users. In this mode you can change the following settings: Gamma Correction, Aspect Ratio, Noise Reduction, Color Matrix, White Balance, Auto Adjust, Position/Clock, Resolution, Factory Default, Menu Display Time, Signal Select, Auto Start, Power Management, Power Off Confirmation and Keystone Save and Clear Lamp Hour Meter.
Language:
You can choose one of seven languages for on-screen instructions. The options are: English, German, French, Italian, Spanish, Swedish and Japanese.
Projector Pointer:
This enables you to select from eight different Pointer icons for the "Pointer" button on your remote control.
After moving your Pointer icon to the area you want on the screen, press the Magnify button on the remote control to enlarge the selected area on the screen. See page E-24 for more details.

NOTE: There may be cases where the Pointer function is not available (ex. a non-interlace signal at 15kHz such as video game.)
Source Display:
You can turn on and off the information for input name such as VIDEO and RGB.
When this option is on, the current input will be displayed each time you switch sources or turn on the projector.
Volume Bar (Direct Button):
This option turns on or off the volume bar when you adjust the sound volume using VOL+/- (up and down) button.
On ....You can increase or decrease the sound volume with the volume bar on screen.
Off ....You can increase or decrease the sound volume without having to use the volume bar.
Menu Display Time (Advanced mode):
This option allows you to select how long the projector waits after the last touch of a button to turn off the menu.
The preset choices are "Manual", "Auto 3 sec", "Auto 10 sec", and "Auto 30 sec". The "Auto 30 sec" is the factory preset.
Manual.....The menu can be turned off manually.
Auto 3 sec.....The menu will automatically be turned off in 3 seconds if no buttons are pressed within 3 seconds.
Auto 10 sec.....The menu will automatically be turned off in 10 seconds if no buttons are pressed within 10 seconds.
Auto 30 sec.....The menu will automatically be turned off in 30 seconds if no buttons are pressed within 30 seconds.
Setup
Enables you to set operating options.
Press "OK" to save your changes for all the features of Page1, Page2, and Page3.
[Page1]
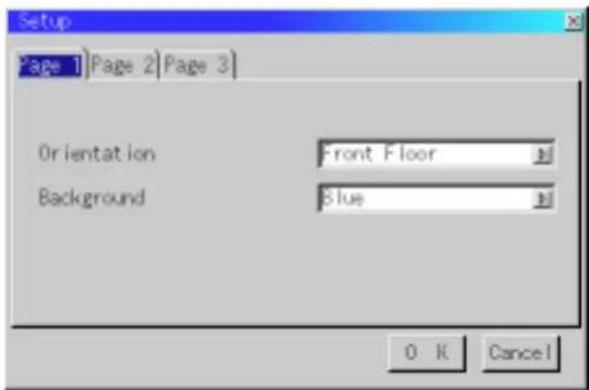
Orientation:
This reorients your image for your type of projection.
The options are: front floor projection, rear ceiling projection, rear floor projection, and front ceiling projection.
Background:
Use this feature to display a black/blue screen or logo when no signal is available.
[Page2] (Advanced mode) Power Off Confirmation:
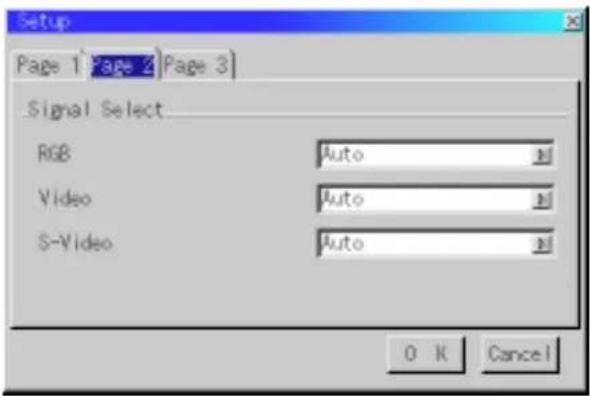
Signal Select:
Allows you to choose "RGB" for an RGB source such as a computer, or "Component" for a component video source such as a DVD player. Normally select "Auto" and the projector automatically detects a component signal. However there may be some component signals that the projector is unable to detect. If this is the case, select "Component".

- MultiSync VT440/VT540
- LCD Projector
- User's Manual
- Precautions
- CAUTION
- WARNING
- DOC Compliance Notice
- GSGV Acoustic Noise Information Ordinance:
- RF Interference
- Important Safeguards
- Installation
- Power Supply
- Cleaning
- Lamp Replacement
- Fire and Shock Precautions
- TABLE OF CONTENTS
- INTRODUCTION
- INSTALLATION
- OPERATION
- MAINTENANCE
- TROUBLESHOOTING
- SPECIFICATIONS
- Introduction to the MultiSync VT440/VT540 Projector
- Congratulations on Your Purchase of The MultiSync VT440/VT540 Projector
- Features you'll enjoy:
- Getting Started
- What's in the Box?
- Getting to Know Your MultiSync VT440/VT540 Projector
- Carrying the Projector:
- Slot for Card Remote Control
- Attaching the lens cap to the lens hood with the supplied string and rivet
- Top Features
- Source Button
- Auto Adjust Button
- Menu Button
- Select (▲▼◀▶) / Volume (+) (-) Buttons
- Enter Button
- Cancel Button
- Status Indicator
- Power Indicator (1)
- Power Button (ON / STAND BY)
- Terminal Panel Features
- Remote Control Features
- Magnify Button
- Pointer Button
- Picture Mute Button
- Help Button
- Power Button
- Infrared Transmitter
- Remote Control Precautions
- CAUTION:
- Setting up Your Projector
- Selecting a Location
- Using a Tabletop or Cart
- Adjusting the Tilt Foot
- Formulas(mm)
- Formulas(inch)
- Ceiling Installation
- Reflecting the Image
- NOTE:
- Connecting Your PC
- Connecting Your Macintosh Computer
- To connect to a Macintosh, simply:
- Connecting an External Monitor
- Connecting Your DVD Player
- Connecting Your VCR or Laser Disc Player
- General Controls
- Turn on the Projector
- Select the Computer or Video Source
- Adjust the Image Size and the Focus
- Turning off the Projector
- IMPORTANT:
- Enlarging and Moving a Picture
- Using the Menus
- Menu Descriptions & Functions
- RGB
- Video
- S-Video
- Brightness
- Contrast
- Color
- Hue
- Sharpness
- Volume
- Lamp Mode
- Gamma Correction (Advanced mode)
- Advanced Options (Advanced mode)
- Aspect Ratio
- When 4:3 is selected from the source (i.e. DVD player), the following selections will display:
- Normal Zoom Wide Zoom Cinema
- When Anamorphic or 16:9 is selected from the source (i.e. DVD player), the following selections will display:
- Noise Reduction:
- Color Matrix
- Menu Mode:
- Language:
- Projector Pointer:
- Source Display:
- Volume Bar (Direct Button):
- Menu Display Time (Advanced mode):
- Setup
- Orientation:
- Background:
- Signal Select:
- Auto Start:
- Power Management:
- Keystone Save:
- Clear Lamp Hour Meter:
- Help
- Contents
- Information
- Replacing the Lamp
- To replace the lamp:
- Remote Control Battery Installation
- Cleaning or Replacing the Filters
- Model Number VT440 / VT440G / VT540 / VT540G
- Optical
- Electrical
- Mechanical
- D-Sub Pin Assignments
- Mini D-Sub 15 Pin Connector
- Cable Connection
Brand : NEC
Model : VT440k
Category : Video projector