
Baby-Safe i-Size - Child car seat BRITAX - Free user manual and instructions
Find the device manual for free Baby-Safe i-Size BRITAX in PDF.


| Product Type | Child Car Seat |
| Brand | Britax |
| Model | Baby-Safe i-Size |
| Category | Infant Carrier |
| Dimensions (HxWxD) | Approx. 58 x 44 x 65 cm |
| Weight | Approx. 4.5 kg |
| User Weight Range | Up to 13 kg (approx. 0-18 months) |
| User Height Range | 40-83 cm |
| Installation Type | i-Size base (sold separately) or vehicle seat belt |
| Orientation | Rear-facing only |
| Safety Standards | UN R129 (i-Size) |
| Side Protection | Integrated side impact protection |
| Headrest Adjustment | Yes, multi-position |
| Harness Type | 5-point harness |
| Cover Removability | Yes, removable and washable |
| Cleaning Instructions | Hand wash cover at 30°C, do not bleach, do not iron, do not tumble dry |
| Compatible Bases | Britax i-Size Base or Flex Base |
| Expiry Date | Typically 6 years from manufacture date |
| Warranty | 2 years |
Frequently Asked Questions - Baby-Safe i-Size BRITAX
User questions about Baby-Safe i-Size BRITAX
0 question about this device. Answer the ones you know or ask your own.
Ask a new question about this device
Download the instructions for your Child car seat in PDF format for free! Find your manual Baby-Safe i-Size - BRITAX and take your electronic device back in hand. On this page are published all the documents necessary for the use of your device. Baby-Safe i-Size by BRITAX.
USER MANUAL Baby-Safe i-Size BRITAX
We are pleased that our BABY-SAFE i-SIZE BASE / FLEX BASE may accompany your child safely through the first months of his or her life.
In order to protect your child correctly, the BABY-SAFE i-SIZE BASE / FLEX BASE must always be used and installed as described in these instructions. Please read the user instructions carefully before you use the BABY-SAFE i-SIZE BASE / FLEX BASE for the fi rst time, and keep these instructions in the space provided on the base station.
These instructions use the following symbols stated below:
| Symbol | Keyword Explanation | |
| DANGER! Risk of severe personal injury | ||
| WARNING! Risk of minor personal injury | ||
| CAUTION! Risk of material damage | ||
| 0 | TIP! Useful notes |
Instructions that follow a set sequence are numbered.
Example:
- Press the button...
2. PRODUCT OVERVIEW
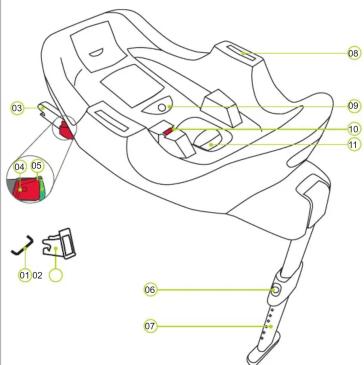
01 ISOFIX fastening points (car)
02 ISOFIX insertion aids
03 ISOFIX locking arms
04 Release knob
05 Safety button
06 Adjustment button
07 Support leg
08 Fixation slots
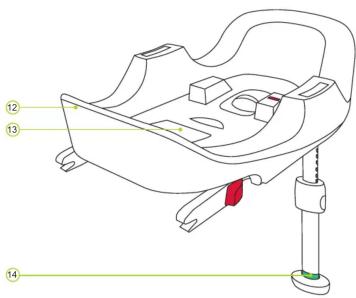
09 Tilt adjustment button
10 Tilt indicator
11 Locking arm release button
12 Top part of the base station
13 Instruction storage compartment
14 Support leg mark
3. CERTIFICATION
The BABY-SAFE i-SIZE BASE / FLEX BASE is only intended for use in combination with the Britax Römer BABY-SAFE i-SIZE child seat, and exclusively to secure your baby in your vehicle.
| BRITAX RÖMER child safety seat | Tested and certifi ed according to ECE* R 129/00 | |
| Body size | Body weight | |
| BABY-SAFE i-SIZE BASE / FLEX BASE | 40 - 83 cm | ≤ 13 kg |
*ECE = European Standard for Child Safety Equipment
The child safety seat has been designed, tested and certified according to the requirements of the European Standard for Child Safety Equipment (ECE R129/00). The seal of approval E (in a circle) and the approval number are located on the orange approval label (sticker on the child safety seat).
DANGER!
DANGER!
WARNING!
None of the base stations may be used in combination with other infant carriers. This approval will be invalidated if you make any modifiers to the child safety seat. Only the manufacturer is permitted to make modifiers to the child safety seat. Unauthorised technical changes can cause the protective function of the seat to be reduced or completely eliminated. Use the BABY-SAFE i-SIZE BASE / FLEX BASE exclusively for securing your child in your vehicle. The base station is in no way suitable as a seat or toy in the home.
4. USE IN THE VEHICLE
Please observe the instructions for using children's restraining systems in the operating instructions of your vehicle.
Please refer to the operating instructions for your vehicle for information about vehicle seats which are certified for the use of children's restraining systems according to ECE R16.
Usage options for the BABY-SAFE i-SIZE BASE / FLEX BASE:
| BRITAX RÖMER child safety seat | Vehicle seating position | |
| i-Size | Not i-Size | |
| BABY-SAFE I-SIZE (infant carrier) | √ | √ |
| + BABY-SAFE I-SIZE BASE | √a) | √b) |
| + BABY-SAFE I-SIZE FLEX BASE | √ | √b) |
a) When choosing a base station for your vehicle, please observe the recommendations in the enclosed vehicle type list (included with the base station). The type list is consistently kept up to date. The latest version can be obtained from us or at www.britax.com.
b) This means that the base station may only be used in vehicles which are listed in the vehicle type list (included with the base station). The type list is consistently kept up to date. The latest version can be obtained from us or at www.britax.com.
You can use your base station as follows:
| in the direction of travel | no |
| against the direction of travel | yes |
| with 2-point belt no | |
| with 3-point belt no | |
| on front passenger seat | yes ^1) |
| on outer rear seat | yes |
| on centre rear seat yes |
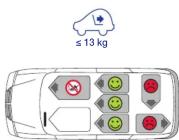
1) The front airbag must be deactivated. Observe the instructions in the vehicle owner's manual.
5. CONTACT
If you have any further questions regarding the use of the carrier, please feel free to contact us:


BRITAX RÖMER
BABY-SAFE i-SIZE BASE BABY-SAFE i-SIZE FLEX BASE
User instructions
natural_image
Illustration of a car seat with a red ribbon and a white support structure (no text or symbols)2000024707 07/16
PAGE II

SAFETY NOTES
⚠️ Please take the time to read these instructions carefully and keep them to hand in the designated storage compartment 13 on the base station at all times! The instructions must be kept with the base station if the latter is passed on to a third party.
DANGER! For the protection of your child:
- In the event of an accident with a collision speed of more than 10 km/h, the base station may be damaged without the damage becoming immediately visible. In this case the base station must be replaced. Please dispose of it properly.
- As a rule, have your base station checked if it was damaged
(e.g if it falls on the ground).
- Regularly check all important parts for damage. Ensure that all me-
chanical parts, in particular, are fully functional.
- Never lubricate or oil parts of the base station.
- Never leave your child unattended in the infant carrier and base station
in the vehicle.
- Park in such a way that you can always stand on the pavement when
you place the infant carrier in the vehicle or take it out.
- Protect the infant carrier and the base station from intensive direct
sunlight when they are not in use. The infant carrier can get very ho
in direct sunlight. Children's skin is sensitive and could be harmed.
- The more snugly the belt fits over your child's body, the better they will
be protected. Therefore, avoid putting thick clothes on your child under
the belt.
- The installation and warning stickers are an important part of the
base station and must not be removed.
• The infant carrier is not intended to hold your baby for prolonged
periods of time. The semi-recumbent position in the infant carrier will
always put a strain on your baby's spine. Take your baby out of the
infant carrier as often as possible – this includes interrupting long car
rides. Do not keep your baby in the infant carrier once it has been
removed from the car.
- Lock the backrests of the vehicle seats (for example, engage the
latch on the foldable rear seat bench).
- Never try to secure a baby on your lap with the vehicle seat belt
or by holding onto them
- Do not place objects in the footwell in front of the base station sun
port leg
port log.
DANGER! For the protection of all vehicle occupants:
In the case of an emergency stop or an accident, unsecured persons or objects may cause injury to other vehicle occupants. Please always check that:
- the backrests of the vehicle seats are locked (i.e. that any foldable
rear seat bench latch is engaged).
- all heavy or sharp-edged objects in the vehicle (e.g. on the parcel
shelf) are secured
- all persons in the vehicle have their seatbelts fastened
- all persons in the vehicle have their exhausts fastened. - the child safety seat is always secured when it is in the vehicle, even
- the child safety seat is always secured when it is in the vehicle, even if no child is being transported.
WARNING! For your protection when handling the child seat:
• To avoid damage, ensure that the base station is not jammed in be-
tween hard objects (car door, seat rails, etc.).
- Keep the base station in a safe place when it is not in use. Do not
place any heavy objects on the base station and do not store it direct.
ly next to sources of heat or in direct sunlight.
CAUTION! To protect your vehicle:
- Certain car seat covers made from more sensitive materials (e.g. velour.
leather, etc.) may sustain signs of wear and tear when using child safety seats. For optimum protection of your car seat covers, we recommend using the BRITAX ROMER car seat protector from our range of acces-
sories.
5.8.1

INSTALLATION IN THE VEHICLE

⚠️ DANGER! An airbag hitting the infant carrier can cause serious
injuries to your baby, possibly resulting in death
Do not use the infant carrier and base station in passenger seats with
DO NOT use the infant carner and base station in passenger seats with activated front airbags! For seats with side airbags, places clean the activated front airbags! For seats with side airbags, please observe the instructions in your owner's manual.
Preparatory activities:
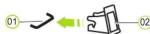
- If your vehicle is not fitted with ISOFIX insertion aids as standard,
clamp the two ISOFIX insertion aids 02, which are included in the
scope of delivery of the seat*, with the cutout pointing upwards.
scope of delivery of the seat, with the cutout pointing to the two ISOFIX fastening points. 01 of your vehicle
to the two ISOFX fastening points 01 of your vehicle.
① TIP: The ISOFIX fastening points are located between the surface
and the backrest of the vehicle seat.
* The insertion aids facilitate the installation of the child safety seat with the use of the ISOFIX
fastening points and prevent damage to the car seat covers. If the insertion aids are not being used,
remove them and keep them in a safe place. For vehicles with a foldable backrest, the insertion aids
need to be removed before folding the backrest.
Any problems which occur are usually caused by dirt or foreign objects on the insertion aids and
on the hooks. Remove soiling or external objects to rectify such problems.

- Pull the grey lever 11 towards the support leg 07
until the ISOFIX locking arms 03 are fully
extended.

- Push the green safety button 05 and the red
release button 04 on both sides of the seat
towards each other. This ensures that both
towards each other. This ensures that both
hooks on the ISOFIX locking arms 03 are open
and ready to use.

-
Rotate the support leg oz outwards until
-
Rotate the support leg of, outwards until it stops
it stopper

- Place the base station against the direction
of travel on a suitable vehicle seat
of travel on a suitable vehicle seat.
① TIP: Depending on the design, there could
be a gap between the contact surface of the
base station and the vehicle seat. This does
not present a safety problem when using the
Not present a safety problem when using the base station.
- Base station.
- Position the two ISOFIX locking arms 03
directly in front of the two insertion aids 02.
- Push both ISOFIX locking arms 03 into the
insertion aids so until the ISOFIX locking
Insertion aids 02 until the ISO/IX locking
arms 03 engage on both sides with a clicking
sound.
DANGER! The green safety button or must
BANGER. The green safety button is must be visible on both sides in order for the base sta
be visible on both sides in order for the base sta-
tion to be properly fastened.
- Take hold of the base station with both hands
and push it with equal pressure on both sides
and push it with equal pressure on both sides
towards the vehicle backrest until the base
station is touching it.


- Pull on the base station to check it is engaged on both sides.

-
Ensure that the support leg ^07 is fully rotated; the red mark at the top of the support leg ^07 must no longer be visible.
-
Press both grey adjustment buttons06 and pull the support leg 07 out until it is secured against the vehicle floor and the green mark 14 is fully visible.
⚠️ DANGER! The green mark 14 must be fully visible on the support leg 07. The support leg 07 must never be suspended in mid-air or supported by other objects.
Ensure that the support leg 07 does not lift the base station from the seat.
- Only BABY-SAFE i-SIZE FLEX BASE:
Follow the steps in chapter "8. Adjusting
the inclination"
For the safety of your child, before every journey in the car
check that:
the ISOFIV looking omore fully engaged on both sides in the
the ISOFIX locking and are fully engaged on both sides in the
ISOFIX fastening points 01 and that both safety buttons 05 are
fully green.
the support interests firmly on the vehicle floor, and the green
mark 14 on the support log foot is visible.
mark 14 on the support leg foot is visible,
the support does not lift the base station from the seat,
the infant carrier is fully engaged in the base station.
the infant carrier is fully engaged in the base station,
the infant carrier is only installed on the front passenger seat if we said, and while the infant carrier
if no front airbag can strike the infant carrier,
the infant carrier is fastened against the direction of travel.
Depending on the vehicle model, there can be differences in the vehicle
seat inclination which can have an impact on your child's seating position.
It is always recommended that the seating position be as upright.
It is always recommended that the seating position be as upright as possible. You should therefore set the inclination to be only as flat
as possible. You should therefore set the inclination to be only as that as your child's constitution requires.
as your clinic
( ) To adjust the inclination:
-
Park your vehicle on as flat a surface as possible
-
Press and hold the grey inclination adjustment
-
Press and hold the grey inclination adjustment button 60 and, at the same time, pull the top
button 69 and, at the same time, pull the top
part of the base station 12 gradually upwards.
(
(No text to output)
1 49
12 DANGER! When swivelling the top part
of the base station 12 down ensure that you
do not trap your fingers
do not trap your fingers.
- Set the inclination so that the inclination indica-
for 10 is green.
DANGERI
DANGER! The base station cannot be used
if the inclination indicator 10 is rec
-
Release the grey inclination adjustment button
-
Release the grey inclination adjustment button
09 and check that the top p
station is properly engaged.
DANCERI When installing the base station
10 DANGER: When installing the base station
in another vehicle, the inclination must
be adjusted from the flattest position
be adjusted from the flattest position.
For the safety of your child, before every journey in the car
□ For the safety of your child, before every journey in the car check that:
oneok that.
the ISOFIX locking an are fully engaged on both sides in the
ISOEIX fastening points 01 and that both safety buttons. 05 are
ISO IX fastening points of and that both safety buttons do are
fully green
the support@rests firmly on the vehicle floor, and the green
the supporters go to firmly on the vehicle floor, and the green
mark 14 on the support leg foot is visible,
the support does not lift the base station from the seat.
the infant carrier is fully engaged in the base station
the infant carrier is fully engaged in the base station,
the infant carrier is only installed on the front passenger seat
if no front airbag can strike the infant carrier
- if he front airbag can strike the infant carrier, the infant carrier is fastened against the direction of travel.
the infant carrier is fastened against the direction of travel.
9. USING THE INFANT CARRIER
Fitting the infant carrier to the base station ▲ DANGER! Ensure that the handle 15 is in the upper position A.
click 15 DANGER! Ensure that the top surface of the base station 12 is free of foreign bodies.
- Place the infant carrier against the direction of travel on the base station (baby is facing backwards).
- Snap the infant carrier into place so that it makes an audible clicking sound.
- Check if the indicators are green on both sides
DANGER! The indicators must be green on both sides. - Pull on the infant carrier handle 15 to check it is fully engaged.

Removing the infant carrier from the base station
⚠️ DANGER! Ensure that the handle 15 is in the upper position A.
- Pull and hold the grey release latch 16.
- Lift the infant carrier until the fixation prongs 17.
- Use the infant carrier until the fixation period is released from the fixation slots 08. WARNING! Keep a firm grip on the infant carrier while doing this.
- Remove the infant carrier from the base station.
release from the fixation slots 08. WARNING! Keep a firm grip on the infant carrier while doing this. - Remove the infant carrier from the base station.

10. CLEANING
The plastic parts can be cleaned using soapy water. Do not use harsh cleaning agents (such as solvents).
11. DISASSEMBLY/DISPOSAL
REMOVAL:
106 110 1. Pull the grey lever 11 towards the support leg 07. 2. Push the green safety button 04 and the red release button 05 on both locking arms 03 towards each other. The locking arms release. 3. Pull the grey lever 11 towards the support leg 07 and press both locking arms 03 at the same time towards the support leg until they are fully retracted. The base station can now be removed. DANGER! The child safety seat must always be secured when it is in the vehicle, even if no child is being transported.
DISPOSAL:
Please observe the waste disposal regulations in your country.
| Disposal of packaging Container for cardboard boxes | |
| Seat cover | Residual waste, thermal utilisation |
| Plastic parts According to the labelling in the corresponding container | |
| Metal parts Container for metals | |
| Belt straps | Container for polyester |
| Buckle and tongue | Residual waste |


- PRODUCT OVERVIEW
- CERTIFICATION
- DANGER!
- WARNING!
- USE IN THE VEHICLE
- CONTACT
- BRITAX RÖMER
- PAGE II
- SAFETY NOTES
- DANGER! For the protection of your child:
- DANGER! For the protection of all vehicle occupants:
- WARNING! For your protection when handling the child seat:
- CAUTION! To protect your vehicle:
- INSTALLATION IN THE VEHICLE
- Preparatory activities:
- For the safety of your child, before every journey in the car
- check that:
- USING THE INFANT CARRIER
- Removing the infant carrier from the base station
- CLEANING
- DISASSEMBLY/DISPOSAL
- REMOVAL:
- DISPOSAL:
Brand : BRITAX
Model : Baby-Safe i-Size
Category : Child car seat