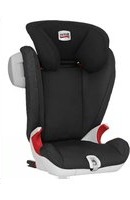
Kidfix SL SICT - Child car seat BRITAX - Free user manual and instructions
Find the device manual for free Kidfix SL SICT BRITAX in PDF.


| Product Type | Child car seat |
| Brand | Britax |
| Model | Kidfix SL SICT |
| Group | 2/3 (15-36 kg) |
| Orientation | Forward-facing |
| Installation | ISOFIX + vehicle seat belt |
| Dimensions (H x W x D) | 67 x 44 x 38 cm (approx.) |
| Weight | 5.5 kg (approx.) |
| Material | High-density polypropylene shell, polyester cover |
| Safety Features | SICT side impact protection, seat belt guides, energy-absorbing shell |
| Adjustments | Height-adjustable headrest, reclining positions |
| Cleaning | Cover removable and machine washable at 30°C |
| Age Range | Approx. 3.5 to 12 years |
| Certification | ECE R44/04 |
| User Manual | Free PDF download available |
Frequently Asked Questions - Kidfix SL SICT BRITAX
User questions about Kidfix SL SICT BRITAX
0 question about this device. Answer the ones you know or ask your own.
Ask a new question about this device
Download the instructions for your Child car seat in PDF format for free! Find your manual Kidfix SL SICT - BRITAX and take your electronic device back in hand. On this page are published all the documents necessary for the use of your device. Kidfix SL SICT by BRITAX.
USER MANUAL Kidfix SL SICT BRITAX
01 ISOFIX fastening points (vehicle)
02 ISOFIX insertion aids
03 SICT (only KIDFIX SL SICT)
04 SICT Release button
05 SICT Fastening points
06 Belt guide (bright red)
07 ISOFIT Locking arms
08 ISOFIT Locking button
09 Belt holder
10 Seat cushion
11 ISOFIT Adjustment button
12 Adjustment belt
13 Compartment for user manual
14 Headrest
15 Headrest adjustment handle
16 Backrest
2. INTRODUCTION
Thank you for choosing KIDFIX SL / KIDFIX SL SICT to keep your child safe through a new stage of their life.
In order to protect your child correctly, the KIDFIX SL / KIDFIX SL SICT must always be used and installed as described in these instructions.
If you have any further questions regarding its use, please feel free to contact
BRITAX RÖMER
These instructions use the following symbols stated below:
| Symbol Keyword Explanation | |
| DANGER! Risk of severe personal injury | |
| WARNING! Risk of minor personal injury | |
| CAUTION! Risk of material damage | |
| TIP: Useful notes | |
Instructions that follow a set sequence are numbered.
Example:
- Press the button.
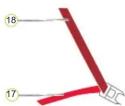
Belt guide colours
For better differentiation, the two vehicle seat
belts are highlighted in different colours. The di
agonal seat belt 18 in dark red and the lap belt
17 In bright red. The colour of the belt guides on the child safety seat follows the same colour
on the third safety seat follows the same section scheme.
[Non-Text]
- Certification
| BRITAX RÖMERChild safety seat | Testing and certificationIn accordance with ECE* R 44/04 | |
| Group | Body weight | |
| KIDFIX SLKIDFIX SL SICT | II+III | 15 to 36 kg |
*ECE = European Standard for Child Safety Equipment
The child safety seat has been designed, tested and certified according
to the requirements of the European Standard for Child Safety Equipment
(ECE R 44/04). The seal of approval E (in a circle) and the approval number
are located on the orange approval label (sticker on the child safety seat).
⚠️ DANGER! This approval will be invalidated if you make any modifica-
tions to the child safety seat. Only the manufacturer is permit-
ted to make modifications to the child safety seat.
WARNING! Use the KIDFIX SL / KIDFIX SL SICT exclusively for secur-
ing your child in your vehicle. It is in no way suitable as a
seat or toy in the home.
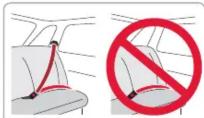
⚠️ DANGER! Never secure your child or the child safety seat with a 2-point
belt. If you secure your child in the child seat with only a
2-point belt, then in the event of an accident this may cause
serious injuries to your child, possibly resulting in death.
4. USE IN THE VEHICLE
Please observe the instructions for using children's restraining systems in the operating instructions of your vehicle. The seat can be used in vehicles with ISOFIX anchoring systems (see type list) and in vehicles with a 3-point belt.
Please find the information on the seats approved for child safety seats of the weight classes 15 to 36 kg in the operating instructions of your vehicle.
The KIDFIX SL / KIDFIX SL SICT is approved for two different methods of installation:
| Symbol | Installation type Approval type Section | ||
| with the ISOFIT locking arms into the ISOFIX fastening points in the vehicle. Check the list of vehicle types. | semi-universal a) | 9A | |
| with the vehicle's 3-point seatbelt | universal | 9B |
a) This means that the child safety seat may only be used in vehicles that are listed in the vehicle type list enclosed. This type list is consistently kept up to date. The latest version can be obtained from us or from www.britax.eu / www.roemer.eu.
You can use your child safety seat as follows:
In the direction of travel Yes
| Against the direction of travel no | 1) |
| with 2-point belt no | |
| with 3-point belt2) | Yes |
| with ISOFIX fastening points (between seat surface and backrest) | Yes |
| on front passenger seat Yes | 3) |
| on outer rear seat | Yes |
| on centre rear seat (with 3-point belt) | Yes4) |
1) Use is permitted on a rearward-facing vehicle seat (e.g. in a van or minibus) only if the vehicle seat is also approved for use by adults. The seat may not be in the area of effect of an airbag.
2) The safety belt must be approved to ECE R 16 or a comparable standard (see test label on belt with an "E" or "a" in a circle).
3) If there is a front airbag: Slide the vehicle seat a long way back and refer to any instructions in vehicle owner's manual.
4) Cannot be used if the vehicle seat is equipped with only a 2-point belt.
5. CARE AND MAINTENANCE
Please ensure that you only use the original BRITAX RÖMER replacement seat covers, as the seat cover is an integral part of the child safety seat and fulfils important functions to ensure the smooth operation of the system. Replacement seat covers are available from your dealer or from an ADAC office.
- The cover can be removed and washed with a mild detergent in the delicates programme of the washing machine (30 °C). Please observe the instructions on the washing label of the cover.
- The plastic parts can be cleaned using soapy water. Do not use any caustic cleaning agents (such as solvents).
DANGER! The child seat must not be used without the seat cover.


Removing the seat cover
-
Moving the headrest of the vehicle seat into the top position
-
Unhook the cover hooks 20 on the rear of the back-
rest 16
- Remove the upper part of the cover.
-
Unlock the survey page 21, 1984
-
Onlook the cover loops 21 at the bottom on the rear of the backrest 16
-
Pull off the cover from the seat cushion 10
Removing the headrest cover
-
Unhook the cover loops 21 on the back of the head-rest14.
-
Unhook the cover hooks 20 on the front of the back-rest16
-
Pull off the cover of the headrest 14
The cover can now be washed. Please observe the instructions on the washing label of the cover:

Re-fitting the cover
Proceed in reverse order to put on the cover.
6. DISASSEMBLY AND DISPOSAL
- To unfasten your child, use the release button of your vehicle seat buckle.
REMOVAL:

- Operate the release button of your vehicle seat
buckle. - Pull out the diagonal belt from the dark red belt hold-
er 09 on the headrest 14
Only for installation type A (ISOFIT): - Press the red ISOFIT locking button to release the ISOFIT featuring 20 and pull out the ISOFIT locking
ISOFIT fastening 08 and pull out the ISOFIT locking arm. 07. Repeat the procedure with the other ISOFIT
locking arm 07. - Pull on the adjustment belt 12 until both ISOFIT
locking arms 07 are in the storage position.

The child safety seat can now be removed.
DANGER! the child safety seat must always be secured when it is in the vehicle, even if no child is being transported.
To release the SICT, 03 press the SICT release button 04
and remove the SICT 03.

e waste disposal regulations in your country.
| Disposal of packaging | Container for cardboard boxes |
| Seat cover | Residual waste, thermal utilisation |
| Plastic parts | According to the labelling in the corresponding container |
| Metal parts | Container for metals |
| Belt straps | Container for polyester |
| buckle and tongue | Residual waste |

15 to 36 kg

(\~4 to 12 years of age)

KIDFIX SL
KIDFIX SL SICT
User instructions
natural_image
Illustration of a gray car comfort seat with red backrest, no text or symbols presentwww.britax.eu
PAGE II
7. SAFETY NOTES
Please take the time to read these instructions carefully and keep them to hand in the intended storage compartment 13 on the child safety seat at all times! The instructions must be with the child safety seat if the latter is passed on to a third party.
DANGER! For the protection of your child:
- In the event of an accident with a collision speed of more than 10 km/h, the child safety seat may be damaged without the damage becoming immediately visible. In this case the child safety seat must be replaced. Please dispose of it properly.
- As a rule, have your child safety seat checked if it was damaged (e.g if it falls on the ground).
- Regularly check all important parts for damage. Ensure that all mechanical parts, in particular, are fully functional.
- Never lubricate or oil parts of the child seat.
- Never leave your child unattended in the child seat in the vehicle.
- Only allow your child to enter and exit the vehicle on the pavement side. - Protect the child safety seat from intensive direct sunlight when it is not in use. The child safety seat can get very hot in direct sunshine. Child skin is sensitive and could thereby be harmed.
- The more snugly the belt fits over your child's body, the better they will be protected. Therefore avoid putting thick clothes on your child under the belt.
• Take regular breaks on long journeys in order to give your child the opportunity to play around.
- Use on the rear seat: Move the front seat forward far enough that you child's feet cannot hit the backrest of the front seat (to prevent risk of injury).
DANGER! For the protection of all vehicle occupants:
In the case of an emergency stop or an accident, unsecured persons or objects may cause injury to other vehicle occupants. Please always check that...
- the backrests of the vehicle seats are locked (i.e. that any foldable rear seat bench latch is engaged).
- all heavy or sharp-edged objects in the vehicle (e.g. on the parcel shelf) are secured
- all persons in the vehicle have their seatbelts fastened.
- the child safety seat is always secured when it is in the vehicle, even if no child is being transported.
WARNING! For your protection when handling the child seat:
- Never use the child safety seat free-standing, not even for test sitting. - When swivelling up the backrest 16, nothing must come between the backrest 16 and the seat cushion10. You or your child could pinch your fingers, injuring them.
• To avoid damage, ensure that the child safety seat is not jammed in between hard objects (car door, seat rails, etc.).
- Keep the child safety seat in a safe place when it is not in use. Do not place any heavy objects on the seat and do not store it directly next to sources of heat or in direct sunlight.
CAUTION! To protect your vehicle
- Certain car seat covers made from more sensitive materials (e.g. velour, leather, etc.) may sustain signs of wear and tear when using child safety seats. For optimum protection of your car seat covers, we recommend using the BRITAX RÖMER car seat protector from our range of accessories.
8. ADJUSTING THE HEADREST &
SECURING THE SICT
A correctly set headrest 14 ensures that the diagonal seat belt section 18 is optimally positioned, and gives your child optimum protection.
The headrest 14 must be adjusted so that there is a space two fingers wide between the headrest 14 and your child's shoulders.

To adjust the height of the headrest to fit your
child:
- Grip the adjustment handle 15 on the back of the headrest, and pull it upwards
This unlocks the headrest
- You can now move the unlocked headrest14 to
the desired height. As soon as you release the
adjustment handle 15, the headrest 14 will lock
into place.
- Place the child safety seat on the vehicle seat.
-
Have you a child sit down in the child safety seat and
-
Have your child sit down in the child safety seat and check the height. Repeat the procedure until the
check the height. Repeat the process headrest 14 has the correct height
How to secure the SICT

ONLY KIDFIX SL SICT: Press the SICT 03 into both SICT fastening points on the side of the child seat nearest the vehicle door 05 and elin in the SICT 03.
CAUTION! Make sure that there is a gap of approximately 5 mm between the SICT and the vehicle door in order to avoid pressure marks and other damage to the door trim.
9. INSTALLATION
A With ISOFIT + 3-point belt
The KIDFIX SL / KIDFIX SL SICT is installed permanently in the vehicle with the ISOFIT locking arms.
Your child is then buckled into the child seat with the vehicle's 3-point seatbelt
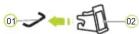
- If your vehicle is not fitted with ISOFIX insertion aids as standard, clamp the two insertion aids 02 which are supplied with the seat* to the upward pointing part of the two ISOFIX fastening points 01 of your vehicle.
TIP! The ISOFIX fastening points are located between the surface and the back-rest of the vehicle seat.
* The insertion aids facilitate the installation of the child safety seat with the use of the SOFIX fastening points and prevent damage to the car seat covers. As long as they are not used, remove them and keep them in a safe place. For vehicles with foldable a backrest, the insertion aids need to be removed before folding the backrest. Any problems occurring usually come from soiling or external objects on the insertion aids and on the hook. Remove soiling or external objects to rectify such problems.
-
Moving the headrest of the vehicle seat into the top position.
-
Carry out the steps in Section 8 "ADJUSTING THE HEADREST & SECURING THE SICT".

-
Place the child seat facing forward (in the direction of travel) on a suitable vehicle seat.
-
Hold the ISOFIT adjustment button 11 down and fully extend the ISOFIT locking arm furthest from the vehicle door07.

- Press the red ISOFIT locking button 08 to ensure that the hook on the ISOFIT locking arm07 is open and ready for use.

- Push both ISOFIT locking arms 07 into the insertion aids 02 until the ISOFIT locking arm 07 engages with a clicking sound.
DANGER! Check that the ISOFIT locking arm is correctly engaged 07 by pulling on it.

- Hold the ISOFIT adjustment button 11 down and fully extend the ISOFIT locking arm nearest to the vehicle door07.

- Press the red ISOFIT locking button 08 to ensure that the hook on the ISOFIT locking arm 07 is open and ready for use.

- Push both ISOFIT locking arms 07 into the insertion aids 02 until the ISOFIT locking arm 07 engages with a clicking sound.
DANGER! Check that the ISOFIT locking arm is correctly engaged 07 by pulling on it.

- Pull on the adjustment belt 12 and push the child seat backwards at the same time, until the die backrest 16 is flush with the backrest of the vehicle seat.

-
Give the child safety seat a firm pull forwards to ensure that it is securely fastened and check the ISOFIT locking arms again 07 to ensure that both are fully locked in place.
-
Carry out the steps in Section 10 „SECURING YOUR CHILD“.
For the safety of your child, before every journey in the car check
that... ▶ the child safety seat is slotted in on both sides with the ISOFIT locking arms 07 in the ISOFIT fastening points 01;
the lap belt runs in the bright red belt guides on both sides of the seat cushion 06.
▶ the diagonal seat belt section8 on the side of the vehicle seatbelt buckle 19 also runs through the light red belt guide 06 of the seat cushion,
▶ the diagonal seat belt section8 runs through the dark red belt holder 09 of the headrest,
the SIC03 is installed and used correctly,
the diagonal seat belt section8 runs diagonally backward,
The seatbelt buckle must not be positioned on the red belt guide 06 in the seat cushion.
DANGER! If your child tries to open the red ISOFIT safety button 08 or the vehicle belt buckle 19, stop the vehicle as soon as safely possible. Check whether the child safety seat is correctly fastened and ensure that your child is correctly secured. Explain to your child the dangers associated with his actions.
UNFASTENING YOUR CHILD AND REMOVAL:
To unfasten your child or to remove the child safety seat, observe the steps in Section 6 „REMOVAL" [PAGE I]
B With 3-point belt
The KIDFIX SL / KIDFIX SL SICT is not installed permanently in the vehicle. It is simply secured together with your child using the vehicle's 3-point seatbelt

- Carry out the steps in Section 8 "ADJUSTING THE HEADREST & SECURING THE SICT".
- Place the child seat on the vehicle seat. Ensure that the backrest 16 is flush with the backrest of the vehicle seat.
Tip! If the headrest of the vehicle seat gets in the way, turn it the other way. 3. Carry out the steps in Section 10 „SECURING YOUR CHILD“.
For the safety of your child, before every journey in the car check that
▶ the child safety seat is securely fastened;
▶ the lap belt runs in the bright red belt guides on both sides of the seat cushion.
the diagonal seat belt section on the side of the vehicle seatbelt buck
le 19 also runs through the light red belt guide '06 of the seat cushion, the diagonal seat belt section8 runs through the dark red belt holder 09 of the headrest.
the diagonal seat belt section, runs diagonally backward,
the straps are tight and not twisted
the SIC03 is installed and used correctly
the seatbelt buckle must not be positioned on the red belt guide 06 in the seat cushion.
DANGER! If your child tries to open the vehicle belt buckle 19, stop the vehicle as soon as safely possible. Check whether the child safety seat is correctly fastened and ensure that your child is correctly secured. Explain to your child the dangers associated with his actions.
UNFASTENING YOUR CHILD AND REMOVAL:
To unfasten your child or to remove the child safety seat, observe the steps in Section 6 „REMOVAL“ [PAGE I]
10. SECURING YOUR CHILD

KIDFIX SL SICT & KIDFIX SL
-
Have your child sit down in the child seat.
-
Pull out the vehicle belt and guide it in front of your child to the vehicle seat buckle 19
DANGER! Ensure the vehicle belt is not twisted, as otherwise the full protective effect of the retaining system is not ensured.
- Engage the buckle tongue in the vehicle seat buckle 19 with a CLICK!

- Place the diagonal seat belt section 18 and lap belt section 17 on the side of the vehicle seatbelt buckle 19 into the light red belt guide 06 of the seat cushion
DANGER! The vehicle seatbelt buckle19 must not be positioned between the light red belt guide 06 and the armrest.

- Also place the lap belt section 17 on the other side
of the seat cushion in the light red belt guide 06.
DANGER! The lap belt section17 must lie as low as possible over your child's hips on both sides.

- Guide the diagonal seat belt section 18 into the dark red belt holder 09 of the headrest 14 until it lies completely in the belt holder 09 and is not twisted. ① Tip! If the backrest 16 conceals the belt holder 09, you can adjust the headrest 14 upwards. The diagonal seat belt section 18 can now be easily inserted. Now return the headrest 14 to the proper height.

- Make sure that the diagonal belt 18 runs over your child's shoulder, and not in front of his or her neck ① Tip! You can still adjust the height of the headrest 14 again here in the vehicle.

△ DANGER! The diagonal seat belt section 18 must run diagonally backward. You can adjust the course of the belt with your vehicle's adjustable belt deflector. △ DANGER! The diagonal belt 18 must never be directed forwards to the belt deflector on the vehicle. In this case, use the child safety seat on the back seat only.

- Tighten the vehicle seat belt by pulling on the diagonal seat belt section 18.
- Observe the further steps of the relevant installation type.

If you have any further questions regarding its use, please feel free to contact us:
BRITAX RÖMER Kindersicherheit GmbH Blaubeurer Straße 71 D-89077 Ulm Germany T: + 49 (0) 731 9345-1991- F: + 49 (0) 731 9345-210 E.: service.de@britax.com www.britax.eu BRITAX EXCELSIOR LIMITED 1 Churchill Way West Andover Hampshire SP10 3UW United Kingdom T: + 44 (0) 1264 333343 F: + 44 (0) 1264 334146 E.: service.uk@britax.com www.britax.eu



Brand : BRITAX
Model : Kidfix SL SICT
Category : Child car seat