
Coburg CM62 - Car radio BLAUPUNKT - Free user manual and instructions
Find the device manual for free Coburg CM62 BLAUPUNKT in PDF.


| Product Type | Car Stereo |
| Brand | Blaupunkt |
| Model | Coburg CM62 |
| Dimensions (W x H x D) | 178 x 50 x 160 mm (1-DIN) |
| Weight | Approx. 1.2 kg |
| Power Supply | 12V DC (car battery) |
| Max Power Output | 4 x 50 Watts |
| Supported Media | CD, CD-R/RW, MP3, USB, AUX |
| Radio Bands | FM, MW, LW |
| Display Type | LCD with white illumination |
| Bluetooth Connectivity | Yes (hands-free calling & audio streaming) |
| Remote Control Included | Yes |
| Equalizer Presets | 5-band EQ with presets (Rock, Pop, Classic, etc.) |
| RDS Function | Yes |
| USB Port | Front USB (playback & charging) |
| AUX Input | 3.5 mm front AUX |
| Steering Wheel Control Compatible | Yes (requires adapter) |
| Security Code | Yes (anti-theft) |
| Cleaning Instructions | Use a soft dry cloth; avoid solvents |
| Operating Temperature | -10°C to +60°C |
Frequently Asked Questions - Coburg CM62 BLAUPUNKT
User questions about Coburg CM62 BLAUPUNKT
0 question about this device. Answer the ones you know or ask your own.
Ask a new question about this device
Download the instructions for your Car radio in PDF format for free! Find your manual Coburg CM62 - BLAUPUNKT and take your electronic device back in hand. On this page are published all the documents necessary for the use of your device. Coburg CM62 by BLAUPUNKT.
USER MANUAL Coburg CM62 BLAUPUNKT
Operating instructions
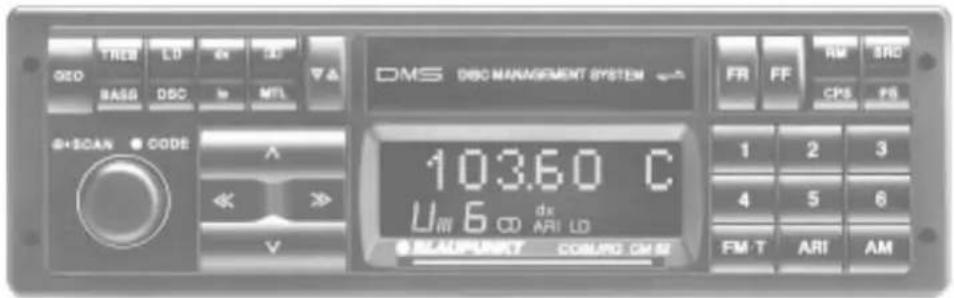
Coburg CM 62

Contents
Important notes 18
△ Notes on road safety 18
Connection 18
Telephone operation 18
KeyCard 19
Wrong KeyCard 19
KeyCard Lost 19
Front Panel Description...... 19
Tone control 20
Radio operation.... 20
Cassette operation 21
CD operation 22
External CD player 23
Notes on operation 23
Tone control 23
The Loudness 23
Radio operation.... 23
Selecting the waveband 23
Selecting a station 23
Storing a station.... 24
The mono switching.... 25
Adjusting the search tuning
sensitivity 25
Display of station name with Preset
Naming System (PNS) 25
Cassette operation 26
Inserting/ejecting a cassette 26
Fast winding 26
Manual tape selection.... 26
Dolby-NR 26
Track switching 26
Skipping/repeating music tracks ..... 27
Listening to the radio during fast winding 27
Switching between the audio sources 27
Cassette eject 27
Care of cassette and car radio ..... 27
Traffic broadcast reception (ARI) ...... 28
Adjusting the priority for ARI messages 28
The ARI alert 28
Switching off the ARI alert 28
Adjusting the volume of ARI messages and ARI alert.... 28
ARI messages during cassette operation.... 29
Automatic start of search tuning ..... 29
Selecting the display colour 29
Beep (after key operations).... 29
Optical indication as theft protection.. 29
Appendix 30
Technical data.... 30
What to do if your radio needs to be serviced.... 30
Important notes
⚠️ Notes on road safety
Being the driver of a motor vehicle you must direct your full attention on the traffic. Thus use your car radio set such that you are always able to cope with the present situation on the road.
In critical situations we even advise you to turn your set off. By all means, inattentions should be avoided. Please consider that you you are still moving 14 m per second at a speed of 50 km/h.
When adjusting the volume please pay attention that you are still able to hear, and react to, acoustic warning signals around you.
Connection
If you intend to install the set by yourself or to add other audio components to your in-car equipment, follow the enclosed installation and connection instructions.
Telephone operation
When operating a car telephone in your vehicle, radio or cassette reproduction can be muted automatically.
For this, however, the car telephone must be connected to this radio/cassette combination.
KeyCard
The KeyCard protects your car radio against theft.
Your car radio cannot be operated without your KeyCard and will not accept any other KeyCards than those delivered with this set. Therefore, your set will be of no worth for a potential thief.
This car radio can be used only with the KeyCards 1 and 2 included in the supply schedule.
You can store different adjustments for the following functions on KeyCard 1 and KeyCard 2:
Bass, treble, balance and fader, allocation of preset buttons, station names, seek tuning sensitivity, Loudness, display colour and BEEP on/off (see also "Programming with DSC").
Besides, the last adjustment of the waveband, the station and the seek tuning sensitivity remain stored on your KeyCard. Thus, when you insert e.g. KeyCard 1 again your car radio will start playing in the mode adjusted before.
Wrong KeyCard
If a wrong KeyCard is inserted, four dashes are first represented on the display ('----') before the indication changes to 'CARD ERR'. During this period the set cannot be operated even with the right KeyCard.
- Remove the false card. Now the correct card has to be inserted by all means.
After the third false try it will take one hour before the set can be operated with the correct card. In the meantime, '----' is indicated on the display.
After another 16 wrong attempts, the car stereo can only be put in operation by one of our authorized service partners. For this, the car radio passport has to be presented.
Switching the car stereo off during the waiting period will set the waiting time to 'zero' after the unit has been activated again.
KeyCard Lost
If you have lost your KeyCard or if it was damaged, one of our authorized service partners will help you against presentation of your car radio passport.
These service partners are designated by (☐) in the radio's service register. If required, call the service centre of your country for detailed information about your local Key-Card service facility.
Front Panel Description
This quick guide to operation consists of four parts:
Tone control
Radio operation
Cassette operation
CD operation
Twin functions are described separately. All functions which require more information are additionally described in chapter “Notes on operation”.
① On/off knob - Scan On/off
Turn the knob to switch on ("CARD" is shown in the display). If no KeyCard is inserted, the set switches off automatically after 10 sec.
To switch on or off, simply insert or push against the KeyCard.
SCAN
By pressing SCAN, the receivable stations of the activated waveband (FM, AM) are searched and played for a short time.
②1 Inserting the KeyCard
Insert the KeyCard in the direction of the arrow in the predetermined position. Push against the card to remove the KeyCard.
Tone control
①Volume control
②GEO (balance and fader control)
Press button - the display (20) a shows BAL (balance) or FAD (fader) and a number between -9 and +9.
Balance: Use rocker switch << >> 23 to adjust the left/right volume.
Fader: Use the rocker switch /√22 to adjust the front/rear volume.
This function can be adjusted separately for KeyCard 1 and 2.
③Sound adjustment (TREB, BASS) TREB - for treble adjustment
Press TREB -
the display ⑳ a shows TRE and a number between -6 and +6. Use the rocker switch << >> ⑳ to adjust treble.
BASS - for bass adjustment
Press BASS -
the display ⑳ a shows BAS and a number between -7 and +7. Use the rocker switch <> ⑳ to adjust bass. The adjustments are finished by pressing BASS, TREB or GEO. Approx. 8 seconds after the last adjustment the display automatically shows again radio or cassette functions.
This function can be adjusted separately for KeyCard 1 and 2.
④LD - for Loudness
Loudness - boosts bass at low volume. Press the LD rocker switch to switch Loud-ness on/off. If Loudness is on, "LD" lights in the display 20j .
This function can be adjusted separately for KeyCard 1 and 2.
⑤DSC - (Direct Software Control)
To adjust the Loudness for example (see "Notes on operation").
The chapter "Notes on operation" describes separately all the basic adjustments which can be set with the DSC function. This includes the display colour, search tuning sensitivity, Loudness, volume of traffic messages, beep (after key operations) and display of the station name.
Radio operation
⑥ dx, lo - search tuning sensitivity Press dx -
“dx” lights in the display 20g .
High search tuning sensitivity; search tuning stops also at weeker stations.
Stereo programmes are played in stereo.
Press lo -
"lo" lights in the display ⑳ e.
Normal search tuning sensitivity; search tuning only stops at stations offering good reception. Stereo programmes are played in stereo.
As the reception conditions can vary from region to region, the DSC function allows you to individually store the search tuning sensitivity (see search tuning sensitivity).
⑮PS - Preset Station Scan
To scan the stored FM programmes on all memory banks.
Press PS - the programmes are played for 8 seconds.
Quit this function by pressing this button once again.
⑯ Buttons 1, 2, 3, 4, 5, 6 (preset buttons)
Storing stations -
Press this button until the set resumes play.
Recalling stations -
Push button
⑰AM
Waveband selector for the medium-frequency band between 531 and 1602 kHz.
18ARI
To switch on the priority for ARI traffic stations.
If "ARI" is in the display ⑳h, only ARI traffic stations in the band between 87.5 and 108 MHz will be received.
The messages are automatically switched through and the ARI alert is in standby mode.
Press the ARI button to switch ARI on and off.
⑲FM·T
Waveband selector for the FM band between 87.5 and 108 MHz, selector for the FM memory banks I-III and T (Travelstore).
Six FM stations can be stored on each memory bank with the help of the buttons 16 . On the Travelstore level “T” you can automatically store the six strongest stations of your area.
⑳Display for
a) Frequency, station name, code
b) Wavebands (U=FM, M=AM)
c) FM memory banks (I-III or T)
d) Preset buttons (1-6)
e) lo (normal search tuning sensitivity)
f) Stereo
g) dx (high search tuning sensitivity)
h) ARI (priority of ARI traffic stations)
i) B (Dolby-NR switched on)
j) LD (Loudness switched on)
k) MTL (CrO, and metal cassettes)
I) RM (Radio Monitor switched on)
m) CPS switched on
n) ARI zone ident
②2/ Search tuning rocker switch - station selection
23<<>> Rocker switch for manual tuning.
Cassette operation
⑦ Dolby-NR
Press DE
Cassettes with Dolby noise reduction can be played.
On these cassettes background hiss is much lower and dynamics are better.
* Noise reduction system manufactured under the licence of Dolby Laboratories. The Dolby logo and the double D are registered trademarks of Dolby Laboratories.
⑧MTL - Metal
Press this button when chromium dioxyde (CrO 2 ) or metal cassettes are played. Switch off this function by pressing MTL once again.
⑨ Δ - Autoreverse
Press button - the other track of the cassette will be played.
The display ⑳ a shows which track is played.
TR1-PLAY - track A or 1
TR2-PLAY - track B or 2
⑩ Cassette compartment
⑪ Fast winding and cassette eject FR (Fast rewind) -
Press button for fast rewind. Stop fast rewind by pressing the FF button.
FF (Fast forward) -
Press button for fast forward. Stop fast forward by pressing the FR button.
Cassette eject
Press the buttons FR and FF ⑪ simultaneously to eject the cassette out of its compartment.
⑫RM - Radio Monitor
This function allows to listen to radio programmes during fast winding of the cassette. "RM" is indicated in the display 201.
⑬CPS
To repeat or skip music tracks on the cassette. "CPS" is indicated in the display ⑳ m.
⑭ SRC - Source
To switch between the audio sources (cassette → radio CD cassette)
CD operation
If a Blaupunkt CD changer without remote control is connected to this system, the CD functions can be controlled as follows:
⑤DSC - Direct Software Control
To adjust the display for CD changer operation.
The following display adjustments are only possible in conjunction with CD changers, as CDC A03, F03, capable to supply a control signal to the car radio (not possible with CDC-M1 and CDC-M3).
Press the DSC button - press the rokker switch /√22 until the display shows "TIME ON" or "TIME OFF".
Use the rocker switch << >> 23 to change the time mode (OFF or ON).
Press the DSC button ⑤ to quit. Explanations:
TIME OFF - the display shows the CD number and the track number (CD track indicator), e.g. "D10-TR12" means that track number 12 of the 10th CD is played.
TIME ON - the display shows the playing time of the track, e.g. "05.45" means that the track was played 5 minutes and 45 seconds.
This function can be adjusted separate-
ly for KeyCard 1 and 2.
To play another CD or track it is first necessary to switch to the CD track display by pressing the rocker switch for a short moment.
During CD operation, the display changes automatically to CD/track indication if a new CD or the next track begins.
14 SRC - Source
Allows to switch to CD Changer operation. The indicator shows the disc/track display - or the track/time display (according to the function adjusted with DSC).
① SCAN - On/Off
To scan the CD tracks.
Press SCAN - the tracks are played one after the other for 10 seconds each.
"TR" flashes and the track is shown in the display 20a .
Press SCAN once again to quit this function.
②22 ∧ ∨ Rocker switch to select the tracks
Upper part depressed shortly: Skip to next track more than 1 sec.: Cue
Lower part depressed
shortly: Skip to previous
track
more than 1 sec.: Review
②3<<>> Rocker switch to select the CD
Right part depressed - next CD
Left part depressed - previous CD
For further information please see the operating instructions of your CD changer.
External CD player
If an external CD player is connected (via Aux jack), the SRC button ⑭ allows to switch between the audio sources (cassette → radio → CD cassette).
The display shows "AUX".
Tone control
The Loudness
At low volume the human ear is less sensitive to bass than to medium and higher frequencies. This effect is reduced with increasing volume.
The Loudness function compensates this effect. Since the perception of music and speech depends on the type of the equipment (amplifier), the configuration and type of the loudspeakers and on the type of the motor vehicle, the Loudness function has been made adjustable.
To set the Loudness threshold adjust normal volume and follow the steps below:
- Press the DSC button ⑤.
- Press the rocker switch /√22 until the display 20 a shows "Loud" and a number between 1 and 6.
- Use the search tuning rocker switch << >> ②3 to adjust the Loudness threshold.
- Press the DSC button ⑤ after the adjustment.
This function can be adjusted separately for KeyCard 1 and 2.
Radio operation
Selecting the waveband
FM - with FM-T button ⑲.
AM - with AM button ⑰.
Selecting a station
... using Scan (on/off) ①
If you wish to tune to another station
- press the Scan button ①.
Starting from the currently received radio programme, the set automatically tunes to the next station frequencies in upward direction and plays them for 8 seconds. During search tuning, the display 20 a shows "SCAN" and while the radio programmes are previewed the station frequency flashes in the display 20 a.
To select a scanned station
- press the Scan button ① once again.
The Scan function is switched off.
If you do not select a station, the set plays again the radio programme which was tuned in before Scan was activated.
... using the search tuning rocker switch Start automatic search tuning
- by pressing the rocker switch /√22 . Start search tuning as often as required until the radio programme of your choice is tuned in.
If you hold the rocker switch depressed, search tuning continuous quickly.
... using preset buttons and memory banks
This function can be used only, if station frequencies have been stored on the preset buttons as described in chapter "Storing a station".
- To recall FM stations, press the FM-T button ⑲ until the desired memory bank I, II, III or T is shown in the display ⑳.
- Then press shortly the desired preset button.
... using Preset Scan (PS) 15
This function allows you to scan and introduce the stored radio programmes of the selected waveband (in FM mode on all memory banks I, II, III and T).
This function can be used only, if station frequencies have been stored on the preset buttons as described in chapter "Storing a station".
- Press PS shortly. The set introduces the next preset programme.
The programme of this station is played for a short time, then the next preset programme is
scanned, etc. If no frequency is stored on a preset button, this preset is skipped.
Preset Scan can be used on all wavebands. As soon as you have found the programme of your choice
- press PS once again. Preset Scan is switched off.
Storing a station
This function can be adjusted separately for KeyCard 1 and 2.
In the FM mode, six stations can be momorized on each of the three memory banks. Use the FM•T button 19 to select the memory bank. Another six stations can be stored on the AM range. Beyond that, the six strongest FM stations can be stored automatically on the Travelstore bank.
When required, the stored stations can be recalled by pressing a button.
... using automatic search tuning
If you want to memorize a station frequency follow the steps below:
- For FM stations, select the memory bank by pressing the FM·T button ⑲ as often as required. The display ⑳ shows I, II, III or T.
To store a station frequency,
- press one of the preset buttons 16 until the radio mute is off and the set resumes reproduction of that programme (after about 2 seconds) to indicate that the station is stored.
The display 20d shows which preset button is pressed.
Follow these steps if you want to store further stations of all wavebands on the other preset buttons and memory banks.
If the automatic search tuning stops on a frequency which was already stored before, then the corresponding preset button will be indicated for about 5 seconds in the display 20d together with the memory bank 20c, but the latter only if it is an FM station.
... using Travelstore
The Travelstore function automatically stores the six strongest FM radio stations of your area and sorts them according to their field strength. This function is helpful, above all, on long-distance travels.
To memorize these stations with Travelstore
- press the FM·T button ⑲ for about 2 seconds.
The radio reproduction is muted until the six strongest stations are stored.
If required, stations can also be stored manually on the Travelstore bank. The display shows dashes to indicate the free preset buttons.
... using manual tuning
If you want to manually tune in and store a station, use the rocker switch << >> ②3 to enter the frequency.
- Use the FM•T 19 or AM A button to select the waveband.
If you wish to store an FM frequency, - use the FM•T button ⑲ to select the memory bank.
- Adjust the frequency with the rocker switch << >> 23.
Store the frequency by
- pressing the preset buttons (until the set resumes play).
In addition to the stored station frequencies, the stations tuned in last on each waveband remain stored.
The mono switching
Your car radio is fitted with a Blaupunkt FM tuner (Codem III) which provides for mostly undisturbed reception on the road.
In areas with poor reception conditions or multipath interferences due to signal echoes, the radio set switches gradually between stereo and mono. This considerably improves the on-the-road reception quality.
To avoid stereo noise common in very critical reception areas, we recommend to switch to mono.
To switch between stereo ↔ mono
- press lo ⑥ for more than 2 seconds.
In mono mode, the stereo indicator ⭕ 20f goes off.
Adjusting the search tuning sensitivity
a) with dx and lo ⑥.
The adjustment is shown in the display ⑳e and ⑳g.
lo - Normal search tuning sensitivity (local)
dx - High search tuning sensitivity (di- stant)
b) via software with DSC
When the station density is extremely high or low, it can be useful to separately adjust the level of the two sensitivities. For this,
- press the DSC button ⑤.
Press the rocker switch /22 until "DIS" (sensitivity level dx) or "LOCAL" (sensitivity level lo) and a number between 1 and 3 are shown
in the display 20a. Use the dx and lo button 6 to switch between LOCAL and DIS.
- Use the rocker switch << >> ②3 to adjust the sensitivity:
01 for high sensitivity 03 for normal sensitivity - Press the DSC button ⑤ after the adjustment.
This function can be adjusted separately for KeyCard 1 and 2.
Display of station name with Preset Naming System (PNS)
If you select a station, the display ⑳ a shows the station frequency. Beyond that, this car radio allows you to change this indication and, for example, to enter the station name instead (NDR, BBC, etc.). This is possible under the following conditions:
Indications of FM and AM stations can only be changed if they are memorized on the FM (I, II, III) and AM memory bank, respectively. Then, however, the zone ident for traffic information broadcasts (ARI) will not be displayed.
- Press the DSC button ⑤.
-
Press the rocker switch /√22 until "PRESET" shows in the display (20)a.
-
Select the station for which you want to enter a name.
The station frequency is shown in the display 20 a. Free entry fields are filled with dashes. The first dash flashes. To enter any character, - press the rocker switch << >> 23.
The display successively shows a point, the numbers (0 to 9), the capital letters (A to Z), the blank and special characters (such as modified vowels and punctuations).
If you want to enter the next character, - shortly press the on/off button ①.
In order to change the previous character, - press the on/off button ① for more than 2 seconds.
When you have finished the entry and wish to enter the name for another station, press the corresponding preset button. The entered values are stored automatically. - Press the DSC button ⑤ to quit.
The entry of the station name can be cleared by memorizing another frequency on that preset button (press the preset button for a longer time). The display then shows the frequency of the newly stored station.
Cassette operation
Inserting/ejecting a cassette
- Switch the car radio on.
- Insert the cassette with track A or 1 facing upwards, but do not apply any force when doing so.
The cassette is played in the direction used last.
The display ⑳ a shows which track is played.
To eject the cassette, press the FR and FF button ⑪ simultaneously.
Fast winding
Fast forward
- Press the FF button ⑪. At the end of the tape, the set switches to the other track (autoreverse).
Interrupt fast forward by
- pressing the FR button.
- Press the FR button ⑪. At the end of the tape, the set switches to the other track.
Fast rewind
Interrupt fast rewind
- by pressing the FF button.
Manual tape selection
To play METAL or CrO2 cassettes
- press MTL ⑧, "MTL" is shown in the
display 20k.
Press this button once again to switch off this function. "MTL" goes off in the display.
Dolby-NR
This tape deck allows to play cassettes which have been recorded with or without Dolby-NR.
On cassettes recorded with Dolby-NR ® background hiss is much lower and dynamics are better.
To switch Dolby-NR on/off
- press the □□ rocker switch ⑦.
"B" lights in the display ⑳ h if Dolby-NR is switched on.
This function is switched off by pressing the rocker switch once again. "B" goes off in the display.
* Noise reduction system manufactured under license from Dolby Laboratories. The word Dolby and the double D symbol are the trademarks of Dolby Laboratories.
Track switching
a) Automatically
At the end of the tape, the car radio switches automatically to the other track. The other side of the cassette is played.
b) Manually
Press Δ ⑨.
The other track of the cassette is played.
The Display 20a changes
With stiff cassettes the tape deck may switch inadvertently from one track to the other. Should this happen, check the tape reel. Winding the cassette may prove helpful.
Skipping/repeating music tracks
CPS means Cassette Programme Scan and allows to skip and repeat music tracks on the cassette.
- Press CPS ⑬. CPS is shown in the display ⑳m.
To skip a music track, that is, to activate fast forward until the beginning of the next track is reached,
- press the FF button ⑪ for fast forward.
Should you wish to play the track once again, that is, to activate fast rewind until the beginning of the current track is reached,
- press the FR button ⑪ (fast rewind).
Your can repeat the previous track even if the next track is already played, but this is only possible within the first 8 seconds of the next track. As soon as fast forward or fast rewind is finished, the next or the previous music track is played.
The CPS system can be used only, if a pause of at least 3 seconds is left between the individual music tracks. Switch this function off by pressing the CPS button ⑬ once again. "CPS" goes off in the display ⑳m.
Listening to the radio during fast winding
with the RM button (Radio Monitor) 12. During fast winding (and CPS) the unit is usually muted. Nevertheless you can listen to the radio
- by pressing RM ⑫, "RM" is shown in the display ⑳.
As soon as fast winding starts, the set plays the programme of the tuned-in station.
Switch this function off by pressing this rocker switch once again, "RM" goes off in the display.
Switching between the audio sources
(Cassette radio CD cassette) with the SRC (source) 14.
With the cassette inserted
- press the SRC ⑭.
The set switches from cassette operation to radio or CD mode.
When cassette mode was activated, the cassette tape is stopped. The tape head and the pinch rollers retract in order to protect the cassette and the tape deck (standby mode).
Switch back with the SRC 14 .
Cassette eject
- Press the FR and FF ⑪ simultaneously.
Care Notes
We recommend C-60 and C-90 type tapes for use in any automobile tape player; to protect your tapes, store them in a cool place away from dirt, dust, or excessive temperatures above 50° Celsius. In order to ensure smooth tape operation, cold tapes should be allowed to heat up a bit before they are played. If dust collects on the audio head or the rubber roller, problems related to rough tape operation or poor sound quality may occur after approx. 100 hours of operation. For normal contamination, use a head-cleaning cassette to remove the dust; for more intensive contamination, use a cotton-wool tip soaked with alcohol. Never use hard tools!
Traffic broadcast reception (ARI)
Certain FM stations broadcast local traffic messages from time to time. Besides various other advantages, the ARI system will make it easier for you to find these stations. Traffic information broadcasting stations can be identified from the ARI zone ident 20n. The frequencies of regional ARI traffic information stations are indicated on the blue motor way signs.
Adjusting the priority for ARI messages
By activating this function, all non-ARI stations will be muted. ARI can be switched on/off with the ARI button 18 . If you wish to listen to traffic broadcast stations only,
- press the ARI button ⑱.
If the priority for ARI messages is adjusted, "ARI" is shown in the display 20h.
If your set is tuned to a non-ARI station, the ARI alert will be released.
- Press the search tuning rocker switch √22 to tune to the next traffic broadcast station.
The ARI alert
Precondition: ARI priority is switched on (ARI lights in the display 20h.
If you leave the coverage area of the traffic broadcast station, making reception difficult, the ARI alert is released after about 30 seconds.
The ARI alert is released immediately, if a preset button is pressed on which a non-ARI station is stored.
Switching off the ARI alert
a) Tune in another station (with traffic broadcast) by
- pressing the search tuning rocker switch or by
- pressing a preset button on which an ARI station is stored.
b) Switch off the ARI priority by
- pressing the ARI button ⑱.
Adjusting the volume of ARI messages and ARI alert
Should you wish to receive traffic information only, it is possible to reduce the volume either slightly or totally whilst maintaining reception of traffic messages. When a traffic message is broadcast, this one is automatically reproduced at the preset volume, although you have previously turned down the volume or switched over to cassette operation.
The preset volume for traffic messages can be adjusted in line with your particular requirements (e.g. having connected an amplifier or in case of a quiet of loud vehicle).
- Press DSC ⑤.
- The display ⑳a shows ARI and a number between 1 and 9. Now you receive the programme with the adjusted volume.
- Use the rocker switch << >> ②3 to correct your adjustment.
After the adjustment
- press DSC ⑤.
This function can be adjusted separately for KeyCard 1 and 2.
ARI messages during cassette operation
This set allows you to listen to a cassette while maintaining reception of traffic messages.
When a traffic message is broadcast, cassette playback is stopped and the traffic message switched through.
Proceed as follows to activate this function:
- Use the ARI button 18 to switch on the ARI priority. "ARI" is shown in the display 20 h if the ARI priority is on.
- Tune to a traffic information station of your area.
- Insert the cassette into the cassette compartment. Now you can listen to cassette playback, which will be interrupted when a traffic message is broadcast.
Automatic start of search tuning
When you leave the coverage area of the tuned in traffic broadcast station, making reception difficult, the set automatically tunes to another traffic information station when cassette operation is activated. During seek tuning the ARI alert sounds.
Selecting the display colour
With DSC ⑤ the display colour can be changed from orange to green to adapt it to the dashboard lighting of your car.
To change the display, proceed as follows:
- Press DSC ⑤.
- Press the rocker switch /√22 until "COLOUR" lights in the display.
- Press << >> ②3 to change the colour.
- Press DSC ⑤ to quit.
This function can be adjusted separately for KeyCard 1 and 2.
Beep (after key operations)
This car radio can release a beep to confirm those key operations which require more than 2 seconds before the respective function is activated. This beep can be switched on or off.
For this, press the following buttons one after the other:
• DSC ⑤.
- Rocker switch / 23 until the display 20 a shows "BEEP ON" or "BEEP OFF".
- Press the rocker switch << >> ②3 to switch between "BEEP ON" and "BEEP OFF".
- Press DSC ⑤ to quit.
This function can be adjusted separately for KeyCard 1 and 2.
Optical indication as theft protection
When your vehicle is stationary, a light emitting diode can flash as optical warning. Depending on how your car radio is connected, you can adjust one of the following three states with DSC ⑤.
- Press DSC ⑤.
- Press the rocker switch /√22 until "LED" and a number is shown in the display:
LED 1 - The LED flashes, if the car radio is switched via the ignition.
LED 2 - The LED flashes, if the car radio is not switched via the ignition.
LED 0 - The LED diode does not flash.
- Select with << >> 23.
- Press DSC ⑤ to quit.
This function can be adjusted separately for KeyCard 1 and 2.
Appendix
Technical data
Amplifier
Output power : 2 x 26 W and 2 x 7 W max. output power
2 x 24 W and 2 x 6.5 W
sine acc. to DIN 45324/
3.1 at 4 Ω
What to do if your radio needs to be serviced
Whenever your radio fails to operate and needs to be repaired by an authorized service center, please do not forget to bring the radio passport and the KeyCard along with you.
FM:
Sensitivity: 0.9 ∝ V at 26 dB S/N ratio
Response: 35-16000 Hz (-3 dB)
Selectivity: >80 dB at ± 300 kHz
40 dB at ± 200 kHz
Crosstalk
attenuation: >30 dB at 1 kHz
Cassette
Response: 30-18000 Hz
(-3 dB constant)
Wow/flutter: 0.25 % typ.
S/N ratio 64 dB typ. with Dolby B
56 dB typ. without Dolby
Aux-In: Input impedance 10 kΩ
Preamp-Out: Output impedance 150 Ω
Modifications reserved!


- Operating instructions
- Coburg cm 62
- Contents
- Important notes
- ⚠️ Notes on road safety
- Connection
- Telephone operation
- Keycard
- Wrong keycard
- Keycard lost
- Front panel description
- Tone control
- Radio operation
- Cassette operation
- Cd operation
- ① On/off knob - scan on/off
- Scan
- Bass - for bass adjustment
- External cd player
- The loudness
- Selecting the waveband
- Selecting a station
- Using preset buttons and memory banks
- Using preset scan (ps) 15
- Storing a station
- Using automatic search tuning
- Using travelstore
- Using manual tuning
- The mono switching
- Adjusting the search tuning sensitivity
- Display of station name with preset naming system (pns)
- Inserting/ejecting a cassette
- Fast winding
- Fast forward
- Interrupt fast forward by
- Fast rewind
- Interrupt fast rewind
- Manual tape selection
- Dolby-nr
- Track switching
- Skipping/repeating music tracks
- Listening to the radio during fast winding
- Switching between the audio sources
- Cassette eject
- Care notes
- Traffic broadcast reception (ari)
- Adjusting the priority for ari messages
- The ari alert
- Switching off the ari alert
- Adjusting the volume of ari messages and ari alert
- Ari messages during cassette operation
- Automatic start of search tuning
- Selecting the display colour
- Beep (after key operations)
- Optical indication as theft protection
- Appendix
- Technical data
- Amplifier
- What to do if your radio needs to be serviced
- Fm
- Cassette
Brand : BLAUPUNKT
Model : Coburg CM62
Category : Car radio