
TB10351 - Iron SIEMENS - Free user manual and instructions
Find the device manual for free TB10351 SIEMENS in PDF.


| Product Type | Soleplate Steam Iron |
| Model | TB10351 |
| Brand | Siemens |
| Power Consumption | 2400 W |
| Voltage | 220-240 V, 50/60 Hz |
| Soleplate Material | Stainless Steel (or Ceramic) |
| Water Tank Capacity | 300 ml |
| Continuous Steam Output | Up to 40 g/min |
| Steam Boost | Up to 150 g/min |
| Anti-Drip System | Yes |
| Auto Shut-Off | Yes, after 8 minutes idle vertically, 30 seconds horizontally |
| Self-Cleaning | Yes, with self-clean function |
| Anti-Calc System | Yes |
| Spray Function | Yes |
| Cord Length | 2.5 m |
| Dimensions (W x D x H) | 30 x 15 x 20 cm |
| Weight | 1.5 kg |
| Safety Features | Auto shut-off, heat-resistant handle |
| Spare Parts Availability | Yes, via Siemens service centers |
| Repairability | Repairable; spare parts available for 10 years after purchase |
| Care and Cleaning | Descale regularly using self-clean function; wipe soleplate when cool |
Frequently Asked Questions - TB10351 SIEMENS
User questions about TB10351 SIEMENS
0 question about this device. Answer the ones you know or ask your own.
Ask a new question about this device
Download the instructions for your Iron in PDF format for free! Find your manual TB10351 - SIEMENS and take your electronic device back in hand. On this page are published all the documents necessary for the use of your device. TB10351 by SIEMENS.
USER MANUAL TB10351 SIEMENS
natural_image
Black-and-white illustration of a vintage flying iron with a circular eye, set against a starry background (no text or symbols)TB 10 ..
DE
natural_image
Medical illustration showing internal anatomy with a numbered label '12' (no readable text or symbols)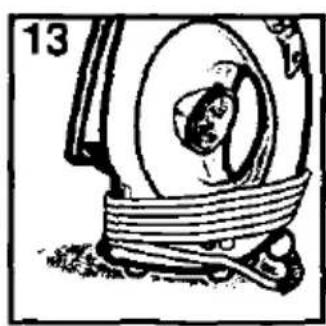
natural_image
Illustration of a mechanical device with a circular component and a striped base (no text or symbols)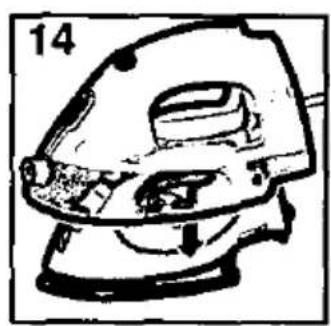
natural_image
Line drawing of a mechanical iron or switch (no text or symbols)DE
[Unreadable]
Sicherheitshinweise
Please fold out the page with the illustrations.
These instructions for use apply to a number of different models.
Some appliances also include the following features:
• automatic switch-off
- drip stop
- test strip for establishing how hard the water is.
The refill bottle is also available as an optional accessory.
Overall view of your iron
1 Indicator light
orange = iron is heating up
green = iron is ready for use
2 Indicator light
red = flashes to show that automatic switch-off has cut in
3 Setting the iron down
4 Adjusting the temperature setting
5 Residual heat indicator
6 Specially shaped tip for precision ironing
7 Filling up with water using the refill beaker
8 Filling up with water using the refill bottle
9 Adjusting the amount of steam
10 Spraying water
11 Shot of steam
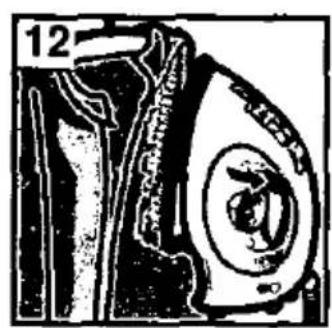
12 Steam in the vertical position
13 Rewinding the cable
14 Attaching the refill bottle
How to iron various fabrics.
| Type of material / Application | Treatment | Setting |
| Polyester, blended fabrics containing wool | dry iron or with steam | ● ⇌ ●● |
| Silk | dry iron or with steam | ●● |
| Wool | do not spray, iron with a damp clothiron with steam | ●● ⇌ ●●● |
| Rayon, blended fabrics containing cotton | iron with steam | ●● ⇌ ●●● |
| Corduroy, stretch corduroy | iron reverse side, with normal steam or shots of steam | ●●● |
| Cotton, damask, linen | Einsprühen, mit Dampf oder mit Super-Dampfstoß bügeln | ●●● ⇌ max. |
| Freshening up velvet, felt, suede | with steam or while holding iron upright, without touching the fabric with the base of the iron | max. |
| Badly wrinkled fabrics, creases that have been accidentally ironed in the wrong place, collars, pockets, seams, button tapes and very dry fabric that is difficult to iron | spray with water, iron with normal steam or shots of steam (walt approx. 4 sec. between shots of steam) | appropriate for the type of material |
| Ironing underneath buttons | make use of the specially shaped tip for precision ironing | appropriate for the type of material |
| Temperature: ● = low ●● = medium ●●● = high | ||
Tips
Sort your ironing according to the fabric-care symbols on the labels and begin at the lowest temperature.
In the case of items that do not have a fabric-care symbol, try the iron on a section that is normally hidden from view first of all. Textiles that have a printed pattern should be ironed at a lower temperature than those with no printing.
GB
This appliance is intended for household use and is not suitable for commercial use. Please read the instructions for use carefully and keep them in a safe place for future reference.
Safety information
This appliance conforms to accepted technical standards and the relevant safety requirements for electrical devices. Repairs to this appliance should only be carried out by a qualified expert. The manufacturer shall not be liable for damage caused by improper usage or failure to follow the instructions for use.
Connect and use the appliance only as specified on the rating plate.
Do not connect the appliance if either the mains cable or the appliance itself appear damaged. Always unplug the appliance after use or in the event of a fault.
Do not:
- allow the mains cable to touch hot parts.
- pull the cable across sharp edges.
If the mains cable is damaged, it should only be replaced by our Customer Service Department in order to avoid all risk of injury.
Keep children away from the appliance.
When the appliance has reached the end of its working life, it should be clearly destroyed and disposed of properly.
Do not leave the iron unsupervised while it is switched on.
While iron is switched on
Burns hazard! The iron becomes hot while it is in use.
⚠ Danger of scalding! Avoid contact with hot steam.
⚠️ Fire hazard! Never put the iron down onto combustible material (e.g. clothing). During breaks in ironing or when you have finished, stand the iron on end or put it down on an area specifically intended for this purpose, such as the holder on the ironing board (Fig. 3). Unplug the iron from the mains whenever you leave the room.
⚠ Damage to the base! Do not put the iron down onto a hard rough surface.
Before you use the iron for the first time
Fill the tank with tap water, allow the iron to heat up and discharge the contents as steam by continually pressing the steam-shot button (Fig. 11).
Additional features
Appliances with automatic switch-off
The iron switches off automatically if it is left standing on its base for longer than 30 sec. without being moved, lying on its side for longer than 30 sec. or standing upright for longer than 8 min.
The red indicator light flashes (Fig. 2).
To switch the iron on again, move it backwards and forwards for a few seconds or unplug it and wait approx. 5 sec. before plugging it in again.
Appliances with drip stop
When the tank is full, the drip stop feature prevents water from leaking out of the steam nozzles when the iron is set to a low temperature.
Filling the tank with water
Unplug the iron from the mains socket. Important!
Use only tap water or a mixture of distilled and tap water. Other liquids will damage the iron. Distilled water on its own does not produce enough steam.
Establishing the water hardness
Find out the water hardness from your local water supply company or, with certain models, use the enclosed test strip.
Dip the test strip into the water for 1 sec., shake it gently and wait 1 min. before reading off the result.
| Water hardness | Measurement range | Test strip |
| very soft | 0 | ○○○○ |
| soft | 0 - 1.3 mmol | ●○○○ |
| medium | 1:3 - 2.5 mmol | ●●○○ |
| hard | 2.5 - 3.8 mmol | ●●●○ |
| very hard | above3.8 mmol | ●●●● |
Irons with refill beaker
Fill the beaker with water:
| Water hardness | Mixing ratio Tap water: distilled water |
| very soft / soft | tap water |
| medium | approx. 2:1 |
| hard | approx. 1:1 |
| very hard | approx. 1:2 |
GB
Slide the steam volume control upwards as far as it will go (Fig. 9). Pour in the required amount of water (Fig. 7). The tank is full when the water level reaches the "max" mark. Slide the steam volume control downwards as far as it will go.
Irons with refill bottle
Fill the bottle with water:
| Water hardness | Mixing tap water with distilled water |
| very soft / soft | tap water |
| medium | fill with distilled water up to the "mittel / medium" mark and top up with tap water |
| hard | fill with distilled water up to the "hart / hard" mark and top up with tap water |
| very hard | fill with distilled water up to the "sehr hart / very hard" mark and top up with tap water |
Close the refill bottle. Slide the steam volume control upwards as far as it will go (Fig. 9). Hold the refill bottle over the opening in the iron and press the button (Fig. 8). Pour in the required amount of water. The tank is full when the water level reaches the "max" mark. If you try to pour in more water, the supply is cut off automatically. This might be followed by a discharge of steam for a short period.
Close the steam volume control.
When the refill bottle is full, its contents are sufficient to fill the iron 2–3 times.
Ironing without steam
Plug the iron into the mains. Set the steam volume control to "off" (Fig. 9). Set the temperature control to the required level (Fig. 4). The iron is ready for use (Fig. 1) when the green indicator light comes on. In order to spray water onto the clothes: Press down firmly on the spray button (Fig. 10).
Ironing with steam
Plug the iron into the mains. Set the temperature control to a position within the red zone (Fig. 4). The amount of steam can be continuously adjusted by means of the steam volume control (Fig. 9). If you wish to interrupt the supply of steam or end it completely, set the steam volume control to "off".
Ironing with shots of steam
Press the steam-shot button (Fig. 11). In order to obtain the full amount of steam, wait approx. 4 seconds before you press the button again.
Steam-ironing with the iron held vertically
Set the temperature control to a position within the red zone and hold the iron vertically at a max. distance of 1 cm. in front of the material (Fig. 12). Press the steam-shot button (Fig. 11). Wait approx. 4 sec. for the next shot of steam.
After use
Unplug the iron from the mains and set the temperature control to "off".
Empty the water tank by sliding the steam volume control upwards as far as it will go (Fig. 9) and pouring out the water.
Dry out the iron by plugging it into the mains again, setting the temperature control to ●●● and pressing the steam-shot button several times.
Set the temperature control to ● and pull out the mains plug.
The residual heat indicator remains illuminated until the iron has cooled down (Fig. 5). When this has happened, wind the connecting cable round the iron (Fig. 13).
If applicable, attach the refill bottle to the iron after it has cooled down (Fig. 14).
Care and maintenance
Pull out the mains plug.
Do not immerse the iron in water or clean it under a running tap.
Important:
Do not descale the iron and do not pour any chemical cleaning agents or solvents into the tank.
To clean the drip valve: every time you use the iron, set the steam volume control to "self clean" several times (Fig. 9).
Wipe the casing and the base with a damp cloth and then rub them dry. Do not use a scouring agent.
To clean off marks on the base: apply the iron as normal to a linen cloth soaked in vinegar.
If the base is badly stained: stand the iron in a receptacle containing vinegar (max. depth of 1 mm) for 15 min.
Then wipe the base clean with a damp cloth and heat up the iron briefly to dry it off.
FR
Gjelder enkelte modeller
The quick brown fox jumps over the lazy dog.
Planchar sin vapor
The guarantee conditions for this appliance are as defined by our representative in the country in which it is sold. Details regarding these conditions can be obtained from the dealer from whom the appliance was purchased. The bill of sale or receipt must be produced when making any claim under the terms of this guarantee.
Subject to change without notice.
FR Garantie
IRL Eire · Ireland Appliance Care Ltd. Unit 4 Ballymount Industrial Estate Ballymount Drive Walkinstown IRL-Dublin 12 Tel. (01) 4 50 26 55
IS Island Smith & Norland O. R, Pälsson Nóatúni 4 P.O. Box 519 IS-121 Reykjavik Tel. 62 83 00
D Bundesrepublik
Deutschland
GB Service and Office &
Central Spares
Appliance Care Ltd.
Conifer House
Westmount Centre
Uxbridge Road
GB-Hayes, Middlesex
MIDDXUB4 OHD
Administration
Tel. (01 81) 7 54 55 00
Fax (01 81) 5 61 49 66
Central Spares
Tel. (01 81) 8 48 74 47
Fax (01 81) 5 69 27 35
P Português
P-2700 Amadora
Estr. Nacional 117, km 2,6
Alfragide Siemens,
SA.-Serv.Tecnicos
Tel. (01) 4 17 86 03
E España
BS Interservice, S.A. Central
Para España
Poligono Malpica
Euroservice ABE Service
Household Appliances
- Arkadias str.
GR-12132-Peristeri
Tel. (01) 57 73-2 10
TR Türkçe
BS EV Aletleri Tic. A.S.
Litros Yolu No.:12
TR-34160 Istanbul-Topkapı
Tel. 5 01 72 80
Tel. 5 01 72 81
Tel. 5 01 72 97
PL Polska
Centrala Serwisu
- DE
- Sicherheitshinweise
- Please fold out the page with the illustrations.
- Overall view of your iron
- Tips
- GB
- Safety information
- While iron is switched on
- Before you use the iron for the first time
- Additional features
- Appliances with automatic switch-off
- Appliances with drip stop
- Filling the tank with water
- Establishing the water hardness
- Irons with refill beaker
- Irons with refill bottle
- Ironing without steam
- Ironing with steam
- Ironing with shots of steam
- Steam-ironing with the iron held vertically
- After use
- Care and maintenance
- Pull out the mains plug.
- Important:
- FR
- Gjelder enkelte modeller
- The quick brown fox jumps over the lazy dog.
- Planchar sin vapor
- FR Garantie
- D Bundesrepublik
- Deutschland
- P Português
- E España
- TR Türkçe
- PL Polska
Brand : SIEMENS
Model : TB10351
Category : Iron