
UB-5825C - Tablet PANASONIC - Free user manual and instructions
Find the device manual for free UB-5825C PANASONIC in PDF.
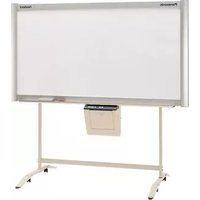


| Product Type | Tablet |
| Brand | Panasonic |
| Model | UB-5825C |
| Display Size | 10.1 inches |
| Display Resolution | 1920 x 1200 pixels |
| Processor | Intel Core i5 (7th Gen) |
| RAM | 4 GB |
| Internal Storage | 64 GB eMMC |
| Operating System | Windows 10 Pro |
| Battery | Lithium-ion, 7.4V, 4200 mAh |
| Battery Life | Up to 8 hours |
| Weight | Approx. 1.1 kg |
| Dimensions | 272 x 196 x 18.3 mm |
| Connectivity | Wi-Fi 802.11ac, Bluetooth 4.2 |
| Ports | USB 3.0, HDMI, microSD slot, audio jack |
| Camera | Front: 2 MP, Rear: 8 MP with autofocus |
| Durability | IP65 dust and water resistant; MIL-STD-810G |
| Power Supply | AC adapter 100-240V, 50/60Hz |
| Audio | Built-in speakers and microphone |
Frequently Asked Questions - UB-5825C PANASONIC
User questions about UB-5825C PANASONIC
0 question about this device. Answer the ones you know or ask your own.
Ask a new question about this device
Download the instructions for your Tablet in PDF format for free! Find your manual UB-5825C - PANASONIC and take your electronic device back in hand. On this page are published all the documents necessary for the use of your device. UB-5825C by PANASONIC.
USER MANUAL UB-5825C PANASONIC
[Stand (option)] [Wall-mounting (option)]

The unit in this picture is UB-5325.
(Stand and Wall-mounting kit are optional.)
Panasonic®
Electronic Board
Operating Instructions
Model No. UB-5325
UB-5825
Panaboard

English....1–28
Français .....29–56
Deutsch....57–84
Español....85–112
Italiano .....113–140
Thank you for purchasing the Panasonic Electronic Board.
For optimum performance and safety, please read these instructions carefully.
Record these items for future reference.
Model number: ____ Date of purchase: ____
Serial number: ____ Dealer's name: ____
Dealer's address: Tel:
Accessories
Q'ty
• Thermal transfer film ..... 1 - Markers (red, black, and blue) ..... 1 each - Operating Instructions 1 - Installation Manual 1 - Eraser 1
Q'ty
- Power cord 1
- A4 (Letter*) size copy paper ..... 20
- Software CD-ROM 1
* Letter size is for U.S.A. and Canada models. - The stand and wall-mounting kit are optional. By way of example, this manual describes an Electronic Board which is used with the stand. - USB cable is not included.
- Microsoft and Windows are either registered trademarks or trademarks of Microsoft Corporation in the United States and/or other countries. • IBM is a trademark of International Business Machines Corporation in the United States, other countries, or both.
- Pentium is a trademark or registered trademark of Intel Corporation or its subsidiaries in the United States and other countries.
- Adobe, Acrobat, Acrobat Reader and Reader are either registered trademarks or trademarks of Adobe Systems Incorporated in the United States and/or other countries.
- All trademarks referred to in this manual are property of their respective companies.
The information given in this Operating Instructions is subject to change without notice.
Warning about saving data
When the system storage device or any of its optional storage device is adversely affected by operational errors, static electricity, electrical noise, vibration, dust or when the power has been cut off due to malfunction, repair or inadvertently, the memory contents may be lost or changed. Before operating the system, make a point of reading the precautionary notes in the Operating Instructions and the help information, and observe them during operation.
Please observe carefully the following precaution:
- Make absolutely sure that all important data is saved by back-up or the original is saved.
The manufacturer hereby declares that it cannot be held accountable for any loss or change in any data stored on floppy disks, hard disks, optical disks, or other memory devices.
Table of Contents
| Page | ||
| Before You Start | For Your Safety. | 4 |
| Precautions. | 5 | |
| • CD-ROM | 6 | |
| Part Names and Functions. | 8 | |
| • Control panel | 9 | |
| Using | Installing the Thermal Transfer Film. | 10 |
| Loading Copy Paper. | 11 | |
| Making Copies. | 13 | |
| • Copy types and procedures. | 13 | |
| Replacing the Thermal Transfer Film. | 14 | |
| Paper Jams. | 15 | |
| Computer Interfacing. | 17 | |
| • System requirements. | 17 | |
| • Contents of CD-ROM. | 17 | |
| • Installing the drivers. | 18 | |
| • Installing the software. | 19 | |
| • Removing the drivers. | 20 | |
| • Removing the software. | 20 | |
| • Scanning. | 21 | |
| • Panaboard Operation Panel. | 22 | |
| • Printing. | 23 | |
| Help | Daily Care and Maintenance. | 24 |
| • Cleaning the screen and the unit. | 24 | |
| • Caring for the eraser. | 24 | |
| • Cleaning the printer head, platen roller and pick-up roller. | 24 | |
| Troubleshooting. | 26 | |
| • Meanings of error codes. | 27 | |
| Specifications. | 28 | |
| • Option and Separately available. | 28 | |
For Your Safety
English
CAUTION:
TO PREVENT RISK OF ELECTRIC SHOCK HAZARD, DO NOT REMOVE THE COVER OF THIS PRODUCT, REFER SERVICING TO QUALIFIED SERVICE PERSONNEL.
WARNING:
TO PREVENT FIRE OR SHOCK HAZARD, DO NOT EXPOSE THIS PRODUCT TO RAIN OR ANY TYPE OF MOISTURE.
THE SOCKET-OUTLET MUST BE NEAR THIS EQUIPMENT AND MUST BE EASILY ACCESSIBLE.
The product should be used only with the power cord that is supplied by the manufacturer.
Stop operation immediately if your product emits smoke, excessive heat, abnormal smell or unusual noise. These conditions can cause fire or electric shock. Immediately turn the product off and unplug the power cord, and contact your dealer for service.
• (220–240 V equipment)
A certified power supply cord has to be used with this equipment. The relevant national installation and/or equipment regulations shall be considered. A certified power supply cord is not lighter than ordinary polyvinyl chloride flexible cord according to IEC 60227 (designation H05VV-F 3G 1.0 mm²).
CLASS 1 LED PRODUCT
For users in the United Kingdom only
Safety Information
This appliance is supplied with a moulded three pin mains plug for your safety and convenience.
A 5 amp. fuse is fitted in this plug. Should the fuse need to be replaced please ensure that the replacement fuse has a rating of 5 amps. and that it is approved by ASTA or BSI to BS1362. Check for the ASTA mark for the BSI mark on the body of the fuse. If the plug contains a removable fuse cover you must ensure that it is refitted when the fuse is replaced. If you lose the fuse cover the plug must not be used until a replacement cover is obtained. A replacement fuse cover can be purchased from your local Panasonic Dealer.
If the fitted moulded plug is unsuitable for the socket outlet in your home then the fuse should be removed and the plug cut off and disposed of safely.
There is a danger of severe electrical shock if the cut off plug is inserted into any 13 amp. socket.
If a new plug is to be fitted please observe the wiring code as shown below. If in any doubt please consult a qualified electrician.
WARNING: This appliance must be earthed.
IMPORTANT: The wires in this mains lead are coloured in accordance with the following code.
Green-and-Yellow: Earth
Blue: Neutral
Brown: Live
As the colours of the wire in the mains lead of this appliance may not correspond with the coloured markings identifying the terminals in your plug, proceed as follows.
The wire which is coloured Green-and-Yellow must be connected to the terminal in the plug which is marked with the letter E or by the Earth symbol or coloured Green or Green-and-Yellow.
The wire which is coloured Blue must be connected to the terminal in the plug which is marked with the letter N or coloured Black.
The wire which is coloured Brown must be connected to the terminal in the plug which is marked with the letter L or coloured Red.
How to replace the fuse:
Open the fuse compartment with a screwdriver and replace the fuse.

Never remove the cover, take apart or modify the product. This will void the warranty.

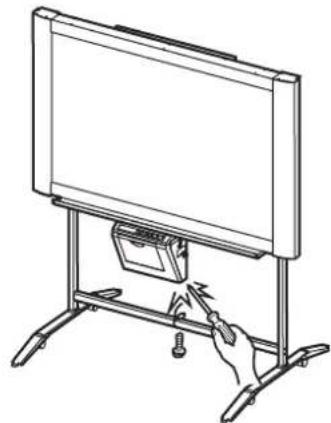
Do not position the electronic board in a location where it is unstable.


Do not put drinks, other liquids or heavy items on the tray or screen.


After installing or moving the electronic board, lock the casters and set the fall-prevention extension legs.

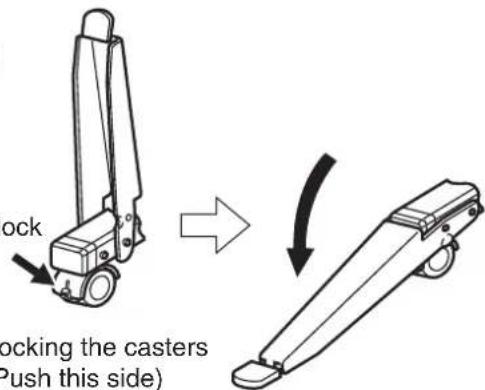
Do not use the electronic board in an excessively humid or dusty location.


If the electronic board is not going to be used for an extended period of time (e.g., during extended holidays), turn off the power and remove the plug from the wall outlet.

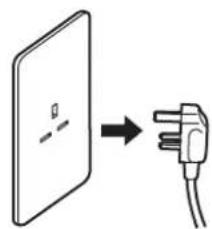
Do not lean against the screen or on the cover (lower), even if the electronic board is mounted on the wall.

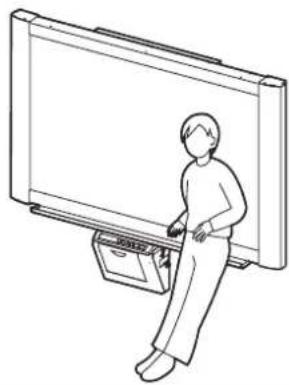
CD-ROM
To prevent the CD-ROMs from accidental damages:
Do not touch or write on the surface of the disc.  | Do not leave the disc out of the protective case.  | Do not leave the disc in direct sunlight or near heat sources.  |
Do not place heavy objects on the disc case or drop the case.  | To clean the disc, hold the disc by its edges and wipe it from the center to the edges with a dry, soft cloth.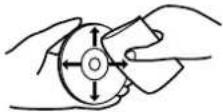 |
Information on Disposal for Users of Waste Electrical & Electronic Equipment (private households)

This symbol on the products and/or accompanying documents means that used electrical and electronic products should not be mixed with general household waste.
For proper treatment, recovery and recycling, please take these products to designated collection points, where they will be accepted on a free of charge basis. Alternatively, in some countries you may be able to return your products to your local retailer upon the purchase of an equivalent new product.
Disposing of this product correctly will help to save valuable resources and prevent any potential negative effects on human health and the environment which could otherwise arise from inappropriate waste handling. Please contact your local authority for further details of your nearest designated collection point.
Penalties may be applicable for incorrect disposal of this waste, in accordance with national legislation.
For business users in the European Union
If you wish to discard electrical and electronic equipment, please contact your dealer or supplier for further information.
Information on Disposal in other Countries outside the European Union
This symbol is only valid in the European Union.
If you wish to discard this product, please contact your local authorities or dealer and ask for the correct method of disposal.
| Installation | ·Do not install the unit where it may be exposed to direct sunlight, near heating equipment, or near air-conditioning vents as this may cause stretching and/or discoloration of the screen.·Do not install the unit in strong sunlight or strong lighting. Proper copying may become impossible.·Do not install the unit in locations where the temperature may change suddenly as this may disable the unit's ability to make copies. |
| Screen Film | ·Make thick and dark lines inside the copying area. Note that any writing inside the shaded area (on right) cannot be copied.·Do not allow writing to remain on the screen for an extended period of time as it will become harder to erase.·Do not touch the screen, write with markers, or erase while the screen is moving as this may result in damage to the unit.·Do not erase with an overly dirty eraser (see page 24).·Do not attach chart paper to the screen film for copying as this may result in damage to the unit. 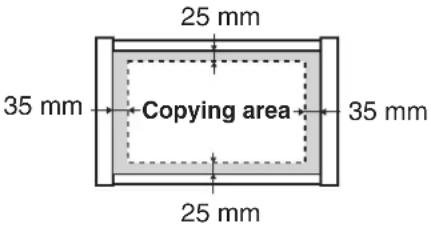 |
| Markers, Erasers and Thermal Transfer Film | ·Use only the included or designated markers, erasers and thermal transfer film. (See page 28.) Use of accessories other than those included or designated (such as oil-based markers) may damage the screen or result in hard-to-erase markings.·Do not store the thermal transfer film in a location subject to extreme changes in temperature (such as near air conditioning or heating equipment) as this may cause condensation on the thermal transfer film and result in poor print quality and/or paper jams.·The length of one roll of designated thermal transfer film (Replacement film: UG-6001) is approximately 50 meters. One roll of thermal transfer film can make approximately 150 sheets of copies. Note that the total number of copies may differ depending on the operating conditions. Also note that the length of the thermal transfer film supplied with the unit is shorter than the replacement film roll and is only approximately 10 meters.·Store markers horizontally as vertical storage may stop the ink from coming out. |
| Power Cord | ·When moving the unit, disconnect the power cord from the electrical power socket and from the printer's power connector and coil it for transportation as stepping on the power cord or having it catch on something during movement may result in damage to the cord. |
| Replacing the Thermal Transfer Film | ·Dispose of the used thermal transfer film in a trash receptacle for burnable trash.·A negative of the copied image will remain on the thermal transfer film. (To protect the security of your information, we recommend cutting up the used thermal transfer film with scissors or shredder before disposing of it.) |
| USB Cable | ·Use a shielded USB cable that is certified as logo by USB-IF.·If you connect the electronic board to a USB hub, it is not guaranteed to work.·Do not connect two or more Panasonic electronic boards to a computer. It may cause the computer operation to become unstable. |
Part Names and Functions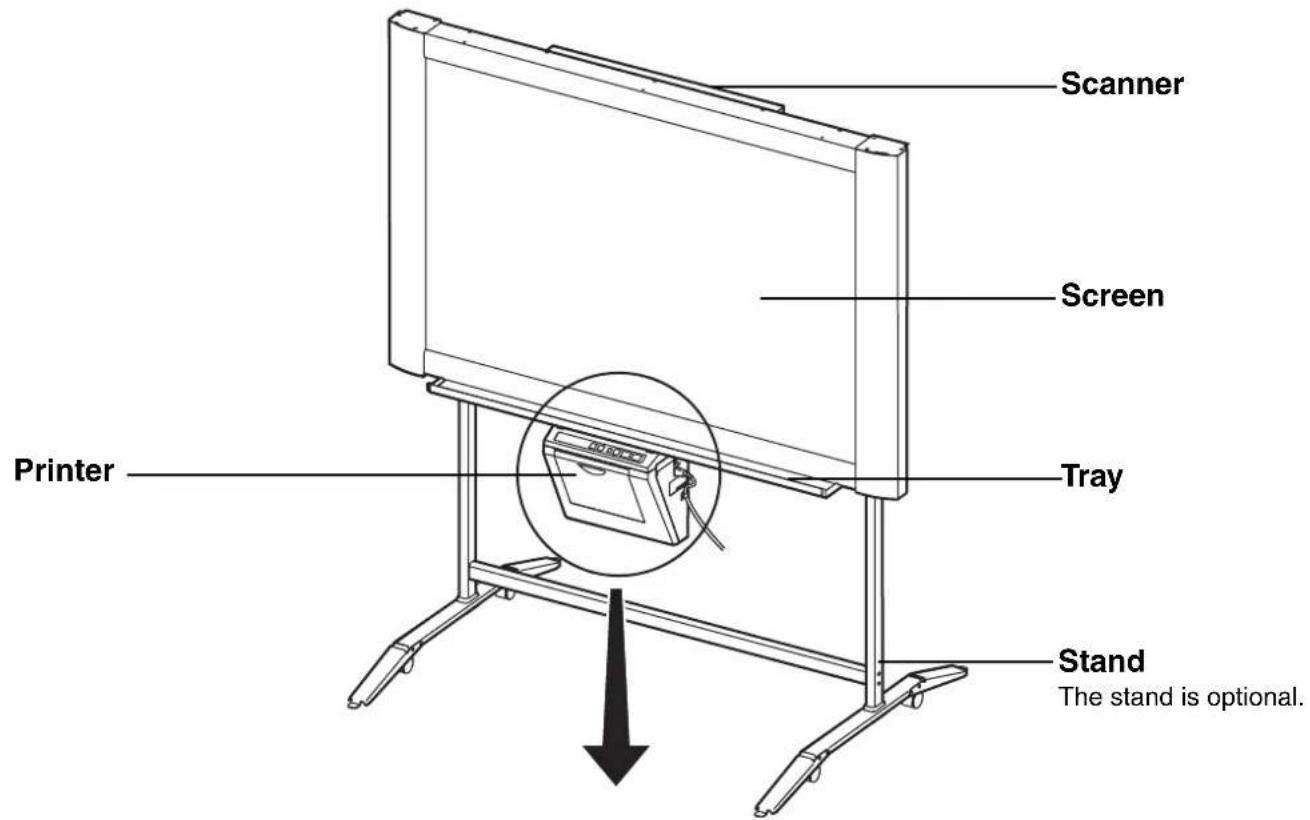
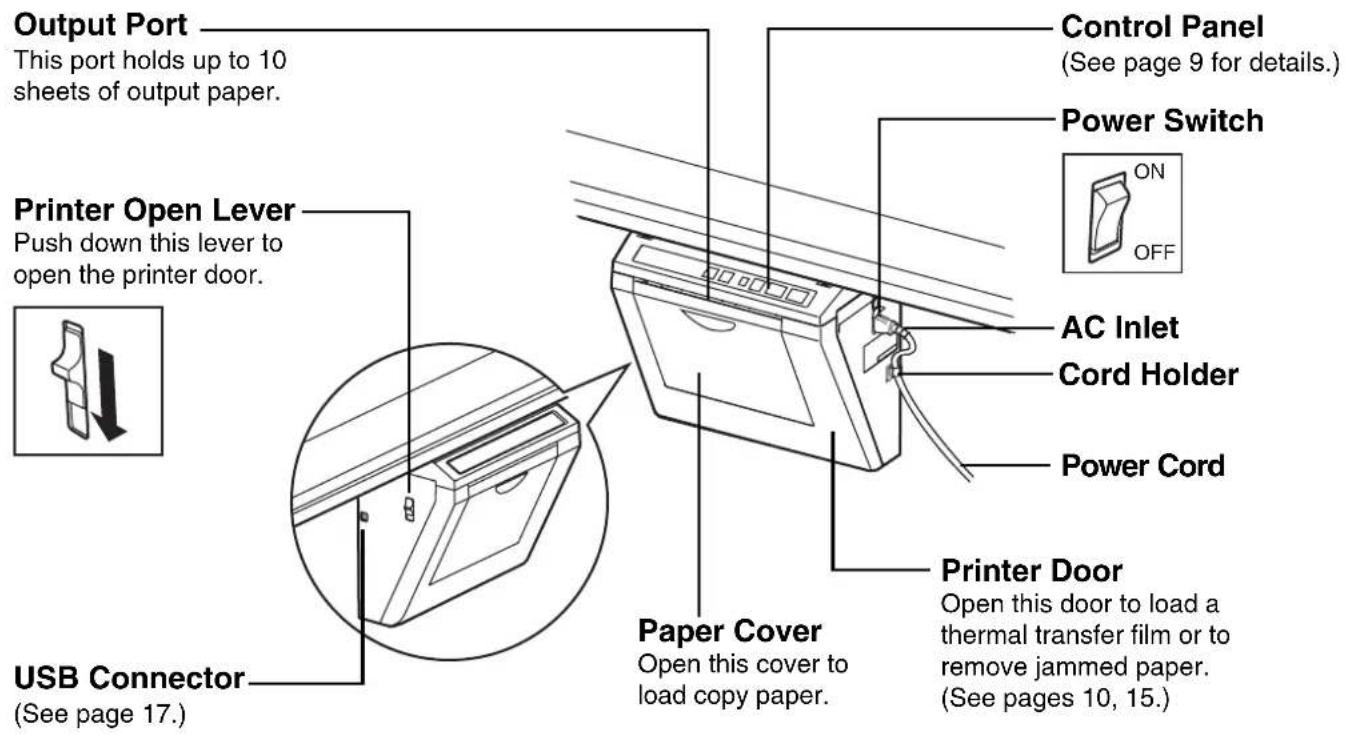
■Control panel

| Panel | Name Description | |
| 1 Contrast/ Remaining Film Indicator | This lamp indicator notifies the user when the time to replace the thermal transfer film is approaching (estimated) and of the printing contrast used during copying.Indicator off: Normal printing contrastIndicator on: Darker than normal printing contrastIndicator flashing*: Almost time to replace the thermal transfer film(Note that only about 15 more sheets may be copied when this indicator starts flashing.)Replacement film (UG-6001) is separately available from the dealer where you purchased your unit.* The flashing indicator will go out after the power is turned off, or the printer has been opened and closed. (When copying is performed, this indicator will begin flashing again.) | |
| 2 Contrast Key | Each time this key is pressed, the unit will alternate between normal and dark contrast modes (Normal/Dark). | |
| 3 2-Screen Copy Key | This key causes the front and back of the screen to be copied on a single sheet of paper. | |
| 4 Multi-Copy/ Error Indicator | This indicator displays the number of copies to be made. The display changes each time the Multi-Copy/Stop Key is pressed.Example: 1 → 2 → ... → 9 → 1 → ...When an error occurred, a flashing symbol will appear in this display to indicate the error status. (See page 27.) | |
| 5 Multi-Copy/ Stop Key | When making multiple copies, press this key until the desired number of copies is displayed on the Multi-Copy/Error Indicator. This key can also be pressed to stop copying while executing multiple copies.The display changes as shown below each time the screen is copied. After reaching 0, the display will reset to 1.Example: 5 → 4 → 3 → 2 → 1 → 0 → 1(Number is counted down.) | |
| 6 Copy Key | This key causes the screen to be copied. | |
| 7 Advance Key | Pressing this key advances the screen from right to left. |
Installing the Thermal Transfer Film
Install the thermal transfer film in the printer.
1 Set the power switch to on (I).
- "/" will flash on the Multi-Copy/Error Indicator when the thermal transfer film has run out.
- The screen will move to home position and stop.
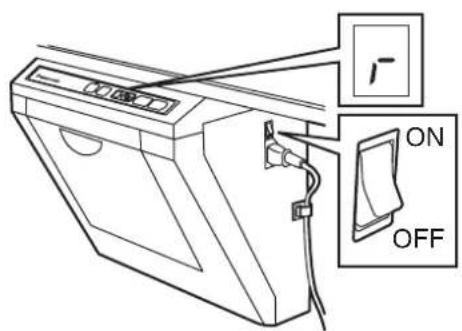
2 Push down the printer open lever and open the printer door.

3 Install the thermal transfer film.
1) Set the thermal transfer film, with the blue gear in front, on the right.

2) Insert the blue shaft into the front left hole.

3) Place the blue gear on the front right groove.

4) Place the white shaft on both sides of the back grooves.

4 Tighten the film, then close the printer door.
1) Rotate the blue gear in the direction of the arrow to take up the slack on the film.

- If a slack remains, perform step 3-2) through 4-1) again.
2) Securely close the printer door by using both hands until a click is heard.
The “” flashing on the Multi-Copy/Error Indicator will go out.

Note
- If “1” is still flashing after closing the printer door, make sure that the thermal transfer film has been installed properly and tightened.
- The printer door should be closed to make copies properly. Confirm both latches are locked.
Loading Copy Paper
It is possible to load up to 40 sheets of A4 (Letter*) size copy paper [assuming a paper weight of 80 g/m²]. Note that only A4 (Letter*) size paper may be used. When the unit is first used or when "P" flashes on the Multi-Copy/Error Indicator to indicate that the unit is out of paper, load copy paper as described below.
* Letter size is for U.S.A. and Canada models.
Notes on Loading Copy Paper
Follow the guidelines below to ensure smooth and accurate printing by the unit.
- Only use A4 (Letter) size copy paper having a weight of 60 g/m² to 90 g/m² as the copy paper for this unit.
- Do not simultaneously load paper of varying type and thickness as this may result in paper jams.
- Before adding copy paper, be sure to remove all the copy paper remaining inside the unit's paper cover. (Note that copy paper will slightly resist being removed, but may be pulled out without problems.) After removing the copy paper, stack the removed paper together with the new paper, fan it thoroughly, square it and reload.
DO NOT USE THE FOLLOWING TYPES OF PAPER
• Extremely smooth or glossy paper - Coated paper - Thermal paper • Paper that is printed on one side - Wrinkled paper, creased paper, etc.
1 Set the power switch to on (I).
- “P” will flash on the Multi-Copy/Error Indicator when copy paper has run out.
- The screen will move to home position and stop.

2 Pull the paper cover forward as shown in the figure.

3 To prevent paper jams such as those caused by multiple sheets feeding at once, fan the paper thoroughly, square it, align it with the guide inside, and insert as far as it will go.

Note
- Only use A4 (Letter*) size copying paper having a weight of 60 g/m² to 90 g/m² as the copy paper for this unit.
* Letter size is for U.S.A. and Canada models.
- Do not stack more copy paper in the unit than the maximum paper limit indicated by the guide (see the above figure) as this may result in paper jams. [Note that the unit can hold about 40 sheets of paper having a weight of 80 g/m².]
4 Close the paper cover until a click is heard.
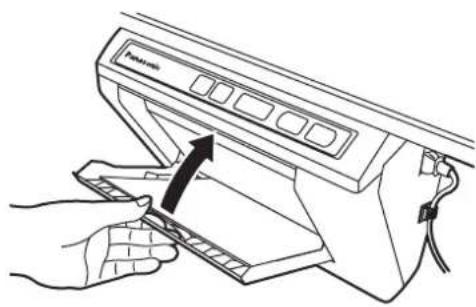
Note
- Close the paper cover, or the unit will not work properly.
- The paper cover should be closed to make copies properly. Confirm the both latches are locked.
Making Copies
This section describes how to copy text and illustrations drawn on the screen.
1 Set the power switch to on (1).
- “?” will light on the Multi-Copy/Error Indicator to indicate that the unit is ready to copy. - The screen will move to home position and stop.

2 Press the Copy Key
- Text and illustrations on the screen will be copied and copies emerge from the output port. - The output port can hold up to 10 sheets of copy paper. (Note that exceeding the output port's capacity may result in paper jams.) - For details on making multiple copies, 2-screen copies and so on, see "Copy types and procedures" on this page.

Note
- Do not use paper that has been copied on one side by this printer as copy paper in this unit or in any other copiers or printers as this may result in dirty rollers, degradation of printing quality, paper jams, and streaks and smudges on output paper. - Do not write on the back side of the output paper from this unit. The printed ink may be transferred underneath the paper. - Text or images in shades of yellow will not copy.
■Copy types and procedures
[A] Copying the front of the screen
1)

[B] Copying the back of the screen
1) Press to move the screen to be copied to the front. 2) Press.
[C] Making multiple copies (up to 9)
1) Select the number of copies (1 to 9) by pressing as necessary. 2) Press. Press to stop copying in mid-operation.
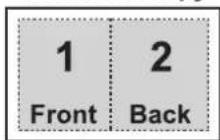
[D] Making 2-screen copies
Copying the front and back of the screen on a single sheet of paper
1)

2-Screen Copy
Replacing the Thermal Transfer Film
The unit is capable of producing about 15 more copies when the Contrast/Remaining Film Indicator begins to flash. The unit has run out of thermal transfer film and can no longer make copies when the Multi-Copy/Error Indicator flashes “”. Separately available replacement film (UG-6001) may be purchased from the dealer where you purchased the unit. Thermal transfer film is replaced as follows.
Notes on Replacing Thermal Transfer Film
- Only use the designated product (UG-6001) from Panasonic as the replacement film. (Note that using another type of replacement film may result in degraded printing quality or damage to the unit.)
- Thermal transfer film is disposable. Dispose of used thermal transfer film as “burnable” or “non-recyclable” rubbish.
- A negative of the copied image will remain on the thermal transfer film. To protect the security of your information, we recommend cutting up the used thermal transfer film with scissors or shredder before disposing of it.
1 Push down the printer open lever to open the printer door, and remove the used film.

2 Refer to steps 3 and 4 in the section of "Installing the Thermal Transfer Film" on page 10.
Note
- If “ 1 ” is still flashing after closing the printer door, make sure that the thermal transfer film has been installed properly and tightened.
- The printer door should be closed to make copies properly. Confirm both latches are locked.
Paper Jams
Remove paper jams by the following procedure when copy paper does not come out of the output port or when “_” flashes on the Multi-Copy/Error Indicator.
1 Push down the printer open lever to open the printer door.

2 Remove the thermal transfer film with both hands.

3 Remove the jammed paper.

4 Install the thermal transfer film.
- Refer to steps 3 and 4 in the section of "Installing the Thermal Transfer Film" on page 10.
- The "U" flashing on the Multi-Copy/Error Indicator will go out.
Note
- If the "U" is still flashing after closing the printer door, make sure that the thermal transfer film has been installed properly and tightened.
- The printer door should be closed to make copies properly. Confirm both latches are locked.
If the flashing "U" does not go out after the foregoing procedure has been performed, this may indicate that the paper feeder is not functioning properly.
Reload the copy paper by following the steps given below.
1 Turn the power off.

2 Open the paper cover and remove all the copy paper remaining inside the unit's paper cover.
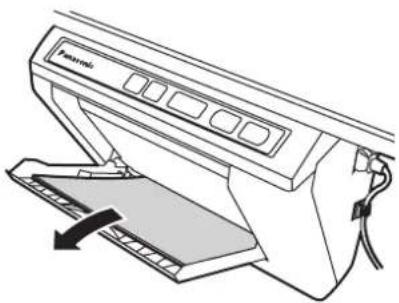
Note
- The copy paper will slightly resist being removed, but may be pulled out without problems.
3 To prevent paper jams such as those caused by multiple sheets feeding at once, fan the paper thoroughly, square it, align it with the guide inside, and insert as far as it will go.

Note
- Do not stack more copy paper in the unit than the maximum paper limit indicated by the guide (see figure) as this may result in paper jams. [Note that the unit can hold about 40 sheets of paper having a weight of 80 g/m².]
4 Close the paper cover until a click is heard.

Note
- Close the paper cover, or the unit will not work properly.
- The paper cover should be closed to make copies properly. Confirm both latches are locked.
5 Turn the power on.
- "?" will light on the Multi-Copy/Error Indicator to indicate that the unit is ready to copy.
- The screen will move to home position and stop.

Computer Interfacing
- Panasonic Document Management System (hereafter Panasonic-DMS) uses the TWAIN driver to scan images drawn on the screen.
- The Panasonic-DMS has a capability of managing documents (image files).
- The printer driver allows the printer to print documents from your computer.
■ System requirements
| Computer | IBM PC/AT or compatible machine with a CD-ROM drive |
| CPU | Pentium® II or higher processor |
| Interface U | SB 1.1 or USB 2.0 * 1 |
| OS | Windows® 98* 2 / Windows Me* 3 / Windows 2000* 4 / Windows XP* 5 |
| Memory | 64 MB or more (Windows 98 / Windows Me)128 MB or more (Windows 2000)256 MB or more (Windows XP) |
| HD | At least 40 MB free space (except saving space for image file) |
*1 This electronic board functions with USB 1.1. *2 Microsoft® Windows® 98 operating system (hereafter Windows 98) *3 Microsoft® Windows® Millennium Edition operating system (hereafter Windows Me) *4 Microsoft® Windows® 2000 operating system (hereafter Windows 2000) *5 Microsoft® Windows® XP operating system (hereafter Windows XP)
■Contents of CD-ROM
The provided CD-ROM includes the following items.
- USB driver
- Printer driver
- TWAIN driver • Panasonic-DMS software • Panasonic-DMS manual • Electronic board operating instructions
Notes when connecting the electronic board to a computer
- First install the USB, printer and TWAIN driver to your computer, then connect the electronic board to the computer (refer to "Installing the drivers" on page 18).
- If you connect the electronic board to a USB hub, it is not guaranteed to work.
- Do not connect two or more Panasonic electronic boards to a computer. It may cause the computer operation to become unstable.
- Use a shielded USB cable that is certified as logo by USB-IF.
■Installing the drivers
Before you use the computer interfacing function for the first time, install the USB, printer and TWAIN driver to your computer by following procedures.
Note
- Do not yet connect a USB cable to the electronic board.
1 Power on your computer and start Windows * 1.
- Log on as an administrator for Windows 2000 or Windows XP.
*1 Microsoft® Windows® operating system (hereafter Windows)
2 Insert the CD-ROM into the CD-ROM drive. The Setup window will appear automatically.
- Depending on the operating system or the settings that you are using, the Setup window may not appear automatically. In such a case, execute "Menu.exe" in the CD-ROM from the Explorer.
3 When "Welcome" window appears, click [Next].
4 Click [Panaboard Setup].
• To install the Panasonic-DMS software, click [Panasonic-DMS] (see page 19).
• To read the operating instructions in the provided CD-ROM, the Adobe Reader or Acrobat Reader must be installed in your computer. It can be downloaded from the Adobe's Web site if Internet is available.

5 Click [Install Drivers].

6 Read "Software License Agreement" carefully and click [Yes].
7 When the following window appears, check that the electronic board is not connected to your computer and click [OK].
- If the USB cable is connected to the electronic board, remove it and click [OK].
- For Windows 98 or Windows Me, a floppy disk or CD-ROM for installing the operating system may be required.
- If the screen prompts to restart Windows, restart Windows.

8 When the following window appears after files are copied, power the electronic board on, and connect a USB cable from the electronic board to your computer.
- Use a shielded USB cable that is certified as logo by USB-IF.
![Drivers Installation Finally, operate the following procedure. Then, please wait until this window is closed automatically. 1. Power on the electronic board. 2. Connect the electronic board and the computer with the USB cable. 3. Do not click [Cancel] until the installation of all drivers is complet…](/content/2026/05/845958/images/10d022309f64f613289511666d853d86e8d8165ce900a6885f126b17c66d266c.jpg)
9 Follow the on-screen instructions if the wizard windows appear.
- If the wizard window is displayed to select the file (##.inf) for the printer driver in Windows XP, select "windows\info\oem##.inf".
- If the wizard window is displayed to connect to the Windows Update in Windows XP SP2, select [No].
- If the warning dialog is displayed in Windows 2000 / Windows XP, select [Yes] or [Continue Anyway] to continue the installation.
- The new hardware wizard windows may be displayed several times depending on the operating system.
- For Windows 98 or Windows Me, a floppy disk or CD-ROM for installing the operating system may be required.
10 When the installation is completed, click [OK].
■Installing the software
When Panasonic-DMS is already installed, leave it (do not uninstall it) and install the new software in the same folder to overwrite it.
1 Power on your computer and start Windows.
- Log on as an administrator for Windows 2000 or Windows XP.
2 Insert the CD-ROM into the CD-ROM drive. The Setup window will appear automatically.
- Depending on the operating system or the settings that you are using, the Setup window may not appear automatically. In such a case, double click "Menu.exe" in the CD-ROM from the Explorer.
3 When "Welcome" window appears, click [Next].
4 Click [Panasonic-DMS].
- To install the USB, printer and TWAIN driver, click [Panaboard Setup] (see page 18). • To read the operating instructions in the provided CD-ROM, the Adobe Reader or Acrobat Reader must be installed in your computer. It can be downloaded from the Adobe's Web site if Internet is available.

5 Click [Install Panasonic-DMS Software].
6 Click [Install].
- To install the Panasonic-DMS Manual, check the [Operating Instructions] check box.

7 Read "Software License Agreement" carefully and click [Yes].
8 Follow the on-screen instructions when messages appear.
9 When the setup process is completed, restart Windows.
- About the Panasonic-DMS, refer to the Document Manager System operating instructions in the CD-ROM.
■Removing the drivers
If you need to remove the USB driver, printer driver and TWAIN driver, perform the following steps.
1 Power on your computer and start Windows.
- Log on as an administrator for Windows 2000 or Windows XP.
2 Click [Start], and then click Control Panel in Settings.
- For WindowsXP, click [start], and then click Control Panel.
3 Double-click Add / Remove Programs icon (Windows XP: Add or Remove Programs) in the Control Panel.
4 Select Panaboard UB5-7 Driver in the Add / Remove Programs list, and click [Add / Remove].
5 Follow the instructions on the screen.
6 After uninstalling, restart your computer.
■ Removing the software
If you need to remove the Panasonic-DMS software, perform the following steps.
1 Power on your computer and start Windows.
- Log on as an administrator for Windows 2000 or Windows XP.
2 Click [Start], move the pointer to [Programs]–[Panasonic]–[Panasonic Document Management System]–[Uninstall]. (For Windows XP, [All Programs] instead of [Programs].)
3 Click [OK].
4 After uninstalling, restart your computer.
■ Scanning
You can scan images on the screen to your computer by operating Panasonic-DMS.
1 Click [Start], move the pointer to [Programs]–[Panasonic]–[Panasonic Document Management System]–[Document Manager]. (For Windows XP, [All Programs] instead of [Programs].) • The Panasonic-DMS software runs. 2 Click the [File] menu, then click [Select Source...]. 3 Select [Panaboard UB5-7 USB TWAIN Driver] and click [Select]. 4 Click the [File] menu, then click [Acquire Image...], or click the scanner icon on the Toolbar.
• The Panaboard Operation Panel will appear.

Note
- When the Panaboard Operation Panel is not displayed, check the USB cable connection or the condition of the electronic board.
5 Click the (Scan) button or the (2-Screen Scan) button.
- Scanning starts and the scanned image will be displayed on the screen of the computer. It is also possible to start scanning using the Copy Key or 2-Screen Copy Key on the electronic board.

6 Click [Close] on the Panaboard Operation Panel to finish scanning.
- About the Document Manager, refer to the Document Manager System operating instructions in the CD-ROM.
Note
- Dragging the Panaboard Operation Panel using the mouse or activating other software programs during scanning may cause scanning troubles.
■Panaboard Operation Panel
It is possible to perform the same operations as with the electronic board control panel (page 9) from the following Panaboard Operation buttons.
Note
- While the Panaboard Operation Panel is displayed, the Copy Key and 2-Screen Copy Key on the electronic board control panel are used for scanning images into the computer.
| Panel Name Description | ||
 | Contrast/ Remaining Film Indicator | This lamp indicator notifies the user when the time to replace the thermal transfer film is approaching (estimated) and of the contrast used during scanning or copying.Indicator off: Normal scanning or copying contrastIndicator on: Darker than normal scanning or copying contrastIndicator flashing*: Almost time to replace the thermal transfer film(Note that only about 15 more sheets may be copied when this indicator starts flashing.)Replacement film (UG-6001) is separately available from the dealer where you purchased your unit.* The flashing indicator will go out after the power is turned off, or the printer has been opened and closed. (When copying is performed, this indicator will begin flashing again.) |
 | Contrast Button | Each time this button is pressed, the unit will alternate between normal and dark contrast modes (Normal/Dark). |
 | 2-Screen Scan Button | This button scans the front and back of the screen on a single page. |
 | Multi-Copy/ Error Indicator | This indicator displays the number of copies to be made.The display changes each time the Multi-Copy/Stop Button is pressed.Example: 1 → 2 → ... → 9 → 1 → ...When an error occurs, a flashing symbol will appear in this display to indicate the error status. (See page 27.) |
 | Multi-Copy/Stop Button | When making multiple copies, press this button until the desired number of copies is displayed on the Multi-Copy/ Error Indicator. This button can also be pressed to stop copying while executing multiple copies.The display changes as shown below each time the screen is copied. After reaching 0, the display will reset to 1.Example: 5 → 4 → 3 → 2 → 1 → 0 → 1(Number is counted down.)* If scanning, the setting 1 to 9 for the number of copies is ignored. |
 | Scan Button This | button scans the screen. |
| Panel | Name | Description |
| Advance Button | Clicking this button advances the screen from right to left. | |
| 2-Screen Copy Button | This button causes the front and back of the screen to be copied on a single sheet of paper. | |
| Copy Button This | button causes the screen to be copied. | |
| Stand by | Status Box | The status box displays the status of the TWAIN driver and the electronic board.Stand by: The electronic board is stand by.Both of the Panaboard Operation Panel and the electronic board control panel are operational.Rotating: The electronic board is rotating the screen.Copying: The electronic board is copying the screen.Scanning: The electronic board is now scanning the images on the screen.Converting: Indicates that the image data is being converted so that the computer will be able to display the scanned data.Busy: The electronic board is processing jobs.Error: An error has occurred with the electronic board. |
| About... | About Button | Click to display information about the TWAIN driver. |
| Close | Close Button | Click to close the Panaboard Operation Panel. |
■Printing
To print documents from the computer to the printer, select the Print menu of the application software and select the printer name set when installing.
The standard printer name is "Panaboard-UB5 USB Printer (A4/Letter)*".
* A4 or Letter changes with the models.
Note
- The Multi-Copy/Error Indicator flashes when printing. After printing, all the panel keys are disabled until the Multi-Copy/Error Indicator lights.
- You cannot stop printing after printing starts. Do not attempt to stop printing.
- Do not turn off the power of the electronic board or unplug the USB cable before printing finishes. It may cause the computer operation to become unstable. • A maximum of 9 copies are available.
- The output port can hold up to 10 sheets of copied paper. (Note that exceeding the output port's capacity may result in paper jams.)
- The Contrast Key is not effective for adjusting the contrast of print.
- When printing almost black pages continuously, uniform colour density and light line streaks may appear. In such a case, try again after waiting a while.
- When the unit falls in abnormal condition during printing, printing jobs (jobs in the spooler) may be lost. In such a case, print again.
Daily Care and Maintenance
Always turn off the power switch and unplug the power plug when cleaning outside and inside the unit.
■ Cleaning the screen and the unit
Gently wipe the screen film and unit with a water-dampened cloth that has been thoroughly wrung.

Note
- Use a neutral kitchen cleaner diluted with water for hard-to-clean stains. If you accidentally write on the screen with an oil-based marker, wipe with a small amount of ethyl alcohol.
- Do not use thinner, benzene, or cleaners containing abrasives as this may result in discoloration.
- Do not wipe the screen film with a dry cloth as this may generate a static charge.
■ Caring for the eraser
When the erasing surface of the eraser becomes dirty, hold down the sheet under the top sheet with your finger and peel off the dirty sheet (white or gray sheet) by pulling in the direction of the arrow.

Note
- Be sure to peel off only one sheet; white or gray sheet of the eraser.
- When the eraser becomes thin, make sure that the corners of the eraser do not strike the screen during erasing as this may damage the screen.
■ Cleaning the printer head, platen roller and pick-up roller
If black streaks appear on the copy, clean the printer head and the platen roller.
If paper jams occur frequently, clean the pick-up roller.
1. Push down the printer open lever and open the printer door.
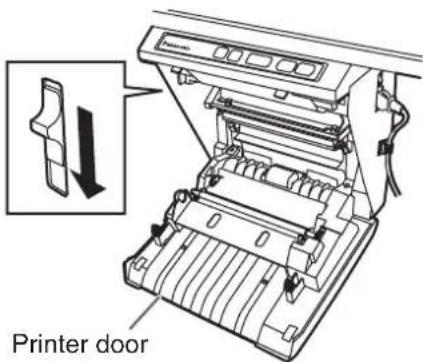
2.
Clean the Printer Head
Dampen the tip of a cotton swab in ethyl alcohol and gently wipe the printer head.

Note
- Never touch the printer head or the surrounding area with your hands as this may disable copying.
3
Clean the Platen Roller and the Pick-up Roller
Remove the thermal transfer film with both hands and carefully wipe any dirt or stains off the platen roller and pick-up roller.

- For details on removing the thermal transfer film, see page 14.
- Dampen a soft cloth with neutral kitchen cleaner diluted in water, wring the cloth thoroughly, and wipe the entire surface of the rollers while rotating them. If this does not remove all dirt, wipe with a cloth dampened with ethyl alcohol.
4
Install the thermal transfer film in its original position and close the printer door.

- For details on installing the thermal transfer film, see pages 10.
- Close the printer door firmly until a click is heard.
Note
- If “” is still flashing after closing the printer door, make sure that the thermal transfer film has been installed properly and tightened.
- The printer door should be closed to make copies properly. Confirm both latches are locked.
Troubleshooting
Treat problems according to the information given in the table below. If problems still persist, call your dealer for service.
| Symptom Care and Remedy | See Page | |
| Power switch is on but the indicator is off. | Check that the power plug is securely plugged in.(If the indicator still does not light, turn the power off and on again.) | - |
| Copied copy paper will not come out. | The unit is out of copy paper or thermal transfer film. (The Error Indicator flashes “P or “.”)→ Insert copy paper or replace the thermal transfer film. | 1114 |
| The printer door is open. (The Error Indicator flashes “D)→ Close the printer door firmly until a click is heard. | 11 | |
| The paper cover is open.→ Close the paper cover firmly until a click is heard. | 12 | |
| Paper is jammed in the printer. (The Error Indicator flashes “U)→ Open the printer door and remove the jammed paper. | 15 | |
| The platen roller and pick-up roller are dirty.→ Open the printer door and wipe the platen roller and the pick-up roller to clean them. | 24 | |
| Nothing is printed on the paper or copies are faint or blurred. | The writing on the screen is too thin or light.→ Make thicker, darker lines or change to a new marker. | - |
| The printer door is slightly open.→ Close the printer door firmly until a click is heard. | 11 | |
| Black streaks or blank(unprinted) spots appear on the copy (copy paper is dirty). | The printer head or platen roller is dirty.→ Open the printer door and clean any dirt off the printer head and platen roller. | 24 |
| The thermal transfer film is wrinkled because it was set in place without removing excess slack.→ Rewind the used portion of the thermal transfer film to remove the excess slack, then reattach it. | 10 | |
| A black or white horizontal line appears, or the page prints in black or blank. | The unit is in strong sunlight or strong lighting.→ Change the direction of the screen or block the light. | - |
| The screen does not advance when the Copy or Advance Key is pressed. | Static electricity was generated when the screen film was wiped.→ Turn off the power and slowly move the screen by hand. | - |
| Contrast/Remaining Film Indicator flashes. | The time to replace the thermal transfer film is approaching. (Only about 15 more sheets may be copied.)→ Prepare a new replacement film (UG-6001). | 14 |
| When connecting a USB cable after installing the driver, the warning message is displayed to require the Panaboard UB5-7 Driver Disk. | The necessary file is not found in Windows 98.→ Click the location's box and select the pass“UB5-7\UsbDrv\Win98-Me” in the pull down menu. | - |
| The software installed before is deleted from the Programs menu or cannot be used after installing the Panasonic-DMS. | After the existing Panasonic-DMS software is uninstalled, the new Panasonic-DMS is installed.→ Install the new Panasonic-DMS again as follows.1. Uninstall the current Panasonic-DMS.2. Install the old Panasonic-DMS.3. Install the new Panasonic-DMS in the same folder with the old one. | 19-20 |
| Panasonic Document Management System menu is remained in the Programs menu even if Panasonic-DMS is uninstalled. | The old Panasonic-DMS is not uninstalled if the old version of the Panasonic-DMS has been installed before installing the new one.→ Uninstall the old Panasonic-DMS from the Add / Remove Programs of the Control Panel. (Refer to “Removing the drivers” on page 20 and remove Panasonic-DMS instead of Panasonic UB5-7 Driver.) | 20 |
| The USB driver or printer driver does not work properly immediately after the installation of the software. | The Panaboard has not been registered in [Control Panel]–[Scanners and Cameras] and [Printers].→ Run “UB5-7\Uninstall\UB5-7Uninst.exe” in the CD-ROM to uninstall the drivers from the computer. Then, install the drivers. | 18 |
| The computer does not recognize the electronic board. | Check that the electronic board is in the condition that enables operation or that the USB cable is connected properly. | - |
| The electronic board is connected via a USB hub.→ Do not connect via a USB hub. | - | |
■Meanings of error codes
The following table describes the meaning of each of the symbols which may flash in the Multi-Copy/Error Indicator.
| Indication Cause Remedy | See Page | ||
 (Error) (Error) | Data transfer error Connect the USB cable securely. 17 | ||
 (Screen) (Screen) | The screen will not move. | Turn off the power and slowly move the screen by hand. | - |
 (door) (door) | The printer door is not closed securely. | Close the printer door securely. 11 | |
| [YSYA](Jam) | Paper jam | Open the printer door and remove the jammed paper. | 15 |
| [5283](ribbon) | The thermal transfer film is slack, has run out or is not installed. | Remove the slack from the thermal transfer film, replace or install the thermal transfer film. | 1014 |
| [8077](Paper) | Out of paper Load copy paper. 11 | ||
| [CD26](Scanner Failure) | The scanner or screen is in strong sunlight or strong lighting. | Change the direction of the screen or block the light. | - |
If other indications such as “” appear, call your dealer.
Specifications
| Model No. UB-5325 UB-5825 | |||
| General | Power supply Refer to the name plate on the printer | ||
| Power consumption (Operational) | Refer to the name plate on the printer | ||
| External dimensions (Height × Width × Depth, without stand) | 1396 mm × 1550 mm × 230 mm | 1396 mm × 1912 mm × 230 mm | |
| Mass (without stand) | 36.0 kg | 38.5 kg | |
| Ambient operating conditions Temperature: 10–35°C (50–95 °F) Humidity: 30–80% RH | |||
| Ambient storage conditions Temperature: -20–60°C (-4–140 °F) Humidity: 15–80% RH | |||
| Writing implements Dry erase felt-tipped markers (black, red, and blue) | |||
| PC interface USB 1.1 | |||
| Input Block | Panel dimensions (Height × Width) | 900 mm × 1400 mm (1664 mm diagoal) | 900 mm × 1762 mm (1978 mm diagoal) |
| Panel surfaces 2 | |||
| Panel advance system Endless scroll type | |||
| Copying area (Height × Width) | 850 mm × 1330 mm | 850 mm × 1692 mm | |
| Scanning system | Image sensors | ||
| Scanning resolution (Height × Width) | A4: 1.6 x 1.7 dots/mm Letter: 1.7 x 1.6 dots/mm | A4: 1.6 x 1.3 dots/mm Letter: 1.7 x 1.2 dots/mm | |
| Output Block | Printing system | Fusion thermal transfer type | |
| Printing resolution 8 dots/mm | |||
| Copy paper | Standard or recycled paper (60 - 90 g/m2) | ||
| Copy paper size | A4/Letter*1 | ||
| Copy colour | Black | ||
| Contrast adjustment | Two levels: Normal/Dark | ||
| 2-screen compressed copying | Yes | ||
| Time required for copying | 15 s/sheet | ||
| Continuous copies | 1 to 9 sheets | ||
| Paper empty indication | Yes | ||
■Option and Separately available
| Option | Stand: KX-B061 | |
| Wall-mounting Kit: KX-B063 | ||
| Separately Available | Replacement film: | UG-6001 (Set of 2 rolls [50 m]) |
| Markers: | KX-B031 (set of 10 black markers),KX-B032 (set of 10 red markers),KX-B033 (set of 10 blue markers) | |
| Erasers: | KX-B042 (set of 6 erasers) | |
| Marker and eraser set: | KX-B035 (contains one black, one red, and one blue markers and one eraser) | |
*1 Letter size is for U.S.A. and Canada models.


- PANASONIC®
- ELECTRONIC BOARD
- OPERATING INSTRUCTIONS
- PANABOARD
- RECORD THESE ITEMS FOR FUTURE REFERENCE
- ACCESSORIES
- Q'TY
- WARNING ABOUT SAVING DATA
- PLEASE OBSERVE CAREFULLY THE FOLLOWING PRECAUTION
- FOR YOUR SAFETY
- ENGLISH
- CAUTION
- WARNING
- FOR USERS IN THE UNITED KINGDOM ONLY
- SAFETY INFORMATION
- HOW TO REPLACE THE FUSE
- CD-ROM
- INFORMATION ON DISPOSAL FOR USERS OF WASTE ELECTRICAL & ELECTRONIC EQUIPMENT (PRIVATE HOUSEHOLDS)
- FOR BUSINESS USERS IN THE EUROPEAN UNION
- INFORMATION ON DISPOSAL IN OTHER COUNTRIES OUTSIDE THE EUROPEAN UNION
- CONTROL PANEL
- INSTALLING THE THERMAL TRANSFER FILM
- TIGHTEN THE FILM, THEN CLOSE THE PRINTER DOOR
- NOTE
- LOADING COPY PAPER
- NOTES ON LOADING COPY PAPER
- DO NOT USE THE FOLLOWING TYPES OF PAPER
- SET THE POWER SWITCH TO ON (I)
- MAKING COPIES
- COPY TYPES AND PROCEDURES
- REPLACING THE THERMAL TRANSFER FILM
- NOTES ON REPLACING THERMAL TRANSFER FILM
- PAPER JAMS
- COMPUTER INTERFACING
- CONTENTS OF CD-ROM
- NOTES WHEN CONNECTING THE ELECTRONIC BOARD TO A COMPUTER
- INSTALLING THE DRIVERS
- CLICK [INSTALL DRIVERS]
- INSTALLING THE SOFTWARE
- CLICK [INSTALL]
- REMOVING THE DRIVERS
- REMOVING THE SOFTWARE
- SCANNING
- PANABOARD OPERATION PANEL
- PRINTING
- DAILY CARE AND MAINTENANCE
- CLEANING THE SCREEN AND THE UNIT
- CARING FOR THE ERASER
- CLEANING THE PRINTER HEAD, PLATEN ROLLER AND PICK-UP ROLLER
- CLEAN THE PRINTER HEAD
- CLEAN THE PLATEN ROLLER AND THE PICK-UP ROLLER
- TROUBLESHOOTING
- MEANINGS OF ERROR CODES
Brand : PANASONIC
Model : UB-5825C
Category : Tablet