
FZ-N1 - Tablet PANASONIC - Free user manual and instructions
Find the device manual for free FZ-N1 PANASONIC in PDF.


| Product type | Rugged tablet |
| Brand | Panasonic |
| Model | FZ-N1 |
| Dimensions (L x W x H) | 203 x 132 x 18 mm |
| Weight | Approximately 540 g |
| Screen | 7-inch touchscreen |
| Power | Rechargeable lithium-ion battery |
| Battery life | Up to 10 hours |
| Operating system | Android |
| Water and dust resistance | IP65/IP67 |
| Shock resistance | Drops up to 1.5 m |
| Connectivity | Wi-Fi, Bluetooth, GPS, NFC |
| Camera | Front and rear |
| Sensors | Accelerometer, gyroscope, ambient light sensor |
| Maintenance and cleaning | Soft, dry cloth; avoid abrasive products |
| Security | Code lock, data encryption |
| Spare parts | Battery, screen, stylus replaceable |
| Warranty | 2 years |
| Operating temperature | -10°C to 50°C |
Frequently Asked Questions - FZ-N1 PANASONIC
User questions about FZ-N1 PANASONIC
0 question about this device. Answer the ones you know or ask your own.
Ask a new question about this device
Download the instructions for your Tablet in PDF format for free! Find your manual FZ-N1 - PANASONIC and take your electronic device back in hand. On this page are published all the documents necessary for the use of your device. FZ-N1 by PANASONIC.
USER MANUAL FZ-N1 PANASONIC
Panasonic®
Operating Instructions Basic Guide
Tablet Computer
Model No. FZ-N1 series
Thank you for purchasing a Panasonic product.
For optimum performance and safety, please read these instructions carefully.
For detailed information about this product, refer to the Reference Manual, which is available by tapping [Online Manual] in the product's app list. (Download required.)
Table of Contents
Introduction.... 3
Regulatory information.... 3
Handling cautions 5
Terms and illustrations in this document 9
Disclaimers 10
Getting Started.... 11
Confirming the included items 11
Description of parts.... 12
Opening and closing the interface cover 16
Removing and attaching the battery cover.... 17
Installing SIM cards (certain models only).... 19
Installing an SD card.... 20
Installing and removing the battery.... 22
Charging the battery.... 24
Turning the unit on and off.... 25
Home screen, status bar, notifications.... 26
Navigation and function buttons 27
Factory data reset.... 28
Troubleshooting 29
Appendix 33
Specifications.... 33
LIMITED WARRANTY.... 40
LIMITED WARRANTY / GARANTIE LIMITÉE...... 45
Introduction
Regulatory information
For USA
FCC RF exposure information
The highest SAR value for this product as reported to the FCC when tested for use at the ear is listed below:
| Highest value |
| 0.28 W/kg |
And when worn on the body in a holder or carry case, is listed below:
| Highest value |
| 0.45 W/kg |
For Canada / Pour le Canada
RF exposure information
The highest SAR value for this product as reported to the IC when tested for use at the ear is listed below:
| Highest value |
| 0.27 W/kg |
And when worn on the body in a holder or carry case, is listed below:
| Highest value |
| 0.45 W/kg |
- Operating environment
Temperature: Operation: -10 °C to 50 °C {14 °F to 122 °F} (IEC60068-2-1, 2) *1
Storage: -30 °C to 70 °C {-22 °F to 158 °F}
Humidity: Operation: 30 % to 80 % RH (No condensation)
Storage: 30 % to 90 % RH (No condensation)
Even within the above temperature/humidity ranges, operation for a long time in extreme environments, smoking nearby, or operation in places where oil is used or where there is a lot of dust will result in product deterioration and will shorten the product life.
Also, when using the product in cold environments, the product may take longer to start up and battery operation time may be reduced.
If the product is wet in temperatures of 0 °C (32 °F) or below, freeze damage may occur. Make sure to dry off the computer in such temperatures.
*1 Do not directly touch this product with your bare hands when using it in a hot or cold environment.
- Do not place the product in the following areas, as doing so may damage the product.
- Near electric appliances. The image may be distorted or noise may occur.
- This product is designed to reduce physical shock applied to the LCD and internal electrical components. However, protection against malfunction due to such shock is not guaranteed. As with any portable device, precautions should be taken to avoid any damage.
- When operating the screen using the dedicated stylus, do not firmly press it down. Doing so may damage the dedicated stylus or result in scratches or dents on the screen.
- Do not place objects on the surface of the product or press down hard on the product with sharp objects. The screen surface may get scratched.
- Do not scratch the rear camera, barcode reader, or flash panel.
- Do not use the dedicated stylus (sold separately) when dust or dirt (e.g., oil) is on the screen. Otherwise foreign particles on the screen/dedicated stylus may scratch the screen surface or obstruct operation of the dedicated stylus.
- Use the dedicated stylus only for touching the screen. Using it for any other purpose may damage the dedicated stylus and result in scratches on the screen.
- Confirm the safety and security of software before downloading or installing it on the product. Installing malware or viruses can cause malfunction and the disclosure of any private information stored in the product, or may cause excessive sound volume.
- Turn off the product before removing the SIM card or SD card. Failure to do so can result in data loss or damage to the SIM card, SD card, or product.
- Do not place the product near a television or radio receiver. This may cause television or radio interference.
- Keep the product away from magnets. Failure to do so may cause malfunction.
- It is illegal in many areas to record a call without permission. Always ask the other party for permission before recording a call.
- Follow these instructions and the Reference Manual to avoid any damage to the devices. Carefully read the instruction manuals of the peripheral devices.
- Use peripheral devices that conform to the product's specifications.
- Connect to the connectors in the correct direction.
- If a connector is hard to insert, do not try forcibly. Check its shape, direction, alignment of pins, etc.
Protecting your data
- To prevent accidental loss of data, we recommend that you back up any important data that you store in the product, SIM card, and SD card.
• To prevent the unintended disclosure of private information, always confirm the destination before sending messages, file attachments, or any other communications, such as email.
- To prevent the unintended disclosure of sensitive information stored in the SD card, we recommend using the unit's SD card encryption feature to encrypt the SD card (see the Reference Manual for more information).
- Before disposing of the product or handing the product over to a third party, remove the SIM card, SD card, and any other accessories.
- Before disposing of the product or handing the product over to a third party, perform a factory data reset (page 28) to erase any data stored in the product.
- Before using Wi-Fi or Bluetooth features, take appropriate action to secure your data.
Waterproof/dustproof
- The product is waterproof/dustproof when the interface cover and headset jack cover are closed, and the battery and battery cover are attached. Therefore, keep water and dust away from the product's internal components, accessories, and optional products.
- To prevent liquids, sand, dust, or any foreign objects from entering the product, always keep the battery cover and battery clean and make sure to firmly close the cover after opening. Take care not to get anything caught between the cover or battery and the product.
- If the product is exposed to water droplets, wipe them off with a dry, soft cloth and shake the product to remove the water droplets. Next, remove the battery cover, and shake the product while holding down the battery so that it does not detach to remove the water. Then, with the battery still attached, wipe off the water droplets on the battery and back side of the battery cover, and dry thoroughly.
- Do not leave any water droplets on the product. Water droplets may cause the micro USB port or headset jack to short circuit, or create smears on the screen.
- If the unit is wet, wipe off the moisture before connecting with peripheral devices.
- Do not dry the product with an appliance or heat source such as a microwave oven or dryer.
- Accessories
Do not use in the rain or in very humid places such as bathrooms because the accessories are not waterproof/dustproof. Stop use if they are worn on the body, because the inside may corrode due to humidity from sweat and cause malfunction.
Maintenance
- When cleaning the product, make sure to turn it off.
- When cleaning the product, wipe it with a soft, dry cloth. An alcohol-based disinfectant may be used if necessary.
- If the product is particularly dirty, thoroughly wring a cloth soaked in water, wipe off the dirt, and then wipe with a dry cloth.
- Do not clean the product with solvents such as benzene, thinner, or strong alkaline detergent because they may affect the surface of the product.
Battery
- The battery is a consumable item, and battery life varies with usage conditions. Typical battery life is approximately one year or about 500 charge cycles. As the battery reaches the end of its life, the amount of time it can be used becomes dramatically shorter and repeated charging does not restore its performance. When this occurs, the battery should be replaced with a new one.
- Do not touch the terminals of the battery. Failure to observe this may cause poor contact.
- When the battery is left installed in the product, it discharges electricity gradually in small amounts even if the product's power is off. If left for a long period (several months or more), the battery will over discharge and its performance may deteriorate.
- Store the battery in environments with an ambient temperature of -20 °C to 35 °C (-4 °F to 95 °F). If the battery is stored in other environments, battery performance and battery life may be reduced.
- When storing or transporting the battery, make sure that the battery's terminals do not become dirty and that no foreign objects or debris become attached to the battery's terminals.
- If battery charging is not completed after the specified charging time has passed, remove the battery from the unit. The battery protection device may be damaged.
- You cannot charge an installed battery if it is not recognized by the product. Make sure that you use the specified battery.
Terms and illustrations in this document
- Panasonic Corporation and/or its affiliates are referred to collectively as “we” or “Panasonic”.
- This product supports microSD, microSDHC, and microSDXC memory cards. In this document, the term “SD card” is used as a generic term for any supported memory card.
- This product supports Micro SIM cards (certain models only). In this document, the term “SIM card” is used as a generic term for any supported SIM card.
- Some illustrations in this document may look different from the actual product. Also, the details of the descriptions may vary due to differences between the software versions or automatic updates of some software.
• Information in this document is subject to change without notice.
- For the latest information about optional products, refer to the product catalogs, etc.
Disclaimers
Panasonic shall not be liable for loss of data or other incidental or consequential damages resulting from the use of this product. This product can download, store, forward, and receive additional content, such as applications, ringtones, contact information, and media files. The use of such content may be restricted or prohibited by the rights of third parties, including but not limited to restriction under applicable copyright laws. You are entirely responsible for additional content that you download to or forward from this product; Panasonic is not responsible for such content or its use. Before using such content, it is your responsibility to verify that your intended use is properly licensed or is otherwise authorized. Panasonic does not warrant or guarantee the accuracy, integrity or quality of any additional content or any other third-party content. Under no circumstances will Panasonic be liable in any way for the improper use of additional content or other third-party content by this product or its operator. This document and any related product documentation may refer to services and applications that are provided by third parties. The use of such services or programs may require separate registration with the third party provider and may be subject to additional terms of use. For applications accessed on or through a third-party web site, please review the web sites' terms of use and applicable privacy policy in advance. Panasonic does not warrant or guarantee the availability or performance of any third-party web sites, services, or applications.
Getting Started
Confirming the included items
If any items are missing, please contact your technical support representative.
- Main unit ×1
- Battery ×1
- Operating Instructions - Read Me First ×1
Front view

① Indicator
Orange, lit: Battery is charging
Green, lit: Battery charging is complete
Red, lit: Battery level is less than 15 % of a full charge
② Front camera
③ Earpiece
④ Ambient light sensor, proximity sensor
The ambient light sensor automatically adjusts the screen brightness. The proximity sensor prevents accidental operations on the touch panel during phone calls.
⑤ NFC antenna (internal)
When using an NFC card or other NFC device, touch the card/device to this area of the unit.
⑥ Display (touch panel)
Can also be operated while using gloves (glove touch mode).
⑦ Speaker
⑧ Application button [A1] (page 27)
⑨ Application button [A2] (page 27)
⑩ Application button [A3] (page 27)
11 Headset jack cover (page 15)
12 Headset jack
13 Power button (page 25)
14 Microphone
15 Interface cover (page 16)
16 micro USB port
17 Strap attachment hole
18 Side button (page 27)
19 Camera button (page 27)
20 Cradle rail
Used when connecting the unit to an optional cradle, etc.
Rear view
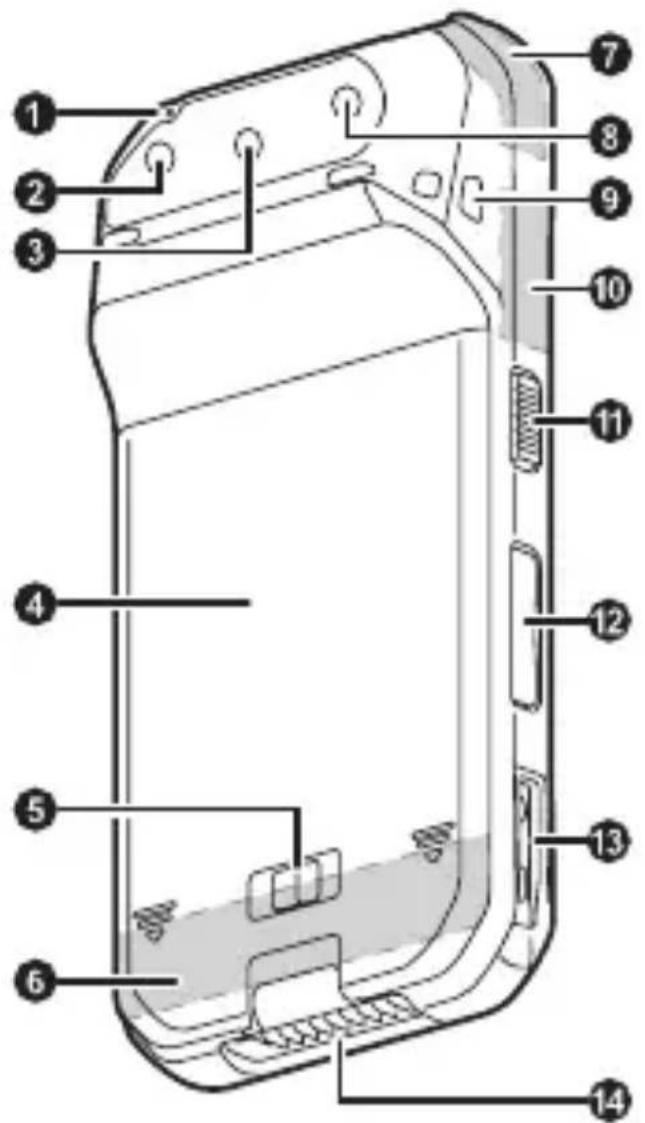
① Microphone ② Rear camera ③ Barcode reader ④ Battery cover ⑤ Battery lock lever ⑥ Cellular antenna (internal) ⑦ GPS antenna (internal) ⑧ Flash Can be used when taking pictures. ⑨ Strap attachment hole ⑩ Wi-Fi, Bluetooth antenna (internal) ⑪ Side button (page 27) 12 Volume buttons
13 Cradle rail
Used when connecting the unit to an optional cradle, etc.
14 Expansion bus connector
Used when connecting an optional cradle, etc. or for other future expansion options.
Opening and closing the headset jack cover
Pull back at the protrusion of the headset jack cover with your fingertip. When closing, make sure the cover is closed firmly.
IMPORTANT
- Observe the following to ensure the waterproof and dustproof performance of the unit.
- Make sure the headset jack cover is securely closed when the headset jack is not being used.
- When closing the headset jack cover, make sure there is no debris lodged in and around the cover.
Opening and closing the interface cover
Opening the interface cover

- Slide in the direction of the arrow at the protrusion (circled in the illustration above) with your fingertip.

- Pull back the cover and rotate it downward.
Closing the interface cover
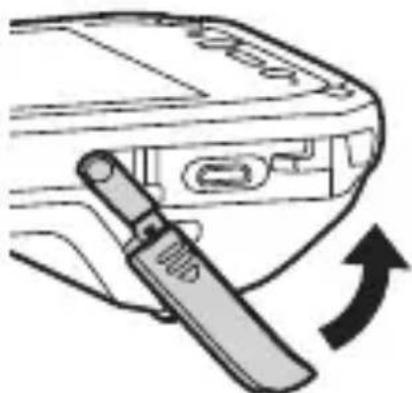
- Rotate the cover upward and insert it to its original position.

- Firmly slide in the direction of the arrow until the red area (circled in the illustration above) of the cover is no longer visible.
IMPORTANT
- Observe the following to ensure the waterproof and dustproof performance of the unit.
- Make sure the interface cover is securely closed and locked when the micro USB port is not being used.
- When closing the interface cover, make sure there is no debris lodged in the gasket that seals the cover.
Removing and attaching the battery cover
Removing the battery cover
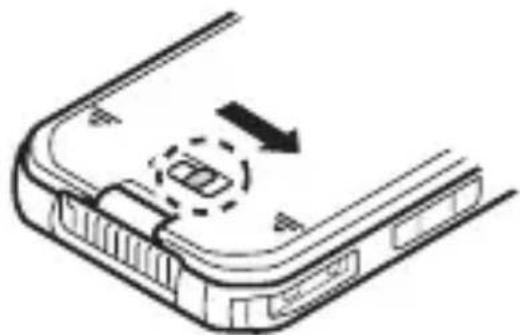
- Slide the battery lock lever (circled in the illustration) in the direction of ⚙ (①), then slide the battery cover in the direction of the arrow (②).

Attaching the battery cover
- Place the battery cover on the unit as shown in the illustration below (①), and then slide it until you hear a click (②).
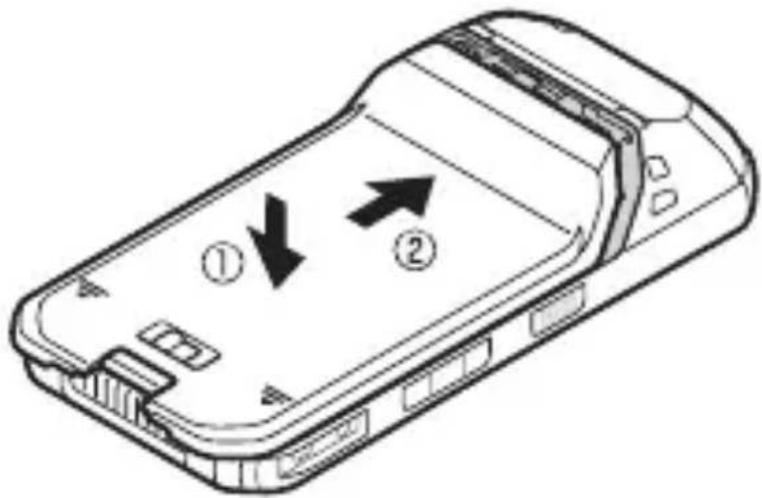
- Lock the cover by sliding the battery lock lever (circled in the illustration) toward 🔒.
- Firmly slide until the red area is no longer visible.
IMPORTANT
- Observe the following to ensure the waterproof and dustproof performance of the unit.
– Always make sure the battery cover is securely closed and locked.
Installing SIM cards (certain models only)
You can install up to two SIM cards.
- Remove the battery cover (page 17).
- If a battery is installed, remove it (page 23).
- Slide the Micro SIM card slot in the direction of the arrow (①), and then open it (②).

- Insert the SIM card into the desired Micro SIM card slot.
• Install only Micro SIM cards.
- If only one SIM card is installed, insert it into Micro SIM card slot 1.
- Hold the SIM card so that the metal terminals are facing you, and insert it with the notch facing in the same direction as the circled area in the illustration below.

- Close the Micro SIM card slot (①), and slide it in the direction of the arrow (②) until you hear a click.

• To remove a SIM card, follow the same procedure, and then pull out the SIM card at step 3.
Note
• See the Reference Manual (tap [Online Manual] in the app list) for information on selecting the active SIM card slot and the preferred mobile network mode.
Installing an SD card
When installing or removing an SD card, place the unit on a flat surface.
- Remove the battery cover (page 17).
- If a battery is installed, remove it (page 23).
- Slide the microSD card slot in the direction of the arrow (①), and then open it (②).

- Insert the microSD card into the microSD card slot (①), and then close the slot (②).
• Install only microSD cards.
- Hold the microSD card so that the metal terminals are facing you, and insert it with the notch facing in the same direction as the circled area in the illustration below.

- Slide the microSD card slot in the direction of the arrow until you hear a click.

• To remove a microSD card, follow the same procedure, and then pull out the microSD card at step 3.
Installing and removing the battery
Installing the battery
- Remove the battery cover (page 17).
- Insert the tab (circled in the illustration below) on the terminal side of the battery into the groove of the unit (①), and then push downward (②).
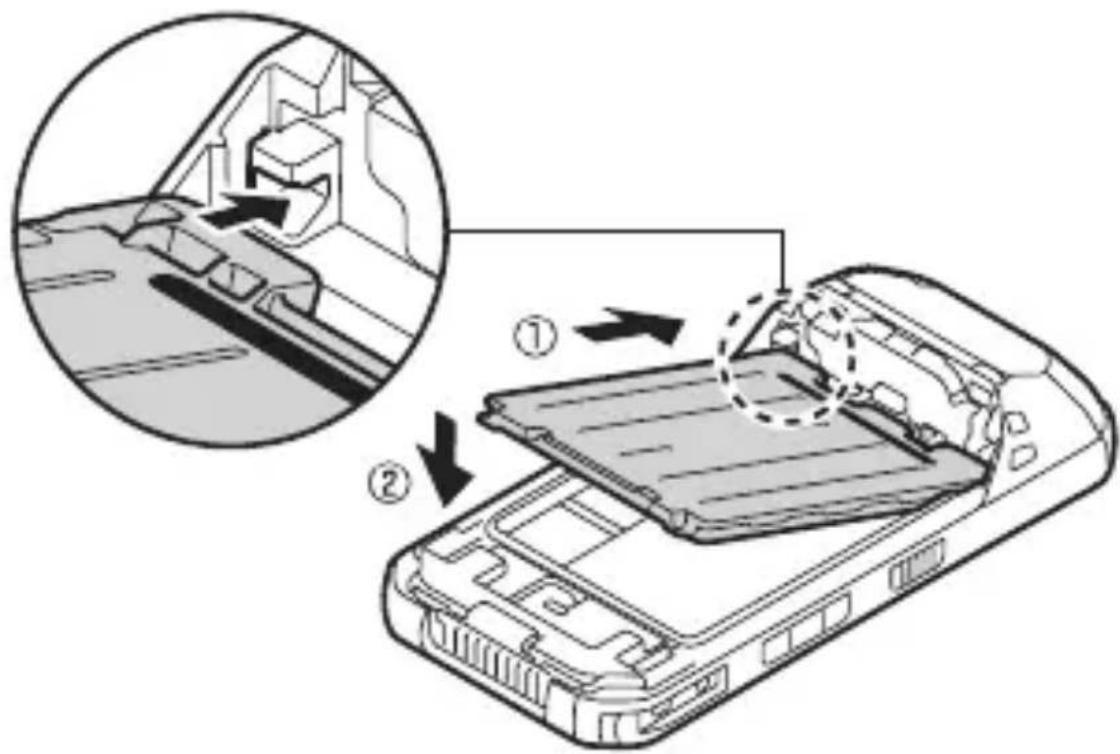
IMPORTANT
- Observe the following to ensure the waterproof and dustproof performance of the unit.
- When installing the battery, make sure there is no debris lodged in the gasket that seals the unit.
Removing the battery
- Remove the battery cover (page 17).
- Lift the battery up using the tab (circled in the illustration) (①), then remove it (②).

IMPORTANT
- Do not remove the battery while the unit is wet. When the unit is wet, remove the water by wiping off the water droplets and thoroughly drying the unit before removing the battery. (See "Waterproof/dustproof", page 7.)
Replacing the battery without turning the unit off (Battery warm swap)
Replace the battery within 30 seconds. If more than 30 seconds have passed, apps that are running are forced to close and you may lose unsaved data.
During warm swapping, all wireless functions are turned off temporarily.
- Press and hold (power button) until the power options dialog is displayed.
- Tap [Battery Warm Swap].
- Follow the on-screen instructions. • It may take some time until the indicator lights in green.
- Replace the battery.
Charging the battery
You can charge the unit by using the optional Charging Cup and the optional adaptor. For more information, refer to the Operating Instructions of the Charging Cup.
- Optional accessories
Charging Cup: FZ-VCBN11U
AC Adaptor: CF-AA6373A
- Insert the adaptor straight into the rear indentation as shown in the figure, and insert into the DC input jack (①).
- Plug the power plug into a power outlet.
- Rotate the adaptor downward (②), and firmly insert the unit until you hear a click (③).

- The battery is not charged at the time of purchase. Charge the battery before turning on the unit for the first time or after an extended period of storage.
- Charge the battery in environments with an ambient temperature of 10°C to 35°C (50 °F to 95 °F).
- The indicator lights in orange while the battery is charging, and lights in green when charging is complete.
- The product prevents overcharging of the battery by charging only when the remaining battery level is less than approximately 95% of its full capacity.
- You can also charge the unit by connecting it to the USB port of a computer or other device using a USB connection cable.
Note
- When removing the USB connection cable, make sure to remove it while holding the plug. Do not pull by the cable.
- When connecting a USB connection cable, note the shape of the micro USB plug and the micro USB port. Do not attempt to connect the USB connection cable upside down.
- Remove any dust or water droplets from plugs before connecting them. Do not use excessive force when inserting plugs or insert them at an angle.
Confirming the battery level
The battery level is displayed in the upper-right corner of the screen, in the status bar.

Fully charged Charging Very low

You can also confirm the specific amount of battery level remaining. From the home screen, tap ⏻→ [Settings] → [Battery].
Turning the unit on and off
Turning the unit on
Press and hold (power button) on the top of the unit until the unit briefly vibrates.
Turning the unit off
- Press and hold until the power options dialog is displayed.
- Select the power off option.
Turning the screen on and off
- Press ⏻
- Swipe up from the bottom of the screen to release the screen lock.
- Swiping the bottom-left to the right launches the [Phone] app (certain models only), and swiping the bottom-right to the left launches the [Camera] app.
Configuring the unit for the first time
The first time you turn the unit on, you will be prompted to configure different settings. Follow the on-screen instructions and configure each item as needed. An Internet connection is required to configure certain items.
Home screen, status bar, notifications
Using the home screen
The home screen is the main screen from which you can launch apps, check widgets, etc. You can customize the home screen to suit your needs by adding, moving, and removing items as desired.
You can also view a list of all installed apps by tapping 😊
While the screen is on, you can display the home screen at any time by tapping or A2 (default setting).
Using the status bar
The status bar is displayed at the top of the screen when using most apps. It displays icons that let you know the status of the battery, network signal, and other features.
- See the Reference Manual for a list of commonly used icons and their meanings.

Using the notifications panel
The notifications panel provides detailed information about incoming email messages, app updates, calendar events, etc. You can open the notifications panel by sliding your finger down slowly from the top of the screen toward the center of the screen. To close the notifications panel, slide your finger up slowly from the bottom of the screen toward the center of the screen. While the notifications panel is open, you can tap a notification and open the corresponding app, or swipe a notification left or right to delete it from the panel.
Navigation and function buttons
The navigation buttons are available in most screens and help you navigate the unit's screens. They appear at the bottom or side of the touch panel screen, depending on the unit's orientation.
Returns to the previous screen or closes the current dialog box, menu, etc. ○ Displays the home screen. ☐ Displays a list of recently used apps. Once the list is displayed, tap an app to launch it, or swipe left or right to remove an app from the list.
The unit also features physical buttons that can be used to access various functions quickly.
The default button assignments are described below.
| A1 | The same function as ◀ |
| A2 | The same function as ○ |
| A3 | Displays the list of options (if available) for the current screen. |
Side button: No function by default.
| Camera button | Press and hold to launch the camera app. When using the camera app, press this button to take a picture, start and stop video recording, etc. |
Some buttons can be customized using the [UserButtonManager] app; see the Reference Manual for more information.
CAUTION
- The following procedure resets all settings and erases any data you have stored in the unit. Back up important data before performing this procedure.
- From the home screen, tap ⏻ → [Settings] → [Backup & reset].
- Tap [Factory data reset] → [RESET TABLET] → [ERASE EVERYTHING].
- The unit restarts when the factory data reset is complete.
- All data in the /mnt/sdcard folder will be erased. Data stored in the SD card will not be erased.
Troubleshooting
If you experience any trouble while using the unit, refer to the information in this section for troubleshooting. See the Reference Manual (tap [Online Manual] in the app list) for additional troubleshooting information. If the problem persists, contact your technical support representative.
Starting up
The unit does not turn on.
- To turn the unit on, press and hold (power button) until the unit briefly vibrates.
- The battery may be low or completely discharged. Charge the battery.
- The unit may be too hot or too cold. Leave the unit in an environment of 10 °C to 35°C (50 °F to 95 °F) for about an hour, and then try again.
The unit does not wake up from sleep.
- The battery may have become completely discharged while the unit was in sleep mode. In this case, any data which has not been saved will be lost, and the unit will not wake up. Charge the battery.
- The unit may be too hot or too cold. Leave the unit in an environment of 10 °C to 35°C (50 °F to 95 °F) for about an hour, and then try again.
Nothing appears on the screen.
- The screen may have turned off to save power. Press (power button).
- Charge the battery. • Install the battery correctly.
- Replace the battery with a fully-charged one.
- The screen is too dark. See “The screen is too dark.” (page 30).
Other startup problems
- Disconnect and remove all peripheral devices.
Shutting down
The unit does not turn off.
- It may take one or two minutes for the unit to turn off. This is not a malfunction.
- Press and hold (power button) for at least 10 seconds to force the unit to restart, and then try again.
- Disconnect and remove all peripheral devices.
Screen
The screen is too dark.
- The [Adaptive brightness] setting reduced the brightness according to the ambient brightness. Manually adjust the screen brightness.
- From the home screen, tap ⏻ → [Settings] → [Display].
- Tap the [Adaptive brightness] switch to turn it off.
- Tap [Brightness level] and then adjust the slider.
- The [Minimum limit brightness] setting of customized silent mode was turned on. Turn the setting off.
- From the home screen, tap ⬙ → [Settings] → [Sound & notification] → [Customized silent mode].
- Tap the [Customized silent mode] switch to turn it off, then tap the [Minimum limit brightness] switch to turn it off.
- Tap the [Customized silent mode] switch to turn it on.
There are red, green, or blue dots on the screen, or there is unevenness in screen colors or brightness.
- The following are not malfunctions.
- Although advanced high-precision technologies are used in the production of color LCD screens, a very small number of the screen pixels may be dark or remain constantly lit.
- Due to the natural characteristics of LCD screens, you may notice unevenness in colors and brightness depending on your angle of view. Hues may also vary by product.
Indicator
| The indicator flashes in orange.• The battery cannot be charged temporarily because the ambient temperature is too low or too high. Leave the unit in an environment of 10 °C to 35 °C (50 °F to 95 °F) for about an hour. |
| The indicator lights in red.• The remaining battery level is approximately less than 15 % of a full charge. Charge the battery. |
| The indicator flashes in red.• Battery authentication failed. Use a specified battery.• There may be debris lodged in the battery charge terminals. Remove the battery and remove any debris found.• Charging may have stopped automatically. Disconnect the charger and then reconnect it. |
| The indicator does not light during charging.Battery charging ends quickly, or the battery cannot be charged at all.• The unit is not connected to the charger properly, or the USB connection cable is not connected properly. Confirm the connection.• There may be debris lodged in the battery charge terminals. Remove the battery and remove any debris found.• Replace the battery with a new one. |
| The screen is dim and the indicator flashes in red or lights in green.• The battery cover may be detached. Attach the cover properly. |
Other
The date and time are incorrect.
- Confirm the date and time settings. From the home screen, tap → [Settings] → [Date & time].
- Set the date and time automatically.
- From the home screen, tap ⏻→[Settings]→[Date & time].
- Tap the [Automatic date & time] and [Automatic time zone] (certain models only) switches to turn them on.
- Make sure the unit is in an area with good wireless reception, turn the unit off, and then turn it on again.
- The unit will not recognize dates after December 30, 2037.
The unit's operation is slow.
- Ambient temperature may be too low or too high. Leave the unit in an environment of 10 °C to 35 °C (50 °F to 95 °F) for about an hour and then try again.
The unit does not respond.
- Turn the unit off and then on again (page 25).
- If an app does not work normally, follow the instructions below to force quit or uninstall the problematic app or process.
- From the home screen, tap ⏻→[Settings]→[Apps].
- Select the desired app or process and then tap[UNINSTALL] or [FORCE STOP].
The screen freezes and no operations can be performed.
- Press and hold (power button) for at least 10 seconds to force the unit to restart, and then try again.
Appendix
Specifications
Typical unit specifications and certain options are described below. Unit configuration may vary.
| Model No. | FZ-N1 |
| CPU | Qualcomm® MSM8974AB2.3 GHz Quad Core |
| Memory | 2 GB*1 |
| Storage | 16 GB |
| Display Internal LCD | 4.7 in. HD (1280 × 720 dots),Aspect ratio 16:916 777 216 colors |
| Wi-Fi Standards supported | IEEE 802.11a / IEEE 802.11b / IEEE 802.11g / IEEE 802.11n / IEEE 802.11acTransmission methodOFDM system, DSSS systemWireless channels usedIEEE 802.11a / IEEE 802.11n (5 GHz) / IEEE 802.11acW52 (36, 38, 40, 42, 44, 46, 48 ch)W53 (52, 54, 56, 58, 60, 62, 64 ch)W56 (100, 102, 104, 106, 108, 110, 112, 116, 118, 120, 122, 124, 126, 128, 132, 134, 136, 140 ch)W58 (149, 151, 153, 155, 157, 159, 161, 165 ch)IEEE 802.11b / IEEE 802.11g / IEEE 802.11n (2.4 GHz): 1 ch - 11 chRF frequency band2.4 GHz Band: 2.412 GHz - 2.462 GHz5 GHz Band: 5.18 GHz - 5.32 GHz, 5.5 GHz - 5.7 GHz, 5.745 GHz - 5.825 GHzData transfer rateIEEE 802.11a: up to 54 MbpsIEEE 802.11b: up to 11 MbpsIEEE 802.11g: up to 54 MbpsIEEE 802.11n:HT20: up to 72.2 MbpsHT40: up to 150 MbpsIEEE 802.11ac:VHT20: up to 86.7 MbpsVHT40: up to 200 MbpsVHT80: up to 433.3 Mbps |
| Bluetooth | Version 4.1, Class 1Transmission methodFHSS systemWireless channels used0 - 78 ch (Low energy: 0 - 39 ch)RF frequency band2402 MHz - 2480 MHzSupported profileA2DP, AVRCP, HFP, HID, HOGP, HSP, MAP, OPP, PAN (certain models only), PBAP, SPP, GAVDP, GATT |
| Mobile networking (certain models only) | LTE, HSPA+, UMTS, EDGE, GPRS, GSM, CDMA 1x, EVDO Rev. ASIM card slotMicro SIM card slot ×2 |
| Sound Speaker | Twin speakers (100 dBA), phone speakerMicrophone3 microphones, noise suppressor |
| Security chip | ARM® TrustZone® (built-in) |
| Camera Front | 5 megapixelsVideo: 1920 × 1080 pixels, 30 fpsStill: 2592 × 1944 pixelsRear8 megapixelsVideo: 1920 × 1080 pixels, 30 fpsStill: 3264 × 2448 pixels |
| GNSS | GPS/GLONASS (±2 to 4 m) |
| Barcode reader | 1D, 2D support |
| Enhanced data security | FIPS 140-2 level-1 compliant |
| Sensors | Ambient light sensor, Digital compass, Gyro sensor, Acceleration sensor, Proximity sensor |
| NFC | Built-in (Type A, B, Felica) |
| Card slots | microSD card slot × 1*2 (microSDXC compatible) |
| Interfaces | USB 2.0 port ×1*3, Headset jack ×1, Expansion bus connector (inside rear side, lower part of the unit) |
| Touchscreen | 10-finger touch (capacitive) with: Glove touch mode*4 Rain sensing touch mode*5 Stylus pen mode (Active type, Passive type) |
| Power supply | Battery |
| AC adaptor (optional) | CF-AA6373A (60 W)*6 |
| Battery (FZ-VZSUN110U included) | Lithium-ion 3200 mAh (typ.) / 3100 mAh (min.) Rated Voltage 3.8 V Operating time (approx.)*7 Barcode scanning*8: 12 hours Charging time(approx.)*9 2 hours |
| Extended life battery(FZ-VZSUN120U optional) | Lithium-ion6400 mAh (typ.) / 6200 mAh (min.)Rated Voltage3.8 VOperating time (approx.)*7Barcode scanning*8: 24 hoursCharging time (approx.)*94 hours |
| Power consumption *10 | Approx. 15 W*11 |
| Dimensions*12(W × D × H) | Approx. 74 mm × 156 mm × 16.3 mm / 31 mm(barcode reader section)[2.9 in. × 6.1 in. × 0.6 in. / 1.2 in (barcode reader section)]without protrusions |
| Weight*13 | Approx. 277 g (0.61 lb), with the included battery |
| Operating environment*14 | Temperature-10 °C to 50 °C (14 °F to 122 °F)Humidity30 % to 80 %RH |
| Storage environment | Temperature-30 °C to 70 °C (-22 °F to 158 °F)Humidity30 % to 90 %RH |
| Operating system*15 | Android 5.1.1 |
| Water and dust resistance | IP65, IP67 |
Specifications are subject to change without notice.
*1 1 MB = 1,048,576 bytes, 1 GB = 1,073,741,824 bytes. *2 Operation has been tested and confirmed using the following Panasonic brand memory cards: SD (up to 2 GB), SDHC (up to 32 GB). Compatibility with other SD devices is not guaranteed.
*3 Does not guarantee operation of all USB-compatible peripherals.
*4 This mode may not operate properly depending on the type of glove.
*5 Only single-finger operation is enabled.
*6 The AC adaptor is designed for use with power sources that supply up to 240 V AC. The AC cord supplied with the AC adaptor is designed for use with power sources that supply up to 125 V AC.
*7 Actual performance varies depending on usage conditions, connected peripherals, etc. Typically, operating time is reduced in colder environments.
*8 As defined by the JEITA Specification, Working Mode B.
*9 Varies depending on usage conditions.
*10 When the battery is fully charged (or not being charged) and the unit is off.
*11 Rated power consumption.
*12 Actual size may vary by unit configuration.
*13 Average weight. Actual weight may vary by unit configuration.
*14 Do not expose the skin to this product when using the product in a hot or cold environment.
When using the product in hot or cold environments, some peripherals may not perform properly. Confirm the recommended operation environment of the peripherals.
Using the product continuously in hot environments will shorten the product life. Avoid continuous use in these types of environments.
When using the product in cold environments, the product may take longer to start up and battery operation time may be reduced.
Even when using the product within the temperature and humidity ranges listed here, using the product continuously in
extreme environments will result in product deterioration and will shorten the life of the product.
*15 Product functionality cannot be guaranteed if the operating system is modified or replaced by the user or a third party.
Limited warranty for U.S.A.
Panasonic System Communications Company of North America (PSCNA)
Computer Products - Worldwide Warranties
Section 1: Limited Warranty - Hardware
PSCNA, referred hereafter as “Panasonic” will repair the products listed below with Panasonic approved parts, free of charge in the Global Panasonic approved location for the period specified below from the date of original purchase in the event of a defect in materials or workmanship.
These warranties are extended solely to the original purchaser. A purchase receipt or other proof of date of original purchase will be required before warranty performance is rendered.
Laptop Computers (CF-##): 3 Years
Tablet PC (FZ-##/JT-B#): 3 Years
Ultra-Mobile PC (CF-U#/CF-H# Series): 3 Years
PDRC - LCD & Keyboard Assembly: 3 Years
Original Battery Warranty
Batteries supplied with the product are covered under the warranty for one (1) year from date of purchase, except as excluded in Section 3. Batteries purchased separately are covered under the warranty for one (1) year from the date of purchase. A replacement battery furnished under the product warranty is covered for the remaining period of the one year warranty of the original or purchased battery.
Optional: Extended Warranty Program (PC)
If this coverage is purchased, the serial numbered unit is entitled to the same warranty coverage as the original warranty, for a period determined at the time of the extended warranty purchase. In this case the battery is not included in the extended warranty coverage; a separate coverage program is available for the battery. The cost of labor, parts, and shipping are included in the price of the Extended Warranty Program.
Optional: Panasonic "Protection Plus" Warranty
Any unit for which the Panasonic “Protection Plus” warranty has been purchased will receive additional coverage for any failure that occurs due to accidental damage. All other terms and conditions of the standard warranty apply and this additional coverage will exist for the duration of the standard warranty period of the unit.
If an extended Protection Plus warranty program is purchased, coverage is extended to the end of the last year of extended coverage purchased.
This warranty does not cover failures or defects that are caused by fire, intentional acts, loss, theft, improper maintenance, modification or service by anyone other than the Panasonic National Service Center or a Panasonic Authorized Service Provider, or damage that is attributable to acts of God.
Cosmetic damage that does not affect functionality is not covered. Cosmetic damage on units with hardware failures will be repaired in accordance with the warranty terms. This warranty is extended solely to the original purchaser on the unit serial number for which it was purchased.
Complete unit replacement fulfills the full obligation and is at the discretion of Panasonic and is limited to once during the coverage term.
Refer to the Panasonic web site for full terms and conditions on the above programs.
Options and Accessories Warranties
The below listed Panasonic brand or supplied options and accessories are covered under this limited warranty for the period specified from the date of purchase or as specifically stated.
• AC Adaptor and Power Cord: 3 Years
• Car Adaptor and Power Cord: 3 Years
- Cradle: 3 Years
- Charging Cup: 3 Years
- Optional Battery: 1 Year
- Battery Charger: 1 Year
- Integrated Panasonic supplied options and kits including, but not limited to, Cameras, GPS devices, Bluetooth devices, Smartcard Readers, Magnetic Card Readers, Barcode Scanners, and Fingerprint Readers: 3 years or the warranty period of the unit in which it is installed provided the installation was performed by Panasonic or an Authorized Integrator.
Section 2: Limited Warranty - Software
Panasonic warrants to you only that the disk(s) or other media on which the Programs are furnished will be free from defects in material and workmanship under normal use for a period of sixty (60) days from the date of delivery thereof to you, as evidenced by your purchase receipt.
This is the only warranty Panasonic makes to you.
Panasonic does not warrant that the functions contained in the Programs will meet your requirements or that the operation of the Programs will be uninterrupted or error free. Panasonic shall have no obligation for any defects in the disk(s) or other media on which the Programs are furnished resulting from your storage thereof, or for defects that have been caused by operation of the disk(s) or other media.
Panasonic's entire liability and your exclusive remedy under this warranty shall be limited to the replacement, in the United States or other Panasonic designated location, of any defective disk or other media which is returned to Panasonic's Authorized Service Center, together with a copy of the purchase receipt, within the aforesaid warranty period.
Section 3: Limited Warranty Exclusions - Specifically excluded from the warranty are:
- All consumable items; such as screen protection films, logo badges, labels, cleaning cloths, carry cases, manuals, cables, straps, belts, holsters, tethers, and harnesses and any other options and accessories not listed above or covered under a separate warranty
- Failures related to the product operating system, hard drive or solid state drive image, software setup, software program, virus, other program(s) or file(s) on any drive or in any computer memory location
- Failures due to BIOS settings or changes, as well as any cosmetic or physical damage to the unit
- Any unit or device with a missing or altered model number or serial number label
- Cosmetic damage or any damage which occurs in shipment
- Failures which are caused by products not supplied by Panasonic
- Failures which result from alteration, accident, misuse, introduction of liquid or other foreign matter into the unit, abuse, neglect, installation, maladjustment of consumer controls, improper maintenance or modification, use not in accordance with product use instructions
- Failures due to service by anyone other than a Panasonic Authorized Service Provider
- Failures caused by improper installation of options or accessories or due to installation by any company other than Panasonic or a Panasonic Authorized Integrator
- Damage, failure, or loss due to the unit being stolen, lost, misplaced, or used by anyone other than the original purchaser
- Damage that is attributable to acts of God
This limited warranty only covers failures due to defects in materials or workmanship which occur during normal use. If a unit is sent to a Panasonic Authorized Service Center and no hardware failure is found, the customer will be billed for labor to correct a software issue or reimage the hard drive plus shipping and applicable administrative fees at the current rates set by the service provider.
THIS PRODUCT IS NOT INTENDED FOR USE AS OR PART OF NUCLEAR EQUIPMENT/SYSTEMS, AIR TRAFFIC CONTROL EQUIPMENT/SYSTEMS, OR AIRCRAFT COCKPIT EQUIPMENT/SYSTEMS*1. PANASONIC WILL NOT BE RESPONSIBLE FOR ANY LIABILITY RESULTING FROM THE USE OF THIS PRODUCT ARISING OUT OF THE FOREGOING USES.
*1 AIRCRAFT COCKPIT EQUIPMENT/SYSTEMS include class 2 Electronic Flight Bag (EFB) Systems and Class 1 EFB Systems when used during critical phases of flight (e.g., during take-off and landing) and/or mounted onto the aircraft. Class 1 EFB Systems and 2 EFB Systems are defined by FAA: AC (Advisory Circular) 120-76A or JAA: JAA TGL (Temporary Guidance Leaflets) No. 36.
Other Limits and Exclusions: There are no other express warranties except as listed above.
PANASONIC SHALL NOT BE LIABLE FOR LOSS OF DATA OR OTHER INCIDENTAL OR CONSEQUENTIAL DAMAGES RESULTING FROM THE USE OF THIS PRODUCT, OR ARISING OUT OF ANY BREACH OF THIS WARRANTY. ALL EXPRESS AND IMPLIED WARRANTIES, INCLUDING THE WARRANTIES OF MERCHANTABILITY AND FITNESS FOR A PARTICULAR PURPOSE ARE LIMITED TO THE APPLICABLE WARRANTY PERIOD SET FORTH ABOVE. Some states do not allow the exclusion or limitation of incidental or consequential damages, or
limitations on how long an implied warranty lasts, so the above limitations or exclusions may not apply to you.
This limited warranty gives you specific legal rights, and you may also have other rights which vary from state to state.
For technical support or to arrange for service on your Panasonic computer product, call our toll-free hotline at 1-855-PSC-TECH (1-855-772-8324).
Web site: www.panasonic.com/toughbook
For hearing or speech impaired TTY users, call 1-877-833-8855 using a TTY device.
For Canada
PANASONIC COMPUTER AND PERIPHERALS LIMITED WARRANTY
Coverage – Panasonic Canada Inc. ("PCI") warrants to you, the first end user customer, this computer product (excluding software media), when purchased from PCI or from a PCI authorized reseller, to be free from defects in materials and workmanship under normal use, subject to the terms set forth below, during the period of warranty coverage specified.
| Scope of Coverage Period of Coverage Type of Failure | Coverage | |
| ·Laptop Computers (except Battery) and AC Adaptor·Factory/PCI installed options including Wireless WAN, GPS, Bluetooth, Finger print reader, Backlit keyboard, Memory Card, Optical Drives, Cameras, Smart card Readers, Magnetic Card Readers and Barcode Scanners·Ultra-Mobile PC·Tablet PC·PDRC-LCD and Keyboard Assemblies·Port Replicator·Cradle·Charging Cup | Three (3) Years from Date of Original End User Customer Purchase | Defective Materials or Workmanship |
| ·Battery·Battery charger·AC Adaptor and Power Cord·Car Adaptor and Power Cord·External USB Drives | One (1) Year from Date of Original End User Customer Purchase | Defective Materials or Workmanship |
| ·Standard or Digitizer Stylus Pen Ninety (90) | Days from Date of Original End User Customer Purchase | Defective Materials or Workmanship |
| • All consumable items including protection film, cleaning cloth, carry case, tether and harness | No Coverage | |
Remedy – In the event of a warranty claim, contact PCI's representatives within the applicable warranty period, identifying the nature of the defect claimed, at 1-800-668-8386 between 9:00 A.M. and 5:00 P.M., Eastern Time Zone, Mon. – Fri. (excluding holidays) for instructions on how to obtain service. A purchase receipt or other proof of date of original purchase is required before warranty service is performed. Defective parts covered by this Limited Warranty will be repaired or replaced with new or comparable rebuilt parts on an exchange basis. Warranty replacement or repair is subject to the terms of this Limited Warranty for the balance of the original period of warranty coverage.
No Coverage – This Limited Warranty does not cover products purchased outside Canada. Neither does it cover damage to, failure of, or defects in a product or accessory through mishandling, improper installation, abnormal use, misuse, neglect, accident, introduction of liquid or other foreign matter into the product, alteration or servicing by anyone not authorized by PCI, or act of God. THIS PRODUCT IS NOT INTENDED FOR USE AS, OR AS PART OF, NUCLEAR EQUIPMENT/SYSTEMS, AIR TRAFFIC CONTROL EQUIPMENT/SYSTEMS, OR AIRCRAFT COCKPIT EQUIPMENT/SYSTEMS *1 . PANASONIC WILL NOT BE RESPONSIBLE FOR ANY LIABILITY RESULTING FROM THE USE OF THIS PRODUCT ARISING OUT OF THE FOREGOING USES.
*1 AIRCRAFT COCKPIT EQUIPMENT/SYSTEMS include Class2 Electrical Flight Bag (EFB) Systems and Class1 EFB Systems when used during critical phases of flight (e.g., during take-off and landing) and/or mounted on to the aircraft. Class1 EFB Systems and 2 EFB Systems are defined by FAA: AC (Advisory Circular) 120-76A or JAA: JAA TGL (Temporary Guidance Leaflets) No.36
IF YOU SHIP THE PRODUCT FOR WARRANTY SERVICE
Carefully pack the product, preferably in the original carton. Include details of defect claimed and proof of date of original purchase. No liability is assumed for loss or damage to the product while in transit, if you chose your own transportation carrier.
SOFTWARE MEDIA LIMITED WARRANTY
Coverage – PCI warrants to you, the first end user customer, that the disk(s) or other media on which software program(s) is/are supplied will be free from defects in materials and workmanship under normal use in Canada for a period of sixty (60) days from date of receipt as evidenced by your purchase receipt for your Panasonic Computer product. THIS IS THE ONLY WARRANTY THAT PCI MAKES RESPECTING THE SOFTWARE MEDIA. PCI does not warrant the software. Please refer to the software licensor's written warranty (accompanying the copy of the software) for any software warranty claim.
Claim Procedure – In the event of a defect in material or workmanship in the media during the sixty (60) day warranty period, and you return it, transportation costs prepaid, to Panasonic Canada Inc., Computer Products Marketing, 5770 Ambler Drive, Mississauga, Ontario L4W 2T3, within the warranty period, together with a copy of your purchase receipt, and an explanation of the suspected defect, PCI will replace in Canada the defective disk(s) or other media.
Remedy – PCI's entire liability, and your only remedy for any breach of this software media warranty is limited to replacement of the media only. It does not cover any other damages, including, but not limited to, loss of use or profit loss, or special, indirect or consequential damages, or other claims, whether or not of similar character.
No Coverage – This limited warranty does not apply if the disk(s) or other media has been used in other than a Panasonic product, or in environmental conditions other than those specified by PCI or the manufacturer, or if subjected to misuse, neglect, mishandling, modification or attempted modification of the program, or if damaged by accident or act of God. PCI is not responsible for damage to or loss of any program, data or removable storage media.
GENERAL
NO OTHER WARRANTIES – PCI DISCLAIMS ALL OTHER WARRANTIES, EITHER EXPRESS OR IMPLIED, INCLUDING, BUT NOT LIMITED TO, IMPLIED WARRANTIES OF MERCHANTABILITY AND FITNESS FOR A PARTICULAR PURPOSE, WITH RESPECT TO THE SOFTWARE, SOFTWARE MEDIA, COMPUTER PRODUCT, OPTIONS AND ACCESSORIES.
NO LIABILITY FOR CONSEQUENTIAL DAMAGES – IN NO EVENT SHALL PCI BE LIABLE FOR ANY SPECIAL, INDIRECT OR CONSEQUENTIAL DAMAGES ARISING FROM ANY BREACH OF THE LIMITED WARRANTIES SET OUT IN THIS DOCUMENT, OR FROM THE USE OF THE COMPUTER PRODUCT, INCLUDING, WITHOUT LIMITATION, LOSS OF DATA, BUSINESS, PROFIT OR GOODWILL.
IN ANY EVENT, PCI'S MAXIMUM LIABILITY FOR ANY BREACH SHALL NOT
EXCEED THE AMOUNT ACTUALLY PAID BY YOU FOR THE COMPUTER PRODUCT.
NO ACTION, REGARDLESS OF ITS BASIS, MAY BE BEGUN AGAINST PCI MORE
THAN TWO (2) YEARS AFTER THE CAUSE OF ACTION AROSE.
Statutory Warranties – Some jurisdictions do not allow these limitations or exclusions,
so they may not apply to you.
For Canada
LIMITED WARRANTY – PANASONIC COMPUTERS AND PERIPHERALS
PRODUCT SHIPMENT FOR WARRANTY SERVICE
Panasonic System Communications Company of North America
Two Riverfront Plaza, Newark, NJ 07102, USA
Panasonic Canada Inc.
5770 Ambler Drive, Mississauga, Ontario L4W 2T3
© Panasonic System Networks Co., Ltd. 2016


- PANASONIC®
- OPERATING INSTRUCTIONS BASIC GUIDE
- TABLET COMPUTER
- TABLE OF CONTENTS
- INTRODUCTION
- GETTING STARTED
- TROUBLESHOOTING
- APPENDIX
- REGULATORY INFORMATION
- FOR USA
- FCC RF EXPOSURE INFORMATION
- FOR CANADA / POUR LE CANADA
- RF EXPOSURE INFORMATION
- PROTECTING YOUR DATA
- WATERPROOF/DUSTPROOF
- ACCESSORIES
- MAINTENANCE
- BATTERY
- TERMS AND ILLUSTRATIONS IN THIS DOCUMENT
- DISCLAIMERS
- CONFIRMING THE INCLUDED ITEMS
- FRONT VIEW
- ① INDICATOR
- ② FRONT CAMERA
- ③ EARPIECE
- REAR VIEW
- IMPORTANT
- OPENING AND CLOSING THE INTERFACE COVER
- OPENING THE INTERFACE COVER
- CLOSING THE INTERFACE COVER
- REMOVING AND ATTACHING THE BATTERY COVER
- REMOVING THE BATTERY COVER
- ATTACHING THE BATTERY COVER
- INSTALLING SIM CARDS (CERTAIN MODELS ONLY)
- NOTE
- INSTALLING AN SD CARD
- INSTALLING AND REMOVING THE BATTERY
- INSTALLING THE BATTERY
- REMOVING THE BATTERY
- REPLACING THE BATTERY WITHOUT TURNING THE UNIT OFF (BATTERY WARM SWAP)
- CHARGING THE BATTERY
- OPTIONAL ACCESSORIES
- CONFIRMING THE BATTERY LEVEL
- TURNING THE UNIT ON AND OFF
- TURNING THE UNIT ON
- TURNING THE UNIT OFF
- TURNING THE SCREEN ON AND OFF
- CONFIGURING THE UNIT FOR THE FIRST TIME
- HOME SCREEN, STATUS BAR, NOTIFICATIONS
- USING THE HOME SCREEN
- USING THE STATUS BAR
- USING THE NOTIFICATIONS PANEL
- NAVIGATION AND FUNCTION BUTTONS
- CAUTION
- STARTING UP
- THE UNIT DOES NOT TURN ON
- THE UNIT DOES NOT WAKE UP FROM SLEEP
- NOTHING APPEARS ON THE SCREEN
- OTHER STARTUP PROBLEMS
- SHUTTING DOWN
- THE UNIT DOES NOT TURN OFF
- SCREEN
- THE SCREEN IS TOO DARK
- THERE ARE RED, GREEN, OR BLUE DOTS ON THE SCREEN, OR THERE IS UNEVENNESS IN SCREEN COLORS OR BRIGHTNESS
- INDICATOR
- OTHER
- THE DATE AND TIME ARE INCORRECT
- THE UNIT'S OPERATION IS SLOW
- THE UNIT DOES NOT RESPOND
- THE SCREEN FREEZES AND NO OPERATIONS CAN BE PERFORMED
- SPECIFICATIONS
- SECTION 1: LIMITED WARRANTY - HARDWARE
- ORIGINAL BATTERY WARRANTY
- OPTIONAL: EXTENDED WARRANTY PROGRAM (PC)
- OPTIONAL: PANASONIC "PROTECTION PLUS" WARRANTY
- OPTIONS AND ACCESSORIES WARRANTIES
- SECTION 2: LIMITED WARRANTY - SOFTWARE
- SECTION 3: LIMITED WARRANTY EXCLUSIONS - SPECIFICALLY EXCLUDED FROM THE WARRANTY ARE
- FOR CANADA
- PANASONIC COMPUTER AND PERIPHERALS LIMITED WARRANTY
- IF YOU SHIP THE PRODUCT FOR WARRANTY SERVICE
- SOFTWARE MEDIA LIMITED WARRANTY
- GENERAL
- LIMITED WARRANTY – PANASONIC COMPUTERS AND PERIPHERALS
- PRODUCT SHIPMENT FOR WARRANTY SERVICE
- PANASONIC SYSTEM COMMUNICATIONS COMPANY OF NORTH AMERICA
- PANASONIC CANADA INC
Brand : PANASONIC
Model : FZ-N1
Category : Tablet